

4 IN 1 GRILL
Model Number:
104557
UPC: 68113104557
Customer Assistance
1 855 451 2897 (US)
Please consider the option to recycle the packaging material and donate any
appliance you are no longer using.

IMPORTANT SAFEGUARDS
When using electrical appliances, basic safety precautions should always be followed
to prevent the risk of fire, electric shock, burns, or other injuries or damages.
•
Read all instructions before using.
•
Use the appliance only for its intended use.
•
To protect against fire, electric shock and injury to persons, do not immerse cord,
plug or the appliance in water or other liquids.
•
The appliance should always be set to OFF before plugging or unplugging from the
electrical outlet. Never pull on the cord to disconnect the appliance from the outlet;
instead, grasp the plug and pull on the plug to disconnect the appliance.
•
Do not allow cord to touch hot surfaces. Let the appliance cool completely before
putting away or storing.
•
Do not touch hot surfaces; use handles or knobs.
•
Close supervision is necessary when any appliance is used by or near children.
•
Unplug from outlet when not in use and before cleaning. Allow to cool before
putting on or taking off parts, and before cleaning appliance.
•
Do not operate any appliance with a damaged cord or plug, or after the appliance
has malfunctioned or has been damaged in any manner. Call our toll-free customer
assistance number for information on examination , repair or adjustment.
•
The use of accessory attachments not recommended may result in fire, electrical
shock, or risk of injury to persons.
•
Do not use outdoors.
•
Do not let power cord hang over edge of table or counter, or touch hot surfaces.
•
Do not place on or near hot gas or electric burner, or in a heated oven.
•
Unplug the unit when finished using.
•
Extreme caution must be exercised when moving an appliance containing hot
or other hot liquids.
To disconnect, turn function switch to off setting, then remove plug from wall
•
outlet.
WARNING: To reduce the risk of fire or electric shock, only authorized personnel
•
should do repairs.
Always place the appliance on a level, stable surface.
•
Never place the appliance close to the edge of a counter or table. Make sure that
•
the power cord is positioned safely so that nobody trips or gets tangled.
When using this appliance, provide 6-8 inches of air space above, behind and on
•
both sides for air circulation.
oil
2

IMPORTANT SAFEGUARDS
•
It is recommended that you use an insulated hot pad underneath the appliance to
avoid any heat damage to your counter or furniture.
•
This appliance is not intended for use by persons (including children) with reduced
physical, sensory or mental capabilities or lack of experience and knowledge
unless they have been given initial supervision or instruction concerning use of the
appliance by a person responsible for their safety.
•
Children shall be supervised to ensure that they do not play with the appliance.
•
To avoid a circuit overload, do not operate this appliance on the same circuit with
another high wattage appliance.
•
The appliance must not be left unattended while it is connected to the wall outlet.
•
Unit should never be used in the half open position.
SAVE THESE INSTRUCTIONS!
ADDITIONAL SAFEGUARDS
This appliance is for HOUSEHOLD USE ONLY.
DO NOT OPERATE THE APPLIANCE IF THE LINE CORD SHOWS ANY DAMAGE OR IF THE
APPLIANCE WORKS INTERMITTENTLY OR STOPS WORKING ENTIRELY.
EXTENSION CORDS
A short power-supply cord is to be provided to reduce the risk resulting from becoming
entangled in or tripping over a longer cord. Extension cords are available and may be
used if care is exercised in their use. If an extension cord is used,
1) The extension cord should be a grounding-type 3-wire cord.
2) muminim a detar droc
of 15 ampere, 14 gage cord should be used. Cords rated for less amperage may
overheat.
3) An extension cord with the power cord must be arranged so that it will not drape
over the countertop or tabletop where they can be pulled on by children or tripped
over accidentally.
noisnetxe na ,yrassecen yletulosba si droc noisnetxe na fI
3
ADDITIONAL SAFEGUARDS
GROUNDING INSTRUCTIONS
This appliance must be grounded while in use.
CAUTION: To ensure continued protection against risk of electric shock, connect to
properly grounded outlets only.
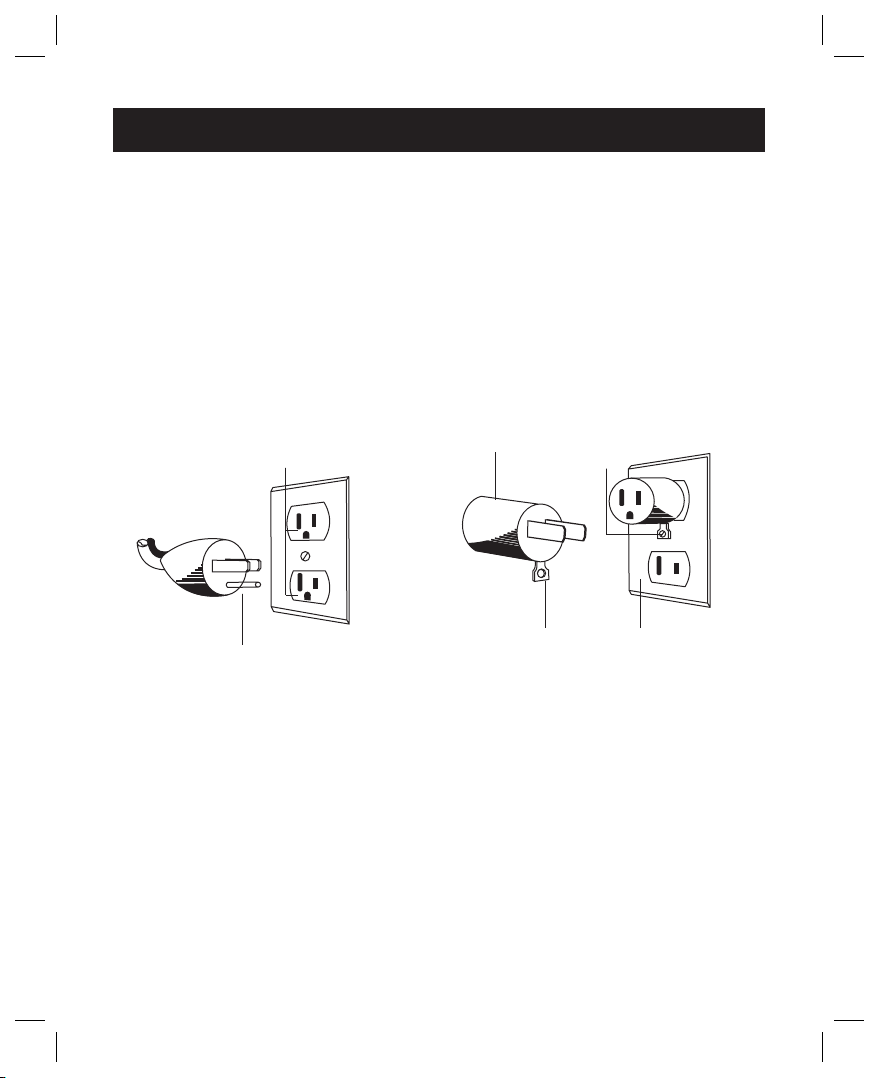
GROUNDING INSTRUCTIONS – US ONLY
The appliance has a plug that looks like Figure A. An adaptor, as shown in Figure B,
should be used for connecting a 3-prong grounding plug to a 2-wire receptacle. The
grounding tab, which extends from the adaptor, must be connected to a permanent
ground such as a properly grounded receptacle as shown in Figure C, using a metal
screw.
Circuit grounding conductor
connected properly
(A)
Grounding prong
Adapter
(B)
Grounding means Cover of grounded
4
Metal mounting
screw
(C)
outlet box
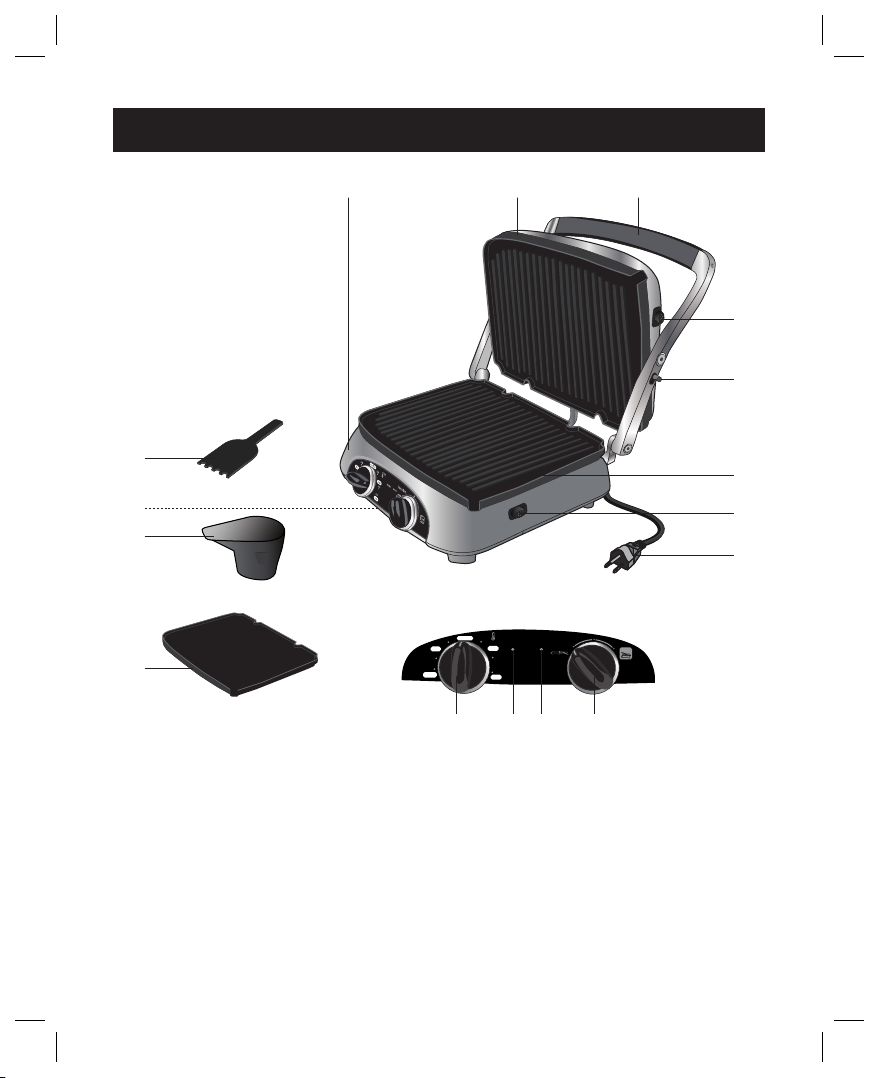
PARTS
16
15
14
13
1
2 3
4
5
6
7
8
°F
medium
350
300
low
250
200
warm
ready
high
400
425
sear
11 10
off
function
power
griddle
grill
912
1 Lower part
2 Upper part
3 Handle
4 Lock button for cooking plate
5 Hinge release lever
6 Grill plates (x2)
7 Lock button for cooking plate
8 Power plug with power cord
9
function switch
10 power light
11 ready light
12 Temperature switch
13 Griddle plate (x2)
14 Drip cup (x2)
15 Cord storage
16 Cleaning / scraping tool
5
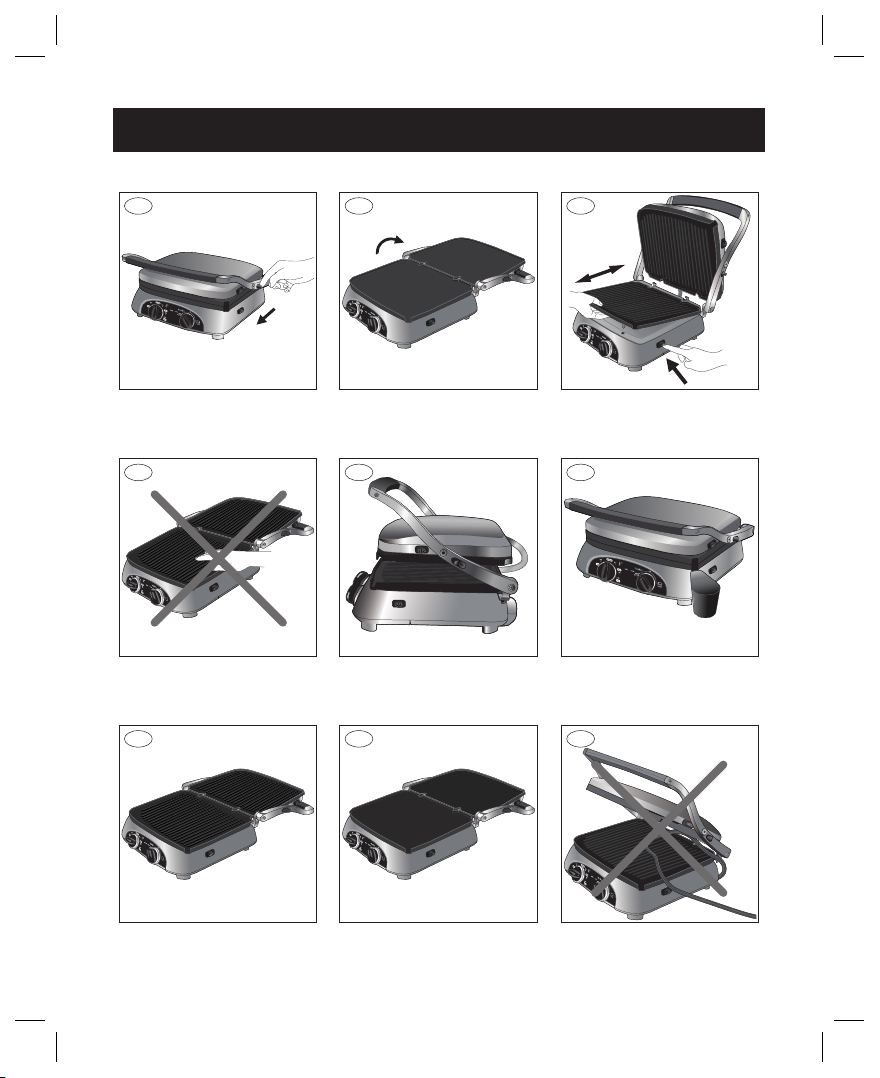
ILLUSTRATIONS
a
d
g
b
e
h i
c
f
6

OPERATION
Before first use
•
Carefully remove the grill from the packaging and retain the packaging for future
use.
•
Remove all stickers from the appliance.
•
Clean the outside of the grill with a damp cloth and a mild detergent.
•
Clean the cooking plates (6, 13), the drip cups (14) and the cleaning / scraping
tool (16) thoroughly by hand or in the dishwasher.
•
Dry the cooking plates (6, 13) thoroughly, before reinserting into the appliance.
•
Open the appliance completely and set the function switch (9) to griddle.
•
When using the grill for the first time, we recommend to heat for at least 10 minutes
on medium setting to burn off any production residue.
•
The grill may produce an odor and emit smoke when first switched on, as residues
from the production process are eliminated. This is normal and does not indicate
a defect or hazard.
Grill usage
•
The grill can be used in 4 different ways. It can be used as a Panini press, an open
grill, griddle or contact grill.
•
According to the function you like to use, adjust the grill and its accessories.
•
Warning: Never let the power cord get in between the cooking plates
Open to horizontal position
•
To use the grill in horizontal position, pull the hinge release lever (5) forward, while
the upper part is closed (ill.
•
Note: If the upper part is already open, the hinge release lever (5) can not be moved.
Close the upper part (2), then operate the hinge release lever (5).
•
While holding the hinge release lever (5), turn the upper part all the way back until
it lays flush with the lower part (1) (ill.
a
).
b
).
7

OPERATION
Changing cooking plates
Adjust the grill to horizontal position.
•
Press the lock buttons (4, 7) then lift the cooking plates (6, 13) up and remove them
•
backwards (ill.
•
Note: The cooking plates (6, 13) are marked on the front. Be sure to use the correct
plate in the marked position (upper or lower).
•
To reinsert the cooking plates (6, 13), insert them into the clamps then push the
cooking plates (6, 13) down, until they lock in place.
Setting temperature
To set the temperature, turn the temperature switch (12) to the required temperature
•
setting for the food you intend to cook.
The table below contains general information on cooking temperatures. For exact
•
cooking temperatures check your favorite recipe.
Temperature Function
warm (approx. 200°F)
low (approx. 250°F)
medium (approx. 300°F to 350°F)
high (approx. 400°F)
sear (approx. 425°F)
c
).
For keeping food warm
Low temperature for cooking thin cuts of meat
or vegetables
Medium temperature for normal grilling (e.g.
meat)
High temperature for grilling (e.g. Panini)
Very high temperature for grilling (e.g. meat)
The temperature switch (12) can be adjusted while the grill is in use.
•
WARNING: Do not touch any metal parts of the grill while in use (ill.
•
the plastic handle (3). Risk of burns!
Do not move the grill while in use. Do not touch the upper part (2).
•
8
d
). Only touch

OPERATION
Use as contact grill
•
The grill can be used as a contact grill for preparing burgers, boneless meat , thin
meat cuts and vegetables.
•
Use the contact grill function, when you want to cook food quickly (ill.
•
Juice and grease flow out via the drip spout of the lower cooking plates (6, 13).
•
When contact grilling, use only the grill plates (6).
•
When cooking more then one piece, make sure all pieces have the same thickness
to guarantee even cooking.
•
Connect the power plug (8) to a wall outlet.
•
Install cooking plates prior to use.
•
Set the function switch (9) to the grill position and the blue power light (10) will
come on. Place a drip cup (14) under the spout of the lower plate (ill.
Set the desired cooking temperature with the temperature switch (12). It may take
•
up to 10 minutes to heat to the set temperature.
Wait until the green ready light (11) comes on.
•
Note: The ready light (11) will come on and go off while cooking. This is normal to
•
regulate temperature.
Place food on the lower plate.
•
Press down the lever on the upper plate until both plates are in good contact with
•
the food. Do not use force.
Cook for the required time. You can check the cooking progress by lifting the upper
•
part (2).
CAUTION: When checking food, stay clear of the cooking plates (6, 13). Danger of
•
hot oil splatter.
After the cooking process is finished, lift the upper part (2) to the upright position.
•
Remove food from the lower plate.
•
Set the function switch (9) to the off position. Remove the power plug (8) from the
•
wall outlet.
Wait until the grill has cooled down completely before moving or cleaning.
•
e
f
).
).
9

OPERATION
Use as Panini press
•
The grill can be used as a Panini press for preparing sandwiches, breads and
quesadillas.
•
Use the grill plates (recommended) (6) (ill.
•
Depending on the type of sandwich, the griddle plates (13) may also be used.
•
Connect the power plug (8) to a wall outlet.
•
Install cooking plates prior to use.
•
Set the function switch (9) to the grill position and the blue power light (10) will
come on. Place a drip cup (14) under the spout of the lower plate (ill.
Set the desired cooking temperature with the temperature switch (12). It may take
•
up to 10 minutes to heat to the set temperature.
Wait until the green ready light (11) comes on.
•
Note: The ready light (11) will come on and go off while cooking. This is normal to
•
regulate temperature.
Place food on the lower plate.
•
Press down the lever on the upper plate until both plates are in good contact with
•
the food. Do not use force.
Cook for the required time. You can check the cooking progress by lifting the upper
•
part (2).
After the cooking process is finished, lift the upper part (2) to the upright position.
•
Remove the food.
•
Set the function switch (9) to the off position. Remove the power plug (8) from the
•
wall outlet.
Wait until the grill has cooled down completely before moving or cleaning.
•
e
).
f
).
10

OPERATION
Use as open grill
•
The grill can be used as an open grill to cook burgers, steaks, boneless poultry,
seafood and vegetables.
•
To use the grill as an open grill, open as described in Open to horizontal position
g
(ill.
).
•
This way 2 independent grill surfaces are available. Food of different taste can be
cooked on the 2 grill plate sides to avoid mixing flavors.
•
Connect the power plug (8) to a wall outlet.
•
Install cooking plates prior to use.
•
Set the function switch (9) to the grill position and the blue power light (10) will
come on. Place the drip cups (14) under the spouts of both plates (ill.
Set to the desired cooking setting with the temperature switch (12). It may take up
•
to 10 minutes to heat up to the set temperature.
Wait until the green ready light (11) comes on.
•
Note: The ready light (11) will come on and go off while cooking. This is normal to
•
regulate temperature.
Food can be cooked on both plates.
•
Cook for the desired time. You may want to turn food over after half the cooking
•
time has elapsed.
CAUTION: When checking food, stay clear of the grill plates (6). Danger of hot oil
•
splatter.
After the cooking remove the food from both plates.
•
Set the function switch (9) to the off position. Remove the power plug (8) from the
•
wall outlet.
Wait until the grill has cooled down completely before moving or cleaning.
•
f
).
11

OPERATION
Use as griddle
•
The grill can be used with the griddle plates (13) to cook pancakes, eggs, french
toast, hash browns or breakfast meats.
•
To use the grill as a griddle, open as described in Open to horizontal position
h
).
(ill.
Prepare the pancake batter, eggs or other food you want to cook with the griddle
•
function.
Connect the power plug (8) to a wall outlet.
•
Install cooking plates prior to use.
•
Set the function switch (9) to the griddle position and the blue power light (10) will
•
come on. Place the drip cups (14) under the spouts of both plates (ill.
Set the desired cooking temperature with the temperature switch (12). It may take
•
up to 10 minutes to heat to the set temperature.
Wait until the green ready light (11) comes on.
•
Note: The ready light (11) will come on and go off while cooking. This is normal to
•
regulate temperature.
Food can be cooked on both plates.
•
CAUTION: When checking the food, stay clear of the cooking plates (6, 13). Danger
•
of hot oil splatter.
After the cooking process is finished, remove food.
•
Set the function switch (9) to the off position. Remove the power plug (8) from the
•
wall outlet.
Wait until the grill has cooled down completely before moving or cleaning.
•
f
).
12

OPERATION
Use as Flat press
•
The grill can be used as a flat press for preparing thinner sandwiches, quesadillas,
fish and vegetable dishes
•
Use the grill plates (recommended) (13) (ill. e ).
•
Connect the power plug (8) to a wall outlet.
•
Set the function switch (9) to the griddle position and the blue power light (10) will
come on. Place a drip cup (14) under the spout of the lower plate (ill.
Set the desired cooking temperature with the temperature switch (12). It may take
•
up to 10 minutes to heat to the set temperature.
Wait until the green ready light (11) comes on.
•
Note: The ready light (11) will come on and go off while cooking. This is normal to
•
regulate temperature.
Place food on the lower plate.
•
Press down the lever on the upper plate until both plates are in good contact with
•
the food. Do not use force.
Cook for the required time. You can check the cooking progress by lifting the upper
•
part (2).
After the cooking process is finished, lift the upper part (2) to the upright position.
•
Remove the food.
•
Set the function switch (9) to the off position. Remove the power plug (8) from the
•
wall outlet.
Wait until the grill has cooled down completely before moving or cleaning.
•
f
).
13

RECIPES
Chocolate Panini
Position : Closed
Selector : Griddle
Plates : Griddle
Serves : 6
Ingredients
¼ cup Chocolate- hazelnut spread (recommended Nutella)
•
1 loaf of pound cake, cut into 12 slices (10.75 loaf)
•
6 fresh strawberries, hulled and thinly sliced
•
2 teaspoons butter
•
1 cup whipped cream
•
Directions
Preheat the grill on 325ºF. Spread the chocolate on all 12 slices. Arrange the strawberry
slices on 6 of the cake slices. Top the strawberries with the remaining 6 slices of cake.
Melt the butter on the lower griddle (flat plate), place the 6 Paninis on the lower griddle,
close the grill and cook for 3 minutes. Serve with a dollop of fresh cream.
14

RECIPES
Greek Style Chicken Kebabs
Position : Closed
Selector : Grill
Plates : Grill
Serves : 4 to 6
Ingredients
4 cloves garlic, grated or minced
•
4 sprigs fresh oregano, leaves stripped and finely chopped
•
6 sprigs fresh rosemary, leaves stripped and finely chopped
•
¼ cup green olive tapenade
•
1 teaspoon crushed red pepper flakes
•
1 lemon, zested and juiced
•
¹/³ cup extra-virgin olive oil
•
2 pounds boneless, skinless chicken breast, cut into 2-inch chunks
•
Black pepper
•
8 Wooden skewers (6 to 8 inch skewers)
•
4 ounces of crumpled feta cheese
•
Directions
In a medium bowl combine the first 9 ingredients. Mix well to completely coat the
chicken. Marinate in the fridge for 2 to 4 hours. Preheat the grill on high. Skewer the
chicken on the wooden skewers. Place 4 chicken kebabs on the lower grill plate. Close
the grill and cook for 6 to 8 minutes. Set the cooked kebabs on a plate and cover with
foil. Repeat with remaining skewers. Sprinkle with the crumpled feta and serve.
15

RECIPES
Wasabi Grilled Tuna Panini
Position : Closed
Selector : Grill
Plates : Grill
Serves : 2
Ingredients
•
3 tablespoons good olive oil
•
¾ pound very fresh tuna steak, 1-inch thick
•
2 teaspoons of kosher salt
•
½ teaspoon freshly ground black pepper
•
1 lime, zested and juiced
•
½ teaspoon wasabi powder
•
1 teaspoon soy sauce
•
5 dashes hot sauce (recommended: Tabasco)
•
2 tablespoon minced scallion, white and green parts
•
½ a loaf of fresh ciabatta bread, cut into 2 sections and cut open length wise
•
1 cup baby arugula, washed and spun dry
Directions
Preheat the grill on sear. Brush both sides of the tuna with olive oil and sprinkle
generously with salt and pepper. Place the tuna on the lower grill and close the grill.
Cook the tuna for 6 minutes. Remove tuna to a plate and let cool while you prepare the
dressing. For the dressing, whisk together 2 tablespoons of olive oil, the lime zest, lime
juice, wasabi powder, soy sauce, hot sauce, 2 teaspoons kosher salt, and ½ teaspoon
pepper in a small bowl. Whisk the dressing well and toss in the scallions. When tuna has
cooled enough to handle, slice into ½ inch thick slices. Spoon ½ of the dressing onto all
4 pieces of the ciabatta. In a small bowl toss the arugula with the remaining dressing.
bottom half’s of the bread on the cutting board, top each with the tuna and
Put the
equal amounts of the arugula. Place the remaining ciabatta on top, press down on
sandwich. Place the sandwich back on the grill and grill for 4 minutes.
16

RECIPES
Grilled Vegetable Panini
Position : Closed
Selector : Grill
Plates : Grill
Serves : Makes 2 sandwiches
Ingredients
½ red pepper cut into 1 inch strips
•
½ yellow pepper cut into 1 inch strips
•
6 spears of asparagus, trimmed and cut in half
•
1 tablespoon olive oil
•
¼ teaspoon kosher salt
•
¼ teaspoon ground pepper
•
4 ounces of fresh mozzarella, cut into 4 slices
•
2 to 3 tablespoons of pesto sauce (homemade or store bought)
•
4 thick slices of whole grain bread
•
Directions
Preheat grill on high. Toss the vegetable in a bowl with olive oil, season with salt and
pepper. Place the vegetables on the lower grill plate and close the grill. Cook for 6
minutes. Set vegetables aside on a plate. Spread the pesto sauce on two slices of the
bread. Top the pesto with 6 pieces of asparagus, then the peppers. Gently place 2 slices
of the cheese on the vegetables and top with the remaining slices of bread. Place the
sandwiches on the lower grill and close the grill. Cook for 4 to 6 minutes until cheese
has melted and sandwich is golden brown. Cut each Panini in half and serve warm.
17

RECIPES
Barbequed Cheddar Burgers
Position : Closed
Selector : Grill
Plates : Grill
Serves : Makes 4 Burgers
Ingredients
1 ½ pounds lean ground beef
•
¹/³ cup purchased barbecue sauce
•
1 teaspoon garlic powder
•
1 teaspoon salt
•
1 teaspoon ground black pepper
•
1 cup grated cheddar cheese
•
4 sesame-seed hamburger buns, lightly toasted
•
Lettuce leaves
•
Sliced tomatoes
•
Directions
Mix first 4 ingredients in large bowl until blended. Mix in pepper. Shape meat mixture
into 4 patties. Cover and chill for ½ hour. Preheat grill on sear. Place the patties evenly
spaced on the lower grill plates. Close the grill and cook the burgers to desired doneness.
Grill for 4 to 6 minutes, (internal temperature of 280ºF to 330ºF). Place burgers on bottom
halves of buns. Top with cheddar cheese, lettuce, tomatoes and upper halves of buns.
18

RECIPES
Coco and Chili Rubbed Steak
Position : Closed
Selector : Grill
Plates : Grill
Serves : 2
Ingredients
1 ½ tablespoon good quality coco
•
2 teaspoons dried red pepper flakes
•
1 teaspoon ground cumin
•
½ teaspoon ground mustard
•
½ teaspoon chili powder
•
½ teaspoon ground allspice
•
2 tablespoons brown sugar packed
•
1 ½ tablespoons kosher salt
•
2 boneless rib eye or porterhouse steaks
•
Directions
Combine the first 8 ingredients in a mini food processor or grinder. Grind until the spice
mixture is well combined. Rub the steaks on both sides with spice mixture using ½ to
²/³ of spice blend. Press the spice blend into the steaks and refrigerate for 1 to 4 hours.
Remaining spice blend can be covered and stored for up to 1 month. Preheat the grill
on sear. Place the steaks on the lower grill and close the grill. Cook the steaks for 4 to 6
minutes for medium rare, 6 to 8 minutes for medium and 8 to 10 minutes for well done.
Let the steaks rest for 2 minutes before serving.
19

RECIPES
Grilled Vegetables
Position : Closed
Selector : Grill
Plates : Grill
Serves : 4 to 6
Ingredients
1 red pepper, sliced into 1 inch strips
•
1 yellow pepper, sliced into 1 inch strips
•
1 bunch of asparagus trimmed
•
2 tablespoons olive oil
•
½ teaspoon kosher salt
•
½ teaspoon ground black pepper
•
Directions
Mix all the ingredients in large bowl toss, the vegetables well. Preheat grill on high.
Lay the asparagus across the lower grill, (some spears may have to be vertical). Close
the grill and cook the asparagus for 6 minutes. Place the asparagus on a plate, cover
loosely with tinfoil. Place the peppers skin side down on the grill. Close the grill and cook
for 6 minutes. Remove the peppers and add to the asparagus.
20

RECIPES
Shrimp Wraps
Position : Open
Selector : Griddle
Plates : Grill
Serves : 6 to 8 appetizer servings
Ingredients
•
6 to 8 birds eye, red chilies, seeds and ribs removed
•
½ cup of fresh lemon juice (about 2 lemons)
•
1 tablespoon chopped cilantro leaves
•
1 tablespoon fresh parsley chopped
•
2 cloves fresh garlic
•
½ cup olive oil
•
½ teaspoon salt
•
2 pounds shrimp (16 to 20 shrimp per pound) peeled and deveined
•
1 lime quartered
•
1 head of bibb lettuce, washed and dried
Directions
Combine the first 7 ingredients in a blender, puree until smooth. Place the shrimp in a
bowl and toss with ²/³ of the marinade. Reserve ¹/³ of the marinade for later. Marinate
the shrimp in the fridge for 20 minutes. Preheat the griddle to 425°F. Cook the shrimp
in two batches on the griddle. Grill the shrimp for 3 minutes per side, until the shrimp
have a nice caramelized appearance and are opaque throughout. Place shrimp an a
plate while you prepare the lettuce. On a large platter arrange the lettuce leaves to
cover the platter, larger leaves should be torn in half. Top each leaf with a shrimp, and
a drizzle of the reserved marinade (do not use marinade that had the raw shrimp in it).
Place the lime qua
wrap in lettuce, enjoy.
rters around the platter. To eat, squeeze the lime on the shrimp and
21

RECIPES
Banana Pecan Pancakes
Position : Flat
Selector : Griddle
Plates : Griddle
Serves : Makes 18 pancakes
Ingredients
2 large eggs
•
2 cups buttermilk
•
6 tablespoons (¾ stick) unsalted butter, melted
•
1 ½ cups all-purpose flour
•
¼ cup sugar
•
2 teaspoons baking soda
•
½ teaspoon sea salt
•
1 cup diced bananas (2 large)
•
½ cup finely chopped pecans
•
2 tablespoons unsalted butter
•
Directions
In a medium bowl, whisk together the eggs and buttermilk. Stir in the melted butter. In a
small bowl, mix the flour, sugar, baking soda, and salt together. Add the dry ingredients
to the wet ingredients, stirring until just combined — batter may be a little lumpy. Stir
in the bananas and pecans. Preheat the griddle on 400°F. Melt 1 tablespoon of butter
on each side of the griddle. Spoon out 3 tablespoons of batter per pancake. Cook 4
pancakes on each griddle plate. Cook the pancakes until the tops look dull and a few
of the bubbles pop, about 3 minutes. Turn the pancakes over and cook for another
minute. Transfer the cooked pancakes to an ovenproof dish and place in a warm oven
until the entire batch is ready to be served.
22

RECIPES
Leek and Mushroom Omelet
Position : Flat
Selector : Griddle
Plates : Griddle
Serves : Makes 2 omelets
Ingredients
•
1 cup mushrooms (about 4 ounces), sliced
•
1 tablespoons butter
•
1 tablespoon olive oil
•
1 large leek, thinly sliced (white and pale green parts only)
•
½ teaspoon dried thyme, crumbled
•
6 eggs
•
3 teaspoons chopped fresh rosemary or 1 ½ teaspoons dried, crumbled
•
½ cup diced, red bell pepper
•
½ cup grated provolone or Italian Fontina cheese
•
Fresh rosemary sprigs
Directions
Preheat the griddle to 375°F. Melt butter on the lower griddle, add leek and pepper to
the lower griddle plate, sauté for 3 minutes. After 3 minutes add 1 teaspoon butter to
upper griddle plate, add mushrooms and sauté until vegetables are golden brown, you
will need to add about 1 teaspoon of olive oil over vegetable during cooking. Sauté
vegetables for about 6 minutes, season to taste with salt and pepper. Move mushrooms
to center of upper griddle. Transfer the leek and peppers to a plate to cool. Whisk 3 eggs
add 1 ½ teaspoons chopped rosemary and thyme in small bowl. Season with salt and
pepper. Stir in half of leek mixture. Add 1 teaspoon butter to lower griddle plate. Starting
on the left side of the griddle carefully
in your hand move the egg mixture away from the drip cups. Cook the egg mixture until
the bottom is light brown and the top is set. Arrange ½ of the mushrooms and ½ of the
cheese on top of eggs. Fold the omelet over and place on a plate to serve. Repeat steps
3, 4 and 5 for remaining eggs.
pour the beaten egg mixture, keeping a spatula
23

CLEANING AND MAINTENANCE
•
After use, turn the function switch (9) to the off position. Unplug the power plug (8)
from the wall outlet and let the appliance cool down completely.
•
Use the cleaning / scraping tool (16) to remove residue from the cooking plates.
Clean the tool by hand or in the dishwasher.
•
Dispose of the grease in the drip cups (14). Clean the drip cups (14) by hand or in
the dishwasher.
•
Press the lock button (4, 7) to remove the cooking plates (6, 13) from the
appliance.
•
WARNING: Only touch the cooking plates (6, 13), after they have cooled down
completely. Risk of burns!
•
Clean the cooking plates (6, 13) by hand or in the dishwasher.
•
Do not use metal items like knives or forks for removing stubborn residues. Do not
use abrasive pads or cleaners for the cooking plates (6, 13). The non-stick coating
might be damaged.
•
After cooking seafood with this appliance, use some lemon juice to avoid taste
transferring to the next food you cook on this appliance.
•
Clean the housing with a soft, damp cloth. Do not use any abrasive pads or
cleaners.
Storage
•
Store your grill in a dry place.
•
Disconnect the grill from the wall outlet.
•
For storing, wrap the power cord (8) around the cord storage (15) on the bottom
of the appliance.
•
WARNING: Do
i
(ill.
One set of cooking plates can be left attached to the grill for storing.
•
Store the grill on a stable shelf or in a cupboard, preferably in its original packaging.
•
To avoid accidents, ensure that both the grill and its power cord (8) are beyond
reach of children or pets.
not allow the power cord (8) to get between the cooking plates (6, 13)
).
24

TROUBLESHOOTING
PROBLEM CAUSE SOLUTION
Grill not working.
Cooking plates (6,
13) do not fit into
place.
Power plug (8) not connected
to wall outlet.
The cooking plates (6, 13)
can only be mounted in their
respective positions. Check
backside for marking UPPER
or LOWER.
Connect power plug (8) to wall
outlet.
Mount the cooking plates (6,
13) according to their
markings.
Ready light (11)
keeps going on
and off.
Hinge release
lever (5) can not
be moved.
If additional assistance is needed, please contact our Customer Assistance at
1.855.451.2897 (U.S.).
The temperature is being
adjusted.
If the upper part (2) is in open
position, the hinge release
lever (5) can not be moved.
No issue. The grill is working
normally.
Close the upper part (2) and
move the hinge lever (5)
towards you.
TECHNICAL DATA
Rated voltage: AC 120 V~, 60Hz
Rated power input: 1500W
25

NOTES
26

NOTES
27

CUSTOMER ASSISTANCE
If you have a claim under this warranty, please call our Customer Assistance Number. For faster
service, please have the model number and product name ready for the operator to assist you.
This number can be found on the bottom of your appliance and on the front page of this manual.
Model Number: __________________ Product Name: __________________
Customer Assistance Number 1.855.451.2897.
Keep these numbers for future reference!
Two-year limited warranty
What does your warranty cover?
• Any defect in material or workmanship.
For how long after the original purchase?
• Two years.
What will we do?
• Provide you with a new one.
• For those items still under warranty but
no longer available, WAL-MART reserves
the right to replace with a similar
FARBERWARE branded product of equal
or greater value.
How do you make a warranty claim?
• Save your receipt.
• Properly pack your unit. We recommend
using the original carton and packing
materials.
• Return the product to your nearest
WAL-MART store or call Customer
Assistance at 1-855-451-2897 (U.S.).
What does your warranty not cover?
• Parts subject to wear, including, without
limitation, glass parts, glass containers,
cutter/strainer, blades, seals, gaskets,
clutches, motor brushes, and/or
agitators, etc.
• Commercial use or any other use not
found in printed directions.
• Damage from misuse, abuse, or
neglect, including failure to clean
product regularly in accordance with
manufacturer's instructions.
How does state law relate to this warranty?
• This warranty gives you specific legal
rights, and you may also have other
rights which vary from state to state or
province to province.
• This warranty is in lieu of any other
warranty or condition, whether express
or implied, written or oral, including,
without limitation, any statutory warranty
or condition of merchantability or fitness
for a particular purpose.
• WAL-MART, FARBERWARE and the product
manufacturer expressly disclaim all
responsibility for special, incidental, and
consequential damages or losses caused
by use of this appliance. Any liability is
expressly limited to an amount equal to
the purchase price paid whether a claim,
however instituted, is based on contract,
indemnity, warranty, tort (including
negligence), strict liability, or otherwise.
Some states or provinces do not allow
this exclusion or limitation of incidental
or consequential losses, so the foregoing
disclaimer may not apply to you.
What if you encounter a problem with this
product while using it outside the country of
purchase?
• The warranty is valid only in the country
of purchase and if you follow the
warranty claim procedure as noted.
© 2012 Farberware Licensing Company, LLC. All Rights Reserved.
Copyright and Trademarks of Farberware Licensing Company,
LLC, including FARBERWARE
Farberware Licensing Company, LLC.
®
, are used under license from
 Loading...