

Page 1
ES73 ES74 ES71A ES75A
LIVRO DE INSTRUÇÕES
LIBRO DE INSTRUCCIONES
INSTRUCTION MANUAL
MANUEL D’UTILISATION
www.fapindustria.pt
Page 2
2
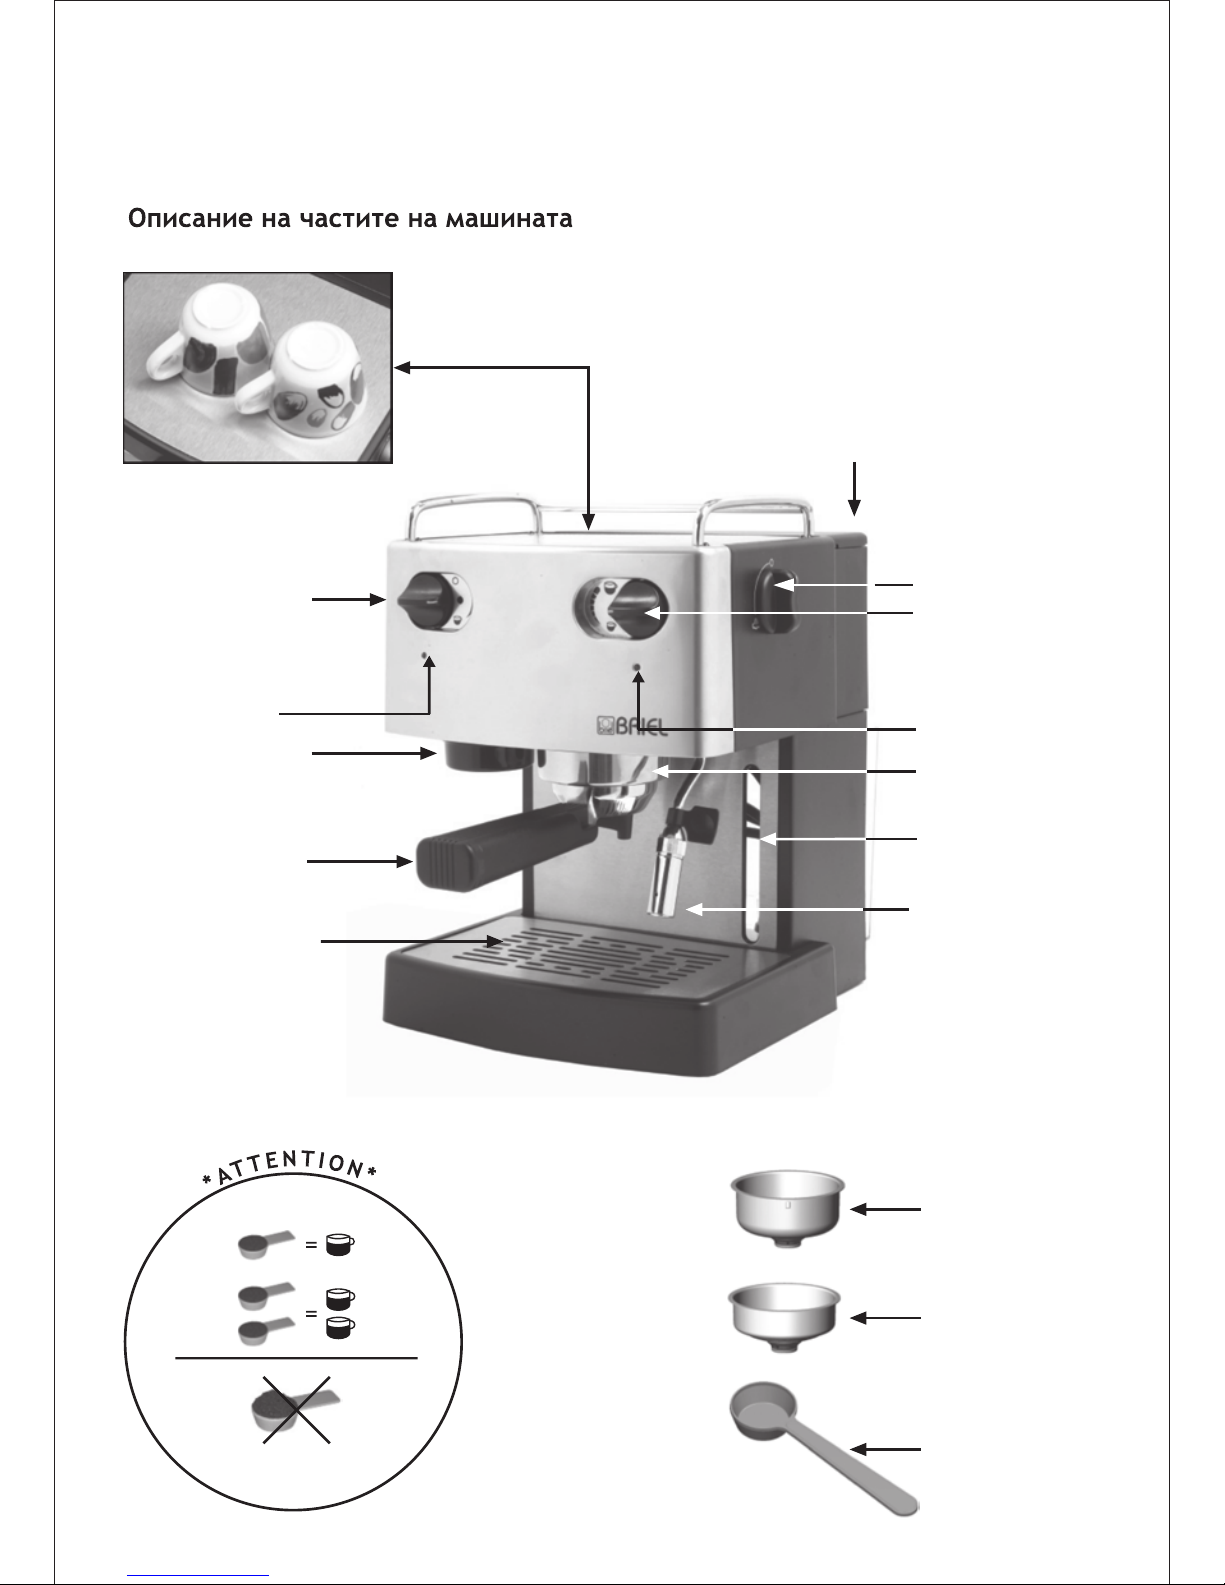
Descrição de componentes
Descripción de las partes
Parts description
Description des pièces
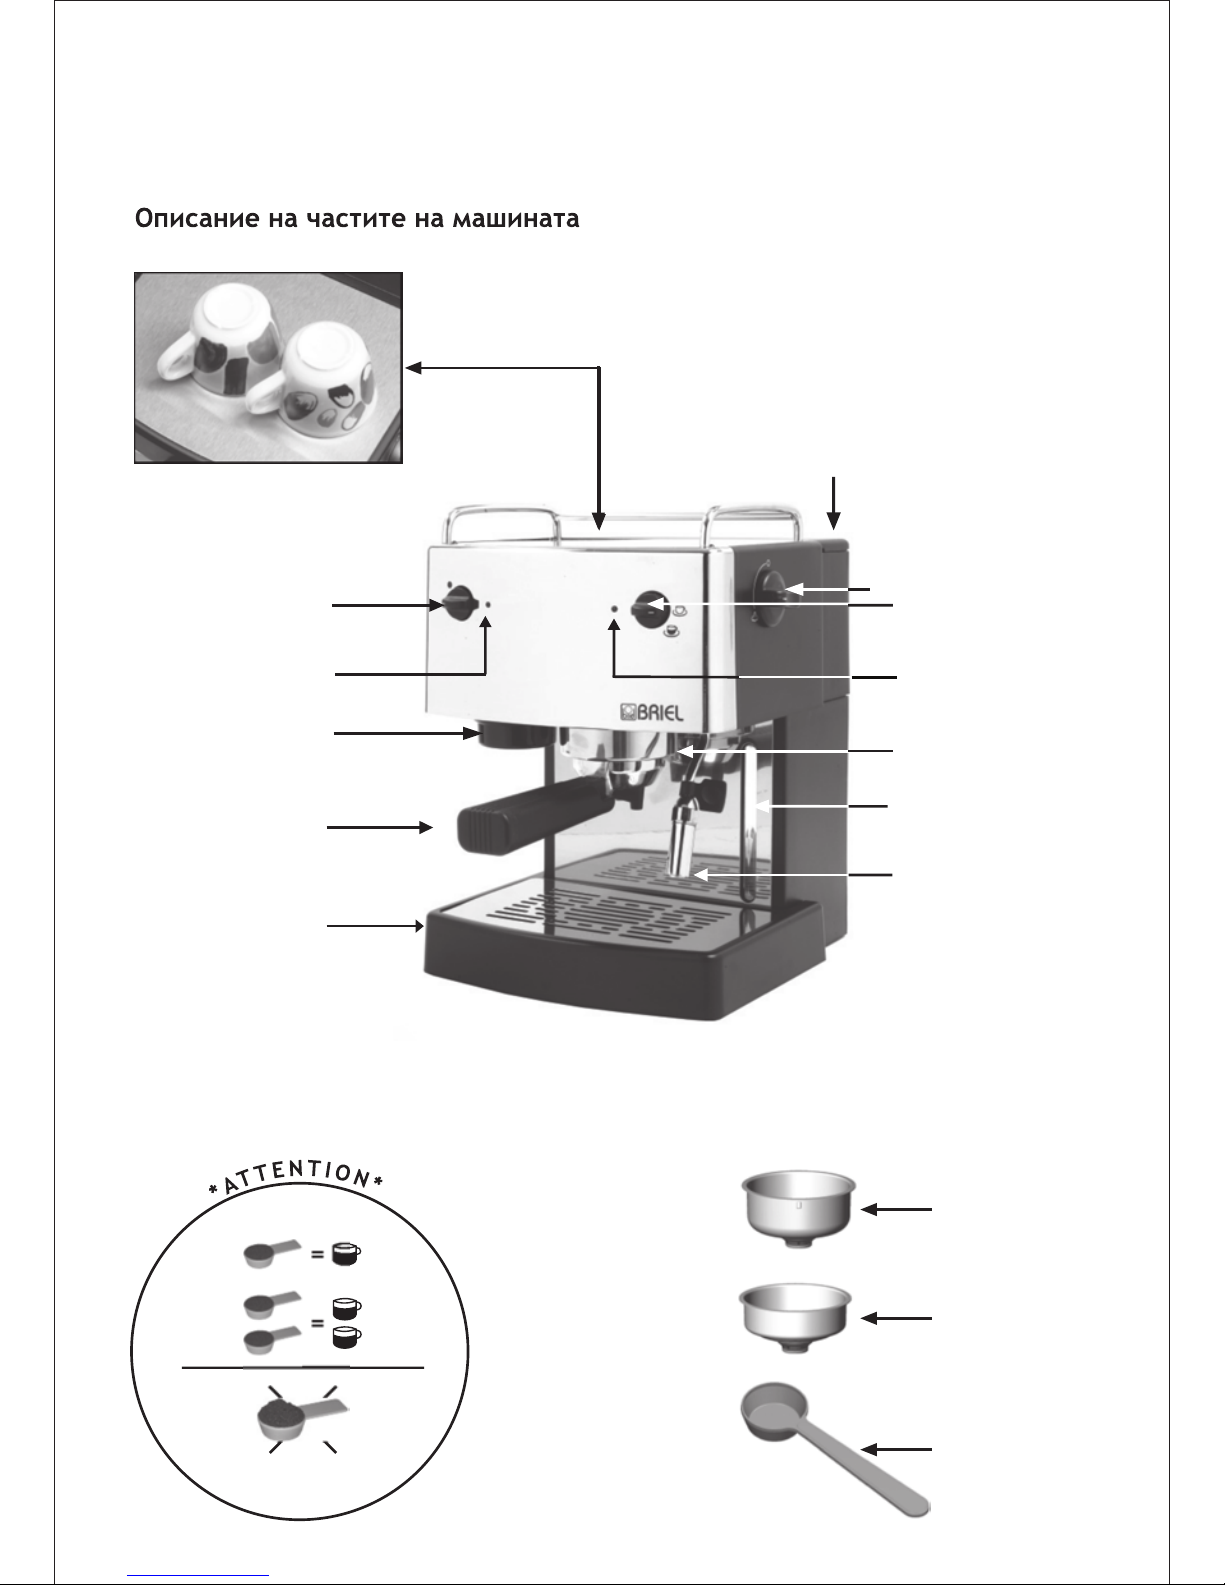
ES73
4
5
6
7
8
9
11
12
13
O
N
N
Ã
O
C
O
L
O
C
A
R
D
E
M
A
S
I
A
D
O
C
A
F
É
-
N
O
P
O
N
E
R
D
E
M
A
S
I
A
D
O
C
A
F
É
-
D
O
N
O
T
P
U
T
T
O
O
M
U
C
H
C
O
F
F
E
E
-
N
’
U
T
I
L
I
S
E
Z
P
A
S
T
R
O
P
C
A
F
É
14
15
16
182
310
Page 3
3
Descrição de componentes
Descripción de las partes
Parts description
Description des pièces
9
11
12
4
5
6
8
3
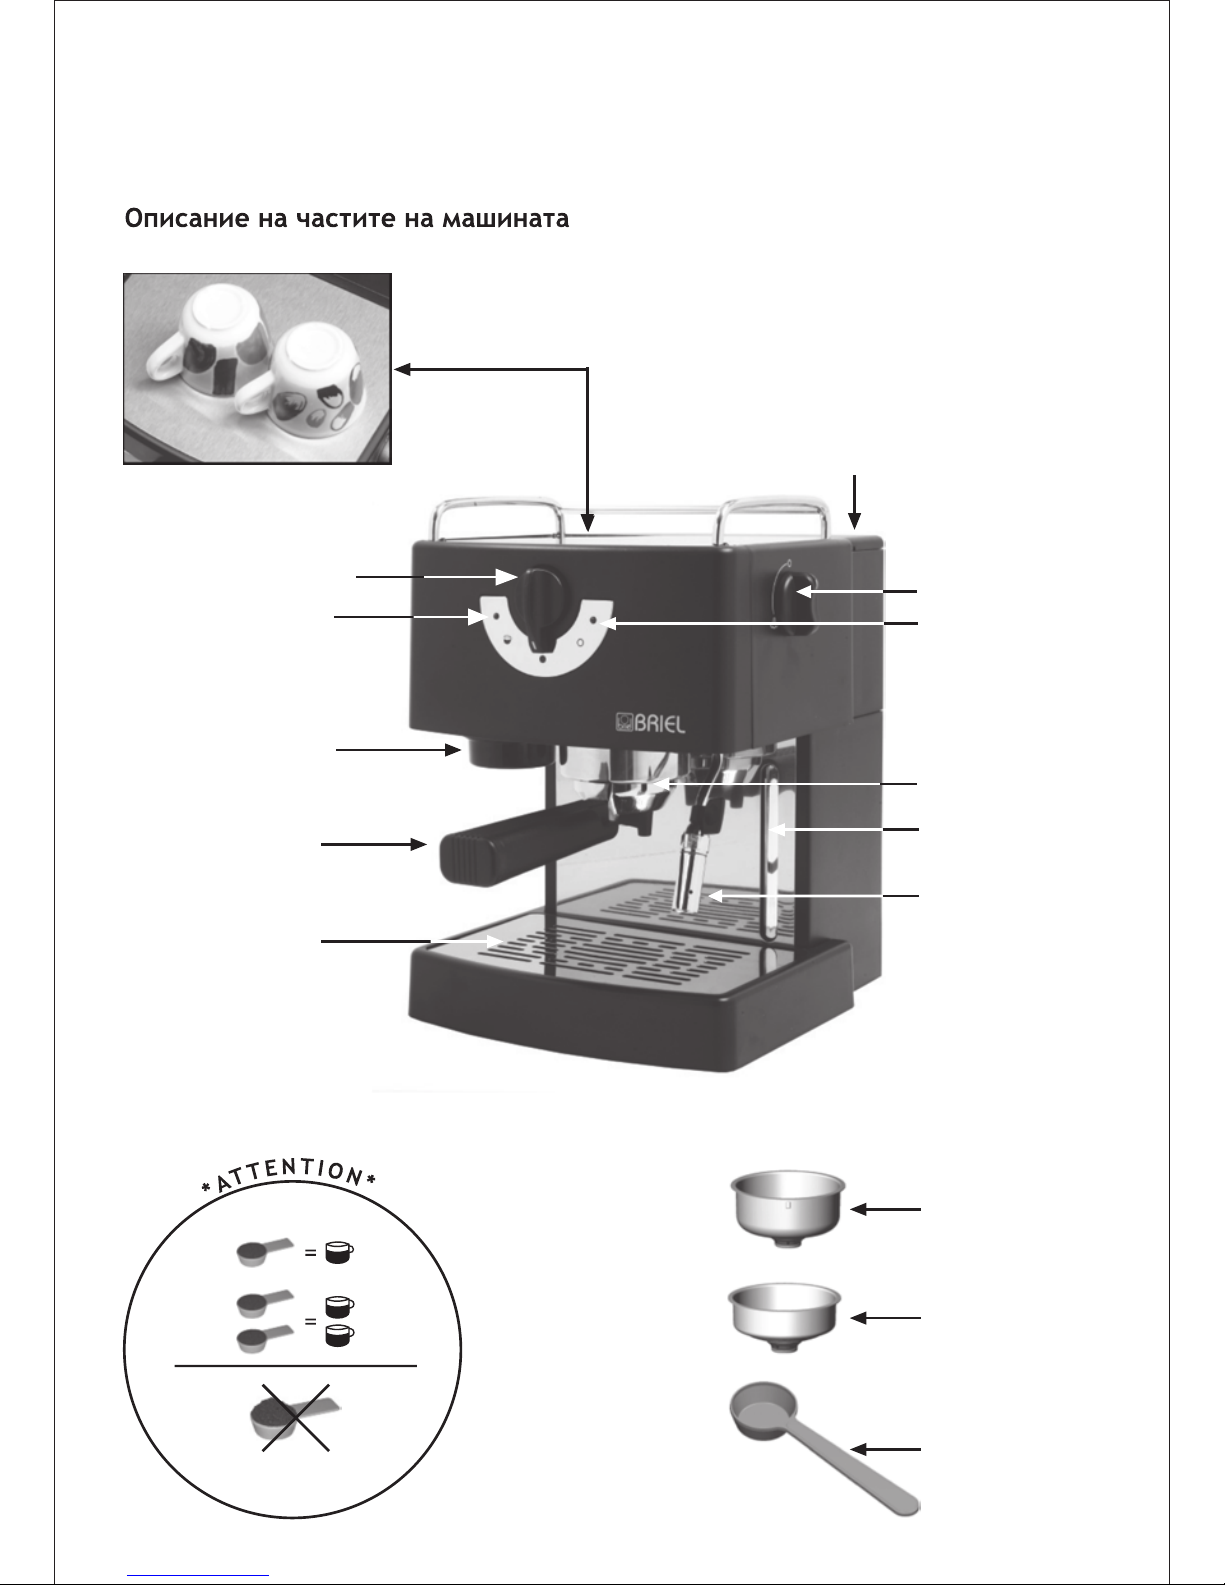
ES74
14
15
16
13
NO
N
Ã
O
C
O
L
O
C
A
R
D
E
M
A
S
I
A
D
O
C
A
F
É
-
N
O
P
O
N
E
R
D
E
M
A
S
I
A
D
O
C
A
F
É
-
D
O
N
O
T
P
U
T
T
O
O
M
U
C
H
C
O
F
F
E
E
-
N
’
U
T
I
L
I
S
E
Z
P
A
S
T
R
O
P
C
A
F
É
1
7
10
Page 4
4
Descrição de componentes
Descripción de las partes
Parts description
Description des pièces
7
9
11
4
5
6
8
17
1
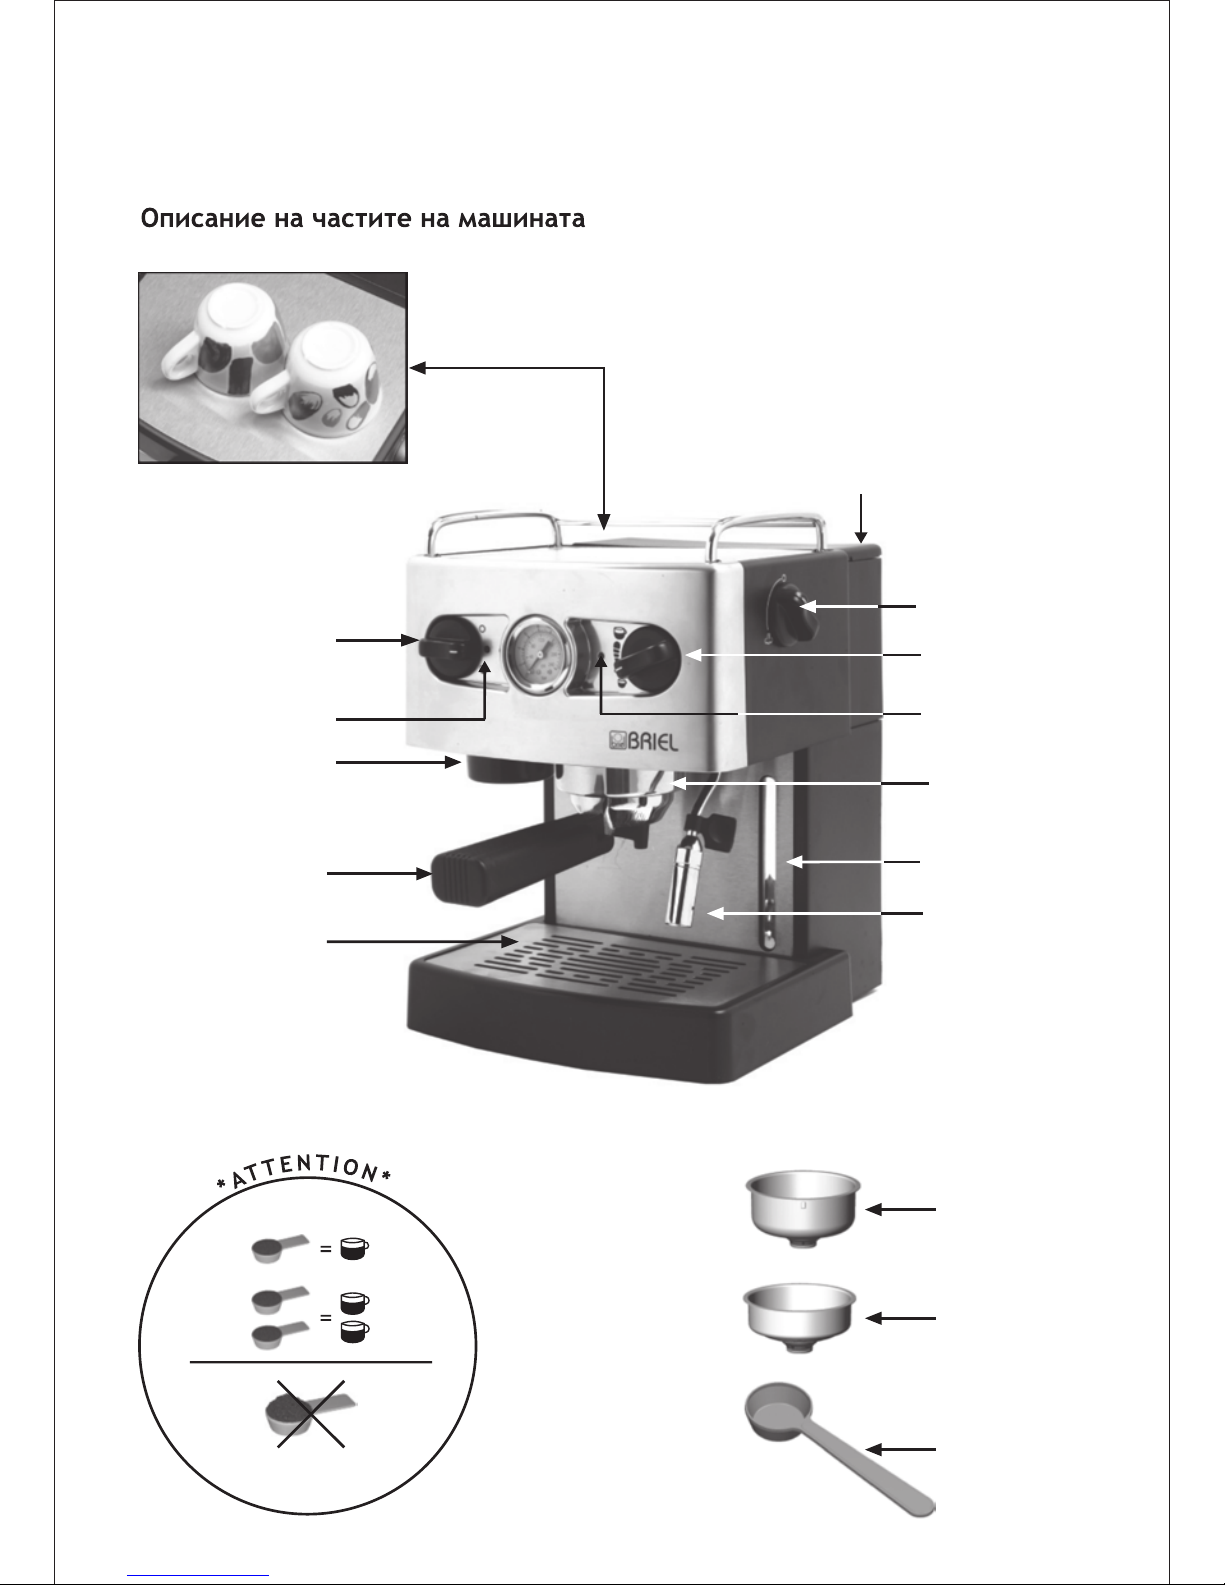
ES71A
14
15
16
13
NO
N
Ã
O
C
O
L
O
C
A
R
D
E
M
A
S
I
A
D
O
C
A
F
É
-
N
O
P
O
N
E
R
D
E
M
A
S
I
A
D
O
C
A
F
É
-
D
O
N
O
T
P
U
T
T
O
O
M
U
C
H
C
O
F
F
E
E
-
N
’
U
T
I
L
I
S
E
Z
P
A
S
T
R
O
P
C
A
F
É
3
10
12
Page 5
5
Descrição de componentes
Descripción de las partes
Parts description
Description des pièces
7
9
11
4
5
6
8
17
1
ES75A
14
15
16
13
10
3
NO
N
Ã
O
C
O
L
O
C
A
R
D
E
M
A
S
I
A
D
O
C
A
F
É
-
N
O
P
O
N
E
R
D
E
M
A
S
I
A
D
O
C
A
F
É
-
D
O
N
O
T
P
U
T
T
O
O
M
U
C
H
C
O
F
F
E
E
-
N
’
U
T
I
L
I
S
E
Z
P
A
S
T
R
O
P
C
A
F
É
12
Page 6
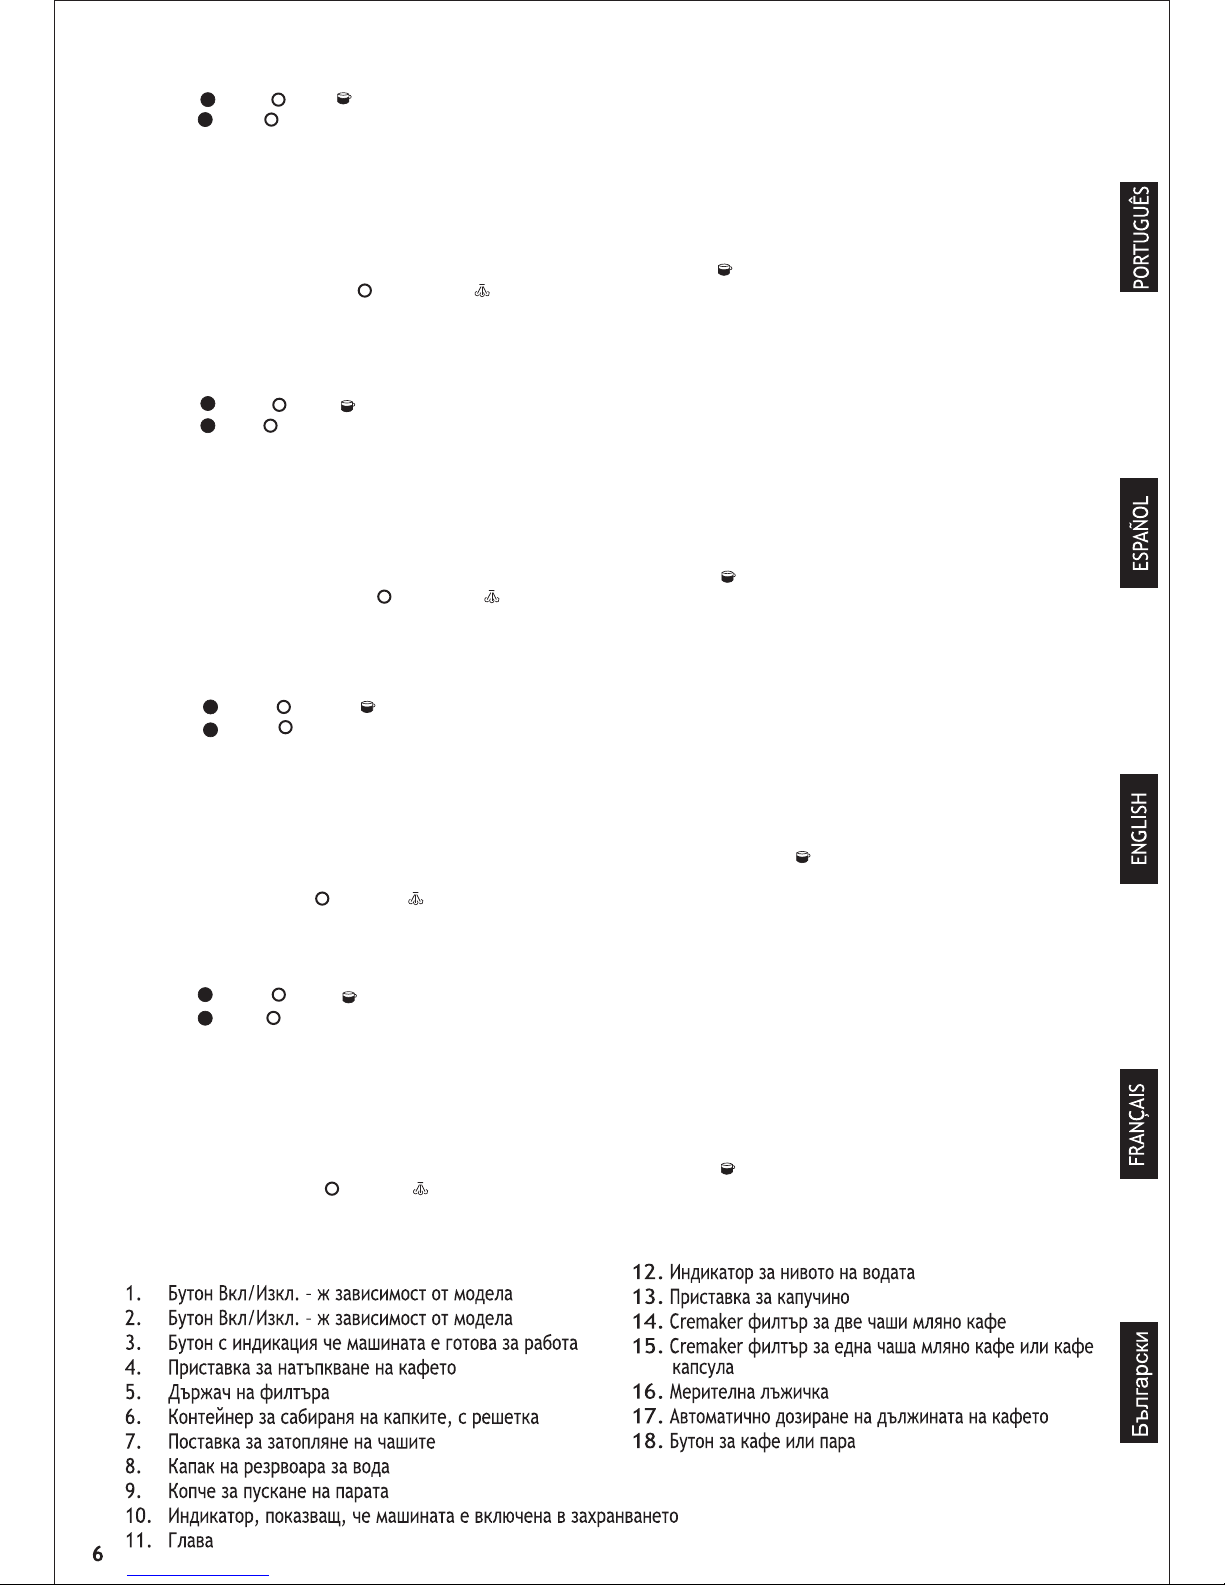
1. ON /OFF café
2. ON /OFF
3. Lâmpada avisadora de temperatura OK
4. Calcador de café
5. Porta- filtros
6. Apara-águas com grelha removível
7. Aquecedor de chávenas
8. Tampa de entrada de água (depósito de água
no interior)
9. Manípulo de vapor ( fechado / aberto)
10. Lâmpada avisadora de funcionamento
11. Cabeça de extracção
12. Indicador do nível de água
13. Tubo de vapor com ponteira para Cappuccino
14. Filtro Cremaker para duas doses de café
moído ou mono-doses de café (pastilhas)
15. Filtro Cremaker para uma dose de café moído
ou mono-doses de café (pastilhas)
16. Colher doseadora
17. Auto Expresso Flow - Selector da quantidade
de café
18. Café
1.
ON / OFF coffee
2. ON / OFF
3. Button with temperature OK indicator lamp
4. Coffee tamper
5. Filter-holder
6. Drip tray with grid
7. Cup warmer with grid
8. Water entry cover lid (water tank on the
inside)
9. Steam control ( closed / opened)
10. Button with power on indicator lamp
11. Brew head
12. Water level indicator
13. Cappuccino nozzle
14. Cremaker filter for two cups of ground coffee
15. Cremaker filter for one cup of ground coffee
or coffee pods
16. Measuring Spoon
17. Auto-Expresso Flow - Water volume adjuster
18. Brew coffee switch
1. ON /OFF café
2. ON /OFF
3. Piloto indicador de temperatura OK
4. Prensador del café
5. Portafiltros
6. Bandeja recoge gotas con rejilla
7. Bandeja calienta tazas
8. Tapa del depósito de agua (depósito d el agua
en el interior)
9. Regulador del vapor ( cerrado / abierto)
10. Piloto indicador de funcionamiento
11. Cabeza de extracción
12. Depósito del agua con indicador del nivel
13. Tubo de cappuccino
14. Filtro Cremaker para dos taza de café molido
o monodosis
15. Filtro Cremaker para una taza de café molido
o monodosis
16. Cuchara dosificadora
17. Auto- Expresso Flow - Selector cantidad de
agua
18. Café
1. ON / OFF Café
2. ON /OFF
3. Commande avec voyant de température
indicateur OK
4. Égaliseur de mouture
5. Porte-filtre
6. Bac collecteur avec grille amovible
7. Plateau chauffe-tasses
8. Couvercle (réservoir amovible à l’intérieur)
9. Robinet vapeur ( fermé / ouvert)
10. Commande avec témoins lumineux
fonctionnement
11. Tête d’extraction
12. Indicateur de niveau d’eau
13. Buse eau chaude / vapeur
14. Filtre Cremaker pour deux tasse café
moulu
15. Filtre Cremaker pour une tasse café moulu
où dosette à café
16. Cuillère-doseur
17. Auto Expresso Flow - Quantité d´eau
18. Café
Page 7
manufacturer may result in fire, electric shock or injury to persons;
· Do not use outdoors;
· Do not let cord hang over edge of table or counter, or touch hot surfaces;
· Do not place on or near a hot gas or electrical burner, or in a heated oven;
· Do not use the appliance for other than the intended use. The appliance is for household use only;
· To disconnect, switch to “OFF”, then remove the plug from the wall outlet;
· After unpacking the appliance, be sure to dispose carefully of the plastic bags so that children or
the infirm cannot reach them;
· To reduce the risk of injury, do not drape cord over the counter top or table top where it can be
pulled on by children or tripped over unintentionally;
· Never remove the Cappuccino nozzle when the steam control is opened.
SAVE THESE INSTRUCTIONS
Technical Data:
Please consult the rating place on the below or at the back of your appliance.
The level of equivalent weighted continuous accoustic pressure A, to which the user of this appliance
is subjected during normal use, is inferior to 70 dB (A).
A. A short power-supply cord is provided to reduce risks resulting from becoming entangled in or
tripping over a longer cord;
B. Longer extension cords are available and may be used if care is exercised in their use;
C. If an extension cord is used, the marked electrical rating of the extension cord should be at least
as great as the electrical rating of the appliance. If the appliance is of the grounded type, the
extension cord should be a grounding type 3-wire cord, and the longer cord should be arranged so
that it will not drape over the counter-top or table top where it can be pulled on by children or
tripped over;
D. Your product is equipped with a polarized alternating current line plug (a plug having one blade
wider than the other). This plug will fit into the power outlet only one way. This is a safety feature.
If you are unable to insert the plug fully into the outlet, try reversing the plug. If the plug should
still fail to fit, contact your electrician to replace your obsolete outlet. Do not defeat the safety
purpose of the polarized plug.
Note: Paragraph D only applies to USA and Canada.
3. SPECIAL CORD SET INSTRUCTIONS REGARDING YOUR CORD SET:
24
Page 8
5. MAKING ESPRESSO
Preparing the appliance:
· Remove the water tank by pulling it outward and fill it with cold water (water tank can also be
filled by raising the cover lid);
· Insert plug into a wall outlet;
· Turn the machine ON. The power ON indicator lamp will light;
· Choose the Cremaker filter to use, according to the instructions on pages two and three (2,
3).
With ground coffee:
Place a measuring-spoon for each coffee to be prepared!
·
Fill the chosen filter with ground coffee using the measuring spoon provided. Place one level
measure of coffee in the filter for each cup of Espresso. Do not overfill. Gently tamp down coffee
with the tamper on the left side of your machine. Insert filter-holder into brew head, by turning
it to the right as you face machine;
· Place one or two Espresso cups on the drip tray to line up with the spouts of the filter-holder.
With coffee pods:
With the coffee pod, you may prepare only one Espresso at a time!
·
Place a fresh coffee pod in the Cremaker filter. Insert filter-holder into brew head, by turning it
to the right as you face machine;
· Place one Espresso cup on the drip tray to line up with the spouts of the filter-holder.
Brew coffee:
·
Make sure steam control is closed ;
· When the machine is ready, the temperature OK indicator lamp will light.
All accessories (filter-holder, measuring spoon, filters, water tank) must be washed with detergent
and tepid water.
Remove the water reservoir by pulling it outward and fill it with cold water. Turn the machine ON. The
power ON indicator lamp will light. Place an Espresso cup under the brew head (with the filter holder
inserted in the brew head) and turn ON the coffee function. You will hear the sound of the pump and
after a few seconds water will flow from the brew head. Allow water to flow until cup is filled. When
the machine is new, it is recommended that several cups of water be allowed to flow through to clean
it.
Sometimes the self-priming pump feature may not work due to a momentary “air lock” condition. If
water does not flow from brew head, place a cup under the cappuccino nozzle. Open steam control
and turn ON the coffee function, until water flows from the cappuccino nozzle. Close steam control
, as Espresso maker is now ready.
You must never operate the machine without water in the tank!
4. PREPARATION
25
Page 9

Modela ES73 and ES74:
· After completing all the above steps, your machine is now ready to brew coffee;
· Turn the brew coffee button. After a few moments, Espresso will start to flow into the cups;
· The more water you allow to flow, the softer the coffee will be. The espresso will have a light
brown foam floating on top;
· To stop the water flow, simply turn the brew coffee to the initial position .
Models ES71A and ES75A:
· After completing all the above steps, your machine is now ready to brew coffee;
· Turn the switcher onto brew coffee position . After a few moments, Espresso will start to flow
into the cups;
· The more water you allow to flow, the softer the coffee will be. The espresso will have a light
brown foam floating on top;
· To stop the water flow, simply turn the switcher onto brew coffee position again.
Models
ES71A and ES75A
are equipped with an electronic timer which allows you to choose in
advance the quantity of espresso you want to flow to the cups. It will automatically stop when the
quantity is reached.
The water volume adjuster may be adjusted as desired. The half filled cup symbol represents a
short coffee (about 2 ounces for 1 cup). On the opposite side, the full filled cup represents a tall
coffee (about 8 ounces for 1 cup). Place the water volume adjuster at any point, depending on
the taste you prefer. The more water you use, the softer the coffee flavour will be; less water
means a stronger coffee flavour.
You can stop the water flow at any time by turning the switch onto brew coffee position .
Filter holder removal:
After having brewed coffee, wait 10 to 15 seconds before removing the filter-holder.
·
To make more Espresso, or to remove the filter-holder, move handle to the left. Be careful, as hot
water will be on top of the ground coffee or on the top of the coffee pod in the holder;
· After Espresso preparation, rinse the the filter-holder and the used Cremaker filter.
Notes:
·
If you have just used ground coffee and want to use a coffee pod now, simply turn ON the coffee
function of your machine, and let the water clean the remaining powder;
· With the coffee pod, you may prepare only one Espresso at a time.
6. PREPARING CAPPUCCINO
“Cappuccino” is the name given by the Italians to the mixture of Espresso and milk foam. This foam
is obtained by using the Cappuccino nozzle. Then the foam and a little bit of milk are blended with
the coffee.
Note:
use larger cups (5 –6 oz.) than those used for Espresso.
Preparing the appliance:
· Remove the water tank by pulling it outward and fill it with cold water (water tank can also be
filled by raising the cover lid);
26
Page 10
to remove. To clean – hold wet cloth very close to tip of nozzle and open steam control . Let
steam escape into the cloth for one or two seconds to clear out nozzle. Wipe outside of nozzle.
Clean by soaking in hot water, then replace. If necessary, use a needle to clean air intake holes on
side of frother;
· No Briel parts should be placed in the dishwater. This will cause distortion and may result in the
parts not functioning proverly or safely;
· From time to time, remove lower section of frother by holding upper part and unscrewing lower
part. Clean carefully and reassemble;
· Clean filter-holder and coffee filters with water after each use;
· Remove drip tray and grid and wash with warm water. Use sponge to clean out drip area;
· Ground coffee will adhere to the seal inside of the brew head. Keep it clean;
· When the machine is not in use for a long period, drain stale water from machine by turning the
coffee function ON. However, do this only after you have filled reservoir with fresh water. Never
operate pump unless there is water in the machine;
· Wash Cremaker filters and the filter-holder regularly;
· The water tank and the drip tray can be removed for an easier cleaning;
· The cappuccino nozzle can be removed from the steam tube for cleaning.
Descaling:
It is advisable to descale the appliance every 4- 6 months, depending on the hardness of the water
and the frequency of use.
· Fill the water tank with a 50% water, 50% vinegar solution;
· Place a recipient under the brew head without filter-holder;
· Turn ON the coffee funtion and let most of the solution flow to a recipient;
· Turn OFF the coffee function, put the recipient under the Cappuccino nozzle and open the steam
control ;
· When the water tank is nearly empty, close the steam control ;
· To remove traces of the descaling solution, fill the water tank with fresh water and turn ON the
coffee function . Let flow the equivalent to 2 and a half water tanks, and turn the coffee function
OFF ;
· Open the steam control , and turn the coffee function ON , and let the remaining water on the
water tank flow. Pay close attention to the water level, as you must never operate the machine
without water in the tank!
This operation may be hazardous if other substances are used instead of approved descaling
materials recommended for household coffee makers. Product failure due to scale accumulation
is not covered by the warranty. No other servicing should be attempted by the user.
Environment protection first!
Your appliance contains valuable materials which can be recovered or recycled.
Leave it at a collection point.
27
Page 11

· Insert plug into a wall outlet;
· Turn the machine ON. The power ON indicator lamp will light;
· When the temperature OK indicator light glows, the machine is ready to produce steam.
· Slowly open steam control . A little portion of water will flow from the nozzle. Wait until steam
starts to come out from the nozzle and close steam control ;
Making Steam:
·
Place the frothing jug half-filled with low fat milk under the cappuccino nozzle so that its tip is
just under the surface of the milk;
· Slowly open steam control to release steam.
· Move pitcher in circular motion keeping the tip of frother just under surface of milk as it begins
to froth. The air intake holes on side of frother should not be immersed in the milk. Do not let
milk come to a boil since it will not froth;
· When you have made enough froth, close steam control , and remove the pitcher;
· Spoon the froth onto the Espresso in each cup and gently pour the hot milk along the side of the
cup. Top each cup of cappuccino with a dash of cinnamon, cocoa, nutmeg or chocolate shavings.
Your Cappuccino is ready to be served!
If you need to produce some more steam:
· When the temperature OK indicator light glows, repeat all the steps above indicated. Turn on the
coffee function to assure you that the machine have water.
Milk residues, when dry, can damage the cappuccino nozzle. You must clean it after each use. To
do it, remove it and rinse it well.
And you can make TEA as well!
Preparing the appliance:
· Remove the water tank by pulling it outward and fill it with cold water (water tank can also be
filled by raising the cover lid);
· Insert plug into a wall outlet;
· Turn the machine ON. The power ON indicator lamp will light;
· When the machine is ready, the temperature OK indicator lamp will light;
· Place the cup with the tee bag inside under the cappuccino nozzle.
· Open the steam control , and turn the coffee function ON . Water immediately drops from the
cappuccino nozzle.
· When you reach the desired quantity of water, turn the coffee function OFF , and close the steam
control ;
7. MAKING TEA
8. CLEANING AND MAINTENANCE
28
· Clean the cappuccino nozzle each time after you have immersed it in milk; otherwise the inside
of nozzle and air intake holes become clogged and milk deposits on outside harden and are difficult
Page 12
19 bar pump:
Cremaker filter:
Is a filter that assures a velvety cream in all Espressos.
9. BRIEL TECHNOLOGY
BRIEL- Indústria de electrodomésticos, S.A. guarantees your appliance for 2 YEARS * parts and labour
from the date of purchase, according to the following conditions:
· This guarantee is limited to the the replacement of inefficient parts or assembly malfunctions in
Briel’s authorized service centers;
· This guarantee is valid exclusively in the country where the appliance was bought;
· To take advantage of this guarantee, present proof of purchase.
This guarantee excludes damage resulting from:
· All appliances not being used according to the manufacturer’s instructions;
· The connection of the appliance to a power supply with a voltage different to that shown on the
rating plate;
· Exterior influences such as atmospheric discharges, floodings, etc;
· A fall or impact (breakage of plastic or glass);
· Incorrect handling not in compliance with the instructions for use;
· Parts with natural consuming such as, filter-holder vedation joint, coffee filters;
· Insufficient aftercare or cleanning, excessive limescale;
· The use of abrasive detergents unsuitable for plastic items;
· Damaged parts;
· Use for commercial purposes (including small offices).
Customer Service
At Briel´s authorized customer services.
Consult the list of authorized service centers provided with the appliance.
* The Guarantee períod is valid only for the European Comunity. For more information contact the Briel´s local dealer
or the place of purchase.
10. GUARANTEE
29
Page 13
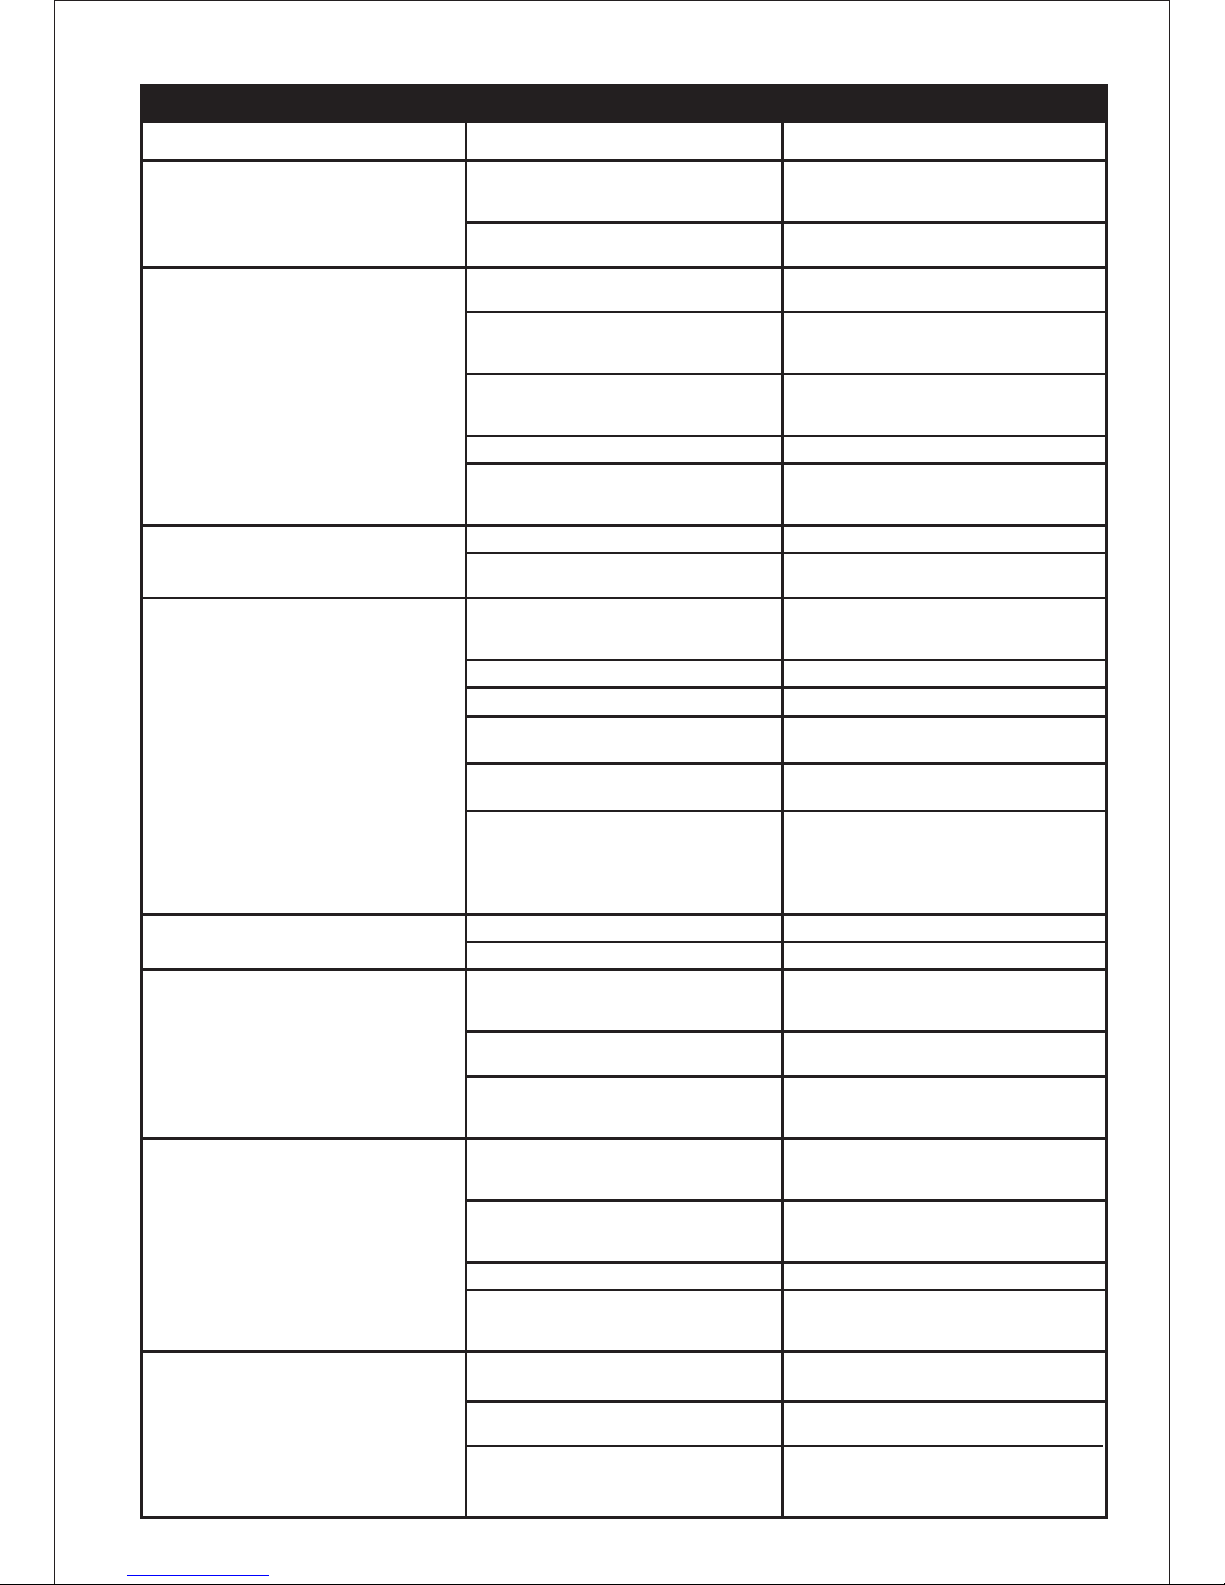
11. TROUBLESHOOTING
Possible Causes SolutionProblems
· The coffee has little or unpleasant
taste;
· The ground coffee may be stale or too
acid;
· Try another brand;
· Always use freshly-ground coffee and
keep it in the fridge;
· Your tap water may be of bad quality
or contain chloride;
· Use filtered water or bottled water;
· There is little or no creamy top; The
cream is too bright or fine;
· Coffee flows to rapidly;
· Coffee may be stale; · Always use freshly-ground coffee and
keep it in the fridge;
· Try a finer grind for espresso;
· Adjust the grinder level to a finer grind
(between level 2 and 3);
· Very coarse grind;
· Your coffee dose has less than 7 grams;· Increase the amount of coffee;
· Use the measuring spoon (1 spoon for
each cup);
· Tamp the coffee a bit more;· Little pressure tamping the coffee;
· Clean and tighten the screw of the
filter;
· Replace the filter;
· Cremaker filter is not well adjusted;
· Water flows instead of coffee; · The pod is not correctly placed; · Center the pod in the filter;
· The filter is not adequate for pods or
not able to use pods;
· Use the Cremakerfilter for one dose
(for pods or 1 cup ground coffee);
· The coffee flows over the sides of the
filter holder;
· Too much coffee in the filter, more
than 7 grams;
· Reduce the amount of coffee;
· Use the measuring spoon (1 spoon for
each cup);
· Gently tamp the coffee;· You tamped the coffee too hard;
Pod incorrectly placed;
· ·
Center the pod in the filter;
·
·
Tighten the filter-holder;
The filter-holder is not correctly
placed in the machine;
·
There are coffee remaining in the
·
brew-head;
Clean the brew-head;
·
Cremaker filter or filter-holder are
·
obstructed;
Clean and unscrew the screw in the
Cremaker filter;
·
Replace the filter *;
·
Clean the filter-holder;
·
Replace the filter-holder *;
· Water drops from the steam nozzle; · Steam control is opened; · Close steam control;
· Replace steam control *;
· Steam control is worn;
· There are coffee grounds in the cup. · You are using a very fine grind; · Try another coffee brand for espresso;
· Adjust the grinder level to a coarser
grind (between level 2 and 3);
· Clean the filter-holder with tap water;· There are coffee remaining in the
filter-holder;
· Cremaker filter is damaged / holes
are very large;
· Clean and tighten the screw of the
filter;
· Replace the filter *;
· Try another coffee brand for espresso;
· Adjust the grinder level to a coarser
grind (between level 2 and 3);
· You are using a very fine grind;· The coffee tastes burned;
· Use a smaller amount of coffee;
· Use the measuring spoon (1 spoon for
each cup);
· There is too much coffee in the filter,
more than 7 grams;
30
· You tamped the coffee too hard; · Gently tamp the coffee;
· The temperature of the water may be
too high;
· Proceed as if you were about to prepare
a coffee using no coffee;
· Verify / replace the thermostat *;
· The cups are not filled equally;
· One cup fills faster than the other;
· The ground coffee has not been evenly
spread in the filter;
· Gently tamp the coffee;
· Filter-holder is not clean or is
obstructed;
· Too much coffee in the filter, more
than 7 grams;
· Verify / clean filter-holder;
· Replace the filter-holder *;
· Reduce the amount of coffee;
· Use the measuring spoon (1 spoon for
each cup);
Page 14
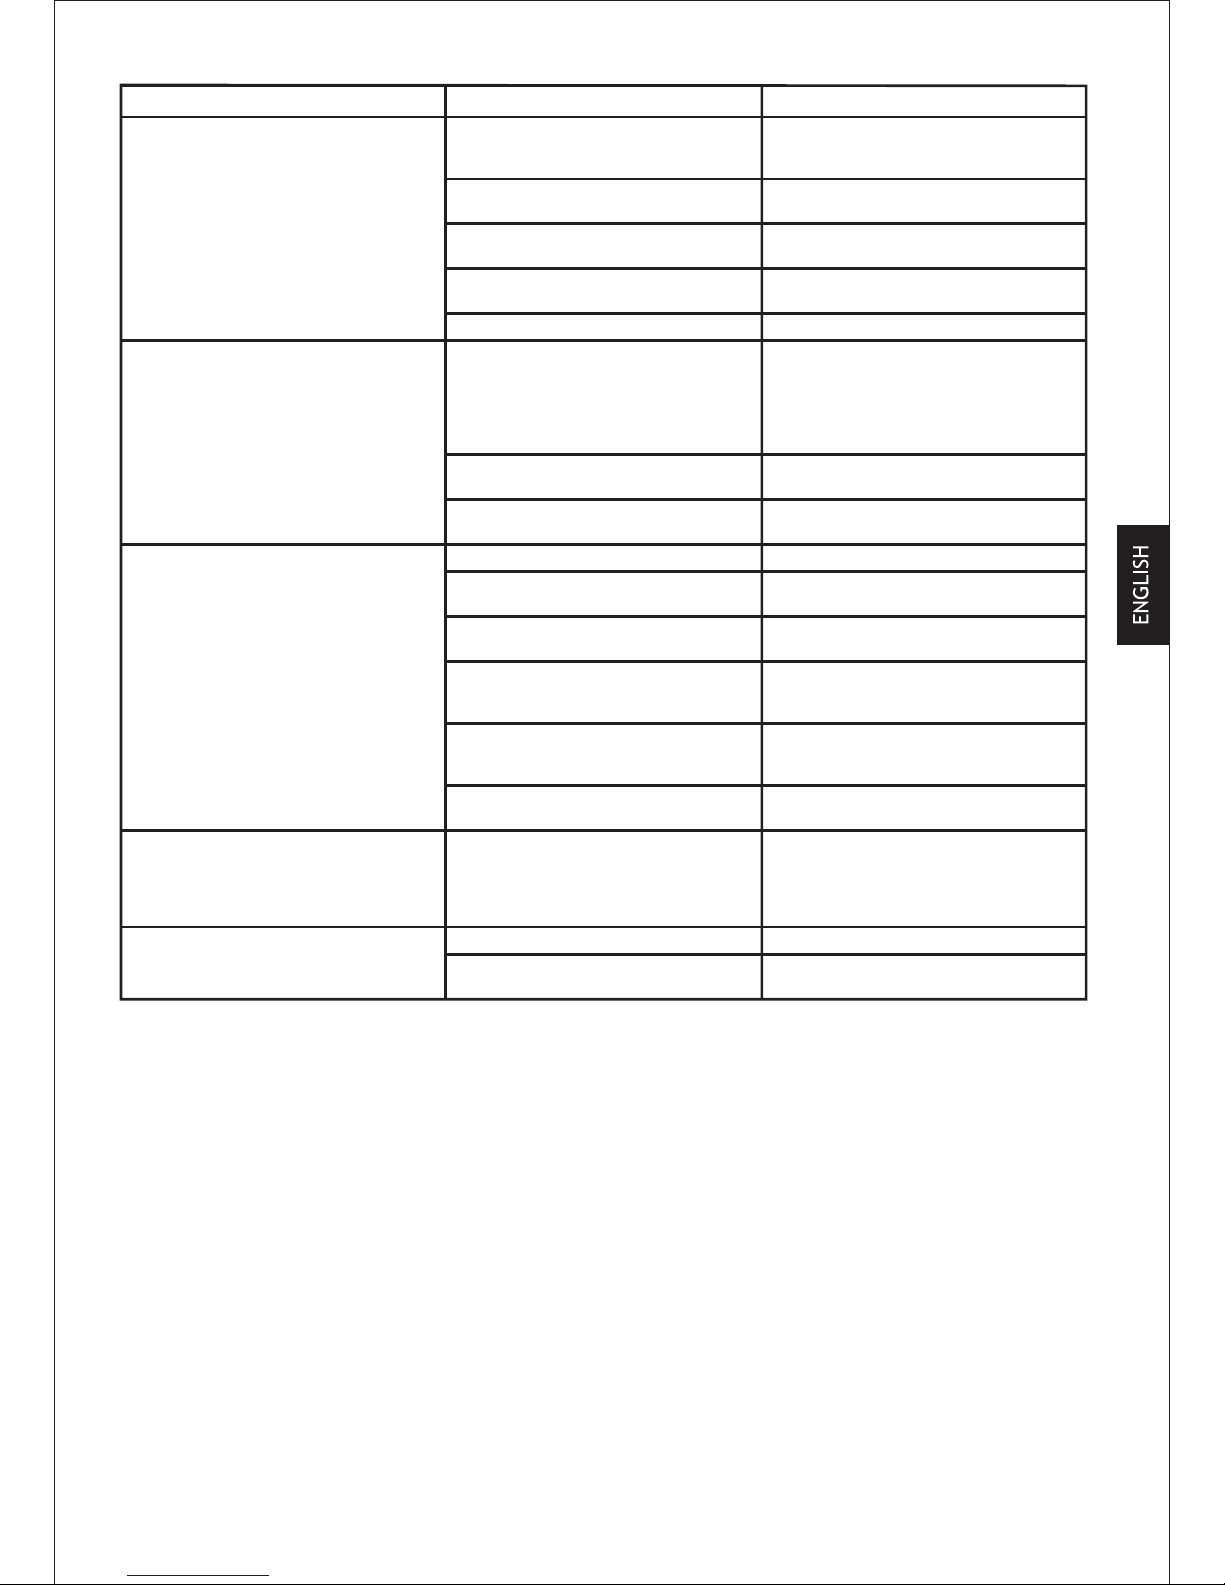
31
* This must be done in an authorized service facility only.
Possible Causes SolutionProblems
· The Espresso flows too slowly or not at
all.
· Very fine grind; · Try another coffee brand for espresso;
· Adjust the grinder level to a coarser
grind (between level 2 and 3);
· There are coffee remaining in the
brew-head;
· Clean the brew-head;
· Descale the machine as described in
the instructions manual;
· There is calcareous in the machine;
· Check out if the water tank is filled
and correctly placed;
· There is no water flow and the pump
is abnormally noisy;
· Verify pressure / replace pump *;· Insufficient pressure
· The coffee is not hot enough; · The machine has not pre-heated
enough time;
· Verify the temperature lamp;
· Place the filter-holder without coffee
in the machine as it pre-heats, so that
the filter-holder can also heat;
· Allow some water to flow through the
filter-holder, so that it can get warm;
· Cold cups · Pre-heat the cups with the steam
nozzle;
· Verify / replace thermostat *;
· Verify / replace resistance *;
· Low temperature water flows from
the brew-head;
· Clean the steam nozzle;· You cannot froth the milk. · The nozzle is obstructed;
· Use a tall, narrow container, preferably
metal.
· Inadequate recipient;
· Inadequate milk; · Use cold whole milk, preferably low
fat milk;
· This is a normal procedure;
· Allow water to flow and place the
recipient only as steam starts;
· Waters flows before steam;
· No steam; · Press the steam button (when
applicable) until the temperature lamp
lights;
· Verify / replace thermostat *;
· Verify / replace resistance *;
· The boiler does heat when you press
the steam button;
· Wait for 15 seconds before removing
the filter-holder;
· When removing the filter-holder, make
some lateral pressure to let the filter
or pod fall;
· You did not wait for 15 seconds before
removing the filter-holder;
· The pod or the filter are gripped in the
machine;
· Check the connections;· The machine is not working at all; · Incomplete connections;
· The machine ran out of water and the
safety system has been triggered;
· Wait 30 min. before using the machine
again;
Page 15
·
3.
ИНСТРУКЦИИ ОТНОСНО ЗАХРАНВАЩИЯ КАБЕЛ:
4.
ПОДГОТОВКА НА КАФЕМАШИНАТА
42
Page 16
5.
ПРИГОТВЯНЕ НА ЕСПРЕСО :
43
Page 17
44
6.
ПРИГОТВЯНЕ НА КАПУЧИНО:
Page 18
45
7.
ПРИГОТВЯНЕ НА ЧАЙ
8.
ПОЧИСТВАНЕ НА МАШИНАТА
Page 19
46
9. ТЕХНОЛОГИИ НА BRIEL
10. СЕРВИЗ
Page 20
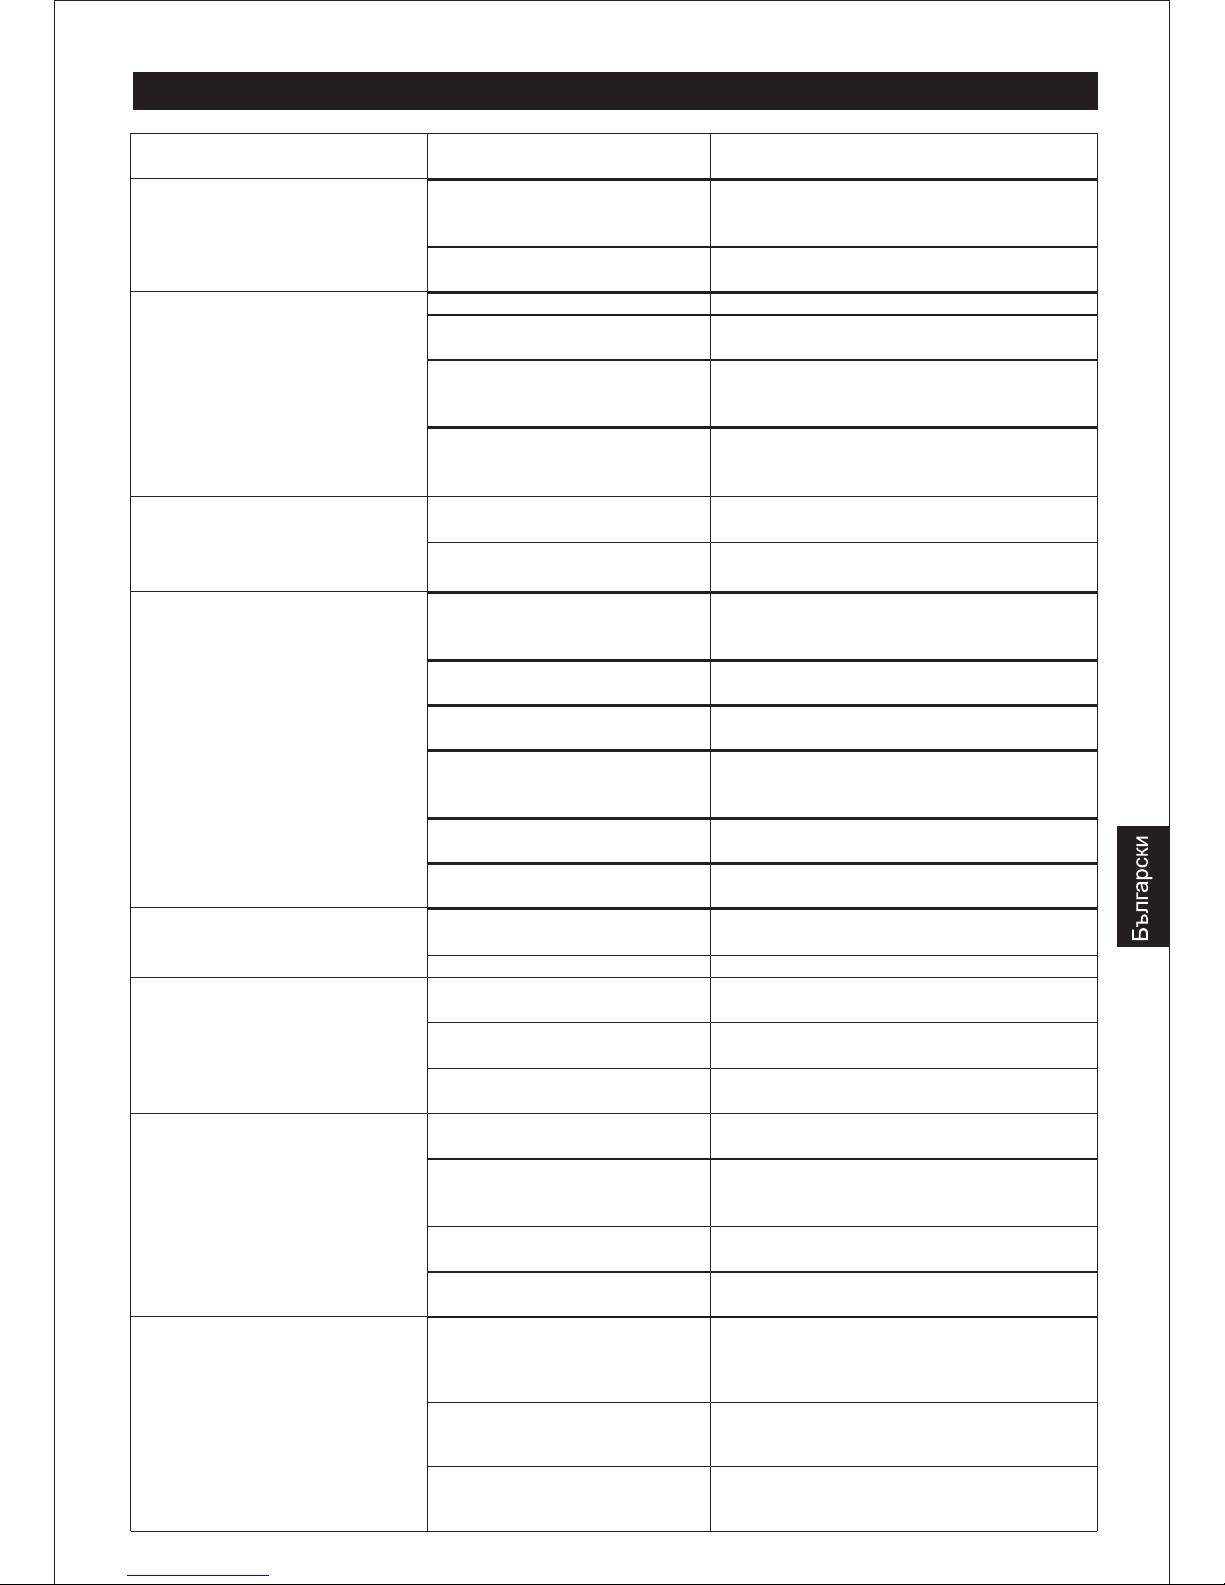
11.
11.КАК ДА ДАЕИСТВАМЕ ПРИ ВЪЗНИКНАЛ ПРОБЛЕМ
ПРОБЛЕМ
ВЪЗМОЖНА ПРИЧИНА РЕШЕНИЕ
Кафето е малко или с
неприятен вкус
Кафето което ползвате е с повисока киселинност
Try another brand;
Always use freshly-ground coffee and keep it
in the fridge;
Водата от чешмата с с
повишено съдържание на хлор
Изпозваите филтрирана или бутилирана
вода
Кафето е с много малко и много
светъл каймак;
Кафето изтича прекалено
бързо;
Кафето е старо Винаги използвайте прясно смляно кафе ;
Кафето е много едро смляно; Опитайте с по-фино смляно кафе
Сложили сте малко
количество кафе;
Увеличете количеството
Използвайте мерителната лъжичка(1
лъжичка, за една чаша кафе)
Cremaker филтъра не е добре
поставен;
Clean and tighten the screw of the filter;
Replace the filter;
Тече вода, вместо кафе; Кафе капсулата не е правилно
поставена;
Поставете правилно;
Не използвате правилния
филтър;
Използваите правилния филтър;
Кафе тече отстрани на държача
на филтъра;
Поставили сте количество
кафе, по-голямо от
необходимото.;
Намалете количеството
Използвайте мерителната лъжичка(1
лъжичка, за една чаша кафе)
Натъпкали сте кафето повече
от необходимото;
Правете го по-внимателно;
Кафе капсулата не е правилно
поставена;
Поставете правилно;
Не използвате правилния
филтър;
Затегнете държача на филтъра
Има остатъци от кафе по
главата;
Почистете;
Cremaker филтъра не е добре
поставен
Поставете добре или се обърнете към
оторизиран сервиз
Капе вода от накрайника за
капучино;
Копчето за пара не е
изключено;
Изключете;
Копчето за пара е износено; Обърнете към оторизиран сервиз;
Има частици кафе в чашата. Използвате много ситно
смляно кафе;
Опитайте с друга марка кафе;
Използвайте по-едро смляно кафе
Останало е кафе в държача на
филтъра;
Почистете го;
Cremaker филтъра е повреден Почистете и затегнете винта на филтъра;
Обърнете към оторизиран сервиз;
Кафето е с вкус на прегоряло; Използвате много ситно
смляно кафе;
Опитайте с друга марка кафе;
Използвайте по-едро смляно кафе
Поставили сте количество
кафе, по-голямо от
необходимото;
Намалете количеството
Използвайте мерителната лъжичка(1
лъжичка, за една чаша кафе)
Натъпкали сте кафето повече
от необходимото;
Правете го по-внимателно;
Температурата на водата е
прекалено висока
Обърнете към оторизиран сервиз- имате
проблем с термостата.
Äíàòà ÷àøà ñå ïúëíè ïî-áúðçî
îò äðóãàòà;
Êàôåòî íå å äîáðå
ðàçïðåäåëåíî âúâ ôèëòúðà;
Íàòúïêàéòå ãî âíèìàòåëíî;
Ôèëòúðà å çàïóøåí; Ïî÷èñòåòå;
Îáúðíåòå êúì îòîðèçèðàí ñåðâèç- èìàòå
ïðîáëåì ñ ðúêîõâàòêàòà;
Ïîñòàâèëè ñòå êîëè÷åñòâî
êàôå, ïî-ãîëÿìî îò
Íàìàëåòå êîëè÷åñòâîòî
Èçïîëçâàéòå ìåðèòåëíàòà ëúæè÷êà(1
47
Дната чаша се пълни по-бързо
от другата;
Кафето не е добре
разпределено във филтъра;
Натъпкайте го внимателно;
Филтъра е запушен; Почистете;
Обърнете към оторизиран сервиз- имате
проблем с ръкохватката;
Поставили сте количество
кафе, по-голямо от
необходимото;
Намалете количеството
Използвайте мерителната лъжичка(1
лъжичка, за една чаша кафе)
Page 21
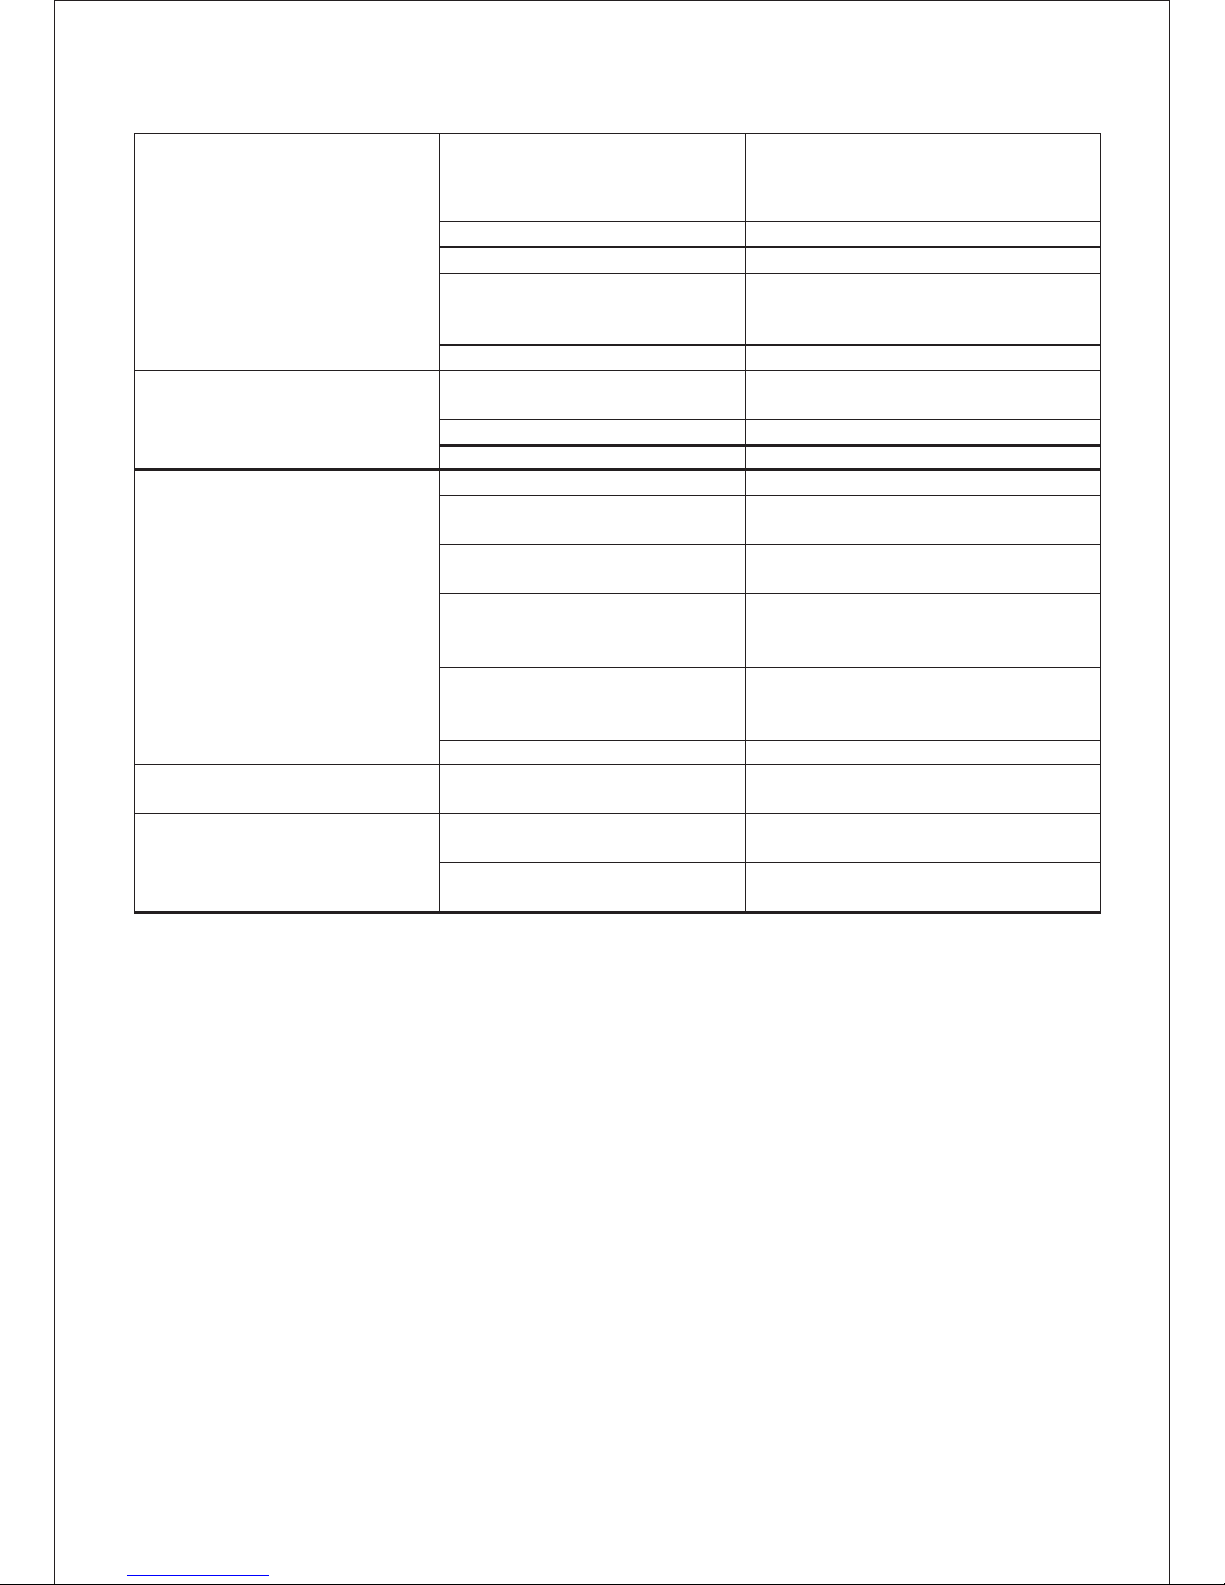
Кафето тече много бавно или
изобщо не потича
Използвате много ситно смляно
кафе;
Намалете количеството
Използвайте мерителната лъжичка(1
лъжичка, за една чаша кафе)
Има остатъци кафе в главата; Почистете;
Нтрупал се е варовик в главата; Почистете;
Не досига вода до помпата и тя
работи много шумно;
Проверете дали има вода жъж
резервоара и дали той е пражилно
поставен;
Недостатъчно налягане Обърнете се към оторизиран сервиз
Кафето е хладко
Машната не е загряла
достатъчно преди употреба;
Проверете лампата на датчика;
Използвате студени чаши Затоплете ги с пара ;
Изтича студена вода от главата; Обърнете се към оторизиран сервиз
Не мога да правя мляко на пяна. Накрайника е задръстен; Почистете;
Използвате неподходящ съд; Позвайте висок, тесен съд, за
предпочитане метален;
Използвате неподходящо мляко Ползвайте студено, за предпочитане с
ниска масленост;
Изтича вода преди парата; Tова е нормално. Изчакайте водата да
спре и да запояне да излиза пара.
Тогава сложете съда под накрайника;
Не излиза пара; Натиснете бутона за пара ( там където
има такъв ), докато индикатора за
температура светне;
Боилера не загрява водата Обърнете се към оторизиран сервиз
Използваното кафе остава по
главата на машината;
Не сте изчакали 15 секунди,
преди да махнете ръкохватката;
Следващия път го направете;
Машината не работи; Имате проблем със
захранването;
Проветрете;
Машината е останала без вода; Изчакаите 30 минути, преди отново да
позвате машината.
48
Page 22
Page 23
Page 24
Page 25
EL769D02 Classic Series
FAP - Indústria de Electrodomésticos S.A.
MAIA - Portugal
www.fapindustria.pt
 Loading...