

Fantini Cosmi CH180RFWIFI Instructions For Use Manual
INSTRUCTIONS FOR USE
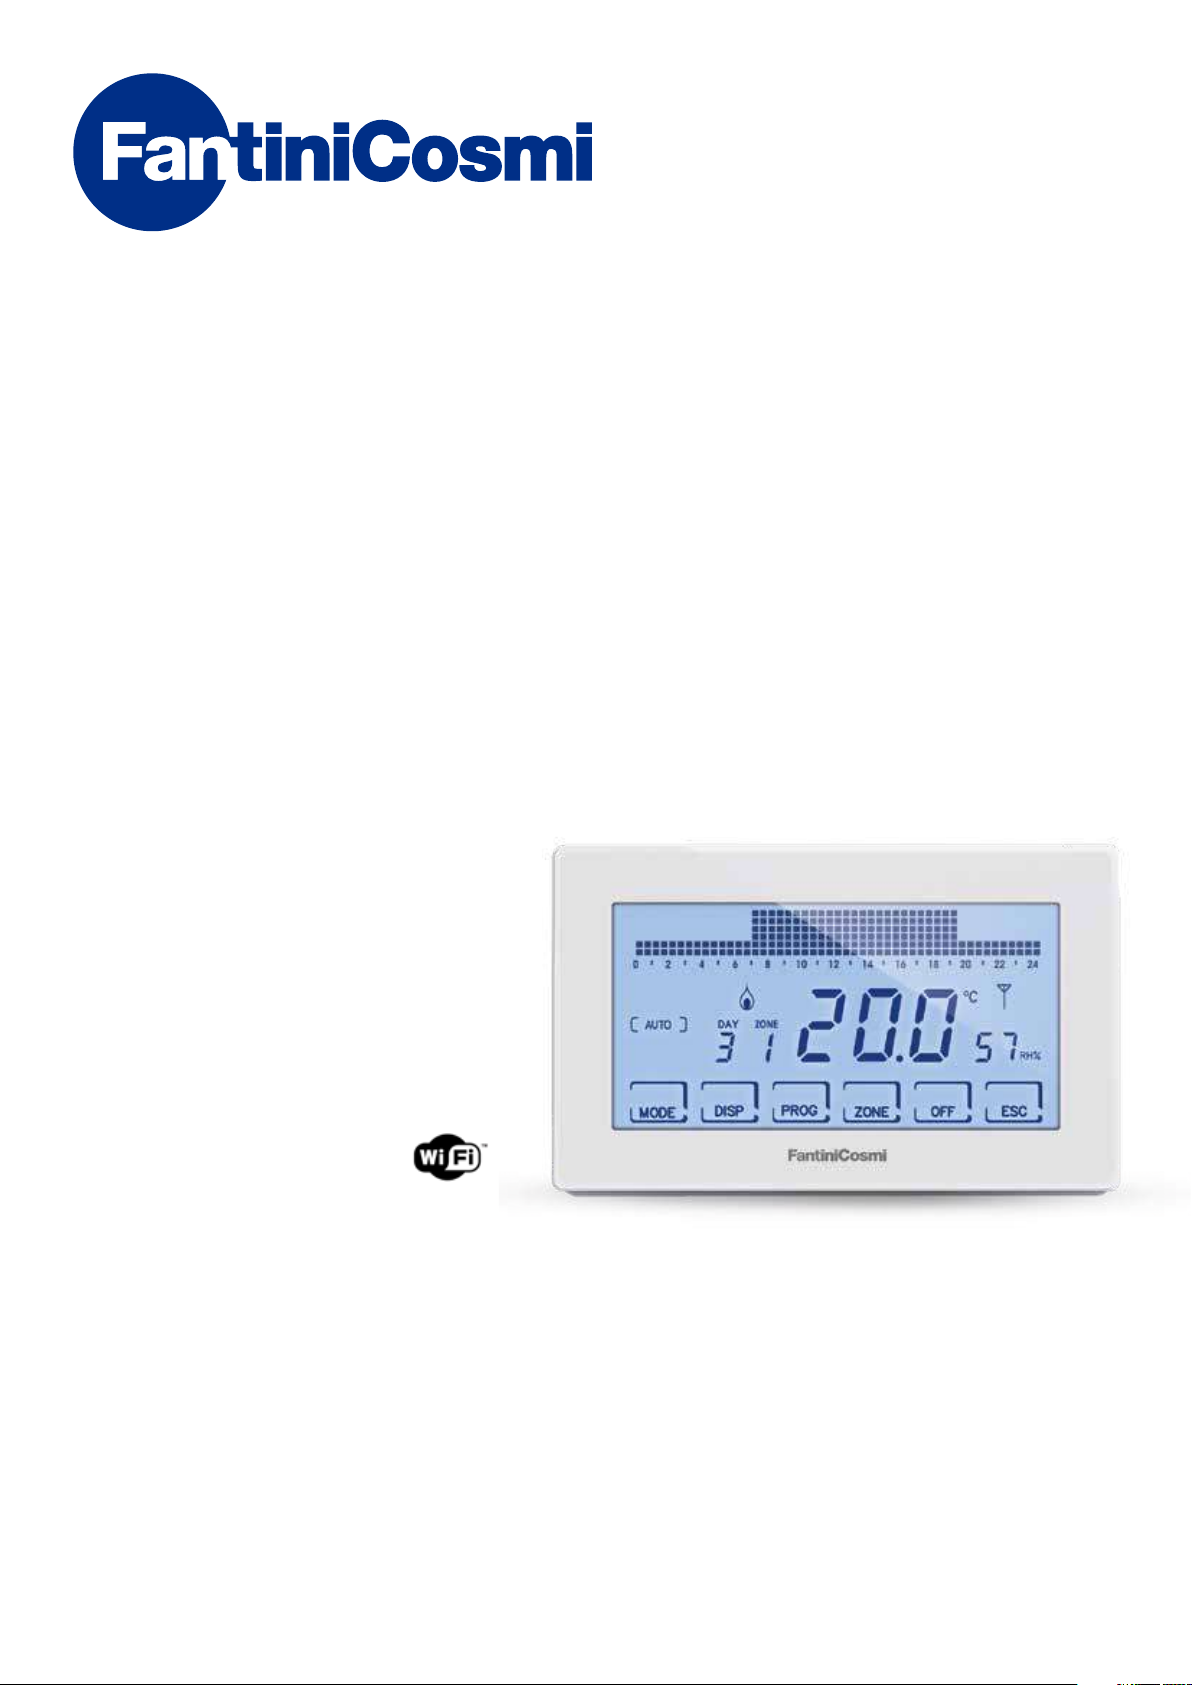
CH180RFWIFI
WIRELESS TOUCHSCREEN
PROGRAMMABLE THERMOSTAT
WITH WIFI CONNECTION
FANTINI COSMI S.p.A.
Via dell’Osio, 6 20090 Caleppio di Settala, Milano - ITALY
Tel. +39 02 956821 | Fax +39 02 95307006 | info@fantinicosmi.it
www.fantinicosmi.it
CH180RFWIFI
Thank you for purchasing a FANTINI COSMI S.p.A. product.
Read this instructions manual carefully and always keep it handy for any consultation.
This documentation reflects the specific product features; however, due to regulatory or commercial
developments, customers are advised to check for the availability of updates to this documentation on the website
FANTINI COSMI S.p.A. : pdf.fantinicosmi.it
WIRELESS TOUCHSCREEN PROGRAMMABLE THERMOSTAT WITH WIFI CONNECTION
OPERATION
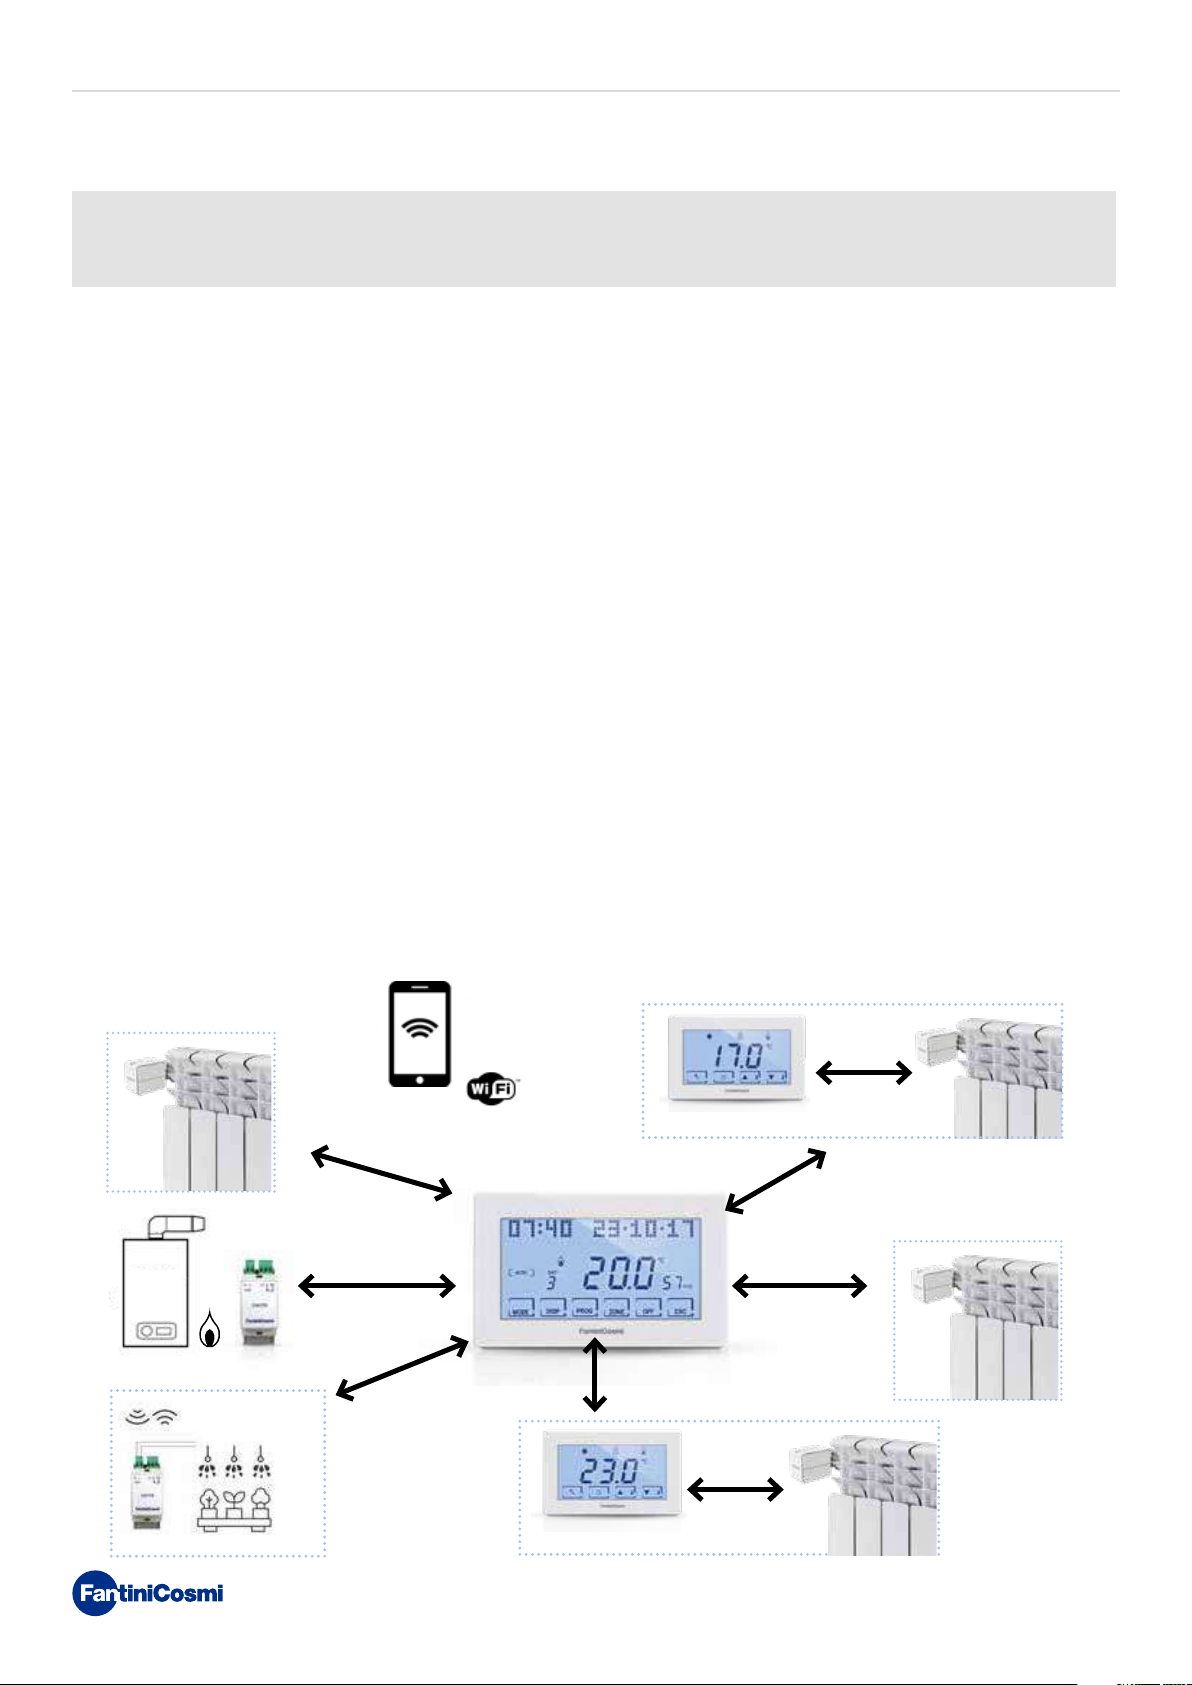
The CH180RFWIFI is a programmable thermostat with WiFi connection for direct control or control through APP
Intelliclima + for Smartphones and Tablets of the wireless multi-zone temperature control system.
It monitors the various zones in the home, communicating with the CH120RF room thermostats and the O60RF wireless
radiator actuators, with the CH175 boiler actuators or zone solenoid valve.
This system uses a program that allows you to set and edit as needed the temperature, humidity and time profiles for
each zone.
It is equipped with a room temperature and humidity sensor, also performing the function of a zone heating, cooling and
humidity control, commanding the O60RF and CH175 actuators.
It can also manage an auxiliary electrical device (for example an irrigation, ventilation, curtain, etc. system) with ON/OFF
control through an outside CH175.
It has an internal configurable relay and users can view the energy consumption of the entire system via the intuitive
graphics on its white backlit, positive LCD touchscreen.
CH180RFWIFI can communicate directly with 15 wireless devices (thermostats, actuators) and can manage up to 8 zones.
In total, the network can be connected to a maximum of 114 devices.
NOTE: wireless transmission toward other devices occurs maximum within 2 minutes.
MULTI-ZONE SYSTEM
The multi-zone system allows users to manage different temperature and humidity levels within the same home.
The values of each zone are set on the master CH180RFWIFI and modified locally by one or more devices installed inside
the rooms. Communication between all the devices occurs via radio waves.
Zona 2
Zona 1
O60RFCH120RF
O60RF
CH175
CH180RFWIFI Master
Zona 3
O60RF
Zona 4...8
O60RFCH120RF
2
CH180RFWIFI
Once powered, the “MASTER” CH180RFWIFI must be included in the Intellicomfort+ system wireless network. This
operation requires use of the configurator (code 1590880) which provides the operating instructions through its display.
When requested by the message on the display, you must move the tip of the configurator toward the point indicated on
the device to be configured to perform touch recognition.
For further details, please see the Intellicomfort+ system installation manual.
WIRELESS TOUCHSCREEN PROGRAMMABLE THERMOSTAT WITH WIFI CONNECTION
CH180RF
CH120RF
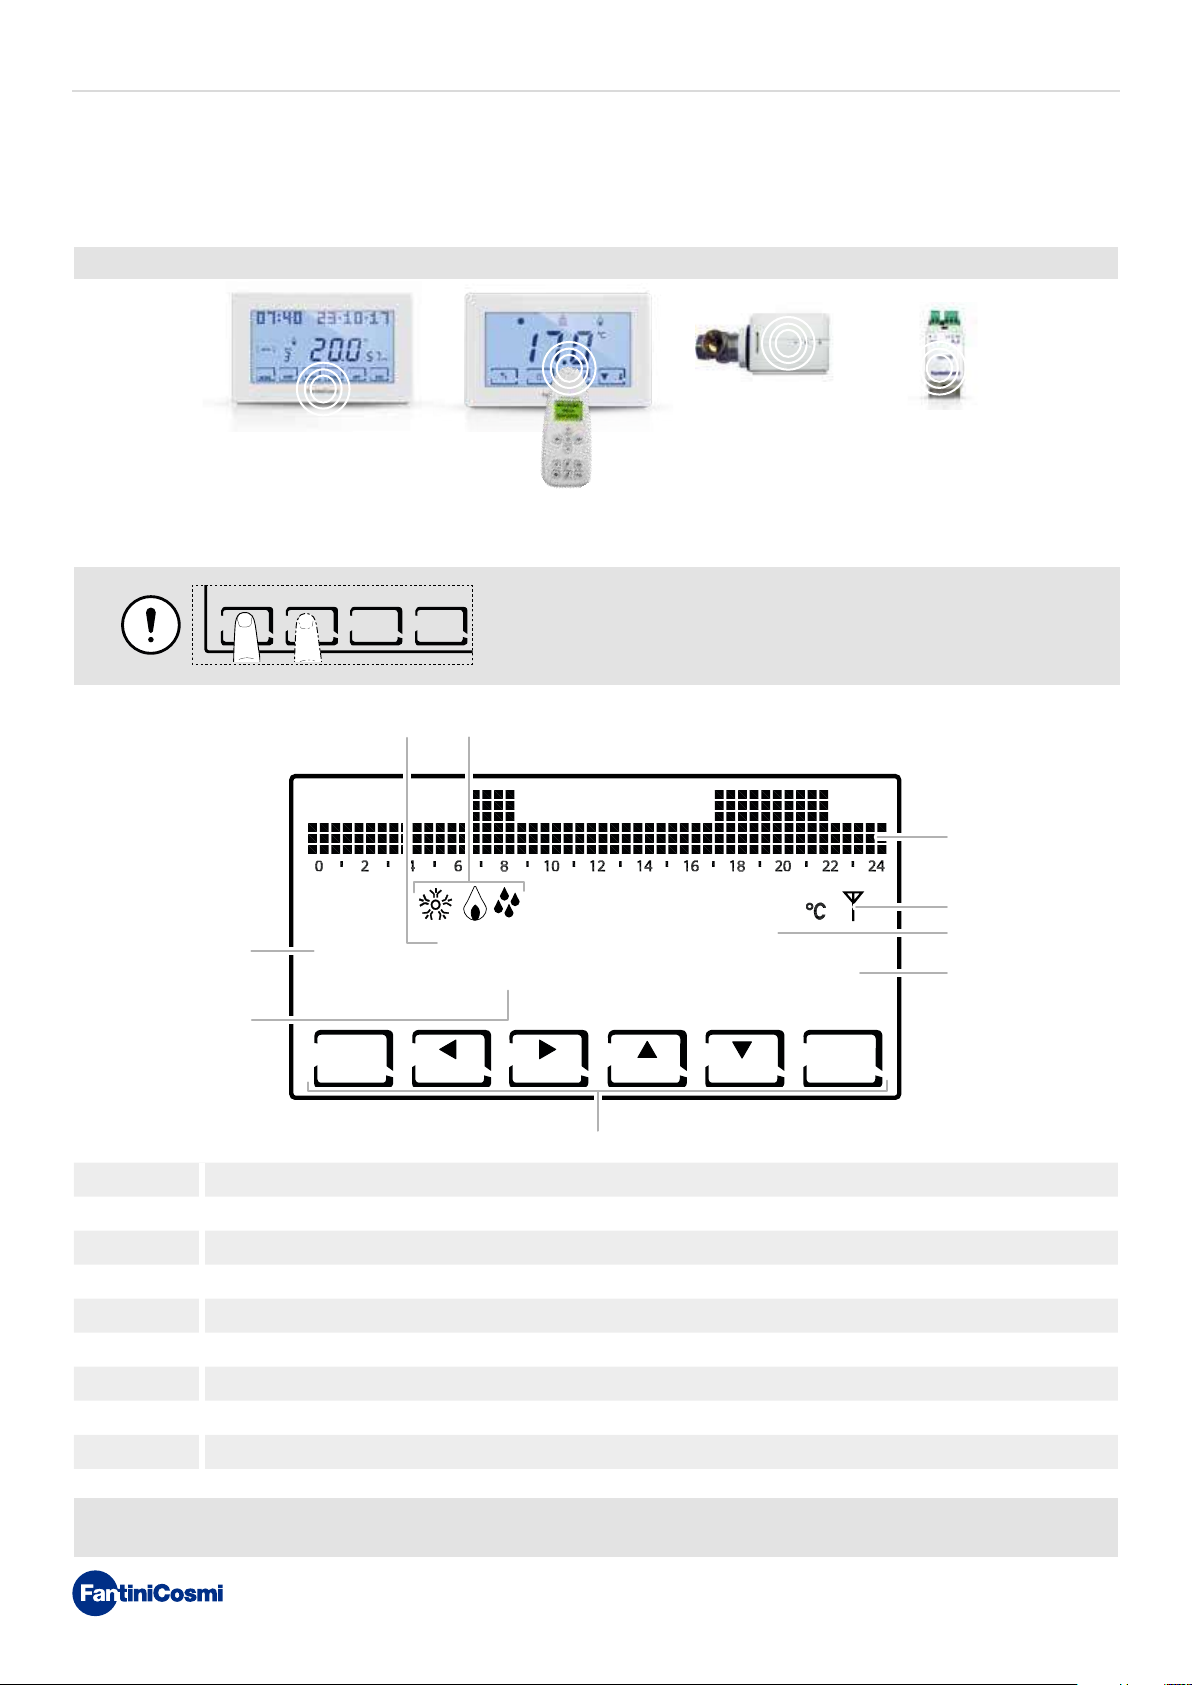
DESCRIPTION OF DISPLAY KEYS
1
[ HOLIDAY ]
[ JOLLY ]
8
7
[ AUTO ]
[ MAN ]
[ OFF ]
OK COPY
MODE
2
DAY
1
DISP
CH160RF CH120RF
1590880
The first press of any touch button allows you to activate the
functions of the buttons themselves and to light up the display.
3
9
ZONE
1
23.0
PROG
ZONE OFF
36
ESC
RH%
4
5
6
1 Day of the week
2 Activation status: heating, cooling or dehumidification
3 Bar graph for viewing messages and daily programming
4 Measured room temperature (Celsius/Fahrenheit)
5 Measured humidity
6 Multi-function touch icons
7 Zone
8 Operating mode
9 Various faults icon
The function of the multi-function keys varies depending on the situation and is described by the symbol which appears
on the display near the key itself.
3

CH180RFWIFI
WIRELESS TOUCHSCREEN PROGRAMMABLE THERMOSTAT WITH WIFI CONNECTION
TECHNICAL FEATURES
Temperature adjustment scale 2 - 40°C, increase 0.1°C
Measurement scale/room T display - 50 - + 50°C
Relative humidity adjustment scale 30 - 70%, increase 0.1°C
Measurement scale/room relative humidity display 0 - 100%, increase 1%
Power supply 230V 50 Hz
Type of output
Relay contact range 5(3)A 250 Vca
Type of action 1BU (micro connection)
Software class A
Minimum adjusting differential 0.3 - 5 K
Thermal gradient of reference 4 K/h
Maximum room temperature 45°C
Storage temperature -10°C - +60°C
WIFI connection 2.4 GHz (802.11 b/g/n)
Router communication port 1080
Transmission and reception frequency 868 MHz
Maximum radio frequency power transmitted < 10 mW
Electric insulation Double insulation
Protection rating IP40
Pollution rating 2
Pulse voltage 4000V
Wall or recessed mounting
1 relay with potential-free change-over contact (COM/NA/NC)
3 screw terminals (closed + open)
Dimensions 127 x 82 x 24 mm
Compliant with standards
ErP classification
■ EN 60730-1 and second parts
■ Directive 2014/53/EU (RED)
■ ErP Class IV; 2%
[Reg. EU 811/2013 - 813/2013]
■ Class VIII; 5% when used with O60RF actuators to
create three or more heating zones.
PACKAGE CONTENTS
■ 1 programmable thermostat
■ 2 screws for fixing on recessed mounting box 503 with American pipe thread 6/32UNC (approx. Ø 3.5mm)
■ 1 quick guide
4

CH180RFWIFI
Summary
WIRELESS TOUCHSCREEN PROGRAMMABLE THERMOSTAT WITH WIFI CONNECTION
OPERATION ..................................................................... 2
MULTI-ZONE SYSTEM ...................................................... 2
DESCRIPTION OF DISPLAY KEYS .................................... 3
TECHNICAL FEATURES ................................................... 4
PACKAGE CONTENTS ...................................................... 4
1 - INSTALLATION ........................................................... 6
2 - ELECTRICAL CONNECTION ........................................ 8
3 - QUICK GUIDE FOR PROGRAMMING (PROG) ............... 9
3.1 - DATE AND TIME SETTING ....................................................9
3.2 - WINTER/SUMMER SETTING ..............................................10
3.3 - HOURLY PROGRAMMING SETTING (PROFILE) ..................10
3.4 - AUX1 SETTING ....................................................................12
3.5 - SETTING KEYBOARD LOCK WITH PASSWORD ..................12
4 - OPERATION (MODE) ................................................. 14
4.1 - OPERATING PROGRAMS ....................................................14
4.2 - SELECTING THE OPERATING PROGRAM...........................15
4.3 - SETTING “AUTO” PROGRAM ..............................................16
4.4 - SETTING GENERAL “JOLLY” PROGRAM ............................17
4.5 - SETTING ZONE “JOLLY” PROGRAM ...................................17
4.6 - SETTING “AUTO” and “HOLIDAY” PROGRAM
TEMPERATURE ...........................................................................18
4.7 - SETTING “MANUAL” and “JOLLY” PROGRAM TEMPERATURE
..18
5 - DISPLAYING PARAMETERS (DISP) ........................... 19
5.1 - SEASON ..............................................................................19
5.2 - EXTERNAL PROBE .............................................................19
5.3 - HOURS OF USE ...................................................................20
5.4 - WIFI STATUS .......................................................................21
5.6 - RSSI ....................................................................................22
5.5 - SERIAL NUMBER ................................................................22
5.7 - FAULTS ...............................................................................23
7 - ADVANCED FUNCTIONS (PROG) .............................. 24
7.1 - DISPLAY ON TIME ...............................................................24
7.2 - DISPLAY INTENSITY ...........................................................24
7.3 - DAYLIGHT SAVINGS TIME ...................................................25
7.4 - ANTIFREEZE TEMPERATURE ............................................25
7.5 - RELATIVE HUMIDITY ...........................................................26
7.6 - RELAY FUNCTION ...............................................................26
7.7 - ZONE NAMES......................................................................27
7.8 - OFFSET ...............................................................................28
7.9 - DIFFERENTIAL MANAGEMENT ..........................................28
7.10 - CELSIUS / FAHRENHEIT...................................................29
7.11 - LANGUAGE .......................................................................29
7.12 - EXTERNAL PROBE ...........................................................30
7.13 - COOL OFF .........................................................................31
7.14 - AUX1 ..................................................................................32
7.15 - ZONE DEU .........................................................................33
7.16 - WIFI ...................................................................................34
7.17 - INFORMATION ..................................................................35
7.18 - RESETTING DEFAULT PARAMETERS ...............................35
8 - REMOTE PROGRAMMING VIA APP ........................... 36
8.1 - WIFI ACTIVATION ................................................................36
8.2 - INSTALLATION PROCEDURE .............................................37
8.3 - CONNECTION PROBLEMS .................................................38
9 - DISPOSAL ................................................................. 39
10 - GENERAL WARRANTY CONDITIONS ..................... 39
6 - LOCK FOR SCREEN CLEANING (ESC) ...................... 23
5
CH180RFWIFI
WIRELESS TOUCHSCREEN PROGRAMMABLE THERMOSTAT WITH WIFI CONNECTION
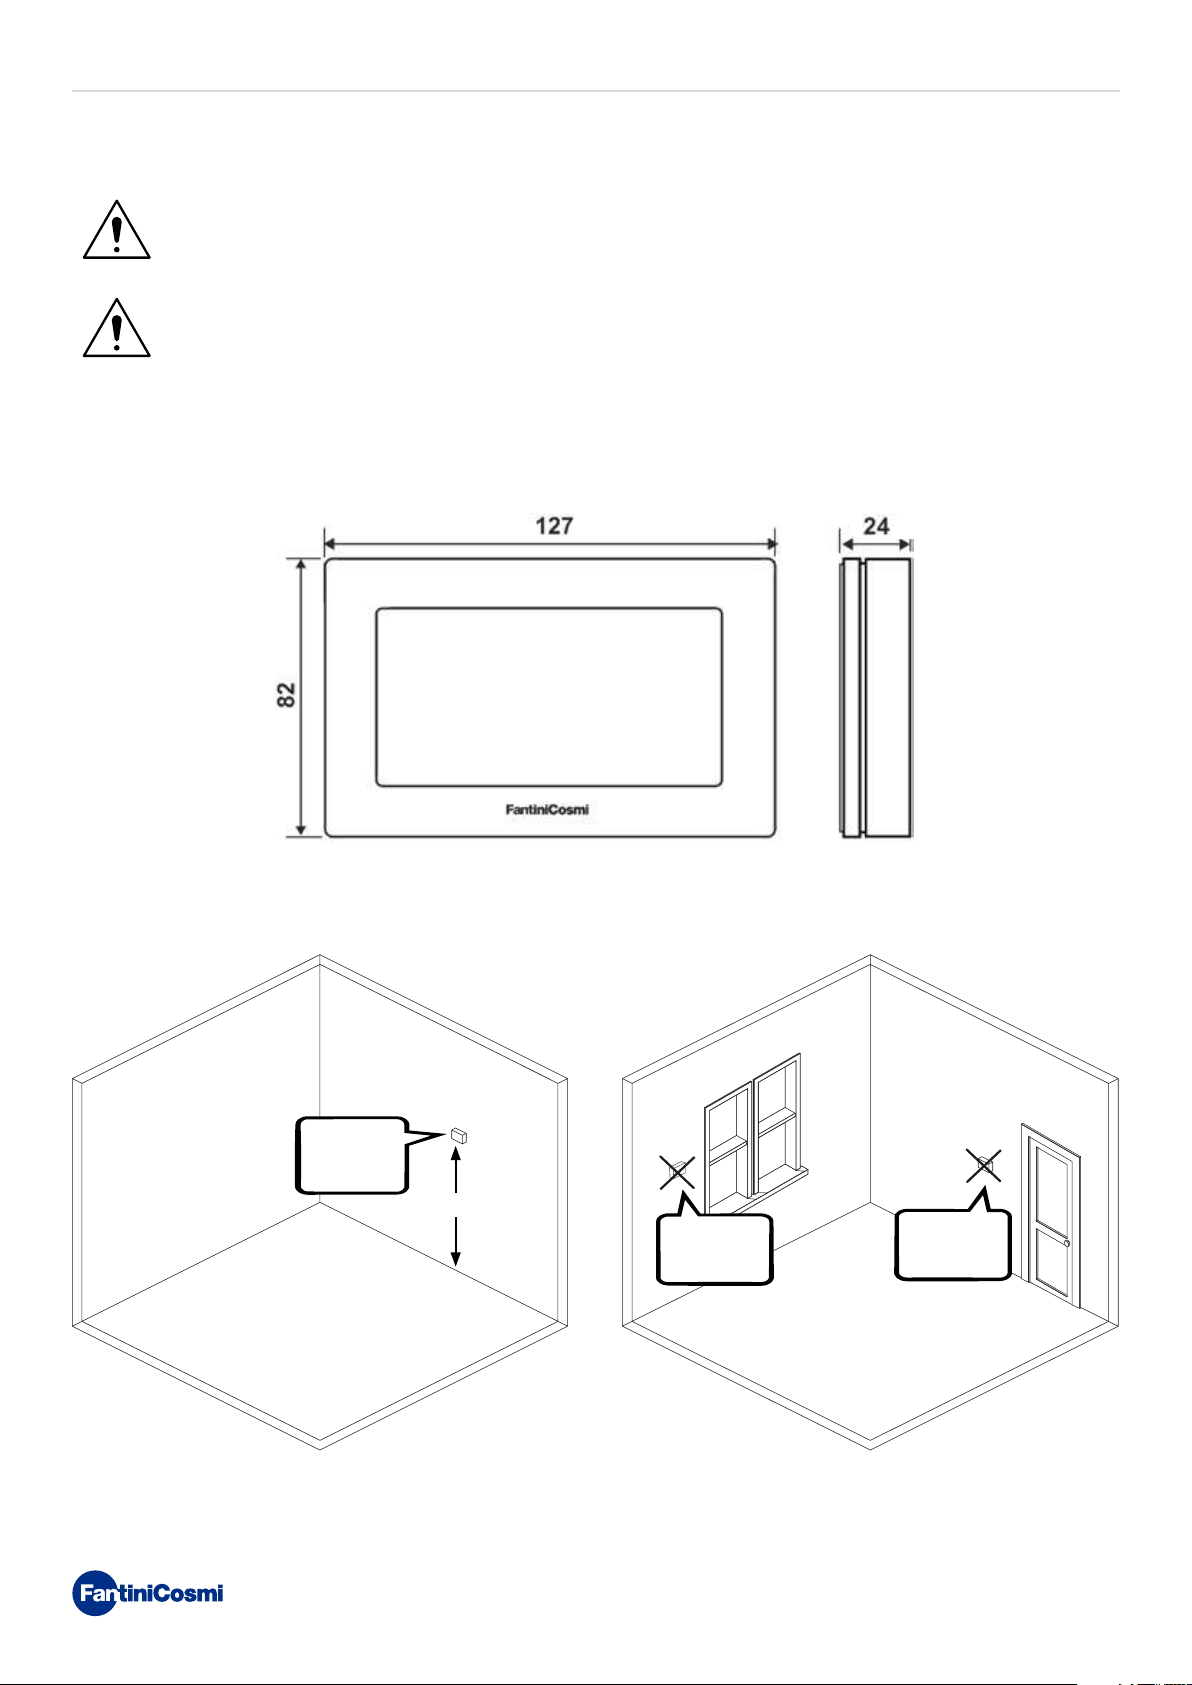
1 - INSTALLATION
ATTENTION!
Installation must be carried out by qualified personnel in compliance with the requirements concerning
installation of electrical devices.
ATTENTION!
Make sure that the power supply is disconnected before performing installation.
The CH180RFWIFI programmable thermostat must be wall or recess mounted, with 3 modules or round box, at a height
of about 1.5 m from the floor, in a position suitable to correctly detect the room temperature.
mm mm
mm
OK
1.5 m
NO
NO
6
LN 21 4
230V~
5(3)A 250v~
T45
CH180RFWIFI
WIRELESS TOUCHSCREEN PROGRAMMABLE THERMOSTAT WITH WIFI CONNECTION
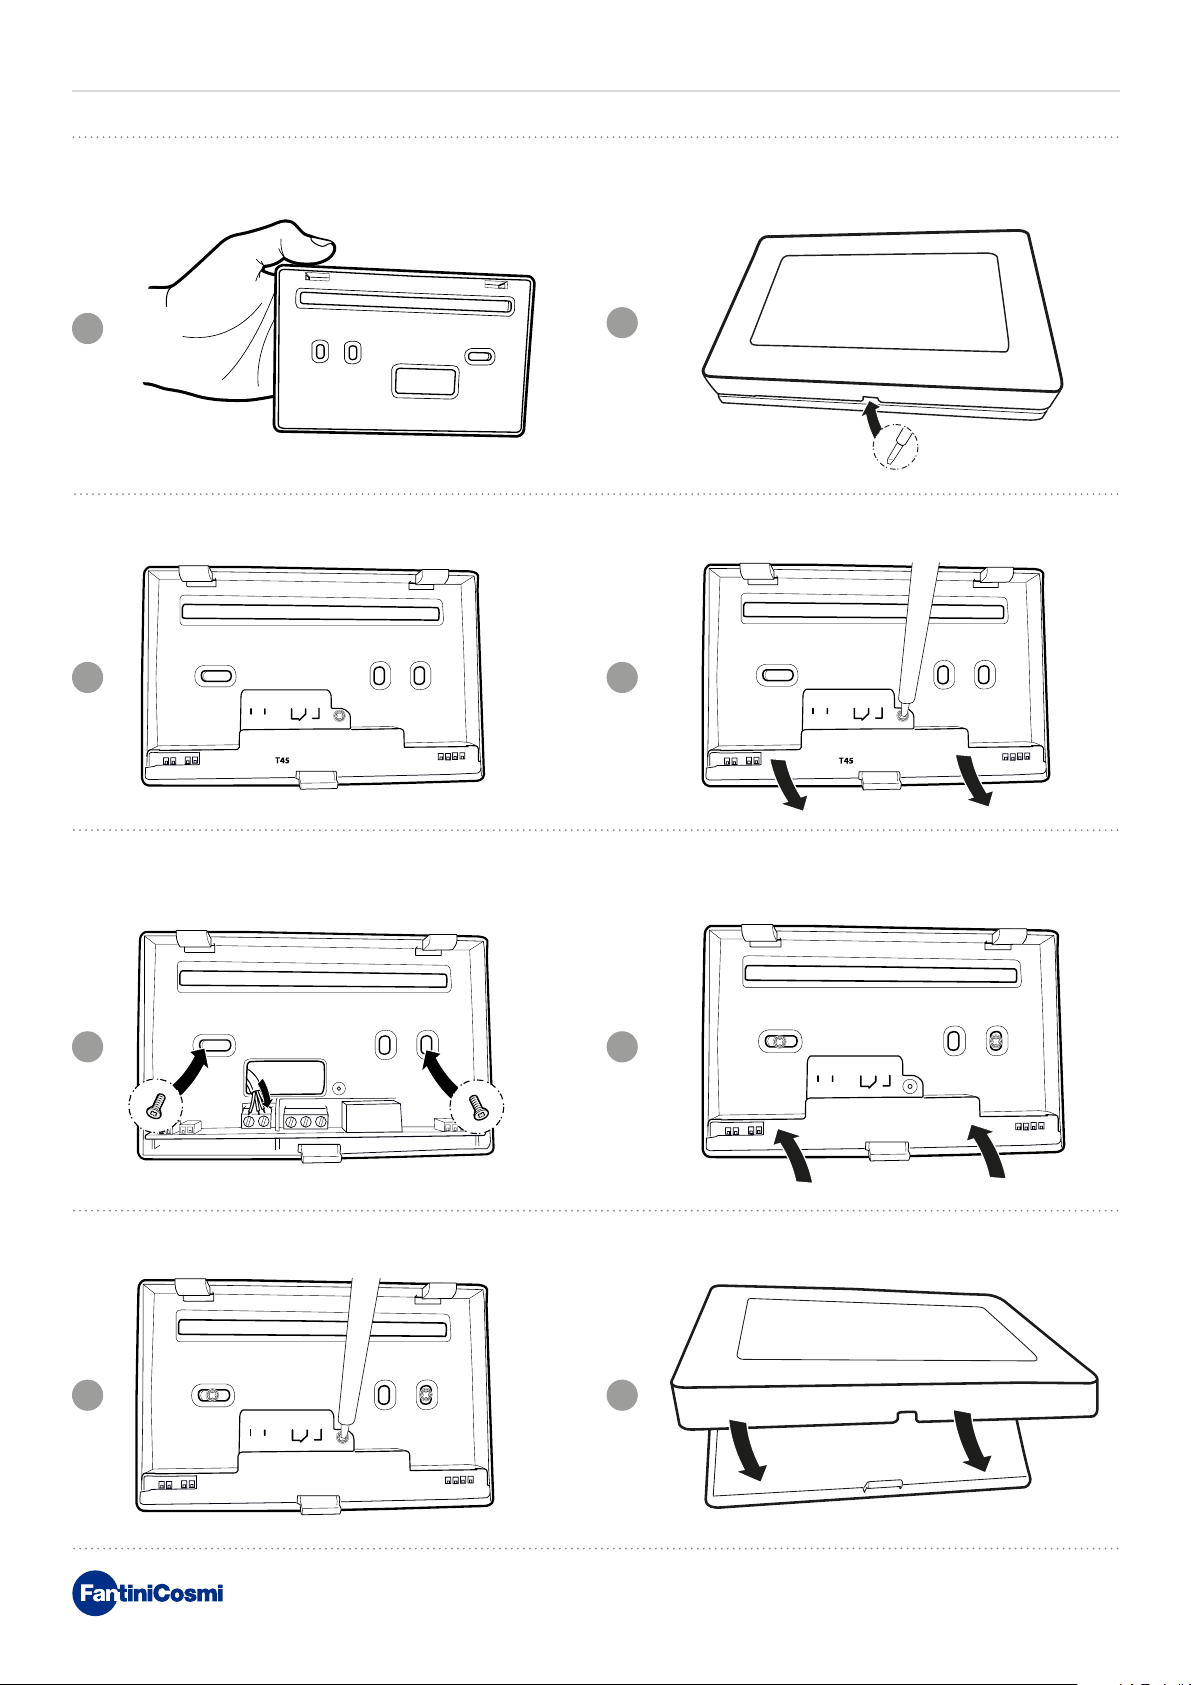
Pry the back panel off the body by applying pressure to the specific groove at the bottom.
1
2
Remove the insulating protection by unscrewing the specific waterproof screw.
3 4
LN 21 4
230V~
5(3)A 250v~
LN 21 4
230V~
5(3)A 250v~
Make the electrical connections (refer to the “Electrical connections” paragraph) and secure the panel to the wall with
the supplied screws.
5 6
Tighten the screw shown and hook the body onto the panel on the wall.
87
LN 21 4
230V~
5(3)A 250v~
T45
7
CH180RFWIFI
WIRELESS TOUCHSCREEN PROGRAMMABLE THERMOSTAT WITH WIFI CONNECTION
2 - ELECTRICAL CONNECTION
ATTENTION!
Electrical connections must be made by qualified personnel.
ATTENTION!
Electrical connection operations must be done with the system’s power disconnected.
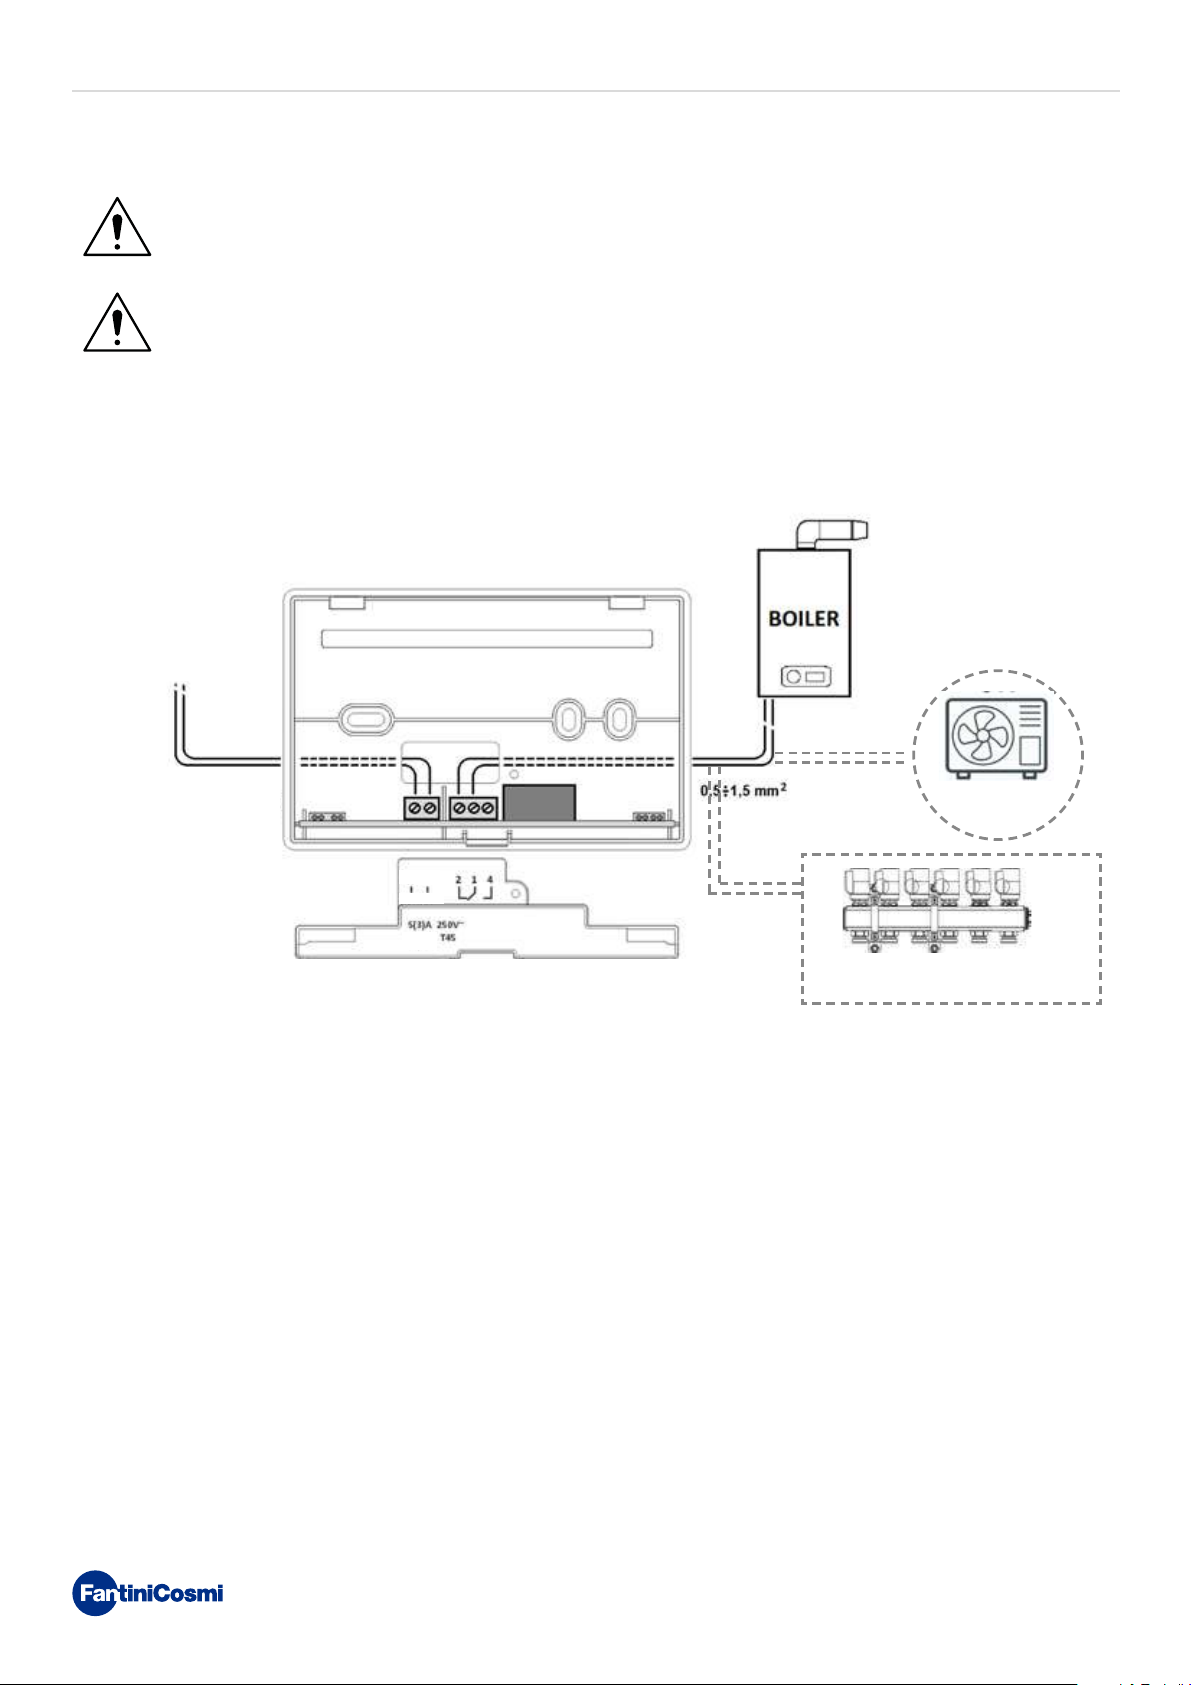
Electrical connections must be made referencing the following diagram.
Power supply L-N 230V
Heat pump
L N
230V~
Thermoactuators
8
CH180RFWIFI
PRESS
PRESS
ESC
PRESS
PRESS
PRESS
TOUCHSCREEN WIRELESS WEEKLY PROGRAMMABLE THERMOSTAT
3 - QUICK GUIDE FOR PROGRAMMING (PROG)
The first time any touch key is pressed has no effect, but only activates the functions of the buttons themselves and
lights up the display.
After 30 seconds of no interaction, the display goes back to the main screen.
= allows you to CONFIRM and
ESC PROG
EXIT from the current screen
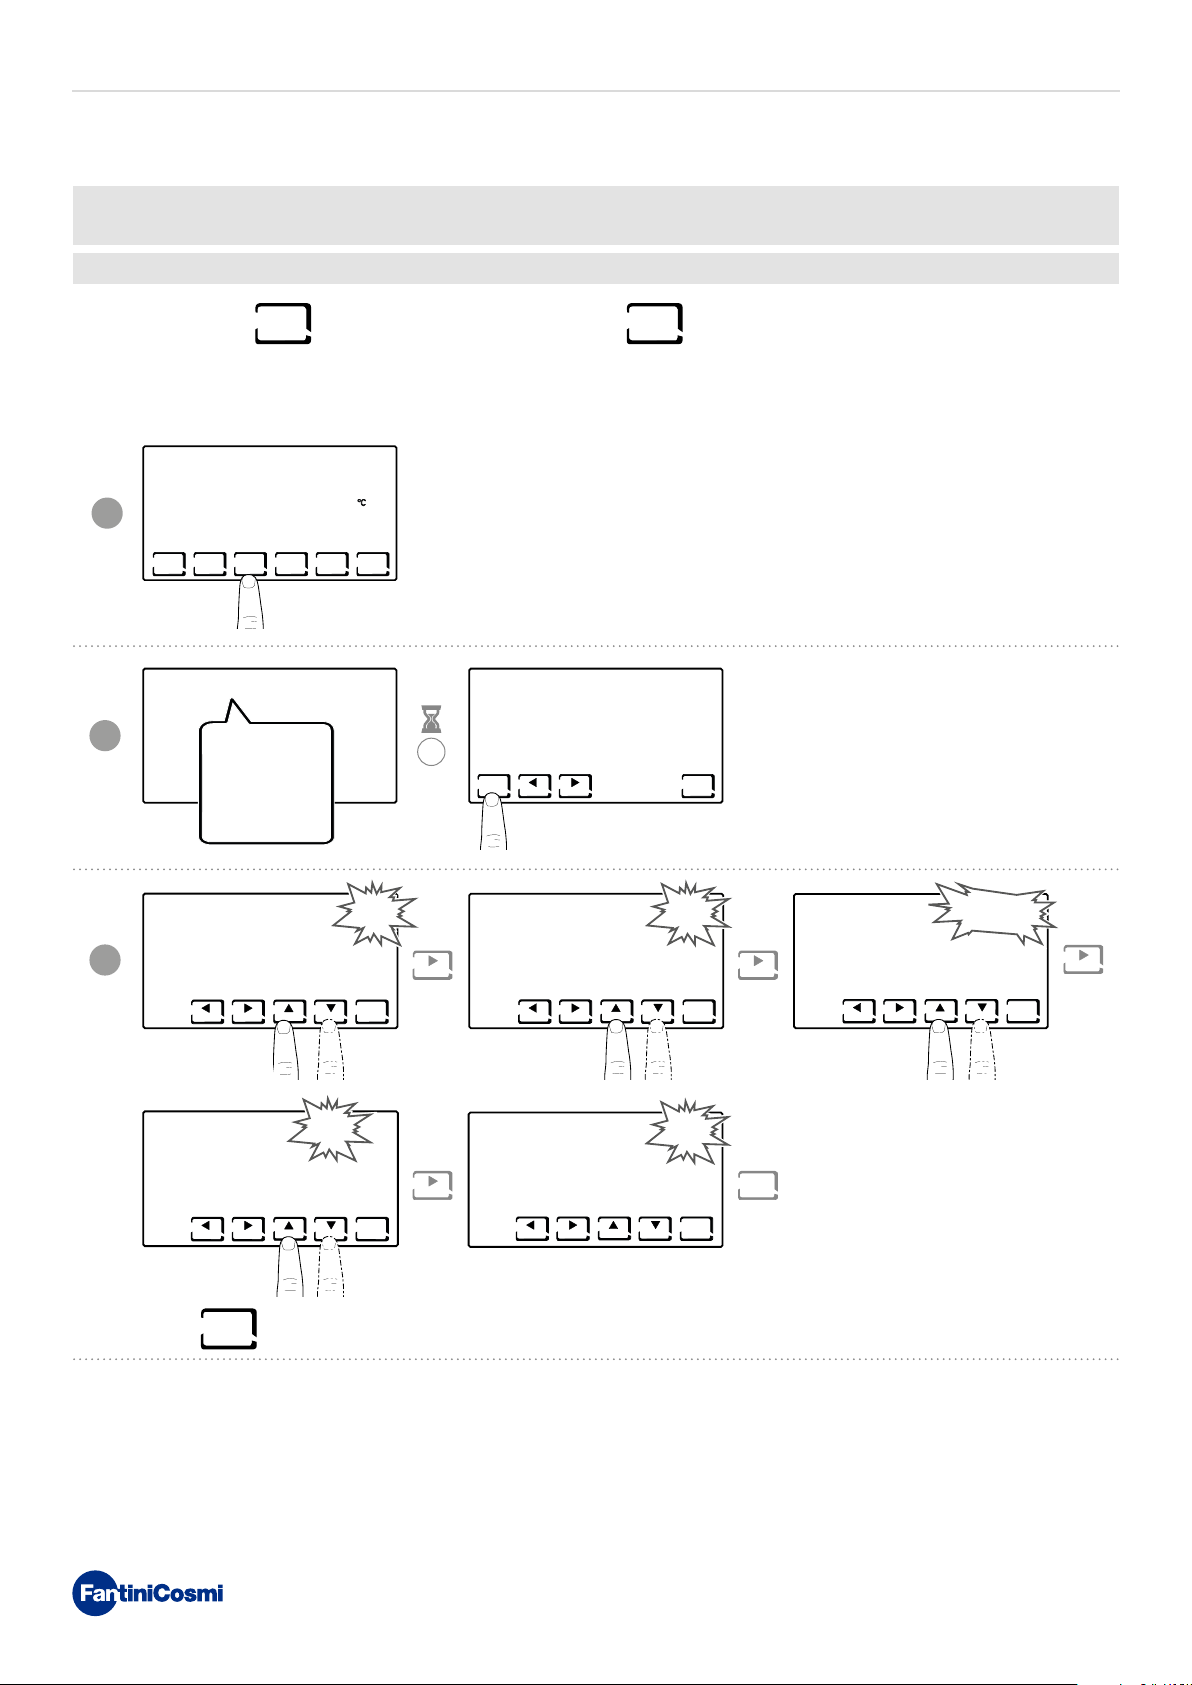
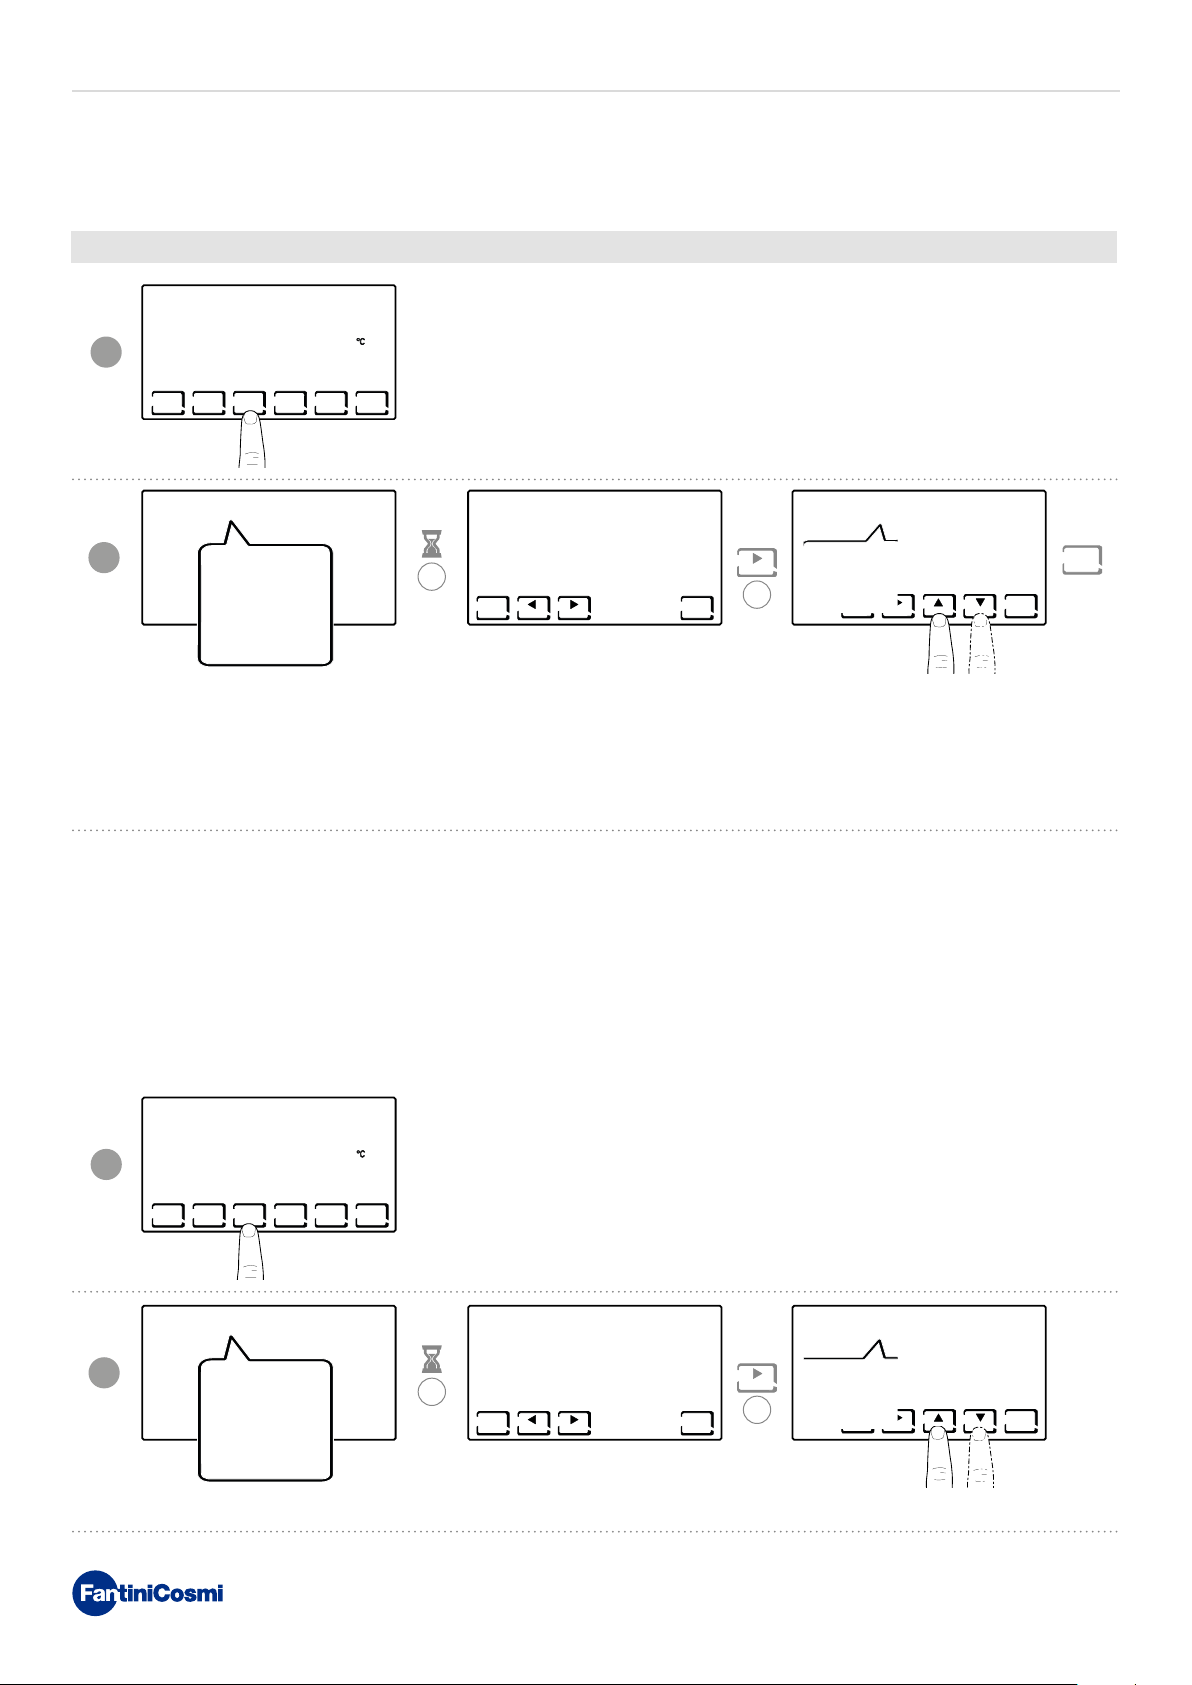
3.1 - DATE AND TIME SETTING
12:01 01-01-18
1
2
DAY
[ MAN ]
1
23.0
MODE
DISP
PROG
ZONE OFF
USER PROGR
DATE AND TIME
WINTER
PROFILE
AUX1: ON
LOCK NO
36
RH%
ESC
DATE AND TIME
2s
OK
= allows you to PROGRAM
ESC
DAY 9
3
HOUR 12:0212:
Note:
always allows you to go back to the previous page.
ESC
MONTH 11
ESC
MIN
ESC
12:02
ESC
ESC
YEAR 2018
ESC
9
CH180RFWIFI
PRESS
PRESS
PRESS
PRESS
PRESS
TOUCHSCREEN WIRELESS WEEKLY PROGRAMMABLE THERMOSTAT
3.2 - WINTER/SUMMER SETTING
12:01 01-01-18
1
2
DAY
[ MAN ]
1
23.0
MODE
DISP
PROG
ZONE OFF
USER PROGR
DATE AND TIME
WINTER
PROFILE
AUX1: ON
LOCK NO
36
RH%
ESC
DATE AND TIME
2s
OK
ESC
x1
WINTER
WINTER
SUMMER
3.3 - HOURLY PROGRAMMING SETTING (PROFILE)
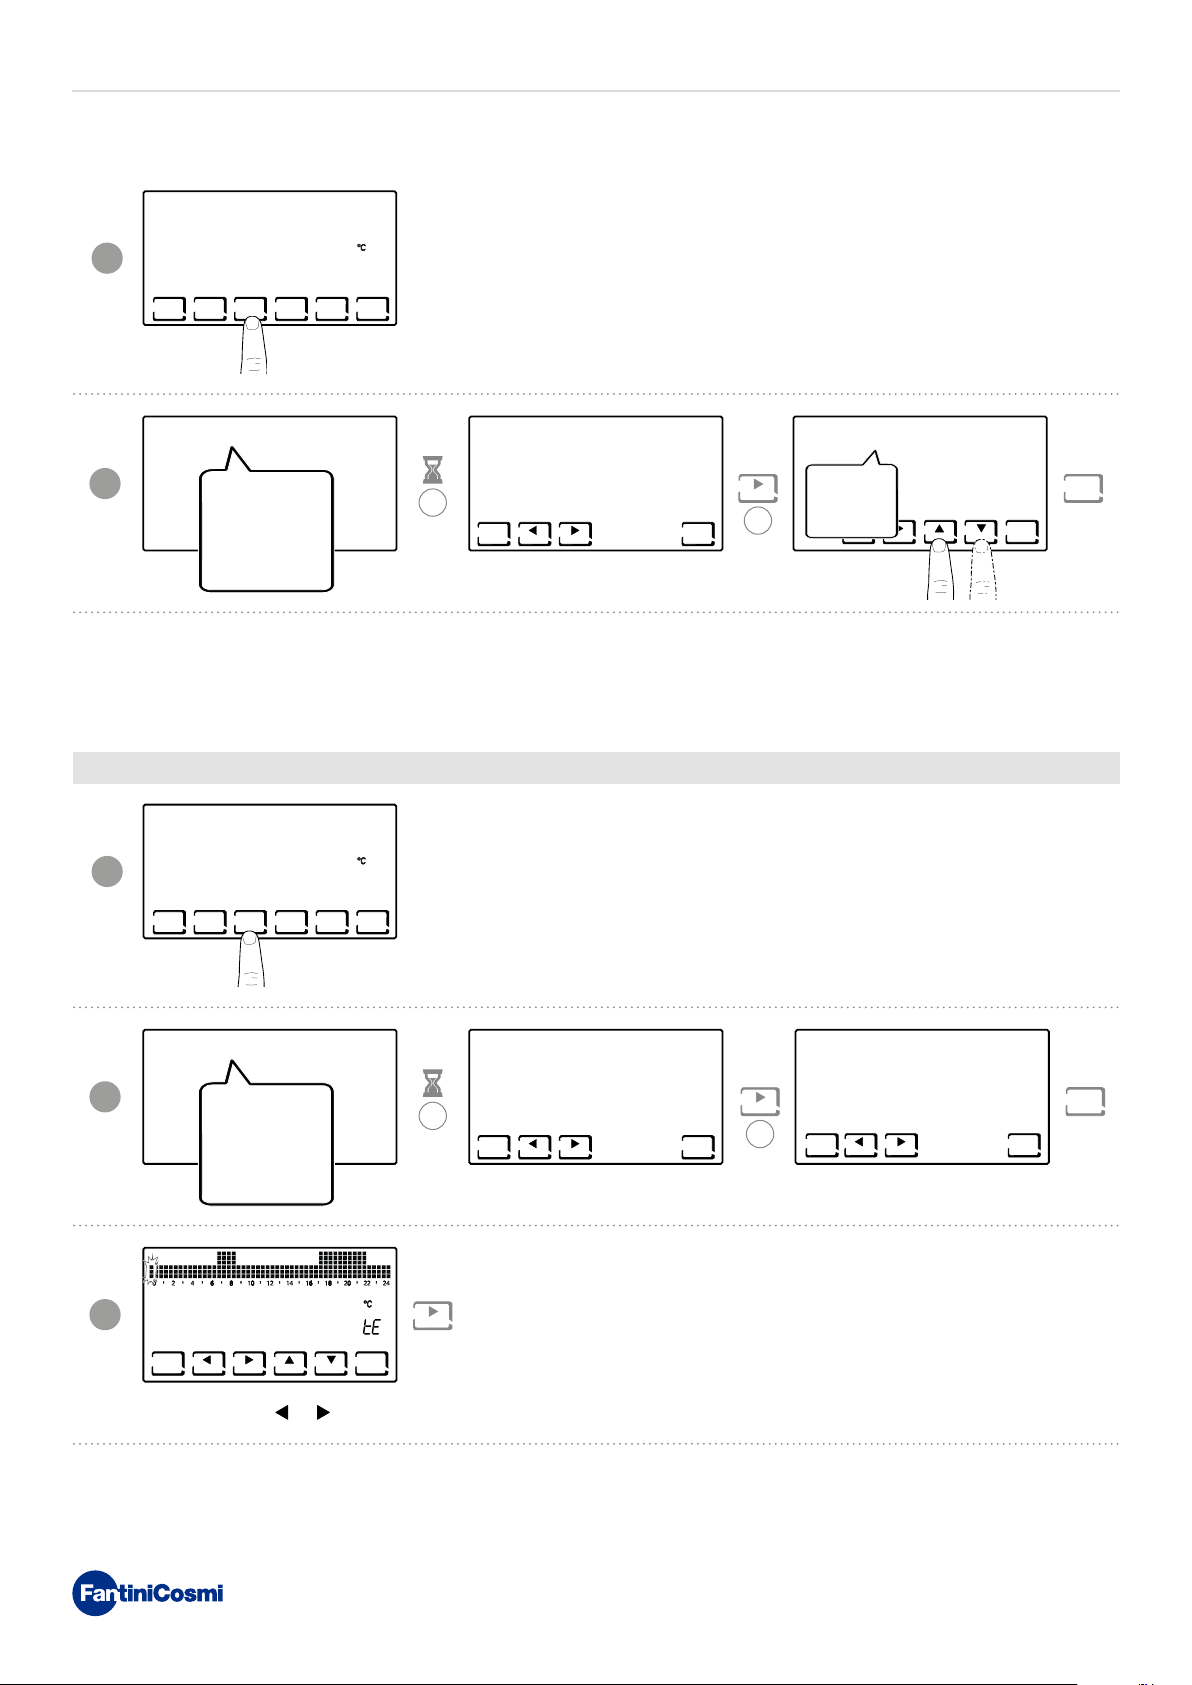
The profiles are set based on whether WINTER or SUMMER mode was previously selected.
12:01 01-01-18
ESC
ESC
1
2
3
DAY
[ MAN ]
1
23.0
MODE
DISP
PROG
ZONE OFF
USER PROGR
DATE AND TIME
WINTER
PROFILE
AUX1: ON
LOCK NO
DAY
ZONE
1
1
18.0
OK COPY
36
RH%
ESC
DATE AND TIME
2s
OK
Note: pressing or allows you to move within the hours.
PROFILE
OK
ESC
x2
OK
ESC
10
CH180RFWIFI
PRESS
DAY
4
OK COPY
Note:
ZONE
1
1
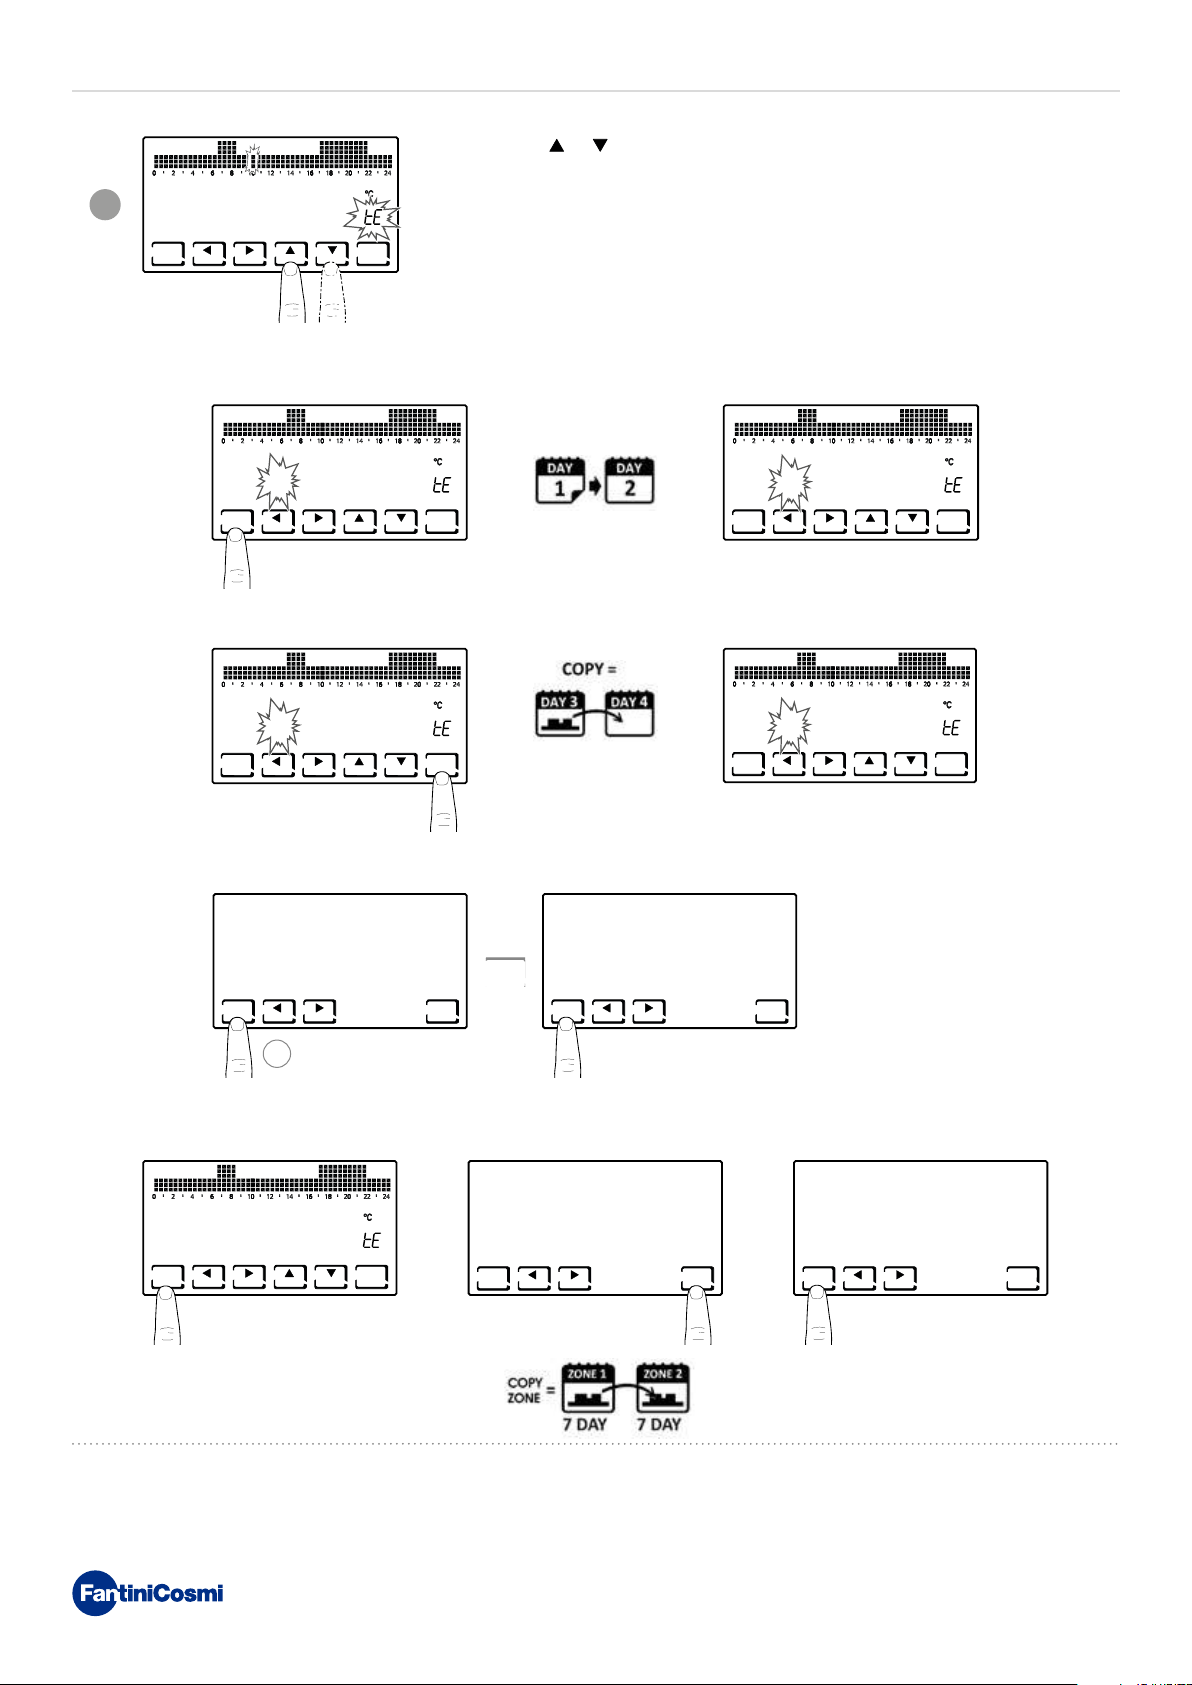
■ Pressing OK allows you to go to the next day.
TOUCHSCREEN WIRELESS WEEKLY PROGRAMMABLE THERMOSTAT
Pressing or allows you to select the profile depending on the time.
SETTABLE PROFILES:
■ tC (comfort) = SUMMER, WINTER
18.0
■ tE (economy) = SUMMER, WINTER
■ tA (antifreeze) = for WINTER only
■ OFF = for SUMMER only
In winter tE < tC; in summer tC < tE.
ZONE1DAY
1
18.0
OK COPY
OK COPY
ZONE2DAY
1
18.0
■ Pressing COPY allows you to copy the temperature profile being displayed to the following day.
ZONE3DAY
1
18.0
OK COPY
OK COPY
ZONE4DAY
1
18.0
■ Pressing and holding OK allows you to go to the next zone.
ZN1 -> ZN2
OK COPY
ZN1 -> ZN3
OK
OK COPY
3s
■ Once you have reached DAY H (HOLIDAY), pressing OK allows you to copy the profile of the whole
zone set to the next one.
ZONEHDAY
2
18.0
OK COPY
ZN1 -> ZN2
OK COPY
ZN1 -> ZN3
OK COPY
11
CH180RFWIFI
PRESS
PRESS
PRESS
TOUCHSCREEN WIRELESS WEEKLY PROGRAMMABLE THERMOSTAT
3.4 - AUX1 SETTING
It is possible within the multi-zone system to autonomously manage an additional ON/OFF device (for example irrigation,
shutter darkening, outside lights, fan, air conditioner, etc. systems).
Yo u must have a CH175 connected to this device and it must be configured as an auxiliary AUX1 actuator.
12:01 01-01-18
1
2
DAY
[ MAN ]
1
23.0
MODE
DISP
PROG
ZONE OFF
USER PROGR
DATE AND TIME
WINTER
PROFILE
AUX1: ON
LOCK NO
36
RH%
ESC
DATE AND TIME
2s
OK
ESC
AUX1: ON
x3
AUX1: ON
AUX1: OFF
ESC
Note: if the symbol ! appears on the screen, it means that the command was set with the hourly profile and
therefore cannot be edited on this page. To edit it, follow the instructions in paragraph 7.
ESC
3.5 - SETTING KEYBOARD LOCK WITH PASSWORD
Lets you lock the CH180RFWIFI keyboard and any CH120RF included in the network through a 3-digit numerical code. It
works only once, then it must be enabled again.
12:01 01-01-18
1
2
Note: selecting LOCK YES displays the OK key. Then follow the procedure described in points 3 and 4.
DAY
[ MAN ]
1
23.0
MODE
DISP
PROG
ZONE OFF
USER PROGR
DATE AND TIME
WINTER
PROFILE
AUX1: ON
LOCK NO
36
RH%
ESC
DATE AND TIME
2s
OK
ESC
x4
LOCK NO
YES
ESC
12
 Loading...