

Fantini Cosmi CH150RF, CH151RF, CH152RF User Manual

Radio wave weekly program
chronothermostat
CH150RF / CH151RF / CH152RF
1

INDEX
Introduction ��������������������������������������������������������������3
Controls and indications ������������������������������������������4
Controls �������������������������������������������������������������4
Indications ���������������������������������������������������������5
User manual ������������������������������������������������������������6
Setting the date and time ����������������������������������6
Summer/Winter selection ����������������������������������7
Operating modes �����������������������������������������������7
“Manual” operating mode ����������������������������������7
“Automatic” operating mode ������������������������������8
“Holiday” operating mode ��������������������������������10
“Jolly” operating mode �������������������������������������10
“OFF” function �������������������������������������������������12
Preset programs ����������������������������������������������13
Chronothermostat programming ���������������������13
Displaying the temperature detected by the
separate probe ������������������������������������������������15
Statistical data �������������������������������������������������15
Setting the desired humidity level ��������������������16
Maintenance ���������������������������������������������������������� 17
Replacing the batteries ������������������������������������17
Installation �������������������������������������������������������������18
Installing the batteries �������������������������������������18
Conguring the chronothermostat �������������������18
Actuator registration ����������������������������������������23
Fastening the socket ���������������������������������������25
Electric connections ����������������������������������������26
Securing the chronothermostat to the socket ��27
Technical features ��������������������������������������������������27
2

Introduction
The CH150RF/151RF/152RF chronothermostat measures the ambient temperature and
controls the heating (conditioning) system
through a radio connection with an actuator�
A humidistat can also be driven� The operating mode can be either chosen from among
the preset ones or customized to one’s own
needs�
The large display shows the temperature pro-
le – i.e. the relationship between the time table and the temperature to be kept – as well as
the measured temperature, relative humidity,
calculated perceived temperature, time and
day of the week�
The chronothermostat is battery powered�
Both the settings and the data are stored in a
non-volatile memory capable of keeping them
even when the batteries are down�
The following external interfaces are available
for the CH150RF chronothermostat:
• Radio actuator
• Separate temperature probe
• Telephone actuator for xed telephone lines,
which makes it possible to perform remote
control through the DTMF keypad (multi-tone)
• Telephone actuator with GSM modem, used
for remote control by means of SMS messages�
Both telephone actuators allow you to:
• remotely interrogate the chronothermostat, to
be informed about the ambient temperature or
the heating / cooling system status;
• remotely manage the chronothermostat operating modes�
The chronothermostat comes in three colours:
white, silver (CH151RF series) and anthracite
black (CH152RF series)�
3
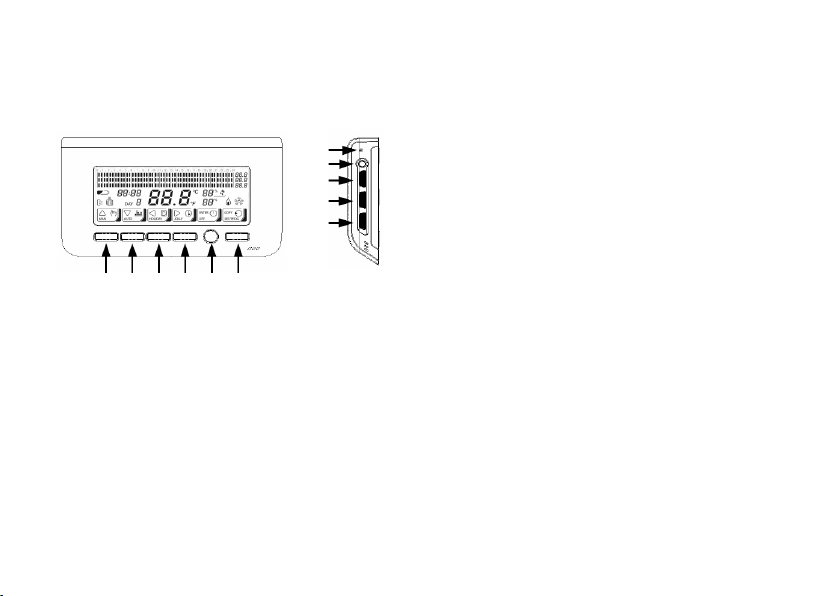
Controls and indications
Controls
11
10
9
8
7
1 2 3 4 5 6
1� Button used to select the “Manual” operating
mode or increase a value (▲) *
2� Button used to select the “Automatic” oper-
ating mode or decrease a value (▼) *
3� Button used to select the “Holiday” operating mode or go back to the previous data item
(◄) *
4� Button used to select the “Jolly” operating
mode or go to the next data item (►) *
5� Button used for the “OFF” or “Enter” functions *
6� Button used for the “Programming” or “Copy”
or “Statistical data displaying” functions *
7� Rotary selector for temperature correction:
T1, Manual temperature, Jolly temperature,
and
Antifreeze temperature *
8� Rotary selector for correcting temperature
T2 or the Jolly operating mode duration *
9� Rotary selector for correcting temperature
T3 or the Jolly operating mode duration
10� Summer/Winter switching button
11� Chronothermostat reset button
* The function associated with the button or selector depends on the current operating mode�
It is highlighted by the icon placed above�
4
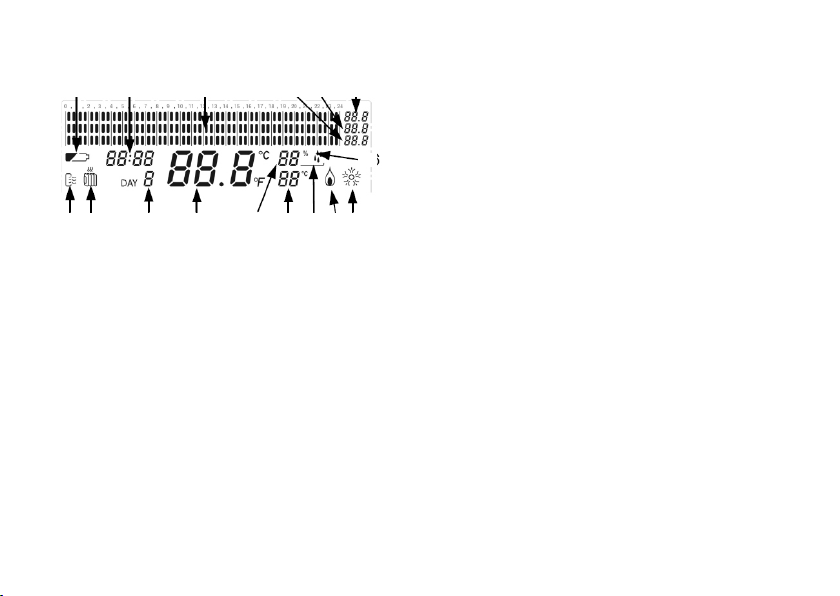
Indications
14
1� Time
1
2 3 4 5
2. Temperature prole
3� Temperature value T1 or “Jolly” operating
mode duration (days)
4� Temperature value T2 or “Jolly” operating
mode duration (hours)
5� Temperature value T3
6� System ON in Summer operation
67151698101113 12
7� System ON in Winter operation
8� Relative humidity percentage
9� Perceived temperature (displayed by the
degree)
10� Ambient/external temperature
11� Current day (1 = Monday … 7 = Sunday;
8 = Holiday)
12� Winter operation
13� Summer operation
14� Battery charge level
15� Humidistat enable
16� Humidistat ON
5
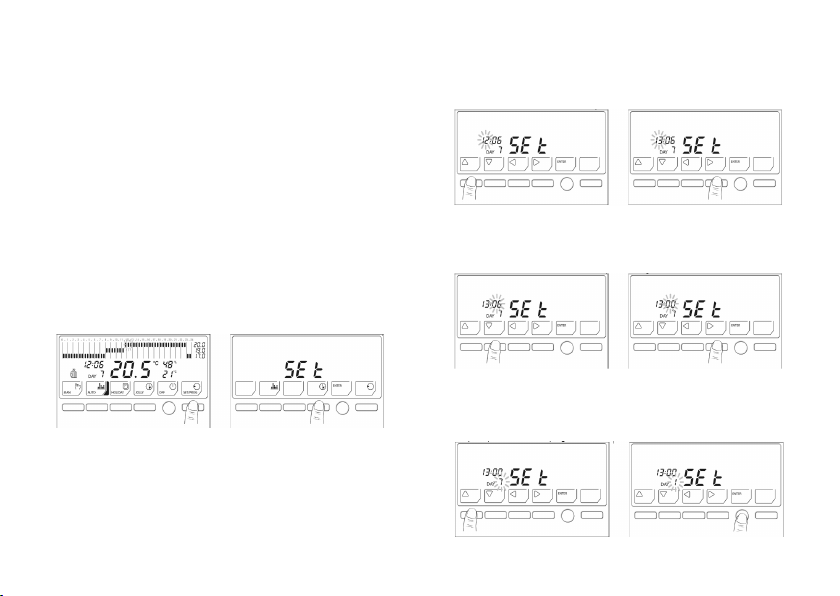
User manual
To operate the chronothermostat after it has
been installed, proceed as follows:
1� Set the date and time�
2� Select the Summer/Winter operation�
3� Select the operating mode�
2. Modify the hour setting by means of the ▲
and ▼ buttons, then go to the minute setting
by means of the ► button.
Setting the date and time
To set the current time and date, proceed as
follows:
1� Enter the programming menu main page�
The operating mode currently used will be interrupted temporarily� Choose the time setting
function�
3� Modify the minute setting by means of the
▲ and ▼ buttons, then go to the day setting
by means of the ► button.
4. Modify the day setting by means of the ▲
button, then press ENTER to go back to the
main page of the programming menu�
6
5� Press ENTER again to exit the programming
menu� The chronothermostat operating mode
previously interrupted will be resumed�
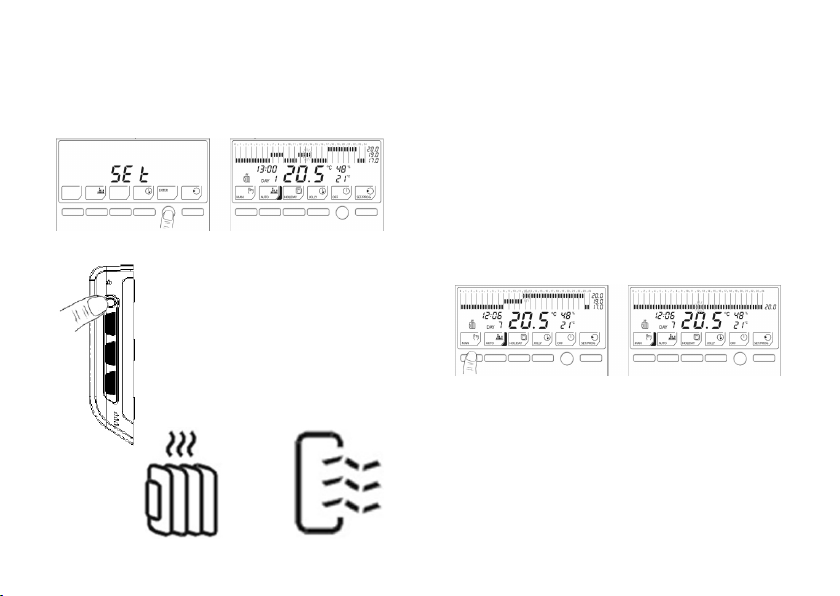
Summer/Winter selection
To shift from the Summer operation (heating system) to the Summer operation (cooling system),
and vice versa, keep the Summer/Winter button depressed for
at least 4 seconds� The selected
operation will be shown on the
display by means of the “Winter”
or “Summer” icons�
Winter Summer
Operating modes
The CH150/151/152 chronothermostat features four different operating modes: Manual,
Automatic, Holiday and Jolly (in addition to the
OFF function)�
“Manual” operating mode
With the Manual operating mode, the chronothermostat adjusts the operation of the heating
or cooling system in order to always keep the
same temperature� To select “Manual”, press
MAN�
7
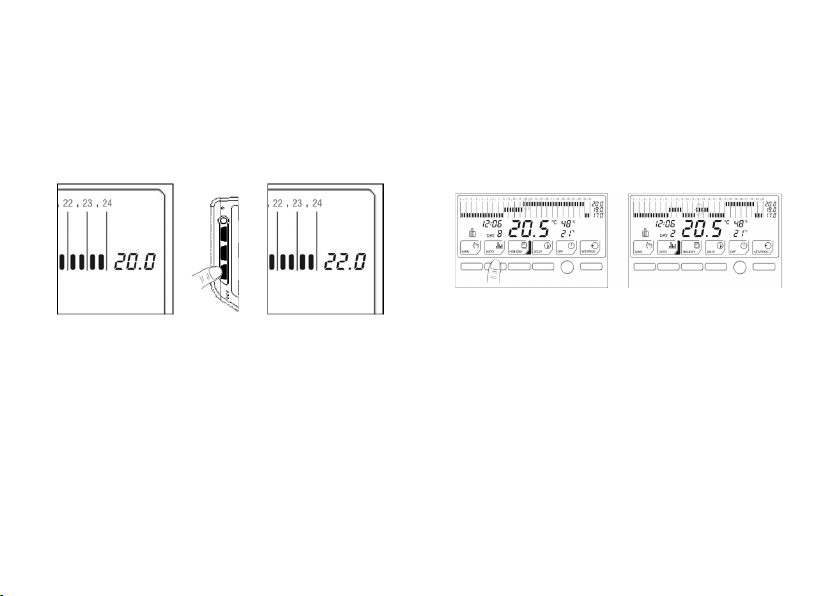
The temperature level can be modied during
operation by means of the lower rotary selector located on the right side of the chronothermostat� The temperature can be changed from
2°C to 40 °C by 0�1°C increments�
“Automatic” operating mode
With the “Automatic” operating mode, the
chronothermostat adjusts the operation of the
heating or cooling system by following the pro-
les dened for the various days of the week.
To select “Automatic”, press AUTO�
The three temperature levels used can be
modied during operation by means of the rotary selectors located on the right side of the
chronothermostat�
8

Temperature T3 cannot be lower than temperature T2 or higher than 40 °C�
During Summer operation, temperature
T3 features an upper limit of 30°C� When this
value is exceeded, T3 will take the OFF value,
which will involve switching the system off�
Temperature T2 cannot be higher than temperature T3 or lower than temperature T1�
Temperature T1 cannot be higher than temperature T2 or lower than 2 °C�
If no customization has been made, the automatic operating mode will function with the
stored temperature proles, i.e. the preset
ones (refer to «Preset programs»)� To custom-
ize the proles, refer to «Chronothermostat
programming»�
9
 Loading...