

FantiniCosmi CH143A User Manual
FLUSH MOUNTING WEEKLY PROGRAMMABLE
THERMOSTAT
cover plate not included
CH143A

INDEX
Intellicomfort
CH143A
INSTALLATION ....................................................................................................
ELECTRICAL CONNECTIONS .............................................................................
BUFFER BATTERY FUNCTION ............................................................................
QUICK GUIDE FOR PROGRAMMING ...................................................................
description of keys ...........................................................................
setting time and date .......................................................................
operating programs .........................................................................
settable temperatures .....................................................................
setting operating programs .............................................................
FUNCTIONS IN DETAIL ........................................................................................
available programs ...........................................................................
settable temperatures .....................................................................
advanced keys and functions ...........................................................
reset ..................................................................................................
MAINTENANCE ....................................................................................................
TECHNICAL FEATURES .......................................................................................
CONTENTS OF PACKAGE
1 chronothermostat
3 frames
3 coloured covers, type A
3 coloured covers, type B
3 pairs of adapters
1 pair of special adapters for Bticino Matix
2 screws
1 user manual
p. 3
p. 5
p. 5
p. 6
p. 6
p. 6
p. 7
p. 8
p. 8
p. 11
p. 11
p. 13
p. 14
p. 19
p. 19
p. 21
2

Intellicomfort
CH143A
INSTALLATION
1
The CH143A chronothermostat must be installed in a 3-module recessed box, in the
middle of the apartment, preferably 1.5 m off the ground. The required components,
all included in the package, are used based on the plates available, according to the
following table.
COVER*
FRAME
COMPATIBLE PLATES
Bticino Living International
and Transizione Piana
Bticino Living Light Air B 3 NO
Bticino Light, Light tech B 1 NO NO
Bticino Axolute A 1 NO NO
Bticino Matix B 2 SI (dedicated) YES position “A”
Vimar Idea and Rondò B 2 YES YES position “B”
Vimar Plana and Eikon B 1 NO NO
Vimar Eikon Evo A 3 NO YES position “A”
Vimar Arké A 3 NO NO
Gewiss Chorus One, Lux, Art B 2 NO YES position “A”
Ave sistema 45: Zama,
Banquise, Yes, Ral
Ave sistema 44: Zama,
Personal, Technopolymer
Legrand Cross, Vela square,
Vela round
TYPE
B 1 NO NO
B 2 YES NO
A 1 NO NO
B 2 NO YES position “A”
TYPE
SIDE ADAPT-
ERS *
TABS TO DETACH
YES position “A+C”
* N.B. COVER A available colours: white, silver and black;
COVER B available colours: white, silver and black, for Bticino Matix white only.
3
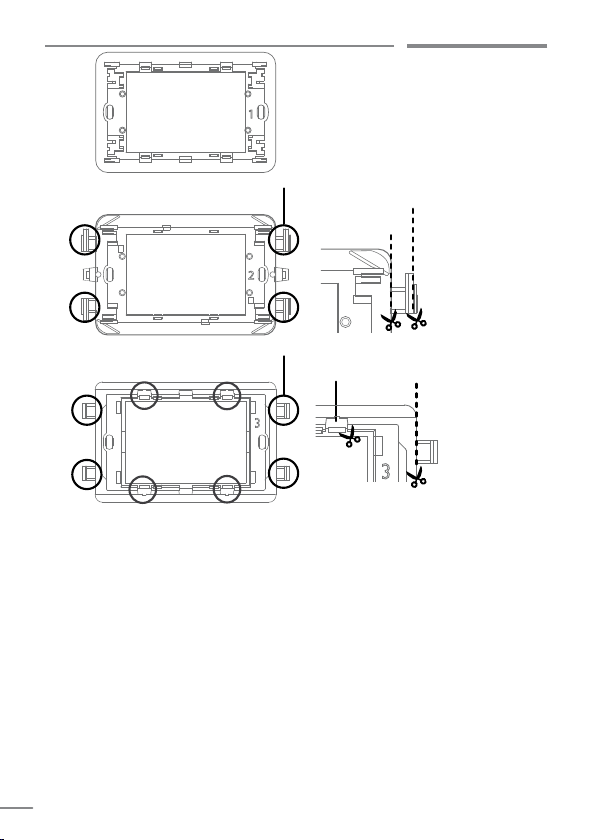
frame
telaio
1
Intellicomfort
according to type of cover plate
cut 4 tabs
“B”
“A”
frame
telaio
2
frame
telaio
according to type of cover plate
2
cut 4 or 8 tabs
“C”
“A”
3
PERFORM THE FOLLOWING OPERATIONS:
1. act on the master switch on the electric panel to cut power to the electrical
system;
2. when required, detach the tabs according to the type of plate;
3. when required, mount the side adapters (A or B) and proceed as follows:
Cover “A”
4a. Fix the thermostat to the appropriate frame;
5a. Mount the cover on the thermostat body.
Cover “B”
4b. Mount the cover on the thermostat body
5b. Fix the thermostat to the appropriate frame;
6. connect the two wires of the boiler to terminals 1-2 of CH143A;
7. connect the two power cables L-N;
8. screw the frame onto the box using the provided screws;
9. mount the plate;
10. switch the electric system back on.
4

CH141A
Caldaia
2
1
4
ELECTRICAL CONNECTIONS
2
Boiler
Caldaia
2
4
1
Intellicomfort
CH143A
ATTENTION: installation must be carried
out by qualified personnel.
!
CH143A
L
N
3
During black-outs, the programmed parameters will not be lost as the settings are
stored in a non-volatile memory.
The internal battery of CH143A allows it to maintain the date/time during blackouts.
N.B. the chronothermostat works properly even when the battery is discharged, but
during blackouts it is not assured that the date/time will be maintained.
230V 50Hz
BUFFER BATTERY FUNCTION
ATTENTION: before performing the
electrical connections, make sure you
!
have disconnected power to the electric
system by means of the master switch on
the electric panel
5
Intellicomfort
QUICK GUIDE FOR PROGRAMMING
4
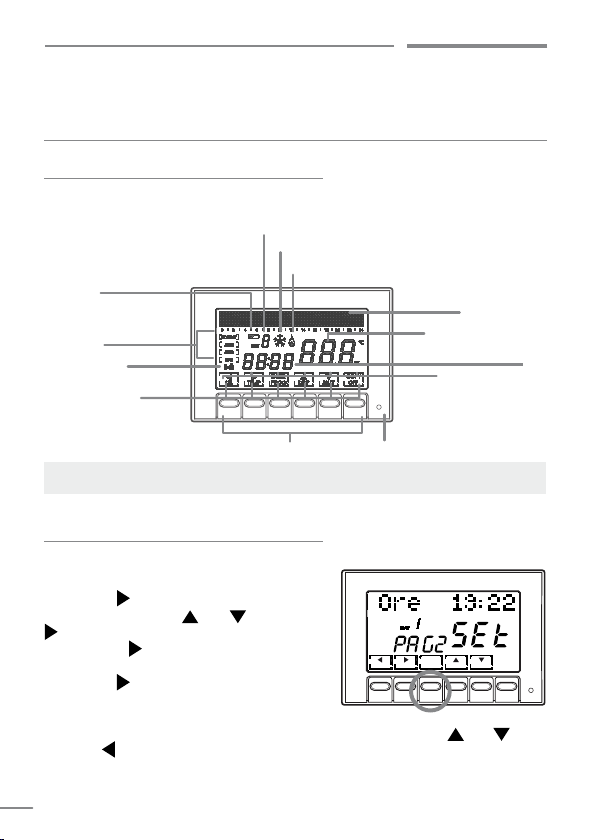
DESCRIPTION OF KEYS
The chronothermostat is equipped with 6 keys, the function of which varies
depending on the situation. It is described by the symbol which appears on the
display next to the key.
low battery symbol
programs
summer/winter
primary function
day of the week
summer relay ON
winter relay ON
graphical section:
messages/time profile
of temperature
room temperature
Celsius / Fahrenheit
secondary function
time
6 function keys
N.B.: pressing a key once has no effect aside from switching on the light on the display
to have a better view.
reset
SETTING TIME AND DATE
After the device switches on, press the key
PROG
briefly: the text “Setup” is displayed;
now press
the hour by pressing and . Then press
to go to the “Minutes” setting.
Again press to select, in order, the Year,
Month and Day.
Pressing again allows you to choose
whether to disable automatic change of
summer/winter time: initially this function is
active can but can be deactivated by pressing “NO” using the keys and .
Pressing
To exit the Setup menu, press
6
to enter the “Hours” page. Set
allows you to go back to the previous page.
ENTER
.
ENTER

Intellicomfort
CH143A
OPERATING PROGRAMS
The CH143A chronothermostat has different operating modes, called programs:
“AUTO” WEEKLY PROGRAM:
one of the four programmable temperatures can
be associated to each half hour for each day of
the week. This is the program displayed when the
chronothermostat is switched on and is generally the
one most used.
“HOLIDAY” DAILY PROGRAM:
like in the AUTO program, you may select one of the
4 programmable temperatures for each half hour, but
the identical sequence will be repeated every day.
“JOLLY” TEMPORARY PROGRAM:
you may choose to hold a certain temperature for a
certain number of hours, after which it will go back to
the previously active program.
SEL TEMP PROG DIS P JOLLY OFF
HOLIDAY
JOLLY
“MAN” MANUAL PROGRAM:
the chronothermostat maintains a fixed temperature,
specified each time, for an unlimited amount of time
until another program is selected.
MAN
7
 Loading...