

FantiniCosmi CH140GSM User Manual

WEEKLY PROGRAMMABLE THERMOSTAT
WITH INTEGRATED GSM
CH140GSM

Intellicomfort
CH140GSM
TABLE OF CONTENTS
INSTALLATION
GSM FUNCTIONALITY VERIFICATIONS
ELECTRICAL CONNECTIONS
QUICK GUIDE TO PROGRAMMING
DESCRIPTION OF KEYS
SETTING THE TIME AND DATE
OPERATING PROGRAMS
PROGRAMMABLE TEMPERATURES
SETTING THE OPERATING PROGRAMS
FUNCTIONS IN DETAIL
PROGRAMS AVAILABLE
PROGRAMMABLE TEMPERATURES
KEYS AND ADVANCED FUNCTIONS
RESET
REMOTE PROGRAMMING VIA SMS
SMS COMMANDS
COMMANDS FOR ALARMS AND ALERTS
COMMANDS FOR THE AUXILIARY RELAY (RELAY 2)
NO 230V POWER OR POWER SUPPLY RETURN ALERT MESSAGES
PAG.
3
4
6
7
7
8
8
9
10
13
13
15
16
23
24
25
29
31
31
PACKAGE CONTENTS
1 PROGRAMMABLE THERMOSTAT
1 USER MANUAL
2
Intellicomfort
CH140GSM
1. INSTALLATION
The CH140GSM programmable thermostat is to be wall-mounted or installed on a
recessed box, with 3 modul es or round, at a height of about 1.5 m from the ground.
PERFORM THE FOLLOWING STEPS:
1. Disconnect the power to the electrical system by actuating the main switch of the electrical
panel
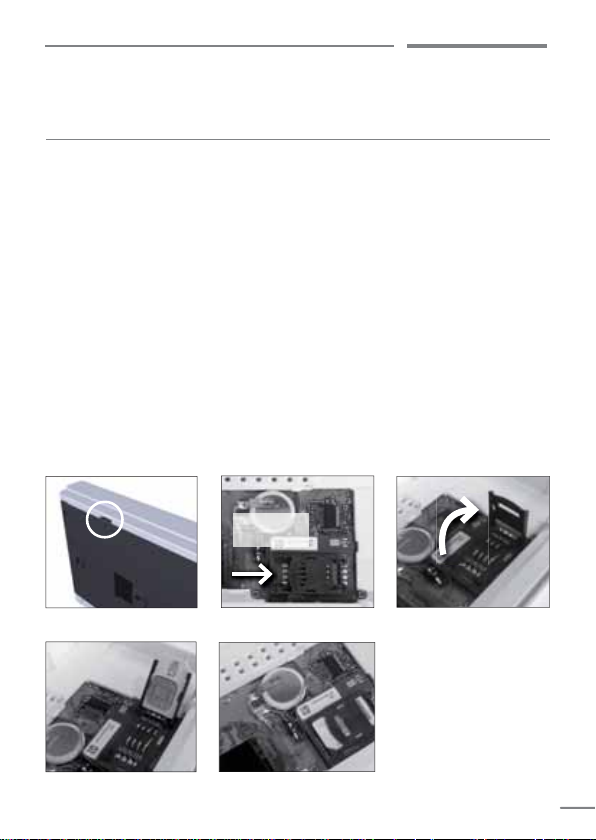
2. Separate the rear baseboard from the body of the programmable thermostat by using a tool
on the relevant sl ot (see Figur e 1)
3. Remove the insulation protection on the baseboard by unscrewing the specific captive screw.
4. Make the electrical connections as shown on page 5.
5. Secure the baseboard to the wall or to the recessed bo x, using the screws supplied.
6. Reposition the insulation protection by tightening the screw.
7. Open the SIM-holder compartment at the back of the programmable thermostat, as shown
in Figure 2.
8. Insert a SIM* (NOTE pag. 4), complying with the direction shown in Figure 3 (see pag. 4) and
close and tighten the flap of the SIM-holder.
9. Press the body of the CH140GSM to the baseboard secured to the wall and couple.
10. Restore the power of the electrical sys tem.
push
to release
Figure 1
Figure 3
Figure 2
3

Intellicomfort
!
!
* NOTE The SIM used must conform to the GSM 11.12 phase 2+ standar d (in
practice, any SIM of regular mobile operators but not the USIMs of mobile
operator: TRE). It must be linked to a top-up voice with SMS contract (if
necessary, verify the credit) or with a subscription contract and the PIN
code must be disabled.
Before inserting the SIM car d it is advisable to verify that it works by using
it in a mobile phone and trying to send and receive an SMS.
After inserting the SIM and switching the CH140GSM on, any SMS
messages that have not yet been delivered or sent in the first moments of
operation will be cancelled.
ATTENTION: the 2 auxiliary inputs must be connected to contacts that are
dry and voltage-free and with cables no longer than 3 m.
GSM FUNCTIONALITY VERIFICATIONS
The programmable thermostat connection to the GSM network can be
detected by the antenna symbol and three bars.
The antenna symbol flashes if the module is not registered to the GSM network
(e.g. no coverage, SIM not inserted or blocked by PIN, etc.).
Once the registration is complete, the antenna lights up steady together with any
bars indicating the signal strength.
On PAG08 of the SETUP menu you can see the quality of GSM coverage in real
time; the values are updated every thr ee sec onds. This feature is useful for testing
during installation if the position assumed is appropriate or not.
The following table shows the signal values and the corresponding messages
shown on the display.
Example: GSM: 18.0 means that the signal is good (two bars) and the communication
has no errors.
4

SYMBOL
VALUES
“RS”
Signal
level
Intellicomfort
CH140GSM
flashing
0÷1 2÷9 10÷14 15÷19 20÷30 99
None
Low Acceptable Good Excellent n.r.
"BE"
VALUE
0= <0.2%
5= 3.2÷6.4%
1= 0.2÷0.4%
6= 6.4÷12.8%
2= 0.4÷0.8%
6= >12.8%
3= 0.8÷1.6%
99= n.r.
4= 1.6÷3.2%
NOTE: during the first seconds after the programmabl e thermost at is switched on,
any anomalies of the SIM are indicated by the appearance of the following error
messages:
ERR 310 = no SIM; verify that the SIM is inserted correctly and close the latch
of the SIM holder;
ERR 311 = SIM has PIN protection; remove the SIM and insert it into a phone
to remove the PIN pr ot ection function.
N.B.: Any other error codes that may appear must be noted to then contact the
technical support.
5
Intellicomfort
!
!
!
2. ELECTRICAL CONNECTIONS
ATTENTION: THE INSTALLATION MUST ONLY BE CARRIED OUT BY
SKILLED PERSONNEL
Ingresso 2
Input 2
(alarm)
(allarme)
Ingresso 1
Relè ausiliario
Auxiliary relay
(electrical utility)
(utenza elettrica)
5
7
1
2
4
Gd
In2
In1
CH140GSM
Gd
B6A
Input 1
(alarm)
(allarme)
Auxiliary
Sonda
probe
ausiliaria
L
N
Boiler
Caldaia
ATTENTION: before wiring, make sure the power has been disconnected
from the electrical system from the main switch on the electrical panel
ATTENTION: the cable length of the auxiliary probe must not exceed 3
metres.
NOTE: The programmed parameters will not be lost during blackout periods since
all the settings are saved in a non-volatile memory.
Even if the power supply is not available for long periods, the clock/calendar
operation is guaranteed by an internal battery.
6
230V 50Hz

Intellicomfort
CH140GSM
3. QUICK GUIDE TO PROGRAMMING
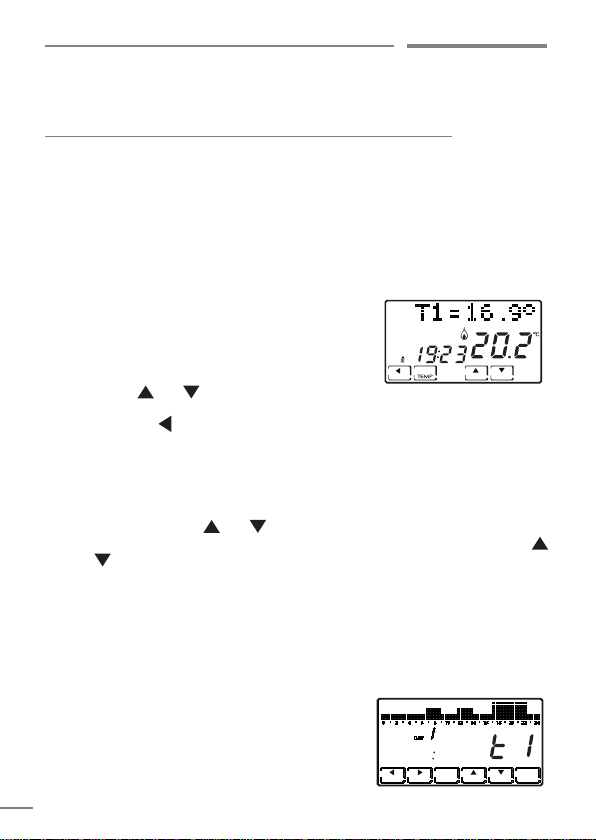
DESCRIPTION OF KEYS
The programmable thermostat is fitted with 6 k eys, the function of which varies depending
on the situation and is described by the symbol that appears on the display in line with
the key.
graphic section:
temperature/clock pr ofil e
messages
day of the weekGSM antenna
relay ON summer
relay ON winter
ambient temperature
Celsius / Fahrenheit
programs
summer / winter
primary function
6 function keys
N.B.: the first time a key is pressed will have no effect other than turning the display
light for it to be seen better.
flat battery symbol
secondary function
time
7
Intellicomfort
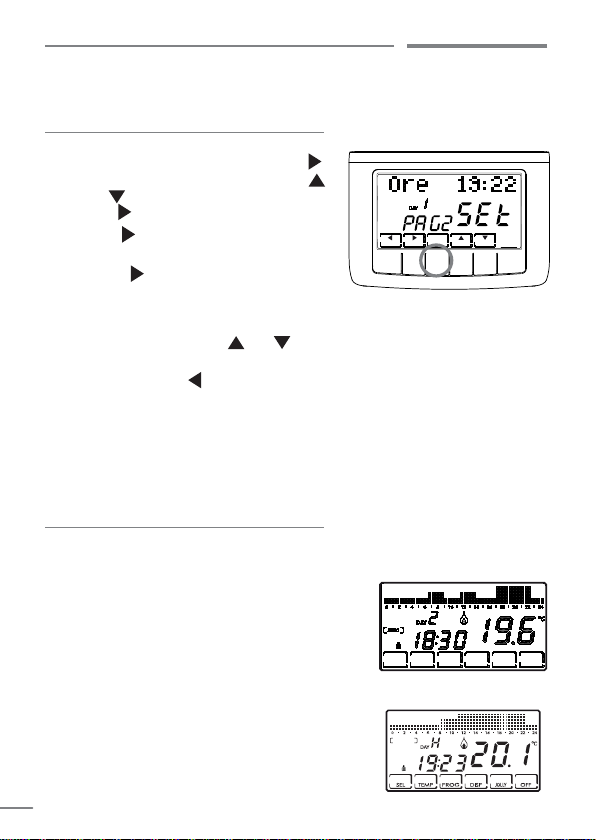
SETTING THE TIME AND DATE
1. After switch-on, press the PROG key
briefly: “Setup” appears; then press
to access the “Hours” page. Use the
and
keys to set the hours and then
press
to set the “Minutes”.
2. Press
again to select the Year, the
Month and the Day in order
3. Press again to select whether to
disable the automatic summer/winter
switch-over: initially, this function is
enabled, however, it can be disabled by
selecting “NO” with the and keys.
4. You can always return to the previous
page by pressing .
5. Press ENTER to exit the Setup menu.
OPERATING PROGRAMS
The CH140GSM programmable thermostat allows for different operating modes,
called programs:
“AUTO” WEEKLY PROGRAM:
you can associate every half hour to one of the four
set temperatures for each day of the week. This is
the program that appears when the programmable
thermostat is switched on and in general, is the most
used.
“HOLIDAY” DAILY PROGRAM:
just like the AUTO program, you can select one of the
4 set temperatures for each half hour, however, this
sequence will be repeated, identical, every day.
,
ENTER
SEL TEMP PROG DISP JOLLY OFF
HOLIDAY
8
Intellicomfort
CH140GSM
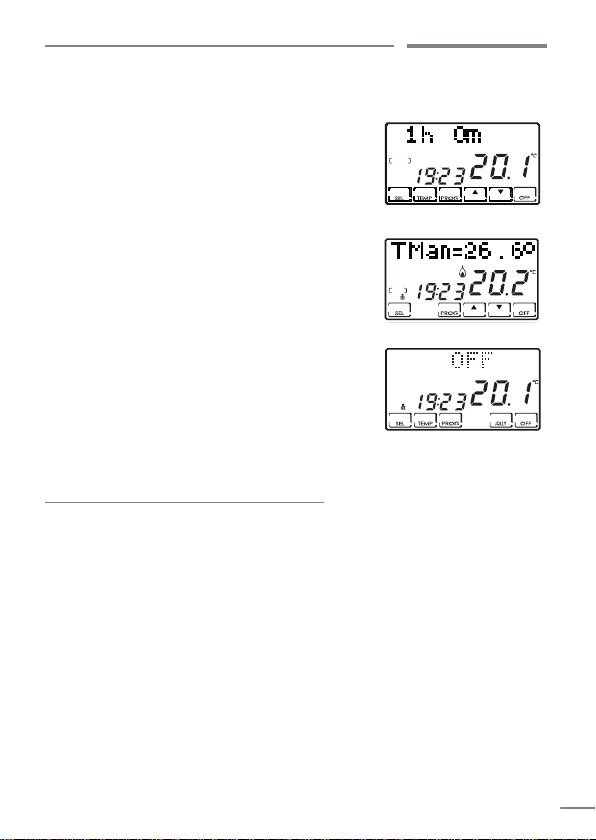
“JOLLY” TEMPORARY PROGRAM:
you can choose to maintain a certain temperature for
a given number of hours, after which it will return to
the previously active program.
“MAN” MANUAL PROGRAM:
the programmable thermostat maintains a fixed
temperature, specified from time to time, for
unlimited time, until another program is selected.
“OFF/ANTI-FREEZE” SYSTEM IS OFF OR WITH
ANTI-FREEZE PROGRAM:
the system remains off or alternatively it will
maintain a very low temperature (2 t o 7°C), to prev ent
the liquid in the heating system from freezing.
PROGRAMMABLE TEMPERATURES
The operating temperature settings can be accessed in the AUTO and HOLIDAY
programs.
Temperatures T1, T2 and T3 can be represented with values ranging from 2°
to 40°C,
The T anti-freeze (TA) temperature can range from 2° to 7°C or be set to OFF
(that is, system off).
These are the temperatures that c an be set when configuring the daily program:
The MANUAL program has its own specific temperature (TMan), just like the
JOLLY (Tj) program, which are set on the respective screens and that range
from 2° to 40°C.
The ANTI-FREEZE/OFF program follows the TA temperature that can range
from 2° to 7°C; alternatively, it can be set to OFF for the system to switch off.
JOLLY
MAN
9
Intellicomfort
SETTING THE OPERATING PROGRAMS
SELECTING THE PROGRAM
Press the SEL key to select the various operating programs, in cyclical
sequence:
AUTO -> MAN -> OFF -> HOLIDAY -> AUTO.
NOTE: the JOLLY tempor ary program is not included in the sequence of programs
but is selected directly with the JOLLY key.
TEMPERATURE SETTINGS
In the AUTO, HOLIDAY and OFF programs press
the TEMP key to change the values of the 4 set
temperatures: pres the TEMP key repeatedly
for the value T1, T2, T3 and Ta to appear in
sequence; go to the T you wish to modify and use
the arrows
temperature by a tenth of a degree at a time.
Use the arrow to go back to the beginning.
Consider that T1 will always be less or equal to
T2, and T2 of T3.
In the JOLLY program, the TEMP key alternates the display of the set
temperature Tj and the hours left f or the pr ogr am to end: these two values c an
be changed using the and keys.
In the MAN program you can modify the fixed temperature TMan using the
and keys.
MODIFYING THE DATE AND TIME IN PROGRESS
Briefly press the PROG key to enter the “SETUP” menu, in which you can
change the time, the date, the winter/summer mode and the automatic
daylight saving function.
CUSTOMIZING THE WEEKLY “AUTO” AND DAILY “HOLIDAY” PROGRAM
Keep the PROG key pressed until “CONFIG”
appears. In this menu you can program the
weekly profiles (AUTO program) and daily
(HOLIDAY program) and set the advanced
functions (refer to the subsequent sections for
their description).
and to increase or decr ease the
000
PROG
COPY
10

Intellicomfort
CH140GSM
NOTE: if “SETUP” appears instead of “CONFIG”, you have r eleased it too quickl y
and must press ENTER to go back to the normal operating mode and try again.
When entering the “CONFIG” menu, the page that allows you to select the
desired temperature (T1/T2/T3/Ta) for every half hour of the day indicated
appears (from 1 to 7 to indicate the days from Monday to Sunday).
NOTE: T1/T2/T3/Ta are displayed on the right side of the display with
the symbols:
Use the
Use the
Use PROG (pressed briefly) to go to the next day (DAY 1 -> 2 -> 3 -> 4 -> 5 -> 6 ->
7 -> H).
Press COPY to copy the temperature profile of the current day to the next day.
The Correction parameter page is acces sed aft er H (profile of the Holiday daily
program).
Use PROG (pressed for l ong) or
Correction page.
From the Correction page onwards, use ENTER to exit from the “CONFIG”
menu.
“JOLLY” PROGRAM SETTINGS
In all programs except MAN, the temporary program is selected by pressing
the JOLLY key: this program allows you to define the desired temperature and
its duration in hours (up to a maximum of 240, that is, 10 days).
For example, it may be useful to keep a lower temperature throughout the
weekend if you are away from home.
Once this program is accessed, you can change the duration, which is initially
an hour, and increase the number of hours using the or decrease them
using the .
Press TEMP to display and change the Tj temperature using the and
keys.
and keys to move a half hour to the right or left.
and keys to switch from one set temperature to another.
at the beginning of day 1 to go directly to the
11
 Loading...