

Page 1

ENGLISH
Page 2

Table of Contents
1. Introduction.......................................................................................................................... 3
1.1 Preface......................................................................................................................... 3
1.2 Packing List.................................................................................................................. 5
1.3 Cautions ....................................................................................................................... 5
1.4 Connection ................................................................................................................... 7
1.5 View............................................................................................................................ 12
1.6 Menu Language ......................................................................................................... 13
1.7 HDD Format ............................................................................................................... 13
2. About the Player ................................................................................................................ 14
2.1 Remote Control.......................................................................................................... 14
3. Main Functions .................................................................................................................. 16
3.1 Setup Menu................................................................................................................ 16
3.2 Movie Library.............................................................................................................. 26
3.3 Photo Library.............................................................................................................. 28
3.4 Music Library.............................................................................................................. 30
3.5 File Manager............................................................................................................... 32
3.6 Playlist Management.................................................................................................. 36
3.7 Copy und Delete Function.......................................................................................... 37
3.8 Internet Media............................................................................................................. 39
3.9 SAMBA Server and Cli ent.......................................................................................... 43
3.10 FTP Server............................................................................................................... 44
3.11 Virtual Remote Control............................................................................................. 46
4. Upgrading the Firmware................................................................................................... 48
5. Appendixes......................................................................................................................... 49
6. Frequently Asked Questions............................................................................................ 51
7. Copyrights and Trademarks............................................................................................. 53
8. Warranty............................................................................................................................. 53
9. GPL Statement ................................................................................................................... 54
ENGLISH
2 / 59
Page 3

1. Introduction
1.1 Preface
Thank you very much for purchasing FANTEC P3700 Web. We hope you will enjoy using it as
a great home entertainment partner. This player has the following functionality.
A/V Output
• HDMI V1.3 for high-definition video and digital audio
• Composite & component video and stereo audio for analog audio-visual connection
• S/PDIF optical and coaxial interface for high-fidelity digital audio
• Adjustable video output resolution (NTSC, PAL, 480p, 576p, 720p, 1080i, 1080p)
Movie Playback
• Movie format: AVI, VOB, MKV, MOV, MP4, MPG, TS, WMV, DAT, IFO, RM, RMVB, ISO
(DVD & BluRay), AVCHD, MTS, M2TS, M4V, ASF , FLV, XviD, DivX 3/4/5, DVD menu
playback, H.264, resolution up to 720p/1080i/1080p
• Supports major audio formats (1080p HD video decoding)
• Fast forward/rewind
• View subtitle
• Subtitle control: color/offset/size
• Unicode (UTF8), BIG5 (Traditional Chin ese), Western, Turkish, Central European, Greek,
Cyrillic, SE European, Russian, Hebrew, Arabic, Japanese, Thai
Music Playback
• Music format: MP3, OGG, WMA, WAV, AAC, FLAC, PCM, LPCM, MS-ADPCM, LC-AAC,
HE-AAC, COOK, RA-Lossless
• Stereo/Dolby Digital AC3 5.1(pass-through & downmix to stereo)
• Dolby Digital Plus 7.1(pass-through)
• Dolby TrueHD 7.1(pass-through & downmix to stereo)
• DTS Digital Surround 5.1(pass-through & downmix to stereo)
• AAC 7.1 (passthrough & downmix to stereo)
• Fast forward/rewind
• Shuffle
• Repeat
Photo Playback
• Photo format: HD JPEG, JPG, BMP, GIF, TIF, PNG
• You can view photos in slide show mode with background music.
• Zoom in/out, Rotate
ENGLISH
3 / 59
Page 4

Network Feature
• A/V streaming/transmission via Ethernet (10M/100M/1000M) & Wi-Fi (802.11b/g/n,
optional)
• File sharing via Samba server
• FTP server
• A/V streaming via UPnP Media Server
• BitTorrent download
• Internet Radio (Please visit www.shoutcast.com
for available stations)
• Video podcast subscribe and download
• Web-based remote control for smart phones, iPhone & PC
Media Library
• Quick-Search, search files by keywords.
• A powerful search engine, allows you to browse multimedia files in most easy ways
File Copy
• Supports copying & moving files among USB devices, Local HDD, and Network
USB 3.0 & USB 2.0 Support
• USB 3.0 DEVICE port (for computer connection, compatible to USB 2.0/1.1 )
• USB HOST port x 5 (for USB storage devices),for connection of an USB DVD drive, an
USB Y-cable is recommended
• 1 x SD / SDHC / MMC / MS / MS pro Card Reader
Note: All the information contained in this manual was correct at the time of publication.
However, as our engineers are always updating and improving the product, your device’s
software may have a slightly different appearance or modified func tionality than presented in
this manual.
ENGLISH
4 / 59
Page 5

1.2 Packing List
Part Quantity
Player 1
USB cable 1
Remote Control 1
Remote Control Battery 2
AC/DC adaptor 1
Quick start guide 1
Driver CD (with User Manual) 1
Warranty card 1
Note: The actual contents in the pa ckage might be dif ferent from the p acking list in the manual .
1.3 Cautions
The FANTEC P3700 Web design and manufacture has your safety in mind. In order to safely
and effectively use this player, please read the following before usage.
1.3.1 Usage Cautions
User should not modify this player. If commercial hard disk is bein g used, the environmental
temperature should be within +5℃ ~ +35℃.
1.3.2 Power
The player’s power voltage: DC 12V.
When using this player , please connect the supplied AC adapter or AC adapter cable to the
player’s power jack. When placing the adapter cable, make sure it can not get damaged or be
subject to pressure. To reduce the risk of electric shock, unplug the adapter first before
cleaning it. Never connect the adapter to the player in a humid or dusty area. Do not replace
the adapter or cable’s wire or connector.
1.3.3 Radio Interference
- If not properly shielded, almost all electronic devices will get radio interference. Under some
conditions, your player might get interference.
- The design of this player has followed the FCC/CE standard, and has followed the following
rules:
(1) This player may not cause harmful interference;
(2) This player could accept some interference received including interference that may cause
undesired operation.
1.3.4 Repair
If the player has a problem, you should take it to an appointed repair center and let the
specialists do the repair, never repair the player yourself, you might damage the player or
endanger yourself or your data.
ENGLISH
5 / 59
Page 6

1.3.5 Disposing of the Player
When you dispose of the player, be sure to dispose it appropriately. Some countries may
regulate disposal of electrical device, please consult with your local authority.
1.3.6 Hard Disk Cautions
The player uses an internal hard disk for data storage, in normal case, format or repair is not
required.
You should carefully read the < Frequently Asked Questions > chapter, and check our website
for latest information before formatting the hard disk.
- Physical impact may create bad sector in the hard disk, you can use CHKDSK to fix the
problem.
- All dat a stored in the player may be lost due to physical impact, electrical shock, power lost,
HDD format etc. Please backup your data.
- It is suggested to do defragment after a long period of usage.
- Regularly backup the data in the hard disk so that it can be recovered in the event of data
corruption or loss. Our company takes no responsibility for loss of dat a stored on the hard disk.
1.3.7 Others
When using this player , please do not let the player come into cont act with water or other liqui d,
if water is accidentally spilled on the player, please use a dry cloth to absorb the spillage.
Electronic products are vulnerable, when using please avoid shaking or hitting the player, and
do not press the buttons too hard.
Do not let the player come into contact with water or other liquid.
Do not disassemble the player, repair the player or change the design of the player, any
damage done will not be included in the repair policy.
Do not press the buttons of the player too hard.
Avoid hitting the player with hard object, avoid shaking the player, and stay away from
magnetic fields.
During electrostatic discharge and the strong electromagnetic field, the product will
malfunction, then unplug the power cable and the product will return to normal performance
next time it is powered on.
ENGLISH
6 / 59
Page 7
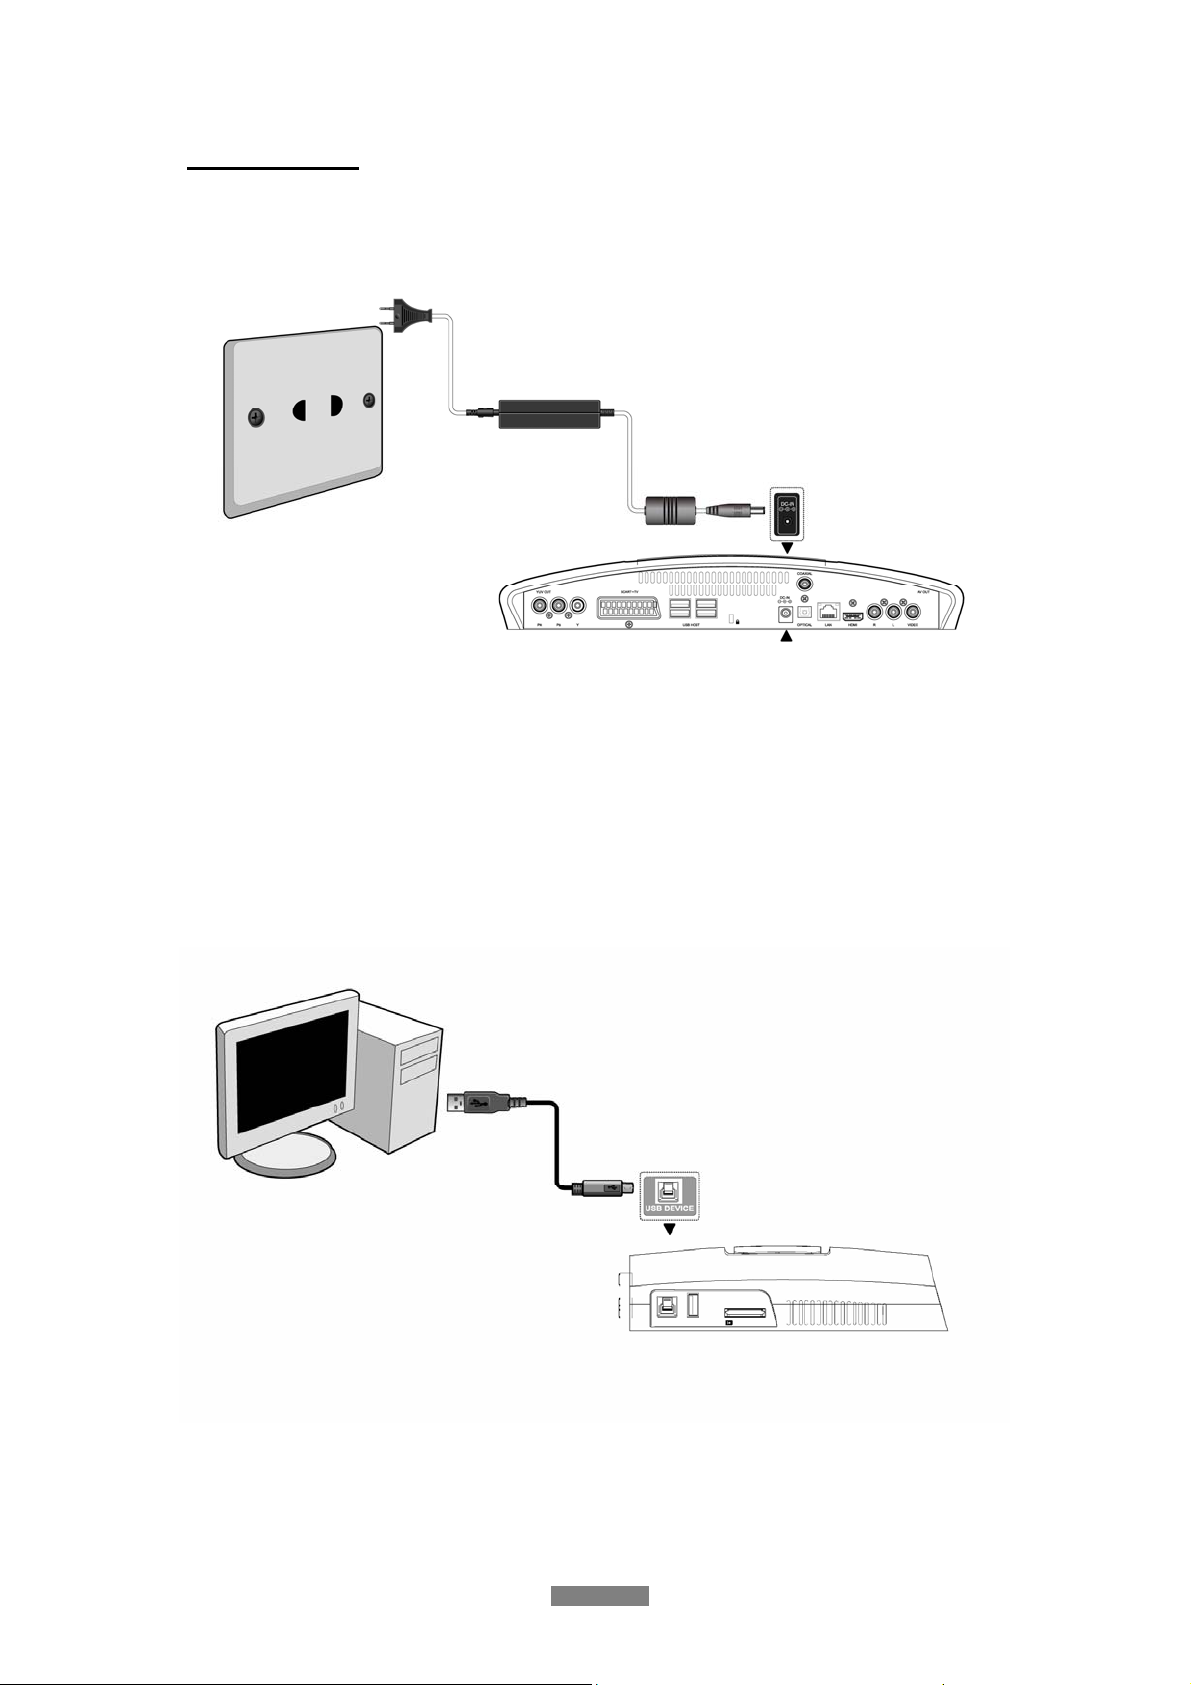
1.4 Connection
1.4.1 Connecting the Power Supply
(1) Follow the picture and connect the AC adaptor to the player’s DC IN jack;
(2) Follow the picture and plug in the AC adaptor to the power outlet.
1.4.2 Connecting to a PC
(1) Make sure the player is powered on;
(2) Plug in the squarish connector of the USB cable to this player’s USB DEVICE port;
(3) Plug in the rectangular connector of the USB cable to computer.
In this way, you can manage content on the built-in HDD of the player on your local PC.
ENGLISH
7 / 59
Page 8
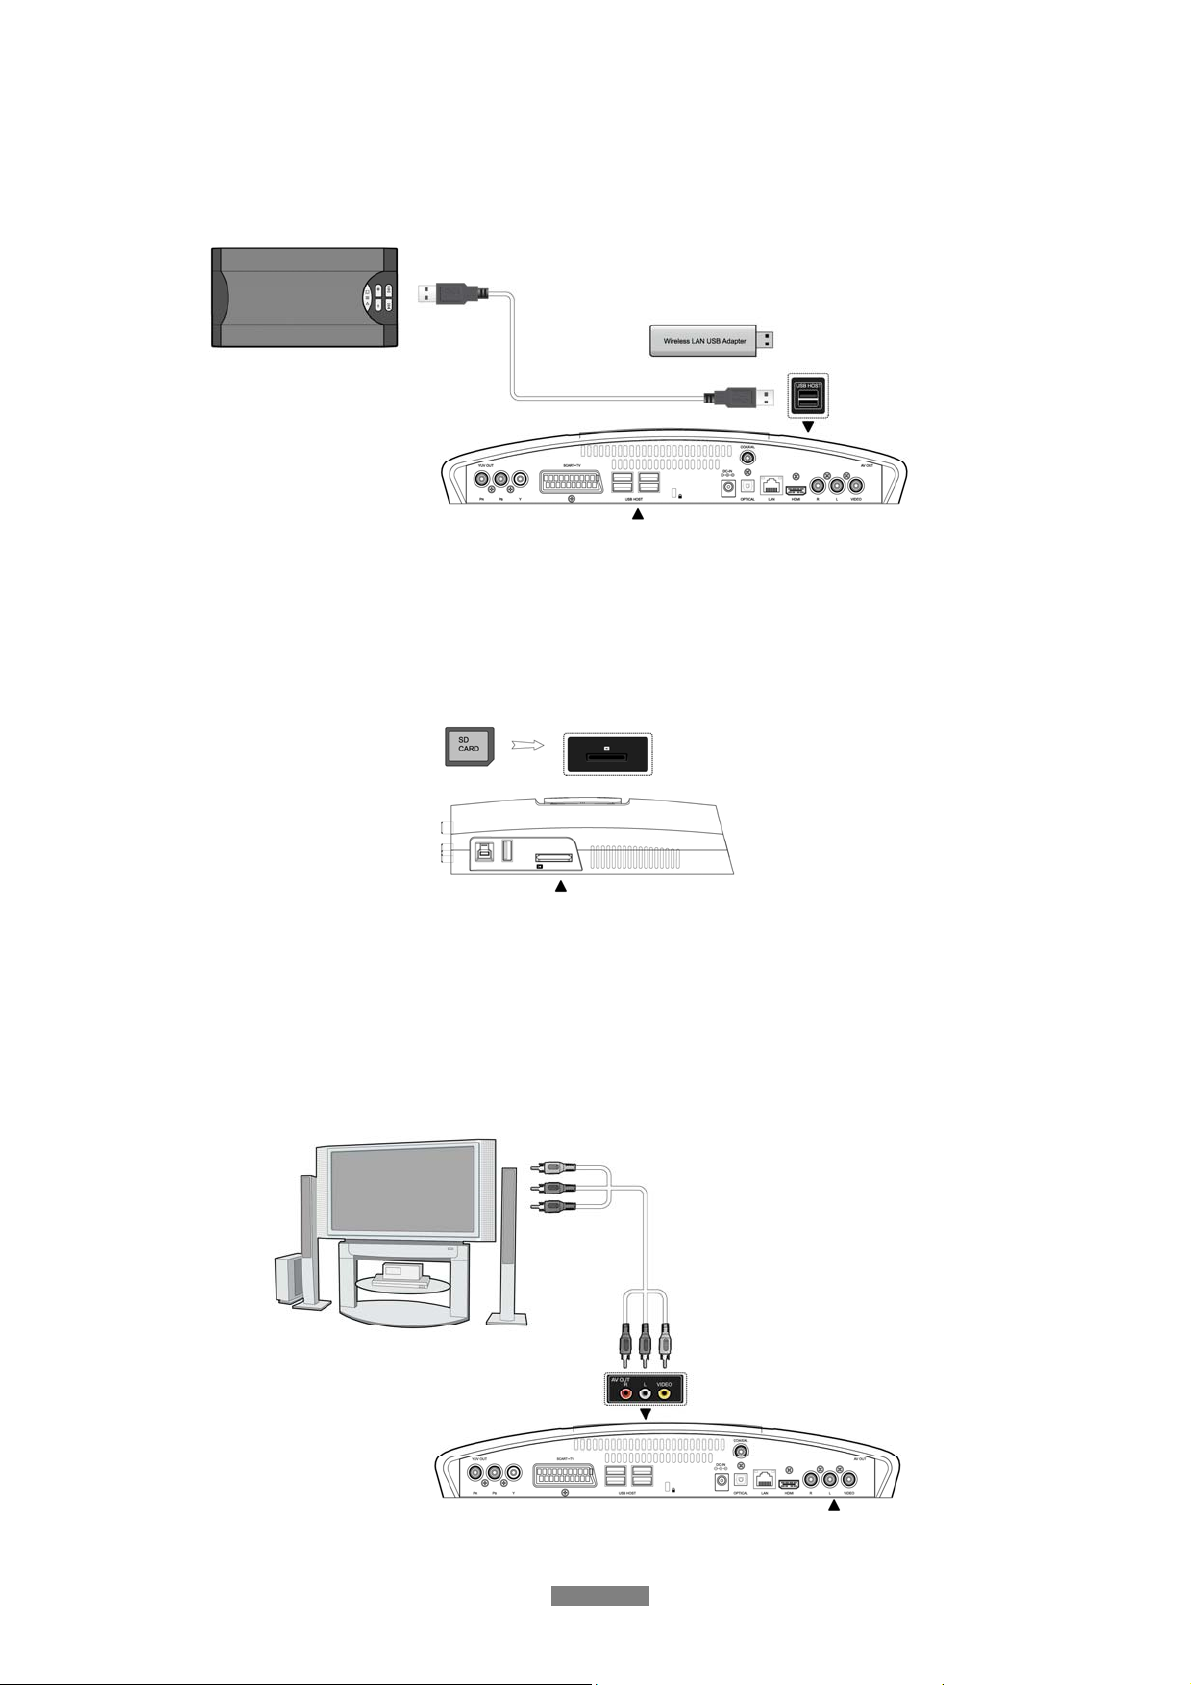
1.4.3 Connecting a USB Device
(1) Make sure the player is powered on;
(2) Plug in the USB stick, USB DVD or USB HDD etc. to the USB HOST port of this player.
In this way, you can browse contents on the USB device.
1.4.4 Connecting a Memory Card
Memory card can be used by inserting to the card slot
(1) Follow the picture to insert the memory card to the card slot properly;
(2) Insert the card by following the arrow pointer in the picture.
In this way, you can browse contents on the memory card.
1.4.5 Connecting to a TV
1.4.5.1 A/V OUT
(1) Follow the picture and plug in the 3 color connector to the player’s A/V OUT jack;
(2) Follow the picture and plug in the 3 color connector to the TV’ s A/V IN jack.
In this way, you can enjoy the content in the player on TV or other display devices.
ENGLISH
8 / 59
Page 9
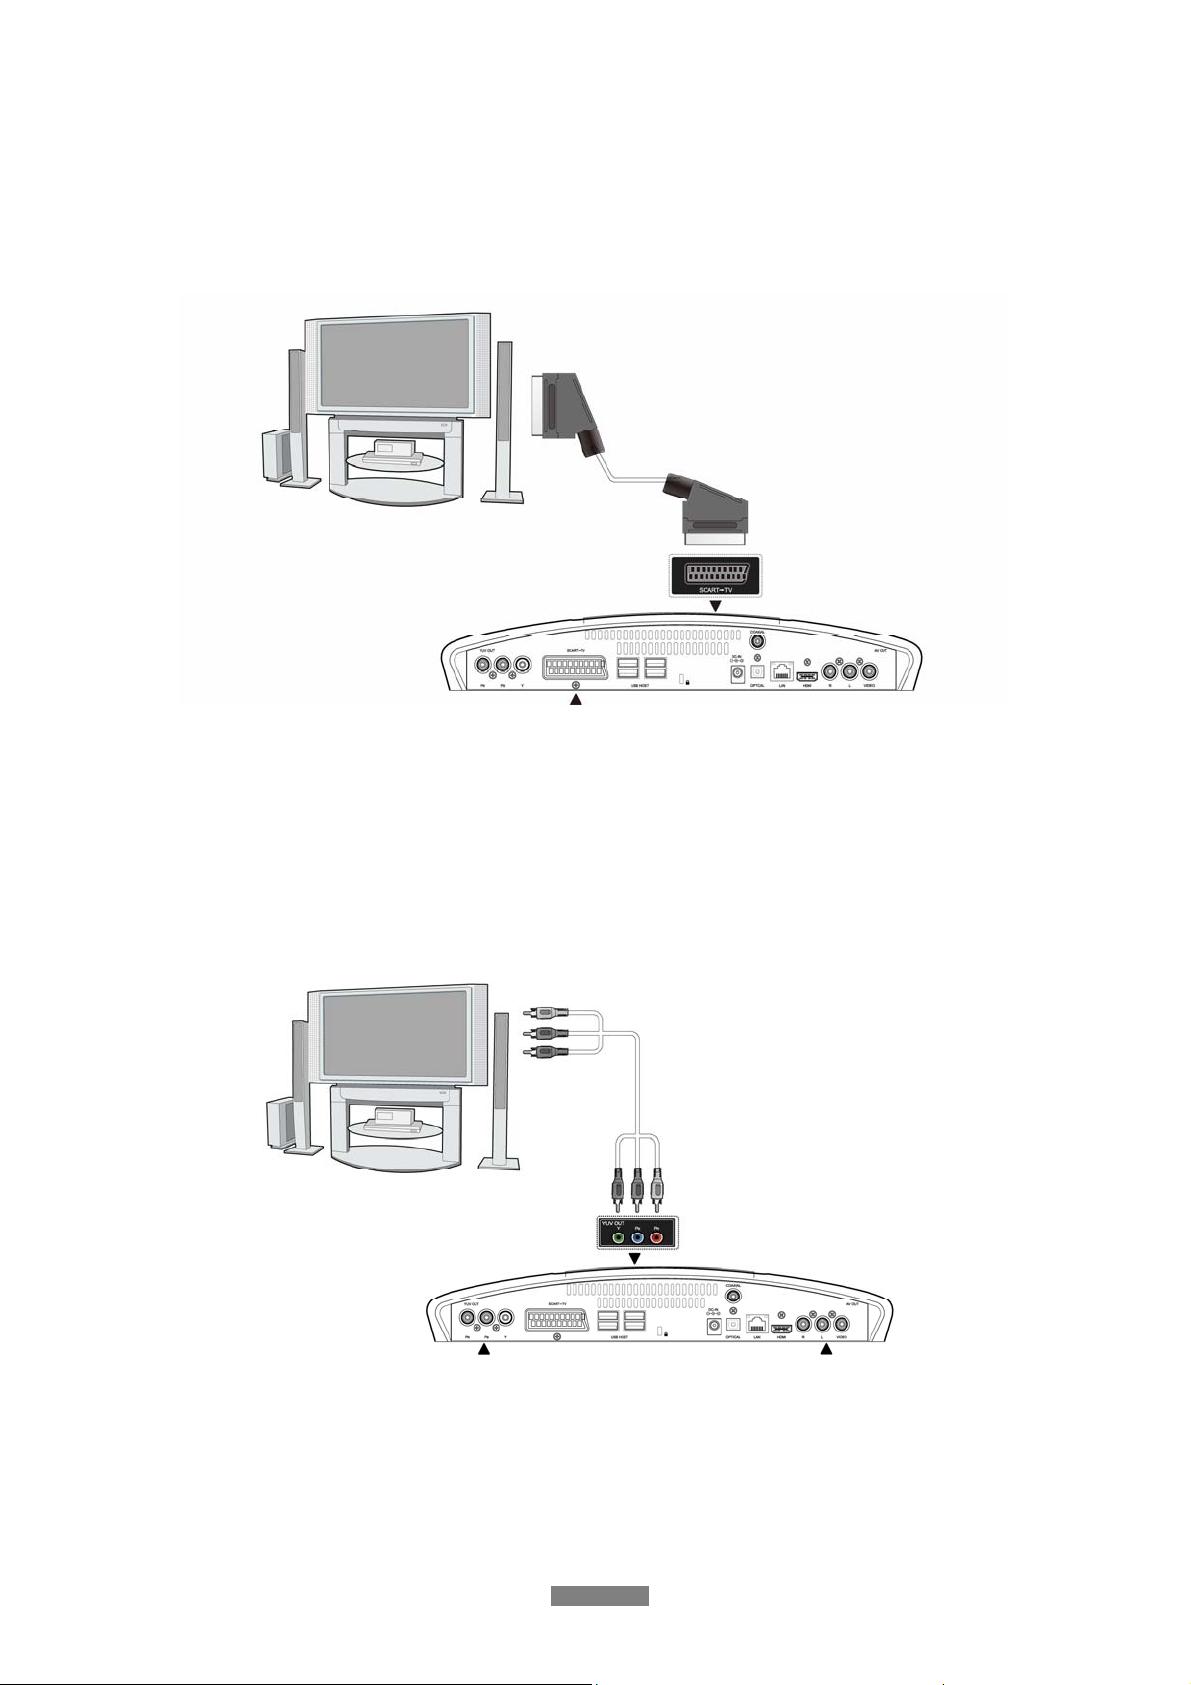
1.4.5.2 SCART OUT
(1) Follow the picture and plug one connector on the SCART cable to the player’s SCART
socket;
(2) Follow the picture and plug the other connector on the SCART cable to the TV’s SCART
socket.
1.4.5.3 Y/Pb/Pr Component OUT
(1) Follow the picture and plug in the 3 color connector to the player’s Y/Pb/Pr jack;
(2) Follow the picture and plug in the 3 color connector to the TV’ s Y/Pb/Pr jack.
Audio Connection while using Y/Pb/Pr Video out:
First method: use the audio output from the A/V OUT jack;
Second method: use the audio output from the S/PDIF Coaxial or Optical jack.
ENGLISH
9 / 59
Page 10
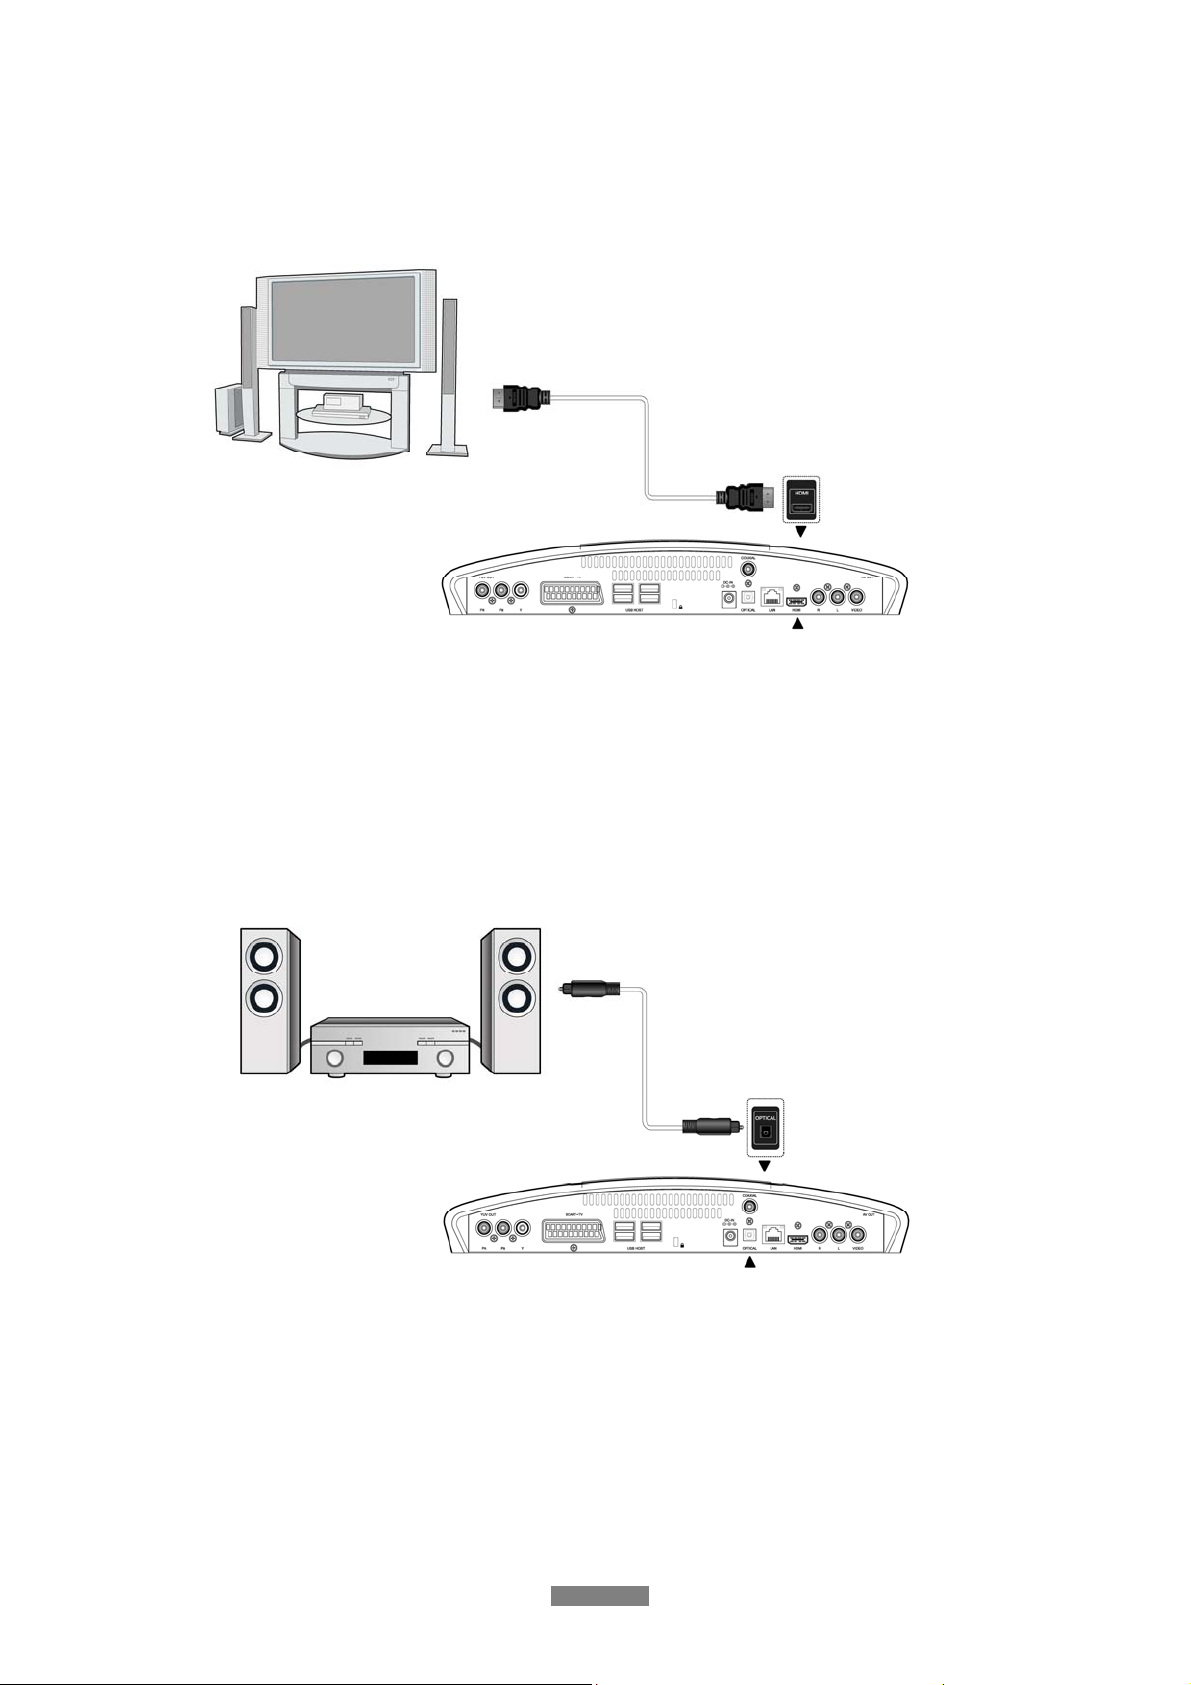
1.4.5.4 HDMI OUT
(1) Follow the picture and plug one connector on your HDMI cable to the player’s HDMI jack;
(2) Follow the picture and plug the other connector on your HDMI cable to the TV’s HDMI jack.
Note: The HDMI cable is an optional accessory sold separately.
In this way, you can have the highest quality video and audio via a single cable.
1.4.6 Connecting to an Digital Amplifier
(1) Follow the picture and plug in the Toslink connector of your optical fiber to the player’s
S/PDIF optical jack;
(2) Follow the picture and plug in the other connector on your optical fiber to the digital audio
device (digital amplifier or decoder).
Note: Optical fiber cable is not supplied.
In this way, you can enjoy powerful Dolby Digital/ Dolby Digital Plus/ Dolby TrueHD/ DTS or
MPEG sound. DTS-HD sound is transferred via HDMI cable and an amplifier with HDMI
interface is needed. (Please refer to ‘3.1.2 Changing Audio Settings’ for configuration)
ENGLISH
10 / 59
Page 11
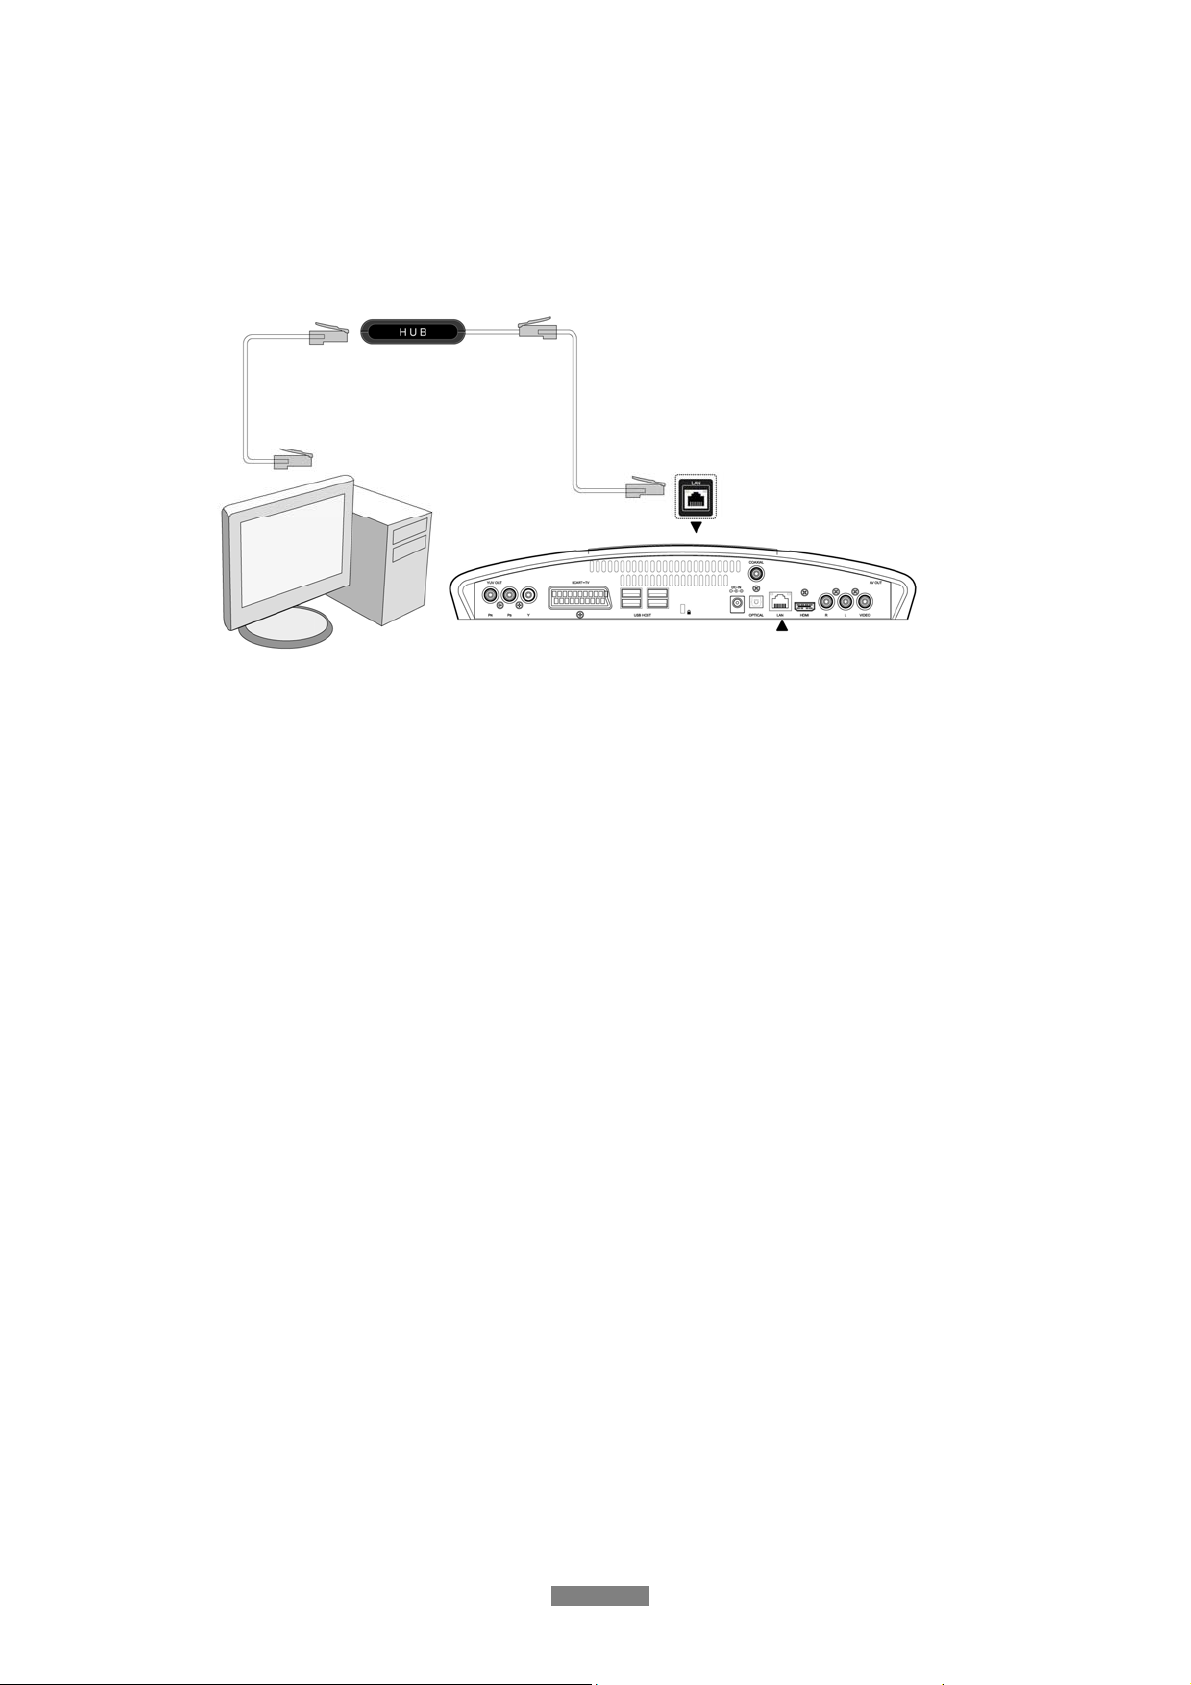
1.4.7 Connecting to a network
To connect to a LAN (Local Area Network) you require a cat5, cat5e or cat6 n etwork cable (not
supplied).
(1) Connect one of the crystal plugs on the cable to the player’s RJ45 LAN socket;
(2) Connect the other crystal plug on the cable to a RJ45 LAN port on your router, switch, or
hub devices.
1.4.8 Connecting to a wireless network
(1) Make sure the player is powered on;
(2) Plug the Wireless LAN USB Adapter (i.e. Wi-Fi USB Dongle) to the USB HOST port of the
player.
Note: The Wi-Fi Dongle is an optional accessory sold separately. (Please refer t o ‘3.1.4
Changing Network Settings’ for more details about wireless setup)
ENGLISH
11 / 59
Page 12
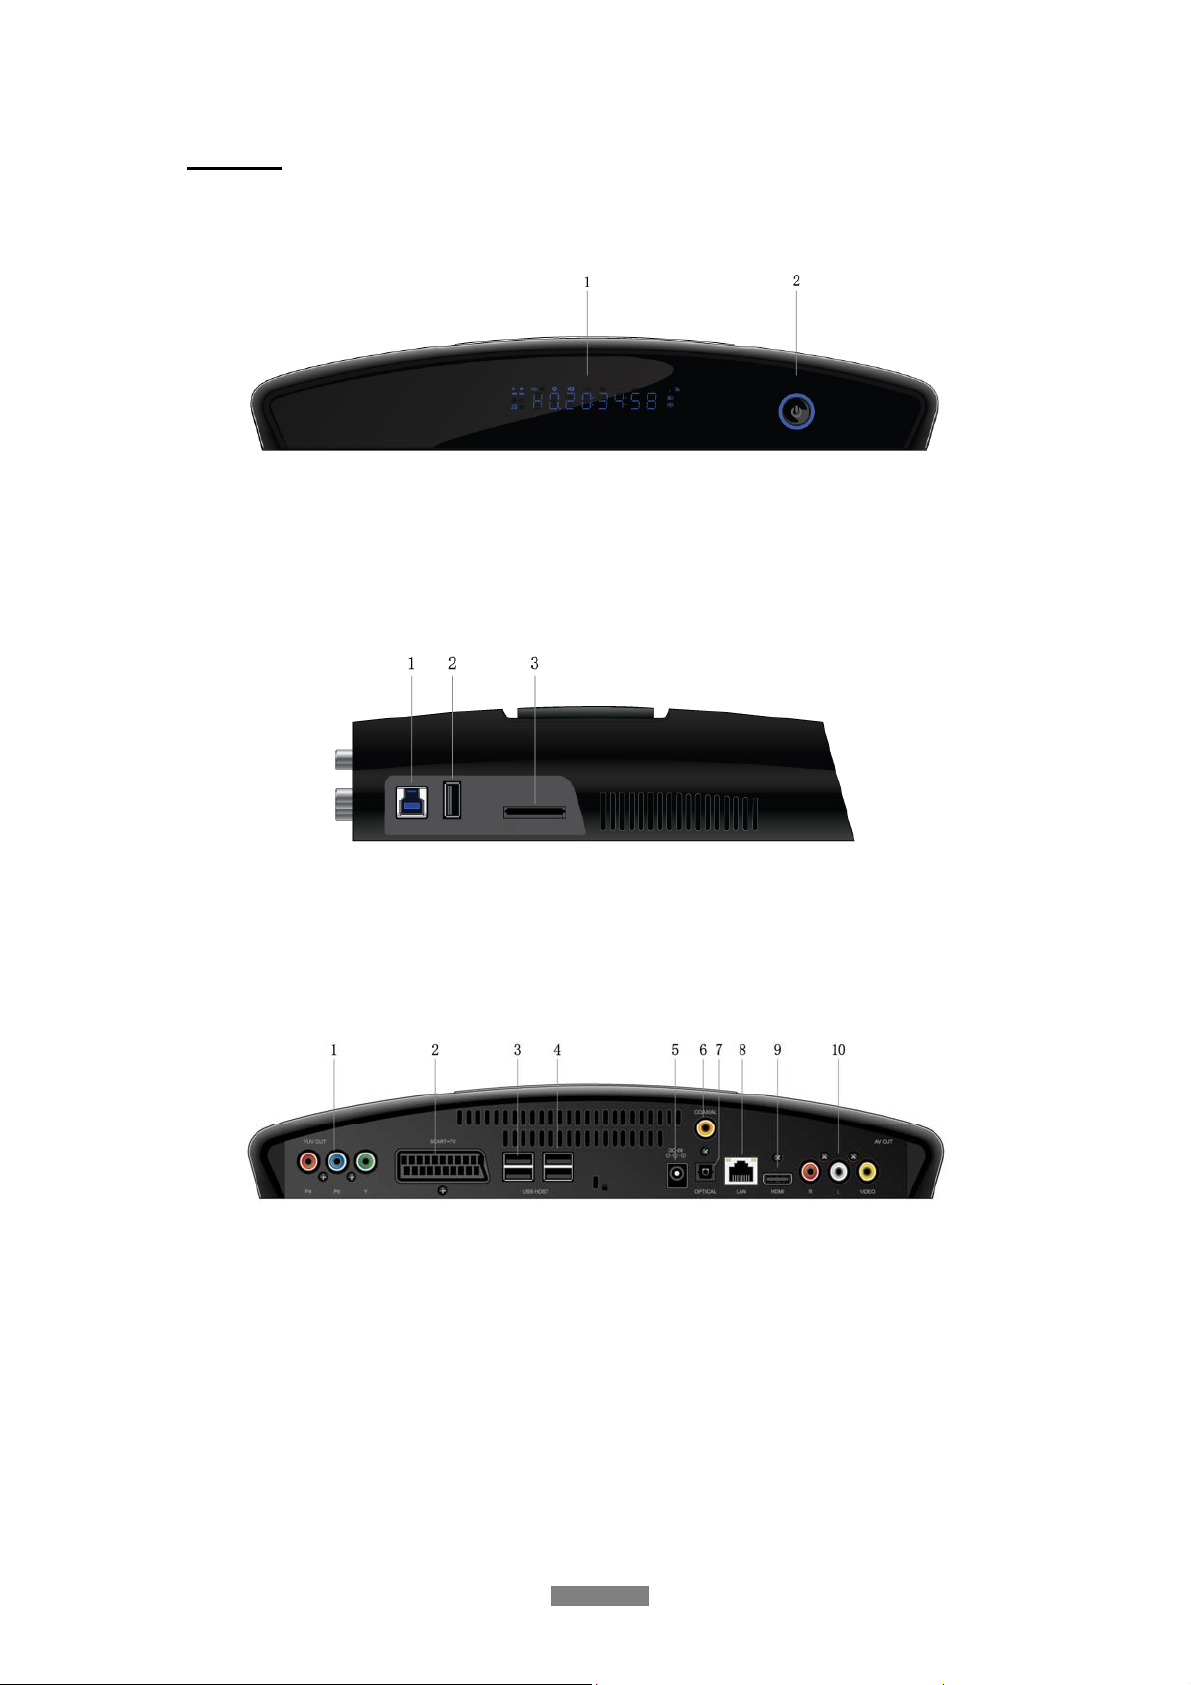
1.5 View
Front Panel
1. VFD display screen 2. POWER button & indicator
Side Panel
1. USB 3.0 Device port 2. USB 2.0 HOST port
3. Memory Card slot
Rear Panel
1. Y/Pb/Pr OUT jack USB HOST port 2. SCART - TV socket
3. USB 2.0 HOST port 4. USB 2.0 HOST port
5. DC-IN jack
7. S/PDIF Optical jack
9. HDMI jack
6. S/PDIF Coaxial jack
8. RJ45 LAN socket
10. A/V OUT jack
ENGLISH
12 / 59
Page 13
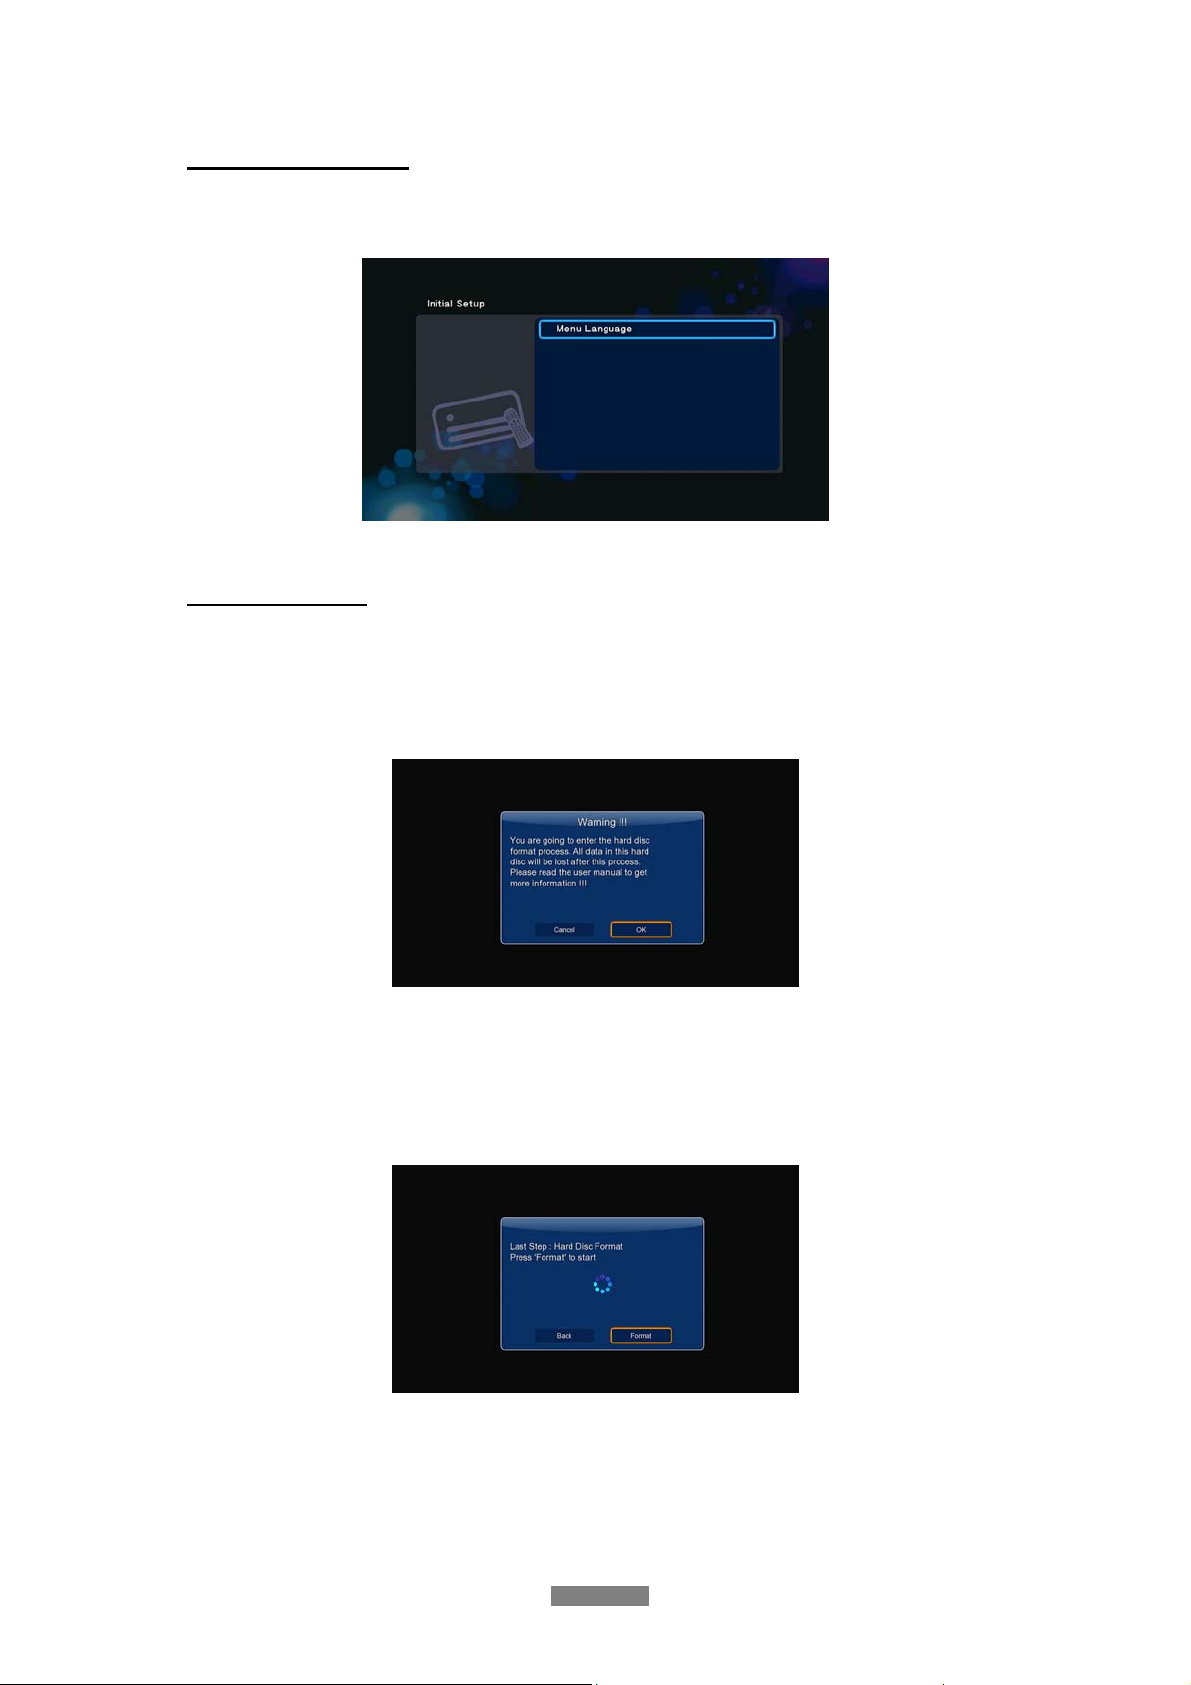
1.6 Menu Language
The system language of this player can be set to English or other languages. Change the
language you wish in the setup menu, the selected language will take effect immediately.
1.7 HDD Format
For users who wish to install a new SATA HDD into the player, at first you have to format the
hard disk. Please refer to the following procedures to format the hard disk.
- Step 1: Select OK on the Warning page, press OK to confirm.
Note: This page can be also accessed via Setup->System-> Format menu.
- Step 2: Enter the default password ‘0000’. Press the numerical buttons to input, and the
OK button to confirm.
- Step 3: Select Format, press OK, and then hard disk format will start.
The formatting procedure will be finished within a few minutes. And then you can use the hard
disk properly on the player.
Note: HDD format will remove all data stored on the hard disk drive. Please take care and
backup your data in advance!
ENGLISH
13 / 59
Page 14
2. About the Player
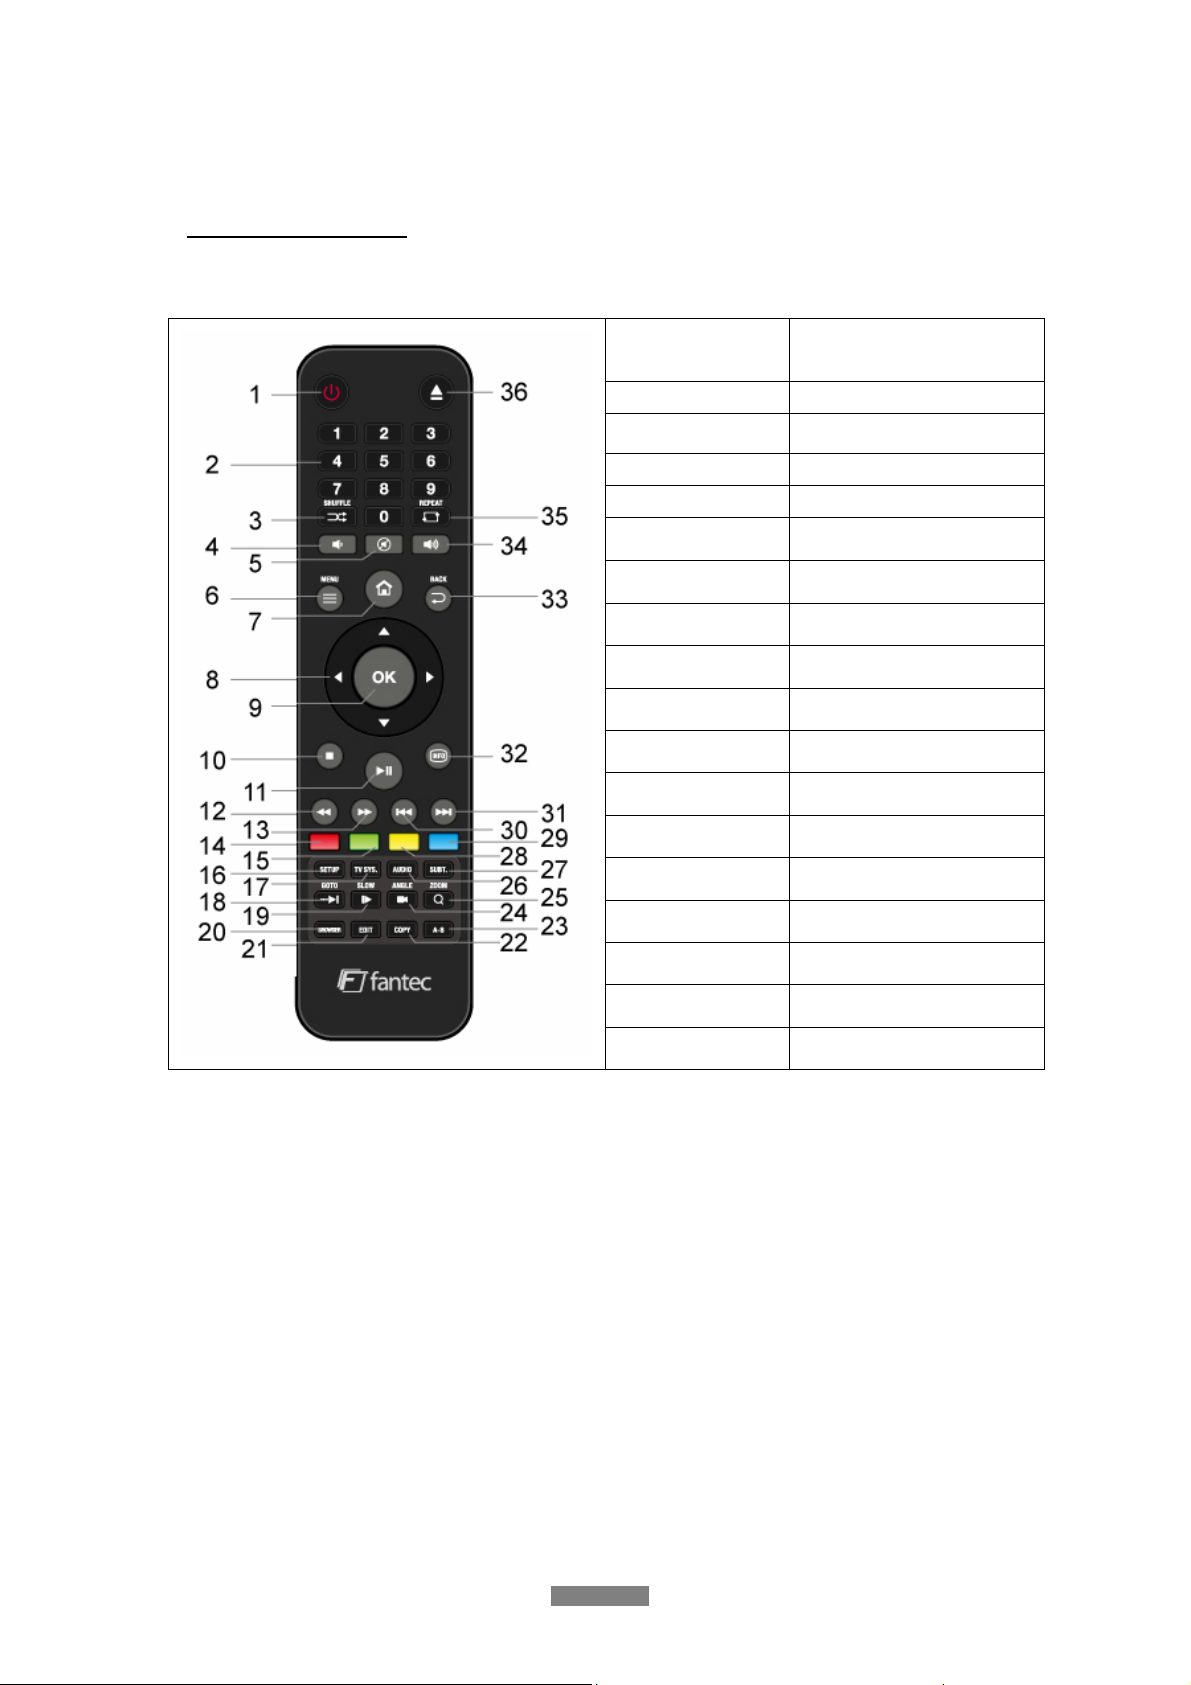
2.1 Remote Control
All procedures in this manual can be carried out using the remote control buttons.
See the following for details on each button and its function:
1. Power
3. Shuffle 4. VOL-
5. Mute 6. Menu
7. Home 8. Navigational buttons
9. OK 10. Stop
11. Play/Pause 12. FR
13. FF 14. Red
15. Green 16. Setup
17. TV SYS. 18. GOTO
2. Numeric buttons
19. Slow 20. Browser
21. Edit 22. Copy
23. A-B 24. Angle
25. Zoom 26. Audio
27. Subtitle 28. Yellow
29. Blue 30. Prev
31. Next 32. Info
33. Back 34. VOL+
35. Repeat 36. Eject
ENGLISH
14 / 59
Page 15

No. Button Function
1
Power
2
Numeric buttons
3
Shuffle
4
VOL-
5
Mute
6
Menu
7
Home
8
Navigational
buttons
9
OK
10
Stop
11
Play/ Pause
12
FR
13
FF
14
Red
15
Green
16
Setup
17
TV SYS.
18
GOTO
19
Slow
20
Browser
21
Edit
22
Copy
23
A-B
24
Angle
25
Zoom
26
Audio
27
Subtitle
28
Yellow
29
Blue
30
Prev
31
Next
32
Info
33
Back
34
VOL+
35
Repeat
36
Eject
Press to enter standby mode or wake up.
Press to enter channel numbers or numeric input when
changing settings.
Press to select shuffle mode during music playback.
Press to decrease the volume.
Press to mute audio output, and press again to resume.
Press to enable the option menu, where you can change the
review mode of file manager and media library;
Press to display or hide the option menu during playback.
Press to enter the home screen.
Press the arrow buttons to select menu options, and the OK
button to confirm.
Press OK button to confirm.
Press to stop playback.
Press to begin/pause playback.
Press to fast rewind the current playback. Press repeatedly to
select speeds
Press to fast forward the current playback. Press repeatedly to
select speeds.
Function is available in virtual keyboard.
Function is available in virtual keyboard.
Press to enter the setup menu.
Press to switch between NTSC, PAL, 480P, 576P, 720P, 1080I,
and 1080P.
Press to jump to a specific point on a title. Specify the point
using Title, Chapter and Time.
Press to play back in slow motion. Press the PLAY button to
resume regular playback.
Press to enter file manager.
Press to enter file editing menu in file manager.
Press to enter file selecting menu in media library.
Press to enter file selecting menu.
Press to set the beginning and end points of a section to repeat.
Press to change the view angle during DVD (with multi-angle)
playback.
Press to zoom the image (photo or video).
Press to select an audio track.
Press to set subtitle options. You can change the
color/size/offset/text encoding of subtitle.
Reserved button. No function has been assigned to it yet.
Reserved button. No function has been assigned to it yet.
Press to view the previous file / page up.
Press to view the next file / page down.
Press to display current status.
Press during playback, an onscreen display appears showing
track number and time elapsed/remaining.
Press to return to the previous screen while navigating menus.
Press to increase the volume.
Press to set repeat option.
Press to safely remove the USB device.
ENGLISH
15 / 59
Page 16
3. Main Functions
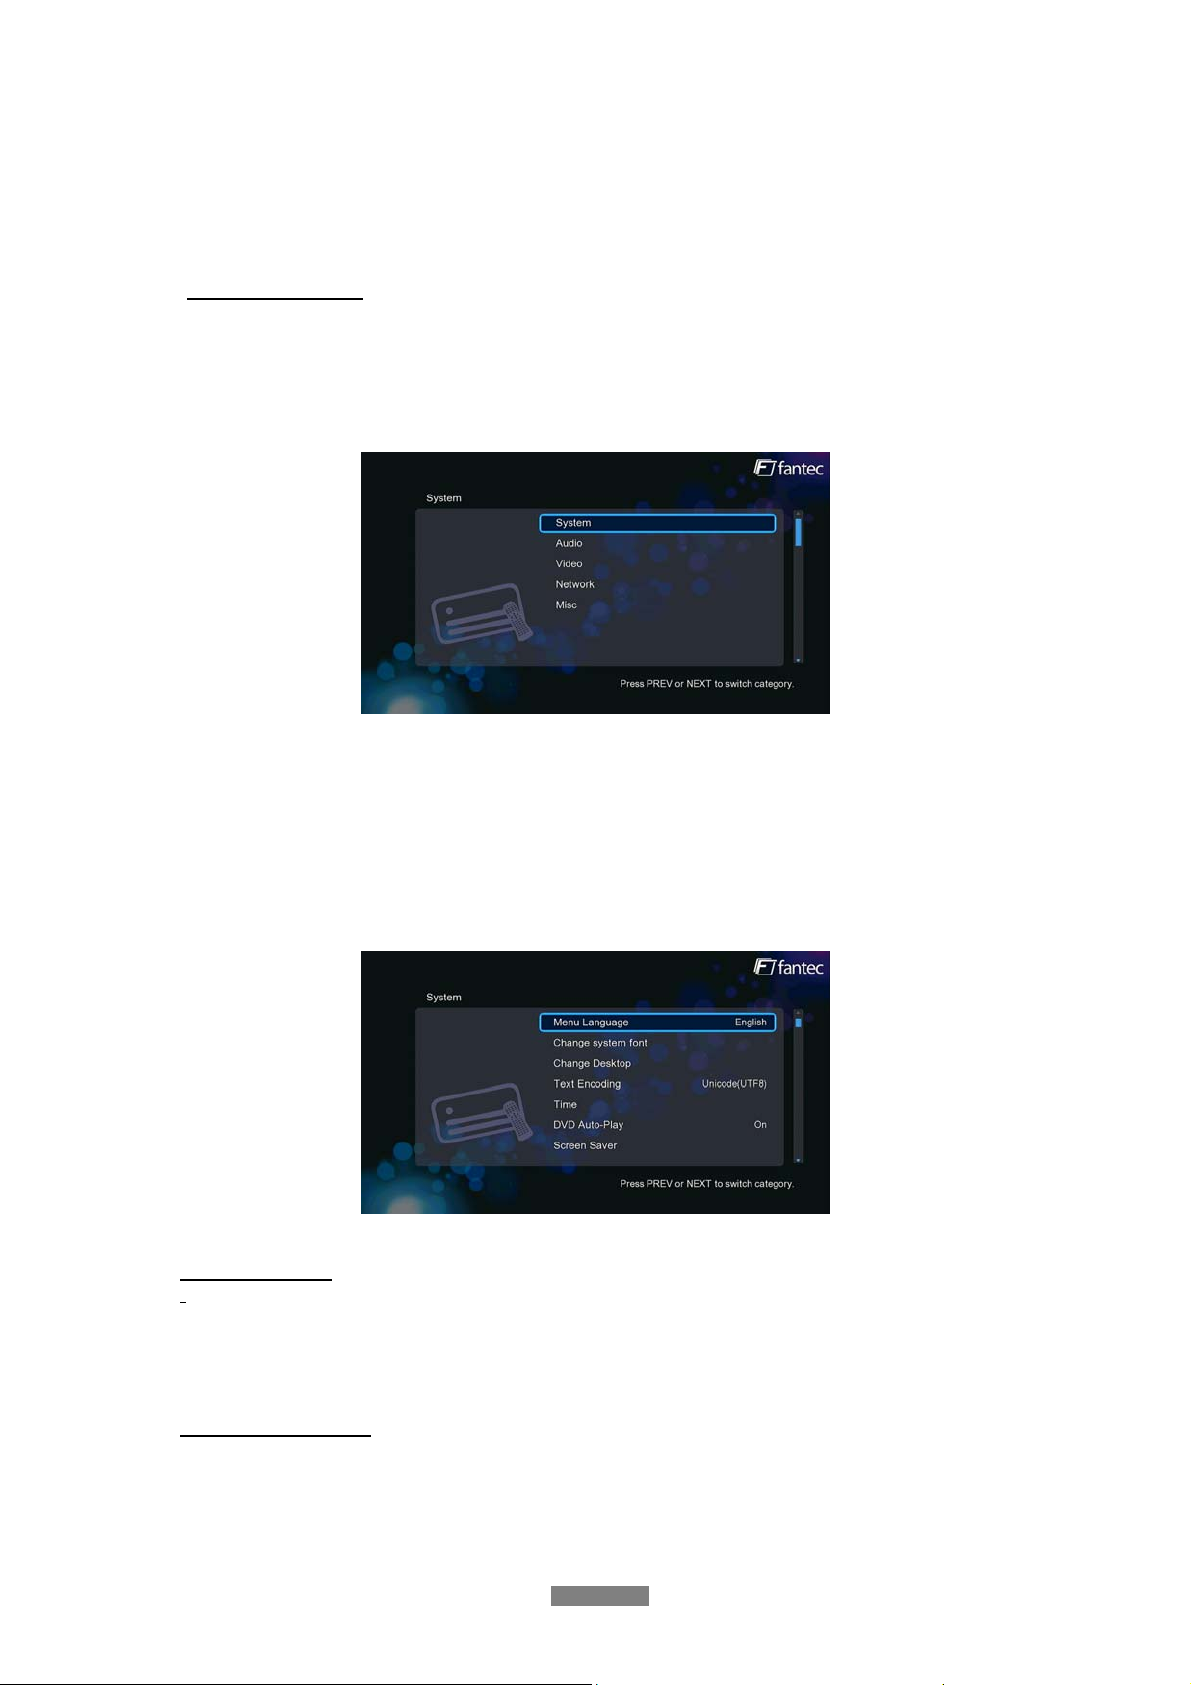
The Setup menu allows you to personalize and configure the preferences for your player.
3.1 Setup Menu
To select a Setup option:
- Select the Setup icon on the home screen, or press SETUP menu on the remote control.
- Use the UP/DOWN navigational buttons to select an option, and then press OK.
There are five Setup options, including System, Audio, Video, Network and MISC. Use the
UP/DOWN navigational buttons to select a menu. Press OK to confirm. Press Back to cancel
and display the previous menu screen.
3.1.1 Changing System Settings
Use this menu to configure system settings.
Menu Language
Select to choose the OSD (On-Screen Display) language. (English, Spanish, French,
German, Italian, Korean, Dutch, Russian, Polish, Chinese, Czech, Slovenian, Romanian,
Portuguese, Hebrew, Magyar, Slovakian, Greek, Japanese)
Change system font
- Select to change system font.
Create a folder named “Resource” in the root directory of your USB or HDD, rename your
font as ‘font.ttf ‘and then copy it to the folder.
ENGLISH
16 / 59
Page 17
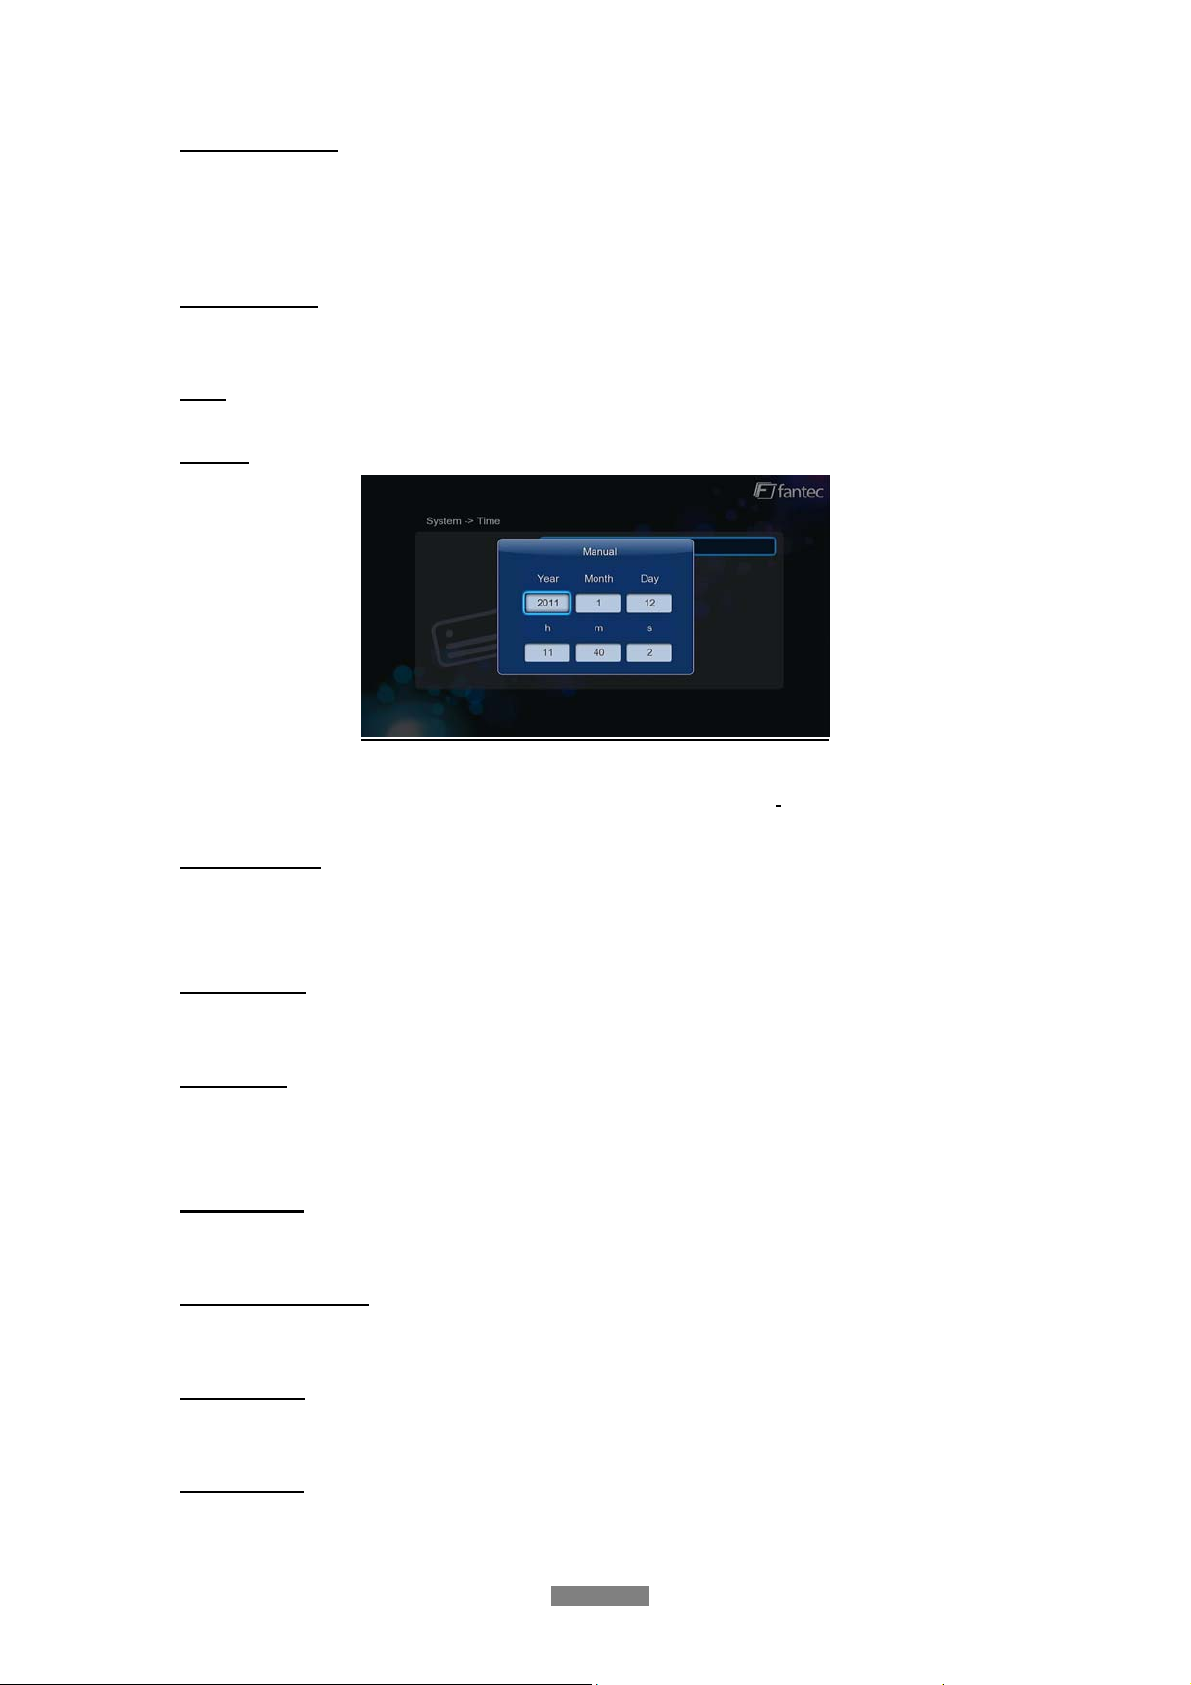
Change Desktop
- Select to change the photo of main menu.
Create a folder named “Resource” in the root directory of your USB or HDD, rename your
photo as ‘desktop.png ‘and then copy it to the folder. (Resolution of the picture: 1280x720)
Text Encoding
- Select to set the text encoding option (subtitle display)
Time
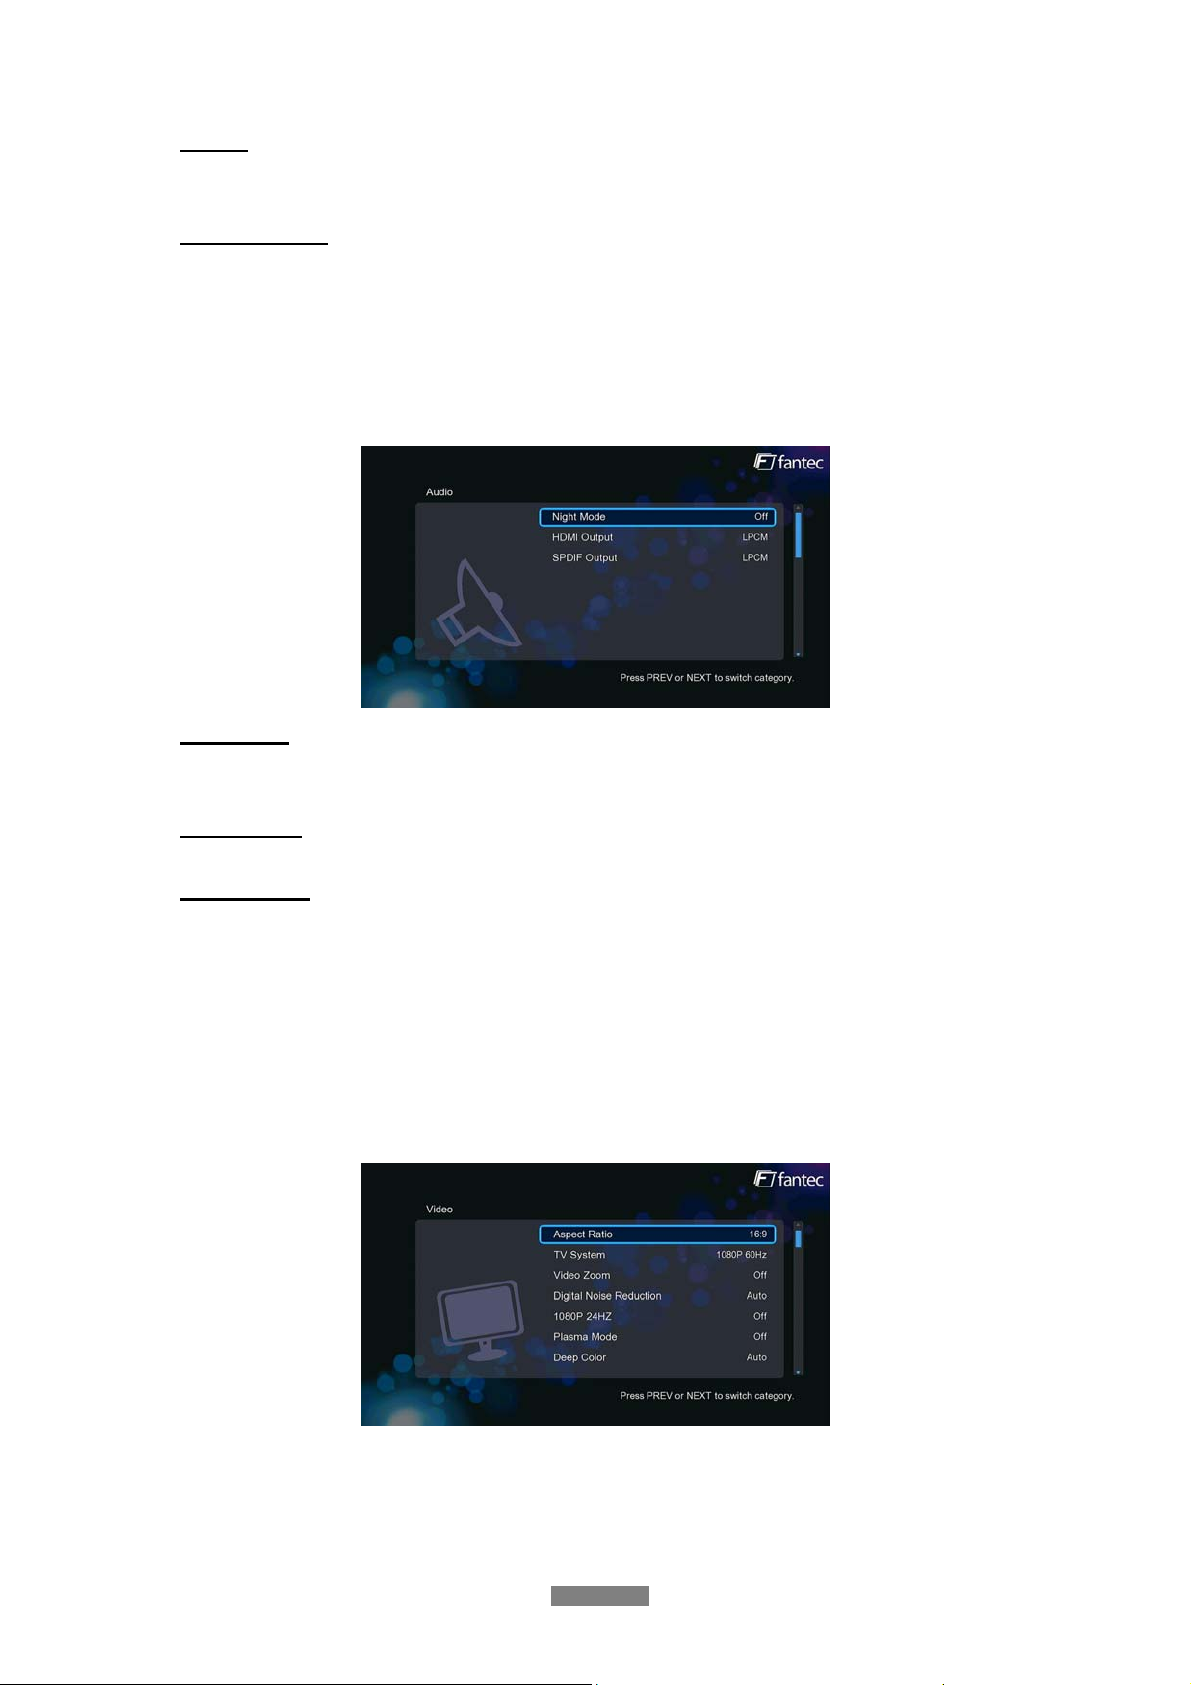
- Select to set the system time.
Manual
Press the left / right button to select each field and the up / down button to adjust each setting.
Numeric buttons are available here. Press the OK button to confirm.
DVD Auto-Play
- Select to turn on/off USB DVD auto-play. If you connect the USB DVD drive, an USB
Y-cable is recommended.
Screen Saver
- Select to turn on / off screen saver.
DLNA DMR
- Digital Media Renderer, can play content received from a digital media controller (DMC),
which will find content from a digital media server (DMS)
Device Name
- Select to key in your desired device name to be seen in your network
Mini KBD Language
- Select to change the language of the mini keyboard.
Scan storage
- Select to set the scan mode of media library and keep media library up to date.
Resume Play
- Select to turn on / off resume playback (auto-bookmarking) feature for movies.
ENGLISH
17 / 59
Page 18
Format
- Select to format your HDD.
Restore Default
- Select to restore factory defaults.
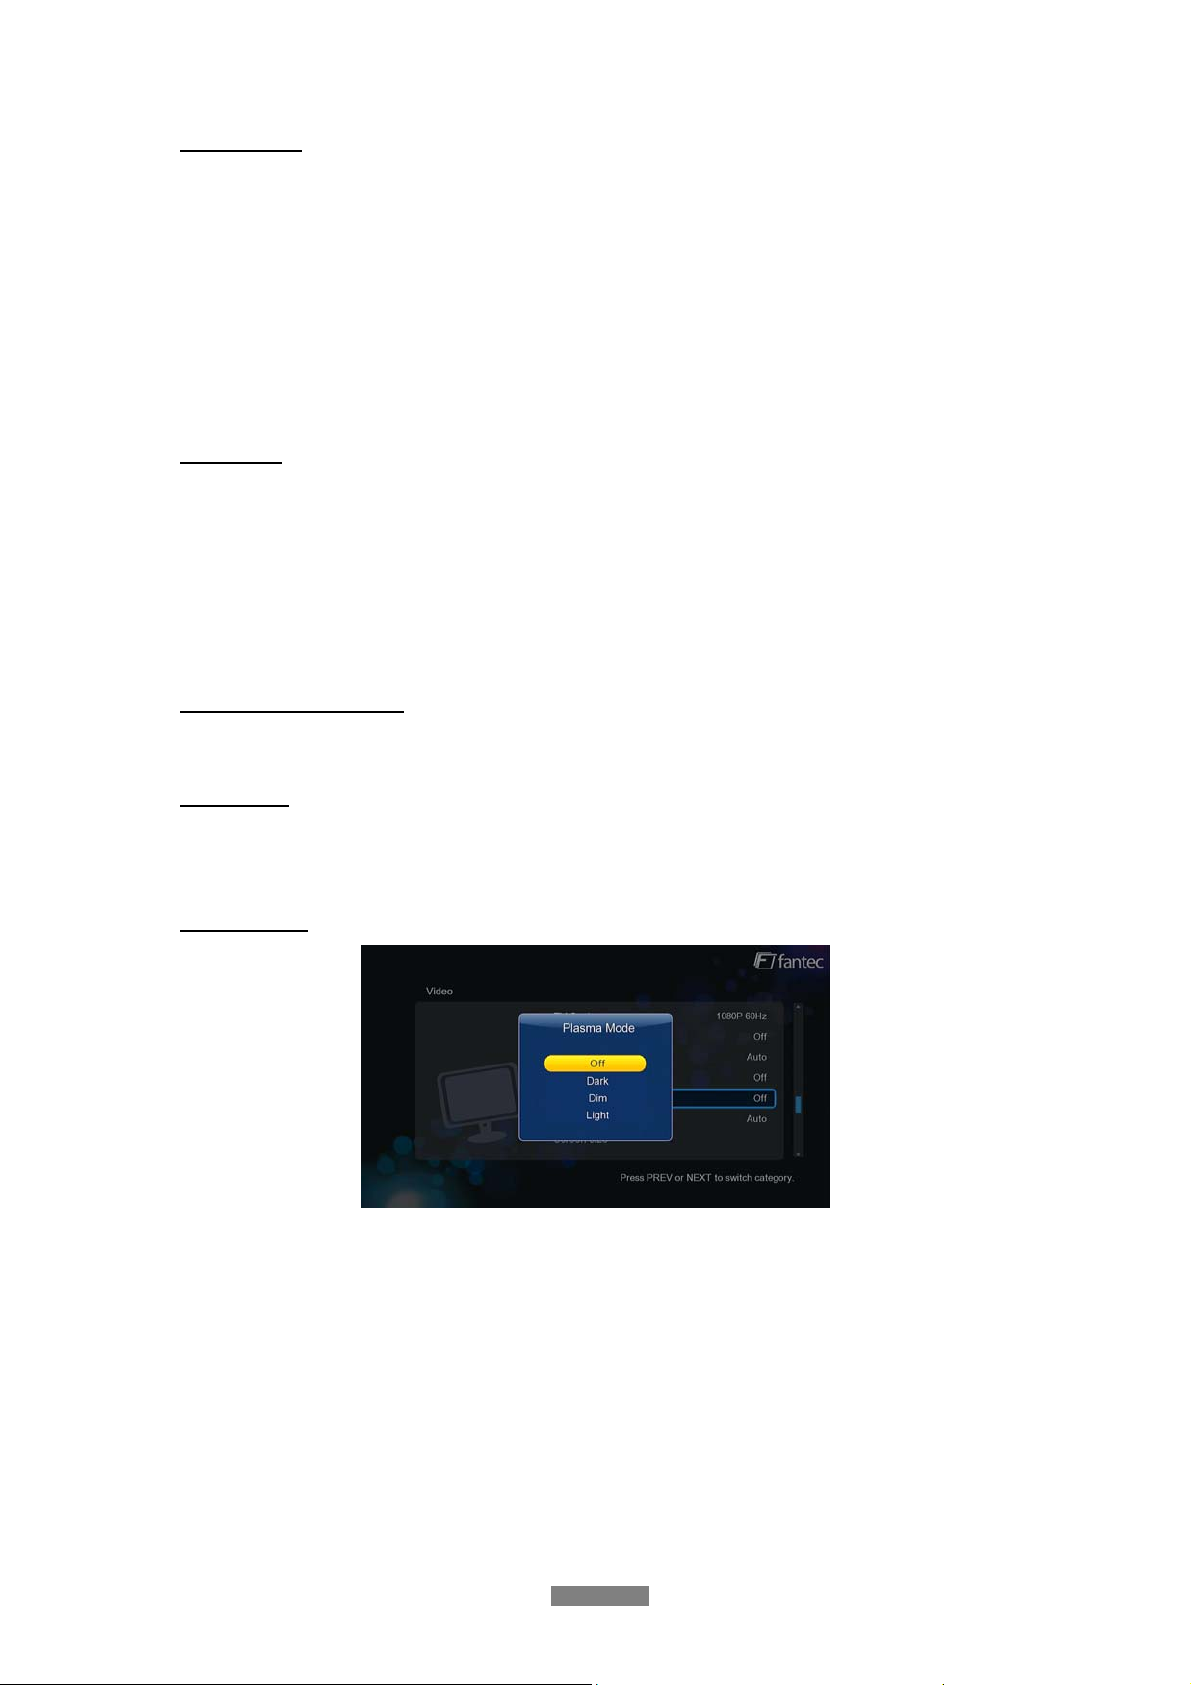
3.1.2 Changing Audio Settings
Use this menu to configure audio settings
Night Mode
- Choose among Off / On / Comfort. If the option comfort is turned on, the audio output
volume will be decreased to make you more comfortable.
HDMI Output
- Choose among LPCM, LPCM Multi-Ch and Pass-through.
SPDIF Output
- Choose among LPCM and Pass-through.
Note: In Pass-through mode, Dolby TrueHD, Dolby Digital Plus, Dolby Digital, DTS sound
can be by passed to the Digital amplifier.
3.1.3 Changing Video Settings
Use this menu to configure video settings.
ENGLISH
18 / 59
Page 19
Aspect Ratio
- Pan Scan 4:3: Display a wide picture on the entire screen and cuts off the redundant
portions. Select when a standard 4:3 TV is connected.
- Letter Box 4:3: Display a wide picture with two black borders on the top and bottom of 4:3
screen. Select when a standard 4:3 TV is connected.
- 16:9: Compress the image to convert the whole image. Select when a 16:9 TV is
connected.
- 16:10: Compress the image to convert the whole image. Select when a 16:10 TV is
connected.
TV System
- Select to adjust TV Type and video output resolution. This setting depends on your
regional location. Include: NTSC / PAL / 480P / 576P / 720P 50HZ / 720P 60HZ / 1080I
50HZ / 1080I 60HZ / 1080P 50HZ / 1080P 60HZ.
NTSC: United States, Canada, Japan, Mexico, the Philippines, South Korea, and Taiwan.
PAL: Europe, Greenland, parts of Africa and South America, the Mideast, China, India,
Australia, and Indonesia.
Digital Noise Reduction
- This option is to enable or disable the digital noise reduction.
1080p 24Hz
- Choose this option to enable or disable 1080P 24HZ support. A TV set with 1080P 24HZ
(24P) mode is needed.
Plasma Mode
- Help to protect your plasma TV by reducing the level of brightness.
ENGLISH
19 / 59
Page 20
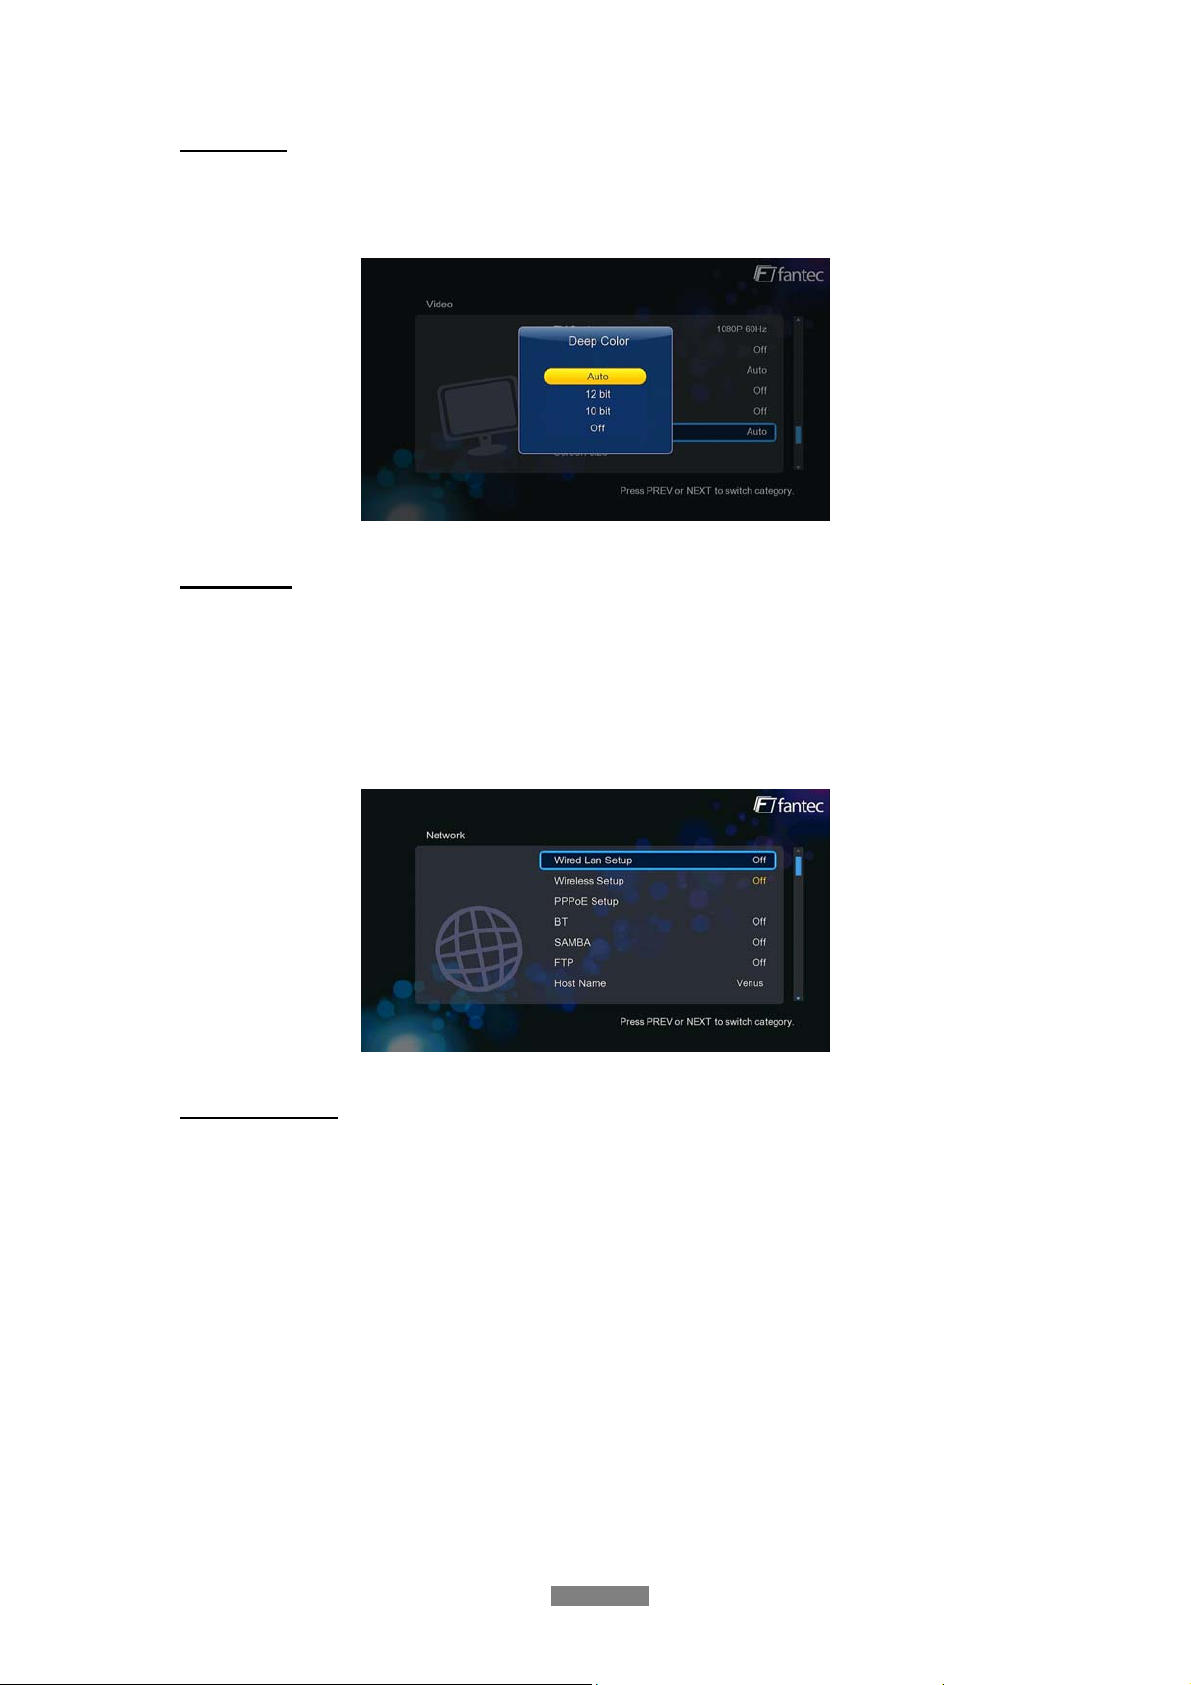
Deep Color
- Help to perform more detailed level of color depth, make continuous color change
smoother. You can get more vivid color effects. A TV set with deep color support is
needed.
Screen Size
- Adjust the video output size according to the size of TV screen. And press Zoom button to
Fit the screen size you have set during video playback.
3.1.4 Change Network Settings
Use this menu to configure your network.
Wired Lan Setup
- DHCP IP (AUTO)
Select to obtain IP address automatically.
- FIX IP (MANUAL)
Select to manually input the IP Address, Subnet Mask, Default Gateway, and DNS Server IP
Address.
ENGLISH
20 / 59
Page 21
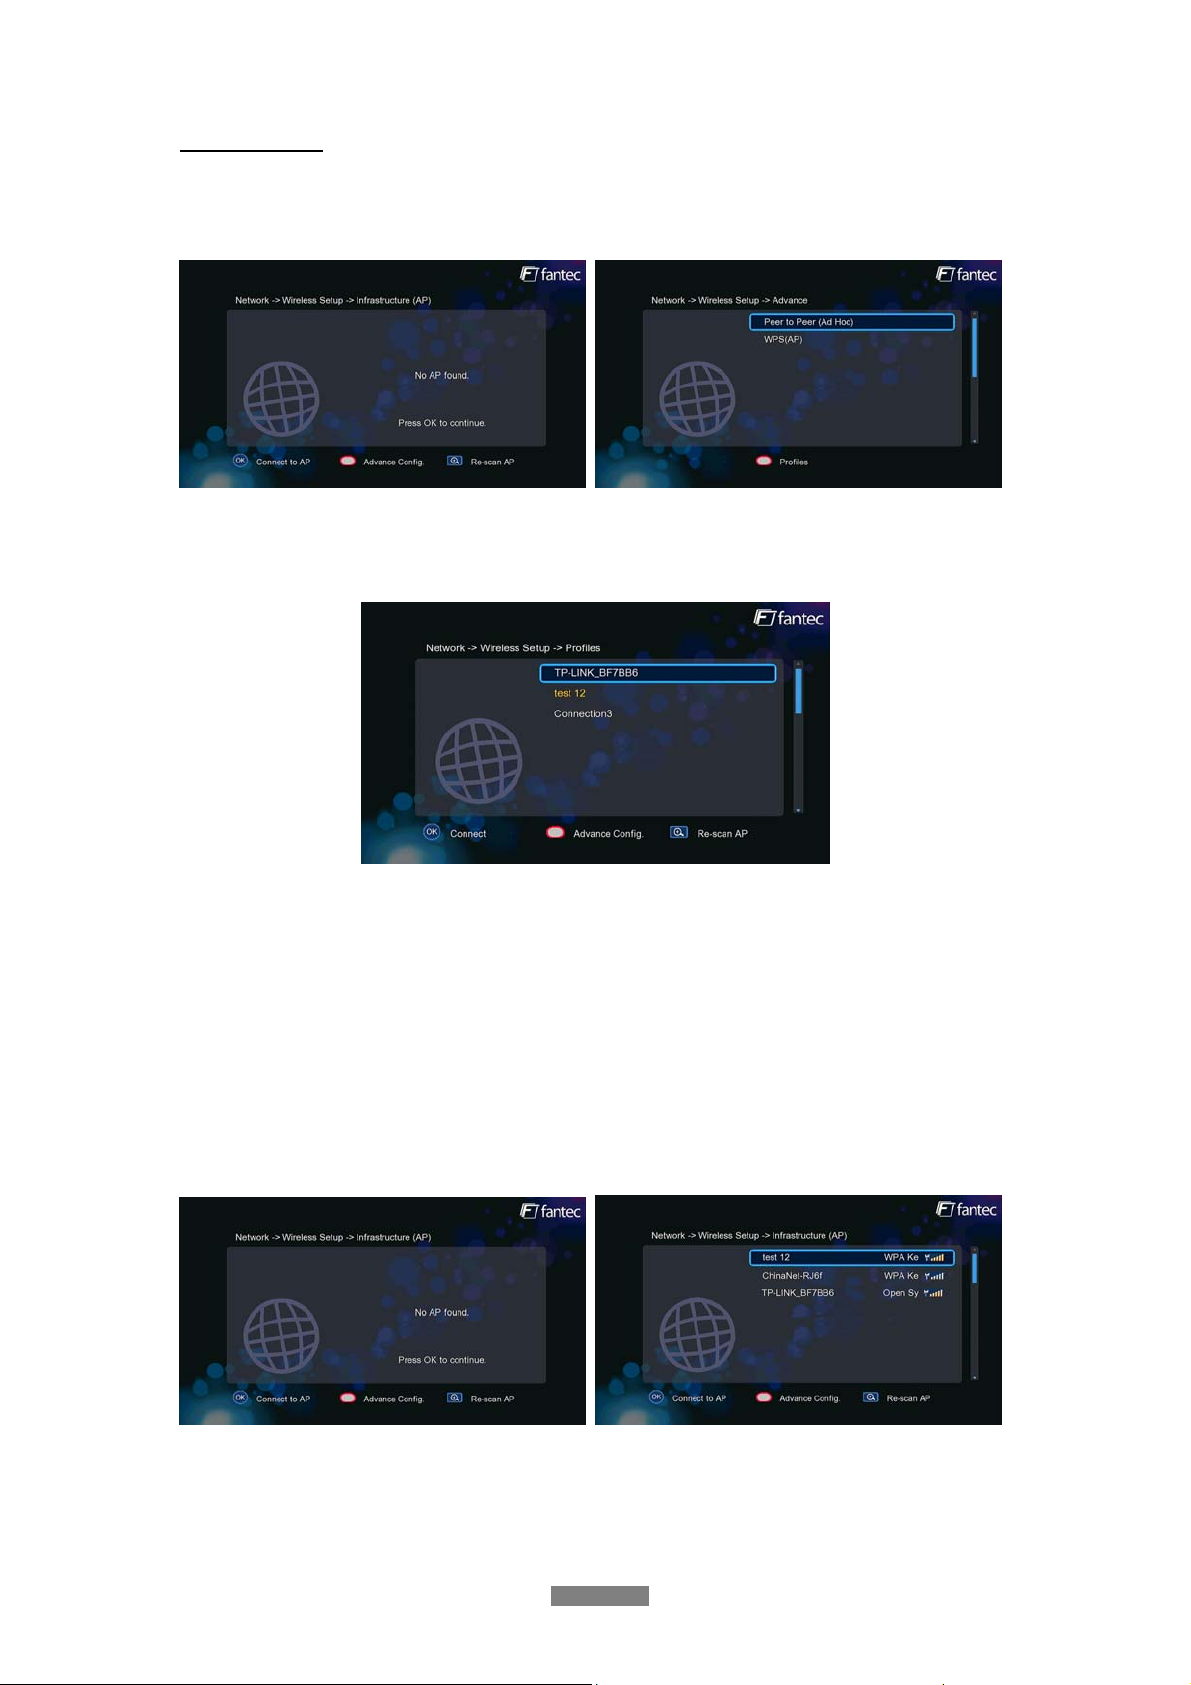
Wireless Setup
- There are 3 mode for you to select, Infrastructure (AP) and Peer to Peer (Ad Hoc) and
WPS (AP) mode. Follow the prompting message on the screen and press Red button to
choose Peer to Peer (Ad Hoc) or WPS (AP) mode.
This player can store up to three wireless network connections. Press OK to connect, press
Back to cancel, and press Zoom to modify the parameters of the connection, press Red
button to choose Peer to Peer (Ad Hoc) or WPS (AP).
Infrastructure (AP)
- Infrastructure mode is used to connect computers with wireless network adapters, also
known as wireless clients, to an existing wired network with the help from wireless router
or access point. Please follow following steps to configure your wireless network.
Step 1: Scanning AP(Access Point)in your network
Follow the prompting message on the screen and press the Zoom button to select
Infrastructure (AP) mode and update the access points list, and all SSID will be displayed on
the screen.
Step 2: Enter WEP / WPA key.
Press OK to input encryption keys via the virtual keyboard. Press the navigational buttons to
select, OK to input, FF to move cursor left, FR to move cursor right, Zoom to switch between
ENGLISH
21 / 59
Page 22
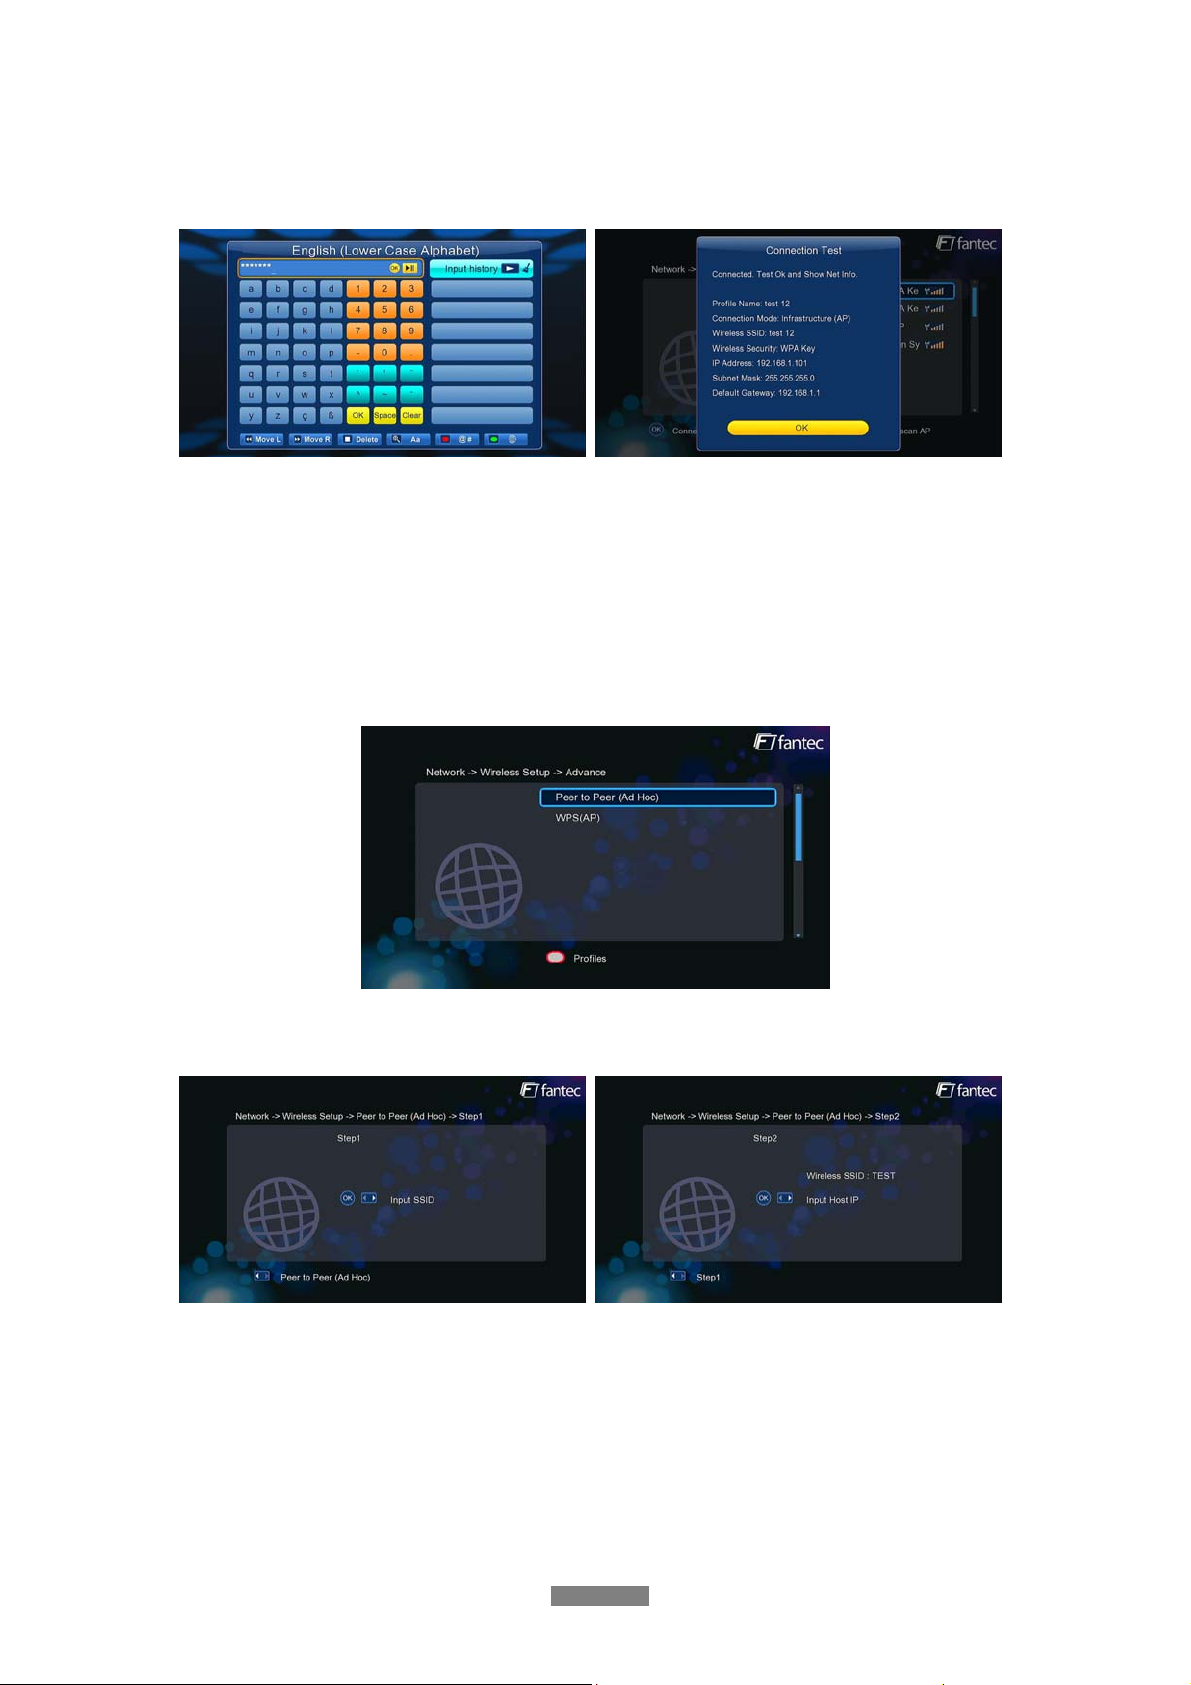
uppercase and lowercase, Stop to delete a character, Red to make more symbols available,
Green to change the language of the virtual keyboard, OK to confirm and to start testing the
connection.
The testing process will take for a while, please be patient to wait. If the test is ok, the network
information (Profile Name, IP address, Subnet Mask, Gateway, etc.) will be displayed on the
screen.
Peer to Peer (Ad Hoc)
- Peer to Peer mode, which is also called Ad Hoc mode or computer-to-computer mode, is
used to connect wireless clients directly together, without the need for a wireless router or
access point.
Step 1: Specify your SSID name
ENGLISH
22 / 59
Page 23
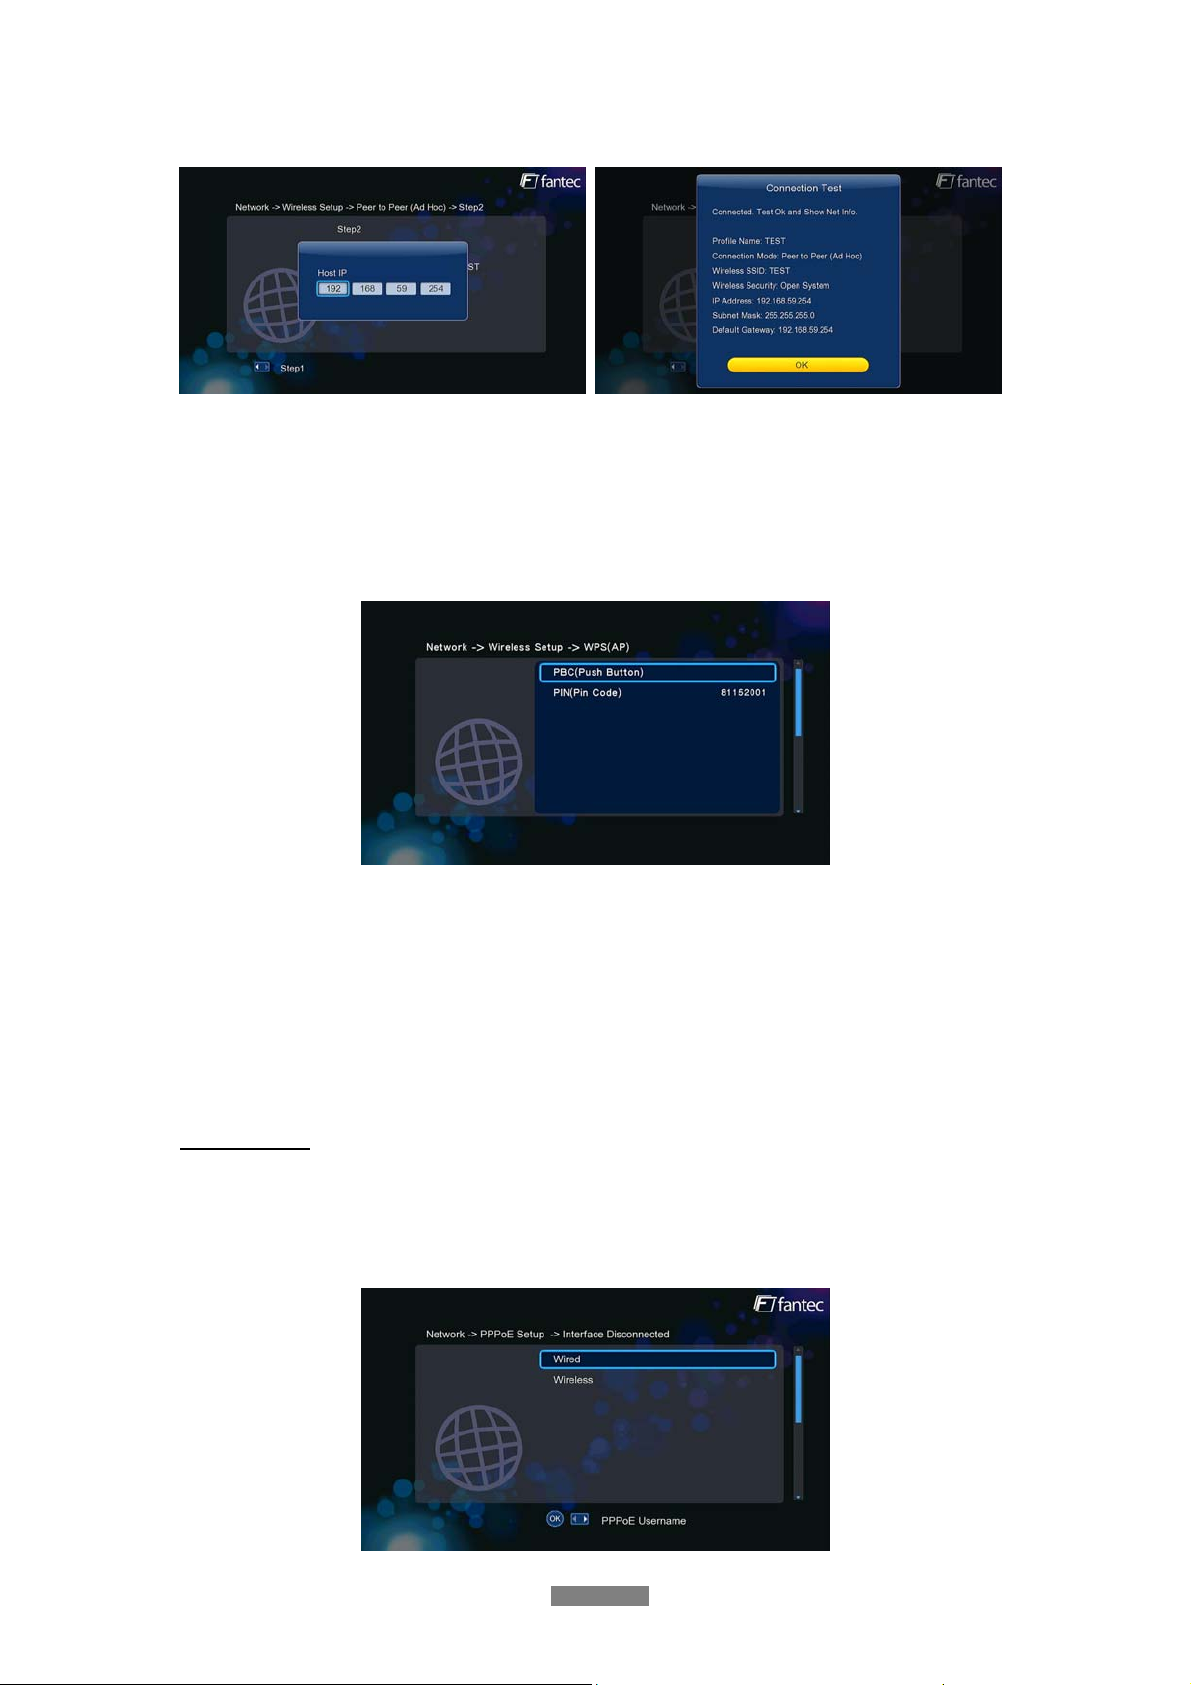
Step 2: Specify your host IP
WPS (AP)
- WPS, Wi-Fi Protected Setup, is used to connect a wireless router directly, without
searching SSID and inputting password. In this mode, you just need to configure the
parameters of your router which support WPS function. There are two modes for you to
select, PBC mode and PIN mode.
PBC: First press the WPS button on the router or select the button mode in the configuration
menu of the router, then select the PBC mode, the connection process will take for a while,
please be patient to wait.
PIN: Input the pin code when configure your router, then select the PIN mode, the connection
process will take for a while, please be patient to wait.
PPPOE Setup
- Input the ADSL accountant and password in this menu, system will obtain IP address
automatically from the server based on PPPOE protocol.
Step 1: Select the connection interface, wired or wireless
ENGLISH
23 / 59
Page 24
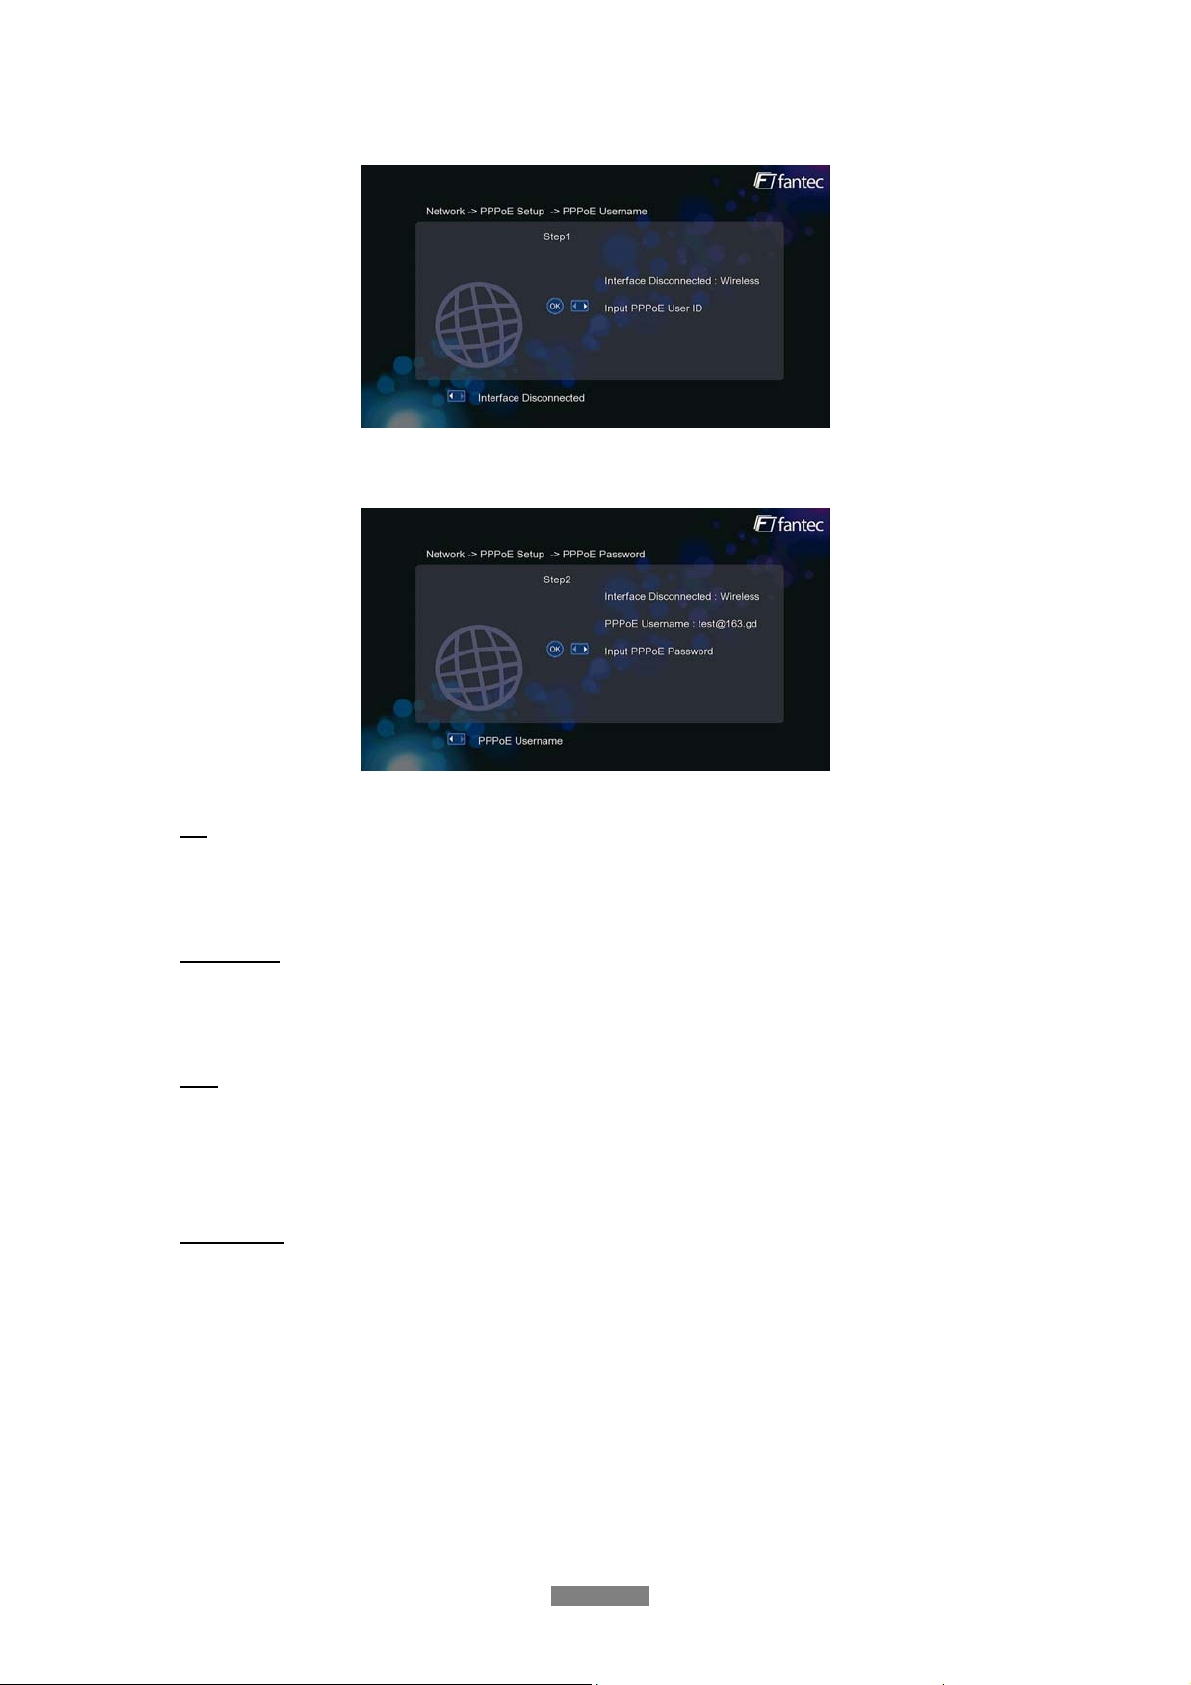
Step 2: Press Right button to input your ADSL accountant
Step 3: Press Right button to input your password and start to test the connection.
BT
- Select to turn BitTorrent download on On/Off. Please refer to ’BT download ’ for more
details on this unique feature of this product.
NAS Mode
- Select to turn NAS function On/Off. Please refer to ’3.9 SAMBA Server ’ for more details
on NAS function of this product.
FTP
- Select to turn on / off FTP services and to configure your desired login User Name and
Password. Please refer to ’3.10 FTP Server’ for more details on this unique feature of this
product.
Host Name
- Select to key in your desired host name to be seen in your network.
ENGLISH
24 / 59
Page 25
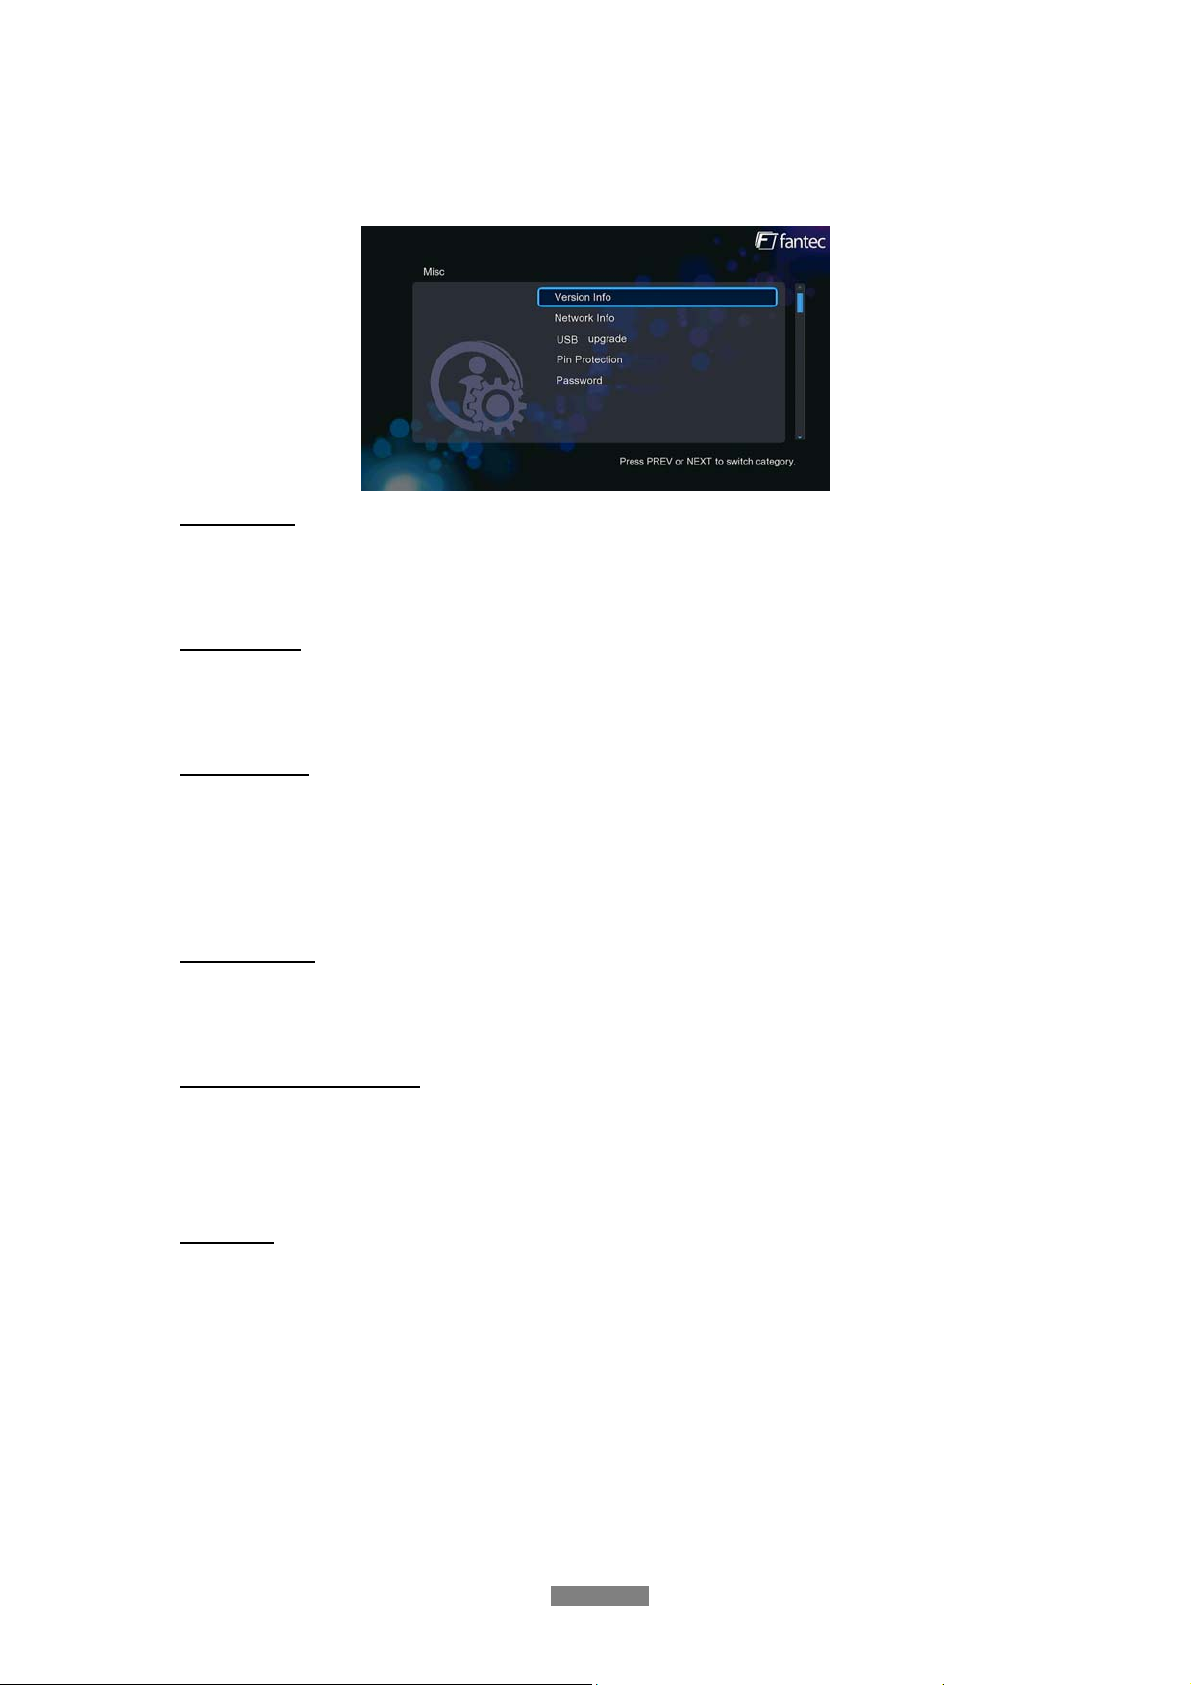
3.1.5 Miscellaneous
Use this menu to adjust miscellaneous settings.
Version Info
- This tab shows you information about the firmware installed and about the material
components of your player.
Network Info
- This tab shows you information about your network, MAC Address, IP address Gateway,
Subnet.
USB Upgrade
- Select to update the firmware via a USB stick.
Step 1: Copy ‘install.img’ or extension files to the root directory of an USB stick, and conn ect i t
to an USB HOST port of the player.
Step 2: Press OK to confirm.
Pin Protection
To prevent deleting files and formatting HDD by asking for a password. The default password
is ‘0000’. Press the numerical buttons to input, and the OK button to confirm.
Folder Access Protection
- Select the folder protection to prevent access to selected folders. The default password is
‘0000’. Press the numerical buttons to input, and the enter button to confirm. In browser
menu press the MENU button and selection the option Lock/Unlock to lock/unlock a folder.
Password
- Change the password. The default password is ‘0000’. Press the numerical buttons to
input, and the OK button to confirm.
ENGLISH
25 / 59
Page 26
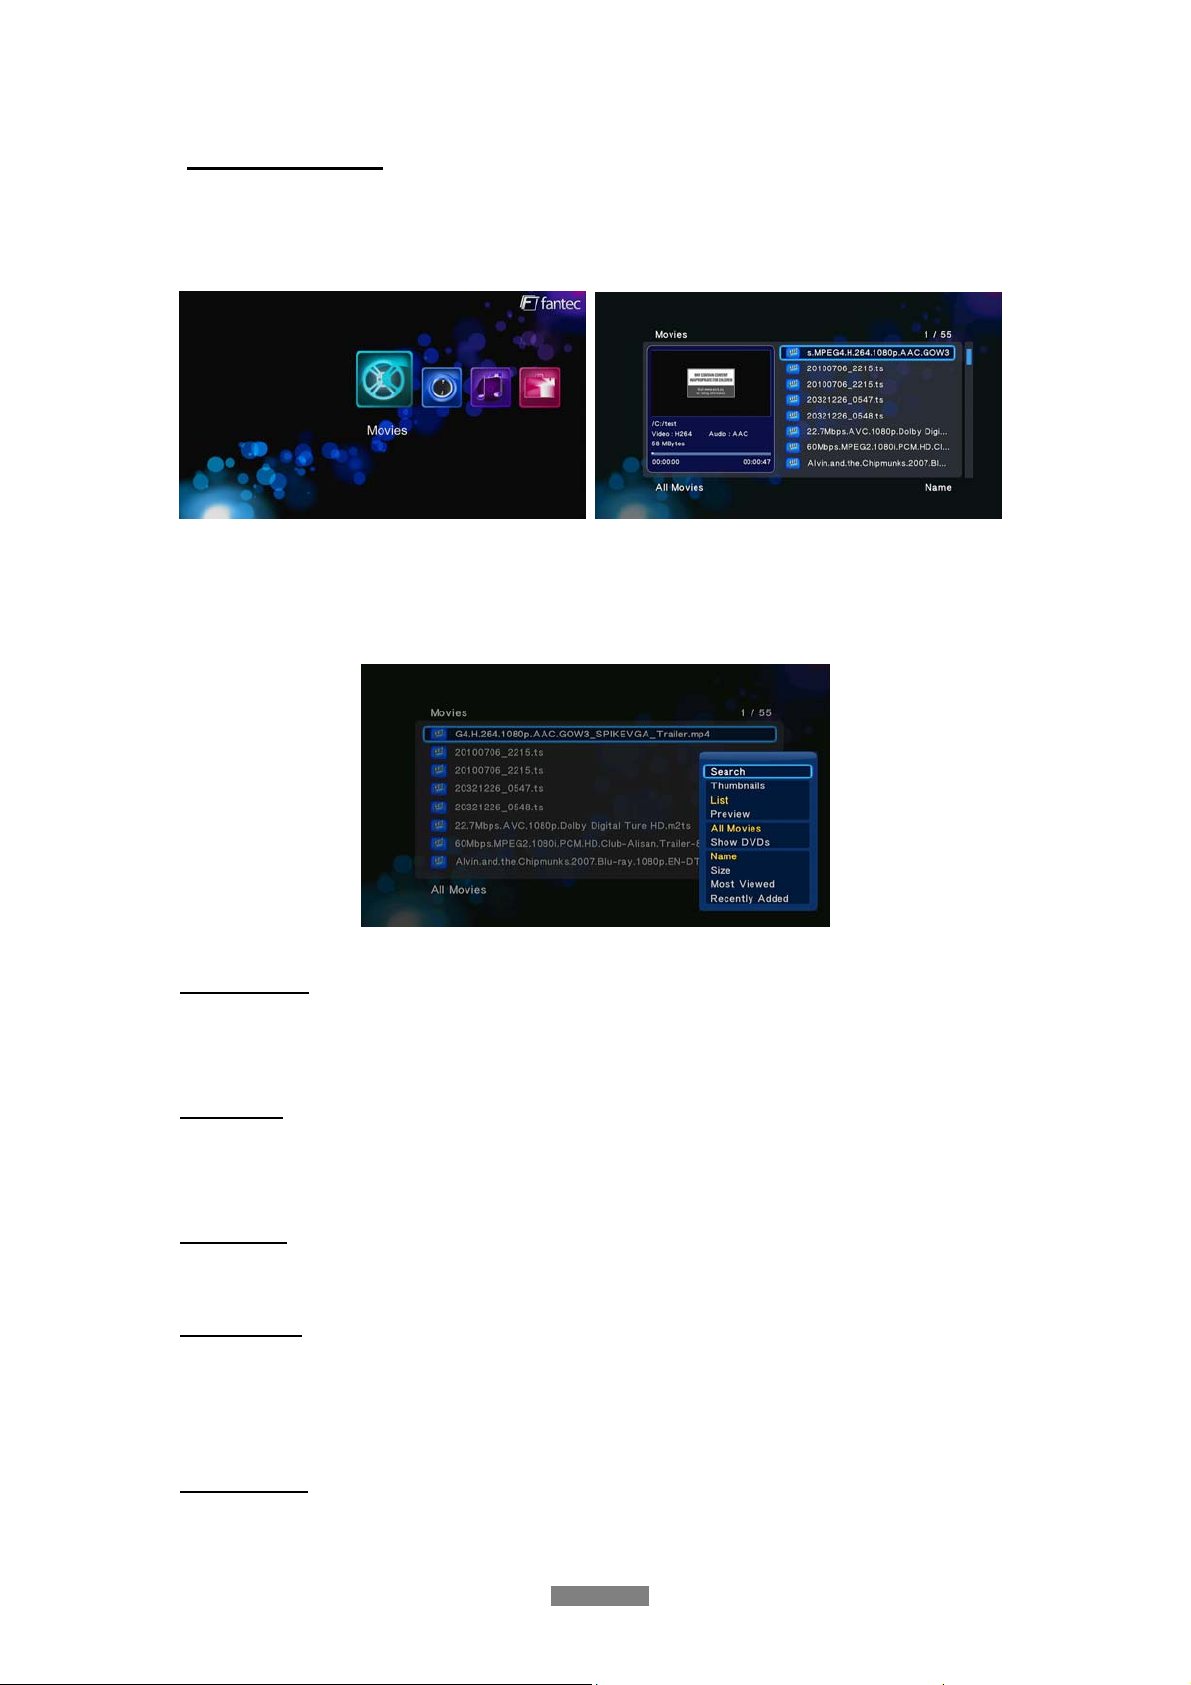
3.2 Movie Library
Select the Movies icon on the main menu to enter into movie library interface. Only supported
files will be displayed. Please refer to chapter ‘5. Appendixes’ for more details about the
supported file formats.
3.2.1 Movie Library Options
In movie library, press MENU button to display the option menu, you can get following
functions though the option menu.
Quick-Search
- Choose the Search option in the option menu and you can search for a media file by filter
to locate the specific media file.
View Mode
- Choose a view mode among Thumbnails, List, and Preview from option menu or go to a
specified folder.
Filter Mode
- Choose to filter by All Movies, Show DVDs or Flash Animation from option menu.
Show DVDs
- Choose to display DVD IFO,BD MV and ISO files directly in media library. During
playback of DVDs, you can press Menu button, to get back to the Title Menu or Root
Menu of the DVD.
Sorting Mode
- Choose to sort by Name, Size, Most Viewed or Recently Added from option menu.
ENGLISH
26 / 59
Page 27
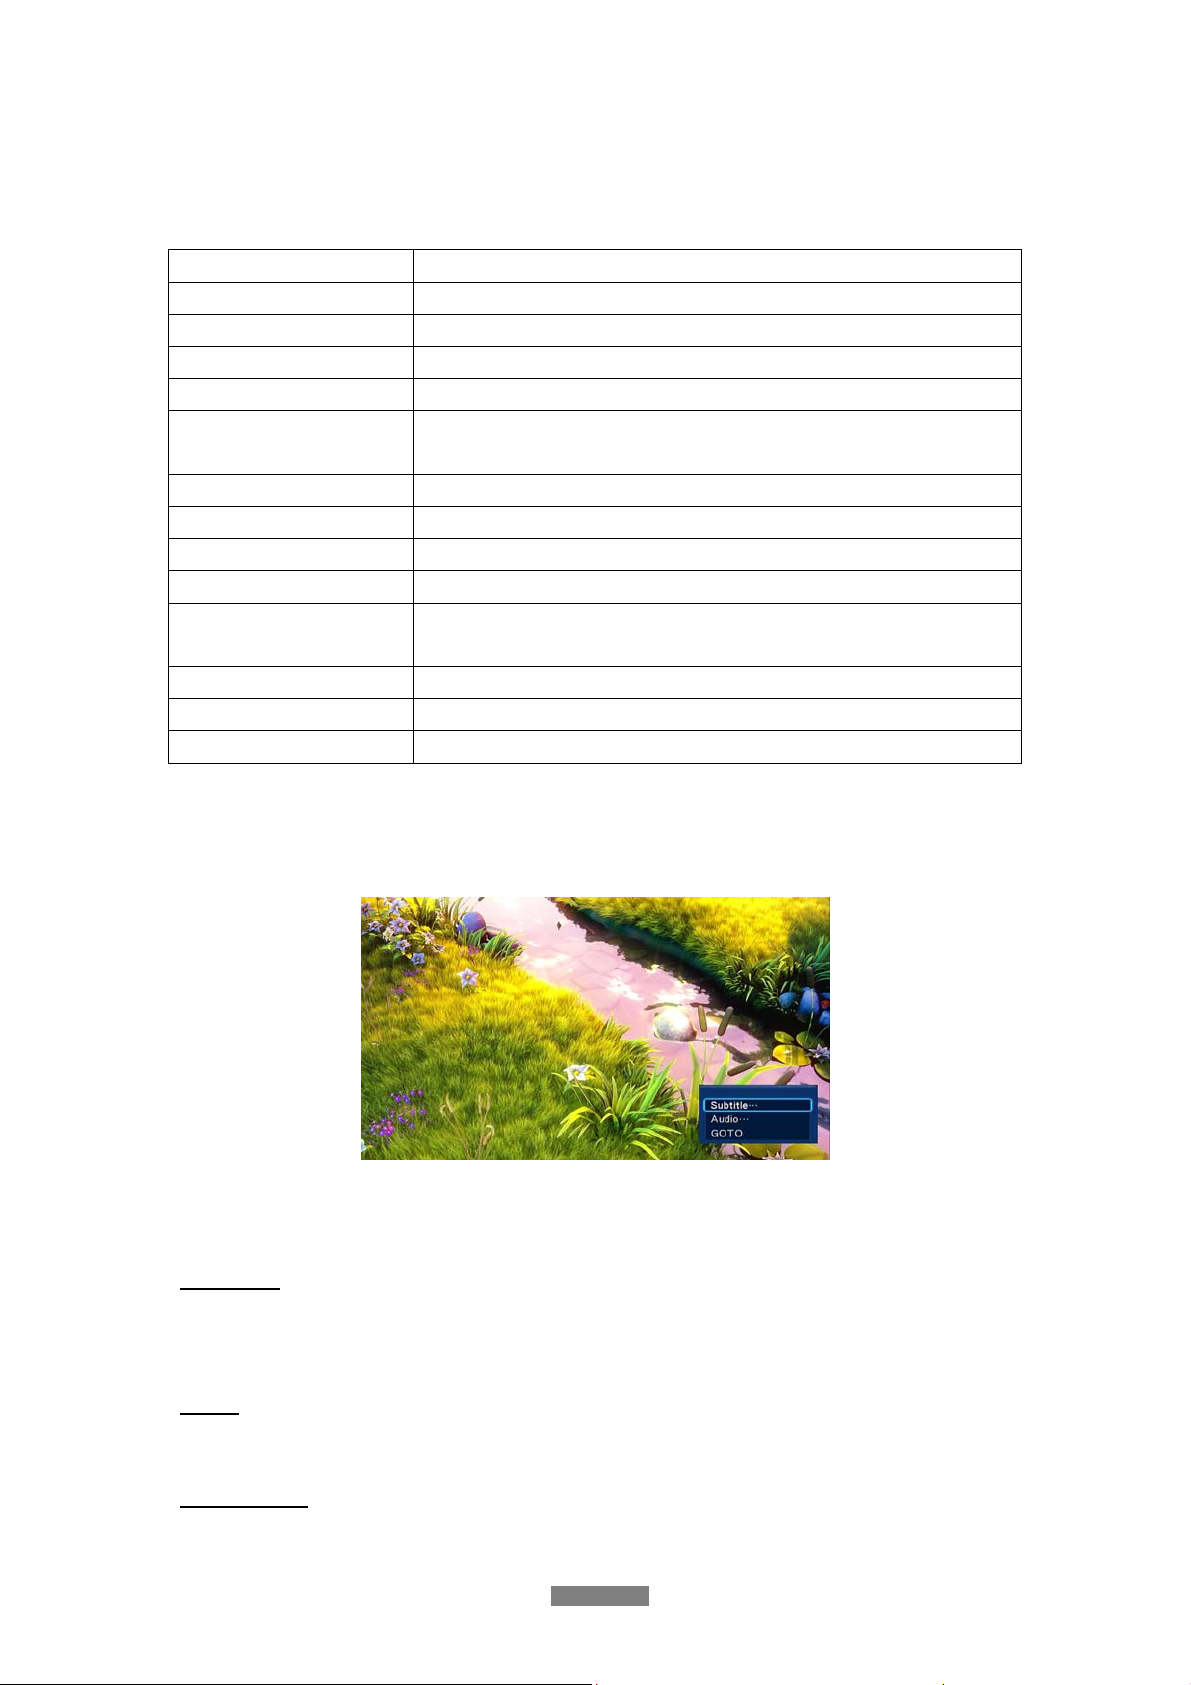
3.2.2 Movie Playback Control
You can access the following functions during playback.
Button Function
Play/Pause
Prev/Next
FR/FF
Slow
GOTO
Pause or resume the current playback.
View the previous or next file/chapter.
Fast rewind or fast forward. Press repeatedly to select the speed.
Play back in slow motion.
Jump to a specific point on a title. Specify the point using Title,
Chapter and Time.
Menu
Stop
VOL+/Audio
Subtitle
Display or hide the option menu during playback.
Stop playback.
Increase/decrease the volume.
Select an audio track.
Select a subtitle and change the color/size/offset/text encoding of
subtitle.
Repeat
Zoom
Info
Set the repeat option.
Zoom in the image.
View the media information.
3.2.3 Movie Playback Options
During movie playback, press Menu button to display or hide the option menu at the bottom of
the screen.
Next to audio track, subtitle, repeat mode, you also can get following functions though the
option menu during video playback.
DVD Menu
- Select to return to the navigation menu (Title Menu / Root Menu) during DVD IFO or ISO
playback.
GOTO
- Select to jump to a specific point on a title. Specify the point using Title, Chapter and Time.
Video Setting
- Select to adjust the value of Brightness, Contrast, Saturation and Hue.
ENGLISH
27 / 59
Page 28
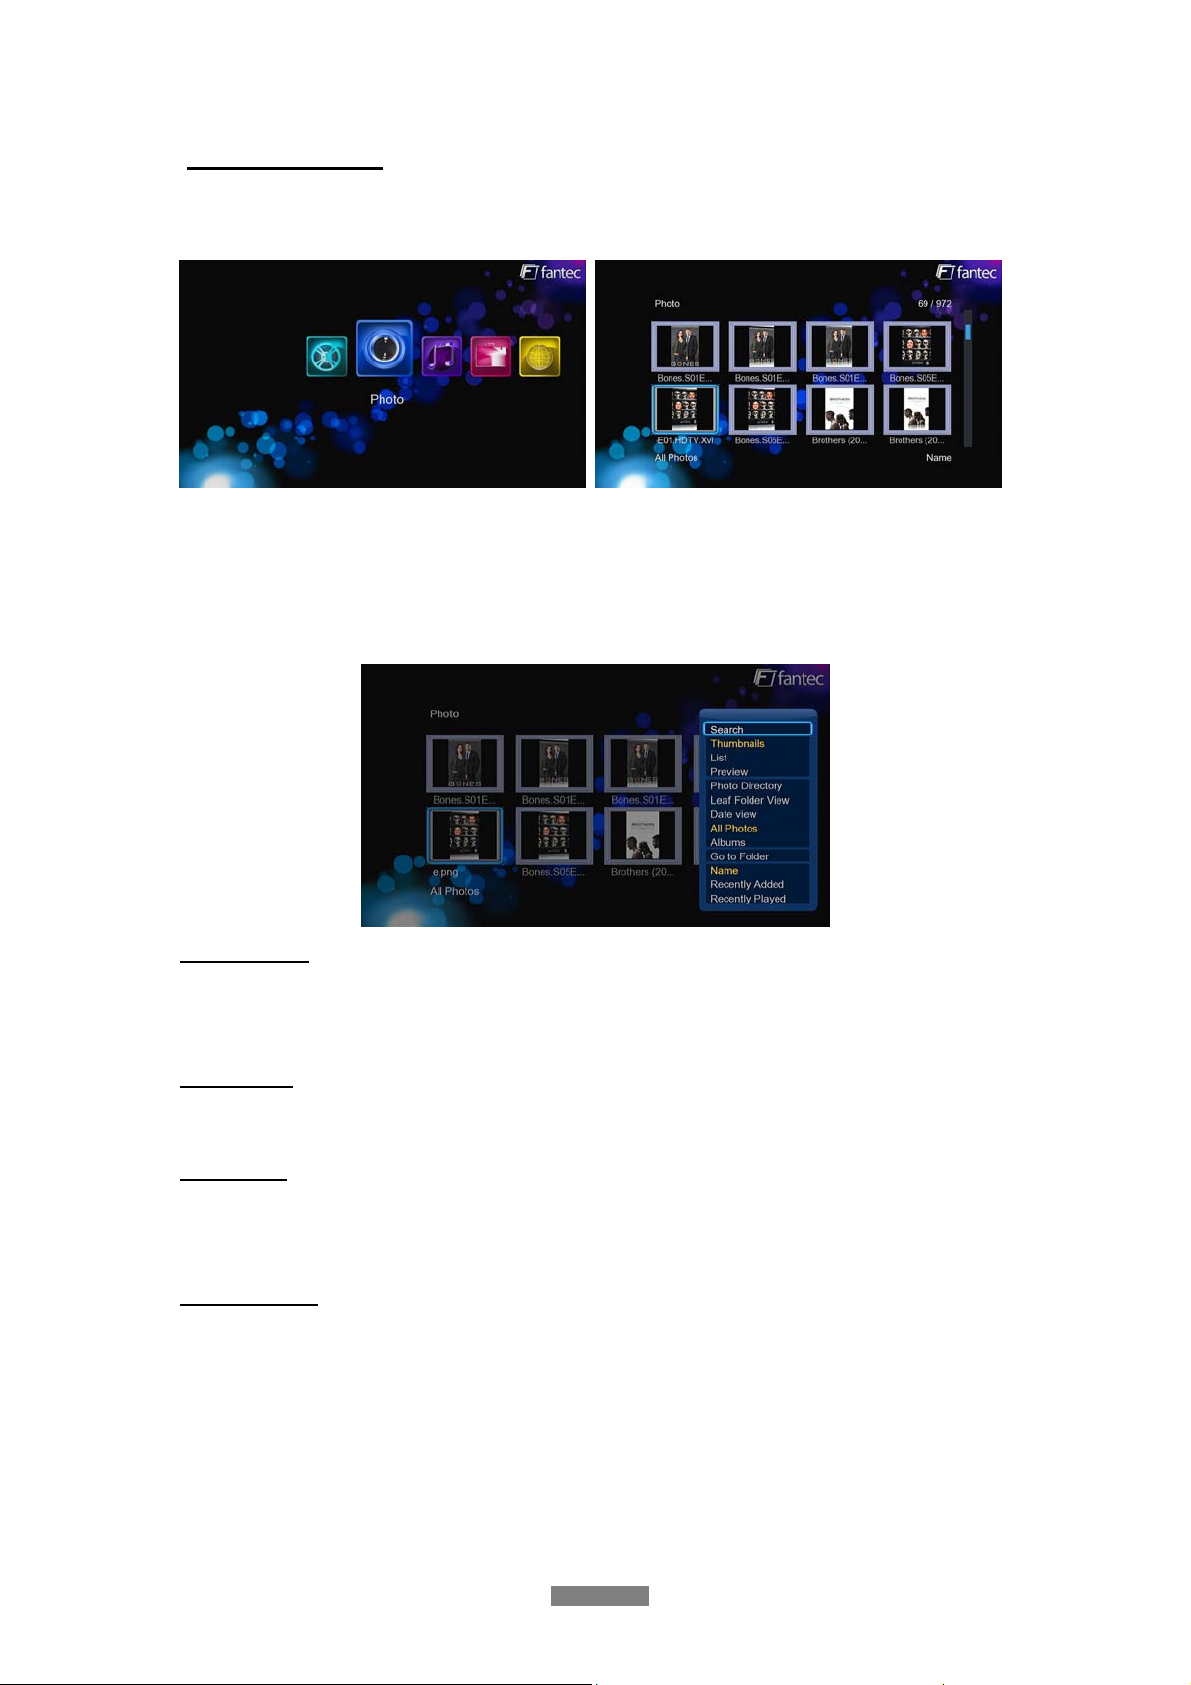
3.3 Photo Library
Select the Photo icon on the main menu to enter into photo library interface. Only supported
files will be displayed. This player supports HD JPEG, JPG, BMP, GIF, TIF and PNG files.
3.3.1 Photo Library Options
In photo library, press Menu button to display the option menu, you can get following functions
though the option menu.
Quick-Search
- Choose the Search option in the option menu and you can search for a photo file by filter
to locate the specific photo file.
View Mode
Choose a view mode among Thumbnails, List, and Preview from option menu
Filter Mode
- Choose to filter by Photo Directory, Date view, All Photos, or Albums from option
menu.
Sorting Mode
- Choose to sort by Name, Recently Added or Recently Played from option menu.
3.3.2 Photo Playback Control
You can access the following functions during photo playback.
ENGLISH
28 / 59
Page 29
Button Function
Prev / Next
Up / Down
Menu
Stop
Zoom
View the previous or next photo.
Rotate a photo in any angle.
Display or hide the option menu during playback.
Stop playback.
Zoom in the image.
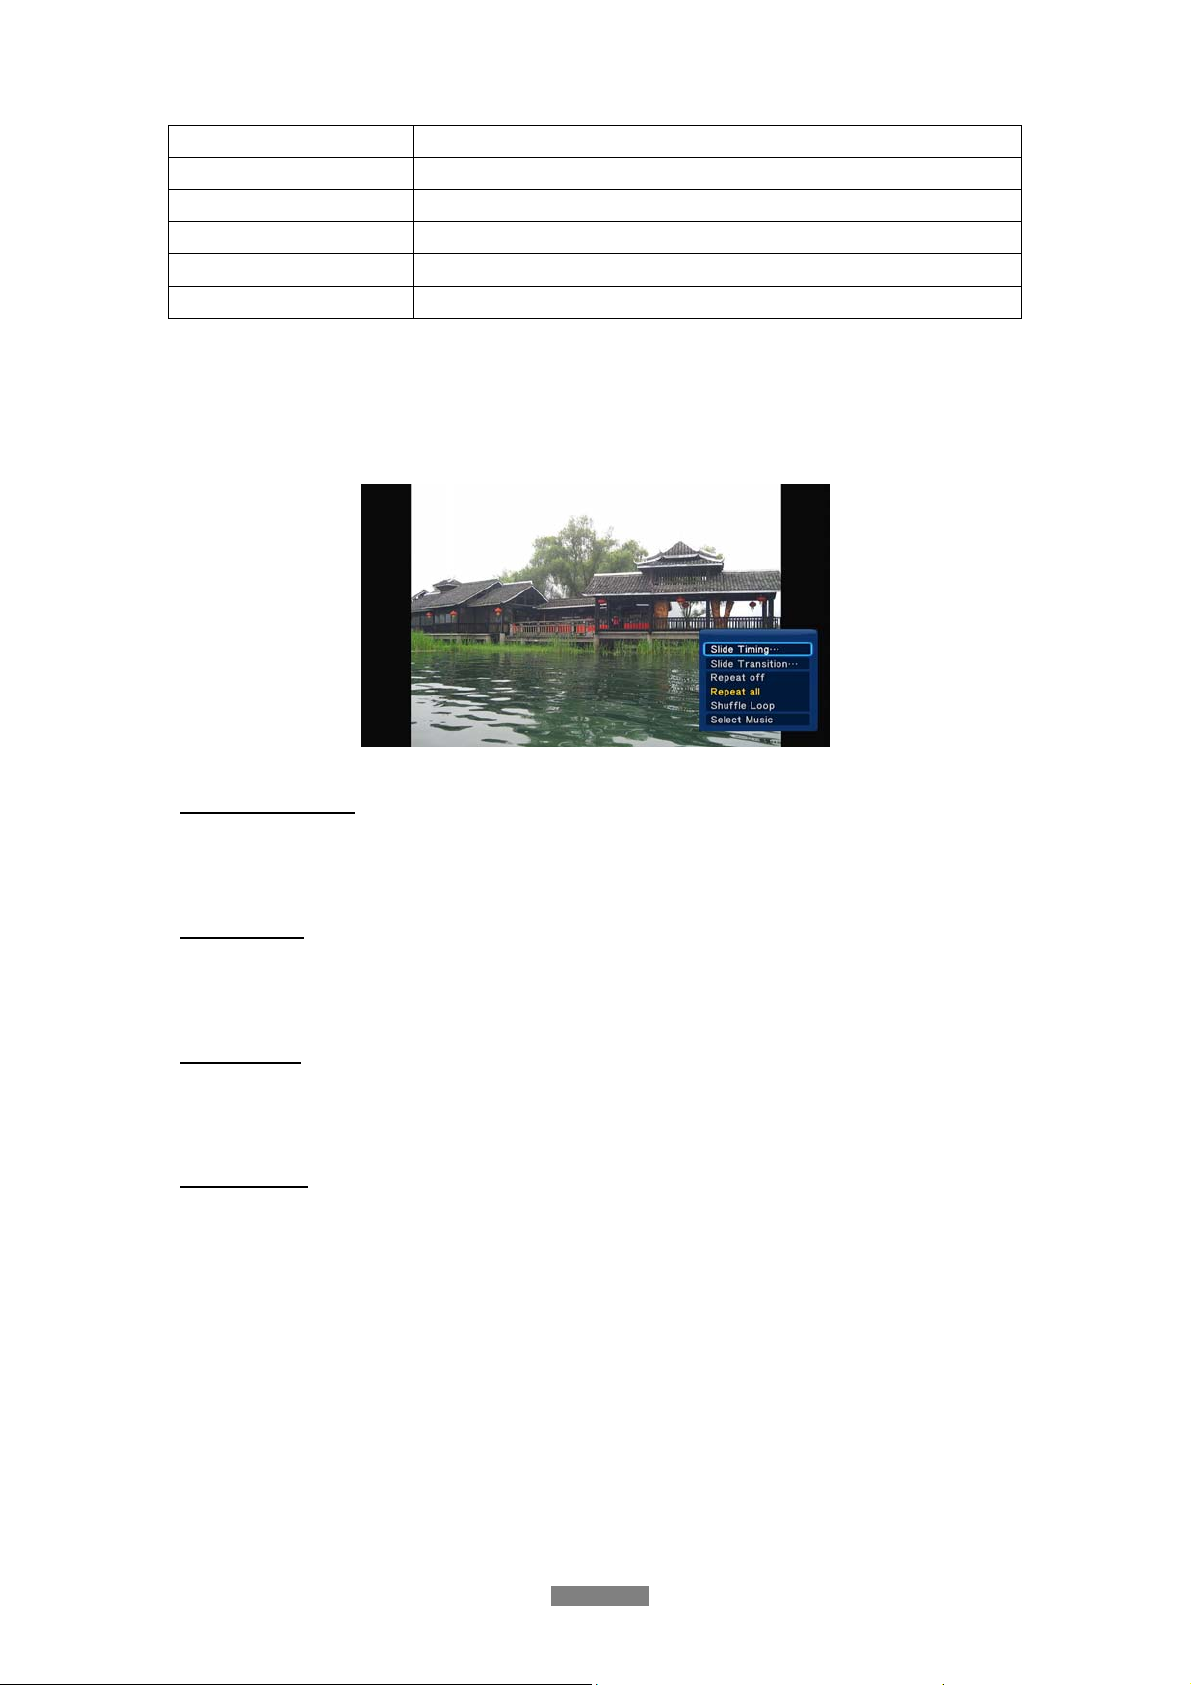
3.3.3 Photo Playback Options
During photo playback, press Menu button to display or hide the option menu at the bottom of
the screen. You can get following functions though the Option menu during photo playback.
Slideshow Control
- Select to choose the Interval (Slide Timing) and Transition effect (Slide Transition) of
the slideshow.
Repeat Mode
- Choose a repeat mode among Repeat off, Repeat all and Shuffle Loop from option
menu.
Select Music
- Select to turn on/off Background music during slideshow playback.
- Select music to specify the background music during photo playback.
Video Setting
- Select to adjust the value of Brightness, Contrast, Saturation and Hue.
ENGLISH
29 / 59
Page 30
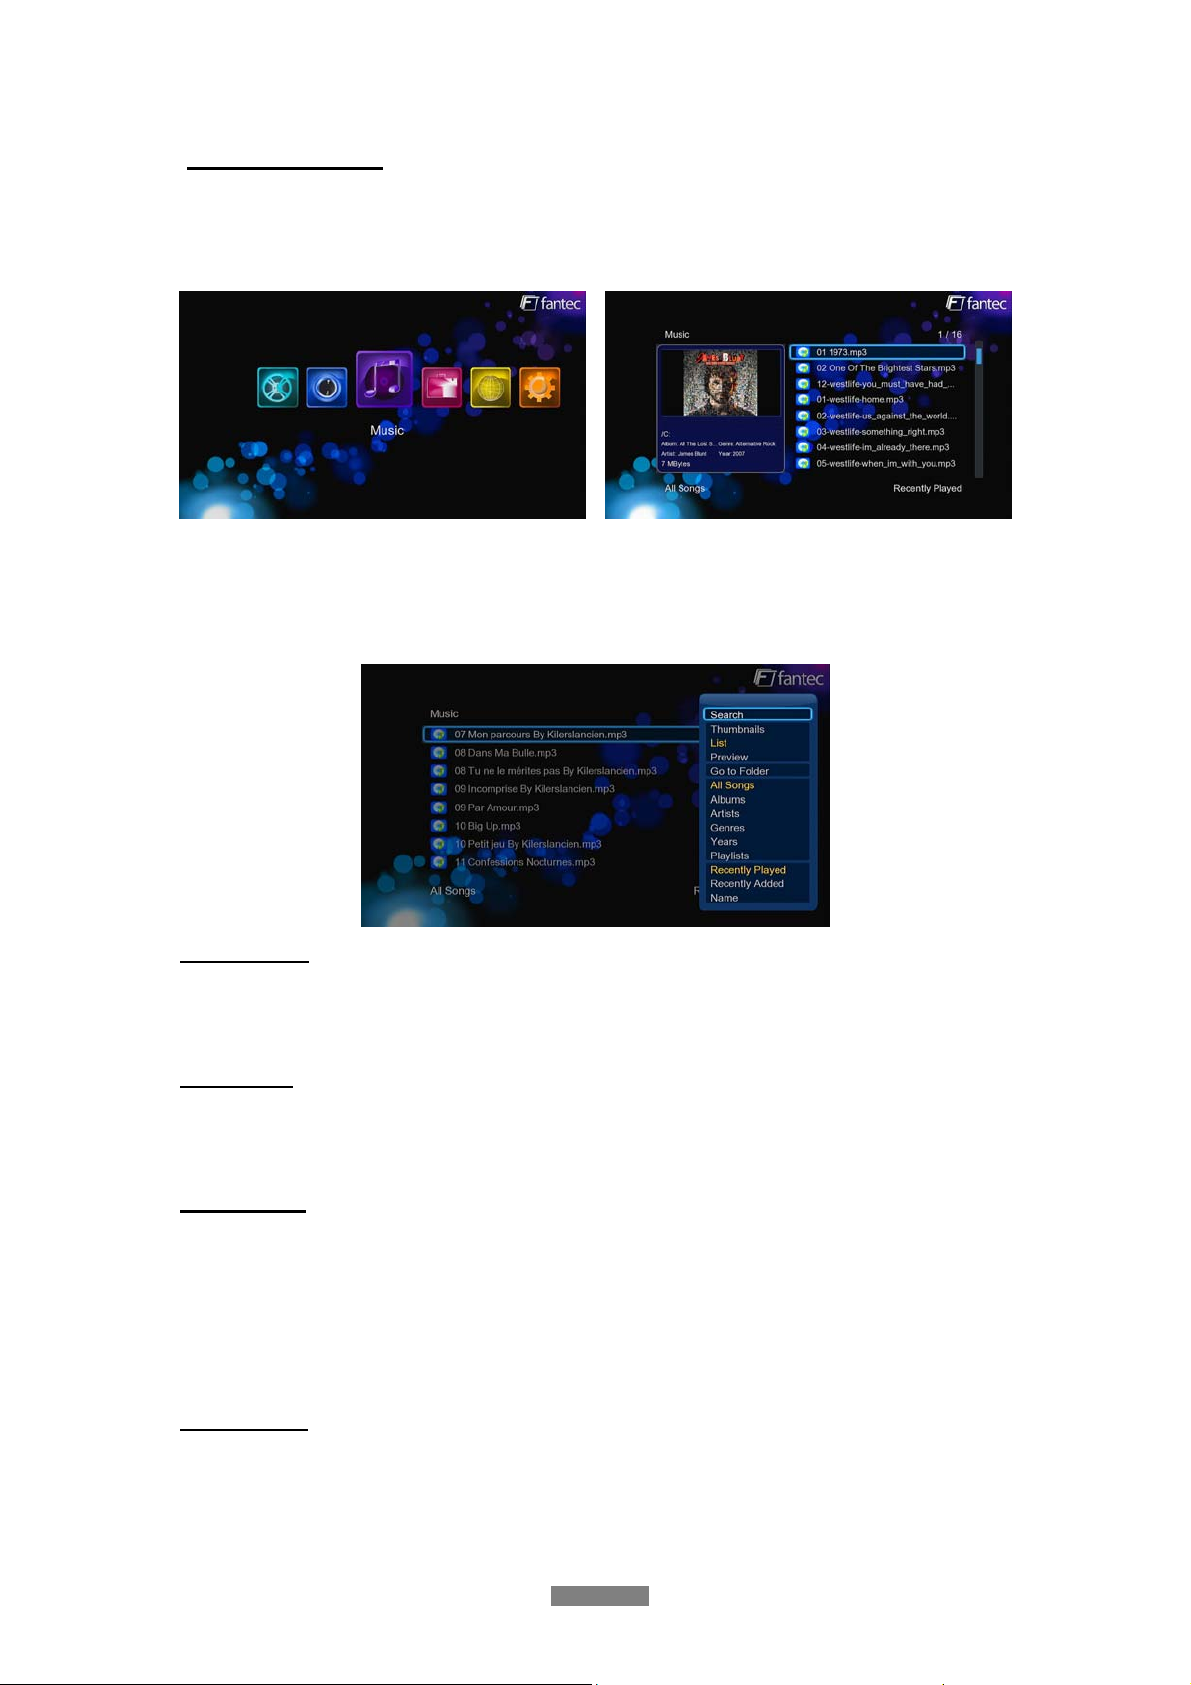
3.4 Music Library
Select the Music icon on the main menu to enter into music library interface. Only supported
files will be displayed. This player supports MP3, OGG, WMA, WAV, AAC and FLAC audio
files.
3.4.1 Music Library Options
In music library, press Menu button to display the option menu, you can get following functions
though the option menu.
Quick-Search
- Choose the Search option in the option menu and you can search for a photo by filter to
locate the specific music.
View Mode
- Choose a view mode among Thumbnails, List, and Preview from option menu or go to a
specified folder.
Filter options
- Choose Albums to search for music files by album.
- Choose Artists to search for music files by artist.
- Choose Genres to search for music files by genre.
- Choose Years to search for music files by modified year.
- Choose Playlists to search for music by generated playlist.
Sorting Mode
- Choose to sort by Name, Recently Added or Recently Played from option menu.
3.4.2 Music Playback Control
You can access the following functions during music playback.
ENGLISH
30 / 59
Page 31
Button Function
Play/Pause
FR / FF
Prev / Next
Menu
VOL+/Repeat
Shuffle
Begin/Pause playback.
Fast rewind or fast forward. Press repeatedly to select the speed.
View the previous or next movie.
Display or hide the option menu during playback.
Increase/Decrease the volume.
Set the repeat option.
Select the shuffle mode.
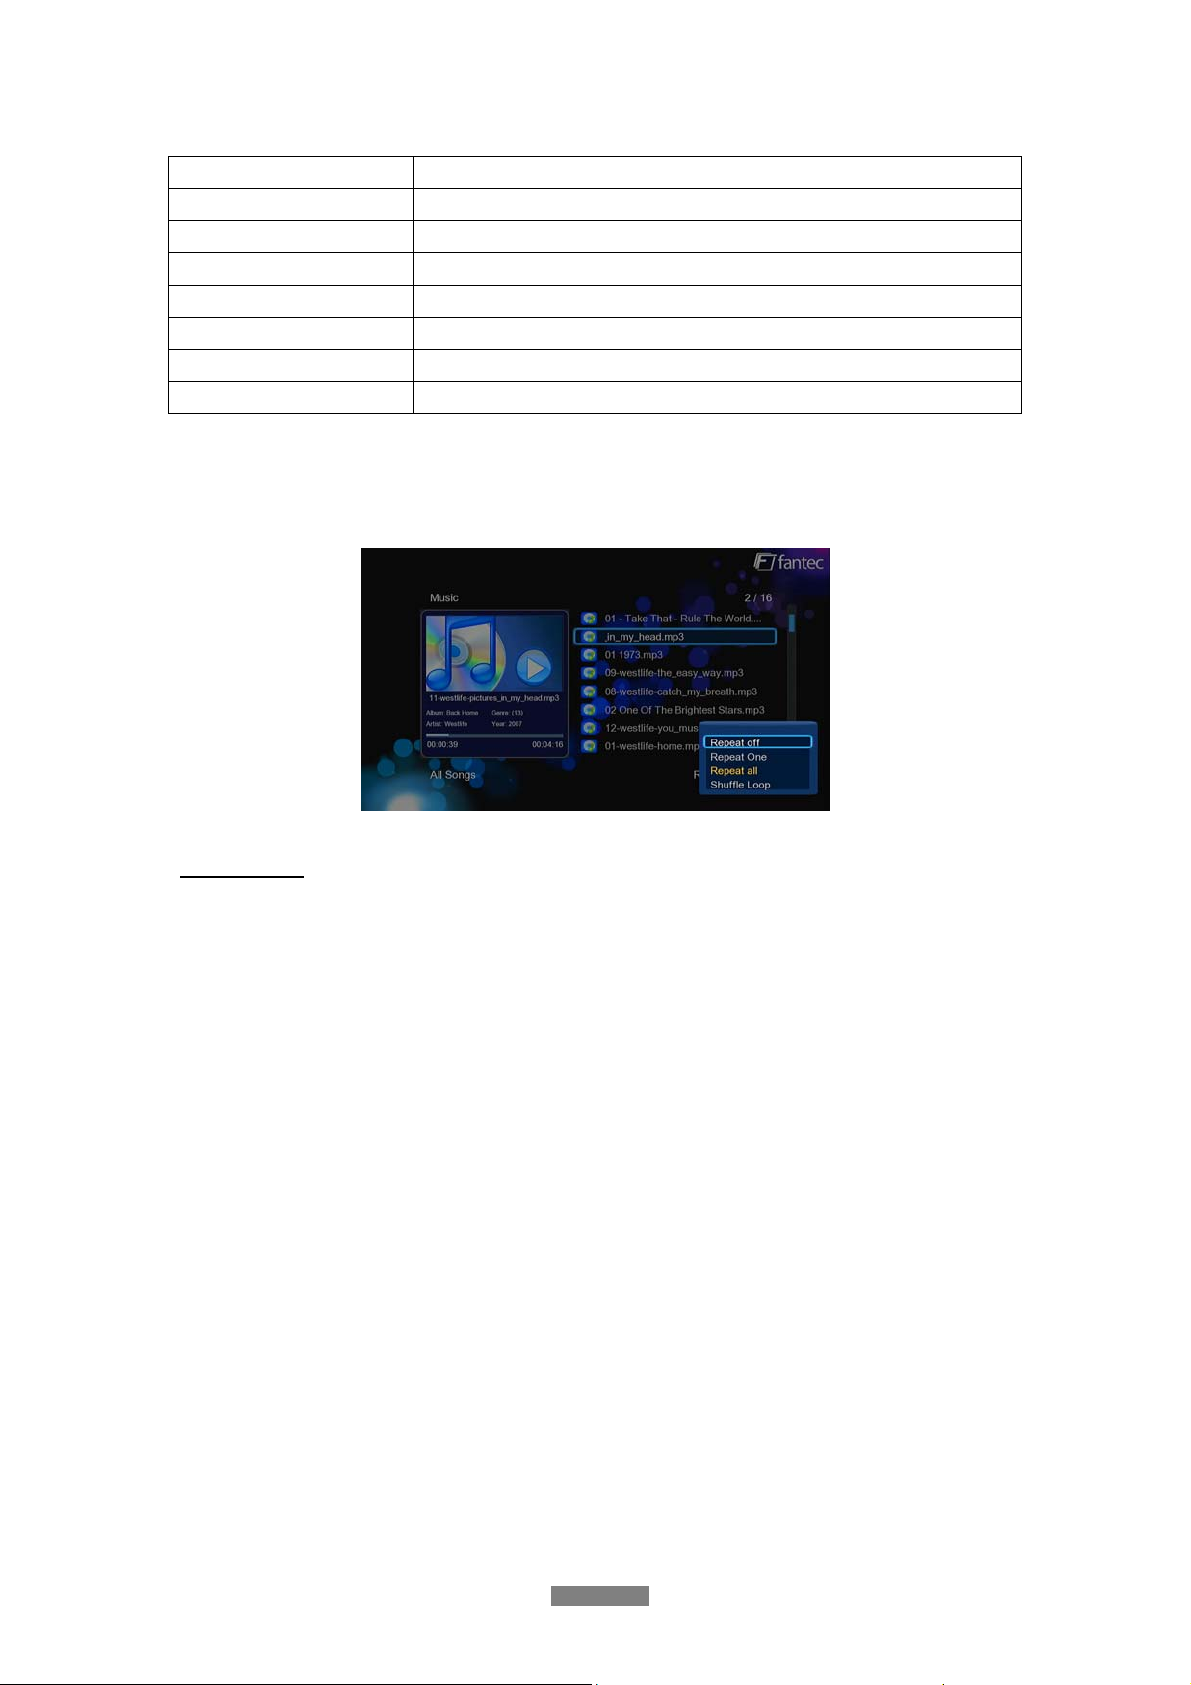
3.4.3 Music Playback Options
During music playback, press Menu button to display or hide the op tion menu at the bottom of
the screen. You can get following functions though the Option menu during music playback.
Repeat Mode
- Choose a repeat mode among Repeat off, Repeat one, Repeat all and Shuffle Loop
from option menu.
ENGLISH
31 / 59
Page 32
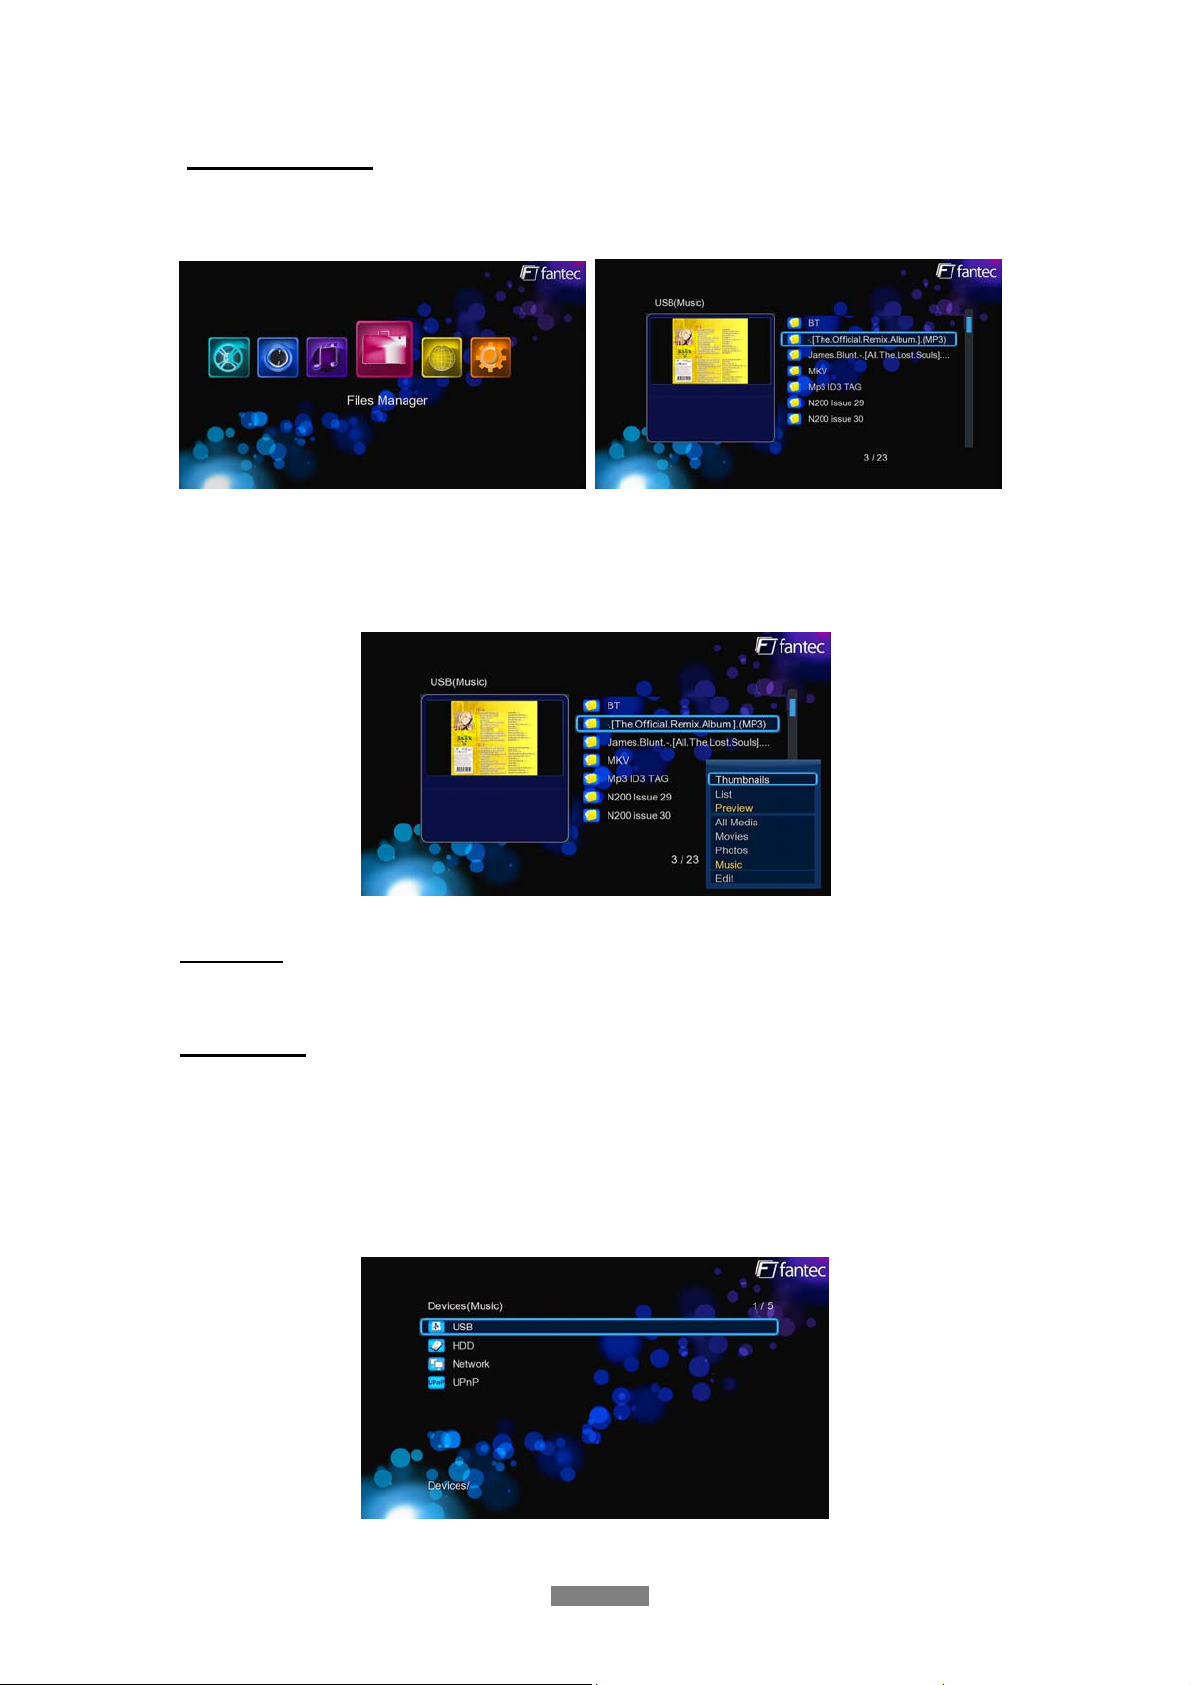
3.5 File Manager
The file manager allows you to browse and play music, photo and movie files stored on an
internal HDD, external USB device, memory card and network.
3.5.1 File Manager Options
In file manager, press Menu button to display the option menu, you can get followin g functio ns
though the option menu.
View Mode
- Choose a review mode among Thumbnails, List, and Preview from option menu.
Filter options
- Choose Movies to display all the supported video files in current directory.
- Choose Photos to display all the supported image files in the current directory.
- Choose Music to display all the supported audio files in the current directory.
3.5.2 A/V Streaming via Network
ENGLISH
32 / 59
Page 33
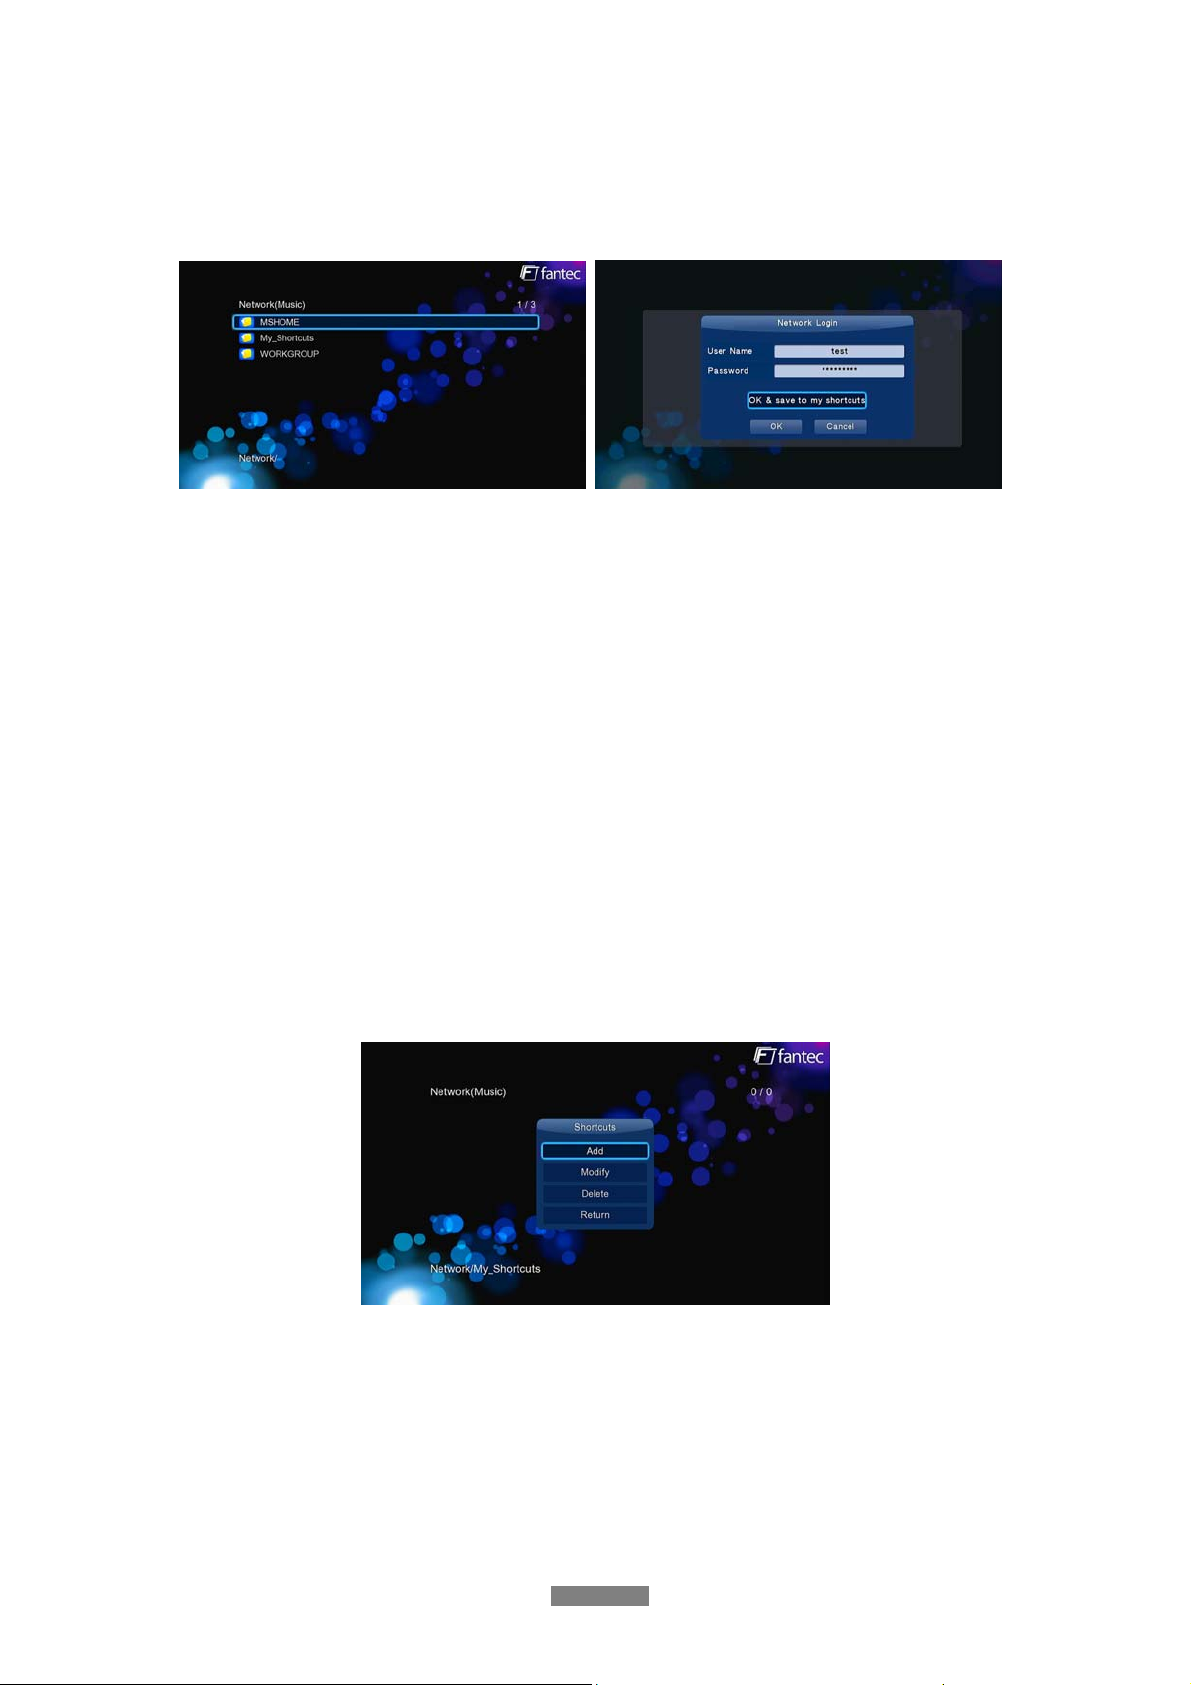
You can stream your media files shared on the home network. Please refer to ’3.1.4 Changing
Network Settings’ for more details on network settings.
There are two ways to locate media files shared on your local network in the Network menu.
One is to browse through workgroup; the other way is to browse through ‘My_Shortcuts’.
You can choose the workgroup which your PC belongs to from the workgroup list, find your PC
name, and press the OK button to confirm. Then you can select and play the shared media
files that you are currently browsing.
Note: While browsing high definition video files (resolution up to 720p / 1080i / 1080p) via
WLAN, the video might be buffering. It is normal due to the limit of network speed or signal
strength.
3.5.2.1 Browsing though workgroup
You can choose the workgroup which your PC belongs to from the workgroup list, find your PC
name, and press the OK button to confirm. Then you can select and play the shared media
files that you want to browse.
Note: Due to different network conditions, sometimes the workgroup might not be accessed or
shown in the list. And then you need to use ‘My_Shortcuts’ to browse shared files.
3.5.2.2 Browsing though ‘My_Shortcuts’
You can also set ‘Specific File Server IP’ and access it from ‘My_Shortcuts’ in the menu.
- Press the Green button and a popup menu appears.
ENGLISH
33 / 59
Page 34
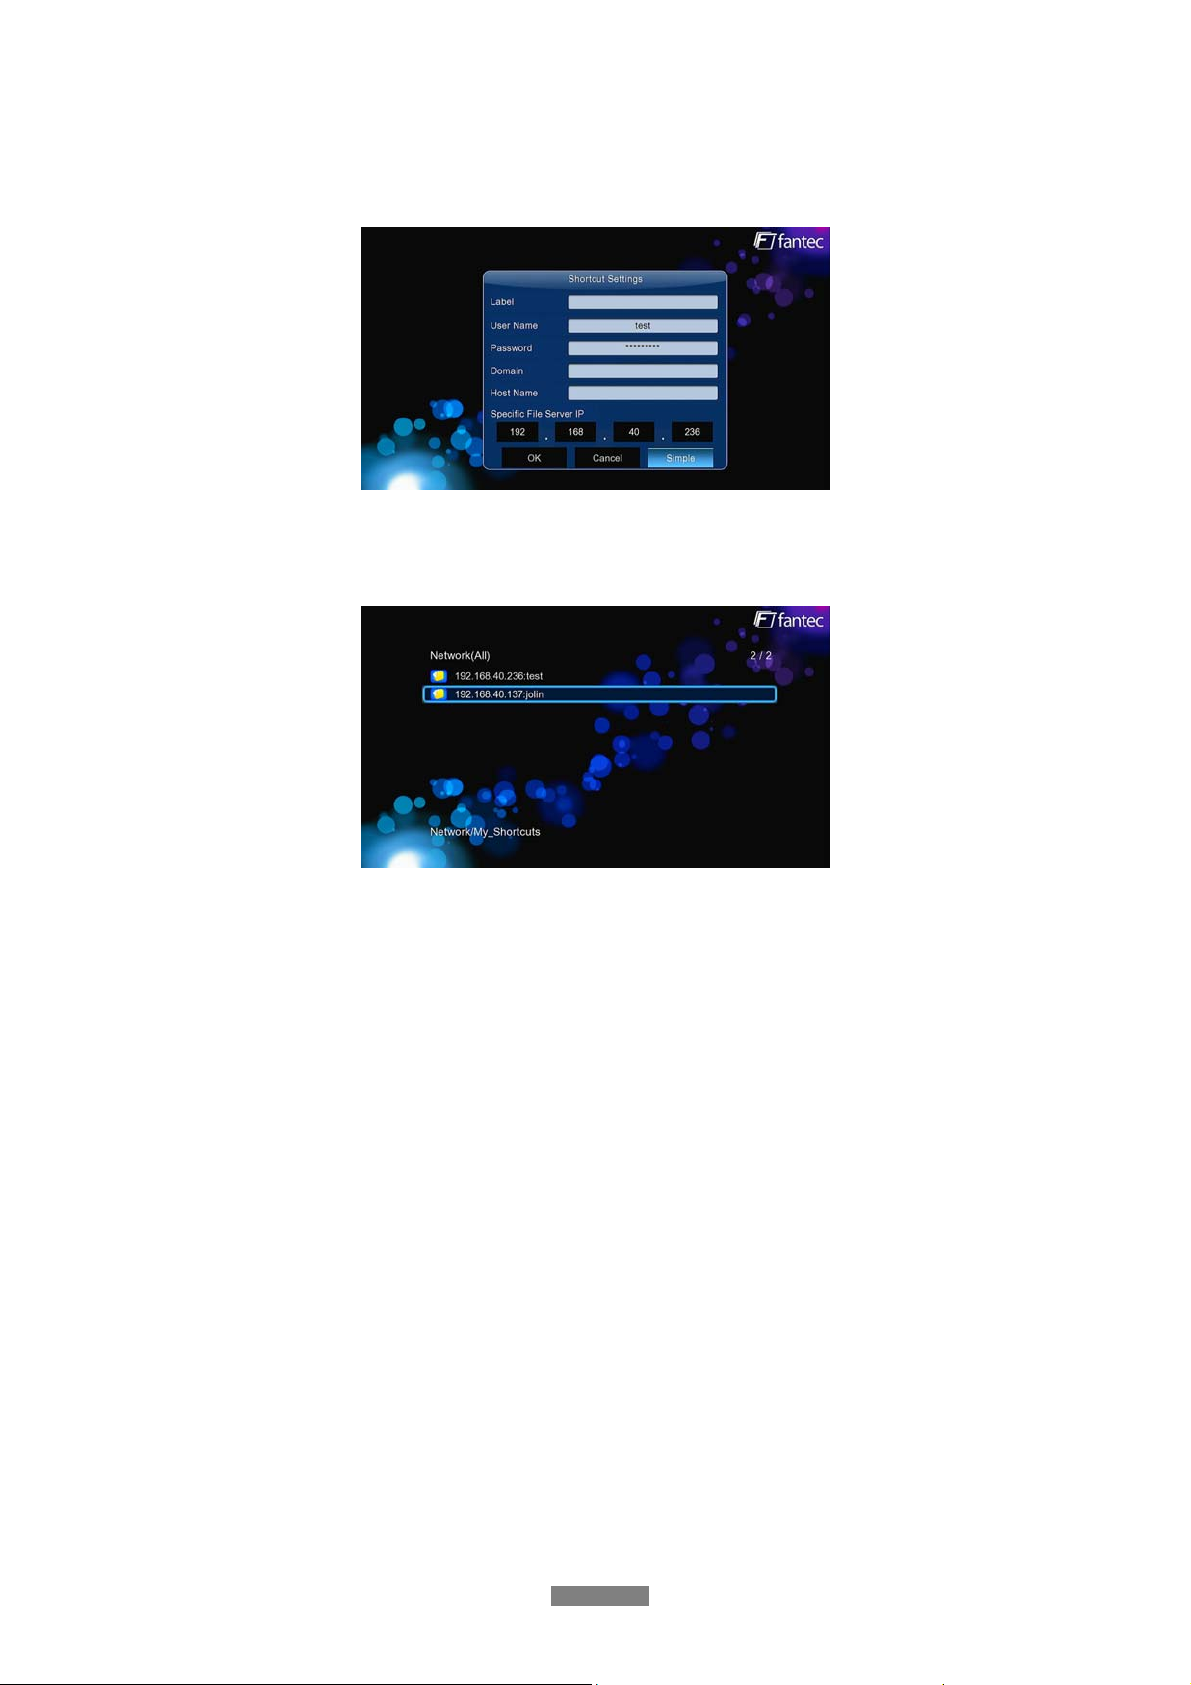
- Select Add to open a popup menu where you can input Label, Net User ID, Net
Password, Domain, Host Name, and Specific File Server IP. Select OK to confirm,
Cancel to cancel, and Simple / Detail to switch between simple and advanced options.
- Select the shortcut you added and press the OK button to confirm. Then you can select
and play the shared media files on the destination computer.
3.5.3 A/V Streaming via UPnP-server
A built-in UPnP (Universal Plug and Play) client has been integrated on the system, which
enables the player to auto-detect UPnP Media Servers on the network to browse and stream
media files from them.
3.5.3.1 Installing UPnP Media Server on your PC
There’re a lot of free and commercial UPnP Media Server software, such as Windows Media
Connect, Windows Media Player 11, XBMC Media Center (Linux/Mac/Windows), MediaTomb
(Linux), etc. Please install one of them on your computer. In the following chapters, we will
take Windows Media Player 11 on Microsoft Windows XP SP2 for an example.
3.5.3.2 Sharing Media on your PC
The Media Sharing feature of Windows Media Player 11 lets you enjoy the contents of your
Windows Media Player library from anywhere in your home.
Open Windows Media Player 11, click Library -> Add Library -> Advanced Options to add or
remove media files from the library.
ENGLISH
34 / 59
Page 35
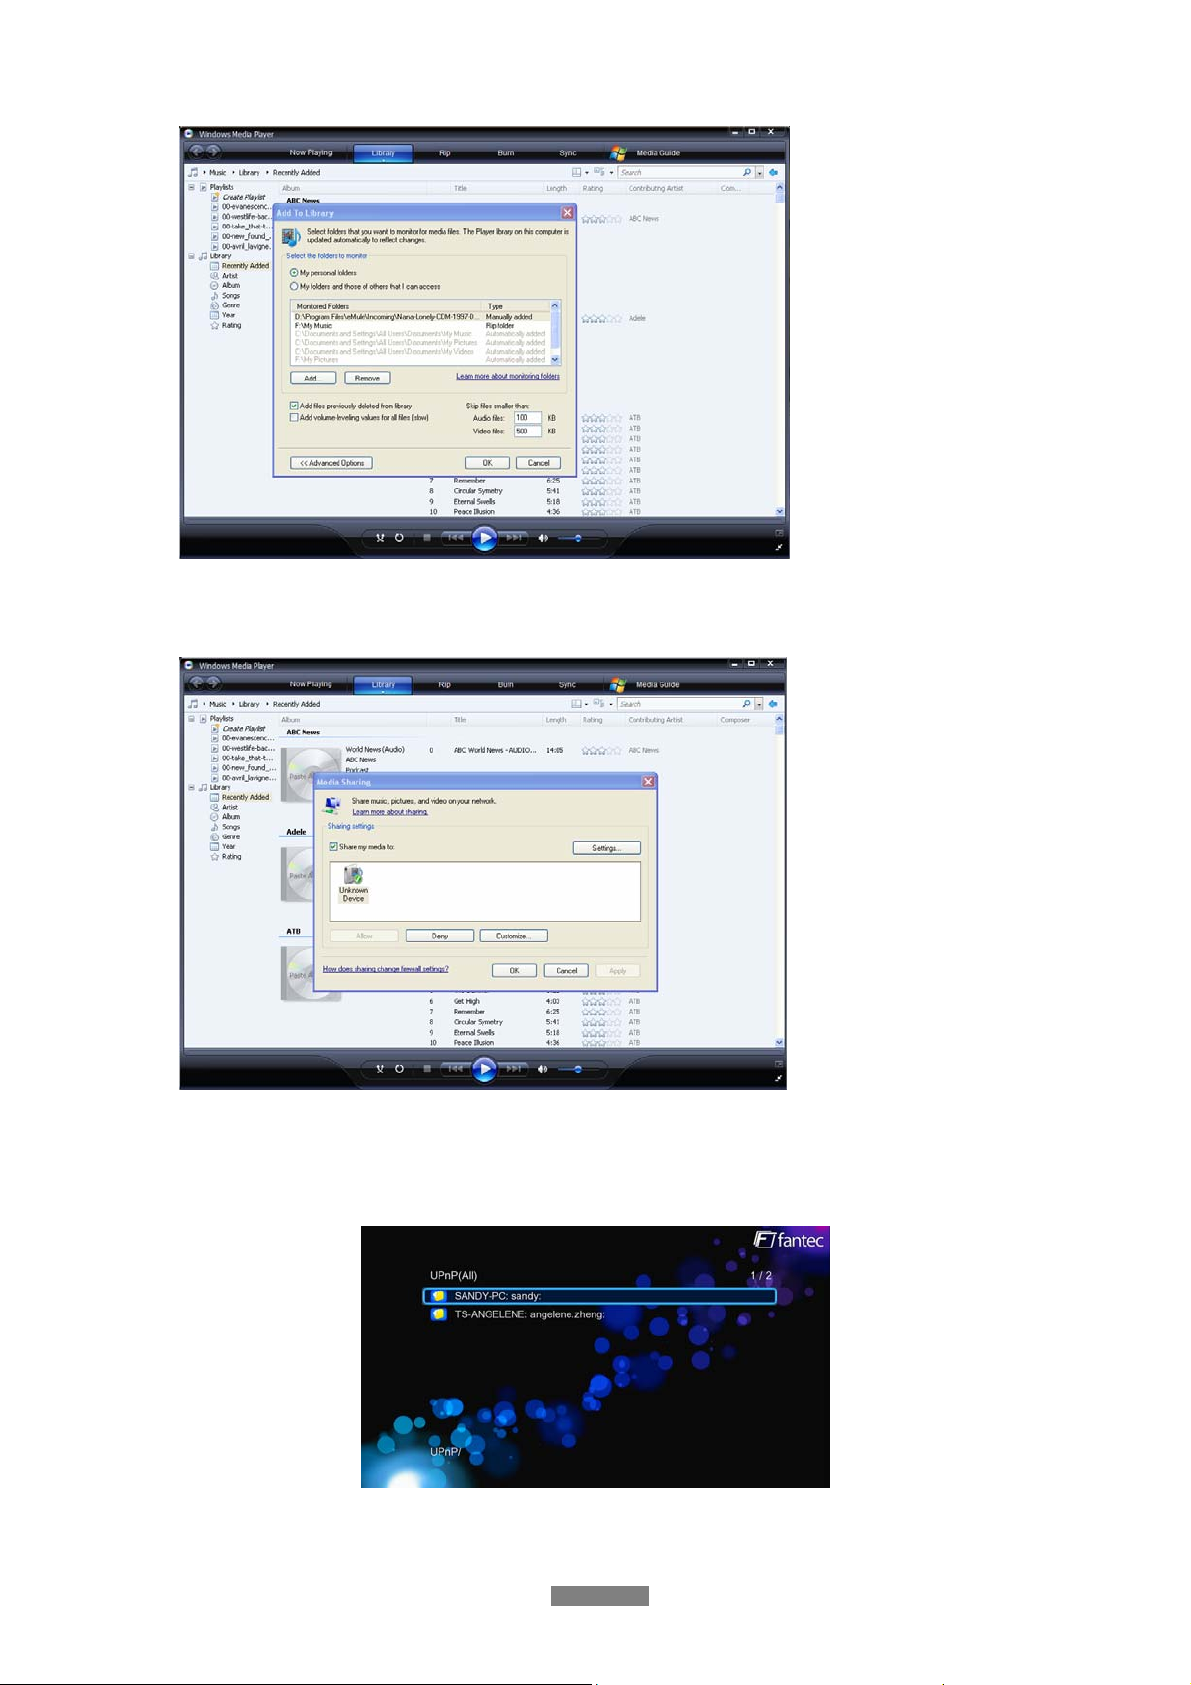
- Click Library -> Media Sharing, then you can allow or deny devices to access the media
library. Click Allow to authorize your player.
3.5.3.3 Streaming Media on your Player
- Connect your player to the home network (LAN or WLAN).
- Visit Browser - > UPnP menu on the player, select the UPnP-server, and press OK.
- Then you can browse the media library shared by Windows Media Player 11.
ENGLISH
35 / 59
Page 36
Note: Make sure your player and your computer are on the same local area network and
subnet. Firewalls may prevent your player to communicate with your computer. Please open
the ports manually and add your player to the ‘trusted’ list, or disable the firewall temporarily.
3.6 Playlist Management
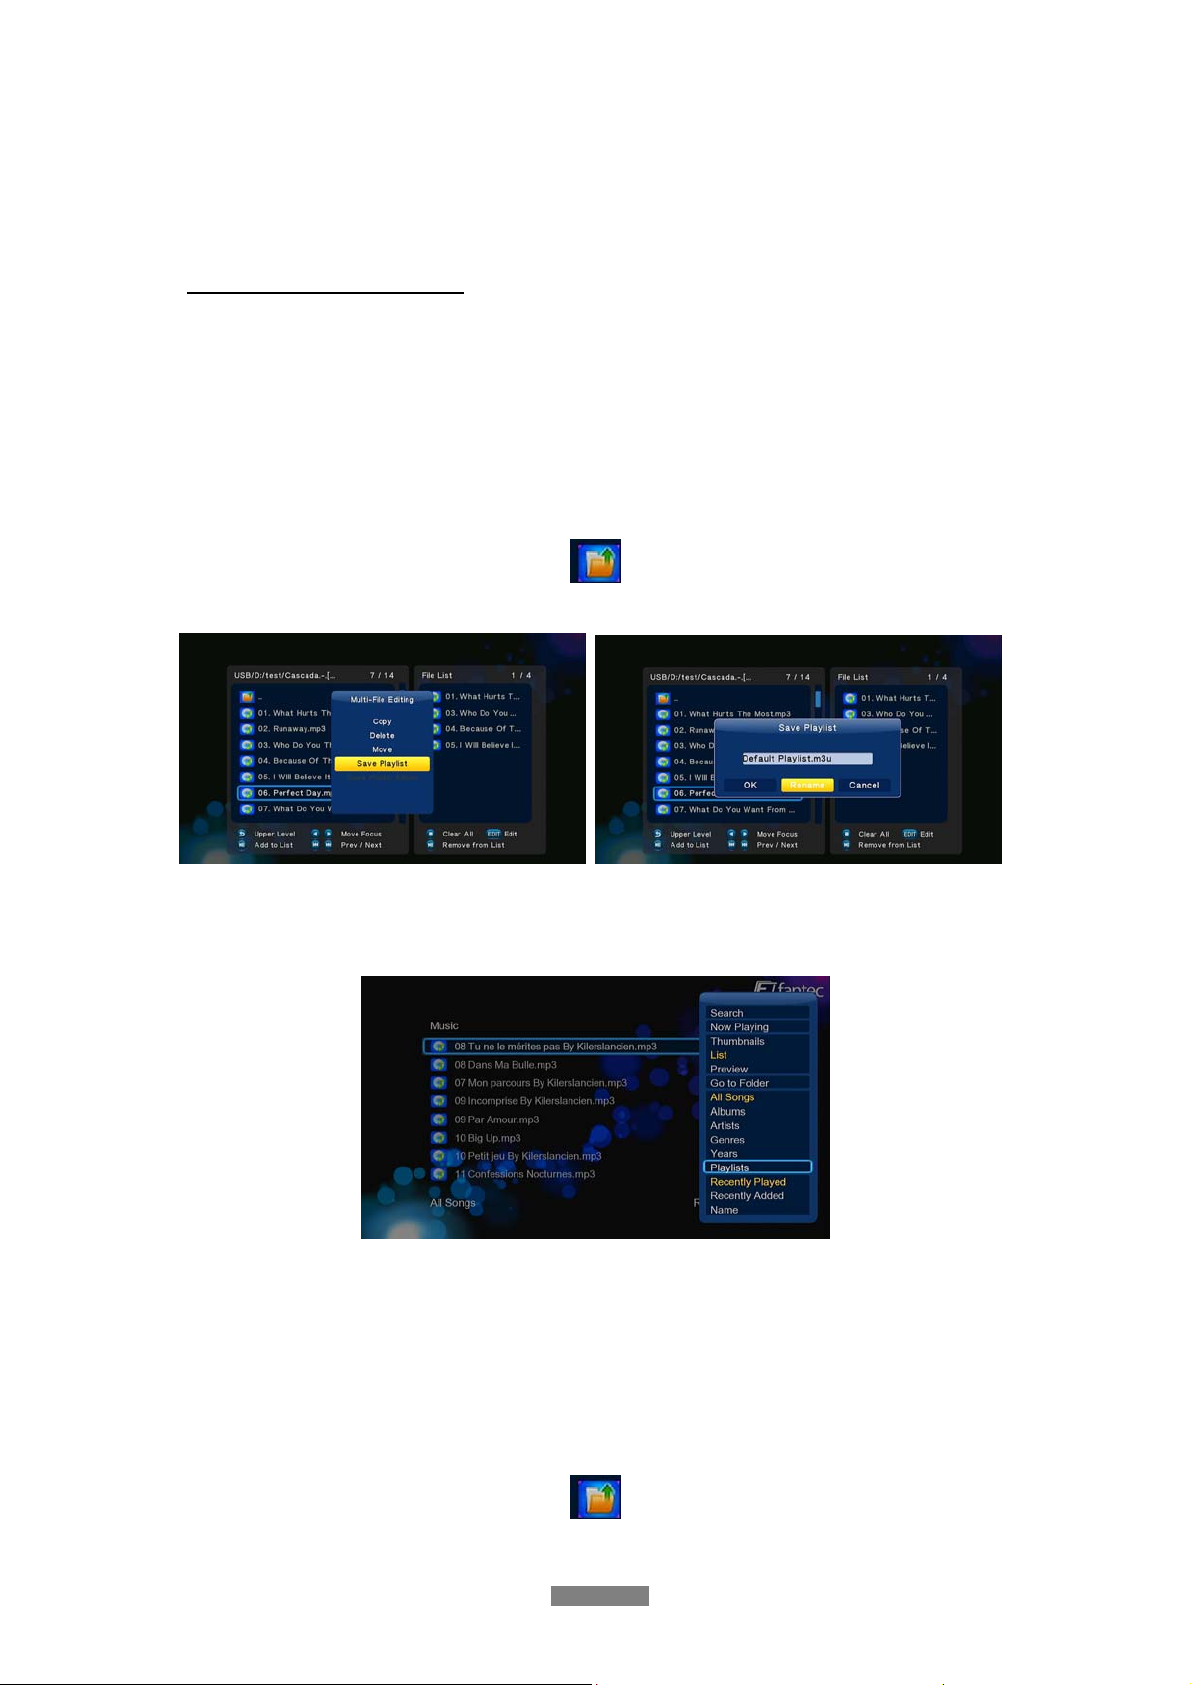
3.6.1 Create music playlist
To create a playlist, please enter the HDD via File Manger. The press Edit button on the
remote control and select Multiple Select option. In the file explorer you can navigate by
Up/Down/Left/Right/Next/Prev button and add or delete files to the File List by the
Play/Pause button.
In order to switch between different folders, please select the upper folder icon:
To save the playlist, please press the Edit button and name the playlist.
3.6.2 Playback music playlist
Enter the music library, press Menu button and choose Playlists to show your music playlists.
3.6.3 Create album playlist
To create an album playlist, please enter the HDD via File Manger. The press Edit button on
the remote control and select Multiple Select option. In the file explorer you can navigate by
Up/Down/Left/Right/Next/Prev button and add or delete files to the File List by the
Play/Pause button.
In order to switch between different folders, please select the upper folder icon:
ENGLISH
36 / 59
Page 37
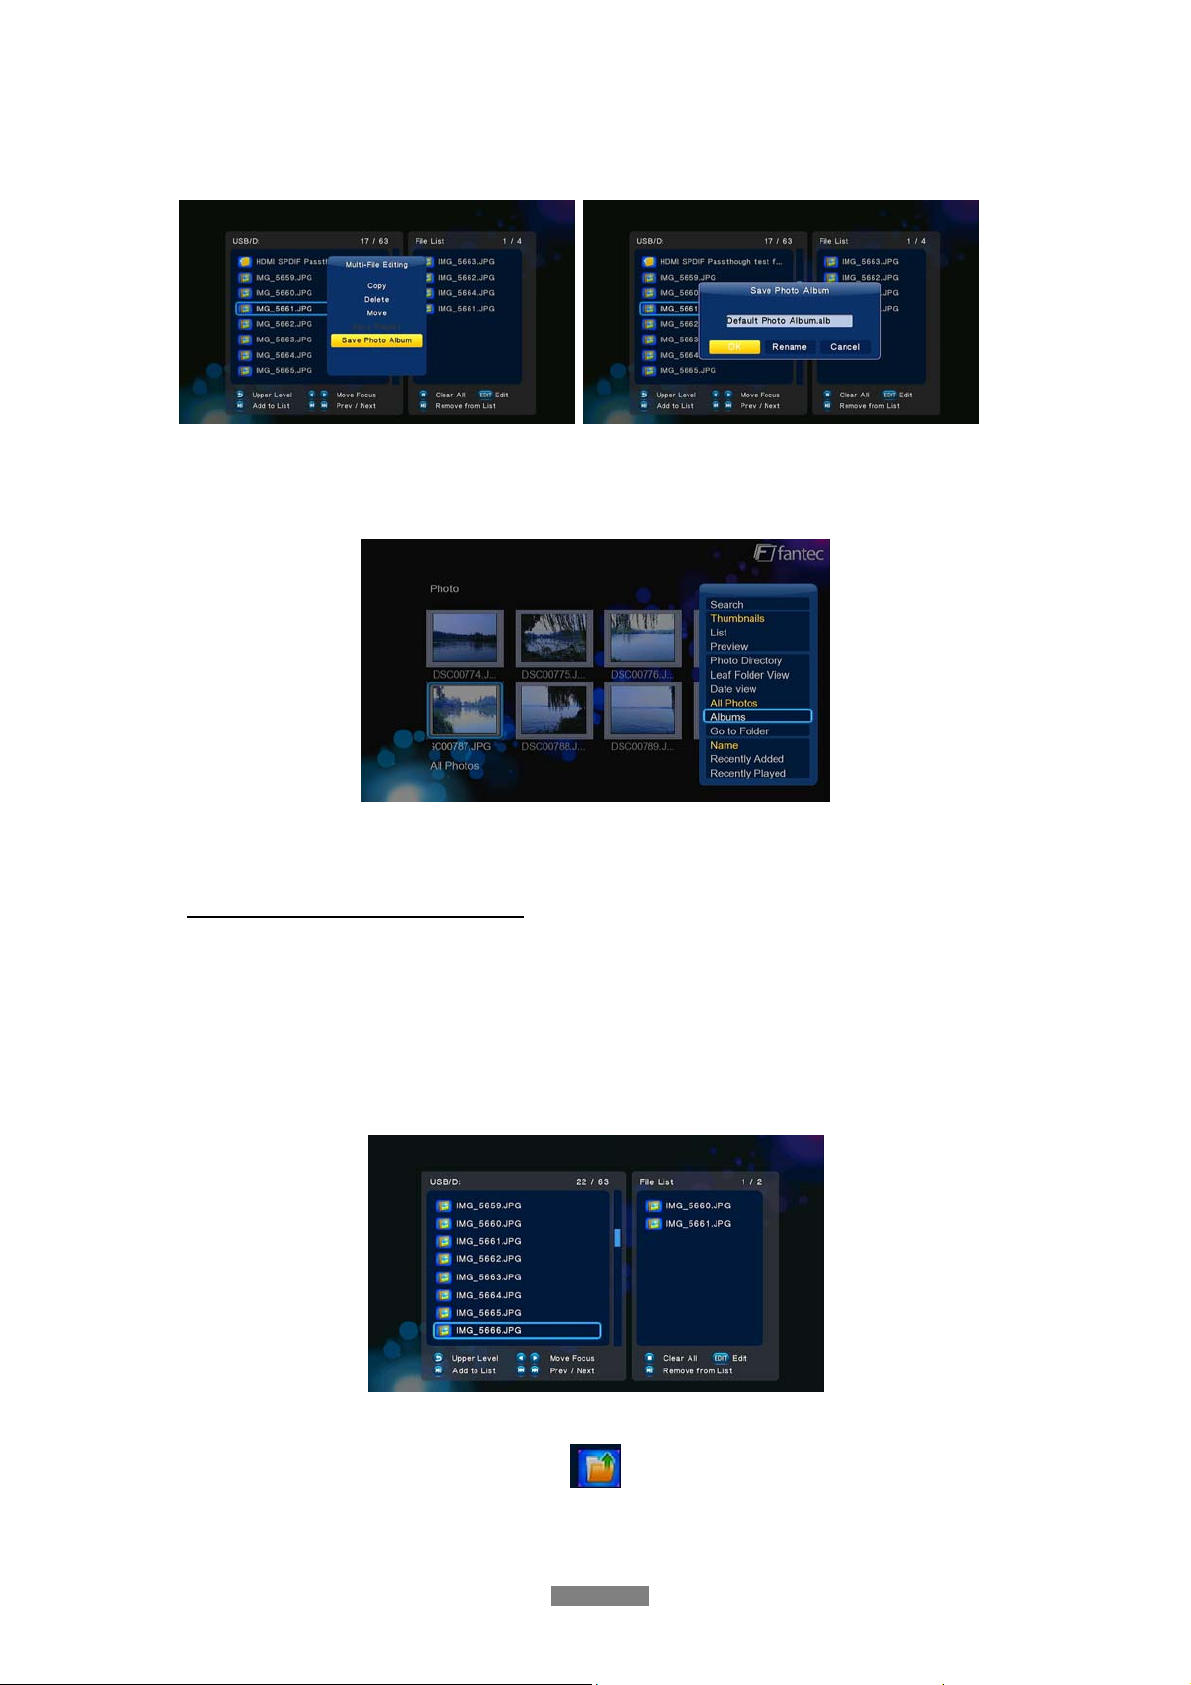
To save the album playlist, please press the Edit button and name the playlist.
3.6.4 Playback Album playlist
Enter the photo library, press Menu button and choose Albums to show your album playlists.
3.7 Copy und Delete Function
3.7.1 Copy under File Manager
To start the copy function, please enter the HDD via File Manger. The press Edit button on
the remote control and select Multiple Select option. In the file explorer you can navigate by
Up/Down/Left/Right/Next/Prev button and add or delete files to the File List by the
Play/Pause button.
In order to switch between different folders, please select the upper folder icon:
To start the copy procedure, please press the Edit button and select Copy.
ENGLISH
37 / 59
Page 38
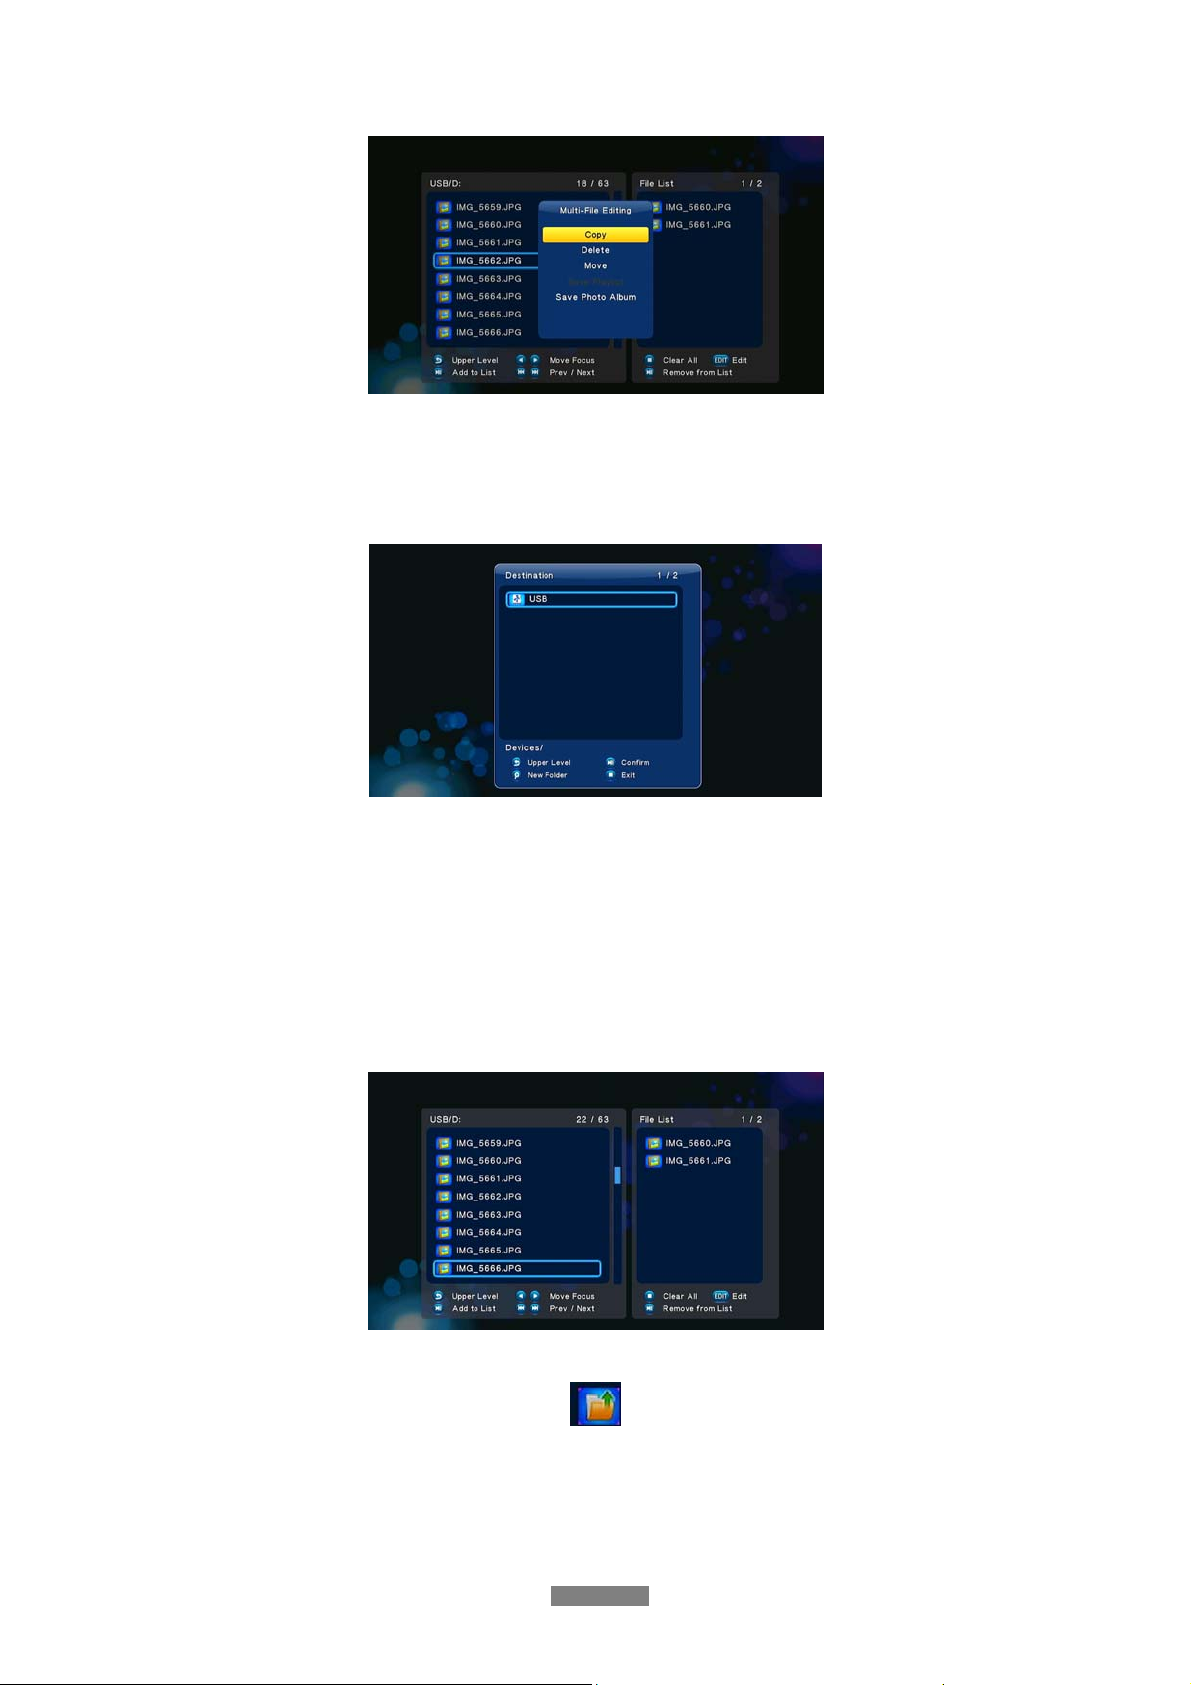
Select the destination or create a new folder and then press Play/Pause button to finish the
copy process.
Note: If you want to copy a single file, just press Edit and then Copy to start the copy
procedure.
3.7.2 Delete under File Manager
To start the Delete function, please enter the HDD via File Manger. The press Edit button on
the remote control and select Multiple Select option. In the file explorer you can navigate by
Up/Down/Left/Right/Next/Prev button and add or delete files to the File List by the
Play/Pause button.
In order to switch between different folders, please select the upper folder icon:
To start the Delete procedure, please press the Edit button and select Delete.
Note: If you want to delete a single file, just press Edit and then Delete to start the delete
procedure.
ENGLISH
38 / 59
Page 39
3.8 Internet Media
This feature is additional function. All contents and services under this feature are provided by
third-party service providers, our company does not offer any contents and services of this
feature and it not responsible for any contents and services provided unde r this feature. Our
company is not responsible for any operational stability of the contents and services, for
example, if you cannot access certain web site for video streaming or news broadcast, or the
content of a web site has been changed etc, are all responsible and control by the third-party
service providers. If you find that these features cannot operate properly, please contact our
customer service or visit our company website to obtain the relevant information.
Here are the introductions of SHOUTcast radio, BT download and video podcast function.
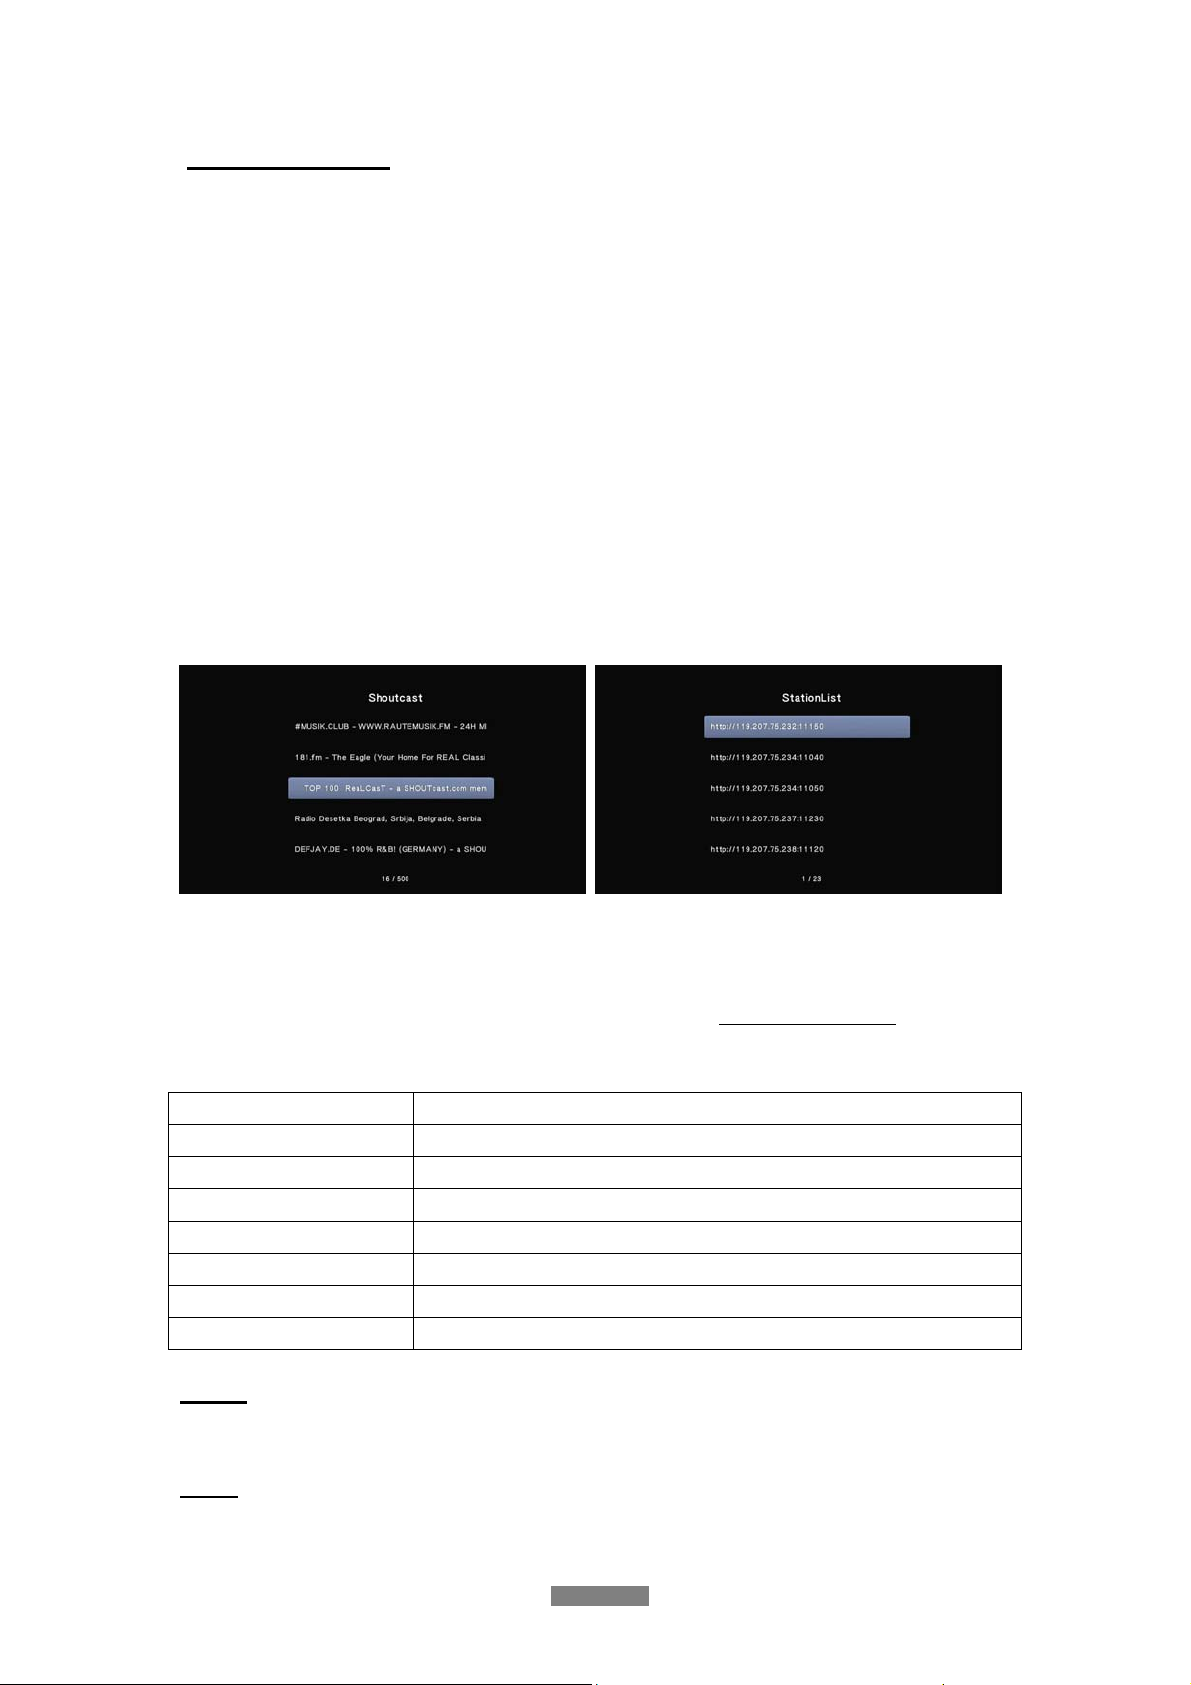
3.8.1 SHOUTcast Radio
Select SHOUTcast Radio icon to get all free internet radio stations, press OK to select and
play radio station, press Back to come back
Note:
• When you enter the Digital Radio menu at the first time, it will take several seconds to
download data from the Internet, please be patient to wait;
• For more about SHOUTcast, please refer to the website: www.shoutcast.com
The following buttons can be used under this menu.
Button Function
UP / DOWN
PREV / NEXT
ENTER
Move cursor up / down to select station, channel, and genre.
Page up / down.
Confirm and enter the selected menu.
MENU Add / delete a station to / from Favourite while it is highlighted.
PLAY
STOP
RETURN
Begin playback after a channel has been selected.
Stop playback.
Return to the previous menu.
Station
- All downloaded stations will be listed under this menu.
Genre
- You can search for stations by genre (pop, rock, jazz, etc.) under this menu.
ENGLISH
39 / 59
Page 40
Favourite
- Your favourite stations can be kept under this menu.
Search
- You can search for radio stations by Keyword. (Please visit www.shoutcast.com
for
available stations)
3.8.2 BT Download
Select the BitTorrent icon on internet media menu. You can see the status of torrents
download progress and configure the BT download settings in this menu. Press Left/Right
button to enter into download menu and BT setup menu.
Add a torrent
Store your torrent files on an USB drive and then connect it to the device. Locate your torrent
files in file manager menu, then press OK button to add the torrent files and star t the downloa d
procedure.
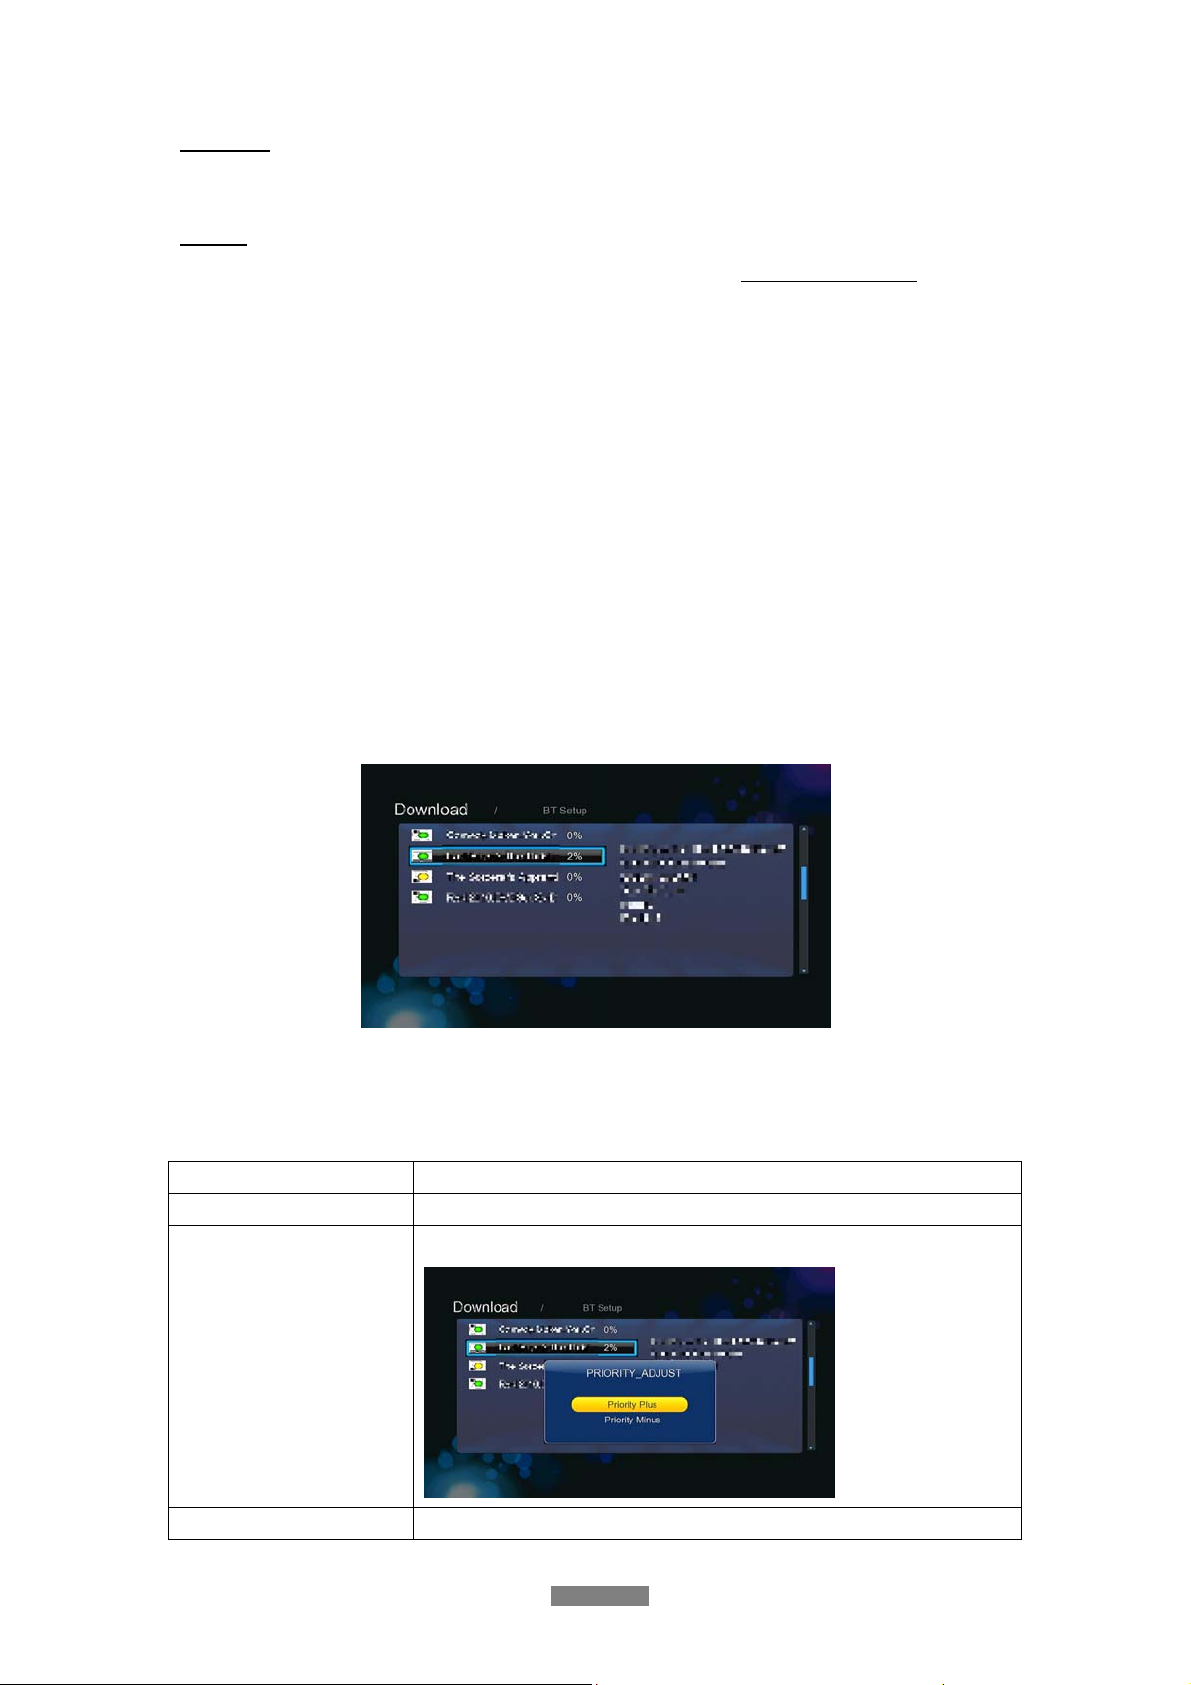
Download Menu
After add the BT torrent files, the download progress can be display ed under Internet Media
menu.
The following buttons can be used under this menu.
Button Function
Up/ Down
OK
Play/Pause
Move cursor up / down.
press to adjust the priority of the download task
Press to start/pause download.
ENGLISH
40 / 59
Page 41
Stop
Return
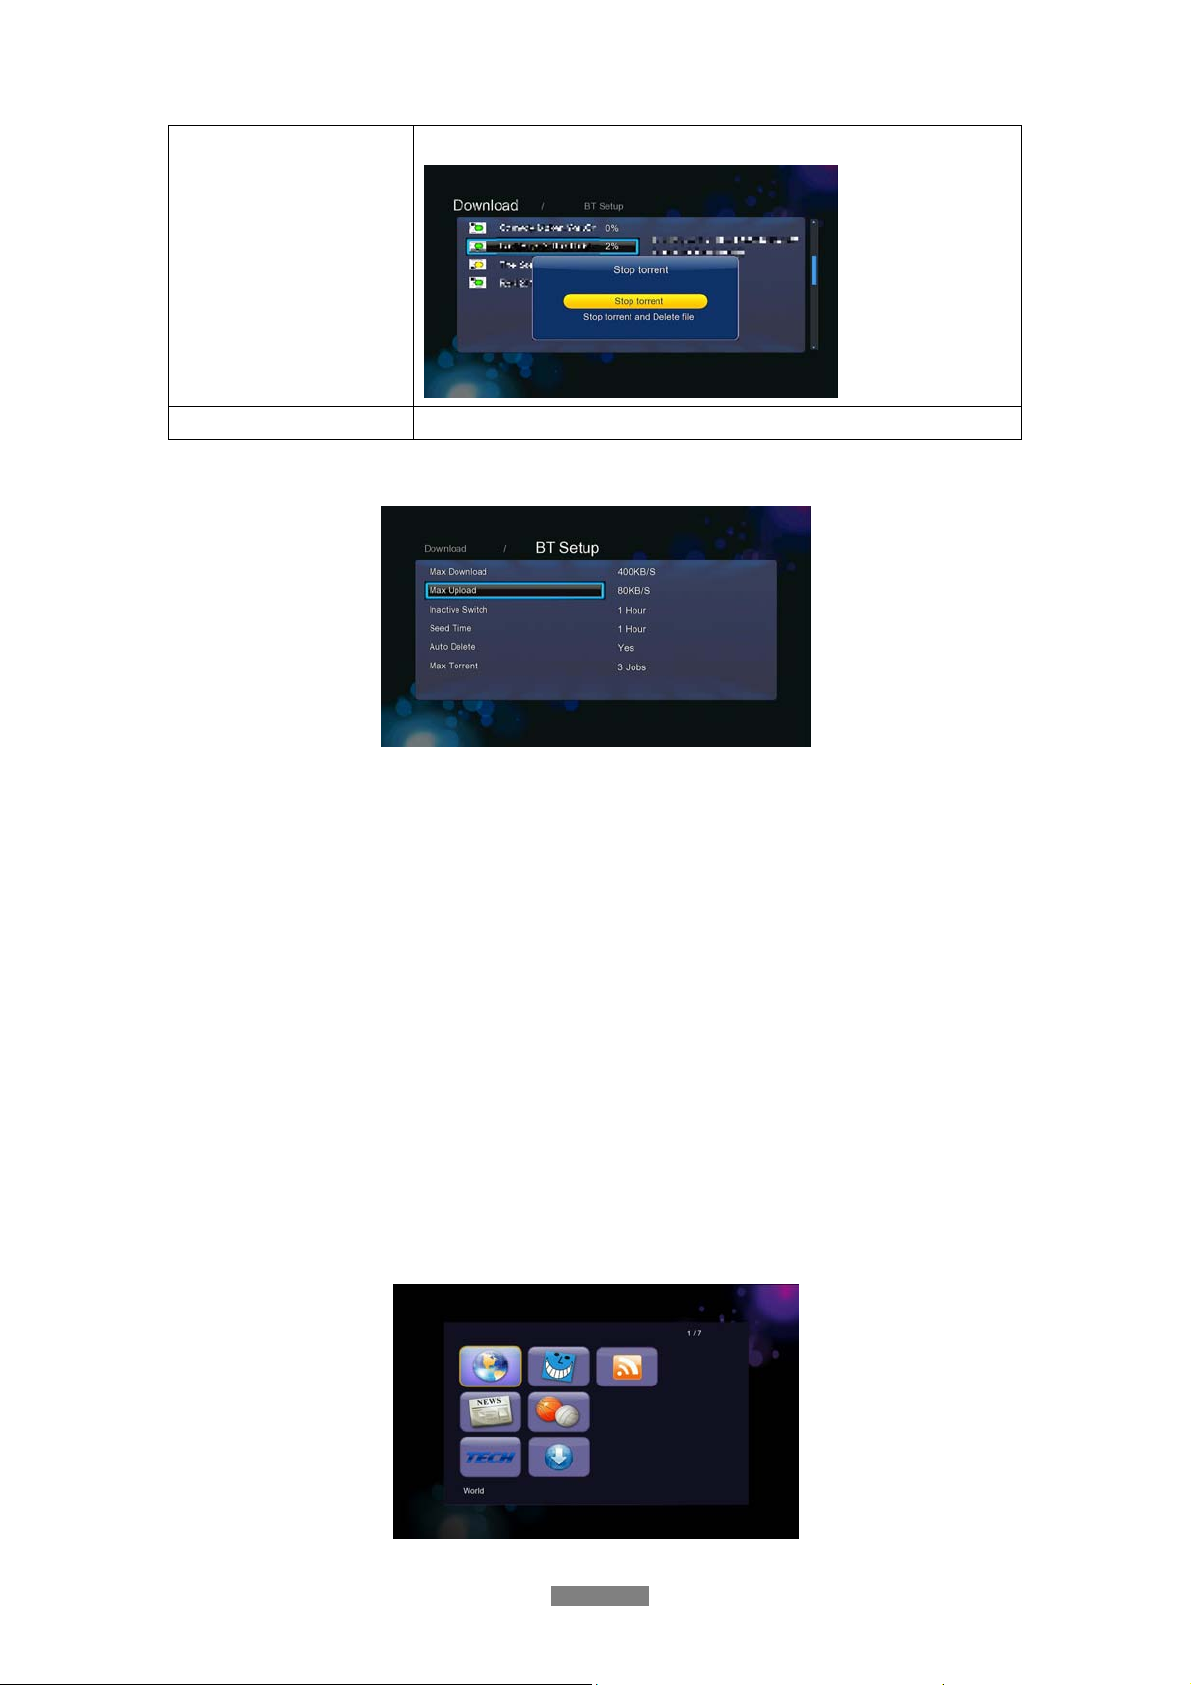
BT setup Menu
Press to stop the download.
Return to the previous menu.
In the BT Setup menu, you can configure the following settings. Use Up/Down and OK to
change the settings.
- Set the maximum download rate.
- Set the maximum upload rate.
- Set the idle hours to start the next download automatically.
- Set the seeding hours.
- Set to delete the finished torrent files automatically or not.
- Set the maximum number of simultaneous download tasks.
Note: Please visit chapter ‘3.11.3 BitTorrent management‘ to get more information about
web-based BT menu.
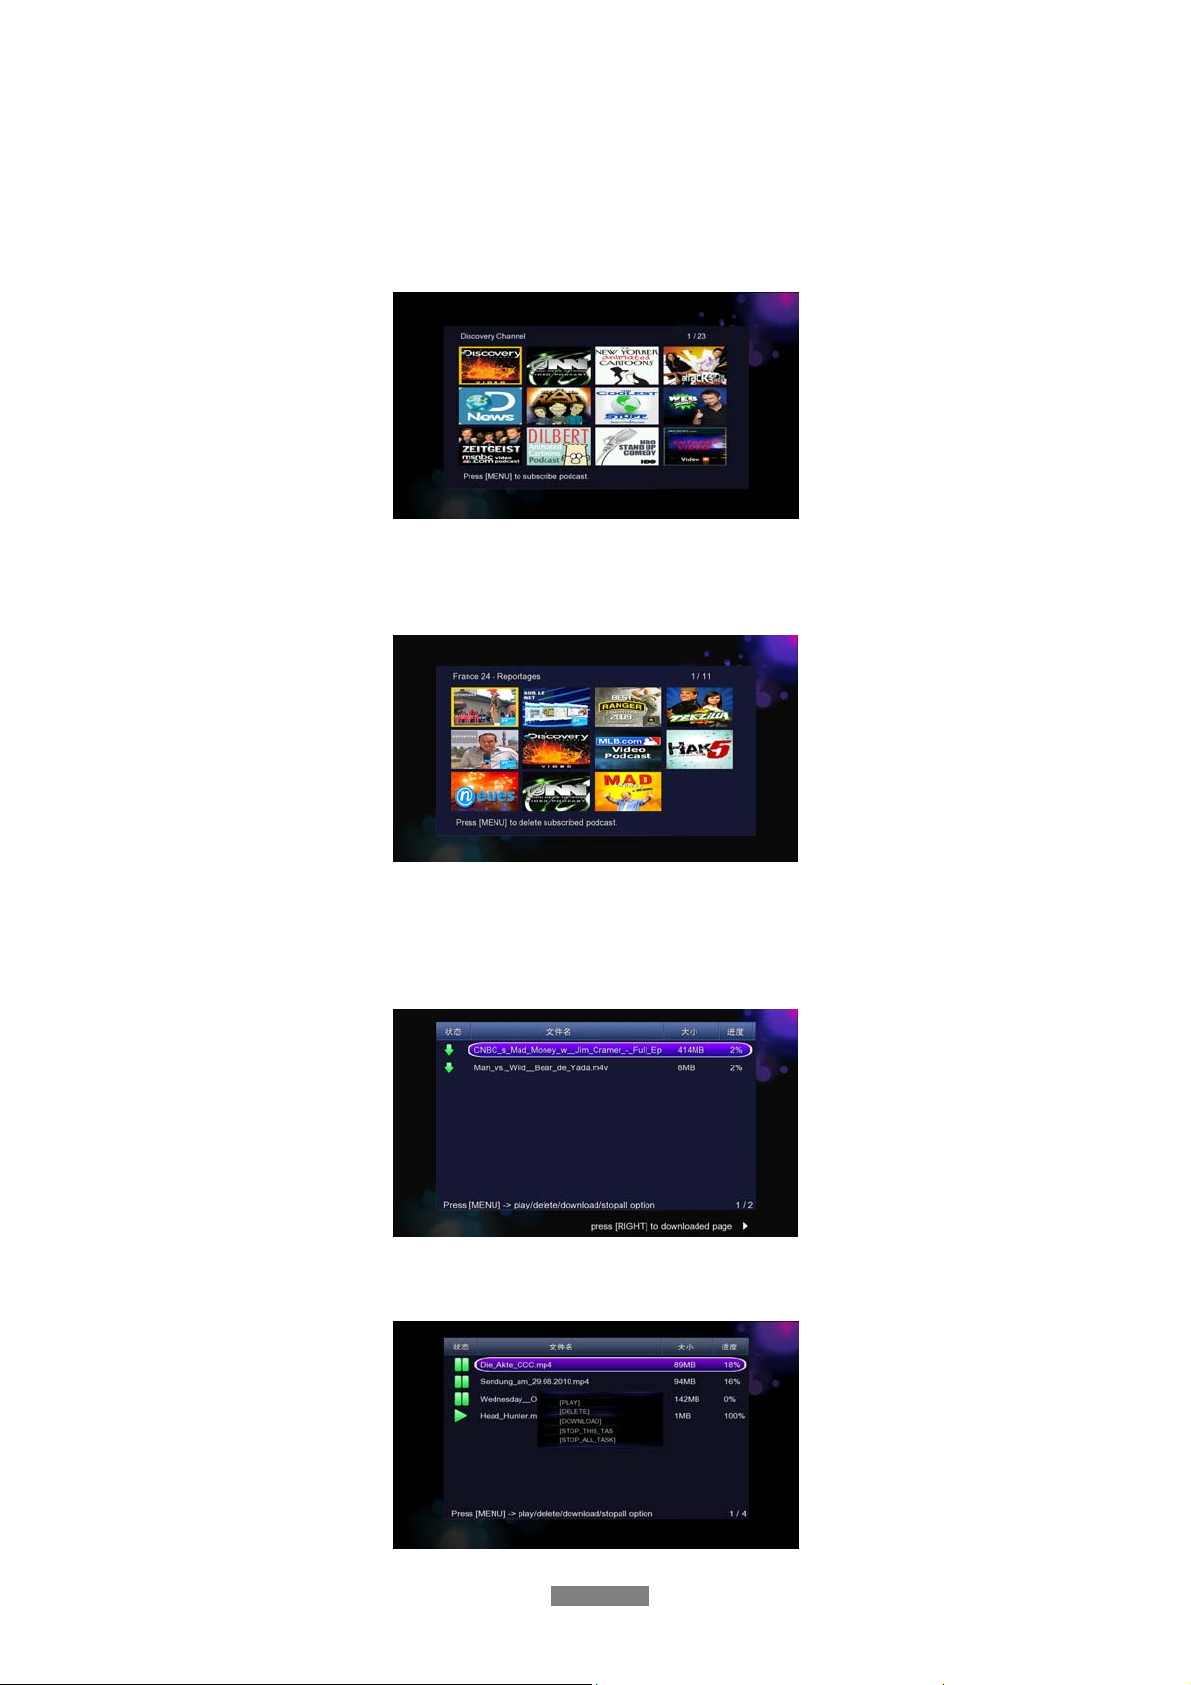
3.8.3 Video Podcast
Select Video podcast on internet media menu, here are world, news, fun, technology, sports,
downloading manager, subscribe manager. And here you can start view, subscribe and
download video podcast.
ENGLISH
41 / 59
Page 42
Video podcast catalog
This product shows you five catalogs, there are world, fun, news, sport and technology.
You can directly watch podcast files, subscribe or download it. To playback a podcast please
enter your preferred podcast by the use Up/Down/Left/Right and OK button. To stop playback,
please press the Stop button.
Subscribe manager
You can view all video podcast that you have subscribed. In order to unsubscribe a podcast
please enter the Subscribe Manager and delete the podcast by pressing the Menu button.
Downloading manager
You can see the status of video download progress. For additional option, please press the
Menu button.
To start playback of downloaded files, please press the Right button and select one of the
podcast files. For additional option, please press the Menu button.
ENGLISH
42 / 59
 Loading...