

Fantasea FP7100 User Manual
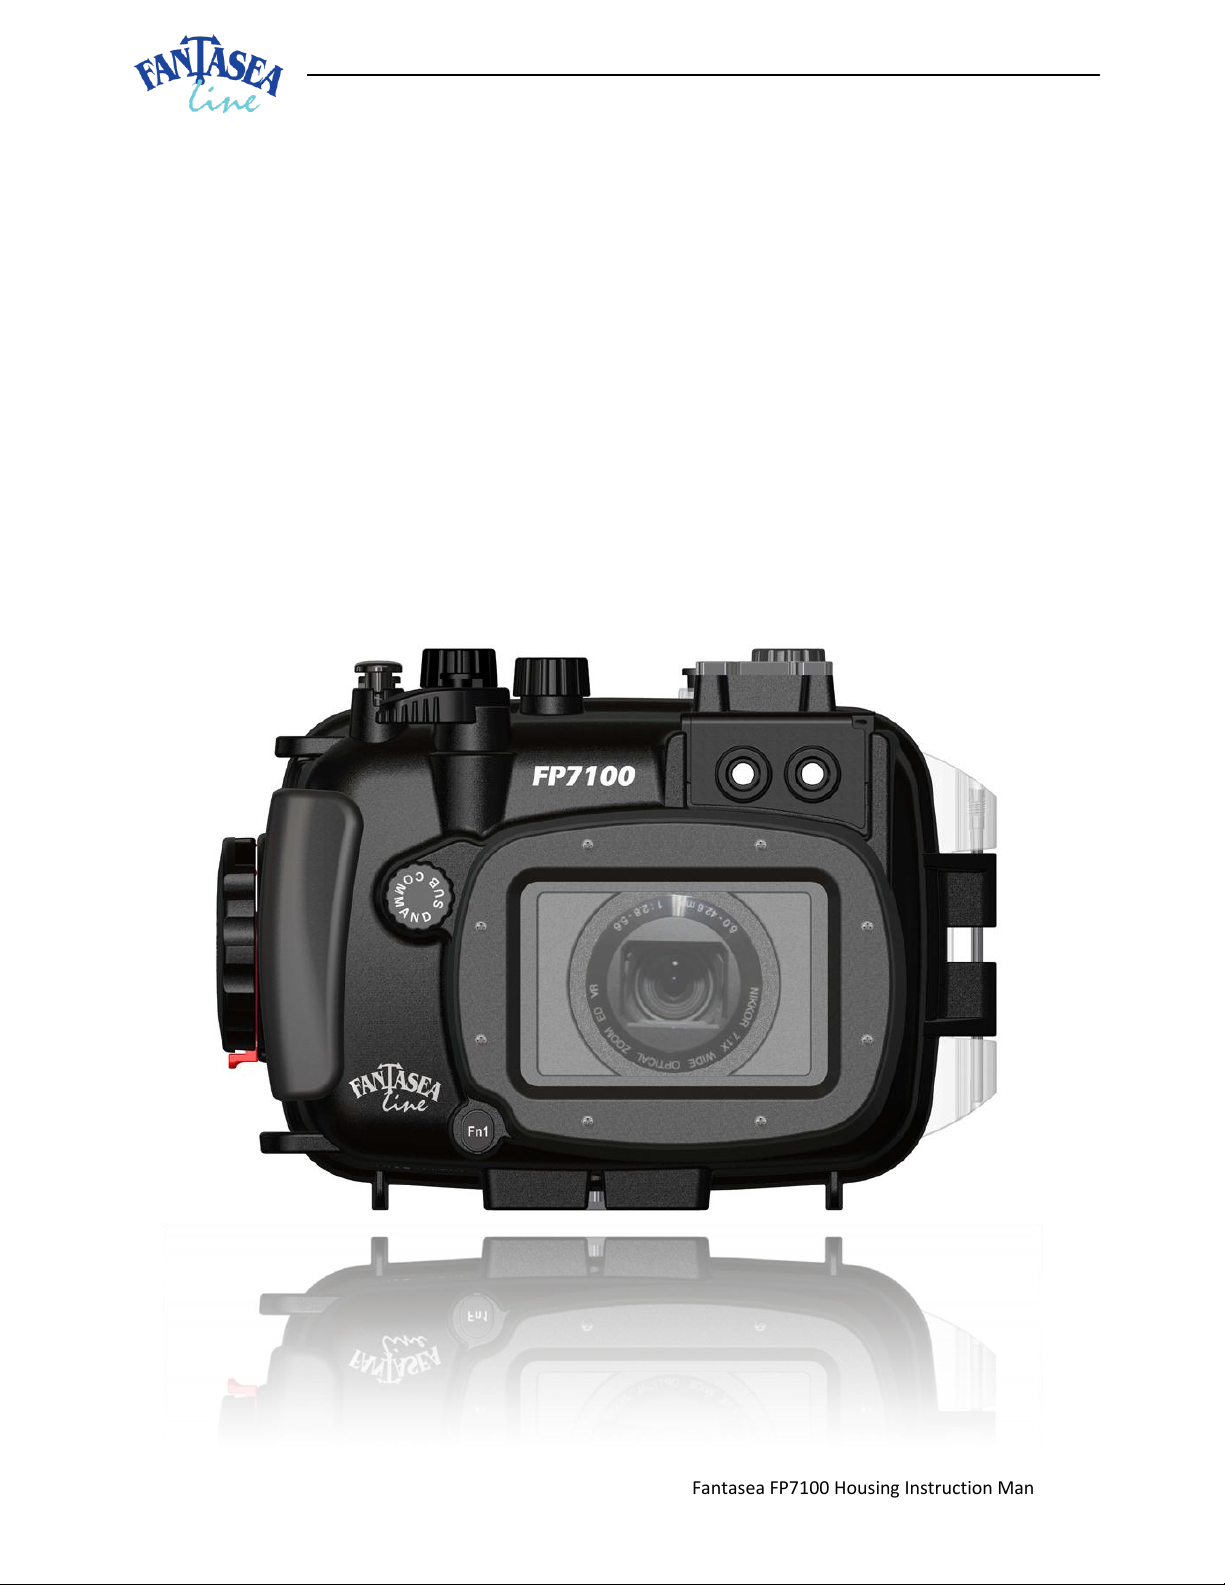
FP7100 Housing
For Nikon Coolpix P7100
Fantasea Line
(Cat. No. 1119)
Instruction Manual
Fantasea FP7100 Housing Instruction Manual 20111213

2
TABLE OF CONTENTS
TABLE OF CONTENTS ................................................................................................................................. 2
DISCLAIMER .................................................................................................................................................. 3
INTRODUCTION ............................................................................................................................................ 3
GENERAL INFORMATION .................................................................................................................................. 3
FEATURES & SPECIFICATIONS .......................................................................................................................... 4
INCLUDED IN PACKAGE ............................................................................................................................. 5
IDENTIFICATION OF HOUSING PARTS .................................................................................................. 6
THE NIKON COOLPIX P7100 DIGITAL CAMERA ............................................................................... 11
SETTING UP THE HOUSING ..................................................................................................................... 12
PREPARING THE CAMERA .............................................................................................................................. 12
PREPARING THE HOUSING ............................................................................................................................. 13
OPENING THE HOUSING ................................................................................................................................. 14
CHECKING THE O-RING ................................................................................................................................. 15
INSTALLING THE CAMERA ............................................................................................................................. 15
CLOSING THE HOUSING ................................................................................................................................. 16
REMOVING THE CAMERA FROM THE HOUSING ............................................................................................ 17
USING THE BUILT-IN CAMERA FLASH ................................................................................................ 18
OPTIONAL ACCESSORIES ........................................................................................................................ 19
EXTERNAL FLASHES ............................................................................................................................... 19
LENS ACCESSORIES ....................................................................................................................................... 21
HOUSING HAND STRAP .................................................................................................................................. 22
HOT-SHOE CONNECTOR FOR LIGHTING ACCESSORIES ................................................................................... 22
LEAK DETECTOR ...................................................................................................................................... 22
FP7100 HOUSING ACCESSORY SYSTEM......................................................................................................... 22
CARE & MAINTENANCE ........................................................................................................................... 23
FANTASEA PRODUCT CONSUMER LIMITED WARRANTY ............................................................ 24
3
Note
Please read this manual carefully in order to properly operate the FP7100
Housing. Store this manual in a safe place for further reference once you have
read it.
DISCLAIMER
While every effort has been made in order to ensure that the information included in this instruction
manual is accurate and complete, no liability will be accepted for any errors or omissions. Fantasea Line
reserves the right to change product specifications and features described herein at any time without prior
notice. No part of this instruction manual may be copied, translated or reproduced without the prior
written permission of Fantasea Line. Fantasea Line makes no warranties aside from limited product
warranty as described at the end of this manual.
INTRODUCTION
General Information
The FP7100 Housing features a new design, specifically created for the Nikon Coolpix P7100 digital camera.
The FP7100 Housing is manufactured to the highest professional standards of function, style and durability.
It is depth rated to 60m/200 feet and is fully functional with ergonomically designed and labeled controls.
The Fantasea FP7100 is the ultimate waterproof home for the Nikon Coolpix P7100.
The FP7100 Housing is ideal for outdoor and underwater photography. Underwater photographers can dive
or snorkel and capture all the excitement of this fascinating world, while outdoor photographers also have
the option of capturing the action of outdoor and water sports activities, such as paddle sports, sailing,
boating, surfing, fishing, hunting, backpacking and camping. The FP7100 Housing is shock resistant and
protects the camera from water, sand, dust, frost, impact, as well as other damaging elements and harmful
occurrences.
The FP7100 Housing was designed to be compatible with a complete Accessory System, enabling
photographers to enhance the quality of their images.

4
Features & Specifications
Depth rated to 60m/200 feet
Made from durable injection molded Polycarbonate
Access to all camera controls and functions
Shock resistant
Double O-ring main seal
Special hot-shoe mount for lighting accessories
Removable double fiber optic cable connection plate
Removable flash diffuser
Removable anti-glare hood for the LCD screen
Easy and secure installation of camera
Labeled controls for comfortable operation
Compatible with a wide range of underwater photo accessories
Weight (with camera on land): 1.1 kg
Weight (with camera in 3.6% salt water): -0.3 kg
Dimensions: 18 x 15 x 13.5 cm \ 7.2 x 6 x 5.4 inch (W x D x H)
5
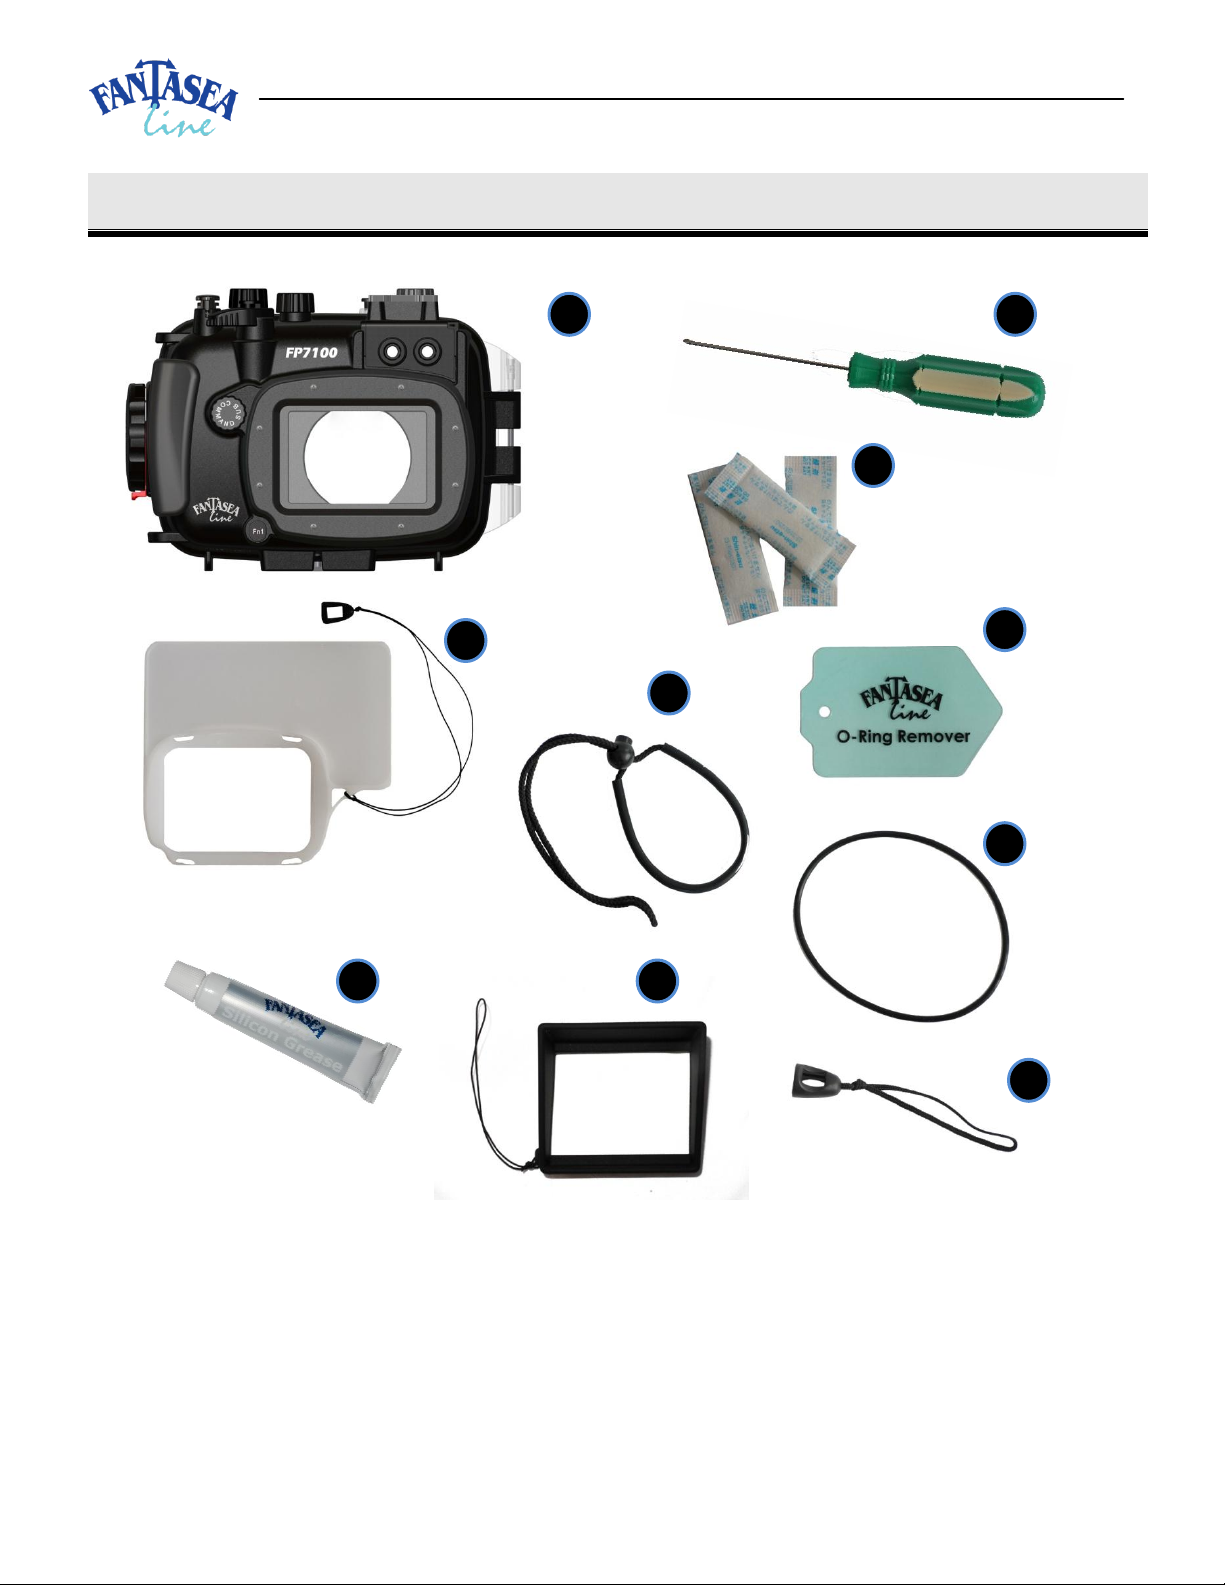
1. FP7100 Housing
2. Removable flash diffuser with secure line
3. Hand lanyard
4. Silicone grease
5. Anti-glare hood for LCD screen
6. Screwdriver
7. Silica gel packs
8. O-ring remover
9. Spare back door O-ring seal
10. Diffuser quick release secure string
(housing side)
1 5 6 7 2 8 9 3 4
10
INCLUDED IN PACKAGE
6
Note
1. Please refer to the Nikon Coolpix P7100 camera instruction manual for
detailed descriptions and instructions regarding all camera controls and
functions.
2. It is strongly recommended that you familiarize yourself with all the
controls topside before using these controls underwater.
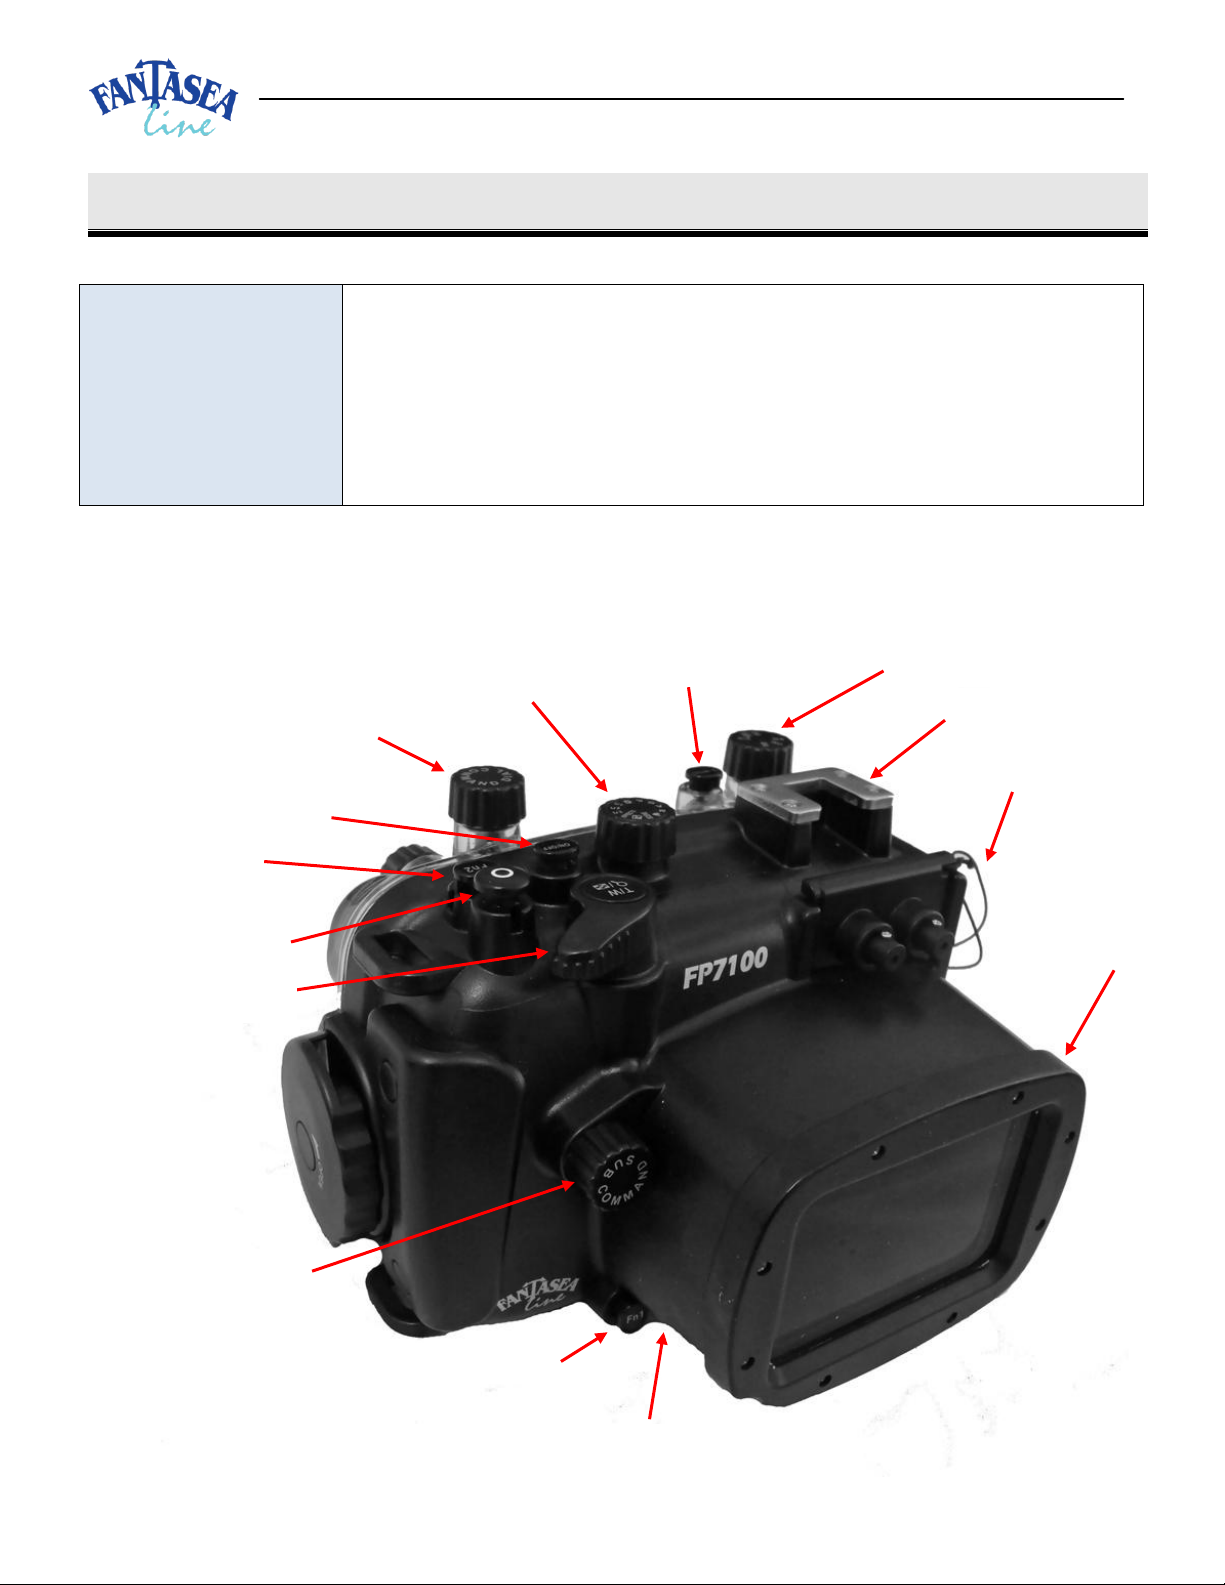
2. Shutter Release
1. Zoom Control
3. Function2
4. On/Off
5. Command Dial
3. Mode Dial
7. Quick Menu
8. Quick Menu Dial
9. Cold-Shoe Mount
10. Fiber Optic Cable Plate
11. Lens Port
12. Tripod Mounting Screw Hole
(bottom)
13. Function1
14. Sub-Command Dial
IDENTIFICATION OF HOUSING PARTS
Top/Front Side of Housing
Corresponding numbered descriptions are found on the following page

7
Numbered descriptions below refer to corresponding numbers on the top/front housing graphic on the
previous page:
1. Zoom Control – Turning this control activates the camera zoom button:
a. Turn the zoom control clockwise ("W") to zoom out, increasing the area visible in the frame.
b. Turn the zoom control counterclockwise (“T”) to zoom in, so that the subject fills a larger
area of the frame.
Note that housing zoom control directions are opposite to camera zoom button directions when
zooming in and out.
2. Shutter Release – Activates the camera shutter release button and auto focus prior to taking the
picture.
3. Function2 – Pushing this control activates the camera Function2 button, which can be assigned
through camera menus.
4. On/Off- Pushing this control activates the camera power switch button.
5. Command Dial- Turning this dial swivels the command dial of the camera within an opposite
direction. Note that housing command dial directions are opposite to camera command dial
directions when turned.
6. Mode Dial – Turning this dial allows for changing camera shooting modes.
a. In order to for the housing mode dial to indicate the proper mode selected by the camera
mode dial, it is recommended to align housing and camera mode dials prior to installing the
camera inside the housing. Please refer to the section “Installing the Camera” for further
information.
b. When housing and camera mode dials are aligned, the mode displayed on the left side of the
housing mode dial is the one selected.
c. Note: Housing and camera mode dials may not remain aligned during your dive. Therefore, it
is important to check the shooting mode selected and displayed on the camera LCD screen
when switching modes. Even in such cases, since mode labels on the housing mode dial
appear according to their order on the camera mode dial, they can still assist with the
amount of turning required in order to reach the desirable shooting mode.
d. In order to switch modes, apply slight downward pressure on the mode dial as you rotate it
in order to create enough contact pressure to accurately reach the desired mode.

8
7. Quick Menu- Pushing this control activates the camera quick menu button. When the quick menu
control is pushed down, a quick menu is displayed for the function that is selected by the Quick
Menu Dial.
8. Quick Menu Dial- Turning this dial swivels the camera quick menu dial.
a. In order for the housing quick menu dial to indicate the proper menu selected by the camera
quick menu dial, it is best to align housing and camera quick menu dials prior to installing the
camera inside the housing. Please refer to the section “Installing the Camera” for further
information.
b. When housing and camera quick menu dials are aligned, the menu displayed on the right
side of the housing quick menu dial is the one selected.
c. Note: Housing and camera quick menu dials may not remain aligned during your dive.
Therefore, it is important to check the menu selected and displayed on the camera LCD
screen when switching menus. Even in such cases, since menu labels on the housing quick
menu dial appear according to their order on the camera quick menu dial, they can still assist
with planning the number of swivels required in order to reach the desirable menu.
d. In order to switch menus, turn the housing quick menu dial.
e. Note that since the rotary wheel cannot be manipulated in order to set the various menu
items, the command dial, sub-command dial and multi-selector buttons should be used for
navigating through the menus and making selections.
9. Cold-Shoe Mount for Lighting Accessories- Enables mounting a flash, night dive torch or focus light
on top of the housing by using a dedicated connector. For further information regarding such
connectors, please visit the Fantasea website – www.fantasea.com
10. Fiber Optic Cable Plate-
a. When installed on the housing, the fiber optic cable plate and the two adaptors inserted
inside it allow for an easy attachment of 2 fiber optic cables to the housing. For further
instructions, please refer to the section “External Flashes”.
b. Remove the fiber optic cable plate from the housing in order to make use of the internal
camera flash during your dive. In order to remove the plate, insert your fingers beneath the
adaptors installed inside the plate and pull the plate upwards till it is removed from its slot.
c. Make sure the fiber optic cable plate is secured to the housing by its secure line in order to
avoid losing it during the dive.
 Loading...