

Page 1

Fantasea Canon S90 & S95 Lens Accessories
Important Notice
This instruction manual relates to the EyeDaptor S90/S95-F67, BigEye Lens
S90/S95, RedEye Filter S90/S95 and PinkEye Filter S90/S95. Please refer to
corresponding paragraphs below for relevant instructions.
EyeDaptor S90/S95-F67
RedEye Filter S90/S95
PinkEye Filter S90/S95
BigEye Lens S90/S95
67mm Add-On Plate
EyeDaptor G Series
EyeDaptor G Series
BigEye Lens G Series
EyeDaptor G Series
EyeDaptor S90/S95-G Series
RedEye Insert
EyeDaptor S90/S95-G Series
PinkEye Insert
EyeDaptor S90/S95-G Series
EyeDaptor S90/S95-G Series
1. Introduction
BigEye Lens S90/S95 (Cat. No. 5139) – A patented wide angle lens for Canon S90 and S95 housings.
Perfect for shooting seascapes, divers, ship wrecks and schools of fish, without moving further away
from the subject, thereby still taking full advantage of water clarity and artificial light sources.
EyeDaptor S90/S95-F67 (Cat. No. 4710) – Enables mounting 67mm threaded accessory lenses and filters
on Canon S90 and S95 housings. Especially designed to allow mounting the SharpEye Macro Lens M67
(Cat. No. 5128) on Canon S90 and S95 housings lens ports, which is perfect for shooting close-up images
of fish, corals, textures and more. The macro lens magnifies the subject and enables the camera to focus
on short distances for creating super sharp images.
RedEye Filter S90/S95 (Cat. No. 5305) – Red color correction filter for Canon S90 and S95 housings. Used
to restore the red color absorbed by blue water and allows for producing vivid and colorful underwater
images and videos.
PinkEye Filter S90/S95 (Cat. No. 5307) - Pink (magenta) color correction filter for Canon S90 and S95
housings. Used to restore the pink color absorbed by green water and allows for producing vivid and
colorful underwater images and videos.
(Cat. No. 4710, 5139, 5305, 5307)
Instruction Manual
2. Compatibility
The EyeDaptor S90/S95-F67, BigEye Lens S90/S95, RedEye Filter S90/S95 and PinkEye Filter S90/S95 are
compatible with the Canon S90 Housing (WP-DC35) and the Canon S95 Housing (WP-DC38).
3. Included in Packaging
1
Canon S90 & S95 Lens Accessories Instruction Manual 2011017
Page 2

Important Notice
Please use the utmost care and do not use excessive force when assembling and
disassembling the different accessories, in order to not cause any damage to the
product.
EyeDaptor G Series
67mm Add-On Plate
PinkEye/RedEye Inserts
BigEye Lens G Series
EyeDaptor S90/S95-G Series
Image #1
4. Identification of Parts
5. Instructions for Use
1. Assembling the EyeDaptor S90/S95-F67
a. Place the EyeDaptor G Series on a flat and
protected surface, so that the adaptor
configuration is facing up and the flat side of the
adaptor is facing down (image #1).
b. Remove the 4 screws holding the 2 stoppers by
using the screwdriver included (image #2 on the
following page).
c. Turn the EyeDaptor G Series upside down and
remove the 2 stoppers off the adaptor (image #3
on the following page).
2
Canon S90 & S95 Lens Accessories Instruction Manual 2011017
Page 3

Image #4
Image #5
Image #2
Image #3
d. Remove the 2 stoppers off the EyeDaptor S90/S95-G Series as well, following the same method
described above for removing the stoppers off the EyeDaptor G Series.
e. Place the EyeDaptor G Series on a flat and protected surface, so that the adaptor configuration (the
side that attaches to the housing lens port) is facing up and the “TOP” marking is pointed away from
your body.
f. Hold the EyeDaptor S90/S95-G Series so that the two adaptor wings and the concaved part of the
adaptor are facing up and the adaptor niche is positioned at the bottom right (image #4).
g. Insert the EyeDaptor S90/S95-G Series into the dedicated groove of the EyeDaptor G Series. Note
that the two screw holes on the wings of the EyeDaptor S90/S95-G Series should be perfectly aligned
with the two small screw holes on the EyeDaptor G Series.
h. Insert the screws included into the dedicated screw holes on the two adaptor wings and use the
screwdriver included in order to tighten the screws into the EyeDaptor S90/S95-G Series and the
EyeDaptor G Series (image #5). Tighten the screws enough in order to keep the EyeDaptor S90/S95G Series fixed inside the EyeDaptor G Series, but don’t tighten them too strongly, as this might cause
damage to the products.
i. Replace the bungee cords originally attached to the EyeDaptor G Series with the 4 shorter bungee
cords included with the EyeDaptor S90/S95-G Series. First, remove the 4 bungee cords tied to the
EyeDaptor G Series by untying them and then pulling them out of the slot they were attached to.
Proceed by attaching the shorter bungee cords included with the EyeDaptor S90/S95-G Series to the
dedicated slots featured on the EyeDaptor G Series. Please note that there is no need to untie
shorter bungee cords in order to attach them to the EyeDaptor G Series. Simply insert the tied
3
Canon S90 & S95 Lens Accessories Instruction Manual 2011017
Page 4
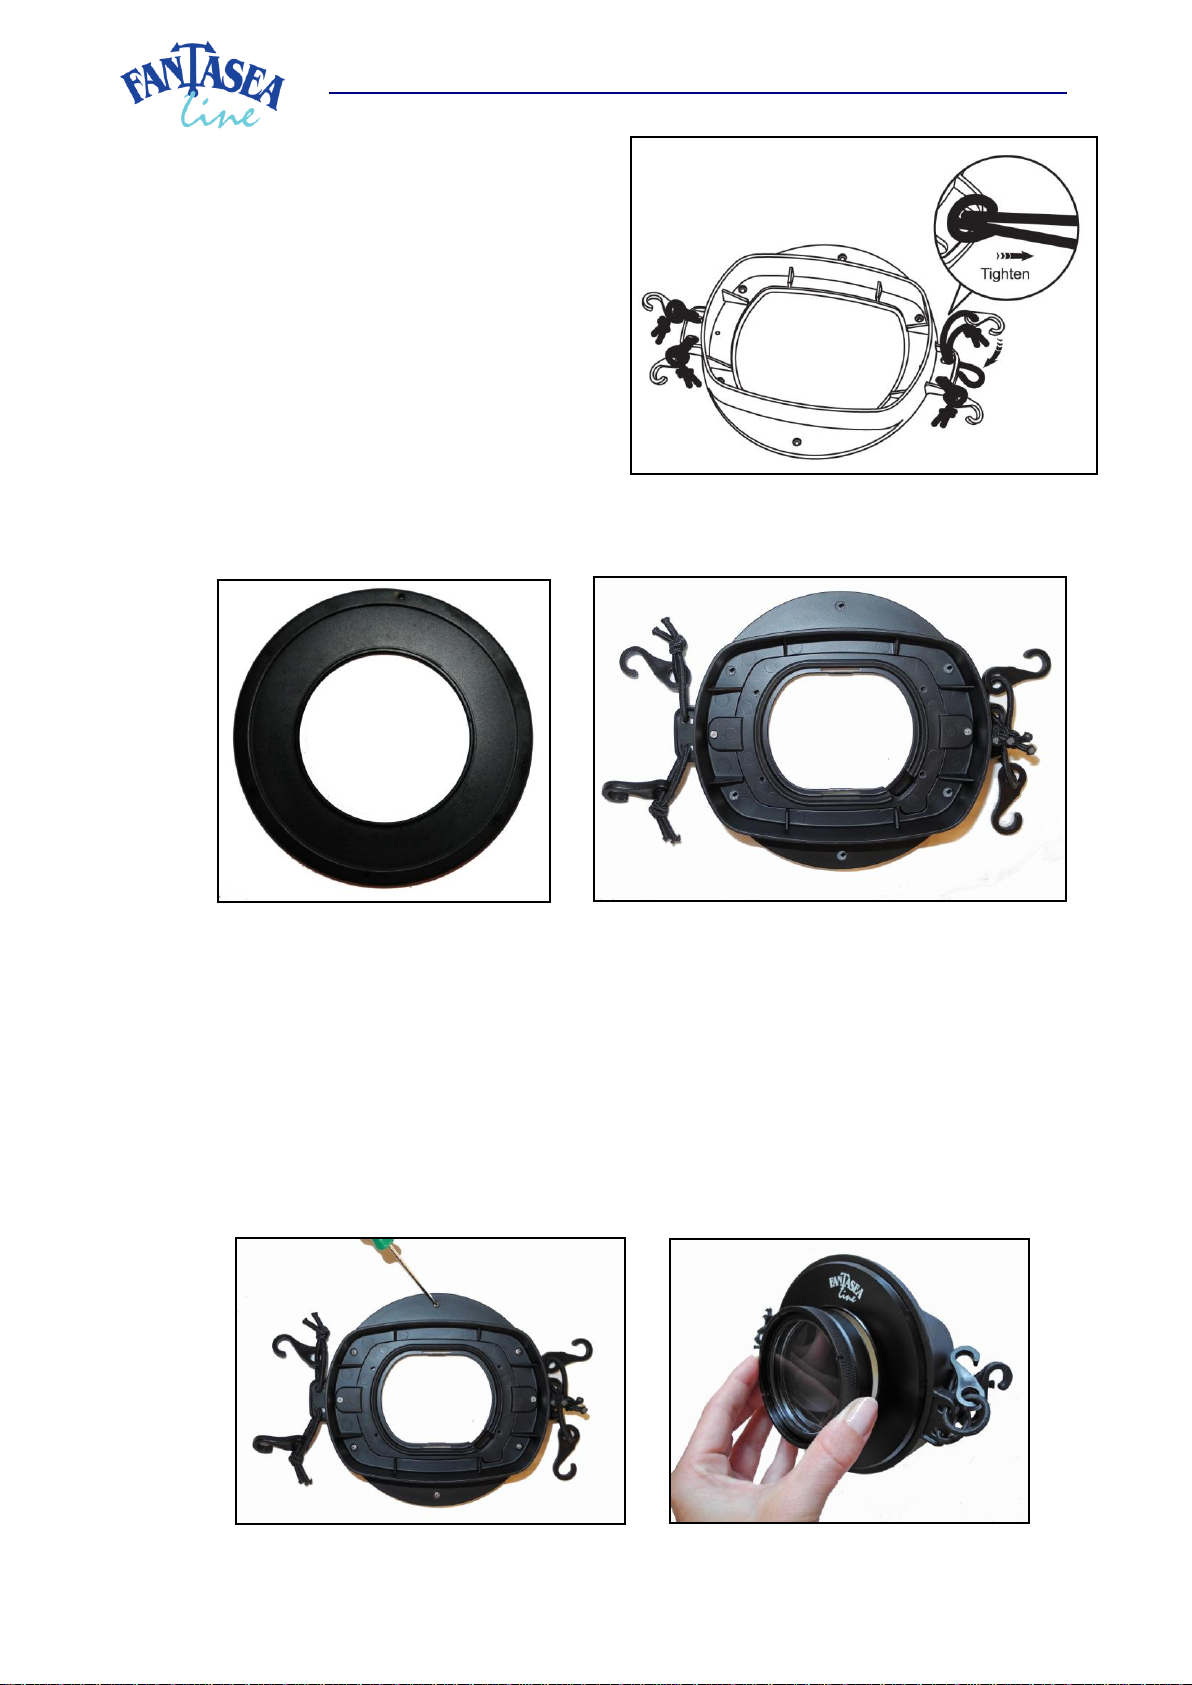
Image #7
Image #8
Image #9
Image #10
Image #6
bungee cord to the dedicated slot, double
back the bungee cord through itself and
pull it in order to tighten it around the slot
(image #6).
j. Place the 67mm Add-On Plate on a flat and
protected surface, so that the thread is
facing down and the concaved side of the
plate is facing up (image #7).
k. Place the EyeDaptor G Series with the
EyeDaptor S90/S95-G Series installed inside
over the 67mm Add-On Plate, so that the
adaptor configuration is facing up and the
flat side of the adaptor is facing the 67mm
Add-On Plate (image #8).
l. Gently turn the EyeDaptor G Series around, till the screw holes on the EyeDaptor G Series are
aligned with the screw holes on the 67mm Add-On Plate.
m. Insert the 6 screws included into the aligned screw holes of the EyeDaptor G Series and 67mm Add-
On Plate. Use the screwdriver included in order to tighten the screws (image #9). Tighten the screws
enough in order to keep them from falling out, but don’t tighten them too strongly, as this might
cause damage to the products.
n. Once the EyeDaptor S90/S95-F67 is assembled, lens accessories featuring a 67mm male thread can
be mounted on the adaptor by gently screwing them into the female thread (image #10).
4
Canon S90 & S95 Lens Accessories Instruction Manual 2011017
Page 5
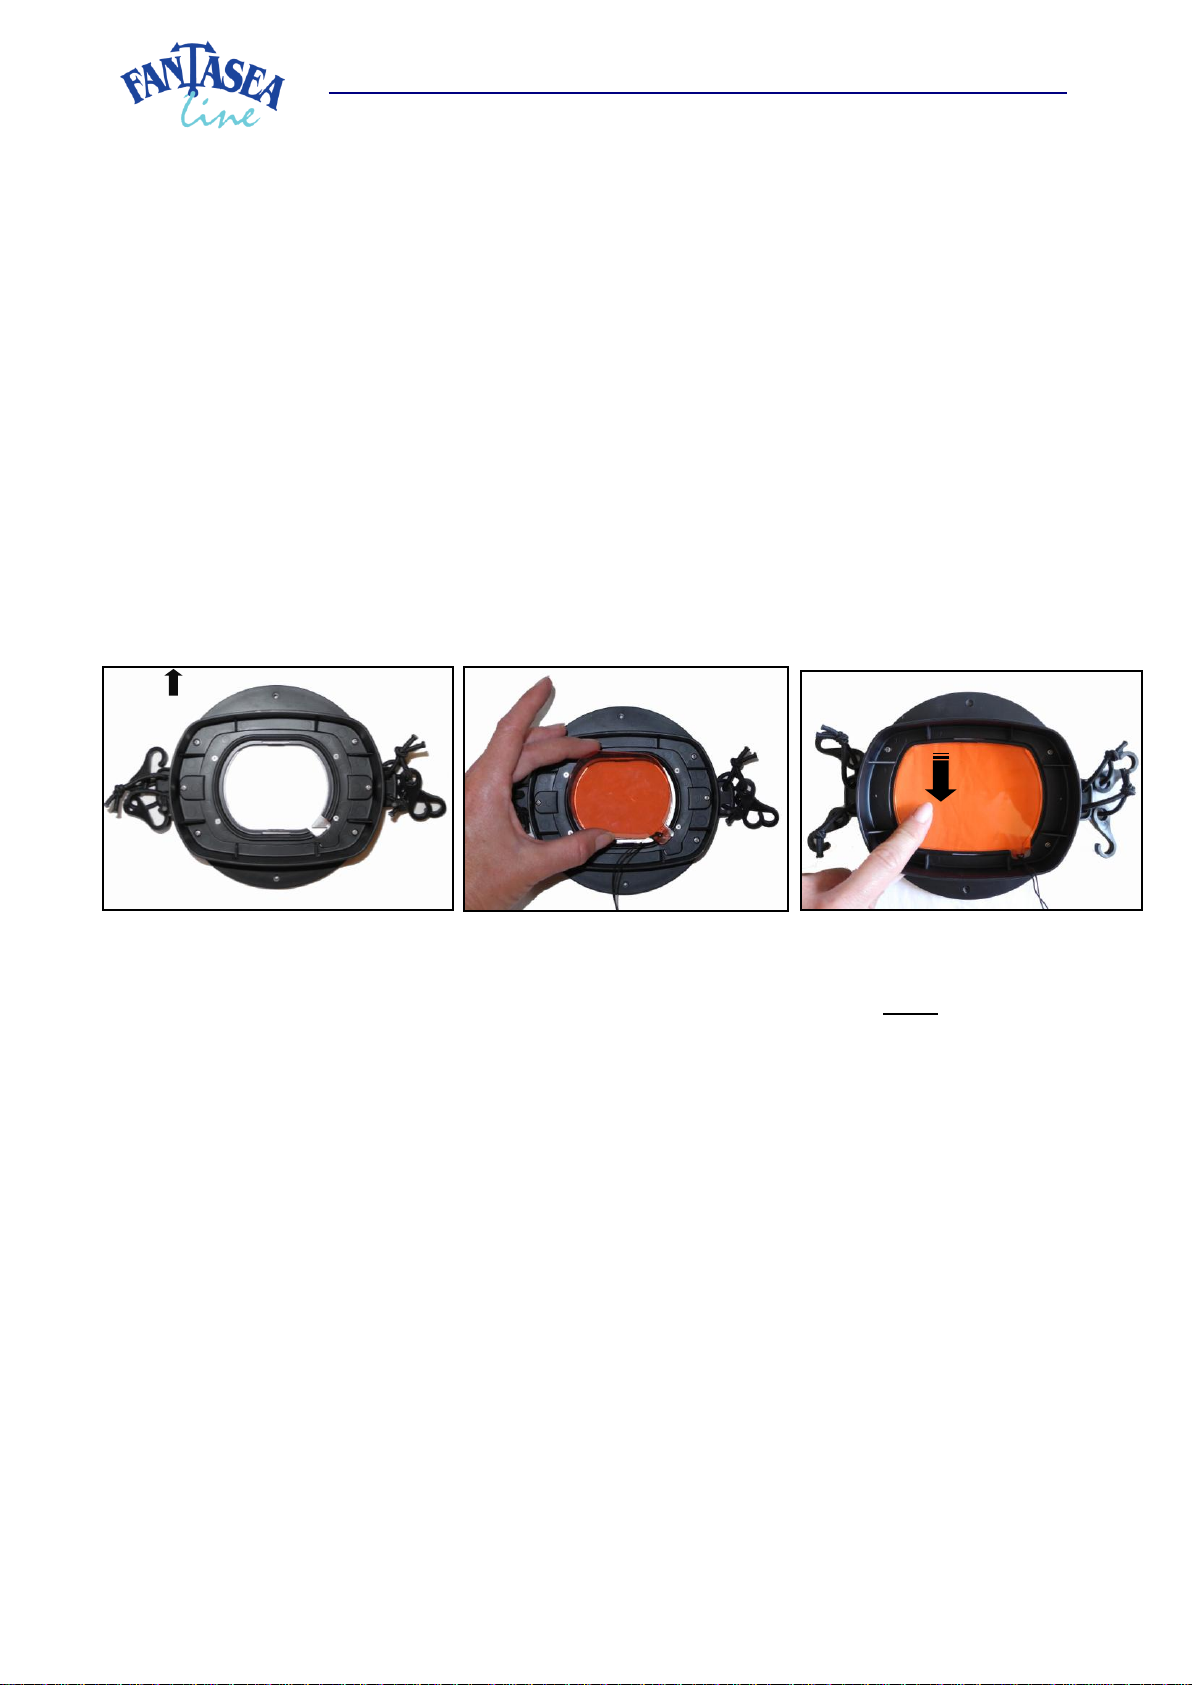
Image #11
Image #13
Image #12
TOP
2. Assembling the RedEye/PinkEye Filter S90/S95
a. Install the EyeDaptor S90/S95-G Series inside the EyeDaptor G Series and replace the bungee cords
on the EyeDaptor G Series by following the steps described in section 1, paragraphs e-i.
b. Peel the transparent protective films off both sides of the color insert.
c. Attach the longer end of the snap cord to the color insert. The shorter end of the snap cord can be
attached either to the housing, arm or to any of the secure line loops featured on the EyeDaptor G
Series.
d. Hold the EyeDaptor G Series with EyeDaptor S90/S95-G Series installed inside so that the flat side of
the adaptor with the two stoppers is facing down, the adaptor configuration is facing up and the
“TOP” marking is pointed away from your body (image #11).
e. Hold the color insert above the EyeDaptor G Series so that the color insert is aligned with the
dedicated slot inside the EyeDaptor S90/S95-G Series and the secure string of the color insert is
positioned on the bottom right corner (image #12).
f. Gently push the color insert into the dedicated slot inside the EyeDaptor S90/S9-G Series (image
#13).
g. Removing the color insert from the RedEye/PinkEye Filter is carried out by gently pulling the secure
string of the color insert until the insert pops out of the adaptor.
3. Assembling the BigEye Lens S90/S95
a. Remove the two stoppers off the EyeDaptor S90/S95-G Series by following the steps described on
section 1, paragraphs a-c.
b. Install the EyeDaptor S90/S95-G Series inside the BigEye Lens G Series and replace the bungee cords
on the BigEye Lens G Series by following the steps described on section 1, paragraphs e-i.
4. Mounting the BigEye, EyeDaptor or Color Correction Filter on the Housing Lens Port
a. Hold the lens accessory in front of the housing lens port, so that the “TOP” marking printed on the
lens configuration is pointed upwards and the adaptor is aligned with the housing lens port (image
#14 on the following page).
b. Place the lens accessory over the housing lens port and follow by securing the four bungee cords to
the four corresponding housing secure line loops (image #15 on the following page).
* When mounting any of these lens accessories on the WP-DC38 housing, please refer to section 4-i below for
special instructions.
5
Canon S90 & S95 Lens Accessories Instruction Manual 2011017
Page 6
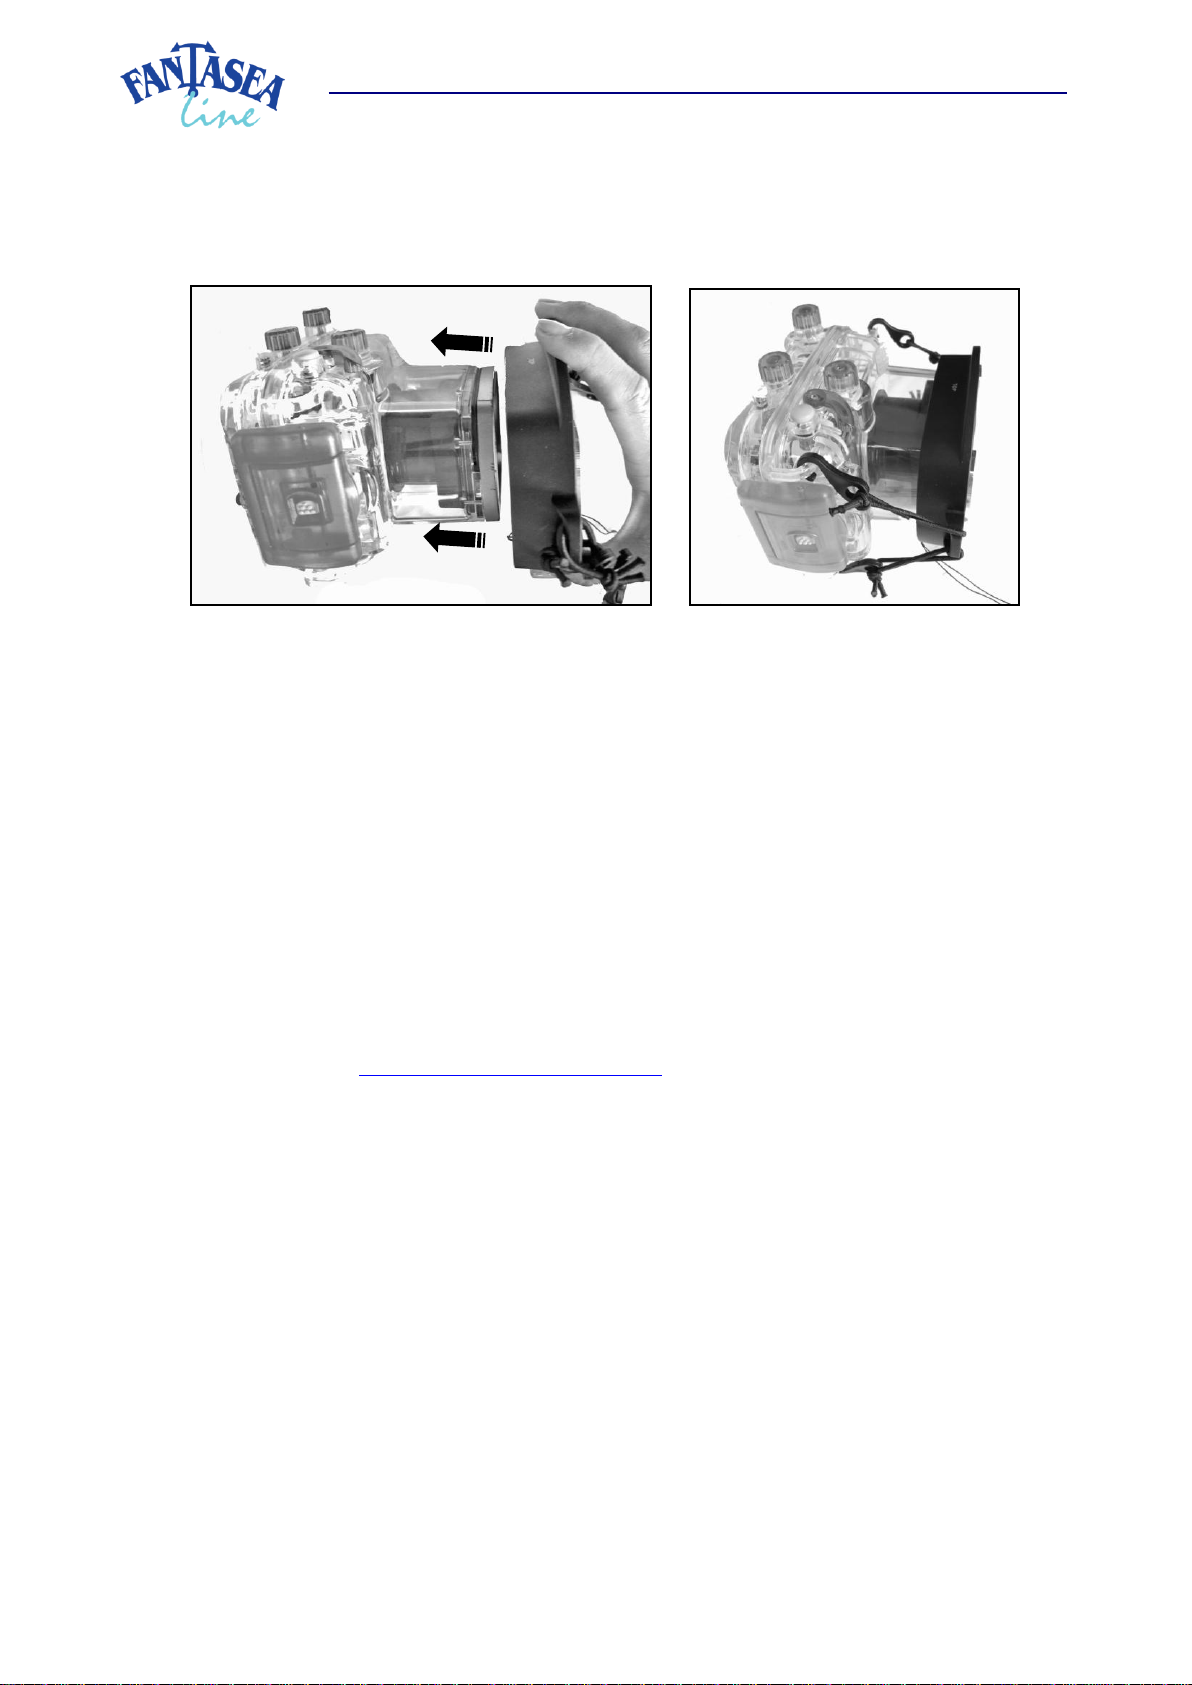
Image #14
Image #15
c. Please note that the bungee cords are essential in order to keep the lens accessory in place.
d. Make sure that the lens accessory is properly mounted on the lens port by gently trying to pull it out.
If properly installed, the lens accessory should not easily come off the lens port.
e. Attach the secure line to the lens accessory and the housing, in order to prevent losing it during the
dive. If making use of an arm in the system, the secure line can be secured to the arm rather than to
the housing.
f. The lens accessory can be removed and installed repeatedly throughout the course of the dive.
Make sure that there are no air bubbles trapped between the housing lens port and lens accessory
before taking images.
g. In order to remove the lens accessory from the lens port, start by detaching the bungee cords from
the housing and follow by removing the lens accessory from the lens port.
h. When removing the lens accessory from the housing lens port, it can be conveniently stored by
mounting it on the EyeGrabber Canon G Series (Cat. No. 4054). This lens holder attaches to any
standard Flex or Ball & Joint arm and enables safely securing Canon S90 & S95 lens accessories
during the dive, making them easily available for future use. For further information, please visit
our website at www.fantasea.com/FantaseaEyes
i. When mounting any of these lens accessories on the WP-DC38 Housing, which lacks a plastic loop on
the bottom left side of the housing, please follow the steps below:
i. At the bottom left corner of the housing, where no loop is found, you will notice a hollow
plastic rod, which is located at the back of the hinge connecting the front and the back
doors of the housing (images #16 and 17 on the following page).
ii. Insert a durable, flexible rubber cord, such as the cords the bungees are made of, through
the hollow rod. Tie the cord around itself in order to make a loop (images #18 and 19 on the
following page). If you have a spare bungee cord, you can use the bungee’s rubber cord in
order to create this loop. If not, any other durable rubber cord would do.
iii. Use the loop you have created in order to secure the lens accessory to the housing. Simply
hook the bottom left bungee cord of the accessory lens to this rubber cord loop as you hook
the other accessory lens’s bungee cords to the housing loops (images #20 and 21 on the
following page).
6
Canon S90 & S95 Lens Accessories Instruction Manual 2011017
Page 7
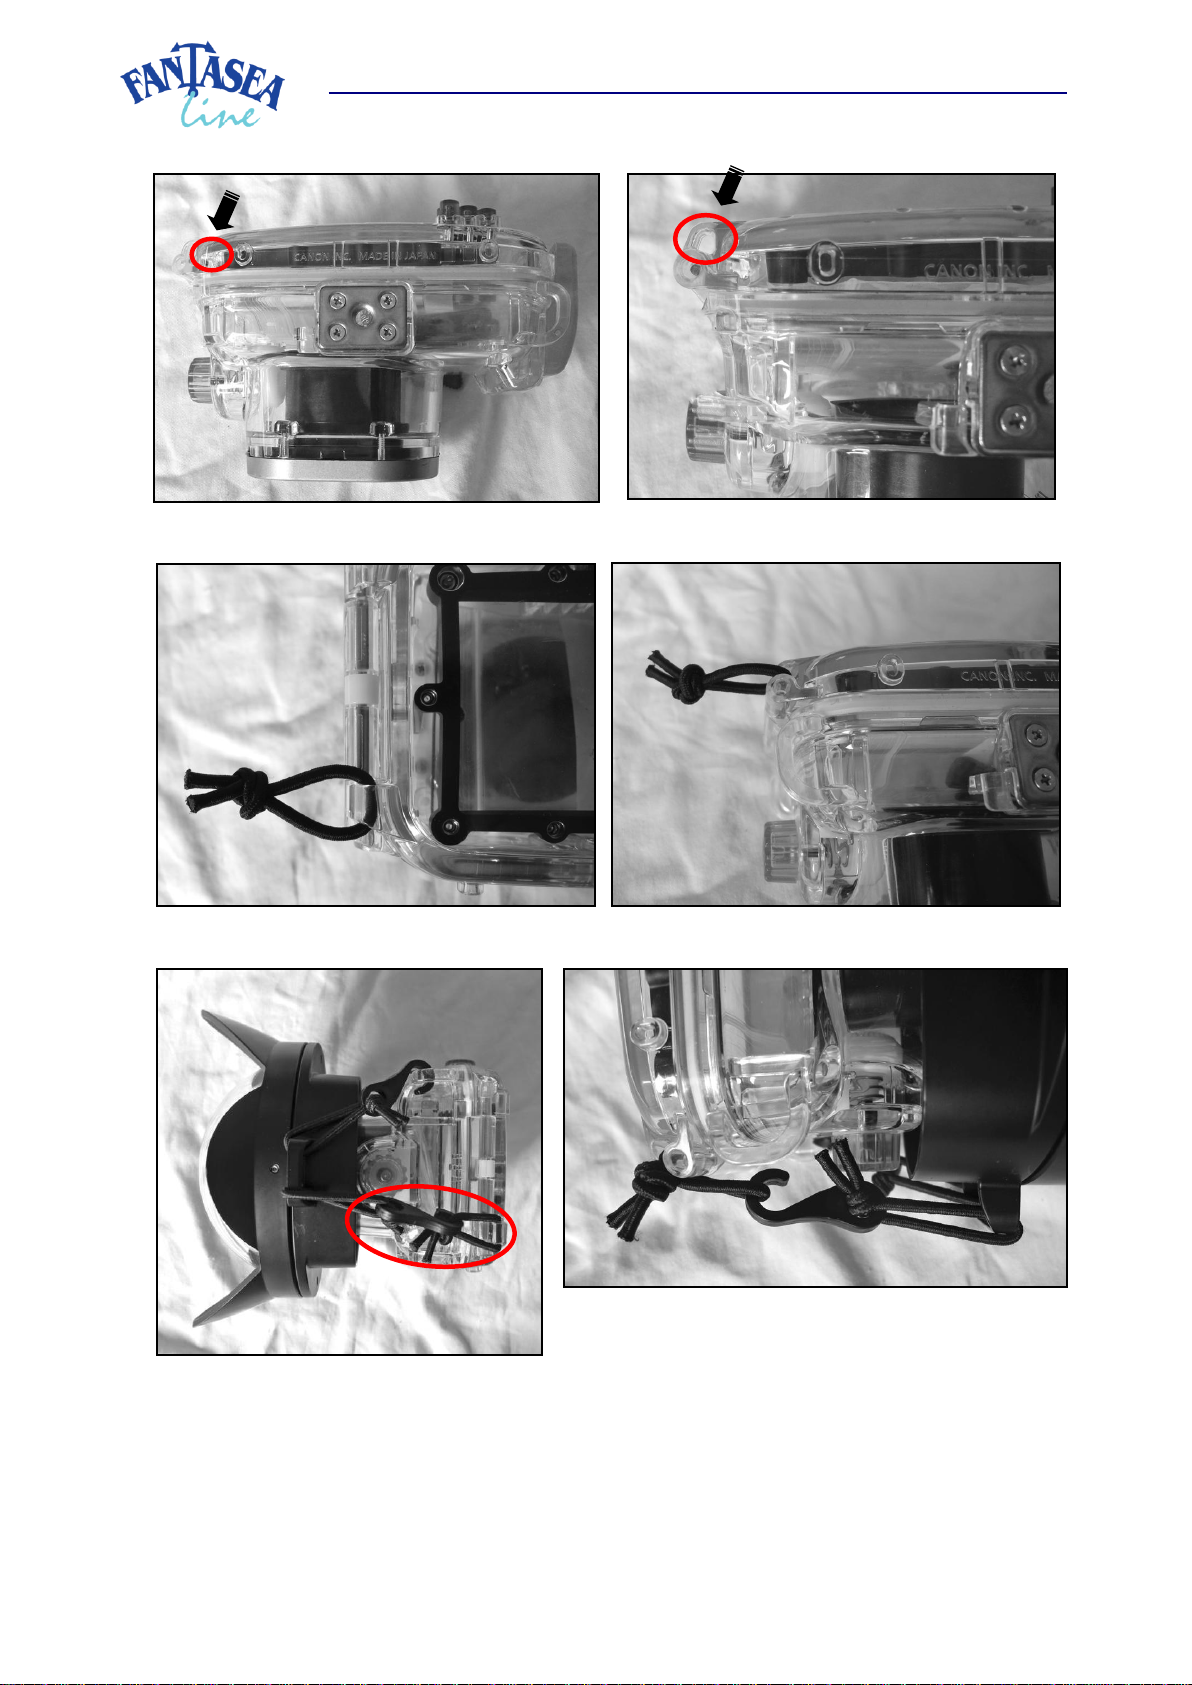
Image #16
Image #17
Image #18
Image #19
Image #20
Image #21
7
Canon S90 & S95 Lens Accessories Instruction Manual 2011017
Page 8

5. Installing Color Correction Inserts inside the EyeDaptor S90/S95-F67 or BigEye Lens S90/S95
a. Color correction inserts included with the RedEye/PinkEye Filter S90/S95 can be installed inside the
EyeDaptor S90/S95-F67 or BigEye Lens S90/S95 for the purpose of producing vivid and colorful
images or videos while making use of macro and wide angle accessory lenses. A dedicated slot was
designed on these accessories in order to allow for easy installation of red or pink color correction
inserts.
b. In order to install a color correction insert inside the EyeDaptor S90/S95-F67 or BigEye Lens S90/S95,
first remove the EyeDaptor or BigEye Lens from the housing lens port (see section #4, paragraph
“g”).
c. Remove the color insert from the RedEye/PinkEye Filter by gently pulling the secure string of the
color insert till the insert pops out of the adaptor.
d. Installing the color insert inside the EyeDaptor S90/S95-F67 or BigEye Lens S90/S95 is the same as
when installing it inside the EyeDaptor G Series with EyeDaptor S90/S95-G Series installed inside.
Please refer to section #2 for installation and removal instructions.
e. Make sure that the color insert is secured with a secure line to the housing, arm or lens accessory so
you do not lose it once removed.
6. Using Color Correction Filters Underwater
a. Note that exposure and white balance settings might require adjustments once a color correction
filter is installed on the housing lens port.
b. If taking photographs in the manual shooting mode, exposure settings should be slightly adjusted in
order to compensate for the light absorbed by the color correction filter. This can be done by using
slightly larger apertures or slower shutter speeds.
c. If making use of the camera manual white balance function, it is important to measure white every
time the filter is installed or removed from the housing lens port. Alternatively, measured values can
be stored in any of the customized shooting modes of the camera for quick and easy adjustment
whenever installing or removing the filter.
d. Note that when a color correction filter is installed, making use of a flash will result with reddish
images in most compositions, due to an overcompensation for loss of red colors underwater. It is
therefore recommended to either turn off the flash or to manually adjust colors with the camera
when making use of a color correction filter.
6. Care & Maintenance
1. Please use the utmost care and do not use excessive force when assembling and disassembling the
different accessories, in order to not cause any damage to the products.
2. Keep the lens accessories away from extreme high temperatures, as under direct sunlight.
3. When storing the lens accessories and during transportation, make sure that they are properly protected
in order to prevent scratches, cracks or any other damage to the products.
8
Canon S90 & S95 Lens Accessories Instruction Manual 2011017
Page 9

www.fantasea.com/contactFor further information, please contact us at
www.fantasea.comor visit our website
4. After Dive Care:
a. Disassemble all lens accessories components and rinse them thoroughly in fresh water.
b. To ensure that the accumulated salt has completely dissolved, it is recommended to soak all
components in warm fresh water once in a while.
c. Wipe the water drops with a soft cloth. Do not leave any droplets to dry on the accessories, as
permanent water spots may remain.
d. Store the lens accessories in a dry and protected area.
e. Do not store the lens accessories in the presence of chemicals, solvents or fuels.
7. Fantasea Product Consumer Limited Warranty
“Fantasea” warrants this Fantasea Line branded product against defects in materials and workmanship
under reasonable use for a period of ONE (1) YEAR, (two years, where required by law as determined by the
origin of the authorized dealer). This warranty is effective from the date of retail purchase from Fantasea or
an authorized Fantasea dealer, by the original end-user purchaser (“Warranty Period”). This warranty does
not cover any commercial use of the product. If a product defect arises and a valid claim is received within
the Warranty Period, at its option, Fantasea, or its authorized service facilities will either (1) repair the
product defect at no charge, (2) exchange the product with a product that is new or which has been
manufactured from new or serviceable used parts and is at least functionally equivalent to the original
product. The warranty will not extend beyond the original warranty period. Your Fantasea Product should be
registered within 30 days of purchase. You must keep the proof of purchase which indicates the date on
which the purchase was made; as you may be required to show proof of purchase if you need warranty
service. The following conditions apply: 1. This warranty extends to the original purchaser only. It is not
assignable or transferable. 2. The warranty does not cover damage resulting from misuse, abuse, negligence,
or accidents. Proper maintenance of the Product is the responsibility of the owner. 3. The warranty does not
cover damage directly or indirectly resulting from the use of unauthorized replacement parts or service
performed by unauthorized facilities. 4. This warranty does not cover any damage to any other product used
in conjunction with the Fantasea product, including cameras and lenses, and resulting from any defect in the
product materials or workmanship. 5. The cost of sending the product back to Fantasea or its authorized
service facilities is the responsibility of the customer. 6. The warranty does not cover any incidental damages
resulting from any defects in the product. This expressly includes any travel reimbursements or any other
costs associated with the purchaser’s optional use of the product. The conditions of this warranty are
expressly in lieu of all other expressed warranties, including the payment of consequential or incidental
damages for the breach of any warranty. Please register your product on line at this URL:
http://www.fantasea.com/registration.
9
Canon S90 & S95 Lens Accessories Instruction Manual 2011017
 Loading...