

Fantasea FL-10 Instruction Manual
Manual for the FL-10 Housing
For Nikon Coolpix L10 Digital Camera

2
TABLE OF CONTENTS
TABLE OF CONTENTS ................................................................................................................................. 2
GENERAL INFORMATION:......................................................................................................................... 3
THE FANTASEA FL-10 HOUSING: ..................................................................................................................... 3
FANTASEA FL-10 USES: .................................................................................................................................. 3
GENERAL CAMERA DESCRIPTION: ................................................................................................................... 9
NIKON COOLPIX L10 FEATURE HIGHLIGHTS .............................................................................................. 10
USING THE FANTASEA FL-10 HOUSING: ............................................................................................. 11
OPENING THE HOUSING: ............................................................................................................................... 11
INSERTING CAMERA: ..................................................................................................................................... 11
CHECKING THE O-RING: ................................................................................................................................ 12
CLOSING THE HOUSING: ................................................................................................................................ 12
VIEWING THE SUBJECT: .......................................................................................................................... 14
TAKING THE PICTURE: ................................................................................................................................... 14
CHOOSING IMAGE FILES: ............................................................................................................................... 14
BATTERY LIFE: ........................................................................................................................................... 15
USING THE FLASH: ..................................................................................................................................... 16
ACCESSORY SLAVE FLASH: ............................................................................................................................ 16
LENS ACCESSORIES: ...................................................................................................................................... 17
FANTASEA COOLPIX ACCESSORY SYSTEMS AND SETS: ................................................................................. 17
SHOOTING TECHNIQUES: ........................................................................................................................ 18
EXPOSURE MODES: (PRE-SET BEFORE CAMERA INSERTION) .......................................................................... 18
ZOOM CONTROL: ........................................................................................................................................... 18
MACRO FOCUS: ............................................................................................................................................. 18
QUICK REVIEW: ............................................................................................................................................. 18
CAMERA STANDBY MODE: ............................................................................................................................ 19
CARE & MAINTENANCE: .......................................................................................................................... 20

3
GENERAL INFORMATION:
THE FANTASEA FL-10 HOUSING:
Fantasea has specially designed the FL-10 housing for the Nikon Coolpix L10 camera. This
housing is ideal for outdoor and underwater photographers who enjoy the camera's automatic
exposure features for capturing fast action pictures easily and creatively. The FL-10 housing
insures easy handling and accurate access to camera functions through the critical placement of
push-button controls and a compact design.
The FL-10 housing provides all essential control functions: On/Off, Shutter Release, Zoom
In/Out, Menu, Flash, Exposure Compensation, Timer, Macro, Playback, Delete and Mode
Selector and has a built in Flash Diffuser and an anti-glare hood over the LCD screen.
FANTASEA FL-10 USES:
The Fantasea FL-10 housing is designed as an underwater/outdoor camera housing. It features
double O-ring on all controls, and has a working depth of 200 feet/60 meters. Underwater
photographers can dive or snorkel and capture all the excitement of this fascinating world, while
outdoor photographers also have the option of capturing the action of such activities as white
water and paddle sports, swimming, sailing and boating, surfing, fishing and hunting,
backpacking and camping. The Fantasea FL-10 will protect the Coolpix L10 camera from water,
sand, dust, and other damaging elements.
4
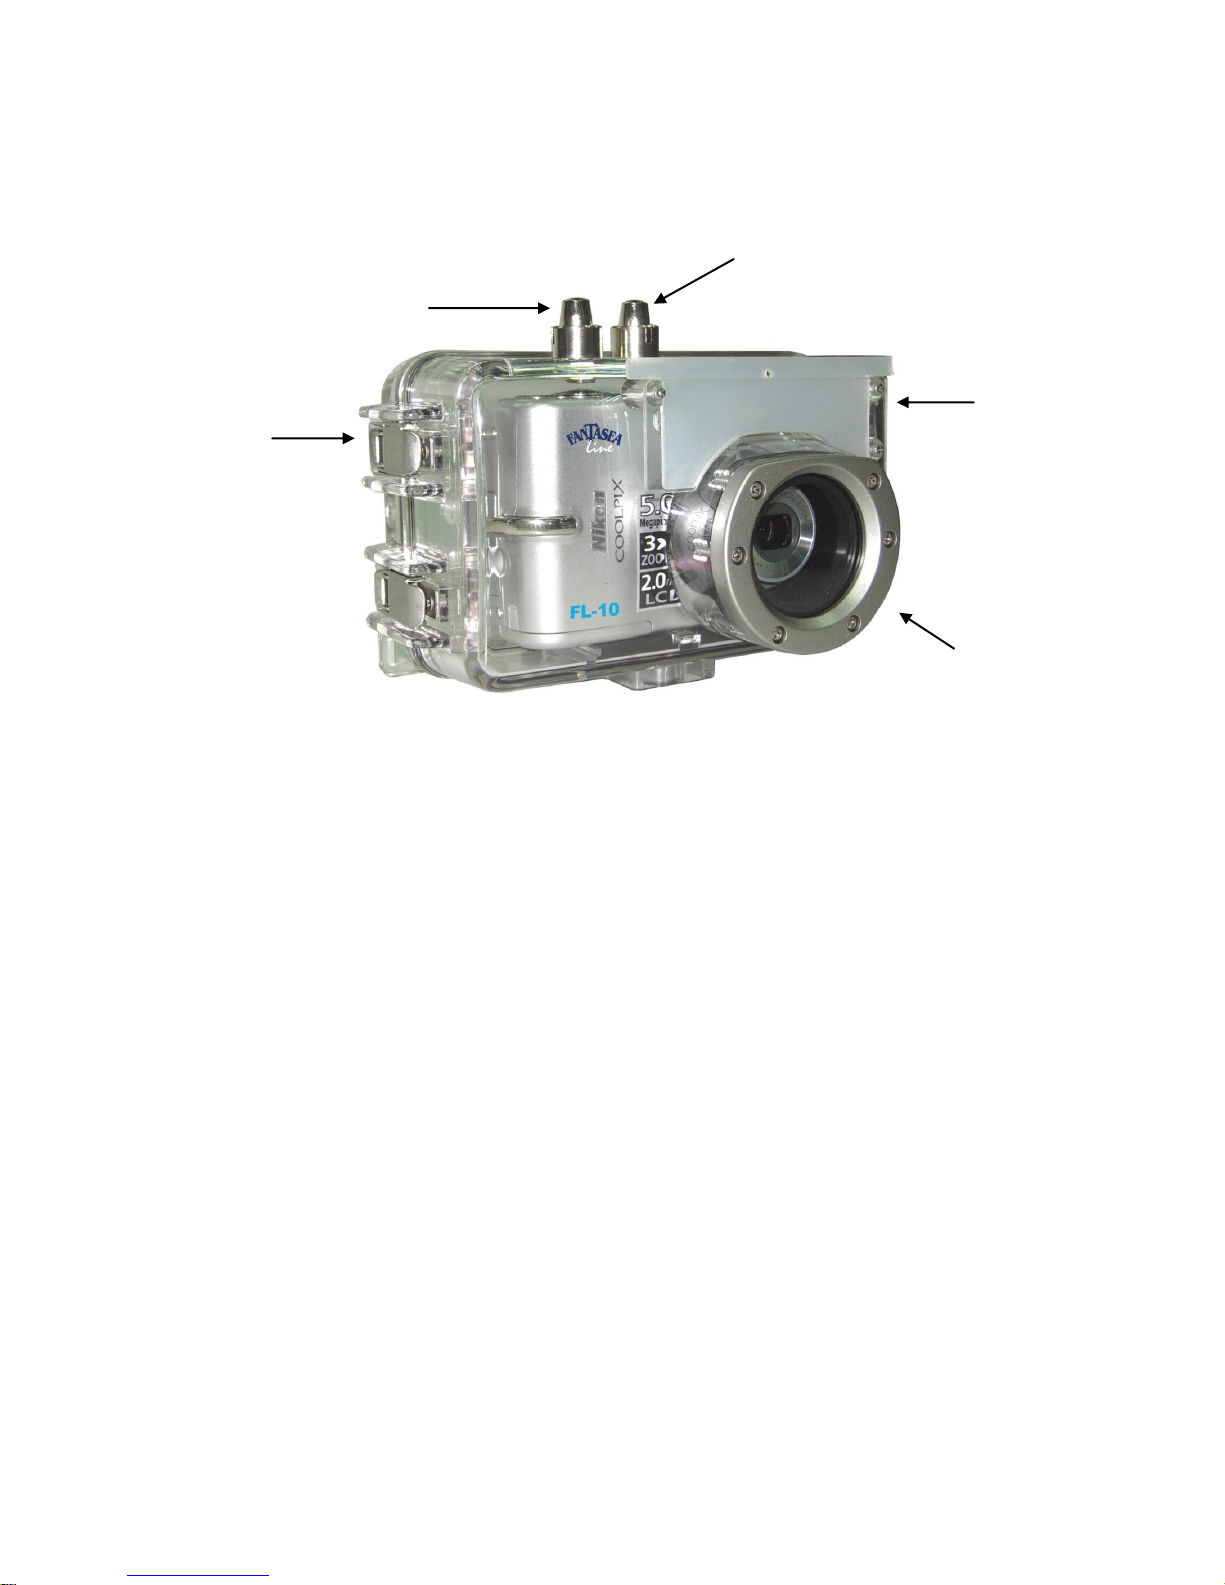
3. Buckles to
Secure Housing
4. Removable Flash
Diffuser
5. Lens Port
Top/Front Side of Housing
Numbered description below refers to corresponding numbers on above graphic.
1: Power On/Off button:
To turn on the camera, press the power switch. The power-on lamp (green) will turn on for a moment,
and the monitor will turn on.
To turn off the camera, press the power switch again.
2: Shutter Release button:
This is a two stage shutter-release button. First lightly press the shutter-release button halfway,
stopping when you feel minimal resistance. Once the camera has focused, press the shutter-release
button the rest of the way down to release the shutter and take the picture.
5
3: Buckles to Secure Housing:
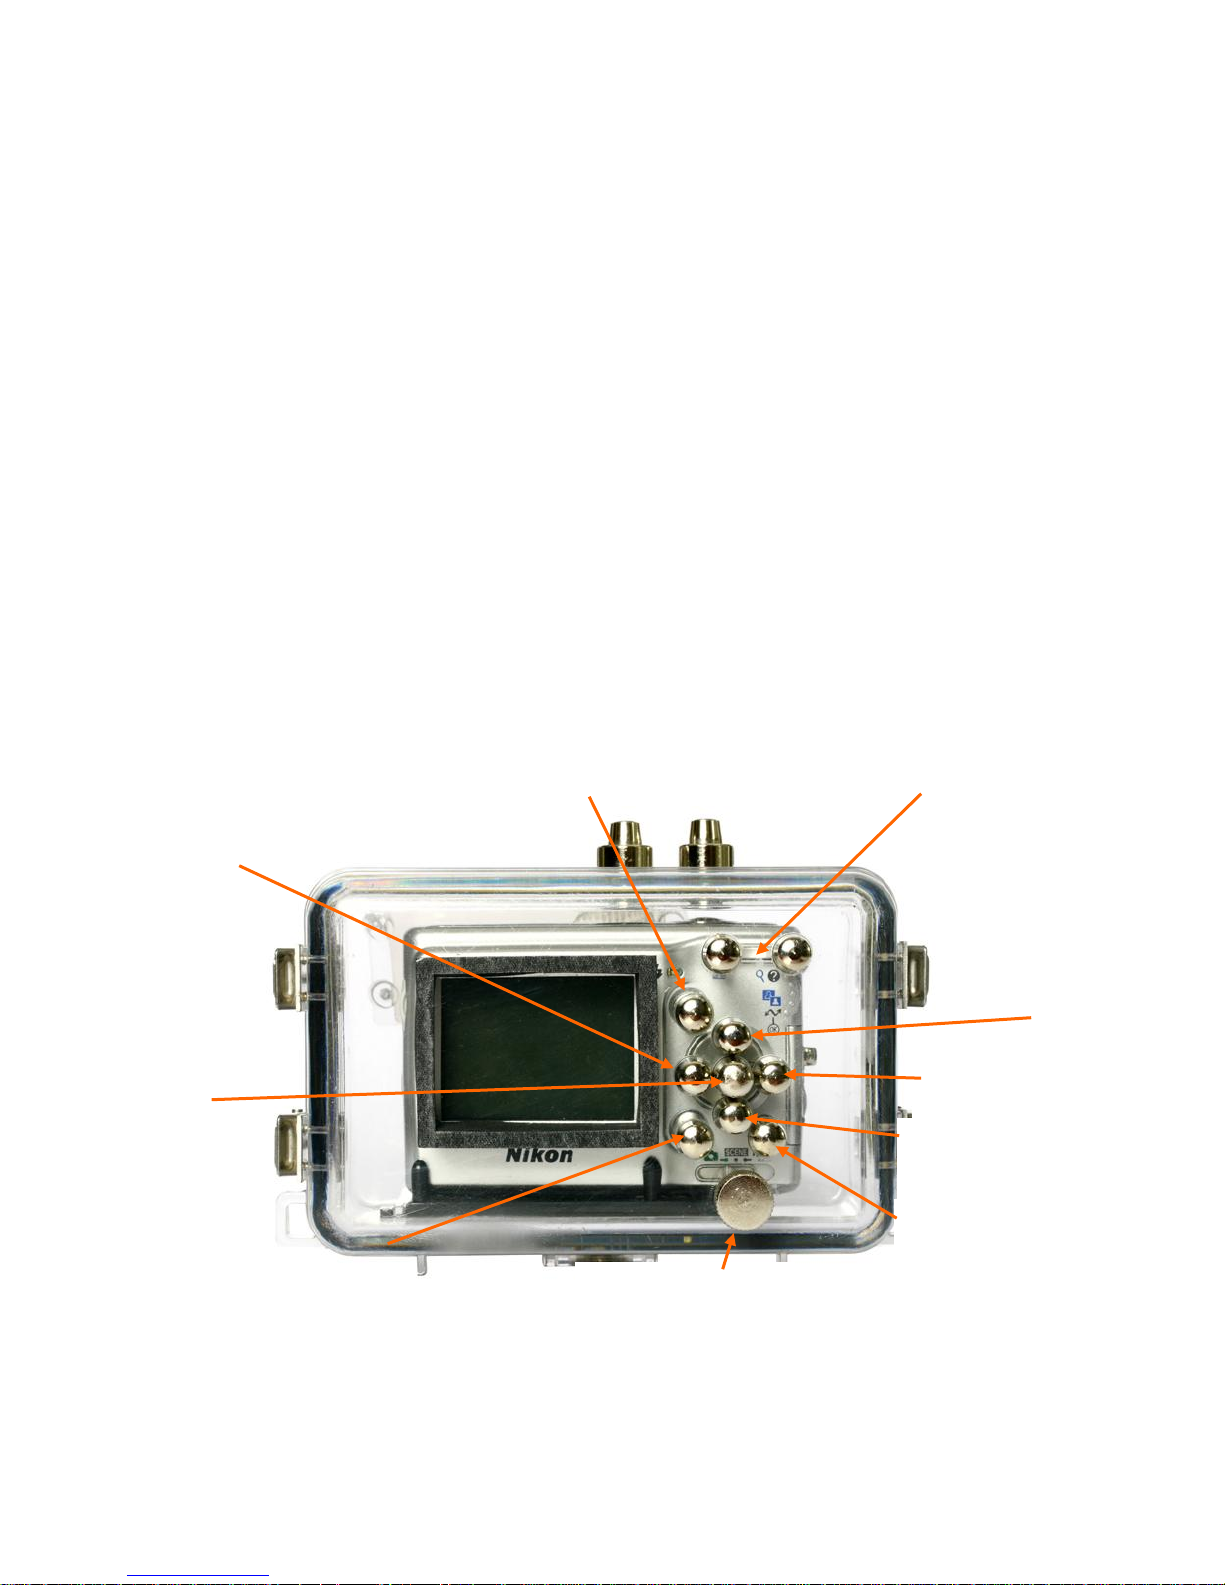
7. Zoom In/Out
9. Exposure
Compensation
10. Self-Timer
11. Macro
13. Delete
14. Mode Selector
15. Playback
12. OK button
Refer to the section "Using the Fantasea FL-10 Housing" on how to open and close the camera
housing.
4: Removable Flash Diffuser:
The Flash Diffuser is used to diffuse the flash's intensity [the internal flash]. See the section on
"Accessory Slave Flash" for additional information.
5: Lens Port:
Refer to the section "Inserting Camera" for useful information.
Back Side of Housing Buttons

6
Numbered description below refers to corresponding numbers on above graphic.
6: Menu Button:
When Menu button is pressed, the following menus are displayed according to the mode that has been
selected:
Auto Mode Shooting Menu
Scene Mode Scene Menu
Movie Mode Movie Menu
Playback Mode Playback Menu
7: Zoom In/Out:
Use the Zoom buttons to activate optical zoom. Press "W" to zoom out, increasing the area visible in
the frame, or "T" to zoom in, so that the subject fills a larger area of the frame. When the camera is
zoomed to the maximum magnification (3x), holding "T" down triggers digital zoom. The subject is
magnified up to 4x, for a total magnification of 12x. A monitor indicator shows the current zoom
ratio.
Press "W" in full-frame playback to display pictures in "contact sheets" of four or nine thumbnail
images.
Press "T" to zoom-in on still images displayed in full-frame playback.
When entering a menu, press "T" to view a description of the currently selected menu option.
Multi-Selector buttons (8-12)
8: Flash Mode:
In order to select a flash mode:
Press the Flash Mode button.
Use the multi-selector up/down arrows to choose the desired flash mode (Auto, Auto with Red-Eye
Reduction, Off, Fill Flash and Slow Sync), and press "OK".

7
9: Exposure Compensation:
Exposure Compensation is used to alter exposure from the value suggested by the camera to make
pictures brighter or darker.
Press the Exposure Compensation button.
Press the multi-selector up/down arrows to adjust exposure, and press "OK".
10: Self-Timer:
The camera is equipped with a ten-second timer for self portraits. When using the self-timer, mount the
camera on a tripod or rest it on a flat and stable surface.
Press the Self-Timer button.
Press the multi-selector up/down arrows to choose "On", and press "OK".
Press the shutter-release button half-way to focus, and then all the way down.
11: Macro:
Macro Close-Up mode is used for taking pictures of objects as close as 15cm/5.9 inch.
Press the Macro Mode button.
Press the multi-selector up/down arrows to choose "On", and press "OK".
Press "T" or "W" to frame the picture, focus and shoot.
12: OK Button:
Push this button to confirm a selection.
13: Delete:
Press Delete to delete the picture currently displayed in the monitor in full-frame playback. Press the
multi-selector up/down arrows to choose "Yes", and press "OK".
In Shooting Mode, press this button to delete the last picture taken. When the confirmation dialog
shown at right is displayed, press the multi-selector up/down arrows to choose "Yes", and press
"OK".
Press Delete to delete the movie currently displayed in the monitor in full-frame playback. Press the
multi-selector up/down arrows to choose "Yes", and press "OK".
 Loading...