

Page 1

Faleemi Technologies Ltd
Weatherproof WiFi Security IP Camera
Quick Start Guide
FSC761
www.faleemi.com [email protected]
© Faleemi Technologies Ltd or its affiliates. All rights reserved.
No part of this publication may be reproduced or transmitted in any form or by any means or used to
make any derivative work (such as translation, transformation, or adaptation) without written
permission from Faleemi Technologies Ltd (“Faleemi”). Faleemi reserves the right to revise this
publication and to make changes in content from time to time without obligation on the part of Faleemi
to provide notification of such revision or change.
Faleemi provides this guide without warranty of any kind, implied or expressed, including, but not
limited to, the implied warranties of merchantability and fitness for a particular purpose. Faleemi may
make improvements or changes in the product(s) described in this manual at any time.
The capabilities, system requirements and/or compatibility with third-party products described herein
are subject to change without notice.
Version.01. 2019
www.facebook.com/faleemi
youtube.com/c/Faleemi
twitter.com/faleemi
Faleemi and the Faleemi logo are all trademarks or registered trademarks of Faleemi Technologies Ltd.
Other trademarks and trade names may be used in this document to refer to either the entities claiming
the marks and the names of their products. Faleemi disclaims proprietary interest in the marks and
names of others.
Apple®, Apple Store®, iPad®, iPhone®, MAC® (Text, Logo, Picture) are trademarks of Apple, Inc.
Android®, Google Play® (Text, Logo, Picture) are trademarks of Google Inc.
Samsung® (Text, Logo, Picture) is a registered trademark of Samsung Electronics Co., Ltd.
Skype ® (Text, Logo, Picture) is a registered trademark of Microsoft Corporation
Facebook® (Text, Logo, Picture) is a registered trademark of Facebook, Inc.
Twitter® (Text, Logo, Picture) is a registered trademark of Twitter, Inc.
Micro SD® text and logo are the trademark of SD-3C, LLC.
Wi-Fi® is a registered trademark of the Wi-Fi Alliance.
All other products, names or companies are the brands or registered trademarks of their respective owners.
We at Faleemi are committed to do our part in protecting our environment. In this continuing
effect, we have supplied the detailed manuals, documentation, software, troubleshooting and
video guides on our website.
www.faleemi.com/support
Page 2

Dear Customer,
Thank you for choosing Faleemi among all the brands. We hope our products will protect your home and give you peace of mind.
At Faleemi, we tly care about our customers’ Purchase Exerience and User Exerience, so “Customer satisfaction garanteed
is our goal”. We are 100% dedicated to your complete satisfaction.
If your exerience has been something less than amazing, or need additional inforation, please drop us an email at
[email protected]. Or you are welcome to visit our website www.faleemi.com/faq for more inforation. Please do
remember that we are always more than happy to ensure you’re a HAPPY Customer.
As a gowing company, we are improving all aspects of our serice and products. If you got any suggestion or comment, welcome
to let us know. We will continue to improve and provide our customers with qualit products and serice.
Yours sincerely,
Team Faleemi
www.faleemi.com
youtube.com/c/Faleemi
facebook.com/faleemi
Contents
Product information
Download APP and Getting started
Setup Option A: Add the cameras via Lan Search
Setup Option B: Add the cameras via wired mode
Setup Option C: Add cameras via WiFi configuration guide
Live Video Interface
Installation
How to connect the camera to the second Phone?
Advanced Settings
How to do the settings for receiving message alert on your phone?
[Push Setting]
[Alarm Event]
[Notifications]
How to set it to record constantly to the memory card?
How to record alarm video to the memory card?
How to view the recorded video on memory card?
How do i change my camera password?
Trouble Shooting Frequently Asked Questions
1. How to reset your camera (restore to factory default)?
2. Timer Restart option
3. Multi-view
4. How do I change my video stream resolution?
5. How do I flip my camera’s video stream?
6. How do I find the WiFi MAC address of my camera?
7. If I change the router, how do I reconnect the camera?
8. How do I change the WiFi SSID on my router?
9. How to set Faleemi camera IP Address and Port ?
10. How to set email alert?
11. How to link your camera to your PC/Mac by Faleemi Plus?
........................................................................................................................................................................................................................................
..........................................................................................................................................................................................................................................
..........................................................................................................................................................................................................................................................
............................................................................................................................................................................................................................................
.............................................................................................................................................................................................................................................
.............................................................................................................................................................................................................................................
............................................................................................................................................................................................................................................
.................................................................................................................................................................................................................................................
.........................................................................................................................................................................................................
Recommended
Recommended
...........................................................................................................................................................................
....................................................................................................................................................................................
.................................................................................................................................................................................
..............................................................................................................................................................................................
.................................................................................................................................................................................
...............................................................................................................................................................................................................................
...............................................................................................................................................................................
.........................................................................................................................................................................................
................................................................................................................................................................................
..........................................................................................................................................................................................................................
..............................................................................................................................................
.............................................................................................................................................
...............................................................................................................................................................
.................................................................................................................................................
................................................................................................................................................................
......................................................................................................................................................
.....................................................................................................................................................................
.............................................................................................................................................................
.........................................................................................................................................................................
......................................................................................................................................................
1
2
3
7
11
15
16
17
19
20
20
21
22
23
24
25
26
27
27
28
28
29
29
29
30
30
31
31
31
Page 3
Plug in
HD Weatherproof WiFi Security IP Camera
Model: FSC761
Quick Start Guide
Smart Reliable SecureSmart Reliable Secure
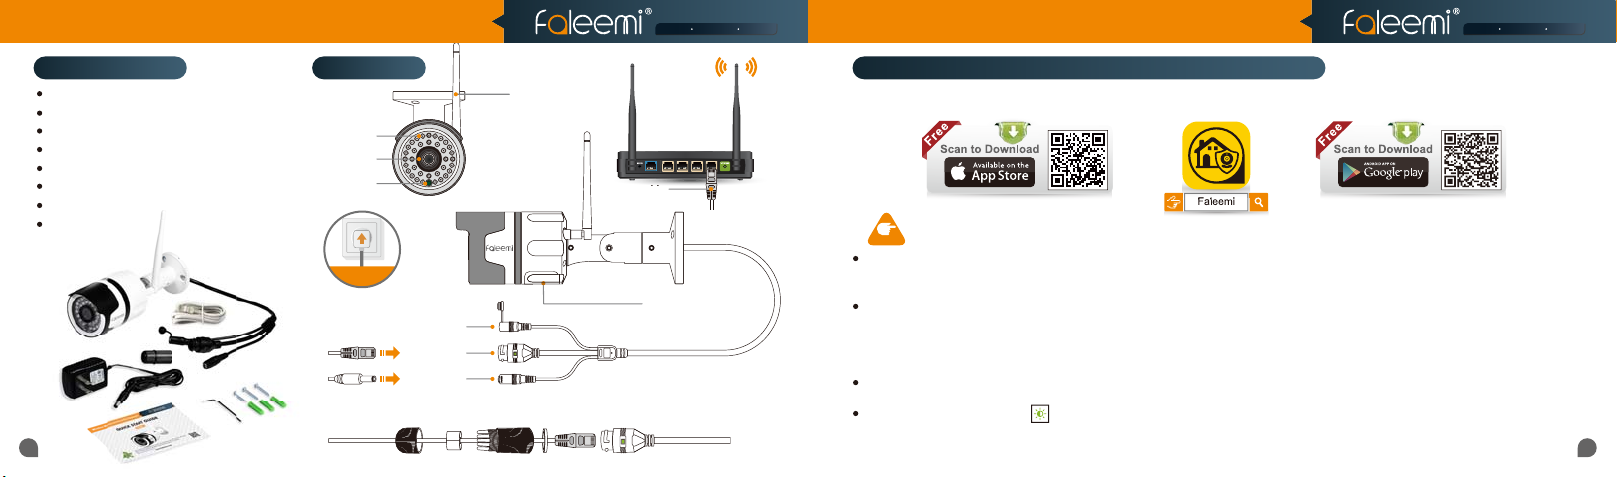
What’s in the box? Connections
Faleemi Weatherproof WiFi Security IP Camera FSC761
WiFi Antenna
Power Adapter
Network Cable
Mounting Screws & Plugs
Hex Key
Weatherproof Connector
Quick Start Guide
01
IR LEDs
Light Sensor
Connection Diagram for Weatherproof Connector
Lens
Set/Reset Button
RJ45 10/100M
LAN Port
DC 12V Power
WiFi Antenna
Cable
Memory Card Slot
Download the Faleemi APP (Android / iOS) before doing the setup
Connect your mobile device to your WiFi and download the App “Faleemi” from the App Store or Google Play store, or scan below QR code
to download it.
Before configuring your camera, please read the points below.
NOTE
Please use the included Ethernet cable to connect your camera to your router before performing the setup. After the camera is connected
to your WiFi, you can relocate it to where you want. You just unplug it and move it to the new location and plug it in, it will connect to your
WiFi automatically, no need to set it up again.
make sure your phone is connected to your
Please
WiFi name (SSID) must be different from your 5.0GHz one.
Please make sure your WiFi name and password do not have the special characters " & " and " ' "(apostrophe).
If you are not sure, please go to your router settings to find this out.
Note: THIS WILL NOT AFFECT THE 5GHz WIFI USE OF YOUR OTHER WIRELESS DEVICES : )
If you don’t know how to go to your router settings, please visit our website
or contact us at
If you don’t see the green light , please do a “Factory Reset”. This process is outlined on
Page 27 of this manual. [“1. How to reset your camera (restore to factory default)?”].
.
2.4GHz WiFi (not cellular data and 5GHz WiFi)
www.faleemi.com/blocks/router
before doing the setup. Your 2.4GHz
to find the instructions
Now, please follow below instructions to get your camera set up.
02
Page 4
Plug in
If you don’t find it, please read below tips
1. Please make sure your phone is connected
to your WiFi (not ce llular data)
2. Please change to anoth er LAN port and tr y
again.
3. You may try wi th another Ethernet cabl e.
After you check a ll the above points, and
then click on t his icon to refresh.
Please use the d efault username of
admin
and password of
123456
here.
You can change them whe n the camera is all
set up. You will find the instructions in
.
HD Weatherproof WiFi Security IP Camera
Model: FSC761
Quick Start Guide
Smart Reliable SecureSmart Reliable Secure
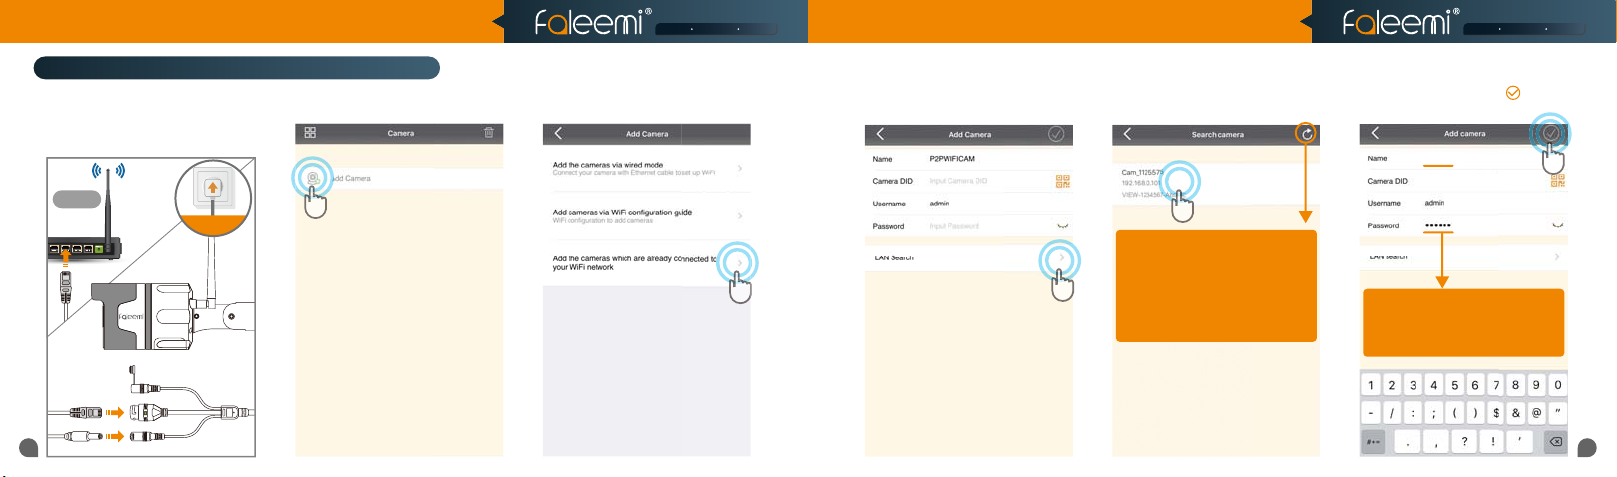
Setup Option A: Step 1 / Add the cameras via Lan Search
1. Please plug the camera in with the
included power supply, and connect the
camera to your router with the included
Ethernet cable.
2.4GHz
Router
03
2. Open the Faleemi App,
Click on [Add Camera].
already connected to your WiFi
network].
6. Give your camera a name, and input
4. Click on [LAN Search]. 5. Click on the camera searched. 3. Click on [Add the cameras which are
If you don’t find it, please read below tips
1. Please make sure your phone is connected
to your WiFi (not cellular data)
2. Please change to another LAN port and try
again.
3. You may try with another Ethernet cable.
After you check all the above points, and
then click on this icon to refresh.
Password 123456, click on [ ].
It will take you to the home page.
Faleemi
VIEW-1234567-ABCDE
Please use the default username of
admin
and password of
You can change them when the camera is all
set up. You will find the instructions in
Page 26
123456
here.
04
Page 5
You will see it says the camera is Online.
1. To ensure the security of your camera,
you
are suggested changing the default password.
Please refer to the instruction in
.
2. You can relocate the camera now. Please just
unplug it and move it to the new location and
plug it in, the camera will connect to your WiFi
automatically, no need to set it up again.
* But please make sure the new location will be
not far from your router.
Congratulations!
Your camera is connected now
Please make sure your
HD Weatherproof WiFi Security IP Camera
Model: FSC761
Quick Start Guide
Smart Reliable SecureSmart Reliable Secure
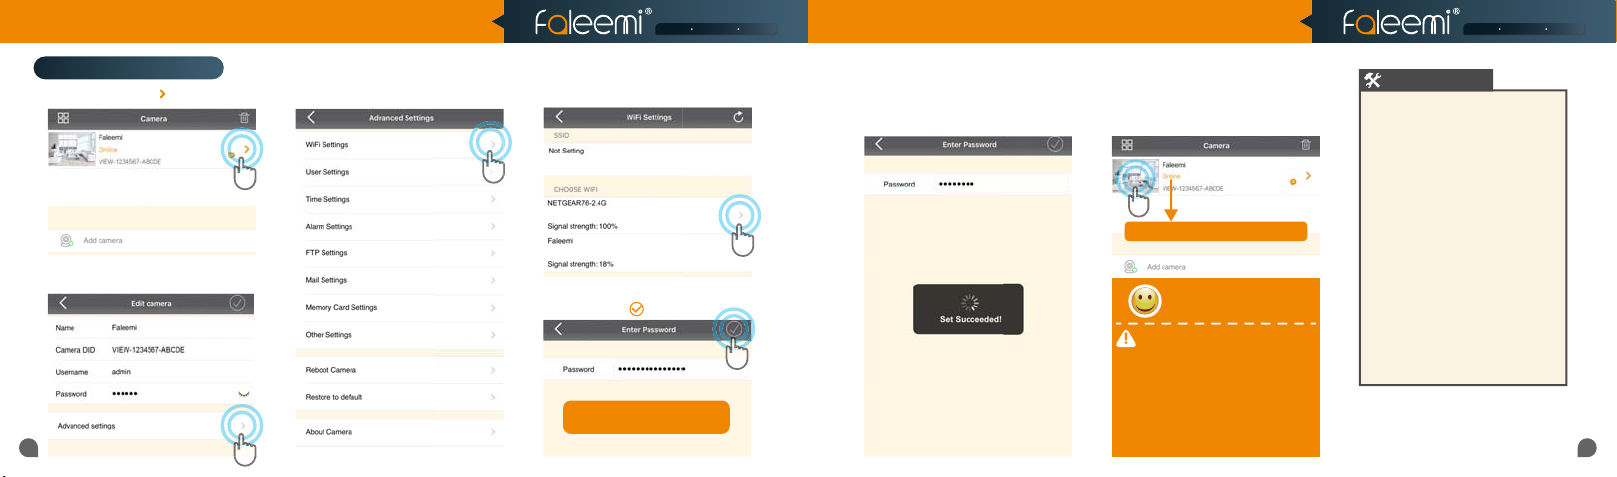
Step 2 / WiFi Connection
1. Click on the icon [ ].
2. Click on [Advanced Settings].
05
3. Click on [WiFi Settings].
4. Choose 2.4GHz WiFi to connect.
5. Input your 2.4GHz WiFi password
and click on [ ].
Please make sure your
WiFi password is correct.
6. It will say [Set Succeeded!].
It means the camera is connected to your
WiFi, please remove the Ethernet cable.
7. You will see it says the camera is
Online. Congratulations! Your camera is
all set up. Click on the image to enjoy
viewing and controlling it now.
You will see it says the camera is Online.
Congratulations!
Your camera is connected now
1. To ensure the security of your camera,
are suggested changing the default password.
Please refer to the instruction in
2. You can relocate the camera now. Please just
unplug it and move it to the new location and
plug it in, the camera will connect to your WiFi
automatically, no need to set it up again.
* But please make sure the new location will be
not far from your router.
Page 26
you
Troubleshooting
1. If the connection was failed, the WiFi
password you just input may be wrong.
Please reset the camera (instructions in
) and do the setup again.
27
2. If your WiFi password was correct but still
failed.
(a). Please make sure your phone is connected
2.4GHz WiFi (not 5GHz WiFi) before
to your
doing the setup.
(b). Your 2.4GHz WiFi name (SSID) must be
different from your 5.0GHz one.
(c). Please make sure your WiFi name and
password do not have the special characters "
& " and " ' "(apostrophe).
If you are not sure, please go to your router
settings to find this out.
If you don’t know how to go to your router
settings, please visit our website
www.faleemi.com/blocks/router to find
the instructions.
Page
For more FAQ information, please visit
https://www.faleemi.com/faq/
Or contact us:
06
Page 6
Plug in
If you see this, pleas e click on
If you can’t scan the QRcode,
please click on
DID (something like
VIEW-1234567-ABCDE)
in the label on the camera manually.
Please use the d efault username of
admin
and password of
123456
here.
You can change them whe n the camera is all
set up. You will find the instructions in
.
HD Weatherproof WiFi Security IP Camera
Model: FSC761
Quick Start Guide
Smart Reliable SecureSmart Reliable Secure
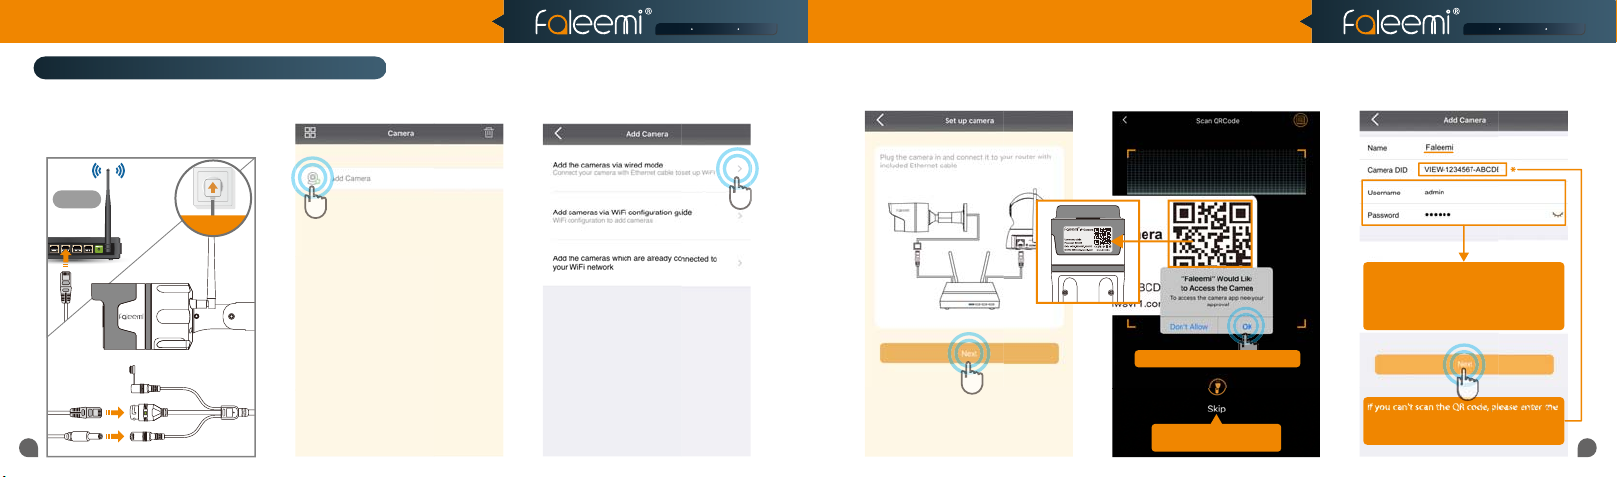
Setup Option B: Add the cameras via wired mode
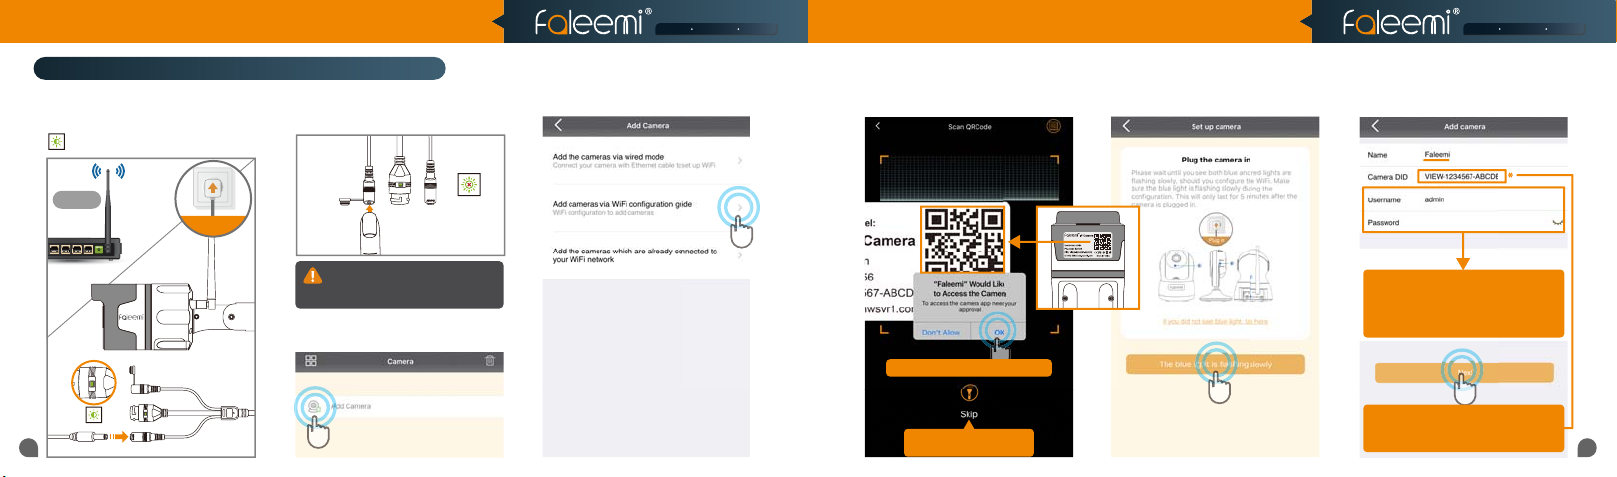
1. Please plug the camera in with the
included power supply, and connect the
camera to your router with the included
Ethernet cable.
2.4GHz
Router
07
2. Open the Faleemi App,
Click on [Add Camera].
3. Click on
[Add the cameras via wired mode].
4. Click on [Next]. 6. Type in the name you have selected
5. Please scan the QR Code at the bottom
of the camera.
Model: FSC761 V2.0
If you see this, please click on
If you can’t scan the QRcode,
please click on
[Skip]
QR Code
[OK]
for your camera and click on [Next].
Please use the default username of
admin
and password of
You can change them when the camera is all
set up. You will find the instructions in
if you can't scan the QR code, please enter the
DID (something like
in the label on the camera manually.
123456
Page 26
VIEW-1234567-ABCDE
here.
08
Page 7
Click on it to make sure your
You will see it says the camera is Online.
1. To ensure the security of your camera,
you
are suggested changing the default password.
Please refer to the instruction in
.
2. You can relocate the camera now. Please just
unplug it and move it to the new location and
plug it in, the camera will connect to your WiFi
automatically, no need to set it up again.
* But please make sure the new location will be
not far from your router.
Congratulations!
Your camera is connected now
HD Weatherproof WiFi Security IP Camera
Model: FSC761
Quick Start Guide
Smart Reliable SecureSmart Reliable Secure
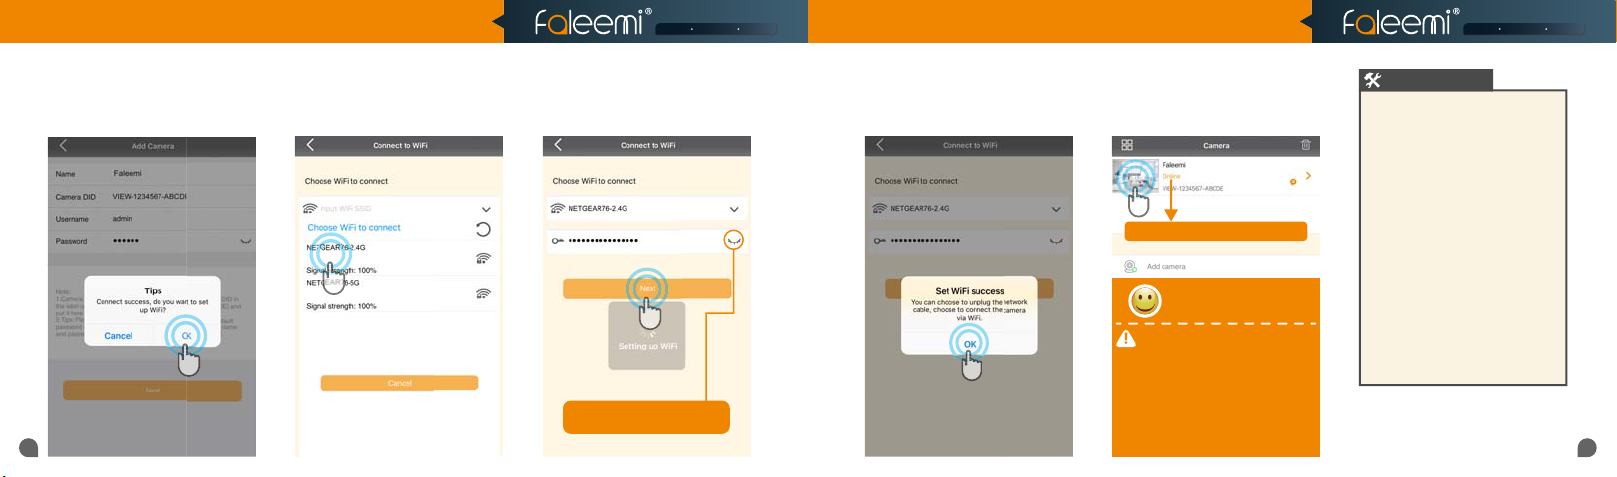
7. It says connection success, if you want
to use wired connection, please click on
[Cancel]; If you want to use WiFi, please
click on [OK] to do the WiFi connection.
09 10
8. Choose 2.4GHz WiFi to connect. 10. It will say WiFi is set successfully. It
9. Input your 2.4GHz WiFi password
and click on [Next].
Click on it to make sure your
WiFi password is correct.
means the camera is connected to your
wifi, Click on [OK], please remove the
Ethernet cable.
11. You will see it says the camera is
Online. Congratulations! Your camera is
all set up. Click on the image to enjoy
viewing and controlling it now.
You will see it says the camera is Online.
Congratulations!
Your camera is connected now
1. To ensure the security of your camera,
are suggested changing the default password.
Please refer to the instruction in
2. You can relocate the camera now. Please just
unplug it and move it to the new location and
plug it in, the camera will connect to your WiFi
automatically, no need to set it up again.
* But please make sure the new location will be
not far from your router.
Page 26
you
Troubleshooting
1. If the connection was failed, the WiFi
password you just input may be wrong.
Please reset the camera (instructions in
27
) and do the setup again.
2. If your WiFi password was correct but still
failed.
(a). Please make sure your phone is connected
2.4GHz WiFi (not 5GHz WiFi) before
to your
doing the setup.
(b). Your 2.4GHz WiFi name (SSID) must be
different from your 5.0GHz one.
(c). Please make sure your WiFi name and
password do not have the special characters "
& " and " ' "(apostrophe).
If you are not sure, please go to your router
settings to find this out.
If you don’t know how to go to your router
settings, please visit our website
www.faleemi.com/blocks/router to find
the instructions.
Page
For more FAQ information, please visit
https://www.faleemi.com/faq/
Or contact us:
Page 8
Plug in
If you see this, pleas e click on
If you can’t scan the QRcode,
please click on
if you can't scan the QR code, please enter the
DID (something like
VIEW-1234567-ABCDE)
in the label on the camera manually.
Please use the d efault username of
admin
and password of
123456
here.
You can change them whe n the camera is all
set up. You will find the instructions in
.
HD Weatherproof WiFi Security IP Camera
Setup Option C: Add cameras via WiFi configuration guide
1. Please put your camera close to your
WiFi router and plug it in, and then you
will see the green light is blinking slowly.
2.4GHz
Router
11
2. Press the Set button for about 3 seconds
until the green light goes off. The camera has
been in WiFi configuration mode.
Set Button
CAUTION: The button is small. Holding
for longer than 10 seconds will reset
the camera.
3. Open the Faleemi App, click on
[Add Camera].
Model: FSC761
1.
Press down
Set Button
3s+
2.
The green light
goes off
4. Click on [Add cameras via WiFi
configuration guide].
5. Please scan the QR Code at the bottom
of the camera.
QR Code
If you see this, please click on
If you can’t scan the QRcode,
please click on
[OK]
[Skip]
Quick Start Guide
6. Click on [The blue light is flashing
slowly].
Model: FSC761 V2.0
Smart Reliable SecureSmart Reliable Secure
7. Type in the name you have selected for
your camera and click on [Next].
123456
Please use the default username of
admin
and password of
You can change them when the camera is all
set up. You will find the instructions in
if you can't scan the QR code, please enter the
DID (something like
in the label on the camera manually.
123456
Page 26
VIEW-1234567-ABCDE
here.
12
Page 9
Click on it to make sure your
You will see it says the camera is Online.
1. To ensure the security of your camera,
you
are suggested changing the default password.
Please refer to the instruction in
.
2. You can relocate the camera now. Please just
unplug it and move it to the new location and
plug it in, the camera will connect to your WiFi
automatically, no need to set it up again.
* But please make sure the new location will be
not far from your router.
Congratulations!
Your camera is connected now
HD Weatherproof WiFi Security IP Camera
Model: FSC761
Quick Start Guide
Smart Reliable SecureSmart Reliable Secure
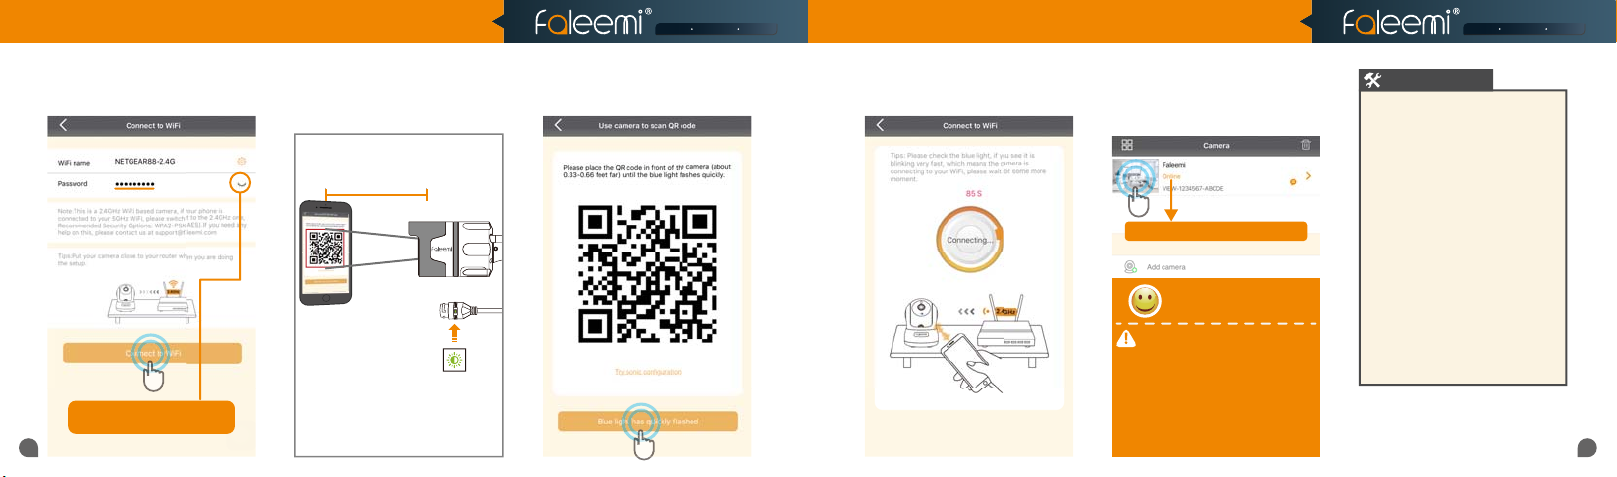
8. Input your 2.4GHz WiFi password and
click on [Connect to WiFi].
Click on it to make sure your
WiFi password is correct.
13
9. Place the camera 6 inches from the
QR code on the phone and keep it
stable. If the scan succeeds, the green
light will light up again and blink.
15cm(6 in)
The green light
lights up
10. Click on [Blue light has quickly
flashed].
11. Connect to WiFi.
12. You will see it says the camera is
Online. Congratulations! Your camera is
all set up. Click on the image to enjoy
viewing and controlling it now.
You will see it says the camera is Online.
Congratulations!
Your camera is connected now
1. To ensure the security of your camera,
are suggested changing the default password.
Please refer to the instruction in
2. You can relocate the camera now. Please just
unplug it and move it to the new location and
plug it in, the camera will connect to your WiFi
automatically, no need to set it up again.
* But please make sure the new location will be
not far from your router.
Page 26
you
Troubleshooting
1. If the connection was failed, the WiFi
password you just input may be wrong.
Please reset the camera (instructions in
27
) and do the setup again.
2. If your WiFi password was correct but still
failed.
(a). Please make sure your phone is connected
to your
2.4GHz WiFi (not 5GHz WiFi) before
doing the setup.
(b). Your 2.4GHz WiFi name (SSID) must be
different from your 5.0GHz one.
(c). Please make sure your WiFi name and
password do not have the special characters "
& " and " ' "(apostrophe).
If you are not sure, please go to your router
settings to find this out.
If you don’t know how to go to your router
settings, please visit our website
www.faleemi.com/blocks/router to find
the instructions.
Page
For more FAQ information, please visit
https://www.faleemi.com/faq/
Or contact us:
14
Page 10
HD Weatherproof WiFi Security IP Camera
Model: FSC761
Live Video Interface Installation
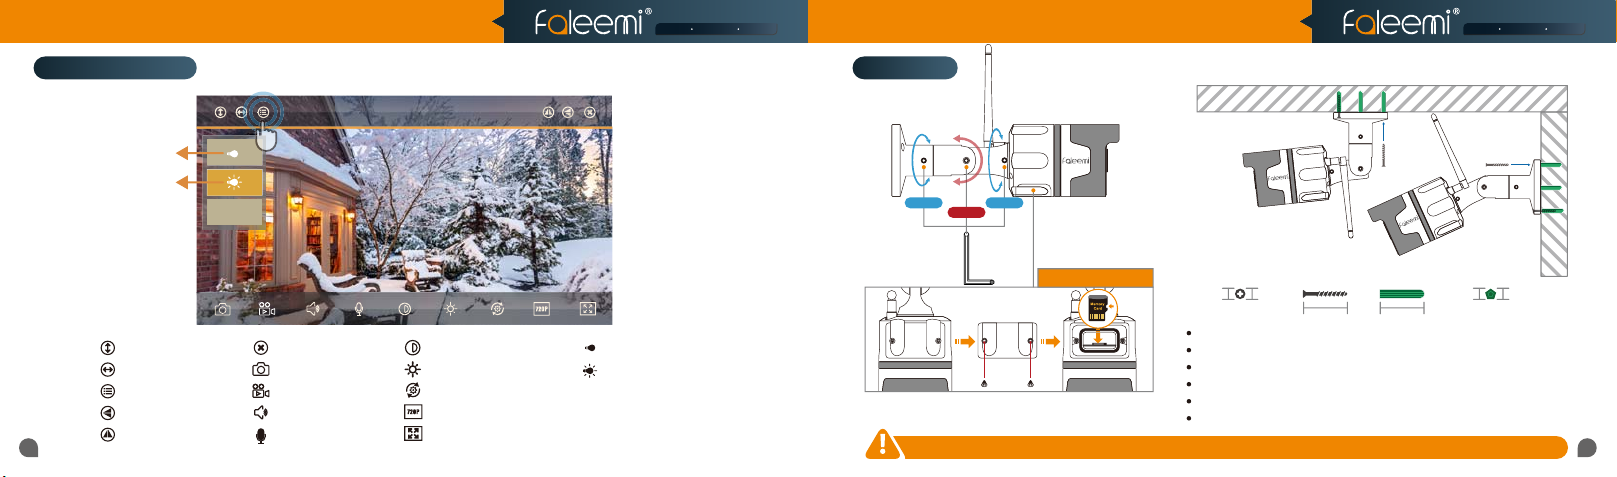
Faleemi_FSC761
Turn off LED
LED Auto Mode
Preset
2 screws
1screw
2 screws
Quick Start Guide
Smart Reliable SecureSmart Reliable Secure
Memory Card Slot
Cruise Vertically (N/A)
Cruise Horizontally (N/A)
Menu
Flip
15
Mirror
Exit
Snapshot to phone
Record video to phone
Audio On/Off (N/A)
Microphone On/Off (N/A)
Contrast
Brightness
Restore to default
480P/720P
Contract
IR LED Off
LED Auto Mode
Preset
Set or Call Preset (N/A)
Please insert the Micro SD card as the above diagram.
Suggest using Micro SDHC/SDXC
(* MicroSD, MicroSDHC/SDXC text and logo are the trademark of SD-3C, LLC)
Please install the camera after it is connected. Please pay attention to safety when you are installing it.
*Suggest using 6mm(1/4") drill bit.
0.26(in) 0.26(in)
6.5(mm) 6.5(mm)
27.5(mm)
1.08(in)
25(mm)
1(in)
Mark the positions of the screw holes on the mounting surface.
Drill holes and insert the anchors (included) as needed.
Firmly attach the camera to the mounting surface using the included screws.
Loosen the Screw by turning them counter clockwise with included hex key.
Adjust the angle of the cameras until the desired view is set.
Tighten the screws to secure camera's position.
16
Page 11
Tips:
Default
, but if you change d
the password on your first phone, please
enter your new pa ssword here.
If you don’t find it, please make sure your
phone is connected to your WiFi
(Not cellular data) and click on this icon to
refresh.
Tips:
Default
, but if you change d
the password on your first phone, please
enter your new pa ssword here.
Camera DID
HD Weatherproof WiFi Security IP Camera
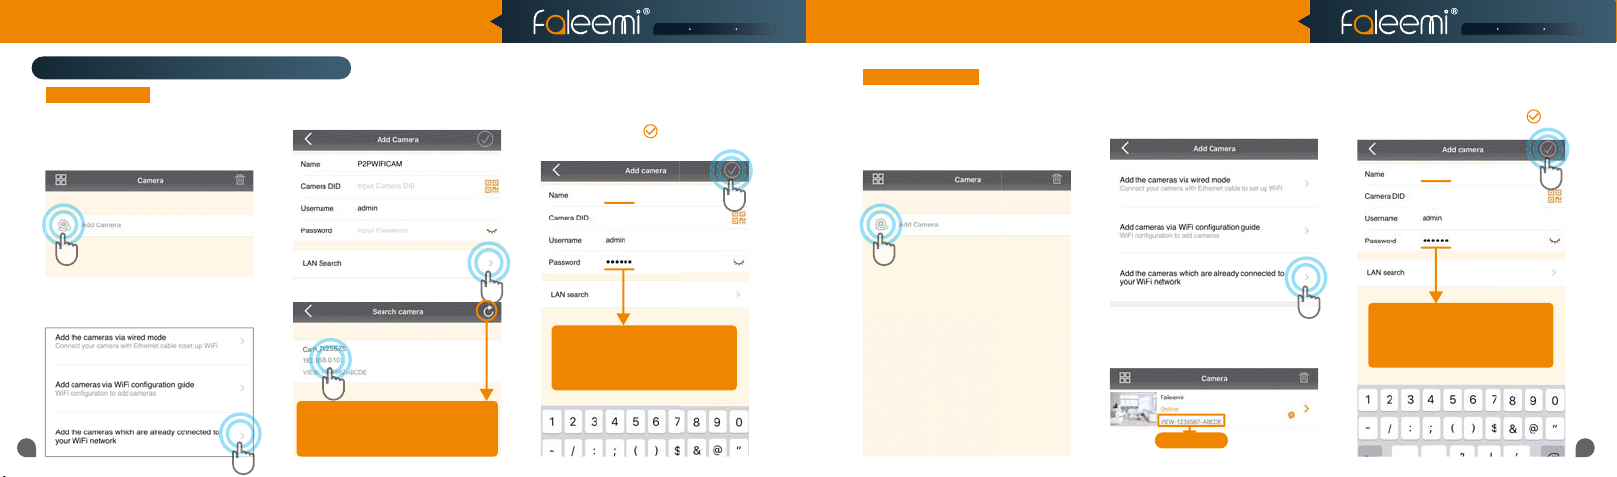
How to connect the camera to the second Phone?
Option A Locally
1. Download the Faleemi App to your
second phone.
2. Open the Faleemi App,
click on [Add Camera].
If your second phone can be connected to the same WiFi as your camera, please follow below instructions.
4. Click on [LAN Search].
Model: FSC761
After you use one phone to get your camera connected, if you would like to add your
camera to the second phone, please follow below instructions to do the setup.
6. Give your camera a name, and input
Passwo rd, click on [ ].
It will take you to the home page.
Faleemi
VIEW-1234567-ABCDE
Option B Remotely
1. Download the Faleemi App to your
second phone.
2. Open the Faleemi App,
click on [Add Camera].
If your second phone can not be connected to the same WiFi, please follow below instructions.
Quick Start Guide
3. Click on [Add the cameras which are
already connected to your WiFi
network].
Smart Reliable SecureSmart Reliable Secure
5. Give your camera a name, and input
Camera DID, Password, click on [ ].
It will take you to the home page.
Faleemi
VIEW-1234567-ABCDE
3. Click on [Add the cameras which are
already connected to your WiFi
network].
17
5. Click on the camera searched.
If you don’t find it, please make sure your
phone is connected to your WiFi
(Not cellular data) and click on this icon to
refresh.
Tips:
Default
(123456), but if you changed
the password on your first phone, please
enter your new password here.
4. Please find your camera DID (some-
thing like VIEW-1234567-ABCDE) in
your first phone or the label on the camera.
Camera DID
Tips:
Default
(123456), but if you changed
the password on your first phone, please
enter your new password here.
18
Page 12
Tips:
If you change you r password, please
remember to updat e the new password
to your other pho ne and click on " "
HD Weatherproof WiFi Security IP Camera
Model: FSC761
Quick Start Guide
Smart Reliable SecureSmart Reliable Secure
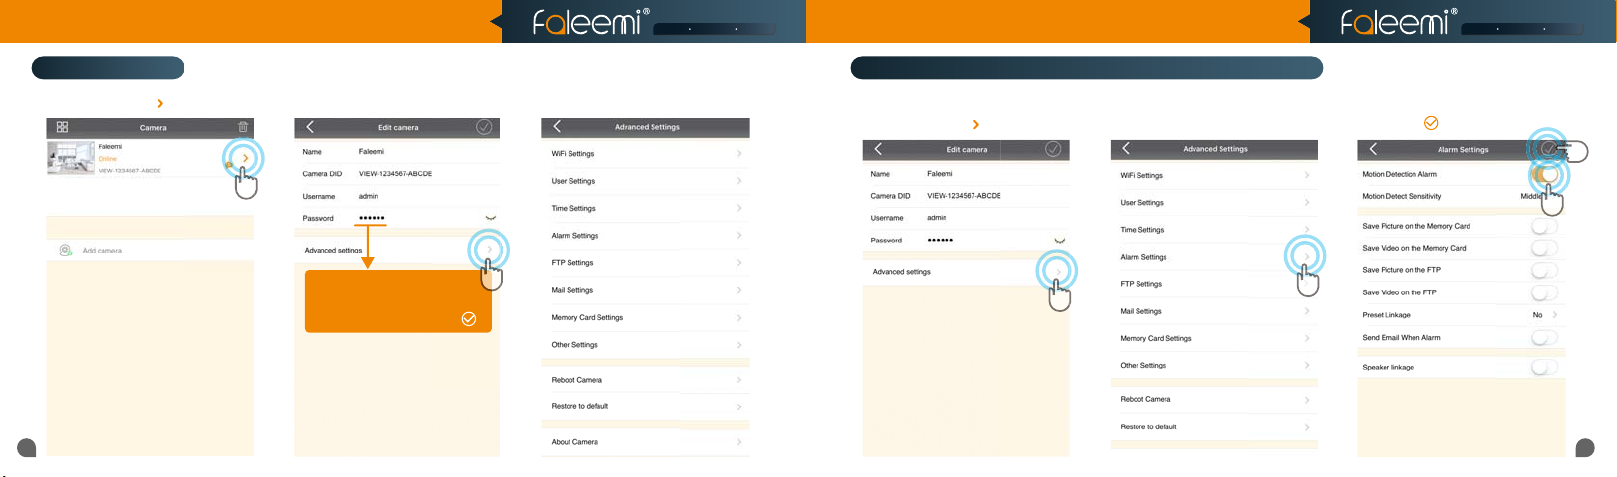
Advanced Settings
1. Click on the icon [ ].
19
Please follow below steps to go to Advanced Settings to do more settings.
2. Click on [Advanced Settings].
Tips:
If you change your password, please
remember to update the new password
to your other phone and click on " "
3. Do [Advanced Settings] here.
How to do the settings for receiving message alert on your phone?
[Alarm Settings]
1. Click on the icon [ ].
2. Click on [Alarm Settings].
1
3. Enable [Motion Detection Alarm].
4. Click on [ ].
4
3
2
20
Page 13
HD Weatherproof WiFi Security IP Camera
Model: FSC761
Quick Start Guide
Smart Reliable SecureSmart Reliable Secure
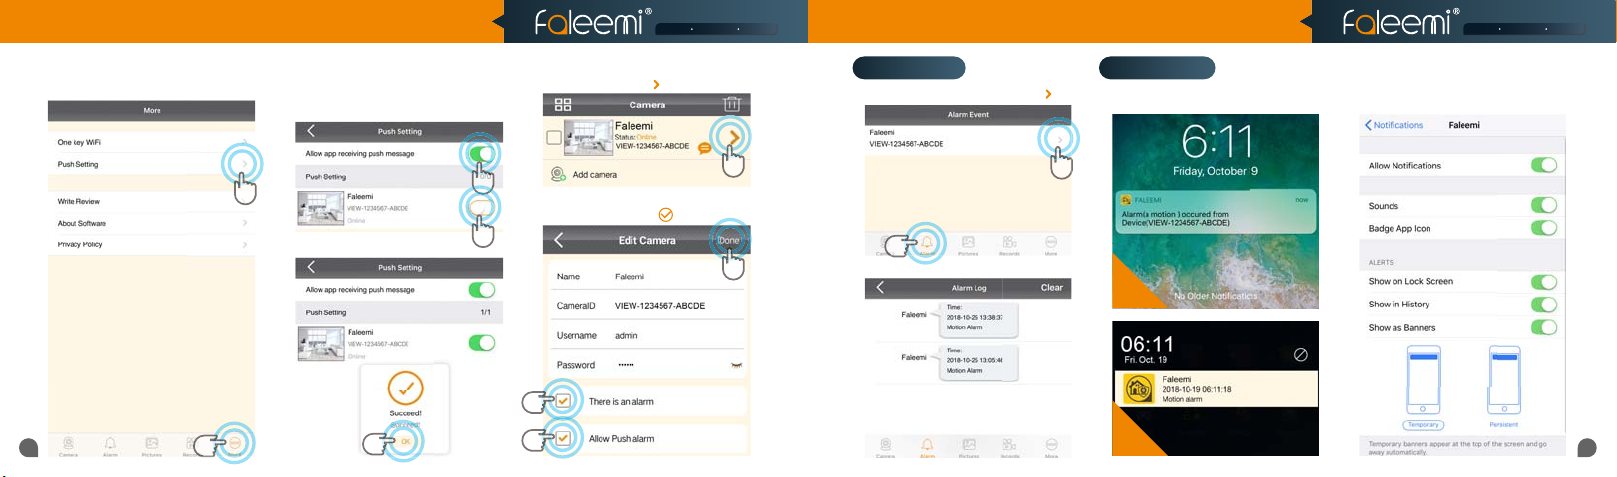
[Push Setting - iOS] [Push Setting - Android]
1. Click on [More]. 2. Click on [Push Setting].
2
3. Find the camera you want to receive
message alert and turn on the button
[Allow app receiving push message].
1
4. Click on [OK].
2
1. Click on the icon [ ].
2. Enable [There is an alarm], [Allow Push
3. Click on [ ].
alarm]
1
21
1
2
If you don’t receive the message, please go
to your phone’s [Settings]—[Notica-
tions]—[Faleemi APP] to check if you turn
on the button “Allow Notications”.
1. Click on [Alarm]. 2. Click on [ ].
NotificationsAlarm Event
You will receive text messages when
there’s motion.
2
1
3
3. It shows alarm log list.
iOS
Android
22
Page 14
Tips: Max 15 Minutes
Tips:
If you just wan t to record alarm
video to the m emory card,
Please turn of f this button.
HD Weatherproof WiFi Security IP Camera
Model: FSC761
Quick Start Guide
Smart Reliable SecureSmart Reliable Secure
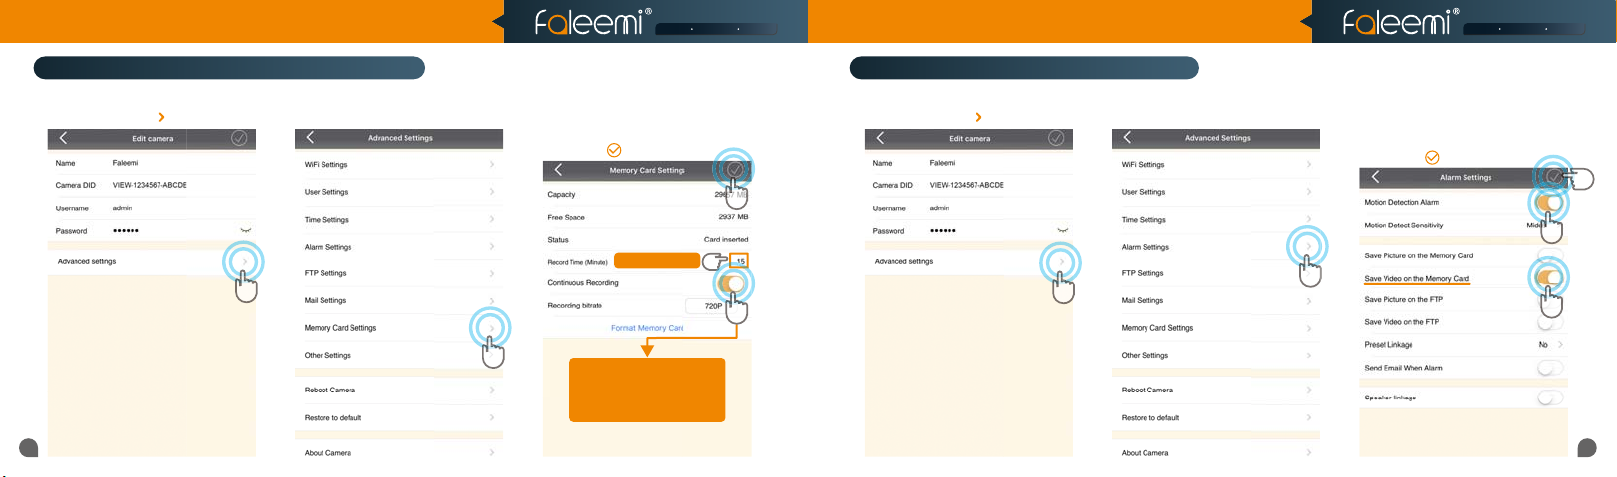
How to set it to record constantly to the memory card?
* Please follow the instruction in Page 16 to insert the SD card and format your memory card before using.
1. Click on the icon [ ].
2. Click on [Memory Card Settings].
1
23
3. Enable [Continuous Recording].
4. Set [Record Time] (15 Mins Max).
5. Click on [ ].
2
If you just want to record alarm
video to the memory card,
Please turn off this button.
Tips: Max 15 Minutes
Tips:
How to record alarm video to the memory card?
1. Click on the icon [ ].
2. Click on [Alarm Settings].
3. Enable [Motion Detect Alarm].
4. Enable [Save Video on the Memory
Card].
5. Click on [ ].
5
5
3
4
1
3
2
4
24
Page 15
HD Weatherproof WiFi Security IP Camera
Model: FSC761
Quick Start Guide
Smart Reliable SecureSmart Reliable Secure
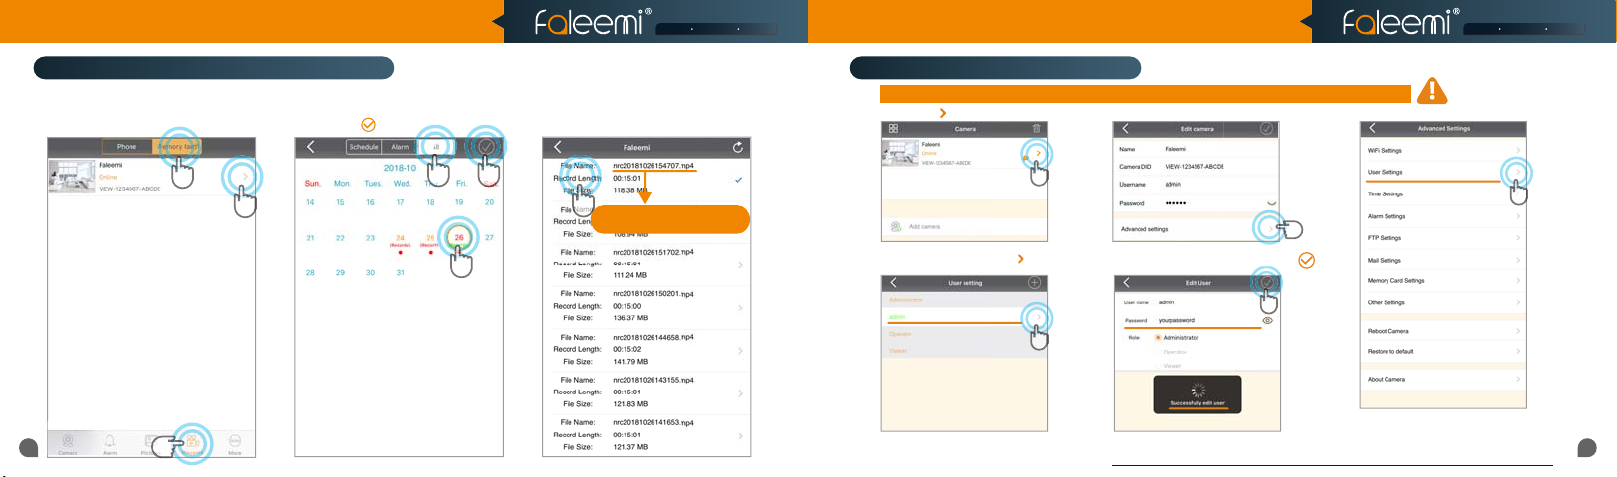
How to view the recorded video on memory card?
1. Click on [Records].
2. Click on [Memory Card].
3. Click on [Camera].
4. Click on [All], Select recording.
5. Select Date.
6. Click on [ ].
2
3
25
1
How do i change my camera password?
7. Click on the file to playback the
recorded video.
6
4
7
NRC 2018/10/26/15:47:07.mp4
Tips:
NRC YEAR/MONTH/DAY/START TIME
5
To ensure the security of your camera, you are suggested changing the default password.
1. Click on [ ].
4. Select [admin], Click on [ ].
2. Click on [Advanced Settings].
5. Enter your new password,Click on [ ].
3. Click on [User Settings].
Record your new password here:
26
Page 16
Home
Office
Store
Pets
Office
HD Weatherproof WiFi Security IP Camera
Troubleshooting Frequently Asked Questions
For more setting guides, please visit our website:
https://www.faleemi.com/faq
If you don’t find the instructions you are looking for
there, please contact us at
Model: FSC761
1. How to reset your camera (restore to factory default)?
Push down the “Reset” button for around 10-15 seconds until
the green light changes from blinking slowly to very quickly
and then let the Reset button go. If the reset is done
successfully, the camera will reboot automatically.
Quick Start Guide
Smart Reliable SecureSmart Reliable Secure
2. If you will be away from your camera for a long time, for example, you will be on holiday for
several months, there may be power outage or network disconnection.
We suggest you using Timer Restart option.
You can set the camera to reboot by itself during this time period.
Please refer to this instruction to do the setup.
http://support.faleemi.com/help/reboot.pdf
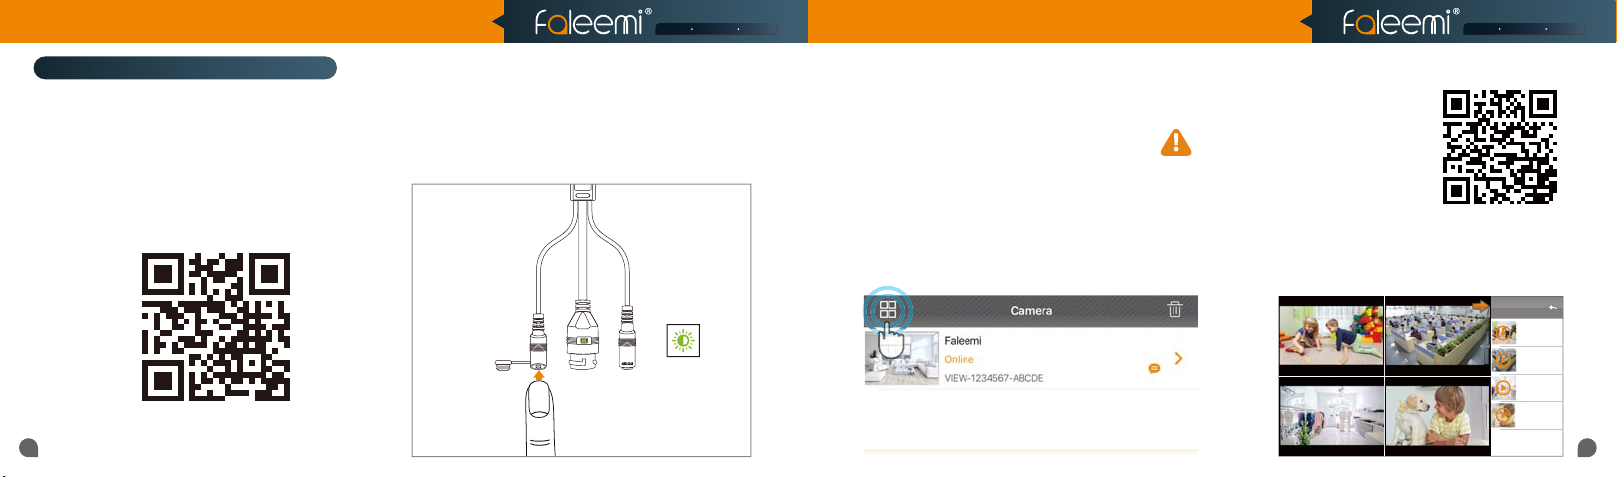
3. If you have several cameras, please set them up one by one according to the instruction from page 3. After all
of them are set up, please follow below steps to use multi-view function.
2. Blinking Fast
Home Office
Office
Home
Reset Button
Store
https://www.faleemi.com/faq
1. Press down
Reset Button
10~15s
Store Pets
Pets
27
Four Cameras
Home
online
Playing
VIEW-462517-FHO..
Office
online
Playing
VIEW-462517-OFF..
Store
online
Playing
VIEW-462517-STO..
Pets
online
Playing
VIEW-462517-FPE..
28
Page 17
HD Weatherproof WiFi Security IP Camera
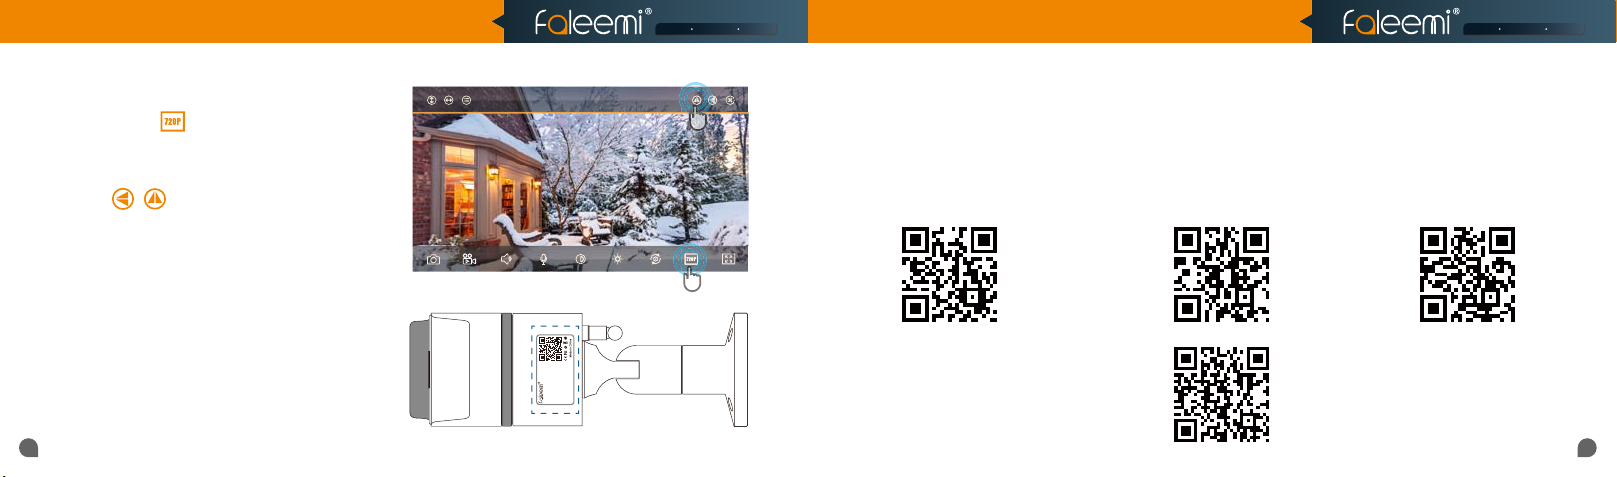
4. How do i change my video stream resolution?
Click on the icon to change the resolution.
5. I mounted my camera upside down,
how do I flip my camera’s video stream?
Click on to flip and mirror your camera.
6. How do I find the WiFi MAC address of my camera?
If you need the WiFi MAC address of the camera to
connect it to your router, please take the photo of the
label on the camera and send it to
We will provide you with the WiFi Mac address
29
Model: FSC761
Faleemi_FSC761
IP Camera
V2.0
Username: admin
Password: 123456
DID: VIEW-1234567-ABCDE
DDNS: 008abcde.nwsvr1.com
Model: FSC761
Quick Start Guide
Smart Reliable SecureSmart Reliable Secure
7. If I change the router, how do I reconnect the camera?
A. We recommend that you change the WiFi name (SSID) and password for the new router to the same as the old router,
so you don't need to reconnect your camera, please just replug it in and it will be online automatically. So do your other
wireless devices.
B. If you can not change the new router WiFi name (SSID) and password, you need to reset the camera (refer to page 27)
and then reconnect it according to the instructions (
page 3)
8. How do I change the WiFi SSID on my router?
Windows 7
Windows 10
https://youtu.be/8gx60SEHSu4 https://youtu.be/V3pgXHvQ67U
https://youtu.be/qzwRIwLnNPg
MAC
for more router settings,
please visit
https://www.faleemi.com/blocks/router
If there is no the guide
for your router settings,
please email us at [email protected]
More Router Settings
30
Page 18
HD Weatherproof WiFi Security IP Camera
Model: FSC761
Quick Start Guide
Smart Reliable SecureSmart Reliable Secure
9. How to set Faleemi camera IP Address and Port ?
Please visit https://youtu.be/2uFUQkM6cBo
10. How to set Email alert?
Please visit
http://support.faleemi.com/mail/Email_alert.pdf
If there is no the guide for your email server,
please email us at [email protected]
31
11. How to link your camera to your PC/Mac by Faleemi Plus?
Download Link:
Faleemi Plus for Windows:
http://support.faleemi.com/software/Faleemi_Plus_v1.0.2.exe
Faleemi Plus for Mac:
http://support.faleemi.com/software/Faleemi_Plus_v1.0.2.dmg
Windows:
https://youtu.be/sEuauwrchbs
Mac:
https://youtu.be/pljGg0l86N8
Faleemi Technologies Ltd
www.faleemi.com [email protected]
www.facebook.com/faleemi
youtube.com/c/Faleemi
twitter.com/faleemi
32
 Loading...