

Page 1
RZZ 254 Ref.2
G1518 and G1528
STEAKHOUSE PLUS GRILLS
USERS INSTRUCTIONS
SECTION 1 - GENERAL DESCRIPTION
SECTION 2 - LIGHTING and OPERATIONS
SECTION 3 - COOKING HINTS
SECTION 4 - CLEANING and MAINTENANCE
These appliances have been CE-marked on the basis of compliance with the Gas Appliance Directive
for the Countries, Gas Types and Pressures as stated on the Data Plate.
These Appliances MUST BE installed by a competent person in compliance with the INSTALLATION AND
SERVICING INSTRUCTIONS and National Regulations in force at the time. Particular attention MUST be paid
to the following:
Gas Safety (Installation & Use) Regulations
Health and Safety at Work Act
Furthermore, if a need arises to convert the appliance for use with another gas, a competent person must be
consulted. Those parts which have been protected by the manufacturer MUST NOT be adjusted by the User.
Users should be conversant with the appropriate provisions of the Fire Precautions Act and the requirements of
the Gas Safety Regulations. in particular the need for regular servicing by a competent person to ensure the
continued safe and efficient performance of the Appliance.
WARNING - TO PREVENT SHOCKS, ALL APPLIANCES WHETHER
GAS OR ELECTRIC, MUST BE EARTHED
Upon receipt of the User's Instruction manual, the installer should instruct the responsible person(s) of the
correct operation and maintenance of the Appliance.
This equipment is ONLY FOR PROFESSIONAL USE, and shall be operated by QUALIFIED persons. It is the
responsibility of the Supervisor or equivalent to ensure that users wear SUITABLE PROTECTIVE CLOTHING
and to draw attention to the fact that, some parts will, by necessity, become VERY HOT and will cause burns if
touched accidentally.
Falcon Foodservice Equipment
HEAD OFFICE AND WORKS
PO Box 37, Foundry Loan, Larbert.
Stirlingshire. Scotland. FK5 4PL
AFE SERVICELINE CONTACT -
PHONE - 01438 363 000 FAX - 01438 369 900
Page 2
SECTION 1 - GENERAL DESCRIPTION
The grill is controlled by a flame failure gas tap and is
supplied with a wire grid, drip tray, cast aluminium
brander and drip trough. The drip tray must be in
position at all times when the burners are on.
Controls Data
Burners
The grills are fitted with plaque burners. Two burners
on the G1518 and four burners on the G1528. A P
suffix indicates Propane operation.
Control
Each grill comprises two control taps which have a
combined on/off and flame failure device.
Ignition
Burners ignition is by means of a match or taper.
Governor
It is essential to fit the gas governor supplied when
using natural gas. This ensures that the gas input to
the grill is correct.
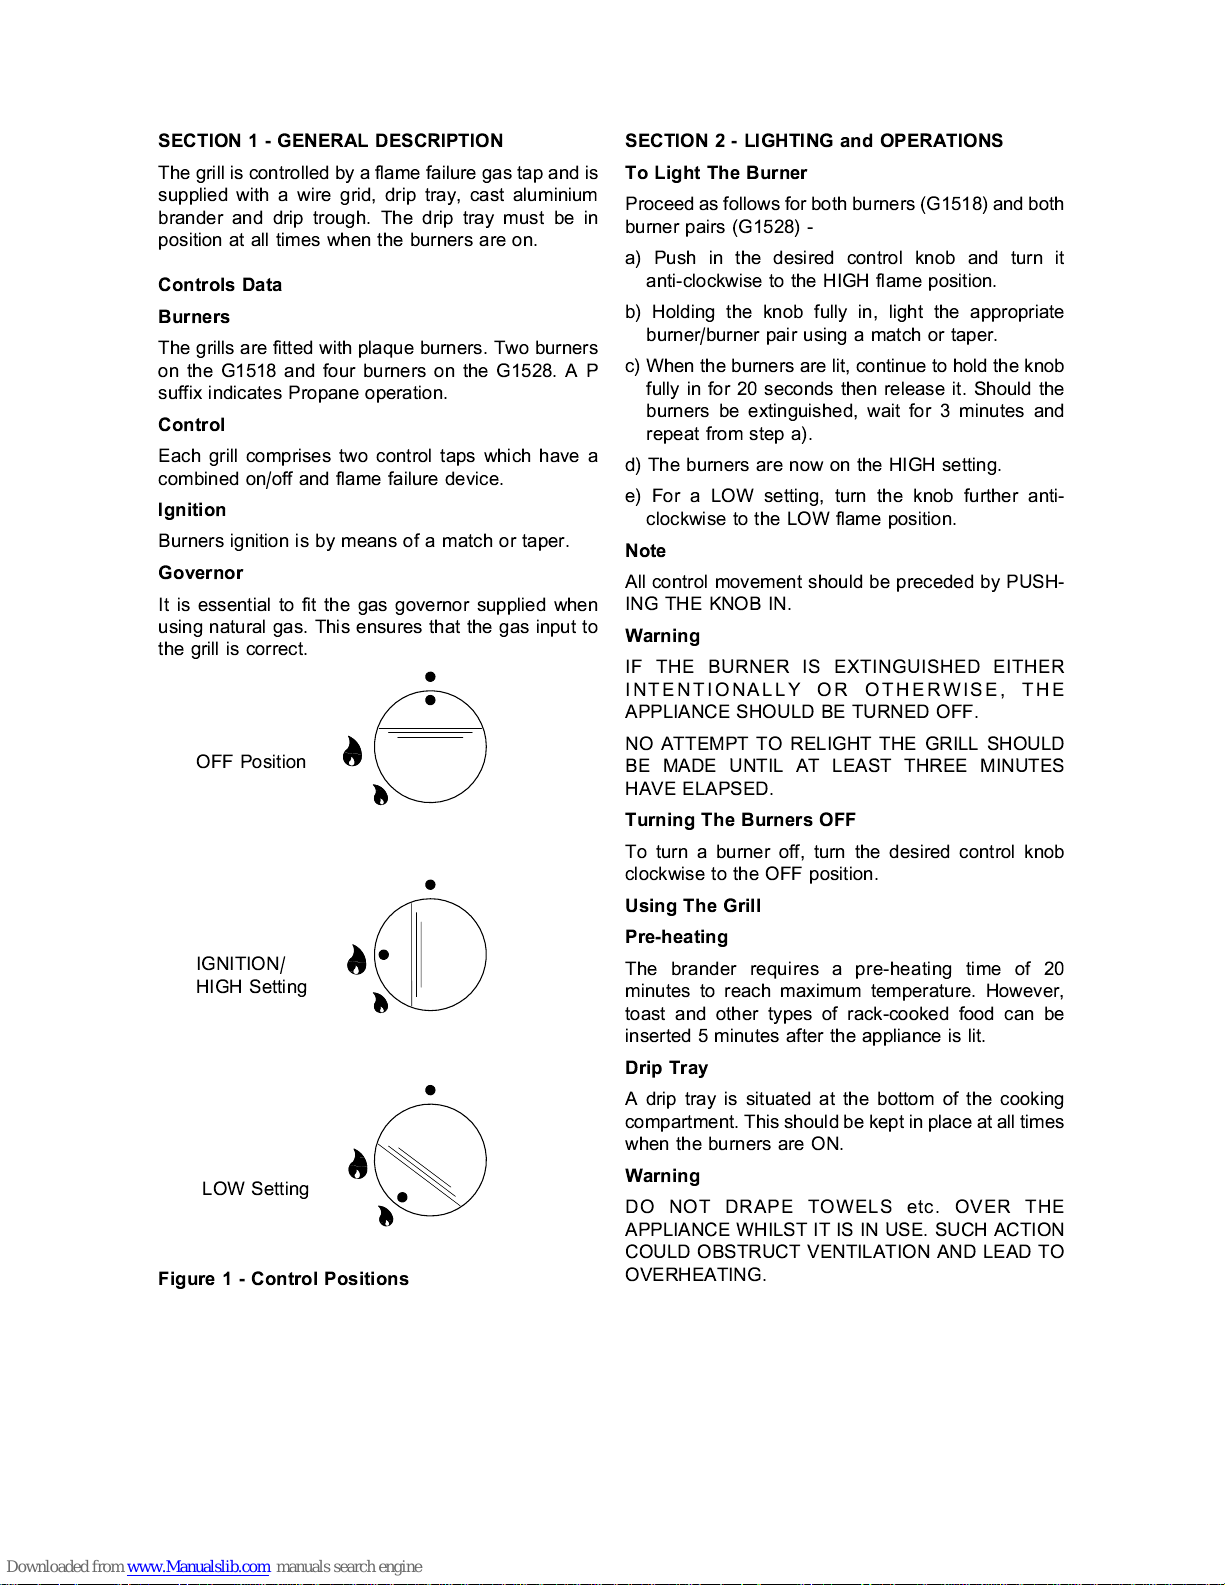
OFF Position
IGNITION/
HIGH Setting
LOW Setting
Figure 1 - Control Positions
SECTION 2 - LIGHTING and OPERATIONS
To Light The Burner
Proceed as follows for both burners (G1518) and both
burner pairs (G1528) -
a) Push in the desired control knob and turn it
anti-clockwise to the HIGH flame position.
b) Holding the knob fully in, light the appropriate
burner/burner pair using a match or taper.
c) When the burners are lit, continue to hold the knob
fully in for 20 seconds then release it. Should the
burners be extinguished, wait for 3 minutes and
repeat from step a).
d) The burners are now on the HIGH setting.
e) For a LOW setting, turn the knob further anti-
clockwise to the LOW flame position.
Note
All control movement should be preceded by PUSH-
ING THE KNOB IN.
Warning
IF THE BURNER IS EXTINGUISHED EITHER
INTENTIONALLY OR OTHERWISE, THE
APPLIANCE SHOULD BE TURNED OFF.
NO ATTEMPT TO RELIGHT THE GRILL SHOULD
BE MADE UNTIL AT LEAST THREE MINUTES
HAVE ELAPSED.
Turning The Burners OFF
To turn a burner off, turn the desired control knob
clockwise to the OFF position.
Using The Grill
Pre-heating
The brander requires a pre-heating time of 20
minutes to reach maximum temperature. However,
toast and other types of rack-cooked food can be
inserted 5 minutes after the appliance is lit.
Drip Tray
A drip tray is situated at the bottom of the cooking
compartment. This should be kept in place at all times
when the burners are ON.
Warning
DO NOT DRAPE TOWELS etc. OVER THE
APPLIANCE WHILST IT IS IN USE. SUCH ACTION
COULD OBSTRUCT VENTILATION AND LEAD TO
OVERHEATING.
Page 3

Location on the
Brander when
sloping
Rear
Rear
Rear
HAMBURGERS
2 3rd Centre
Food
Approx.
Cooking Time
(minutes)
Runner Position
from top using
Brander level
STEAK
(Rare)
11/2-3 2nd
STEAK
(Medium)
2-4 3rd or 4th
STEAK
(Well Done)
3-7 5th
Food
Approx.
Cooking Time
(minutes)
Runner Position
from top
SAUSAGES (25g)
2 3rd or 4th
SAUSAGES (56g)
3 3rd or 4th
BACON
11/
2
3rd
SECTION 3 - COOKING HINTS
GRILLING is a QUICK, SIMPLE and DIRECT method
of Cooking. Ideal for a wide and varied list of Menu
items, HEAT is transferred from the source in direct
rays, (radiation) on to the food requiring to be cooked.
TheseFoodstuffscanbeplacedonTRAYSor
alternatively, directly on the BRANDER.
Using The Brander Plate
Note
Steak cooking times are approximate, dependant
upon thickness and cut of meat. The shorter time
would, for instance, apply to thinner cuts of steak of
1
/2" (13mm) thickness. a thicker sirloin or rump steak
would take longer.
Using the Wire Grid
SECTION 4 - CLEANING and MAINTENANCE
Cleaning The Appliance
Warning
Before cleaning, turn off and allow to cool sufficiently.
The appliance must not be cleaned with a jet of water
and steam cleaned.
Daily Cleaning
Vitreous Enamel Surfaces
Wash thoroughly with warm soapy water.
Important Note
Do not use proprietary cleaners, especially those
which may have a high caustic content, on the
vitreous enamelled surfaces of this unit. This is
particularly important when the appliance is hot. Such
cleaners can cause serious damage or discolouration
to the enamel finish, and only a soap or detergent
solution should be used.
Aluminium Brander
The brander should be left under the full heat of the
grill. This will after a period, carbonize the spillage.
Brush off with a wire brush.
Wire Grid Shelf
Steep the grid in hot soapy water, rub with a pan
scrubber on stubborn stains.
Stainless Steel
Wash with warm soapy water. A mild detergent on a
cloth can be used for stubborn stains. Sides and drip
trays always rub along the grain, rinse with clean
water and dry with a clean cloth. The drip tray should
be cleaned out of all fat and debris before soaking in
hot soapy water. Rinse in clean water and dry with a
clean cloth.
Overhead Extraction Units
It is important that overhead extraction unit filters and
their respective drip trays are maintained in good
condition. Excessive fat deposits which collect are a
serious fire risk to underlying units as hot fat may drip
down and catch fire.
 Loading...