

Falcon FWS38DX, FWS60DX Installation, Operation And Maintenance Instructions
FALCON REFRIGERATED WINE STORAGE UNIT
Installation
Operation
and
Maintenance
Instructions
Refrigerated
Wine Storage Unit with
Sentry System™ Refrigeration Monitor
FWS38DX & FWS60DX
UNPACKING YOUR WINE STORAGE UNIT
Remove Packaging
Your wine storage unit has been packed for shipment with all
parts that could be damaged by movement securely fastened.
Before using, be sure all packing materials and tape have
been removed.
Important
Keep your carton packaging until your wine storage unit has
been thoroughly inspected and found to be in good condition. If there is damage, the packaging will be needed as
proof of damage in transit.
Note to Customer
This merchandise was carefully packed and thoroughly
inspected before leaving our plant. Responsibility for its safe
delivery was assumed by the retailer upon acceptance of the
shipment. Claims for loss or damage sustained in transit
must be made on the retailer as follows:
Exterior and Concealed Damage •
Any damage must be reported immediately to your retailer.
DO NOT RETURN DAMAGED MERCHANDISE TO THE
MANUFACTURER - FILE THE CLAIM WITH THE RETAILER.
Model
Dimensions (mm)
W D H
Weight
(kg)
Bottle
Capacity
Storage
Capacity
(Litre)
Temperature
Range
(°C)
Power
Supply
FWS38DX 375 600 870 54 24 85 4-18 230VAC/50Hz
FWS60DX 607 616 870 75 54 175 4-18 230VAC/50Hz
NOTE: This appliance is not intended for use by persons (including children) with reduced physical, sensory or mental
capabilities, or lack of experience and knowledge, unless they have been given supervision or instruction concerning
use of the appliance by a person responsible for their safety.
1

INSTALLING YOUR WINE STORAGE UNIT
Select Location
The proper location will ensure peak performance of your
appliance. Choose a location where the unit will be out of
direct sunlight and away from heat sources. Best performance will be maintained when installed within the following parameters:
Ideal Ambient Temperature Range
Built-In 18-26 °C
Free-Standing 18-32
Cabinet Clearance
Ventilation is required from the bottom front section of the
unit. Keep this area open and clear of any obstructions.
Leveling Legs
Adjustable legs at the front corners of the unit should be
set so the unit is firmly positioned on the floor and the front
is raised just enough so that the door closes easily when
opened about halfway.
Turn leveling legs clockwise to raise unit, counterclockwise
to lower it.
Electrical Connection
Use nominal 230 VAC, 50 Hz only. DO NOT USE AN
EXTENSION CORD.
°C
WARNING! THIS APPLIANCE MUST BE EARTHED. All
external wiring must comply with the IEE Regulations for
the Electrical Equipment of Buildings. Connections to the
electrical supply can be made with either a plug and socket
or be permanently wired via a double-pole switch.
The appliance is supplied with a 250VAC PVC (85 degrees
C) core cable (0.5mm=x2.5 metres long). Any replacement cable fitted must follow this specification. The unit
may be supplied with either a moulded or rewirable plug.
Should the plug not fit the socket at the installation site, it
should be removed and replaced with the correct type of
plug.
If a moulded plug is fitted which is not suitable, it must be
removed and disposed of. To avoid the risk of electrocution, a plug must not be left where a child may plug it into
a supply socket. It must not be used for any other appliance. A three pin plug to BS 1363 with a capacity of not
less than 13A must be used and fitted with a 13A fuse
“ASTA” apporved to BS 1363.
If you replace the fuse, the cover must be refitted. If the
cover is lost, the plug must not be used until a replacement
has been obtained from your supplier. The color of the
fuse cover is that of the insert in the base of the fuse recess
or elsewhere on the plug. Always state this color when
ordering a replacement cover.
Green/Yellow
(earth)
Blue (neutral)
Figure 1
Fuse (13A)
Brown (live)
If your appliance has a moulded plug, you do NOT have
to do the following assembly as shown in Figure 1. Appliances with moulded plugs are ready to use as is.
IMPORTANT: The wires should be connected to the terminals of the plug as follows:
Earth to the terminal marked E or coloured Green or •
Green/Yellow.
Neutral to the terminal marked N or coloured Black or •
Brown.
Live to the terminal marked L or coloured Red or •
Brown.
When wiring the plug, ensure that all strands of wire are retained in each terminal. The flexible main cable, plug and
socket must not be exposed to flue products or be allowed
to come in contact with a hot surface. The cable must not
be trapped or pulled taut when the appliance is pushed into
position.
THIS UNIT SHOULD NOT, UNDER ANY CIRCUMSTANCES,
BE UNEARTHED.
2
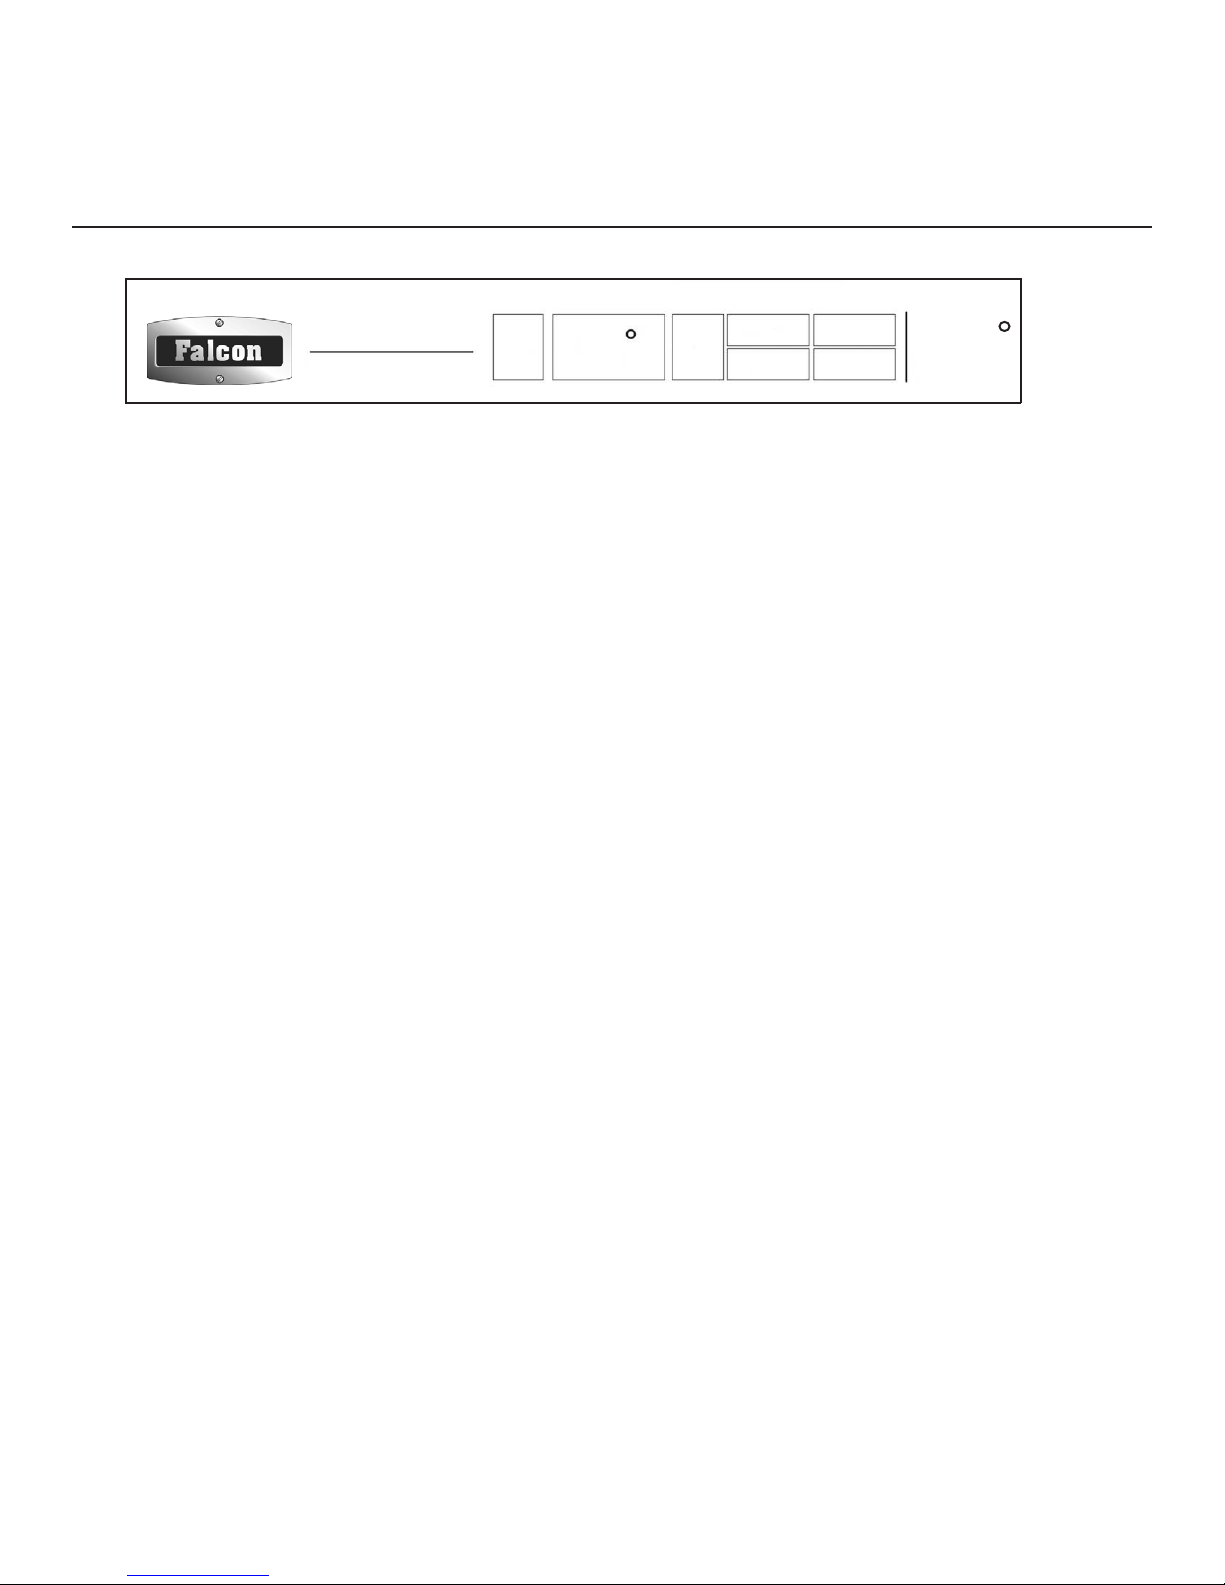
SENTRY SYSTEM™ REFRIGERATION MONITOR
ON
OFF
13
Start Your Appliance
Your appliance will start upon initial plug-in. The LED will
flash amber upon initial plug-in due to your unit being
powered-on at the factory to verify performance and then
powered-off. The Sentry System™ refrigeration monitor
senses a power outage has occurred and relays this information to you when you initially power-up your appliance.
This is normal and pressing the “ON/OFF” button will reset
this alarm function.
If your appliance’s control has been shut off (i.e., unit
plugged in, interior lights operate, display blank), unit must
be turned on. To turn on your appliance, push and hold
for five (5) seconds, the “ON/OFF” button located on the
display panel (see Figure 2).
Once loaded with wine bottles, allow at least 48 hours for
the unit to stabilize before making any adjustments to the
initial setting.
Set Your Temperature Mode
This product can display either Fahrenheit or Celsius. To
do so, press the “°F/C” button on the display panel.
Set the Controls
The available temperature range of the unit is from 4 to
18 degrees C. The temperature set point is initially set in
the factory at thirteen (13) degrees C. The temperature set
point can be lowered or raised by first pushing the “SET”
button on the display pad. A “SET” icon will be displayed.
Pushing either the “WARMER” or “COLDER” buttons located on the display pad will raise or lower the set temperature by one (1) degree C or F (depending on your setting).
As with any refrigeration product, there is a slight temperature variance at different locations within the cabinet.
Adjustable Temperature Control
The temperature control is fully adjustable from the low
single digits to the high teens. The range allows flexibility
of temperature preferences.
Set
Warmer
Colder
C
°F/C
Light
Sentry System™
Power Failure - Flashing Amber
High/Low Temp - Red
Press ON/OFF - Reset
Alarms OFF - Steady Amber
Figure 2
Interior Light and Switch
The interior light makes it easy to view your wine labels
and enhances the display of your collection. The light will
always come on when the door is opened.
Warning Alarms
Your wine storage unit has been fitted with a Sentry
System™ refrigeration monitor. This monitor will let you
know if your unit is not functioning properly for optimum
wine storage.
Door Ajar Alarm
If the door has been left open for over five (5) minutes, the
alarm will sound and the LED will flash green. This will
stop as soon as the door is closed.
High and Low Temperature
If your unit reaches temperatures outside normal operating
temperatures for your set point for more than one (1) hour,
an alarm will sound and the LED will flash red. This will
warn you that your wines have seen temperatures that may
not be conducive for long-term storage.
Power Failure
If your unit experiences a power failure, the LED will flash
amber until the alarm is reset.
Reset Alarms
Press the “ON/OFF” button for approximately one (1) second. This will reset all audible and display alarms.
Sabbath Mode
Your wine storage unit is equipped with a Sabbath Mode
feature. By activating this mode, you will be disabling all
displays, audible alarms and lights.
To activate Sabbath Mode, press and hold the “SET” button while pressing the “
°F/C” button four (4) times within
seven (7) seconds. To deactivate Sabbath Mode, repeat the
process. Sabbath Mode will automatically deactivate after
72 hours.
3
 Loading...