

Page 1

Continental Dual Fuel FSD
User’s Manual
&
Installation and Servicing Instructions
Continental-Ausfallsicherung Elektro-Gas-Herd
Benutzerhandbuch
und
Installations- und Wartungsanleitung
U108712 - 01
Page 2

English
Hotplate Burners 3
Wok Centre Ring 4
Wok Cooking 4
The Ovens 5
Storage 8
Cleaning your cooker 9
Moving your cooker 10
Troubleshooting 12
General Safety Instructions 13
Service and spares 15
Be safe
You need clean fresh air - so does your cooker.
Burner fl ames produce exhaust gases, heat and
moisture. Make sure that the kitchen is well
ventilated: keep natural ventilation holes open or
install a powered cooker hood that vents outside. If
you have several burners on or use the cooker for a
long time, open a window or turn on an extractor
fan. For more detail see the Installation Instructions.
We recommend you read the “General Safety
Instructions” section if you have not used a gas
cooker before.
We describe some basic guidelines on how to use a
gas cooker safely.
Installation 16
Conversion to LP Gas 22
Servicing 25
Circuit Diagram 29
Technical Data 31
Gas and Electricity on
Make sure that the gas supply is turned on and that
the cooker is wired in and switched on. The cooker
needs electricity.
Peculiar smells
When you fi rst use your cooker it may give off a
slight odour. This should stop after a little use.
Before using for the fi rst time, to dispel
manufacturing odours, turn the ovens to 240°C
and run for an hour.
Make sure the room is well ventilated to the
outside air, by opening windows or turning on a
cooker hood, for example.
2
Page 3
Hotplate Burners
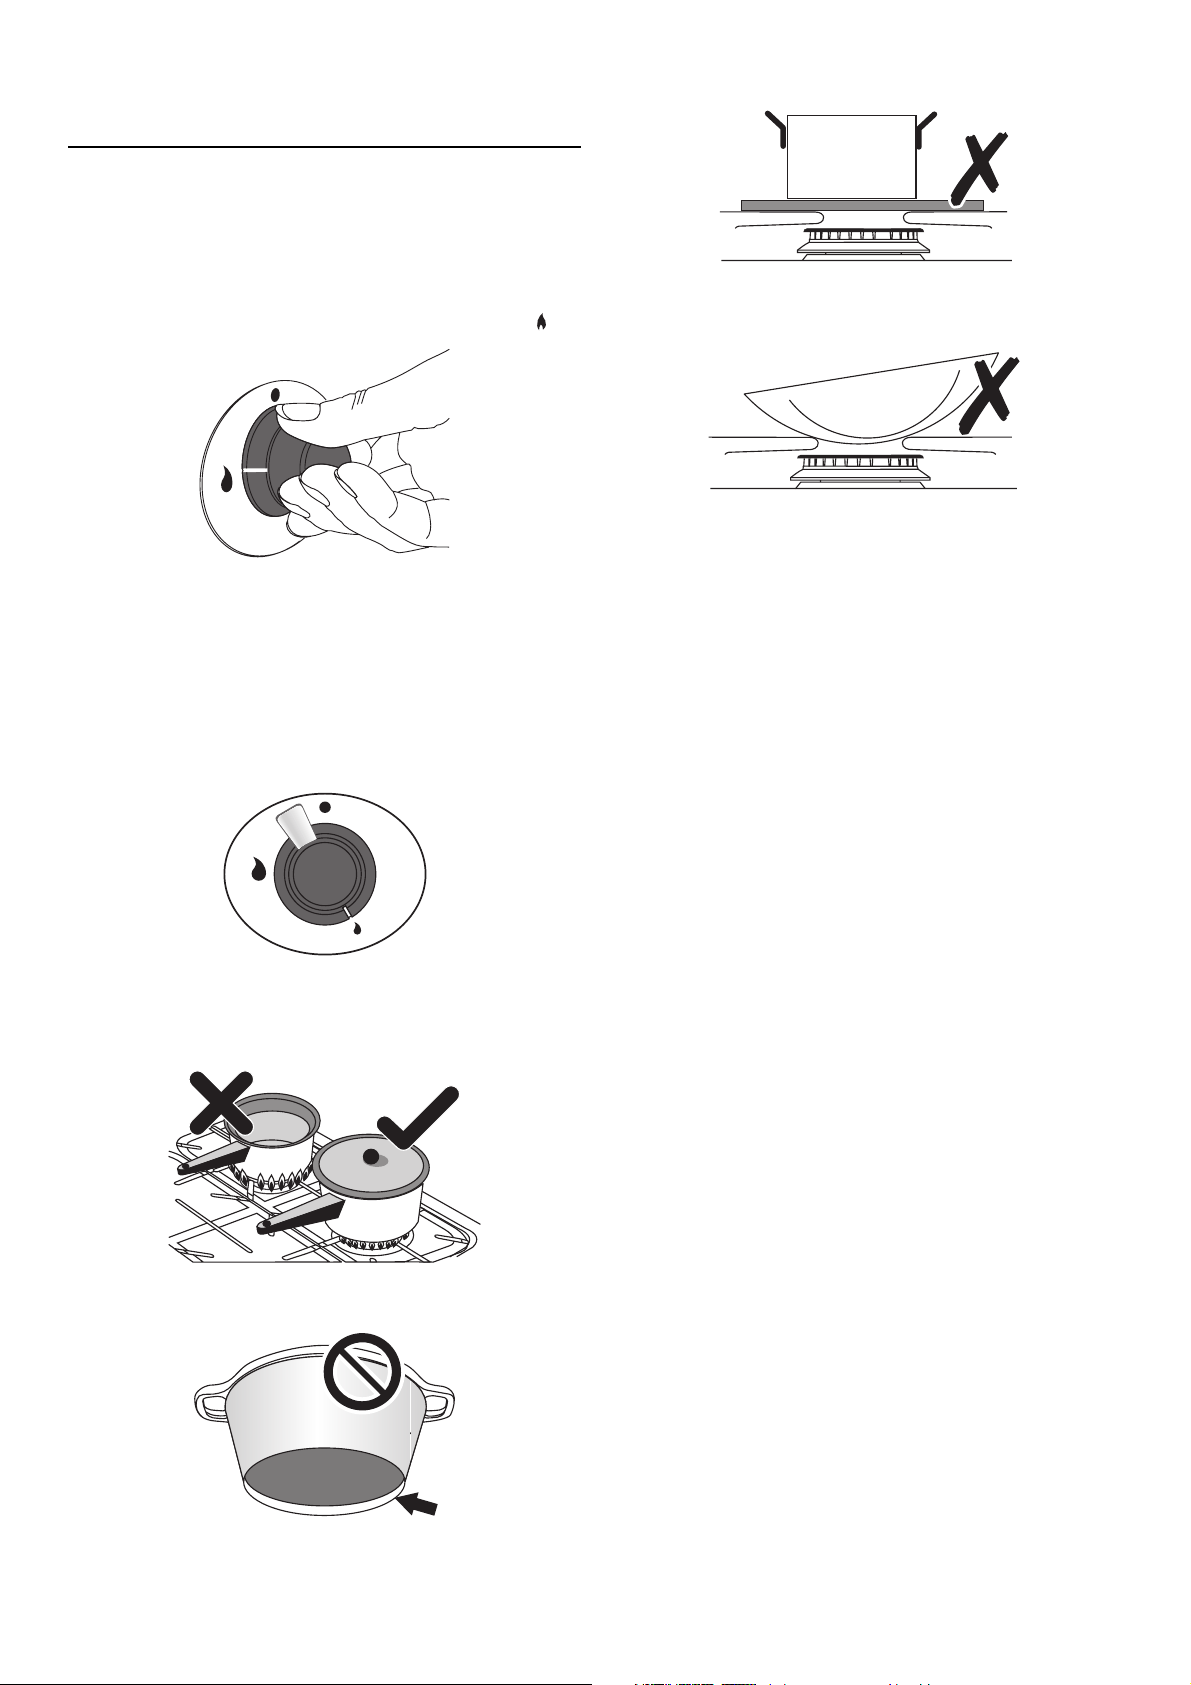
The drawing below each knob indicates which
burner that knob controls. There is a spark ignition
system that works when the knob is pressed in.
English
Each burner also has a special safety device that
stops the fl ow of gas if the fl ame goes out.
Push in and turn a knob to the large fl ame symbol (
Keep holding the knob pressed in to let the gas through
to the burner for few seconds. The igniter should spark
and light the gas.
If, when you let go of the control knob, the burner goes
out, the safety device has not held in. Turn the control
to the off position and wait one minute, then try again
this time holding in the control knob for slightly longer.
Adjust the fl ame height to suit by turning the knob.
).
Simmering aids, such as asbestos or mesh mats, are NOT
recommended. They will reduce burner performance
and could damage the pan supports.
Avoid using unstable and misshapen pans that may tilt
easily and pans with a very small base diameter e.g. milk
pans, single egg poachers.
Minimum pan sizes
The minimum pan diameter recommended is
120mm (about 43/4”) for the outer burners and
160mm (about 63/8”) for the centre burner.
When hotplate control knob is pressed in, sparks
will be made at every burner, this is normal.
If after lighting, a hotplate burner’s fl ame goes
out, turn it off and leave it for one minute before
relighting it.
On this cooker the low position is beyond high, not
between high and off . The small fl ame marks the ‘low
position’. Turn the knob towards it after the contents of
a pan have boiled.
Make sure fl ames are under the pans. Using a lid will
help the contents boil more quickly.
You can remove the burner head for cleaning; see
’Cleaning your cooker’.
You should wipe the top surface of the cooker
around the hotplate burners as soon as possible
after spills occur. Try to wipe them off while the
hotplate is still warm.
Note:
Use of aluminium pans may cause metallic marking
of the pan supports. This does not aff ect the
durability of the enamel and may be cleaned off
with a metal cleaner such as ‘Brasso’.
Pans and kettles with concave bases or down turned
base rims should not be used.
3
Page 4
English
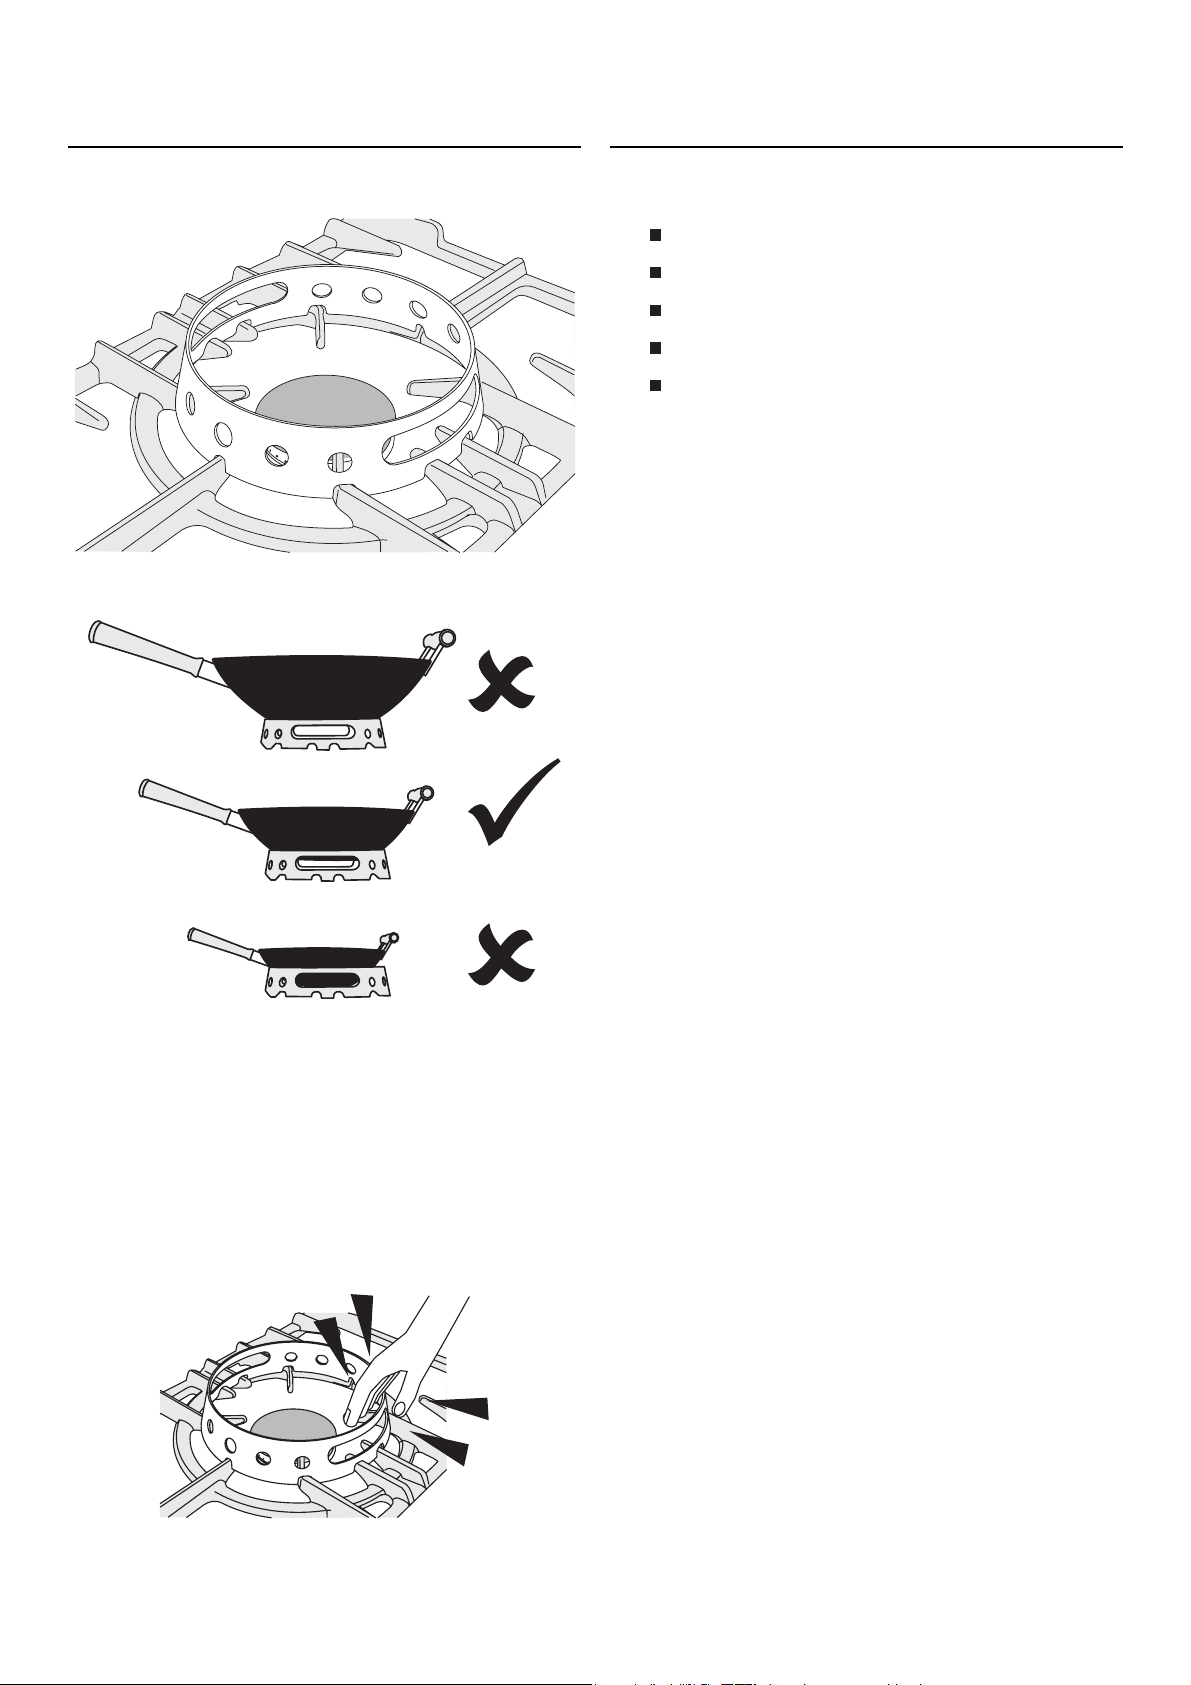
Wok Centre Ring
The Wok ring is designed fi t the centre burner. It will not
fi t any of the other burner pan supports
It should be located so that the cut-outs in the ring sit
directly on the projecting burner supports.
Wok Cooking
A Wok may be used for 5 traditional methods of
oriental cooking: -
Stir Frying
Shallow Frying
Deep Frying
Steaming
Braising
Stir frying has become the most familiar and
popular method of oriental cooking. The continual
manual process requires the addition of one food
item at a time with the relatively fast preparation
time off ering the benefi t of colour and nutrient
retention whilst retaining a crisp texture.
The other 4 types of Wok cooking do not require
constant stirring. These methods require a steadier
base for the utensil as the Wok contains very hot
water or oil. The Wok ring gives greater stability
when practising these methods of cooking - but
take care.
Woks vary very widely in size and shape. It’s important
that the Wok is securely held - but if the Wok is too big
or too small the ring will not support it properly.
In order for the Wok to heat properly it must be close to
the burner. For this reason we don’t recommend that
you use the Wok ring with a fl at bottomed wok.
When you fi t the ring, check that it is properly located
on the pan support fi ngers.
Make sure that it is stable and that the Wok is sitting
level in the ring.
The cradle will get very hot in use - allow plenty of time
for it to cool before you pick it up.
4
Page 5

The Ovens
During use the appliance becomes hot. Care should be taken to avoid touching the heating elements inside
the oven.
Before using for the fi rst time, to dispel manufacturing odours turn the ovens to 230°C and run for an hour. To
clear the smell make sure the room is well ventilated to the outside air, by opening windows or turning on a
cooker hood, for example
The Left Hand Oven The Right Hand Oven
English
The left hand oven is a Multi-function oven. As well as
the oven fan and fan element, it is fi tted with two extra
heating elements, one visible in the top of the oven
and the second under the oven base. Take care to avoid
touching the top element and element defl ector when
placing or removing items from the oven. For more
detail on this oven see the section ‘Multi-function oven’.
The two Multi-function oven controls, a function
selector and a temperature setting knob, are at the right
hand end of the control panel.
Turn the function selector
control to a cooking
function.
The fan in the right hand oven circulates hot air
continuously, which means faster more even
cooking.
The recommended cooking temperatures for a
fanned oven are generally lower than a non-fanned
oven.
The right hand fan oven control is on the right hand
side of the control panel.
Turn the oven temperature
knob to the temperature
you need.
The oven indicator light
will glow until the oven has
reached the temperature
you selected. It will then
cycle on and off during
cooking
Turn the oven
temperature knob to the
temperature you need.
The oven indicator
light will glow until the
oven has reached the
temperature you selected.
It will then cycle on and
off during cooking.
5
Page 6
English
Multi-function oven functions
The Multi-function oven has many varied uses. We
suggest you keep a careful eye on your cooking
until you are familiar with each function. Remember
- not all functions will be suitable for all food types.
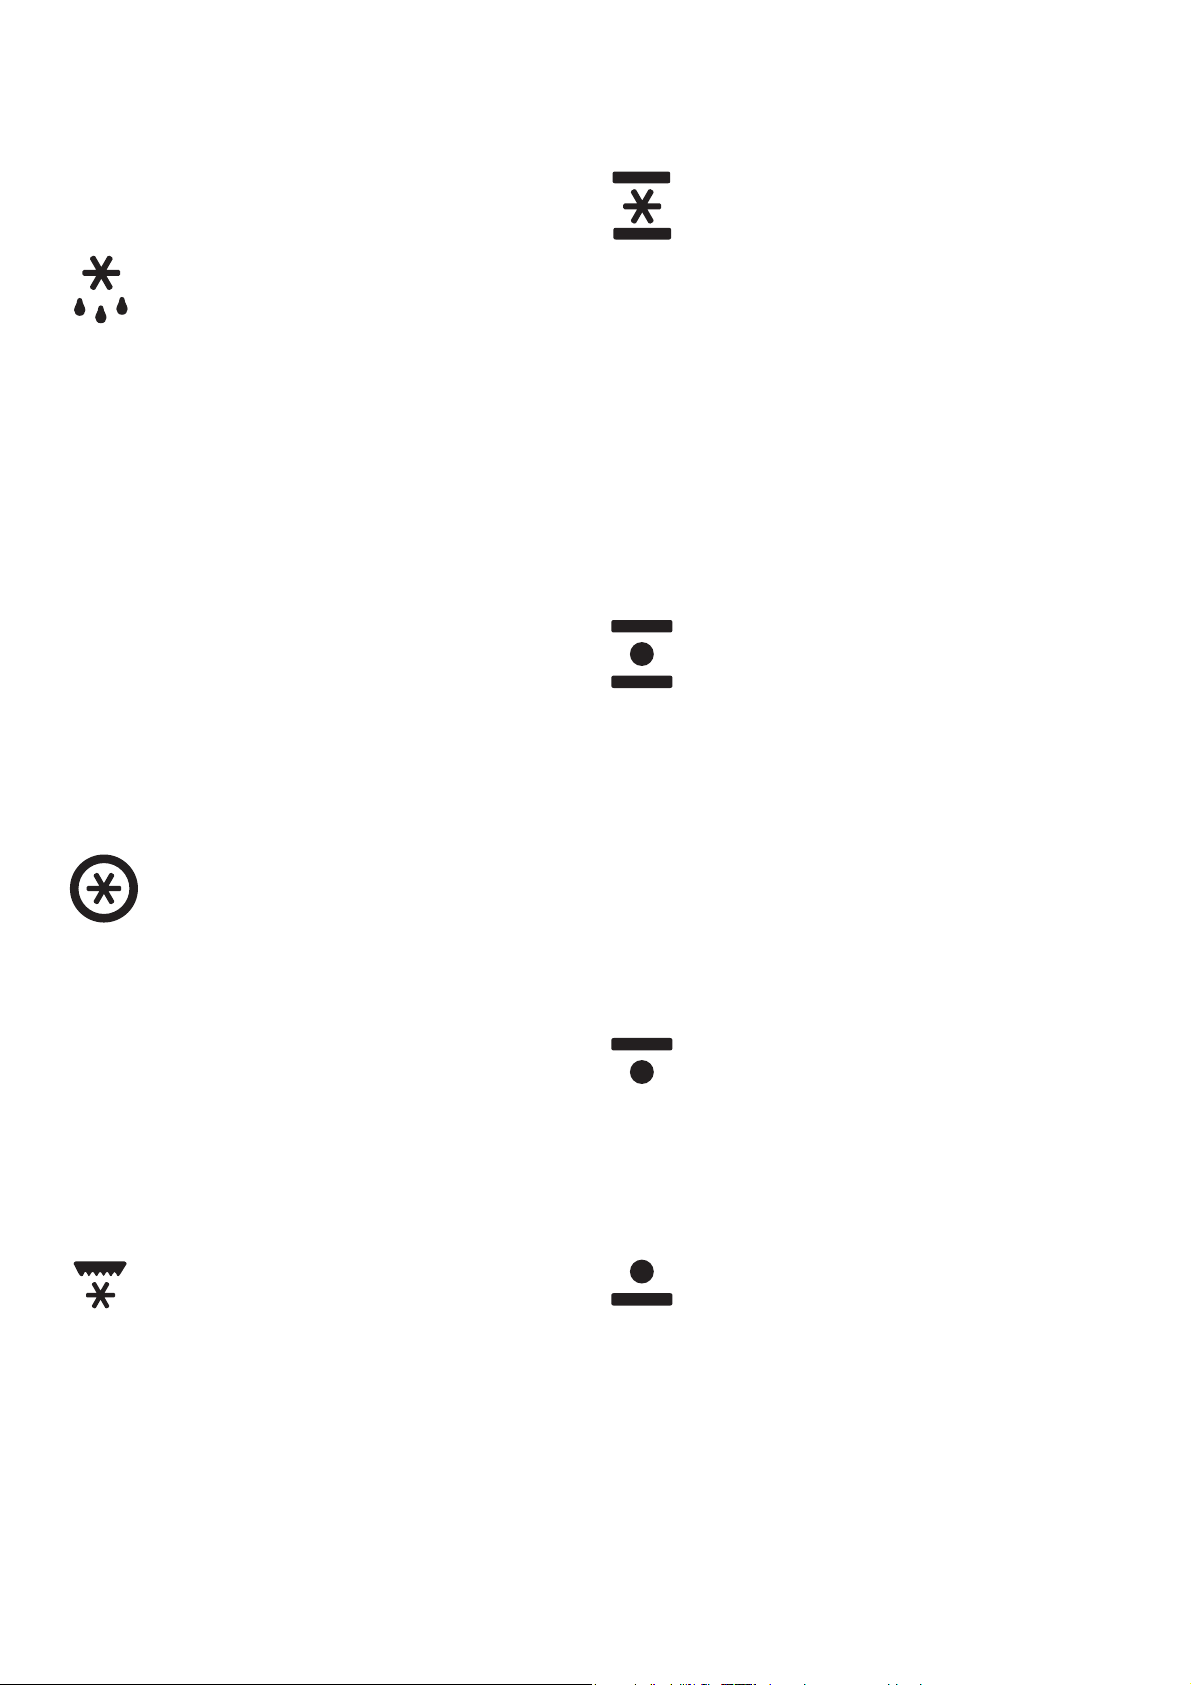
Defrost
This function operates the fan to circulate cold
air only. No heat is applied. This enables small items
such as desserts, cream cakes and pieces of meat,
fi sh and poultry to be defrosted.
Defrosting in this way speeds up the process and
protects the food from fl ies. Pieces of meat, fi sh and
poultry should be placed on a rack, over a tray to
catch any drips. Be sure to wash the rack and tray
after defrosting.
Defrost with the oven door closed.
Large items, such as whole chickens and
joints should not be defrosted in this way. We
recommend this be carried out in a refrigerator.
Defrosting should not be carried out in a warm
oven or when an adjoining oven is in use or still
warm.
Ensure that dairy foods, meat and poultry are
completely defrosted before cooking.
Fan oven
This function operates the fan and the heating
element around it. An even heat is produced
throughout the oven, allowing you to cook large
amounts quickly.
Fan oven cooking is particularly suitable for baking
on several shelves at one time and is a good ‘allround’ function. It may be necessary to reduce the
temperature by approximately 10°C for recipes
previously cooked in a conventional oven.
If you wish to pre-heat the oven, wait until the
indicator light has gone out before inserting the
food.
for normal grilling. Pre-heat this function before
cooking.
Fan assisted oven
This function operates the fan, circulating
air heated by the elements at the top and the
base of the oven. The combination of fan and
conventional cooking (top and base heat) makes
this function ideal for cooking large items that need
thorough cooking, such as a large meat roast. It is
also possible to bake on two shelves at one time,
although they will need to be swapped over during
the cooking time, as the heat at the top of the
oven is greater than at the base, when using this
function.
This is a fast intensive form of cooking; keep an
eye on the food cooking until you have become
accustomed to this function.
Conventional oven (top and base
heat)
This function combines the heat from the top and
base elements. It is particularly suitable for roasting
and baking pastry, cakes and biscuits. Food cooked
on the top shelf will brown and crisp faster than on
the lower shelf, because the heat is greater at the
top of the oven than at the base, as in ‘Fan assisted
oven’ function. Similar items being cooked will
need to be swapped around for even cooking. This
means that foods requiring diff erent temperatures
can be cooked together, using the cooler zone in
the lower half of the oven and hotter area to the
top.
Browning element
This function uses the element in the top
of the oven only. It is a useful function for the
browning or fi nishing of pasta dishes, vegetables in
sauce and lasagne, the item to be browned being
already hot before switching to the top element.
Fanned grilling in the oven
This function operates the fan whilst the top
element is on. It produces a more even, less fi erce
heat than a conventional grill. For best results, place
the food to be grilled, on the grid in the deluxe
oven shelf. Thick pieces of meat or fi sh are ideal
for grilling in this way, as the circulated air reduces
the fi erceness of the heat from the grill. The oven
door should be kept closed whilst grilling is in
progress, so saving energy. You will also fi nd that
the food needs to be watched and turned less than
Base heat
This function uses the base element only. It
will crisp up your pizza or quiche base or fi nish off
cooking the base of a pastry case on a lower shelf.
It is also a gentle heat, good for slow cooking of
casseroles in the middle of the oven or for plate
warming.
The Browning and Base heat functions are useful
additions to your oven, giving you fl exibility to
fi nish off items to perfection. With use, you will
soon realise how these functions can combine to
extend your cooking skills.
6
Page 7
English
The Right Hand Oven
The fan in the right hand oven circulates hot air
continuously, which means faster more even
cooking.
The recommended cooking temperatures for a
fanned oven are generally lower than a non-fanned
oven.
Both Ovens
Before using for the fi rst time, to dispel
manufacturing odours turn the ovens to 230°C
and run for an hour. To clear the smell make sure
the room is well ventilated to the outside air, by
opening windows or turning on a cooker hood, for
example.
Please remember that all cookers vary temperatures in your new Falcon ovens may diff er
to those in your previous cooker.
The wire shelves should always be pushed fi rmly to
the back of the oven.
Baking trays meat tins etcetera should be placed
level centrally on the oven’s wire shelves. Keep all
trays and containers away from the sides of the
oven, as overbrowning of the food may occur.
For even browning, the maximum recommended
size of a baking tray is 340mm by 340mm.
Steam
When cooking foods with high water content (e.g.
oven chips) there may be some steam visible at the
grille at the rear of the hotplate. This is perfectly
normal.
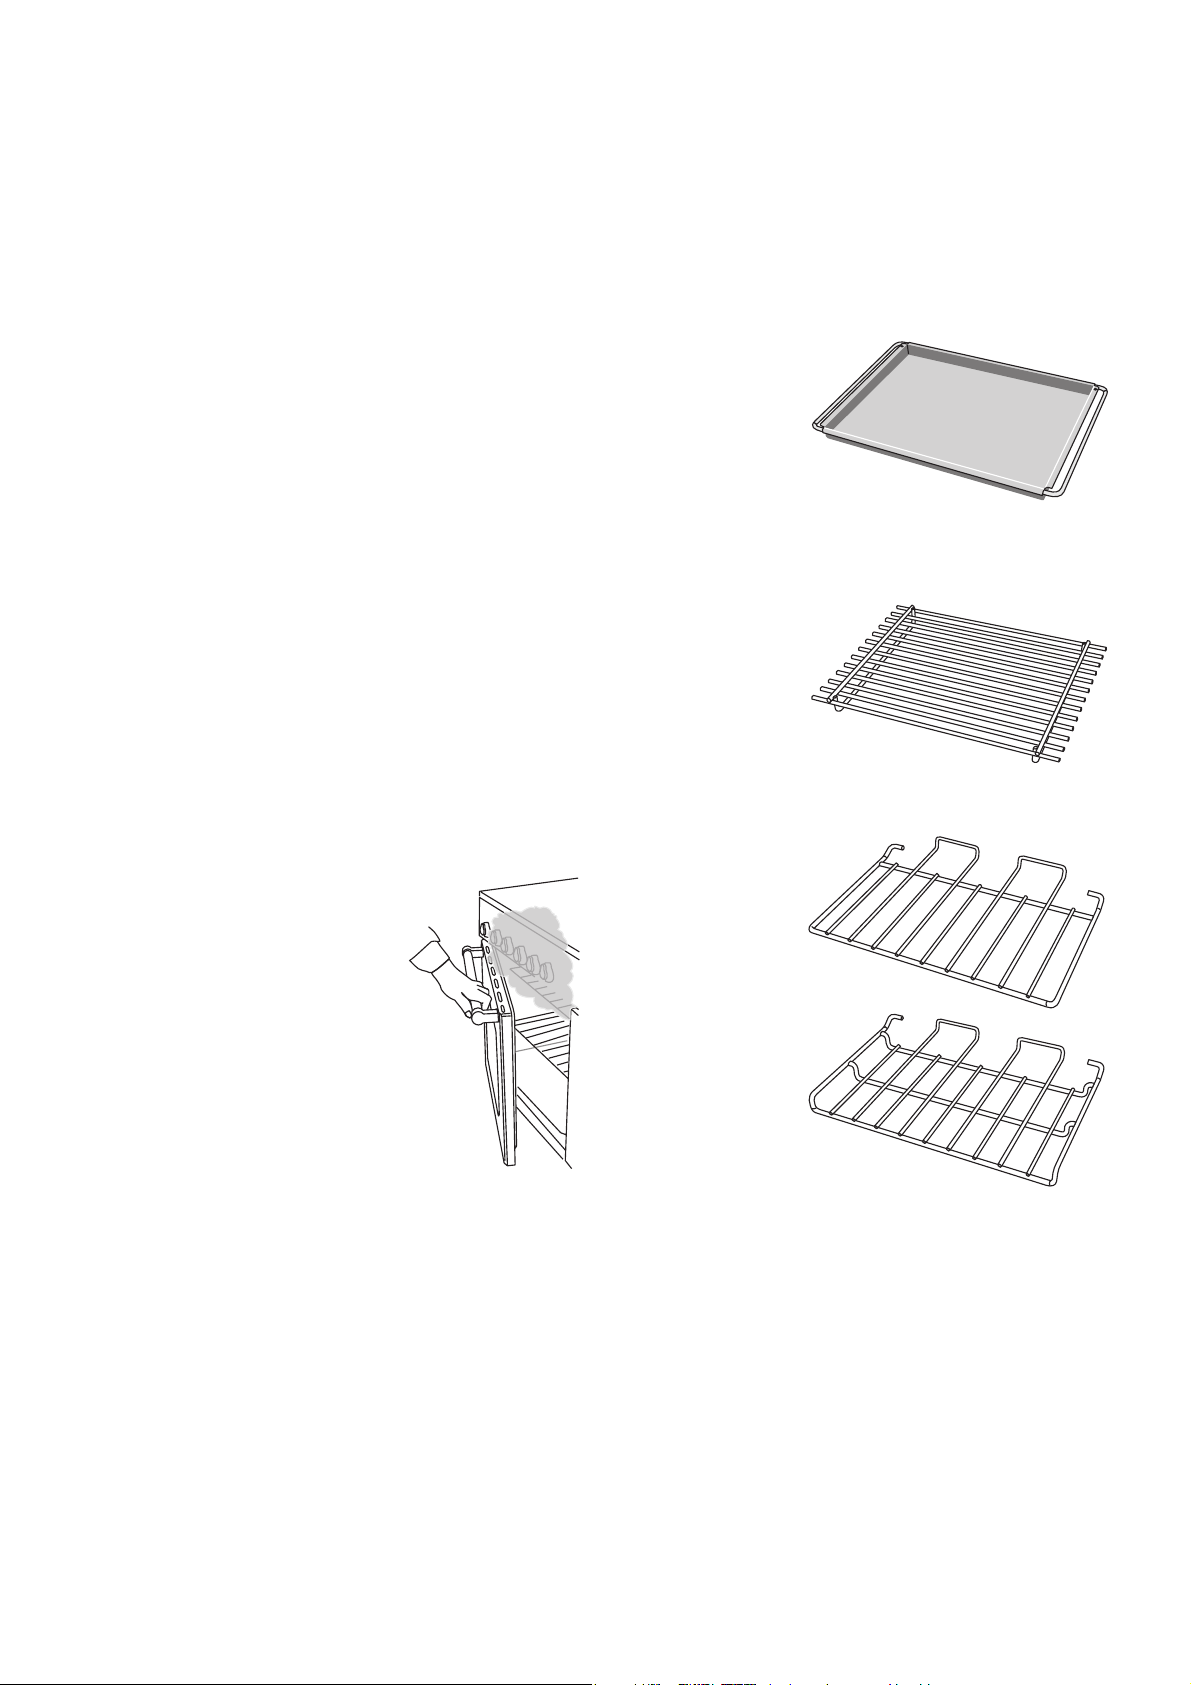
Oven shelves
The cooker is supplied with a deluxe oven tray.
A deluxe oven tray.
The deluxe oven tray has a support grid or trivet
so that it can be used for grilling as well as normal
oven cooking.
Deluxe oven tray trivet.
Each oven is also supplied with two diff erent
shelves.
Cooking high moisture content
foods can create a ‘steam burst’,
when the oven door is opened.
When opening the oven stand
well back and allow any steam
to disperse.
When the oven is on, don’t
leave the door open for longer
than necessary, otherwise the
knobs may get very hot.
Always leave a ‘fi ngers width’
between dishes on the same
shelf; this allows the heat to circulate freely around
them.
The Cook & Clean oven liners (see Cleaning your
cooker) work better when fat splashes are avoided.
Cover meat when cooking.
To reduce fat splashing when you add vegetables
to hot fat around a roast, dry them thoroughly or
brush lightly with cooking oil.
If you want to brown the base of a pastry dish,
preheat a baking tray for 15 minutes before placing
the dish in the centre of the tray.
A fl at shelf
And a drop shelf.
The drop shelf increases the possibilities for oven
shelf spacing.
The deluxe tray slides in and out easily - take care
when pulling it forward that it does not become
unstable or slide out of the grooves in the side of
the oven.
The other oven shelves have an end stop and so
cannot be accidental pulled out; but they can be
easily removed and refi tted.
Where dishes may boil and spill over during
cooking, place them on a baking tray.
7
Page 8

English
Pull the shelf forward
until the back of the
shelf is stopped by the
shelf stop bumps in the
oven sides.
Lift up the front of the
shelf so the back of the
shelf will pass under the
shelf stop and then pull
the shelf forward.
To refi t the shelf, line up the shelf with a groove
in the oven side and push the shelf back until the
ends hit the shelf stop. Lift up the front so the shelf
ends clear the shelf stops, and then lower the front
so that the shelf is level and push it fully back.
Storage
The bottom drawer is for storing oven trays and
other cooking utensils.
It can get very warm so don’t store anything in it
that may melt or catch fi re.
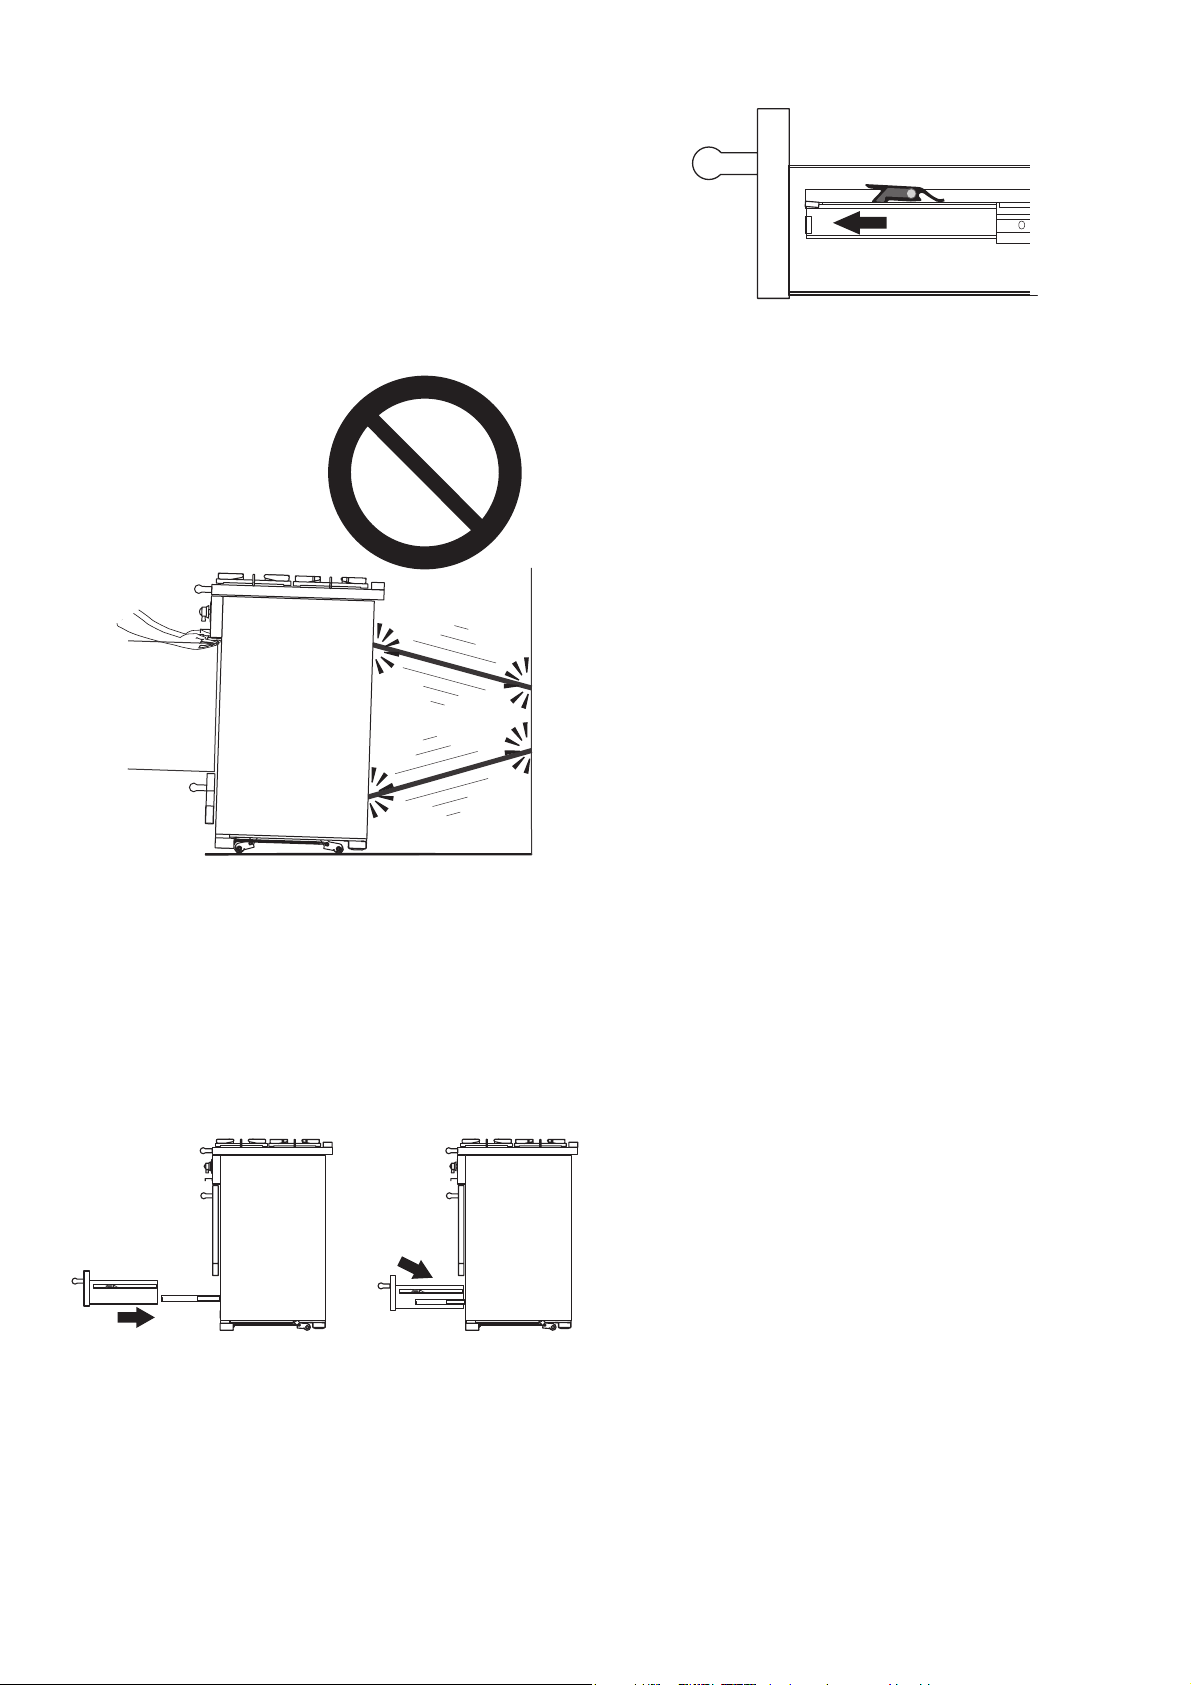
The drawer can be removed completely for
cleaning etc.
To remove the drawer
Pull the drawer forward. Lift up the ends of the
plastic clips (one each side) to release the catches
holding the drawer to the side runners and at the
same time pull the drawer forward and away from
the side runners.
For safety’s sake push the drawer runners back out
of the way.
To refit the draw
To replace the drawer in the cooker, pull the side
rails fully out.
Carefully move the drawer back between the rails
and rest it on the side rails.
At each side hold the
front of the drawer
and pull the side
rail forward so that
the clips click into
position holding the
drawer to the side
rails
8
Page 9
English
Cleaning your cooker
Before thorough cleaning, isolate from the
electricity supply. Remember to switch on the
electricity supply before use.
Never use paint solvents, washing soda, caustic
cleaners, biological powders, bleach, chlorine
based bleach cleaners, coarse abrasives or salt.
Don’t mix diff erent cleaning products - they may
react together with hazardous results. Do not
use a steam cleaner on your cooker
If you want to move your cooker for cleaning, see
the section called ‘Moving your cooker’.
All parts of the cooker can be cleaned with hot
soapy water - but take care that no surplus water
seeps into the appliance.
Stainless Steel Hob
Lift away pots or pans from hob. Remove pan
supports from spillage area and carefully place in a
sink of warm soapy water. Wipe loose debris from
hob.
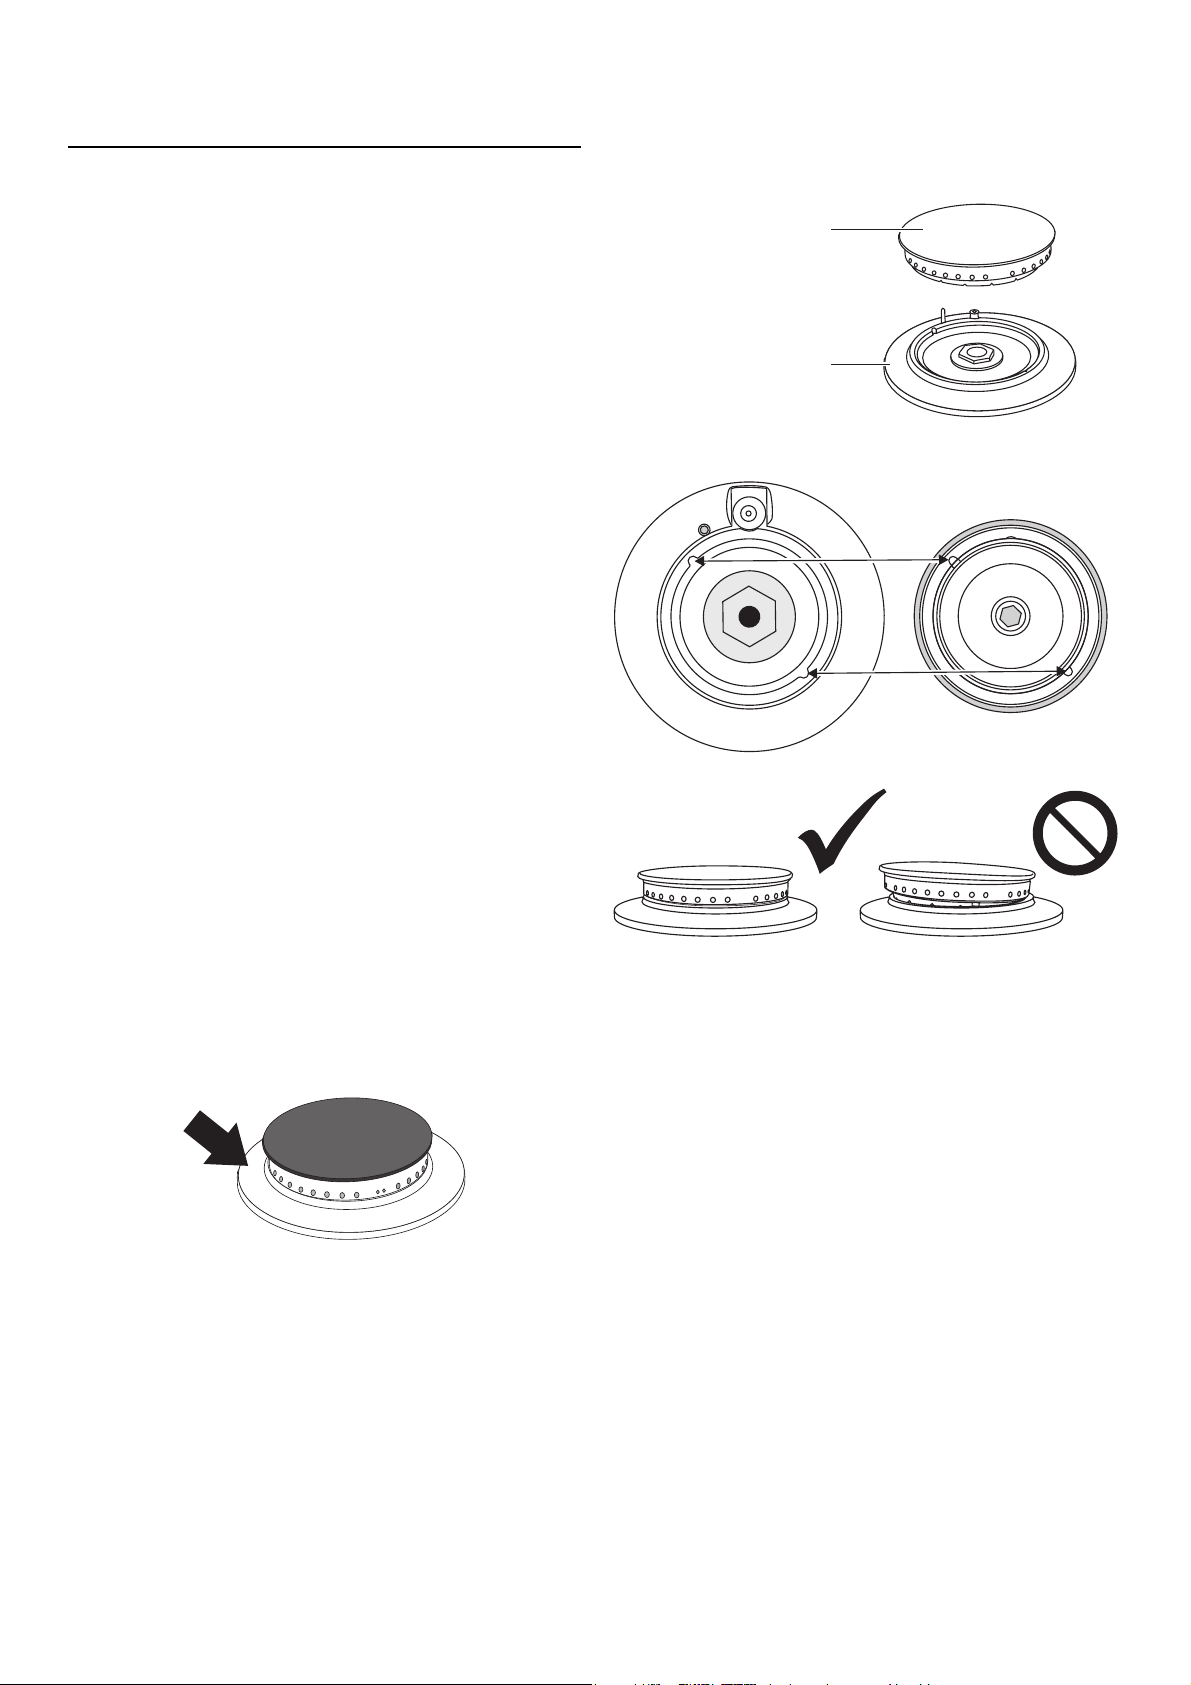
The burner heads and caps can be removed for
cleaning. Make sure they are absolutely dry before
replacing.
Burner head
Burner Base
When fi tting burner head, ensure this locates
properly within the base.
Avoid using any abrasive cleaners including
cream cleaners, e.g. Cif, on brushed Stainless Steel
surfaces. For best results use a liquid detergent e.g.
Domestos Multi Surface Cleaner.
Rinse with cold water and thoroughly dry with a
clean, soft cloth. Ensure all parts are dry before
repositioning.
Hotplate burners
The large aluminium alloy rings around the burners
will require regular cleaning to maintain a good
condition, preferably after each use and whilst they
are still warm.
Should these rings become marked please use the
following cleaning method:
1. Remove food deposits gently using a soft damp
cloth and Astonish or Cif Cream Cleaner
2. Rinse with a clean soft cloth and dry.
base of cook top burner bottom of burner head
Check burner ports are not blocked. If blockage
occurs, remove stubborn particles using a piece of
fuse wire.
Control Panel and Oven Doors
For best results liquid detergents should be used.
The control panel and control knobs should only
be cleaned with a soft cloth wrung out in clean
hot soapy water - but take care that no surplus
water seeps into the appliance. Wipe with a clean
dampened cloth then polish with a dry cloth. The
oven doors should only be cleaned with a soft cloth
wrung out in clean hot soapy water.
Cleaning Brass Components
Uncoated natural brass is used as part of the
authentic fi nish and may tarnish with age.
Be careful not to disturb the ignition electrode or
hotplate burner safety device probe.
To regain a polished fi nish, these areas should be
cleaned using a proprietary cleaner such as Brasso.
Stubborn marks on the aluminium burner rings can
be removed using a similar cleaning material. This
will also restore the polished fi nish.
9
Page 10
English
The Ovens
To avoid damage to the interior enamel, DO NOT
line the base of the oven with aluminium cooking
foil.
The ovens have panels that have been coated with
a special enamel that partly cleans itself. This does
not stop all marks on the lining, but helps to reduce
the amount of manual cleaning needed.
The Cook & Clean panels work better above
200°C. If you do most of your cooking below this
temperature, occasionally remove the panels and
wipe with a lint free cloth and hot soapy water.
The panels should then be dried and replaced
and the oven heated at 200°C for about one
hour. This will ensure the Cook & Clean panels are
working eff ectively.
Don’t use steel wool (Brillo), scourers or any other
materials that will scratch the surface. Don’t use
oven cleaning pads.
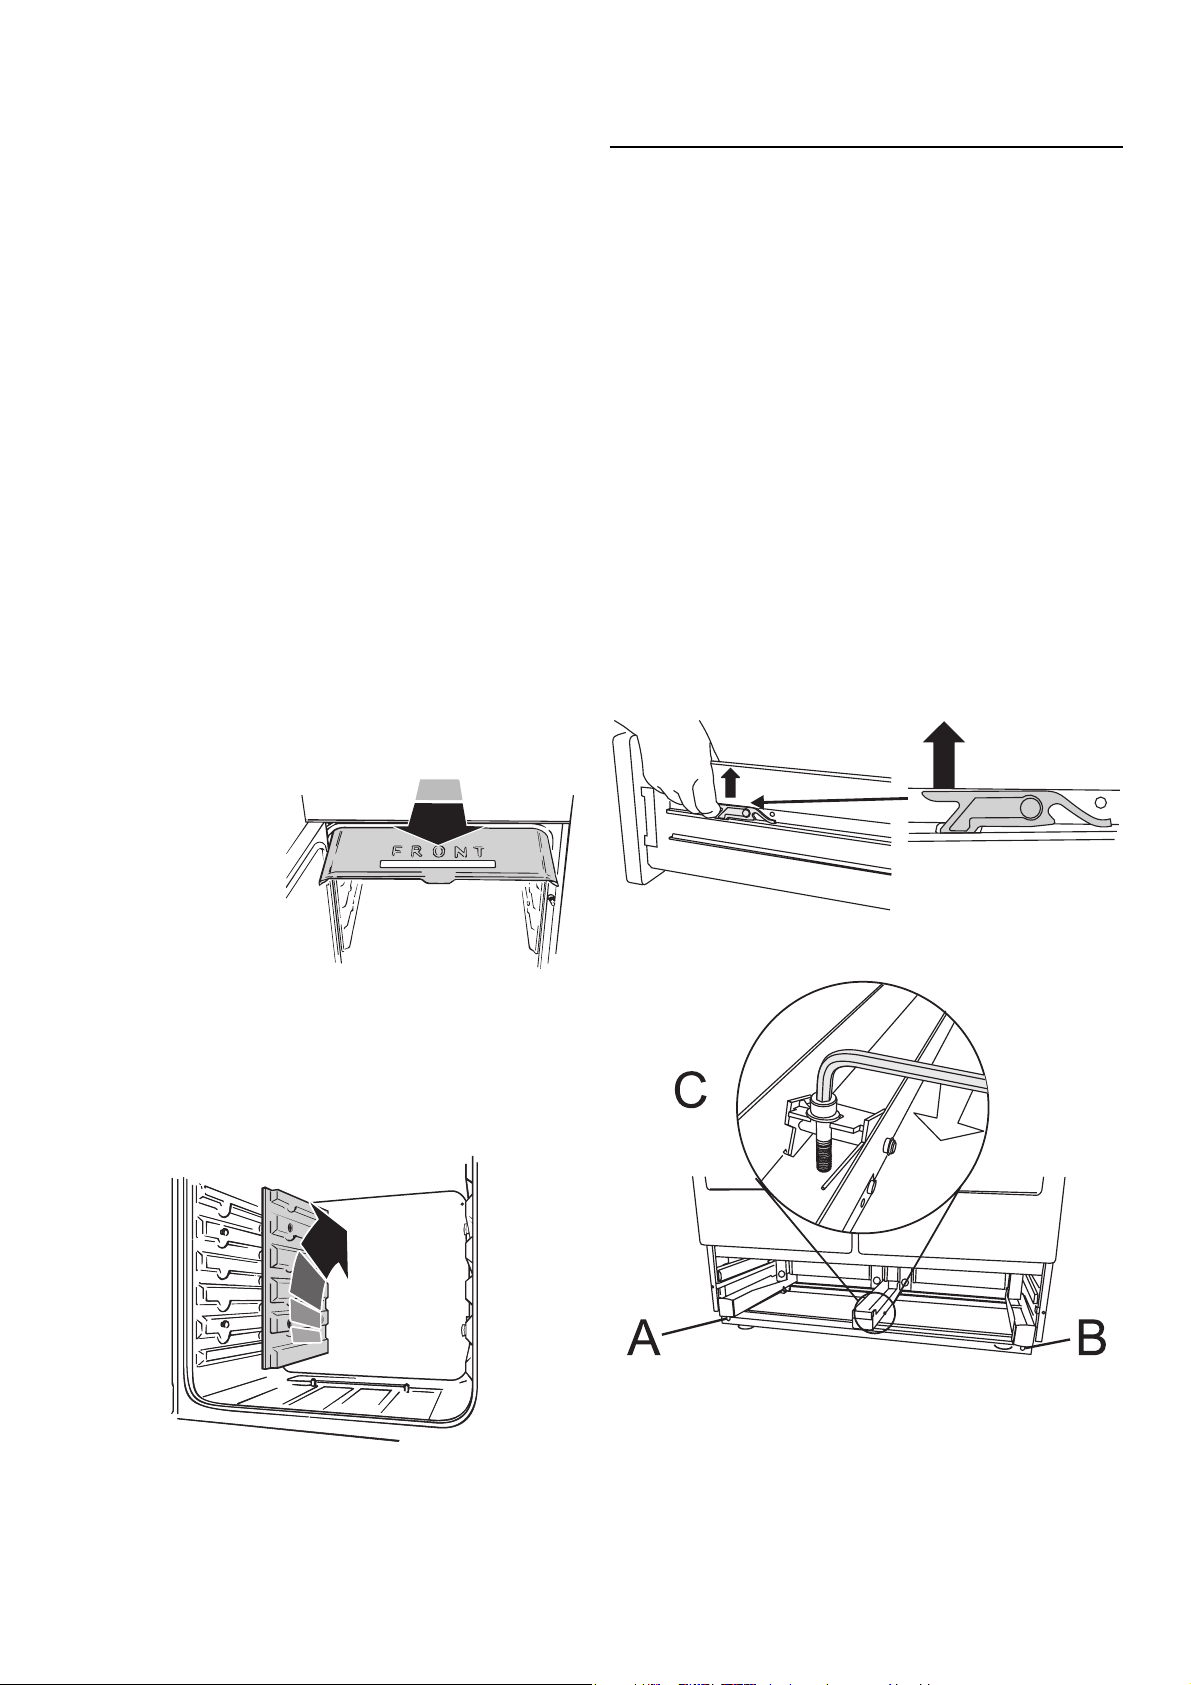
Removing the Oven Linings
Some of the lining panels can be removed for
cleaning and for cleaning behind. Remove the
shelves fi rst.
Moving your cooker
Switch off the electricity supply.
The cooker is heavy; two people may be required
to move it.
The cooker is fi tted with one roller at the front and
two at the back. There are also two screws down
levelling feet at the front.
The front roller, designed for moving the cooker,
can be wound down. The levelling tool that
controls this roller should be in the storage drawer
compartment. If you cannot fi nd the levelling
tool, contact your installer. See the start of the
‘Installation’ section of these instructions where
they should have entered their details.
To remove the drawer
Pull the drawer forward. Lift up the ends of the
plastic clips (one each side) to release the catches
holding the drawer to the side runners and at the
same time pull the drawer forward and away from
the side runners.
On some models the
right hand fanned
oven has a removable
oven roof - if fi tted
slide the roof liner
forward and remove.
The side panels of either oven can be removed.
Each side of the oven is fi xed with four fi xing
screws. You don’t have to remove the screws to
remove the oven linings. Lift each side panel
upwards and they will slide off the screws. Then pull
them forwards.
For safety’s sake push the drawer runners back out
of the way.
A left rear roller, B right rear roller, C centre roller
Locate the Allen key tool as shown.
Once the linings are removed, the oven enamel
interior can be cleaned.
When replacing the linings fi t the side linings fi rst.
Turn the levelling tool clockwise, two full (180°)
turns. It will be stiff . The front of the oven will rise
slightly as the roller drops down.
10
Page 11
Open both the oven doors so that you can get a
good grip on the bottom of the fascia panel as you
move the oven.
Do not move the oven by pulling the handrail,
door handles or knobs.
Move the oven a bit at a time, checking behind it
to make sure the gas hose is not caught. Make sure
both electricity and gas cables have suffi cient slack
to move the cooker forward as you go along.
English
At each side hold the front of the drawer and pull
the side rail forward so that the clips click into
position holding the drawer to the side rails.
If a stability chain is fi tted, release it as you ease
the cooker out.
When you replace the cooker, wind it down off the
rollers by turning the levelling tool anti-clockwise.
This is important. It will stop the cooker moving
accidentally, while in use.
To refit the draw
To replace the drawer in the cooker, pull the side
rails fully out.
Carefully move the drawer back between the rails
and rest it on the side rails.
11
Page 12

English
Troubleshooting
Steam is coming from the oven
When cooking foods with a high water content (e.g.
oven chips) there may be some steam visible at the
rear grille. Take care when opening the oven door,
as there may be a momentary puff of steam when
the oven door is opened. Stand well back and allow
any steam to disperse.
The oven fan is noisy
The note of the oven fan may change as the oven
heats up - this is perfectly normal.
The knobs get hot when I use the oven, can I avoid
this?
Yes, this is caused by heat rising from the oven, and
heating them up. Don’t leave the oven door open.
If there is an installation problem and I don’t get my
original installer to come back to fix it who pays?
You do. Service organisations will charge for their
call outs if they are correcting work carried out by
your original installer. It’s in your interest to track
down your original installer.
Current Operated Earth Leakage Breakers
Where the cooker installation is protected by a
30-milliamp sensitivity residual current device
(RCD), the combined use of your cooker and other
domestic appliances may occasionally cause
nuisance tripping. In these instances the cooker
circuit may need to be protected by fi tting 100mA
device. This work should be carried out by a
qualifi ed electrician.
Food is cooking too slowly, too quickly, or burning
Cooking times may diff er from your previous oven.
Individual tastes may require the temperature to be
altered either way, to get the results you want. Try
cooking at a diff erent temperature setting.
The oven is not cooking evenly
Do not use a tin or baking tray larger than 340mm x
340mm.
If you are cooking a large item, be prepared to turn
it round during cooking.
If two shelves are used, check that space has been
left for the heat to circulate. When a baking tray is
put into the oven, make sure it is placed centrally
on the shelf.
Check that the door seal is not damaged and that
the door catch is adjusted so that the door is held
fi rmly against the seal.
A dish of water when placed on the shelf should be
the same depth all over. (For example, if it is deeper
at the back, then the back of the cooker should be
raised up or the front lowered). If the cooker is not
level arrange for your supplier to level it for you.
Oven temperature getting hotter as the cooker gets
older
If turning the knob down has not worked or only
worked for a short time then you may need a
new thermostat. This should be fi tted by a service
person.
Hotplate ignition or hotplate burners faulty
Is the power on?
Are the sparker (ignition electrode) or burner slots
blocked by debris?
Are the burner caps correctly located?
Hotplate burners will not light
If only one or all the hotplate burners will not
light, make sure that the parts have been replaced
correctly after wiping or removing for cleaning.
Check that there is not a problem with your gas
supply. You can do this by making sure that other
gas appliances you may have are working.
12
Do the burners spark when you push in the control
knob? If not, check the power is on.
Page 13

General Safety Instructions
English
In the UK:-
The hotplate must be installed by a CORGI
registered engineer.
In the Republic of Ireland:-
The installation must be carried out by a
Competent Person.
The installation must be in accordance with the
installation instructions and comply with the
relevant regulations and also the local gas and
electricity supply companies’ requirements
If you smell gas
Don’t turn electric switches on or off.
Don’t smoke
Don’t use naked flames
Do turn off the gas at the meter or cylinder
Do open doors and windows to get rid of the gas
Call your gas supplier.
If you are using natural gas in the UK ring British
Gas - Trans Co on
0800 111 999
This appliance is designed for domestic cooking
only. Use for any other purpose could invalidate any
warranty or liability claim.
The use of a gas cooking appliance results in the
production of heat and moisture in the room in
which it is used. Ensure that the kitchen is well
ventilated: keep natural ventilation holes open or
install a mechanical ventilation device, (mechanical
extractor hood).
Prolonged intensive use may call for additional
ventilation, for example opening a window. Use
extractor fans or hoods when fi tted.
The cooker should be serviced by a qualifi ed service
engineer and only approved spare parts used. Have
the installer show you the location of the cooker
control switch. Mark it for easy reference. Always
allow the cooker to cool and then switch off at
the mains and before cleaning or carrying out any
maintenance work, unless specifi ed otherwise in
this guide.
All parts of the cooker become hot with use and
will retain heat even after you have stopped
cooking.
Take care when touching cooker, to minimize the
possibility of burns, always be certain that the
controls are in the OFF position and that it is cool
before attempting to clean the cooker.
Use dry oven gloves when applicable - using damp
gloves might result in steam burns when you touch
a hot surface. Never operate the cooker with wet
hands.
Do not use a towel or other bulky cloth in place of
a glove. They might catch fi re if they touch a hot
surface.
Clean with caution. If a wet sponge or cloth is used
to wipe spills on a hot surface, be careful to avoid
steam burns. Some cleansers can produce noxious
fumes if applied to a hot surface.
Do not use unstable saucepans and position the
handles away from the edge of the hotplate.
Babies, toddlers and young children should not be
allowed near the cooker at any time. They should
never be allowed to sit or stand on any part of the
appliance. Teach them not to play with controls or
any other part of the cooker.
Never store anything of interest to children in
cabinets above a cooker - children climbing on the
cooker to reach them could be seriously injured.
Clean only parts listed in this guide.
In the interests of hygiene and safety the cooker
should be kept clean at all times as a build up in fats
and other food stuff could result in a fi re.
Always keep combustible wall coverings or curtains
etc. a safe distance away from your cooker.
Do not spray aerosols in the vicinity of the cooker
while it is in on.
Do not store or use combustible materials, or
fl ammable liquids in the vicinity of this appliance.
Do not use water on grease fi res. Never pick up
a fl aming pan. Turn the controls off . Smother a
fl aming pan on a surface unit by covering the pan
completely with a well fi tting lid or baking tray. If
available use a multipurpose dry chemical or foamtype fi re extinguisher.
Never leave the hotplate unattended at high heat
settings. Pans boiling over can cause smoking and
greasy spills may catch on fi re.
13
Page 14

English
Never wear loose-fi tting or hanging clothes while
using the appliance. Be careful when reaching
for items stored in cabinets over the hotplate.
Flammable material could be ignited if brought
in contact with a hot surface unit and may cause
severe burns.
Take great care when heating fats and oils, as they
will ignite if they get too hot.
Use a deep fat thermometer whenever possible to
prevent overheating fat beyond the smoking point.
Never leave a chip pan unattended. Always heat fat
slowly, and watch as it heats. Deep fry pans should
be only one third full of fat. Filling the pan too full
of fat can cause spill over when food is added. If you
use a combination of oils or fats in frying, stir them
together before heating, or as the fats melt.
Foods for frying should be as dry as possible. Frost
on frozen foods or moisture on fresh foods can
cause hot fat to bubble up and over the sides of
the pan. Carefully watch for spills or overheating
of foods when frying at high or medium high
temperatures. Never try to move a pan of hot fat,
especially a deep fat fryer. Wait until the fat is cool.
The oven should NOT be used for heating the
kitchen. This wastes fuel and the control knobs may
become overheated.
When the oven is on DO NOT leave the oven door
open for longer than necessary.
The specifi cation of this cooker should not be
altered.
This appliance is heavy, take care when moving it.
When the cooker is not in use ensure that the
control knobs are in the off position.
Do not use the top of the fl ue (the slot along the
back of the cooker) for warming plates, dishes,
drying tea towels or softening butter.
When using an electrical appliance near the
hotplate, be sure that the cord of the appliance
does not come into contact with the hotplate.
Take care that no water seeps into the appliance
Only certain types of glass, glass-ceramic,
earthenware or other glazed containers are suitable
for hotplate cooking; others may break because of
the sudden change in temperature.
Do not allow anyone to climb, stand or hang on any
part of the cooker.
Do not use aluminium foil to cover shelves, linings
or the oven roof.
To avoid damage to the interior enamel, do not
place the oven pan or baking trays on the bottom
of the oven and do not line the base of the oven
with aluminium cooking foil.
Never heat unopened food containers. Pressure
build up may make container burst and cause
injury.
The cooker is designed for cooking foods only and
must not be used for any other purpose.
14
Page 15
English
Service and spares
Please complete the appliance details below
and keep them safe for future reference - this
information will enable us to accurately identify
your particular appliance and help us to help
you. Filling this in now will save you time and
inconvenience if you later have a problem with
your appliance. It may also be of benefi t to keep
your purchase receipt with this leafl et. You may
be required to produce the receipt to validate a
warranty fi eld visit.
Fuel Type: Dual Fuel
Name of Appliance :
Falcon Continental 1092 FSD
Appliance Colour*
Appliance Serial Number *:
Please note
If your appliance is outside the warranty period, our
service provider may charge for this visit.
If you request an engineer to visit and the fault
is not the responsibility of the manufacturer, our
service provider reserves the right to make a
charge.
Appointments not kept by you may be subject to a
charge.
Out of Warranty
We recommend that our appliances are serviced
regularly throughout their life to maintain the best
performance and effi ciency.
Service work should only be carried out by
technically competent and suitably qualifi ed
personnel.
Spare Parts
To maintain optimum and safe performance, only
use genuine spare parts. Do not use re-conditioned
or unauthorised gas controls. Contact your retailer.
Retailers Name & Address:
Date of Purchase:
Installers Name & Address:
Date of Installation:
* This information is on the appliance data badge.
If you have a problem
In the unlikely event that you have a problem with
your appliance, please refer to rest of this booklet,
especially the problem solving section, fi rst to
check that you are using the appliance correctly.
If you are still having diffi culty, contact your retailer
15
Page 16
SERVICING WARNING
Disconnect from electricity and gas before servicing. Check appliance is safe when you have finished.
Installation
You must be aware of the following
safety requirements & regulations
Prior to installation, ensure that the local distribution
conditions (nature of the gas and gas pressure) and the
adjustment of the appliance are compatible.
This appliance shall be installed in accordance with the
regulations in force and only in a well ventilated space.
Read the instructions before installing or using this
appliance.
In the UK:-
The regulations and standards are as follows:-
In your own interest and that of safety, it is law
that all gas appliances be installed by competent
persons. CORGI registered installers undertake to
work to safe and satisfactory standards. Failure to
install the appliance correctly could invalidate any
warranty or liability claims and lead to prosecution.
The hotplate must be installed in accordance with
In the UK
The room containing the hotplate should have
an air supply in accordance with BS 5440 Part 2 :
2000. All rooms require an openable window or
equivalent, while some rooms require a permanent
vent in addition to the openable window. The
hotplate should not be installed in a bedsitting
room with volume less than 20m3. If it is installed
in a room of volume less than 5m3 an air vent of
eff ective area 100cm2 is required; if it is installed in
a room of volume between 5m3 and 10m3, an air
vent of eff ective area 50cm2 is required; while if the
volume exceeds 11m3, no air vent is required.
If there are other fuel burning appliances in the
same room, BS 5440 Part 2 : 2000 should be
consulted to determine the requisite air vent
requirements.
In the Republic of Ireland:-
Reference should be made to the current edition of
IS 813 which makes clear the conditions that must
be met to demonstrate that suffi cient ventilation is
available.
All relevant British Standards / Codes of Practice,
in particular BS 5440 Part 2 2000,
For Natural Gas - BS 6172 : 1990 and BS 6891 :
1998
For LP Gas - BS 5482-1:1994 (when the
installation is in a permanent dwelling). This
appliance should not be installed in a boat or
caravan.
The Gas Safety (Installation and Use) regulations
1998.
The relevant Building / IEE regulations.
In the Republic of Ireland:-
The installation must be carried out by a
Competent Person and installed in accordance
with the current edition of I.S.813 “Domestic Gas
Installations”, the current Building Regulations and
reference should be made to the current ETCI rules
for electrical installation.
Provision of Ventilation
This appliance is not connected to a combustion
products evacuation device. Particular attention shall
be given to the relevant requirements regarding
ventilation.
Location of Hotplate
The hotplate may be installed in a kitchen/kitch en diner
but NOT in a room con tain ing a bath or shower.
NOTE:
An appliance for use on LPG shall not be
installed in a room or internal space below
ground level. e.g. in a basement.
Conversion
This appliance is supplied as: G 20 20millibar
CAT II2E3+
A conversion kit for other gases is supplied with
the cooker. If the appliance is to be converted
to another gas we recommend that this is done
before installation. See the Conversion Instructions
packed with the conversion kit. After converting
the appliance please attach the Gas Conversion
sticker over the appropriate area of the data badge,
this will identify the gas type the appliance is now
set for.
This appliance is designed for domestic cooking
only. Use for any other purpose could invalidate any
warranty or liability claim.
16
Page 17
SERVICING WARNING
Disconnect from electricity and gas before servicing. Check appliance is safe when you have finished.
You will need the following equipment
to complete the cooker installation
satisfactorily
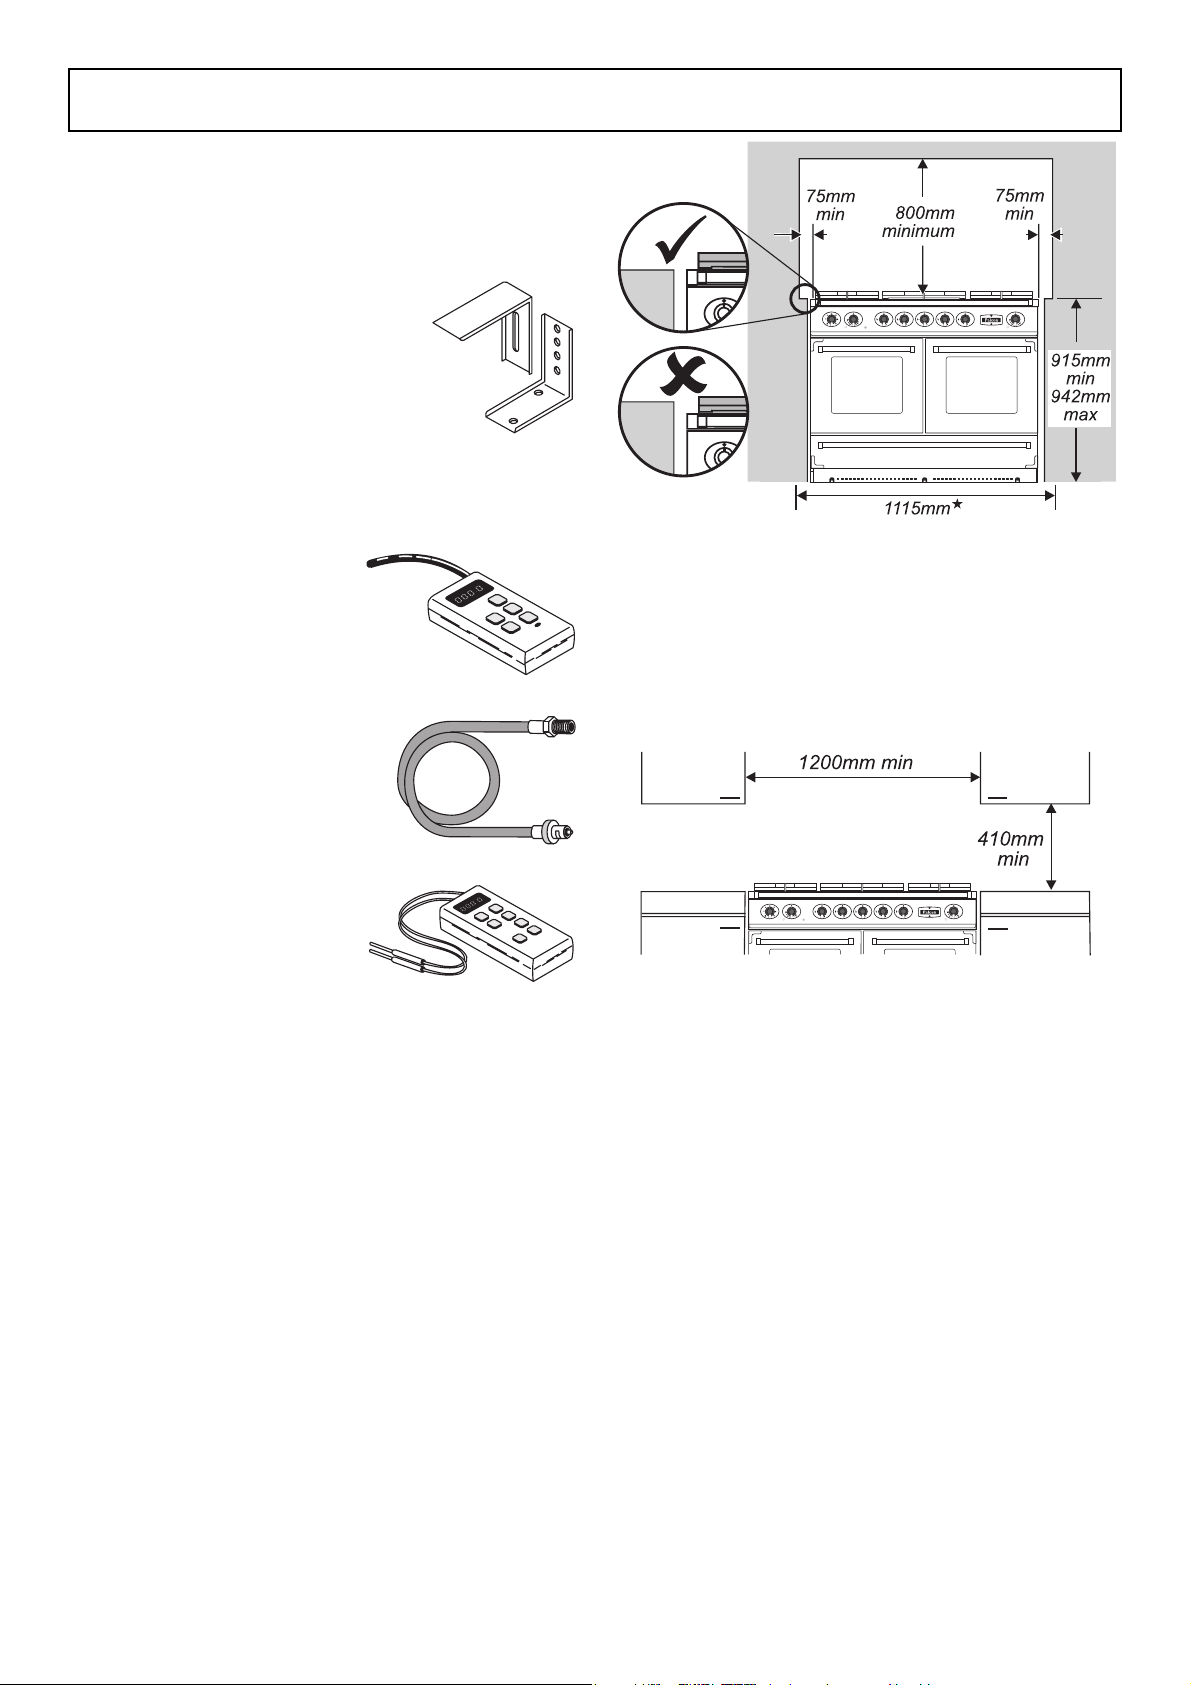
STABILITY BRACKET
If the cooker is to be supplied
with gas through a fl exible hose,
a stability bracket or chain must
be fi tted.
These are not supplied by with the cooker but are
available at most builders’ merchants.
GAS PRESSURE TESTER
FLEXIBLE GAS HOSE
Must be in accordance with
the relevant standards.
*door opening width
The hotplate surround should be level with, or above, any
adjacent work surface. Above hotplate level a gap of 75mm
should be left between each side of the cooker and any
adjacent vertical surface.
For non-combustible surfaces (such as unpainted metal or
ceramic tiles) this can be reduced to 25mm.
A minimum space of 800mm is required between the top of the
hotplate and a horizontal combustible surface.
MULTIMETER
(for electrical checks)
You will also need the following tools:
1. Electric drill
2. Masonry drill bit
(only required if fi tting the cooker on a stone or concrete
fl oor)
3. Rawlplugs
(only required if fi tting the cooker on a stone or concrete
fl oor)
4. Steel tape measure
5. Cross head screwdriver
6. Flat head screwdriver
7. Spirit level
8. Pencil
9. Adjustable spanner
10. Screws for fi tting stability bracket
Positioning the Cooker
The diagrams show the minimum recommended distance from
the cooker to nearby surfaces.
The cooker should not be placed on a base.
*Any cooker hood should be installed in accordance with the
hood man u fac tur er’s instructions.
Surfaces of furniture and walls at the sides and rear of the
appliance should be heat, splash and steam resistant. Certain
types of vinyl or laminate kitchen furniture are particularly
prone to heat damage and discolouration. We cannot accept
responsibility for damage caused by normal use of the cooker
to any material that de-laminates or discolours at temperatures
less than 65°C above room temperature.
For safety reasons curtains must not be fi tted im me di ate ly
behind the cooker.
We recommend a gap of 1115mm between units to allow
for moving the cooker. Do not box the cooker in; it must still
be possible to move the cooker in and out for cleaning and
servicing.
A clearance of 130mm is required if the cooker is near a corner
of the kitchen to allow the oven doors to open.
17
Page 18

SERVICING WARNING
Disconnect from electricity and gas before servicing. Check appliance is safe when you have finished.
Lower the Rollers.
Fit the Allen key tool to the centre roller lowering mechanism
(C in the fi g. below).
Unpacking the Cooker
Do not take any packaging off the cooker until it is directly
in front of the place it is to be installed (unless it will not fi t
through a door in its outer packaging).
Cut the banding straps and lift the cardboard box off the
cooker, leaving the cooker standing on the base packaging. See
the loose unpacking sheet.
Moving the Cooker
The cooker is very heavy. Take great care.
We recommend two people manoeuvre the cooker. Ensure that
the fl oor covering is fi rmly fi xed, or removed to prevent it being
disturbed when moving the cooker around. You will need the
levelling tool.
From the back tilt the cooker forward and remove the rear half
of the polystyrene base pack.
A left rear roller, B right rear roller, C centre roller
LOWER THE FRONT ROLLER by doing 14 complete (360°) turns
clockwise.
Now LOWER THE TWO REAR ROLLERS.
First fi t the levelling tool on the hexagonal adjusting nut as
shown below.
Make 10 complete (360°) turns clockwise. (This means turning
and removing the levelling tool 20 times).
Repeat from the front and remove the front half of the poly
base. Pull the drawer out to its furthest point.
Lift up the ends of the plastic clips (one each side) to release
the catches holding the drawer to the side runners and at the
same time pull the drawer forward and away from the side
runners. For safety’s sake push the drawer runners back out of
the way. Put the drawer somewhere safe - do not refi t it until
the installation is complete.
Make sure you lower BOTH REAR ROLLERS. There are two
adjusting nuts, one for each roller, at both the front bottom
corners of the cooker.
Unfold the rear edge of pack
base tray. Carefully push
the cooker backwards into
position. Take care not to
damage the power cable.
Push the cooker close to its
fi nal position, leaving just
enough space to get behind it.
18
Page 19

SERVICING WARNING
Disconnect from electricity and gas before servicing. Check appliance is safe when you have finished.
Conversion to LP
If the appliance is to be converted to LP gas do the conversion
at this point. See the conversion section of these instructions.
Levelling
You are recommended to use a spirit level on a shelf in one of
the ovens to check for level.
Place the cooker in its intended position taking care not to
twist it within the gap between the kitchen units as damage
may occur to the cooker or the units.
The rollers can be adjusted to level the cooker. To adjust the
height of the rear of the cooker use the levelling tool supplied
to turn the adjusting nuts at the front bottom corners of the
cooker.
Adjust the height of the front roller to level the cooker. Turn
clockwise to raise the cooker and anticlockwise to lower.
When you are satisfi ed with the height and level raise the front
of the cooker by one turn of the front roller adjuster. Screw
down the front feet to meet the fl oor. Screw the front roller
adjuster anticlockwise to raise the front roller so that the front
of the cooker is supported on the feet, not the front roller, to
prevent accidental movement of the cooker.
1. Place the cooker in its intended position and level the
cooker.
2. Draw a pencil line 100mm from the front edge of the
levelling feet.
3. Mark the centre line for the bracket by measuring 550mm
from the left hand side of the cooker.
4. Lower the front roller and move the cooker forward.
5. Measure back from the pencil line 550mm to locate the
front edge of the bracket. Fix the bracket to the fl oor.
6. Measure the height from fl oor level to engagement
edge in back of cooker. Add 3mm to this dimension and
assemble the stability bracket to this height. (i.e. from
fl oor level to underside of the top member) and ensure
the bracket does not foul the oven burner assembly.)
Gas Connection
A gas shut off valve must be fi tted between the gas supply and
the connection hose. The fl exible hose (not supplied with the
cooker) must be in accordance with the relevant standards. If in
doubt contact, your supplier.
Gas Connection
Fitting a stability bracket
A stability bracket or chain (not supplied by with the cooker)
should be fi tted when the cooker is connected to a fl exible gas
supply. Any restraining device should be secured to the fabric
of the building and should be able to be released so that the
cooker can be pulled out for cleaning and maintenance.
When fi tting a stability bracket read these instructions together
with the leafl et supplied with the bracket.
view from the rear
A position of pressure test point screw
B appliance gas inlet
C position for gas supply connector
19
Page 20

SERVICING WARNING
Disconnect from electricity and gas before servicing. Check appliance is safe when you have finished.
The inlet connection on the cooker is ISO 7-1 internal. If you
require a ISO 228-1 connection fi nd the ISO 7-1 to ISO 2281 connector in the conversion kit. Apply a suitable thread
sealing compound to the ISO 7-1 end.
Screw the connector into the cooker inlet until it is fi nger
tight. Using two suitable tools, one on the inlet on the cooker
to make sure it is held steady and one on the connector,
tighten the connector into the inlet on the cooker.
Minimum torque 15Nm.
Maximum torque 20Nm
Connect the hose to the connector.
The hose should be fi tted so that both inlet and outlet
connections are vertical so that the hose hangs downwards in
a ‘U’ shape.
For the UK
For Natural Gas the fl exible hose must be in accordance with
B.S.669.
For LP Gas it should be capable of 50mbar pressure, 70C
temperature rise and carry a red stripe, band or label.
If in doubt contact, your supplier.
The total electrical load of the appliance is approximately
7.2kW. The cable size used should be suitable for this load and
comply with all local requirements.
Access to the mains terminal is gained by removing the
electrical terminal cover box on the back panel.
Connect the mains cable to the correct terminals for your
electrical supply type.
Because the height of the cooker can be adjusted and each
connection is diff erent it is diffi cult to give precise dimensions.
Ideally the house supply connection should be in the shaded
area shown in the fi gure showing the back of the cooker (‘A’ in
the fi gure). Alternatively connect from the side.
After completing the gas connection, check the cooker is gas
sound with a pressure test. When checking for gas leaks do
not use washing up liquid - this can corrode. Use a product
specifi cally manufactured for leak detection.
CAUTION: DO NOT USE A FLAME TO CHECK FOR GAS LEAKS
Pressure testing
The gas pressure can be measured at the pressure test point on
the gas connection block. Turn and light one of the hotplate
burners.
For Natural Gas the pressure should be 20mbar.
For Propane the pressure should be 37mbar
Reassemble burner top, making sure it is reassembled in the
correct way on the burner body.
Electrical Connection
This appliance must be installed by a qualifi ed electrician
to comply with the relevant regulations and also the local
electricity supply company requirements.
WARNING: THIS APPLIANCE MUST BE EARTHED
Note
The cooker must be connected to the correct electrical supply
as stated on the voltage label on the cooker, through a suitable
cooker control unit incorporating a double pole switch having
a contact separation of at least 3mm in all poles. This cooker
must not be connected to an ordinary domestic power point.
Check that the links are correctly fi tted and that
the terminal screws are tight.
Secure the mains cable using the cable clamp.
Current Operated Earth Leakage Breakers
Where the installation is protected by a 30-milliamp sensitivity
residual current device (RCD), the combined use of your
cooker and other domestic appliances may occasionally cause
nuisance tripping. In these instances the cooker circuit may
need to be protected by fi tting a 100mA device. This work
should be carried out by a qualifi ed electrician.
Hotplate
Check each burner in turn. There is a fl ame safety device that
stops the fl ow of gas to the burner if the fl ame goes out. There
is also a spark ignition system that works when the knob is
pressed in.
For each burner, push in and turn the knob to the large fl ame
symbol ( ).
The igniter should spark and light the gas. Keep holding the
knob pressed in to let the gas through to the burner for few
seconds.
If, when you let go of the control knob, the burner goes out,
the safety device has not held in. Turn the control to the off
position and wait one minute, then try again this time holding
in the control knob for slightly longer.
20
Page 21

SERVICING WARNING
Disconnect from electricity and gas before servicing. Check appliance is safe when you have finished.
Oven check
Turn on the ovens and check that they start to heat up. Turn off
the ovens.
Fitting the plinth
Remove the 3 screws for the plinth mounts along the front
bottom edge of the range. Fasten the plinth using these screws
(alternative colour screws can be found in the loose parts pack).
Refit the drawer
Pull the side rails fully out.
Carefully move the drawer back between the rails and rest it on
the side rails.
At each side hold the front of the drawer and pull the side rail
forward so that the clips click into position holding the drawer
to the side rails.
Leave the levelling tool in the storage drawer, so that the
customer can use it if they wish to move the cooker.
Customer care
Please inform the user how to operate the cooker and hand
over these instructions.
Thank you.
21
Page 22

SERVICING WARNING
Disconnect from electricity and gas before servicing. Check appliance is safe when you have finished.
Conversion to LP Gas
Tap adjustment
Servicing - warning
This conversion must be performed by a competent person.
After conversion the installation must comply with the relevant
regulations and also the local electricity supply company
requirements. Read the instructions before converting this
appliance.
Failure to convert the appliance correctly could invalidate any
warranty or liability claims and lead to prosecution.
This instruction must be used in conjunction with the rest
of the appliance instruction, in particular for information on
Standards, cooker positioning, connection hose suitability etc.
When servicing or replacing gas-carrying components
disconnect from gas before commencing operation and check
appliance is gas sound after completion.
Do not use re-conditioned or unauthorised gas controls.
Conversion
Disconnect from electricity and gas before servicing. Check
appliance is safe when you have fi nished.
This appliance is CAT II2E+3+. It is supplied set for G20 natural
gas at 20millibar
A conversion kit for LP gas (G30 29mbar/G31 37mbar) is
supplied with the cooker.
Pull off all the control knobs.
Open the oven door & grill door and remove the fi xing screws
underneath the control panel.
Remove the 3 fi xing screws at the top of the control panel.
Pull the control panel forward. Rest it on the open grill door
and the open right hand oven door.
To convert the control taps
Unscrew the tap bypass screw.
Injectors
Burner head
Brass venturi
Burner base
Burner ring
Undo the large brass nuts and remove the brass venturis and
brass rings.
Either:-
Use a long box spanner to access and remove the old
jets.
Or: -
Lift up the front of the hotplate top and prop it up. The
burner bases are now accessible - remove the old jets.
Save the jets removed from the appliance for possible future
use. Fit the new jets, see the table for the correct type.
Using a pair of long nose pliers carefully remove the bypass
screw and fi t the correct replacement screw. Tighten the screw
down.
If you have lifted up the hotplate then carefully replace it
taking care not to damage or displace the ignition electrodes
or fl ame safety probes (arrowed) and replace the rear fi xing
screws.
Tighten the screw down.
Repeat for all the burner control taps.
Refi t the control panel.
22
Page 23

SERVICING WARNING
Disconnect from electricity and gas before servicing. Check appliance is safe when you have finished.
Reassembly
LP Gas
Centre burner
If you are converting to
LP Gas the burner ring in
the centre burner must be
changed for the large ring
in the conversion kit.
Large ring
Natural Gas at 20mbar
Burner
A 95 39 original ring
B 120 54 original ring
C 165 96 original ring
Burner rings
Screw in the hexagon headed venturi but to make fi tting the
outer burners easier do not fully tighten yet.
Save the original brass ring with the removed orifi ces and
bypass screws.
LP Gas - Butane at 28-30 or Propane at 37mbar
Burner
A 64 32 original ring
B 82 40 original ring
C 107 57
Burner rings
Large ring in
conversion kit
the centre burner
23
Page 24

SERVICING WARNING
Disconnect from electricity and gas before servicing. Check appliance is safe when you have finished.
The Outer Burners
Replace the smaller rings on the
outer burners. The very small ring is
for the right hand front burner.
Screw in the hexagon headed venturis but to make fi tting
the other burners easier do not fully tighten yet.
base of cook top burner bottom of burner head
Refi t the pan supports.
Reassemble in reverse order.
Stick on label
Stick the appropriate label on to the data badge to indicate the
gas the appliance is now set for.
Pressure Testing
Connect the appliance to the gas supply.
an outer burner
When all the burner bases and venturis have been fi tted
tighten the venturi nuts.
Reassemble burner heads, making sure they are reassembled in
the correct way on the burner bodies.
Check the appliance is gas sound.
The gas pressure can be measured at the pressure test point on
the gas inlet. Turn and light one of the hotplate burners.
Check operation of all the burners.
24
Page 25

SERVICING WARNING
Disconnect from electricity and gas before servicing. Check appliance is safe when you have finished.
Servicing
1 SERVICING
When servicing or replacing gas carrying components,
disconnect from the gas supply before commencing operation.
Check the appliance is gas sound after completion of service.
When checking for gas leaks do not use washing up liquid - this
can corrode. Use a product specifi cally manufactured for leak
detection.
Do not use re-conditioned or unauthorised gas controls.
Disconnect from the electricity supply before commencing
servicing, particularly before removing any of the following:
- control panel, side panels, hotplate tray or any electrical
components or covers.
Before electrical re-connection, check that the appliance is
electrically safe.
Note - References to LH and RH oven apply as viewed from the
front.
BEFORE SERVICING ANY GAS CARRYING COMPONENTS. TURN
OFF THE GAS SUPPLY.
2 To Remove the Hotplate
Disconnect the appliance from the electricity supply.
Pull the unit forward to gain access.
a) Remove the pan supports/hotplate accessories and
burner caps.
b) Remove the brass venturi in the centre of each hotplate
burner bezel.
4 To Remove an Outer Side Panel
Disconnect the appliance from the electricity supply.
a) Remove the control panel as detailed in Section 3
b) Remove the retaining screw on the upper front edge
and the two fi xings on the rear or the side panel. Undo
the lower retaining screw situated below the edge at the
panel front corner.
c) Remove the panel by pulling it away from the unit.
Should diffi culty be encountered, it may be necessary to
slacken the two closest burners and both brass venturi as
detailed in Section 2.
d) Replace parts in reverse order. Ensure that both venturis
are fully tightened.
5 To Remove an Oven Neon
Disconnect the appliance from the electricity supply.
a) Remove the control panel as detailed in Section 3
b) Remove the relevant neon connection and undo the nut
which secures the neon to the control panel.
c) Replace parts in reverse order. Ensure the replacement
neon functions correctly.
6 To Remove a Thermostat
Disconnect the appliance from the electricity supply.
Remove the hotplate - see 2. Remove the control panel - see 3.
Open the appropriate oven door and remove the oven shelves.
Pull the appliance forward to gain access to the rear cover box.
Undo the cover screws and lift clear.
Right Hand oven
Remove the two fi xings that secure the thermostat phial cover.
Unclip the thermostat phial from the clips in the oven back
panel.
c) Remove the bezel from the hotplate and disconnect the
spark ignition lead from the spark electrode.
d) Lift the hotplate clear of the appliance.
e) Replace in reverse order.
3 To Remove the Control Panel
Disconnect the appliance from the electricity supply.
a) Remove the pan supports/hotplate accessories and
burner caps.
b) Slacken the brass venturi at the centre of each burner.
c) Remove the control knobs from all taps.
d) Open both oven doors. Remove 3 fi xings on the top front
and 3 fi xings on the control panel underside.
e) Pull the control panel forward. Remove the connections
from the rear of the three neons. Disconnect the earth
lead and lift the panel clear of the unit.
f) Replace all parts in reverse order.
g) When replacing any electrical connections refer to the
wiring diagram.
Left Hand oven
Remove the two screws holding the thermostat phial to the
oven fan cover at the rear of the oven. Pull the unit forward
to access the rear of the cooker. Remove the cover boxes
by removing the fi xing screws and lifting clear. Feed the
thermostat capillary clear of the oven.
Disconnect the wires from the thermostat and undo the two
fi xings that secure the control to the mounting plate.
Fit the replacement and re-assemble in reverse order. Ensure
that the phial is clipped to the oven rear, positioned centrally
between the clips. Check that the thermostat functions
correctly.
7 To Remove an Oven Cut-Off Thermostat
Disconnect the appliance from the electricity supply.
a) Pull the unit forward to gain access to the cover box.
Undo the cover screws and lift clear.
b) The control is located on the earth plate beside the oven
element connections.
c) Disconnect the thermostat wiring. Undo the fi xings that
secure the thermostat to the earth plate and remove.
d) Fit replacement control and re-assemble parts in reverse
order.
25
Page 26

SERVICING WARNING
Disconnect from electricity and gas before servicing. Check appliance is safe when you have finished.
8 To Remove a Hotplate Tap
Disconnect the appliance from the electricity supply.
a) Remove the hotplate as detailed in Section 2.
b) Remove the control panel as detailed in Section 3.
c) Undo compression fi tting at the rear of the tap. Remove
the fi xings that secure the tap to the gas rail. Disconnect
the ignition switch wiring.
d) Remove the tap. Remove and discard the gasket seal. Fit
new gasket seal to replacement tap.
e) Re-assemble in reverse order. Check the appliance is gas
sound. Check hotplate ignition.
9 To Change an Ignition Switch
Change the gas tap as detailed in Section 9.
10 To Remove a Hotplate Burner Injector
a) Remove the hotplate as detailed in Section 2.
b) Remove the injector directly from the burner body.
c) Fit the appropriate injector.
d) Re-assemble in reverse order. Check the appliance is gas
sound.
11 To Remove a Hotplate Burner Spark Electrode
a) Remove the pan supports, hotplate accessories and
burner heads.
b) Undo the bezel venturi and remove the bezel from the
hotplate. The spark ignition wire will be pulled through
the electrode clearance hole.
c) Disconnect the spark electrode from the ignition wire.
Note
Take care to prevent the ignition wire from falling back through
the clearance hole.
d) Undo the spark electrode from the bezel by removing the
spring clip and spring.
e) Fit the replacement electrode to the burner bezel. Ensure
that the spring and clip are properly located.
f) Replace in reverse order and check correct burner
ignition.
14 To Remove the Oven Outer Door Panel
a) Open the oven door.
b) Remove two screws ‘A’ and two screws ‘B’ from the door.
c) Remove the outer door panel.
d) Undo the nuts that secure the handle to the door panel.
Fit the handle to the replacement door panel.
e) Fit the replacement panel to the oven inner door.
f) Re-assemble in reverse order.
15 To Remove the Door Latch
a) Remove the oven outer door panel as detailed in Section
15.
b) Remove the fi xings that secure the latch assembly to the
inner door panel.
c) Fit the replacement catch and re-assemble in reverse
order.
d) Check correct operation of door.
16 To Remove the Oven Door Seal
12 To Remove a Hotplate Burner
a) Remove the pan supports, hotplate accessories and
burner heads.
b) Remove the hotplate as detailed in Section 2.
c) Remove the nut that secures the burner body to the
support channel.
d) Remove the fi xings that secure the support channel to
the chassis. Lift the channel clear of the appliance.
e) Undo the compression fi tting which connects the burner
body to the gas pipe. Remove the burner body from the
appliance.
f) Replace in reverse order. Check the appliance is gas
sound and that the burner operates satisfactorily.
13 To Remove an Oven Door
a) Open the oven door.
b) Support the door and remove the two screws which
secure the upper hinge to the front frame of the unit.
c) Remove the door from the lower hinge by lifting slightly
and moving it outward.
d) Re-assemble in reverse order.
a) Open oven door. The seal is held in place by small hooks
on the rear face. At the corner pull seal diagonally away
from the door centre until that hook is released.
b) Proceed to the next hook and release it in a similar way,
and so on. Use force if the hooks are stiff , as the old seal
will be discarded.
c) When fi tting new seal, position the seal join at the
bottom. Hook the new seal in one of the corner holes of
the door, and proceed round the door snapping in each
hook in turn.
26
Page 27

SERVICING WARNING
Disconnect from electricity and gas before servicing. Check appliance is safe when you have finished.
17 To Adjust the Oven Door Catch Keeper
a) Open the oven door and slacken the locknut at the
keeper base.
b) Adjust the keeper inward or outward as required, until
the desired door operation is obtained.
c) Re-tighten the locknut.
18 To Remove the Hotplate Spark Generator
Disconnect the appliance from the electricity supply.
a) Pull the unit forward to access the cover boxes at the
appliance rear. Remove the fi xings that secure the cover
and lift it clear.
b) Undo the terminal connections noting their positions.
c) Undo the fi xings that secure the spark generator and
remove the device.
19 To Remove the Hotplate Electrode Leads
Disconnect from the electricity supply.
Pull the unit forward to access the rear of the appliance.
a) Remove the pan supports, hotplate accessories and
burner heads.
b) Remove the hotplate as detailed in Section 2.
c) Remove the cover box and disconnect all HT leads at the
generator.
d) Remove the lower back panel and disconnect the lead at
the electrode.
e) Pull the sleeved bundle of HT leads up through the rear
upright.
f) Pull the appropriate lead from the sleeve and push in the
replacement.
g) Replace the leads in the rear upright.
h) Re-connect the leads at the generator and oven
electrode.
j) Re-assemble in reverse order and check ignition.
20 To Remove Oven Inner Back
a) Open the oven door. For the LH oven unscrew the 2
thermostat phial fi xing screws. Remove the fi xings that
secure the inner back to the oven rear.
b) Lift the removable panel away.
c) Re-assemble in reverse order. Ensure that the retaining
fi xings are fully tightened.
21 To Replace an Oven Fan
Disconnect the appliance from the electricity supply.
a) Pull the unit forward to access the cover boxes at the rear
of the appliance. Remove the fi xings that secure the cover
and lift it clear.
b) Remove the fan wiring, noting the connection positions.
c) Remove the inner back as detailed in Section 20.
d) Hold the fan blades and undo the centre nut (LH thread),
brass washers, fan blade and circlip.
e) Undo the fi xings that retain the fan and remove it from
the cavity rear.
f) Fit the replacement and re-assemble parts in reverse
order. Check that the oven operates satisfactorily.
22 To Remove an Oven fan Element
Disconnect the appliance from the electricity supply.
a) Remove oven inner back (see 20).
b) Remove 2 screws from the top of the element and 1 from
the bottom of the element in side the oven.
c) Lift element out carefully, disconnect the terminals
connected to the element noting their positions. If it
is not possible to disconnect the leads in this way, pull
cooker forward to gain access to the rear, remove screws
securing the electric cover to the back sheet and remove
cover and disconnect the terminals from the rear.
d) Fit new element, and reassemble in reverse order.
e) Check that the oven operates correctly.
27
Page 28

SERVICING WARNING
Disconnect from electricity and gas before servicing. Check appliance is safe when you have finished.
23 To Remove the left hand Oven Bottom and Top
Elements
Disconnect the appliance from the electricity supply.
Bottom Element
Pull the cooker forward to access the cover boxes at the rear
of the unit. Remove the fi xings that secure the cover and lift it
clear.
Remove the 2 screws ‘A’ and allow the plate to drop down.
Remove the 2 screws B, lower the upper plate and remove
through the slot in the cooker back.
Undo the terminal connections, noting their positions.
Remove the element fi xings and withdraw element. Replace
the element and re-assemble parts in reverse order.
Top Element
Open the left hand oven door and undo the fi xings that secure
the heat shield. Remove the top element bracket fi xings and
withdraw element. Replace the element and re-assemble parts
in reverse order. Check that the oven operates satisfactorily.
24 To Adjust the Oven Door Angle
The door bottom hinge can be adjusted to alter the angle of
the door.
Loosen the bottom hinge fi xing screws and use the notch and a
fl at bladed screwdriver to move the position of the hinge to set
the hinge position.
Retighten the hinge screws.
Eff ect of hinge adjustment – exaggerated for clarity
Centre line of hinge pin
Oven door omitted for clarity
28
Page 29

SERVICING WARNING
Disconnect from electricity and gas before servicing. Check appliance is safe when you have finished.
Circuit Diagram
Ratings are for 230V 50Hz
Key to circuit diagram
A Left hand Multi function oven thermostat
B Multi function oven function control
C Oven light switch
D Right hand oven thermostat
F Multi function oven base element
G Multi function oven top element (outer pair)
H Multi function oven browning element (inner pair)
I Multi function oven fan element
J Multi function oven fan
K Right hand fan oven element
M Right hand oven fan
O Oven light
P Ignition switches
Q Ignition generator
R Cut-out
S Neon
Colour Code
b Blue
br Brown
or Orange
r Red
v Violet
w White
y Yellow
bl Black
29
Page 30

30
Page 31

Technical Data
This cooker is category II2E3+
It is supplied set for group H natural gas.
A conversion kit for other gases is included.
INSTALLER: Please leave these instructions with the User.
DATA BADGE LOCATION: Cooker back, serial number repeater badge below oven door opening.
Country of Destination: GB/IE
See appliance data badge for test pressures
Gas Electric
Natural Gas 20 mbar 220 - 240V 50Hz
Propane 37 mbar
Butane 29 mbar
(See appliance data badge for test pressures)
Dimensions
Overall height
Overall width
Overall depth
Space for fixing
Minimum space above hotplate
minimum 915 mm maximum 942 mm
1090 mm See ‘Positioning of Cooker’
660 mm (600mm excluding handles)
See ‘Positioning of Cooker’
800mm
Connections
Gas: Electric
Rp 1/2 at rear right-hand side 220 - 240V 50Hz
Ratings
Natural Gas L.P. Gas
Hotplate Input Injector Input Injector
Centre Burner
Large Burners
Right hand front Burner
Gas burner inputs based on Gross Calorifi c Value
Ovens
Fan element 2.5 kW 2.5 kW
Top element 1.2 kW
Browning Element 1.15 kW
Bottom element 1.0 kW
Ovens Multifunction Forced air convection
Energy effi ciency class :
on a scale of A (more effi cient) to G (less effi cient)
Energy consumption based on standard load
Usable volume (litres) 62 67
Size Medium Large
Time to cook standard load 41 minutes 38 minutes
Baking area 1400 cm2 1400 cm2
5.0 kW 165 5 kW (357g/h) 107
3.0 kW 120 3.0 kW (214g/h) 82
1.7 kW 95 1.7 kW (121g/h) 64
Left hand Multifunction Oven Right hand Fan Oven
BA
0.90 kWh
0.85 kWh
Maximum total electrical load at 230V 5.1kW approximate total including, oven fan etc.
31
Page 32

Deutsch
Kochstellenbrenner 33
Wok-Ring für mittleren Brenner 34
Kochen mit dem Wok 34
Die Backöfen 35
Schublade 38
Reinigen Ihres Herdes 39
Versetzen Ihres Herdes 41
Problembeseitigung 42
Allgemeine Sicherheitshinweise 43
Reparatur und Ersatzteile 45
Einbau 46
Reparatur 50
Sicherheitshinweise
Sie benötigen saubere, frische Luft – genau wie
Ihr Herd. Gasbrennerfl ammen erzeugen Abgase,
Hitze und Feuchtigkeit. Stellen Sie sicher, dass
die Küche gut belüftet ist: halten Sie natürliche
Belüftungsöff nungen off en oder sehen Sie
eine elektrische Lüftungseinrichtung (z. B. eine
Dunstabzughaube) vor, die nach außen entlüftet.
Wenn Sie mehrere Gasbrenner eingeschaltet
haben oder den Herd eine lange Zeit benutzen,
öff nen Sie ein Fenster oder schalten Sie das
Abzuggebläse ein. Weitere Einzelheiten enthält die
Montageanweisung.
Falls Sie einen Gasherd zum ersten Mal benutzen,
empfehlen wir Ihnen das Lesen des Abschnitts
„Allgemeine Sicherheitshinweise“.
Schaltplan 54
Technische Daten 55
Hier beschreiben wir einige grundsätzliche
Richtlinien über den sicheren Gebrauch eines
Gasherdes.
Gas und Strom eingeschaltet
Stellen Sie sicher, dass die Gasversorgung
eingeschaltet und der Herd angeschlossen und
eingeschaltet ist. Der Herd benötigt Strom.
Seltsame Gerüche
Beim ersten Gebrauch des Herdes kann ein leichter
„Neugeruch“ auftreten. Dieser sollte nach einiger
Zeit des Gebrauchs aufhören.
Vor dem ersten Gebrauch des Herds die
Backöfen auf 240 °C einstellen und eine Stunde
lang heizen, um den Neugeruch zu beseitigen.
Der Raum muss gut zur Außenluft belüftbar
sein, zum Beispiel durch Öff nen von
Fenstern oder durch Einschalten einer
Dunstabzugshaube.
32
Page 33

Kochstellenbrenner
Die Zeichnung unter jedem Regler gibt an,
welchen Gasbrenner dieser Regler regelt. Es ist eine
Funkenzündung vorhanden, die funktioniert, wenn
der Regler gedrückt wird.
Jeder Gasbrenner hat eine spezielle
Sicherheitsvorrichtung, die den Gasstrom
unterbricht, falls die Flamme erlischt.
Regler hineindrücken und auf das große
Flammensymbol (
Halten Sie den Regler einige Sekunden lang gedrückt,
damit das Gas zum Brenner strömen kann. Durch die
Funken der Zündung wird das Gas entzündet.
) drehen.
Deutsch
Töpfe und Kessel mit konkaven Böden oder nach unten
gedrehten Bodenrändern sollten nicht benutzt werden.
Hilfen zum Kochen auf kleiner Flamme, wie Asbest- oder
Gittermatten werden NICHT empfohlen. Sie verringern
die Gasbrennerleistung und können die Pfannenträger
beschädigen.
Falls der Brenner beim Loslassen des Reglers erlischt,
funktioniert die Sicherheitsvorrichtung nicht. Den
Regler auf Aus stellen. Den Vorgang nach einer Minute
wiederholen und diesmal den Regler etwas länger und
evtl. fester eindrücken.
Regulieren Sie die Flammenhöhe durch Drehen des
Reglers auf die gewünschte Kochstufe.
Bei diesem Herd befi ndet sich die niedrige Einstellung
hinter der hohen, nicht zwischen Hoch und Aus. Die
kleine Flamme markiert die „untere Stellung“. Drehen
Sie den Regler auf diese zu, nachdem der Inhalt eines
Topfes gesiedet hat.
Stellen Sie sicher, dass Flammen unter den Töpfen
sind. Aufsetzen eines Deckels hilft, den Inhalt schneller
kochen zu lassen.
Vermeiden Sie, unstabile oder verformte Töpfen zu
verwenden, da diese leicht kippen, sowie Töpfe mit
sehr geringem Bodendurchmesser, wie z. B. Milchtöpfe,
Einzeleierkocher.
Empfohlene Mindesttopfdurchmesser
Der empfohlene Mindesttopfdurchmesser ist
120mm für die äußeren Brenner und 160mm für
den mittleren Brenner.
Wenn der Kochstellenregler gedrückt gehalten
wird, entstehen bei allen Brennern Funken – dies ist
völlig normal.
Wenn nach dem Entzünden die Flamme eines
Kochstellenbrenners erlischt, drehen Sie den Regler
aus und warten Sie eine Minute ab, bevor Sie die
Flamme erneut entzünden.
Sie können den Brennerkopf zum Reinigen
entfernen; Hinweise dazu fi nden Sie unter „Reinigen
Ihres Herdes“.
Sie sollten die Oberfl äche des Herdes rund um
die Kochstellenbrenner nach Spritzern so bald
wie möglich abwischen. Versuchen Sie, diese
abzuwischen, während die Kochstelle noch warm
ist.
Hinweis:
Aluminiumtöpfe können Metallspuren auf den
Pfannenträgern hinterlassen. Diese beeinträchtigen
die Haltbarkeit der Emaille nicht und können mit
einem speziellen Metallreiniger entfernt werden.
33
Page 34

Deutsch
Wok-Ring für mittleren Brenner
Der Wok-Ring passt auf den mittleren Brenner. Er passt
auf keine der anderen Brenner-Pfannenträger.
Er sollte so platziert werden, dass die Ausschnitte des
Rings direkt auf den vorstehenden Brenner-Trägern
sitzen.
Das Gestell wird während des Gebrauchs sehr heiß,
lassen Sie viel Zeit zum Abkühlen, bevor Sie es
abnehmen.
Kochen mit dem Wok
Ein Wok kann für 5 traditionelle asiatische
Zubereitungsmethoden verwendet werden. -
Unter Rühren schnell braten
Braten mit wenig Öl
Frittieren
Dünsten
Schmoren
Das schnelle Braten unter Rühren ist die
bekannteste und populärste asiatische
Zubereitungsmethode. Bei dieser Methode werden
die einzelnen Nahrungsmittel fortlaufend in den
Wok gegeben. Aufgrund der relativ schnellen
Zubereitungszeit bleiben Farbe und Nährwert
erhalten, während die Zutaten knackig bleiben.
Woks können in Größe und Form stark variieren. Es ist
wichtig, dass der Wok fest steht, doch wenn der Wok
zu groß oder zu klein ist, wird er nicht richtig im Ring
sitzen.
Damit der Wok richtig aufgeheizt werden kann, muss
er sich nahe am Brenner befi nden. Aus diesem Grund
wird die Verwendung des Wokrings bei einem Wok mit
fl achem Boden nicht empfohlen.
Wenn Sie den Ring anbringen, ist darauf zu achten, dass
er richtig auf den Fingern des Pfannenträgers sitzt.
Stellen Sie sicher, dass er stabil sitzt und der Wok
waagerecht im Ring sitzt.
Bei den anderen 4 Zubereitungsmethoden im Wok
muss nicht ständig gerührt werden. Bei diesen
Methoden muss der Wok besonders standfest
sein, da er sehr heißes Wasser oder Öl enthält. Der
Wok-Ring sorgt für größere Stabilität bei diesen
Zubereitungsmethoden, dennoch ist Vorsicht
angebracht.
34
Page 35

Die Backöfen
Bei Gebrauch wird das Gerät heiß. Seien Sie vorsichtig und berühren Sie die Heizelemente im Ofen nicht.
Vor dem ersten Gebrauch des Herds die Backöfen auf 230 °C einstellen und eine Stunde lang heizen, um den
Neugeruch zu beseitigen. Dazu muss der Raum gut zur Außenluft belüftbar sein, zum Beispiel durch Öff nen
von Fenstern oder durch Einschalten einer Dunstabzugshaube.
Der linke Backofen Der rechte Backofen
Deutsch
Der linke Ofen ist ein Multifunktionsofen. Neben dem
Ofengebläse und Gebläseelement besitzt er zwei
Heizelemente, eines, das oben im Backofen zu sehen
ist und das zweite unter dem Ofenboden. Achten Sie
beim Einschieben oder Herausnehmen von Dingen
aus dem Backofen darauf, nicht das obere Element
und den Elementdefl ektor zu berühren. Weitere
Hinweise zu diesem Ofen fi nden Sie im Abschnitt
„Multifunktionsofen“.
Die zwei Funktionsregler für den Multifunktionsofen,
der Funktionswahlregler und der Temperaturstellregler
befi nden sich am rechten Ende des Bedienfelds.
Drehen Sie den
Funktionswahlregler auf
eine Backfunktion.
Das Gebläse im rechten Backofen zirkuliert ständig
die heiße Luft und erlaubt damit schnelleres und
gleichmäßigeres Braten und Backen.
Die empfohlenen Back- und Brattemperaturen für
einen Umluftbackofen sind im Allgemeinen niedriger
als für einen normalen Backofen.
Der rechte Umluftofenregler befi ndet sich auf der
rechten Seite der Bedienblende.
Drehen Sie den
Temperaturregler auf die
gewünschte Temperatur.
Die Backofenkontrollleuchte
leuchtet, bis der Ofen
die gewählte Temperatur
erreicht hat. Er schaltet sich
dann während des Kochens
ein und aus.
Drehen Sie den
Temperaturregler auf die
gewünschte Temperatur.
Die Backofenkontrollleuchte
leuchtet, bis der Ofen
die gewählte Temperatur
erreicht hat. Er schaltet sich
dann während des Kochens
ein und aus.
35
Page 36

Deutsch
Funktionen des Multifunktionsofens
Der Multifunktionsofen lässt sich auf viele
verschiedene Arten benutzen. Wir empfehlen, dass
Sie besonders sorgfältig auf Ihr Kochgut achten,
bis Sie mit jeder Funktion vertraut sind. Denken Sie
bitte daran: Nicht alle Funktionen eignen sich für alle
Lebensmittelarten.
Auftauen
Diese Funktion betätigt das Gebläse nur
zum Zirkulieren von Kaltluft. Es wird keine Hitze
eingesetzt. Hiermit können kleine Speisen, wie
Desserts, Cremetörtchen und Fleisch-, Fisch- und
Gefl ügelstücke aufgetaut werden.
Auftauen auf diese Weise beschleunigt den Vorgang
und schützt die Speisen vor Fliegen. Fleisch-, Fischund Gefl ügelstücke sollten auf einen Backrost
über einem Blech gesetzt werden, um Tropfen
aufzufangen. Rost und Blech müssen nach dem
Auftauen gespült werden.
Beim Auftauen die Ofentür geschlossen halten.
Große Speisen wie ganze Hühner und Fleischbraten
sollten nicht auf diese Weise aufgetaut werden. Wir
empfehlen, dies in einem Kühlschrank zu machen.
Auftauen sollte nicht in einem warmen Ofen
erfolgen oder wenn ein benachbarter Ofen in
Gebrauch oder noch warm ist.
zu erzielen, das Grillgut auf den Rost im DeluxeOfenblech setzen. Dicke Fleisch- oder Fischstücke
sind ideal zum Grillen auf diese Weise geeignet,
da die zirkulierte Luft die Stärke der Hitze des
Grills verringert. Die Ofentür sollte geschlossen
gehalten werden, während das Grillen stattfi ndet,
um Energie zu sparen. Sie werden ebenfalls
bemerken, dass die Speisen weniger beobachtet
und umgedreht werden müssen als beim
normalen Grillen. Heizen Sie diese Funktion vor der
Zubereitung vor.
Umluftofen
Diese Funktion betätigt das Gebläse, der
von den Elementen aufgeheizte Luft oben und
unten im Backofen zirkuliert. Die Kombination aus
Umluft und konventioneller Zubereitung (Oberund Unterhitze) macht diese Funktion ideal zur
Zubereitung großer Speisen, die gründlich gekocht
werden müssen, wie ein großer Fleischbraten. Es
ist ebenfalls möglich, auf zwei Einschubleisten
gleichzeitig zu backen, obwohl diese während der
Backzeit gewechselt werden müssen, da die Hitze
oben im Ofen größer als unten ist, wenn diese
Funktion benutzt wird.
Dies ist eine schnelle, intensive Form des Backens:
behalten Sie die Speisenzubereitung im Auge, bis
Sie sich an diese Funktion gewöhnt haben.
Vor der Zubereitung kontrollieren, ob Milchspeisen,
Fleisch und Gefl ügel vollkommen aufgetaut sind.
Heißluftbackofen
Diese Funktion betätigt das Gebläse und das
Heizelement rund um das Gebläse. Es wird eine
gleichmäßige Hitze im ganzen Ofen erzeugt, sodass
Sie große Mengen schnell zubereiten können.
Die Zubereitung im Heißluftofen eignet sich
besonders zum Backen auf mehreren Backblechen
gleichzeitig und ist eine gute „Allround“-Funktion.
Es kann notwendig sein, die Temperatur um etwa
10°C für Rezepte zu senken, die bisher in einem
konventionellen Ofen zubereitet wurden.
Falls Sie den Ofen vorheizen wollen, warten Sie,
bis die Anzeigeleuchte erloschen ist, bevor Sie die
Speisen einschieben.
Heißluftgrillen im Ofen
Diese Funktion betätigt das Gebläse, während
das obere Element eingeschaltet ist. Sie erzeugt
eine gleichmäßigere, weniger starke Hitze als
ein konventioneller Grill. Um beste Ergebnisse
Konventioneller Backofen (Oberund Unterhitze)
Diese Funktion kombiniert die Hitze der oberen
und unteren Elemente. Sie eignet sich besonders
zum Braten und Backen von Feingebäck, Kuchen
und Keksen. Speisen, die auf dem oberen Einschub
gebacken werden, werden schneller als auf dem
unteren Einschub braun und knusprig, da die Hitze,
wie bei der Funktion „Umluftofen“, oben im Ofen
größer als unten ist. Einige Speisen, die zubereitet
werden, müssen für gleichmäßige Zubereitung
umgetauscht werden. Dies bedeutet, dass Speisen,
die verschiedene Temperaturen benötigen,
zusammen zubereitet werden können, da die
kühlere Zone in der unteren Hälfte und der heißere
Bereich oben im Ofen genutzt werden kann.
Bräunungselement
Diese Funktion verwendet nur das Element
oben im Ofen. Es ist eine nützliche Funktion zum
Bräunen oder Fertigstellen von Nudelgerichten,
Gemüse in Soße und Lasagne, da die zu bräunende
Speise bereits heiß ist, bevor zum oberen Element
gewechselt wird.
36
Page 37

Deutsch
Unterhitze
Diese Funktion verwendet nur das untere
Element. Es macht Ihren Pizza- oder Quicheboden
knusprig oder backt die Unterseite eines
Tortenbodens auf einem unteren Einschub fertig.
Es ist ebenfalls eine langsame Hitze, die gut zur
langsamen Zubereitung von Kasserollen in der Mitte
des Ofens oder zum Tellerwärmen geeignet ist.
Die Bräunungs- und Unterhitzefunktionen sind
nützliche Ergänzungen für Ihren Ofen und geben
Ihnen die Flexibilität, Speisen perfekt zuzubereiten.
Im Laufe der Zeit werden Sie schon bald merken,
wie diese Funktionen kombiniert werden können,
um Ihre Kochkünste zu erweitern.
Der rechte Backofen
Das Gebläse im rechten Backofen zirkuliert ständig
die heiße Luft und erlaubt damit schnelleres und
gleichmäßigeres Braten und Backen.
Die empfohlenen Back- und Brattemperaturen
für einen Umluftbackofen sind im Allgemeinen
niedriger als für einen normalen Backofen.
Beide Backöfen
Vor dem ersten Gebrauch des Herds die Backöfen
auf 230 °C einstellen und eine Stunde lang heizen,
um den Neugeruch zu beseitigen. Dazu muss der
Raum gut zur Außenluft belüftbar sein, zum Beispiel
durch Öff nen von Fenstern oder durch Einschalten
einer Dunstabzugshaube.
Denken Sie bitte daran, dass alle Herde verschieden
sind: Die Temperaturen in Ihren neuen FalconBacköfen können sich von denen in Ihrem früheren
Herd unterscheiden.
Die Drahtroste sollten immer fest an die Rückseite
des Backofens geschoben werden.
Wenn der Ofen eingeschaltet ist, die Tür nicht
länger als notwendig geöff net lassen, da sonst die
Regler sehr heiß werden können.
Lassen Sie immer eine ‚Fingerbreite‘ zwischen
Speisen auf dem gleichen Rost, da hierdurch die
Wärme unbehindert um sie herum zirkulieren kann.
Die Cook & Clean-Backofenauskleidungen (siehe
Reinigen Ihres Herdes) funktionieren besser, wenn
Fettspritzer vermieden werden. Fleisch beim
Kochen abdecken.
Um Fettspritzer zu verringern, wenn Sie Gemüse
in heißes Fett rund um einen Braten legen, das
Gemüse gründlich abtrocknen oder es mit einer
dünnen Schicht Öl bestreichen.
Wenn Sie den Boden eines Teiggerichts bräunen
wollen, heizen Sie ein Backblech 15 Minuten lang
vor, bevor Sie das Gericht in die Mitte des Bleches
setzen.
Wenn Speisen während des Kochens überkochen
können, setzen Sie sie auf ein Backblech.
Dampf
Beim Kochen von Speisen mit hohem Wassergehalt
(z. B. Backofen-Pommes frites) ist ggf. ein wenig
Dampf am Gitter hinten an der Kochstelle zu sehen.
Dies ist ganz normal.
Ofenroste
Der Herd wird mit einem Deluxe-Ofenblech
geliefert.
Ein Deluxe-Ofenblech
Backbleche, Fleischschalen usw. sollten waagerecht
und mittig auf die Drahtroste des Backofens gesetzt
werden. Halten Sie alle Schalen und Behälter von
den Seiten des Backofens fern, da übermäßiges
Bräunen der Speisen auftreten kann.
Für gleichmäßiges Bräunen ist die maximal
empfohlene Größe eines
Backblechs 340mm mal 340mm.
Beim Kochen von Speisen mit
hohem Feuchtigkeitsgehalt
kann ein „Dampfstoß“ auftreten,
wenn die Backofentür geöff net
wird. Beim Öff nen des Backofens
zurückstehen und eventuellen
Dampf austreten lassen.
Das Deluxe-Ofenblech verfügt über einen
Einlegerost oder Halter und kann somit zum Grillen
sowie zum normalen Backen und Braten im Ofen
verwendet werden.
Deluxe-Blecheinlegerost
Jeder Ofen wird darüber hinaus mit zwei
verschiedenen Ofenblechen geliefert.
37
Page 38

Deutsch
Ein Flachrost
Und ein gekröpfter Rost
Der gekröpfte Rost bietet mehr Möglichkeiten zum
Einsetzen anderer Bleche und Roste.
Das Deluxe-Blech gleitet einfach herein und heraus
- passen Sie auf, wenn Sie es nach vorne ziehen,
damit es nicht unstabil wird oder aus den Rillen in
der Seite des Ofens herausrutscht.
Schublade
Die Schublade unten dient zum Aufbewahren von
Ofenblechen und anderen Kochutensilien.
Sie kann sehr warm werden, bewahren Sie daher
nichts darin auf, das schmelzen oder Feuer fangen
kann.
Die Schublade kann zum Reinigen usw. vollständig
herausgenommen werden.
Schublade entfernen
Die Schublade nach vorne ziehen. Die Enden der
Kunststoff clips (einer auf jeder Seite) anheben,
um die Anschläge, die die Schublade an den
Seitenleisten halten, zu lösen und gleichzeitig die
Schublade nach vorne und von den Seitenleisten
abziehen.
Die anderen Ofenroste haben einen Endanschlag
und können daher nicht versehentlich
herausgezogen werden, sie lassen sich jedoch
einfach entfernen und wieder einsetzen.
Den Rost nach vorne
ziehen, bis die Rückseite
des Rostes durch die
Schiebeleistenanschläge
in den Ofenseiten
gestoppt wird.
Die Vorderseite des
Rostes anheben,
sodass die Rückseite
des Rostes unter dem
Schiebeleistenanschlag
hindurchgeht, und dann
den Rost nach vorne
ziehen.
Um den Rost wieder einzusetzen, den Rost mit
einer Rille in der Ofenseite ausrichten und den
Rost nach hinten schieben, bis das Ende an den
Schiebeleistenanschlag stößt. Den vorderen
Teil anheben, sodass die Rostenden über die
Schiebeleistenanschläge gehen und dann den
vorderen Teil absenken, sodass der Rost waagerecht
ist und ihn ganz nach hinten schieben.
Aus Sicherheitsgründen sollten Sie die
Schubladenleisten wieder einschieben.
Einsetzen der Schublade
Um die Schublade wieder in den Herd einzusetzen,
ziehen Sie die seitlichen Laufl eisten ganz heraus.
Schieben Sie die Schublade vorsichtig zwischen die
Laufl eisten und setzen Sie sie auf diese auf.
Halten Sie die
Schublade von vorn
fest und ziehen Sie
auf beiden Seiten die
seitliche Laufl eiste
so nach vorn, dass
die Halteklammern
einrasten und
die Schublade an
den Laufl eisten
befestigen.
38
Page 39

Deutsch
Reinigen Ihres Herdes
Vor der gründlichen Reinigung von der
Stromversorgung trennen. Daran denken, die
Stromversorgung vor dem Gebrauch wieder
einzuschalten.
Niemals Lösungsmittel, Bleichsoda, Ätzmittel,
biologische Pulver, Bleichmittel, Bleichen
auf Chlorbasis, grobe Scheuermittel oder
Salz verwenden. Keine unterschiedlichen
Reinigungsprodukte mischen. Sie können
miteinander mit gesundheitsschädlichen
Ergebnissen reagieren. Verwenden Sie zur
Reinigung des Herds keinen Dampfreiniger.
Wenn Sie Ihren Herd vor dem Reinigen bewegen
wollen, lesen Sie dazu im Abschnitt „Versetzen Ihres
Herdes“ nach.
Alle Teile des Herdes können mit heißer
Spülmittellauge gereinigt werden. Achten Sie
jedoch darauf, dass kein überschüssiges Wasser in
das Gerät eindringt.
1. Entfernenn Sie Essensablagerungen vorsichtig
mit einem feuchten Tuch und einer Scheuermilch
wie Astonish oder Cif.
2. Wischen Sie mit einem sauberen, weichen Tuch
nach und trocknen Sie den Ring.
Achten Sie darauf, nicht an die Zündelektrode
oder die Sicherheitsvorrichtung für den
Kochplattenbrenner zu kommen.
Die Brennerköpfe können zur Reinigung
herausgenommen werden. Vergewissern Sie sich,
dass diese absolut trocken sind, bevor Sie sie
wieder anbringen.
Brennerkopf
Brennerunterteil
Edelstahlkochfeld
Nehmen Sie Töpfe und Pfannen vom Kochfeld
herunter. Entfernen Sie Pfannenträger aus
dem verschmutzten Bereich und legen Sie
diese vorsichtig in ein Spülbecken mit warmer
Seifenlauge. Wischen Sie lose Reste vom Kochfeld
ab.
Vermeiden Sie die Verwendung von scheuernden
Reinigungsmitteln, wie Reinigungsmilch, z. B.
Scheuermilch auf polierten Edelstahlfl ächen.
Beste Ergebnisse erzielen Sie mit einem fl üssigen
Reinigungsmittel.
Spülen Sie mit kaltem Wasser nach und trocknen
Sie das Kochfeld gründlich mit einem sauberen
weichen Tuch. Alle Teile müssen trocken sein, bevor
sie wieder angebracht werden.
Kochstellenbrenner
Die großen Aluminiumringe an den Brennern
müssen regelmäßig gereinigt werden, damit sie
in gutem Zustand bleiben. Die Reinigung sollte
möglichst nach jedem Gebrauch erfolgen und
idealerweise so lange die Ringe noch warm sind.
Bei Anbringung des Brennerkopfes ist darauf zu
achten, dass dieser richtig im Unterteil sitzt.
Boden des Brenneroberteils Unterseite des
Gasbrennerkopfes
Die Brennerauslässe dürfen nicht blockiert sein. Bei
Blockierungen entfernen Sie hartnäckige Partikel
mit einem Stück feinem Draht.
Sollte es zu Ablagerungen auf diesen
Ringen kommen, wenden Sie die folgende
Reinigungsmethode an:
39
Page 40

Deutsch
Bedienblende und Ofentüren
Beste Ergebnisse erzielen Sie mit einem fl üssigen
Reinigungsmittel.
Die Bedienblende und die Regler sollten nur mit
einem weichen Tuch, ausgewrungen in sauberer,
heißer Spülmittellauge, gereinigt werden. Dabei
jedoch darauf achten, dass kein überschüssiges
Wasser in das Gerät gelangt. Mit einem sauberen,
feuchten Tuch abwischen und dann mit einem
trockenen Tuch polieren. Die Ofentüren sollten
nur mit einem weichen Tuch, das in sauberer und
heißer Spülmittellauge ausgewrungen wurde,
gereinigt werden.
Messingkomponenten reinigen
Unbeschichtetes natürliches Messing wird als
rustikales Dekorelement verwendet und kann im
Laufe der Zeit anlaufen.
Um diese Bereiche wieder zum Glänzen zu
bringen, sollten sie mit einem speziellen Reiniger
gereinigt werden. Hartnäckige Flecken auf den
Aluminiumbrennerringen können ebenfalls mit
einem ähnlichen Reinigungsmittel entfernt werden.
Dadurch wird der Glanz wiederhergestellt.
Entfernen der Ofenauskleidungen
Einige der Auskleidungsbleche können zum
Reinigen entfernt werden. Zuerst Roste
herausnehmen.
Der rechte
Umluftbackofen hat
ein abnehmbares
Ofendach
– schieben Sie die
Dachauskleidung nach
vorne und ziehen Sie
sie heraus.
Die Seitenabdeckungen jedes Ofens können
herausgenommen werden. Jede Seite des Ofens
ist mit vier Befestigungsschrauben befestigt. Sie
müssen die Schrauben nicht herausnehmen, um
die Ofenauskleidungen zu entfernen. Wird jede
Seitenabdeckung nach oben angehoben, gleitet sie
von den Schrauben. Diese dann nach vorne ziehen.
Die Backöfen
Um Schäden an der Emailleschicht im Innenraum
zu vermeiden, sollten Sie KEINE Alufolie auf den
Boden des Ofens legen.
Die Backöfen verfügen über Abdeckungen, die
mit spezieller Emaille beschichtet wurden, die sich
teilweise selbst reinigt. Dies verhindert nicht alle
Markierungen an der Auskleidung, hilft aber dabei,
einen Großteil des erforderlichen Reinigens von
Hand zu verringern.
Die Cook & Clean-Auskleidungen funktionieren
besser über 200°C. Wenn Sie das meiste Braten
und Backen unter dieser Temperatur ausführen,
nehmen Sie gelegentlich die Abdeckungen
heraus und wischen sie mit einem fuselfreien
Tuch und heißer Spülmittellauge ab. Die
Abdeckungen sollten dann getrocknet und
wieder eingesetzt und der Ofen etwa 1 Stunde
lang bei 200°C geheizt werden. Dies stellt sicher,
dass die Cook & Clean-Abdeckungen eff ektiv
arbeiten.
Sobald die Auskleidungen entfernt sind, kann das
Emailleinnere des Backofens gereinigt werden.
Beim Wiedereinsetzen der Auskleidungen zuerst
die Seitenauskleidungen anbringen.
Keine Stahlwolle, mit Seife gefüllte
Stahlwollreinigungspads, Topfkratzer oder andere
Materialien, die die Oberfl äche verkratzen können,
verwenden. Keine Ofenreinigungsschwämme
verwenden.
40
Page 41

Deutsch
Versetzen Ihres Herdes
Die Stromversorgung ausschalten.
Der Herd ist schwer, daher sind u.U. zwei Leute
notwendig, um ihn zu versetzen.
Der Herd hat eine Rolle vorne und zwei Rollen
hinten. Es befi nden sich ebenfalls zwei schraubbare
Nivellierfüße an der Vorderseite.
Die vordere Rolle, die zum Bewegen des Herdes
bestimmt ist, kann heruntergeschraubt werden.
Das Nivellierwerkzeug für diese Rolle sollte sich im
Staufach der Schublade befi nden. Wenn Sie das
Verstellwerkzeug nicht fi nden können, wenden
Sie sich an Ihren Installateur. Gehen Sie dazu
zum Beginn des Abschnitts „Installation“ dieser
Anleitung, wo der Installateur seine Adresse
aufgeschrieben haben sollte.
Schublade entfernen
Die Schublade nach vorne ziehen. Die Enden der
Kunststoff clips (einer auf jeder Seite) anheben,
um die Anschläge, die die Schublade an den
Seitenleisten halten, zu lösen und gleichzeitig die
Schublade nach vorne und von den Seitenleisten
abziehen.
schwergängig sein. Der Vorderteil des Herdes wird
leicht angehoben, wenn die Rolle herausgedreht
wird.
Beide Ofentüren öff nen, sodass sich die Unterseite
der Bedienblende gut greifen lässt, während Sie
den Herd bewegen.
Den Herd nicht bewegen, indem Sie am Haltegriff ,
den Türgriff en oder den Reglern ziehen.
Den Herd immer nur
ein Stück bewegen
und hinter dem
Herd kontrollieren,
dass sich der
Gasschlauch nicht
verfangen hat.
Sicherstellen, dass
das Stromkabel und
der Gasschlauch
lang genug sind,
um den Herd nach
vorne zu bewegen.
Wenn eine Stabilitätskette angebracht ist,
diese lösen, während Sie den Herd vorsichtig
herausziehen.
Aus Sicherheitsgründen sollten Sie die
Schubladenleisten wieder einschieben.
Wenn Sie den Herd wieder aufstellen, schrauben
Sie die Rollen wieder ein, indem Sie das
Nivellierwerkzeug gegen den Uhrzeigersinn
drehen. Dies ist wichtig. Es verhindert, dass sich der
Herd beim Gebrauch versehentlich bewegt.
Einsetzen der Schublade
Um die Schublade wieder in den Herd einzusetzen,
ziehen Sie die seitlichen Laufl eisten ganz heraus.
Schieben Sie die Schublade vorsichtig zwischen die
Laufl eisten und setzen Sie sie auf diese auf.
A linke, hintere Rolle, B rechte, hintere Rolle, C mittlere Rolle
Setzen Sie den Innensechskantschlüssel wie
gezeigt an.
Das Nivellierwerkzeug im Uhrzeigersinn um zwei
vollständige (180°) Drehungen drehen. Es wird
41
Halten Sie die Schublade von vorn fest und ziehen
Sie auf beiden Seiten die seitliche Laufl eiste so nach
vorn, dass die Halteklammern einrasten und die
Schublade an den Laufl eisten befestigen.
Page 42

Deutsch
Problembeseitigung
Dampf kommt aus dem Backofen
Beim Kochen von Speisen mit hohem Wassergehalt
(z. B. Backofen-Pommes frites) ist ggf. ein wenig
Dampf am hinteren Luftschlitz zu sehen. Beim
Öff nen der Ofentür vorsichtig sein, da es einen
kurzen Dampfstoß geben kann, wenn die Ofentür
geöff net wird. Zurückstehen und den Dampf
austreten lassen.
Das Backofengebläse ist laut
Der Ton des Gebläses kann sich ändern, während
sich der Backofen aufheizt – dies ist ganz normal.
Die Regler werden heiß, wenn ich den Backofen
benutze. Kann ich dies vermeiden?
Ja, dies wird durch Hitze verursacht, die aus dem
Ofen steigt und sie aufheizt. Die Backofentür stets
geschlossen lassen.
Wenn es ein Problem mit der Installation gibt und
mein ursprünglicher Installateur nicht kommen kann,
wer zahlt?
Sie zahlen. Kundendienste berechnen Gebühren,
wenn sie Arbeiten korrigieren, die von Ihrem
ursprünglichen Installateur ausgeführt wurden.
Es ist in Ihrem Interesse, Ihren ursprünglichen
Installateur zu fi nden.
Fehlerstrom-Schutzschalter (FI-Schalter)
Soll die Herdinstallation durch eine FehlerstromSchutzeinrichtung (FI-Schalter) mit 30 mA
geschützt werden, kann der kombinierte Gebrauch
Ihres Herdes und anderer Haushaltsgeräte
gelegentlich zu ungewolltem Auslösen führen.
In diesen Fällen muss der Herdschaltkreis ggf.
durch den Einbau einer 100 mA-Schutzeinrichtung
geschützt werden. Diese Arbeit sollte von einem
qualifi zierten Elektriker ausgeführt werden.
Speisen kochen zu langsam, zu schnell oder
verbrennen
Kochzeiten können anders als bei Ihrem vorherigen
Herd sein. Je nach individuellem Geschmack
kann die Temperatur geändert werden, um das
gewünschte Ergebnis zu erzielen. Versuchen
Sie, mit einer anderen Temperatureinstellung zu
kochen.
Der Backofen backt oder brät nicht gleichmäßig
Verwenden Sie keine Backform oder kein
Backblech, das größer als 340 mm x 340 mm ist.
Wenn Sie größere Lebensmittel braten, sollten Sie
diese während des Kochens umdrehen.
Wenn zwei Schubleisten verwendet werden,
kontrollieren, ob genug Platz zwischen beiden
gelassen wurde, damit die Hitze zirkulieren kann.
Wenn ein Backblech in den Ofen gesetzt wird,
vergewissern Sie sich, dass es mittig auf der
Schubleiste sitzt.
Kontrollieren Sie, ob die Türdichtung beschädigt
und die Türverriegelung so eingestellt ist, dass die
Tür fest an der Dichtung sitzt.
Eine Schale mit Wasser, die auf die Schubleiste
gesetzt wird, sollte überall die gleiche Tiefe haben.
(Wenn sie zum Beispiel hinten tiefer ist, sollte
der hintere Teil des Herdes angehoben oder die
Vorderseite abgesenkt werden.) Wenn der Herd
nicht waagerecht steht, lassen Sie Ihren Lieferanten
den Herd für Sie waagerecht stellen.
Backofentemperatur wird heißer, wenn der Herd älter
wird
Wenn das Herunterdrehen des Reglers nicht
funktioniert hat oder nur für eine kurze Zeit
funktioniert hat, benötigen Sie eventuell
ein neues Thermostat. Dies sollte von einem
Kundendienstvertreter eingebaut werden.
Defekte Kochstellenzündung oder Kochstellenbrenner
Ist die Stromversorgung eingeschaltet?
Sind die Zündelektroden oder Gasbrennerschlitze
durch Schmutz blockiert?
Sind die Brennerköpfe richtig aufgesetzt?
Kochplattenbrenner zünden nicht
Wenn nur eine oder alle Kochplattenbrenner nicht
zünden, vergewissern Sie sich, dass die Teile nach
dem Wischen oder Entfernen zur Reinigung richtig
wieder angebracht worden sind.
Kontrollieren Sie, ob es ein Problem mit Ihrer
Gasversorgung gibt. Dies ist möglich, indem Sie
sich vergewissern, dass alle anderen Gasgeräte, die
Sie haben, korrekt funktionieren.
42
Sehen Sie einen Funken an den Gasbrennern, wenn
Sie den Regler gedrückt halten? Wenn dies nicht
der Fall ist, prüfen Sie, ob der Strom eingeschaltet
ist.
Page 43

Allgemeine Sicherheitshinweise
Deutsch
Dieses Gerät muss von einem Fachmann gemäß
den Montageanweisungen installiert werden. Die
Installation muss den einschlägigen Vorschriften
sowie den Anforderungen lokaler Elektrizitätsversor
gungsunternehmen entsprechen.
Bei Gasgeruch
Elektrische Schalter nicht ein- oder ausschalten.
Nicht rauchen!
Keine offenen Flammen verwenden.
Das Gas am Gaszähler oder Zylinder ausschalten.
Türen und Fenster öffnen, um das Gas loszuwerden.
Das Gasversorgungsunternehmen anrufen.
Dieses Gerät ist nur zum Haushaltsgebrauch
ausgelegt. Verwendung für einen anderen
Zweck kann zum Verfall der Garantie oder der
Haftungsansprüche führen.
Die Verwendung eines Gaskochgerätes führt zu
Wärme- und Feuchtigkeitsbildung im Aufstellraum.
Deshalb immer auf eine gute Belüftung der Küche
achten: halten Sie die Belüftungsöff nungen
geöff net oder sehen Sie eine mechanische
Lüftungseinrichtung (z. B. eine mechanische
Dunstabzughaube) vor.
Die besonders intensive oder lang anhaltende
Benutzung des Gerätes kann eine zusätzliche
Belüftung, wie z. B. das Öff nen eines Fensters
erforderlich machen. Verwenden Sie Abzuggebläse
oder Dunstabzughauben, wenn vorhanden.
Der Herd sollte von einem qualifi zierten
Wartungstechniker repariert und nur geprüfte
Ersatzteile verwendet werden. Lassen Sie sich die
Lage des Herdkontrollschalters vom Installateur
zeigen. Markieren Sie ihn, um ihn leichter fi nden
zu können. Lassen Sie den Herd stets abkühlen
und schalten Sie ihn dann an der Netzversorgung
aus. Dies gilt auch vor der Reinigung oder vor der
Durchführung von Wartungsarbeiten, wenn in
dieser Anleitung nicht anders angegeben.
Verwenden Sie trockene Ofenhandschuhe. Feuchte
Handschuhe können zu Dampfverbrennungen
beim Berühren einer heißen Oberfl äche führen.
Betreiben Sie den Herd niemals mit nassen Händen.
Verwenden Sie kein Geschirrtuch oder ein anderes
großes Tuch statt eines Handschuhs. Sie können
Feuer fangen, wenn sie eine heiße Oberfl äche
berühren.
Lassen Sie beim Reinigen Vorsicht walten. Wenn
ein nasser Schwamm oder ein nasses Tuch zum
Aufwischen von Spritzern auf einer heißen
Oberfl äche verwendet werden, seien Sie vorsichtig,
um Dampfverbrennungen zu vermeiden. Einige
Reinigungsmittel können bei Anwendung auf einer
heißen Oberfl äche schädliche Dämpfe entwickeln.
Verwenden Sie keine unstabilen Töpfe und halten
Sie die Griff e vom Rand der Kochstelle entfernt.
Es darf Babys und kleinen Kindern niemals erlaubt
werden, in der Nähe des Herdes zu sein. Sie dürfen
keinesfalls auf irgendeinem Teil des Geräts sitzen
oder stehen. Bringen Sie ihnen bei, nicht an den
Reglern oder anderen Teilen des Herdes zu spielen.
Bewahren Sie niemals etwas in Schränken über
einem Herd auf, das für Kinder von Interesse
ist. Kinder, die auf den Herd klettern, um sie
zu erreichen, können ernsthafte Verletzungen
erleiden.
Reinigen Sie nur die in dieser Anleitung
aufgeführten Teile.
Im Interesse von Hygiene und Sicherheit sollte der
Herd jederzeit sauber gehalten werden, da sich
ansammelnde Fette oder andere Lebensmittelreste
zu einem Feuer führen können.
Brennbare Wandbehänge oder Vorhänge usw.
sollten im sicheren Abstand zu Ihrem Herd
angebracht sein.
Versprühen Sie keine Aerosole in der Nähe des
Herdes, während er eingeschaltet ist.
Alle Teile des Herdes werden bei Gebrauch heiß
und bleiben auch nach dem Kochen noch eine
Zeitlang heiß.
Seien Sie beim Berühren des Herdes vorsichtig,
um Verbrennungen zu vermeiden. Versichern Sie
sich ebenfalls immer, dass die Regler in der AUSStellung und kühl sind, bevor Sie versuchen, den
Herd zu reinigen.
Lagern oder verwenden Sie keine brennbaren
Materialien oder entzündliche Flüssigkeiten in der
Nähe dieses Geräts.
Verwenden Sie bei Fettbränden kein Wasser.
Heben Sie niemals einen brennenden Topf hoch.
Schalten Sie die Regler aus. Ersticken Sie das Feuer
in einem brennenden Topf auf einer Fläche durch
vollständiges Abdecken mit einem gut passenden
Deckel oder Backblech. Verwenden Sie einen
43
Page 44

Deutsch
Trockenchemikalien- oder Schaumfeuerlöscher,
falls verfügbar.
Lassen Sie die Kochplatte niemals unbeaufsichtigt
auf einer hohen Einstellung. Überkochende Töpfe
können zu Rauch führen und Fettspritzer können
Feuer fangen.
Tragen Sie niemals lose oder hängende Kleidung
während der Benutzung des Gerätes. Seien Sie
vorsichtig, wenn Sie nach Gegenständen greifen,
die in Schränken über der Kochstelle aufbewahrt
werden. Brennbares Material kann sich entzünden,
wenn es in Kontakt mit einer heißen Oberfl äche
gelangt und kann schwere Verbrennungen
verursachen.
Lassen Sie beim Erwärmen von Fetten und Ölen
große Vorsicht walten, da sich diese entzünden
können, wenn sie zu heiß werden.
Benutzen Sie, wenn möglich, ein
Frittierthermometer, um das Überhitzen von Fett
über den Rauchpunkt hinaus zu verhindern.
Lassen Sie eine Friteuse niemals unbeaufsichtigt.
Erwärmen Sie Fett immer langsam und beobachten
Sie es, während es sich erhitzt. Frittierpfannen
sollten nur zu einem Drittel mit Fett gefüllt sein.
Füllen der Pfanne mit zu viel Fett kann zu Spritzern
führen, wenn Nahrungsmittel hinzugegeben
werden. Wenn Sie eine Kombination aus Ölen oder
Fetten zum Braten verwenden, rühren Sie diese
vor dem Erwärmen oder während das Fett schmilzt
zusammen.
Bratgut sollte so trocken wie möglich sein. Frost
an Gefriergut oder Feuchtigkeit an frischen
Lebensmitteln kann zu Überkochen von heißem
Fett über den Rand der Pfanne führen. Achten
Sie beim Braten mit hohen oder mittelhohen
Temperaturen sorgfältig auf Spritzer oder
Überhitzen von Nahrungsmitteln. Versuchen Sie
niemals, eine Pfanne mit heißem Fett zu bewegen,
vor allem eine Friteuse. Warten Sie, bis das Fett
abgekühlt ist.
Nur bestimmte Arten von Glas, Glaskeramik,
Tonwaren oder anderen glasierten Behältern
eignen sich zum Kochen auf der Kochstelle.
Andere können aufgrund der plötzlichen
Temperaturänderung zerbrechen.
Sorgen Sie dafür, dass niemand auf einen Teil des
Herdes klettert, sich auf ihn stellt oder sich daran
hängt.
Verwenden Sie keine Aluminiumfolie zum
Abdecken von Rosten, Auskleidungen oder
Ofendach.
Um Schäden an der Emailleschicht im Innenraum
zu vermeiden, sollten Sie die Ofenpfanne oder die
Backbleche nicht auf den Boden des Ofens stellen
und keine Aluminiumfolie auf den Boden des Ofens
legen.
Erwärmen Sie niemals ungeöff nete Speisebehälter.
Druckaufstauung kann zum Platzen des Behälters
und damit Verletzungen führen.
Der Herd ist nur zum Zubereiten von Speisen
bestimmt und darf nicht für einen anderen Zweck
benutzt werden.
Der Ofen sollte NICHT zum Heizen der Küche
verwendet werden. Dies verschwendet Energie und
die Regler können sich überhitzen.
Wenn der Backofen eingeschaltet ist, die Ofentür
nicht länger als notwendig off en halten.
Die technischen Daten dieses Herdes sollten nicht
geändert werden.
Dieses Gerät ist schwer und beim Umsetzen sollte
Vorsicht walten gelassen werden.
Wenn der Herd nicht in Gebrauch ist, stellen Sie
sicher, dass die Regler in der Aus-Stellung sind.
Verwenden Sie nicht die Oberseite des Abzugs
(der Schlitz entlang der Rückseite des Herdes) zum
Vorwärmen von Platten, Tellern, Trocknen von
Geschirrtüchern oder Erweichen von Butter.
Bei Gebrauch eines elektrischen Geräts nahe der
Kochplatte sollten Sie sich vergewissern, dass die
Schnur des Geräts die Kochplatte nicht berühren
kann.
Achten Sie darauf, dass kein Wasser in das Gerät
eindringt.
44
Page 45

Deutsch
Reparatur und Ersatzteile
Füllen Sie bitte die Geräteinformationen unten
aus und bewahren Sie diese an einem sicheren
Ort auf. Diese Angaben helfen uns, Ihr Gerät
genau zu identifi zieren und helfen uns, Ihnen
zu helfen. Füllen Sie die Karte bitte jetzt aus,
um Zeit und Ungelegenheiten zu sparen, wenn
später ein Problem mit Ihrem Gerät auftreten
sollte. Es kann ebenfalls nützlich sein, Ihren
Kaufzettel zusammen mit dieser Broschüre
aufzubewahren. Sie könnten aufgefordert werden,
die Kaufbestätigung vorzulegen, um die Gültigkeit
einer Garantiereparatur zu prüfen.
Kraftstofftyp: Gas/Elektrizität
Name des Geräts:
Falcon Continental 1092 FSD
Farbe des Geräts*:
Seriennummer *:
Bei einem Problem
Falls Sie wider Erwarten ein Problem mit Ihrem
Gerät haben sollten, schauen Sie sich bitte zunächst
den Rest dieser Anleitung an, vor allem den
Abschnitt zur Problemlösung, um sicherzustellen,
dass Sie das Gerät korrekt benutzen.
Wenn Sie danach noch immer Schwierigkeiten
haben, wenden Sie sich bitte an Ihren Händler.
Bitte beachten
Ist der Garantiezeitraum für Ihr Gerät abgelaufen,
erhebt unser Kundendiensttechniker für diesen
Besuch ggf. eine Gebühr.
Wenn Sie einen Ingenieurbesuch anfordern und
der Fehler nicht Verantwortung des Herstellers ist,
behält sich unser Kundendiensttechniker das Recht
zur Berechnung einer Gebühr vor.
Nicht wahrgenommene Termine können ebenfalls
in Rechnung gestellt werden.
Außerhalb des Garantiezeitraums
Wir empfehlen, dass unsere Geräte regelmäßig über
ihre gesamte Lebensdauer gewartet werden, um
beste Leistung und Wirtschaftlichkeit zu erhalten.
Händlername und –anschrift:
Kaufdatum:
Name und Anschrift des Installateurs:
Installationsdatum:
* Diese Informationen befi nden sich auf dem
Geräteschild.
Wartungs- und Reparaturarbeiten sollten nur von
sachkundigem und ausreichend qualifi ziertem
Personal ausgeführt werden.
Ersatzteile
Um optimale und sichere Leistung zu erhalten, nur
Originalersatzteile verwenden. Keine erneuerten
oder unzulässigen Gasregler verwenden. Wenden
Sie sich an Ihren Händler.
45
Page 46

Deutsch
Einbau
Dieses Gerät ist nur zum Haushaltsgebrauch ausgelegt.
Verwendung für einen anderen Zweck kann zum Verfall der
Garantie oder der Haftungsansprüche führen.
Stellen Sie vor der Installation sicher, dass der Herd für Ihre
Gasart und Versorgungsspannung geeignet ist. Entnehmen Sie
diese dem Leistungsschild des Geräts.
Schauen Sie auf dem Leistungsschild nach, für welches Gas der
Herd eingestellt ist.
Umstellung
Dieses Gerät wird geliefert als: G 20 20 Millibar CAT II2E3+
Ein Umstellsatz für andere Gasarten ist im Lieferumfang
des Herds enthalten. Soll das Gerät auf die Verwendung
einer anderen Gasart umgestellt werden, empfehlen wir,
dies vor der Installation zu tun. Informationen hierzu fi nden
Sie in der Anleitung zur Gasumstellung, die in diesem
Umstellsatz enthalten ist. Kleben Sie nach der Umstellung den
Umstellungsaufkleber an der entsprechenden Position auf das
Leistungsschild. Dadurch wird anzeigt, für welches Gas das
Gerät nun eingestellt ist.
Befi nden sich andere kraftstoff verbrennende Geräte im
gleichen Raum, ist ggf. mehr Belüftung notwendig.
Position der Kochplatte
Die Kochplatte kann in einer Küche bzw. Küche mit Esszimmer
installiert werden, jedoch NICHT in einem Raum mit einer
Badewanne oder Dusche.
HINWEIS:
Ein Gerät für fl üssiges Propangas darf nicht in einem
Zimmer oder internen Raum unter Erdgeschossebene wie z.
B. in einem Keller installiert werden.
Aufstellen des Herdes
Die Abbildungen zeigen den empfohlenen Mindestabstand
des Herdes zu benachbarten Flächen.
Der Herd sollte nicht auf einen Sockel gestellt werden.
Sicherheitsanforderungen/Vorschriften
und Richtlinien
Dieses Gerät muss von einer Fachkraft installiert werden.
Die Installation muss den einschlägigen Vorschriften und
Richtlinien sowie den Anforderungen lokaler Elektrizitätsversor
gungsunternehmen entsprechen. Lesen Sie vor der Installation
oder dem Gebrauch dieses Geräts die Anleitung.
In Ihrem eigenen und dem Interesse der Sicherheit ist es
gesetzlich vorgeschrieben, dass alle Gasgeräte von Fachleuten
installiert werden müssen. Bei unkorrekter Installation des
Geräts können Garantie- oder Haftungsansprüche nichtig
werden und zu Strafverfolgung führen.
Stellen Sie vor der Installation sicher, dass der Herd für Ihre
Gasart und Versorgungsspannung geeignet ist. Entnehmen Sie
diese dem Leistungsschild.
Stellen Sie es in einem gut belüfteten Raum auf.
Belüftungsmaßnahmen
Dieses Gerät wird nicht an eine Abgasleitung angeschlossen. Es
muss nach den geltenden Installationsbedingungen aufgestellt
und angeschlossen werden. Besonders zu beachten sind
geeignete Belüftungsmaßnahmen.
Örtliche Richtlinien zur Be- und Entlüftung müssen beachtet
werden, mindestens ist jedoch folgendes notwendig:
Alle Räume benötigen ein Fenster, das geöff net werden kann,
oder vergleichbares, für einige Räume ist zusätzlich zu einem
Fenster ein permanenter Abzug erforderlich. Der Herd darf
nicht in einer kombinierten Wohnküche mit einem Rauminhalt
von weniger als 20 m3 installiert werden. Soll er in einem Raum
mit einem Rauminhalt von unter 5 m3 installiert werden, ist ein
Luftabzug mit einer Wirkfl äche von 100 cm2 erforderlich. Soll
er in einem Raum mit einem Rauminhalt von 5 m3 bis 10 m3
installiert werden, ist ein Luftabzug mit einer Wirkfl äche von 50
cm2 erforderlich. Überschreitet der Rauminhalt 11 m3 ist kein
Luftabzug erforderlich. Hat der Raum jedoch eine Tür, die direkt
ins Freie geöff net werden kann, ist selbst bei einem Rauminhalt
zwischen 5 m3 und 10 m3 kein Luftabzug erforderlich.
*Breite bei geöff neter Tür
Die Kochstelleneinfassung sollte auf einer Ebene mit oder
über jeder benachbarten Arbeitsfl äche liegen. Über der
Kochstellenhöhe sollte eine Lücke von 75 mm an jeder Seite
des Herdes und zu jeder benachbarten senkrechten Fläche
gelassen werden.
Für nicht entzündliche Flächen (wie unlackiertes Metall oder
Keramikfl iesen) kann dies auf 25 mm verkleinert werden.
Ein Mindestraum von 800mm ist zwischen der Oberseite
der Kochstelle und einer horizontalen entzündlichen Fläche
erforderlich.
*Jede Dunstabzugshaube sollte gemäß den Anweisungen des
Dunstabzughaubenherstellers installiert werden.
Möbel- und Wandfl ächen auf beiden Seiten und hinter dem
Gerät sollten wärme-, spritz- und dampfbeständig sein.
Bestimmte Arten von vinyl- oder laminatbeschichteten
Küchenmöbeln sind besonders anfällig für Hitzeschäden und
Verfärbungen. Wir übernehmen keinerlei Haftung für Schäden
wie das Lösen von Laminatbeschichtungen oder Verfärbungen
46
Page 47

bei Temperaturen unter 65 °C über Raumtemperatur, die durch
die normale Verwendung des Herdes verursacht werden.
Aus Sicherheitsgründen dürfen keine Vorhänge direkt hinter
dem Herd angebracht werden.
Wir empfehlen eine Lücke von 1.115mm zwischen Einheiten,
um Bewegen des Herdes zu berücksichtigen. Den Herd
nicht einklemmen. Es muss noch immer möglich sein, den
Herd zur Reinigung und Wartung hereinzuschieben und
herauszuziehen.
Ein Abstand von 130 mm ist erforderlich, wenn der Herd nahe
einer Ecke der Küche steht, damit sich die Backofentüren öff nen
lassen.
Deutsch
Die Enden der Kunststoff clips (einer auf jeder Seite) anheben,
um die Anschläge, die die Schublade an den Seitenleisten
halten, zu lösen und gleichzeitig die Schublade nach vorne
und von den Seitenleisten abziehen. Aus Sicherheitsgründen
sollten Sie die Schubladenleisten wieder einschieben. Legen
Sie die Schublade an einen sicheren Ort, sie wird erst wieder
eingesetzt, wenn die Installation abgeschlossen ist.
Senken Sie die Rollen ab.
Den Innensechskantschlüssel an der mittleren
Rollenabsenkvorrichtung (C in der Abb. unten) anbringen.
Auspacken des Herdes
Entfernen Sie keine Verpackung vom Herd, bis er sich direkt
vor dem Aufstellort befi ndet (es sei denn, er passt in seiner
Außenverpackung nicht durch eine Tür).
Durchtrennen Sie die Schnüre und heben Sie den Karton vom
Herd ab. Lassen Sie den Herd auf der Bodenverpackung stehen.
Siehe loses Auspackblatt.
Versetzen des Herdes
Der Herd ist sehr schwer. Seien Sie sehr vorsichtig.
Wir empfehlen, dass zwei Personen den Herd bewegen. Sorgen
Sie dafür, dass der Bodenbelag fest angebracht ist oder entfernt
wurde, um Beschädigungen beim Bewegen des Herds zu
vermeiden. Sie werden das Nivellierwerkzeug benötigen.
Kippen Sie den Herd von der Rückseite nach vorne und
entfernen Sie die hintere Hälfte der Polystyrol-Verpackung.
Wiederholen Sie dies an der Vorderseite und entfernen Sie
die vordere Hälfte des Verpackungsbodens. Ziehen Sie die
Schublade bis zum Anschlag heraus.
A linke, hintere Rolle, B rechte, hintere Rolle, C mittlere Rolle
SENKEN SIE DIE VORDERE ROLLE AB, indem Sie 14 ganze (360°)
Drehungen ausführen.
Senken Sie jetzt DIE ZWEI HINTEREN ROLLEN AB.
Legen Sie das Nivellierwerkzeug wie unten abgebildet an die
Stellmutter an.
Führen Sie 10 ganze (360°) Drehungen aus. (Dazu müssen Sie
das Nivellierwerkzeug 20 mal drehen und neu anlegen.)
47
Page 48

Deutsch
Senken Sie unbedingt BEIDE DER HINTEREN ROLLEN AB. An
den vorderen unteren Ecken des Herdes befi nden sich zwei
Stellmuttern - je eine pro Rolle.
Klappen Sie den hinteren Rand des Verpackungsbodens auf.
Schieben Sie den Herd vorsichtig nach hinten in Position.
Achten Sie dabei auf das Stromkabel. Schieben Sie den Herd
nah an seine endgültige Position und lassen Sie nur genug
Platz, um hinter ihn greifen zu können.
Umstellung auf Flüssiggas
Wenn das Gerät auf Flüssiggas umgestellt werden soll, nehmen
Sie die Umstellung an dieser Stelle vor. Informationen dazu
fi nden Sie im Abschnitt „Gasumstellung“ dieser Anleitung.
Flexibler Gasschlauch
Zwischen Gasversorgung und Anschlussschlauch muss ein
Gasabsperrventil angebracht werden. Der fl exible Schlauch
(nicht im Lieferumfang des Herdes enthalten) muss den
einschlägigen Normen entsprechen. Wenden Sie sich im
Zweifelsfall an Ihren Lieferanten.
Höheneinstellung
Es wird empfohlen, eine Wasserwaage auf einem
Einschubblech in einem der Backofen zu benutzen, um zu
prüfen, ob er waagerecht steht.
Den Herd in seine gewünschte Position stellen und
dabei darauf achten, ihn nicht in der Lücke zwischen
Kücheneinheiten zu verdrehen, da dies den Herd oder die
Einheiten beschädigen könnte.
Die Rollen können eingestellt werden, um den Herd
waagerecht zu stellen. Um die Höhe der Rückseite des Herdes
einzustellen, das im Lieferumfang enthaltene Nivellierwerkzeug
benutzen, um die Stellmuttern an den vorderen Ecken des
Herdes zu drehen.
Die Höhe der vorderen Rolle einstellen, um den Herd
waagerecht zu stellen. Im Uhrzeigersinn drehen, um den Herd
anzuheben, gegen den Uhrzeigersinn, um ihn zu senken.
Wenn Sie mit der Höhe und waagerechten Position zufrieden
sind, heben Sie die Vorderseite des Herdes um eine Drehung
der vorderen Einstellrolle. Die Vorderfüße auf den Boden
herunterschrauben. Die vordere Einstellrolle gegen den
Uhrzeigersinn rollen, um die vordere Rolle anzuheben, sodass
die Vorderseite des Herdes auf den Füßen, nicht der vorderen
Rolle ruht, um versehentliches Bewegen des Herdes zu
verhindern.
Gasanschluss
Haltevorrichtung
Eine Haltevorrichtung sollte angebracht sein, wenn der
Herd an eine fl exible Gasversorgung angeschlossen ist. Eine
Haltevorrichtung sollte am Bauwerk befestigt werden und
sollte gelöst werden können, damit der Herd zur Reinigung
oder Wartung herausgezogen werden kann.
Ansicht von hinten
A Position der Druckprüfpunktschraube.
B Gerätegaseinlass
C Position für Gasversorgungsanschluss
Der Einlassanschluss für den Herd ist ISO 7-1 Innengewinde.
Wenn Sie einen Anschluss ISO 228-1 benötigen, fi nden
Sie den Adapter im Umstellsatz. Tragen Sie ein geeignetes
Gewindedichtmittel auf das ISO 7-1-Ende auf.
Schrauben Sie den Steckverbinder in den Herdeinlass, bis
er fi ngerdicht sitzt. Mittels zweier geeigneter Werkzeuge
(eines am Einlass des Herds, um sicherzustellen, dass er
ruhig gehalten wird und einem am Steckverbinder) den
Steckverbinder im Einlass am Herd festziehen.
Min. 15 Nm.
Max 20 Nm.
Den Schlauch an den Steckverbinder anschließen.
Der Schlauch sollte so angebracht werden, dass Ein- und
Auslassanschlüsse senkrecht sind, so dass der Schlauch uförmig nach unten hängt.
Da die Höhe des Herdes verstellt werden kann und jeder
Anschluss anders ist, ist es schwierig, genaue Abmessungen zu
geben. Idealerweise sollte der Hausversorgungsanschluss im
schraffi erten Bereich in der Abbildung auf der Rückseite des
Herdes sein („A“ in der Abbildung). Anderenfalls von der Seite
aus anschließen.
Kontrollieren Sie nach Herstellung des Gasanschlusses mit
einer Druckprüfung, ob der Herd gasdicht ist. Verwenden
Sie bei Prüfung auf Gasaustritte kein Spülmittel – dies kann
zu Rost führen. Verwenden Sie ein Produkt, das speziell für
Leckerkennung hergestellt wurde.
VORSICHT: BEI DER SUCHE NACH LECKS KEINE OFFENEN
FLAMMEN VERWENDEN.
48
Page 49

Druckprüfung
Der Gasdruck kann am Druckprüfpunkt am Gasanschlussblock
gemessen werden. Schalten Sie einen Kochplattenbrenner ein
und zünden Sie ihn an.
Das Brenneroberteil wieder zusammensetzen und dabei
sicherstellen, es korrekt auf dem Brennergehäuse zu montieren.
Elektrischer Anschluss
Dieses Gerät muss von einem qualifi zierten Elektriker gemäß
einschlägigen Vorschriften sowie den Anforderungen lokaler
Elektrizitätsversorgungsunternehmen installiert werden.
ACHTUNG: DIESES GERÄT MUSS GEERDET WERDEN
Hinweis
Der Herd muss über eine geeignete Herdsteuerung mit
einem doppelpoligen Schalter mit einer Kontakttrennung
von mindestens 3 mm in allen Polen an die korrekte
Stromversorgung angeschlossen werden, wie auf dem
Spannungsschild am Herd angegeben. Dieser Herd darf nicht
an eine normale Haushaltssteckdose angeschlossen werden.
Die gesamte elektrische Belastung des Geräts beträgt etwa
7,2 kW. Die verwendete Kabelgröße sollte für diese Belastung
geeignet sein und alle örtlichen Anforderungen erfüllen.
Zugriff auf den Netzanschluss erhalten Sie durch Entfernen des
elektrischen Klemmenanschlusskastens an der Rückwand.
Das Netzkabel an die korrekten Anschlüsse für Ihre
Stromversorgungsart anschließen.
Deutsch
einer 100 mA-Schutzeinrichtung geschützt werden. Diese
Arbeit sollte von einem qualifi zierten Elektriker ausgeführt
werden.
Kochstelle
Alle Brenner nacheinander kontrollieren. Eine Flammensich
erheitsvorrichtung stoppt die Gaszufuhr zum Brenner, wenn
die Flamme erlischt. Außerdem ist eine Funkenzündung
vorhanden, die funktioniert, wenn der Regler gedrückt wird.
Für jeden Brenner den Regler drücken und auf das große
Flammensymbol () drehen.
Durch die Funken der Zündung wird das Gas entzündet. Halten
Sie den Regler einige Sekunden lang gedrückt, damit das Gas
zum Brenner strömen kann.
Falls der Brenner beim Loslassen des Reglers erlischt,
funktioniert die Sicherheitsvorrichtung nicht. Den Regler auf
Aus stellen. Den Vorgang nach einer Minute wiederholen und
diesmal den Regler etwas länger und evtl. fester eindrücken.
Backofenprüfung
Die Backöfen einschalten und kontrollieren, ob sie sich
erwärmen. Die Öfen ausschalten.
Anbringen des Sockels
Die drei Schrauben für die Sockelhalterungen entlang der
vorderen Unterkante des Herds entfernen. Den Sockel mit
diesen Schrauben anbringen (andersfarbige Schrauben fi nden
Sie im losen Zubehör).
Kontrollieren, ob die Verbindungen korrekt angebracht
und die Klemmschrauben fest angezogen sind.
Das Netzkabel über die Kabelschelle befestigen.
Fehlerstrom-Schutzschalter (FI-Schalter)
Soll die Installation durch eine Fehlerstrom-Schutzeinrichtung
(FI-Schalter) mit 30 mA geschützt werden, kann der
kombinierte Gebrauch Ihres Herdes und anderer
Haushaltsgeräte gelegentlich zu ungewolltem Auslösen führen.
In diesen Fällen muss der Herdschaltkreis ggf. durch den Einbau
Einsetzen der Schublade
Ziehen Sie die Laufl eisten ganz heraus.
Schieben Sie die Schublade vorsichtig zwischen die Laufl eisten
und setzen Sie sie auf diese auf.
Halten Sie die Schublade von vorn fest und ziehen Sie auf
beiden Seiten die seitliche Laufl eiste so nach vorn, dass die
Halteklammern einrasten und die Schublade an den Laufl eisten
befestigen.
Das Nivellierwerkzeug in der Schublade lassen, damit der
Kunde es benutzen kann, wenn er den Herd versetzen möchte.
Kundendienst
Bitte informieren Sie den Benutzer über die Bedienung des
Herdes und übergeben Sie ihm diese Anleitung.
Vielen Dank.
49
Page 50

Deutsch
Reparatur
1 REPARATUR
Bei Reparatur oder Austausch gasführender Bauteile den Herd
vor Beginn der Arbeiten vom Gas trennen.
Nach Abschluss der Reparatur prüfen, ob das Gerät gasdicht
ist. Verwenden Sie bei Prüfung auf Gasaustritte kein Spülmittel
– dies kann zu Rost führen. Verwenden Sie ein Produkt, das
speziell für Leckerkennung hergestellt wurde.
Keine erneuerten oder unzulässigen Gasregler verwenden.
Vor Aufnahme der Reparatur von der Stromzufuhr trennen, vor
allem bevor folgende Teile entfernt werden: - Bedienblende,
Seitenabdeckungen, Kochplattenblech oder elektrische
Komponenten oder Abdeckungen.
Vor dem Wiederanschluss an die Stromversorgung ist
sicherzustellen, dass das Gerät elektrisch sicher ist.
Anmerkung – Hinweise auf den linken und rechten Ofen
beziehen sich auf die Ansicht von vorn.
VOR ALLEN WARTUNGSARBEITEN AN GASFÜHRENDEN
KOMPONENTEN MUSS DIE GASZUFUHR UNTERBROCHEN
WERDEN.
2 Kochplatte entfernen
Das Gerät von der Stromversorgung trennen.
Das Gerät nach vorne ziehen, um Zugang zu erhalten.
a) Pfannenträger/Kochplattenzubehör und Brennerköpfe
entfernen.
b) Die Messing-Venturi-Düse in der Mitte aller Kochplattenbr
ennereinfassungen entfernen.
Brennerkopf
MessingVenturi-Düse
Brennerunterteil
Brennerring
c) Die Einfassung von der Kochplatte entfernen und die
Funkenzündungsleitung von der Funkenelektrode
trennen.
d) Die Kochplatte vom Gerät abheben.
e) In der umgekehrten Reihenfolge zusammensetzen.
3 Bedienblende entfernen
Das Gerät von der Stromversorgung trennen.
a) Pfannenträger/Kochplattenzubehör und Brennerköpfe
entfernen.
b) Die Messing-Venturi-Düsen in der Mitte der einzelnen
Brenner lockern.
c) Die Regler von allen Hähnen entfernen.
d) Beide Ofentüren öff nen. 3 Befestigungselemente an der
oberen Vorderseite und 3 Befestigungselemente an der
Unterseite der Bedienblende entfernen.
e) Die Bedienblende nach vorne ziehen. Die Anschlüsse
hinten an den drei Leuchten entfernen. Die Erdleitung
trennen und die Blende vom Gerät abheben.
f) In der umgekehrten Reihenfolge zusammensetzen.
g) Beim Ersetzen elektrischer Anschlüsse ziehen Sie bitte
den Schaltplan zu Hilfe.
4 Eine äußere Abdeckung entfernen
Das Gerät von der Stromversorgung trennen.
a) Die Bedienblende wie in Abschnitt 3 beschrieben
entfernen.
b) Die Sicherungsschraube an der oberen Vorderkante
sowie die beiden Befestigungselemente an der Rückseite
oder an der Seitenabdeckung entfernen. Die untere
Sicherungsschraube lösen, die sich unterhalb der Kante
an der vorderen Ecke der Bedienblende befi ndet.
c) Die Abdeckung vom Gerät abheben. Bei Problemen kann
es erforderlich sein, die beiden nächstliegenden Brenner
und beide Messing-Venturi-Düsen wie in Abschnitt 2
beschrieben zu lösen.
d) In der umgekehrten Reihenfolge zusammensetzen.
Kontrollieren, ob beide Venturi-Düsen fest angezogen
sind.
5 Eine Ofenneonleuchte entfernen
Das Gerät von der Stromversorgung trennen.
a) Die Bedienblende wie in Abschnitt 3 beschrieben
entfernen.
b) Den entsprechenden Leuchtenanschluss entfernen und
die Mutter, mit der die Leuchte an der Bedienblende
befestigt ist, lösen.
c) In der umgekehrten Reihenfolge zusammensetzen.
Kontrollieren, ob die Ersatzleuchte richtig funktioniert.
6 Einen Thermostat entfernen
Das Gerät von der Stromversorgung trennen.
Die Kochplatte entfernen (siehe 2). Das Bedienfeld entfernen
(siehe 3). Die entsprechende Ofentür öff nen und die Ofenroste
herausnehmen. Den Herd nach vorne ziehen, um Zugriff auf
den Abdeckkasten zu erhalten. Die Schrauben lösen und die
Abdeckung abheben.
Rechter Backofen
Die beiden Befestigungselemente entfernen, mit denen
die Abdeckung des Thermostatglases befestigt ist. Das
Thermostatglas aus den Clips an der hinteren Ofenabdeckung
herausnehmen.
Linker Backofen
Die beiden Schrauben entfernen, mit denen das
Thermostatglas an der Gebläseabdeckung hinten im Ofen
befestigt ist. Das Gerät nach vorne ziehen, um Zugriff auf den
hinteren Bereich des Herds zu erhalten. Die Abdeckkästen
abheben, nachdem die Befestigungsschrauben entfernt
wurden. Die Thermostatkapillare vom Ofen entfernt zuführen.
Die Drähte vom Thermostat trennen und die beiden
Befestigungselemente lösen, mit denen die Kontrollvorrichtung
an der Befestigungsplatte befestigt ist.
Das Ersatzthermostat einsetzen und in umgekehrter
Reihenfolge zusammenbauen. Kontrollieren, ob das Glas hinten
im Ofen mittig zwischen den Clips befestigt ist. Kontrollieren,
ob das Thermostat richtig funktioniert.
50
Page 51

Deutsch
7 Ein Ofensicherungsthermostat entfernen
Das Gerät von der Stromversorgung trennen.
a) Das Gerät nach vorne ziehen, um Zugriff auf den
Abdeckkasten zu erhalten. Die Schrauben lösen und die
Abdeckung abheben.
b) Der Regler befi ndet sich auf der Erdungsplatte neben den
Ofenelementanschlüssen.
c) Die Thermostatverdrahtung trennen. Die
Befestigungselemente lösen, mit denen das Thermostat
an der Erdungsplatte befestigt ist, und das Thermostat
entfernen.
d) Den Ersatzregler einsetzen und die Teile in umgekehrter
Reihenfolge zusammenbauen.
8 Einen Kochplattenhahn entfernen
Das Gerät von der Stromversorgung trennen.
a) Die Kochplatte wie in Abschnitt 2 beschrieben entfernen.
b) Die Bedienblende wie in Abschnitt 3 beschrieben
entfernen.
c) Die Rohrverschraubung hinten am Hahn lösen.
Die Befestigungselemente entfernen, mit denen
der Hahn an der Gasringleitung befestigt ist. Die
Zündschalterverdrahtung trennen.
d) Den Hahn entfernen. Die Dichtung entfernen und
wegwerfen. Den Ersatzhahn mit einer neuen Dichtung
versehen.
e) In umgekehrter Reihenfolge wieder zusammenbauen.
Kontrollieren, ob das Gerät gasdicht ist. Die
Kochplattenzündung prüfen.
9 Einen Zündschalter auswechseln
Den Gashahn wie in Abschnitt 9 beschrieben auswechseln.
10 Eine Kochplattenbrennerdüse entfernen
a) Die Kochplatte wie in Abschnitt 2 beschrieben entfernen.
b) Die Düse direkt vom Brennerkörper entfernen.
c) Die entsprechende Düse anbringen.
d) In umgekehrter Reihenfolge wieder zusammenbauen.
Kontrollieren, ob das Gerät gasdicht ist.
12 Einen Kochplattenbrenner entfernen
a) Pfannenträger, Kochplattenzubehör und Brennerköpfe
entfernen.
b) Die Kochplatte wie in Abschnitt 2 beschrieben entfernen.
c) Die Mutter entfernen, mit der der Brenner an der
Trägerschiene befestigt ist.
d) Die Befestigungselemente entfernen, mit denen die
Trägerschiene am Gestell befestigt ist. Heben Sie die
Schiene vom Gerät.
e) Die Rohrverschraubung lösen, mit der der Brenner mit
der Gasleitung verbunden ist. Den Brenner vom Gerät
entfernen.
f) In der umgekehrten Reihenfolge zusammensetzen.
Kontrollieren, ob das Gerät gasdicht ist und ob der
Brenner zufrieden stellend funktioniert.
13 Ofentür entfernen
a) Die Ofentür öff nen.
b) Die Tür festhalten und die beiden Schrauben entfernen,
mit denen das obere Scharnier am Vorderrahmen des
Geräts befestigt ist.
c) Die Tür vom unteren Scharnier entfernen, indem sie leicht
angehoben und nach außen bewegt wird.
d) In umgekehrter Reihenfolge wieder zusammenbauen.
14 Äußere Verkleidung der Ofentür entfernen
a) Die Ofentür öff nen.
b) Die beiden Schrauben „A“ und die beiden Schrauben „B“
von der Tür entfernen.
c) Die äußere Türverkleidung entfernen.
d) Die Muttern lösen, mit denen der Handgriff an der
Türabdeckung befestigt ist. Den Handgriff an der
Ersatztürabdeckung anbringen.
e) Die Ersatzverkleidung an der Ofeninnentür anbringen.
f) In umgekehrter Reihenfolge wieder zusammenbauen.
11 Eine Kochplattenfunkenelektrode entfernen
a) Pfannenträger, Kochplattenzubehör und Brennerköpfe
entfernen.
b) Die Einfassung der Venturi-Düse lösen und von der
Kochplatte entfernen. Der Funkenzündungsdraht wird
durch das Elektrodenloch gezogen.
c) Die Funkenelektrode vom Zündungsdraht trennen.
Hinweis
Darauf achten, dass der Zündungsdraht nicht durch das Loch
fällt.
d) Die Funkenelektrode von der Einfassung entfernen,
indem die Federklemme und die Feder entfernt werden.
e) Die Ersatzelektrode in die Brennereinfassung einsetzen.
Dafür sorgen, dass Feder und Klemme richtig befestigt
sind.
f) In umgekehrter Reihenfolge zusammensetzen und
kontrollieren, ob der Brenner richtig zündet.
15 Schließhaken der Tür entfernen
a) Die äußere Abdeckung der Ofentür wie in Abschnitt 15
beschrieben entfernen.
b) Die Befestigungselemente entfernen, mit denen die
Schließhakenvorrichtung an der inneren Türverkleidung
befestigt ist.
c) Den Ersatzschließhaken einsetzen und in umgekehrter
Reihenfolge zusammenbauen.
d) Die Türfunktion prüfen.
51
Page 52

Deutsch
16 Ofentürdichtung entfernen
a) Die Ofentür öff nen. Die Dichtung wird an der hinteren
Fläche durch kleine Häkchen gehalten. Die Dichtung an
der Ecke diagonal von der Türmitte abziehen, bis dieses
Häkchen gelöst wurde.
b) Das nächste Häkchen ähnlich lösen und dies für alle
Häkchen wiederholen. Falls die Haken schwer zu
lösen sind, kann Kraft angewendet werden, da die alte
Dichtung weggeworfen wird.
c) Beim Anbringen einer neuen Dichtung die
Verbindungsstelle der Dichtung unten platzieren. Die
neue Dichtung in eines der Ecklöcher der Tür einhaken
und nacheinander alle Häkchen um die Tür herum
einhaken.
17 Sperrklinke der Ofentür verstellen
a) Die Ofentür öff nen und die Sicherungsmutter im unteren
Bereich der Sperrklinke lösen.
19 Elektrodenleitungen der Herdplatte entfernen
Von der Stromversorgung trennen.
Das Gerät nach vorne ziehen, um Zugriff auf den hinteren
Bereich des Geräts zu erhalten.
a) Pfannenträger, Kochplattenzubehör und Brennerköpfe
entfernen.
b) Die Kochplatte wie in Abschnitt 2 beschrieben entfernen.
c) Den Abdeckkasten entfernen und alle
Hochspannungsleitungen am Funkengeber trennen.
d) Die untere hintere Abdeckung entfernen und die Leitung
an der Elektrode trennen.
e) Das isolierte Bündel Hochspannungsleitungen durch die
hintere Leiste ziehen.
f) Die entsprechende Leitung aus der Isolierung ziehen und
die Ersatzleitung hineinschieben.
g) Die Leitungen wieder in die hintere Leiste einsetzen.
h) Die Leitungen wieder mit dem Funkengeber und der
Ofenelektrode verbinden.
j) In umgekehrter Reihenfolge wieder zusammenbauen
und die Zündung kontrollieren.
20 Innere Ofenabdeckung entfernen
a) Die Ofentür öff nen. Am linken Ofen die 2
Befestigungsschrauben lösen, mit denen das
Thermostatglas befestigt ist. Die Befestigungselemente
entfernen, mit denen die innere Rückwand hinten am
Ofen befestigt ist.
b) Die Sperrklinke nach innen oder außen verstellen, bis die
gewünschte Türfunktion erzielt wurde.
c) Die Sicherungsmutter wieder anziehen.
18 Herdplattenfunkengeber entfernen
Das Gerät von der Stromversorgung trennen.
a) Das Gerät nach vorne ziehen, um Zugriff auf die
Abdeckkästen hinten am Gerät zu erhalten. Die
Befestigungselemente der Abdeckung entfernen und die
Abdeckung abheben.
b) Die Anschlüsse lösen und ihre Position notieren.
c) Die Befestigungselemente lösen, mit denen der
Funkengeber befestigt ist, und die Vorrichtung entfernen.
b) Die Abdeckung abnehmen.
c) In umgekehrter Reihenfolge wieder zusammenbauen.
Sicherstellen, dass die Befestigungselemente fest
angezogen sind.
21 Ein Ofengebläse ersetzen
Das Gerät von der Stromversorgung trennen.
a) Das Gerät nach vorne ziehen, um Zugriff auf die
Abdeckkästen hinten am Gerät zu erhalten. Die
Befestigungselemente der Abdeckung entfernen und die
Abdeckung abheben.
b) Die Gebläseverdrahtung entfernen und die
Anschlusspositionen notieren.
c) Die innere Rückwand wie in Abschnitt 20 beschrieben
entfernen.
d) Die Gebläselamellen festhalten und die mittlere
Mutter (Linksgewinde), Messingunterlegscheiben,
Gebläselamelle und Sprengring lösen.
e) Die Befestigungselemente des Gebläses lösen und hinten
aus der Vertiefung nehmen.
f) Das Ersatzgebläse einsetzen und die Teile in umgekehrter
Reihenfolge zusammenbauen. Sicherstellen, dass der
Ofen zufrieden stellend funktioniert.
52
Page 53

Deutsch
22 Ein Ofengebläseelement entfernen
Das Gerät von der Stromversorgung trennen.
a) Innere Ofenrückwand entfernen (siehe 20).
b) Zwei Schrauben von der Oberseite und eine Schraube
von der Unterseite des Elements im Ofen entfernen.
c) Das Element vorsichtig abnehmen. Die Anschlüsse vom
Element trennen und ihre Positionen notieren. Sollte
es nicht möglich sein, die Leitungen auf diese Weise zu
trennen, den Herd nach vorne ziehen, um Zugriff auf die
Rückseite zu erhalten. Dann die Schrauben, mit denen
die Stromabdeckung am hinteren Blech befestigt ist,
entfernen. Die Abdeckung abnehmen und die Anschlüsse
von der Hinterseite trennen.
d) Das neue Element anbringen und in umgekehrter
Reihenfolge zusammenbauen.
e) Sicherstellen, dass der Ofen richtig funktioniert.
24 Anpassen des Ofentürwinkels
Das Scharnier an der Unterseite der Tür kann angepasst
werden, um den Winkel der Tür zu ändern.
Lösen Sie die Bestigungsschrauben der Scharniere an der
Unterseite und versetzen Sie mit Hilfe des Lochs und eines
fl achkantigen Schraubenziehers die Position des Scharniers.
Ziehen Sie die Scharnierschrauben dann wieder fest an.
Auswirkung der Scharnieranpassung – zur besseren Illustration
übertrieben dargestellt
Mittellinie des Scharnierbolzens
Zur besseren Illustration ohne Ofentür dargestellt.
23 Unteres und oberes Element des linken Ofens
entfernen
Das Gerät von der Stromversorgung trennen.
Unteres Element
Den Herd nach vorne ziehen, um Zugriff auf die Abdeckkästen
hinten am Gerät zu erhalten. Die Befestigungselemente der
Abdeckung entfernen und die Abdeckung abheben.
Die 2 Schrauben „A“ entfernen und die Platte herunterfallen
lassen. Die 2 Schrauben „B“ entfernen, die obere Platte
absenken und durch den Schlitz in der Herdrückseite
entfernen.
Die Anschlüsse lösen und ihre Position notieren.
Die Befestigungsmittel des Herdelements entfernen und das
Element herausnehmen. Das Element ersetzen und die Teile in
umgekehrter Reihenfolge zusammenbauen.
Oberes Element
Die linke Ofentür öff nen und die Befestigungselemente lösen,
mit denen der Hitzeschutz befestigt ist. Die Befestigungsteile
der oberen Elementhalterung entfernen und das Element
herausnehmen. Das Element ersetzen und die Teile in
umgekehrter Reihenfolge zusammenbauen. Sicherstellen, dass
der Ofen zufrieden stellend funktioniert.
53
Page 54

Deutsch
Schaltplan
Nennwerte sind für 230 V 50 Hz
Legende:
A Thermostat linker Multifunktionsofen
B Funktionsregler Multifunktionsofen
C Ofenlichtschalter
D Thermostat Backofen rechts
F Unteres Element Multifunktionsofen
G Oberes Element Multifunktionsofen (äußeres Paar)
H Bräunungselement Multifunktionsofen (inneres Paar)
I Gebläseelement Multifunktionsofen
J Multifunktionsofengebläse
K Element rechter Umluftofen
M Ofengebläse rechts
O Backofenleuchte
P Zündschalter
Q Zündfunkengeber
R Sicherung
S Neon
Farbcode
b Blau
br Braun
or Orange
r Rot
v Lila
w Weiß
y Gelb
bl Schwarz
54
Page 55

Technische Daten
Dieser Herd gehört der Kategorie: Cat II 2H3B/P; Cat II 2H3+; Cat II 2E+3+; Cat II 2E3B/P; Cat II 2L3B/P; Cat II 2ELL3B/P
Es wird eingestellt auf Erdgas Gruppe H geliefert.
DATENSCHILDBEFESTIGUNG: Unter der Schublade. Ziehen Sie die Schublade heraus (siehe „Auspacken des
Herds“).
INSTALLATEUR: Bitte legen Sie diese Anleitung in den farbigen CornuFé-Ordner im Anleitungspack und
übergeben Sie ihn dem Benutzer.
Testdrücke siehe Gerätedatenschild
Abmessungen
Gesamthöhe
Gesamtbreite
Gesamttiefe mit Griffen
Gesamttiefe ohne Griffe
Platz zur Befestigung
Mindestraum über Kochplatte
minimum 910mm maximum 937mm
1092mm Siehe „Aufstellung des Herdes“
720mm
650mm
Siehe „Aufstellung des Herdes“
800mm
Deutsch
Brennerleistungen
Die Backöfen Der linke Backofen Der rechte Backofen
Gebläseelement
Oberes Element
Bräunungselement
Unteres Element
Die gesamte elektrische Belastung des Geräts beträgt etwa 5.1kW.
Die Backöfen
Energieeffizienzklasse
auf einer Skala von A (niedriger Verbrauch) bis G (hoher Verbrauch)
Energieverbrauch Bei Standardbeladung
Nettovolumen (Liter)
Typ
Kochzeit bei Standardbeladung (Minuten)
Backfläche
2.5kW 2.5kW
1.2kW
1.15kW
1.0kW
Mul ti funk ti ons ofen Umluft/Heißluft
BA
0.90kWh 0.85Wh
62 67
Mittel Groß
41 Minuten 38 Minuten
1400cm2 1400cm2
55
Page 56

 Loading...