

Page 1

CONTENTS EN
CONTENTS
1 INTRODUCTION ........................................................................................3
2 IMPORTANT SAFETY INSTRUCTION .........................................................5
3 DESCRIPTION AND USE OF THE CONTROL ..........................................11
3.1 Upper panel .............................................................................................11
3.2 Setting the washing program and switching it on and off .......................... 12
3.2.1 Switching on ............................................................................................15
3.2.2 Selecting and starting the program ........................................................... 16
3.2.3 End of program ........................................................................................16
3.2.4 Interrupting a program .............................................................................. 16
3.2.5 Changing the current program .................................................................16
3.2.6 Canceling the current program .................................................................17
3.2.7 Options ....................................................................................................17
3 .2.8 Switching off ............................................................................................ 19
3.3 Additional functions ..................................................................................19
3.3.1 Adjusting the water softener .....................................................................19
4 ENERGY SAVING AND ENVIRONMENTAL RESPECT .............................. 21
4.1 Reducing the consumption of detergent and respecting the environment .21
5 REMOVING THE DISHES ......................................................................... 22
6 TROUBLESHOOTING ..............................................................................23
7 INSTALLATION AND HOOK-UP ...............................................................25
8 OPERATING INSTRUCTIONS .................................................................. 27
8.1 Using the water softening system .............................................................28
Rev 0.0 1
Page 2

EN
8.2 Using the rinse-aid and detergent dispensers ...........................................30
8.2.1 Adding the rinse-aid ................................................................................. 31
8.2.2 Adjusting the rinse-aid dispenser system .................................................. 31
8.2.3 Adding the detergent ...............................................................................32
8.3 General warnings and recommendations .................................................34
8.4 Using the racks ........................................................................................ 36
8.4.1 Lower rack ...............................................................................................37
8.4.2 Cutlery basket ..........................................................................................39
8.4.3 Upper rack ...............................................................................................40
9 CLEANING AND USER-MAINTENANCE ..................................................43
9.1 General warnings and recommendations .................................................43
9.2 Cleaning the water intake fi lter .................................................................. 44
9.3 Cleaning the spray arms ........................................................................... 44
9.4 Cleaning the fi lter unit ............................................................................... 46
9.5 General warnings and recommendations for correct maintenance ............ 47
9.6 Troubleshooting minor problems ..............................................................48
10 TECHNICAL DATA ...................................................................................50
2 Rev 0.0
Page 3

INTRODUCTION
1 INTRODUCTION
Thank you for choosing one of Fagor’s products. To use this
dishwasher correctly and safely, please read this manual carefully.
The manual is divided into sections giving you a step-by-step guide
to all your appliance’s functions. The text is easy to understand and
is complete with detailed illustrations. This user-friendly manual will
provide answers to all your questions of the use of the dishwasher.
Before using this dishwasher, carefully read chapter 2 “Important
safety instruction”.
For any other information about use and maintenance of the
dishwasher, read the enclosed general manual carefully.
This manual comprises the following sections:
INTRODUCTION: general information about the manual.
WARNINGS: a list of warnings concerning safety and use of the
dishwasher.
INSTALLATION INSTRUCTIONS: for the qualifi ed technician who
must carry out the installation, hook-up and testing of the appliance.
EN
USER INSTRUCTIONS: instructions on using the dishwasher programs and information about all the dishwasher functions.
Nomenclature of fi gures and tables:
The progressive number of each fi gure is shown in the bottom righthand corner of the relative box. An example of a progressive number
is “Fig. 4-01”, where the fi rst number (4) indicates the section to
which the fi gure belongs, while the second number (01) indicates
the progressive number of the fi gure in section 4 (Fig. 4-01 is the
fi rst fi gure in section 4). The tables are numbered in the same way,
bearing in mind that “Table” is used instead of “Fig.” (e.g.: Table 4-01
is the fi rst table in section 4). If a table occupies more than one page,
a letter is added after the progressive number (e.g.: “Table 4-01a”,
Table 4-01b”).
Rev 0.0 3
Page 4
EN
INTRODUCTION
Symbols used in this manual (see table 1-01)
DANGER. This symbol highlights information and warnings which,
if not observed, may compromise personal safety or damage to
appliance.
DANGER OF ELECTROCUTION. This symbol highlights information
and warnings of an electrical nature which, if not observed, may
compromise personal safety or damage to appliance.
This symbol highlights general information and warnings.
Table 1-01
4 Rev 0.0
Page 5
WARNINGS
2 IMPORTANT SAFETY INSTRUCTION
(Save this instructions)
THIS MANUAL FORMS AN INTEGRAL PART OF THE APPLIANCE: IT MUST ALWAYS BE KEPT INTACT TOGETHER WITH THE
DISHWASHER (INCLUDING THE “INSTALLATION” AND “DESCRIPTION OF CONTROLS” MANUALS, IF ATTACHED). BEFORE USING
THE APPLIANCE, CAREFULLY READ ALL THE INSTRUCTIONS
CONTAINED IN THIS MANUAL. INSTALLATION MUST BE PERFORMED BY A QUALIFIED TECHNICIAN, IN COMPLIANCE WITH
THE REGULATIONS IN FORCE. THIS APPLIANCE IS INTENDED
FOR DOMESTIC USE, AND COMPLIES WITH THE DIRECTIVES
CURRENTLY IN FORCE, INCLUDING THE PREVENTION AND
ELIMINATION OF RADIO FREQUENCY INTERFERENCE. THE APPLIANCE IS DESIGNED FOR THE FOLLOWING PURPOSE: WASH-
ING AND DRYING OF DISHES; ANY OTHER USE SHALL BE
CONSIDERED IMPROPER. THE MANUFACTURER DECLINES
ALL RESPONSIBILITY FOR USES OTHER THAN THOSE DESCRIBED ABOVE.
THE NAME PLATE FEATURING THE TECHNICAL DATA, SERIAL
NUMBER AND MARKINGS IS VISIBLY POSITIONED ON THE INNER EDGE OF THE DOOR. THE NAME PLATE MUST NEVER
BE REMOVED.
THIS APPLIANCE IS NOT SUITABLE FOR USE ON BOATS, CARAVANS OR THE LIKE.
DISHWASHERS CERTIFIED FOR DOMESTIC USE ARE NOT SUITABLE FOR AUTHORISED FOOD FACTORIES.
EN
CHECK THAT THE VOLTAGE, FREQUENCY AND PROTECTION OF
THE DOMESTIC MAINS POWER SUPPLY MATCH THE RATINGS
ON THE NAME PLATE OF THE APPLIANCE.
DO NOT LEAVE DISCARDED PACKAGING MATERIALS UNSUPERVISED WITHIN THE HOME. SEPARATE THE VARIOUS PACKAGING
MATERIALS AND TAKE THEM TO THE NEAREST SORTED WASTE
COLLECTION CENTRE. KEEP CHILDREN, PHYSICALLY AND/
OR MENTALLY IMPAIRED ADULTS, AND ANIMALS AWAY FROM
PACKAGING WASTE; DANGER OF SUFFOCATION.
Rev 0.0 5
Page 6
EN
WARNINGS
BEFORE PROCEEDING WITH INSTALLATION, DISCONNECT THE
MAINS POWER SUPPLY FROM THE WORK AREA.
DO NOT USE EXTENSION CORDS, ADAPTORS OR SHUNT CONNECTIONS IN ORDER TO AVOID THE POSSIBILITY OF OVERHEATING OR BURNING OR PRODUCING A FIRE HAZARD.
DURING INSTALLATION, TAKE CARE NOT TO INJURE YOURSELF
ON THE SHARP EDGES OF THE APPLIANCE; WEAR SAFETY
GLOVES.
THE APPLIANCE MUST BE PROVIDED WITH AN EARTH CONNECTION IN ACCORDANCE WITH THE ELECTRICAL SAFETY REGULATIONS IN FORCE. IF IN DOUBT, HAVE THE SYSTEM CHECKED
BY A QUALIFIED ELECTRICIAN (SEE ALSO THE WARNINGS INDICATED IN CHAPTER 7).
THE MANUFACTURER DECLINES ALL RESPONSIBILITY FOR
DAMAGE TO PERSONS OR PROPERTY RESULTING FROM
THE FAILURE TO EARTH THE APPLIANCE OR FROM A DEFECTIVE EARTH CONNECTION.
ALWAYS SWITCH OFF THE DISHWASHER AFTER EACH USE TO
AVOID WASTING ELECTRICITY.
IN THE EVENT OF A FAULT, DISCONNECT THE DISHWASHER
FROM THE ELECTRICAL POWER SUPPLY AND SHUT OFF THE
WATER TAP.
DO NOT USE APPLIANCES WHICH HAVE BEEN DAMAGED DURING TRANSIT! IF IN DOUBT, CONSULT YOUR DEALER. THE APPLIANCE MUST BE INSTALLED AND CONNECTED IN ACCORDANCE
WITH THE INSTRUCTIONS PROVIDED BY THE MANUFACTURER
OR BY A QUALIFIED TECHNICIAN.
ONLY USE DETERGENTS SPECIALLY FORMULATED FOR DISHWASHERS. DO NOT USE DETERGENTS FORMULATED FOR
WASHING DISHES BY HAND.
ONLY USE RINSE-AID SPECIALLY FORMULATED FOR DOMESTIC
DISHWASHERS.
6 Rev 0.0
Page 7
WARNINGS
DO NOT INHALE OR SWALLOW DETERGENT AS THIS MAY CAUSE
BURNS AND/OR PERMANENT DAMAGE TO THE NOSE, MOUTH
AND THROAT, AND EVEN LEAD TO SUFFOCATION; KEEP DETERGENT AWAY FROM YOUR EYES. IF ONE OF THE ABOVE SITUATIONS OCCURS, SEEK MEDICAL ASSISTANCE IMMEDIATELY.
TO PREVENT CHILDREN FROM COMING INTO CONTACT WITH
DETERGENT, FILL THE DISHWASHER JUST BEFORE STARTING
THE WASH PROGRAM AND THEN KEEP THE DETERGENT OUT
OF THE REACH OF CHILDREN.
THIS DISHWASHER MUST BE USED BY ADULTS. USE BY PERSONS WITH REDUCED MENTAL AND/OR PHYSICAL CAPABILITIES IS ONLY PERMITTED UNDER THE SUPERVISION OF A PERSON RESPONSIBLE FOR THEIR SAFETY.
DO NOT ALLOW CHILDREN TO APPROACH AND/OR PLAY IN OR
ON THE DISHWASHER. THE APPLIANCE MAY CONTAIN RESIDUES OF DETERGENT WHICH CAN CAUSE PERMANENT DAMAGE TO THE EYES, MOUTH AND THROAT, AS WELL AS POSSIBLE DEATH BY SUFFOCATION; IF THE ABOVE OCCURS, SEEK
MEDICAL ASSISTANCE IMMEDIATELY.
BEWARE; IT IS POSSIBLE FOR CHILDREN TO GET TRAPPED INSIDE THE DISHWASHER!
EN
DO NOT INTRODUCE SOLVENTS SUCH AS ALCOHOL OR TURPENTINE WHICH MAY CAUSE AN EXPLOSION.
DO NOT POUR POWDER AND/OR LIQUID DETERGENT INTO THE
RINSE-AID CONTAINER AS THIS WILL DAMAGE THE CONTAINER.
DO NOT POUR POWDER AND/OR LIQUID DETERGENT INTO THE
WASTER SOFTENER TANK AS THIS WILL DAMAGE THE TANK.
DO NOT USE INDUSTRIAL DETERGENTS AS THIS MAY DAMAGE
THE APPLIANCE AND/OR TRIGGER VIOLENT CHEMICAL REACTIONS (E.G. EXPLOSIVE GAS).
Rev 0.0 7
Page 8
EN
WARNINGS
DO NOT LOAD DISHES THAT ARE SOILED WITH ASH, WAX OR
PAINTS.
DO NOT INTRODUCE ITEMS IN HEAT-SENSITIVE PLASTI¬C,
SUCH AS DISPOSABLE CUTLERY OR PLATES, AS THESE MAY
BECOME DEFORMED. DO NOT WASH OBJECTS IN PLASTIC UNLESS THEY ARE MARKED “DISHWASHER PROOF” OR THE LIKE.
FOR UNMARKED OBJECTS, FOLLOW THE INSTRUCTIONS OF
THE MANUFACTURER; IF NO INFORMATION IS AVAILABLE, DO
NOT WASH THESE OBJECTS IN THE DISHWASHER.
DO NOT INTRODUCE ANIMALS INTO THE DISHWASHER.
WHEN OPENING THE DISHWASHER DOOR DURING A CYCLE
THERE IS A RISK OF SCALDING DUE TO THE HEAT CONTAINED
INSIDE. DO NOT STAND IN OF THE STEAM THAT RISES FROM
THE APPLIANCE AND DO NOT TOUCH THE COMPONENTS INSIDE.
WAIT 20 MINUTES AFTER THE END OF THE WASHING CYCLE OR
AFTER INTERRUPTING IT BEFORE REMOVING THE DISHES TO
ALLOW THEM TO DRY.
IN CERTAIN SITUATIONS, HYDROGEN MAY BE GENERATED INSIDE A HOT WATER SYSTEM THAT HAS NOT BEEN USED FOR
OVER TWO WEEKS. HYDROGEN IS AN EXPLOSIVE GAS. IF THE
HOT WATER SYSTEM HAS NOT BEEN USED FOR TWO WEEKS
OR MORE, OPEN ALL THE HOT WATER TAPS AND ALLOW THE
WATER TO RUN FOR A FEW MINUTES BEFORE USING THE DISHWASHER. THIS WILL DISCHARGE ANY HYDROGEN BUILDUPS.
AS THIS GAS IS FLAMMABLE, DO NOT SMOKE OR USE NAKED FLAMES WHILE PERFORMING THIS OPERATION.
LEANING OR SITTING ON THE DISHWASHER DOOR WHEN
OPEN MAY CAUSE THE APPLIANCE TO OVERTURN, PUTTING PEOPLE AT RISK. NEVER LEAVE THE DISHWASHER
DOOR OPEN; PEOPLE MIGHT TRIP OVER IT.
DO NOT LEAN AGAINST OR STAND ON THE DISHWASHER
RACKS.
8 Rev 0.0
Page 9
WARNINGS
DO NOT DRINK THE WATER RESIDUES WHICH MAY BE PRESENT
INSIDE THE DISHES OR DISHWASHER.
KNIVES OR OTHER SHARP-ENDED COOKING UTENSILS MUST
BE PLACED IN THE CUTLERY BASKET BLADE-DOWN, OR LAID
HORIZONTAL IN THE UPPER RACK. TAKE CARE NOT TO CUT
YOURSELF AND ENSURE THAT THEY DO NOT PROJECT FROM
THE RACK.
POSITION SHARP/POINTED OBJECTS SO AS TO PREVENT THEM
FROM DAMAGING THE DOOR GASKETS.
DO NOT OPERATE THE DISHWASHER UNLESS ALL THE OUTER
PANELS HAVE BEEN POSITIONED CORRECTLY.
DO NOT TAMPER WITH THE DISHWASHER CONTROLS.
AQUASTOP MODELS; THE AQUASTOP DEVICE PREVENTS
FLOODING IN THE EVENT OF A WATER LEAK. WHEN THE AQUASTOP DEVICE IS TRIPPED (THE ERROR IS INDICATED ON THE
DISPLAY), CALL IN A QUALIFIED TECHNICIAN TO IDENTIFY AND
REPAIR THE PROBLEM. IN MODELS EQUIPPED WITH THE AQUASTOP DEVICE, THERE IS A SOLENOID VALVE INSIDE THE WATER
INTAKE HOSE. DO NOT CUT THE HOSE AND DO NOT ALLOW
THE SOLENOID VALVE TO DROP INTO THE WATER. IN THE
EVENT OF DAMAGE TO THE WATER INTAKE HOSE, DISCONNECT
THE APPLIANCE FROM THE ELECTRICAL POWER SUPPLY AND
FROM THE WATER SUPPLY.
IMMEDIATELY AFTER INSTALLING THE DISHWASHER, PERFORM
A QUICK TEST OF THE APPLIANCE (SEE “INSTALLATION” MANUAL). IF THE DISHWASHER FAILS TO OPERATE CORRECTLY,
DISCONNECT IT FROM THE ELECTRICAL POWER SUPPLY AND
CALL THE NEAREST TECHNICAL SERVICE CENTRE. DO NOT
ATTEMPT TO REPAIR THE APPLIANCE.
THE DISHWASHER MEETS ALL THE REQUIREMENTS SET OUT
BY THE REGULATIONS IN FORCE CONCERNING SAFETY AND
ELECTRICAL EQUIPMENT. ANY TECHNICAL CHECKS SHOULD
BE CONDUCTED EXCLUSIVELY BY A TRAINED AND AUTHORIZED
EN
Rev 0.0 9
Page 10
EN
WARNINGS
TECHNICIAN: REPAIRS CARRIED OUT BY UNAUTHORIZED
PERSONS WILL INVALIDATE THE WARRANTY, AS WELL AS
POSE A POTENTIAL HAZARD TO THE USER.
BEFORE CLEANING OR SERVICING THE APPLIANCE, REMOVE
THE PLUG OR TURN OFF THE MULTI-POLE SWITCH.
REMOVE THE WASHING COMPARTMENT DOOR AND DISCONNECT THE MAINS POWER SUPPLY WHEN REMOVING THE OLD
DISHWASHER FOR MAINTENANCE OR DISPOSAL.
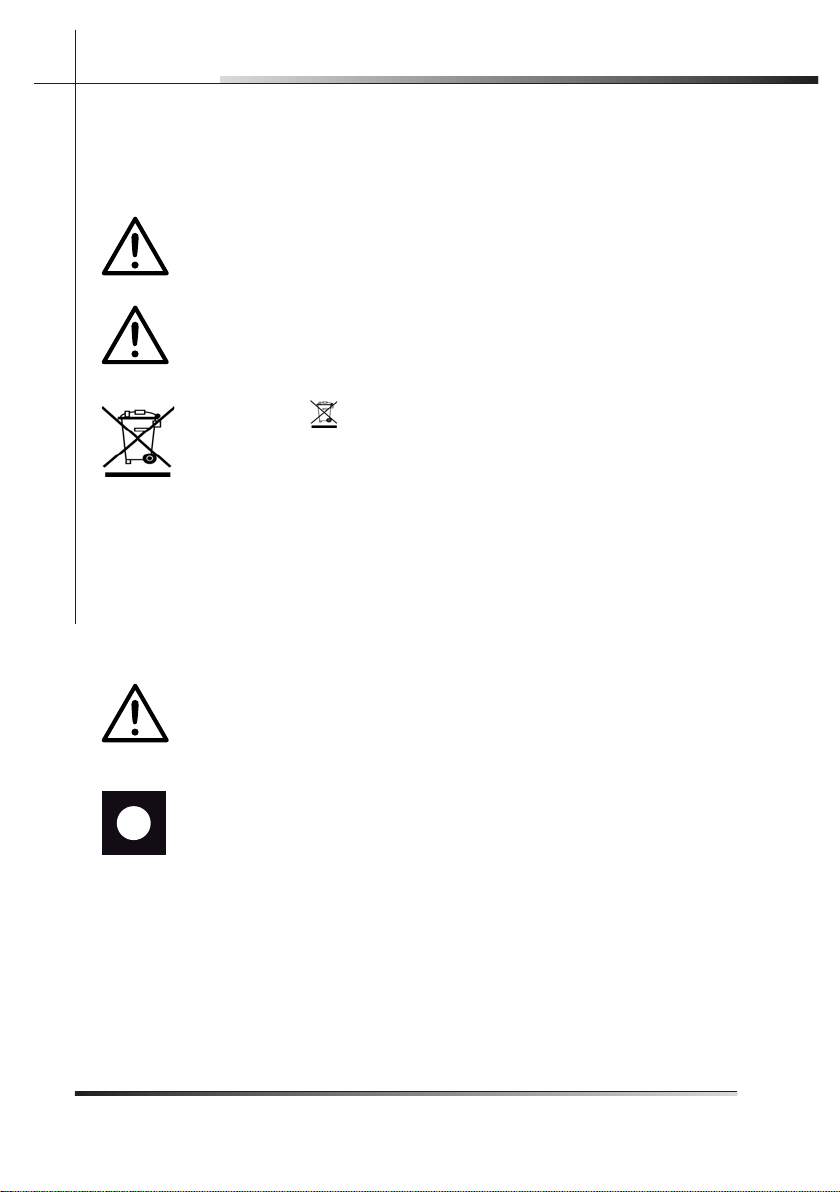
THE SYMBOL ON THE PRODUCT, OR ON THE DOCUMENTS
ACCOMPANYING THE PRODUCT, INDICATES THAT THIS APPLIANCE MAY NOT BE TREATED AS HOUSEHOLD WASTE. INSTEAD
IT SHALL BE HANDED OVER TO THE APPLICABLE COLLECTION
POINT FOR THE RECYCLING OF ELECTRICAL AND ELECTRONIC
EQUIPMENT. DISPOSAL MUST BE CARRIED OUT IN ACCORDANCE WITH LOCAL ENVIRONMENTAL REGULATIONS FOR
WASTE DISPOSAL. FOR MORE DETAILED INFORMATION ABOUT
TREATMENT, RECOVERY AND RECYCLING OF THIS PRODUCT,
PLEASE CONTACT YOUR LOCAL CITY OFFICE, YOUR HOUSEHOLD WASTE DISPOSAL SERVICE OR THE SHOP WHERE YOU
PURCHASED THE PRODUCT.
BY ENSURING THIS PRODUCT IS DISPOSED OF CORRECTLY,
YOU WILL HELP PREVENT POTENTIAL NEGATIVE CONSEQUENCES FOR THE ENVIRONMENT AND HUMAN HEALTH.
THE MANUFACTURER DECLINES ALL RESPONSIBILITY FOR DAMAGE TO PERSONS, ANIMALS OR PROPERTY RESULTING FROM FAILURE TO OBSERVE THE ABOVE
PRECAUTIONS, FROM TAMPERING WITH EVEN A SINGLE
COMPONENT OF THE APPLIANCE, OR FROM THE USE OF
UNORIGINAL SPARE PARTS.
IF IN DOUBT ABOUT THE CONTENTS OF THIS MANUAL,
CONTACT THE TECHNICAL ASSISTANCE CENTER.
10 Rev 0.0
Page 11
USER INSTRUCTIONS
Sanitized
3 DESCRIPTION AND USE OF THE CONTROLS
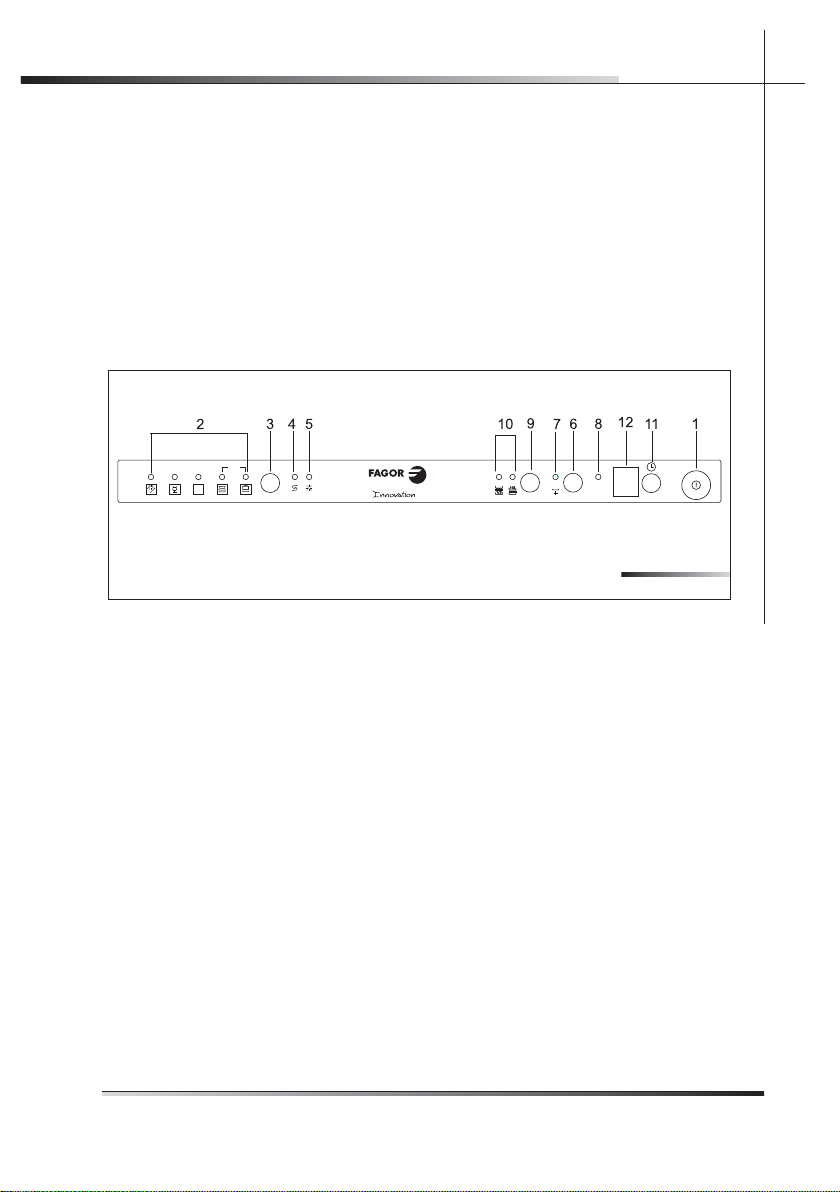
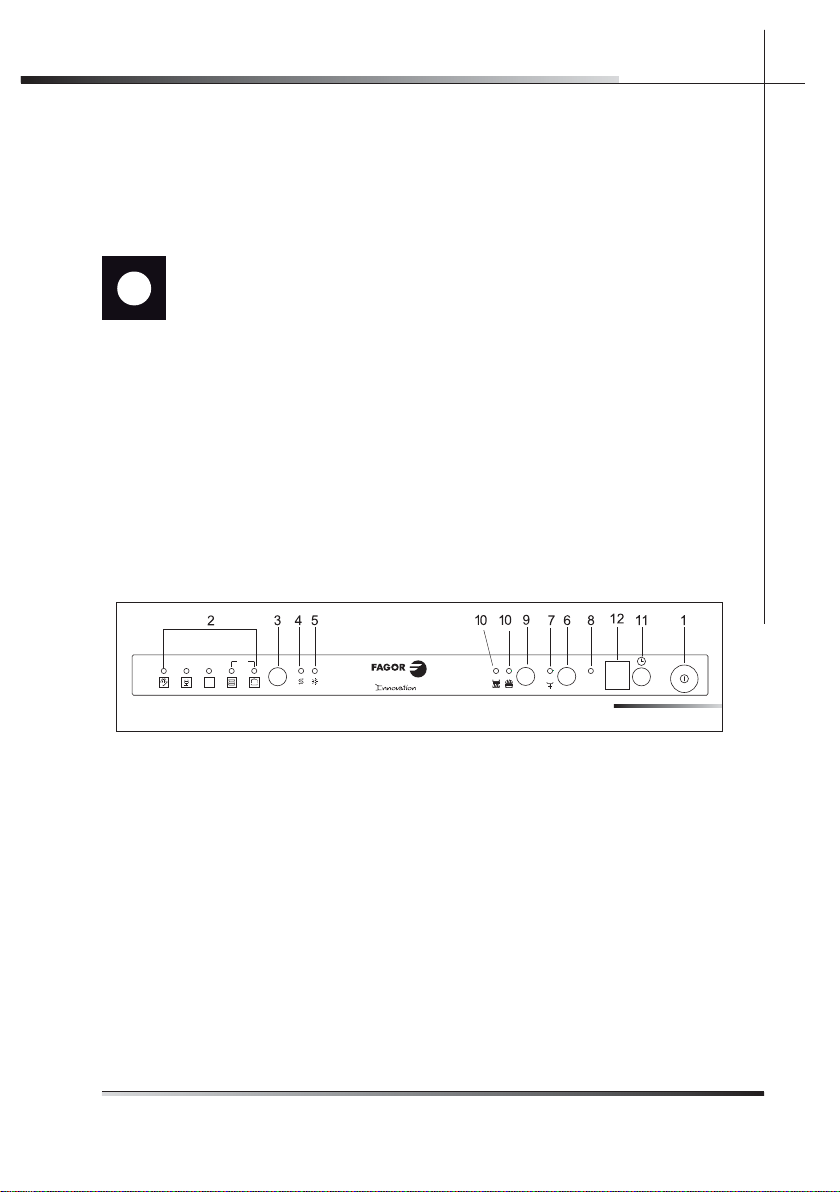
3.1 Upper panel
All the dishwasher controls are grouped on the upper panel (see fi g. 3-01). The
dishwasher can only be switched on, programmed, switched off, etc. with the
door open.
A brief description (see table 3-01) of the various controls on the upper panel is
provided on the table below.
EN
END
AUTO
P
Sanitized
FIG. 3-01
Rev 0.0 11
Page 12

EN
Sanitized
USER INSTRUCTIONS
On/off button
1
Press to power the appliance.
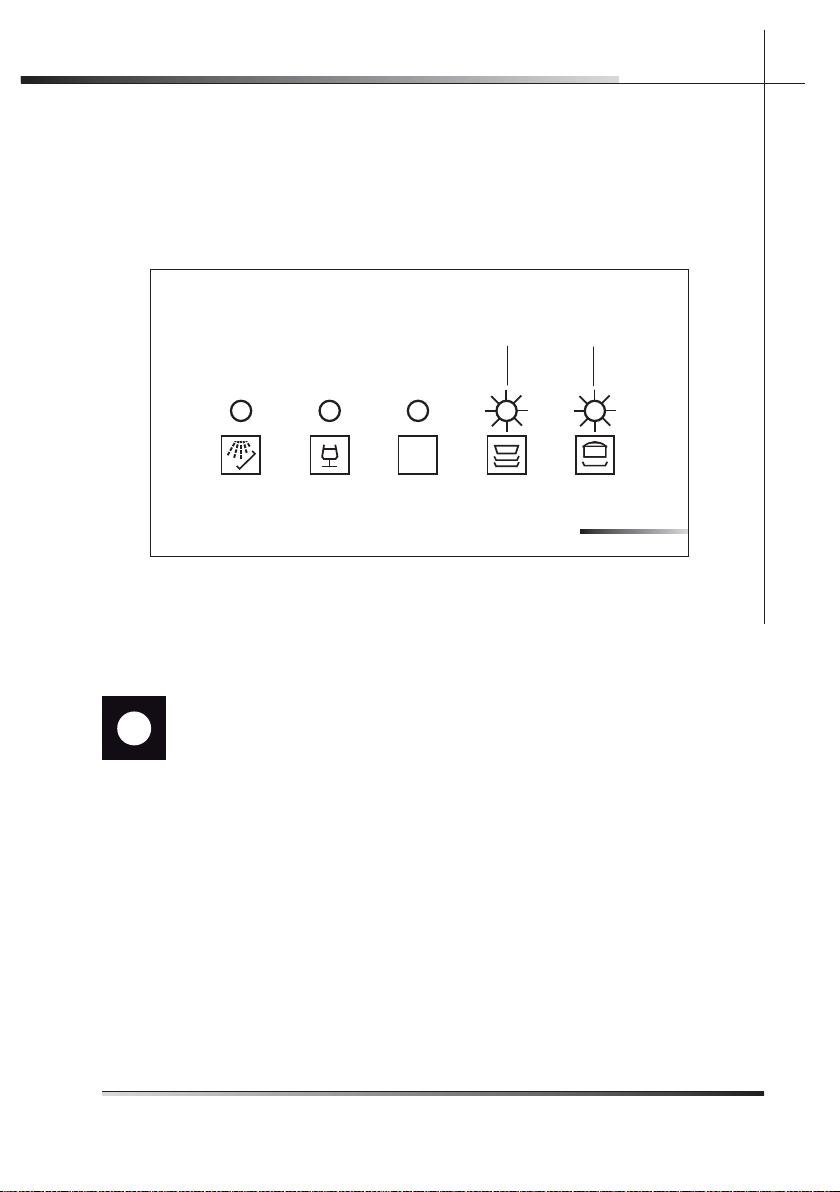
Program indicator lights
2
These show which program is selected and whether there are any troubleshootings
(error messages).
Program selection button
3
Press in sequence to select the required program.
Add salt indicator light
4
Shows the appliance has run out of salt.
Add rinse aid
5
Shows the appliance has run out of rinse aid.
Supplementary program button
6
Press to select one of the fi ve supplementary programs (see table 3-02b).
Supplementary program indicator light
7
Shows that one of the fi ve supplementary programs will be run (see table 3-02b).
Sanitation indicator light
8
Shows that the function is active.
Half-load wash button
9
Press to select the half-load wash option.
Half-load indicator lights
10
One of the lights shines to show that the half-load wash function has been selected in
the upper or lower rack.
Program delay button
11
Press to delay the start of the program up to 9 hours.
12
Information display (start delay, adjusting water softener)
Table 3-01
3.2 Setting the washing program and switching
it on and off
The dishwasher is equipped with a control panel (see fi g. 3-02) which is used
to program the appliance and switch it on and off.
b
a
END
AUTO
12 Rev 0.0
P
Sanitized
FIG. 3-02
Page 13
USER INSTRUCTIONS
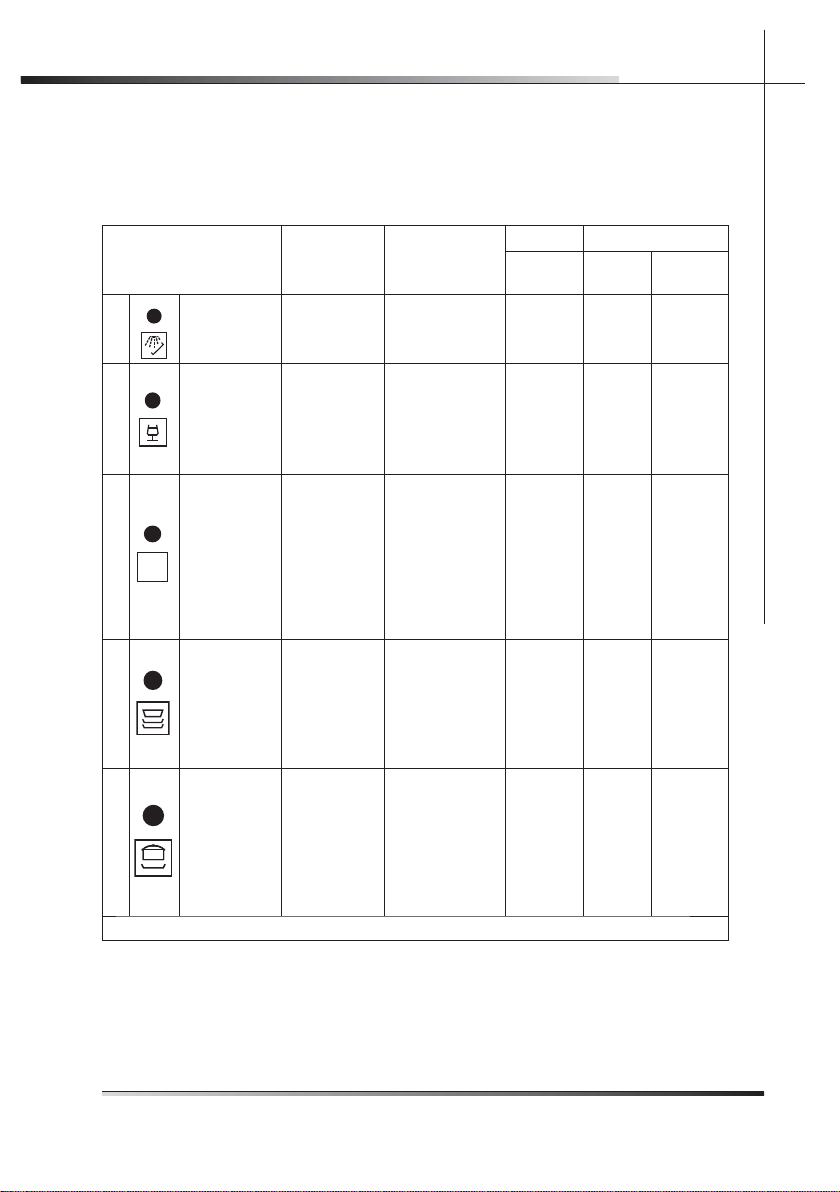
To select the most suitable program to wash the dishes, consult the following
table which specifi es the most appropriate type of washing sequence depending on the kind of dishes and how dirty they are (see tables 3-02a and
3-02b).
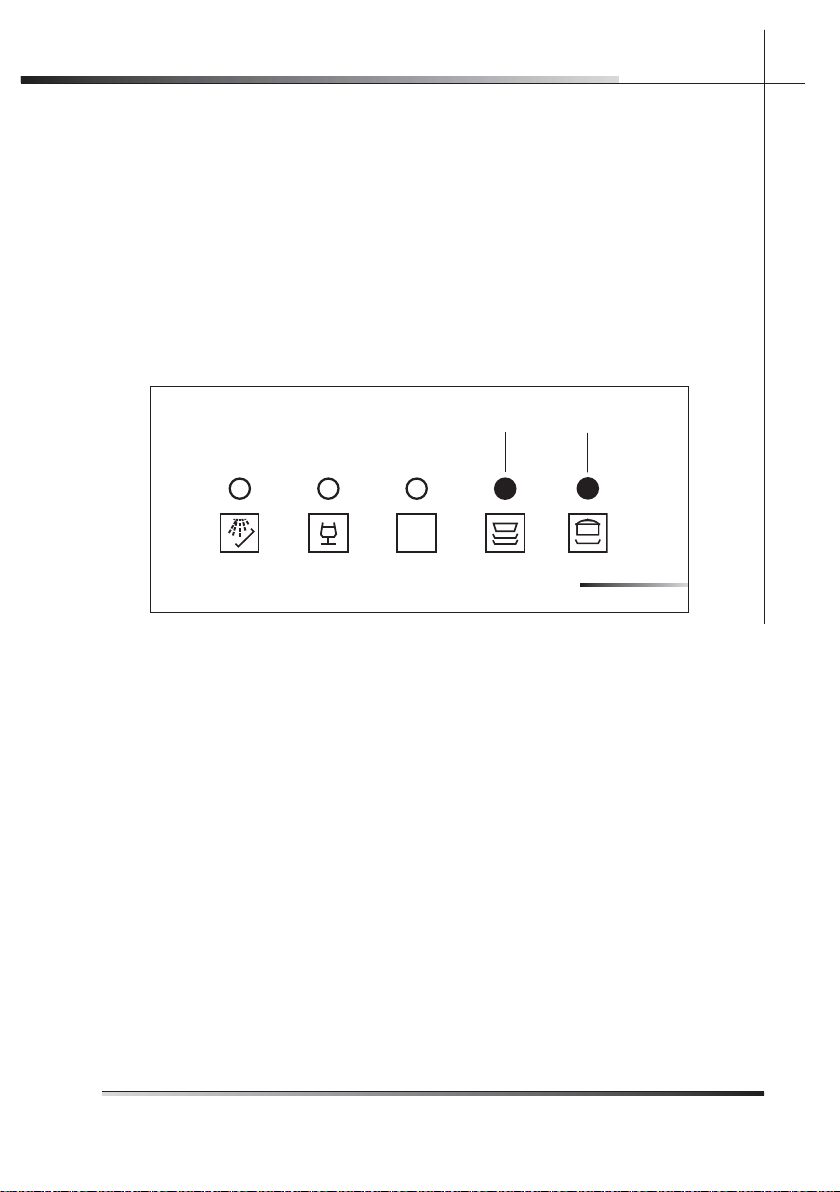
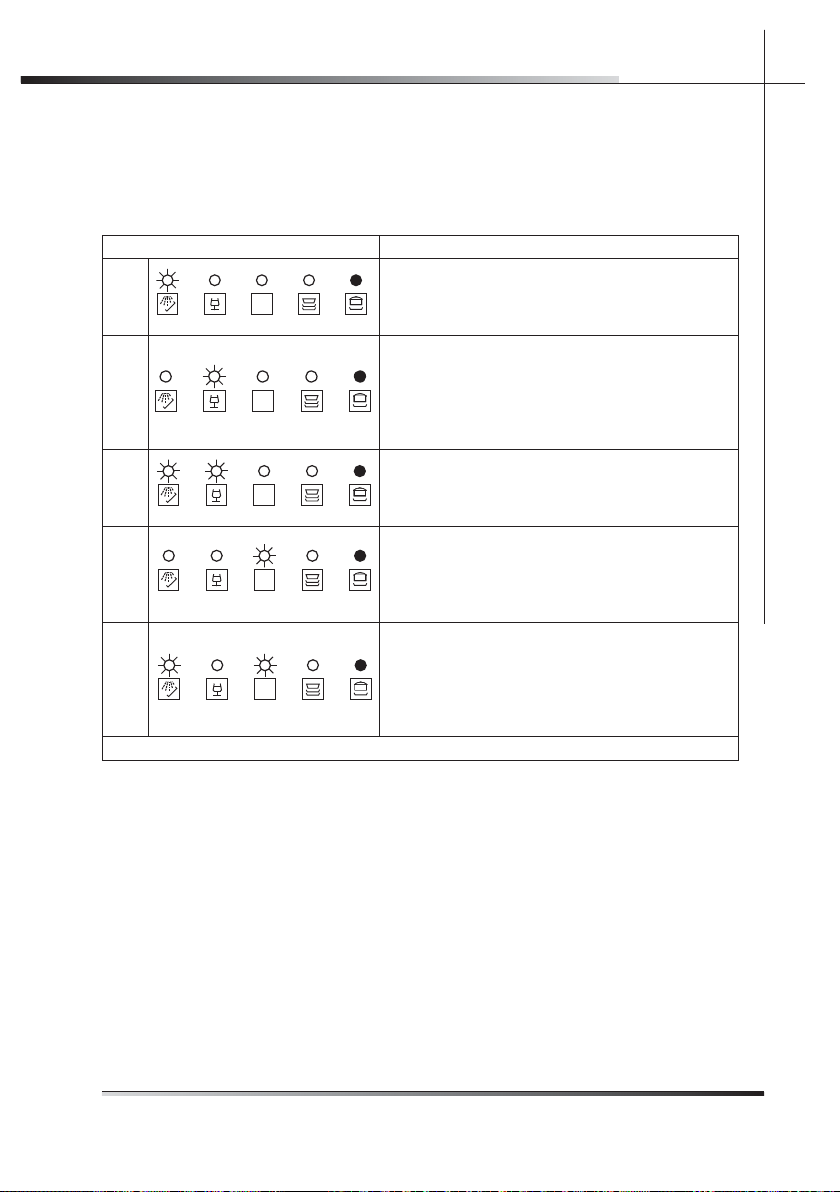
STANDARD PROGRAMS
NUMBER AND SYMBOL
1
2
3
AUTO
4
5
DISH
WARMING
CRYSTAL
AUTO SUPER
WASH
ETL SANITATION
LISTED
NORMAL
EXTREME
WASH
ETL SANITATION
LISTED
DISHES AND
CUTLERY
Pans and
dishes to rinse
and dry
Moderately
dirty
Moderately
dirty, including
dried-on
residue
Moderately
dirty
Very dirty pans
and dishes,
including
dried-on
residue
PROGRAM
SEQUENCE
Rinse at 69°C
(156.2°F) Dry.
Wash at 45°C
(113°F)
Cold rinse.
Rinse at 69°C
(156.2°F)
Dry.
Cold pre-wash
(depends on the
type of dirt)
Wash at 65°C
(149°F).
Cold rinse.
Hot rinse at
70°C (158°F).
Dry.
Cold pre-wash.
Wash at 55°C
(131°F).
Cold rinse.
Rinse at 68°C
(154.4°F).
Dry.
Pre-wash at
45°C (113°F).
Wash at 70°C
(158°F)
2 cold rinses
Rinse at 70°C
(158°F)
Dry.
TIME CONSUMPTION
MINUTES
50 min.
70 min.
115-130
min.
112 min.
122 min.
(2)
WATER
(1)
3.9 l
1.03 gal.
10.8 l
2.85 gal.
11-15 l
2.91-
3.96 gal.
14.8 l
3.91 gal.
18.3 l
4.83 gal.
ENERGY
kWh (2)
Table. 3-02a
0.64
0.6
1-1.2
0.8
1.12
EN
Rev 0.0 13
Page 14
EN
USER INSTRUCTIONS
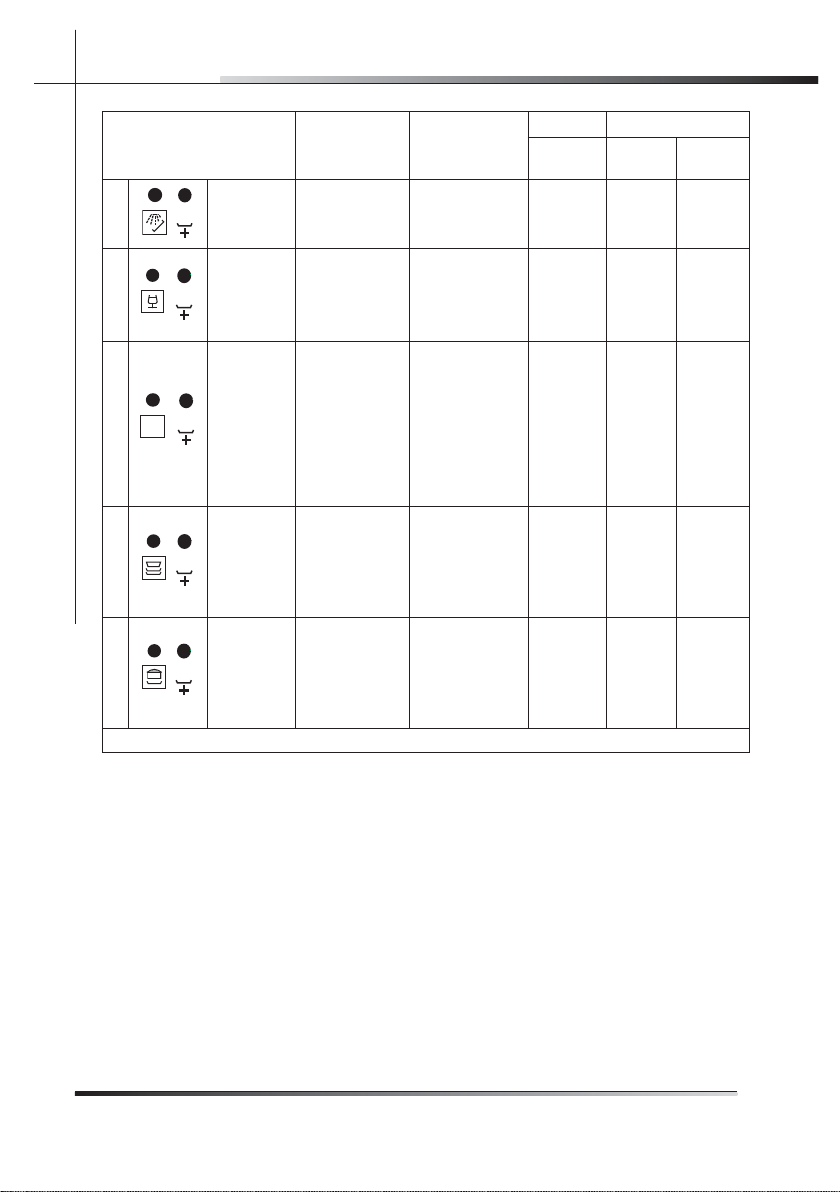
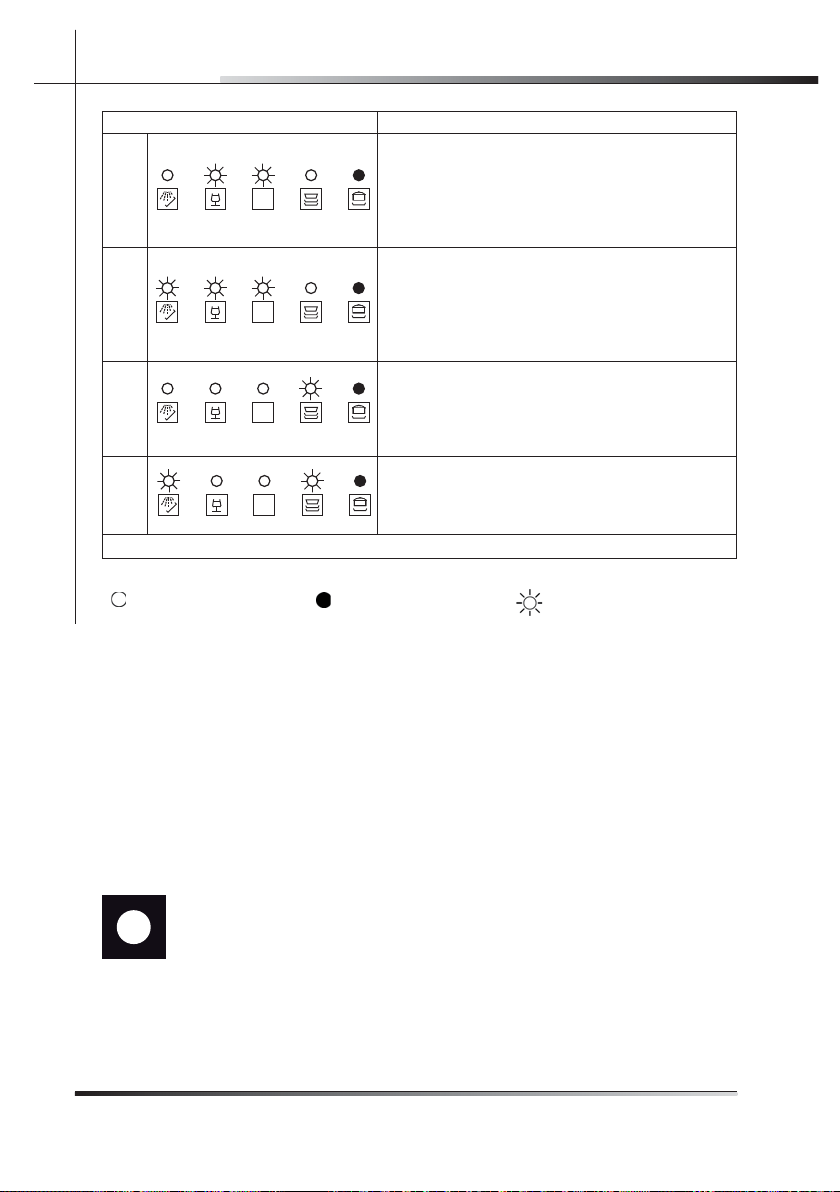
SUPPLEMENTARY
PROGRAMS NUMBER
AND SYMBOL
10
6
7
AUTO
8
9
RINSE
P
SHORT Slightly dirty
P
AUTO
P
DELICATE
ECONOMY
P
HEAVY
P
WASH
DISHES AND
CUTLERY
Pans and dishes
waiting to be
washed
Wash
immediately
after use
Wash
immediately
after use
Moderately
dirty pans and
dishes, including
dried-on residue
PROGRAM
SEQUENCE
Cold pre-wash 16 min.
Wash at 38°C
(136.40°F)
Cold rinse.
Rinse at 58°C
(136.4°F).
Cold pre-wash
(depends on the
type of dirt)
Wash at 55°C
(131°F).
Cold rinse.
Hot rinse at
69°C (156.2°F).
Dry.
Wash at 55°C
(131°F).
Cold rinse.
Rinse at 69°C
(156.2°F).
Dry.
Wash at 70°C
(158°F)
2 cold rinses.
Rinse at 70°C
(158°F)
Dry.
TIME CONSUMPTION
MINUTES
(2)
37 min.
105-120
min.
123 min.
102 min.
WATER
(1)
3.9 l
1.03 gal.
10.6 l
2.8 gal.
11-15 l
2.91-
3.96 gal.
11,9 l
3.14 gal.
15.1 l
3.99 gal.
Table. 3-02b
ENERGY
kWh (2)
0.03
0.38
0.8-1
0.9
1.0
(1) Average water consumption with the softener set to level 0 (zero).
Any other setting will increase water consumption to 2.5 l (0.66 gal.) / cycles with setting 5.
(2) The cycle times listed in the use and care manual are based on normal soil loads and 49°C
(120°F) incoming water and will vary based on your actual conditions.
- Only “AUTO SUPER WASH” and “EXTREME WASH” programs conforms to NSF std 184 and are
certifi ed by INTERTEK with the ETL SANITATION LISTED.
- When the “Sanitized” light shines it means that the dishwasher and its contents have been sanitized according to the requirements of the National Sanitation Foundation (NSF).
- When the “AUTO PROGRAMS” are selected, the dishwasher recognizes the type of dirt and
automatically adjusts the washing parameters as appropriate.
14 Rev 0.0
Page 15
USER INSTRUCTIONS
Sanitized
Only run the soak program with half loads.
To run programs 6, 7, 8, 9, 10 (see table 3-02b), select the required standard
program (see programs 1, 2, 3, 4, 5 in table 3-02a) and then press the supple-
mentary program button (ref. 6 fi g. 3-02).
After using the above tables to choose the most suitable washing cycle, program the appliance.
Before starting a washing program, make sure that:
The water supply tap is • open.
There is regenerating• salt in the water softener tank.
The correct amount of detergent• has been added to the dispenser (to add detergent, see the instructions in the general
manual).
The spray arms are able to rotate • freely and without obstruction.
The racks have been • correctly loaded
The dishwasher door • is securely closed.
3.2.1 Switching on
Press the on/off button (ref. 1 fi g. 3-02) to start the dishwasher. Then wait for
one of the program indicator lights to turn on (ref. 2 fi g. 3-02).
b
a
EN
END
AUTO
P
Sanitized
FIG. 3-02
Rev 0.0 15
Page 16

EN
USER INSTRUCTIONS
3.2.2 Selecting and starting the program
Press the • program selection button (ref. 3 fi g. 3-02) several times until
the indicator light corresponding to the required program turns on (ref. 2 fi g.
3-02);
if required, press the relative buttons to select any complementary functions •
(e.g.: “half-load”, “program delay”; see para 3.2.7 “options”);
close the door; the program will start after about • 2 seconds and the relative
indicator light will fl ash throughout the cycle (program running signal).
If the door of the dishwasher has not been closed or has been incorrectly closed, the washing cycle will not begin.
SUPPLEMENTARY PROGRAMS
The supplementary program button (ref. 6 fi g. 3-02) adds fi ve extra programs
to the ones that can be directly selected with the program selection button.
Press the supplementary program button (the indicator light turns on) after
selecting the “main” program (see 1, 2, 3, 4, 5 in table. 3-02a).
As the function is memorized, press the button again (the indicator light turns
off) if you wish to run one of the 5 main programs for the next cycle.
3.2.3 End of program
The end of the program is signaled by a short beep. Additionally the indicator
light of the standard and supplementary programs (marked “end”) fl ash.
3.2.4 Interrupting a program
To interrupt the current program simply open the door of the dishwasher; to
restart the program, simply close the door again. The program restarts from
where it was interrupted.
3.2.5 Changing the current program
To change the current program, simply open the door of the dishwasher and
select the new program. Close the door to run the new program automatically.
16 Rev 0.0
Page 17
USER INSTRUCTIONS
3 .2.6 Canceling the current program
To cancel the current program, open the door and press and hold down •
the program selection button (ref. 3 fi g. 3-02) for a few seconds until the
indicator lights of the fourth and fi fth programs turn on (ref. pr. 4, pr. 5 fi g.
3-03).
Close the door again.•
After about 1 minute, the dishwasher terminates the cycle and the indica-•
tor lights of the fourth and fi fth programs (ref. pr. 4, pr. 5 fi g. 3-03) start
fl ashing.
EN
pr. 4
AUTO
pr. 5
FIG. 3-03
3.2.7 Options
HALF-LOAD
This option is particularly suitable for reduced loads and saves on water and
electricity.
Before selecting the half-load wash option, open the dishwasher door and
choose the required washing program (see para 3.2 “Setting the washing program and switching it on and off”).
The half-load wash cycle can be selected in two different ways using the half-
load wash button (ref. 9 fi g. 3-02):
press the button • once to select washing in the upper rack. This is confi rmed by the appropiate indicator light (ref. 10a fi g. 3-02);
press the button • twice to select washing in the lower rack. This is confi rmed by the appropiate indicator light (ref. 10b fi g. 3-02);
press the button• three times to return to the standard full load condition
(washing in both racks, both indicator lights off).
When washing with just the lower rack is selected, the cutlery basket can
be separated and just half used.
Rev 0.0 17
Page 18

EN
USER INSTRUCTIONS
PROGRAM DELAY
(available for all programs except soak)
The “Program delay” function delays the beginning of the washing program
up to 9 hours from the moment in which programming takes place. This makes
it possible to use the dishwasher at a certain time of day.
Before programming a delay, open the door of the dishwasher, select the
required washing program (see para 3.2 “Setting the washing program and
switching it on and off”). Select the day by pressing the Program delay button
(ref. 11 fi g. 3-02); each time you press the button, the display increases the
delay by 1 hour before the appliances starts.
18 Rev 0.0
Page 19
USER INSTRUCTIONS
3.2.8 Switching off
At the end of the program, the dishwasher sounds a short beep and the indicator lights of the fourth and fi fth program (ref. pr. 4, pr. 5 fi g. 3-04) fl ash.
Turn off the appliance by opening the door and pressing the on/off button (ref.
1 fi g. 3-02).
EN
pr. 4
AUTO
pr. 5
FIG. 3-04
3.3 Additional functions
3.3.1 Adjusting the water softener
N.B.: a different washing program from soak must be used to make
the following adjustment.
Press and hold down the program delay button (ref. 11 fi g. 3-05) until the
preset value appears followed by a dot (normally 3.). Release the button and
then press it again and again until the required value is displayed, as indicated
in the table (see table. 3-03).
The 6 possible adjustment levels will appear in this sequence:
3., 4., 5., 0., 1., 2..
When the required value appears on the display, release the button; after 5
seconds the appliance automatically reverts to the program delay and the
adjustment is set to the chosen value.
Rev 0.0 19
Page 20

EN
Sanitized
USER INSTRUCTIONS
N.B.: the display indicates the water hardness adjustment and the
program delay. A dot (.) after the number means that the water
hardness adjustment is being displayed. If no dot (.) appears,
the program delay is being displayed.
END
AUTO
P
Sanitized
FIG. 3-05
Water hardness table (see table. 3-03)
WATER HARDNESS
German degrees (°D) French degrees (°F)
American degrees
grains/galls
0 - 4 0 - 7 0 - 4.5 0.
5 - 15 8 - 25 4.6 - 14.5 1.
16 - 23 26 - 40 14.6 - 23.5 2.
24 - 31 41 - 60 23.6 - 35 3.
32 - 47 61 - 80 35.1 - 46.5 4.
48 - 58 81 - 100 46.6 - 58.5 5.
Contact your local water board for information on the hardness of your water
supply.
If it is necessary to open the door during the washing cycle, the
program will be interrupted, the relative indicator light will continue to
fl ash and a beep will indicate that the cycle has not terminated. Wait
for about 1 minute before closing the door and continuing with the
program. When the door closes, the program will start from where it
was interrupted. This operation should be performed only if neces-
sary as it could cause irregular program performance.
SETTING
Table 3-03
20 Rev 0.0
Page 21

USER INSTRUCTIONS
4 ENERGY SAVING AND ENVIRONMENTAL
RESPECT
• Always try to run the dishwasher fully loaded.
Do not wash the dishes under a running tap. •
Use the• most suitable washing program for each type of load.
Do not pre-rinse. •
If available, connect the dishwasher to a hot water system with a tempera-•
ture of up to 60°C (140°F).
When possible, • skip the drying cycle by opening the door after washing:
the air and the residue heat will dry the dishes to perfection.
4.1 Reducing the consumption of detergent
and respecting the environment
The phosphates contained in dishwasher detergents are harmful to the environment. To avoid using excessive amounts of detergent and to save on
electricity:
• Separate the more delicate items from those that are more resistant to aggressive detergents and high temperatures;
Do not pour• the detergent directly onto the dishes .
EN
Rev 0.0 21
Page 22

EN
USER INSTRUCTIONS
5 REMOVING THE DISHES
At the end of the washing program, wait at least 20 minute before
removing the dishes in order to allow them to cool. To prevent any
water droplets on the upper rack from falling onto the dishes in the
lower rack, empty the lower rack fi rst and then the upper one.
22 Rev 0.0
Page 23
USER INSTRUCTIONS
6 TROUBLESHOOTING
The dishwasher can to signal a number of malfunctions by turning on various
indicator lights, as described below (see following table):
FAULT DESCRIPTION
Acquastop failure
E1
E2
E3
E4
E5
AUTO
AUTO
AUTO
AUTO
AUTO
The anti-fl ooding system has tripped (only for models
fi tted with this feature). Activates in case of water leaks.
Contact the technical assistance center.
Safety level
The system limiting the water level in the dishwasher
has tripped. Interrupt the current program. Switch off
the dishwasher, switch it back on again, program a new
cycle and press start. If the problem persists, contact
the technical assistance center.
Water heating malfunction
The water is not heated or is incorrectly heated. Repeat
the washing program; if the problem persists, contact
the technical assistance center.
Water temperature monitoring malfunction
Interrupt the current program. Switch off the dishwasher,
switch it back on again, program a new cycle and press
start. If the problem persists, contact the technical
assistance center.
Water intake malfunction
The appliance does not take in water or does so
incorrectly. Make sure the water connections are
correct, that the water supply tap is open and that the
fi lter is not clogged. If the problem persists, contact the
technical assistance center.
Table 6-01a
EN
Rev 0.0 23
Page 24
EN
USER INSTRUCTIONS
FAULT DESCRIPTION
Water pump-out malfunction
The appliance does not pump out the water or does so
E6
E7
E8
E9
AUTO
AUTO
AUTO
AUTO
Light off Light on Light fl ashing
If an alarm situation occurs, the dishwasher interrupts the current program and
signals the fault.
Alarms • E1, E2, E3, E4, E8, E9 immediately terminate the current program.
Alarms• E5, E6 interrupt the current program and, after the problem has been
eliminated, resume the cycle.
Alarm • E7 is displayed at the end of the cycle which, however, is completed
given that it does not jeopardize the operation of the dishwasher.
To “reset” an alarm:
open or close the door, or switch the appliance on and back off again. At this •
point, the dishwasher can be programmed again.
If the fault persists, contact the Authorized Technical Assistance
Center.
incorrectly. Make sure the drain hose is not kinked or
crushed and that the siphon and fi lters are not clogged.
If the problem persists, contact the technical assistance
center.
Turbine fl ow-regulator malfunction
The appliance is unable to precisely measure the
quantity of incoming water. Interrupt the current program
and switch off the dishwasher. Switch it back on again,
program a new cycle and press start. If the problem
persists, contact the technical assistance center.
Alternate washing system malfunction
Interrupt the current program and switch off the
dishwasher. Switch it back on again, program a new
cycle and press start. If the problem persists, contact
the technical assistance center.
Water intake system malfunction
Contact the technical assistance center.
Table 6-01b
24 Rev 0.0
Page 25
INSTALLATION INSTRUCTIONS
7 INSTALLATION AND HOOK-UP
To install and hook up this appliance, consult the attached installation
manual.
Bear in mind the following warnings when installing and hooking up the dishwasher.
DURING INSTALLATION, TAKE CARE NOT TO INJURE YOURSELF
ON THE SHARP EDGES OF THE APPLIANCE; WEAR SAFETY
GLOVES.
INSTALLATION, REPAIRS AND SERVICING MUST BE PERFORMED BY QUALIFIED AND AUTHORIZED TECHNICIANS.
WORK CARRIED OUT BY UNAUTHORIZED PERSONS MAY GENERATE HAZARDS, AS WELL AS INVALIDATING THE WARRANTY.
INSTALLATION MUST BE PERFORMED IN COMPLIANCE WITH
ALL THE DIRECTIVES IN FORCE IN THE COUNTRY OF INSTALLATION AND, IF THESE DO NOT EXIST: IN THE UNITED STATES THE
NATIONAL ELECTRIC CODE; IN CANADA THE CANADIAN ELECTRIC CODE C22.1 - LATEST EDITION/PROVINCIAL AND MUNICIPAL CODES AND/OR LOCAL CODES.
BUILDING-IN A DISHWASHER UNDERNEATH A CERAMIC HOB IS
ABSOLUTELY FORBIDDEN. A DISHWASHER CAN BE BUILT-IN
UNDERNEATH A CONVENTIONAL HOB PROVIDED THERE IS NO
BREAK IN THE KITCHEN WORKTOP, AND THE DISHWASHER
AND HOB ARE INSTALLED AND SECURED CORRECTLY, SO
THAT NO HAZARDS ARE GENERATED .
PREVENTING THE RISK OF CLOGGING OR DAMAGE: IF THE
WATER PIPE IS NEW OR HAS NOT BEEN USED FOR A LONG
TIME, BEFORE CONNECTING TO THE WATER SUPPLY CHECK
THAT THE WATER IS CLEAR AND FREE OF IMPURITIES, TO PREVENT DAMAGE TO THE APPLIANCE. THE DISHWASHER MUST
ALWAYS BE CONNECTED TO THE WATER SYSTEM WITH
NEW HOSES; OLD OR USED HOSES MUST NEVER BE REUSED .
CHECK THAT THE VOLTAGE AND THE FREQUENCY OF THE
MAINS MATCH THE RATINGS ON THE NAME PLATE OF THE APPLIANCE POSITIONED ON THE INNER EDGE OF THE DOOR.
EN
Rev 0.0 25
Page 26
EN
INSTALLATION INSTRUCTIONS
IN THE EVENT OF DAMAGE TO THE SUPPLY CORD, HAVE IT
REPLACED BY THE MANUFACTURER OR AN AUTHORIZED TECHNICAL SERVICE CENTER.
THIS APPLIANCE MUST BE EARTHED. IN CASE OF A MALFUNCTION, THE EARTH REDUCES THE RISK OF ELECTROCUTION BY
PROVIDING THE ELECTRICAL CURRENT WITH AN ALTERNATIVE,
LESS RESISTANT PATH.
BEFORE MAKING ELECTRICAL CONNECTIONS, DISCONNECT
THE MAINS POWER SUPPLY FROM THE WORK AREA.
CHECK THAT THE MAINS SUPPLY WHEN INSTALLING COMPLIES
WITH THE REGULATIONS IN FORCE IN THE COUNTRY OF USE,
AND THAT IT IS CORRECTLY EARTHED.
THIS APPLIANCE IS FITTED WITH A SUPPLY CORD CONTAINING
AN EARTH WIRE AND PLUG. FIT THE PLUG INTO A SUITABLE
SOCKET, INSTALLED AND EARTHED IN COMPLIANCE WITH THE
LAWS IN FORCE IN THE COUNTRY OF INSTALLATION.
AN INCORRECTLY CONNECTED EARTH WIRE MAY CAUSE OF
ELECTROCUTION. IF IN DOUBT AS TO THE CORRECT EARTHING
OF THE APPLIANCE, CALL A QUALIFIED ELECTRICIAN OR THE
TECHNICAL ASSISTANCE CENTER. DO NOT CHANGE THE PLUG
ATTACHED TO THE APPLIANCE. IF THE PLUG IS NOT SUITABLE
FOR THE SOCKET, CALL A QUALIFIED ELECTRICIAN TO FIT A
SUITABLE PLUG.
IN THE EVENT OF DAMAGE TO THE SUPPLY CORD, HAVE IT REPLACED BY THE MANUFACTURER OR AN AUTHORIZED TECHNICAL SERVICE CENTER IN ORDER TO AVOID ANY RISK.
DO NOT USE EXTENSION CORDS, ADAPTORS OR SHUNT CONNECTIONS IN ORDER TO AVOID THE POSSIBILITY OF OVERHEATING OR BURNING, OR PRODUCING FIRE HAZARD.
26 Rev 0.0
Page 27

USER INSTRUCTIONS
8 OPERATING INSTRUCTIONS
BEFORE USING THE APPLIANCE, MAKE SURE YOU HAVE READ
AND UNDERSTOOD ALL THE WARNINGS IN CHAPTER 2, “IMPORTANT SAFETY INSTRUCTIONS”.
Once the dishwasher has been correctly installed, prepare for use as follows:
adjust the water softening system; •
add the regenerating salt; •
add the rinse-aid and detergent.•
EN
Rev 0.0 27
Page 28
EN
USER INSTRUCTIONS
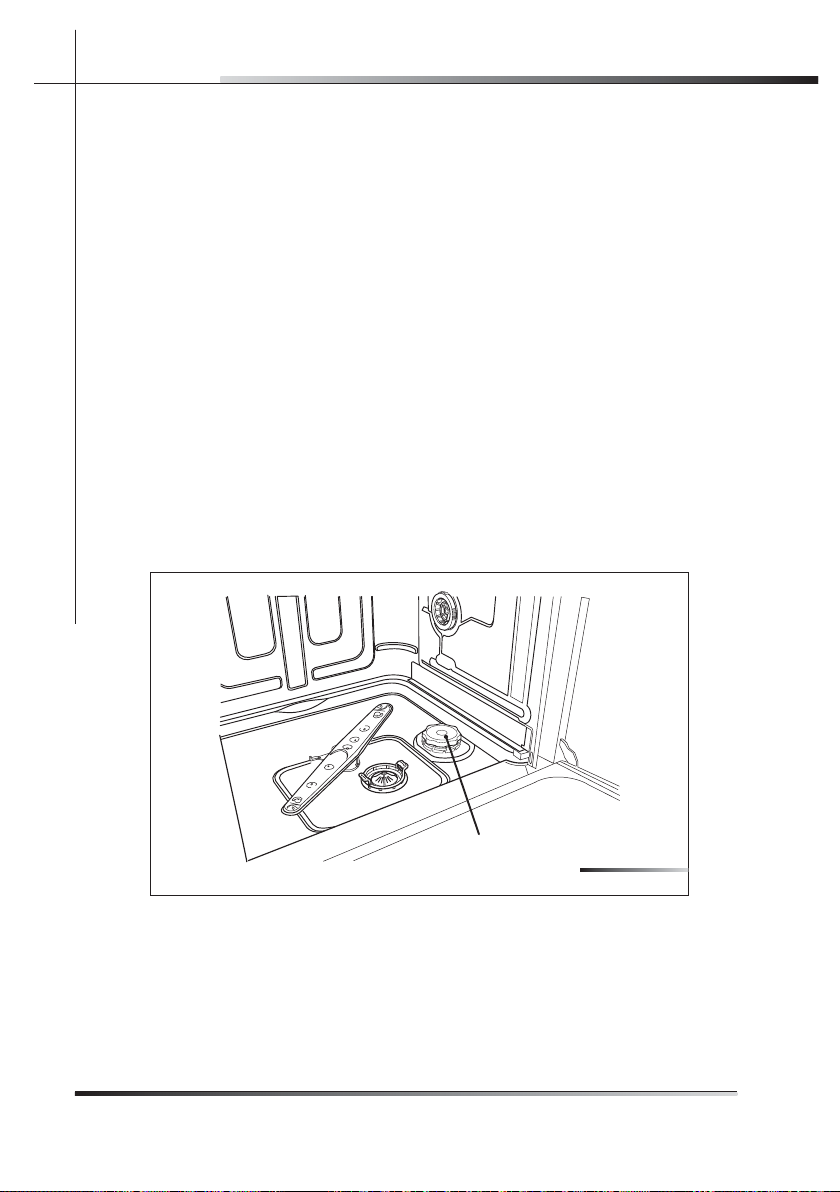
8.1 Using the water softening system
The amount of scale contained in the water (water hardness index) can cause
whitish staining on the dry dishes, which tend to become dull over time. The
dishwasher is equipped with an automatic softening system which uses a special regenerating salt to reduce the hardness of the water. The dishwasher is
factory set for water hardness level 3 (average hardness 41-60°dF – 24-31°dH
/ 23.6-35 gpg). When using water of medium hardness, the regenerating salt
container should be refi lled after approximately 20 washing cycles. The salt
container can hold approximately 1.7 Kg (3.75 lb) of salt in grains. Some models are equipped with an optical no-salt indicator. In these models, the cap of
the salt container contains a green fl oat which descends as the salt concentration in the water drops. When the green fl oat can no longer be seen, the
container must be topped up with regenerating salt. The container is situated
at the bottom of the dishwasher. After removing the lower rack, unscrew the
salt container cap (ref. A fi g. 8-01) by turning it counter clockwise and pour in
the salt using the funnel (ref. A fi g. 8-02) supplied with the dishwasher. Before
replacing the cap (ref. A fi g. 8-01), remove any salt residues from around the
opening.
A
Fig. 8-01
28 Rev 0.0
Page 29

USER INSTRUCTIONS
SA LT
SALT
A
Fig. 8-02
When using the dishwasher for the fi rst time, in addition to the salt it is also •
necessary to add one liter of water to the container.
Each time the salt container is refi lled, make sure that • the cap (ref. A fi g.
8-01) is securely closed. The mixture of water and detergent must never
penetrate the salt container, as this would compromise the operation of the
regeneration system. In the event of this occurring, the warranty will be invalidated.
Only use regenerating salt specially formulated for domestic dishwashers. If •
using salt tablets, do not fi ll the container completely.
• Do not use table salt as it contains insoluble substances which, over time,
may damage the water softening system.
When necessary, refi ll the regenerating salt container • before starting the
washing program. This way, the excess saline solution will be immediately
removed by the water; the prolonged presence of salt water inside the tank
may lead to corrosion.
BE CAREFUL NOT TO CONFUSE THE SALT AND DETERGENT
PACKAGES; ADDING DETERGENT TO THE SALT CONTAINER
WILL DAMAGE THE WATER SOFTENING SYSTEM.
EN
Rev 0.0 29
Page 30
EN
USER INSTRUCTIONS
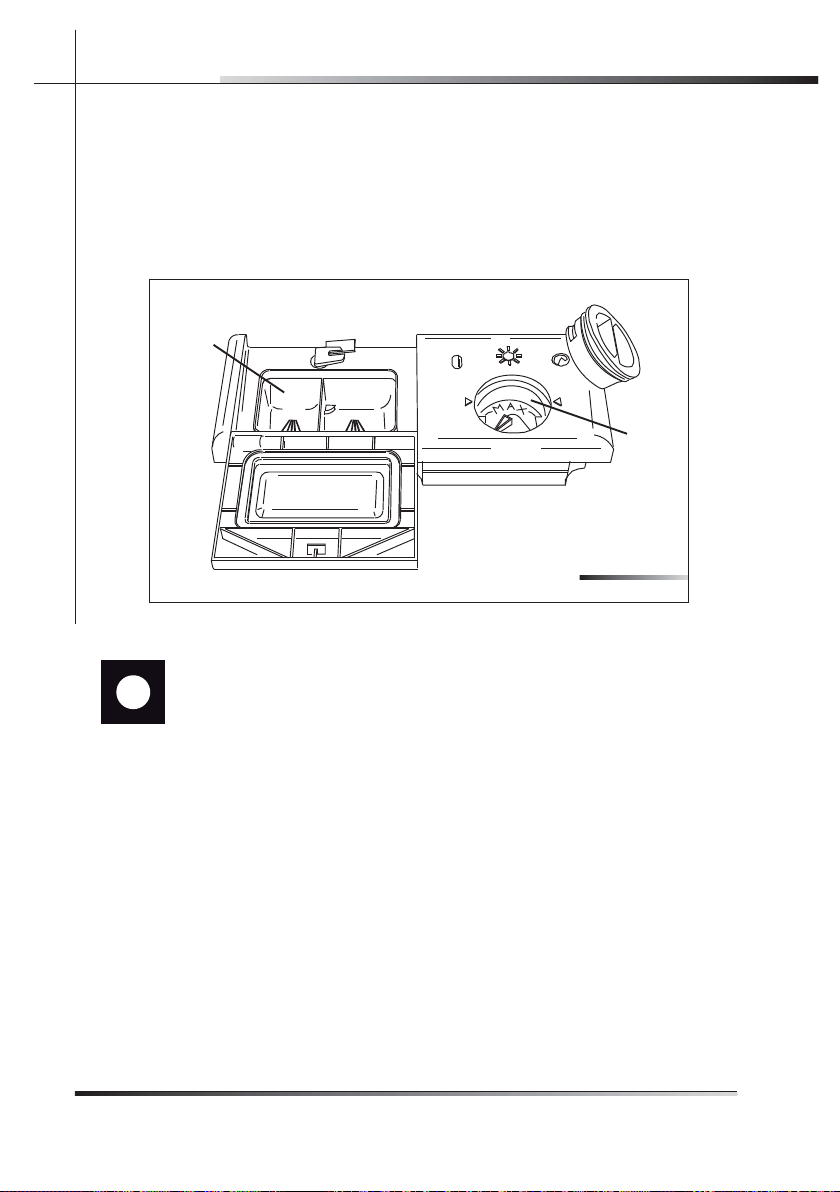
8.2 Using the rinse-aid and detergent
dispensers
The detergent and rinse aid dispensers are situated on the inner part of the
door: the detergent dispenser (ref. A fi g. 8-03) is on the left, and the rinse-
aid dispenser (ref. B fi g. 8-03) is on the right.
A
B
Fig. 8-03
WITH THE EXCEPTION OF THE SOAK PROGRAM, BEFORE EVERY WASH CYCLE IT IS NECESSARY TO ADD THE REQUIRED
AMOUNT OF DETERGENT TO THE DETERGENT DISPENSER.
THE RINSE AID, ON THE OTHER HAND, SHOULD ONLY BE ADDED AS REQUIRED.
30 Rev 0.0
Page 31

USER INSTRUCTIONS
8.2.1 Adding the rinse-aid
The rinse aid helps the dishes dry faster and prevents the formation of scale deposits and staining; it is automatically added to the water during the fi nal rinse
cycle, from the container situated on the inner side of the door .
EN
B
A
C
Fig. 8-04
To add rinse aid:
Open the door. •
Rotate the container cap (ref. A fi g. 8-04) counter clockwise by ¼ of a turn •
and remove it.
Add the rinse aid until the container is full (approximately 4.7 oz). The optical •
level indicator (ref. B fi g. 8-04), on the side of the cap should be completely
obscured. Refi ll the rinse aid when the optical level indicator becomes clear
again, or when the rinse aid warning light illuminates (see para “Description
and use of controls”).
Replace the cover (ref. A fi g. 8-04) by turning it in a clockwise direction until •
it is fully closed.
Use a cloth to remove any spillage of rinse aid which might lead to the forma-•
tion of excess foam.
8.2.2 Adjusting the rinse-aid dispenser setting
The rinse-aid dispenser can be set to one of 6 different levels. The dishwasher
is factory set for medium water hardness (selector set to “3”). To change the
setting, turn the dispenser selector (ref. C fi g. 8-04) to the desired position:
the amount of rinse-aid dispensed is proportional to the position of this selector. The minimum amount of rinse-aid (selector turned to “1”) is approximately
0.033 oz and the maximum amount (selector turned to “6”) is approximately
0.2 oz.
Rev 0.0 31
Page 32

EN
USER INSTRUCTIONS
To adjust the rinse aid setting, rotate the dispenser cap (ref. A fi g. 8-04) a •
quarter turn in an counter clockwise direction and remove it.
Then use a screwdriver to rotate the rinse aid selector to the desired posi-•
tion.
Replace the cover (ref. A fi g. 8-04) by turning it in a clockwise direction until •
it is fully closed.
The amount of rinse aid must be increased if the washed dishes appear dull •
or feature circular stains.
If, on the other hand, the dishes are sticky or have white streaks, it is neces-•
sary to reduce the rinse aid setting.
8.2.3 Adding the detergent
DO NOT INHALE OR SWALLOW DETERGENT AS THIS MAY CAUSE
BURNS AND/OR PERMANENT DAMAGE TO THE NOSE, MOUTH
AND THROAT, AND EVEN LEAD TO SUFFOCATION; KEEP DETERGENT AWAY FROM YOUR EYES. IF ONE OF THE ABOVE SITUATIONS OCCURS, SEEK MEDICAL ASSISTANCE IMMEDIATELY.
PREVENT CHILDREN FROM COMING INTO CONTACT WITH DETERGENT; KEEP THEM AWAY FROM THE DISHWASHER WHEN
THE DOOR IS OPEN AS IT MAY CONTAIN DETERGENT RESIDUES.
FILL THE DISHWASHER JUST BEFORE STARTING THE WASHING
CYCLE AND THEN KEEP THE DETERGENT OUT OF THE REACH
OF CHILDREN.
To open the detergent dispenser cover, lightly press the relative button (ref.
A fi g. 8-05). Add the detergent and close the cover carefully, pushing down
on the arrow (ref. B fi g. 8-05). During the washing cycle, the dispenser will be
opened automatically.
A
Fig. 8-05
32 Rev 0.0
Page 33

USER INSTRUCTIONS
EN
A
When a program with hot prewash is selected (see table 3-02a), extra de-•
tergent must be placed in the cavity (ref. A or B fi g. 8-06, depending on
models).
Only• use dishwasher-specifi c detergents. For optimal washing results it is
important to use a good quality detergent.
The detergent packs must be sealed and stored in a dry place to prevent •
the formation of lumps which may negatively affect washing results. Once
opened the detergent packs should not be kept for too long, otherwise the
detergent loses its effectiveness.
Do not use detergents formulated for washing dishes by hand, because they •
produce a great deal of foam and may negatively affect the operation of the
dishwasher.
Add the correct amount of detergent. An insuffi cient amount of detergent •
will result in a partial removal of dirt from the dishes, whereas an excessive
amount is wasteful and does not improve the washing results.
The market offers liquid and powder detergents with differing chemical com-•
positions, which may contain phosphates, or be phosphate-free but contain natural enzymes.
Detergents containing • phosphates are more effective against grease and
starch at temperatures above 60°C (140°F).
Enzyme detergents, on the other hand, are also effective at lower tempera-•
tures (from 40 to 55°C / from 104 to 131°F) and are more easily biodegradable. With enzyme detergents it is possible to obtain at low temperatures
comparable results to those which can only be achieved at 65°C (149°F)
using traditional detergents. For the safeguarding of the environment we
recommend the use of phosphates and chlorine-free detergents.
B
Fig. 8-06
Rev 0.0 33
Page 34

EN
USER INSTRUCTIONS
When using detergent tabs, place them in the cutlery basket. The dispenser •
has been designed for powder or liquid detergent. As the cap does not
open completely during the washing cycle, tabs are not fully released (and
dissolved). This could generate the following problems:
- insuffi cient detergent released during the cycle and poor washing results;
- the detergent is compacted in the dispenser and is released during the fi nal
rinse cycle.
THE INTRODUCTION OF DETERGENT INTO THE RINSE AID
DISPENSER, EVEN IN LIQUID FORM, WILL DAMAGE THE DISHWASHER.
8.3 General warnings and recommendations
Before using the dishwasher for the fi rst time, it is advisable to read the following recommendations concerning dish types to be washed and their loading.
There are generally no constraints on the washing of domestic dishes, but in
certain cases it is necessary to take their characteristics into account. Before
loading the dishes into the racks it is necessary to:
remove coarse food remains: e.g. bones, fi sh-bones, etc. which may clog •
the fi lter or damage the wash pump;
soak any pots or pans with burnt-on food remains on the bottom to facilitate •
removal, then load them into the LOWER RACK.
Use the “½ load wash” option (if available) for washing small amounts of dishes; it saves water and electricity. When using this function, only load the rack
selected for the ½ load wash; the other rack must remain empty. There is
no need to pre-wash the dishes under running water before loading them into
the racks since this only wastes water. Correct loading of the dishes helps
ensure optimal washing results.
WARNING!
make sure that the dishes are securely in place so that they cannot tip over •
or obstruct the rotation of the spray arms during the washing cycle;
do not place very small objects in the racks as these could fall and obstruct •
the spray arms or the wash pump;
containers such as cups, bowls, glasses and pots should always be loaded •
with the opening facing downwards and with any cavities at an angle, to allow the water to drain out;
do not stack dishes or place them in such a way that they cover one other; •
do not place glasses too close together because they may knock against •
each other and break, or there might be staining at the point where they
touch.
34 Rev 0.0
Page 35

USER INSTRUCTIONS
MAKE SURE that the items being washed are dishwasher-safe.
Items that are not dishwasher-safe:
• Wooden dishes, pots or pans: these may be damaged by the high wash-
ing temperatures.
Handcrafted items: • these are rarely suitable for washing in a dishwasher.
The relatively high water temperatures and the detergents used may damage them.
Lightweight objects: • place lightweight objects in the upper rack where the
water pressure is lower.
Dishes and objects in copper, tin, zinc or brass:• these tend to stain.
Aluminum dishes:• items made from anodized aluminum may lose their
color.
Silverware:• silver items may stain.
Glass and crystal:• in general, glass and crystal objects can be washed in
the dishwasher. However, certain types of glass and crystal may become
dull and lose their clearness after many washings. Therefore, for these items
we recommend using the least aggressive program available (see para “Description and use of the controls”).
Decorated items:• the decorated objects available on the market are gener-
ally able to withstand washing in the dishwasher, although the colors may
fade after a great many washes. If in doubt as to the fastness of the colors, it is advisable to wash just a few items at a time for approximately one
month.
EN
Rev 0.0 35
Page 36

EN
USER INSTRUCTIONS
8.4 Using the racks
The dishwasher has a capacity of 12 place-settings, including serving dishes.
Examples of loading 12 place-settings in the upper rack (see fi g. 8-07) and in
the lower rack (see fi g. 8-08) are shown below.
Fig. 8-07
Fig. 8-08
36 Rev 0.0
Page 37

USER INSTRUCTIONS
8.4.1 Lower rack
The lower rack receives the full force of the lower spray arm, and should therefore be used for the “toughest” items with a heavier degree of soiling.
All types and combinations of loads are permitted, provided that the dishes,
pots and pans are arranged with all the soiled surfaces exposed to the water
jets coming from the bottom.
To make the most of the space inside the rack when loading large items, is
equipped with tip-up supports for plates (see fi g. 8-09).
EN
Fig. 8-09
Rev 0.0 37
Page 38

EN
USER INSTRUCTIONS
Loading the lower rack (see fi g. 8-10)
Carefully load fl at plates, soup plates, dessert and serving dishes, positioning them vertically. Pots, pans and their covers must be loaded upside down.
When loading soup plates and dessert bowls, be sure to leave a gap between
them.
LOADING EXAMPLES:
Esempi di caricamento:
1/2 LOAD
Disposizione 1/2 carico
(solo su alcuni modelli)
Fig. 8-10
38 Rev 0.0
Page 39

USER INSTRUCTIONS
8.4.2 Cutlery basket (see fi g. 8-11)
The cutlery basket can be removed to simplify unloading.
Arrange the cutlery in an orderly manner inside the basket, with the handles
pointing downwards and taking care not to injure yourself with the knife
blades. The basket is suitable for all types of cutlery, except those long enough
to interfere with the upper spray arm.
Place long items (ladles, wooden spoons and cooking knives) that may inter-
fere with the spray arm in the upper rack making sure that knife tips do
not protrude.
The dishwasher is complete with two cutlery baskets, which means that one
of them can be removed, freeing space in the bottom rack, if there is not much
cutlery to be washed, or if a ½ load program is being used (on models with this
function).
The baskets feature an exclusive system of independent sliding tip-up supports, offering a choice of combinations to allow optimum use of the space
available.
EN
Inserto
HORIZONTAL
orizzontale
INSERT CLOSED
chiuso
VERTICAL INSERTS
Inserti verticali
Rev 0.0 39
MOVEMENT REQUIRED
Movimento per
TO EXTRACT THE INSERTS
l'estrazione degli
inserti
Inserto
HORIZONTAL
INSERT OPEN
orizzontale
aperto
Fig. 8-11
Page 40

EN
USER INSTRUCTIONS
8.4.3 Upper rack (see fi g. 8-12)
It is recommended to load the upper rack with small or medium-sized items
such as glasses, small plates, tea or coffee cups, shallow bowls and light
objects made from heat resistant plastic.
If the upper rack is used in the lowermost position, it can also be loaded with
serving dishes, provided they are only slightly soiled.
The top rack is fi tted, on the left, with two plastic racks which can be raised to
make room for tall glasses, such as stem glasses.
40 Rev 0.0
Fig. 8-12
Page 41

USER INSTRUCTIONS
Loading the upper rack (see fi g. 8-13)
Load plates facing forward; cups, bowls etc. must always be facing down-wards. The left-hand side of the rack can be loaded with two layers of cups and
glasses. The center can be fi lled with plates and side-plates, fi tted upright into
the supports provided.
LOADING EXAMPLES:
Fig. 8-13
EN
Rev 0.0 41
Page 42

EN
USER INSTRUCTIONS
T he upper rack can be set in three different positions on both sides. The rack
must be level on both sides.
To raise the rack (ref. A fi g. 8-14), lift it with the two handles (e.g.: ref. B fi g. 8-
14) to the fi rst or second catch depending on the height required. To lower it
(ref. C fi g. 8-14), pull up the two release levers (e.g.: ref. D fi g. 8-14). This is also
possible with the rack loaded, but in this case when lowering the rack it should
be held steady with one hand to avoid knocking the dishes.
A
C
B
D
Fig. 8-14
42 Rev 0.0
Page 43

USER INSTRUCTIONS
9 CLEANING AND USER-MAINTENANCE
BEFORE CARRYING OUT ANY WORK, ALWAYS DISCONNECT
THE APPLIANCE FROM THE ELECTRICAL POWER SUPPLY.
9.1 General warnings and recommendation
NEVER USE ABRASIVE AND/OR CORROSIVE DETERGENTS
TO CLEAN THE APPLIANCE.
Clean the outer surfaces and door-lining of the dishwasher regularly using a
soft cloth moistened with a neutral detergent (not abrasive and/or corrosive)
suitable for painted surfaces. Clean the door gaskets with a damp sponge.
Periodically (once or twice a year) it is advisable to clean the tank and gaskets,
using a soft cloth and water to remove any deposits.
Do not clean the controls with too much water as this may leak onto the electronic components and damage them.
After cleaning, dry the appliance with a soft, lint-free cloth.
If stainless steel surfaces are preset, clean them with a non-abrasive product
specifi c for stainless steel. To prevent stains, a nebulizer may also be used,
though sparingly and at a moderate pressure.
EN
Rev 0.0 43
Page 44

EN
USER INSTRUCTIONS
9.2 Cleaning the water intake fi lter
Clean the water inlet fi lter at regular intervals. After closing the delivery tap,
unscrew the ring nut (ref. A fi g. 9-01) on the water inlet pipe (using a pair of pliers, if necessary) and delicately clean the fi lter, removing deposits or impurities.
Then fi rmly fi x the pipe by tightening the ring nut (ref. A fi g. 9-01) (use a pair of
pliers, if necessary).
A
Fig. 9-01
9.3 Cleaning the spray arms
The spray arms can be easily removed for periodic cleaning of the nozzles,
to prevent possible clogging. Wash them under running water (at room temperature) and carefully replace them in their seats, checking that their rotary
movement is in no way impeded; if this is not the case, make sure they have
been mounted properly.
Removing the spray arms
• To remove the upper spray arm (ref. A fi g. 9-02), unscrew the locking ring
(ref. B fi g. 9-02) by turning it clockwise. After cleaning, remount the spray
arm in its seat and tighten the locking ring by turning it anti-clockwise.
To remove the lower spray arm (ref. A fi g. 9-03), simply lift it up, pulling by the •
central part (see fi g. 9-03). Then remount the lower spray arm into its seat
and push it down slightly until it click into place (see fi g. 9-03).
44 Rev 0.0
Page 45

USER INSTRUCTIONS
A
B
A
EN
Fig. 9-02
•
•
•
•
•
•
Fig. 9-03
Rev 0.0 45
Page 46

EN
A
USER INSTRUCTIONS
9.4 Cleaning the fi lter unit
Periodically inspect the fi lter unit (ref. A fi g. 9-04) and, if necessary, clean it •
under running water (at room temperature), using a stiff brush. To remove
the fi lter, grip the tabs, turn counter clockwise and lift upwards;
push the center fi lter (ref. A fi g. 9-05) from the underside to remove it from •
the micro-fi lter;
separate the two parts which make up the plastic center fi lter by pressing •
the body of the fi lter in the zone shown by the arrows (ref. B fi g. 9-05);
remove the center fi lter by lifting it upwards.•
after cleaning, remount the fi lter unit, joining the two parts comprising the •
centre fi lter by pushing slightly until they click into place; insert the centre
fi lter into the micro-fi lter (see fi g. 9-05). Reposition the fi lter unit (ref. A fi g.
9-04) into its seat, turning it clockwise until it locks.
A
BB
46 Rev 0.0
Fig. 9-04
Fig. 9-05
Page 47

USER INSTRUCTIONS
9.5 General warnings and recommendations
for correct maintenance
Clean the fi lters • under running water (at room temperature) using a stiff
brush.
When removing the fi lter• , take care that there are no food residues on
it. If any residues fall into the washing pit (ref. A fi g. 9-06), they might block
hydraulic components or foul the spray arm nozzles.
It is essential to • thoroughly clean the fi lters according to the above in-
structions: the dishwasher cannot function if the fi lters are clogged.
Carefully replace• the fi lters in their seats, to avoid damaging the wash
pump.
EN
Rev 0.0 47
Fig. 9-06
Page 48

EN
USER INSTRUCTIONS
Prolonged non-use recommendations
Run the soak program • twice in succession.
Unplug the power• cord from the socket.
Leave • the door slightly open in order to prevent the formation of unpleas-
ant odors inside the washing tank.
Fill the rinse-aid dispenser• .
Shut off the water supply tap• .
Before starting the dishwasher after prolonged non-use
Check that there are no deposits of sludge or rust inside the water pipe: if •
there are, allow the water to run from the water supply tap for a few minutes.
Plug the power cord• back into the socket.
Reconnect the water intake hose and open the tap again• .
9.6 Troubleshooting minor problems
In some cases it is possible to remedy minor problems by referring to the following instructions:
If the program fails to start, check that:
the dishwasher is connected to the electrical power supply; •
there is no power failure; •
the water tap is open;•
the dishwasher door is properly closed. •
If water remains inside the dishwasher, check that:
the drain hose is not kinked•
the drain siphon is not obstructed; •
the dishwasher fi lters are not clogged. •
If the dishes do not come out clean, check that:
the correct amount of detergent has been added; •
there is regenerating salt inside the special container; •
the dishes are being loaded correctly; •
the selected program is suitable for the dish types and their degree of soil; •
all the fi lters are clean and positioned correctly; •
the spray arm nozzles are not obstructed; •
there is no object obstructing the rotation of the spray arms.•
48 Rev 0.0
Page 49

USER INSTRUCTIONS
If the dishes fail to dry or remain dull, check that:
there is rinse aid inside the special container; •
the rinse-aid dispenser setting is correct; •
the detergent used is of good quality and has not lost its effectiveness (due •
to incorrect storage, for example, the box was left open without brackets).
If the dishes show signs of streaking, staining, etc., check
that:
the rinse aid dispenser setting is not too high. •
If there are visible traces of rust inside the tank:
the tank is made of steel, and therefore any rust marks are due to external •
elements (fragments of rust from the water pipes, pots, cutlery, etc.). Special
products are commercially available to remove such marks.
check that the amount of detergent being used is correct. Certain deter-•
gents can be more corrosive than others.
check that the cap of the salt container is securely closed, and that the water •
softening setting is correct.
IF AFTER PERFORMING THE ABOVE TROUBLESHOOTING INSTRUCTIONS THE PROBLEM PERSISTS, CALL THE NEAREST
TECHNICAL ASSISTANCE CENTER.
WARNING: ANY OPERATIONS PERFORMED ON THE APPLIANCE BY AN UNAUTHORIZED PERSON ARE NOT COVERED BY THE WARRANTY AND SHALL BE PAID FOR BY THE
USER.
EN
Rev 0.0 49
Page 50

EN
USER INSTRUCTIONS
10 TECHNICAL DATA (SEE TABLE 10-01)
Width
Depth measured fl ush
with the outer edge of the
control panel
59.7 cm ÷ 59.9 cm (23-1/2” ÷ 23-37/64”)
55 cm (21-21/32”)
Height
Capacity
Water supply pressure
Electrical characteristics
from 86 cm to 91 cm (from 33-55/64” to 35-53/64”)
12 standard place-settings
min. 7 - max. 130 PSI (min. 0.5 – max. 9 bar)
See rating plate
Table 10-01
50 Rev 0.0
Page 51

SOMMAIRE FR
SOMMAIRE
1 INTRODUCTION ........................................................................................3
2 AVERTISSEMENT SUR LA SÉCURITÉ ET L’UTILISATION .......................... 5
3 DESCRIPTION ET UTILISATION DES COMMANDES ............................... 12
3.2 Sélection du programme de lavage, mise en marche et arrêt ...................13
3.2.1 Mise en marche ....................................................................................... 16
3.2.2 Sélection et démarrage du programme .................................................... 17
3.2.3 Fin du programme .................................................................................... 17
3.2.4 Interruption d’un programme .................................................................... 17
3.2.5 Sélection d’un autre programme .............................................................. 17
3.2.6 Annulation du programme en cours d’exécution ......................................18
3.2.7 Options ....................................................................................................18
3.2.8 Arrêt ....................................................................................................... 20
3.3 Fonctions supplémentaires ....................................................................... 20
3.3.1 Réglage de l’adoucisseur ......................................................................... 20
4 POUR ÉCONOMISER DE L’ÉNERGIE ET RESPECTER L’ENVIRONNE-
MENT ......................................................................................................22
4.1 Pour réduire les consommations de produit de lavage et respecter l’environ-
nement ....................................................................................................22
5 VIDER LE LAVE-VAISSELLE .....................................................................23
6 GUIDE DE DÉPANNAGE ..........................................................................24
7 INSTRUCTIONS POUR L’INSTALLATION ET LA POSE ............................26
8 INSTRUCTION POUR L’UTILISATION.......................................................29
8.1 Utilisation de l’adoucisseur d’eau ............................................................ 30
Rev 0.0 1
Page 52

FR
SOMMAIRE
8.2 Utilisation du distributeur de produit de lavage et du doseur de liquide de
rinçage ..................................................................................................... 32
8.2.1 Ajout du liquide de rinçage ....................................................................... 33
8.2.2 Réglage du dosage du liquide de rinçage .................................................33
8.2.3 Chargement du produit de lavage ............................................................34
8.3 Avertissements et conseils généraux ........................................................36
8.4 Utilisation des paniers ..............................................................................38
8.4.1 Panier inférieur ......................................................................................... 39
8.4.2 Panier à couverts ..................................................................................... 41
8.4.3 Panier supérieur .......................................................................................42
9 INSTRUCTIONS POUR LE NETTOYAGE ET L’ENTRETIEN ......................45
9.1 Avertissements et conseils généraux ........................................................45
9.2 Nettoyage du fi ltre d’arrivée d’eau ............................................................ 46
9.3 Nettoyage des bras de lavage ..................................................................46
9.4 Nettoyage du groupe fi ltrant ..................................................................... 48
9.5 Instructions et conseils pour un entretien correct ...................................... 49
9.6 Élimination de petits inconvénients ........................................................... 50
10 DONNÉES TECHNIQUES
(VOIR TAB. 10-01) ....................................................52
2 Rev 0.0
Page 53

INTRODUCTION
1 INTRODUCTION
Nous vous remercions d’avoir choisi l’un de nos produits. Pour
connaître les conditions les plus appropriées pour une utilisation
correcte et sûre de votre lave-vaisselle, lisez attentivement les instructions de ce manuel. Les paragraphes sont proposés de façon
à faire connaître progressivement toutes les fonctions de l’appareil ;
les textes sont facilement compréhensibles et sont illustrés par des
images détaillées. Ce manuel, d’une consultation facile, est conçu
pour offrir des réponses aux questions qui peuvent surgir lors de
l’utilisation du lave-vaisselle.
Avant d’utiliser le lave-vaisselle, lisez avec attention ce qui est reporté au chapitre 2 “Avertissements pour la sécurité et l’utilisation”.
Pour toute autre information concernant l’utilisation et l’entretien du
lave-vaisselle, lisez attentivement le manuel général ci-joint.
Le manuel comprend les sections suivantes :
INTRODUCTION : cette section contient des informations génériques concernant le manuel.
AVERTISSEMENTS : cette section contient une série d’avertissements concernant la sécurité et l’utilisation du lave-vaisselle.
INSTRUCTIONS POUR L’INSTALLATEUR : elles sont destinées au
technicien qualifi é qui doit effectuer l’installation, la mise en service et l’essai de l’appareil.
INSTRUCTIONS POUR L’UTILISATEUR : cette section contient des
conseils utiles sur l’utilisation des paniers, bras de lavage, réservoirs
et fi ltres.
Nomenclature des fi gures et des tableaux :
l’encadré qui contient les fi gures reporte, en bas sur la droite, la
numérotation progressive de celles-ci. Un exemple de numérotation
est “Fig. 4-01”, où le premier chiffre (4) correspond au chapitre d’appartenance de la fi gure, tandis que le deuxième chiffre (01) correspond au numéro progressif de la fi gure au sein du chapitre 4 (dans
l’exemple, la Fig. 4-01 correspond à la première fi gure du chapitre
4). La numérotation des tableaux suit le même principe avec, au lieu
de “Fig.”, la notation “Tab.” (par ex. Tab. 4-01 correspond au premier tableau du chapitre 4). Si un même tableau occupe plusieurs
pages, une lettre est ajoutée après le chiffre progressif (par ex. “Tab.
4-01a”, Tab. 4-01b”).
FR
Rev 0.0 3
Page 54

FR
INTRODUCTION
Symboles utilisés dans ce manuel (voir tab. 1-01)
DANGER. Ce symbole indique des informations et avertissements
qui doivent impérativement être respectés pour ne pas compromettre
la sécurité des personnes ou endommager l’appareil.
DANGER ÉLECTRIQUE. Ce symbole indique des informations
et avertissements concernant les circuits électriques qui doivent
impérativement être respectés pour ne pas compromettre la sécurité
des personnes ou endommager l’appareil.
Ce symbole indique des informations et avertissements de caractère
général.
Tab. 1-01
4 Rev 0.0
Page 55

AVERTISSEMENT
2 AVERTISSEMENTS SUR LA SÉCURITÉ ET
L’UTILISATION
CE MANUEL FAIT PARTIE INTÉGRANTE DE L’APPAREIL : IL
DOIT ÊTRE CONSERVÉ INTACT ET ACCOMPAGNER LE LAVEVAISSELLE (AVEC LES ÉVENTUELS MANUELS ANNEXÉS “INSTALLATION” ET “DESCRIPTION DES COMMANDES”). AVANT
L’UTILISATION, NOUS CONSEILLONS DE LIRE AVEC ATTENTION
TOUTES LES INDICATIONS CONTENUES DANS LE MANUEL.
L’INSTALLATION DOIT ÊTRE EFFECTUÉE PAR DU PERSONNEL
QUALIFIÉ, CONFORMÉMENT AUX NORMES EN VIGUEUR. CET
APPAREIL EST PRÉVU POUR UNE UTILISATION DE TYPE DOMESTIQUE ET RÉPOND AUX DIRECTIVES ACTUELLEMENT EN
VIGUEUR, Y COMPRIS EN CE QUI CONCERNE LA PRÉVENTION
ET L’ÉLIMINATION DES PERTURBATIONS ÉLECTROMAGNÉTIQUES. L’APPAREIL EST FABRIQUÉ POUR EXÉCUTER LA FONCTION SUIVANTE : LAVAGE ET SÉCHAGE DE LA VAISSELLE ;
TOUTE AUTRE UTILISATION DOIT ÊTRE CONSIDÉRÉE COMME
INCORRECTE.
LE FABRICANT DÉCLINE TOUTE RESPONSABILITÉ POUR
UNE UTILISATION AUTRE QUE DE CELLES INDIQUÉES.
LA PLAQUE D’IDENTIFICATION, AVEC LES DONNÉES TECHNIQUES, LE NUMÉRO MATRICULE ET LE MARQUAGE, EST POSITIONNÉE DE FAÇON VISIBLE SUR LE BORD INTERNE DE LA
PORTE DU LAVE-VAISSELLE.
LA PLAQUE D’IDENTIFICATION NE DOIT JAMAIS ÊTRE EN-
LEVÉE.
L’APPAREIL N’EST PAS ADAPTÉ POUR UNE UTILISATION MARITIME OU MOBILE COMME, PAR EXEMPLE, SUR DES CAMPINGCARS OU BATEAUX. LES LAVE-VAISSELLE CERTIFIÉS POUR UN
USAGE DOMESTIQUE NE SONT PAS DESTINÉS AUX ÉTABLISSEMENTS ALIMENTAIRES AUTORISÉS.
(Conserver ces instructions)
FR
CONTRÔLER QUE LA TENSION, LA FRÉQUENCE ET LA SENSIBILITÉ DE PROTECTION DE L’INSTALLATION ÉLECTRIQUE GÉNÉRALE CORRESPONDENT AUX INDICATIONS REPORTÉES SUR LA
PLAQUE D’IDENTIFICATION DE L’APPAREIL.
Rev 0.0 5
Page 56

FR
AVERTISSEMENT
NE PAS LAISSER DES RÉSIDUS D’EMBALLAGE SANS SURVEILLANCE DANS L’HABITATION. SÉPARER LES DIFFÉRENTS
MATÉRIAUX DE L’EMBALLAGE À JETER ET LES APPORTER DANS
LE CENTRE DE COLLECTE SÉLECTIVE LE PLUS PROCHE. LES
RÉSIDUS D’EMBALLAGE NE DOIVENT PAS ÊTRE LAISSÉS À LA
PORTÉE DES ENFANTS, DE PERSONNES AYANT DES CAPACITÉS PHYSIQUES ET/OU MENTALES RÉDUITES OU DES ANIMAUX
AFIN D’ÉVITER LE RISQUE D’ASPHYXIE.
AVANT DE PROCÉDER À L’INSTALLATION, COUPER L’ALIMENTATION ÉLECTRIQUE DANS LA ZONE DE POSITIONNEMENT.
NE PAS UTILISER DES PROLONGATEURS, ADAPTATEURS OU
DÉRIVATEURS, CAR ILS PEUVENT PROVOQUER DES SURCHAUFFES OU S’ENFLAMMER EN ENTRAÎNANT DES RISQUES
D’INCENDIE.
PENDANT L’INSTALLATION, FAIRE ATTENTION AUX BORDS
TRANCHANTS SUR LE LAVE-VAISSELLE ; POUR ÉVITER DE SE
BLESSER, METTRE DES GANTS DE SÉCURITÉ.
LA MISE À LA TERRE CONFORMÉMENT AUX MODALITÉS PRÉVUES PAR LES NORMES DE SÉCURITÉ DE L’INSTALLATION
ÉLECTRIQUE EST OBLIGATOIRE. EN CAS DE DOUTE, FAIRE
CONTRÔLER L’INSTALLATION PAR UN ÉLECTRICIEN QUALIFIÉ
(VOIR ÉGALEMENT LES AVERTISSEMENTS REPORTÉS DANS LE
CHAPITRE 7).
LE FABRICANT DÉCLINE TOUTE RESPONSABILITÉ POUR
LES ÉVENTUELS DOMMAGES AUX PERSONNES OU AUX
CHOSES DÉRIVANT D’UNE MISE À LA TERRE NON EXÉCUTÉE OU DÉFECTUEUSE.
APRÈS CHAQUE UTILISATION, METTRE HORS TENSION LE
LAVE-VAISSELLE POUR ÉVITER UNE DISPERSION D’ÉNERGIE
ÉLECTRIQUE.
6 Rev 0.0
Page 57

AVERTISSEMENT
EN CAS D’ANOMALIES DE FONCTIONNEMENT, DÉBRANCHER
LE LAVE-VAISSELLE DU RÉSEAU ÉLECTRIQUE ET FERMER LE
ROBINET D’EAU .
NE PAS UTILISER DES APPAREILS ENDOMMAGÉS PAR LE
TRANSPORT ! EN CAS DE DOUTE, CONSULTER LE REVENDEUR.
L’APPAREIL DOIT ÊTRE INSTALLÉ ET BRANCHÉ CONFORMÉMENT AUX INSTRUCTIONS FOURNIES PAR LE FABRICANT OU
PAR DU PERSONNEL QUALIFIÉ.
UTILISER UNIQUEMENT DES PRODUITS DE LAVAGE DÉCLARÉS
ADAPTÉS POUR L’USAGE DANS LES LAVE-VAISSELLE. NE PAS
UTILISER DES PRODUITS DE LAVAGE POUR LE LAVAGE À LA
MAIN. UTILISER UNIQUEMENT DU LIQUIDE DE RINÇAGE POUR
LAVE-VAISSELLE DOMESTIQUES.
NE PAS INHALER NI INGÉRER LE PRODUIT DE LAVAGE ; IL PEUT
PROVOQUER DES BRÛLURES ET/OU DES LÉSIONS IRRÉPARABLES AU NEZ, À LA BOUCHE ET À LA GORGE ET MÊME PROVOQUER L’ASPHYXIE ; ÉVITER QUE LE PRODUIT DE LAVAGE ENTRE
EN CONTACT AVEC LES YEUX. SI LES SITUATIONS SUSMENTIONNÉES SE PRODUISENT, FAIRE IMMÉDIATEMENT APPEL À
UN MÉDECIN.
AFIN D’ÉVITER QUE LES ENFANTS ENTRENT EN CONTACT AVEC
LES PRODUITS DE LAVAGE, CHARGER CEUX-CI JUSTE AVANT
DE DÉMARRER LE PROGRAMME DE LAVAGE, PUIS LES RANGER
HORS DE LEUR PORTÉE.
LE LAVE-VAISSELLE DOIT ÊTRE UTILISÉ PAR DES ADULTES. SON
UTILISATION PAR DES PERSONNES AVEC DES CAPACITÉS PHYSIQUES ET/OU MENTALES RÉDUITES N’EST ADMISE QUE SOUS
LA SUPERVISION D’UN RESPONSABLE POUR LEUR SÉCURITÉ.
POUR ÉLIMINER LE RISQUE DE DOMMAGES AUX PERSONNES,
NE PAS PERMETTRE AUX ENFANTS DE S’APPROCHER DU LAVEVAISSELLE ET/OU DE JOUER AVEC OU SUR CELUI-CI. DES RÉSIDUS DE PRODUIT DE LAVAGE PEUVENT RESTER À L’INTÉRIEUR
DU LAVE-VAISSELLE ET PROVOQUER DES LÉSIONS IRRÉPARABLES AUX YEUX, À LA BOUCHE ET À LA GORGE ET MÊME PRO-
FR
Rev 0.0 7
Page 58

FR
AVERTISSEMENT
VOQUER L’ASPHYXIE ; SI LES SITUATIONS SUSMENTIONNÉES
SE PRODUISENT, FAIRE IMMÉDIATEMENT APPEL À UN MÉDECIN.
FAIRE ATTENTION : IL EXISTE LE RISQUE QUE LES ENFANTS
S’ENFERMENT À L’INTÉRIEUR DU LAVE-VAISSELLE !
NE PAS INTRODUIRE DE SOLVANTS COMME DE L’ALCOOL OU
DE LA TÉRÉBENTHINE, CAR ILS PEUVENT PROVOQUER DES EXPLOSIONS.
NE PAS VERSER DU PRODUIT DE LAVAGE EN POUDRE ET/OU
LIQUIDE DANS LE RÉSERVOIR DU LIQUIDE DE RINÇAGE, CAR
CELUI-CI PEUT S’ENDOMMAGER.
NE PAS VERSER DU PRODUIT DE LAVAGE EN POUDRE ET/OU
LIQUIDE DANS LE RÉSERVOIR DE L’ADOUCISSEUR, CAR CELUICI PEUT S’ENDOMMAGER.
NE PAS UTILISER DES PRODUITS DE LAVAGE POUR USAGE INDUSTRIEL ; ILS PEUVENT ENDOMMAGER LES MATÉRIAUX QUI
CONSTITUENT L’APPAREIL ET PROVOQUER DES RÉACTIONS
CHIMIQUES VIOLENTES (PAR EX. GAZ EXPLOSIF).
NE PAS INTRODUIRE DE LA VAISSELLE TACHÉE DE CENDRES,
DE CIRE OU DE PEINTURE / VERNIS.
NE PAS INTRODUIRE DANS L’APPAREIL DE LA VAISSELLE EN
PLASTIQUE SENSIBLE AUX TEMPÉRATURES ÉLEVÉES COMME,
PAR EXEMPLE, DES COUVERTS OU RÉCIPIENTS JETABLES, CAR
ILS PEUVENT SE DÉFORMER. NE PAS LAVER DES OBJETS EN
PLASTIQUE S’ILS NE REPORTENT PAS L’INSCRIPTION “LAVABLE
AU LAVE-VAISSELLE” OU UNE INDICATION SIMILAIRE. EN CAS
D’OBJETS NON MARQUÉS, CONTRÔLER LES INDICATIONS DU
FABRICANT ; EN CAS D’ABSENCE D’INFORMATIONS, NE PAS
LAVER CES OBJETS DANS LE LAVE-VAISSELLE.
NE PAS INTRODUIRE D’ANIMAUX DANS LE LAVE-VAISSELLE.
8 Rev 0.0
Page 59

AVERTISSEMENT
SI L’ON OUVRE LA PORTE DU LAVE-VAISSELLE PENDANT LE
FONCTIONNEMENT, IL EXISTE LE RISQUE DE BRÛLURES À CAUSE DE LA CHALEUR PRÉSENTE À L’INTÉRIEUR DE L’APPAREIL ;
NE PAS S’EXPOSER À LA VAPEUR QUI SORT DU LAVE-VAISSELLE ET NE PAS TOUCHER LES COMPOSANTS QUI SE TROUVENT
À L’INTÉRIEUR.
UNE FOIS LE PROGRAMME DE LAVAGE TERMINÉ OU APRÈS
QU’IL A ÉTÉ INTERROMPU, ATTENDRE AU MOINS 20 MINUTES
AVANT DE VIDER LE LAVE-VAISSELLE, AFIN QUE LA VAISSELLE
AIT LE TEMPS DE REFROIDIR.
DANS CERTAINES SITUATIONS, DE L’HYDROGÈNE PEUT SE
FORMER DANS UN SYSTÈME FONCTIONNANT AVEC DE L’EAU
CHAUDE QUAND IL N’EST PAS UTILISÉ PENDANT PLUS DE
DEUX SEMAINES. L’HYDROGÈNE EST UN GAZ EXPLOSIF. SI
LE SYSTÈME À EAU CHAUDE N’A PAS ÉTÉ UTILISÉ PENDANT
DEUX SEMAINES OU PLUS, AVANT D’UTILISER LE LAVE-VAISSELLE, IL FAUT OUVRIR TOUS LES ROBINETS DE L’EAU CHAUDE ET LAISSER L’EAU COULER PENDANT QUELQUES MINUTES.
CELA PERMET L’ÉLIMINATION DES ÉVENTUELLES ACCUMULATIONS D’HYDROGÈNE. CE GAZ ÉTANT INFLAMMABLE, NE
PAS FUMER NI UTILISER DES FLAMMES NUES PENDANT
CETTE OPÉRATION.
SI L’ON S’APPUIE SUR LA PORTE OUVERTE DU LAVE-VAISSELLE OU QUE L’ON MONTE DESSUS, LE LAVE-VAISSELLE
PEUT SE RENVERSER, AVEC LES RISQUES CONSÉQUENTS
POUR LES PERSONNES. NE PAS LAISSER LA PORTE DU
LAVE-VAISSELLE OUVERTE, CAR ON PEUT LA HEURTER.
NE PAS S’APPUYER SUR LES PANIERS DU LAVE-VAISSELLE OU
MONTER DESSUS.
NE PAS BOIRE L’EAU QUI EST ÉVENTUELLEMENT RESTÉE DANS
LA VAISSELLE OU DANS LE LAVE-VAISSELLE.
FR
LES COUTEAUX ET LES AUTRES USTENSILES DE CUISINE AVEC
DES POINTES TRANCHANTES DOIVENT ÊTRE PLACÉS DANS LE
PANIER À COUVERTS AVEC LES POINTES TOURNÉES VERS LE
BAS OU EN POSITION HORIZONTALE DANS LE PANIER SUPÉRIEUR, EN VEILLANT À NE PAS SE BLESSER ET À CE QU’ILS NE
Rev 0.0 9
Page 60

FR
AVERTISSEMENT
DÉPASSENT PAS, DE FAÇON À ÉVITER LE RISQUE DE SE COUPER.
POSITIONNER LES OBJETS TRANCHANTS/POINTUS DE FAÇON
À ÉVITER QU’ILS ENDOMMAGENT LES JOINTS DE LA PORTE.
NE PAS METTRE EN MARCHE LE LAVE-VAISSELLE SI LES PANNEAUX QUI LE FERMENT NE SONT PAS TOUS POSITIONNÉS
CORRECTEMENT.
NE PAS MODIFIER LES COMMANDES DU LAVE-VAISSELLE.
MODÈLES DOTÉS D’AQUASTOP : L’AQUASTOP EST UN DIS-
POSITIF QUI EMPÊCHE LE DÉBORDEMENT EN CAS DE FUITES
D’EAU. APRÈS L’INTERVENTION DE L’AQUASTOP (SIGNALÉE
PAR L’AFFICHAGE DE L’ERREUR CORRESPONDANTE SUR L’AFFICHEUR), IL FAUT CONTACTER UN TECHNICIEN QUALIFIÉ POUR
QU’IL TROUVE CE QUI EST À L’ORIGINE DE LA PANNE ET EFFECTUE LA RÉPARATION. DANS LES MODÈLES DOTÉS D’AQUASTOP, LE TUYAU D’ALIMENTATION EN EAU CONTIENT UNE ÉLECTROVALVE. NE PAS COUPER LE TUYAU ET NE PAS LAISSER
TOMBER L’ÉLECTROVALVE DANS L’EAU. SI LE TUYAU D’ALIMENTATION EN EAU EST ENDOMMAGÉ, DÉBRANCHER L’APPAREIL DU RÉSEAU HYDRIQUE ET ÉLECTRIQUE.
IMMÉDIATEMENT APRÈS L’INSTALLATION, EFFECTUER UN BREF
ESSAI DE L’APPAREIL (VOIR MAN. “INSTALLATION”). EN CAS DE
DÉFAUT DE FONCTIONNEMENT, DÉBRANCHER L’APPAREIL DU
RÉSEAU ÉLECTRIQUE ET CONTACTER LE CENTRE SAV LE PLUS
PROCHE. NE PAS ESSAYER DE RÉPARER L’APPAREIL.
LE LAVE-VAISSELLE SATISFAIT TOUTES LES EXIGENCES
PRESCRITES PAR LES NORMES DE SÉCURITÉ EN VIGUEUR
CONCERNANT LES APPAREILS ÉLECTRIQUES. LES ÉVENTUELS
CONTRÔLES TECHNIQUES DOIVENT ÊTRE EFFECTUÉS PAR DU
PERSONNEL SPÉCIALISÉ ET AUTORISÉ : LES RÉPARATIONS
EFFECTUÉES PAR DU PERSONNEL NON AUTORISÉ COMPORTENT NON SEULEMENT L’ANNULATION DE LA GARANTIE, MAIS PEUVENT ÉGALEMENT ÊTRE UNE SOURCE DE
RISQUE POUR L’UTILISATEUR .
10 Rev 0.0
Page 61

AVERTISSEMENT
POUR LE NETTOYAGE ET L’ENTRETIEN DE L’APPAREIL : AVANT
D’EFFECTUER L’ENTRETIEN DE L’APPAREIL, DÉBRANCHER LA
FICHE OU COUPER L’ALIMENTATION AU MOYEN DU DISPOSITIF
D’INTERRUPTION OMNIPOLAIRE.
IL FAUT ENLEVER LA PORTE DE LA CUVE DE LAVAGE ET COUPER L’ALIMENTATION ÉLECTRIQUE À L’APPAREIL QUAND ON
DÉPOSE UN ANCIEN LAVE-VAISSELLE POUR DES RÉPARATIONS
OU POUR LE REMPLACEMENT DÉFINITIF.
LE SYMBOLE PRÉSENT SUR L’APPAREIL OU SUR LA DOCUMENTATION QUI L’ACCOMPAGNE INDIQUE QUE CE PRODUIT NE
PEUT EN AUCUN CAS ÊTRE TRAITÉ COMME DÉCHET MÉNAGER.
IL DOIT PAR CONSÉQUENT ÊTRE REMIS À UN CENTRE DE COLLECTE DES DÉCHETS CHARGÉ DU RECYCLAGE DES ÉQUIPEMENTS ÉLECTRIQUES ET ÉLECTRONIQUES. POUR LA MISE AU
REBUT, RESPECTER LES NORMES RELATIVES À L’ÉLIMINATION
DES DÉCHETS EN VIGUEUR DANS LE PAYS D’INSTALLATION.
POUR OBTENIR DE PLUS AMPLES DÉTAILS AU SUJET DU TRAITEMENT, DE LA RÉCUPÉRATION ET DU RECYCLAGE DE CET APPAREIL, S’ADRESSER AU BUREAU COMPÉTENT DE LA COMMUNE, À LA SOCIÉTÉ DE COLLECTE DES DÉCHETS OU DIRECTEMENT
AU REVENDEUR.
EN PROCÉDANT CORRECTEMENT À LA MISE AU REBUT DE CET
APPAREIL, ON CONTRIBUE À ÉVITER TOUTE CONSÉQUENCE
NUISIBLE POUR L’ENVIRONNEMENT ET LA SANTÉ DE L’HOMME.
LE FABRICANT DÉCLINE TOUTE RESPONSABILITÉ POUR
LES DOMMAGES AUX PERSONNES, AUX CHOSES ET AUX
ANIMAUX PROVOQUÉS PAR L’INOBSERVANCE DES PRESCRIPTIONS SUSMENTIONNÉES OU DÉRIVANT DE LA MODIFICATION ABUSIVE, NE SERAIT-CE QUE D’UNE SEULE
PARTIE, DE L’APPAREIL ET DE L’UTILISATION DE PIÈCES DE
RECHANGE NON D’ORIGINE.
EN CAS DE DOUTES SUR LE CONTENU DU MANUEL,
CONTACTER LE SERVICE APRÈS-VENTE.
FR
Rev 0.0 11
Page 62

FR
Sanitized
INSTRUCTIONS POUR L’UTILISATEUR
3 DESCRIPTION ET UTILISATION DES COM-
MANDES
3.1 Bandeau de commande
Les commandes et les contrôles du lave-vaisselle sont réunis sur le bandeau
de commande supérieur (voir fi g. 3-01). Toutes les opérations de mise en marche, programmation, arrêt, etc. doivent être exécutées avec la porte ouverte.
Une brève description (voir tab. 3-01) des différentes commandes disponibles
depuis le bandeau de commande est reportée ci-après.
END
AUTO
P
Sanitized
Fig. 3-01
12 Rev 0.0
Page 63

INSTRUCTIONS POUR L’UTILISATEUR
Sanitized
Touche marche/arrêt
1
Quand on appuie sur cette touche, on met l’appareil sous tension.
Voyants programme sélectionné
2
Le voyant allumé indique le programme sélectionné ; il est également utilisé pour
signaler d’éventuelles pannes (Guide de dépannage).
Touche sélection programmes
3
En appuyant sur cette touche, on peut sélectionner le programme désiré parmi ceux
qui sont proposés en séquence.
Voyant absence sel
4
Quand il est allumé, le voyant signale l’absence de sel dans le réservoir prévu à cet
effet.
Voyant absence liquide de rinçage
5
Quand il est allumé, le voyant signale l’absence de liquide de rinçage dans le réservoir
prévu à cet effet.
Touche programmes supplémentaires
6
En appuyant sur cette touche, on peut sélectionner l’un des cinq programmes
supplémentaires (voir tableau 3-02b).
Voyant programmes supplémentaires
7
Le voyant allumé indique que c’est l’un des cinq programmes supplémentaires (voir
tableau 3-02b) qui sera exécuté.
Voyant désinfection
8
Quand il est allumé, ce voyant indique que la fonction correspondante a été activée.
Touche demi-charge
9
Quand on appuie sur cette touche, on sélectionne l’option lavage demi-charge.
Voyants demi-charge
10
Quand l’un des deux voyants est allumé, il indique que le lavage demi-charge a été
sélectionné pour le panier supérieur ou inférieur.
Touche départ différé
11
En appuyant sur cette touche, on peut différer le démarrage du programme d’un
temps allant jusqu’à 9 heures.
12 Affi cheur d’informations
FR
Tab. 3-01
3.2 Sélection du programme de lavage, mise en
marche et arrêt
Le lave-vaisselle est doté d’un bandeau de commande (voir fi g. 3-02) au moyen
duquel il est possible d’effectuer toutes les opérations de mise en marche, programmation et arrêt.
b
a
END
AUTO
Rev 0.0 13
P
Sanitized
Fig. 3-02
Page 64

FR
INSTRUCTIONS POUR L’UTILISATEUR
Pour sélectionner le programme le plus adapté à la vaisselle à laver, se référer
au tableau reporté ci-après : il indique le type de lavage le plus approprié également en fonction du type de vaisselle et du degré de saleté (voir tab. 3-02a,
3-02b).
NUMÉRO
PROGRAMMES
STANDARD
ET SYMBOLE
1
2
3
AUTO
4
5
CHAUFFE-
ASSIETTES
VERRES
LAVAGE
SUPER AUTO
ETL SANITATION
LISTED
NORMAL
LAVAGE
SUPER
INTENSIF
ETL SANITATION
LISTED
VAISSELLE
ET
COUVERTS
Casseroles
et vaisselle
à rincer et
sécher
Vaisselle
normalement
sale
Vaisselle
normalement
sale, y
compris avec
des résidus
secs
Vaisselle
normalement
sale
Vaisselle et
casseroles
très sales, y
compris avec
des résidus
secs
EXÉCUTION
PROGRAMME
Rinçage à 69°C
(156,2 °F).
Séchage.
Lavage à 45°C
(113°F).
Rinçage à froid.
Rinçage à 69°C
(156,2°F).
Séchage.
Prélavage à froid
(En fonction
du type de
salissures)
Lavage à 65°C
(149°F).
Rinçage à froid.
Rinçage à chaud
à 70°C (158 °F).
Séchage.
Prélavage à froid.
Lavage à 55°C
(131°F).
Rinçage à froid.
Rinçage à 68°C
(154,4°F).
Séchage.
Prélavage à 45°C
(113°F).
Lavage à 70°C
(158°F).
2 rinçages à froid
Rinçage à 70°C
(158°F).
Séchage.
DURÉE CONSOMMATION
MINUTES
(2)
50’
70’
115’-130’
112’
122’
EAU
(1)
3,9 l
1,03
gal.
10,8 l
2,85
gal.
11-15 l
2,91-
3,96
gal
14,8 l
3,91
gal.
18,3 l
4,83
gal.
ENERGY
kWh (2)
0,64
0,6
1-1,2
0,8
1,12
Tab. 3-02a
14 Rev 0.0
Page 65

INSTRUCTIONS POUR L’UTILISATEUR
FR
NUMÉRO
PROGRAMMES
SUPPLÉMENTAIRES
ET SYMBOLE
6
7
8
9
10
AUTO
P
P
P
P
P
ÉCONOMIE
RINÇAGE
BREF
DÉLICAT
AUTO
LAVAGE
INTENSIF
VAISSELLE ET
COUVERTS
Casseroles et
vaisselle en
attente du lavage
Vaisselle peu
sale
Lavage immédiat
après l’utilisation
Lavage immédiat
après l’utilisation
Casseroles
et vaisselle
normalement
sales, y compris
avec des résidus
secs
EXÉCUTION
PROGRAMME
Prélavage à
froid.
Lavage à 38°C
(136,4°F).
Rinçage à froid.
Rinçage à 58°C
(136,4°F).
Prélavage à froid
(En fonction
du type de
salissures)
Lavage à 55°C
(131°F)
Rinçage à froid.
Rinçage à chaud
à 69°C (156,2
°F).
Séchage.
Lavage à 55°C
(131°F).
Rinçage à froid.
Rinçage à 69°C
(156,2°F).
Séchage.
Lavage à 70°C
(158°F).
2 rinçages à
froid.
Rinçage à 70°C
(158°F).
Séchage.
DURÉE CONSOMMATION
MINUTES
(2)
16’
37’
105’-120’
123’
102’
EAU
(1)
3,9 l
1,03
gal.
10,6 l
2,8 gal.
11-15 l
2,91-
3,96
gal.
11,9 l
3,14
gal.
15,1 l
3,99
gal.
ENERGY
kWh (2)
0,03
0,38
0,8-1
0,9
1,0
Tab. 3-02b
(1) Consommation d’eau moyenne avec l’adoucisseur réglé sur le niveau 0 (zéro).
Toutes les autres sélections font augmenter la consommation d’eau jusqu’à un maximum de 2,5 l
(0,66 gal.) / cycle en cas de sélection du niveau 5.
(2) Les durées des cycles indiquées sur le manuel d’utilisation et entretien sont calculées pour le
lave-vaisselle chargé normalement et pour une température de l’eau en entrée de 49°C (120°F).
Elles peuvent varier en fonction des conditions réelles.
- Seuls les programmes « LAVAGE SUPER AUTO » et « LAVAGE SUPER INTENSIF » sont confor-
mes à la norme NSF 184 et sont certifi és par INTERTEK avec le label ETL SANITATION LISTED.
- L’allumage du voyant « Sanitized » signifi e que le lave-vaisselle et la vaisselle qui vient d’être lavée
ont été désinfectés conformément aux exigences de la National Sanitation Foundation (NSF).
- Quand on sélectionne les programmes « AUTO », le lave-vaisselle reconnaît le type de salissures
et adapte en conséquence les paramètres de lavage de façon automatique.
Rev 0.0 15
Page 66

FR
Sanitized
INSTRUCTIONS POUR L’UTILISATEUR
Effectuer le trempage uniquement en demi-charge.
Pour exécuter les programmes 6, 7, 8, 9, 10 (voir tab. 3-02b), il faut appuyer
sur la touche programmes supplémentaires (réf. 6 fi g. 3-02) après avoir
sélectionné le programme standard souhaité (voir programmes 1, 2, 3, 4, 5 sur
tab. 3-02a).
Après avoir choisi le programme de lavage le plus adapté en se référant aux
tableaux prévus à cet effet, procéder à la programmation du lave-vaisselle.
Avant de démarrer un programme de lavage, vérifi er que :
•
le robinet de l’eau auquel le lave-vaisselle est raccordé est ouvert ;
•
il y a du sel régénérant dans le réservoir de l’adoucisseur (pour
l’ajout du sel, voir les instructions sur le manuel général) ;
•
le distributeur contient une dose adéquate de produit de la-
vage (pour l’ajout du produit de lavage, voir les instructions sur le
manuel général) ;
•
les bras de lavage tournent librement et sans obstacles ;
•
les paniers ont été chargés correctement (voir les instructions
sur le manuel général) ;
•
la porte du lave-vaisselle est fermée correctement.
3.2.1 Mise en marche
Quand on appuie sur la touche marche/arrêt (réf. 1 fi g. 3-02), on met le lavevaisselle sous tension. Il faut ensuite attendre l’allumage de l’un des voyants
programmes (réf. 2 fi g. 3-02).
b
a
END
AUTO
P
Sanitized
Fig. 3-02
16 Rev 0.0
Page 67

INSTRUCTIONS POUR L’UTILISATEUR
3.2.2 Sélection et démarrage du programme
Appuyer sur la touche sélection programmes (réf. 3 fi g. 3-02) le nombre
•
de fois qu’il faut pour que le voyant correspondant au programme souhaité
s’allume (réf. 2 fi g. 3-02).
Sélectionner éventuellement les options souhaitées (par ex. : “sélection
•
demi-charge”, “départ différé” ; voir paragr. 3.2.7 “options”) à l’aide des touches prévues à cet effet.
Fermer la porte ; après environ 2 secondes, le programme démarre. Le
•
voyant correspondant (signalisation de programme en cours) clignote pendant son exécution.
PROGRAMMES SUPPLÉMENTAIRES
La touche programmes supplémentaires (réf. 6 fi g. 3-02) permet d’obtenir cinq
autres programmes en plus de ceux que l’on peut sélectionner directement
à l’aide de la touche sélection programmes.
Il faut appuyer sur cette touche (le voyant s’allume) après que l’on a sélectionné le programme “principal” (voir 1, 2, 3, 4, 5 sur tab. 3-02a).
La fonction reste mémorisée ; c’est pourquoi il faut appuyer de nouveau sur
la touche programmes supplémentaires (le voyant s’éteint) si l’on veut effectuer
l’un des 5 programmes principaux au cycle successif.
Si l’on ne referme pas la porte du lave-vaisselle ou qu’on ne la ferme
pas correctement, le cycle de lavage ne démarre pas.
FR
3.2.3 Fin du programme
La fi n du programme est signalée par un bref signal acoustique et par les
voyants des programmes normal et fort (indiquées avec “end”) qui clignotent.
3.2.4 Interruption d’un programme
Pour interrompre un programme en cours d’exécution, il suffi t d’ouvrir la porte
du lave-vaisselle ; pour continuer l’exécution du programme, il suffi t de refermer la porte. Le programme reprend du point où il avait été interrompu.
3.2.5 Sélection d’un autre programme
Pour modifi er un programme en cours, il suffi t d’ouvrir la porte du lave-vaisselle
et de sélectionner le nouveau programme. Quand on ferme de nouveau la
porte, le lave-vaisselle exécute automatiquement le nouveau programme.
Rev 0.0 17
Page 68

FR
INSTRUCTIONS POUR L’UTILISATEUR
3.2.6 Annulation du programme en cours d’exécution
•
Pour annuler le programme en cours, il faut, après avoir ouvert la porte,
appuyer sur la touche de sélection programmes (réf. 3 fi g. 3-02) et la
maintenir appuyée pendant quelques secondes jusqu’à ce que les voyants
du quatrième et du cinquième programme s’allument en même temps (réf.
pr.4, pr.5 fi g. 3-03).
•
Refermer la porte.
•
Après environ 1 minute, le lave-vaisselle se porte à la fi n du cycle et les
voyants du quatrième et du cinquième programme (réf. pr.4, pr.5 fi g. 3-03)
commencent à clignoter.
pr. 4
AUTO
pr. 5
Fig. 3-03
3.2.7 Options
SÉLECTION DE L’OPTION DEMI-CHARGE
Cette fonction est spécialement indiquée en cas de charges réduites, elle permet de réaliser une économie d’eau et d’énergie électrique.
Avant de sélectionner le lavage demi-charge, ouvrir la porte du lave-vaisselle et
sélectionner le programme de lavage souhaité (voir paragr. 3.2 “Sélection du
programme de lavage, mise en marche et arrêt”). La sélection du lavage demicharge s’effectue au moyen de la touche demi-charge (réf. 9 fi g. 3-02) selon
deux options différentes :
en appuyant une fois sur la touche, on sélectionne le lavage sur le panier
•
supérieur ; cela est confi rmé par l’allumage du voyant correspondant (réf.
10a fi g. 3-02) ;
en appuyant deux fois sur la touche, on sélectionne le lavage sur le panier
•
inférieur ; cela est confi rmé par l’allumage du voyant correspondant (réf.
10b fi g. 3-02) ;
en appuyant trois fois sur la touche, on revient à la condition normale de
•
pleine charge (lavage sur les deux paniers, les deux voyants sont éteints).
Quand on sélectionne le lavage uniquement dans le panier inférieur, on peut
séparer le panier à couverts et n’en utiliser que la moitié.
18 Rev 0.0
Page 69

INSTRUCTIONS POUR L’UTILISATEUR
DÉPART DIFFÉRÉ
(disponible pour tous les programmes, sauf trempage)
La fonction “Départ différé” permet de sélectionner un temps de retard pour
le démarrage du programme de lavage allant jusqu’à 9 heures à compter du
moment où la programmation est effectuée. Cela permet de faire fonctionner le
lave-vaisselle à l’heure souhaitée.
Avant de sélectionner le départ différé, ouvrir la porte du lave-vaisselle et sélectionner le programme de lavage souhaité (voir paragr. 3.2 “Sélection du programme de lavage, mise en marche et arrêt”). La sélection du temps de retard
s’effectue en appuyant sur la touche Départ différé (réf. 11 fi g. 3-02) ; quand on
appuie plusieurs fois sur la touche, l’affi cheur visualise en séquence les temps
de retard pour le démarrage du programme, à partir de 1 heure.
FR
Rev 0.0 19
Page 70

FR
INSTRUCTIONS POUR L’UTILISATEUR
3.2.8 Arrêt
À la fi n du programme, le lave-vaisselle émet un bref signal acoustique et les
voyants du quatrième et du cinquième programme (réf. pr.4, pr.5 fi g. 3-
04) clignotent.
Pour arrêter l’appareil, ouvrir la porte et appuyer sur la touche marche/arrêt
(réf. 1 fi g. 3-02).
pr. 4
AUTO
pr. 5
Fig. 3-04
3.3 Fonctions supplémentaires
3 .3.1 Réglage de l’adoucisseur
REMARQUE : pour effectuer ce réglage, il faut sélectionner un pro-
gramme de lavage autre que le trempage.
Appuyer sur la touche départ différé (réf. 11 fi g. 3- 05) et la maintenir appuyée
jusqu’à ce que la valeur réglée précédemment apparaisse, suivie d’un point
(normalement, 3.). Relâcher la touche, puis appuyer de nouveau dessus le
nombre de fois qu’il faut pour affi cher la valeur désirée, à choisir en se référant
au tableau (voir tab. 3-03).
Les 6 niveaux de réglage possibles s’affi chent dans la séquence suivante :
3., 4., 5., 0., 1., 2..
Relâcher la touche quand l’affi cheur visualise la valeur désirée ; 5 secondes
après, l’appareil revient automatiquement à la sélection du départ différé tandis
que la valeur de réglage sélectionnée est mémorisée.
20 Rev 0.0
Page 71

INSTRUCTIONS POUR L’UTILISATEUR
Sanitized
REMARQUE : l’affi cheur indique le réglage de la dureté de l’eau
et le départ différé. Le point (.) après le chiffre indique que la
valeur affi chée se réfère à la dureté de l’eau. S’il n’y a pas de
point (.), cela signifi e qu’elle se réfère au départ différé.
FR
END
AUTO
P
Sanitized
Fig. 3-05
Tableau de la dureté de l’eau (voir tab. 3-03)
DURETÉ DE L’EAU
Degrés Allemands
(°D)
Degrés Français
(°F)
Degrés USA
grains/galls
0 - 4 0 - 7 0 - 4,5 0.
5 - 15 8 - 25 4,6 - 14,5 1.
16 - 23 26 - 40 14,6 - 23,5 2.
24 - 31 41 - 60 23,6 - 35 3.
32 - 47 61 - 80 35,1 - 46,5 4.
48 - 58 81 - 100 46,6 - 58,5 5.
Demander les informations relatives au degré de dureté de l’eau à la société de
distribution de l’eau.
Si l’on ouvre la porte au cours de la phase de lavage, le programme est interrompu, tandis que le voyant correspondant continue à
clignoter et qu’un signal acoustique avertit que le cycle n’est pas
terminé. Avant de fermer la porte pour faire redémarrer le programme, il faut attendre environ 1 minute. Quand on ferme la porte, le
programme reprend du point où il avait été interrompu. N’effectuer
cette opération que si elle est vraiment nécessaire, car elle peut
provoquer des anomalies dans l’exécution du programme.
RÉGLAGE
Tab. 3-03
Rev 0.0 21
Page 72

FR
INSTRUCTIONS POUR L’UTILISATEUR
4 POUR ÉCONOMISER DE L’ÉNERGIE ET
RESPECTER L’ENVIRONNEMENT
Essayer de toujours utiliser le lave-vaisselle en pleine charge.
•
Ne pas rincer au préalable la vaisselle à l’eau courante.
•
Utiliser le programme de lavage le plus approprié à chaque type de char-
•
ge.
Ne pas effectuer de rinçages préliminaires.
•
Lorsque cela est possible, raccorder le lave-vaisselle à une installation d’eau
•
chaude jusqu’à 60°C (140°F).
Lorsque cela est possible, exclure le séchage en laissant la porte en-
•
tr’ouverte à la fi n du lavage ; l’air et la chaleur résiduelle sécheront parfaite-
ment la vaisselle.
4.1 Pour réduire les consommations de produit
de lavage et respecter l’environnement
Les phosphates présents dans le produit de lavage pour lave-vaisselle constituent un problème du point de vue écologique. Pour éviter une consommation
excessive de produit de lavage, mais aussi d’énergie électrique, il est conseillé :
de séparer la vaisselle plus délicate de la vaisselle plus résistante aux
•
produits de lavage agressifs et aux températures élevées ;
de ne pas verser le produit de lavage directement sur la vaisselle.
•
22 Rev 0.0
Page 73

INSTRUCTIONS POUR L’UTILISATEUR
5 VIDER LE LAVE-VAISSELLE
Une fois le programme de lavage terminé, attendre au moins 20
minutes avant de vider le lave-vaisselle, afi n que la vaisselle ait le
temps de refroidir. Pour éviter que les éventuelles gouttes d’eau restées dans le panier supérieur tombent sur la vaisselle qui se trouve
encore dans le panier inférieur, il est conseillé de vider d’abord le
panier inférieur et ensuite le panier supérieur.
FR
Rev 0.0 23
Page 74

FR
INSTRUCTIONS POUR L’UTILISATEUR
6 GUIDE DE DÉPANNAGE
Le lave-vaisselle est en mesure de signaler une série d’anomalies de fonctionnement à travers l’allumage simultané de plusieurs voyants, selon les modalités
indiquées dans le tableau reporté ci-après :
ANOMALIE DESCRIPTION
Problème aquastop
Intervention du système anti-débordement (uniquement
E1
E2
E3
E4
E5
AUTO
AUTO
AUTO
AUTO
AUTO
pour les modèles qui en sont équipés). L’Aquastop
intervient en cas de fuites d’eau. S’adresser au service
après-vente.
Niveau de sécurité
Intervention du système qui limite le niveau d’eau dans
le lave-vaisselle. Interrompre le programme en cours,
arrêter le lave-vaisselle. Remettre sous tension le lavevaisselle, le programmer de nouveau et démarrer le
cycle de lavage. Si le problème persiste, s’adresser au
service après-vente.
Anomalie chauffage de l’eau
Le chauffage de l’eau n’est pas effectué ou est effectué
d’une façon anormale.
Exécuter de nouveau le programme de lavage ; si le
problème persiste, s’adresser au service après-vente.
Anomalie détection température de l’eau.
Interrompre le programme en cours, arrêter le lavevaisselle. Remettre sous tension le lave-vaisselle,
le programmer de nouveau et démarrer le cycle de
lavage. Si le problème persiste, s’adresser au service
après-vente.
Anomalie arrivée de l’eau
L’arrivée de l’eau dans le lave-vaisselle ne s’effectue
pas ou s’effectue d’une façon anormale. Contrôler que
les raccordements hydrauliques sont corrects, que le
robinet d’arrivée de l’eau est ouvert et que le fi ltre n’est
pas obstrué. Si le problème persiste, s’adresser au
service après-vente.
Tab. 6-01a
24 Rev 0.0
Page 75

INSTRUCTIONS POUR L’UTILISATEUR
ANOMALIE DESCRIPTION
Anomalie vidange
La vidange n’est pas exécutée ou est exécutée d’une
E6
E7
E8
E9
AUTO
AUTO
AUTO
AUTO
Voyant éteint Voyant allumé Voyant clignotant
façon anormale. Contrôler que le tuyau d’évacuation
n’est pas plié ou étranglé et que le siphon ou les fi ltres ne
sont pas obstrués. Si le problème persiste, s’adresser
au service après-vente.
Anomalie petite turbine
La quantité d’eau chargée n’est pas mesurée de façon
précise. Interrompre le programme en cours, arrêter le
lave-vaisselle. Remettre sous tension le lave-vaisselle,
le programmer de nouveau et démarrer le cycle de
lavage. Si le problème persiste, s’adresser au service
après-vente.
Anomalie système de lavage alterné.
Interrompre le programme en cours, arrêter le lavevaisselle. Remettre sous tension le lave-vaisselle,
le programmer de nouveau et démarrer le cycle de
lavage. Si le problème persiste, s’adresser au service
après-vente.
Anomalie système d’arrivée de l’eau.
S’adresser au service après-vente.
FR
Tab. 6-01b
Quand une situation d’alarme se produit, le lave-vaisselle interrompt le programme en cours en signalant l’anomalie.
Les alarmes E1, E2, E3, E4, E8, E9 provoquent la fi n immédiate du pro-
•
gramme en cours.
Les alarmes E5, E6 interrompent le programme en cours ; le programme
•
reprend quand le problème à l’origine de l’interruption a été résolu.
L’alarme E7 est visualisée à la fi n du cycle, celui-ci n’est pas interrompu car
•
le fonctionnement du lave-vaisselle n’est pas compromis.
Pour réinitialiser une alarme, il faut :
ouvrir et fermer la porte ou arrêter et remettre sous tension le lave-vaisselle.
•
À ce point, il est possible de reprogrammer le lave-vaisselle.
Si l’anomalie persiste, appeler le Centre d’Assistance Technique
agréé.
Rev 0.0 25
Page 76

FR
INSTRUCTIONS POUR L’INSTALLATEUR
7 INSTRUCTIONS POUR L’INSTALLATION ET
LA POSE
Pour le détail des opérations à exécuter pour l’installation et la pose,
consulter le manuel d’installation ci-joint.
Nous reportons ci-après quelques avertissements à respecter lors des phases
d’installation et pose du lave-vaisselle.
PENDANT L’INSTALLATION, FAIRE ATTENTION AUX BORDS
TRANCHANTS SUR LE LAVE-VAISSELLE ; POUR ÉVITER DE SE
BLESSER, METTRE DES GANTS DE SÉCURITÉ.
L
’INSTALLATION ET LES INTERVENTIONS DE RÉPARATION
OU ASSISTANCE DOIVENT ÊTRE EXÉCUTÉES PAR DU PERSONNEL TECHNIQUE QUALIFIÉ ET AUTORISÉ. LES INTERVEN-
TIONS EXÉCUTÉES PAR DU PERSONNEL NON AUTORISÉ PEUVENT ÊTRE DANGEREUSES ET, DE PLUS, COMPORTENT LA
PERTE DE LA GARANTIE. L’INSTALLATION DOIT ÊTRE EXÉCUTÉE
CONFORMÉMENT AUX DIRECTIVES DU PAYS D’INSTALLATION DU
LAVE-VAISSELLE ET, À DÉFAUT DE CELLES-CI : AUX ÉTATS-UNIS,
LE NATIONAL ELECTRIC CODE ; AU CANADA, LE CANADIAN ELECTRIC CODE C22.1 - LATEST EDITION/PROVINCIAL AND MUNICIPAL CODES AND/OR LOCAL
CODES.
IL EST FORMELLEMENT INTERDIT D’ENCASTRER LE LAVEVAISSELLE SOUS UNE TABLE DE CUISSON EN VITROCÉRAMIQUE. IL EST POSSIBLE D’ENCASTRER LE LAVE-VAISSELLE SOUS
UNE TABLE DE CUISSON TRADITIONNELLE À CONDITION QUE
LE PLAN DE TRAVAIL DE LA CUISINE SOIT CONTINU ET QUE LE
LAVE-VAISSELLE ET LA TABLE DE CUISSON SOIENT MONTÉS ET
FIXÉS CORRECTEMENT, DE FAÇON À N’ENTRAÎNER AUCUN
RISQUE.
PRÉVENIR LES RISQUES D’ENGORGEMENT OU DE DOMMAGE : SI LA TUYAUTERIE DE L’EAU EST NEUVE OU QU’ELLE EST
RESTÉE INACTIVE PENDANT LONGTEMPS, AVANT DE PROCÉDER AU RACCORDEMENT AU RÉSEAU DE DISTRIBUTION D’EAU,
S’ASSURER QUE L’EAU QUI SORT EST CLAIRE ET SANS IMPURETÉS AFIN D’ÉVITER D’ENDOMMAGER L’APPAREIL. POUR LE
RACCORDEMENT DU LAVE-VAISSELLE AU RÉSEAU HYDRIQUE, UTILISER EXCLUSIVEMENT DES TUYAUX NEUFS ; NE
PAS RÉUTILISER DE VIEUX TUYAUX OU DES TUYAUX USÉS.
26 Rev 0.0
Page 77

INSTRUCTIONS POUR L’INSTALLATEUR
CONTRÔLER QUE LES VALEURS DE TENSION ET DE FRÉQUENCE DE RÉSEAU CORRESPONDENT À CELLES REPORTÉES SUR
LA PLAQUE D’IDENTIFICATION DE L’APPAREIL, PLACÉE SUR LE
BORD INTERNE DE LA PORTE.
SI LE CORDON D’ALIMENTATION EST ENDOMMAGÉ, LE FAI-
RE REMPLACER PAR LE FABRICANT OU PAR UN CENTRE SAV
AGRÉÉ.
L’INSTALLATION DE CET APPAREIL ÉLECTROMÉNAGER DOIT
PRÉVOIR SA MISE À LA TERRE. EN CAS DE PANNES, LA MISE À
LA TERRE LIMITE LE RISQUE D’ÉLECTRISATION, EN FOURNISSANT UN PARCOURS DE MOINDRE RÉSISTANCE AU COURANT
ÉLECTRIQUE.
AVANT DE PROCÉDER À L’EXÉCUTION DU BRANCHEMENT
ÉLECTRIQUE, COUPER L’ALIMENTATION ÉLECTRIQUE DANS LA
ZONE DE POSITIONNEMENT.
CONTRÔLER QUE L’INSTALLATION ÉLECTRIQUE DU LIEU D’INSTALLATION EST CONFORME AUX LOIS EN VIGUEUR DANS LE
PAYS D’UTILISATION DE L’APPAREIL ET QU’ELLE EST DOTÉE DE
MISE À LA TERRE.
FR
CET APPAREIL ÉLECTROMÉNAGER EST MUNI D’UN CORDON
D’ALIMENTATION DOTÉ DE CONDUCTEUR ET FICHE POUR LA
MISE À LA TERRE. LA FICHE DOIT ÊTRE INSÉRÉE DANS UNE PRISE ADAPTÉE, INSTALLÉE ET BRANCHÉE À LA TERRE CONFORMÉMENT AUX LOIS EN VIGUEUR DANS LE PAYS D’INSTALLATION.
LE BRANCHEMENT INCORRECT DU CONDUCTEUR DE TERRE
DE L’APPAREIL ÉLECTROMÉNAGER PEUT ENTRAÎNER DES RISQUES D’ÉLECTRISATION. EN CAS DE DOUTES SUR LA MISE À
LA TERRE CORRECTE DE L’APPAREIL, CONTACTER UN ÉLECTRICIEN QUALIFIÉ OU LE PERSONNEL DU SERVICE APRÈS-VENTE.
NE PAS MODIFIER LA FICHE FOURNIE AVEC L’APPAREIL ÉLECTROMÉNAGER. SI LA FICHE N’EST PAS ADAPTÉE À LA PRISE,
S’ADRESSER À UN ÉLECTRICIEN QUALIFIÉ POUR FAIRE INSTALLER UNE PRISE ADAPTÉE.
Rev 0.0 27
Page 78

FR
INSTRUCTIONS POUR L’INSTALLATEUR
LE REMPLACEMENT DU CORDON D’ALIMENTATION DOIT ÊTRE
EFFECTUÉ PAR LE FABRICANT OU PAR UN CENTRE SAV AGRÉÉ
AFIN D’ÉVITER TOUT RISQUE.
NE PAS UTILISER DES PROLONGATEURS, ADAPTATEURS OU
DÉRIVATEURS, CAR ILS PEUVENT PROVOQUER DES SURCHAUFFES EN ENTRAÎNANT DES RISQUES D’INCENDIE.
28 Rev 0.0
Page 79

INSTRUCTIONS POUR L’UTILISATEUR
8 INSTRUCTION POUR L’UTILISATION
AVANT D’UTILISER L’APPAREIL, S’ASSURER D’AVOIR LU ET
COMPRIS TOUS LES AVERTISSEMENTS REPORTÉS DANS LE
CHAPITRE 2 “AVERTISSEMENTS SUR LA SÉCURITÉ ET L’UTILISATION”.
Après avoir installé correctement le lave-vaisselle, le mettre en service en effectuant les opérations suivantes :
régler l’adoucisseur d’eau ;
•
remplir de sel régénérant ;
•
remplir de liquide de rinçage et charger le produit de lavage.
•
FR
Rev 0.0 29
Page 80

FR
INSTRUCTIONS POUR L’UTILISATEUR
8.1 Utilisation de l’adoucisseur d’eau
La quantité de calcaire contenu dans l’eau (indice de dureté de l’eau) est responsable des taches blanchâtres sur la vaisselle sèche qui, avec le temps,
a tendance à devenir opaque. Le lave-vaisselle est équipé d’un adoucisseur
automatique qui, en utilisant du sel régénérant spécifi que, neutralise le calcaire. Le lave-vaisselle est réglé à l’usine pour une dureté de niveau 3 (dureté
moyenne 41-60°dF - 24-31°dH / 23,6-35 gpg). En utilisant de l’eau d’une du-
reté moyenne, il faut remettre du sel environ tous les 20 lavages. Le réservoir
de l’adoucisseur a une capacité d’environ 1,7 kg (3,75 lb) de sel en grains.
Certains modèles sont dotés d’un indicateur optique du niveau du sel. Dans
ces modèles, le bouchon du réservoir à sel contient un fl otteur de couleur verte
qui descend lorsque la concentration de sel dans l’eau diminue. Lorsque le
fl otteur vert n’est plus visible depuis le bouchon transparent, il faut ajouter le
sel régénérant. Le réservoir est situé sur le fond du lave-vaisselle. Après avoir
extrait le panier inférieur, enlever le bouchon (réf. A fi g. 8-01) du réservoir en
le dévissant dans le sens inverse des aiguilles d’une montre, puis verser le sel
en utilisant l’entonnoir (réf. A fi g. 8-02) fourni avec le lave-vaisselle. Avant de
revisser le bouchon (réf. A fi g. 8-01), éliminer les éventuels résidus de sel près
de l’ouverture du goulot.
A
30 Rev 0.0
Fig. 8-01
Page 81

INSTRUCTIONS POUR L’UTILISATEUR
SE L
SEL
FR
A
Lors de la première utilisation du lave-vaisselle, il faut également verser, en
•
Fig. 8-02
plus du sel, un litre d’eau.
Après chaque remplissage du réservoir, s’assurer que le bouchon (réf. A
•
fi g. 8-01) est fermé correctement. Le mélange d’eau et produit de lavage
ne doit pas pénétrer dans le réservoir à sel car cela compromet le fonctionnement du système de régénération. De plus, cela entraîne la perte de la
garantie.
N’utiliser que du sel régénérant spécifi que pour lave-vaisselle domestiques.
•
Si l’on utilise du sel en pastilles, ne pas remplir complètement le réservoir.
Ne pas utiliser du sel alimentaire car il contient des substances non
•
solubles qui, avec le temps, peuvent compromettre le fonctionnement de
l’adoucisseur.
Quand cela est nécessaire, effectuer l’opération de chargement du sel juste
•
avant de démarrer le programme de lavage ; la solution saline en excès
sera ainsi éliminée par l’eau ; un contact prolongé de l’eau salée avec l’intérieur de la cuve de lavage peut provoquer des phénomènes de corrosion.
FAIRE ATTENTION À NE PAS CONFONDRE LE SEL ET LE
PRODUIT DE LAVAGE : L’INTRODUCTION DE PRODUIT DE LA-
VAGE DANS LE RÉSERVOIR À SEL ENDOMMAGE L’ADOUCISSEUR.
Rev 0.0 31
Page 82

FR
INSTRUCTIONS POUR L’UTILISATEUR
8.2 Utilisation du distributeur de produit de
lavage et du doseur de liquide de rinçage
Le distributeur de produit de lavage et le doseur du liquide de rinçage se trouvent du côté interne de la porte : le distributeur à gauche (réf. A fi g. 8-03) et
le doseur à droite (réf. B fi g. 8-03).
A
B
Fig. 8-03
À L’EXCEPTION DU PROGRAMME TREMPAGE, IL FAUT INTRODUIRE DANS LE DISTRIBUTEUR LA DOSE ADÉQUATE DE PRODUIT DE LAVAGE AVANT CHAQUE LAVAGE. LE LIQUIDE DE RINÇAGE DOIT EN REVANCHE ÊTRE AJOUTÉ UNIQUEMENT QUAND
CELA EST NÉCESSAIRE.
32 Rev 0.0
Page 83

INSTRUCTIONS POUR L’UTILISATEUR
8.2.1 Ajout du liquide de rinçage
Le liquide de rinçage accélère le séchage de la vaisselle et évite la formation
de taches et de dépôts de calcaire ; il est automatiquement ajouté à l’eau au
cours du dernier rinçage depuis le réservoir qui se trouve sur le côté intérieur
de la porte.
FR
B
A
C
Fig. 8-04
Pour ajouter le liquide de rinçage :
ouvrir la porte du lave-vaisselle ;
•
dévisser le bouchon (réf. A fi g. 8-04) du réservoir de ¼ de tour dans le sens
•
inverse des aiguilles d’une montre et l’enlever ;
verser le liquide de rinçage jusqu’à remplir le réservoir (140 ml environ) ;
•
l’indicateur optique (réf. B fi g. 8-04) situé à côté du bouchon doit s’obscurcir
complètement ; rajouter du liquide de rinçage quand l’indicateur optique devient clair ou que le symbole qui signale l’absence de liquide de rinçage s’allume sur l’affi cheur (voir paragr. ”Description et utilisation des commandes”).
Remettre le bouchon (réf. A fi g. 8-04) et le visser dans le sens des aiguilles
d’une montre jusqu’à le fermer complètement.
À l’aide d’un chiffon, nettoyer le liquide de rinçage qui a éventuellement dé-
•
bordé car il peut produire de la mousse.
8.2.2 Réglage du dosage du liquide de rinçage
Le dosage du liquide de rinçage peut être réglé sur 6 niveaux. À l’usine, le
lave-vaisselle est réglé sur le niveau moyen (indicateur du sélecteur positionné
sur “3”). Pour régler le dosage, tourner le sélecteur (réf. C fi g. 8-04) situé à
l’intérieur du doseur sur la position souhaitée. La dose sera proportionnelle à
la position du sélecteur : la dose minimum de liquide de rinçage (indicateur du
sélecteur positionné sur “1 “) est d’environ 1 ml, tandis que la dose maximum
(indicateur du sélecteur positionné sur “6”) est d’environ 6 ml.
Rev 0.0 33
Page 84

FR
INSTRUCTIONS POUR L’UTILISATEUR
Pour accéder au réglage du doseur, il faut tourner le bouchon du réservoir
•
(réf. A fi g. 8-04) du réservoir de ¼ de tour dans le sens inverse des aiguilles
d’une montre et l’enlever.
Ensuite, à l’aide d’un tournevis, tourner le sélecteur du dosage sur la posi-
•
tion désirée.
Remettre le bouchon (réf. A fi g. 8-04) et le visser dans le sens des aiguilles
•
d’une montre jusqu’à le fermer complètement.
La dose de liquide de rinçage doit être augmentée quand la vaisselle est
•
opaque ou qu’elle présente des taches circulaires.
Si, en revanche, la vaisselle est collante ou qu’elle présente des rayures
•
blanchâtres, il faut réduire la dose de liquide de rinçage.
8.2.3 Chargement du produit de lavage
NE PAS INHALER NI INGÉRER LE PRODUIT DE LAVAGE ; IL PEUT
PROVOQUER DES BRÛLURES ET/OU DES LÉSIONS IRRÉPARABLES AU NEZ, À LA BOUCHE ET À LA GORGE ET MÊME PROVOQUER L’ASPHYXIE ; ÉVITER QUE LE PRODUIT DE LAVAGE ENTRE
EN CONTACT AVEC LES YEUX. SI LES SITUATIONS SUSMENTIONNÉES SE PRODUISENT, FAIRE IMMÉDIATEMENT APPEL À
UN MÉDECIN.
IL FAUT ÉVITER QUE LES ENFANTS PUISSENT ENTRER EN
CONTACT AVEC LE PRODUIT DE LAVAGE ; LES TENIR À L’ÉCART
DU LAVE-VAISSELLE OUVERT CAR IL PEUT CONTENIR DES RÉSIDUS DE PRODUIT DE LAVAGE. CHARGER LE PRODUIT DE LAVAGE JUSTE AVANT DE DÉMARRER LE PROGRAMME DE LAVAGE, PUIS LE RANGER HORS DE LEUR PORTÉE.
Pour ouvrir le couvercle du distributeur de produit de lavage, appuyer légèrement sur le bouton prévu à cet effet (réf. A fi g. 8-05). Remplir le distributeur de
produit de lavage et fermer correctement le couvercle. Le couvercle du distributeur s’ouvre automatiquement durant le lavage.
A
Fig. 8-05
34 Rev 0.0
Page 85

INSTRUCTIONS POUR L’UTILISATEUR
FR
A
Quand on sélectionne un programme avec le prélavage à chaud (lire le ta-
•
bleau 3-02a), ajouter une quantité supplémentaire de produit de lavage dans
la cavité (réf. A ou B fi g. 8-06, selon les modèles).
N’utiliser que des produits de lavage spécifi ques pour lave-vaisselle. L’em-
•
ploi de produits de lavage de bonne qualité est important pour obtenir d’excellents résultats de lavage.
Ranger les emballages de produit de lavage bien fermés dans un endroit sec
•
afi n d’éviter la formation de grumeaux qui compromettraient les résultats de
lavage. Après leur ouverture, les produits ne doivent pas être gardés trop
longtemps car le produit de lavage perd de son effi cacité.
Ne pas utiliser de produits de lavage pour laver la vaisselle à la main, car ils
•
produisent beaucoup de mousse et peuvent compromettre le fonctionnement du lave-vaisselle.
Doser correctement la quantité de produit de lavage, car une quantité in-
•
suffi sante provoque une élimination incomplète de la saleté, tandis qu’une
quantité excessive n’augmente pas l’effi cacité du lavage et ne constitue
qu’un gaspillage.
Dans le commerce, il existe des produits de lavage liquides et en poudre
•
qui se différencient par leur composition chimique : ils peuvent soit contenir
des phosphates soit en être dépourvus mais contenir des enzymes na-
turelles.
Les produits de lavage avec phosphates exercent une action plus effi cace
•
sur les graisses et sur les amides au-delà de 60°C (140°F).
Les produits de lavage enzymatiques exercent en revanche leur force net-
•
toyante également aux basses températures (de 40 à 55°C / de 104 à
131°F) et sont plus facilement biodégradables. Ces produits de lavage permettent d’atteindre, à de basses températures, les mêmes résultats de lavage que l’on ne pourrait obtenir qu’avec des programmes à 65°C (149°F).
B
Fig. 8-06
Rev 0.0 35
Page 86

FR
INSTRUCTIONS POUR L’UTILISATEUR
Pour la protection de l’environnement, nous conseillons l’emploi de produits
de lavage sans phosphates ni chlore.
Quand on utilise du produit de lavage en pastilles, celles-ci devraient être
•
placées dans le panier à couverts. Le distributeur est conçu pour l’emploi
de produit de lavage en poudre ou liquide et le couvercle ne s’ouvre pas
complètement pendant le cycle de lavage ; ainsi, la pastille peut ne pas se
dissoudre complètement. Cela peut déterminer :
- une quantité insuffi sante de produit de lavage relâché pendant le cycle
avec des résultats de lavage médiocres ;
- l’accumulation du produit de lavage dans le distributeur et son relâchement
pendant le cycle de rinçage fi nal.
L’INTRODUCTION DE PRODUIT DE LAVAGE, MÊME LIQUIDE,
DANS LE RÉSERVOIR DU LIQUIDE DE RINÇAGE ENDOMMAGE
LE LAVE-VAISSELLE.
8.3 Avertissements et conseils généraux
Avant de procéder au premier lavage avec le lave-vaisselle, il est conseillé de
lire les paragraphes suivants concernant la nature de la vaisselle à laver et
son positionnement dans les paniers. Il n’existe généralement pas de limites
quant au lavage de la vaisselle d’usage domestique, mais dans certains cas il
faut tenir compte de ses caractéristiques. Avant de mettre la vaisselle dans les
paniers, il faut :
• éliminer les restes de nourriture les plus gros, comme les os ou les arêtes,
qui pourraient non seulement engorger le fi ltre, mais aussi endommager la
pompe de lavage ;
• faire tremper les casseroles ou les poêles qui présentent sur leur fond des
résidus de nourriture brûlée afi n que ces derniers se détachent plus facilement ; les placer ensuite dans le PANIER INFÉRIEUR.
Utiliser l’option “demi-charge” (si présente) pour laver de petites quantités de
vaisselle ; elle permet de réaliser une économie d’eau et d’énergie électrique.
Dans ce cas, charger uniquement le panier sélectionné pour le lavage
demi-charge, l’autre panier doit rester vide. Effectuer un prélavage de la vaisselle sous l’eau courante avant de la charger dans les paniers est un inutile
gaspillage d’eau. Une disposition correcte de la vaisselle assure de bons
résultats de lavage.
ATTENTION!
S’assurer que la vaisselle est positionnée de manière stable, qu’elle ne peut
•
pas se renverser et qu’elle n’entrave pas la rotation des bras de lavage durant le fonctionnement ;
36 Rev 0.0
Page 87

INSTRUCTIONS POUR L’UTILISATEUR
ne pas introduire de petits objets dans les paniers ; en tombant, ils peuvent
•
bloquer les bras de lavage ou la pompe de lavage ;
les récipients tels que les tasses, les bols, les verres et les casseroles doi-
•
vent toujours être disposés avec l’ouverture vers le bas et, si possible, avec
les cavités inclinées pour permettre l’écoulement de l’eau (par ex. le pied
concave de certains verres) ;
ne pas disposer les articles de vaisselle les uns dans les autres ou de sorte
•
qu’ils se couvrent réciproquement ;
ne pas disposer les verres trop près les uns des autres car, en se touchant,
•
ils peuvent se casser ou rester tachés.
S’ASSURER que la vaisselle est adaptée au lavage en lave-vaisselle.
Nous reportons ci-après une liste de vaisselle non adaptée au lavage
en lave-vaisselle.
Casseroles et vaisselle en bois : elles peuvent s’abîmer à cause des
•
températures de lavage élevées.
Objets d’artisanat : ils peuvent rarement être lavés dans un lave-vaisselle.
•
Les températures relativement élevées de l’eau et les produits de lavage
utilisés peuvent les endommager.
Objets légers : les objets légers doivent être lavés dans le panier supérieur,
•
où la pression de l’eau est plus faible.
Vaisselle et objets en cuivre, étain, zinc et laiton : ils tendent à se ta-
•
cher.
Vaisselle en aluminium : la vaisselle en aluminium anodisé peut se déco-
•
lorer.
Argenterie : la vaisselle en argent peut se tacher.
•
Verre et cristal : en général, les objets en verre et en cristal peuvent être
•
lavés dans un lave-vaisselle. Cependant, il existe certains types de verre et
de cristal qui deviennent opaques et qui perdent leur transparence après un
certain nombre de lavages ; pour ce type de matériaux, nous conseillons de
toujours utiliser le programme le moins agressif du tableau des programmes
(voir le paragr. “Description et utilisation des commandes”).
Vaisselle avec des décorations : les objets décorés que l’on trouve dans
•
le commerce ont généralement une bonne résistance aux lavages dans les
lave-vaisselle, même s’il peut arriver que leurs couleurs pâlissent après des
lavages fréquents. En cas de doute sur la résistance des couleurs, il est
conseillé de laver peu de pièces à la fois pendant environ un mois.
FR
Rev 0.0 37
Page 88

FR
INSTRUCTIONS POUR L’UTILISATEUR
8.4 Utilisation des paniers
Le lave-vaisselle a une capacité de 12 couverts, y compris la vaisselle de
service. Nous reportons ci-après des exemples pour le chargement des 12
couverts sur le panier supérieur (voir fi g. 8-07) et sur le panier inférieur (voir fi g.
8-08).
Fig. 8-07
Fig. 8-08
38 Rev 0.0
Page 89

INSTRUCTIONS POUR L’UTILISATEUR
8.4.1 Panier inférieur
Le panier inférieur reçoit l’action du bras de lavage inférieur à l’intensité maximale et doit donc contenir la vaisselle la plus “diffi cile” et la plus sale.
Toutes les combinaisons et variétés de chargement sont permises à condition
que l’on prenne soin de disposer la vaisselle, les casseroles et les poêles de
façon à ce que toutes les surfaces soient exposées aux jets d’eau provenant
du bas.
Pour exploiter au maximum l’espace dans le panier lorsque l’on charge de la
vaisselle de grandes dimensions, sont dotés de supports pour assiettes rabattables (voir fi g. 8-09).
FR
Rev 0.0 39
Fig. 8-09
Page 90

FR
INSTRUCTIONS POUR L’UTILISATEUR
Chargement du panier inférieur (voir fi g. 8-10)
Disposer soigneusement et verticalement les assiettes plates, creuses, à dessert et les plats. Les casseroles, les poêles et leurs couvercles doivent être
tournés vers le bas. Disposer les assiettes creuses et à dessert en ayant toujours soin de laisser un espace entre elles.
EXEMPLES DE CHARGEMENT :
Esempi di caricamento:
DISPOSITION ½ CHARGE
Fig. 8-10
40 Rev 0.0
Page 91

INSTRUCTIONS POUR L’UTILISATEUR
8.4.2 Panier à couverts (voir fi g. 8-11)
Le panier à couverts amovible facilite le prélèvement des couverts.
Les couverts doivent être disposés dans le panier à couverts de façon homogène, avec les pointes dirigées vers le bas et en veillant à ne pas
se blesser avec les lames des couteaux. Le panier est destiné à contenir
toutes sortes de couverts, à l’exception des couverts ayant une longueur qui
pourrait empêcher la rotation du bras de lavage supérieur.
Les couverts longs (louches, cuillers en bois, couteaux de cuisine) qui peu-
vent interférer avec le bras de lavage supérieur doivent être placés dans le pa-
nier supérieur, en veillant à ce que la pointe des couteaux ne dépasse
pas du panier.
Le lave-vaisselle est équipé de deux paniers à couverts, cette solution permet
d’en enlever un en libérant de l’espace dans le panier inférieur quand les couverts sont peu nombreux ou que l’on a choisi le programme demi-charge (sur
les modèles qui ont cette fonction).
Les paniers à couverts sont dotés d’un système exclusif avec des inserts rabattables indépendants qui permettent une série de combinaisons utiles pour
utiliser au mieux l’espace disponible.
FR
INSERT
Inserto
HORIZONTAL
orizzontale
OUVERT
chiuso
INSERTS VERTICAUX
Inserti verticali
Rev 0.0 41
MOUVEMENT POUR
Movimento per
L’EXTRACTION DES INSERTS
l'estrazione degli
inserti
INSERT
Inserto
HORIZONTAL
orizzontale
FERMÉ
aperto
Fig. 4-11
Page 92

FR
INSTRUCTIONS POUR L’UTILISATEUR
8.4.3 Panier supérieur (voir fi g. 8-12)
Il est conseillé de charger le panier supérieur avec de la petite vaisselle ou de
la vaisselle d’une grandeur moyenne, comme des verres, des petites assiettes,
des tasses à café ou à thé, des bols et des objets légers en plastique résistant
à la chaleur.
Si le panier supérieur est utilisé dans la position la plus basse, on peut également y charger des plats à condition qu’ils ne soient pas trop sales. Le panier
supérieur est doté, sur la gauche, de deux grilles en plastique rabattables pour
laisser la place à des verres hauts (par ex. des verres à pied).
Fig. 8-12
42 Rev 0.0
Page 93

INSTRUCTIONS POUR L’UTILISATEUR
Chargement du panier supérieur (voir fi g. 8-13)
Mettre les assiettes tournées vers l’avant ; les tasses et les récipients creux doivent être placés avec l’ouverture orientée vers le bas. Le côté gauche du panier
peut être chargé avec les tasses et les verres disposés sur deux niveaux. Au
centre, on peut enfi ler les assiettes et les soucoupes verticalement, dans les
supports prévus à cet effet.
EXEMPLES DE CHARGEMENT :
Fig. 8-13
FR
Rev 0.0 43
Page 94

FR
INSTRUCTIONS POUR L’UTILISATEUR
Le panier supérieur peut être réglé sur trois positions différentes des deux
côtés. Le panier doit être au même niveau des deux côtés.
Pour relever le panier (réf. A fi g. 8-14), le soulever en le tirant par les deux poignées prévues à cet effet (ex. réf. B fi g. 8-14) jusqu’au premier ou deuxième
déclic, selon la hauteur désirée. Pour le baisser (réf. C fi g. 8-14), il faut en revanche tirer vers le haut les deux leviers de déblocage (ex. réf. D fi g. 8-14). Ces
opérations peuvent également être effectuées avec le panier chargé ; dans ce
cas, quand on le baisse, il est préférable de le retenir avec une main pour éviter
que la vaisselle subisse des chocs.
A
C
B
D
Fig. 8-14
44 Rev 0.0
Page 95

INSTRUCTIONS POUR L’UTILISATEUR
9 INSTRUCTIONS POUR LE NETTOYAGE ET
L’ENTRETIEN
AVANT TOUTE INTERVENTION, IL FAUT COUPER L’ALIMENTATION ÉLECTRIQUE À L’APPAREIL.
9.1 Avertissements et conseils généraux
ÉVITER IMPÉRATIVEMENT DE NETTOYER L’APPAREIL AVEC
DES PRODUITS DE LAVAGE ABRASIFS ET/OU CORROSIFS.
Les surfaces extérieures et la contre-porte du lave-vaisselle doivent être nettoyées périodiquement à l’aide d’un chiffon doux et propre, humidifi é avec un
nettoyant neutre normal (non abrasif et/ou corrosif) pour surfaces peintes. Les
joints d’étanchéité de la porte devront être nettoyés avec une éponge humide.
Il est conseillé de nettoyer périodiquement (une ou deux fois par an) la cuve et
les joints pour éliminer la saleté qui peut se déposer en utilisant un chiffon doux
et de l’eau. Éviter d’utiliser trop d’eau pour nettoyer les commandes ; l’eau
peut pénétrer dans la partie électronique et endommager les composants.
Une fois le nettoyage terminé, essuyer l’appareil avec un chiffon doux qui ne
peluche pas.
Si l’appareil présente des surfaces en acier inox, elles peuvent être nettoyées
avec un produit, non abrasif, spécifi que pour l’acier inoxydable. Pour éviter la
formation d’auréoles, on peut également utiliser un vaporisateur, à utiliser cependant avec parcimonie et avec des pressions modérées.
FR
Rev 0.0 45
Page 96

FR
INSTRUCTIONS POUR L’UTILISATEUR
9.2 Nettoyage du fi ltre d’arrivée d’eau
Le fi ltre d’arrivée d’eau doit être nettoyé périodiquement. Après avoir fermé le
robinet d’eau, dévisser la bague (réf. A fi g. 9-01) du tuyau d’arrivée d’eau (utiliser une pince, si nécessaire), puis nettoyer délicatement le fi ltre en éliminant les
dépôts et les impuretés. Une fois cette opération terminée, fi xer fermement le
tuyau en vissant la bague de serrage prévue à cet effet (réf. A fi g. 9- 01) (utiliser
une pince, si nécessaire).
A
Fig. 9-01
9.3 Nettoyage des bras de lavage
Les bras de lavage peuvent être facilement démontés pour permettre le nettoyage
périodique des orifi ces afi n d’éviter qu’ils se bouchent. Les laver sous un jet d’eau
(à température ambiante) et les réintroduire avec précaution dans leurs sièges.
S’assurer qu’ils tournent librement ; en cas contraire, contrôler qu’ils ont été
montés correctement.
Démontage des bras de lavage
Pour démonter le bras de lavage supérieur (réf. A fi g. 9-02), il faut dévisser la
•
bague de retenue (réf. B fi g. 9-02) en la tournant dans le sens des aiguilles d’une
montre. Une fois le nettoyage exécuté, remonter le bras de lavage dans son
siège, puis visser la bague de retenue en la tournant dans le sens inverse des
aiguilles d’une montre.
Pour démonter le bras de lavage inférieur (réf. A fi g. 9-03), il suffi t de le tirer
•
vers le haut, en le saisissant dans la partie centrale (voir fi g. 9-03). Une fois le
nettoyage exécuté, remonter le bras de lavage orbital en le positionnant dans
son siège et en exerçant une légère pression, de façon à l’encastrer sur le bras
de lavage inférieur. Ensuite, remonter le bras de lavage inférieur en le positionnant dans son siège et en exerçant une légère pression vers le bas, de façon à
l’encastrer (voir fi g. 9-03).
46 Rev 0.0
Page 97

INSTRUCTIONS POUR L’UTILISATEUR
A
B
A
FR
Fig. 9-02
•
•
•
•
•
•
•
Fig. 9-03
Rev 0.0 47
Page 98

FR
A
INSTRUCTIONS POUR L’UTILISATEUR
9.4 Nettoyage du groupe fi ltrant
Il est conseillé de contrôler périodiquement le groupe fi ltrant (réf. A fi g. 9-04)
•
et, si nécessaire, de le nettoyer sous l’eau courante (à température ambiante) en utilisant une brosse dure. Pour l’enlever, il faut saisir les languettes,
tourner dans le sens inverse des aiguilles d’une montre et tirer vers le haut ;
pousser depuis le dessous le fi ltre central (réf. A fi g. 9-05) pour l’extraire du
•
microfi ltre ;
séparer les deux pièces qui constituent le fi ltre central en appuyant sur le
•
corps du fi ltre dans la zone indiquée par les fl èches estampillées (réf. B fi g.
9-05);
retirer le fi ltre central en le soulevant.
•
Une fois le nettoyage exécuté, remonter le groupe fi ltrant après avoir assem-
•
blé les deux pièces du fi ltre central en exerçant une légère pression de façon
à ce qu’elles s’encastrent ; introduire le fi ltre central à l’intérieur du microfi ltre
(voir fi g. 9-05). Repositionner le groupe fi ltrant (réf. A fi g. 9-04) dans son siège en le tournant dans le sens des aiguilles d’une montre pour le bloquer.
A
BB
48 Rev 0.0
Fig. 9-04
Fig. 9-05
Page 99

INSTRUCTIONS POUR L’UTILISATEUR
9.5 Instructions et conseils pour un entretien
correct
Les fi ltres doivent être nettoyés à l’eau courante (à température ambiante)
•
avec une brosse dure.
Il faut contrôler qu’il n’y a pas de résidus alimentaires sur le fi ltre lorsqu’on
•
le retire. Ces résidus, en tombant dans la vidange (réf. A fi g. 9-06) pourraient bloquer certains composants hydrauliques ou obstruer les orifi ces des
bras de lavage.
Il est indispensable de nettoyer avec soin les fi ltres, conformément aux
•
indications susmentionnées : le lave-vaisselle ne peut pas fonctionner si les
fi ltres sont encrassés.
Remettre correctement les fi ltres dans leur siège afi n d’éviter d’endom-
•
mager la pompe de lavage.
FR
Fig. 9-06
Si le lave-vaisselle reste inutilisé pendant longtemps
Effectuer le programme de trempage deux fois de suite.
•
Débrancher la fi che de la prise de courant.
•
Laisser la porte légèrement ouverte, de façon à empêcher la formation de
•
mauvaises odeurs à l’intérieur de la cuve de lavage.
Remplir le doseur de liquide de rinçage.
•
Fermer le robinet d’eau.
•
Rev 0.0 49
Page 100

FR
INSTRUCTIONS POUR L’UTILISATEUR
Avant de réutiliser le lave-vaisselle après un arrêt prolongé
Contrôler qu’il n’y a pas de dépôts de boue ou de rouille dans la tuyau-
•
terie d’arrivée ; si tel est le cas, laisser couler l’eau du robinet d’alimentation
jusqu’à ce que l’eau qui sort soit claire.
Rebrancher la fi che dans la prise de courant.
•
Raccorder le tuyau fl exible d’alimentation en eau et rouvrir le robinet.
•
9.6 Élimination de petits inconvénients
Il est possible d’éliminer personnellement certains inconvénients en se référant
aux instructions suivantes :
Si le programme ne démarre pas, contrôler que :
le lave-vaisselle est branché au réseau électrique ;
•
la distribution d’énergie électrique n’est pas coupée ;
•
le robinet d’eau est ouvert ;
•
la porte du lave-vaisselle est fermée correctement.
•
Si de l’eau stagne dans le lave-vaisselle, contrôler que :
le tuyau d’évacuation n’est pas étranglé ;
•
le siphon de vidange n’est pas bouché ;
•
les fi ltres du lave-vaisselle ne sont pas encrassés.
•
Si la vaisselle n’est pas propre, contrôler que :
le produit de lavage a été introduit en quantité suffi sante ;
•
il y a du sel régénérant dans le réservoir spécifi que ;
•
la vaisselle a été disposée correctement ;
•
le programme sélectionné est approprié au type et au degré de saleté de la
•
vaisselle ;
tous les fi ltres sont propres et correctement insérés dans leurs sièges ;
•
les orifi ces de sortie de l’eau des bras de lavage ne sont pas bouchés ;
•
aucun objet n’a bloqué la rotation des bras de lavage.
•
Si la vaisselle ne sèche pas ou reste opaque, contrôler que :
il y a du liquide de rinçage dans le réservoir spécifi que ;
•
le réglage de la distribution du liquide de rinçage est correct ;
•
le produit de lavage utilisé est de bonne qualité et qu’il n’a pas perdu ses
•
caractéristiques (par exemple à cause d’une conservation incorrecte avec
l’emballage ouvert).
50 Rev 0.0
 Loading...