

Page 1
TECHNICAL
SUPPORT
SERVICE
RANGE:
PRODUCT:
TECHNICAL STUDY
technical
Fagor /Edesa 2006
Document No: 11238
Date: 13/11/06
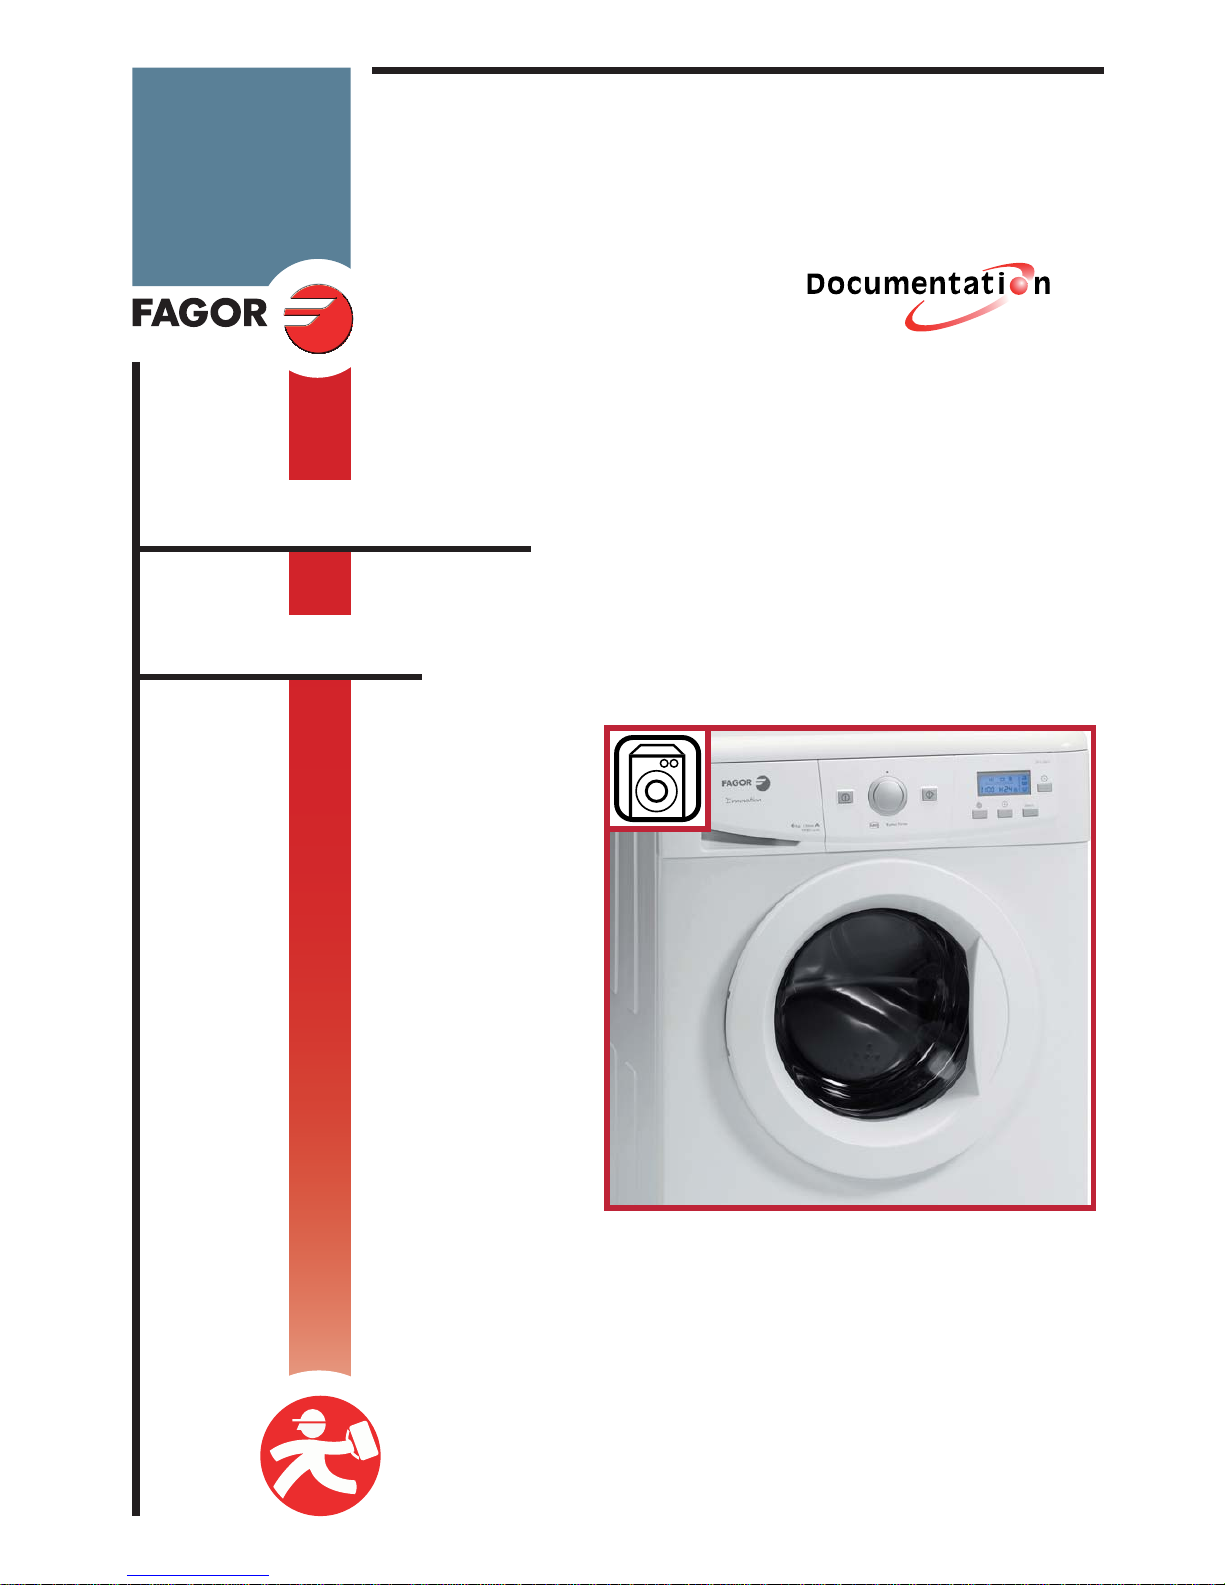
Washer-Dryer
Page 2

How to use this manual
technical
© Copyright by Fagor Electrodomésticos S.Coop. 2006. All rights reserved. The
total or partial reproduction of this document, by any procedure and on any type of
media, is prohibited without written authorisation from the holder of the usage rights.
Breach of this copyright will be pursued in conformity with applicable legislation and
may lead to criminal charges.
FAGOR ELECTRODOMESTICOS reserves the right to introduce, without prior
notifi cation, any modifi cations to the characteristics of its manufactured products.
!
I
Electrical hazard: This identifies potential risks
for the product. Such risks may cause permanent
damage to the product
Warning:
This identifies information or circumstances that
may cause personal injuries or death.
Important: This identifies information that is critical for a
correct understanding of the product.
This document is intended for all persons rendering technical support services
(T.S.S.). It is designed to facilitate the repair of the product described. It provides
documentary support for technical consultations.
This manual contains notes warning about safety issues:
Page 3

Table of contents
technical
1.- Warnings and precautions ...................................1
2.- Features .................................................................2
3.- Description of operation .......................................4
3.1.- General description ............................................................. 4
3.1.1.- Start-up ................................................................. 5
3.1.2.- Locking .................................................................. 6
3.1.3.- Extra rinse ........................................................... 6
3.1.4.- Flot/Anti-crease ..................................................... 7
3.1.5.- Programme progress ............................................ 7
3.1.6.- Power failure ......................................................... 8
3.2.- Diagram of drying function .................................................. 9
3.3.- Programme table ............................................................... 10
3.4.- Components ...................................................................... 11
3.5.- Circuit confi guration .......................................................... 14
3.6.- Troubleshooting ................................................................. 16
3.6.1.- T.S.S. Programme ............................................... 16
3.6.2.- Safety mechanisms and criteria .......................... 17
3.6.3.- Imbalance detection ............................................ 18
3.6.4.- Operation in case of imbalance .......................... 19
3.7.- Assembly and disassembly instructions ............................ 23
3.8.- Diagrams and drawings .................................................... 25
Page 4

Warnings and precautions
technical
1
1.- Warnings and precautions
The maximum recommended amount of clothes to be dried is the equivalent of 1.5
kg dry weight of delicate fabrics, and 2.5 kg dry weight of other fabrics. Therefore,
if a full load of clothes is washed, and is then to be dried, this load must be divided
into two loads for drying.
Putting in excessively delicate articles such as curtains, woollens, silk, or items which contain materials such as foam rubber or similar materials is not recommended.
To prevent drying after the wash, set the drying timer in the Stop position.
Drying
The drying is carried out by hot air circulating in a closed circuit system and steam
condensation by mains water cooling.
It is therefore important that the water inlet tap remains open.
Simultaneously, the drainage pump starts up at regular intervals throughout the
whole of the drying process to remove the cooling water together with that resulting
from condensation.
For the last few minutes of the drying cycle, the circulating air is not heated. This
allows temperatures inside to balance out, thus preventing wrinkle formation.
Interrupting this fi nal timing is not recommended.
The time required for drying depends on the size and type of fabric, and the size of
the load.
Page 5
Description of operation
technical
2
3.- Description of operation
3.1.- General description
Select
3FS-3611
TurboTime
ABS
6
kg
1100
r.p.m.
Class
A
Detergent
drawer
ON/OFF
button
Programme
selector
Start
Pause
LCD
Display
Spin + flot
button
Time
delay
button
Additional
functions
button
Drying time
button
O
30ºC
40º
60º
90º
Pre-wash 60º
Spin
35º
Celeri s 30
1100
r.p.m
100
200
Anti-
crease
0
INTENSIVE
WASH
EASY
IRON
DRYING
TIME
Rinse
6Kg
400
600
800
DELICATE
30º
40º
WOOL
COTTON
PARO
INICIO
Normal drying
Delicate drying
SPIN
EXTRA
RINSE
WASH
DRYING
END
Detergent
drawer
LCD
Display
Programme
selector
Spin + flot
button
Intensive
wash button
Easy iron
button
ON/OFF
button
Drying time
button
Extra
rinse
key
EDESA
Pre-wash
Wash
Spin
Dry
Easy iron
Anti-crease/fl ot
Intensive Wash
Time delay
FAGOR
Page 6
Features
technical
3
2.- Features
The wash options must always be selected after
selecting the wash programme. Any change of
programme during the selection annuls the options
which were previously selected.
a) Spin selection and anti-crease (fl ot) button.
The selected programme has an associated spin
speed.
b) This can be modifi ed by pressing the spin button
repeatedly - the spin speed in revolutions will
decrease by 100 each time until 400 is reached.
c) Skip spin option. Press the spin button
once more to reach the skip spin option. This
programme, without a fi nal spin, is used to prevent
creases from forming when washing special
fabrics
d) Option: fl ot/anti-crease. This stops at the fi nal
rinse, leaving the clothing fl oating in water. When
the function is deactivated, the washer continues
the programme, draining and spinning. This is
used when you are not at home, for example,
to delay the spin until you have arrived so that
creases are not caused by the clothes being spun
and then left in the drum.
Time delay
Time delay selection. A delay of up to 24 hours
may be selected. The delay must be selected
after choosing the wash programme.
To select the time delay in hours press the clock
button. Each time the button is pressed delays
the start time by one hour. Cancel time delay To
cancel time delay press the clock button repeatedly. The delay will be cancelled by reaching 24 hours and then pressing once more.
Changing to another programme also cancels the delay.
b
c
a
d
Select
Select
Select
Select
Select
Page 7

Features
technical
4
Additional functions
Button for selecting additional functions according to programmes.
a) There are 3 options: easy iron, intensive
wash, extra rinse. Press the button to display
the required option.
b) By clicking several times you can choose
between various combinations, of one, two,
and even three additional functions at the same
time, depending on the chosen programme.
•Button: Easy iron. This option reduces the
formation of creases in garments by performing
a special programme with special movements
to fluff up the garments after the spin and make
ironing easier.
•Button: Extra rinse. This increases
the intensity of the final rinse applied to the clothing. This is recommended for
large loads and garments belonging to users with sensitive skin. Increases water
consumption!
•Button: Intensive Wash. This option, specially recommended for very dirty or
stained garments, gives better results by lengthening the wash cycle.
Important: If the ON/OFF button is pressed or there is any change of programme
during the selection, all the options which were previously selected are cancelled.
DEMO programme
The DEMO programme is a special exhibition programme which allows the
operation of Innova washing machines in shops without faults due to water inlet,
emptying, door open, etc, being displayed.
To select or annul this programme, press the spin and select buttons simultaneously
for 8 seconds.
b
Select
Select
a
Page 8

Description of operation
technical
5
3.1.1.- Start-up
To select the wash and dry programme, follow
these steps:
a) Turn the machine on with the ON / OFF button.
b) Pull the programme selector out to activate it.
c) Select the wash programme by turning the programme selector control (see programme table).
To select the drying time, follow these steps:
a) Press the drying time button to select the drying
time. The screen will display the time, which is
increased each time the drying time button is
pressed.
Important: If a wash + dry option is selected, the
load may not be greater than 4 kg. (1.5 kg for delicate wash programmes).
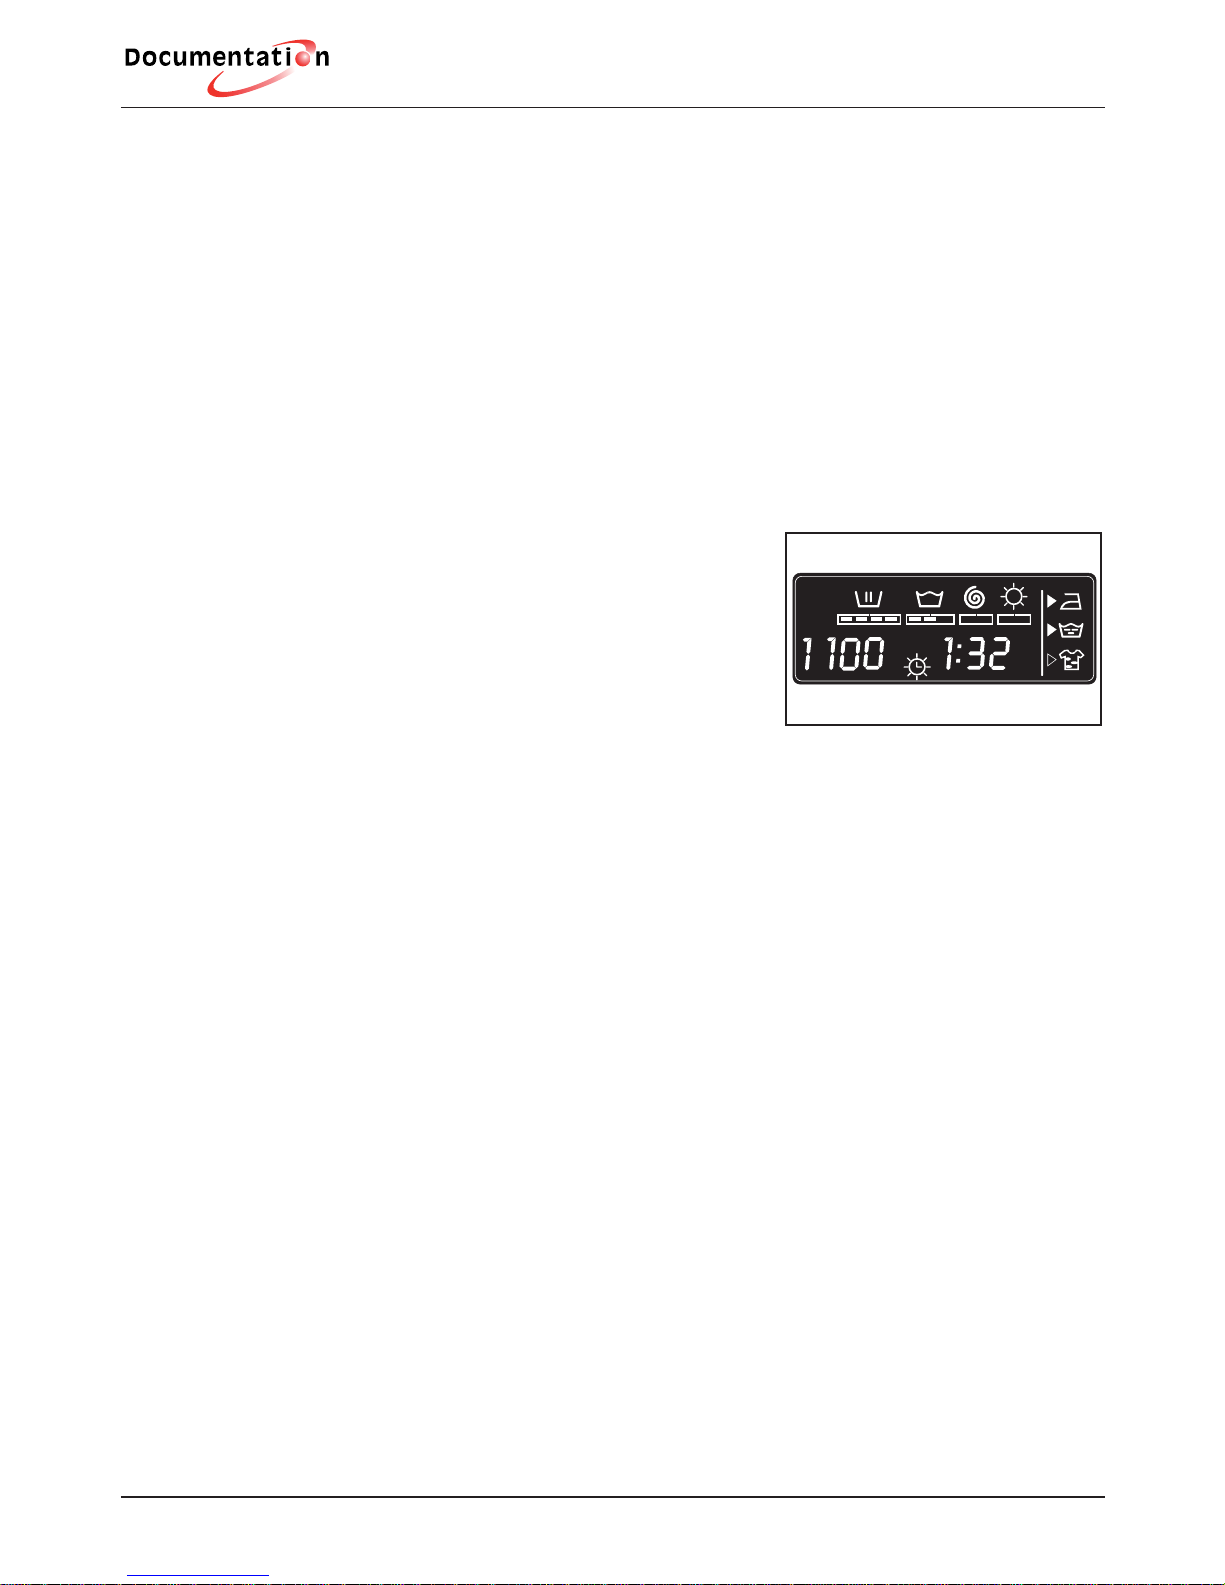
When the programme is selected, the following information will be displayed:
1- Phases of the wash and dry programme
Wash
Rinse
Spin
Dry
2- Spin speed in revolutions/min
3- Programme number (for a few seconds), and then its duration.
4- Additional functions
Easy iron
Extra rinse
Intensive Wash:
a
a
b
c
1
234
Page 9
Description of operation
technical
6
There are 4 types of programme available
Normal programmes
Delicate programmes.
Additional programmes
Drying programmes
3.1.2.- Locking
a) The Lock function is activated by holding down
the Start/Pause button for 3 sec. The lock must
be activated after having selected the wash programmes and all related options, as well as the
delay required.
Once the lock has been activated, the machine
will not respond to any button, not even the Start
button or the wash programme selector.
In these circumstances, the only button which will
affect the washer is the OFF button, which will,
logically, stop the programme. However when it
is turned ON again, the programme will continue
from the point where it stopped, i.e., pressing
OFF does not cancel the childproof lock.
b) The locking mechanism is only deactivated
when the wash programme ends.
3.1.3.- Extra Rinse Option
- Adds one rinse to the selected programme, at the start of the rinse phase
- The washer has three rinses, the fi rst two with water intake through the wash tray
and the last with intake through the softener tray.
- Skip Spin Option: This option eliminates the spins the washing machine would
normally carry out in the selected programme
Normal Delicate Additional Drying
PROGRAMMES
Normal cold
Fast 30ºC
Normal 30 ºC
Normal 40 ºC
Normal 60 ºC
Normal 90 ºC
Pre-wash 60 ºC
Delicate cold
Delicate 30ºC
Delicate 40ºC
Delicate 60ºC
Rinses
Spin
Normal drying
Delicate drying
Empty/End
1
2
3
4
5
6
7
8
9
10
11
12
13
14
15
16
a
b
Select
Select
Page 10
Description of operation
technical
7
3.1.4.- Flot/Anti-crease Option
- With this option the programme stops before emptying the last rinse; for the
programme to continue, the Flot option must be unlocked
Note: The wash options must always be selected after selecting the wash
programme. A change of programme during the selection, or after the wash has
been started, cancels the options which were previously selected, and only the new
programme’s spin speed is lit up.
3.1.5.- Programme progress
When the programme has started, the screen can
display the current wash phase, as well as the
remaining time. As the programme continues, the
active phases will be displayed successively in the
upper part of the screen. The remaining programme time is also displayed in the screen. It is updated periodically, but not minute-by-minute.
Any option button may be selected, as long as
the wash phase in which it takes effect has not passed, and when the programme
permits that option. Pressing the delay button during the wash has no effect on the
washer-dryer. Pressing the Start/Pause button during the wash puts the washer in
the PAUSE state.
Important: If during the wash and dry cycle the programme is changed using
the selector, the washer-dryer is left in the PAUSE state, and the programme is
annulled. To add or remove an article, press the start/pause button and make sure
that the water is not above the door overfl ow level, and that the interior temperature
is not high. Press the start/pause button again to re-start the washer from the same
phase of the cycle in which it was stopped.
3.1.6.- Power failure
When the supply returns after a power failure, the washer continues to work as
normal, from the point at which it stopped (its memory lasts a few hours). The same
thing happens if the ON/OFF button is pressed.
Page 11

Description of operation
technical
8
Programme
No.
Wash load Time Consumption in
Kw
Water
consumption
14 normal 4 Kg 180 min 2,9 Kw 48 L
15 delicate 3 Kg 180 min 1,8 Kw 27 L
The vibration when drying is movement for 57 sec, then stopped for 3 sec.
The water inlet of the electrically operated valve for drying is activated 20 minutes
into the selected programme.
During the drying process, the drainage pump works in cycles of 5 sec. on, then
55 stopped.
At the start of the drying programme, water comes in for 3 sec through the
detergent tray. This is to prevent steam leaving through the detergent tray.
The drying programme can take from a minimum of 20 minutes up to a maximum
of 180 minutes, in 10-minute increments.
If the cold water intake is greater than 0.35 litres per minute when the drying
process is complete the clothes will be damp and hot.
3.2.- Diagram of drying function
Cold water
inlet
Condenser
Humid air
Electric pump
Drain
Drum
Outer Drum Casing
Hot air
Double cycled Thermostat 170º
700 + 700W drying elements
Single cycled thermostat 85º
Turbine
Dry air
safety 95º
0.35l/m
ow
Page 12
Description of operation
technical
9
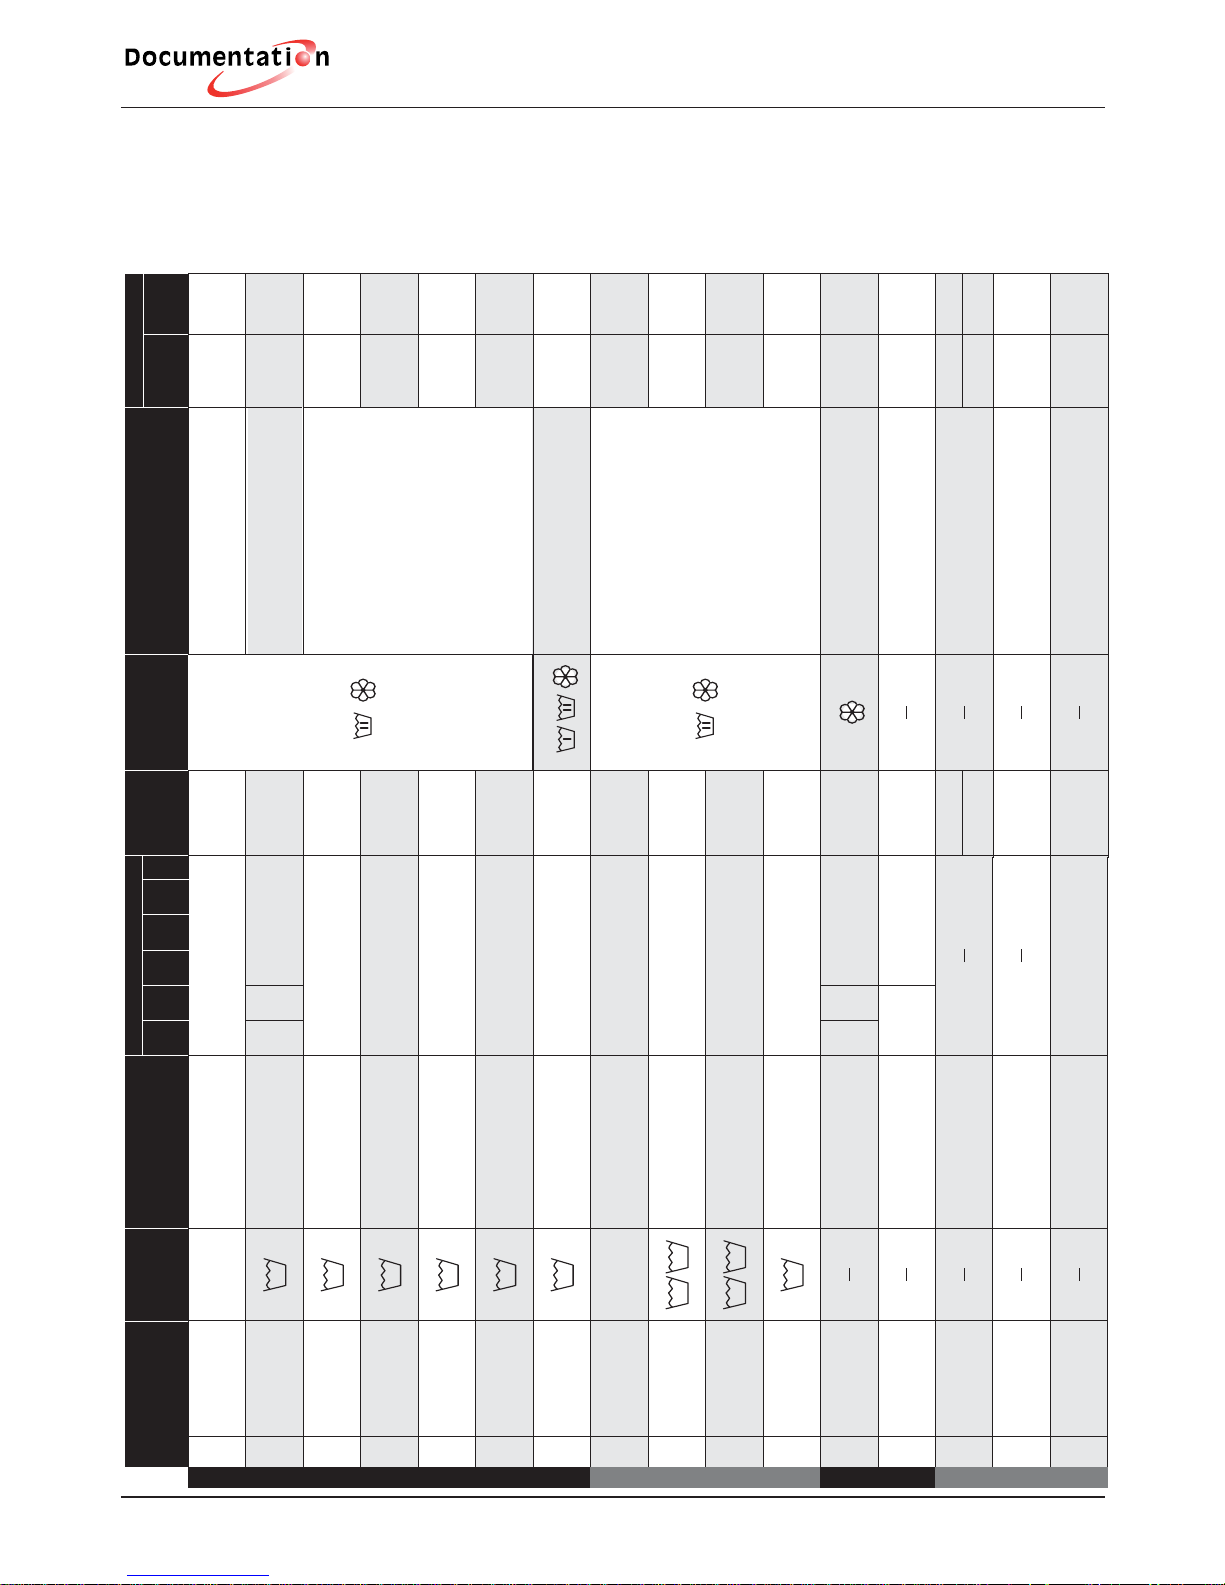
3.3.- Programme table:
YES NO YES
YES
YES
YES
YES
YES
YES
YES
YES
YES
YES
YES
YESNO
NO
1
2
3
4
5 (*)
6
7
8
9
10
11
12
13
14
15
16
Normal cold
Normal 30 ºC
Normal 40 ºC
Normal 60 ºC
Normal 90 ºC
Delicate cold
Delicate 30 ºC
Delicate 40 ºC
Delicate 60 ºC
Rinses
Spin
Normal drying
Delicate drying
Drainage/End
Normal programmeDelicate programmesAddit. progr.Drying programmes
Cold
Cold
30
30
40
60
90
60
40
60
40
3030
YES NO
Extra
Rinse
Intensive
Wash
Easy
iIroning
Select
Spin
Skip
Spin
Ani-crease
Recommended
temperature
Max.
load
(Kg)
Programme
Type of material
Buttons for possible options
Fast 30 ºC
Cotton/Linen
delicate colours
very slightly soiled
Cotton/Linen
white/coloured
very slightly soiled
Cotton/Linen
delicate colours
slightly soiled
Cotton/Linen
Solid colours
Slightly soiled
Cotton/Linen
Solid colours
Normal soiling
Cotton/Linen
White
Very dirty
Pre-wash 60ºC
Cotton/Linen
White/solid colours
Very dirty
Synthetic/mix
Cotton delicate colours
Very slightly soiled
Synthetic/mix
Cotton delicate colours
Slightly soiled
Synthetic/mix
Cotton delicate colours
Normal soiling
Synthetic/mix
Cotton white/solid colours
Normal soiling
Cotton/mix cotton
Synthetic/Delicate
Wool/wool mix
Cotton/mix cotton
Synthetic/Delicate
Wool/wool mix
Cotton/linen
Synthetic/mixed
Cotton/mix cotton
Synthetic/Delicate
Wool/wool mix
0,15/49
0,20/30
0,40/49
0,65/49
1,02/49
1,90/55
1,45/60
0,15/55
0,35/55
0,60/55
1,00/55
0,05/30
0,05/0
2,8/48
1,8/27
1,2/26
0,00/0
60
30
82
87
91
110
105
50
50
55
70
23
10
160
100
95
2
Emptying and long nal spin
Normal drying
Delicate drying
6
1,5
6
6
6
6
6
3
3
3
3
6
6
4
3
1,5
6
Wash
products
compartment
Programme
description
TURBO TIME PLUS
Total wash
load
KWh/litres
Approx.
duration
(minutes)
Max.
load
(kg)
Normal wash, rinses,
automatic additive absorption
if required, and long nal spin
SHORT wash, rinses,
automatic additive absorption
if required, and long nal spin
Normal wash, rinses,
automatic additive absorption
if required, and long nal spin
Pre-wash, normal wash, rinses,
automatic additive absorption
if required, and long nal spin
Delicate wash, rinses,
automatic additive absorption
if required, and gentle nal spin
Rinses, automatic
additive absorption if required,
and long nal spin
Emptying and end of programme.
Takes the programme to the nal position
Page 13

Description of operation
technical
10
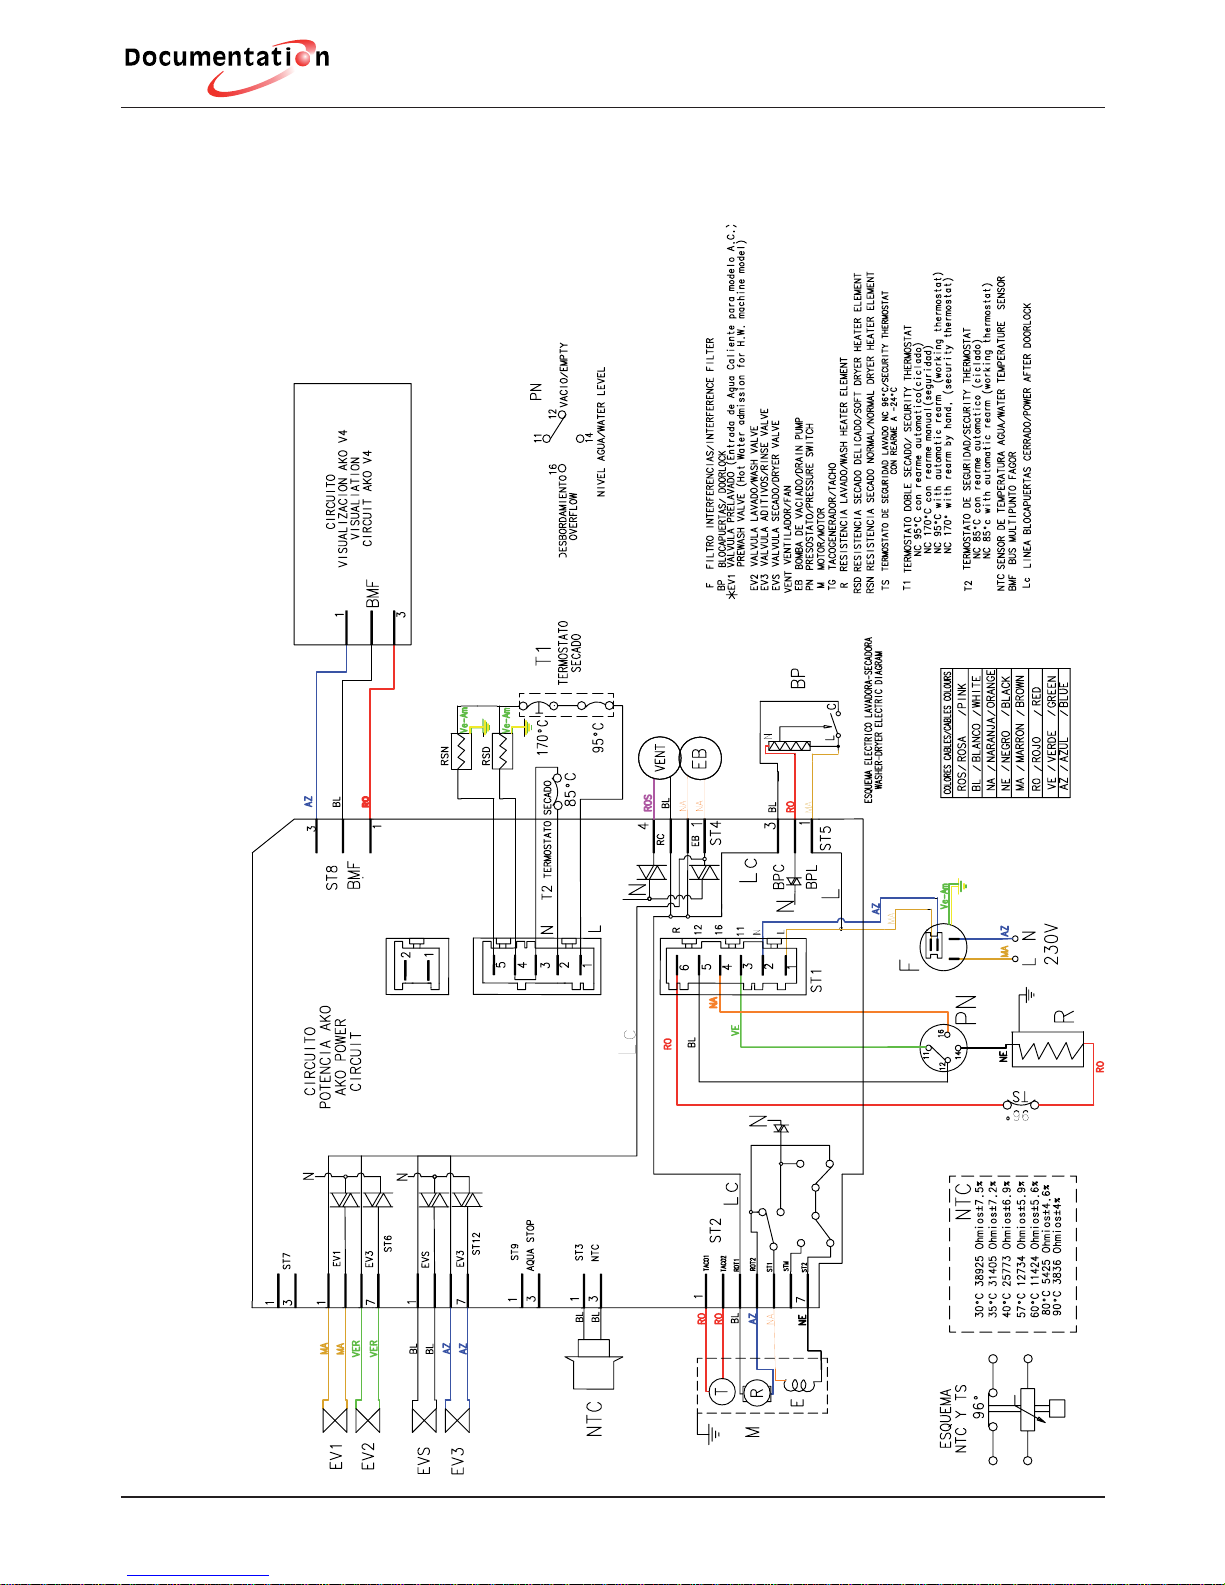
3.4.- Components
Door lock
Used in machines with
variable spin and makes
rotating movements when
washing and spinning.
Motor power supply:
- Clockwise, power 220V.
, contacts 2 and 3. Bridge
between contacts 5 and 6.
- Anti-clockwise, power
220V. , contacts 3 and 5.
Bridge between contacts 2
and 6.
Motor
Voltage: 220V / 50 Hz
Stator resistance: 1.3
Rotor resistance: 1.7
Tachogenerator
resistance: 184
Tachogenerator voltage:
1.2 V / 1,000 rpm
Opens hatch lock
Voltage: 220 V /
50 Hz 16 Amp.
Between 40 and
75 second delay
Component
NTC Safety Thermostat
NTC
Resistance
thermostat
Safety
Component
The electronic card
reads the NTC (variable
resistance), and
determines whether the
water temperature has
reached the selected
temperature in the
programme to complete
the heating phase
NTC (see values in the
table)
Safety thermostat
96ºC Contact normally
closed
-20ºC Thermostat resets
96 ºC
Heating
resistance
Function Features
Page 14

Description of operation
technical
11
NTC Temperature / Resistance values
Temperature(ºC) <30 30 35 40 57 60 80 90
Resistance (K Ω) >40 39 31 26 13 11 5 4
Component Function Features
Drainage pump
Drains the water from
inside the drum
Voltage: 220 v / 50 Hz
Drainage rate: 16 litres/
minute
Maximum drainage
height: 1 metre
Winding resistance: 163.4
Power 30 Watt.
Quadruple valve
The pressure switch
is activated in the
following conditions:
When the level reaches
12 litres, the wash
level. (11-12)
- When the level
exceeds 33 litres
(overflow), the
drainage pump is
activated (safety).
(11-16)
- The rinse level is
performed according
to the time of the
microprocessor of the
electronic card.
Level 1
102 / 72 ± 3
Overflow safety
310 ± 10
12 Water outlet
14 Heating
16 Overflow
11 Common
11
12
14
16
Presostato
Water input during prewash, wash and softener.
Voltage 220 V/50 Hz
Electrically operated valve
fl ow for pre-wash, wash
and softener is 7 litres per
minute.
Electrically operated valve
fl ow for drying is 0.35
litres per minute.
Value: 3,750
Page 15

Description of operation
technical
12
Component
Function
Features
Heating resistance Heating element
Resistance: 25,4
Material: Real stainless steel
Power: 1850w
Voltage: 220 v
Display
Circuit
Power circuit
Voltage: 220 v / 50 Hz
Important:
It is necessary to configure the circuit before
starting the machine.
(follow configuration
instructions)
Voltage: 220 v / 50 Hz
Display circuit
Power circuit
Page 16

Description of operation
technical
13
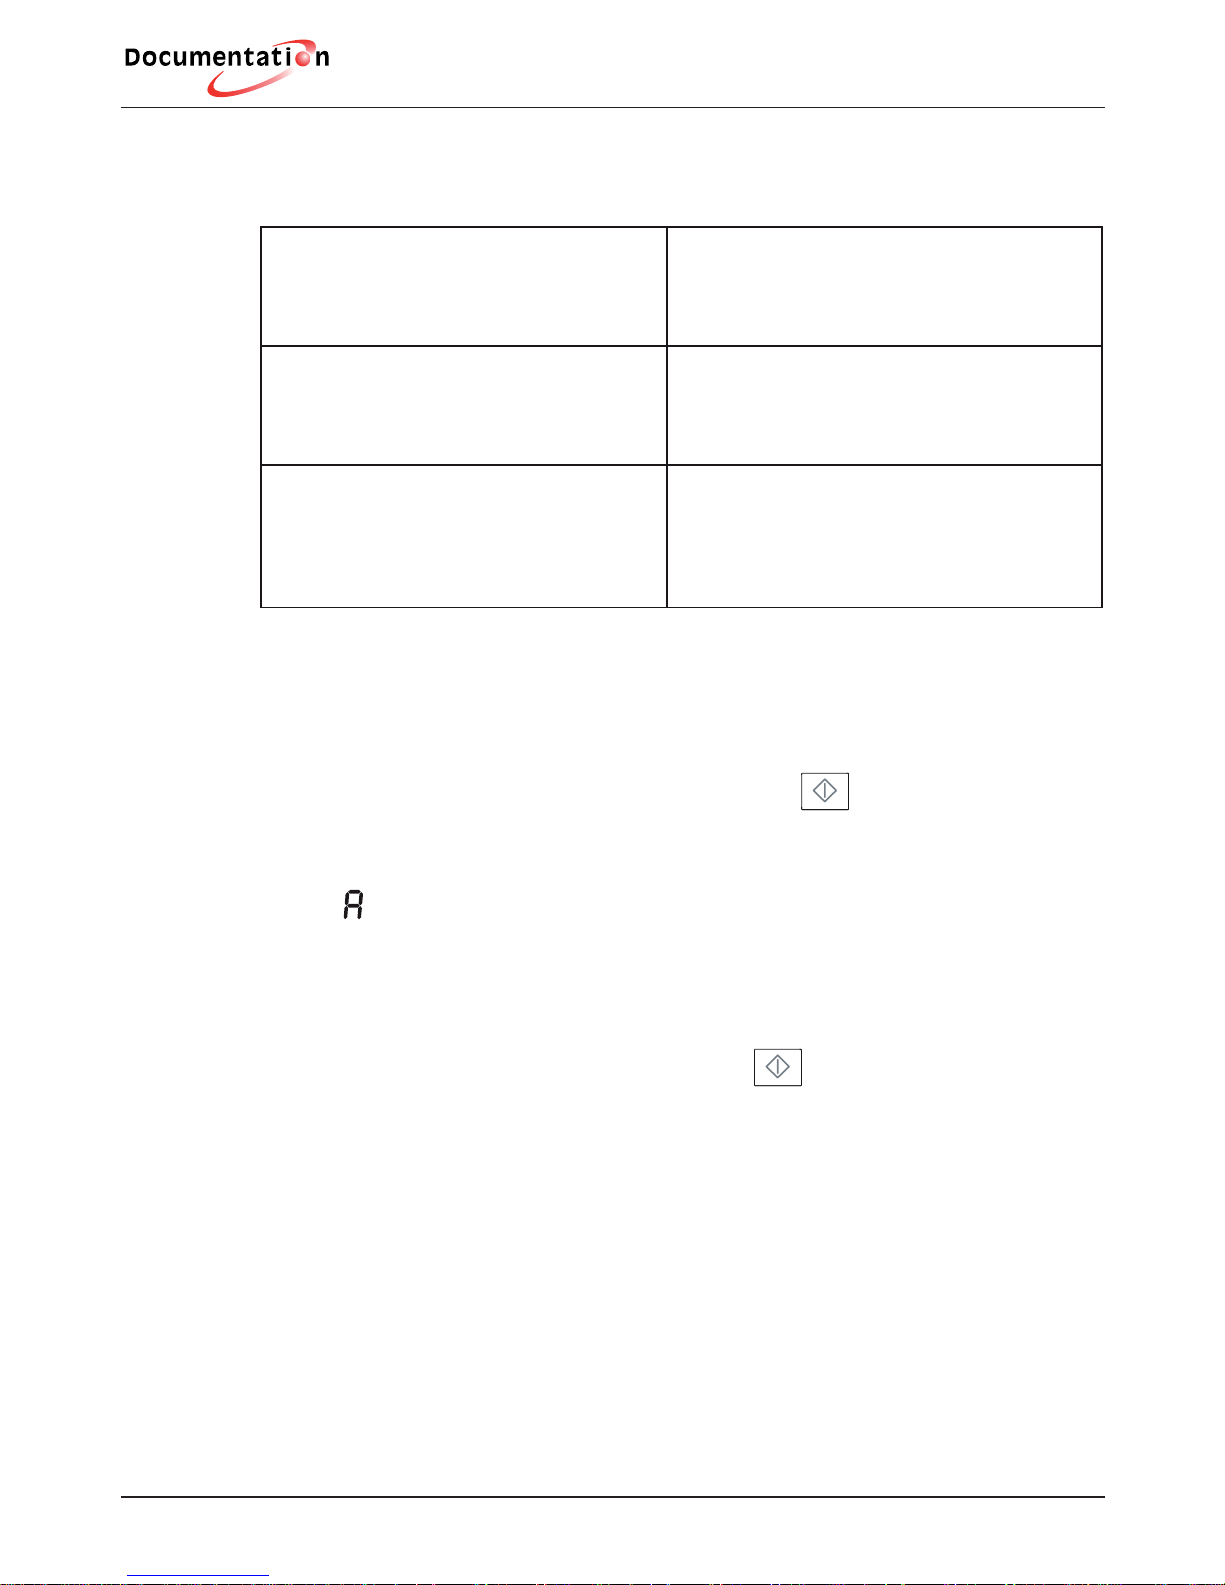
3.5.- Fagor circuit confi guration:
3.1.3.- Fagor circuit configuration:
If the circuit is not configured, it will go into
To change the configuration, follow these steps:
1.- Turn the machine off
2.- Press the start / pause button and keep it pressed (until step 5)
3.- Press the button for 1 second until the LCD screen lights up
4.- Press the spin button and wait 2 seconds until the letter is displayed
on the LCD screen
5.- Release all keys simultaneously
6.- The door lock will be locked
7.- Press the spin button and the configuration digits are displayed
(the last digit of the LCD will flash).
8.- Pressing the Time Delay button changes the parameter to be adjusted,
starting with the KG digit and following the sequence:
KG – RPM – RECIRCULATION – COLD WATER – DOOR OPENING– KG - ….….
Pressing the SPIN button changes the value of the parameter; the possible values
are limited to the circuit’s hardware reference and the selected KGs. If the KGs
are changed after having selected the RPM, and the previous RPM value is not
permitted for the newly selected KGs, the RPM will re-adjust to the value closest
for the newly selected KGs.
1200
RPM
RECIRCULATION PUMP
YES 00 / NO 0
COLD WATER
YES 0 / NO 8
DOOR OPENING
YES 8 / NO 0
KG
6
Select
Select
status as soon as it is plugged in
(go to step no. 7). If the circuit is configured it enters the current configuration.
Page 17

Description of operation
technical
14
Confi guring an Edesa Circuit:
When a circuit is replaced or changed, it must be confi gured.
To confi gure the circuit, follow these steps.
1.- Move the function selector knob to position 0.
2.- Set the r.p.m. selector to position 2 (0 r.p.m.)
3.- Press the Start/Pause key and keep it pressed.
4.- Keeping the Start/Pause button pressed, set the selector to
programme nº 2 (cold position * ), and the end LED comes on.
5.- Keeping the Start/Pause button pressed, press the intensive
wash button, and the phase LEDs for the wash, rinse, and end
come on. The LCD screen displays the letter A, and we release
the Start/Pause button and intensive wash button simultaneously.
6.- Press the intensive wash button and the rinse LED fl ashes,
and E00 is displayed in the LCD screen. If it has no LCD screen,
the confi guration LEDs come on.
7.- Check that the LEDS which are lit correspond to the ones
indicated in the label stuck on the body of the washer’s tray.
8.- Validate the confi guration by pressing the start/stop button until the intensive
wash, extra rinse and easy iron fl ash; the TSS test programme is then activated.
LS-1136
LF5M005W5
EDESA
(P2)
6 Kg.
(Position 2)
1100 r.p.m.
2
3
4
5
6
7
8
1
REF. BARCODE
CONTROL PANEL (COD. 39)
XXXX
XXXXXXX
O
30ºC
40º
60º
90º
Prelavado 60º
Centrifug.
35º
Celer is 30
C
E
N
T
R
I
F
U
G
.
1100
r.p.m
100
200
Anti-
arrugas/vi ncos
0
LAVA.
INTENSIVO
FÁCIL
PLA
NCHADO
TIEMPO
SECADO
Aclarado
Enxag.
400
600
8
00
30º
40º
LANA LA
ALGODON COTON
PARO
INICIO
Page 18
Description of operation
technical
15
KG - Drum capacity
6: 6 kg
KG options depending on circuit references /
washing machine model.
HOT WATER
0: Cold water
8: Hot water
If the circuit does not have this option it will
always be 0.
R.P.M. (Revolutions per minute).
These values depend on the hardware
reference and the KGs selected. 1400,
1300, 1200, 1100, 900, 800 ...
DOOR OPENING
0: WITHOUT door opening
8: WITH instant door opening
If the circuit does not have this option it will
always be 0.
RECIRCULATION
0: WITHOUT Recirculation Pump
00: WITH Recirculation Pump
If the circuit does not have this option it will
always be 0.
Circuit checking (see table 1)
Once the circuit has been configured, it is checked
by pressing the start/pause button for 3 sec. until
the digits stop flashing. After 3 sec. it exits the
configuration process, entering the TSS programme
entrando en el programa SAT (See table 1)
• Fagor T.S.S. Programme:
In order to check the operation of the washing machine’s electric components,
the T.S.S. programme can be activated by following these steps:
1.- General ON / OFF switch (LCD off)
2.- Press the start / pause button and keep it pressed
3.- Hold down the ON/OFF switch until the LCD screen lights up.
4.- Press and hold down the select spin button and wait approx. 2/ 3 sec., until the
letter is displayed on the screen
5.- Release all buttons simultaneously
6.- Press the spin button and wait until the digits on the screen (LCD) appear
(the last button on the right flashes).
7.- Press and hold down the start / pause button until all the digits
on the screen are flashing.
8.- The number 1 will be displayed on the screen – then follow the instructions in
table 1, below.
6
5
4
3
2
1
Page 19

Description of operation
technical
16
3.6.- Troubleshooting
3.6.1.- T.S.S. Programme
PROGRAMME
SELECTION MODE
TIME
(approx)
1
Drying Motor Power supply + Resistance 1
(3.6 Amp)
5
seconds
2
Drying Motor Power supply + Resistance 1 and 2
(7 Amp)
5
seconds
1
Water input via Pre-wash electrically operated
valve +
Movement of wash motor with inversion
15 sec.
2 Emptying + Spin 6 min.
3
Water inlet via the electrically operated valve for
washing until wash level is reached
pressure
switch
level
4 Heating resistance activated until 40 ºC is reached 10 min.
5
Water intake through the three electrically
operated valves
5 sec.
Emptying + movement of wash motor with
inversion
1.5 min.
STOP
The programme ends and the selected wash
programme is displayed
Note: Whenever it is necessary to go on to the next step, press the start/
pause button or turn the programme selector one position towards the right or
left.
Once the TSS programme has ended, the programme may be repeated by
pressing the START button.
Page 20

Description of operation
technical
17
3.6.2.- Seguridades criterios
SAFETY
MECHANISMS
FAULT CONDITION WASHER ACTION RESET
(End of safety)
FILLING
F01
EV ON 8 min. and PN
OFF (empty)
(except in reliability
programme)
It remains on pause with
door lock ON
Any of these conditions
resets the safety:
1. – Power is lost (supply
or ON/OFF switch).
2.- Change of programme
selector position.
UNBALANCED
F03
Detects imbalance in
18 attempts (15 min)
of low imbalance level
(see spin table)
It performs 2 attempts
with the high imbalance
level, limiting the speed
to C1.
Even if it spins at this
speed, it will indicate the
fault (see spin table).
NTC
F05
NTC in short circuit or
open circuit It performs the selected
programme but without
heating
NO HEATING
F06
B < 5º C / 15 min.
(excepto en programa
fiabilidad)
EMPTYING
F02
EB ON 6 min. and PN
ON (full)
STOP
(End of programme)
OVERFULL
F07
Drainage pump cuts
out or loses electricity
supply
F07
Electronic operated
valve cuts out
DOOR LOCK
F04
Door lock ON and
also detects failure
of both control triacs
of the door lock (both
open)
PROGRAMME
SELECTOR
F08
Selector in short
circuit or open circuit
Performs DELICATE cold
programme (only in User
Mode)
MOTOR
F09
Tachogenerator
motor lock fault (three
consecutive attempts) STOP
End of programme
Door lock always closed
INVERSION
WITH MOTOR
STOPPED
F10
Does not invert the
direction until the
motor stops (Max.
time (1 min.)
The fault indicator disap-
pears, as in previous
cases but the door lock is
kept closed.
To unlock it, keep it OFF.
B= pending increase in temperature when heating
Page 21

Description of operation
technical
18
3.6.3.- Imbalance Detection
DETECTION LEVEL WHEN WASHING 650 gr.
DETECTION LEVEL FOR LOW SPIN 750 gr.
DETECTION LEVEL FOR HIGH SPIN 1520 gr.
Note: These data are for a belt tension of 120 Hz and a SELNI motor
Function in the stop programme end
While PN is kept off
(empty)
Door lock OFF & Pump OFF.
Power failure: It is ready to start a new programme
(pause status).
It is in PAUSE status.
When Start is pressed: restarts a new programme
While PN is kept on
(full)
Door lock OFF & Pump in cycles:
(1 minute On , 1 minute OFF)
In case of overflow, the first pump cycle is:
(6 minutes On , 1 minute OFF)
Power failure: stays in the same situation.
It is always in START status.
When Start is pressed: stays in the same situation.
Will show fault F2 while this condition exists.
Memory function for power cuts
Maintains programme memory for at least 2 hours.
When spinning, the step times are always reset
Changes in the programme selector
A programme change means that the programme will start again from the starting
position.
Page 22

Description of operation
technical
19
3.6.4.- Imbalance Operation
1. - Spin attempts
If an imbalance is detected, the present phase will restart at second 25.
The number of attempts is limited to 18 (15 minutes).
After 18 spin attempts, it checks whether the imbalance level is lower than the high
imbalance level (1520 g).
If it is lower, follow the spin sequence but limit the speed to C1 (minimum spin speed
position on the rpm selector).
The number of attempts here is 2. If it also fails to start after these two attempts,
move to the next programme step.
The spin time indicated in the steps of the electronic programmer is not reduced by
the spin attempts in which an imbalance is detected.
2. - Reading the pressure switch
If the pressure switch is activated when the spin peak between imbalance readings
1, 2 and 3 is reached, the machine continues to spin normally until the next
imbalance reading.
If the pressure switch is activated during any other spin, the motor stops and wait
until you read “empty” on the pressure switch. The current phase will then restart.
The spin time indicated in the steps of the electronic programmer is not reduced by
waiting to read “empty” on the pressure switch
3.- Spinning in the TSS programme
Spinning in the TSS programme does not include the fi rst 42 seconds of the spin
cycle.
4. – Skip spin
It will perform a Very Delicate Spin for 60 seconds.
Page 23
Description of operation
technical
20
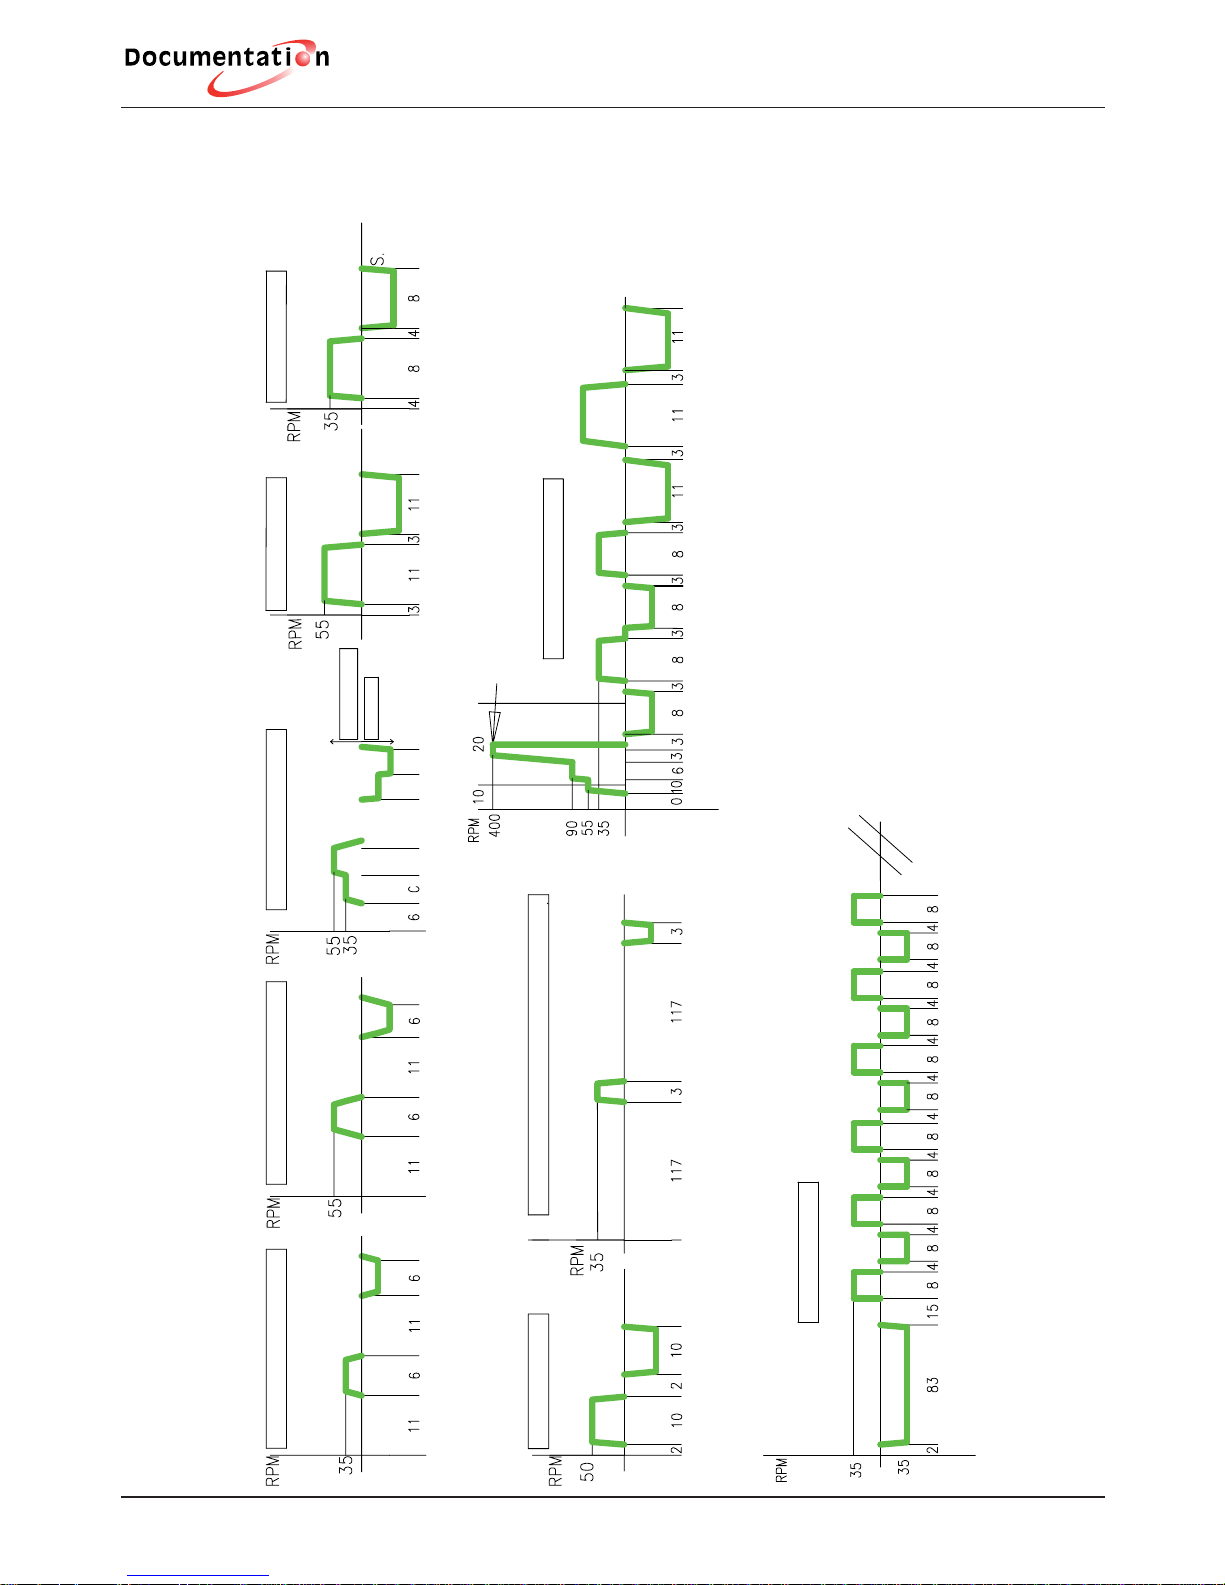
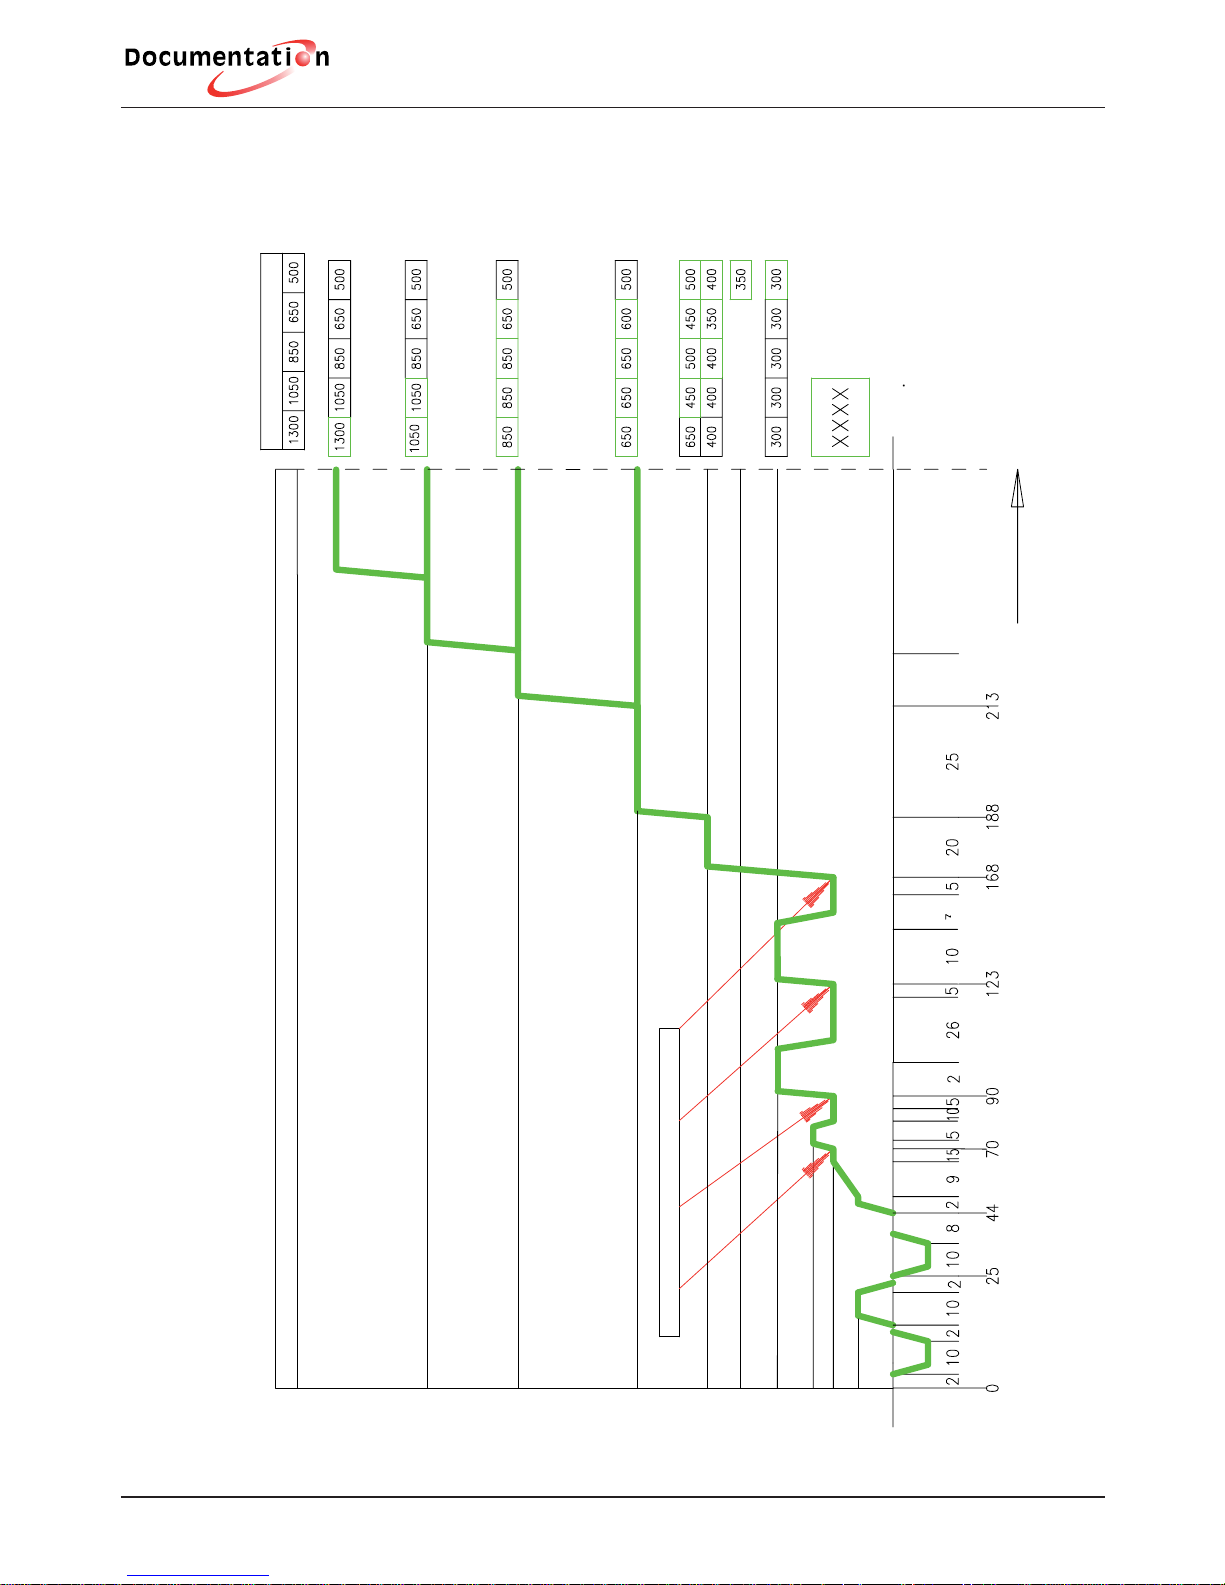
Wash vibrations
SEMI DELICATE VIBRATION
SEMI-DELICATE VIBRATION
SUPER VIBRATION
PLUS VIBRATION
FLOT VIBRATION (max. time 2 hours)
NON-DETECTION OF
OVERFLOW AREA
ANTICLOCKWISE
CLOCKWISE
NORMAL VIBRATION
VERY DELICATE VIBRATION
T.S.S. VIBRATION
EXTRA VIBRATION
SEC.
SEC.
SEC.
SEC.
SEC.
SEC.
SEC.
SEC.
Page 24

Description of operation
technical
21
Easy iron phase
NORMAL SPIN AND EASY IRON /ELECTRONIC WASHING MACHINES E2002
PHASE 0 EASY IRON
PHASE 1 EASY IRON
PHASE 2 EASY IRON
PHASE 3 EASY IRON
MACHINE MODEL
RPM
SELECTOR
IMBALANCE TEST
IMBALANCE TEST
IMBALANCE TEST 1 and 2
IMBALANCE TEST 1 and 2
Page 25
Description of operation
technical
22
Normal spin diagram
PHASE 0 NORMAL SPIN
Step 7
Step 6
Step 5
Step 4
Step 3
Step 2
Step 1
Step 0
IMBALANCE TEST 1, 2,
3
RPM SELECTOR
POSITIONS
SEC
Depending on
the programme
140
35
90
RPM
MACHINE MODEL
Page 26

Description of operation
technical
23
3.7.- Assembly and disassembly instructions
(A) Disassembly of the Evoluta Condensation Chamber
Undo the three screws that fi x the condensation chamber to the drum (Thor
screws)
Disconnect thermostat cables
Disconnect fan motor cables
Loosen the 2 screws which hold the Evoluta to the Muffl er Duct
Remove the anti-return duct (bracket)
(B) Changing the Fan Motor
Remove the Evoluta condensation chamber (A)
Undo the 5 fi xing screws
Remove the fan (take care, as the central bolt has a left-hand thread)
Undo the three screws which fi x the fan to the evoluta cover
(C) Changing the single cycled Thermostat
Remove the Evoluta condensation chamber (A)
Remove the fan motor
Undo the thermostat fi xing bolt (this bolt is inside the Condensation chamber)
N/C 85 degrees
(D) Change Element – Double Thermostat
Remove the Evoluta Condensation chamber (A)
Undo the three fi xing screws for the upper counterweight
Loosen the two screws which hold the Evoluta to the Muffl er Duct
Put a wedge support in between the unit and the base of the upper coun
terweight to raise up the Counterweight-Chamber
Loosen the two screws which hold the double thermostat
Loosen the two screws which hold the element
It is advisable to fi t a new seal to the newly installed element
Page 27

Description of operation
technical
24
(F) Changing the Muffl er Duct
Loosen the screws which hold the Counterweight to the Muffl er Duct
Loosen the two screws which hold the Chamber-Evoluta to the Muffl er Duct
Undo the three fi xing screws for the counterweight
Disconnect the electric cables
Page 28
Description of operation
technical
25
3.8.- Drawings and diagrams
Page 29

© FAGOR ELECTRODOMESTICOS, S.COOP. 2006
Bº San Andrés, s/n
20500 Mondragón (Gipuzkoa)
Spain
 Loading...