

Page 1
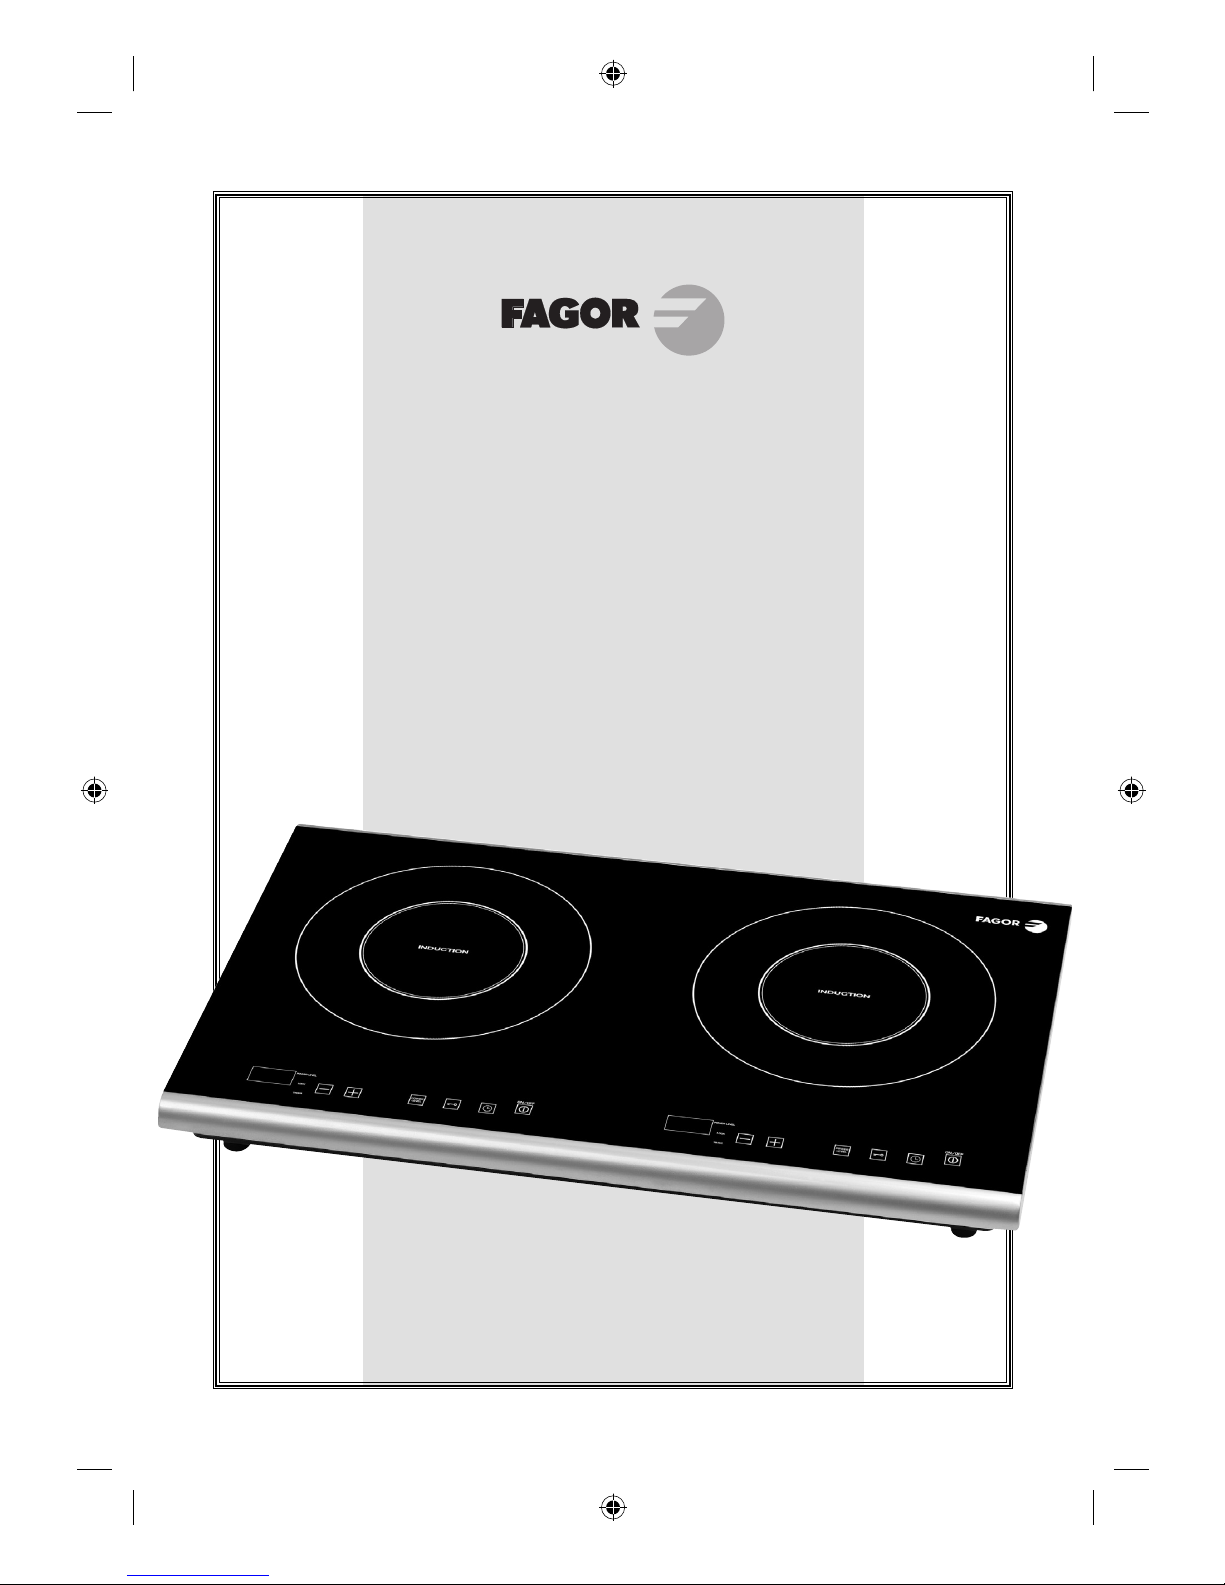
DOUBLE
INDUCTION
BUFFET
WARMER
CALENTADOR DE BUFFET DE INDUCCIÓN DOBLE
User’s Manual
Manual del Usuario
DIBW Manual Rev'n.indd CiDIBW Manual Rev'n.indd Ci 1/25/10 8:20 PM1/25/10 8:20 PM
Page 2

DIBW Manual Rev'n.indd CiiDIBW Manual Rev'n.indd Cii 1/25/10 8:20 PM1/25/10 8:20 PM
Page 3

1
ENGLISH
Contents
Introduction to Induction ..................................................................................... 2
How does induction work? ............................................................................ 2
What are the benefi ts of cooking with induction? ......................................... 2
What type of cookware are compatible with Induction? ............................... 3
General Safety Regulations ................................................................................. 4
Installation ............................................................................................................ 6
Operation .............................................................................................................. 7
Cleaning and Maintenance ................................................................................11
Troubleshooting .................................................................................................. 12
ESPAÑOL ............................................................................................................ 17
Limited Warranty ................................................................................................ 32
DIBW Manual Rev'n.indd 1DIBW Manual Rev'n.indd 1 1/25/10 8:20 PM1/25/10 8:20 PM
Page 4
2
ENGLISH
Introduction to Induction
How does induction work?
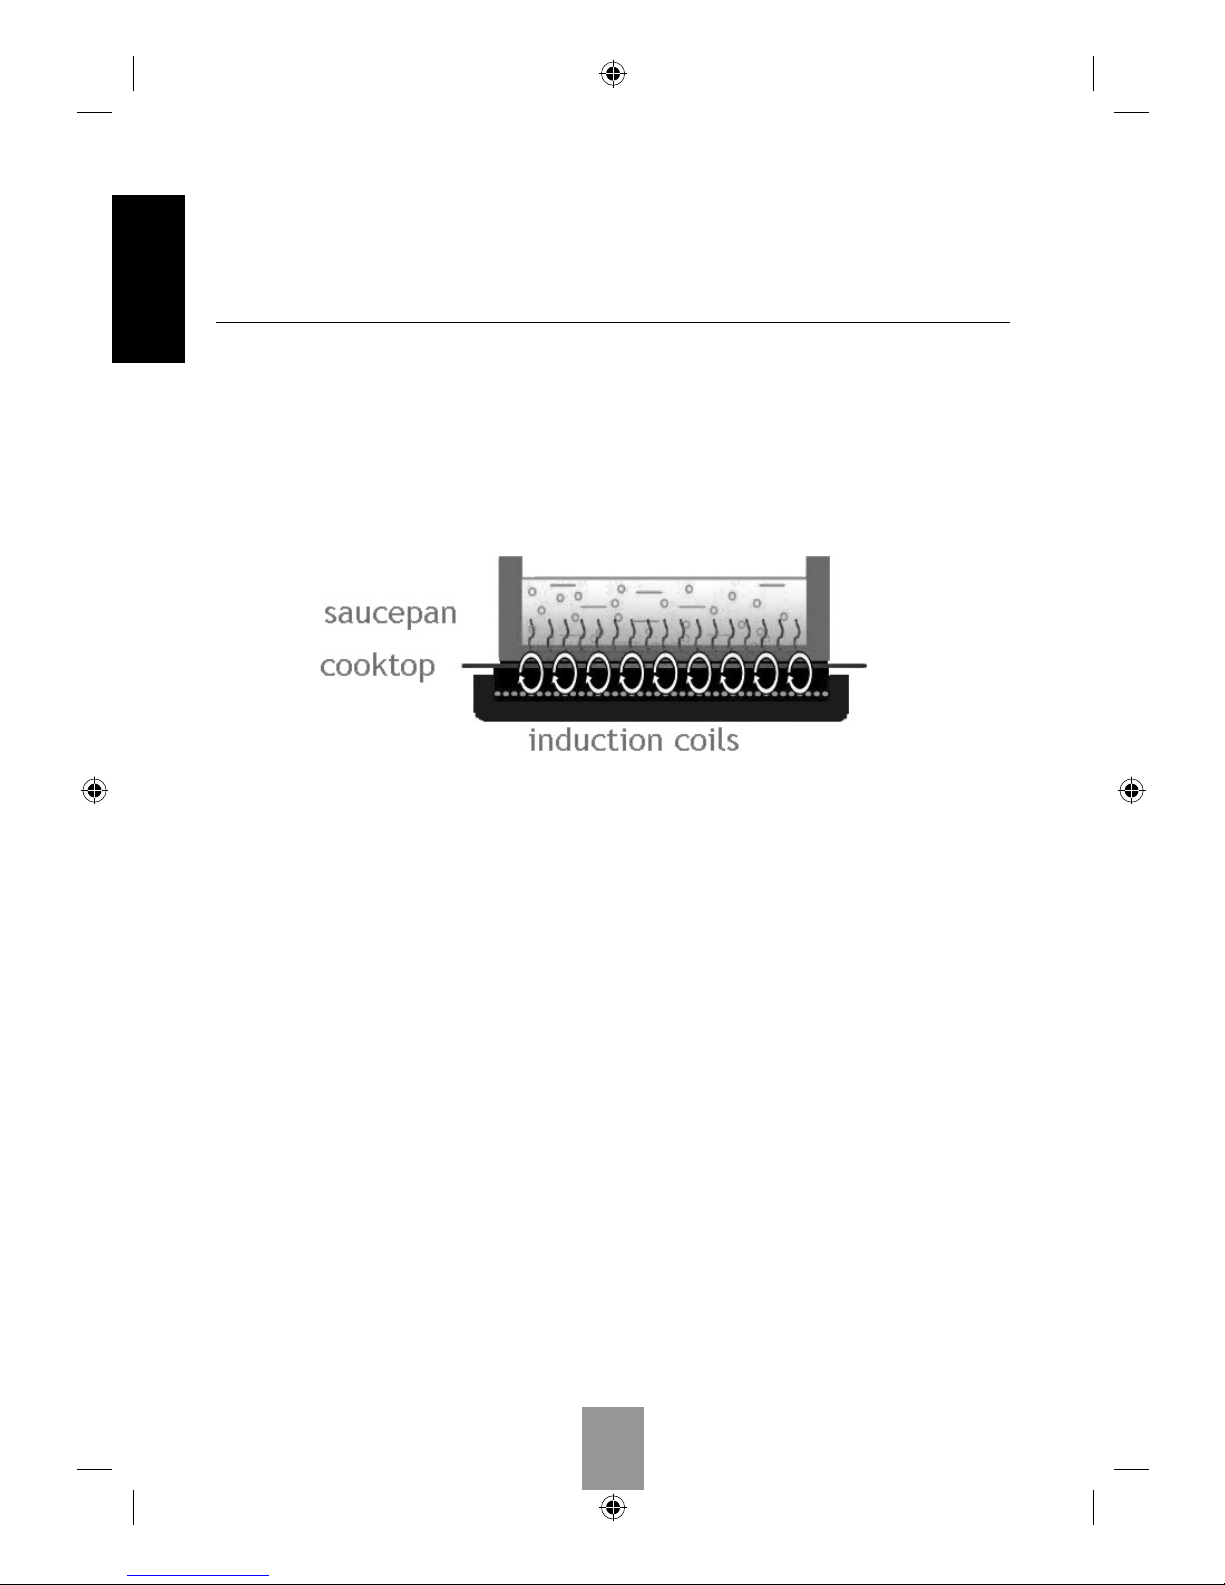
An induction cooktop holds a series of burners called induction coils (based on
magnetic principles). These coils generate magnetic fi elds that induct a warming
reaction in steel and iron-based pots and pans. This way, the cookware itself heats the
food, not the cooktop surface.
What are the benefi ts of cooking with induction?
EFFICIENT: Induction is the most eco-friendly and energy-effi cient way to cook.
Induction cooktops use 90% of the energy produced, which is much more energyeffi cient than gas or electric cooktops. By recognizing the base of the cookware,
induction heats only the diameter of the pot so very little energy is wasted. Moreover,
induction emits no fl ame, so less residual heat is produced in your kitchen.
SAFE: There are no open fl ames and the surface remains cool to the touch.
EVEN HEAT DISTRIBUTION: Hot spots and rings are avoided because the bottom of
your cookware heats uniformly.
EASY TO CLEAN: The ceramic glass is fl at and smooth; spills and overfl ows do not
stick to the surface, so they can easily be wiped away.
DIBW Manual Rev'n.indd 2DIBW Manual Rev'n.indd 2 1/25/10 8:20 PM1/25/10 8:20 PM
Page 5

3
ENGLISH
What type of cooking vessels are compatible with Induction?
Since Induction is based on magnetic principles, the cooking or chafi ng vessel used
must have a ferrous (iron-based, magnetic) bottom. Some types of cookware are
made of naturally magnetic metals (such as pure iron), while others are made to be
magnetic by “sandwiching” a thin layer of a ferrous metal in the base. This layer in the
base is what will be affected by the magnetic fi eld produced by the induction unit and
distribute the heat. Generally speaking, tri-ply, high-quality stainless steel and cast
iron will work on induction cooktops. Copper, glass and aluminum will not work unless
they have a sandwiched magnetic base.
The easiest way to check whether your cooking or chafi ng vessel is compatible with
induction cooktop, is to take a magnet and try to stick it to the bottom of your pot. If
it sticks, your pot will work on induction. You can even use the simplest decorative
fridge magnet for this test. Note that the magnet has to stick only to the bottom of the
pot, not necessarily the sides. If the sides are not magnetic but the bottom is, your pot
will still work on induction.
The pots that work best on induction are medium- to heavy-gauge.
Induction compatible cookware*
• Stainless Steel and Tri-Ply (note: not all types of stainless steel have magnetic
properties. Check by testing it with a magnet fi rst)
• Enameled iron and steel
• Cast iron
• All FAGOR cookware, chafi ng dishes and pressure cookers
Non-induction compatible
• Copper
• Glass
• Aluminum
• Pottery
*Always check your cookware with a magnet before attempting to use it on induction.
ATTENTION:
The cookware used on your Fagor Double Induction Buffet Warmer must have a
fl at bottom and be at least 6 inches in diameter.
DIBW Manual Rev'n.indd 3DIBW Manual Rev'n.indd 3 1/25/10 8:20 PM1/25/10 8:20 PM
Page 6

4
ENGLISH
General Safety Regulations
The product you have purchased is a state of the art induction appliance. It adheres
to all of the latest safety and technology standards; however, as with any electric
appliance, there are some potential risks. Only operate this unit in accordance with the
instructions provided and only for its intended household use.
ATTENTION:
In order to prevent possible injuries or electric shock, please observe the following
safety rules:
• Never touch the unit or the power plug with wet hands.
• Be sure to operate the unit on a fl at, level and stable surface.
• Do not connect the unit to the same outlet with other household appliances such
as microwaves, etc. as it could overload the outlet and trip a circuit breaker.
• If using an extension cord to connect the unit, please note that a damaged
extension cord can cause it to malfunction. Always check your extension cord for
damage and be sure it is compliant with the required voltage. Be sure not to place
cord where people can trip over it.
• Never attempt to unplug this product by pulling on the power cable.
• Do not move the unit during cooking or with hot cookware on top of it.
• Do not place any empty cooking vessels on the surface while it is functioning. An
empty cooking vessel will heat up very rapidly and may cause material damage or
personal injury.
• Do not place any metal objects on the surface (other than the cookware you
intend to warm or cook in).
• Check the power cable for damage from time to time. Never operate the unit
when the cable is damaged. If the power cable shows any signs of defect, let a
qualifi ed electrician repair it.
• Do not heat up any unopened cans of food on cooking surface. A heated can of
food could explode. Only cook or warm food in induction compatible cookware.
• Although the surface of the unit remains cool to the touch because heat is
transferred directly to the cooking vessel. Please note that residual heat radiated
down from the cooking vessel will eventually warm up the cooking surface,
especially the area directly underneath the pot. Be careful when handling the unit
after use and let it cool down before storing.
• Persons with a pacemaker or similar medical device should exercise caution using
or standing near an induction unit while it is in operation, as the electromagnetic
fi eld may affect the working of the pacemaker or similar medical device. We advise
consulting your doctor or the pacemaker or similar medical device manufacturer
about your particular situation.
DIBW Manual Rev'n.indd 4DIBW Manual Rev'n.indd 4 1/25/10 8:20 PM1/25/10 8:20 PM
Page 7
5
ENGLISH
• Do not place any magnetized objects like credit cards, cassettes etc. on the glass
surface while the induction cooktop is in operation. The magnetic properties of
the induction unit may damage these items.
• In order to avoid overheating, do not place any aluminum foil or metal plates on
the cooking surface.
• Attention: Do not insert any objects such as wires or tools into the ventilation
slots. This may cause electric shock.
• Never use this appliance when it is not functioning properly, shows signs of
damage or if it has been dropped.
• Do not leave the induction cooktop unsupervised during operation. Keep children
away from the unit while in operation. Children should be supervised at all times
when in or around the kitchen.
• This appliance is not intended for use by children, or persons with reduced physical,
sensory or mental capabilities, lack of familiarity with the safety and operating
instructions found in this manual, or lack of experience with operating the appliance
-unless they are closely supervised and have been given proper instructions.
• Do not submerge this product in water or other liquids and do not wash it in the
dishwasher.
• Do not operate this product on any metal table or surface.
• Only qualifi ed experts may perform repair and maintenance work on this product
using authentic FAGOR replacement and accessory parts. Never attempt to
dissemble and repair this appliance yourself!
• This product is not intended for commercial or outdoor use; it is for indoor and
household use only.
• This appliance has a polarized plug (one blade is wider than the other). To reduce
the risk of electric shock, this plug is intended to fi t into a polarized outlet only one
way. If the plug does not fi t fully into the outlet, try turning it the other way around.
If it still does not fi t, contact a qualifi ed electrician. Do not attempt to modify the
plug in any way.
• Do not place anything (paper towel, cloth, aluminum foil) between the cookware
and the glass cooking surface. This may cause a fi re hazard.
Technical Data:
Rating Voltage: 120V, 60Hz 1800 Watt / 16 amps
Power range: 1-6. See “Power Share Operation” section in this manual
Timer range:
5 to 150 minutes, every touch “+” will increase 5 minutes,
every touch “-” will decrease 1 minute.
DIBW Manual Rev'n.indd 5DIBW Manual Rev'n.indd 5 1/25/10 8:20 PM1/25/10 8:20 PM
Page 8

6
ENGLISH
Installation
Prior to use and installation, remove the double induction buffet warmer from the box
and the packaging materials. Inspect for any visible damage to the unit. For traveling
and transportation purposes, you may want to save the box and the packaging
materials.
• Place the appliance on a stable and level surface.
• Never place the appliance on a fl ammable surface (e.g. table cloth, carpet, etc.).
• Do not block the ventilation slots. This cause the unit to overheat. Keep a minimum
distance of 3-5 inches from walls and other objects, appliances, etc.
• Do not place the unit next to devices or objects that react sensitively to magnetic
fi elds (e.g. radios, TVs, cassette recorders, etc.).
• Do not place the induction cooktop next to open fl ames, heaters or other sources
of heat.
• Make sure that the power cable is not damaged or compressed beneath the unit.
• Make sure that the power cable does not come into contact with sharp edges
and/or hot surfaces.
• Prior to connecting the unit, check whether the voltage indicated in this manual
corresponds to the voltage supply in your home. An improper connection may
lead to damage to the unit and possible injury to persons.
• The cooktop’s surface is made of temperature-resistant glass. In the event that
damage to the unit is observed, even if it is only a small crack on the glass surface,
disconnect the unit from the power supply immediately and contact Fagor’s
customer service department by calling 1.800.207.0806.
DIBW Manual Rev'n.indd 6DIBW Manual Rev'n.indd 6 1/25/10 8:20 PM1/25/10 8:20 PM
Page 9
7
ENGLISH
Operation
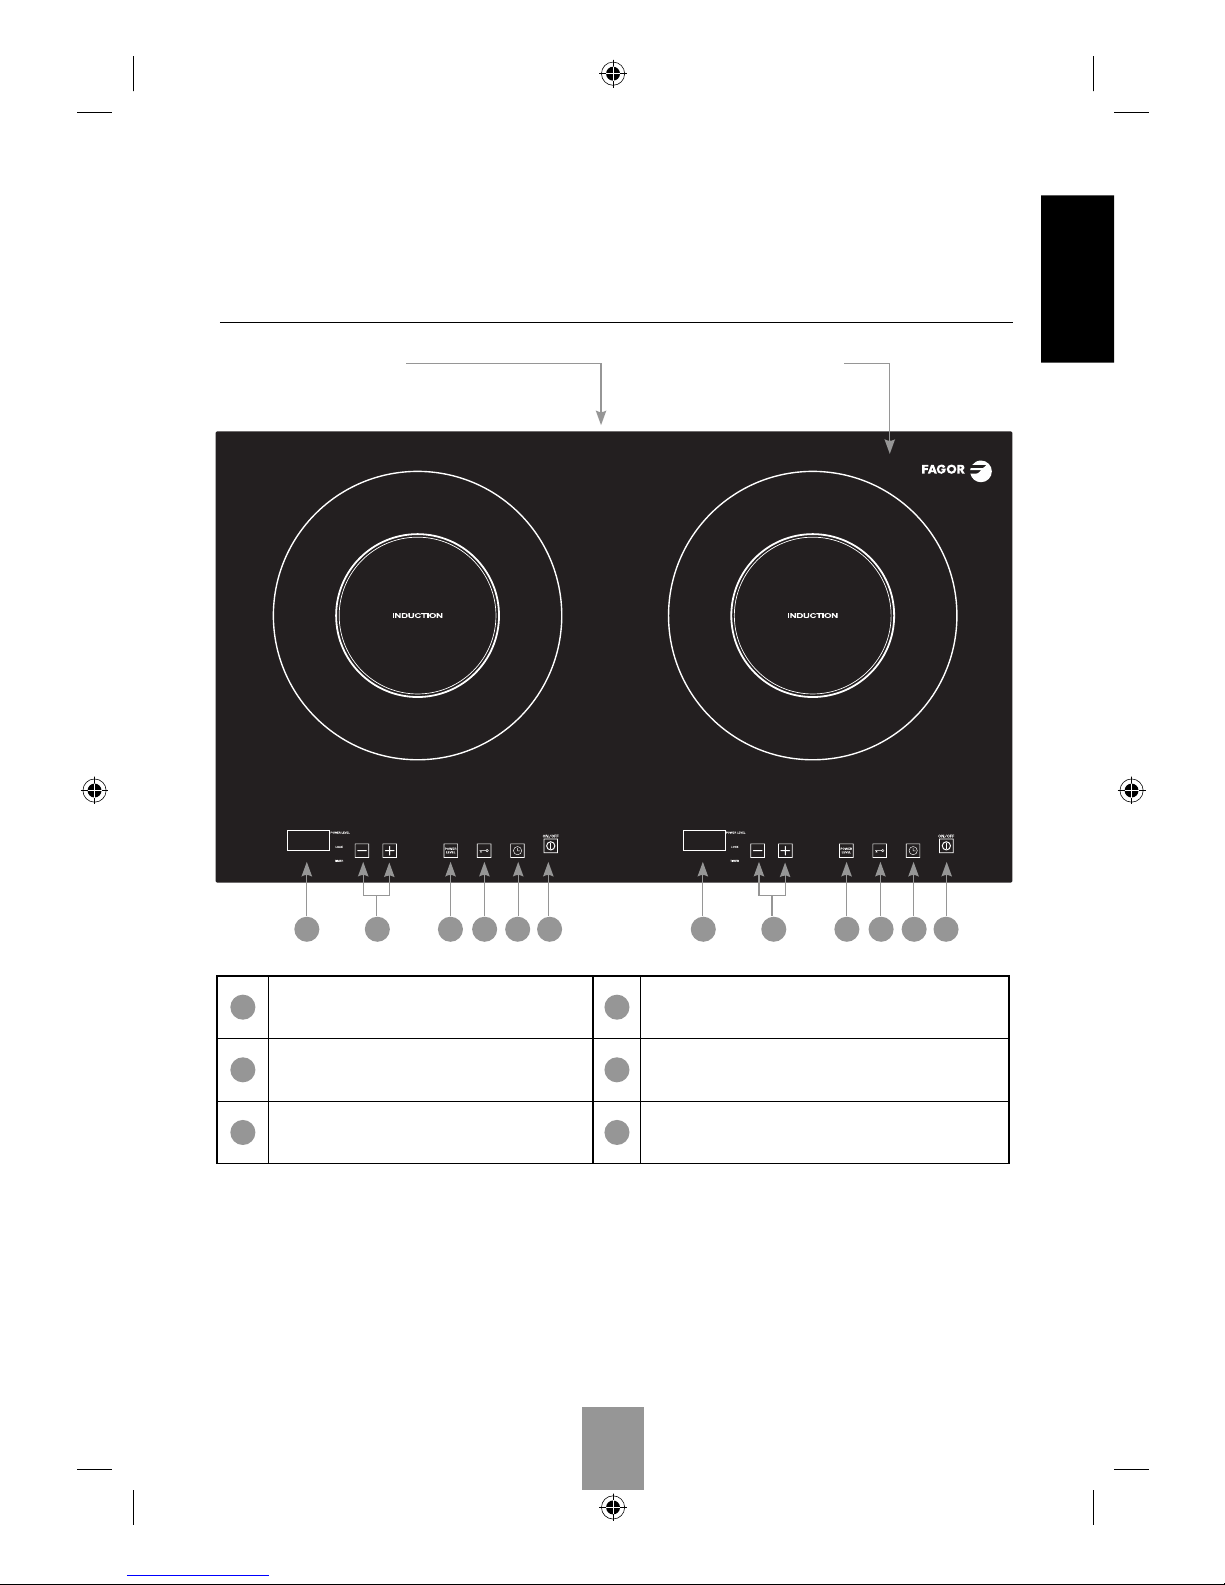
Heat resistant
glass cooking
surface
AIR VENT
Do not block air
vent slots on back
A AB BC CD DE EF F
A
DISPLAY PANEL
D
CHILD LOCK Press and hold to turn on and off.
B
PLUS/MINUS buttons for power or timer.
E
TIMER button
C
POWER LEVEL Press this button after the
ON/OFF button to start the cooktop.
F
ON/OFF button
DIBW Manual Rev'n.indd 7DIBW Manual Rev'n.indd 7 1/25/10 8:20 PM1/25/10 8:20 PM
Page 10
8
ENGLISH
How to use your Fagor Double Induction Buffet Warmer:
1. Follow the instructions installation found in this manual. Plug the power cable
into a properly installed outlet. You will hear a beep, the light above the ON/OFF
button will turn on and the unit will go into standby mode.
2. Place your cookware in the middle of one of the cooking zones and tap the ON/
OFF button that corresponds to the cooking zone you are utilizing once.
The light above the words POWER LEVEL beside the display panel will blink and
you will hear another beep. If you do not press any other buttons in the following
30 seconds, the cooktop will beep once more and automatically go back to
standby mode.
3. Tap the POWER LEVEL button once. The unit will turn on to a default power level
3 and the light above the POWER LEVEL button stops blinking and stays on. The
display panel will show a “3” to indicate that you are cooking on power level 3.
You will hear the fan begin to function.
If you tap the POWER LEVEL button before placing induction compatible cookware
on the cooktop, it will beep continuously and the symbol “- - -” will blink on the
display panel to indicate that it doesn’t detect any cookware and cannot generate
heat. After 10 seconds the unit will beep once and go back to standby mode.
4. Once you have tapped the POWER LEVEL button and have started cooking on
the default level “3”, you can increase or decrease the power by tapping the
PLUS / MINUS buttons. The power levels range from 1 to 6:
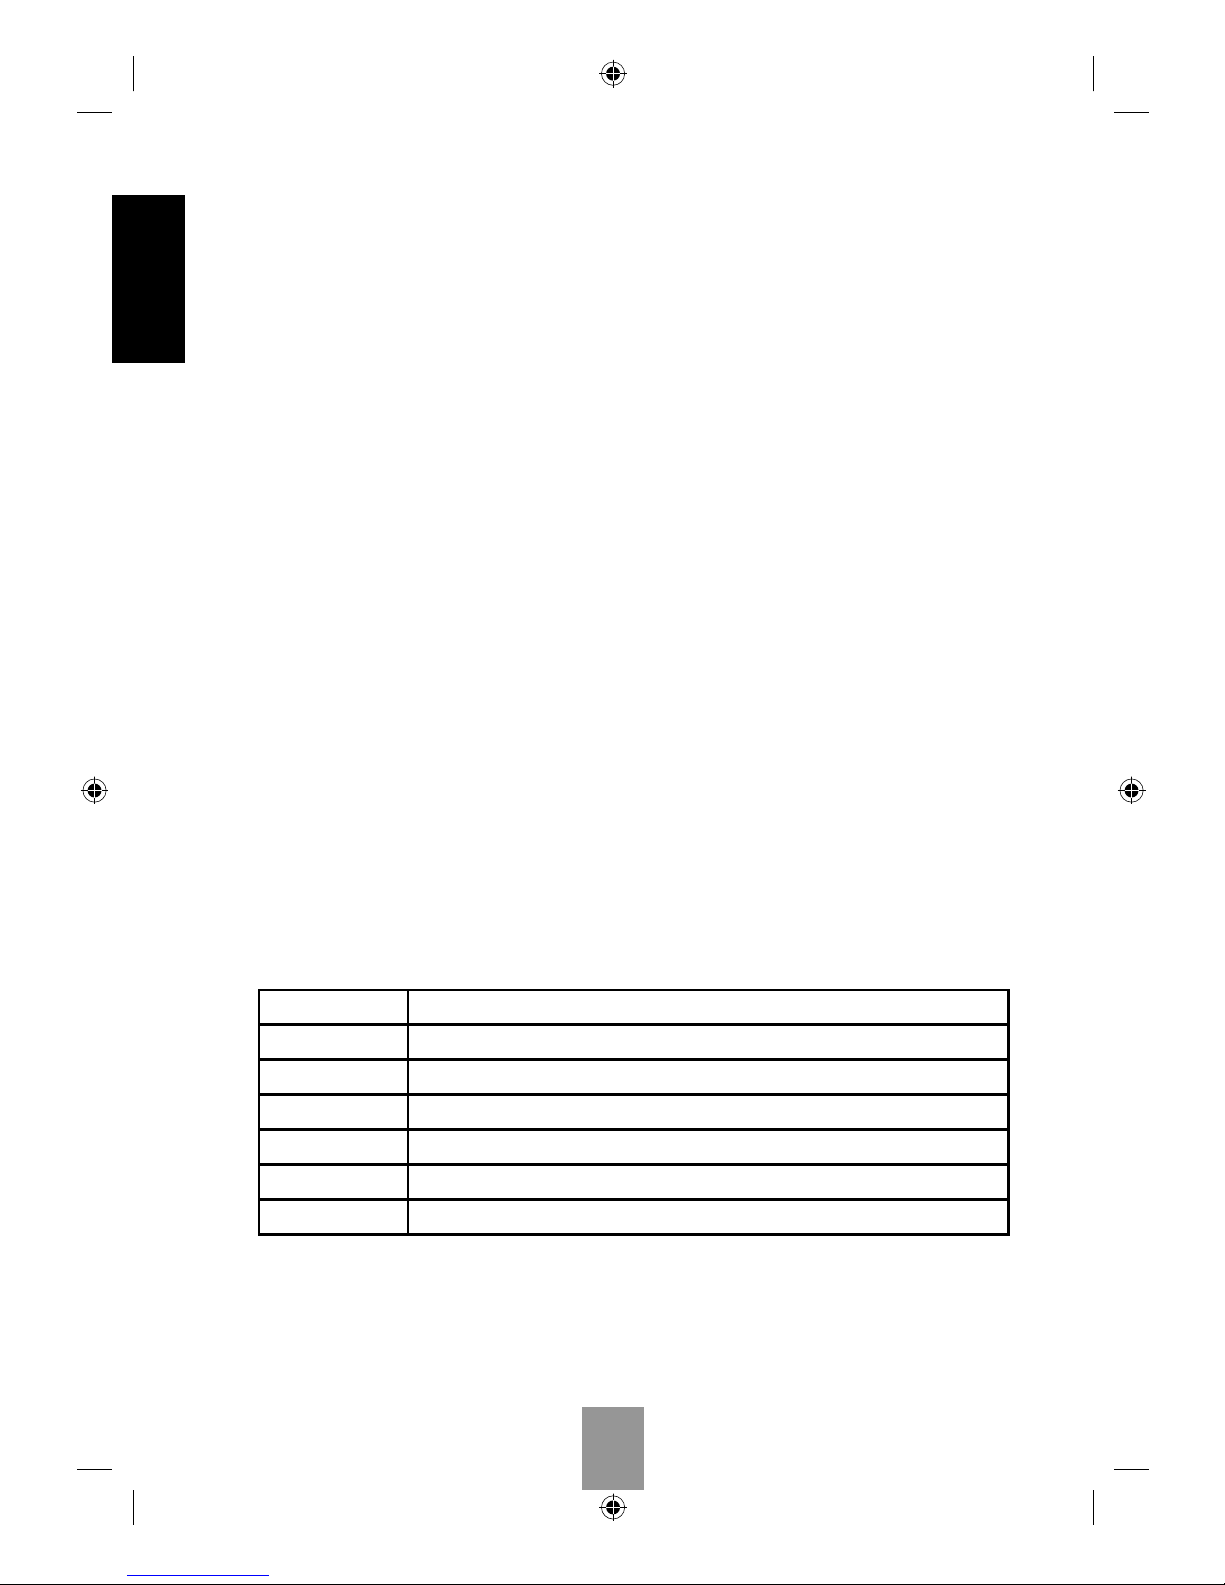
Power levels and suggestions of use:
Power Level Suggested Use
1-Lowest Use this level to melt chocolate or keep food warm.
2-Low Use this level for a gentle simmer or to reheat food.
3-Medium/Low This level brings water to near boiling point.
4-Medium Use this level to boil or cook.
5-Medium/High Use this level to boil or cook at a medium/high level.
6-High This level allows you to sauté, or to quickly bring water to boil.
5. Once you have fi nished cooking, tap the ON/OFF button once to turn the cooktop
off. The fan may continue to run for some time to cool the unit down. Once the
fan has stopped, unplug the unit. Make sure you wait for the unit to cool off
completely before storing.
DIBW Manual Rev'n.indd 8DIBW Manual Rev'n.indd 8 1/25/10 8:20 PM1/25/10 8:20 PM
Page 11
9
ENGLISH
Power Sharing:
This Double Induction buffet warmer is suited to be used as a single or double zone
warming surface or as a single cooking zone auxiliary device. It is not intended, nor
suitable for high power cooking simultaneously on two cooking zones at once. In
order to clarify any misconceptions about the functionality of this product we will
next describe in the following section how the unit operates from a power sharing
perspective.
This unit operates with a Power Sharing System. This means that the two cooking
zones share the maximum 1800 W power available to them. The practical consequence
of this system is that the power levels on the two sides cannot go above power level
6 when being used simultaneously.
If you are cooking on power level 3, for example, on the left side, you will only be able
to use power levels 1, 2 and 3 on the right side. If you increase the power above level
3 on the right side, it will automatically reduce the power level on the left side, and
vice versa.
At any given moment, the sum of the number indicated on the left side and the number
indicated on the right side cannot be higher than 6.
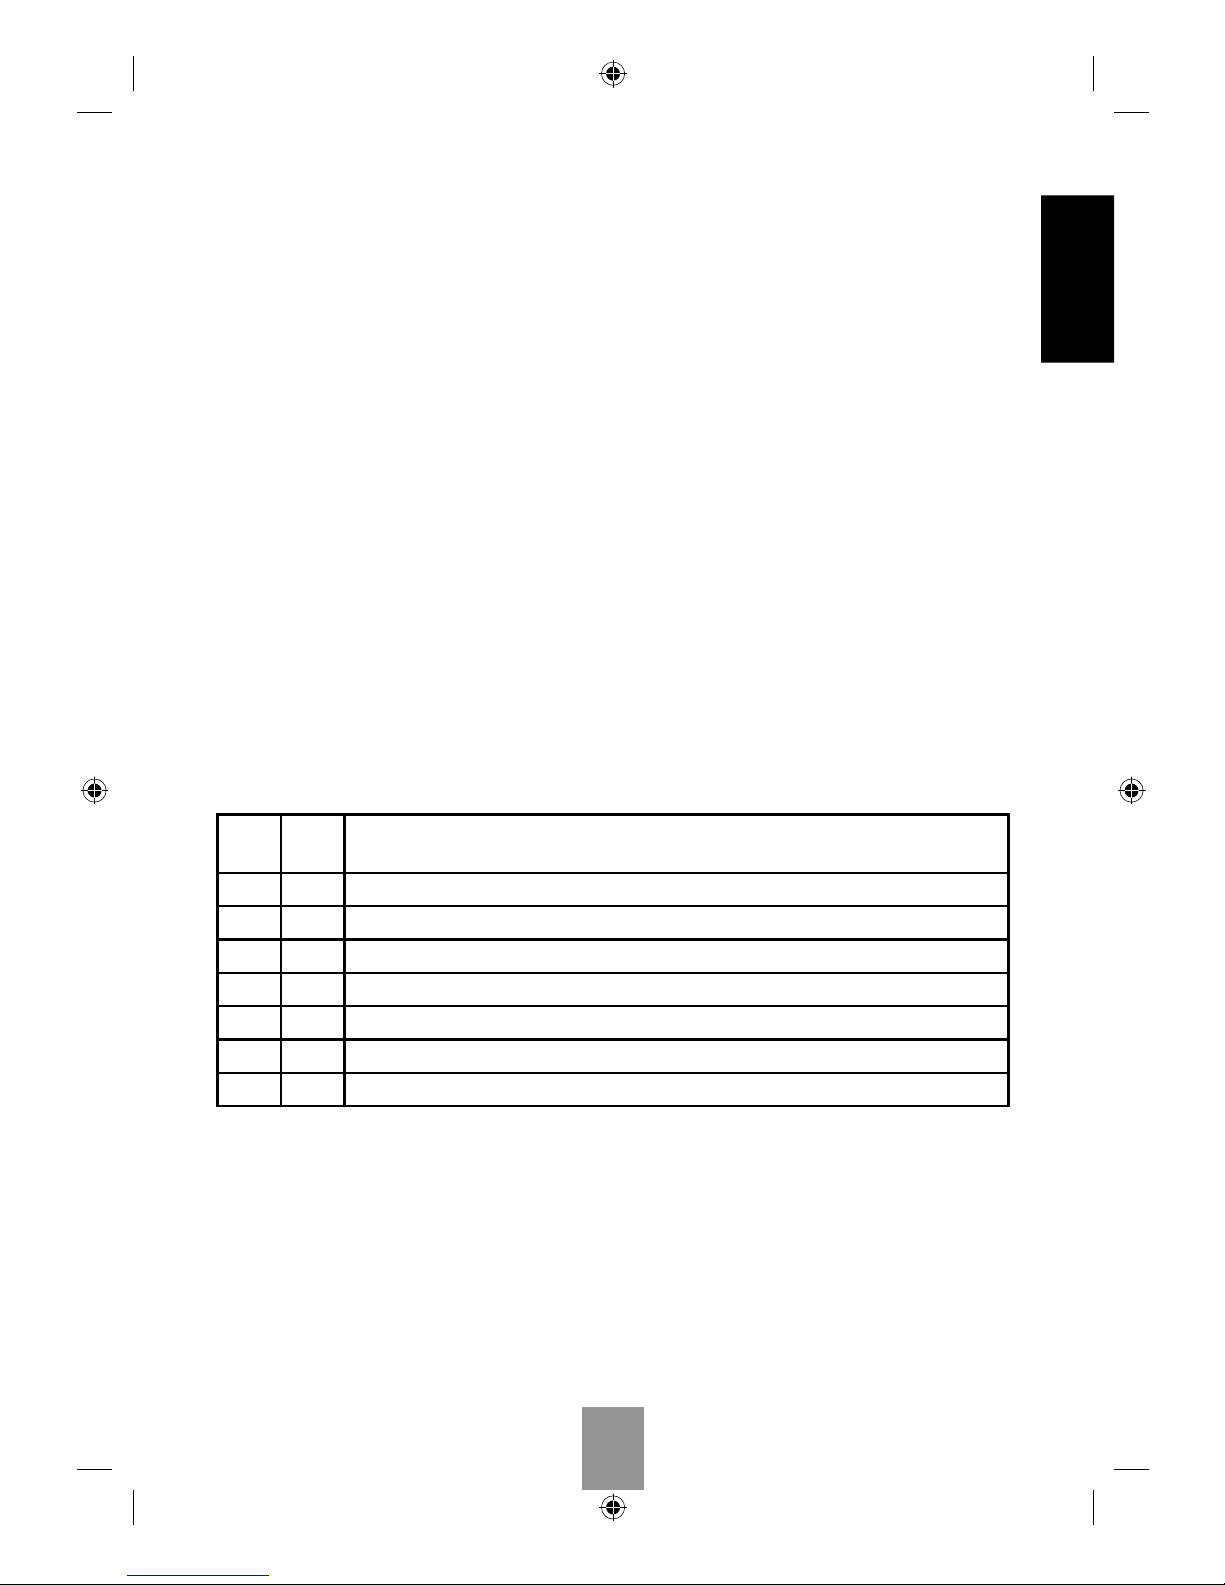
The possible combinations of MAXIMUM cooking levels are as follows:
LEFT
ZONE
RIGHT
ZONE
SUGGESTED USE
6 0 (off) You are sautéing or cooking on “high” on the left; the right side is off.
5 1 You are cooking on “medium/high” on the left, and keeping warm on the right.
4 2 You are boiling water or cooking on a “medium” on the left, and reheating on the right.
3 3 You are gently simmering on both sides.
2 4 You are reheating on the left, and cooking on a “medium” on the right.
1 5 You are keeping warm on the left, and cooking at “medium-high” on the right.
0 (off) 6 You are not using the left side, and cooking on “high” on the right.
DIBW Manual Rev'n.indd 9DIBW Manual Rev'n.indd 9 1/25/10 8:20 PM1/25/10 8:20 PM
Page 12

10
ENGLISH
Automatic safety shutdown:
The cooktop has an automatic safety shutdown feature that will turn the cooktop off
automatically after 150 minutes, as a safety measure in case the cooktop is left on
accidentally.
If you want to keep using the cooktop after the default cooking time you can do so by
pressing the ON/OFF and then the POWER LEVEL buttons, although we recommend
that you let the unit cool down before using it again.
Using the Timer:
The timer allows you to program a determined cooking time, after which the cooktop
will turn itself off.
1. To use the timer, follow steps 1 to 4 of the “How to Use Your Fagor Induction
Cooktop” section. Once you have set the desired cooking level, tap the TIMER
button once. The display panel will show “0” and the light above the word “timer”
will turn on.
2. Tap the PLUS button to increase the programmed time in 5 minute intervals. If
you tap the MINUS button, you will decrease the timer in 1 minute intervals. The
maximum programmable time is 150 minutes.
Once you have selected the desired cooking time, the displayed time will show
on the display panel for a few seconds, then it will go back to displaying the
power level you are cooking on. You will know that the timer is on because the
light above the word “timer” will be on. If you want to check the amount of time
remaining, tap the timer button once. The display panel will show the remaining
number of minutes for 10 seconds, then go back to displaying the current power
level.
3. To change the programmed time while it’s counting down, tap the TIMER button
again once, and use the PLUS/MINUS buttons to change the time. To stop the timer,
tap the ON/OFF button to turn the unit off, then press it again followed by the POWER
LEVEL button to turn it back on and choose the correct power level you wish to cook
on.
4. When the programmed time is up, the cooktop will beep once and go into standby
mode.
DIBW Manual Rev'n.indd 10DIBW Manual Rev'n.indd 10 1/25/10 8:20 PM1/25/10 8:20 PM
Page 13

11
ENGLISH
Using the Child Safety Lock:
The child safety lock can be used to prevent children from turning the unit on
accidentally, simply to lock the controls in order to avoid inadvertently changing
settings while the unit is operation.
To turn the child lock on. You must press and hold your fi nger on the button for a few
seconds until you hear a beep and the light above the word “lock” turns on. (Note: It
is not suffi cient to simply tap the child lock button, as this will not activate the safety
lock feature.)
While locked, the cooktop will not respond to power or timer changes. When the
CHILD LOCK is on, the only button that will function is the ON/OFF button, to allow
you to turn the unit off in case of an emergency.
To turn the child lock off, tap and hold the button for a few seconds, until you hear a
beep and the light above the word “lock” turns off.
DIBW Manual Rev'n.indd 11DIBW Manual Rev'n.indd 11 1/25/10 8:20 PM1/25/10 8:20 PM
Page 14

12
ENGLISH
Cleaning and Maintenance
• Remove the power cord from the outlet prior to cleaning. Do not use any abrasive
cleaning agents and make sure that water does not penetrate inside the unit.
• Never immerse the appliance, its cable or the plug into water or other liquids.
• Wipe off the glass surface with a damp cloth or use a mild, non-abrasive soap
solution.
• Wipe the casing and the operating panel down with a soft cloth or a mild detergent.
• Do not use any oil based cleansing products in order to avoid damaging the
plastic parts or the casing.
• In order to keep your unit looking new, make sure that the bottom of your cookware
does not scrape the glass surface, although a scratched surface will not impair
functionality.
• Make sure to properly clean the unit before storing it in a cool, dry place.
DIBW Manual Rev'n.indd 12DIBW Manual Rev'n.indd 12 1/25/10 8:20 PM1/25/10 8:20 PM
Page 15
13
ENGLISH
Troubleshooting
In order to ensure best results when using the Double Induction Buffet Warmer, read
all of the operating instructions and safety regulations contained in this manual.
The following are practical tips and solutions to some common problems you may
experience when using the Double Induction Buffet Warmer. If you cannot determine
the cause of the error and correct it, contact Fagor’s customer service department by
calling 1.800.207.0806.
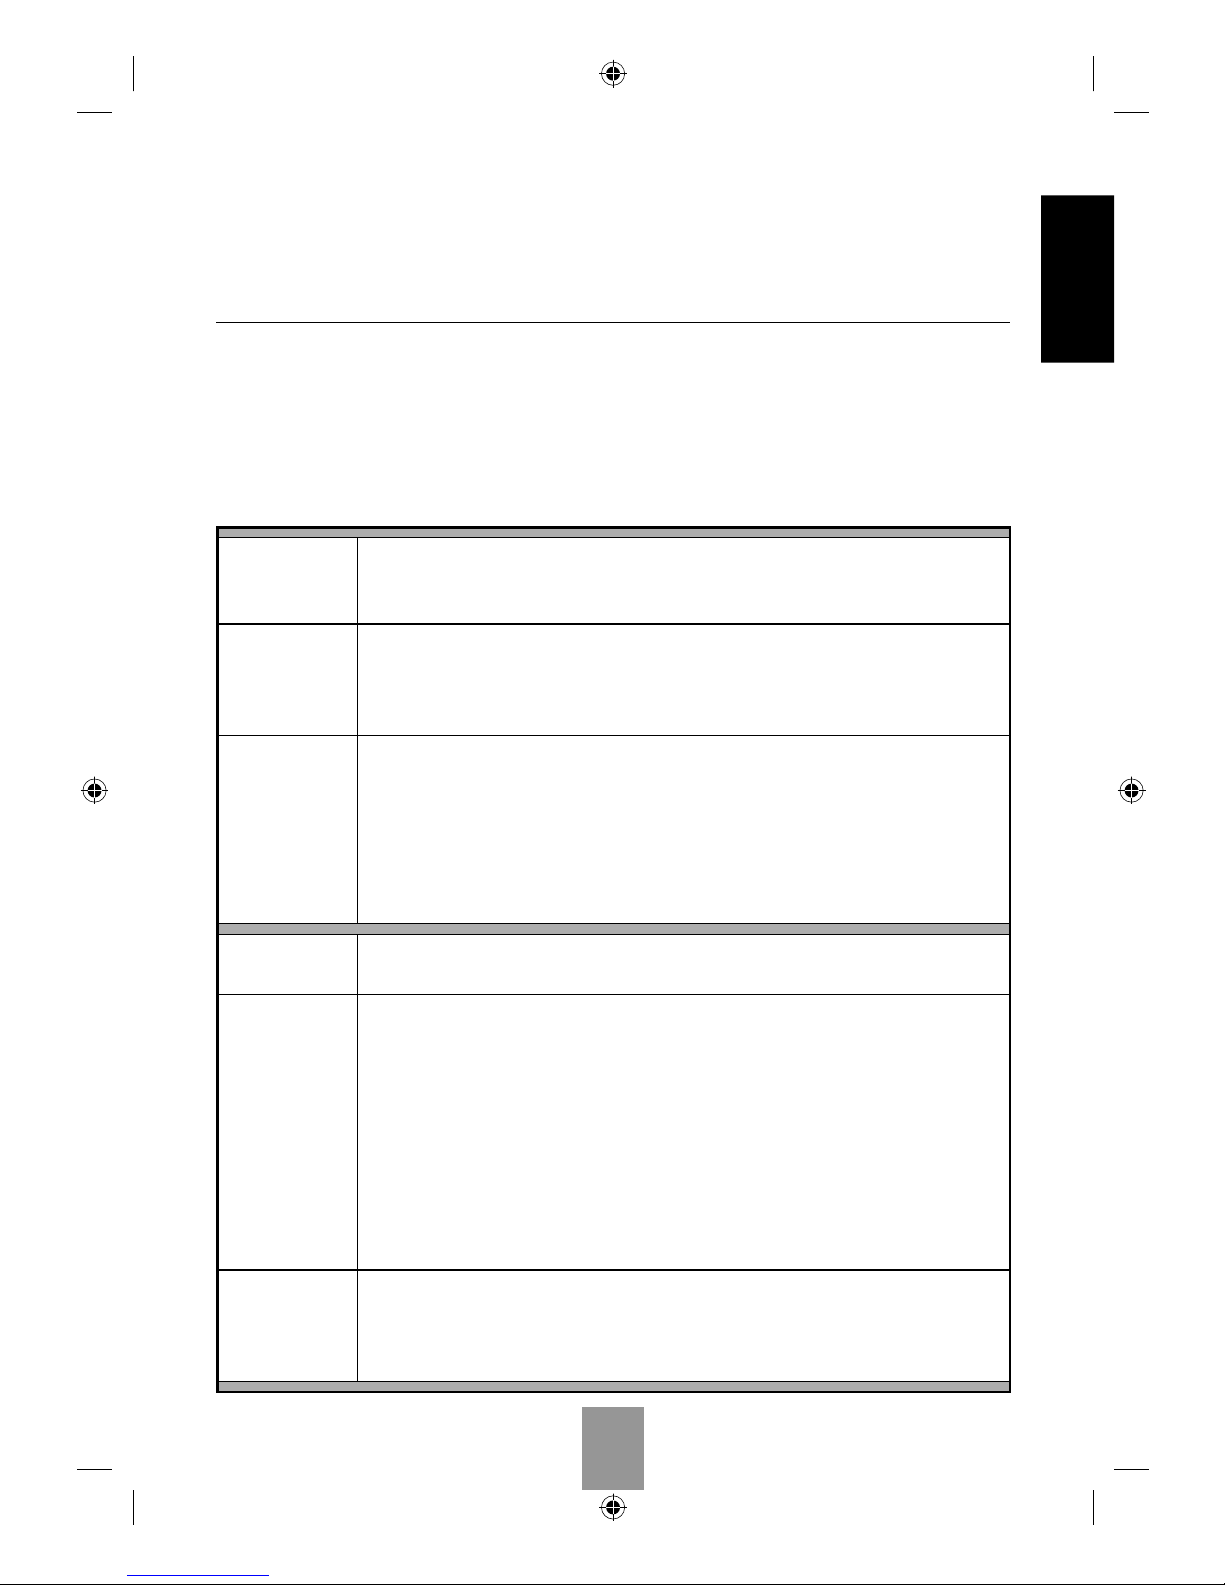
Problem: The unit continuously beeps and does not generate heat after the
cookware has been placed on the surface and the ON/OFF button
followed by the POWER LEVEL button have been pressed.
Reason: The induction cooktop is not detecting the cookware. This could
occur because:
1. The bottom of the cookware is not fl at.
2. The cookware is not induction compatible.
Solution: 1. All cookware used on induction must have a completely fl at
bottom. If your vessel does not have a fl at bottom you will not be
able to use it on induction.
2. Check if the cookware you want to use is compatible with
induction by trying to stick a magnet to its bottom. If the magnet
doesn’t stick, the cookware will not work on induction. Try using
a different vessel.
Problem: I have a stainless steel cooking/chafi ng vessel; however, it does not
work on my induction cooktop.
Reason: Not all types of Stainless Steel are induction compatible, as some
do not have magnetic properties.
Most stainless steel vessels have an aluminum sandwich bottom, which
consists of one layer of aluminum sandwiched between two layers of
stainless steel. The top layer is usually 18/10 stainless steel which is not
magnetic, and the bottom layer is usually a layer of magnetic stainless
steel (also called “ferrous” or 18/0 stainless steel). This type of pot
will work on induction. However, if your pot is all 18/10 stainless steel
and does not have a sandwich bottom, it will not have the magnetic
properties needed to make it induction compatible.
Solution: If you are unsure whether your cooking or chafi ng vessel is induction
compatible, check with a magnet fi rst. If the magnet doesn’t stick,
you will not be able to use that particular vessel on an induction
cooktop.
DIBW Manual Rev'n.indd 13DIBW Manual Rev'n.indd 13 1/25/10 8:20 PM1/25/10 8:20 PM
Page 16
14
ENGLISH
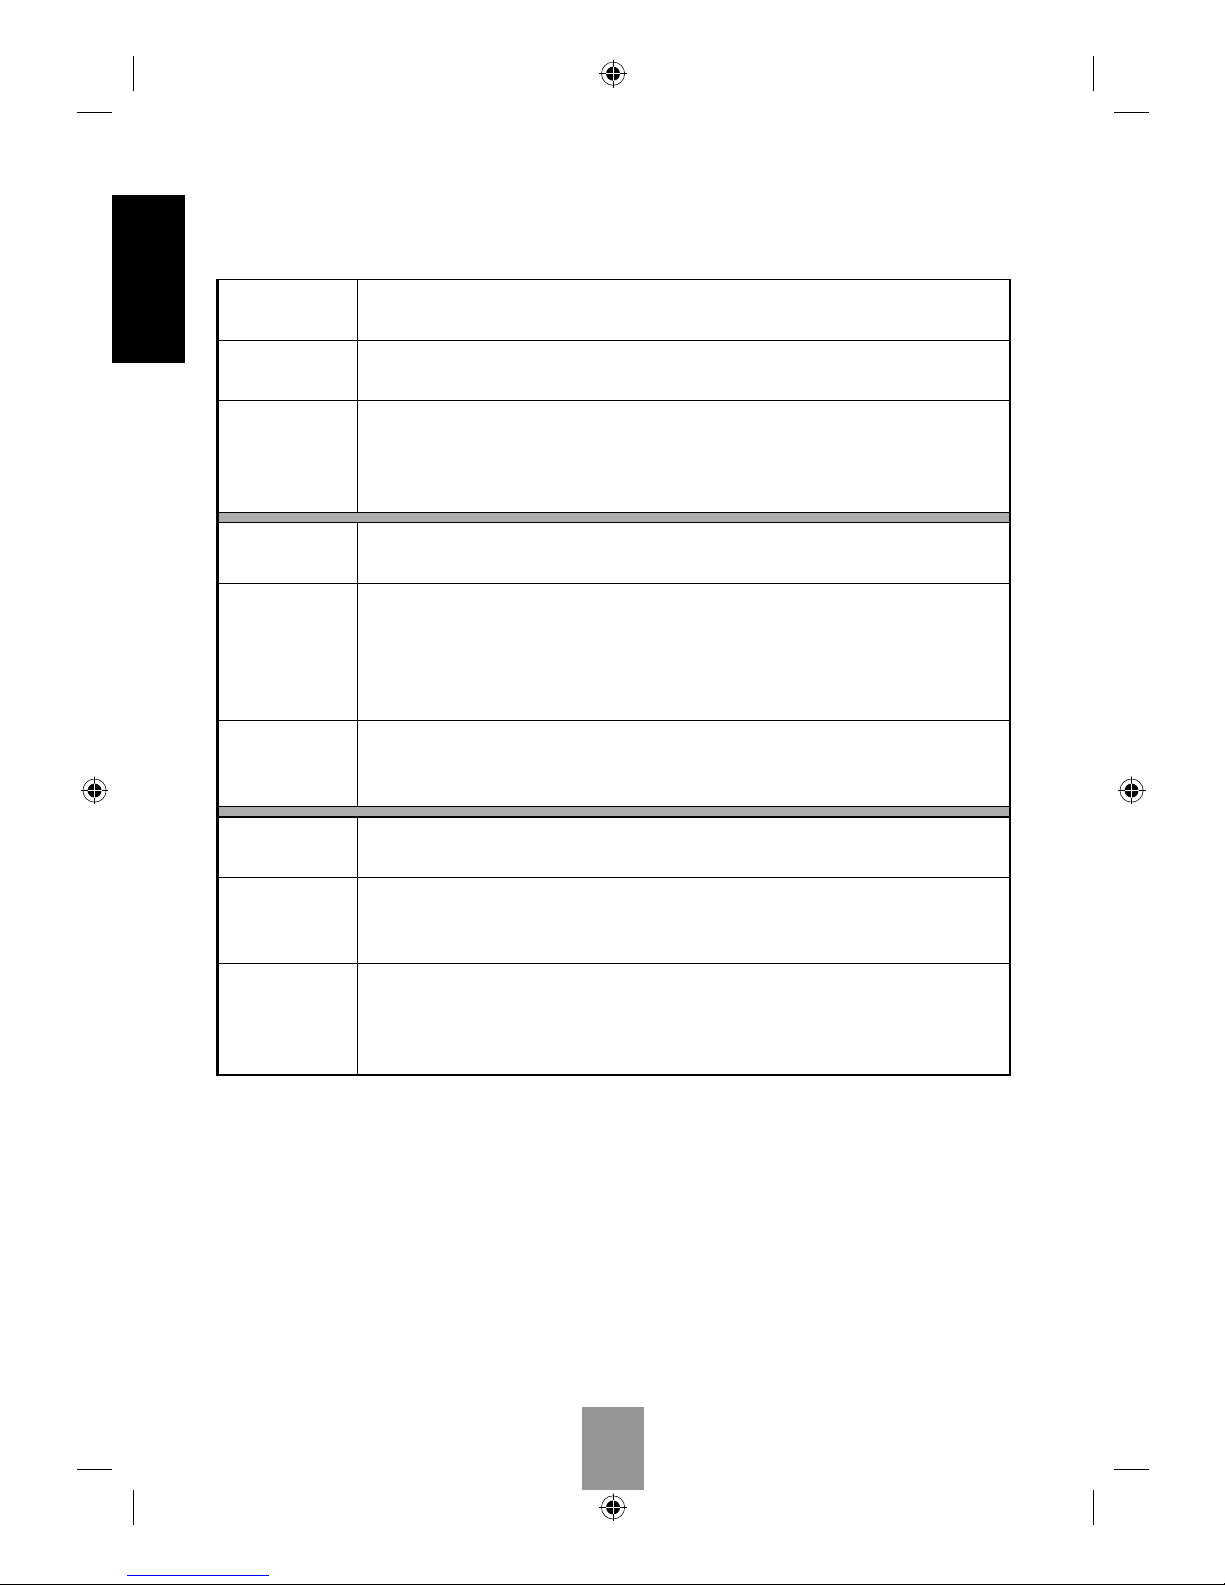
Problem: Touch controls don’t react at all when you tap the buttons, or don’t
react to every touch.
Reason: The cooktop might not be plugged in, or the child safety lock may
be activated.
Solution: Make sure the unit has been plugged in to a properly installed outlet
with the correct voltage. Make sure the light above the word “lock” is
not on. If it is on, refer to the “Using the Child Safety Lock” section in
this manual for instructions to turn it off.
Problem: The cooktop emits a buzzing noise when I place cookware on the
surface and start cooking.
Reason: A low buzzing noise is normal when operating an induction cooktop.
The buzzing sound indicates that the magnetic fi eld is being generated
and the cookware is heating up. If you are cooking on power levels
1 or 2, the buzzing will be intermittent. On all other levels it will be
constant.
Solution: This is normal operation. As a general rule, the higher-quality
cookware you use (the thicker the bottom), the lower the buzzing
noise will be.
Problem: I have turned the cooktop off after cooking, but I can still hear the
fan working.
Reason: Even after the cooktop has been turned off, the internal fan will keep
working for a few seconds or minutes to fi nish cooling down the
unit’s interior operating mechanisms.
Solution: This is normal operation. The fan will turn off by itself after the cooling
down process is complete. Do not unplug the unit before the fan is
off. If you must unplug the unit, make sure you let the unit cool down
completely before storing it.
DIBW Manual Rev'n.indd 14DIBW Manual Rev'n.indd 14 1/25/10 8:20 PM1/25/10 8:20 PM
Page 17
15
ENGLISH
If the cooktop detects an internal / external error or a wrong connection, it will display
the error message with a code number on the display panel and the cooktop will stop
functioning. These code numbers will allow you identify the cause of the error and
help you fi nd the solution to the problem. If the problem has been solved the error
message will disappear and you will be able to continue using your cooktop. If the
error persists, please call Fagor’s customer service for assistance. You can reach us
at 1-800-207-0806
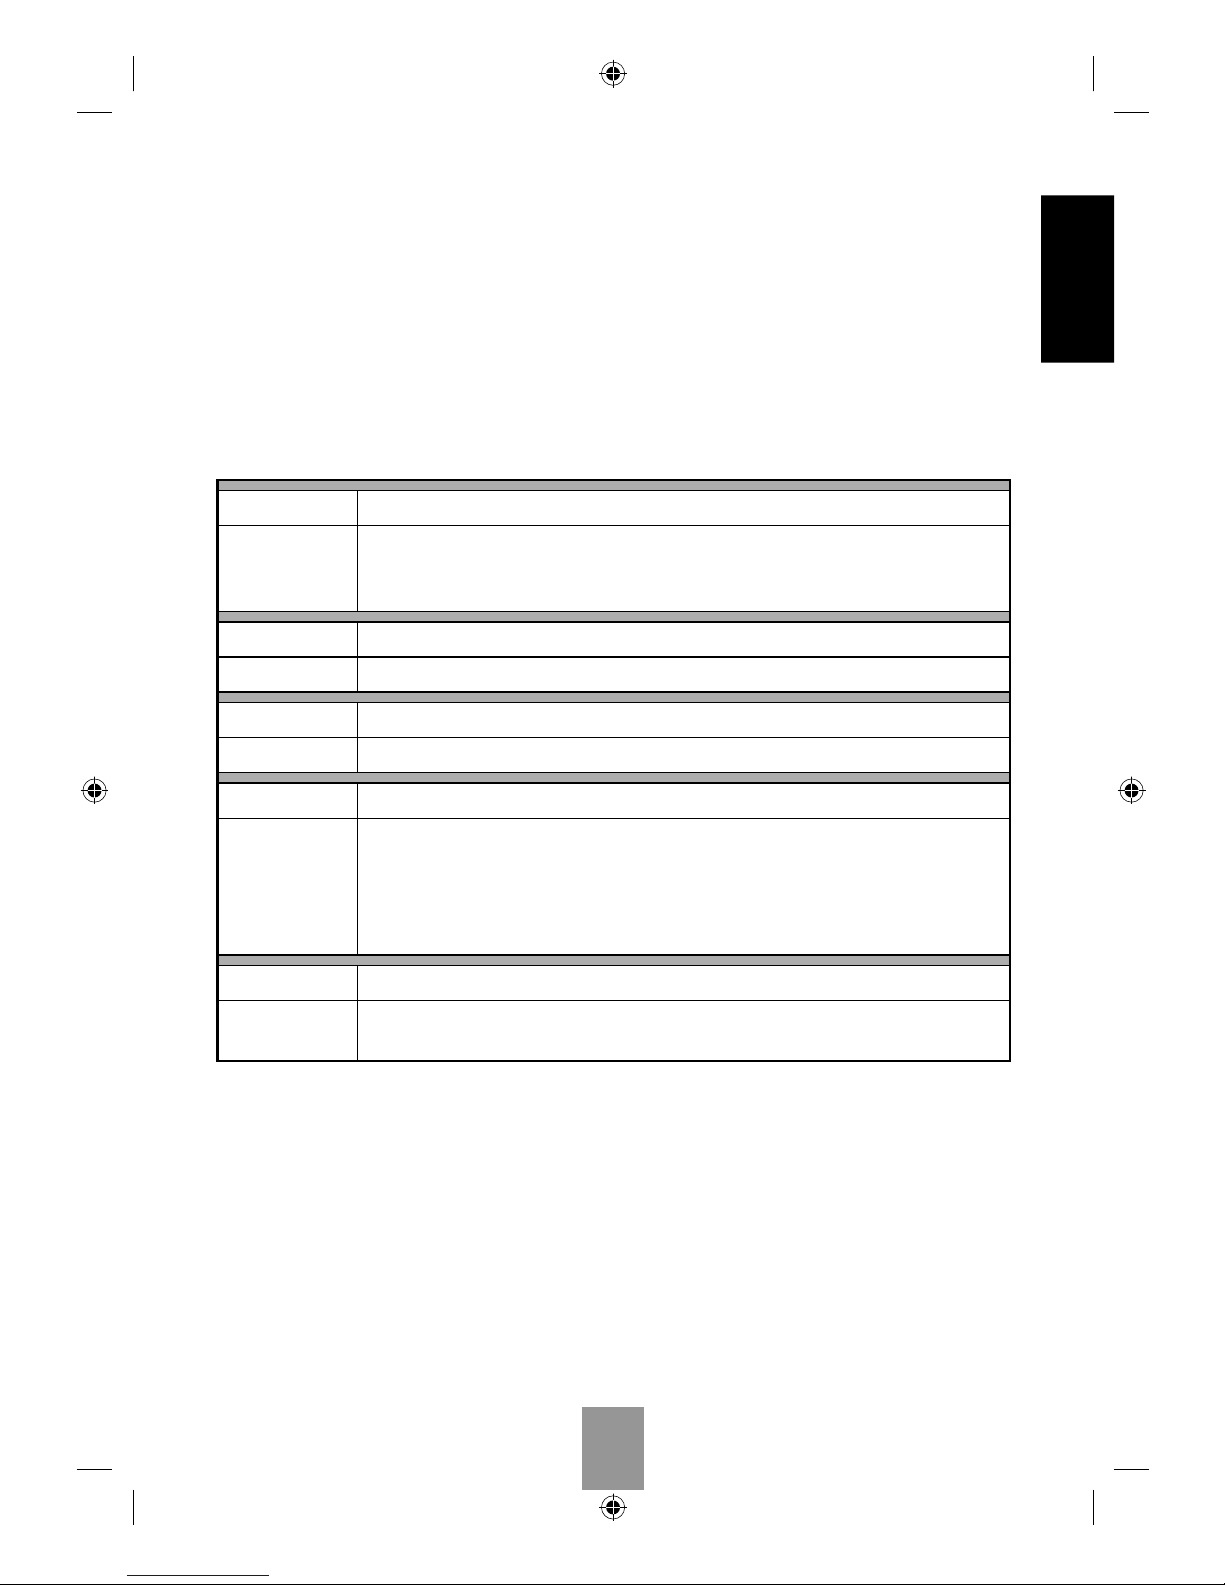
E3, E5, E9: Failure of an internal component or electric connection.
Solution: Do not attempt to repair the cooktop yourself. Please call our
customer service for instruction on how to send the unit back for
repair.
E1: Electronic control of low voltage.
Solution: Make sure the cooktop is connected to the correct voltage.
E2: Electronic control of high voltage.
Solution: Make sure the cooktop is connected to the correct voltage.
E7: Overheating protection.
Solution: Make sure there is a minimum distance of 5 inches between the
ventilation slot (found at the back of the cooktop) and any obstruction
such as a wall or other appliances. Unplug and let the unit cool down.
Plug back in and press the ON/OFF button followed by the START
button.
EE: Timer error.
Solution: This indicates an error with the programmable timer. Turn the unit off
and on again and try programming the timer again.
DIBW Manual Rev'n.indd 15DIBW Manual Rev'n.indd 15 1/25/10 8:20 PM1/25/10 8:20 PM
Page 18

DIBW Manual Rev'n.indd 16DIBW Manual Rev'n.indd 16 1/25/10 8:20 PM1/25/10 8:20 PM
Page 19

17
ESPAÑOL
Índice
Introducción a la inducción ............................................................................... 18
¿Cómo funciona la inducción? ................................................................... 18
¿Cuáles son los benefi cios de cocinar con Inducción? ............................ 18
¿Qué tipo de ollas puedo usar en una Inducción? .................................... 19
Normas generales de seguridad ....................................................................... 20
Instalación .......................................................................................................... 22
Funcionamiento del Calentador de Buffet ........................................................ 23
Limpieza y mantenimiento ................................................................................. 27
Problemas y soluciones ..................................................................................... 28
Garantía Limitada .............................................................................................. 32
DIBW Manual Rev'n.indd 17DIBW Manual Rev'n.indd 17 1/25/10 8:20 PM1/25/10 8:20 PM
Page 20
18
ESPAÑOL
Introducción a la inducción
¿Cómo funciona la inducción?
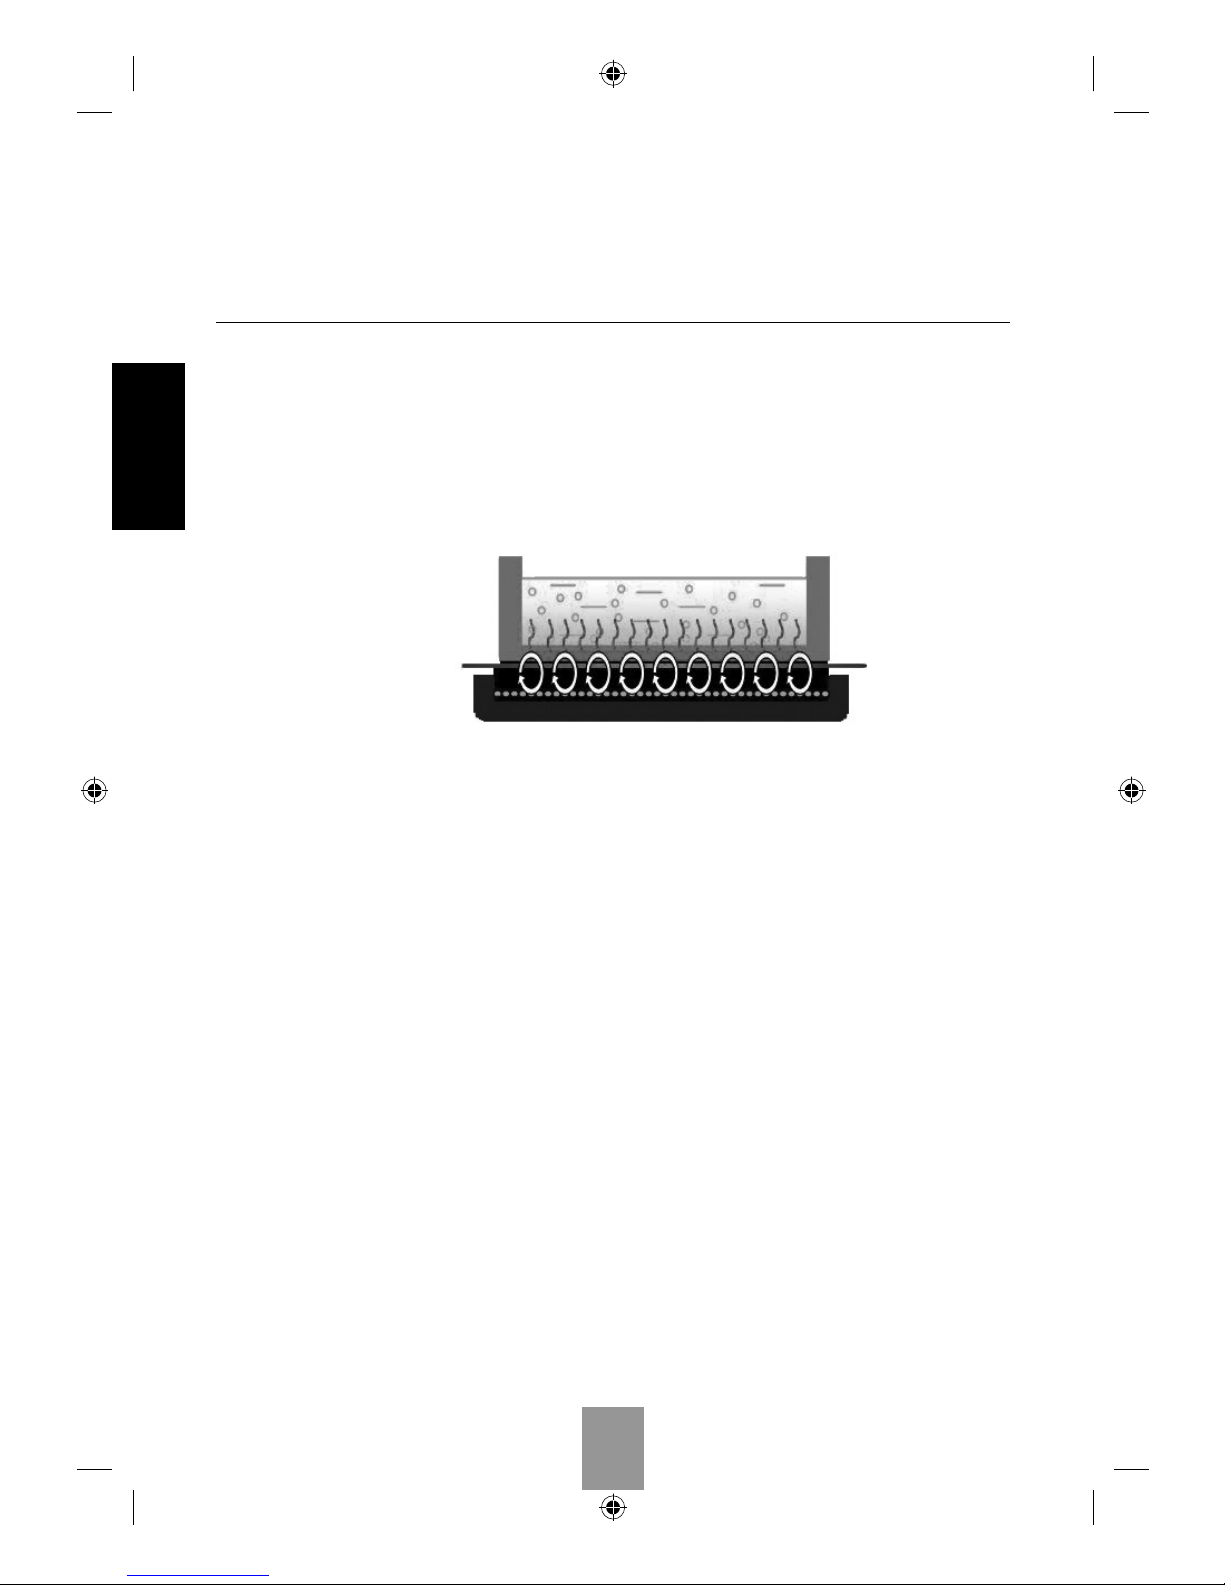
Una placa de inducción contiene unos quemadores llamados bobinas de inducción
(basados en principios magnéticos). Estas bobinas generan campos magnéticos que
inducen una reacción de calor en sartenes y cacerolas de base ferro-magnética. De
esta manera, es la olla la que calienta la comida, no la superfi cie de cristal de la
placa.
¿Cuáles son los benefi cios de cocinar con una placa de inducción?
EFICIENTE: la cocina de inducción es la forma más efi ciente y ecológica de cocinar.
La inducción utiliza el 90% de la energía producida, que es mucho más efi ciente que
la cocina a gas o eléctrica. Se desperdicia muy poca energía porque la inducción
reconoce la base de la olla y sólo calienta ese diámetro. Además, al no haber llamas
abiertas no se disipa calor a la cocina.
SEGURA: no hay llamas abiertas y la superfi cie de cristal no quema al tacto.
DISTRIBUCIÓN UNIFORME DEL CALOR: los puntos calientes y anillos se eliminan
dado que la base de sus cazuelas se calienta uniformemente.
FÁCIL DE LIMPIAR: la superfi cie es plana y lisa; la comida y líquidos derramados no
se pegan a la placa, de modo que pueden limpiarse fácilmente.
sartén
placa
bobinas de inducción
DIBW Manual Rev'n.indd 18DIBW Manual Rev'n.indd 18 1/25/10 8:20 PM1/25/10 8:20 PM
Page 21

19
ESPAÑOL
¿Qué tipo de ollas puedo usar en una Inducción?
Dado que la inducción está basada en principios magnéticos, las ollas y sartenes
que use en ella deben tener una base ferrítica (que contenga hierro). Algunos tipos de
ollas y sartenes están hechos de metales magnéticos por naturaleza (como el hierro
puro), mientras que otros se magnetizan añadiendo una fi na lámina de metal ferrítico
a la base de la olla. Esta lámina en la base es la que se verá afectada por el campo
magnético de la placa de inducción y distribuirá el calor. Generalmente, las sartenes y
ollas de tri-ply, hierro forjado o acero inoxidable de alta calidad funcionarán en la placa
de inducción. Ollas de cobre, cristal o aluminio no funcionarán a menos que tengan
una base laminada magnética.
La manera más sencilla de comprobar si sus ollas son compatibles con una placa de
inducción es coger un imán e intentar pegarlo a la base. Si se pega, su olla funcionará
en la inducción. Puede utilizar incluso un imán decorativo del frigorífi co para hacer
este test. Tenga en cuenta que el imán se tiene que pegar sólo a la base de la olla o
sartén, no necesariamente a los lados. Si los lados no son magnéticos pero la base sí,
su olla funcionará perfectamente en inducción.
Ollas y sartenes compatibles con la inducción*
• Acero Inoxidable y Tri-Ply (atención: no todos los tipos de acero inoxidable tienen
propiedades magnéticas. Compruébelo antes con un imán.)
• Ollas de acero o de hierro esmaltado
• Hierro forjado
• Todas las ollas a presión y menaje de FAGOR
Ollas y sartenes no compatibles con la inducción
• Cobre
• Cristal
• Aluminio
• Fuentes tipo cerámico
*Compruebe siempre sus sartenes y ollas con un imán antes de intentar usarlas en una inducción.
ADVERTENCIA:
Las ollas y sartenes que use en su Calentador de Buffet de Inducción Doble
tienen que tener una base plana con un diámetro de 6 pulgadas, como mínimo.
DIBW Manual Rev'n.indd 19DIBW Manual Rev'n.indd 19 1/25/10 8:20 PM1/25/10 8:20 PM
Page 22

20
ESPAÑOL
Normas Generales de Seguridad
El producto que ha comprado es un Calentador de Buffet de Inducción Doble con
tecnología punta. Cumple todos los estándares tecnológicos y de seguridad. Sin
embargo, como con cualquier aparato eléctrico, existen algunos riesgos potenciales.
Empléelo siguiendo estrictamente las instrucciones de este manual y sólo en ámbito
doméstico.
ATENCIÓN:
Para prevenir posibles heridas o descargas eléctricas, tenga en cuenta por favor las
siguientes medidas de seguridad:
• Nunca toque el calentador de buffet ni el enchufe con las manos húmedas.
• Asegúrese de colocar la unidad sobre una superfi cie plana, nivelada y estable.
• No conecte la unidad al mismo enchufe que otros electrodomésticos como
microondas, etc. ya que podría sobrecargar el enchufe y provocar un cortocircuito.
• Si va a emplear un cable de extensión para conectarlo, por favor tenga en cuenta
que un cable de extensión dañado puede ocasionar un fallo en el aparato.
Asegúrese de que el cable de extensión está en buen estado y soporta el voltaje
requerido. No coloque el cable por donde transita la gente para evitar tropiezos y
accidentes. No intente nunca desenchufar el aparato tirando del cable de corriente.
• No mueva el Calentador de Buffet mientras esté cocinando o con cazuelas calientes
encima. No coloque ninguna cazuela vacía sobre el Calentador de Buffet mientras
esté en funcionamiento. Una cazuela vacía puede calentarse muy rápidamente y
causar daños materiales y personales. No coloque ningún objeto de metal sobre
el Calentador de Buffet (aparte de las cazuelas con las que usted tenga intención
de cocinar o calentar).
• Compruebe el cable de corriente para posibles daños de vez en cuando. Nunca
use el Calentador de Buffet en el caso de que el cable esté dañado. Si el cable de
corriente muestra algún desperfecto, deje que un electricista cualifi cado lo repare.
• No caliente ninguna lata de comida no abierta en el Calentador de Buffet. Una lata
calentada podría explotar. Sólo cocine o caliente comida en cacerolas compatibles
con la inducción.
• Aunque la superfi cie de cristal no se calienta durante la cocción porque el calor
es transferido directamente a la olla, por favor tenga en cuenta que después de
un tiempo cocinando o calentando el calor residual de la olla acabará calentando
el cristal, especialmente el área que está justo debajo de la olla. Tenga cuidado al
manejar el Calentador de Buffet después de cocinar, y deje que se enfríe antes de
guardarlo.
• Las personas con marcapasos o aparatos médicos similares, deben tener
precaución mientras la unidad esté en funcionamiento, ya que el campo
electromagnético puede afectar al funcionamiento del marcapasos o aparatos
médicos similares. Le recomendamos que consulte con su médico o con el
fabricante del marcapasos o aparato médico similar acerca de su situación
particular.
DIBW Manual Rev'n.indd 20DIBW Manual Rev'n.indd 20 1/25/10 8:20 PM1/25/10 8:20 PM
Page 23
21
ESPAÑOL
• No ponga ningún objeto magnetizado (por ejemplo tarjetas de crédito, cintas de
casette, etc.) sobre el Calentador de Buffet mientras esté en funcionamiento. Las
propiedades magnéticas de la inducción podrían afectar estos objetos.
• Para evitar el sobrecalentamiento, no coloque ningún papel de aluminio o platos
metálicos sobre la superfi cie de cocina.
• No inserte ningún objeto como cables o instrumentos en la rejilla de ventilación.
Atención: esto puede causar una descarga eléctrica.
• Nunca use el Calentador de Buffet si no está funcionando correctamente, muestras
signos de daño o ha sufrido un golpe o caída.
• No deje el Calentador de Buffet sin vigilancia mientras esté funcionando. Mantenga
a los niños alejados. Los niños deben estar bajo supervisión continua mientras
estén en la cocina.
• Este electrodoméstico no está pensado para ser utilizado por niños ni personas
con capacidades físicas, sensoriales o mentales reducidas, personas que no estén
familiarizadas con las instrucciones de seguridad y uso que se explican en este
manual, o personas sin experiencia en la utilización de este electrodoméstico,
a menos que estén bajo una estricta supervisión y se les hayan proporcionado
instrucciones adecuadas.
• No sumerja el aparato en agua u otros líquidos y no la lave en el lavavajillas.
• No ponga a funcionar el Calentador de Buffet sobre una mesa o superfi cie metálica.
• Sólo expertos cualifi cados pueden llevar a cabo reparaciones y trabajo de
mantenimiento en el Calentador de Buffet usando repuestos y accesorios
auténticos FAGOR. Nunca lo intente desarmar y reparar Usted mismo!
• Este producto no está concebido para uso industrial ni en exteriores; es sólo y
exclusivamente para uso en el hogar.
• Este aparato tiene un enchufe polarizado (un lado es más ancho que el otro). Para
reducir el riesgo de descarga eléctrica, el enchufe sólo se podrá conectar a la
toma de corriente de una manera. Si ve que no puede conectarlo correctamente,
intente voltear el enchufe y conectarlo de nuevo. No intente modifi car el enchufe
de ninguna manera.
• No coloque ningún objeto, papel, servilletas, telas o metales entre la superfi cie
de cocción y la olla o cacerola en la que cocine. Esto puede provocar riesgo de
incendio.
Información Técnica:
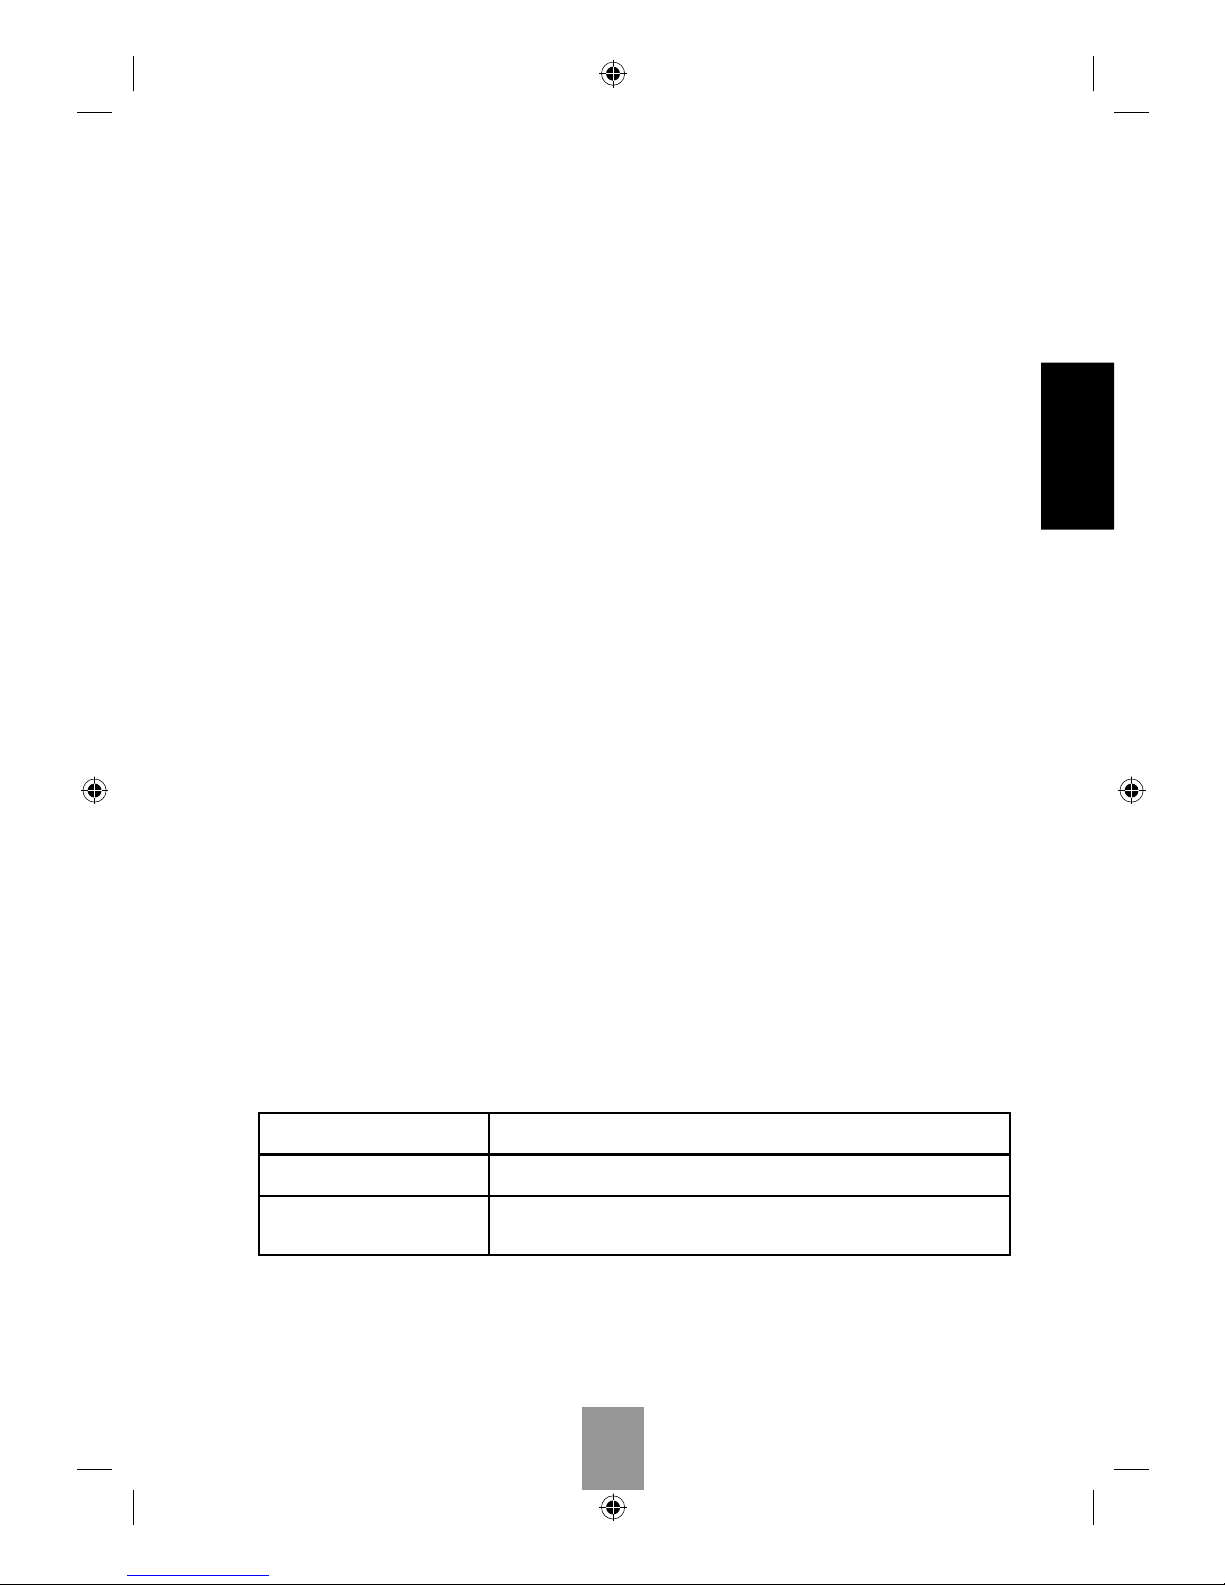
Rango de Voltaje: 120V, 60Hz 1800 Vatios / 16 Amperios
Rango de Potencia: 1-6. Ver sección de “Potencia Compartida” de este manual.
Rango de Temporizador:
De 5 a 150 minutos, presionando “+” el tiempo aumenta en 5
minutos, presionando “-“ disminuye un minuto.
DIBW Manual Rev'n.indd 21DIBW Manual Rev'n.indd 21 1/25/10 8:20 PM1/25/10 8:20 PM
Page 24

22
ESPAÑOL
Instalando la placa de Inducción
• Coloque la unidad sobre una superfi cie estable y nivelada.
• Nunca lo coloque la placa sobre una superfi cie infl amable (por ejemplo un mantel,
alfombra, etc.)
• No bloquee las rendijas de ventilación de la inducción. Esto puede sobrecalentar
el Calentador de Buffet. Mantenga una distancia mínima de 3-5 pulgadas desde
las paredes u otros objetos, electrodomésticos, etc.
• No coloque el Calentador de Buffet próximo a aparatos u objetos que reaccionen
sensiblemente a los campos magnéticos (por ejemplo radios, TVs, radio cassettes,
etc.).
• No coloque el Calentador de Buffet cerca de llamas, calentadores u otras fuentes
de calor.
• Asegúrese de no aplastar el cable de corriente debajo del aparato.
• Asegúrese de que el cable no entre en contacto con bordes afi lados ni superfi cies
calientes.
• Antes de conectar el Calentador de Buffet, compruebe si el voltaje indicado
en la pegatina en la base del Calentador de Buffet corresponde con el voltaje
instalado en su casa. Una conexión errónea puede dañar su Calentador de Buffet
y ocasionar accidentes y heridas.
• La superfi cie del Calentador de Buffet está hecha de cristal resistente a altas
temperaturas. En caso de que vea un daño en el cristal, aunque sólo sea una
pequeña grieta en la superfi cie, desconecte el aparato de la fuente de corriente
inmediatamente y contacte con nuestro departamento de atención al cliente
llamando al 1.800.207.0806.
DIBW Manual Rev'n.indd 22DIBW Manual Rev'n.indd 22 1/25/10 8:20 PM1/25/10 8:20 PM
Page 25
23
ESPAÑOL
Funcionamiento del Calentador de Buffet
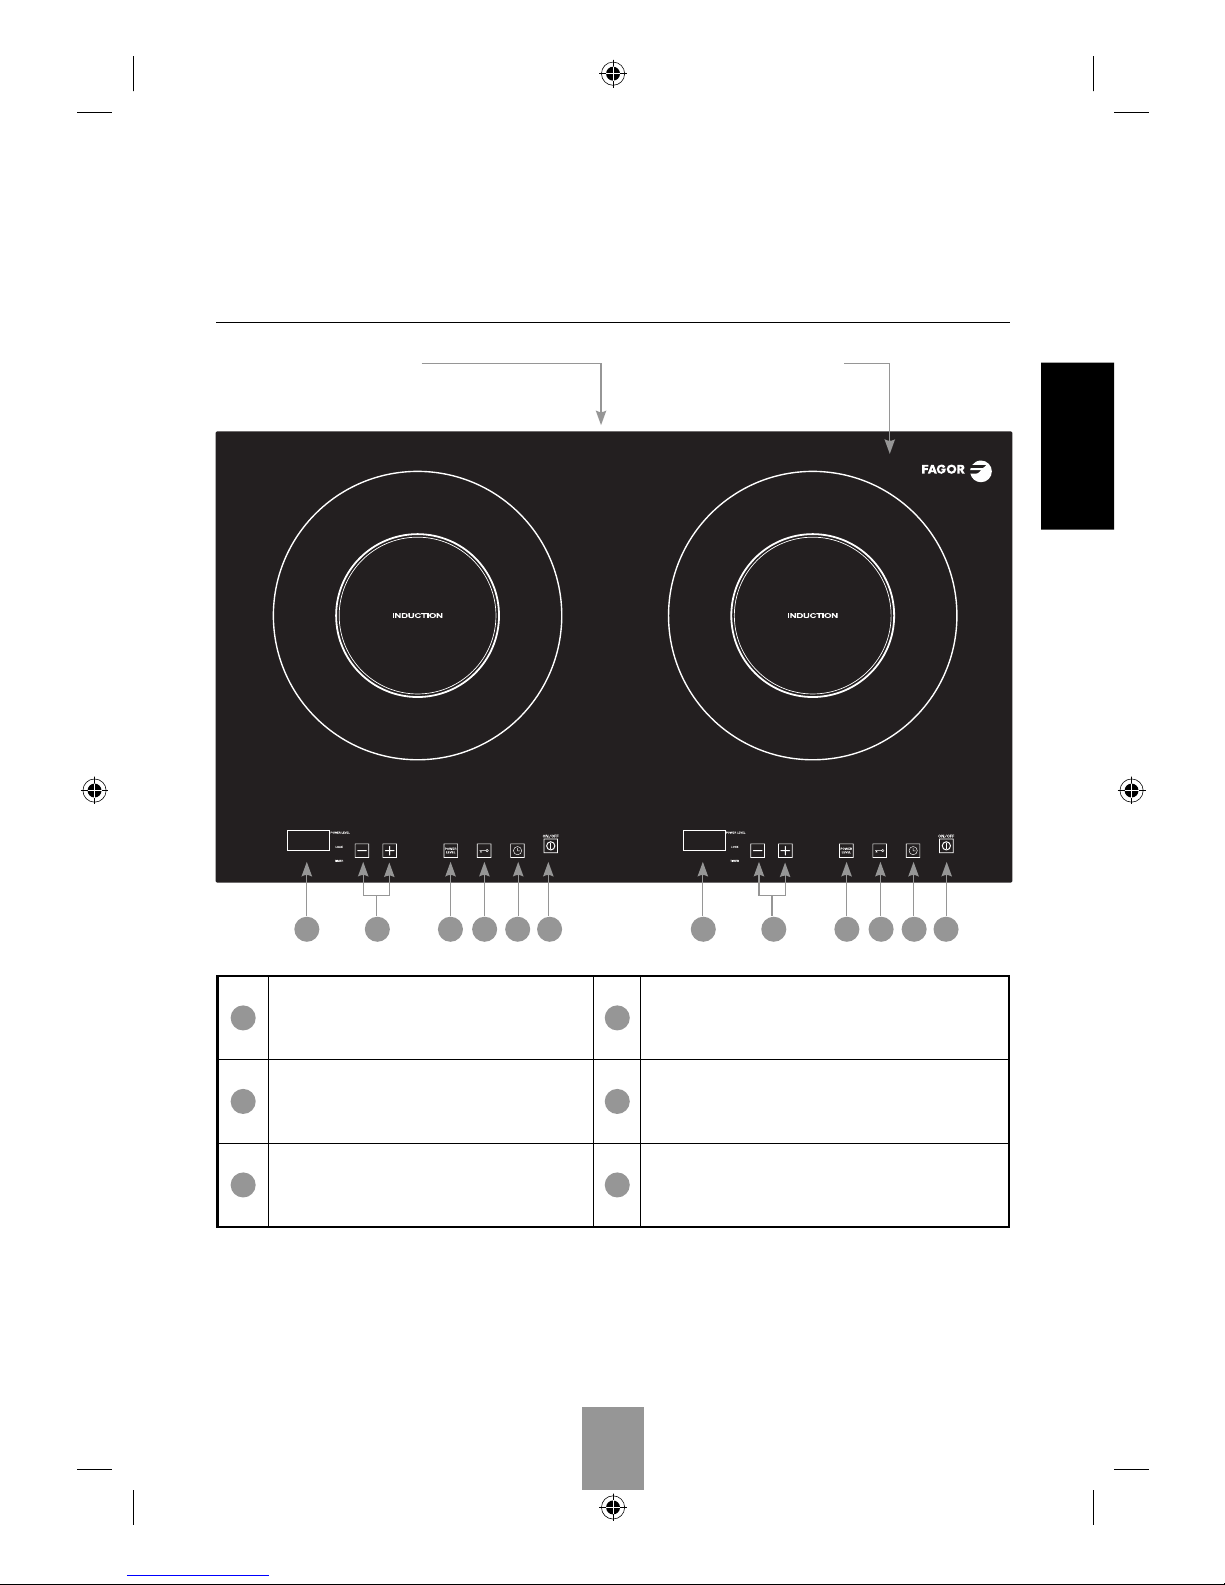
Superfi cie de
cristal resistente
al calor
VENTILACIÓN
A AB BC CD DE EF F
A
PANEL DE CONTROL
D
BLOQUEO DE SEGURIDAD PARA NIÑOS. Bloquea
los mandos de control. Manténgalo pulsado unos
segundos para activarlo.
B
MÁS/MENOS botones para aumentar o
disminuir la potencia o el temporizador.
E
TEMPORIZADOR
C
POTENCIA Presione este botón después de
presionar el botón de encendido para que
empiece a funcionar.
F
ENCENDIDO/APAGADO
DIBW Manual Rev'n.indd 23DIBW Manual Rev'n.indd 23 1/25/10 8:20 PM1/25/10 8:20 PM
Page 26
24
ESPAÑOL
Como utilizar su Calentador de Buffet de Inducción Doble de Fagor:
1. Siga con atención las instrucciones de instalación del Calentador de Buffet de
este manual. Conéctelo a un enchufe seguro y bien instalado. Oirá un pitido, la
lucecita roja encima de la palabra ON/OFF se encenderá, y el aparato entrará en
modo de espera.
2. Coloque la cacerola u olla en la que vaya a cocinar o calentar en el centro de una
de las dos zonas de cocción, y pulse en el botón de ENCENDIDO/APAGADO una
vez.
La luz roja encima de las palabras “POWER LEVEL” parpadeará y oirá otro pitido.
Si no presiona ningún otro botón en los próximos 30 segundos, el Calentador de
Buffet dará otro pitido y volverá a modo de en espera.
3. Presione el botón POTENCIA una vez. El Calentador de Buffet se enciende con
el nivel de potencia predeterminado 3 y la luz al lado del botón POTENCIA dejará
de parpadear y permanecerá encendido. El panel de control mostrará un “3”
para indicar que está cocinando en el nivel 3. Oirá como el ventilador empieza a
funcionar.
Si presiona el botón POTENCIA antes de colocar una cazuela compatible
con inducción en la superfi cie de cocción, empezará a emitir breves pitidos
intermitentes y en el panel de control aparecerá el símbolo “- - -” para indicar
que no detecta ninguna cazuela y que no puede general calor. Después de 10
segundos el Calentador de Buffet volverá a modo de en espera automáticamente.
4. Una vez haya pulsado el botón POTENCIA y haya empezado a cocinar en el
nivel predeterminado “3”, puede incrementar o disminuir la potencia pulsando los
botones MÁS / MENOS. Los niveles de potencia tienen un rango de 1 a 6:
Niveles de potencia y sugerencias de uso:
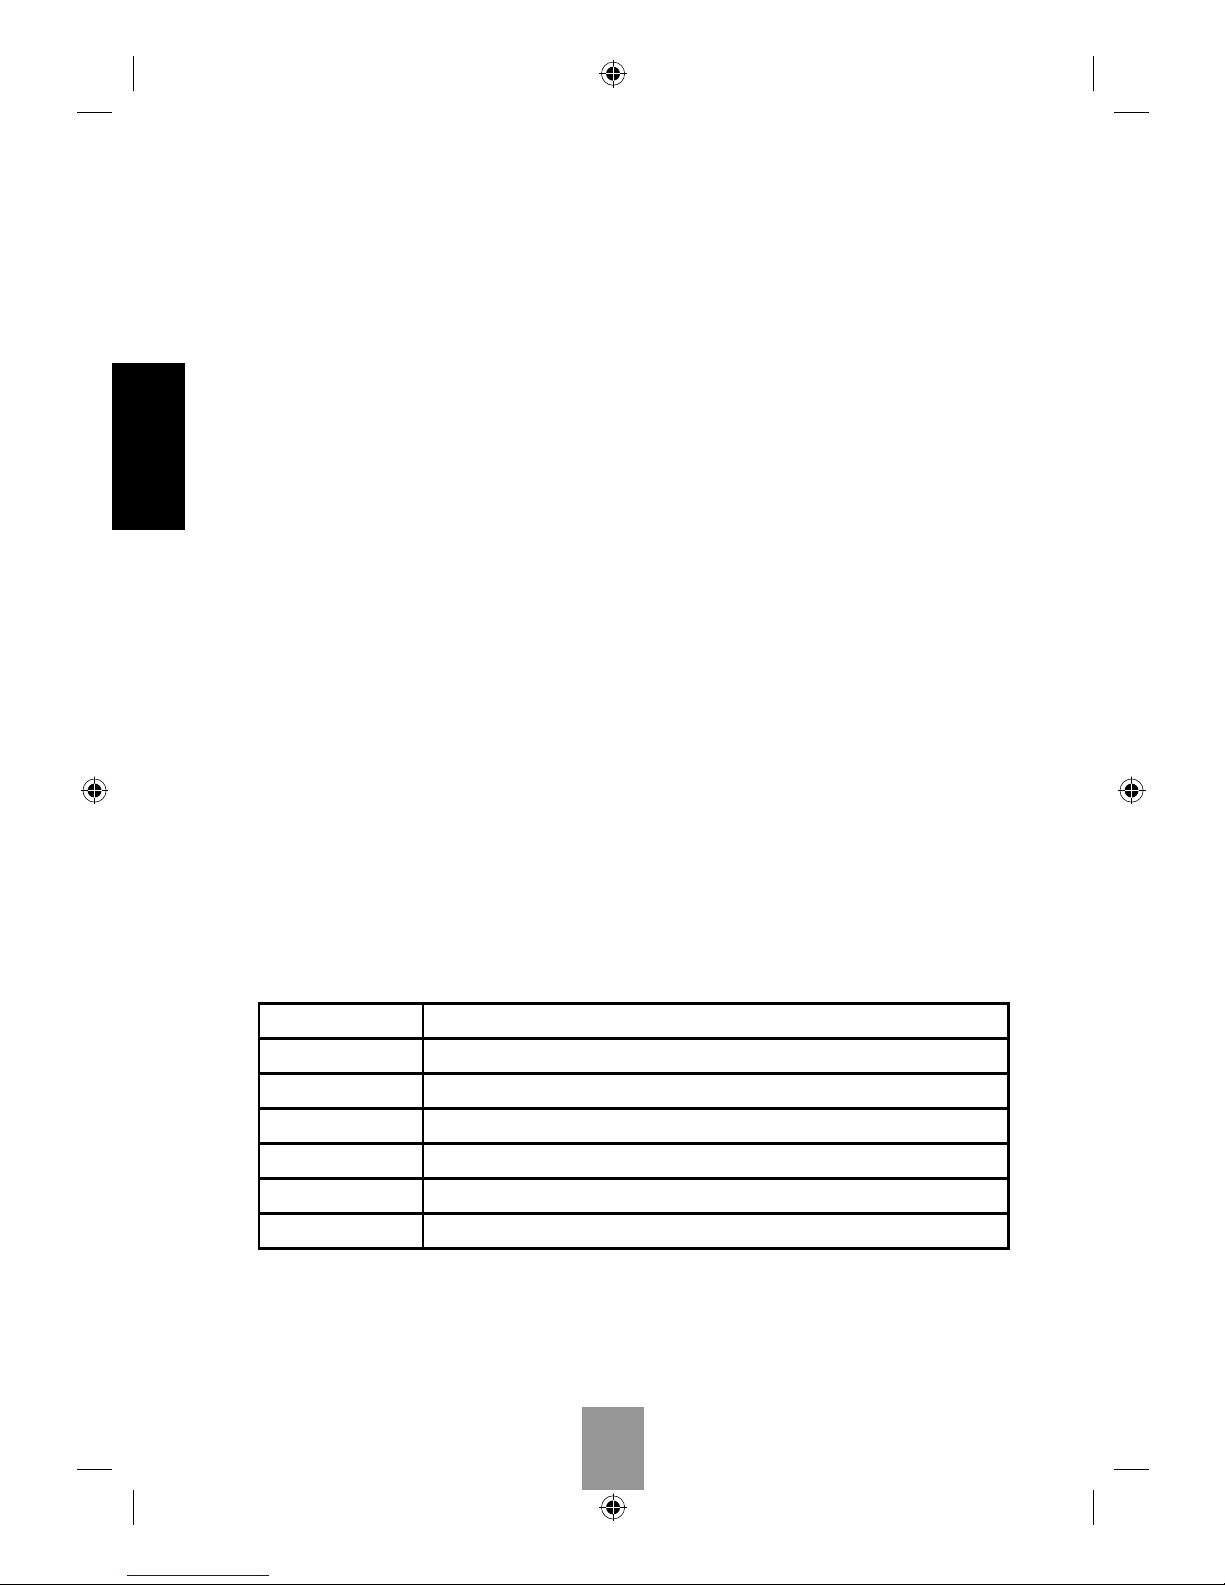
Niveles Potencia Sugerencia Uso
1-El nivel más bajo Adecuado para fundir chocolate o mantener la comida caliente.
2-Bajo Para cocinar a fuego lento o recaletnar.
3-Medio/Bajo Lleva el agua a un punto cercano a la ebullición.
4-Medio Use este nivel para hervir o cocinar.
5-Medio/Alto Para hervir o cocinar a fuego medio-fuerte.
6-Alto Para hervir rápidamente agua o saltear.
5. Una vez haya acabado de cocinar, pulse el botón ENCENDIDO/APAGADO una vez
para apagar el Calentador de Buffet. El ventilador puede continuar funcionando
para enfriar la unidad. Una vez que el ventilador pare, desenchufe la unidad.
Asegúrese de que espera hasta que la unidad se ha enfriado completamente
antes de guardarla.
DIBW Manual Rev'n.indd 24DIBW Manual Rev'n.indd 24 1/25/10 8:20 PM1/25/10 8:20 PM
Page 27
25
ESPAÑOL
Distribución de energía:
Este calentador de buffet de inducción doble, está diseñado para calentar tanto en
una zona como en las dos al mismo tiempo o como una placa individual auxiliar de
cocina.
No está diseñado para cocinar a altas temperaturas en las dos zonas de cocinado
a la vez. Para clarifi car cualquier error de concepción referente al funcionamiento
del producto, describiremos a continuación como opera el producto en cuanto a
la distribución de energía: esta unidad cuenta con un sistema de Distribución de
Energía. Esto signifi ca que dos zonas de cocinado comparten el máximo de 1800 W
disponibles para ellos. La consecuencia práctica de este sistema es que los niveles
de potencia en ambos lados no pueden superar el nivel 6 cuando sean utilizados
simultáneamente.
Si usted está cocinando, por ejemplo, al nivel 3 de potencia en el lado izquierdo sólo
podrá usar los niveles 1, 2 ó 3 en el lado derecho. Si incrementa la potencia sobre
el nivel 3 en el lado derecho, se reducirá automáticamente la potencia en el lado
izquierdo y viceversa.
En todo momento, la suma de los números indicadores del nivel de potencia en los
lados izquierdo y derecho no debe superar al nivel 6.
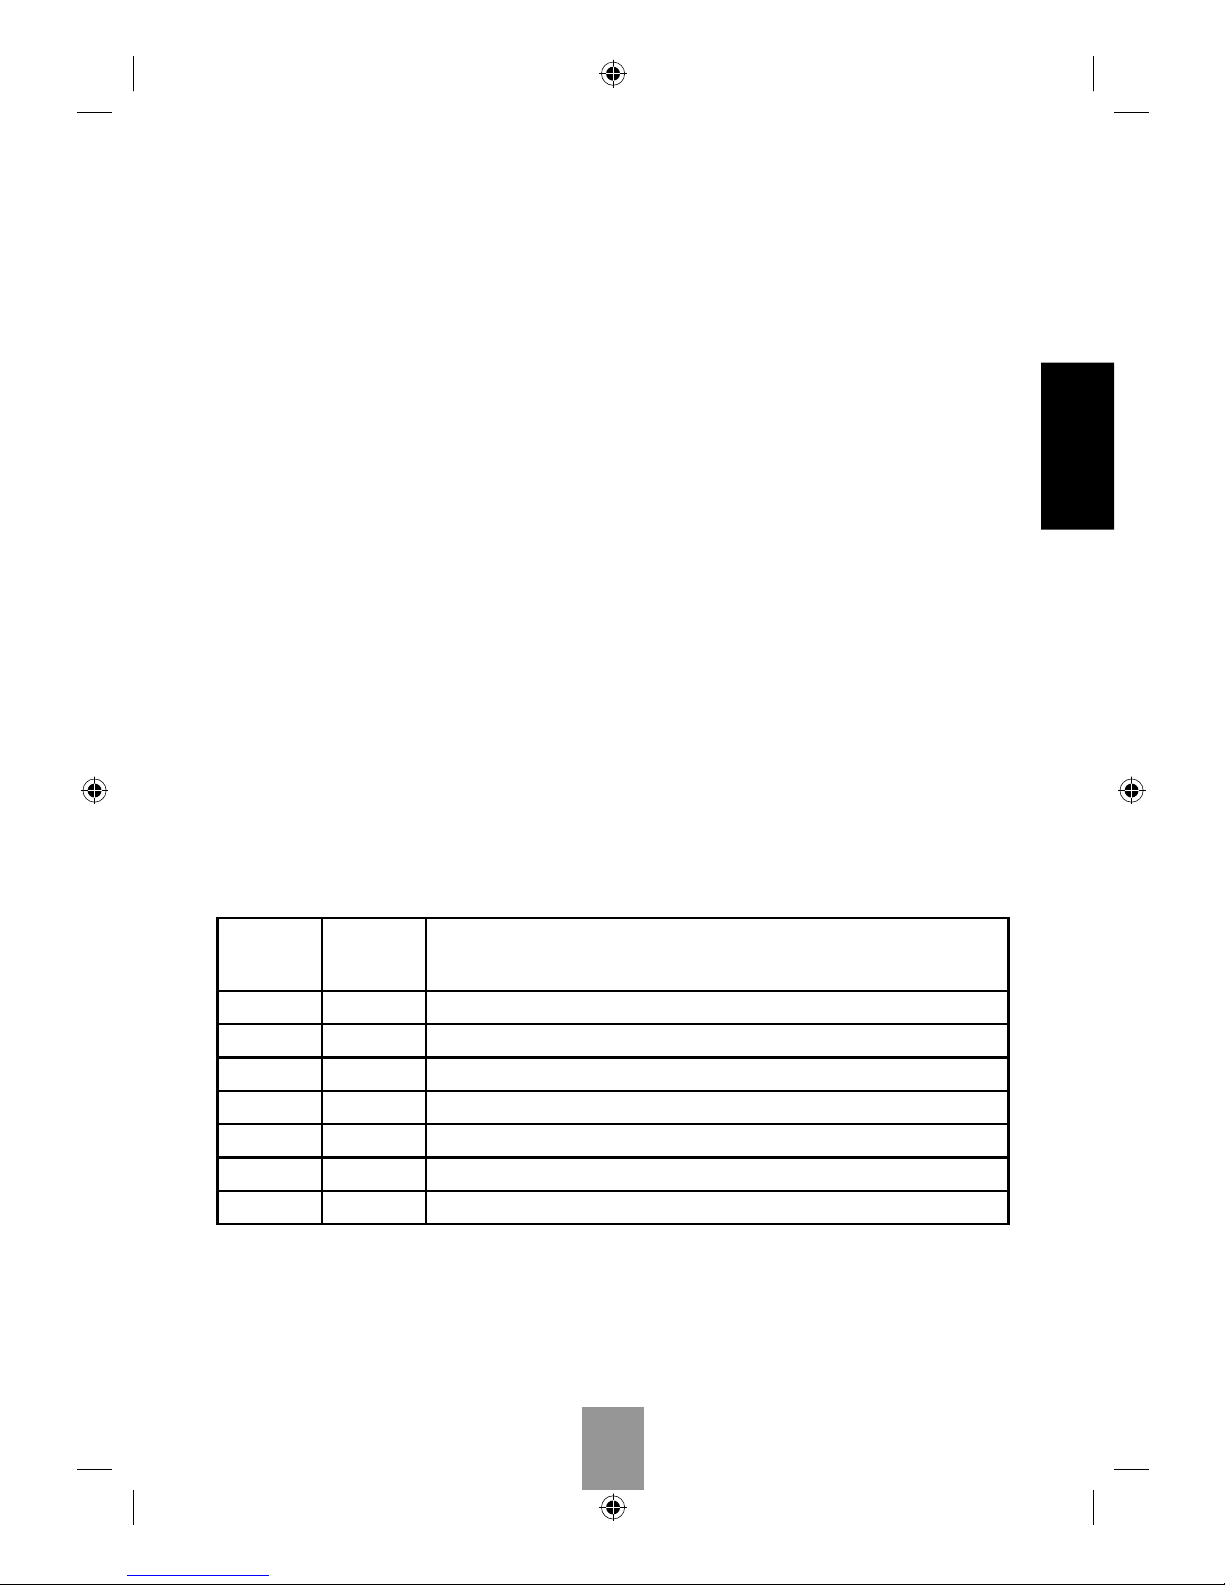
La posibles combinaciones de MÁXIMO nivel de potencia de cocinado son las
siguientes:
ZONA
IZQUIERDA
ZONA
DERECHA
USO SUGERIDO
6 0 (apagado) Usted está sofriendo o cocinando en “alto” a la izquierda; el lado derecho está apagado.
5 1 Está cocinando en “medio/alto” a la izquierda y manteniendo caliente a la derecha.
4 2 Está hirviendo agua o cocinando a “medio” a la izquierda y recalentando a la derecha.
3 3 Está hirviendo a fuego lento en ambos lados.
2 4 Está recalentando a la izquierda y cocinando a “medio” a la derecha.
1 5 Está manteniendo caliente a la izquierda y cocinando a “medio alto” a la derecha.
0 (apagado) 6 No está usando el lado izquierdo y está cocinando en “alto” a la derecha.
DIBW Manual Rev'n.indd 25DIBW Manual Rev'n.indd 25 1/25/10 8:20 PM1/25/10 8:20 PM
Page 28

26
ESPAÑOL
Tiempos de cocción predeterminados:
El Calentador de Buffet tiene una característica de apagado automático que apagará
la unidad automáticamente tras 150 minutos de cocción, como una medida de
seguridad en caso en que la unidad se deje encendida accidentalmente.
Si quiere seguir usando su Calentador de Buffet después del tiempo predeterminado,
lo puede hacer pulsando los botones ENCENDIDO/APAGADO y el botón POTENCIA
para encenderlo de nuevo; aunque le recomendamos que deje que la unidad se enfríe
antes de utilizarla de nuevo.
Funcionamiento del Temporizador:
El temporizador le permite programar un tiempo de cocción determinado, después del
cual su Calentador de Buffet se apagará solo.
1. Para utilizar el temporizador, siga los pasos del 1 a 4 de la sección “Cómo utilizar
su Calentador de Buffet de Inducción Fagor”. Una vez haya fi jado la potencia
de cocción deseada, presione el botón TEMPORIZADOR una vez. El panel del
temporizador mostrará “0” y la luz roja encima de la palabra TIMER se encenderá.
2. Presione el botón MÁS para incrementar el tiempo programado de 5 minutos en 5
minutos. Si presiona el botón MENOS, disminuirá el tiempo de minuto en minuto.
El tiempo máximo programable son 150 minutos.
Una vez haya seleccionado el tiempo de cocción deseado, el panel de control
mostrará el tiempo programado durante unos segundos, luego volverá a mostrar
el nivel de potencia (1 a 6) en el que está cocinando.
Sabrá que el temporizador está funcionando porque la luz roja encima de la
palabra TIMER seguirá encendida. Si desea ver el tiempo que queda, pulse el
botón TEMPORIZADOR una vez. El panel de control mostrará los minutos que
faltan durante unos segundos.
3. Para cambiar el tiempo programado mientras se está llevando a cabo la cuenta
atrás, pulse el botón TEMPORIZADOR una vez, y use los botones MÁS/MENOS
para cambiar el tiempo. Para cancelar el temporizador, pulse el botón de
ENCENDIDO/APAGADO dos veces, seguido del botón POTENCIA. Tendrá que
volver a seleccionar el nivel de potencia deseado.
4. Una vez se complete el tiempo programado, la placa emitirá un pitido y volverá
a modo de en espera. Si quiere seguir cocinando, vuelva a apretar el botón de
ENCENDIDO/APAGADO, seguido del de POTENCIA.
DIBW Manual Rev'n.indd 26DIBW Manual Rev'n.indd 26 1/25/10 8:20 PM1/25/10 8:20 PM
Page 29

27
ESPAÑOL
Cierre de Seguridad para Niños:
El BLOQUEO DE SEGURIDAD se puede usar para prevenir que los niños enciendan
accidentalmente la placa o que cambien los programas de cocinado. Puede usar esta
función tanto con la placa encendida, como con la placa apagada.
Para activar el bloqueo, pulse y mantenga pulsado el botón de BLOQUEO DE
SEGURIDAD. No basta con un solo toque: tiene que mantener el dedo sobre el botón
unos 3-4 segundos, hasta que oiga un pitido y la luz roja encima de la palabra “Lock”
se encienda.
Con el bloqueo activado, los controles no responderán a cambios de potencia ni
del temporizador. El único botón que seguirá funcionando es el de ENCENDIDO/
APAGADO, para permitirle apagar la placa en caso de emergencia.
Para besbloquear los controles, mantenga pulsado el botón de BLOQUEO DE
SEGURIDAD unos 3-4 segundos hasta que oiga otro pitido y se apague la luz roja
encima de la palabra “Lock”.
DIBW Manual Rev'n.indd 27DIBW Manual Rev'n.indd 27 1/25/10 8:20 PM1/25/10 8:20 PM
Page 30

28
ESPAÑOL
Limpieza y mantenimiento
• Desenchufe el cable de corriente antes de limpiar el Calentador de Buffet de
Inducción Doble. No use ningún agente limpiador abrasivo y asegúrese que no
penetra agua dentro de la unidad.
• Nunca sumerja el Calentador de Buffet, sus cables o el enchufe en agua u otros
líquidos.
• Limpie la superfi cie de cristal con un paño húmedo o use una solución jabonosa
no abrasiva.
• Limpie el cuerpo con un paño suave y húmedo o con un detergente suave.
• No utilice ningún producto de limpieza con base de aceite para no dañar las
partes de plástico o la superfi cie de cristal.
• No utilice ningún material o sustancia infl amable, ácida o alcalina cerca del
Calentador de Buffet, ya que esto podría reducir la vida de su Calentador de
Buffet y suponer un riesgo de incendio cuando esté encendida.
• Para mantener su Calentador de Buffet como nuevo, asegúrese que el fondo
de sus cacerolas no esté rayando la superfi cie de cristal, aunque una superfi cie
rayada no impide su uso.
• Asegúrese de limpiar adecuadamente la unidad antes de guardarla en un sitio
seco.
DIBW Manual Rev'n.indd 28DIBW Manual Rev'n.indd 28 1/25/10 8:20 PM1/25/10 8:20 PM
Page 31
29
ESPAÑOL
Problemas y Soluciones
Con el fi n de garantizar mejores resultados cuando utilice el Calentador de Buffet, lea
todas las instrucciones de funcionamiento y las normas de seguridad contenidas en
este manual. Los siguientes son consejos prácticos y soluciones a algunos problemas
comunes que usted puede experimentar al utilizar el Calentador de Buffet portátil de
Fagor. Si no puede determinar la causa del error y corregirlo, póngase en contacto con
nuestro departamento de atención al cliente llamando al 1.800.207.0806.
Problema: La unidad emite un pitido cada pocos segundos y no genera calor
después de haber colocado una olla sobre el cristal de la placa
y de haber presionado el botón ENCENDIDO seguido por el botón
POTENCIA.
Causa: La inducción no detecta la olla. Esto podría ocurrir por las siguientes
razones:
1. La parte inferior de la olla utilizada no es plana.
2. La olla no es compatible con la inducción.
Solución: 1. Todas las ollas, sartenes y cazuelas que se vayan a utilizar en una
placa de inducción deben tener un fondo completamente plano.
Si su olla no tiene un fondo completamente plano usted no será
capaz de utilizarla en una placa de inducción.
2. Compruebe si la olla que desea utilizar es compatible con la
inducción. Para ello trate de pegar un imán en su parte inferior (la
zona de contacto con la placa de inducción). Si el imán no se pega,
la olla no funcionará en una placa de inducción. Tendrá que utilizar
otro tipo de olla.
Problema: Tengo una olla de acero inoxidable que no funciona en mi placa de
inducción.
Causa: No todos los tipos de acero inoxidable son compatibles con la inducción,
ya que algunos no tienen propiedades magnéticas.
Por lo general, las ollas de acero inoxidable tienen un sándwich de aluminio
como fondo, que consta de una capa de aluminio insertada entre dos
capas de acero inoxidable. La capa superior es generalmente de acero
inoxidable 18/10, que no es magnético, y la capa inferior por lo general
es una capa de acero inoxidable magnético (también llamado acero
inoxidable “ferrítico” o “18/0”). Con este tipo de olla sí que funcionará la
inducción. Sin embargo, si la olla es entera de acero inoxidable 18/10 y no
tiene un fondo de tipo sándwich, no tendrá las propiedades magnéticas
necesarias para ser compatible con la inducción.
Solución: Si no está seguro de si su olla es compatible o no con la inducción,
acerque un imán al fondo (a la parte exterior, no interior) de la olla. Si
el imán no se pega, usted no será capaz de usar esa olla en una placa
de inducción.
DIBW Manual Rev'n.indd 29DIBW Manual Rev'n.indd 29 1/25/10 8:20 PM1/25/10 8:20 PM
Page 32
30
ESPAÑOL
Problema: Los botones no reaccionan al pulsarlos, o no reaccionan a cada
contacto.
Causa: Es poible que la placa no está conectada a la corriente, o que el
BLOQUEO DE SEGURIDAD esté activada.
Solución: Asegúrese de que la placa ha sido conectada a un enchufe seguro
y bien instalado de 110 ó 120V. Asegúrese de que la luz encima de
la palabra “Lock” no está encendida. Si está encendida, refi érase
a la sección “Cierre de Seguridad para Niños” en este manual para
desbloquearlo.
Problema: La placa funciona bien, pero emite un zumbido constante cuando
usted coloca la olla en la superfi cie y empieza a cocinar.
Causa: Un leve zumbido es normal durante el funcionamiento de una inducción.
El zumbido indica que el campo magnético se está generando y que la
olla se está calentando. Si cocina en los niveles de potencia 1 ó 2, el
zumbido será intermitente. En todos los demás niveles de potencia el
zumbido será constante.
Solución: Este es el funcionamiento normal de la placa. Por regla general, cuanta
mejor calidad tengan las ollas, sartenes o cazuelas que use y cuanto
más grueso sea el fondo, menos perceptible será el zumbido.
Problema: He apagado la placa después de cocinar, pero todavía puedo oír el
ventilador interno funcionando.
Causa: Incluso después de que la placa se haya apagado, el ventilador
interno debe seguir trabajando durante unos segundos o minutos para
terminar de enfriar los componentes internos de la placa.
Solución: Este es el funcionamiento normal. El ventilador se apagará por sí solo
después de que el proceso de enfriamiento se haya completado.
Trate de no desenchufar la unidad antes de que el ventilador se haya
apagado. Si tiene que desconectar la unidad, asegúrese de que deja
que la unidad se enfríe completamente antes de guardarla.
DIBW Manual Rev'n.indd 30DIBW Manual Rev'n.indd 30 1/25/10 8:20 PM1/25/10 8:20 PM
Page 33
31
ESPAÑOL
Si la placa detecta una conexión incorrecta o un error externo o interno, mostrará un
mensaje de error con un número de código en la pantalla y dejará de funcionar. El
número de código le permitirá a usted identifi car el origen del problema y encontrar
la solución. Cuando el problema se haya solucionado, la pantalla dejará de mostrar el
mensaje de error y la placa funcionará de nuevo. Si no consigue corregir el error o el
mensaje de error no desaparece, contacte con nuestro Centro de Atención al Cliente
en el número 1-800-207-0806.
E3, E5, E9: Fallo de un componente interno o una conexión eléctrica.
Solución: No intente reparar la placa usted mismo. Llame por favor a nuestro
servicio de atención al cliente para recibir instrucciones de cómo
enviar la unidad al centro de reparaciones.
E1: Aviso de voltaje demasiado bajo.
Solución: Asegúrese que el aparato está conectado al voltaje adecuado.
E2: Aviso de voltaje demasiado alto.
Solución: Asegúrese que el aparato está conectado al voltaje adecuado.
E7: Protección contra sobrecalentamiento.
Solución: Asegúrese de que no hay nada bloqueando la rejilla de ventilación
(en la parte de atrás de la placa) y que hay al menos 5 pulgadas
entre la rejilla y una pared u otra obstrucción cercana. Desenchufe
el aparato, espere a que se enfríe un poco, luego vuélvalo a
enchufar para poder seguir utilizando el aparato pulsando el botón
ENCENDIDO/APAGADO.
EE: Error de temporizador
Solución: Este código indica un error con el temporizador. Apague y vuelva
a encender la placa, y vuelva a intentar programar el temporizador.
DIBW Manual Rev'n.indd 31DIBW Manual Rev'n.indd 31 1/25/10 8:20 PM1/25/10 8:20 PM
Page 34

Limited Warranty
This manufacturer’s product warranty extends to the original consumer purchaser
of the product. Neither the retailer nor any other company involved in the sale or
promotion of this product is a co-warrantor of this manufacturer warranty.
WARRANTY DURATION: All materials and workmanship are warranted to the original
consumer purchaser for a period of TWO (2) YEARS from the original purchase date.
WARRANTY COVERAGE: This product is warranted against defective materials or
workmanship. This warranty is void if the product has been damaged by accident,
in shipment, unreasonable use, misuse, neglect, improper service, commercial
use, repairs by unauthorized personnel or other causes not arising out of defects in
materials or workmanship. This warranty is effective only if the product is purchased
and operated in the USA, and does not extend to any units which have been used in
violation of written instructions furnished by manufacturer or to units which have been
altered or modifi ed or to damage to products or parts thereof which have had the
serial number removed, altered, defaced or rendered illegible.
WARRANTY DISCLAIMERS: This warranty is in lieu of all warranties expressed or
implied and no representative or person is authorized to assume for manufacturer any
other liability in connection with the sale of our products. There shall be no claims for
defects or failure under any theory of tort, contractor commercial law including, but
not limited to, negligence, gross negligence, strict liability, breach of warranty and
breach of contract.
WARRANTY PERFORMANCE: During the above one-year warranty period, a product
with a defect will be either repaired or replaced with a reconditioned comparable model
(at manufacturer’s option). The repaired or replacement product will be in warranty for
the balance of the one year warranty period and an additional one-month period. No
charge will be made for such repair or replacement.
SERVICE AND REPAIR: If service is required for an appliance, you should fi rst call tollfree 1-800-207-0806 between the hours of 8:30 am and 5:30 pm Eastern Standard
Time and ask for CUSTOMER SERVICE. Please refer to “Fagor Double Induction
Buffet Warmer item # 670040350” when you call.
NOTE: Manufacturer cannot assume responsibility for loss or damage during incoming
shipment. For your protection, carefully package the product for shipment, and insure
it with the carrier. Be sure to enclose the following items with your appliance: your
full name, return address and daytime phone number; a note describing the problem
you experienced; a copy of your sales receipt or other proof of purchase to determine
warranty status. C.O.D. shipments cannot be accepted.
32
DIBW Manual Rev'n.indd 32DIBW Manual Rev'n.indd 32 1/25/10 8:20 PM1/25/10 8:20 PM
Page 35

FAGOR DOUBLE INDUCTION BUFFET WARMER
WARRANTY REGISTRATION CARD
MR./MRS./MS.: ________________________________________________________
TELEPHONE: __________________________________________________________
ADDRESS: ___________________________________________________________
DATE OF PURCHASE: ___________________________________________________
NAME OF STORE WHERE BOUGHT: __________________________________________
EMAIL: ______________________________________________________________
Please fill out and mail this warranty registration card to:
FAGOR WARRANTY REGISTRATION
PO BOX 94, LYNDHURST, NJ 07071
✃
DIBW Manual Rev'n.indd 33DIBW Manual Rev'n.indd 33 1/25/10 8:20 PM1/25/10 8:20 PM
Page 36
Toll Free: 1.800.207.0806
The manufacturer reserves the right to modify the
items described in this manual.
El fabricante se reserva el derecho de modifi car
los modelos descritos en el presente libro de
instrucciones
DIBW Manual Rev'n.indd 34DIBW Manual Rev'n.indd 34 1/25/10 8:20 PM1/25/10 8:20 PM
 Loading...