

Page 1

Acrylic Bathtub Installation Instructions
Safety Instructions
Always follow the safety precautions/warnings when using and installing the Acrylic Bathtub.
Failure to follow any of these Installation Instructions will void the warranty.
WARNING: Improper use or installation of this product may result in death or serious injury.
!
CAUTION: Improper use or installation of this product may result in injury or property damage.
!
This symbol indicates a prohibited use of the product.
This symbol is used to indicate a required step in the use of this product.
!
WARNING:
Please carry out the installation as described in
this manual. Improper installation could result in
!
damage, leaks, fire or electrical shocks.
Connect to a proper water source to avoid the
!
risk of skin irritation.
After opening, properly dispose of any unneeded
!
packaging materials. Box or plastic materials my
pose a suffocation hazard.
Be sure that any electrical installation is per-
formed by a licensed electrician in accordance
!
with all laws and regulations.
!
a ground fault circuit interrupter (GFCI). Such GFCI should be provided by the installer and should be tested on a
routine basis. To test the GFCI push the reset button. Power should be restored. If the GFCI fails to operate in
this manner, the GFCI is defective. If the GFCI interrupts power without the test button being pushed there is a
ground current flowing, indicating the possibility of electric shock. Do not use the AirBath. Disconnect the AirBath
and have the problem corrected by a qualified service representative before using.
CAUTION:
When transporting the bathtub, do not hold by
!
the air hose, pump, control box or other external
parts or bump them against hard objects. Leaks may
result.
Do not bump the bathtub against, drop or store
any rigid objects into the tub. The tub may be-
come cracked, damaged and/or leak.
0GU5034, V.01
When installing, leave a 1/8” (3 mm) gap be-
!
tween the tub and any rigid wall or tile. Also,
carefully caulk all the edges to prevent leaks or damage
from thermal expansion.
Avoid mortar, plaster, or other adhesives from
contact with the bathtub surface. Damage to the
bathtub surface may result.
!
The electrical circuit supplied for the AirBath must include a suitable ground fault circuit interrupter (GFCI)
as required by NEC article 680.70. The unit must be connected only to a supply circuit that is protected by
!
Do not climb into the bathtub to perform any tasks
other than intended use. Injury or bathtub dam-
age could result.
Do not install the hot and cold water lines in
!
backwards. Scalding could result.
Check local laws and codes for any specific in-
!
structions on installation and/or use not covered
in this manual.
Page 2
Notes
1. Ensure that the unit is the correct model and color and that expected parts are present.
2. Inspect for shipping damage. Any damage claims must be
made to the carrier immediately. Do not install the bathtub if
any finish damage is revealed.
3. For AirBaths make sure that all air hoses and electrical connections are properly connected.
4. Observe all installation procedures and local plumbing codes
and regulations.
5. Provide an appropriate, clean and level sub-floor.
ABA & ABY Installation
1
Prepare Location
• Remove old bathtub, if necessary.
• Prepare sub-floor and level, if necessary.
• Construct wooden frame.
• Use template to ensure correct framing.
• For AirBaths an access panel of at least 16” x 20” wide, or per
local code, must be installed at the blower end of the unit for
maintenance or servicing.
• Locate and install rough plumbing.
• All framing must be square and plumb.
• The bathtub cannot be hung by its lip. The bathtub weight
must be transferred solely through the feet.
6. Ensure adequate space for the bathtub and provide properly
dimensioned framing.
7. Do not remove protective plastic until necessary. Cover the
bathtub with cardboard for additional protection.
8. Do not place ladders, tripods, building material, waste or other
equipment in the bathtub.
9. See spec sheet for dimensional information.
10. Power Supply Specification (AirBath only):
60 Hz, 120 V, 1050 W
2
Install Drain (Sold Separately)
Install the drain according to the
manufacturer’s directions and local
codes. The template is designed for
bathtubs using Toto drains.
Note: Take care not to scrape or mar the bathtub while installing
the drain.
3
Test Fit
Test fit (dry fit) the bathtub in the frame to make sure the bathtub
will fit.
4
Seat the bathtub into the framing.
• Leave a 1/8” (3 mm) gap between the flange and the framing.
• Mortar should be used to secure and level the bathtub.
• Use two people to move the bathtub.
• Assure the bathtub is level in both directions for proper water
drainage.
• Any attached wood base should remain attached.
Page 3
ABA & ABY Installation (continued)
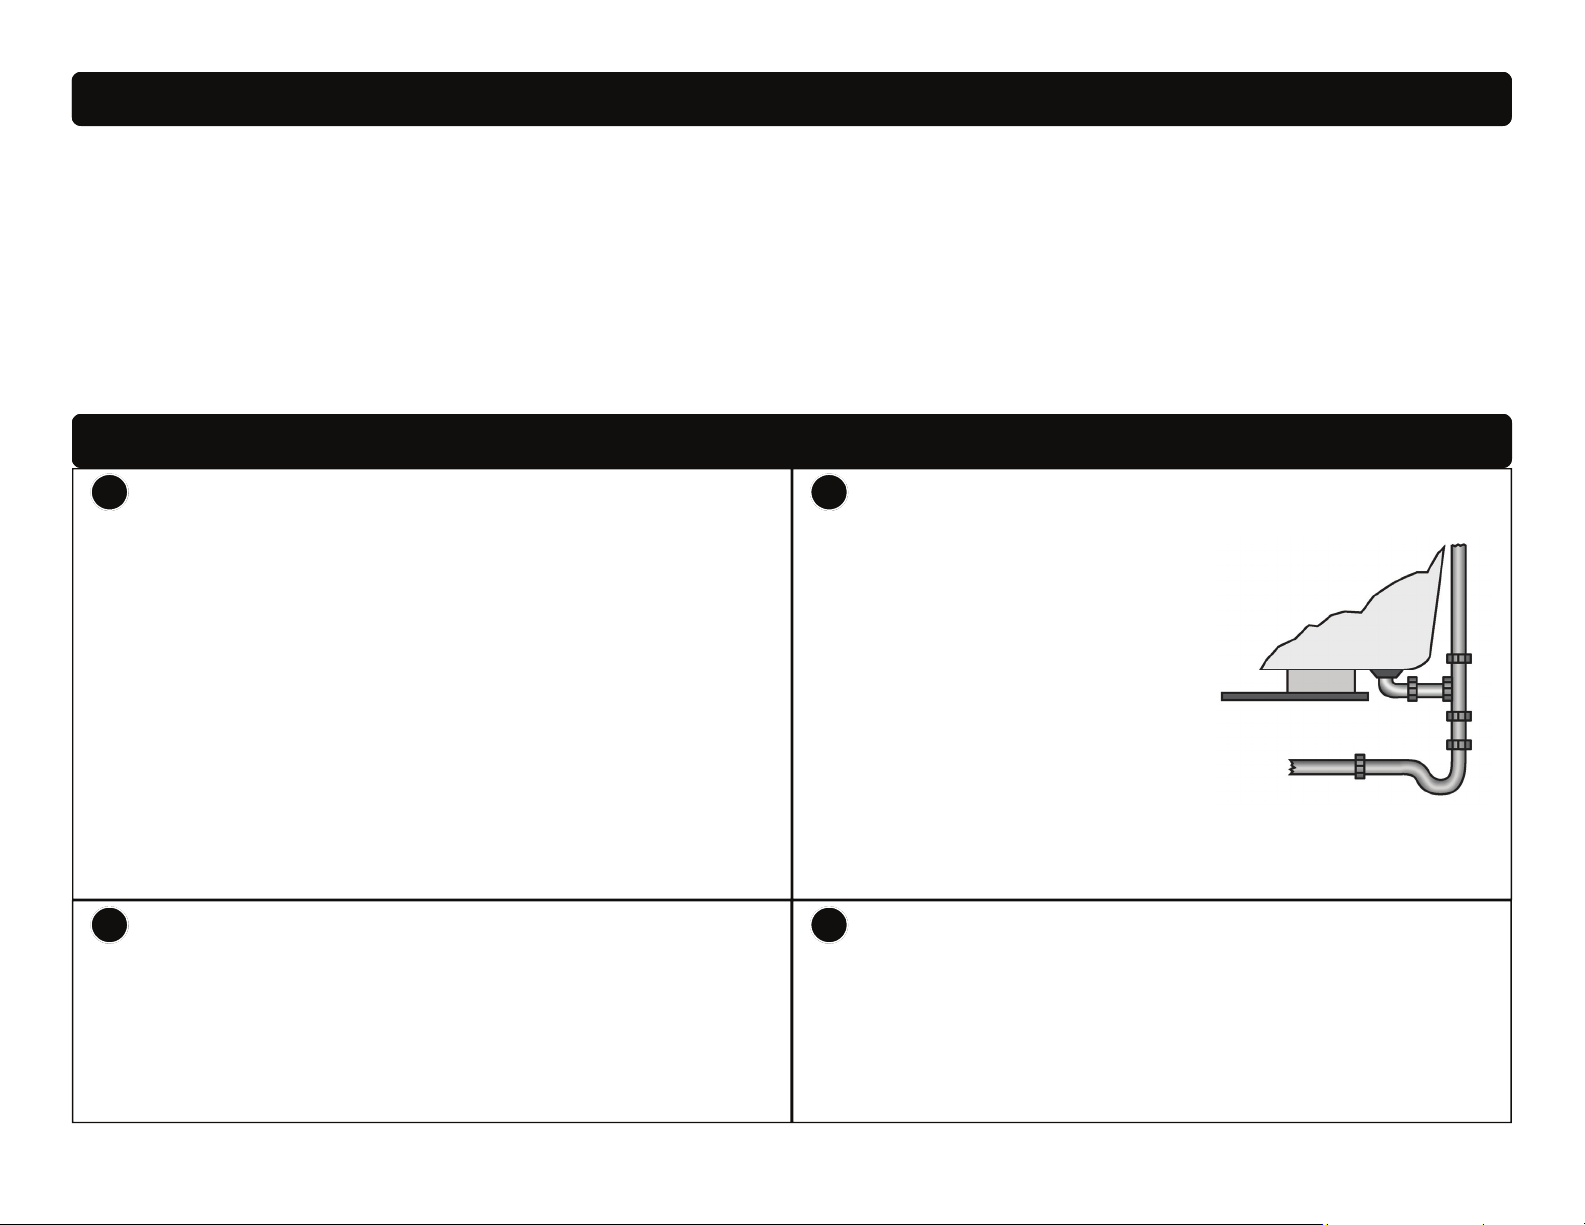
Connect the drain to plumbing
5
• Follow local codes
• Make sure that connections are tight to avoid leaks.
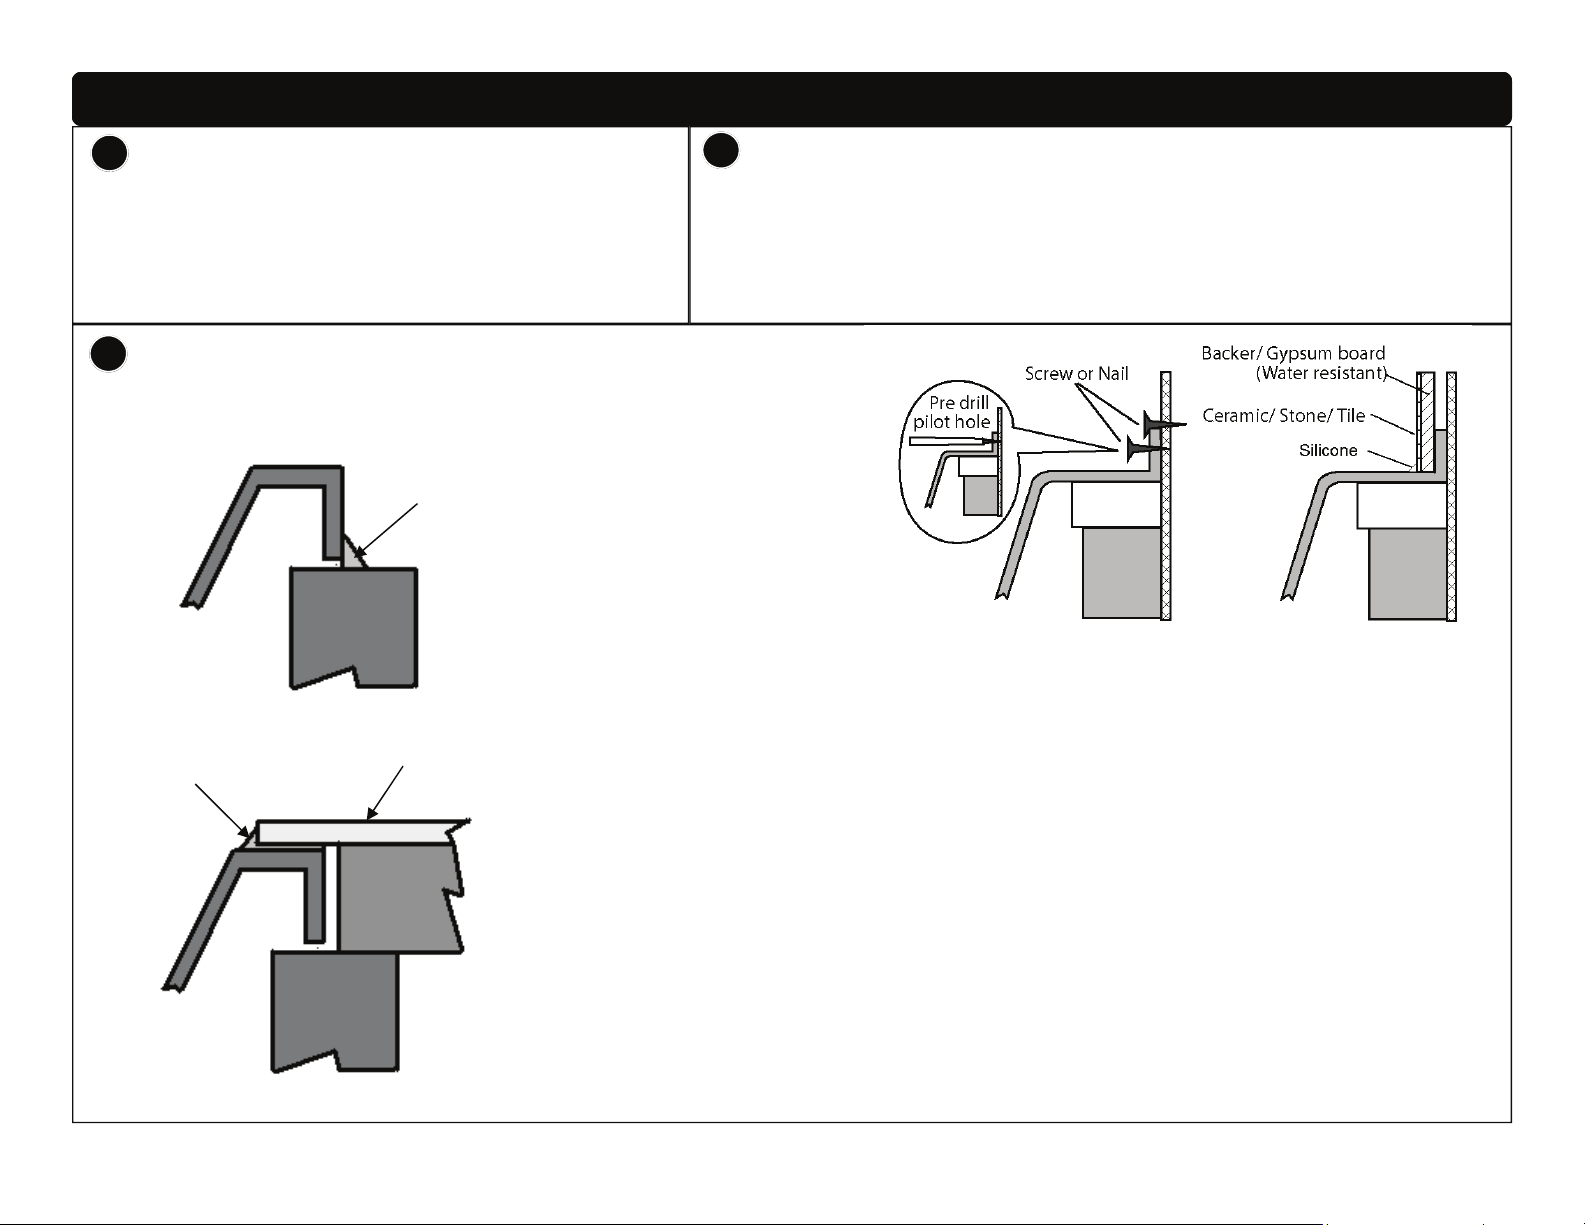
Finish decking and seal bathtub
7
With Flange
Silicone
Finished Surface
Silicone
6
Make electrical connections (AirBath)
• All electrical connections must be made by a licensed electrician and
meet local codes. Refrain from using extension cords.
• Class A, 15 amp Ground Fault Control Interrupter (GFCI) with grounding
is required.
• The controller, blower and GFCI must be accessible.
With Tile-in Flange
• Pre-drill pilot holes through the tile-in flange.
• Mount with screw or nail to studs.
• Finish tiling the bathtub deck and be sure to seal the
bathtub lip to prevent leaks.
Optional Under Mount
• See spec sheet to determine if this is available
• Cut finished surface to desired dimensions.
• Dry fit to the bathtub.
• Temporarily mark on the bathtub the edge of the opening of the finished surface.
• Remove the finished surface and apply silicone to the bathtub (underneath the
finished surface location).
• Replace the finished surface and secure it.
• Add and/or remove silicone as desired.
• Make sure the finished surface is not supported by the bathtub and is secured per
local codes.
Page 4
ABA & ABY Installation (continued)
8
Check Installation
AirBaths: Make sure the blower has ample unobstructed space to draw air and that the space is clear of dust and debris.
All bathtubs: Make sure the bathtub is level and supported by the feet or wood base or mortar sub-floor and not the flange lip.
9
Clean Up
• When cleaning after installation, do not use abrasive cleaners, as they may scratch and dull the surface. Use warm water and a
liquid non-abrasive detergent to clean the surface.
• Stubborn stains, paint or tar can be removed with isopropyl (rubbing) alcohol. Rinse well and dry with a soft, clean cloth.
• Do not use metal scrapers, wire brushes or other metal tools.
10
Trial Operation
• Close the drain.
• Fill the bathtub.
• Check for leaks from the air jets (AirBath only).
• Check for leaks from the drain.
• Check plug voltage and verify the Control Panel activates then the “ON” button is
Drain
pressed. (AirBath only - see Owner manual)
• Check operation. (AirBath only - see Owner manual)
• After operation, drain the bathtub and run the Automatic Maintenance Cycle.
(AirBath only - see Owner manual)
Jet Fitting
ABF Installation with access under the floor
1
Preparation
• Clean, level and prepare the floor for installation.
• Place the unit in the exact installed position on the floor. Be sure the tub is resting on the bottom supports and not the acrylic.
• Determine the location of the drain pipe on the floor by taking measurements of the drain and waste location underneath the unit.
(Drain and waste locations will vary by model.)
• Carefully place the unit on a blanket, cardboard, or other clean protective surface so that the unit is properly supported.
• Clean the drain hole area in preparation of setting the drain. The area should be dry and free of any debris.
Page 5
ABF Installation with access under the floor (continued)
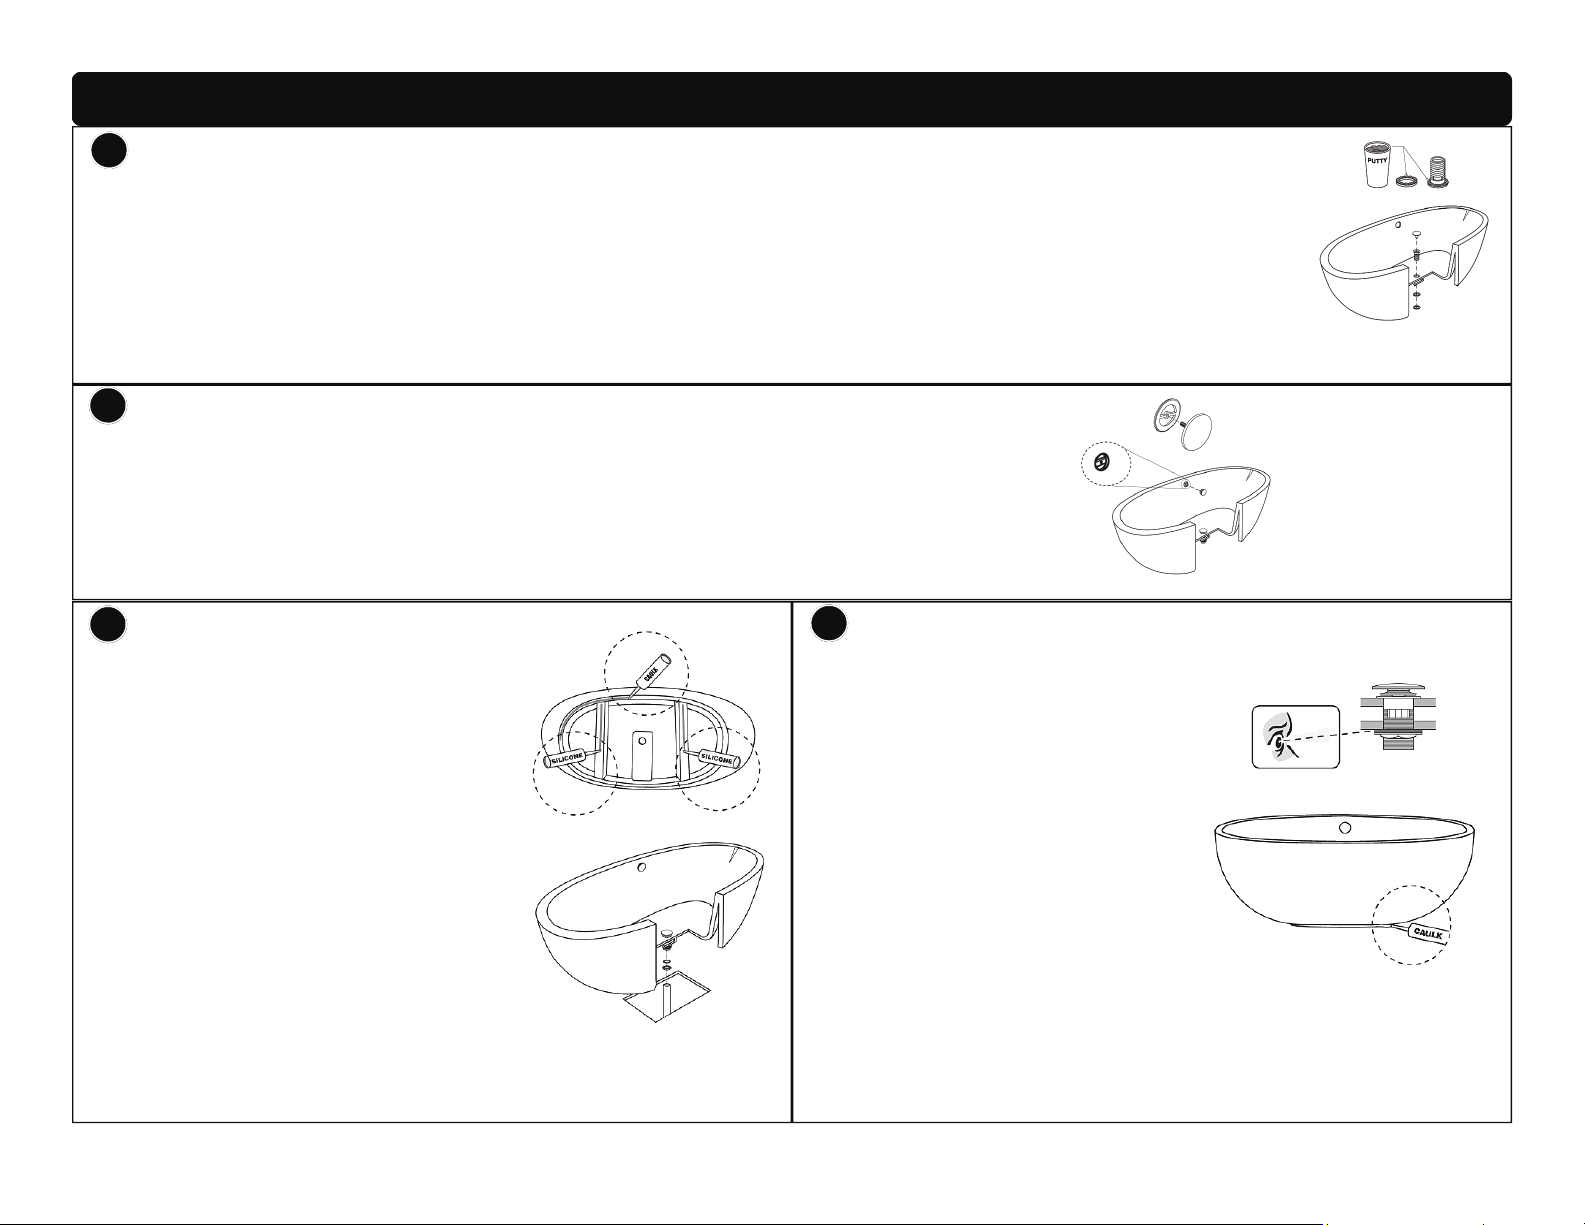
2
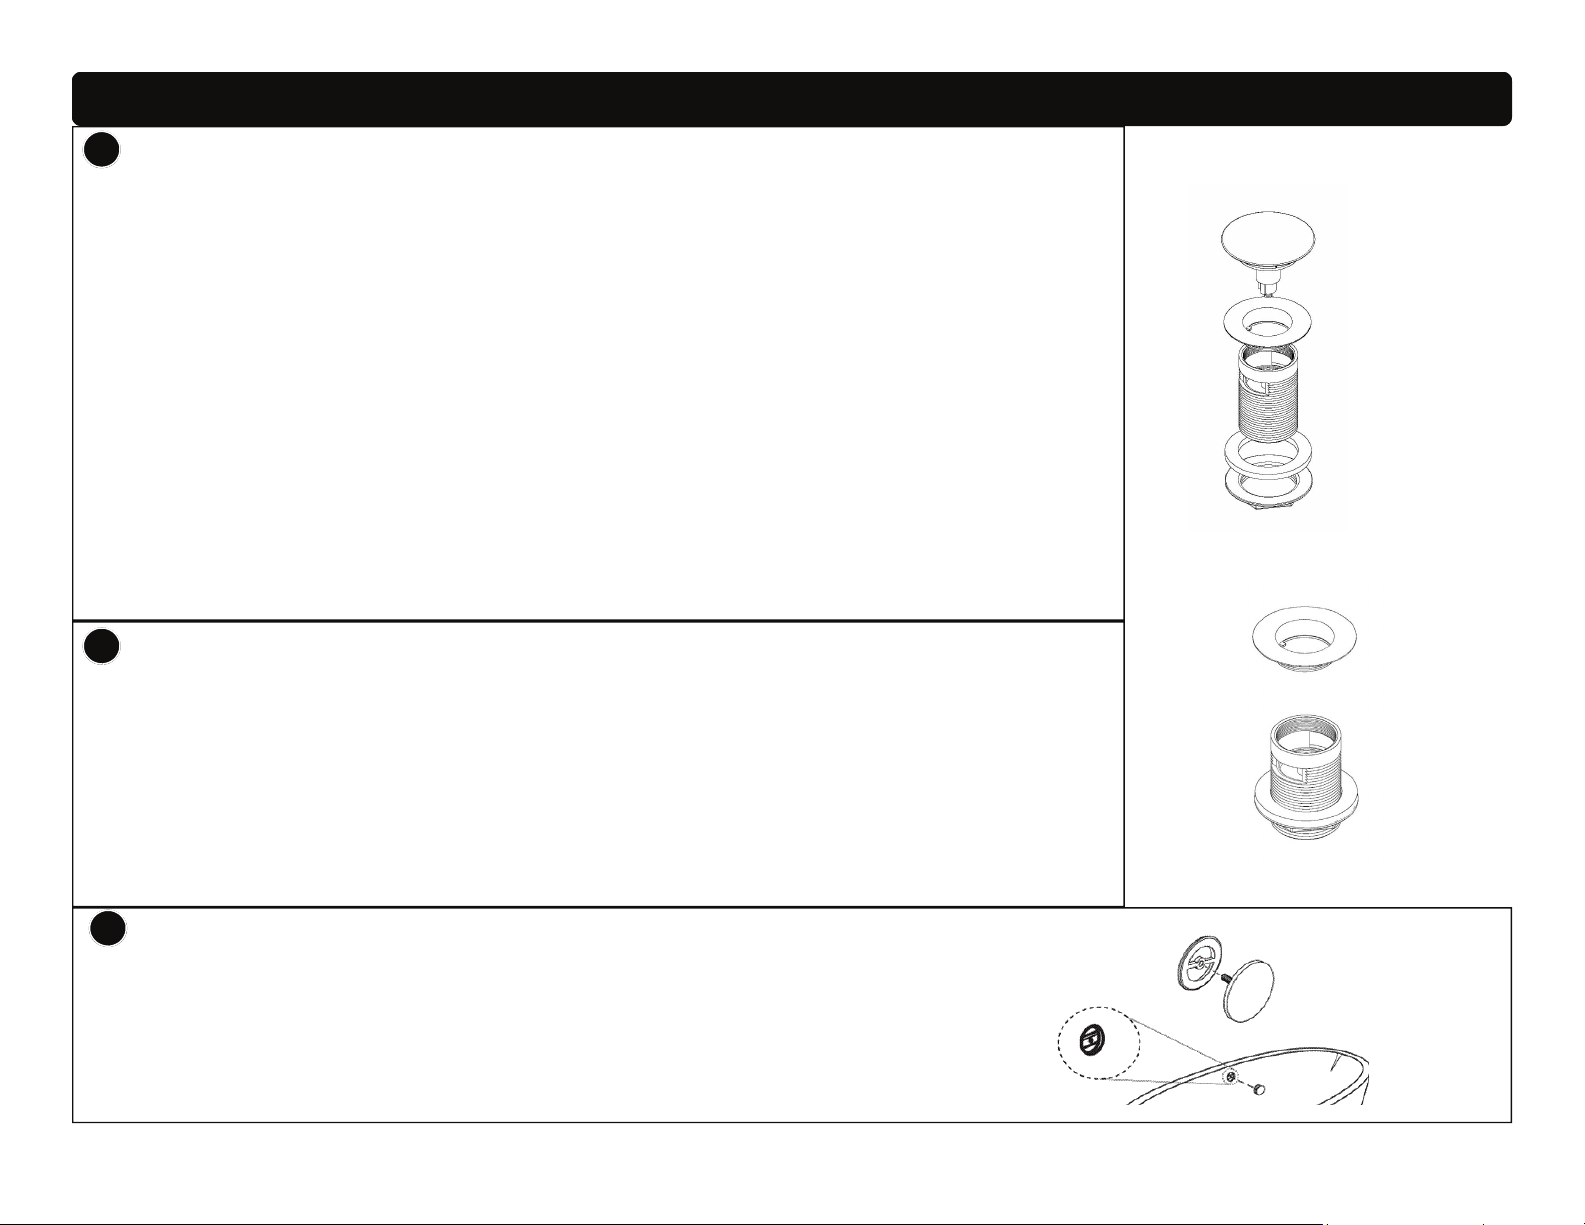
Install Drain Hardware
• Apply a bead of clear silicone or plumbers putty around the drain body and pass it through the drain hole.
• Apply Teflon tape to the threaded portion of the drain body.
• Apply plumbers putty to the washer and slide it over the bottom of the drain body.
• Attach the drain body nut on the drain body and tighten until the nut and washer have created a seal with the
bottom of the bathtub. Do not over tighten.
3
Install Overflow Hardware
• Place the back plate over the screw of the overflow cover.
• Align the overflow cover with the bar (installed at the factory) in the overflow hole.
• Carefully hand tighten the overflow cover until it stops. Do not over tighten.
4
Install Bathtub
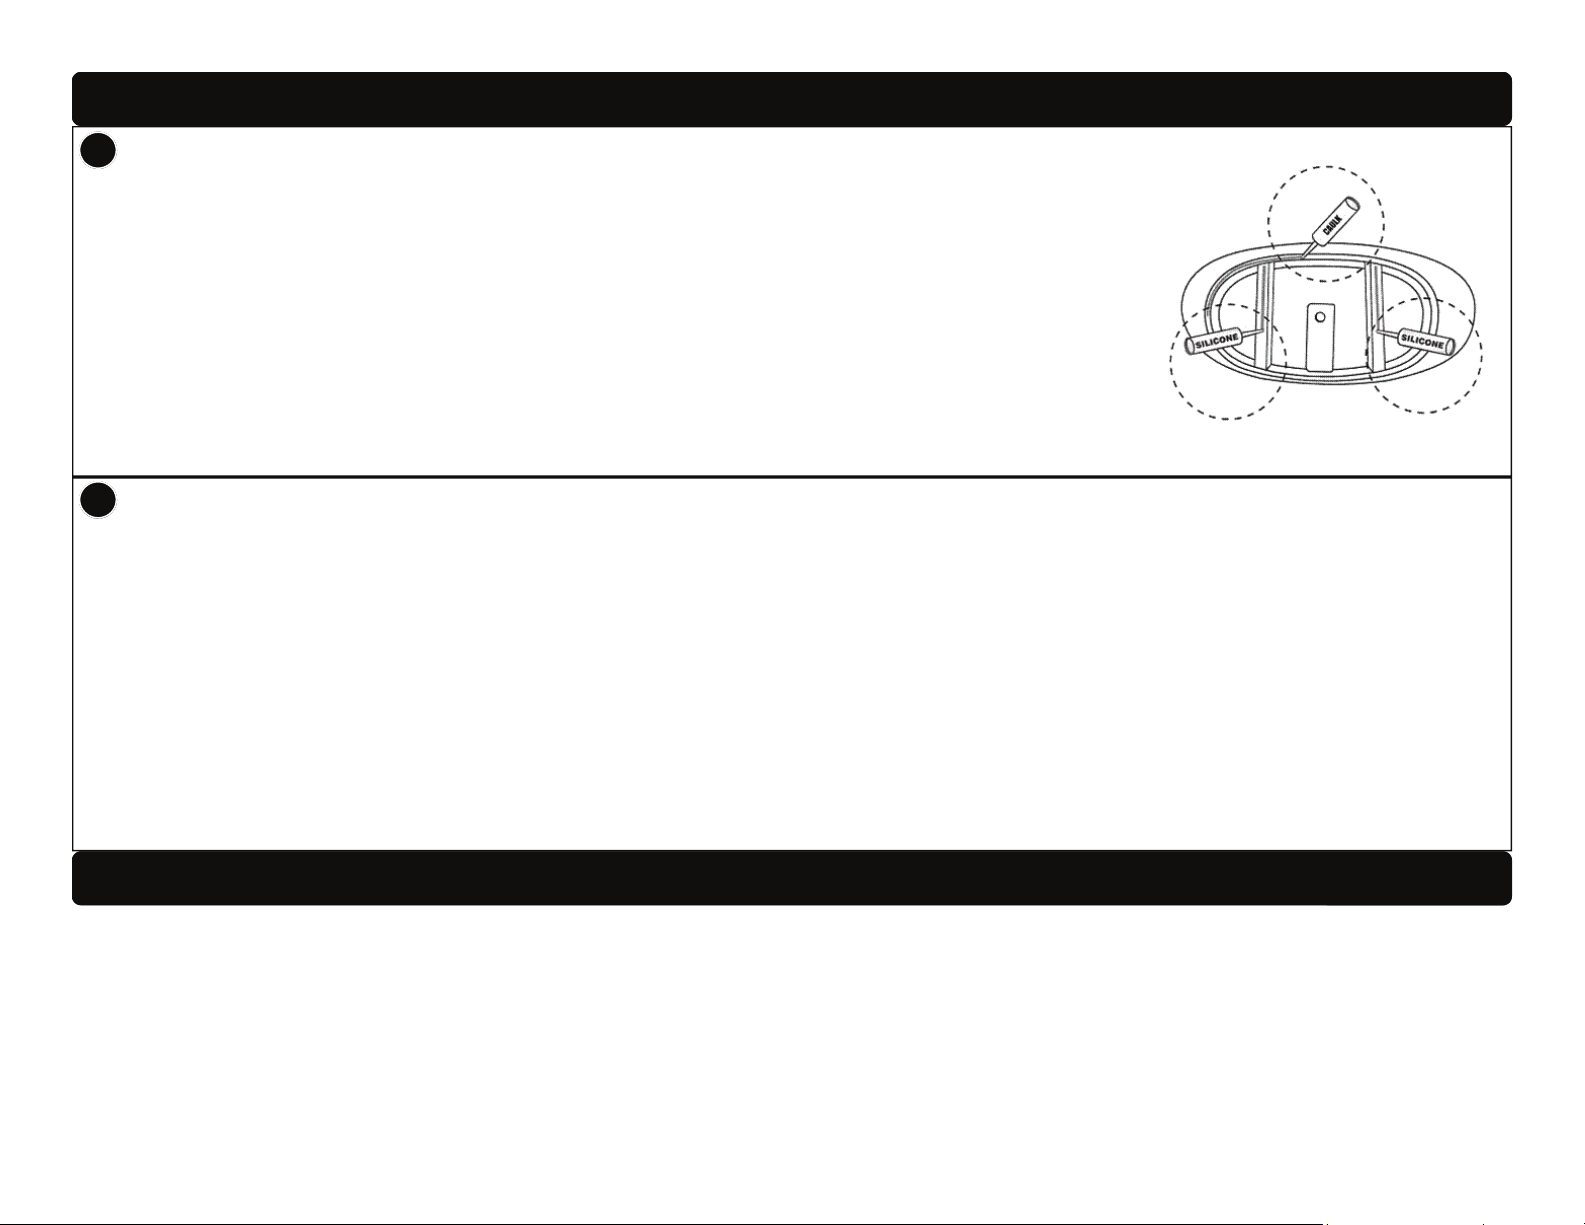
• Apply a generous bead of adhesive
or silicone (such as GE 5040 Silicone II) to the bottom of the tub supports.
• Apply a bead of tub and tile caulk
(such as GE 7000 Silicone II Paintable Silicone) around the edge of
the base.
• Carefully set the tub into position
and finish the installation of the tailpiece (supplied by the installer).
• Be sure the tub is resting on the bot-
tom supports and not the acrylic.
5
Complete Installation
• Fill the tub with water to the over-
flow and drain the tub while inspecting the waste connections
below the floor for leaks. Access
from below will be necessary for
this step.
• With the bathtub now in place
wipe off any excess tub and tile
caulk around the bottom edge of
the bathtub where it meets the
floor.
• Run a bead of tub and tile caulk
around the bottom edge of the bathtub where it meets the
floor. Wipe off any excess caulk with a wet cloth.
Page 6
ABF Installation without access under the floor
1
Preparation
• Clean, level and prepare the floor for installation.
• Clean the drain hole area in preparation of setting the drain. The area should be dry and free
of any debris.
• Apply plumbers putty around the drain body (with top installed) and pass it through the drain
hole.
• Apply Teflon tape to the threaded portion of the drain body.
• Apply plumbers putty to the washer and slide it over the bottom of the drain body.
• Attach the drain body nut on the drain body and tighten until the nut and washer have created
a seal with the bottom of the bathtub. Do not over tighten.
• Place the unit in the exact installed position on the floor. Be sure the tub is resting on the bot-
tom supports and not the acrylic.
• Determine the location of the drain pipe in the floor (provided by the installer) by taking meas-
urements of the installed drain with respect to the tub. This should include the position of the
drain footprint on the floor and the depth of the drain body.
• Carefully place the unit on a blanket, cardboard, or other clean protective surface so that the
unit is properly supported.
2
Install Drain body to floor pipe
• Install the floor pipe using the measurements from the installed drain and tub.
• Dry fit the tub with installed drain to the floor pipe.
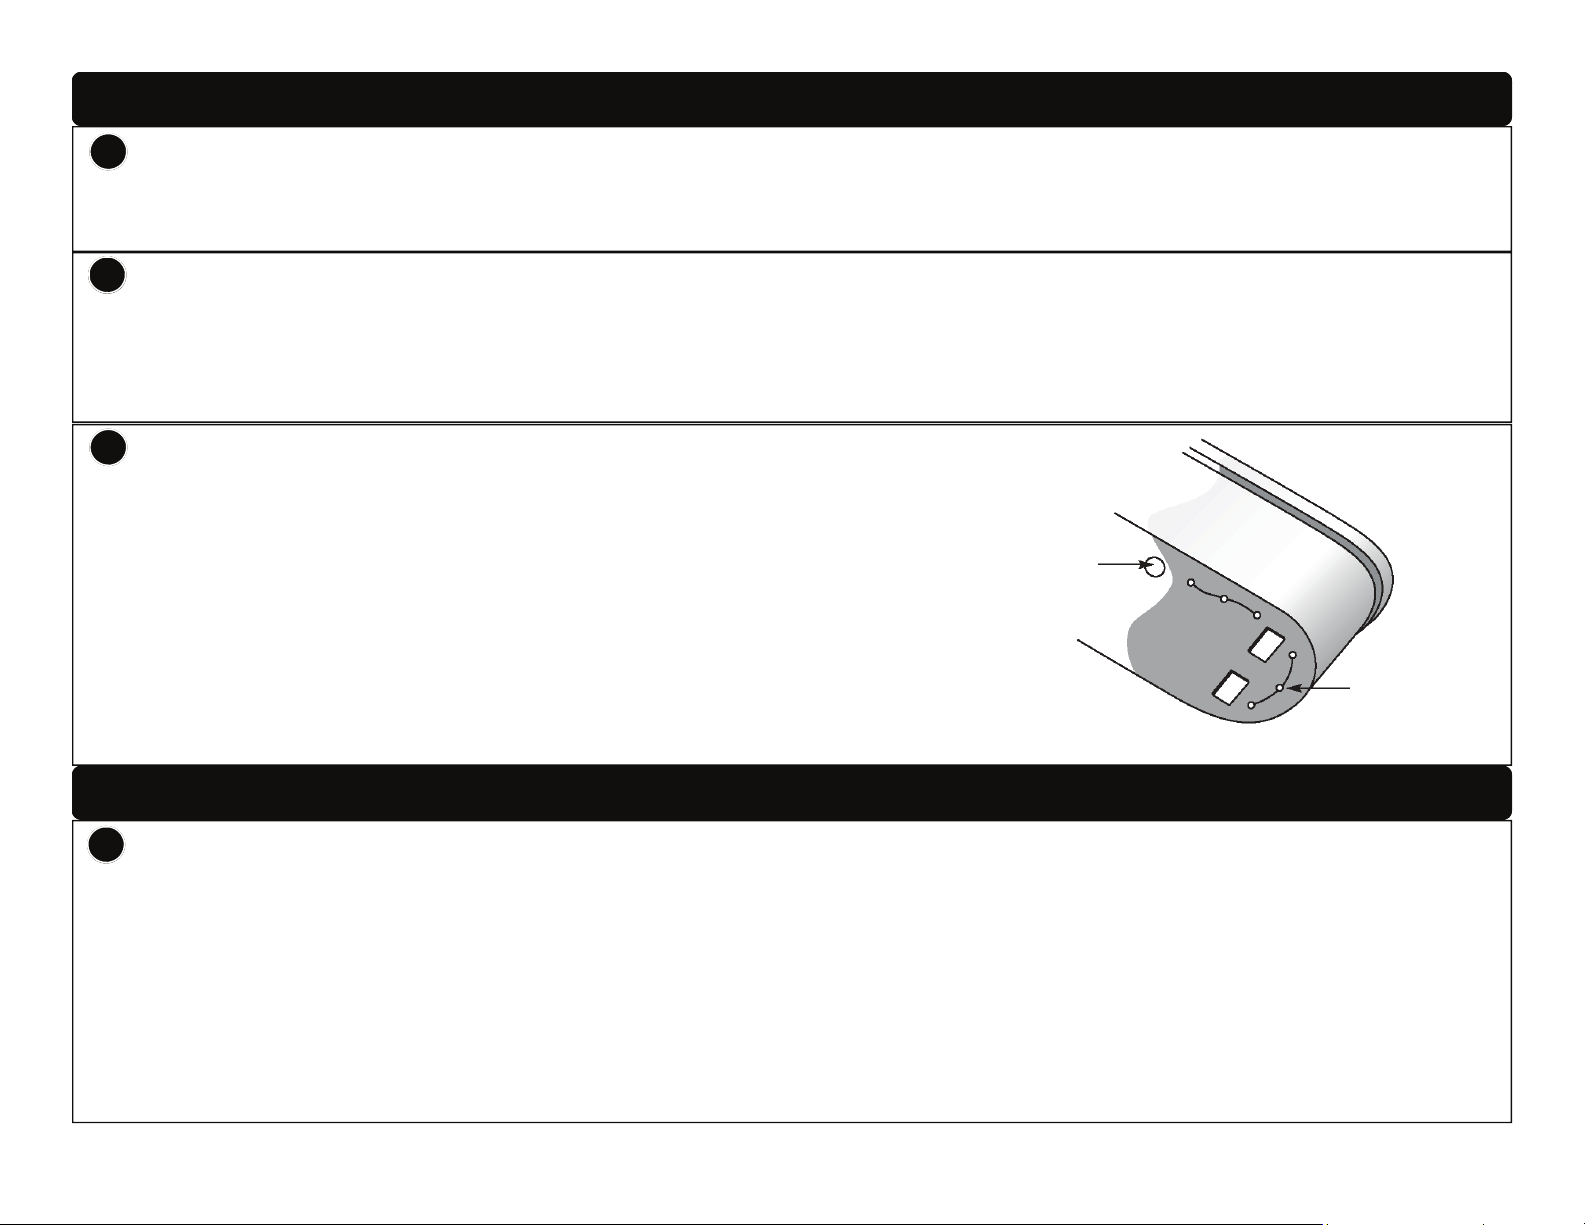
• Unscrew the stopper.
• Unscrew the drain body top and remove the drain body from the tub without unthreading the
nut.
• Install the drain body (with nut and washer) to the floor pipe.
• Re-apply plumbers putty to the washer and/or the drain body top as needed.
stopper
drain body
top
drain body
washer
nut
3
Install Overflow Hardware
• Place the back plate over the screw of the overflow cover.
• Align the overflow cover with the bar (installed at the factory) in the overflow hole.
• Carefully hand tighten the overflow cover until it stops. Do not over tighten.
Page 7
ABF Installation without access under the floor (continued)
4
Install Bathtub
• Apply a generous bead of adhesive or silicone (such as GE 5040 Silicone II) to the bottom of the
tub supports.
• Apply a bead of tub and tile caulk (such as GE 7000 Silicone II Paintable Silicone) around the
edge of the base.
• Carefully set the tub into position over the drain body.
• From inside the tub thread on the drain body top. Do not over tighten.
• Be sure the tub is resting on the bottom supports and not the acrylic.
5
Complete Installation
• Fill the tub with water to the overflow and drain the tub while inspecting the waste connections below the floor for leaks.
• With the bathtub now in place wipe off any excess tub and tile caulk around the bottom edge of the bathtub where it meets the
floor.
• Run a bead of tub and tile caulk around the bottom edge of the bathtub where it meets the floor. Wipe off any excess caulk with a
wet cloth.
• Replace the stopper.
To the installer
• Be sure to provide the customer with the Installation manual.
• Fill out the necessary warranty information on the back off the Owner manual (for AirBaths).
Page 8

Instructions d’installation de la baignoire en acrylique
Instructions de sécurité
Suivez toujours les précautions/avertissements de sécurité lors de l’installation et de l’utilisation de la baignoire en acrylique.
Le non respect de ces instructions d’installation annulera la garantie.
AVERTISSEMENT: Une mauvaise utilisation ou installation de ce produit peut causer des blessures sérieuses ou la mort.
!
PRUDENCE: Une mauvaise utilisation ou installation de ce produit peut causer des blessures sérieuses ou dégâts matériels.
!
Ce symbole signifie une utilisation interdite du produit.
AVERTISSEMENT:
causer des dégâts, fuites, incendie ou chocs électri-
PRUDENCE:
mande ou pièces externes ou ne les cognez pas contre
des objets rigides. Cela peut causer des fuites.
cela peut casser, fissurer, ou causer des fuites.
Ce symbole est utilisé pour indiquer une étape obligatoire dans l’utilisation de ce produit.
!
!
Veuillez effectuer l’installation comme décrite
!
dans ce manuel. Une mauvaise installation peut
Branchez à une source d’eau appropriée afin!
!
d’éviter le risque d’une irritation cutanée.
Après l’ouverture de l’emballage, veuillez éliminer
!
tous les éléments inutiles. La boîte ou les articles
de plastique peuvent présenter un risqué de suffo-
Lors du transport de la baignoire, ne la tenez pas
!
par les tuyaux d’air, la pompe, la boîte de com-
Ne pas cogner la baignoire, ne pas laisser tomber
ou poser des objets rigides sur la baignoire. Car
Assurez-vous que toutes les installations
!
électriques sont effectuées par un électricien
licencié selon les lois et règlements en vigueur.
Le réseau électrique alimentant la baignoire AirBath doit comprendre un disjoncteur différentiel (GFCI) tel
!
que requis par l’article 680.70 du NEC. La baignoire doit être connectée à un réseau protégé par un disjoncteur différentiel. Ce disjoncteur doit être fourni par installateur et testé régulièrement. Pour tester le disjoncteur appuyez sur le bouton «reset». Le courant électrique doit se rétablir. Si ce n’est pas le cas, le disjoncteur est défectueux. Si le disjoncteur coupe le courant sans que l’on appuie sur le bouton de test, cela signifie qu’un courant tellurique passe et qu’un choc électrique peut se produire. N’utilisez pas la baignoire AirBath dans ces conditions.
Débranchez la baignoire et faites appel à un technicien qualifié pour corriger le problème avant de l’utiliser .
!
Lors de l’installation, laissez 1/8” d’espace (3mm)
!
entre la baignoire et n’importe quel mur ou carreau
rigide. Calfeutrez soigneusement tous les bords afin de prévenir les fuites ou dégâts causés par dilatation thermique.
Évitez que le mortier, le plâtre, ou tout autre adhésive entrent en contact avec la surface de la
baignoire car cela peut l`endommager.
Ne pas grimper dans la baignoire pour effectuer
d’autres tâches que celles prévues. Cela peut
causer des blessures ou endommager la baignoire.
N’installez pas les tuyaux d’alimentation d’eau
!
chaude et d’eau froide en sens inverse. Cela
pourrait causer des brûlures.
Vérifiez les lois et les codes locaux pour les
!
instructions spécifiques d’installation et/ou
d’utilisation non couvertes dans ce manuel.
0GU5034, V.01
Page 9

Remarques
1. Assurez-vous que l’unité est de modèle et de couleur désirés. De
plus, vérifiez que toutes les pièces sont incluses.
2. Inspectez afin de déceler des dommages causés par l’expédition.
Toutes les réclamations pour dommages doivent être immédiatement
faites auprès du porteur. N’installez pas la baignoire si vous décelez
des
dommages de finition.
3. Pour les baignoires à jets d’air, assurez-vous que tous les tuyaux d’air
et les raccordements électriques sont branchés correctement.
4. Observez toutes les procédures d’installation ainsi que les codes et
les lois locaux de plomberie en vigueur.
Installation ABA & ABY
1
Préparation de l’emplacement
• Retirer l’ancienne baignoire si nécessaire.
• Préparez le sous-plancher si nécessaire.
• Construisez l’armature de bois.
• Utilisez le Garabit afin de vous assurez d’une armature
adéquate.
• Pour les baignoires à air, un panneau d’accès d’au moins
16” X 20” de large, ou selon le code local, doit être installé à
l’extrémité du ventilateur de l’unité afin de permettre l’entretien
et la réparation.
• Positionnez et installez la plomberie.
• Tous les encadrements doivent être à angle droit et d’aplomb.
• La baignoire ne peut pas être accrochée par son rebord. Le
poids de baignoire doit être transféré seulement par les pieds.
5. Fournissez un sous-plancher adéquate, propre et nivelé.
6. Prévoyez suffisamment d’espace pour la baignoire et fournissez une
armature de dimension appropriée.
7. Ne pas retirer la pellicule de protection si ce n`est pas nécessaire.
Couvrez la baignoire de carton pour une protection supplémentaire.
8. Ne pas installer d’échelle, de trépied, de matériel de construction, de
déchet ou d’autres équipements dans la baignoire.
9. Consultez les notes techniques pour des informations à propos des
dimensions.
10. Spécification de l’alimentation électrique (Seulement baignoire à jets
d’air): 60 Hz, 120 V, 1050 W
2
Installation du Drain (Vendu séparément)
Installez le drain selon les instructions
du manufacturier et selon les codes
locaux. Le gabarit est conçu pour les
baignoires utilisant les drains de Toto.
Remarque: Prenez garde de ne pas érafler ou marquer la
baignoire lors de l’installation du drain.
3
Test de mise en place
Faites le test de mise en place (Mise en place à sec) de la baignoire dans l’armature avant de calfeutrer afin de vous assurer
que la baignoire s’emboîte bien.
4
Poser la baignoire dans l’armature
• Laissez un espace de 1/8” (3 mm) entre la bride et l'armature.
• Λε mortier devrait être utilisé afin de fixer et niveler la baignoire.
• Utilisez deux personnes pour déplacer la baignoire.
• Assurez-vous que la baignoire est nivelée dans les deux directions
pour un drainage approprié de l`eau ,
• N’importe quelle fondation en bois devrait rester attachée.
Page 10

Installation ABA & ABY (Suite)
5
Relier le drain à la tuyauterie
• Suivez les codes locaux.
• Afin d’éviter les fuites, assurez-vous que les raccords
sont bien serrés.
Terminer le platelage et sceller la baignoire
7
Avec la bride
Silicone
Établissez les raccords électriques (baignoire à jets d’air)
6
• Tous les raccords électriques doivent être effectués par un électricien licen-
cié et conformément aux codes locaux. Évitez d`utiliser des rallonges.
• Il est requis d`utiliser un disjoncteur de fuite à la terre de 15-amp, de class A
avec la mise à la terre.
• Le contrôleur, le ventilateur et le GFCI doivent être accessibles.
Avec tuile-dans la bride
Silicone
Surface finie
• Percez des trous préliminaires à travers la tuile-dans bride.
• Fixez à l’aide de vis ou de clous.
• Terminez le carrelage de la plate-forme de la baignoire et
assurez-vous de sceller le rebord de la baignoire afin d’éviter
les fuites.
Option - Sous plan
• Consultez les spécifications techniques pour déterminer la disponibilité.
• Découpez la surface finie aux dimensions souhaitées.
• Faites le test de mise en place à sec de la baignoire.
• Marquez temporairement sur la baignoire les angles d`ouverture de la surface finie.
• Retirez la surface finie et appliquez le silicone sur la baignoire (Sur la partie située en
dessous de la surface finie).
• Replacez la surface finie et fixez-la.
• Ajoutez et/ ou enlevez le silicone comme vous le souhaitez.
• Rassurez-vous que la surface finie n`est pas supportée par la baignoire et est fixée
conformément aux codes de votre localité.
Page 11

Installation ABA & ABY (suite)
8
Vérifier l’installation
Les Baignoires à jets d’air: Rassurez-vous que le ventilateur a un espace suffisamment dégagé pour tirer l’air et est hors de débris et de poussière.
Les Baignoires: Rassurez-vous que la baignoire est nivelée et soutenue par les pieds, une fondation en bois ou un sous-plancher de mortier et non par la bride.
9
Nettoyage
• Lors du nettoyage après installation, n’utilisez pas de produits nettoyants abrasifs, car ils peuvent égratigner et mater la surface.
Pour nettoyer la surface, utilisez de l’eau chaude et un détergent non abrasive liquide.
• Les tâches tenaces, la peinture ou le goudron peuvent être enlevés avec de l'alcool d'isopropyle (frottage). Rincez bien et séchez
avec un tissu mou et propre.
10
Opération d`essai
• Fermez le drain.
• Remplissez la baignoire.
• Vérifiez les fuites pouvant provenir des jets d’air (Baignoire à jet d’air uniquement)
• Vérifiez les fuites pouvant provenir du drain.
• Vérifiez la tension de la prise et vérifiez que le panneau de commande s’active lorsque vous ap-
puyez sur le bouton ’Marche’. (Baignoire à jets d’air uniquement - voir le Manuel du Propriétaire)
• Vérifiez le fonctionnement. (Baignoire à jets d’air uniquement - voir le Manuel du Propriétaire)
• Après l’essai, videz la baignoire et lancez le cycle d’entretien automatique. (Baignoire à jets d’air
uniquement - voir le Manuel du Propriétaire)
Drain
Jet d`air
ABF Installation avec accès sous le plancher
1
Préparation
• Nettoyez, nivelez et préparez le plancher pour l`installation.
• Placez l`unité dans la position exacte d`installation sur le plancher. Rassurez-vous que la baignoire est posée sur les pieds du
support et non sur l`acrylique.
• Déterminez la position du tuyau du drain sur le plancher en prenant les mesures du drain et la position des eaux usées en des-
sous de l`unité. (Le drain et la position des eaux usées varient en fonction du modèle.)
• Placez soigneusement l`unité dans la couverture, carton, ou toute autre surface de protection propre de telle sorte que l`unité soit
correctement supportée.
• Nettoyez la trou du drain pour la préparation pour l`installation du drain. La zone doit être sèche et exempt de tous débris.
Page 12

ABF Installation avec accès sous le plancher (suite)
2
Installez les éléments du drain
• Appliquez une couche de silicone adhésive autour du corps du drain et passez-la à travers le trou du drain.
• Appliquez du ruban Téflon sur la partie filetée du corps du drain.
• Appliquez le silicone adhésive sur la rondelle et insérez-la sur le bas du corps du drain.
• Rattachez l`écrou du corps du drain sur le corps du drain et serrez jusqu`à ce que l`écrou et la rondelle for-
ment un joint avec le bas de la baignoire. Ne pas trop serrer.
3
Installez les éléments du trop-plein
• Placez la plaque noire autour de la vis du bouchon du trop-plein.
• Alignez le bouchon du trop-plein avec la barre (installée à l`usine) dans le trou du
trop-plein.
• Serrez soigneusement à la main le bouchon du trop-plein jusqu`à ce qu`il s`arrête.
Ne pas trop serrer.
4
Installez la baignoire
• Appliquez une couche de silicone
adhésive ou silicone (telle que silicone II GE 5040) sur les supports du
bas de la baignoire.
• Appliquez une couche de mastic de
baignoire et carreau (tel que silicone
paintable II GE 7000) autour du bord
de la base.
• Posez soigneusement la baignoire
en position et terminez l`installation
des abouts (Fournis par
l`installateur).
• Rassurez-vous que la baignoire est
posée sur les supports du bas et
non sur l`acrylique.
5
Complétez l`installation
• Remplissez la baignoire d`eau
jusqu`au niveau du trop-plein et
videz-la en inspectant les fuites
au niveau des connections des
eaux usagées en dessous du
plancher. L`accès au dessous
sera nécessaire pour cette étape.
• Avec la baignoire maintenant en
place, nettoyez tous excès de
mastic de baignoire et de carreau
en dessous tout autour de la baignoire, au point de contact avec
le plancher.
• Appliquez le mastic tout autour du bas de la baignoire sur le
point de contact avec le plancher. Nettoyez tous excès de
mastic avec un chiffon mouille .
Page 13

ABF Installation sans accès sous le plancher (suite)
1
Préparation
• Nettoyez, nivelez et préparez le plancher pour l`installation.
• Nettoyez le trou du drain pour la préparation pour l`installation du drain. La zone doit être sè-
che et exempt de tous débris.
• Appliquez une couche de silicone adhésive autour du corps du drain (avec le dessus installé)
et passez-la à travers le trou du drain.
• Appliquez le silicone adhésive sur la rondelle et insérez-la sur le bas du corps du drain.
• Rattachez l`écrou du corps du drain sur le corps du drain et serrez jusqu`à ce que l`écrou et la
rondelle forment un joint avec le bas de la baignoire. Ne pas trop serrer.
• Placez l`unité dans la position exacte d`installation sur le plancher. Rassurez-vous que la bai-
gnoire est posée sur les pieds du support et non sur l`acrylique.
• Déterminez la position du tuyau du drain sur le plancher (fourni par l`installateur) en prenant
les mesures du drain installé en fonction de la baignoire. Cela devrait inclure la position des
empreintes du drain sur le plancher et la profondeur du corps du drain.
• Placez soigneusement l`unité dans la couverture, carton, ou toute autre surface de protection
propre de telle sorte que l`unité soit correctement supportée.
2
Installez le corps du drain sur la conduite du plancher
• Installez la conduite du plancher en utilisant les dimensions du drain et baignoire installés.
• Faites le test de mise en place à sec de la baignoire avec le drain à la conduite du plancher.
• Desserrez le bouchon.
• Desserrez le dessus du corps du drain et retirez le corps du drain de la baignoire sans défiler
l`écrou.
• Installez le corps du drain (avec écrou et rondelle) sur la conduite du plancher.
• Appliquez de nouveau silicone adhésive sur la rondelle et/ ou sur le dessus du corps du drain
si nécessaire.
Bouchon
Dessus du
corps du drain
Corps du drain
Rondelle
Ecrou
3
Installez les éléments du trop-plein
• Placez la plaque noire autour de la vis du bouchon du trop-plein.
• Alignez le bouchon du trop-plein avec la barre (installée à l`usine) dans le trou du
trop-plein.
• Serrez soigneusement à la main le bouchon du trop-plein jusqu`à ce qu`il s`arrête.
Ne pas trop serrer.
Page 14

ABF Installation sans accès sous le plancher (suite)
4
Installez la baignoire
• Appliquez une couche de silicone adhésive ou silicone (telle que silicone II GE 5040) sur les
supports du bas de la baignoire.
• Appliquez une couche de mastic de baignoire et carreau (tel que silicone paintable II GE 7000)
autour du bord de la base.
• Posez soigneusement la baignoire en position sur le corps du drain.
• A partir de l`intérieur de la baignoire, enfiler le dessus du corps du drain. Ne pas trop serrer.
• Rassurez-vous que la baignoire est posée sur les supports du bas et non sur l`acrylique.
5
Complétez l`installation
• Remplissez la baignoire d`eau jusqu`au niveau du trop-plein et videz-la en inspectant les fuites au niveau des connections des
eaux usagées en dessous du plancher.
• Avec la baignoire maintenant en place, nettoyez tous excès de mastic de baignoire et de carreau en dessous tout autour de la bai-
gnoire, au point de contact avec le plancher.
• Appliquez le mastic tout autour du bas de la baignoire sur le point de contact avec le plancher. Nettoyez tous excès de mastic
avec un chiffon mouille .
• Replacez le bouchon.
Pour l’installeur
• Rassurez-vous de remettre le guide d’installation au client.
• Complétez l’information de garantie nécessaire à l’endos du manuel du propriétaire (pour les baignoires à jets d’air).
Page 15

Instrucciones de Instalación de la Bañera de Acrílico
Instrucciones de Seguridad
Siempre siga las precauciones/advertencias de seguridad al utilizar e instalar la Bañera de Acrílico.
No seguir con alguna de estas Instrucciones de Instalación invalidará la garantía.
ADVERTENCIA: El uso o instalación inadecuada de este producto puede tener como resultado la muerte o una lesión grave.
!
PRECAUCIÓN: El uso o instalación inadecuada de este producto puede tener como resultado una lesión o daño a la propiedad.
!
Este símbolo indica un uso prohibido del producto.
Este símbolo es utilizado para indicar un paso necesario en el uso de este producto.
!
ADVERTENCIA:
Realice la instalación como se describe en este
manual. La instalación inadecuada puede resultar
!
en daños, fugas, incendios o choques eléctricos.
Conéctese a la fuente de agua adecuada para
!
evitar el riesgo de irritación de la piel.
Después de abrirlo, deseche adecuadamente cual-
!
quier material de empaquetado innecesario. Los
materiales de la caja o plásticos pueden tener peligro
de asfixia.
Asegúrese que la instalación eléctrica sea reali-
zada por un electricista autorizado de acuerdo
!
con todas las leyes y lineamientos.
!
mente a un circuito de suministro que esté protegido por un de circuito de falla a tierra (GFCI). Dicho GFCI debe ser proporcionado por el instalador y debe ser puesto a prueba en una base de rutina. Para poner a prueba el GFCI, oprima el botón de
reinicio. Se debe volver a encender la energía eléctrica. Si el GFCI no opera de esta manera, el GFCI está defectuoso. Si el
GFCI interrumpe la energía eléctrica sin que se haya oprimido el botón de prueba, hay una corriente de tierra fluyendo, indicando la posibilidad de un choque eléctrico. No utilice el AirBath. Desconecte el AirBath y haga que un representante de servicios
calificado corrija el problema antes de utilizarlo.
PRECAUCIÓN:
Al transportar la bañera, no la cargue por la
!
manguera de aire, bomba, caja de control u
otras partes externas, ni las golpee contra objetos duros. Puede haber fugas.
No golpee la bañera contra, deje caer o almacene
ningún objeto rígido dentro de la bañera. La bañera
puede romperse, dañarse y/o presentar fugas.
0GU5034, V.01
Al instalarla, deje un espacio de 1/8” (3 mm) entre
!
la bañera y cualquier pared rígida o azulejo. También enmansille cuidadosamente todas las orillas para prevenir fugas o daños por expansión térmica.
Evite el contacto de argamasa, yeso u otros adhesivos con la superficie de la bañera. Puede
haber daños en la superficie de la bañera.
!
El circuito eléctrico suministrado para el AirBath (“Baño de Aire”) debe incluir un interruptor de circuito de falla a tierra
(GFCI, por sus siglas en inglés) adecuado, tal como lo requiere NEC artículo 680.70. La unidad debe conectarse única-
!
No se suba a la bañera para realizar ninguna tarea que no sea el uso previsto. Pueden causarse
lesiones o daños a la bañera.
No instale las líneas de agua caliente y fría al
!
revés. Pueden ocurrir quemaduras.
Revise las leyes y códigos locales para conocer
!
cualquier instrucción específica acerca de la
instalación y/o uso no cubierta en este manual.
Page 16

Notas
1. Asegúrese que la unidad es el modelo y color correctos y que
las partes que se necesitan estén presentes.
2. Inspeccione si hay daños por el envío. Cualquier queja por daños debe hacerse inmediatamente al transportista. No instale
la bañera si se revela cualquier daño en el terminado.
3. Para AirBaths, asegúrese que todas las mangueras de aire y
conexiones eléctricas estén conectadas adecuadamente.
4. Observe todos los procedimientos de instalación y códigos y
reglamentos de plomería locales.
5. Proporcione un sub-piso adecuado, limpio y nivelado. Asegú-
Instalación ABA & ABY
1
Prepare la ubicación
• Retire la bañera anterior, si es necesario.
• Prepare el sub-piso y nivele, si es necesario.
• Construya el marco de Madera.
• Utilice una plantilla para asegurar un enmarcado correcto.
• Para los AirBaths, se debe instalar un panel de acceso de al
menos 16” x 20” de ancho, o de acuerdo con el código local,
en la salida del calefactor de la unidad para mantenimiento o
revisión.
• Todo el enmarcado debe ser cuadrado y justo.
• La bañera no debe ser colgada por el borde. El peso de la ba-
ñera debe ser transferido únicamente a través de sus patas.
rese que haya un espacio adecuado para la bañera y proporcione un enmarcado con las dimensiones correctas.
6. No quite el plástico protector hasta que sea necesario. Cubra
la bañera con cartón para una mayor protección.
7. No coloque escaleras, trípodes, material de construcción, desperdicios u otro equipo dentro de la bañera.
8. Vea la hoja de espec para la información de las dimensiones.
9. Especificación de Suministro de Energía (AirBath únicamente):
60 Hz, 120 V, 1050 W
2
Instale el desagüe (se vende por separa-
do)
Instale el desagüe de acuerdo con las
instrucciones del fabricante y los códigos locales. La plantilla está diseñada
para las bañeras que utilizan desagües Toto.
Nota: Tenga cuidado de no rayar o estropear la bañera mientras
instala el desagüe.
3
Prueba de ajuste
Haga la prueba de ajuste (ajuste en seco) de la bañera en el marco para asegurar que la bañera se ajustará al tamaño.
4
Acomode la bañera en el enmarcado.
• Deje un espacio de 1/8” (3 mm) entre la pestaña y el enmarcado.
• Se debe utilizar argamasa para asegurar y nivelar la bañera
• Utilice dos personas para mover la bañera.
• Asegúrese que la bañera esté nivelada en ambas direcciones para
un desagüe de aguas adecuado.
• Cualquier base de madera fijada debe permanecer fija.
Page 17

Instalación ABA & ABY (continuación)
Conecte el desagüe a las tuberías
5
• Siga los códigos locales
• Asegúrese que las conexiones estén apretadas para
evitar fugas.
Termine el anclaje y selle la bañera
7
Con pestaña
Silicona
Superficie terminada
Silicona
6
Haga las conexiones eléctricas (AirBath)
• Todas las conexiones eléctricas deben ser realizadas por un electricista
autorizado y cumplir con los códigos locales. Absténgase de utilizar cables de extensión.
• Se requiere un Interruptor de Control de Fallas a Tierra (GFCI) Clase A,
de 15 amp con conexión a tierra.
Con pestaña al azulejo
• Pre-perfore los orificios piloto a través de la pestaña al azulejo.
• Monte con un tornillo o clavo a las tachuelas.
• Termine la colocación de azulejos en el anclaje de la bañera y
asegúrese de sellar el borde de la bañera para prevenir fugas.
Bajo montaje opcional
• Ver la hoja de espec para determinar si está disponible
• Corte la superficie terminada a las dimensiones deseadas.
• Haga el ajuste en seco a la bañera.
• Marque temporalmente en la bañera la orilla de la abertura de la superficie terminada.
• Retire la superficie terminada y aplique silicona a la bañera (debajo de la ubicación de la su-
perficie terminada).
• Reemplace la superficie terminada y asegúrela.
• Agregue y/o retire la silicona según se requiera.
• Asegúrese que la superficie terminada no esté soportada por la bañera y esté asegurada de
acuerdo con los códigos locales.
Page 18

Instalación ABA & ABY (continuación)
8
Revise la instalación
AirBaths: Asegúrese de que el calefactor tenga un espacio amplio sin obstrucciones para extraer aire y que el espacio esté libre
de polvo y desechos.
9
Limpie
• Al limpiar después de la instalación, no utilice limpiadores abrasivos, ya que éstos pueden rayar y maltratar la superficie. Utilice
agua tibia y un detergente líquido no abrasivo para limpiar la superficie.
• Las manchas, pinturas o alquitrán resistentes pueden ser retirados con alcohol isopropílico (para tallar). Enjuague perfectamente y
seque con un trapo limpio.
10
Operación de prueba
• Cierre el desagüe.
• Llene la bañera.
• Revise si hay fugas de los conductos de aire (AirBath únicamente).
• Revise si hay fugas del desagüe.
• Revise el voltaje del enchufe y verifique que el Panel de Control se activa después
de que el botón “ENCENDIDO” es oprimido. (AirBath únicamente—véase manual
del Usuario)
• Revise la operación. (AirBath únicamente—véase manual del Usuario)
• Después de la operación, desagüe la bañera y corra el Ciclo de Mantenimiento Au-
tomático. (AirBath únicamente—véase manual del Usuario)
Desagüe
Accesorio
del conducto
Instalación ABF con acceso debajo del piso
1
Preparación
• Limpie, nivele y prepara el piso para la instalación.
• Coloque la unidad en la posición instalada exacta en el piso. Asegúrese que la bañera esté descansando en los soportes inferio-
res y no en el acrílico.
• Determine la ubicación de la tubería de desagüe tomando las medidas del desagüe y la ubicación de los desperdicios debajo de
la unidad. (Las ubicaciones del desagüe y desperdicios variarán dependiendo del modelo.)
• Coloque cuidadosamente la unidad en una colcha, cartón u otra superficie protectora limpia de tal forma que la unidad esté sopor-
tada adecuadamente.
• Limpie el área del orificio del desagüe para preparer la configuración del desagüe. El área debe estar seca y libre de cualquier de-
secho.
Page 19

Instalación ABF con acceso debajo del piso (continuación)
2
Instale los accesorios del desagüe
• Aplique un cama de silicona transparente o masilla de plomería alrededor del cuerpo de desagüe y páselo a
través del orificio de desagüe.
• Aplique cinta de teflón a la porción ensartada del cuerpo de desagüe.
• Aplique masilla de plomería a la arandela y deslícela sobre la parte inferior del cuerpo de desagüe.
• Fije la tuerca del cuerpo de desagüe al cuerpo de desagüe y apriétela hasta que la tuerca y la arandela hayan
creado un sello con la parte inferior de la bañera. No la apriete de más.
3
Instale los accesorios del rebosadero
• Coloque la placa posterior sobre el tornillo de la cubierta del rebosadero.
• Alinee la cubierta del rebosadero con la barra (instalada en la fábrica) en el orificio del rebosadero.
• Apriete cuidadosamente con la mano la cubierta del rebosadero hasta que se detenga. No apriete de más.
4
Instale la bañera
• Aplique una cama generosa de ad-
hesivo o silicona (tal como la Silicona II GE 5040) a la parte inferior de
los soportes de la bañera.
• Aplique una cama de enmasillado
de bañeras y azulejos (tal como la
Silicona Pintable II GE 7000) alrededor de la orilla de la base.
• Fije cuidadosamente la bañera en
su posición y termine la instalación
de la pieza de cola (suministrada
por el instalador).
• Asegúrese que la bañera esté des-
cansando en los soportes inferiores
y no en el acrílico.
5
Termine la instalación
• Llene la bañera con agua hasta
el rebosadero y desagüe la bañera mientras inspecciona las conexiones de desperdicio debajo
del piso para ver si hay fugas. El
acceso desde abajo será necesario para este paso.
• Con la bañera ahora en su lugar,
limpie todo el enmasillado de bañeras y azulejos sobrante alrededor de la orilla inferior de la bañera, donde pega con el piso.
• Ponga una cama de enmasillado de bañeras y azulejos alre-
dedor de la orilla inferior de la bañera donde pega con el piso.
Limpie todo el enmasillado sobrante con un trapo mojado.
Page 20

Instalación ABF sin acceso debajo del piso
1
Preparación
• Limpie, nivele y prepare el piso para la instalación.
• Limpie el área del orificio de desagüe para preparar la instalación del desagüe. El área debe estar se-
ca y libre de desechos.
• Aplique masilla de plomería alrededor del cuerpo de desagüe (con la parte superior instalada) y páse-
lo a través del orificio de desagüe.
• Aplique cinta de teflón a la parte ensartada del cuerpo de desagüe.
• Aplique masilla de plomería a la arandela y deslícela sobre la parte inferior del cuerpo de desagüe.
• Fije la tuerca del cuerpo de desagüe al cuerpo de desagüe y apriétela hasta que la tuerca y la arande-
la hayan creado un sello con la parte inferior de la bañera. No la apriete de más.
• Coloque la unidad en la posición instalada exacta en el piso. Asegúrese que la bañera esté descan-
sando en los soportes inferiores y no en el acrílico.
• Determine la ubicación de la tubería de desagüe en el piso (proporcionada por el instalador) tomando
medidas del desagüe instalado con respecto a la bañera. Esto debe incluir la posición de la huella del
desagüe en el piso y la profundidad del cuerpo de desagüe.
• Coloque cuidadosamente la unidad en una cobija, cartón u otra superficie protectora limpia para que
la unidad esté adecuadamente soportada.
2
Instale el cuerpo de desagüe a la tubería de piso
• Instale la tubería de piso utilizando las medidas del desagüe y bañera instalados.
• Haga el ajuste en seco de la bañera con el desagüe instalado a la tubería de piso.
• Desatornille el tapón.
• Desatornille la parte superior del cuerpo de desagüe y retire el cuerpo de desagüe de la bañe-
ra sin des-insertar la tuerca.
• Instale el cuerpo de desagüe (con tuerca y arandela) a la tubería de piso.
• Vuelva a aplicar masilla de plomería a la arandela y/o a la parte superior del cuerpo de desa-
güe, según se requiera.
tapón
parte superior
del cuerpo de
desagüe
cuerpo de
desagüe
arandela
tuerca
3
Instale los accesorios del rebosadero
• Coloque la placa posterior sobre el tornillo de la cubierta del rebosadero.
• Alinee la cubierta del rebosadero con la barra (instalada en la fábrica) en el orificio del rebosa-
dero.
• Apriete cuidadosamente con las manos la cubierta del rebosadero hasta que se detenga. No
apriete de más.
Page 21

Instalación ABF sin acceso debajo del piso (continuación)
4
Instale la bañera
• Aplique una cama generosa de adhesivo o silicona (tal como la Silicona II GE 5040) a la parte
inferior de los soportes de la bañera.
• Aplique una cama de enmasillado de bañeras y tuberías (tal como la Silicona Pintable II GE
7000) alrededor de la orilla de la base.
• Fije cuidadosamente la bañera en su posición sobre el cuerpo de desagüe.
• Desde el interior de la bañera, inserte en la parte superior del cuerpo de desagüe. No apriete de
más.
• Asegúrese que la bañera esté descansando en los soportes inferiores y no en el acrílico.
5
Termine la instalación
• Llene la bañera con agua hasta el rebosadero y desagüe la bañera mientras inspecciona las conexiones de desperdicio debajo
del piso para ver si hay fugas.
• Con la bañera ahora en su lugar, limpie todo el enmasillado de bañeras y azulejos sobrante alrededor de la orilla inferior de la ba-
ñera, donde pega con el piso.
• Ponga una cama de enmasillado de bañeras y azulejos alrededor de la orilla inferior de la bañera donde pega con el piso. Limpie
todo el enmasillado sobrante con un trapo mojado.
• Reemplace el tapón.
Al instalador
• Asegúrese de entregarle al cliente el manual de instalación.
• Llene toda la información de garantía necesaria en la parte de atrás del Manual del usuario (para los AirBaths).
 Loading...