

Facom CR.4T, CR.10T Instruction Manual
Notice d'instructions
Instruction manual
Bedienungsanleitung
Gebruiksaanwijzing
Manual de instrucciones
Istruzioni per l'uso
Manuel de instruções
Instrukcja obsługi
Betjeningsvejledning
Φυλλάδιο οδηγιών
NU-CR.4T-CR.10T/0704
Compositions
hydrauliques
4 et 10 tonnes
4-ton and 10-ton
hydraulic
compositions
Hydraulische
Kompositionen
4 und10 Tonnen
Hydraulische set
4 en 10 ton
Composiciones
hidráulica de 4 y 10
toneladas
Composizioni idrauliche
da 4 e 10 tonnellate
Conjuntos hidráulicos
4 e 10 toneladas
Zestawy hydrauliczne
4 i 10 ton
Hydrauliske systemer
på 4 og 10 tons
Υδραυλικά
συστήµατα 4 και
10 τνων
■
■
■
■
■
■
■
■
■
■
CR.4T
735437
CR.10T
735429
WA.21
OIL
A
LCOHOL
ALCOOL
BRAKES
FREINS
1
2
3
DECLARATION DE CONFORMITE A LA DIRECTIVE "MACHINES"
(Directives 89/392/CEE modifiée)
et aux réglementations prises pour sa transposition
DECLARATION DE CONFORMITE A LA DIRECTIVE "MACHINES"
DECLARATION DE CONFORMITE A LA DIRECTIVE "MACHINES"
DECLARATION DE CONFORMITE A LA DIRECTIVE "MACHINES"
DECLARATION DE CONFORMITE A LA DIRECTIVE "MACHINES"
DECLARATION DE CONFORMITE A LA DIRECTIVE "MACHINES"
6 et 8, rue Gustave Eiffel - 91423 Morangis
Tél. : (16-1) 64.54.45.45
Fax : (16-1) 69.09.60.93
XXXXXXXXX XXXXXXXXXXXXXXXX XXXXXXXXXXXXXXXX XXXXXXXXXXXX XXX
XXXXXXXXX XXXXXXXXXXXXXXXX XXXXXXXXXXXXXXXX XXXXXXXXXXXX XXX
XXXXXXXXX XXXXXXXXXXXXXXXX XXXXXXXXXXXXXXXX XXXXXXXXXXXX XXX
XXXXXXXXX XXXXXXXXXXXXXXXX XXXXXXXXXXXXXXXX XXXXXXXXXXXX XXX
XXXXXXXXX XXXXXXXXXXXXXXXX XXXXXXXXXXXXXXXX XXXXXXXXXXXX XXX
XXXXXXXXX XXXXXXXXXXXXXXXX XXXXXXXXXXXXXXXX XXXXXXXXXXXX XXX
XXXXXXXXX XXXXXXXXXXXXXXXX XXXXXXXXXXXXXXXX XXXXXXXXXXXX XXX
XXXXXXXXX XXXXXXXXXXXXXXXX XXXXXXXXXXXXXXXX XXXXXXXXXXXX XXX
XXXXXXXXX XXXXXXXXXXXXXXXX XXXXXXXXXXXXXXXX XXXXXXXXXXXX XXX
XXXXXXXXX XXXXXXXXXXXXXXXX XXXXXXXXXXXXXXXX XXXXXXXXXXXX XXX
XXXXXXXXX XXXXXXXXXXXXXXXX XXXXXXXXXXXXXXXX XXXXXXXXXXXX XXX
XXXXXXXXX XXXXXXXXXXXXXXXX XXXXXXXXXXXXXXXX XXXXXXXXXXXX XXX
XXXXXXXXX XXXXXXXXXXXXXXXX XXXXXXXXXXXXXXXX XXXXXXXXXXXX XXX
XXXXXXXXX XXXXXXXXXXXXXXXX XXXXXXXXXXXXXXXX XXXXXXXXXXXX XXX
XXXXXXXXX XXXXXXXXXXXXXXXX XXXXXXXXXXXXXXXX XXXXXXXXXXXX XXX
XXXXXXXXX XXXXXXXXXXXXXXXX XXXXXXXXXXXXXXXX XXXXXXXXXXXX XXX
XXXXXXXXX XXXXXXXXXXXXXXXX XXXXXXXXXXXXXXXX XXXXXXXXXXXX XXX
XXXXXXXXX XXXXXXXXXXXXXXXX XXXXXXXXXXXXXXXX XXXXXXXXXXXX XXX
XXXXXXXXX XXXXXXXXXXXXXXXX XXXXXXXXXXXXXXXX XXXXXXXXXXXX XXX
XXXXXXXXX XXXXXXXXXXXXXXXX XXXXXXXXXXXXXXXX XXXXXXXXXXXX XXX
XXXXXXXXX XXXXXXXXXXXXXXXX XXXXXXXXXXXXXXXX XXXXXXXXXXXX XXX
XXXXXXXXX XXXXXXXXXXXXXXXX XXXXXXXXXXXXXXXX XXXXXXXXXXXX XXX
XXXXXXXXX XXXXXXXXXXXXXXXX XXXXXXXXXXXXXXXX XXXXXXXXXXXX XXX
XXXXXXXXX XXXXXXXXXXXXXXXX XXXXXXXXXXXXXXXX XXXXXXXXXXXX XXX
Le Responsable Qualité FACOM
++++++++
P
CR.4T01
CR.10T01
CR.4T02
CR.10T02
4
CR.4T02
CR.10T02
CR.4T01
CR.10T01
OK
1
2
3
5
6
7
4
4
CR.4T06
190
7,5
CR.10T06
127
5
5
CR.4T07
114
4,5
-
-
-
4 t
L (mm)
L ('')
10 t
L (mm)
L ('')
1
CR.4T03
533
21
CR.10T03
711
28
2
CR.4T04
457
18
CR.10T04
483
19
3
CR.4T05
254
10
CR.10T05
279
11
10
CR.4T12
CR.10T11
4 t
10 t
6
CR.4T08
CR.10T07
7
CR.4T09
CR.10T08
8
CR.4T10
CR.10T09
9
CR.4T11
CR.10T10
14
CR.4T16
CR.10T15
4 t
10 t
11
CR.4T13
CR.10T12
12
CR.4T14
CR.10T13
13
CR.4T15
CR.10T14
5
6
7
8
OK
9
a
b
c
d
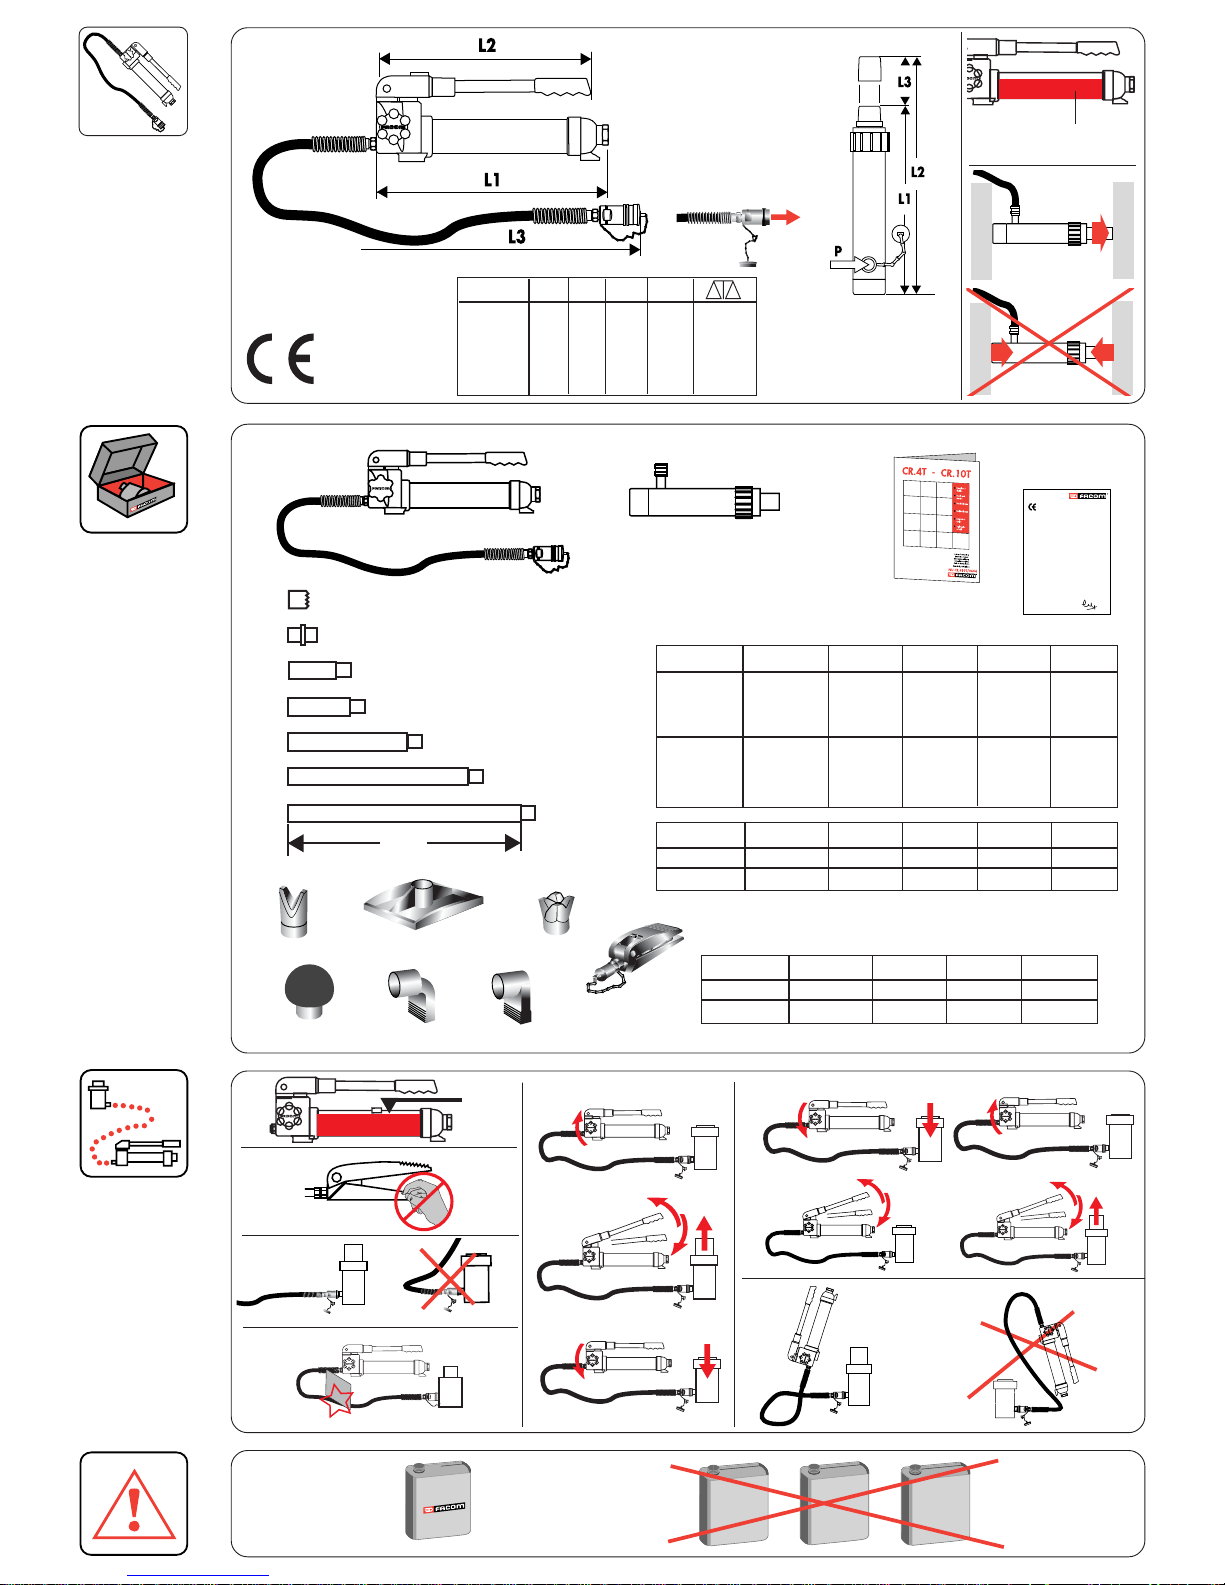
L1 L2 P (bar) L3
CR.4T01 458 375 700 1780 20,0 kg
CR.10T01 648 540 700 1780 30,9 kg
CR.4T02 279 400 620 122 1,9 kg
CR.10T02 348 502 640 154 4,8 kg
OK
89 10
11 12 13 14
CR.4T01 : 270 cm
3
CR.10T01 : 600 cm
3
L
OK

RESPONSABILITE DE L’UTILISATEUR
L’utilisateur doit avoir pris connaissance des instructions et des précautions suivantes avant d’utiliser la composition
hydraulique de carrosserie. La non - observation de ces précautions pourrait causer une détérioration du vérin
et des accessoires, voire de provoquer des blessures auprès des utilisateurs.
Il est nécessaire de comprendre au préalable, ces avertissements.
AVERTISSEMENTS !
1. Le vérin de carrosserie n’est prévu que pour une utilisation avec des accessoires de la marque FACOM. L’utilisation d’accessoires d’une ou plusieurs autres marques que FACOM
peut causer une surcharge, diminuer la capacité et réduire la stabilité de l’ensemble, voire de provoquer un accident sérieux.
2. La multiplication des accessoires pourrait alors faire plier l’ensemble et causer des blessures sur les personnes ainsi que d’endommager les équipements proches.
3. Vérifiez régulièrement le niveau de l’huile dans la pompe (1). A l’inverse, trop d’huile peut endommager ou dérégler les appareils. Voyez la rubrique “ instructions avant utilisa-
tion ” pour la procédure à suivre.
4. Pour chaque rallonge utilisée, la résistance de l’ensemble diminue de 50%. Voyez les détails dans les rubriques suivantes.
5. Il est recommandé d’utiliser un manomètre (non compris dans votre valise hydraulique) afin de vérifier la pression des différents types de rallonges.
6. Ne démontez jamais les raccords sauf si le piston se trouve dans la position basse.
7. Avant de monter en pression, vérifiez si tous les accessoires et les rallonges sont correctement accouplés.
8. Pour éviter que l’ensemble ne glisse, vous devez toujours correctement centrer la charge avec le vérin et les accessoires concernés.
9. Quand vous changez l’huile, n’utilisez jamais du liquide de frein, de l’alcool, de la glycérine, des détergents, de l’huile de moteur ou de l’huile usagée. L’usage d’une huile sale
peut engendrer sur votre matériel, des dommages internes. Pour plus d’informations, prenez contact directement avec votre distributeur FACOM qui vous a vendu votre matériel.
FACOM recommande l’huile référence WA.21
10. Tenez les mains éloignées du vérin écarteur afin d’éviter des blessures (2)
11. Evitez de couder le tuyau. Tenez le tuyau toujours dans une position horizontale ou courbée légèrement (3)
12.
Ne placez jamais un poids trop lourd sur le tuyau, chaque incision peut provoquer des explosions pendant l’usage
(4).
INSTRUCTIONS POUR UNE PARFAITE UTILISATION
1. Avant chaque utilisation, il faut contrôler le vérin de carrosserie. Vous devez tout particulièrement vérifier s’il y a des fuites, des tuyaux ou des connexions usés ou endommagés,
des rallonges courbées ou endommagées et des accessoires mal fixés ou perdus.
2. L’utilisateur doit comprendre que la réparation du vérin de carrosserie exige des connaissances spécifiques.
C’est pourquoi les pièces défectueuses devront être remplacées par du personnel qualifié avec des pièces d’origine FACOM.
3. Chaque pièce du vérin de carrosserie doit être contrôlée en cas de charge jugée anormale ou suite à un choc.
MONTAGE
1.
Pour préparer la pompe, enlevez la protection du tuyau et du couplage du vérin. Insérez le couplage du tuyau avec celui du vérin. Prenez une rallonge propre et montez la. Contrôlez que
la rallonge est parfaitement montée sur le piston.
Remarque : la protection de filetage doit être gardée pour une prochaine utilisation.
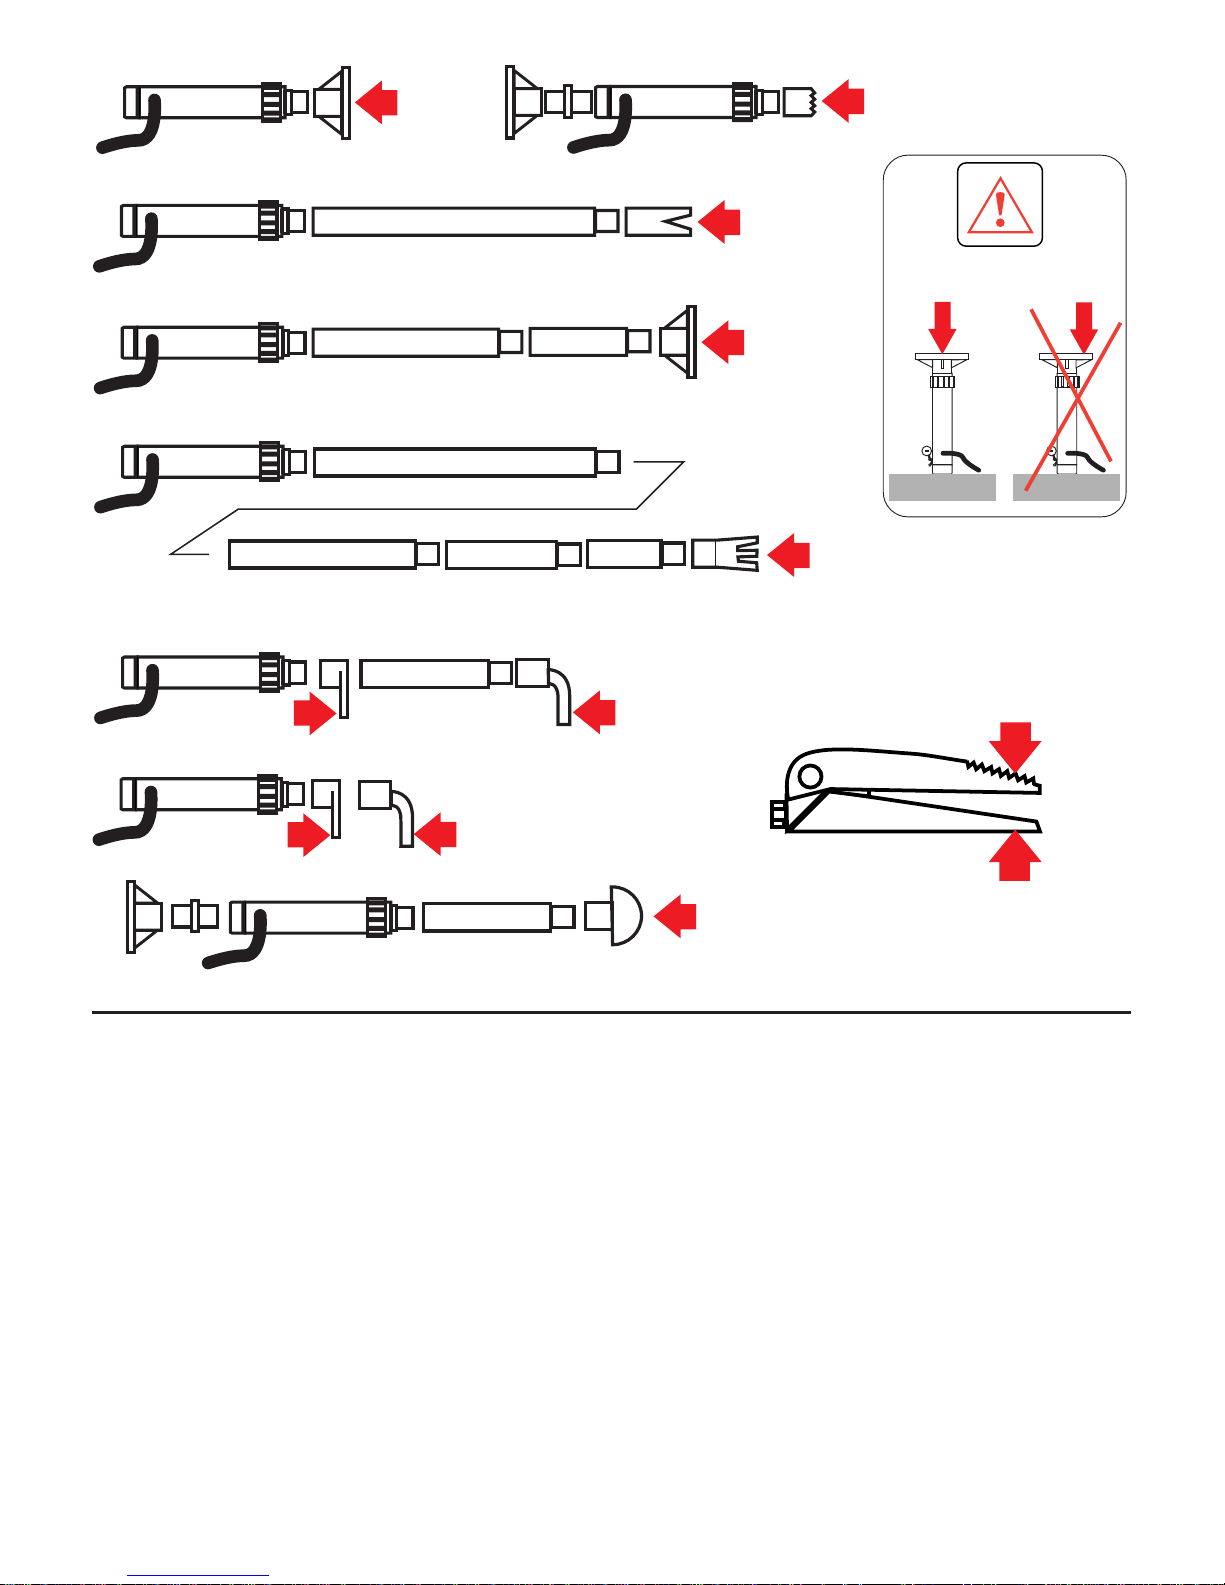
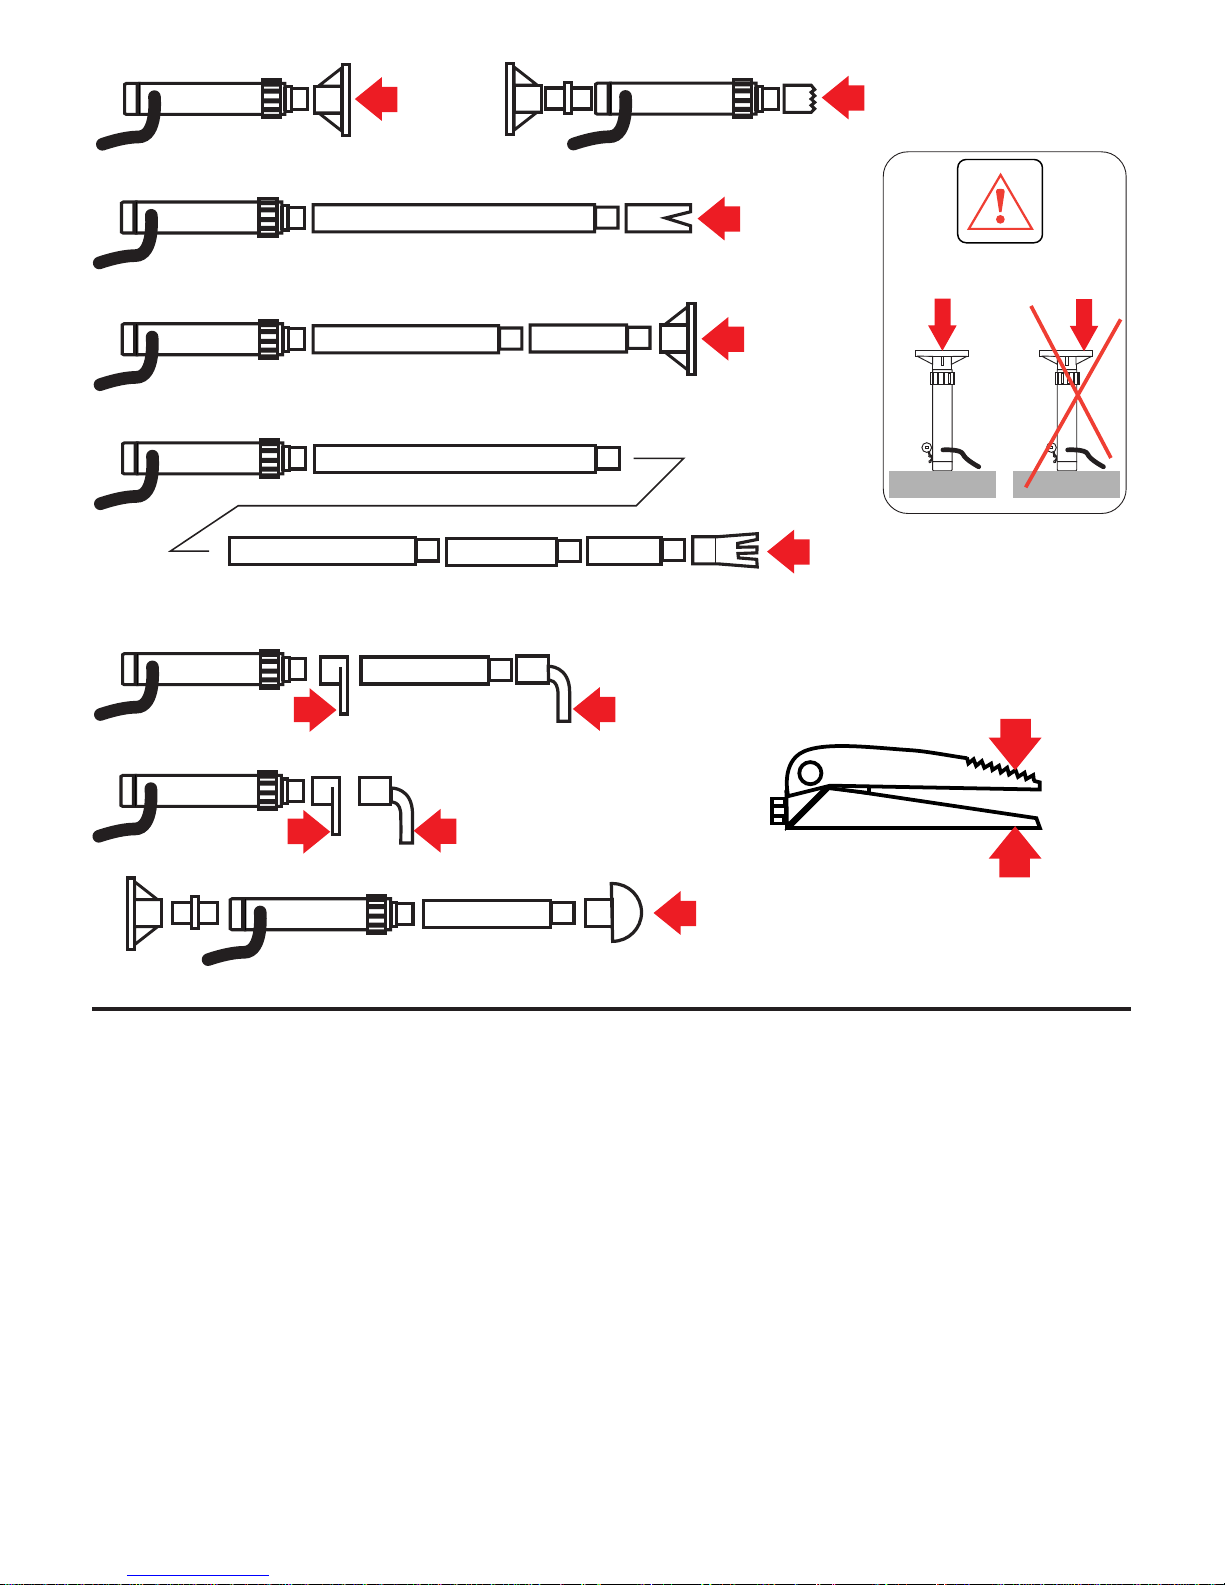
2. L’utilisation de rallonges ou d’autres accessoires comme le piston et le pied du bélier peut diminuer la capacité de l’appareil. Quand vous utilisez des rallonges, la rallonge la plus
courte doit être montée toujours en dernier.
Ne la montez jamais au centre.
INSTRUCTIONS AVANT UTILISATION
1.
Vérification du niveau d’huileVérification du niveau d’huile
Vérification du niveau d’huileVérification du niveau d’huile
Vérification du niveau d’huile
Mettez le vérin horizontalement, piston en position courte et ouvrez la vanne. Enlevez le bouchon. Le réservoir doit être rempli exactement jusqu’à l’ouverture (1). Si cela est
nécessaire, remplir avec de l’huile FACOM (référence WA.21), la juste quantité.
2.
Lubrification intérieureLubrification intérieure
Lubrification intérieureLubrification intérieure
Lubrification intérieure
Actionnez quelques fois, le levier, vanne ouverte afin d’être assuré d’une parfaite lubrification.
MODE D’EMPLOI
1.
Mise en marcheMise en marche
Mise en marcheMise en marche
Mise en marche
Fermez la vanne (5) en tournant dans le sens des aiguilles d’une montre jusqu’à ce qu’elle soit bloquée (pas trop quand même). Puis utilisez la pompe (6). Continuez cette opération de pompage jusqu’à ce que la position désirée soit atteinte.
2.
DégagementDégagement
DégagementDégagement
Dégagement
Tournez lentement la vanne (7) dans le sens contraire des aiguilles d’une montre et retirez le piston. La vitesse de cette action peut être réglée selon la vitesse avec laquelle on
tourne la vanne.
REMARQUE :
La pompe est équipée d’une soupape de sûreté qui conduit l’huile dans le réservoir quand la pression de la pompe est arrivée au maximum. Ensuite, continuez de pomper, n’actionnera pas
le système. Attention au cas où les rallonges seraient mal positionnées. Si vous observez que les rallonges se plient, ouvrez immédiatement la vanne de la pompe et corrigez votre installation.
Une surcharge continuelle indique que votre outillage n’est pas forcément adapté et que votre travail nécessite une plus grande capacité du vérin.
MAINTENANCE
1.
Après utilisationAprès utilisation
Après utilisationAprès utilisation
Après utilisation
Quand le vérin de carrosserie n’est plus utilisé, tenez celui-ci en position courte et la vanne ouverte. Gardez propre le vérin et les rallonges et lubrifiez régulièrement les éléments
“ fragiles ” de la pompe. Rangez de préférence le vérin et les rallonges dans votre valise quand vous ne les utilisez pas.
2.
Purge du système hydrauliquePurge du système hydraulique
Purge du système hydrauliquePurge du système hydraulique
Purge du système hydraulique
Durant le transport, le rangement ou l’usage de la pompe ou du bélier piston, la pompe peut avoir moins d’huile et de l’air peut s’introduire dans le système. Pour purger le système hydraulique, mettez la pompe dans une position horizontale et le vérin en position basse (8). Ouvrez la vanne complètement et pompez environ 10 fois avec le levier. Fermez la vanne et pompez le
vérin jusqu’au bout, après cela, relâchez. Répétez cela 2 ou 3 fois si cela s’avère nécessaire.
POSITION PENDANT L’UTILISATION DE LA POMPE
Quand vous utilisez la pompe dans une position horizontale, le levier doit être au-dessus. Quand vous utilisez la pompe dans une position verticale, le tuyau doit être redressé en bas (9).
Chaque autre position doit être évitée afin qu’aucune bulle d’air ne soit pompée dans le tuyau et le vérin.
La capacité du vérin de carrosserie peut varier en fonction du nombre d’accessoires utilisés et par le type de charge souhaitée. La capacité estimée pour la charge de chaque pièce est illustrée en (10)
.
Quand vous utilisez deux rallonges ou plus, la rallonge la plus courte doit être éloignée le plus du vérin.
DECLARATION DE CONFORMITE
NOUS, FACOM S.A., 6/8 RUE GUSTAVE EIFFEL - BP 99 - 91 423 MORANGIS CEDEX FRANCE,
DECLARONS SOUS NOTRE PROPRE RESPONSABILITE QUE LES PRODUITS :
CR.4T, CR.10T – VERINS DE CARROSSERIE: 4 et 10 tonnes Marque FACOM
SONT CONFORMES AUX DISPOSITIONS DES DIRECTIVES EUROPEENES SUIVANTES :
- DIRECTIVE “ MACHINES ” 98/37/CE ANNEXES I, II, III ET V
FR
GARANTIE: Type D = 2 ans. Voir les conditions générales dans le catalogue FACOM F04 ou dans le tarif FACOM.
Le Responsable Qualité FACOM
The FACOM Quality Manager
PROBLEMES ET SOLUTIONS
La pompe ne peut pas soulever la charge ou arriver à la capacité maximale:
La vanne n'est pas complètement fermée. Vérifiez la vanne, fermez la si nécessaire.
Le niveau d'huile est trop bas. Vérifiez le niveau, ajoutez de l'huile si nécessaire. (voir MAINTENANCE)
La pompe peut contenir de l'air. Purgez le système. ( voir MAINTENANCE)
La pression du vérin chute sous la charge:
La vanne n'est pas complètement fermée. Vérifiez la vanne, fermez la si nécessaire.
La pompe peut contenir de l'air. Purgez le système. ( voir MAINTENANCE)
La pompe paraît “ comme une éponge ”:
Le niveau d'huile est trop bas. Vérifiez le niveau, ajoutez de l'huile si nécessaire. (voir MAINTENANCE)
La pompe peut contenir de l'air. Purgez le système. ( voir MAINTENANCE)
La poignée monte ou recule en charge:
La pompe peut contenir de l'air. Purgez le système. ( voir MAINTENANCE)
Le bélier ne monte pas au maximum:
Le niveau d'huile est trop bas. Vérifiez le niveau, ajoutez de l'huile si nécessaire. (voir MAINTENANCE)
La pompe peut contenir de l'air. Purgez le système. ( voir MAINTENANCE)
Le bélier ne descend pas complètement:
Les pièces en mouvement de la pompe ont besoin d'être lubrifiées.
Note : Si les procédures décrites ci-dessus ne permettent pas de résoudre un problème donné, le produit doit être examiné par votre distributeur FACOM le plus proche.
10
100 %
100 %
50 %
25 %
6 %
25 %
50 %
50 %
500 kg
OK

1
CR50040-11 (CR.4T01+CR.4T02)
CR50100-11 (CR.10T01+CR.10T02)
2
3
4
5
6
CR.4T01
CR.10T01
CR.4T01
CR.10T01
1 CR50040-01
2 CR50040-02
3 CR50040-03
4 CR50040-04
5 CR50040-05
6 CR50040-11
1 CR50100-01
2 CR50100-02
3 CR50100-03
4 CR50100-04
5 CR50100-05
6 CR50100-11
CR.4T02
CR.10T02
1 CR50040-06
2 CR50040-07
3 CR50040-08
6 CR50040-11
1 CR50100-06
2 CR50100-07
3 CR50100-08
6 CR50100-11
CR.4T02
CR.10T02
2
1
3
6

EN
USER’S RESPONSIBILITY
The user must have read the following instructions and precautions before using the hydraulic body assembly. Failure to observe these precautions could cause
damage to the jack and the accessories, or cause injuries to users.
These warnings must be read and understood before any use.
WARNINGS!
1. The body jack is planned only for use with FACOM brand accessories. Use of accessories of one or more other brands than FACOM may cause an overload,
reduce the capacity and reduce the stability of the unit, and may cause a serious accident.
2. Using too many accessories could then cause the unit to collapse, cause injuries to persons and damage nearby equipment.
3. Regularly check the oil level in the pump (
11
11
1). Conversely, too much oil can damage the machines or put them out of order.
See the heading «instructions before use» for the procedure to follow.
4. For each extension used, the resistance of the unit is reduced by 50%. See the details in the following headings.
5. Use of a manometer is recommended (not included in your hydraulic case) to check the pressure of the various types of extension.
6. Never disconnect the connections unless the piston is in the low position.
7. Before increasing the pressure, check that all the accessories and extensions are correctly coupled.
8. To prevent the unit sliding, you must always correctly centre the load with the jack and the accessories concerned.
9. When you change the oil, never use brake liquid, alcohol, glycerin, detergents, engine oil or used oil. Use of dirty oil can cause internal damage to your
equipment. For more information, contact directly your FACOM distributor who sold you your equipment. FACOM recommends oil reference WA.21
10. Keep your hands away from the separator jack to prevent injury (
22
22
2).
11. Avoid bending the pipe. Always keep the pipe in a horizontal or slightly curved position (
33
33
3).
12. Never place too heavy a weight on the pipe; each incision/cut can cause explosions during use (
44
44
4).
INSTRUCTIONS FOR CORRECT USE
1. Before each use the body jack must be inspected. You must in particular check whether there are leaks, worn or damaged pipe or connections, bent or damaged extensions
and accessories which are incorrectly attached or lost.
2. The user must understand that repairing the body jack requires specific knowledge.
For this reason defective parts must be replaced by qualified personnel with original FACOM parts.
3. Each part of the body jack must be inspected in the event of a load judged to be abnormal or following an impact.
ASSEMBLY
1. To prepare the pump, remove the pipe protection and the jack coupling. Insert the pipe coupling with that of the jack. Take a clean extension and attach it.
Check that the extension is perfectly attached to the piston.
Observation: the thread protection must be kept for future use.
2. Use of extensions or other accessories such as the piston and the suction ram stand may reduce the machine’s capacity. When you use extensions, the shortest extension
must always be attached last.
Never attach it to the centre.
INSTRUCTIONS BEFORE USE
1. Check oil level:
Position the jack horizontally, with the piston in the short position, and open the valve. Remove the cap. The tank must be filled precisely as far as the opening (
11
11
1).
It necessary, fill with FACOM oil (reference WA.21), to the correct level.
2. Internal lubrication:
Operate the lever a few times with the valve open in order to guarantee correct lubrication.
INSTRUCTIONS FOR USE
1. Starting:
Close valve (
55
55
5) by rotating in a clockwise direction until it is blocked (do not overtighten). Then use the pump (
66
66
6). Continue this pumping operation until the desired position
is reached.
2. Release:
Slowly rotate the valve (7) in an anticlockwise direction and retract the piston. The speed of this action may be adjusted according to the speed with which the valve is rotated.
OBSERVATION:
The pump is fitted with a safety valve which directs the oil into the tank when the pump pressure has reached its maximum. After this, continuing to pump will not operate the system. Take care
that the extensions are not incorrectly positioned. If you observe that the extensions are folding, immediately open the pump valve and correct your installation. A continual overload indicates
that your equipment is not necessarily appropriate and that your work requires a higher jack capacity.
MAINTENANCE
1. After use:
When the body jack is no longer in use, keep it in the retracted position with the valve open. Keep the jack and extensions clean and regularly lubricate the «fragile» elements
of the pump.Ideally store the jack and the extensions in your case when you are not using them.
2. Bleeding the hydraulic system:
During transport, storage or use of the pump or the piston suction ram, the pump may have less oil and air can be introduced into the system. To bleed the hydraulic system, place the pump in
a horizontal position and the jack in the low position (
88
88
8). Open the valve completely and pump approximately 10 times with the lever. Close the valve and pump the jack as far as it will go,
and then release. Repeat this operation 2 or 3 times if this proves necessary.
PISTON DURING USE OF THE PUMP
When you use the pump in a horizontal position the lever must be above. When you use the pump in a vertical position the pipe must be straightened out at the bottom (
99
99
9). All other positions
must be avoided to prevent any air bubble being pumped in the pipe and the jack.
The body jack capacity may vary according to the number of accessories used and to the type of load desired. The estimated capacity for the load of each part is illustrated in (
1010
1010
10). When
you use two or more extensions, the shortest extension must be the furthest from the jack.
DECLARATION OF COMPLIANCE
WE, FACOM S.A., 6/8 RUE GUSTAVE EIFFEL - BP 99 - 91 423 MORANGIS CEDEX FRANCE,
STATE UNDER OUR LIABILITY THAT THE FOLLOWING PRODUCTS:
CR.4T, CR.10T – 4-ton and 10-ton BODYWORK JACKS by FACOM
COMPLY WITH THE PROVISIONS SET OUT IN THE FOLLOWING EUROPEAN DIRECTIVES:
- “ MACHINES “ DIRECTIVE 98/37/CE APPENDICES I, II, III AND V
GUARANTEE: Type D = 2 years. See the general conditions in the FACOM F05 catalogue or the FACOM price list.
Le Responsable Qualité FACOM
The FACOM Quality Manager
PROBLEMS AND SOLUTIONS
The pump cannot lift the load or reach maximum capacity:
The valve is not completely closed. Check the valve and close if necessary.
The oil level is too low. Check the level, and add oil if necessary. (see MAINTENANCE)
The pump may contain air. Bleed the system. (see MAINTENANCE)
The jack pressure falls under the load:
The jack is not completely closed. Check the valve and close if necessary.
The pump may contain air. Bleed the system. (see MAINTENANCE)
The pump seems «like a sponge»:
The oil level is too low. Check the level and add oil if necessary. (see MAINTENANCE)
The pump may contain air. Bleed the system. (see MAINTENANCE)
The handle rises or falls under load:
The pump may contain air. Bleed the system. (see MAINTENANCE)
The suction ram does not rise to its highest point:
The oil level is too low. Check the level and add oil if necessary. (see MAINTENANCE)
The pump may contain air. Bleed the system. (see MAINTENANCE)
The suction ram does not come down fully:
The moving parts of the pump need to be lubricated.
Note: If the procedures described above do not enable a given problem to be resolved the product must be examined by your closest FACOM distributor.
10
100 %
100 %
50 %
25 %
6 %
25 %
50 %
50 %
OK
500 kg

DE
VERANTWORTUNG DES BENUTZERS
Vor Einsatz der Komposition muss der Benutzer von folgenden Anweisungen und Vorsichtsmaßnahmen Kenntnis genommen haben. Die Nichtbeachtung dieser Vorsichtsmaßnahmen könnte
zu einer Beschädigung des Zylinders und des Zubehörs oder sogar zu Verletzungen der Benutzer führen.
Folgende Warnungen sind zunächst zur Kenntnis zu nehmen.
WARNUNGEN!
1. Der Karosseriezylinder ist nur für den Einsatz mit Zubehörteilen der Marke FACOM vorgesehen. Die Verwendung von Zubehör einer oder mehrerer anderer Marken als FACOM
kann eine Überlastung verursachen, die Leistungsfähigkeit herabsetzen und die Stabilität des Ganzen beeinträchtigen oder selbst zu ernsthaften Unfällen führen.
2. Der Einsatz von zu viel Zubehör könnte das Ganze zum Zusammenklappen bringen und Verletzungen an Personen sowie Schäden an den in der Nähe befindlichen Ausrüstungen
verursachen.
3. Regelmäßig den Ölstand in der Pumpe (
11
11
1) prüfen. Andernfalls könnte zu viel Öl die Geräte beschädigen oder verstellen. Siehe Abschnitt „Anweisungen vor Einsatz“ betreffend
die Verfahrensweise.
4.
Bei jeder verwendeten Verlängerung wird der Widerstand des Ganzen um 50 % herabgesetzt.Bei jeder verwendeten Verlängerung wird der Widerstand des Ganzen um 50 % herabgesetzt.
Bei jeder verwendeten Verlängerung wird der Widerstand des Ganzen um 50 % herabgesetzt.Bei jeder verwendeten Verlängerung wird der Widerstand des Ganzen um 50 % herabgesetzt.
Bei jeder verwendeten Verlängerung wird der Widerstand des Ganzen um 50 % herabgesetzt. Siehe Einzelheiten in den folgenden Abschnitten.
5. Es wird empfohlen, ein Manometer zu verwenden (nicht in Ihrem Hydraulikkoffer enthalten), um den Druck der einzelnen Verlängerungstypen zu überprüfen.
6. Anschlüsse niemals abmontieren, außer wenn der Kolben sich in unterer Position befindet.
7. Vor Druckerhöhung prüfen, ob alle Zubehörteile und Verlängerungen richtig gekoppelt sind.
8. Um zu vermeiden, dass das Ganze rutscht, Last mit dem Zylinder und den betroffenen Zubehörteile zentrieren.
9.
Beim Ölwechsel niemals Bremsflüssigkeit, Alkohol, Glycerin, Reinigungsmittel, Motoröl oder Altöl verwenden. Die Verwendung von schmutzigem Öl kann am Material innere Schäden
hervorrufen. Wegen weiterer Informationen nehmen Sie direkt Kontakt mit Ihrem FACOM-Händler auf, der Ihnen das Material verkauft hat. FACOM empfiehlt Öl mit der Referenz WA.21.
10. Hände vom Spreizer entfernt halten, um Verletzungen zu vermeiden (
22
22
2).
11. Vermeiden, den Schlauch zu krümmen. Schlauch immer in waagerechter Position oder nur leicht gekrümmt halten (
33
33
3).
12. Niemals ein zu schweres Gewicht auf dem Schlauch abstellen, denn jeder Einschnitt kann zu Explosionen während des Einsatzes führen (
44
44
4).
ANWEISUNGEN FÜR EINEN EINWANDFREIEN EINSATZ
1. Vor jedem Einsatz ist der Karosseriezylinder zu überprüfen. Sie müssen insbesondere prüfen, ob Lecks, abgenutzte oder beschädigte Schläuche oder Anschlüsse, gekrümmte oder
beschädigte Verlängerungen und schlecht befestigte oder fehlende Zubehörteile vorliegen.
2. Der Benutzer muss wissen, dass für die Reparatur des Karosseriezylinders spezifische Kenntnisse erforderlich sind. Deshalb müssen schadhafte Teile von Fachpersonal mit FACOMOriginalteilen ersetzt werden.
3. Jedes einzelne Teil des Karosseriezylinders muss im Fall einer als anormal beurteilten Last oder infolge eines Schocks kontrolliert werden.
MONTAGE
1. Um die Pumpe zu reparieren, Schutz des Schlauchs und der Zylinderkupplung entfernen. Kupplung des Schlauchs mit der des Zylinders einfügen. Eine saubere Verlängerung
nehmen und diese montieren. Prüfen, ob die Verlängerung richtig über den Kolben montiert ist.
Bemerkung: Der Gewindeschutz ist für eine nächste Benutzung aufzubewahren.
2. Die Verwendung von Verlängerungen und anderen Zubehörteilen wie Kolben und Fußplatte kann die Leistungsfähigkeit des Geräts herabsetzen. Wenn Sie Verlängerungen
verwenden, muss die kürzeste Verlängerung immer zuletzt verwendet werden.
Diese niemals in die Mitte montieren.
ANWEISUNGEN VOR EINSATZ
1. Ölstand prüfen
Zylinder waagerecht anordnen, Kolben in kurzer Position, und Ventil öffnen. Verschluss entfernen. Der Behälter muss genau bis zur Öffnung (
11
11
1) gefüllt werden. Falls erforderlich,
FACOM-Öl (Referenz WA.21) in der richtigen Menge nachfüllen.
2. Innere Schmierung
Hebel bei geöffnetem Ventil einige Male betätigen, um sicher zu sein, dass die Schmierung einwandfrei ist.
GEBRAUCHSANLEITUNG
1. Inbetriebnahme
Ventil (
55
55
5) schließen, indem man es im Uhrzeigersinn dreht, bis es blockiert ist (allerdings nicht zu sehr). Dann Pumpe (
66
66
6) benutzen. Diesen Pumpvorgang so lange fortsetzen, bis die
gewünschte Position erreicht ist.
2. Freisetzung
Ventil (
77
77
7) entgegen dem Uhrzeigersinn drehen und Kolben herausnehmen. Die Geschwindigkeit dieser Aktion kann je nach der Geschwindigkeit, mit der man das Ventil dreht,
eingestellt werden.
BEMERKUNG:
Die Pumpe ist mit einem Sicherheitsventil ausgestattet, welches das Öl in den Behälter befördert, wenn der Druck der Pumpe auf dem Maximalwert angekommen ist. Bei einem Weiterpumpen wird
dann das System nicht betätigt. ACHTUNG bei falscher positionierung der Verlängerungen!. Wenn Sie feststellen, dass die Verlängerungen sich biegen, unverzüglich das Ventil der Pumpe öffnen
und Ihre Installation korrigieren. Eine kontinuierliche Überlastung zeigt an, dass Ihr Werkzeug nicht geeignet ist und dass für Ihre Arbeit eine höhere Zylinderleistung erforderlich ist.
WARTUNG
1. Nach dem Einsatz
Wenn der Karosseriezylinder nicht mehr benutzt wird, diesen bei geöffnetem Ventil in kurzer Position halten. Zylinder und Verlängerungen sauber halten und die „empfindlichen“
Elemente der Pumpe regelmäßig schmieren. Zylinder und Verlängerungen vorzugsweise in den Koffer legen, wenn diese nicht gebraucht werden.
2. Entlüftung des Hydrauliksystems
Während des Transportes, der Lagerung oder der Benutzung der Pumpe oder des Kolbenwidders kann es sein; dass die Pumpe weniger Öl enthält und dass Luft in das System eindringt.
Um das Hydrauliksystem zu entlüften, Pumpe in die waagerechte und Zylinder in die untere Position bringen (
88
88
8). Ventil vollständig öffnen und mit dem Hebel etwa 10-mal pumpen.
Ventil dann schließen und Zylinder bis zum Ende pumpen, dann loslassen. Diesen Vorgang, falls erforderlich, 2 oder 3-mal wiederholen.
POSITION WÄHREND DER VERWENDUNG DER PUMPE
Wenn Sie die Pumpe in waagerechter Position benutzen, muss der Hebel nach oben gerichtet sein. Wenn Sie die Pumpe in senkrechter Position benutzen, muss der Schlauch nach unten gerichtet
sein (
99
99
9). Jede andere Position ist zu vermeiden, damit keine Luftblasen in den Schlauch oder in den Zylinder gepumpt werden.
Die Leistung des Zylinders kann je nach den benutzten Zubehörteilen und je nach gewünschter Belastungsart schwanken. Die geschätzte Belastung der einzelnen Teile geht aus (
1010
1010
10) hervor.
Wenn Sie zwei Verlängerungen oder mehr benutzen, muss die kürzeste so weit wie möglich vom Zylinder entfernt werden.
KONFORMITÄTSERKLÄRUNG
WIR, FACOM S.A., 6/8 RUE GUSTAVE EIFFEL - BP 99 - 91 423 MORANGIS CEDEX FRANKREICH,
BESCHEINIGEN HIERMIT IN ALLEINIGER VERANTWORTUNG, DASS DIE ERZEUGNISSE:
CR.4T, CR.10T – KAROSSERIEZYLINDER von 4 Tonnen und 10 Tonnen Marke FACOM
MIT DEN BESTIMMUNGEN DER FOLGENDEN EUROPÄISCHEN RICHTLINIEN ÜBEREINSTIMMEN:
- „MASCHINENRICHTLINIE” 98/37/EG ANHÄNGE I, II, III UND V
GARANTIE : Typ D = 2 Jahre. Siehe die allgemeinen Geschäftsbedingungen im FACOM-Katalog F05 oder in der FACOM-Preisliste.
Le Responsable Qualité FACOM
The FACOM Quality Manager
 Loading...