

Page 1
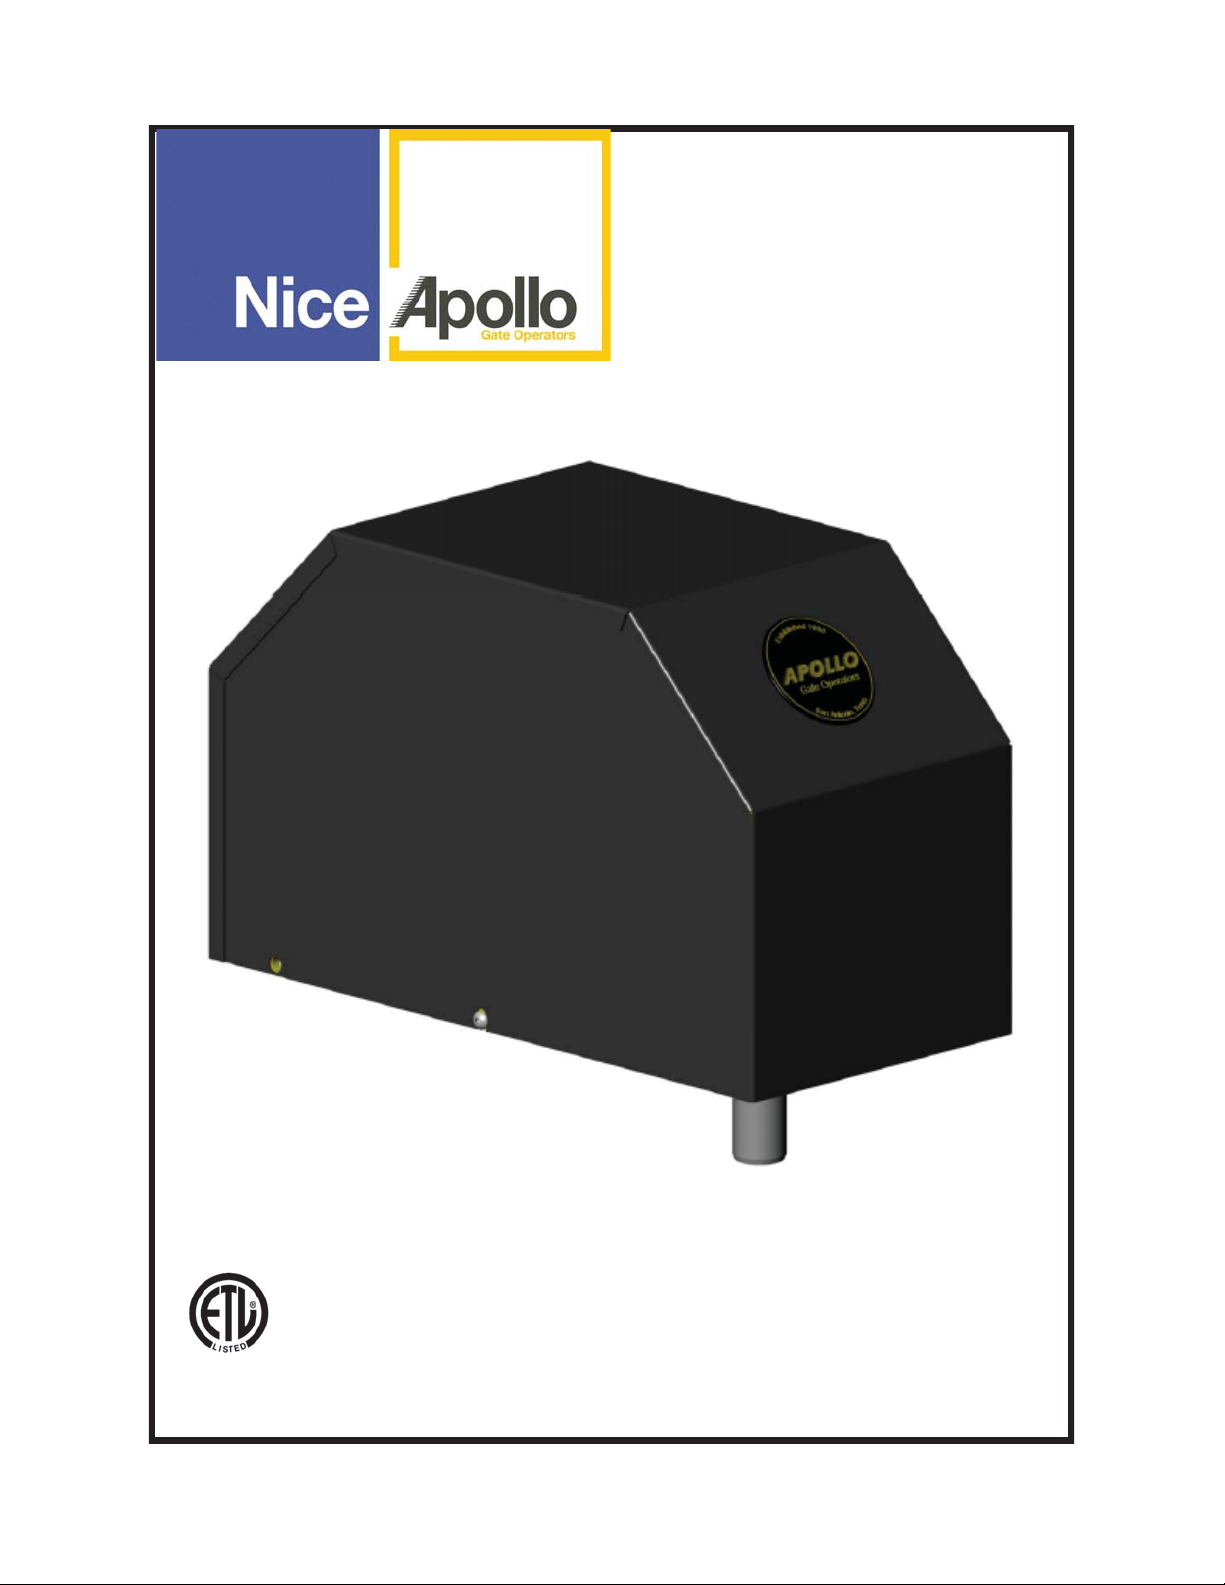
3500ETL-1K
3600ETL-1K (Dual)
Light Commercial Swing
Gate Operator
INSTALLATION MANUAL
Rev 1.0
1
Page 2

Table of contents
IMPORTANT SAFETY INSTRUCTIONS …………………………………………………………...II
APPLICATION ….……………………………………………………………………………………… III
PRE-INSTALLATION CHECKLIST …………………………………...…………………..…….….. IV
PART IDENTIFICATION ………………………………………...……………………………….……….. 6
Optional parts identification
1. POST LOCATION GUIDE …………...…………………………………………………..……….… 7
1 -
2. OPERATOR INSTALLATION …………………………………………………………………...……... 8
2.1 - Post Installation
2.2 - Control Box Installation
2.3 - Control Arm Assembly & Installation
2.4 - Gate Bracket Installation
2.5 - Left Hand and Right Hand Operation Wiring
2.6 - Learning and Limit switch adjustment
3. CIRCUIT BOARD LAYOUT ……………………………………………………………………....… 16
4. OUTPUTS & INPUTS ……………………..………………………………………………..………… 17
4.1 - Gate Operator Accessory Inputs
4.2 - Communication buses
4.2.1 - BLUEBUS ACCESSORIES
4.2.2 - Programming the plug-in receiver and remote controls
4.3.3 - OVIEW REMOTE CONTROL
5. WIRING AND CONNECTIONS ………………………………...…………………………….……...…. 20
6. OPTIONAL INPUTS/OUTPUTS ……………………………………………………………..….. 21
6.1 - Fire dept. connection
6.2 - Exit and edge inputs wiring diagram
6.3 - Guard station
6.4 - Magnetic lock connection
6.5 - Radio receiver connection (third party)
7. INSPECTION AND OPERATION ……………………………………………………………….... 22
8. GENERAL LAYOUT AND SAFETY ACCESS ……………………………………………….... 23
9. ACCESSORIES AND SENSORS …………………………………………………………....…… 24
10. BOARD DIAGRAM …………………………………………………………………….…………... 25
11. PROGRAMMING BUTTONS …………………………………………………………..…….………. 26
11.1 - Force
11.2 - Speed
11.3 – Acceleration
11.4 - Delay
11.5 - Function
11.6 – Display
12. GLOSSARY …………………………………………………………………………..………..…… 31
13. EMERGENCY VEHICLE ACCESS ………………………………………………………………… 32
14. MAINTENANCE SCHEDULE - APOLLO GATE OPENER ……………………………..….. 33
15. APOLLO GATE OPENER TROUBLESHOOTING ……………………………………………….... 32
16. APOLLO 3500ETL-1K/3600ETL-1K PROGRAMMING QUICK START ..………..……… 34
17. PUTTING THE CONTROLLER INTO LEARNING MODE …………………..……….……. 34
18. INSTALLATION CHECKLIST ……………………………………………………………….… 35
WARRANTY INFORMATION
3500ETL-1K/3600ETL-1K POST INSTALLATION DIMENSIONS
2
Page 3

x
x
x
x
x
x
should be clearly visible from
x
x
x
x
x
x
x
x
IMPORTANT SAFETY INSTRUCTIONS
WARNING - To reduce the risk of injury or death:
x
READ AND FOLLOW ALL INSTRUCTIONS.
Installation should be performed by a professional installer.
Required welding should be performed by a qualified welder.
Should electricity be required, use a certified electrician only.
Any device that requires 120 Volts AC should be U.L. approved.
Review with the owner all safety concerns including:
Do not operate the gate unless area around gate is in full view.
Never let children operate or play with gate controls. Keep the remote
control away from children.
Always keep people and objects away from the gate. NO ONE SHOULD
CROSS THE PATH OF THE MOVING GATE.
Periodically test the obstruction sensitivity to assure safe and proper
operation. Do not test sensitivity by standing between the gate and the
hinge or stop post.
The “CAUTION AUTOMATIC GATE” signs
both sides of the gate.
Always insure that the gate has closed securely before leaving area.
Arrange with local fire and law enforcement for emergency access.
Use the emergency release only when the gate is not moving.
A secondary entrapment device such as loop detectors, edge switches, and
beam detectors are highly recommended and required to meet the UL325
standard.
Install control devices such as keypads far enough away (8 feet or further)
from any moving parts of the operator and gate to prevent possible injury.
Do not install control box where the gate can come in contact with person using the push button on side of control box.
Always disconnect the battery or power source when making adjustments or
repairs to any part of the gate or operator.
All rollers should be covered to prevent injury.
KEEP GATES PROPERLY MAINTAINED. Read the owner’s manual. Have a
qualified service person make repairs to gate hardware.
The entrance is for vehicles only. Pedestrians must use separate entrance.
Test the gate operator monthly. The gated entrance MUST reverse on contact
with a rigid object or stop when an object activates the non contact sensors. After adjusting the force or limit of travel, retest the gate operator. Failure to adjust
and retest the gate operator properly can increase the risk of injury or death.
SAVE THESE INSTRUCTIONS
II
3
Page 4
x
x
x
APPLICATIONS
The Model 3500/3600 Swing Gate Operator is designed for residential and commercial applications.
The 3500/3600 is listed with ETL and complies with the UL 325 standard. The 3500/3600 will handle
swing gates up to 20 feet in length and 1,000 pounds each. A professional fence or gate dealer is recommended to assure proper installation. The Model 3500/3600 operator is 12 Volt DC (Direct Current)
powered. There are several advantages with 12 Volt DC systems:
x
Low voltage virtually eliminates risk of electrical shock.
Battery powered operators provide up to 200 operations in the event of power outages.
The battery may be recharged with a trickle charger or by solar energy (Electrical battery
chargers should have a class 2 transformer rating).
With Battery connected to trickle charger (use Part# 404C from page 6)
If a trickle charger is used and a standard electrical outlet is not readily available, a licensed electrician
will be required for proper electrical hook up.
The Charging Method table below should be used as a guide for capacity of operation of operators
only, additional options may reduce the the daily usage. Please note that the charge capability of solar
panels will vary with different geographical locations, please refer to Table 1 below.
1050 Gate Operator Solar Charge Controller (With Solar Panel)
The built-in solar charge controller provides maintenance-free protection for 12VDC batteries and solar panels by preventing overcharging. Charging current is adjustable from 0.10 Amps to 1.50 Amps
in 0.05 Amp increments, with adjustable cycle times and Auto Off/On. The battery charge profile may
be manually adjusted to match a particular battery’s specifications, or default settings can be used to
maintain the majority of 12VDC batteries on the market. The charging algorithm is temperature compensated using a built-in temp sensor to further protect batteries against overheating and overcharging.
SpecificaƟons
Charging Current: .10 – 1.50A in .05A increments
Cycling On/Off: 4s – 30s in 1s increments
Auto: Off/On
Daily Cycles 1-10 1-20 1-40 1-60 1-80 80+
5 watt solar panel
10 watt solar panel
20 watt solar panel
40 watt solar panel
1.5 amp battery charger
10 amp battery charger
Table 1
Note: Double the amount of solar panels for Dual Gate Operators.
III
4
Charging Methods for Average Daily Usage
*
*
*
*
*
*
Page 5

PRE-INSTALLATION CHECKLIST
The following check list should be used before beginning installation:
Verify that the proper operator has been selected for this application.
Verify proper installation and operation of the gate.
1. Are the hinges serviceable?
2. Does the gate swing free and level?
3. Will the gate require a locking device?
4. Is the hinge and stop posts sturdy enough to handle the gate & operator?
5. Does the gate meet U.L. construction?
Determine the general location of the operator, attachment points, and
solar panel (if used).
1. Is there a suitable location for the operator?
2. Can the solar panel (if used) be mounted in an unobstructed area facing
south (in the northern hemisphere)?
3. Will additional solar panel cable be required?
4. Is electricity available (if required)?
Consider safety and access options. Recommend if needed.
1. Will there be children or animals in the area?
2. Are safety loops, edge switches, or photo beam detectors required?
3. How can the gate be opened in emergencies?
4. How will visitors enter and exit?
5. Will vehicles (and trailers) have sufficient room off roadway to operate any
control devices such as keypads?
IMPORTANT
Never weld parts to the gate or posts when the operator circuit board is pow-
ered. Doing so may damage the board beyond repair and void your warranty.
IV
5
Page 6
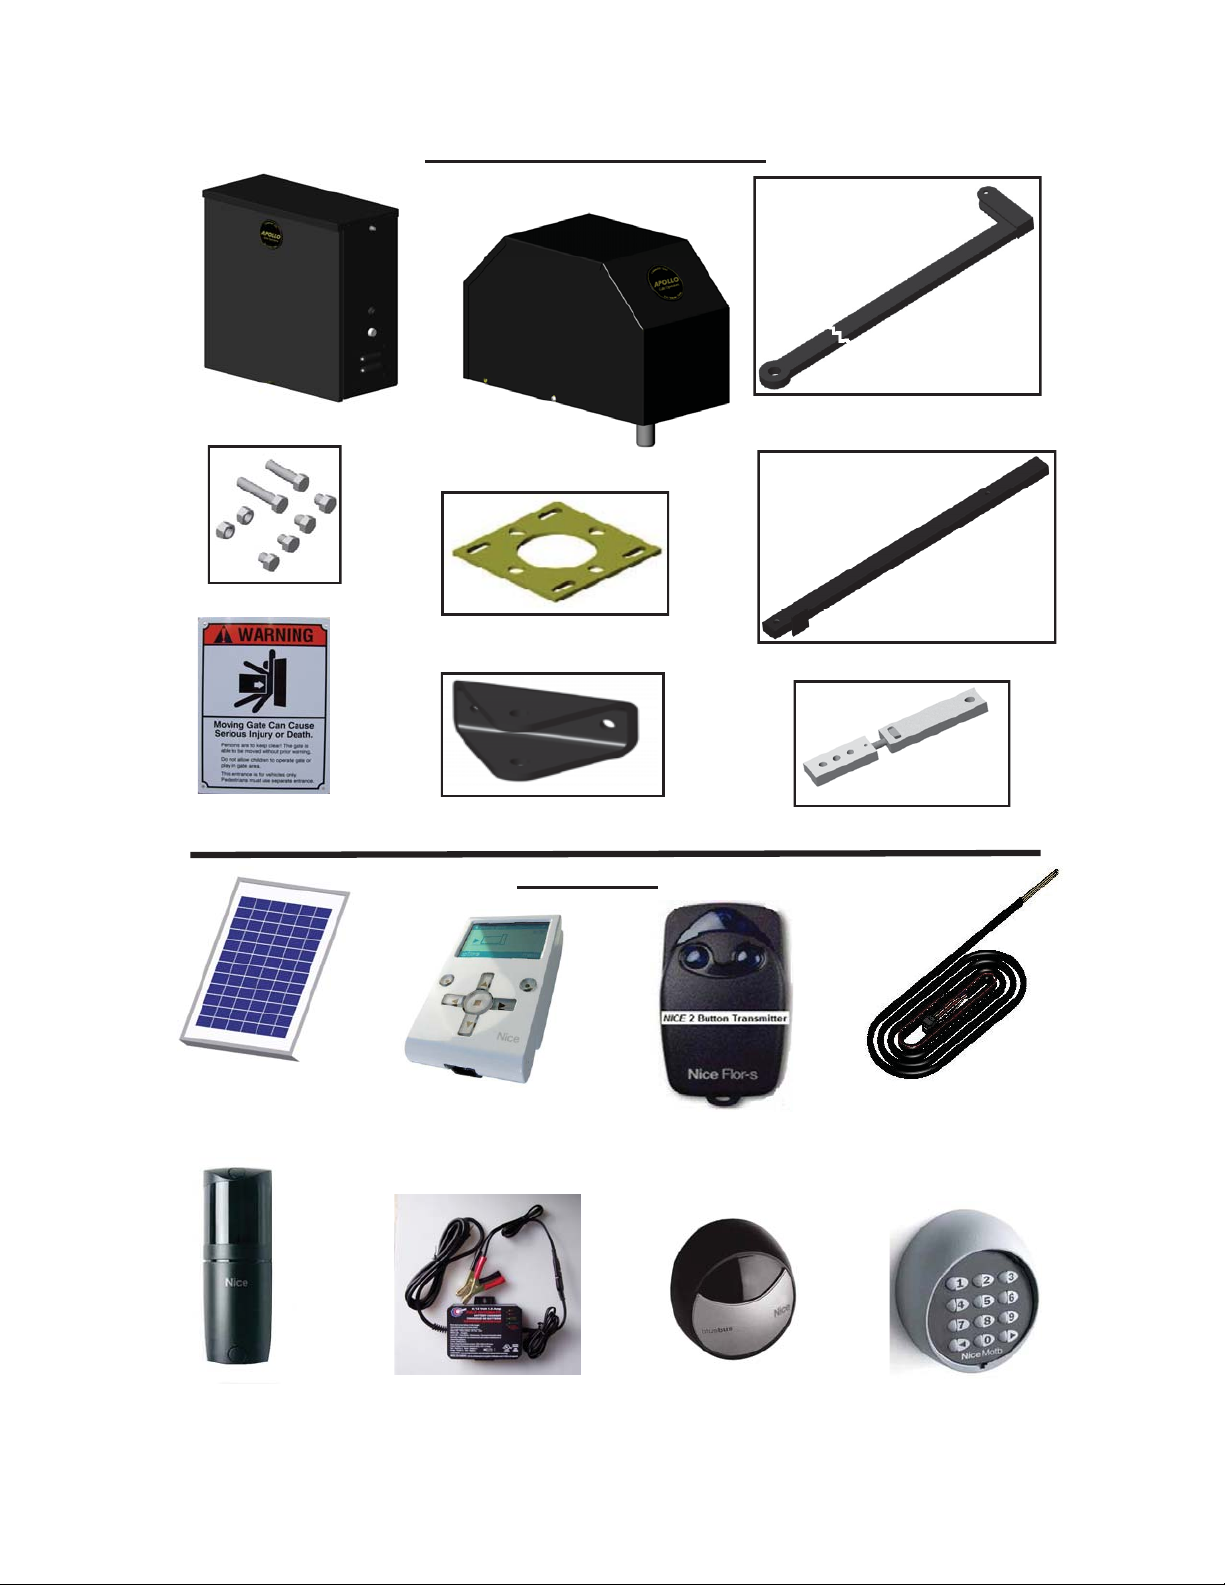
Part# A2058 Cable Harness for (8’)
Part# A2014 Cable Harness for (38’)
PART IDENTIFICATION
B
A
Part# 11111B Control Box
Fasteners
Part# 273 - CAUTION Sign
(2 each)
Operator
Part# 10038315 Mounting Plate
Part# 10025215 Secondary Arm
OPTIONS
A) Part# 10045790 Insert Collar
B) Part# 10045990 Primary Arm
Part# 10031390 Secondary Arm
Part# 3500AAA Adjustable Arm
Part# 201
5 Watt Solar Panel &
Bracket
Part# FT210B
6
Part# OVIEW
Part# 404C
Automatic Battery Charger
Part# 320N
Nice Transmitter
Part#: MOFB
Part# MOTB
Page 7
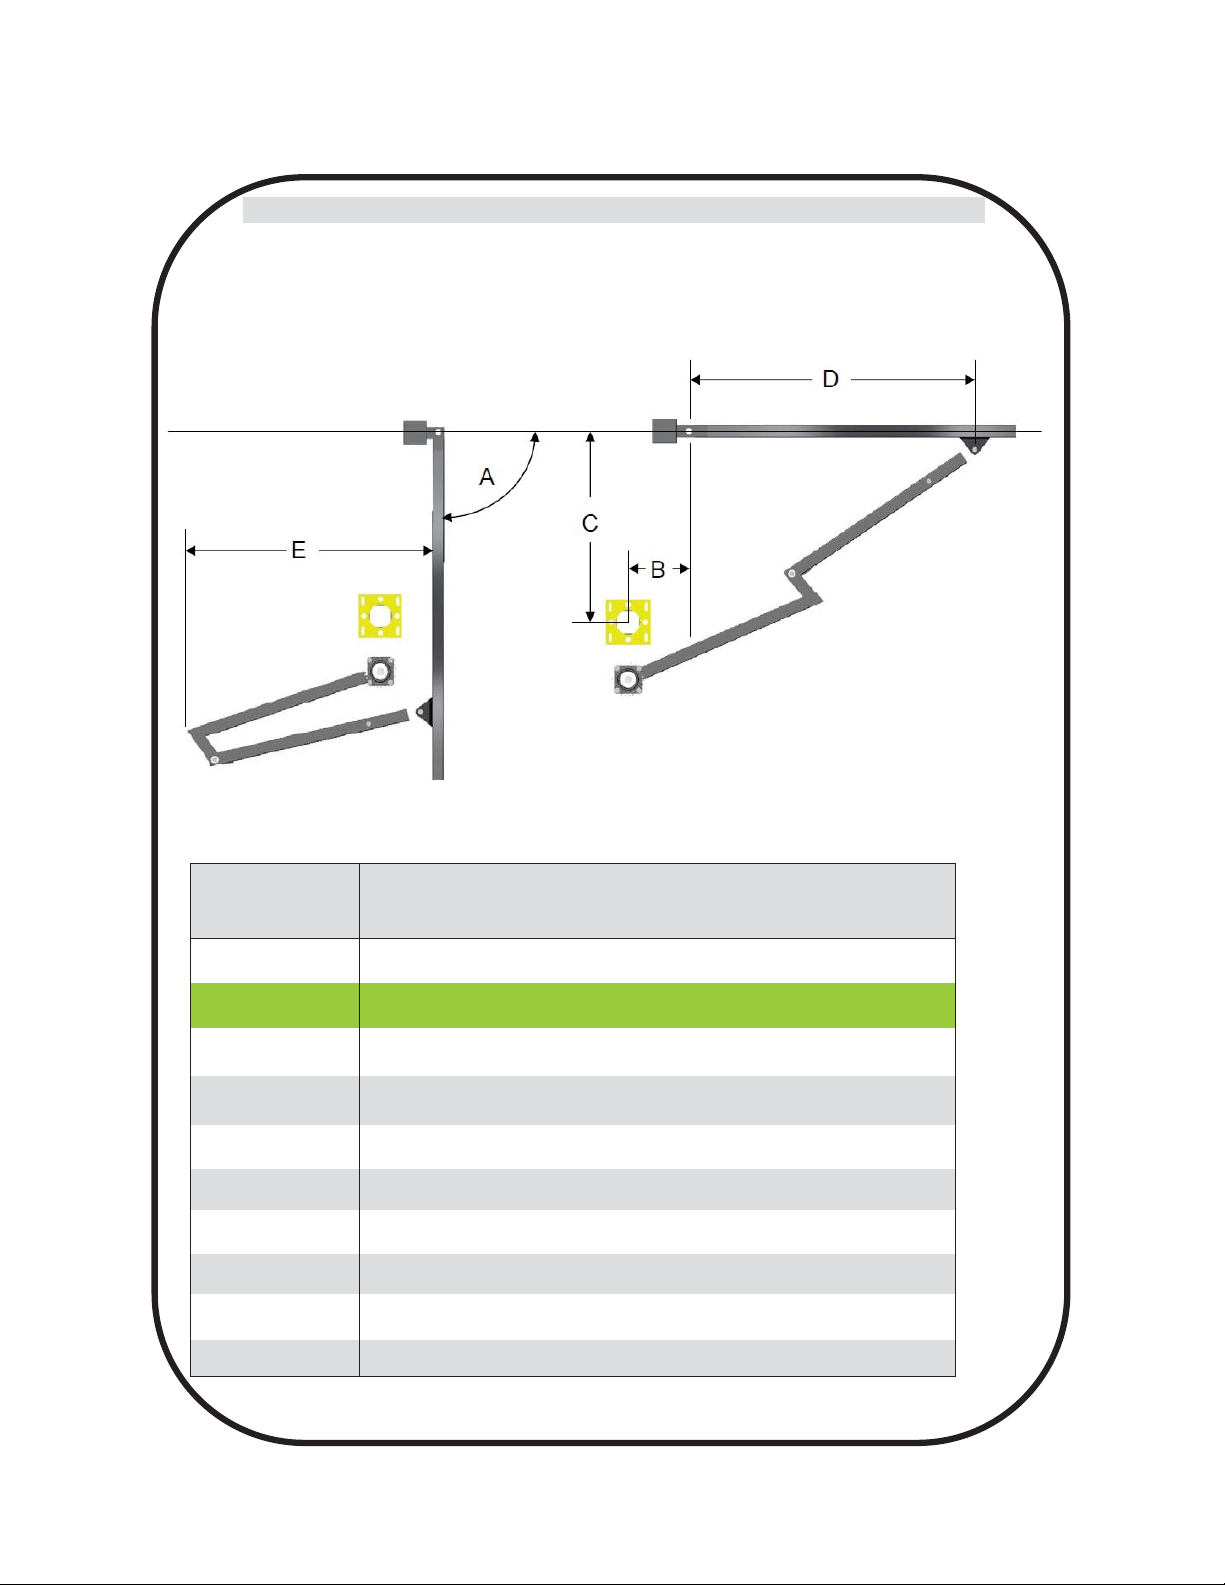
POST LOCATION GUIDE
1 - 3500ETL-1K/3600ETL-1K POST INSTALLATION DIMENSIONS
Determine the angle that the gate will open to (A). Select the post coordinates (B&C) as shown
on the chart below. Distances are from the hinge square to the center of the mounting post.
Longer gates should operate at the longer speeds.
Figure 1: Overview of Post Location
Table 1: Table 1: Optional Gate Opening Angles & Post/Arm Measurements
A
Open Degrees B inches C inches D inches E inches
Approximate
Seconds to open
90º 10 31.2 46.3 40.6 15
90º 10 30 47.1 42 16
92º 15 30 42.1 34 15
97º 13.5 25.5 46.3 46.8 17
97º 15 25 45 47.1 16
100º 20 25 40 43.7 13
107º 20 20 42.4 53.5 17
110º 25 20 37.4 50.6 13
116º 25 15 39.3 58.4 16
117º 20 15 44.3 50.3 20
OPTIMUM
7
Page 8
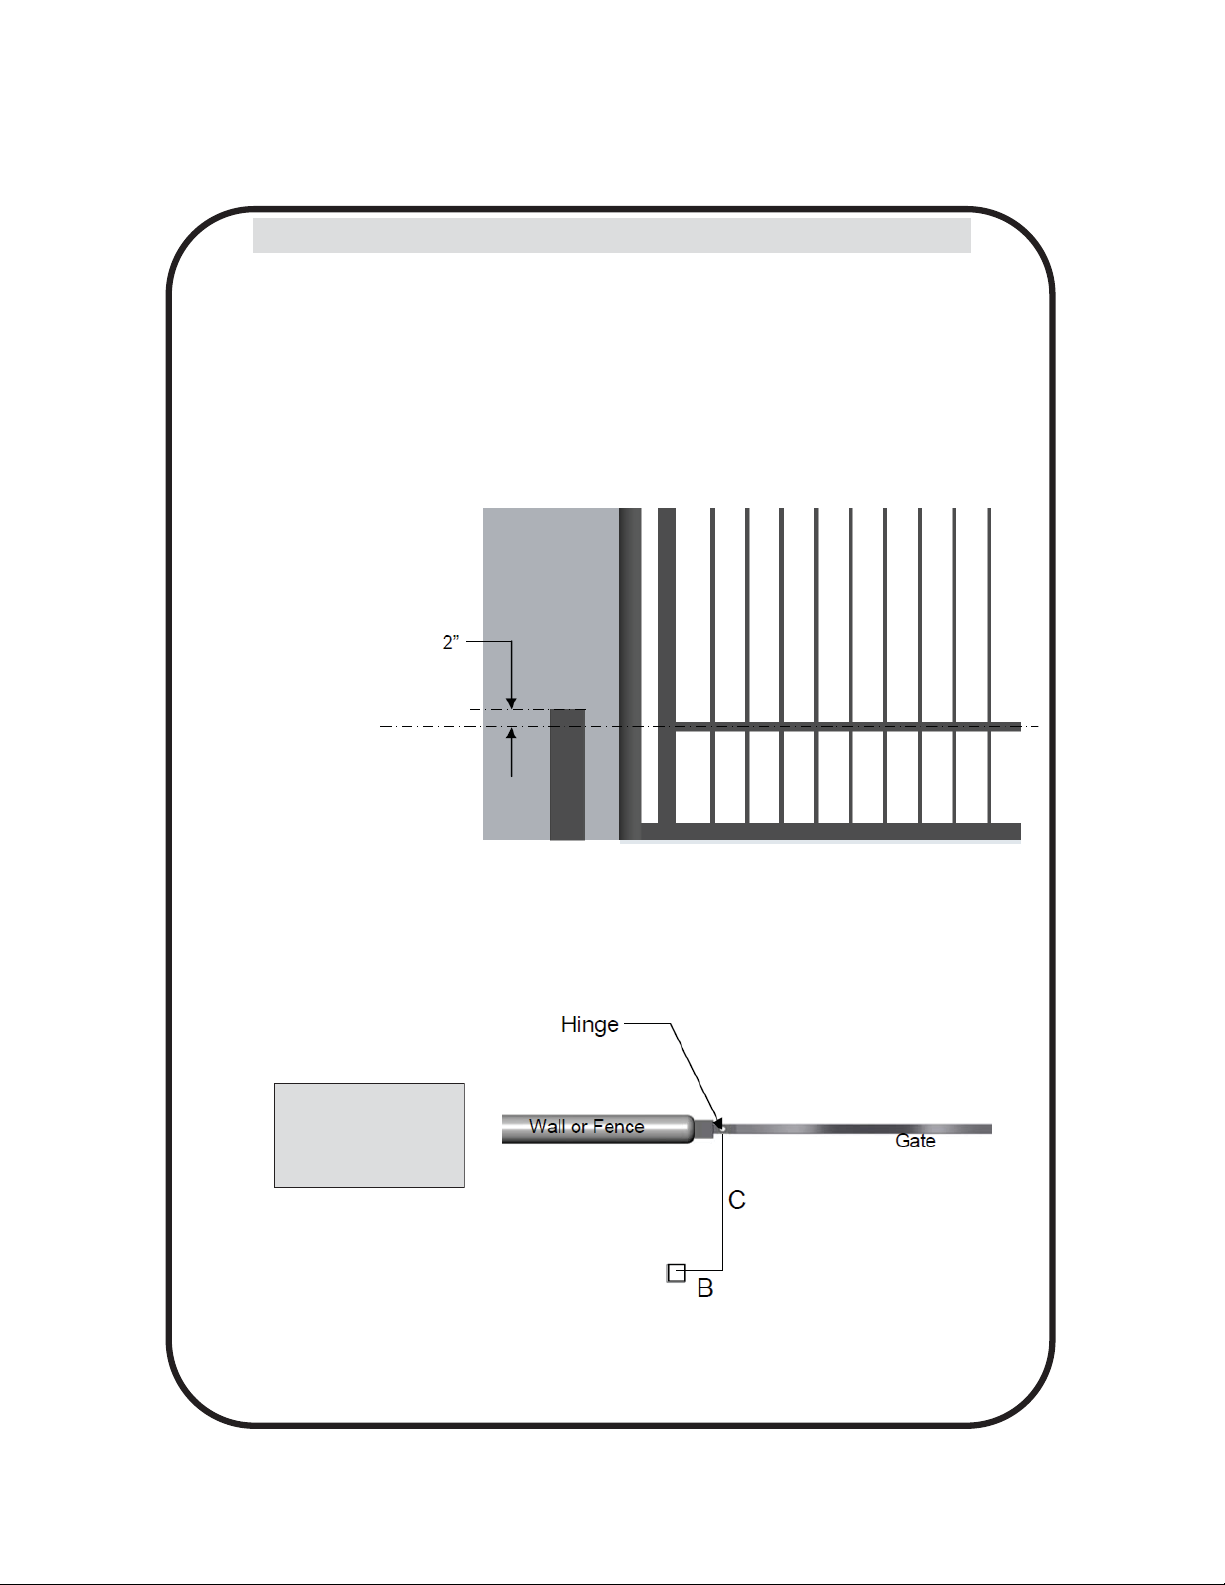
OPERATOR INSTALLATION
2 - 3500ETL-1K/3600ETL-1K Operator Installation
2.1 - Post Installation
STEP 1: The 3500/3600 operator is designed for installation using a 4” x 4” square post (not
supplied) with 1/4” wall thickness.
1. Determine the height on the gate where the operator will attach to.
2. Install the post as per the diagram below. The top of the post should be 2” above the centerline of
the location where the gate bracket will be mounted on the gate. Gate bracket should be mounted
to a structural member on the gate. Do not attach the gate bracket to pickets.
3. Conduit should be considered at this time for cable routing from control box to operator.
Horizontal center line
of where gate bracket
is to be installed
Figure 2: Top of post to gate bracket horizontal center line dimension
IMPORTANT: The mounƟng post should be square to the gate in the closed posiƟon and level for proper
TOP VIEW
NOTE: Distances are
from the hinge to
the center of the
mounting post
Figure 3: Dimensions from gate hinge to mounting post - (Refer to Table 1. for dimension options)
8
Page 9
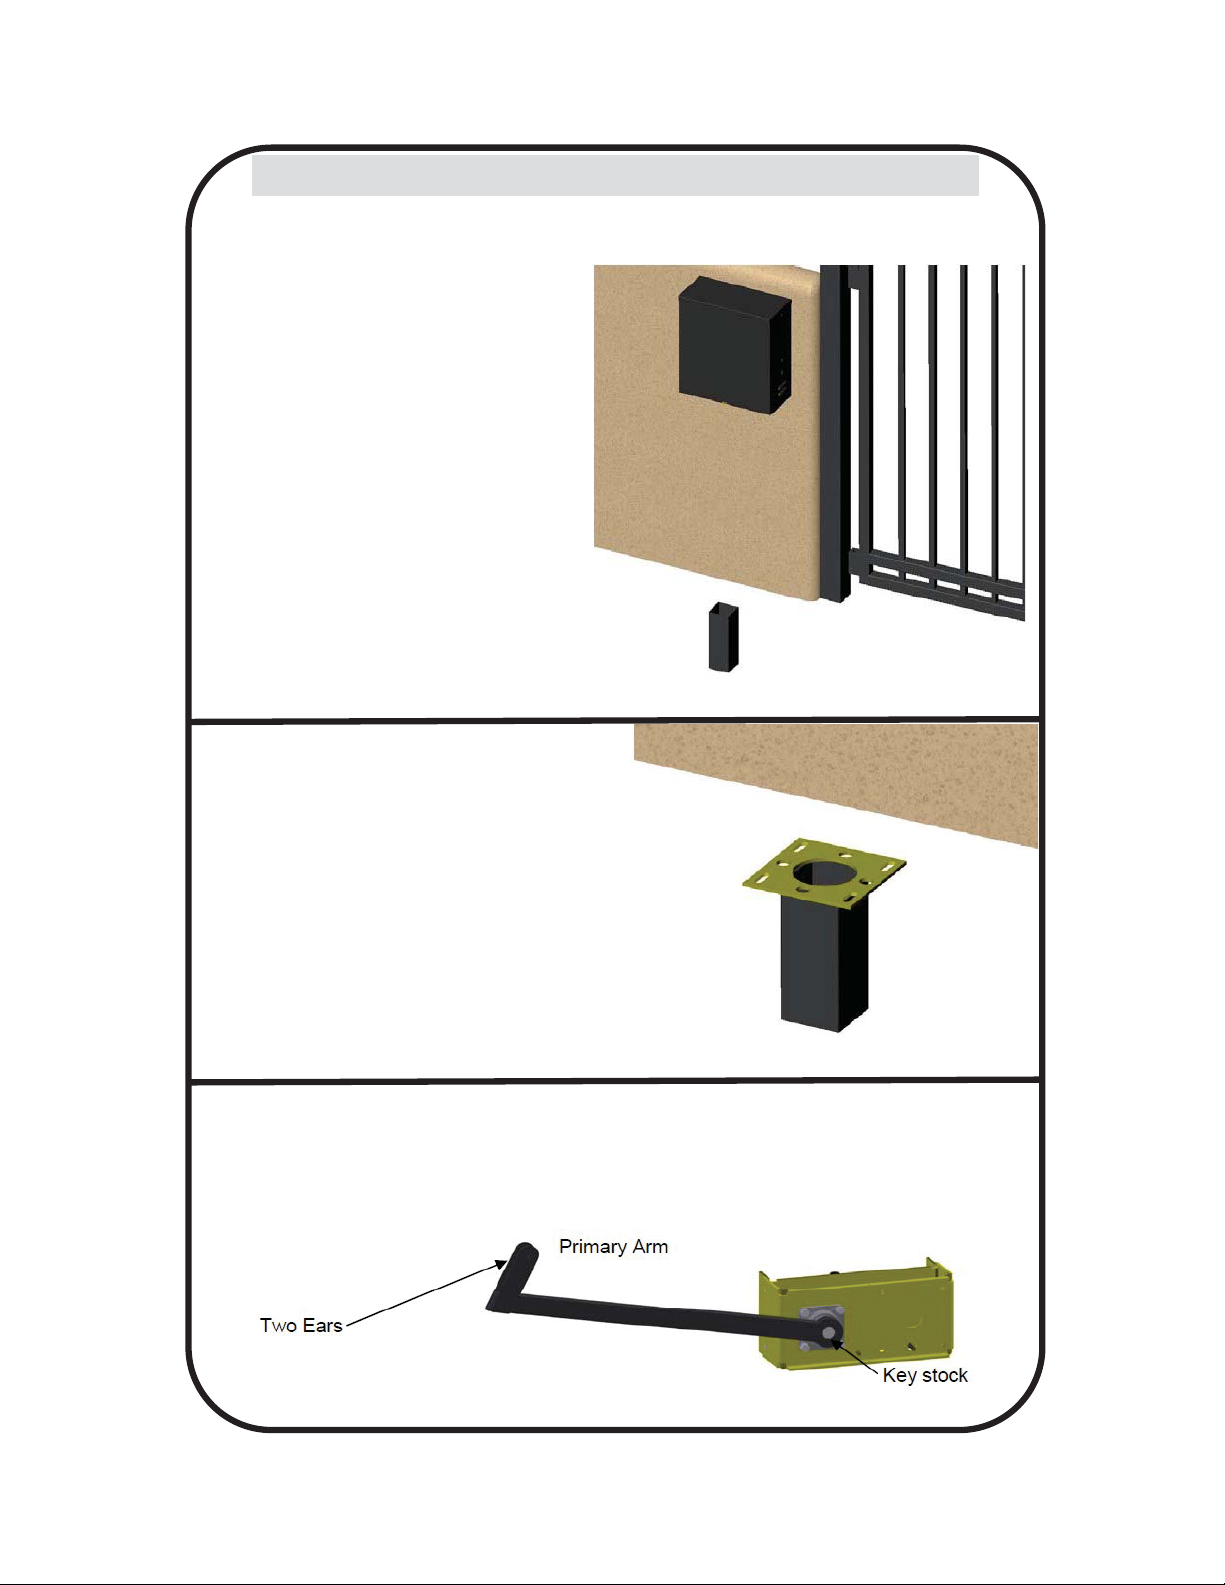
2 - 3500ETL-1K/3600ETL-1K Operator Installation (Continued)
2.2 - Control Box Installation
STEP 2. Mount the control box as close to
the operator as possible (recommended
within 5 feet). Use mounting hardware capable of supporting the weight of the control box with the battery installed.
Do not mount the control box where
the person using the push button on
the side of the box can come in contact with the gate.
Set the battery inside of the control box
with the terminals toward the front. (Do
not use batteries with side terminals.)
Figure 4: Example control box installation
2.3 - Control Arm Assembly & Installation
STEP 3: Weld the mounting
bracket on top of the mounting
post. The bracket should be
level and square to the post.
Tack welds may be made from
the top side of the bracket and
post. Bottom welds should be
made for permanent rigidity.
Figure 5: Mounting bracket to mounting post installation
STEP 4: Lay the operator chassis on it’s side. The two ears on the primary arm should
point toward the direction the gate will close. Install the primary arm to the main drive
shaft using the 1/4” key stock and tighten both set screws. The collar on the primary arm
should be installed on the shaft as far as possible.
Figure 6: Connecting the primary arm to the operator chassis
9
Page 10
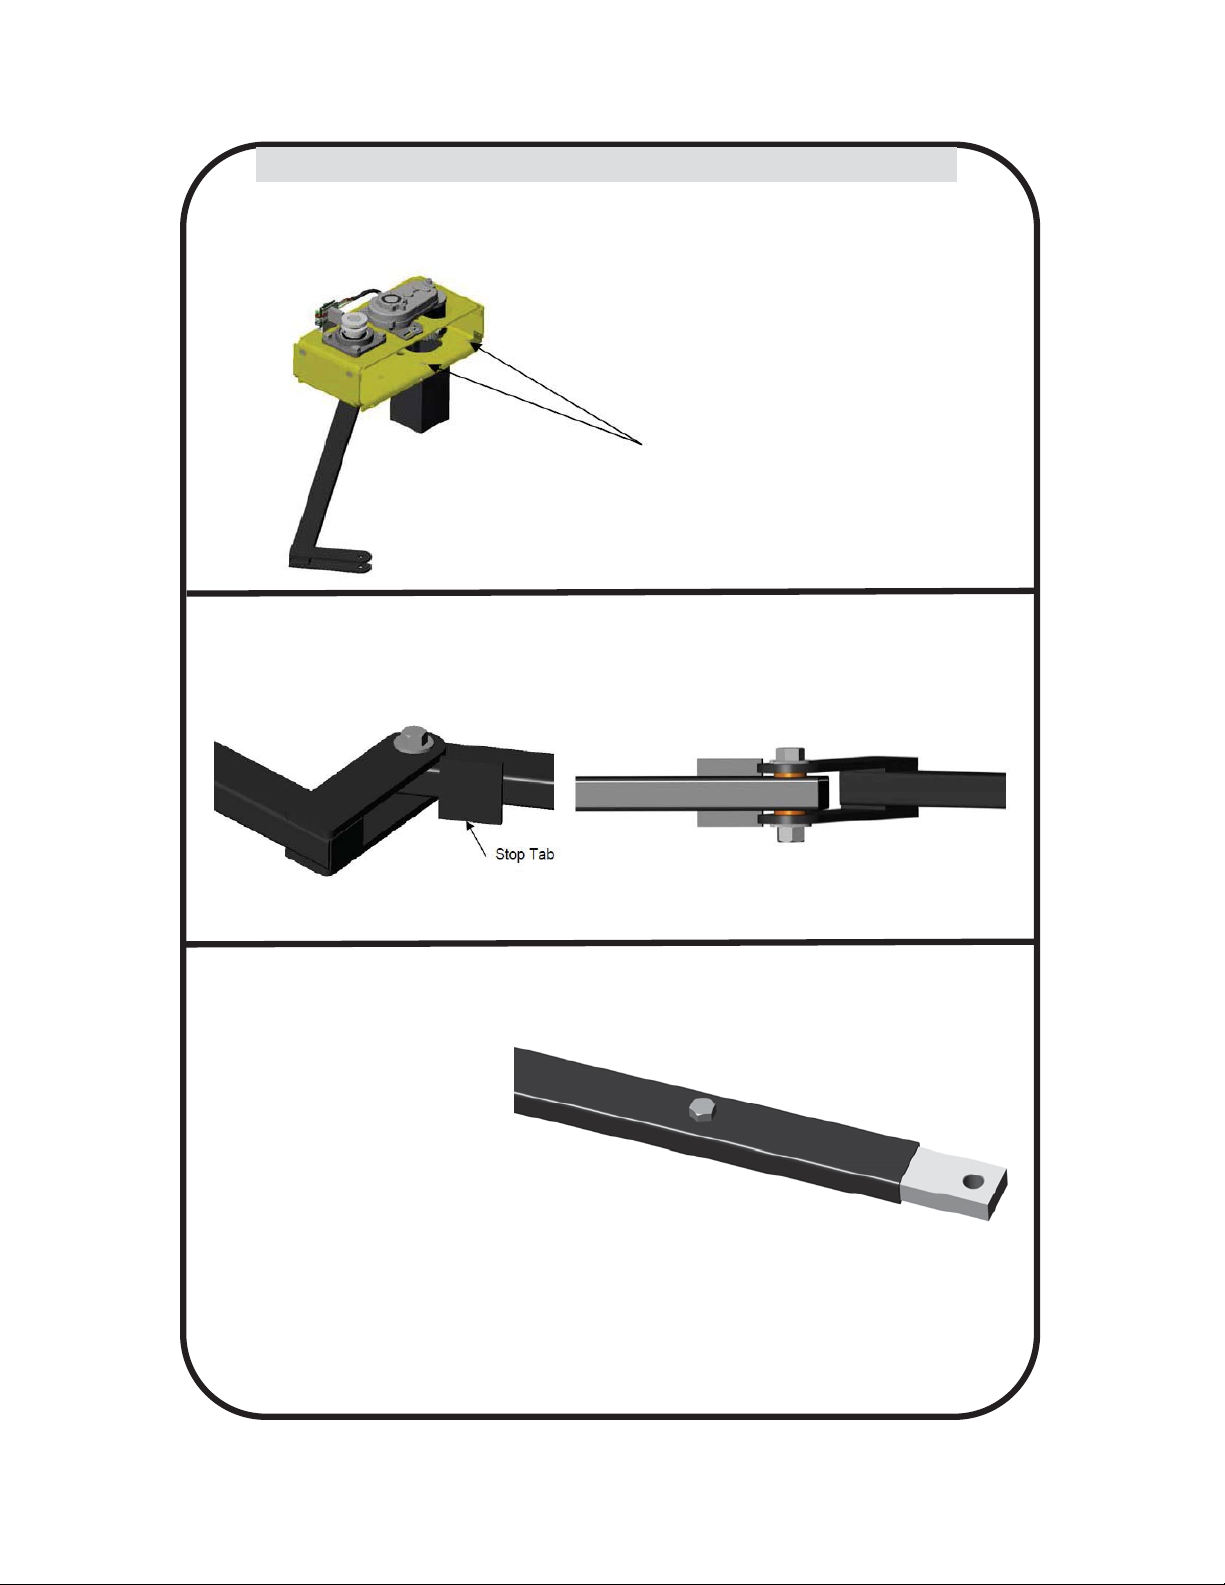
2 - 3500ETL-1K/3600ETL-1K Operator Installation (Continued)
2.3 - Control Arm Assembly & Installation (Continued)
STEP 5: Install the drive unit on the
mounting bracket using (4) 1/2” x 3/4”
hex bolts and lock washers.
Figure 7: Installation of drive unit to mounting bracket
STEP 6. Install the secondary arm to the primary arm using a 1/2” x 2-1/4” hex bolt, brass
washers, and lock nut.
The stop tab should be positioned away from the gate.
10
Figure 8: Installation of secondary arm to the primary arm
STEP 7: Install the adjustable arms to the secondary arm using the 1/2”
x 1-1/2” hex bolt and nut.
Use the middle hole in
the adjustable arm.
Figure 9: Connecting the adjustable arm to the secondary arm
Page 11

2 - 3500ETL-1K/3600ETL-1K Operator Installation (Continued)
2.4 - Gate Bracket Installation
STEP 8: Install the gate
bracket to the adjustable
arm using the 1/2” x 2-1/2”
hex bolt, washers, and
lock nut.
Figure 10: Connection of the gate bracket to the adjustable arm
STEP 9. Push the arms assembly up against the gate in the closed position. Make sure that the
primary arm is locked into the stop tab on the secondary arm. Tack weld or c-clamp the gate
bracket to the gate. Permanent welds or bolt attachment should be completed once limits are
set.
Figure 11: Connection of the gate bracket to the gate
STEP 10. Wire the Harness to the
operator terminal block as shown
in Figure 12.
Harness to Control Board
Figure 12: 3500 Terminal Block Wiring
INTERNAL MOTOR WIRING
ORANGE (Open)
WHITE (Close)
GREEN (Common)
RED (Motor Lead)
Black (Motor Lead)
11
Page 12
2 - 3500ETL-1K/3600ETL-1K Operator Installation (Continued)
2.5 - Left Hand and Right Hand Operation Wiring
Figure 13: limit switch wiring for left hand operation
For a single gate installation, connect the
3500 motor leads and limit wiring to the
“Motor 1” terminals.
For a dual gate installation, connect the
Master 3600 motor leads and limit wiring
to the “Motor 1” terminals and the Slave
3500 motor leads and limit wiring to the
“Motor 2” terminals.
Wire each motor for proper direction (left
or right) as shown in the image above.
12
Figure 15: 3500/3600 CONNECTION AT THE 1050 Control Board
Figure 14: limit switch wiring for right hand operation
Page 13
2 - 3500ETL-1K/3600ETL-1K OPERATOR INSTALLATION (Continued)
2.6 - Learning and Limit switch adjustment
Apollo has taken great care to simplify the installation, operation and safety of this device and to
ensure longevity and reliability of the unit over time. The learning procedure consists of the following steps shown below:
1. Install all gate accessories such as Photo-Eye’s, Sensors, Loops and other safety devices.
2. Using the MOTOR DISCONNECT SWITCH, disengage the drive motor setting the switch on
OFF position (see figure 19)
3. Move the gate manually (with your hands) to ensure that the gate travels to the fully open and
fully closed positions with no binding or problems. Gate should move freely. The control board
is already in the “LEARNING MODE” when shipped. If not in learning mode press FUNCTION
then press LEARN then press SWING then press LIGHT, AVERAGE OR HEAVY, then press
ENTER.
4. Manually move the gate mid-way and re-engage the motor setting the MOTOR DISCONNECT
SWITCH on ON position (see Figure 19). Test motor direction by pressing OPEN. If the gate
instead CLOSES swap the RED and BLACK motor leads shown in Figure 13 & 14. Using the
OPEN button on the front of the Control board, hold the button down until the gate reaches the
fully intended open position.
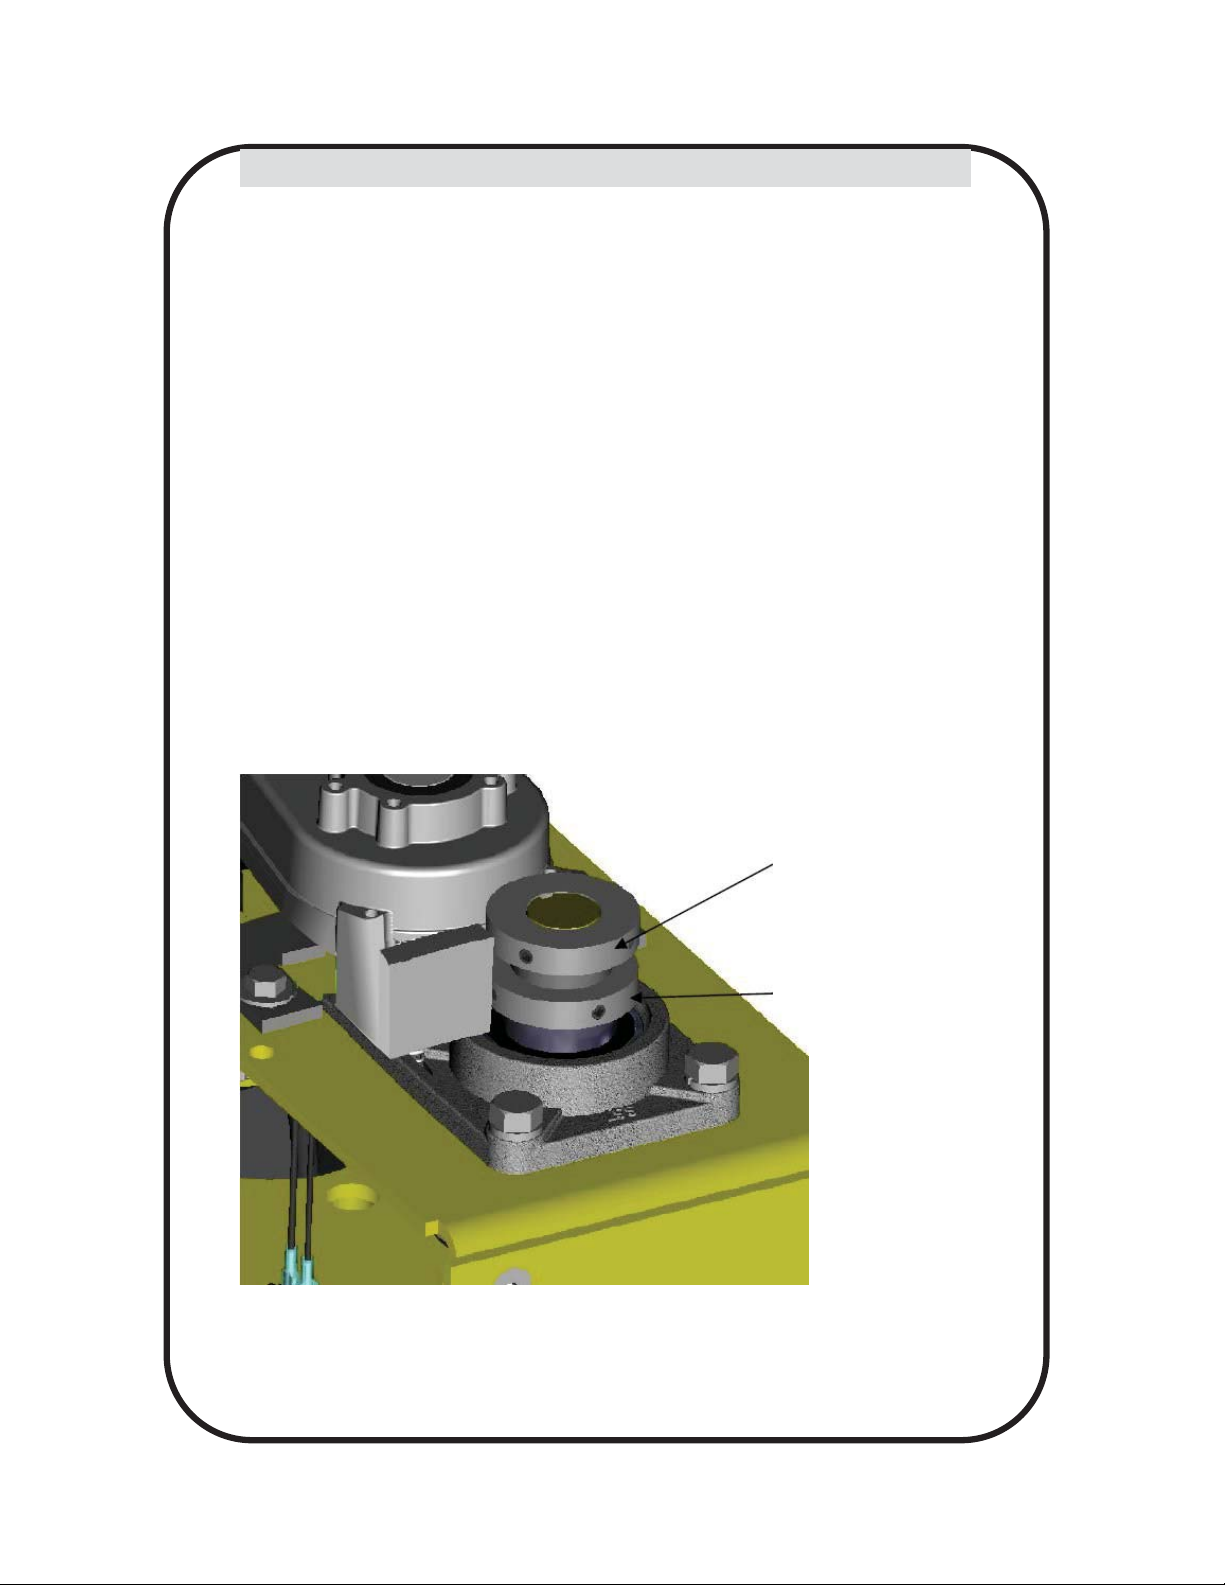
Figure 16: Limit Assembly
Magnet Collar OPEN
Magnet Collar CLOSE
13
Page 14

2 - 3500ETL-1K/3600ETL-1K OPERATOR INSTALLATION (Continued)
2.6 - Learning and Limit switch adjustment (Continued)
5. Adjust the Collar Open (See Figure 16) until the GREEN light illuminates on the front of the control board (See Figure 17). The FULLY OPEN limit switch is now set.
Figure 17: Green Open LED
6. Using the CLOSE button on the front of the Control Board, hold the button down until the gate
reaches the fully intended closed position.
7. Adjust the Magnet Collar Close (See Figure 16) until the RED light illuminates on the front of the
control board (See Figure 18). The fully CLOSED limit switch is now set.
Figure 18: Red Closed LED
14
Page 15

2 - 3500ETL-1K/3600ETL-1K OPERATOR INSTALLATION (Continued)
2.6 - Learning and Limit switch adjustment (Continued)
8. Press “OK” to allow the control board to scan for attached items, such as sensors, photoeye’s and other safety devices.
9. The gate will open partially then stop. This is being done, so the control board can sense the
type and operational condition of the drive motor. The gate will then run to the closed limit
switch so the board can properly sense the intended closed position.
10. The control board will then OPEN the gate slowly to establish travel and intended open position by sensing the open limit switch.
11. Once the gate reaches the OPEN limit switch, the control board will now increase gate travel
speed to the highest speed allotted, and will now travel to the CLOSED limit switch at full
speed.
12. The gate opener is now programmed for basic usage.
2.7 - Motor Disconnect Switch
Motor Disconnect Switch:
Flip the Motor Disconnect Switch to OFF to
disengage, flip the Motor Disconnect Switch to
ON to re-engage
OFF
2.8 - Fine Close Limit Adjustment
The close tension on the gate can be further
adjusted by: Removing the 1/2” bolt on the
secondary arm (course adjustment 1”-2”).
Slide the adjustable arm out and rotate
counter clockwise to increase close pressure and clockwise to reduce close pressure. The three holes in the adjustable arm
will allow further adjustment if necessary.
ON
Figure 19: Motor disconnect switch
Figure 20: Fine adjustment of gate close tension
15
Page 16

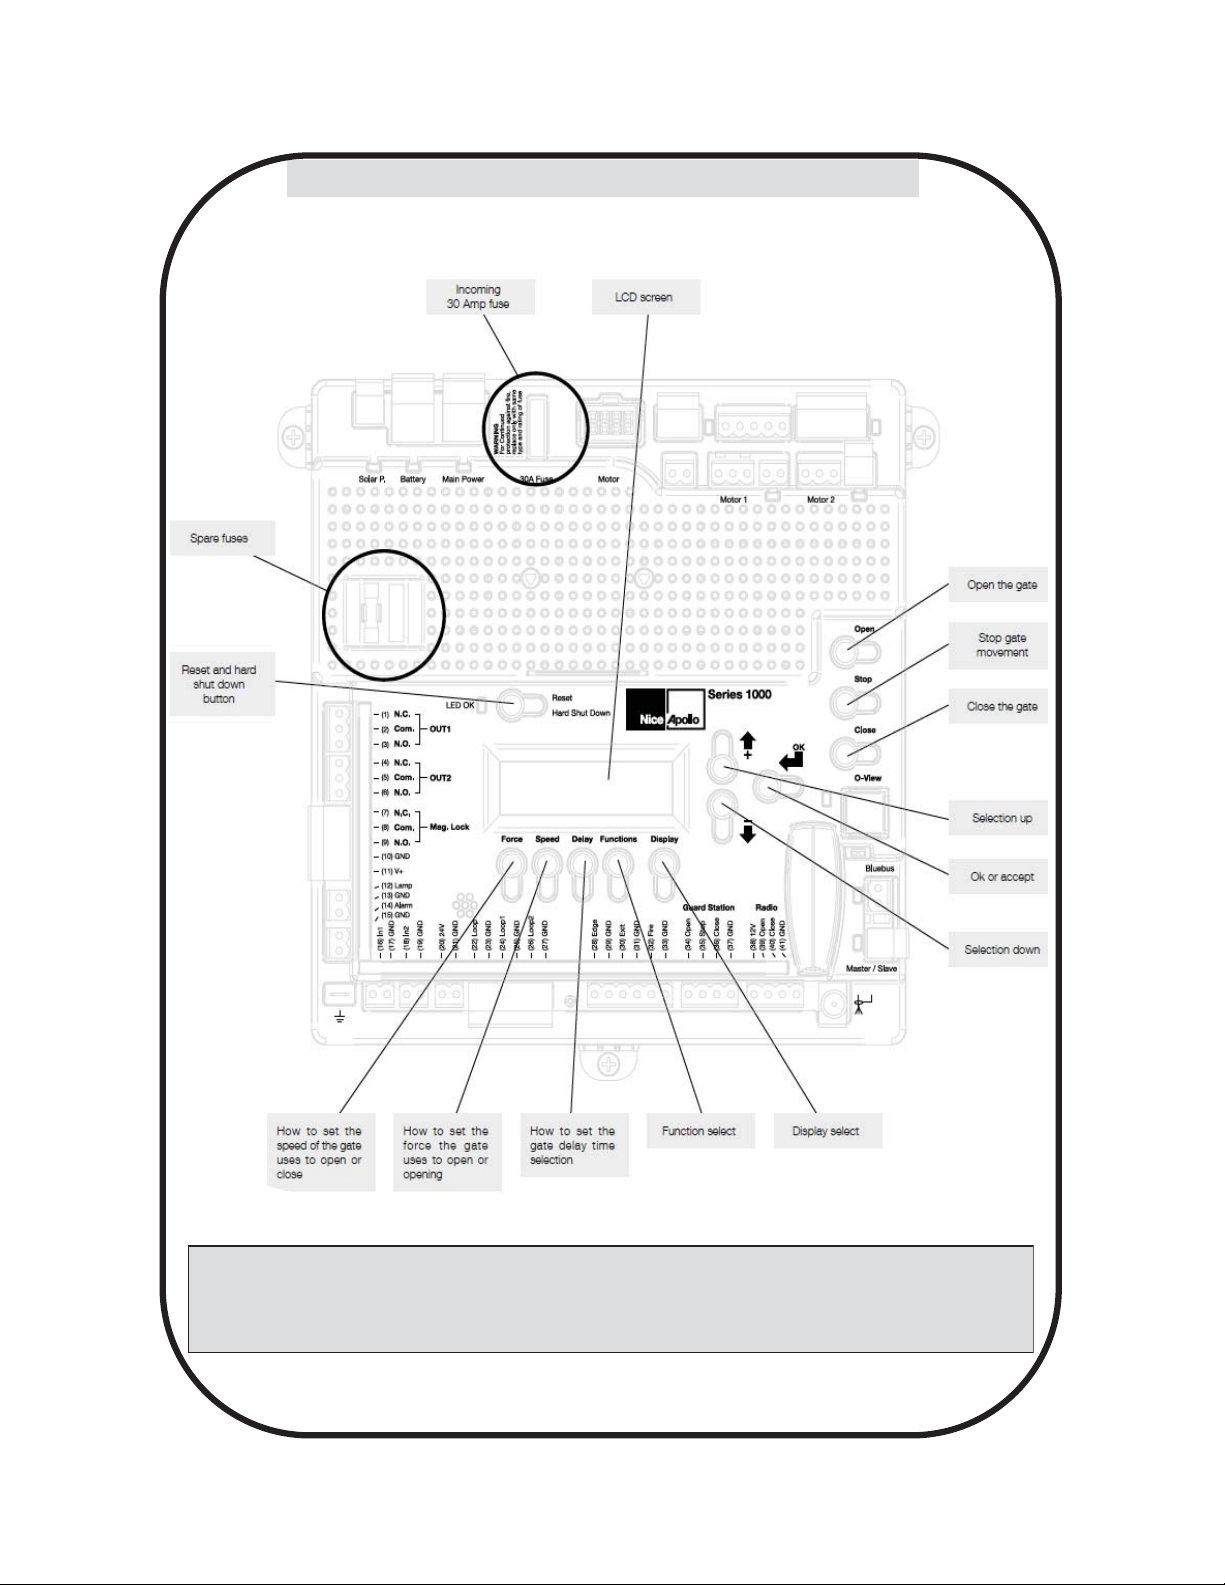
3 - CIRCUIT BOARD LAYOUT
Figure 21 - CONTROL BOARD BUTTONS
16
Figure 22 - CIRCUIT BOARD LAYOUT
Page 17

4 - OUTPUTS & INPUTS
Commercial Gate Operator Accessory Outputs:
OUT1 and OUT2: Individual, isolated relays
provide COMMON, NORMALLY OPEN, and
NORMALLY CLOSED dry contacts for switching accessories based on programming of the
“Auxiliary IO” function. These outputs are programmed in the “FUNCTION Auxiliary I/O”
menu.
Magnetic Lock: Provides fused power (1.85A
max) and isolated relay COMMON, NORMALLY OPEN, and NORMALLY CLOSED dry
contacts for electrically powered and maintained magnetic locks. The delay for magnetic
lock activation/deactivation may be adjusted
from 0 to 5 seconds.
Lamp: Provides fused power (1.85A max) to
drive a flashing warning lamp to indicate gate
operation. This output is active when the gate
is operating (Opening and Closing). Sets the
amount of time the lamp accessory output is
activated prior to gate movement. Settings
from 0 to 5 seconds with a step of 0.5 seconds.
Alarm: Provides fused power (0.5A @
12VDC) to drive an alarm siren to signal the
occurrence of a hard shutdown, caused by 2
consecutive entrapment events (signals). This
alarm output is reset by pressing the “Reset
Hard Shutdown” button on the front panel or
activating the “FIRE” input.
Figure 23 - BOARD OUTPUTS
Figure 24 - INPUTS
4.1 - Gate Operator Accessory Inputs
Auxiliary Inputs 1 (16) and 2 (18): These digital inputs may be connected to the digital outputs of accessories and pro-
grammed to activate or control the gate operator in a number of different modes. Shorting pin 1 to pin 2 through a dry
contact activates the programmed settings for these input. These inputs are programmed in the “FUNCTION Auxiliary I/
O” menu.
LOOP Input: (22) Dry contact input that can be programmed for an inductive safety loop or photo-eye detector. Shorting
the digital input to GND reverses a closing gate to the full open position. The opened gate is held opened for as long as
the LOOP input is active. (SAFETY)
LOOP 1 Input: (24) Dry contact input that can be programmed for an inductive safety loop or photo-eye detector. Activating the LOOP 1 input maintains an OPEN gate fully open and a CLOSED gate fully closed until deactivated.
(SHADOW) Setting the LOOP1 input to “Photo Mode” causes the moving gate to stop, then reopens the gate when the
LOOP1 input is deactivated.
LOOP 2 Input: (26) Dry contact input that can be programmed for an inductive safety loop or photo-eye detector. Activating the LOOP2 input (26) while the gate is opening cause the gate to close to the fully closed position. This loop input
is intended for use with safety sensors to prevent entrapment between the opening gate and an adjacent wall or structure.
Edge Input: (28) This input may be configured as “DIGITAL” or “ANALOG” as required by the sensor type. When configured as “DIGITAL”, this is a dry contact input; otherwise when configured as “ANALOG”, the input must measure
8200ohms. When the input is activated it stops the gate regardless of direction of travel, momentarily reverses it then
stops.
Exit Input: (30) Dry contact input for a vehicle exit sensor. Opens gate from the closed position and holds gate open
with maintained input or reverses gate if closing.
Fire Input: (32) Dry contact input for a fire department control switch. Opens the gate and holds the gate open until the
control switch is deactivated. This input is “hold to run”. Auto-close is disabled when this input is activated. Also clears
hard shutdown.
17
Page 18

4.1 - Gate Operator Accessory Inputs (Continued)
Guard Station Open: (34) Dry contact input for a guard station open switch. Momentarily shorting the
digital input to GND opens the gate to the full open position with the subsequent auto-close feature
enabled.
Guard Station Stop: (35) Dry contact input (Normally Closed) for a guard station stop switch. Momentarily opening this input stops the opening gate at its current position. While this input is activated,
all other inputs are disabled and are not functional.
Guard Station Close: (36) Dry contact input for a guard station close switch. Momentarily shorting
the digital input to GND closes the gate (master and slave).
RADIO
Radio Open: (39) Dry contact input for an accessory radio open switch. Momentarily shorting the digi-
tal input to GND opens the gate to the full open position with the subsequent auto-close feature enabled.
Radio Close: (40) Dry contact input for an accessory radio close switch. Momentarily shorting the
digital input to GND closes the gate.
Radio Input: Open/Close: (39 and 40) If you tie open and close together the unit will operate like a
garage door opener in the instance that each time you press the button, it will either OPEN, STOP or
CLOSE.
4.2 - Communication buses
Figure 25 - COMMUNICATION BUSES
4.2.1 - BLUEBUS ACCESSORIES
MOTB: Moon Touch programmable keypad with secure codes (up to 9 digits per code if required) to control
gate opening and closing. Connects to the 2-wire BlueBUS connector with inexpensive unshielded twistedpair wire.
FT210B/MOFB: Photocell transmitter and receiver pair that connects to the 2-wire BlueBUS connector with
inexpensive unshielded twisted-pair wire and is a monitored, non-contact sensor for entrapment protection
as specified in UL325, Section 31.1 “General Entrapment Protection Provisions”.
Master Slave:
This interface is not used in this application
18
Page 19

4.2.2 - Programming the plug-in receiver and remote controls
SMXI/A Plugin Receiver:
The SMXI/A 433Plug-In Receiver provides up to 15 channels for specific control of individual gate functions.
The receiver includes built-in programming functions for adding or removing Nice FloR/A wireless remote controls to/from a gate installation. The following procedures detail the steps to assign a remote control, add a
new remote control, delete a single remote control, or remove all remote controls from the receiver memory.
Programming the FloR/A 2-Button or 4-Button Remote Control with the SMXI/A Plug-In Receiver.
These procedures apply to the FloR/A wireless remote control. These procedures assign factory default controls automatically to the remote control.
1. Have a functioning Nice FloR/A 2-button or 4-button remote control with a battery installed prior to programming the remote control.
2. Press and hold the button on the side of the SMXI/A receiver until the led illuminates green on the SMXI/A
receiver, then release the button.
3. Within 10 seconds, press and hold any key on the FloR/A remote control until the led in the SMXI/A receiver blinks green 3 times, indicating that the FloR/A is programmed to control the receiver.
4. After the led on the SMXI/A receiver blinks green 3 times, another 10 second interval is started to program
another FloR/A remote control if desired. Repeat step 3 to program the additional FloR/A remote control.
Step 3 may be repeated as many times as necessary to program all available FloR/A remote controls.
5. Verify that the FloR/A remote control(s) can control the gate by pressing one or more buttons individually
on the remote control(s).
Wirelessly add new remote control to the SMXI/A Plug-In Receiver
A FloR/A remote control that has been programmed to control a SMXI/A receiver may be used to create other
FloR/A remote controls for the same receiver. This procedure needs to be performed within 10 to 20m (30 to
60 feet) of the SMXI/A receiver, but the SMXI/A receiver does not need to be physically accessed.
1. Press and hold any button on the un-programmed FloR/A remote control for at least 5 seconds, then release the button, taking note of the button that was pressed.
2. Press the same button on the programmed FloR/A remote control three times.
3. Press the same button in step 1 on the un-programmed FloR/A remote control and release.
4. It is recommended to test the new copy of the FloR/A remote control with the assigned gate controller.
NOTE: This procedure will affect all SMXI/A receivers within radio range.
Deleting a Single FloR/A Remote Control from the SMXI/A Plug-In Receiver Memory
A FloR/A remote control that has been programmed to control a SMXI/A receiver may be removed from the
SMXI/A receiver memory without affecting other assigned remote controls. This procedure needs to be performed at the SMXI/A Plug-In Receiver with the affected FloR/A remote control.
1. Press and hold the button on the side of the SMXI/A receiver until the led on the SMXI/A receiver illumi-
nates green and keep the button pressed. The led will illuminate after approximately 4 seconds.
2. Press and hold any button on the FloR/A remote control until the led on the SMXI/A receiver blinks 5 green
flashes.
3. Release the button on the side of the SMXI/A receiver.
4. It is recommended to verify that the de-programmed FloR/A remote control no longer controls the gate.
Deleting all FloR/A Remote Controls from the SMXI/A Plug-In Receiver Memory.
All programmed remote controls may be removed from the SMXI/A plug in receiver memory. This procedures
need to be performed at the gate controller.
1. Press and hold the button on the side of the SMXI/A receiver until the led on the SMXI/A receiver illumi-
nates green and keep the button pressed.
2. Watch the led and on the receiver and verify the following sequence in the led.
3. Within 4 seconds after pressing the button (approx.) the green led illuminates.
4. Within 8 seconds after pressing the button (approx.) the green led turns off.
5. With 12 second after pressing the button (approx.) the green led starts flashing.
6. Count the green led flashes on the SMXI/A receiver. On EXACTLY the 5TH flash, release the button on the
SMXI/A receiver.
7. It is recommended to test the FloR/A remote controls, if available, with SMXI/A plug in receiver to verify that
it no longer affects the gate controller.
19
Page 20

4.2.3 - OVIEW REMOTE CONTROL
OVIEW (see page 6 for Picture of OVIEW)
Programming and diagnostic unit which connects directly to the gate controller and is part
of the Nice “Opera” control system. The unit can be used in “stand-alone” mode via its
front-panel keypad, or it may be accessed via a Bluetooth or cellular-enabled PDA, PC, or
Smartphone when used with the O-View Software Suite. This unit, when matched with the
OVIEW Bluetooth or GSM modules, enables remote control and management of the gate
controller. Remote control functions include most of the programming functions that are
available at the front panel LCD on the control board as well as software updates.
OVBT: Bluetooth module for OVIEW and the “O-View Software Suite” application for PC,
PDA, or Smartphone for localized wireless control of the gate controller.
OVBTGSM: Combination GSM and Bluetooth module that plugs into the OVIEW and
provides cellular phone access through the “O-View Software Suite” application for PC,
PDA, or Smartphone, for wireless local, national, and international controller of the gate
controller.
O-VIEW Software Suite: Provides desktop or Smartphone level control of the gate
controller. Other benefits include software updates that can be made wirelessly as new
versions of software are made available.
5 - WIRING AND CONNECTIONS
Use only U.L. listed (or equivalent) non-contact sensors. Inputs from the photo beam to the
circuit board are Normally Open (N.O.). Use only U.L. listed (or equivalent) non-contact
sensors. Connect the non-contact sensors. Photo-beam input shall REVERSE travel of
gate when activated during the CLOSE CYCLE ONLY. Gate will resume normal operation
when photo-beam is no longer activated.
To reduce the risk of SEVERE INJURY or DEATH:
x Disconnect power to the gate operator by manually opening its dedicated circuit breaker
before making any mechanical or electrical adjustments.
x All wiring connections MUST be made by a qualified individual.
x Run individual circuits in separate U.L. listed conduits. Do not combine high voltage
(120VAC) power wiring and low voltage (+12VDC to +24VDC) control wiring in the same
conduits.
20
Page 21

6 - OPTIONAL INPUTS/OUTPUTS
6.1 - Fire dept. connection
32 FIRE
33 GND
Dry contact input for a fire department control
switch. Normally Open (NO) contact must be
shorted to ground through a switch to open the
gate.
6.2 - Exit and edge inputs wiring diagram
28 EDGE
29 GND
30 EXIT
31 GND
The EDGE input may be configured as a mon-
itored ANALOG input, or DIGITAL (NC or NO)
input. The EDGE sensor input is intended for
ANSI/UL 325 listed gate edge sensors to protect against entrapment and hazardous pinch
points along the moving edge of the closing
gate.
The EXIT (NO) sensor input is provided to activate to open the gate, or re-open a closing
gate, upon sensing an exiting vehicle.
Figure 26 - FIRE DEPT. INPUT
6.3 - Guard station
34 OPEN (NO)
35 STOP (NC)
36 CLOSE (NO)
37 GND
With the Guard Station switches installed, the
user can operate the gate by
pushing the respective buttons for the command that is desired. Gate Open (NO),
Stop (NC) and Close (NO), dry contact inputs,
are controlled by NORMALLY OPEN (NO)
and NORMALLY CLOSED (NC) momentary
switches.
NOTE: If the guard station inputs are not used
STOP (35) and GND (37) need
to be tied together
Figure 27 - EXIT AND EDGE INPUTS
Figure 28 - GUARD STATION INPUTS
21
Page 22

6.4 - Magnetic lock connection
7 NC
8 Com (Common)
9 NO
10 GND
11 V+
This connection is used to install the magnetic lock.
In this instance a gate can be locked magnetically to
prevent a forced opening.
Consult lock manual for specifics on installation and
wiring.
Note: Terminal 11 voltage is equal to system input
voltage.
Figure 29 - MAGNETIC LOCK WIRING (EXAMPLE)
6.5 - Radio receiver connection (third party)
38 12V
39 OPEN
40 CLOSE
41 GND
The customer supplied radio receiver allows the gate operator to be operated via remote, such as wireless key-card
readers or user remote controls. Connecting the Open (39)
and Close (40) pins together with a receiver enables singlebutton gate control. This configuration allows a single button
to control the gate in the following sequence:
Press - Gate Open
Press - Gate Stop
Press - Gate Close
Press - Gate Stop
Terminal #38 (12V) is off when the board goes into standby.
Disable standby when using a third party receiver.
Figure 30 - RADIO RECEIVER
7 - INSPECTION AND OPERATION
Proper inspection of all equipment is required to ensure continuous functionality, safety and to ensure reliable operation in all weather conditions. Inspect electrical assemblies and wiring installations for damage, general condition, and proper functioning to ensure the continued satisfactory operation of the electrical system. Adjust, repair,
overhaul, and test electrical equipment and systems in accordance with the recommendations and procedures in
the gate operator system and/or component manufacturer’s maintenance instructions.
Replace components of the electrical system that are damaged or defective with identical parts, with manufacturer’s approved equipment, or its equivalent to the original in operating characteristics, mechanical strength, and environmental specifications. A partial list of suggested problems to look for and checks to be performed are listed
below:
x Damaged, discolored, or overheated equipment, connections, wiring, bearing caps and installations.
x Excessive heat or discoloration at high current carrying connections. (look for bluing or heat affected metal).
x Misalignment of electrically driven equipment. (Causes strain on pulley assemblies and bearings).
x Poor electrical bonding (broken, disconnected or corroded bonding strap) and grounding, including evidence of
corrosion.
x Dirty equipment and connections. Clean equipment and connections.
x Improper, broken, inadequately supported equipment, wiring and conduit, loose connections of terminals, and
loose ferrules.
x Poor mechanical or weld joints. Broken welds.
x Condition of fuses. Ensure that they are of the correct type and amperage.
x Insufficient clearance between exposed current carrying parts and ground or poor insulation of exposed termi-
nals. All exposed connections must be covered (prevent arcing between exposed parts, and electrical shock).
x Broken or missing wire, connectors, etc.
x Operational check of electrically operated equipment such as motors, inverters, generators, batteries, lights, pro-
tective devices, etc. Ensure proper functionality of all systems during inspections.
x Ensure safety placards and warning signs are present as specified within this document. Ensure proper function-
ality of all safety devices as specified. Non-functioning or malfunctioning safety devices should be replaced immediately.
22
Page 23

8 - GENERAL LAYOUT AND SAFETY ACCESS
Figure 31 - Loop Sensor and Photocells Installation Diagram
Figure 32 - Photocells Installation Diagram
23
Page 24

9 - ACCESSORIES AND SENSORS
EXTERNAL ENTRAPMENT PROTECTION:
Non-contact and contact sensors must be installed individually or in combination with
each other to provide external entrapment protection.
Care should be exercised to reduce the risk of nuisance tripping, such as when a vehicle trips the sensor while the gate is still moving, and one or more non-contact sensors
shall be located where the risk of entrapment or obstruction exists, such as the perimeter reachable by a moving gate or barrier.
A hardwired contact sensor shall be located and its wiring arranged so that the communication between the sensor and the gate operator is not subjected to mechanical
damage.
A wireless contact sensor such as one that transmits radio frequency (RF) signals to
the gate operator for entrapment protection functions shall be located where the transmission of the signals are not obstructed or impeded by building structures, natural
landscaping or similar obstruction.
DURING INSTALLATION
x DISCONNECT POWER at the control panel before making any electric service pow-
er connection.
x Be aware of all moving parts and avoid close proximity to any pinch points.
x Know how to operate the Motor Disconnect Switch.
x Adjust the unit to use the minimum force required to operate the gate smoothly even
during mid-travel reversing.
x Place controls a minimum of 8 feet away from the gate so that the user can see the
gate and operate controls but cannot touch the gate or gate operator while operating
the controls.
x Warning signs must be placed on each side of the gate or in high-visibility areas to
alert of automatic gate operations.
24
Page 25
10 - BOARD DIAGRAM
Figure 33 - GENERAL BOARD OVERVIEW
THE PROGRAMMING BUTTONS INDICATED IN THE ABOVE REFERENCE SHOULD BE USED
ONLY AFTER UNDERSTANDING THE MANUAL AND ITS RELATION TO THE PROGRAMMING
SEQUENCES SHOWN ON THE FOLLOWING PAGES. CARE SHOULD BE TAKEN WHENEVER
CHANGES ARE IMPLEMENTED TO ENSURE PROPER FUNCTIONALITY AND SAFETY.
25
Page 26

11 - PROGRAMMING BUTTONS
11.1 - Force
Static: Set sensitivity to constant force on a scale of 1 to 10 (1 being the most sensitive).
Dynamic: Set sensitivity of sudden impact force to the moving gate on a scale of 1 to 10 (1 being most
sensitive).
ESC: Exit the FORCE menu.
11.2 - Speed
Max: Sets the limit of maximum allowed gate speed on a scale of 20% to 100% (20% being the lowest
setting).
Standard: Sets the limit of the gate speed during normal movement (not soft start/stop) on a scale of
20% to MAX (20% being the lowest setting).
Low: Sets the limit of the gate speed while in LEARNING mode and when moving in SLOW, on a scale
of 20% to 100% (20% being the lowest setting).
Slowdown: Set gate speed when going into approaching the open or close limits on a scale of 20% to
100% (20% being the lowest setting).
11.3 - Acceleration
Max: Sets the limit of gate acceleration when reversing the gate after an obstacle has been detected by
the UL/Edge or current sense feature (Force). Settings from 3 to 10, with 10 being the highest rate of
gate acceleration.*
Standard: Sets the limit of the gate acceleration in normal operation. Settings from 1 to MAX, with MAX
being the highest rate of gate acceleration.
**TO PREVENT DAMAGE TO THE GATE OR THE CONTROLLER USE LOWER ACCELERATION
SETTINGS FOR HEAVIER GATES.
ESC: Exit the SPEED menu.
11.4 - Delay
Auto Close: Sets the timeout before the gate closes automatically from the fully open position. Set-
tings from 0 (off) to 90 seconds. Setting this to 0 will disable the auto close timer.
Slave: Sets the delay for opening the slave gate leaf in a Master/Slave (Motor 1 and Motor 2 operation), (dual gate) system. Settings from 0 to 5 seconds with a step of 0.5 seconds.
Lamp/Strobe: Sets the amount of time the Lamp accessory output is activated prior to gate movement. Settings from 0 to 5 seconds with a step of 0.5 seconds.
Lock: Sets the amount of time the Magnetic Lock accessory output is activated to disable the lock
when opening the gate. Settings from 0 to 5 seconds with a step of 0.5 seconds.
Run Time: Sets the maximum run time for the gate. Used in case the gate doesn’t reach its limits. Settings from 15 to 120 seconds with a step of 1 second.
ESC: Exit the DELAY menu.
26
Page 27

11.5 - Function
Learn:
Puts the gate operator into learning mode for a Swing or Slide gate and Blue BUS
peripherals. Learning mode for a Swing or Slide style gate involves selecting the gate type
(Light, Average, Heavy), then fully opening and closing the gate to sense the limits. Selecting
the gate type selects precalculated values for the FORCE, SPEED, and ACCELERATION
settings. Learning the Blue BUS peripherals enables the gate operator to discover and integrate accessory devices like Blue BUS access control and safety devices.
Positions: Configures the points in the gate open, close, and partial cycles at which decel-
eration occurs.
x Slow Down – Open: Sets the point in the % of gate opening when the gate begins decel-
eration to the fully open position.
x Slow Down – Close: Sets the % of gate opening when the gate begins deceleration to
the fully close position.
x Partial: Sets the point in the % of gate opening when the gate begins deceleration to the
Partial open position.
Auxiliary Inputs: Auxiliary inputs IN AUX1 (16) and IN AUX2 (18) can be programmed
with one of the following options:
• No program No Function used
• OPEN the Gate
• CLOSE the Gate
• STEP Cycling Step (Open-Stop-Close-Stop)
• PARTIAL opening
• PARTIAL 1 Partial Opening 1 (open one leaf in dual gate applications)
• STOP the gate and Auto-closing
• HOLD TO OPEN Input must be maintain active for Opening
• HOLD TO CLOSE Input must be maintain active for Closing
• FIRE Reset Hard Shut Down and Open the Gate
• TIMER 1 Start Count Down TIMER1
• TIMER 2 Start Count Down TIMER2
• PHOTO Photocell PHOTO input: reverse to opening when closing
• PHOTO1 Photocell PHOTO1 input: Stop Gate when activated
• PHOTO2 Photocell PHOTO2 input: reverse to closing when opening
• SHADOW Loop input: prevent closing gate when completely open
• LOCK system from other command (only STEP H overrides the Block)
• UNLOCK Un-lock the system if locked
• OPEN and LOCK Open the Gate and inhibit further commands (except STEP H)
• CLOSE and LOCK Close the Gate and inhibit further commands (except STEP H)
• OPEN and UNLOCK Open the Gate and un-inhibit further commands
• CLOSE and UNLOCK Close the Gate and un-inhibit further commands
• STEP H Command high priority Step cycling (open-stop-close-stop
Auxiliary Outputs: Auxiliary outputs OUT AUX1 (1,2,3,) and OUT AUX2
(4,5,6,) can be programmed with one of the following options:
x NO PROGRAM Output not used
x OPEN Output is activated when Gate is open
x CLOSE Output is activated when Gate is closed
x MOVING Output is activated when Gate is moving
x TIMER 1 Output is activated when TIMER1 is counting down
x TIMER 2 Output is activated when TIMER2 is counting down
x LOCK Output is activated when the Gate is locked
x MAINT Output is activated when the maintenance cycle counter decrements to 0
27
Page 28

11.5 - Function (continued)
Radio Channel:
For the Plug-in Onboard Receiver, 15 radio channels may be programmed
with one of the following options:
x No program
x OPEN (Default CH. 2)
x CLOSE
x STEP (Default CH. 1)
x PARTIAL
x PARTIAL 1
x STOP
x HOLD TO OPEN
x HOLD TO CLOSE
x TIMER 1
x TIMER 2
x LOCK
x UNLOCK
x OPEN and LOCK
x CLOSE and LOCK
x OPEN and UNLOCK
x CLOSE and UNLOCK
x STEP H
x TOGGLE and LATCH
Timers:
Set time for count down timers Timer 1 and Timer 2. Settings between 1 second and 9 hours in 1
second increments.
Events:
Up to 8 weekly events (EV1 through EV8) can be programmed and stored. Each event can be
programmed to trigger at a specific time and can be assigned to any combination of days of the
week (Monday through Sunday). Events that are already programmed into the system may be
suspended temporarily, or removed permanently from memory. The following actions can be assigned to events:
• No program
• Open
• Close
• Partial
• Partial1
• AxOut1On
• AxOut1 Off
• AxOut2 On
• AxOut2 Off
• Open and Lock
• Close and Lock
• Open and Unlock
• Close and Unlock
28
Page 29

11.5 - Function (Continued)
Events (continued)
To program weekly events EV1 through EV8, perform the following steps:
1. Press FUNCTION -> Events.
2. Press and hold OK to display EV1 (display will blink “EV1”).
3. Press UP or DOWN to toggle between events, then press OK to make a selection. The display
changes to hours.
4. Press UP or DOWN to toggle between hours, then press OK to make a selection. The display
changes to minutes.
5. Press UP or DOWN to toggle between minutes, then press OK to make a selection. The display
changes to individual days of the week.
6. Press UP or DOWN to toggle between days of the week. Press OK to toggle between ON and
OFF for each day of the week. Continue toggling through the days of the week until ESC is displayed. Press OK to advance to the next event.
7. Repeat step 2 through 6 for event EV2 through EV8.
To temporarily suspend one or more weekly events (EV1 through EV8), perform the following steps:
1. Press FUNCTION -> Events.
2. Press OK quickly to display EV1 active days.
3. Press OK quickly again to display “Suspend”. Event EV1 is now suspended and will not run until
re-enabled.
4. Press UP or DOWN to toggle through the events EV1 – EV8 and repeat steps 2 through 3 to
suspend or enable other weekly events.
Charger:
A battery charger is built-in with the Control board for use with a backup battery. The charger may
be manually programmed for customized charge settings or set to “Auto” to provide a battery
charging profile that automatically compensates for temperature and current during the charging
process. The following parameters are available for programming the battery charger:
x Charger On/Off
x Select Max current for charging (from 0.1A to 1.5A step 0.05A)
x Cycling Time (1 second off charging every cycling time)
x Auto (best charge considering temperature)
Standby:
Programs the timeout for the gate operator to go into low power standby mode. Low power standby
is Settings from 5 to 120 seconds, or may be disabled with “OFF”. During low power standby there
is no data displayed on the gate operator LCD and it consumes a minimum amount of power to extend the life of the backup battery. All the outputs are switched off and the LED OK blinks to show
this standby status of the system.
Note: Terminals 11, 20, and 41 lose power in standby mode.
29
Page 30

11.5 - Function (Continued)
Advance Settings:
The following settings are available for customizing the gate operator as required by the customer’s installation requirements:
x Set Language (English, Spanish, Italian)
x Set clock 12H/24H
x Set LCD Contrast
x Direction of the Motor (only selectable in learning mode)
x Auto Close Opt. (ON - Gate only closes when at open limit, OFF - Gate auto-closes from any
open position)
x Exit Opt. (ON - Free Exit always opens gate, OFF - Free Exit doesn't open gate if stopped
while opening)
x Set Anti-tailgate (Closes gate immediately after vehicle has cleared safety sensors)
x Phototest (activates monitoring feature for BlueBus photoeyes)
x Select inputs LOOP or PHOTO
x Select UL/EDGE input type (NO, NC, Analog)
x Select Master / Slave Motor1 or Motor2
x Activate link for remote Master/Slave (Enables control of an additional gate operator board -
Not Applicable in this installation)
x Power Fail Open (Opens gate automatically on batter backup power if main AC power input
loss is detected) (Not Applicable in this installation)
x Motor 12V (Forces motor control voltage to +12VDC even if the supply voltage varies from
+9.5VDC up to +35VDC)
x Set Virtual Encoder (Used for motors without built-in encoders)
Default: This setting gives the installer/user the option of returning some or all
settings of the gate operator to the original factory settings:
• System settings
• Radio Channel settings
• Event settings
• Charger settings
ESC: Exit the FUNCTION menu.
30
Page 31

11.6 - Display
ESC: Exit the DISPLAY menu.
Info: Displays the manufacturer name, product name/model, software versions, and serial
number.
Clock: Displays the calendar date and time in the real time clock. Pressing and holding the
“OK” button for 5 seconds enables the date and time settings to be updated manually.
Main Volt: Displays the gate operator main control voltage in volts DC.
Battery Volt: Displays the gate operator backup battery voltage in volts DC.
Sun Volt: Displays the solar panel input voltage in volts DC.
Motor Volt: Displays the voltage at the motor in volts DC.
UL Volt: Displays the voltage at the UL/Edge sensor input in volts DC.
Temperature: Displays the temperature of the gate controller board in degrees Centigrade or
Fahrenheit (press OK and hold 5 seconds to change scale).
Service: The following information is recorded and viewable about the operating history of the
gate:
x Total: Displays the total number of open-close cycles (non- Settings ).
x Partial: Display the total number of partial cycles. Reset by pressing the “OK” button for sev-
eral seconds.
x Maint. Display the number of cycles before service is required. Settings from 1000 to 50000
cycles in increments of 1000 cycles.
Motor: Displays the Motor position, voltage, and current.
Motor 1: Displays the Motor1 position, voltage, and current.
Motor 2: Displays the Motor2 position, voltage, and current.
Charger: Displays the battery charger voltage and current.
Last Reset: Displays the code for diagnostic review. Used for diagnostic and troubleshooting.
12 - GLOSSARY
CLASS I - RESIDENTIAL VEHICULAR GATE OPERATOR- A vehicular gate operator (or system)
intended for use in a home of one-to four single family dwelling, or garage or parking area associated therewith.
CLASS II - COMMERCIAL / GENERAL ACCESS VEHICULAR GATE OPERATOR - A vehicular
gate operator (or system) intended for use in a commercial location or building such as a multifamily housing unit (five or more single family units), hotels, garages, retail store, or other building
servicing the general public.
CLASS III - INDUSTRIAL / LIMITED ACCESS VEHICULAR GATE OPERATOR - A vehicular gate
operator (or system) intended for use in an industrial location or building such as a factory or loading dock area or other locations not intended to service the general public.
31
Page 32

12 - GLOSSARY (Continued)
CLASS IV - RESTRICTED ACCESS VEHICULAR GATE OPERATOR - A vehicular gate operator
(or system) intended for use in a guarded industrial location or building such as an airport security
area or other restricted access locations not servicing the general public, in which unauthorized access is prevented via supervision by security personnel.
LOCK- Ceases all operator function except HIGH PRIORITY inputs.
ENTRAPMENT - The condition when an object is caught or held in a position that increases the risk
of injury.
FORCE STATIC - Constant load threshold for sensitivity setting.
FORCE DYNAMIC - Impact sensitivity setting.
GATE - A moving barrier such as a swinging, sliding, raising, lowering, or the like, barrier, that is a
stand-alone passage barrier or is that portion of a wall or fence system that controls entrance and/or
egress by persons or vehicles and completes the perimeter of a defined area.
(STEP H) HIGH PRIORITY - Step by step control.
INHERENT ENTRAPMENT SENSOR SYSTEM - An automatic sensor system which senses entrap-
ment of a solid object and is incorporated as a permanent and integral part of the operator.
STEP BY STEP - Command that opens-stops-closes-stops the gate with each press of the button.
SYSTEM - In the context of these requirements, a system refers to a group of interacting devices in-
tended to perform a common function.
UNLOCK - Resumes normal operation after a blocked condition.
WIRED CONTROL - A control implemented in a form of fixed physical interconnections between the
control, the associated devices, and an operator to perform predetermined functions in response to
input signals.
WIRELESS CONTROL - A control implemented in means other than fixed physical interconnections
(such as radio waves or infrared beams) between the control, the associated devices, and an operator to perform predetermined functions in response to input signals.
TOGGLE AND LATCH - When radio channel set to TOGGLE and LATCH, first activation will open
and hold gate open (LATCHed). Second activation will unlatch gate and allow it to autoclose or be
closed by some other method.
13 - EMERGENCY VEHICLE ACCESS
x The automatic vehicular gate system must be designed to allow access to emergency vehicles
under different operating conditions.
x During normal powered operation, emergency vehicles access the gate by use of the emergency
vehicle access device installed on your gate system. The type of device that is used in your community is dependent on your city codes. These devices may include (but are not limited to) Fire
Department lock boxes, Click-2-Enter radio receivers, strobe light sensors, siren sensors, etc.
x If applicable, this operator is equipped with a Motor Disconnect Switch system that will allow the
gate to be pushed open in the event of a power outage or equipment failure.
x NOTE: Never attempt to manually push open any gate with an operator attached to it until you
have verified that power to the operator has been shut-off.
x The automatic vehicular gate system must be designed to allow access to emergency vehicles
under different operating conditions.
x In the event of a power failure, the emergency vehicle access device may not be functional be-
cause the gate operator is un-powered. NOTE: DC powered back-up systems are optional and
your gate system may or may not be equipped with one. Check with your installer to determine if
your gate system is equipped with a back-up power system.
32
Page 33

14 - MAINTENANCE SCHEDULE - APOLLO GATE OPENER
TABLE 2
Activate the primary (inherent) reverse system by blocking the gate
with a solid object. The gate should reverse momentarily then stop.
Alarm
Battery
Fire Dept Check emergency vehicle access device for proper operation
Gate Inspect for damage
Restart the gate and Lock again with a solid object. The gate should
reverse momentarily, then stop, and go into hard shutdown with an
alarm
Check the batteries for any leakage or loose connections. Batteries
should be replaced every two years
COMPLETE BASI C
● ●
●
● ●
●
Reverse System
Check that the gate reverses on contact with an object in both the
opening and closing cycles
Loop(s) Check vehicular reverse and shadow loops for proper operation
Release Check Motor Disconnect Switch for proper operation
Complete Overall Check: Complete check of gate and gate operating system
Mounting Hard- Check screws and nuts
15 - APOLLO GATE OPENER TROUBLESHOOTING
TABLE 3
SYMPTOM(S) POSSIBLE SOLUTION
Operator will not power On.
Power LED is OFF
Gate opens a short
distance, then stops
and reverses
Gate opens but will
not close
x Check terminal Lock wiring for loose or broken wires
x Check the fuse
x Check wiring polarity
x Check the UL/Edge input on the gate controller
x Adjust Force Settings
x Check Motor 1 and Motor 2 encoder LEDs to verify the LEDs toggle
when the gate is moving
x Check the input LEDs. Any ON will hold the gate open and indicates
a problem with a keying device
x Check the secondary safety devices. Any activated safety devices
will hold the gate open and indicates a problem with the safety device
x Check the loop detectors. Any activated safety devices can hold the
gate open and indicates a problem with the loop detector or ground
● ●
● ●
●
●
●
Hard Shutdown (2
back to back obstructions) LED blinking,
Buzzer sounds for 5
Gate opens by itself
x Clear any obstructions from the path of the gate. Press RESET to
clear (or hard reset button)
x Check accessory inputs and clear them as necessary
33
Page 34
16 - APOLLO 3500ETL-1K PROGRAMMING QUICK START
Learning 3500ETL-1K/3600ETL-1K Actuator
1. Install electrical power to the gate opener unit.
2. Install all gate accessories such as Photo-Eye’s, Sensors, Loops and other safety devices.
3. Turn on the electrical power to the unit.
4. Using the MOTOR DISCONNECT SWITCH, disengage the drive motor. See Figure 19 - MOTOR DISCONNECT SWITCH.
5. Move the gate manually (with your hands) to ensure that the gate travels to the fully open and
fully closed positions with no binding or problems. Gate should move freely.
6. Using the MOTOR DISCONNECT SWITCH, re-engage the drive system, re-engage the drive
system, setting the switch to ON (see Figure 19)
7. Using the open button on the front of the Control board, hold the button down until the gate
reaches the fully open position. If the gate moves in the opposite direction swap the RED and
BLACK motor leads at the 3-pin motor power connector on the control board.
8. Adjust the Magnet Collar OPEN on the Limit Assembly (see Figure 16) until the GREEN light
illuminates on the front of the control board. The FULLY OPEN limit switch is now set.
9. Using the CLOSE button on the front of the Control Board, hold the button down until the gate
reaches the fully closed position.
10. Adjust the Magnet Collar CLOSE on the Limit Assembly (see Figure 16) until the RED light
illuminates on the front of the control board. The fully CLOSED limit switch is now set.
11. The control board is already in the “LEARNING MODE” when shipped. If not in LEARNING
MODE, press FUNCTION, then press LEARN, then press SWING, then select LIGHT, AVERAGE < or HEAVY, then press ENTER to start the gate learning process.
12. The gate will open partially then stop. This is being done, so that the control board can sense
the type and operational condition of the drive motor. The gate will then run to the closing limit, so that it can properly sense where it is located.
13. The control board will then OPEN the gate slowly to establish travel and limits.
14. Once the gate reaches the fully OPENED limit switch, the control board will now increase
gate travel speed to the highest speed allotted, and will now travel to the fully CLOSED position at full speed.
15. The gate opener is now programmed for basic usage.
17 - Putting the controller into learning mode
Steps on how to place the Apollo 1050 control board into learning mode.
1. Press Function
2. Press OK
3. Select Swing
4. Select weight of gate (LIGHT , AVERAGE, or HEAVY)
5. Press Enter
Unit should now be in LEARNING MODE
34
Page 35

18 - INSTALLATION CHECKLIST
Left box is for installer check off and the right box is for customer
check off.
1. The gate has been checked to make sure it is level and moves freely in both directions.
2. Potential pinch areas have been guarded so as to be inaccessible OR have contact and/or non-contact obstruction sensing devices installed.
3. The installer has installed one or more contact or non-contact obstruction
sensing devices, in compliance with UL325 requirements for this installation.
4. If pedestrian traffic is expected, a separate pedestrian gate has been installed, a
minimum of seven feet from the gate. The customer has been informed that all
pedestrian traffic must use the pedestrian gate.
5. Warning signs have been installed on each side of the gate in highly visible locations. The customer has been informed that these signs must remain at all
times.
6. There are no controls installed on the gate operator, or within 8 feet of the gate.
7. The installer has properly adjusted the obstruction sensing feature and has
tested the gate to make sure that the gate stops and reverses a short distance
with minimal resistance applied (Approximately 75 lbs. on a swing gate, at the
end of the gate.
8. The installer has instructed the customer in the proper use of the gate operator
and reviewed all of the operational functions, obstruction sensing devices,
warning beeper and reset, etc.
9. The installer has instructed the customer in the proper use of the operator’s
manual disconnect feature. The manual dis-connect must never be used while
the gate is in motion. The power switch must be turned off before using the
manual disconnect and disengaging the operator.
10. The installer has reviewed all safety instructions with the customer, and has left
the safety instructions and owner’s information sheets for their reference.
11. The installer has answered any questions the customer has regarding the operation of the gate operator and gate operator safety precautions.
12. The installer has explained to the customer that a regular maintenance sched-
ule for both the gate and the gate operator is recommended.
Installation Acceptance__________________________________
Address where opener is located___________________________
Installer name, number and address________________________
End user name and telephone number
___________________________
35
Page 36

LIMITED TWO-YEAR WARRANTY
Apollo Gate Operators are warranted against defects for a period of 24 months
from the date of purchase, providing recommended installation procedures are followed.
This warranty is in lieu of all other warranties expressed or implied (some states do not
allow limitations on how long an implied warranty lasts, so this limitation may not apply to
you) and shall be considered void if damage was due to improper installation or use,
connection to improper power source, or if damage was caused by fire, flood, or lightning.
The manufacturer will not be responsible for any labor charges incurred in the removal or
replacement of defective parts.
In case of failure due to defective material or workmanship during the warranty
period, the defective part will be repaired or replaced at the manufacturer’s option at no
charge if returned freight prepaid. New or factory rebuilt replacements may be used.
Replacement parts are warranted for the remaining portion of the original warranty
period. The manufacturer will pay standard ground freight on the return of repaired or
replaced items in warranty.
36
Nice Group USA Inc.
12625 Wetmore Road Suite 218
San Antonio, TX 78247
Ph. +1.210.545.2900
Fax +1.210.545.2915
www.niceapollo.com
 Loading...