

Page 1

eZono Service Documentation
QW-04: eZono 3000 Troubleshooting Guide
Document Number: eZono_3000_customer_troubleshooting_guide
Version: 1.1
Owner: Fenia Grypaiou
Date of Issue: 09 March 2015
Status: Approved
© eZono AG, 2009-2015
eZono Confidential
This document and all of its contents are protected by copyright and are owned and controlled by
eZono AG. The contents of this document are confidential and must not be disclosed to any 3rd
party without the express written consent of eZono AG or in the accordance with the terms of a
written contract with eZono AG
Page 2
eZono Service Documentation
DOCUMENT REVISION HISTORY
Date Person Version Reason
19/11/09 Robert Sweeney 1.0 Initial approved document.
15/11/13 Fenia Grypaiou 1.0.1
Proposal for reviewed document . Added steps on chapter 2 and
reviewed appendix A. Added appendix B.
10/12/13 Fenia Grypaiou 1.0.2
Finalizing the document and sending for review. Added appendixes C
and D.
09/03/15 Fenia Grypaiou 1.1 Document update (see DCR2015-013)
Version: 1.1 © eZono AG, 2009-2015 - Confidential Page ii
QW-04: eZono 3000 Troubleshooting
Guide
Page 3

eZono Service Documentation
TABLE OF CONTENTS
DOCUMENT REVISION HISTORY............................................................II
TABLE OF CONTENTS...............................................................................III
1. INTRODUCTION.......................................................................................1
1.1 Purpose.................................................................................................................................................................. 1
1.2 Scope..................................................................................................................................................................... 1
1.3 Glossary................................................................................................................................................................. 1
1.3.1 Acronyms....................................................................................................................................................... 1
1.3.2 Definition of terms......................................................................................................................................... 1
1.4 References.............................................................................................................................................................. 2
1.5 Document overview.............................................................................................................................................. 2
2. SYSTEM TROUBLESHOOTING................................................................3
2.1 Identify issue.......................................................................................................................................................... 3
2.2 Power related issue................................................................................................................................................ 5
2.3 Battery related issue............................................................................................................................................... 7
2.4 Display related issue.............................................................................................................................................. 9
2.5 GUI start-up issue................................................................................................................................................ 10
2.6 Touchscreen issue................................................................................................................................................ 11
2.7 Fixed touch buttons issue.................................................................................................................................... 12
2.8 Transducer detection issue................................................................................................................................... 13
2.9 Image quality issue............................................................................................................................................... 14
2.10 Audio related issue............................................................................................................................................. 16
2.11 System overheating............................................................................................................................................ 17
2.12 System error message......................................................................................................................................... 18
2.13 Frequently asked questions................................................................................................................................ 19
2.14 eZono support................................................................................................................................................... 19
2.14.1 Support information................................................................................................................................... 19
2.14.2 Contact details............................................................................................................................................ 19
3. APPENDIX A – SYSTEM SOFTWARE UPGRADE..................................20
4. APPENDIX B - EXPORT LOG FILES........................................................22
5. APPENDIX C - ERROR MESSAGES RELATED TO THE BATTERY......23
6. APPENDIX D - CUECARDS ISSUE..........................................................25
Version: 1.1 © eZono AG, 2009-2015 - Confidential Page iii
QW-04: eZono 3000 Troubleshooting
Guide
Page 4

eZono Service Documentation
1. Introduction
1.1 Purpose
This document is primarily written for customers of the eZono 3000 system. Its purpose is to help troubleshoot
issues with the eZono 3000 ultrasound system, suggesting actions that may help to avoid the unnecessary return of a
system to the eZono Service Centre for assessment of an issue that may have been remedied by the customer.
1.2 Scope
The intended audience of this document is as follows:
• eZono customer (primarily)
• eZono customer service department
• eZono quality department
• eZono Service Centre
1.3 Glossary
1.3.1 Acronyms
ESC eZono Service Centre
FAQ Frequently Asked Question
GUI Graphical User Interface
LCD Liquid Crystal Display
LED Light Emitting Diode
RMA Return Merchandise Athorisation
1.3.2 Definition of terms
Customer In this document, “customer” refers to the party that purchased the system directly from
eZono. Therefore, in almost all cases, customer refers to an eZono distributor that has received
training of system operation and maintenance.
Field fix Refers to the action taken by the customer that has successfully resolved a system issue and has
avoided the unnecessary return of the system to the ESC.
RMA form The RMA form is used by the customer to record information relating to the system being
returned under the eZono RMA process described in reference document [2].
System In this document, “system” is used to refer to the eZono 3000 portable ultrasound system
without peripherials (eg battery, power supply, transducer, stand etc).
Version: 1.1 © eZono AG, 2009-2015 - Confidential Page 1 of 25
QW-04: eZono 3000 Troubleshooting
Guide
Page 5

eZono Service Documentation
1.4 References
[1] eZono 3000 User Manual
[2] eZono_Elbe_customer_RMA_process
[3] eZono_Elbe_customer_RMA_form
1.5 Document overview
The following chapters of this document are organised as follows:
• Chapter 2 – System troubleshooting
The first section of this chapter attempts to identify the type of issue being experienced by the customer.
Subsequent sections then provide a troubleshooting guide that deal with the identified issue.
• Appendix A – System upgrade
This appendix describes the process of upgrading system software.
• Appendix B – Export log files
This appendix describes the process of exporting log files.
• Appendix C – Error messages related to the battery
This appendix describes the error message related to the battery.
• Appendix D – CueCards issue
This appendix describes the error message that could appear during the cuecards installation.
Version: 1.1 © eZono AG, 2009-2015 - Confidential Page 2 of 25
QW-04: eZono 3000 Troubleshooting
Guide
Page 6
eZono Service Documentation
2. System troubleshooting
2.1 Identify issue
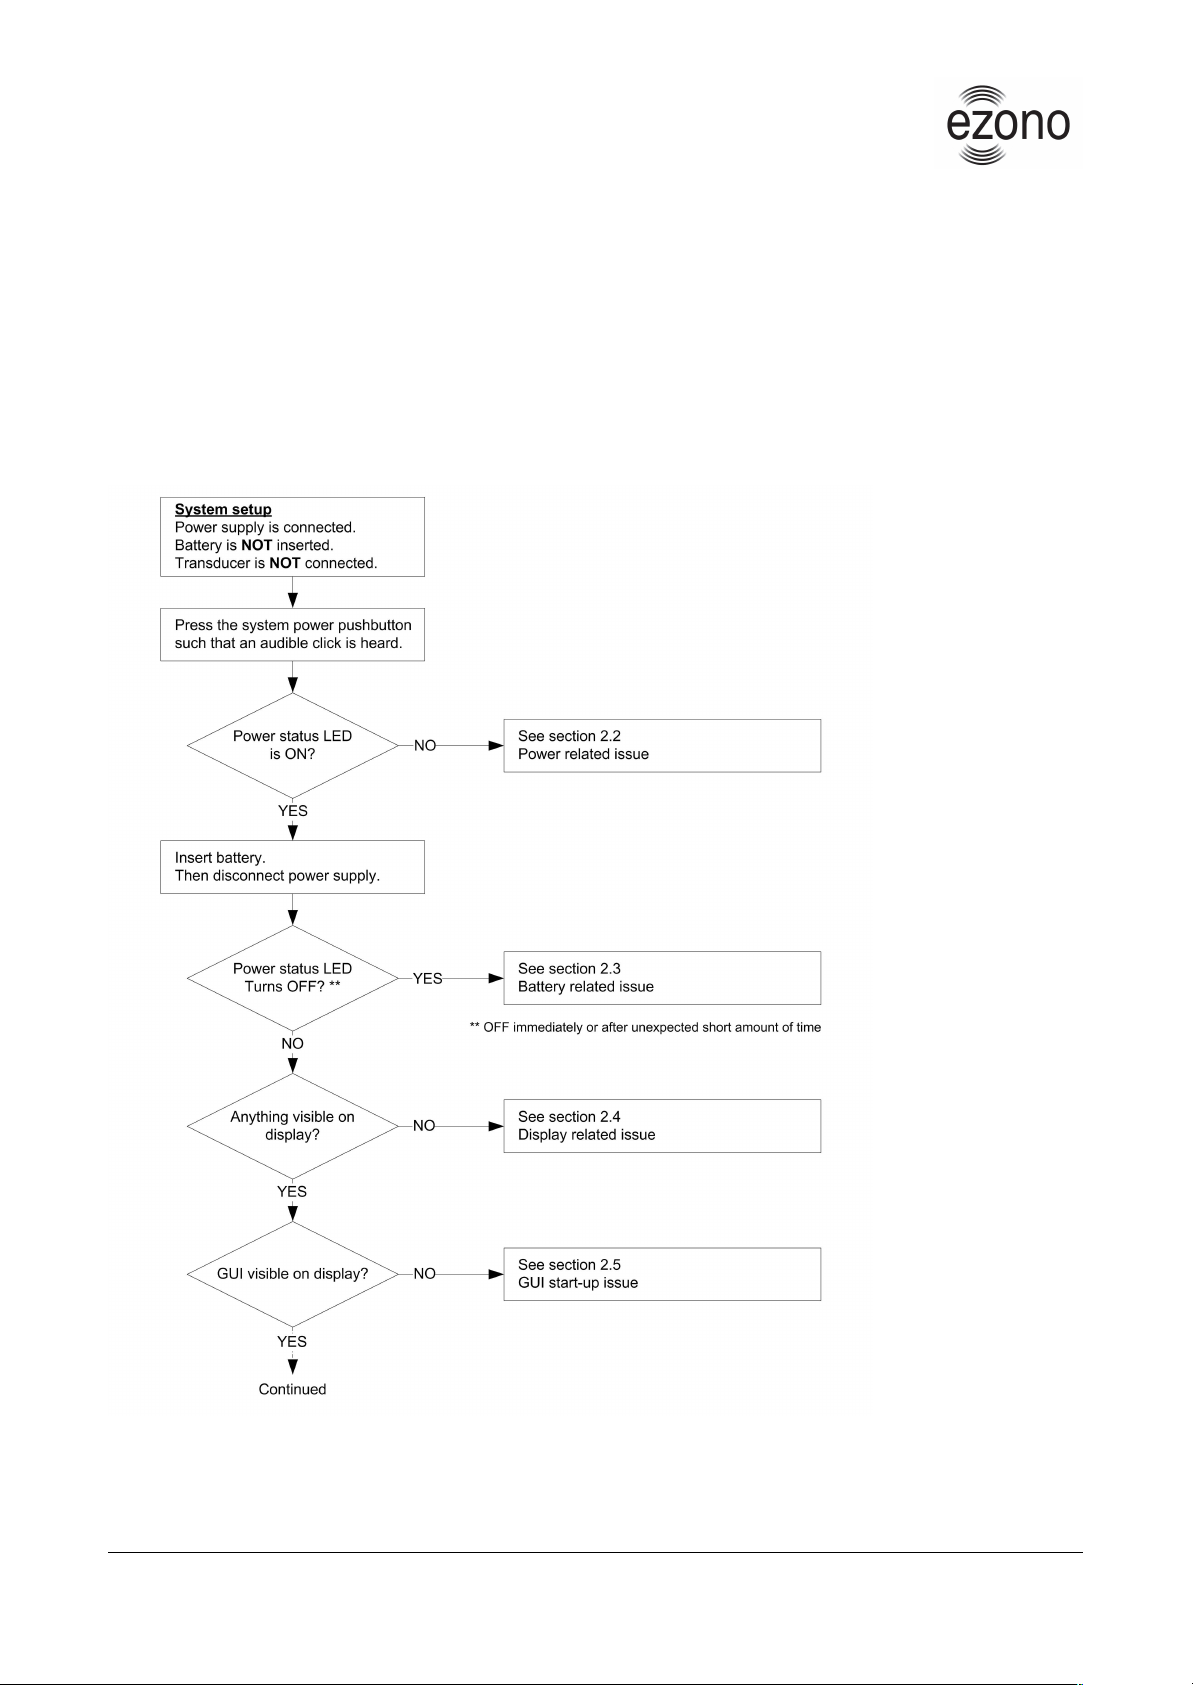
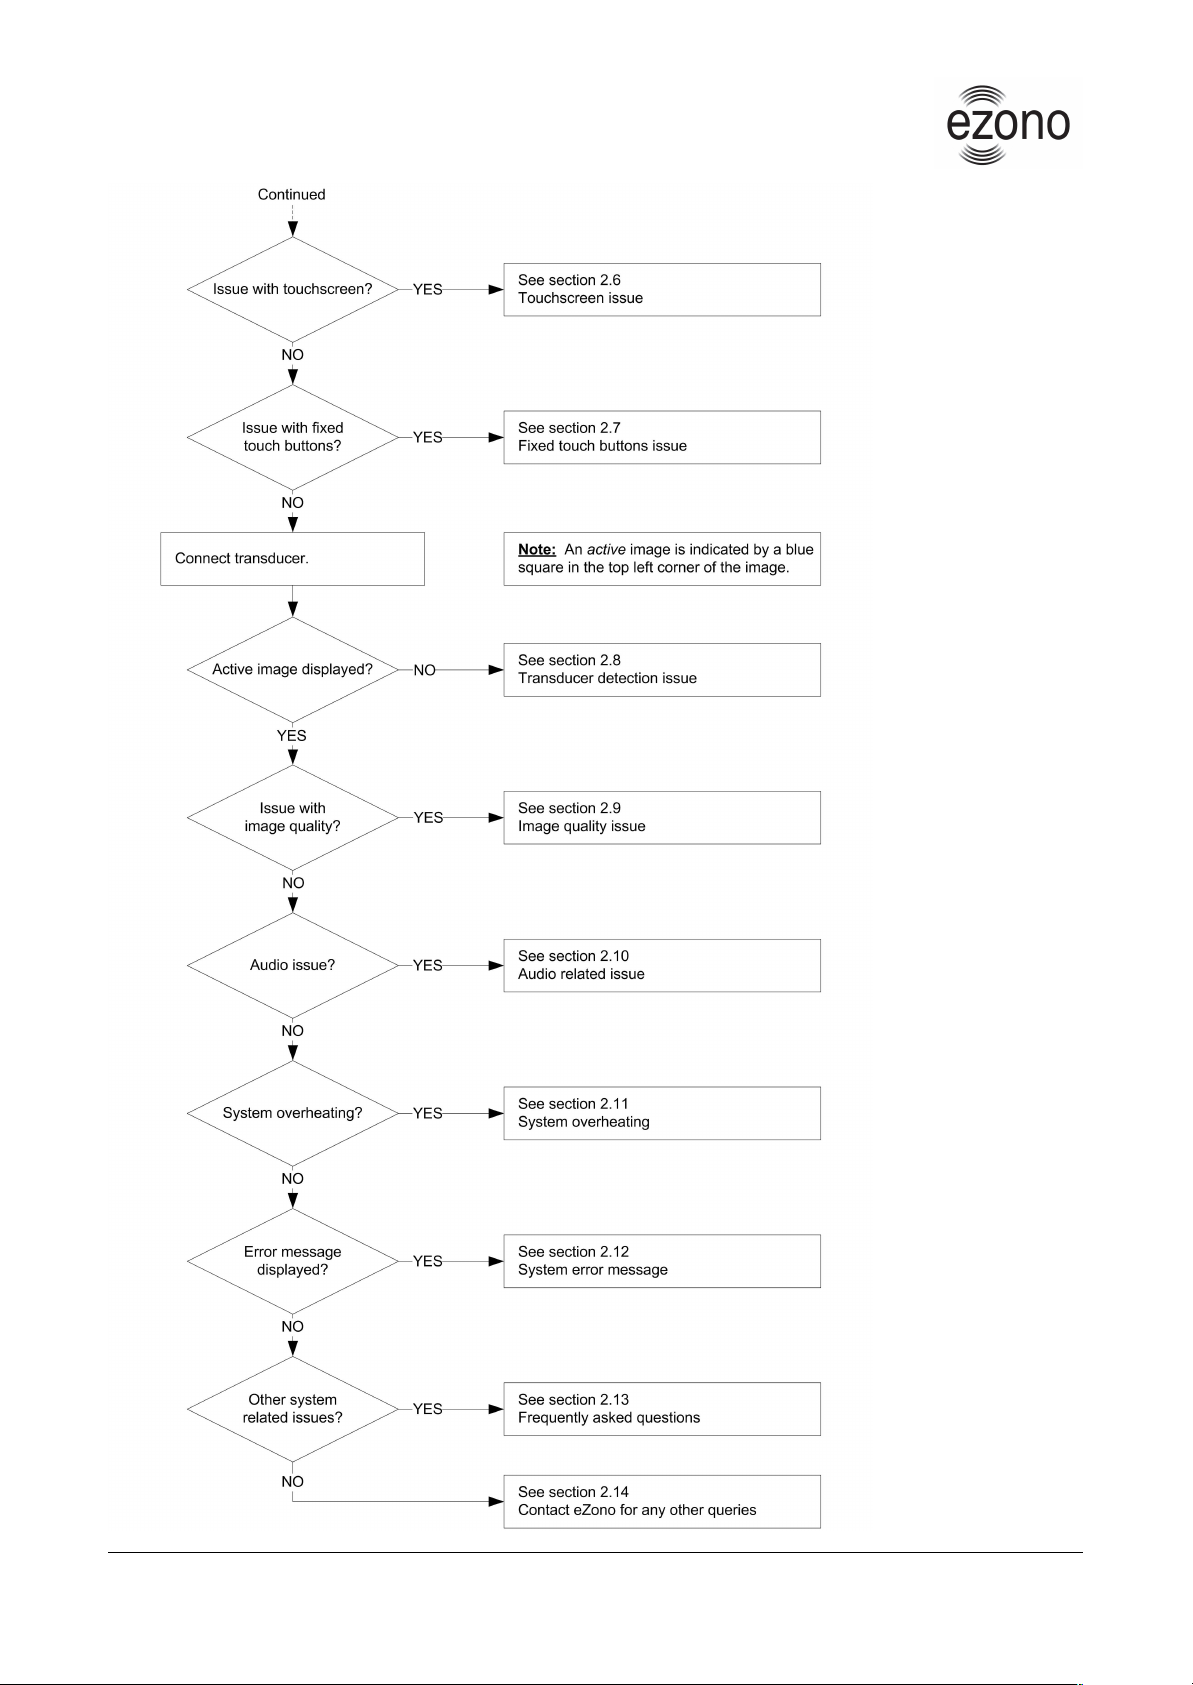
The following flow diagram attempts to identify the nature of system issue experienced by the customer. It also
provides references to appropriate sections of this document detailing the actions to be taken to troubleshoot given
issues.
Version: 1.1 © eZono AG, 2009-2015 - Confidential Page 3 of 25
QW-04: eZono 3000 Troubleshooting
Guide
Page 7
eZono Service Documentation
Version: 1.1 © eZono AG, 2009-2015 - Confidential Page 4 of 25
QW-04: eZono 3000 Troubleshooting
Guide
Page 8

eZono Service Documentation
2.2 Power related issue
Set-up
The issue occurs while the system is set up as follows:
1. The power supply is connected.
2. The battery is NOT inserted.
Symptom
The issue causes the following symptoms:
• The power pushbutton is pressed but the power status LED remains OFF – the system does not turn ON.
Diagnoses
The following information collection can be helpful to help diagnose and remedy the issue:
1. Note if the power pushbutton can be heard to “click” when pressed and “click again when released.
2. Did the system or power supply suffer a drop, impact or other event which may have triggered the issue?
3. Note if power supply casing is cracked or displays any other sign of damage.
4. Note if the power supply cords are cracked, pinched, badly twisted or displays any other sign of damage.
5. Using a multimeter, measure if the output of the power supply is 19V.
6. Insert a battery. Note if the system power status LED turns ON when the power pushbutton is pressed.
7. Connect a different known-good power supply. Note if the same symptoms are observed.
Field fix
The following actions may help to avoid the return of the system to the ESC for inspection:
1. Confirm that the mains Voltage outlet is good.
2. If an international mains Voltage plug adapter is used then confirm that the adapter is good.
3. Confirm that the mains cord is securely connected to the mains Voltage outlet AND to the power supply.
4. Use a known-good system power supply.
Version: 1.1 © eZono AG, 2009-2015 - Confidential Page 5 of 25
QW-04: eZono 3000 Troubleshooting
Guide
Page 9

eZono Service Documentation
RMA
If the issue is resolved by using a known-good power supply then it will be necessary to return the faulty power
supply to the ESC for inspection.
If the issue is not resolved by using a known-good power supply then it will be necessary to return of the system to
the ESC for inspection.
• Initiate RMA process described in reference document [2] by submitting a completed RMA form [3] to
eZono.
Version: 1.1 © eZono AG, 2009-2015 - Confidential Page 6 of 25
QW-04: eZono 3000 Troubleshooting
Guide
Page 10

eZono Service Documentation
2.3 Battery related issue
Set-up
The issue occurs while the system is set up as follows:
1. The battery is removed (important) and then re-inserted.
2. The power supply is NOT connected.
Symptom
The issue causes the following symptoms:
1. The power pushbutton is pressed but the power status LED remains OFF – the system does not turn ON.
2. The power status LED turns ON but turns OFF after an unexpected short amount of time – system turns
OFF.
3. When the power supply is connected the battery status LED does not start to slow flash green after 15
seconds.
Diagnoses
The following information collection can be helpful to help diagnose and remedy the issue:
1. Note which symptoms listed above are observed.
2. Did the system or battery suffer a drop, impact or other event which may have triggered the issue?
3. Note if the battery casing is cracked or displays any other sign of damage.
4. The battery contains a small LCD that indicates the remaining charge of the battery.
Note the number of black indicator bars on the LCD (Min 0, Max 5).
5. Insert the battery, connect the power supply and perform the following checks:
• Note if after 15 seconds the battery status LED starts to slow flash green.
• If yes then after 40 minutes note if the number black indicator bars on the battery LCD has
increased.
• If yes then continue to charge the battery for a further 3 hours.
• Then remove power supply, turn ON the system and note system operation time on battery only.
6. Connect a different known-good battery that has at least 2 black bars on the battery charge indicator LCD.
Note if the same symptoms are observed.
Version: 1.1 © eZono AG, 2009-2015 - Confidential Page 7 of 25
QW-04: eZono 3000 Troubleshooting
Guide
Page 11

eZono Service Documentation
Field fix
The following actions may help to avoid the return of the system to the ESC for inspection:
1. Ensure that the battery is fully inserted such that the battery cover can be fitted in place.
2. Connect the power supply to allow battery to be charged.
- Charging is indicated by the battery status LED slow flashing green.
- Battery charge can be observed in the GUI (Press the Utilities button followed by the Setup tab).
- Charging battery to full capacity can be expected to take a maximum of 4 hours.
3. Use a known-good battery.
RMA
If the issue is resolved by using a known-good battery then it will be necessary to return the faulty power supply to
the ESC for inspection.
If the issue is not resolved by using a known-good battery then it will be necessary to return of the system to the ESC
for inspection.
• Initiate RMA process described in reference document [2] by submitting a completed RMA form [3] to
eZono.
Version: 1.1 © eZono AG, 2009-2015 - Confidential Page 8 of 25
QW-04: eZono 3000 Troubleshooting
Guide
Page 12

eZono Service Documentation
2.4 Display related issue
Set-up
The issue occurs while the system is set up as follows:
1. The power supply is connected.
2. The battery is not inserted.
3. The transducer is not connected.
Symptom
The issue causes the following symptoms:
• The power status LED is ON but the display shows no content and remains black.
Diagnoses
The following information collection can be helpful to help diagnose and remedy the issue:
1. Did the system suffer a drop, impact or other event which may have triggered the issue?
2. Remove the battery cover.
Look into the empty battery bay towards the back of the display.
Note if it the white light of the display backlight can be seen.
Field fix
The following actions may help to avoid the return of the system to the ESC for inspection:
• Power down the system by pressing power button for longer than 5 seconds and then turn ON again.
RMA
Failing a successful field fix, it will be necessary to return the system to the ESC for inspection
• Initiate RMA process described in reference document [2] by submitting a completed RMA form [3] to
eZono.
Version: 1.1 © eZono AG, 2009-2015 - Confidential Page 9 of 25
QW-04: eZono 3000 Troubleshooting
Guide
Page 13

eZono Service Documentation
2.5 GUI start-up issue
Set-up
The issue occurs while the system is set up as follows:
1. The power supply is connected.
2. The battery is not inserted.
3. The transducer is not connected.
Symptom
The issue causes the following symptoms:
• Something appears on the system display but the GUI does not start up.
Diagnoses
The following information collection can be helpful to help diagnose and remedy the issue:
1. Did the system suffer a drop, impact or other event which may have triggered the issue?
2. Note the content of the display. This can give a clue to the source of the issue.
Field fix
The following actions may help to avoid the return of the system to the ESC for inspection:
• Power down the system by pressing power button for longer than 5 seconds and then turn ON again.
RMA
Failing a successful field fix, it will be necessary to return the system to the ESC for inspection
• Initiate RMA process described in reference document [2] by submitting a completed RMA form [3] to
eZono.
Version: 1.1 © eZono AG, 2009-2015 - Confidential Page 10 of 25
QW-04: eZono 3000 Troubleshooting
Guide
Page 14

eZono Service Documentation
2.6 Touchscreen issue
Set-up
The issue occurs while the system is set up as follows:
• None specific (it is assumed only that the GUI is visible).
Symptom
The issue causes the following symptoms:
1. Touchscreen does not function – GUI navigation is not possible.
2. Touchscreen sensitivity to touches is poor - GUI navigation is difficult.
3. Touchscreen hit location is not accurate - GUI navigation is difficult.
Diagnoses
The following information collection can be helpful to help diagnose and remedy the issue:
1. Note if the issue is also associated with another issue or warning message.
2. Note if issue can be reproduced in a consistent and repeatable manner.
3. Did the system suffer a drop, impact or other event which may have triggered the issue?
4. Note if touchscreen is badly scratched or cracked.
Field fix
The following actions may help to avoid the return of the system to the ESC for inspection:
1. Ensure that the touchscreen sensitivity is set to the user's preference:
• Press the Utilities button on the touchscreen.
• Press the Setup tab.
• Increase the Touchpad sensitivity control slider to maximum.
2. Perform the touchscreen calibration procedure (if possible):
• Press the Utilities button on the touchscreen.
• Press the Maintenance tab.
• Press the Touchscreen setup button.
RMA
Failing a successful field fix, it will be necessary to return the system to the ESC for inspection
• Initiate RMA process described in reference document [2] by submitting a completed RMA form [3] to
eZono.
Version: 1.1 © eZono AG, 2009-2015 - Confidential Page 11 of 25
QW-04: eZono 3000 Troubleshooting
Guide
Page 15

eZono Service Documentation
2.7 Fixed touch buttons issue
Set-up
The issue occurs while the system is set up as follows:
1. The GUI is visible and navigation by touchscreen is possible.
2. A transducer is connected.
Symptom
The issue causes the following symptoms:
1. One or more of the fixed touch buttons cannot be activated or is difficult to activate.
2. One or more of the fixed touch buttons activates without any user touch being made.
Diagnoses
The following information collection can be helpful to help diagnose and remedy the issue:
1. Note for which button(s) the issue is observed.
2. Note if the issue is also associated with another issue or warning message.
3. Note if issue can be reproduced in a consistent and repeatable manner.
4. Did the system suffer a drop, impact or other event which may have triggered the issue?
5. Note if black frame containing the fixed touch buttons can be seen to move significantly when pressed.
6. Note if the frame or surrounding plastic housing is cracked or otherwise damaged.
Field fix
The following actions may help to avoid the return of the system to the ESC for inspection:
1. Note that fixed touch buttons must be pressed for at least 1 second for activation.
2. The fixed touch buttons can be activated by un-gloved or gloved fingertip but NOT by stylus!
3. Ensure that liquids, gels etc. are not present in the area surrounding the fixed touch buttons.
RMA
Failing a successful field fix, it will be necessary to return the system to the ESC for inspection
• Initiate RMA process described in reference document [2] by submitting a completed RMA form [3] to
eZono.
Version: 1.1 © eZono AG, 2009-2015 - Confidential Page 12 of 25
QW-04: eZono 3000 Troubleshooting
Guide
Page 16

eZono Service Documentation
2.8 Transducer detection issue
Set-up
The issue occurs while the system is set up as follows:
1. The GUI is visible and navigation by touchscreen is possible.
2. A transducer is connected.
Symptom
The issue causes the following symptoms:
• An active image (indicated by a blue square in the top left corner of the image) is not displayed.
Diagnoses
The following information collection can be helpful to help diagnose and remedy the issue:
1. Note if the transducer detection issue is also associated with another issue or warning message.
2. Note if the issue can be reproduced in a consistent and repeatable manner.
3. Did the system or transducer suffer a drop, impact or other event which may have triggered the issue?
4. Note if transducer plug housing is cracked or displays any other sign of damage.
5. Connect a different known-good transducer and note if it is detected (active image shown).
Field fix
The following actions may help to avoid the return of the system to the ESC for inspection:
1. Disconnect and reconnect the transducer.
2. Ensure that the transducer is indeed locked in position – try to extract the transducer when it is locked.
3. Power down the system by pressing power button for longer than 5 seconds and then turn ON again.
4. Use a known-good transducer.
RMA
If the issue is resolved by using a known-good transducer then it will be necessary to return the faulty transducer to
the ESC for inspection.
If the issue is not resolved by using a known-good transducer then it will be necessary to return of the system to the
ESC for inspection.
• Initiate RMA process described in reference document [2] by submitting a completed RMA form [3] to
eZono.
Version: 1.1 © eZono AG, 2009-2015 - Confidential Page 13 of 25
QW-04: eZono 3000 Troubleshooting
Guide
Page 17

eZono Service Documentation
2.9 Image quality issue
Set-up
The issue occurs while the system is set up as follows:
1. The GUI is visible and navigation by touchscreen is possible.
2. A transducer is connected.
Symptom
The issue causes the following symptoms:
1. The ultrasound image contains lines or patches in the vertical axis that are noticeably brighter or darker than
the surrounding image.
2. The brightness control buttons do not adjust image brightness.
3. The contrast control buttons do not adjust image contrast.
4. The time gain control buttons do not adjust brightness at different image depths.
Diagnoses
The following information collection can be helpful to help diagnose and remedy the issue:
1. Note if the image quality issue is also associated with another issue or warning message.
2. Note if the image quality issue can be reproduced in a consistent and repeatable manner.
3. Note if the issue occurs only under certain GUI settings, physical set-up, environment conditions etc.
4. Did the system or transducer suffer a drop, impact or other event which may have triggered the issue?
5. Note if transducer plug housing is cracked or displays any other sign of damage.
6. Note if transducer cord is cracked, pinched, badly twisted or displays any other sign of damage.
7. Note if the applied surface of transducer head is badly scratched, bubbled or otherwise damaged.
8. Connect a different known-good transducer. Note if the same symptoms are observed.
Field fix
The following actions may help to avoid the return of the system to the ESC for inspection:
1. Use ultrasound transmission gel to ensure a consistent transducer contact with the body.
2. Disconnect and reconnect the transducer.
Version: 1.1 © eZono AG, 2009-2015 - Confidential Page 14 of 25
QW-04: eZono 3000 Troubleshooting
Guide
Page 18

eZono Service Documentation
3. Power down the system by pressing power button for longer than 5 seconds and then turn ON again.
4. Use a known-good transducer.
RMA
If the issue is resolved by using a known-good transducer then it will be necessary to return the faulty transducer to
the ESC for inspection.
If the issue is not resolved by using a known-good transducer then it will be necessary to return of the system to the
ESC for inspection.
• Initiate RMA process described in reference document [2] by submitting a completed RMA form [3] to
eZono.
Version: 1.1 © eZono AG, 2009-2015 - Confidential Page 15 of 25
QW-04: eZono 3000 Troubleshooting
Guide
Page 19

eZono Service Documentation
2.10 Audio related issue
Set-up
The issue occurs while the system is set up as follows:
• None specific (it is assumed only that the GUI is visible and that navigation by touchscreen is possible).
Symptom
The issue causes the following symptoms:
• No “click” sound is produced when GUI buttons and fixed touch buttons are pressed.
Diagnoses
The following information collection can be helpful to help diagnose and remedy the issue:
1. Did the system suffer a drop, impact or other event which may have triggered the issue?
2. Note if system audio issue is also associated with other issue or warning message.
Field fix
The following actions may help to avoid the return of the system to the ESC for inspection:
1. Ensure that system button sounds is enabled in the GUI:
• Press the Utilities button on the touchscreen.
• Press the Setup tab.
• Press the Button Sounds button if it is disabled (red X means that sound is disabled!)
• Adjust the Audio volume control slider to maximum.
RMA
Failing a successful field fix, it will be necessary to return the system to the ESC for inspection
• Initiate RMA process described in reference document [2] by submitting a completed RMA form [3] to
eZono.
Version: 1.1 © eZono AG, 2009-2015 - Confidential Page 16 of 25
QW-04: eZono 3000 Troubleshooting
Guide
Page 20

eZono Service Documentation
2.11 System overheating
Set-up
The issue occurs while the system is set up as follows:
• None specific (it is assumed only that the GUI is visible and that navigation by touchscreen is possible).
Symptom
The issue causes the following symptoms:
• System indicates overheating (Overheating symbol and/or warning message).
Diagnoses
The following information collection can be helpful to help diagnose and remedy the issue:
1. Note if system overheating occurs in a consistent and repeatable manner.
2. Note if system overheating occurs only under certain GUI settings, physical set-up, environment conditions
etc.
3. Confirm that the internal system fans can be heard when the system is turned ON.
4. The two internal system fans can be seen through the front air vent. Confirm that the fins of both fans can
be seen to turn (easiest seen when the system is turned ON and the fans speed up or when the system is
turned OFF and the fans slow down).
Field fix
The following actions may help to avoid the return of the system to the ESC for inspection:
1. Ensure that the system is removed form any packaging or carry case during extended usage.
2. Ensure that there is no material blocking either of the two system air vents.
3. Ensure that the physical set-up of the system does not cause either air vent to be obstructed.
RMA
Failing a successful field fix, it will be necessary to return the system to the ESC for inspection
• Initiate RMA process described in reference document [2] by submitting a completed RMA form [3] to
eZono.
Version: 1.1 © eZono AG, 2009-2015 - Confidential Page 17 of 25
QW-04: eZono 3000 Troubleshooting
Guide
Page 21

eZono Service Documentation
2.12 System error message
Set-up
The issue occurs while the system is set up as follows:
• None specific (it is assumed only that the GUI is visible and that navigation by touchscreen is possible).
Symptom
The issue causes the following symptoms:
• An error message is displayed.
Diagnoses
The following information collection can be helpful to help diagnose and remedy the issue:
1. Check the system user manual [1] for explanation of error message.
2. Did the system suffer a drop, impact or other event which may have triggered the issue?
3. Note the details of the error message and the frequency of occurrence.
4. Note if the error message appears only under certain GUI settings, physical set-up, environment conditions
etc.
Field fix
The following actions may help to avoid the return of the system to the ESC for inspection:
1. Check if the on-line FAQ's provide an answer that deals with the error message (see section 2.13).
2. Check if there is a system software upgrade available that deals with the error message (see Appendix A).
3. Contact eZono support (see section 2.14.2).
RMA
Failing a successful field fix, it will be necessary to return the system to the ESC for inspection
• Initiate RMA process described in reference document [2] by submitting a completed RMA form [3] to
eZono.
Version: 1.1 © eZono AG, 2009-2015 - Confidential Page 18 of 25
QW-04: eZono 3000 Troubleshooting
Guide
Page 22

eZono Service Documentation
2.13 Frequently asked questions
The eZono website provides a list of frequently asked questions that deal with common issues previously encountered
by customers (see section 2.14.2). If this troubleshooting guide document fails to resolve the issue experienced by the
customer then the on-line FAQ's offer a useful additional source of information.
2.14 eZono support
2.14.1 Support information
If required, eZono can provide the following support:
• Help to clarify steps described in this troubleshooting guide document.
• Confirm if there is a FAQ that matches the customer issue and if a field fix is recommended.
• Confirm if there is a software upgrade available to resolve the customer issue.
• Explain the RMA process (see reference document [2]) - failing the resolution of the issue.
• Provide repair status – for a system or peripheral already returned under RMA.
2.14.2 Contact details
Customer support is available as follows:
Telephone Monday to Friday 9am to 5pm : +49 3641 876 1739 (Central European)
Fax: +49 3641 876 1759
Email: [email protected]
Web: www.ezono.com
USA
Telephone Monday to Friday 9am to 5pm: +1 206 939 5670 (Pacific)
Email: [email protected]
Version: 1.1 © eZono AG, 2009-2015 - Confidential Page 19 of 25
QW-04: eZono 3000 Troubleshooting
Guide
Page 23

eZono Service Documentation
3. Appendix A – System software upgrade
The process of upgrating 1.12 Software version or later, is as follows:
• Process assumes that the customer has already downloaded the latest SW upgrade from the eZono homepage.
• For copleting with success a SW installation from the new release:
1. Use a non-bootable USB drive
2. Download the two upgrade files
3. After downloading save the files in the non-bootable USB drive without using any folder or
subfolder
• Verify that the file name and the filesize on the USB are exactly the same as on the website e.g:
(filename: 2012-10-08_11-29_1.12.0.1.0-29637_ezono-disk-images-upgrade and filesize: 518.936.436 bytes)
• Process assumes that the GUI is visible and that navigation by touchscreen is possible.
4. Then turn on the system and note the current system software version
• Press the Utilities button on the touchscreen.
• Press the Maintenance tab.
• Note the Software version from the screen.
• Press the Upgrade button.
5. If for any reason the SW cannot be installed:
• Note the system serial number from the label on back of system.
6. Contact eZono support (see section 2.14.2) to request information about software upgrade.
• Provide system serial number.
• Provide current system software version.
7. If appropriate, eZono will provide the software upgrade as follows:
• Make software file containing upgrade available for download from eZono website.
• Email software file containing upgrade directly to customer.
• Ship software file containing upgrade on USB flash drive directly to the customer.
8. Copy the software upgrade file provided to USB flash drive (if not already on flash drive!).
9. Plug the flash drive into a USB port of the system to be upgraded.
10. Allow 10 seconds for the flash drive to be recognised by the system.
11. Press the Utilities button on the touchscreen.
12. Press the Maintenance tab.
Version: 1.1 © eZono AG, 2009-2015 - Confidential Page 20 of 25
QW-04: eZono 3000 Troubleshooting
Guide
Page 24

eZono Service Documentation
13. Press Upgrade button.
14. Follow on-screen instructions.
Please Note that if your SW version 1.10-1.11 is and you want to upgrade your system to 1.12.0 then
the upgrade has to be as following:
• Upgrade first from your SW version to the 1.12.0
• Download the upgrade files 1 and 2 with the following filenames and filesize:
◦ file1:
▪ filename: ezono_upgrade
▪ filesize: 45.378.033 bytes
◦ file2:
▪ filename: 2012-10-08_11-29_1.12.0.1.0-29637_ezono-disk-images-upgrade
▪ filesize: 518.936.436 bytes
• After the complition of this step please upgrade from 1.12.0 to 1.12.1
◦ Download the upgrade file with the following filenames and filesize:
◦ file:
▪ filename: ezono_upgrade
▪ filesize: 17.8 MB (18,705,076 bytes)
• Please do not interrupt the installation. The process can take more than 20 minutes
• After finishing the installation please verify the new SW version of the system (see: Appendix A,
step 4)
• Then your system will have the latest SW version
• If something wrong happens, please send a screen shot of the screen to [email protected] and our
enginners will contact you for further information
Version: 1.1 © eZono AG, 2009-2015 - Confidential Page 21 of 25
QW-04: eZono 3000 Troubleshooting
Guide
Page 25

eZono Service Documentation
4. Appendix B - Export log files
There are two ways to export your log files:
1. The first way is:
• Power on the system
• Insert a non-bootable USB stick
• Press the Utilities button
• Press the Maintenance button
• Press the Export log button
2. The second way is:
• Power off the system
• Unplug the power supply cable and the battery
• Plug the power supply and the battery again
• Insert a non-bootable USB stick
• Boot the system
• Wait for a one minute and then unplug the USB
• Power off the system
• Autologs should be saved on the USB stick
• Please verify that Autologs are on the USB stick
• Send the Autologs to [email protected] for investigation
• If Autologs cannot be created please contact [email protected]
Version: 1.1 © eZono AG, 2009-2015 - Confidential Page 22 of 25
QW-04: eZono 3000 Troubleshooting
Guide
Page 26

eZono Service Documentation
5. Appendix C - Error Messages related to the battery
Error Message: 1800 – 1000:
If this error message appear on the systems screen please follow the next steps:
• remove the battery
• remove the Power Supply (the system is now obviously completed powered down)
• connect the power supply
• turn on the system and wait for the graphical user interface to start up
• verify that the system GUI appears correctly and that you can scan
• now insert the battery (this is maybe enough to force the system to re-establish communication with the
battery)
• if the error message 1800 – 1000 appear again then leave everything exactly as it is for 10 to 20 minutes
• after this repeat the above steps. It is possible that if you leave the battery in the system for a few
minutes will be enough to give the battery a wake-up charge and restore correct functionality.
Battery capacity lower than 50%:
If this error message appear on the systems screen that indicates that the battery needs recalibration and full
charge.
• At one end of the battery there is a small 5-segment LCD used to indicate the battery charge. The LCD
shows one black bar for 1-20% charge, 2 bars for 20-40%, and so on. What do you see on the LCD of the
problematic battery?
• Please use one of the eZono battery chargers to recalibrate your battery or send your battery to eZono for
testing and recalibration. The error will come out continuously till the battery is replaced or recalibrated.
It is recommended to have a second battery as a spare part and a charger that you can use for recalibration
and full charge.
Check if battery is charging or not:
• Connect the power supply and insert the battery
• Turn on the system
• Press the Utilities button
• Press the Set Up button and observe if the percentage of the BIOS of the battery is getting higher after some
minutes
Version: 1.1 © eZono AG, 2009-2015 - Confidential Page 23 of 25
QW-04: eZono 3000 Troubleshooting
Guide
Page 27

eZono Service Documentation
◦ If yes unplug the power supply and verify the percentage of the battery again. Note: that sometimes the
percentage of the battery, when the power supply is connected is higher than without the power supply
connected.
◦ If the percentage remains the same then either the battery or the system are defective and have to come
back to eZono or to the distributor for repair. Please contact [email protected].
Failing a successful field fix, it will be necessary to return the system to the ESC for inspection
Initiate RMA process described in reference document [2] by submitting a completed RMA form [3] to
eZono.
Version: 1.1 © eZono AG, 2009-2015 - Confidential Page 24 of 25
QW-04: eZono 3000 Troubleshooting
Guide
Page 28
eZono Service Documentation
6. Appendix D - CueCards issue
To install the CueCards:
• Download from myezono.com the CueCards
• After downloading save the files in the non-bootable USB drive without using any folder or subfolder
• Power on the system
• Plug in the USB stick
• Press the Procedure button
• Then press the Manage Procedure button
• At the end press the Install Procedures button
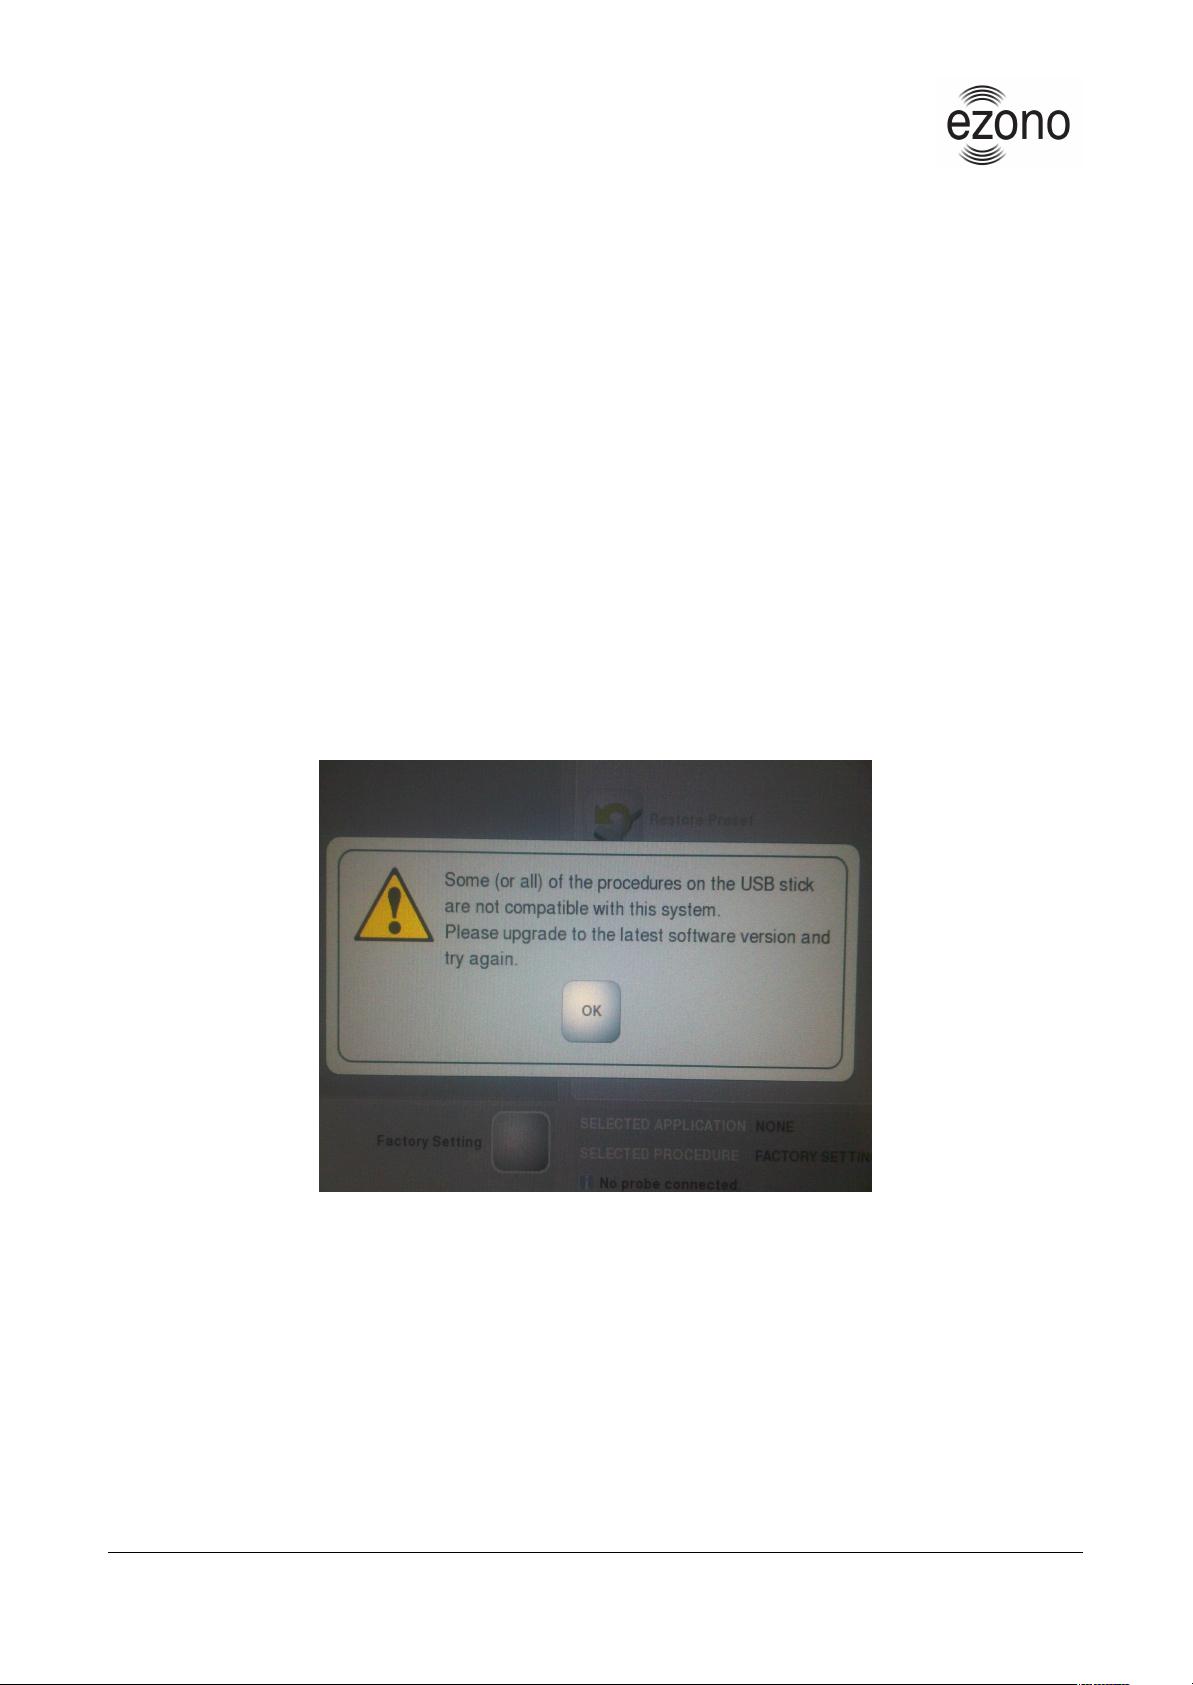
If the following message will appear on your screen while installing the CueCards then the only think that you have
to do is to press the “OK” button and start again the installation.
Version: 1.1 © eZono AG, 2009-2015 - Confidential Page 25 of 25
QW-04: eZono 3000 Troubleshooting
Guide
 Loading...