

Page 1

IMPORTANT:
complete user guide
instructions, and specifications.
Go to www.extron.com for the
, installation
Retractor SM • Installation Guide
This guide provides basic instructions for an experienced technician to quickly install the Extron
Retractor SM Show Me® cable retraction modules in an Extron TeamWork® Collaboration System and
in compatible Cable Cubby enclosures.
Additional instructions are available in the TeamWork Collaboration System Installation Guide and the
installation guides for the individual Cable Cubby® enclosures and the Retractor SM User Guide. All
are available at www.extron.com.
NOTE: For information on safety guidelines, regulatory compliances, EMI/EMF compatibility,
accessibility, and related topics, see the Extron Safety and Regulatory Compliance Guide
on the Extron website.
Planning
Retractor SM modules can be mounted in a horizontal, vertical, or angular orientation depending upon under‑table clearance and
accessibility.
Horizontal mounting is recommended to provide maximum legroom and to protect the Retractors against accidental damage.
Be certain the Horizontal Mounting Bracket can be fastened under the table or on a table support without bending the pulley
system or forcing it from a perpendicular angle with the enclosure (see the Top View diagram on page3).
Vertical mounting is used where insufcient under‑table space exists for horizontal mounting or where under‑table access is
limited. Ensure the Retractor SM modules hang freely without touching the oor and are not obstructed under the table.
Angular mounting is used where insufcient under‑table space exists for horizontal mounting and tabletop to oor clearance
prevents vertical mounting. An additional mounting hole allows installation at an angle providing extra oor clearance.
• For horizontal mounting, a Retractor SM Horizontal Bracket Kit is required.
• A Retractor SM Filler Module is required to occupy unused Retractor space.
• Depending on the enclosure, various Retractor SM Mounts are available, both Triple and Quad.
NOTE: See the Extron website for a list of compatible Retractor SM Mounts and brackets to suit the application and
enclosure.
Mounting kits, bracket kits, ller modules, and accessories are available at www.extron.com.
For new installations, to determine the best location for the enclosure, keep in mind the under‑table space required for the
retraction system. Refer to the enclosure installation guide for mounting.
NOTE: Before starting an installation, determine if additional hardware is needed.
Required Tools and Additional Accessories
Tape Measure Phillips Screw Driver Zip TiesMarking Pen Tweeker
(x2)
-or-
(x4)
(x3)
(x2)
(x2)
(x4)
Filler Module
(Optional)
Horizontal Mounting
Bracket (Optional)
Retractor SM
Mount - Triple
Retractor SM
Mount - Quad (x2)
Retractor SM
Mount - Triple
1
Page 2
Retractor SM • Installation Guide (Continued)
Horizontal Mounting
Vertical Mounting
15.2 in.
(386 mm)
25.7 in.
(653 mm)
27.4 in.
(696 mm)
30
8.3 in.
(211 mm)
14.4 in.
(366 mm)
13.3 in.
(338 mm)
17.7 in.
(450 mm)
ooa
(695 mm)
Cable Cubby 1202
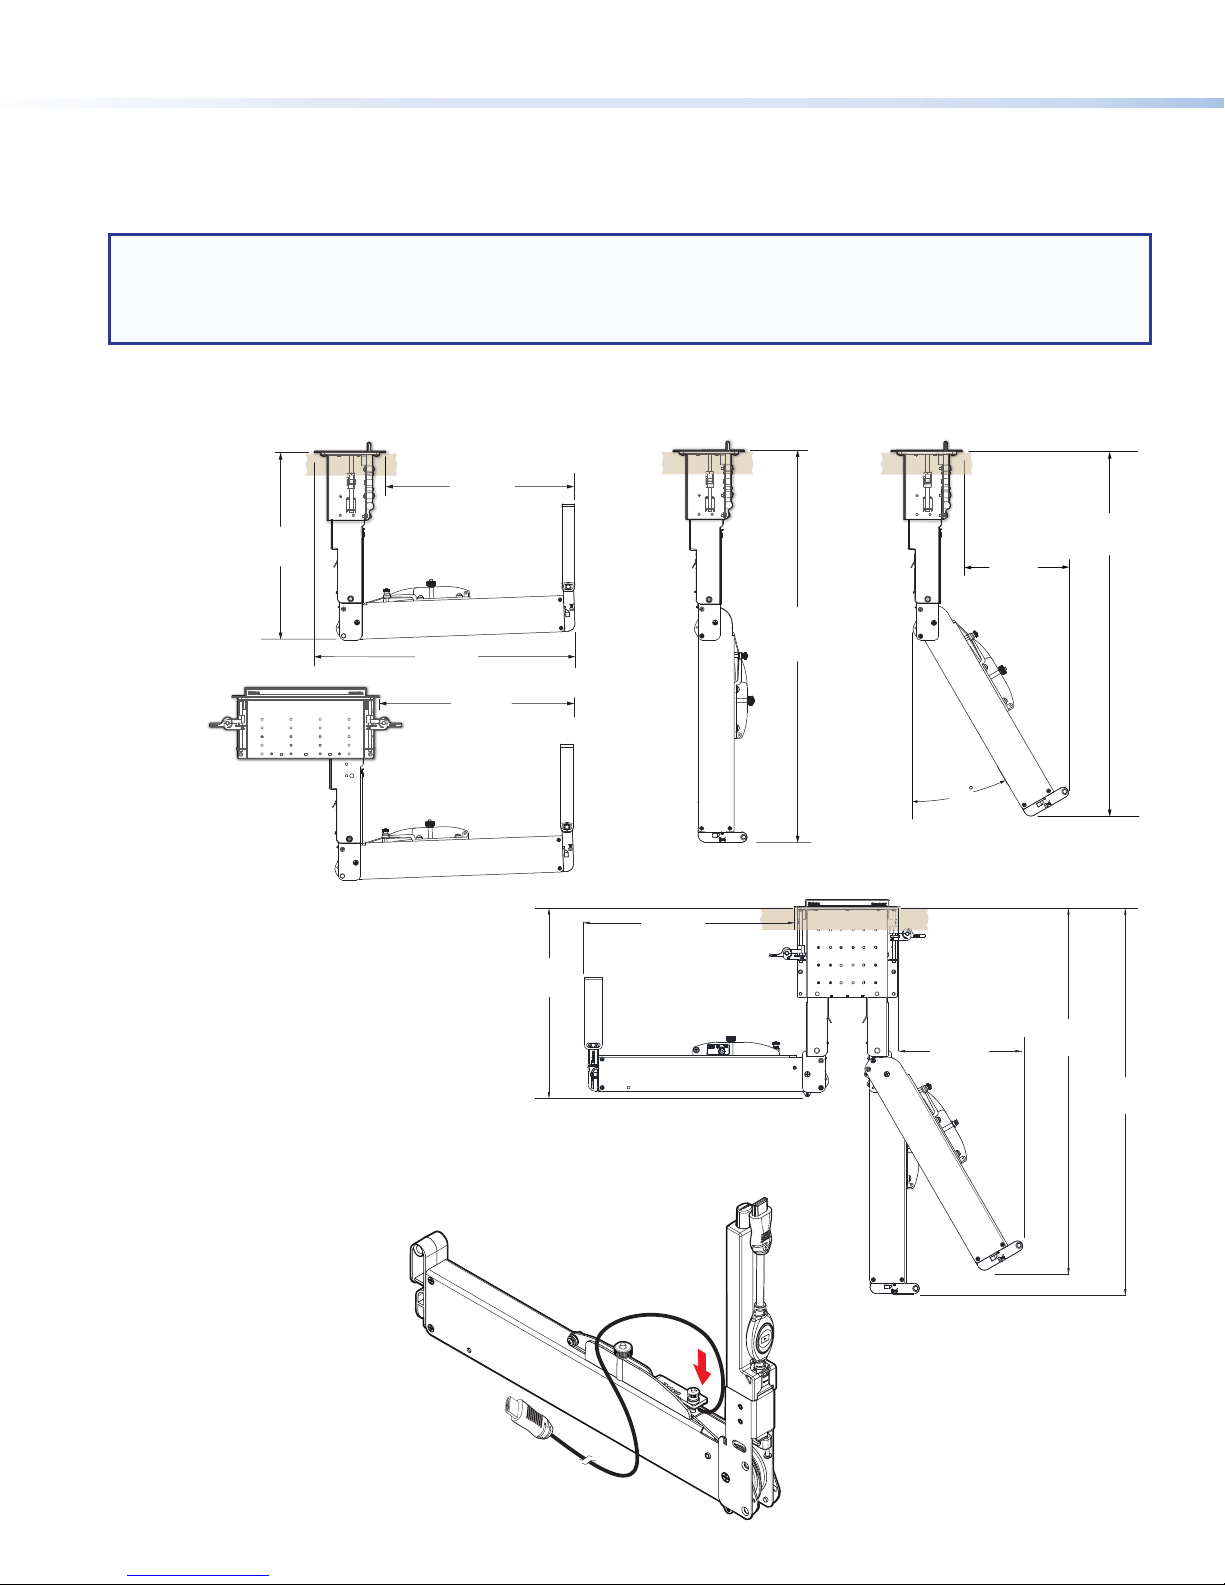
Getting Started — Determine Under-table Clearances
Follow the installation instructions provided in your Cable Cubby enclosure package to determine a suitable mounting location.
The diagrams that follow show the space required for a Retractor SM module installation in a compatible enclosure.
NOTES:
• To prevent objects from impeding cable retraction, ensure the exposed cable clears nearby obstructions.
• Excess cabling can cause clearance issues. Use zip ties to secure under‑table cabling to prevent accidental contact or
entanglement.
The Retractor SM module is mounted from below the enclosure.
Retractor SM
Cable Cubby 1202
13.3 in.
(338 mm)
Horizontal Mounting
17.7 in.
(450 mm)
14.4 in.
(366 mm)
15.2 in.
(386 mm)
13.4 in.
(341 mm)
Vertical Mounting
14.8 in.
(376 mm)
27.4 in.
(696 mm)
Angular Mounting
30
Cable Cubby 700
8.7 in.
(220 mm)
8.3 in.
(211 mm)
(653 mm)
25.7 in.
(653 mm)
25.7 in.
27.4 in.
Pigtails
For connections to devices under the table, the Retractor SM
modules have 6feet (1.8m) of pigtail from the exit of the cable
retainer as shown.
2
6 ft. (1.8 m) Std.
Page 3

Getting Started — Prepare the Retractors
Remove two enclosure screws
(one on each side) from this position
for horizontal and angular mounting.
Cable Stop Assembly
1
Share Button
Screws (one on each side)
The Retractor SM modules are delivered ready to mount vertically. No further modications are required. If the Share button is not
seated fully against the cable release assembly, conrm proper tension adjustment using the instructions in the Retractor SM User
Guide.
To mount a Retractor horizontally or at an angle:
Cable Stop Assembly
Screws (one on each side)
Remove two enclosure screws
1
(one on each side) from this position
for horizontal and angular mounting.
Share Button
NOTE: For horizontal mounting instructions see
the Retractor SM User Guide and the Retractor
SM Horizontal Bracket Installation Guide.
To mount the Retractor at an angled position for increased under-table clearance:
For angular mounting, move the
2
cable stop assembly upward until
the angular mounting hole is visible.
Go to
.
3
Angular Mounting Hole
Mounting Location
Install the two enclosure screws
3
removed in step 1 (one on each side)
in the angular mounting location.
Getting Started — Prepare the Enclosure
By now, you should be certain the Retractor SM modules have adequate under‑table clearance for installation and that proper
legroom is provided to avoid accidental contact with the system. You should have the required accessories for mounting the
retraction system and to congure the enclosure (see Required Tools and Additional Accessories on page1).
Horizontal
Bracket
Top View
ARGER
B CH
US
DANGER:
• Disconnect the power from the Cable Cubby enclosure before
beginning a Retractor system installation.
• Débranchez l’alimentation du boîtier CableCubby avant de
commencer l’installation d’un système de Rétracteur.
3
Page 4

Retractor SM • Installation Guide (Continued)
Installation
CAUTION:
• Do not operate a Retractor until it is installed.
• Retraction should be a slow, controlled motion.
• Keep hands away from moving parts.
ATTENTION :
• Ne vous servez pas d’un rétracteur avant qu’il soit
installé.
• La rétraction doit être un mouvement lent et contrôlé.
• N’approchez pas vos mains des parties en
mouvement.
The enclosure must be installed and properly congured before
beginning the retraction system installation.
1. Follow the enclosure installation instructions for new
installations or prepare an existing enclosure installation to
mount the Retractor modules.
2. Follow the Retractor mounting instructions in the Retractor
SM User Guide and the individual installation guides for
each mounting bracket (see an example installation at right).
3. Connect retraction system cables and other cables
(if installed).
4. When the Retractor module is installed, proceed to Locking
Screw on the next page for nal installation details.
Cable Cubby 1202
Enclosure
Quad
Bracket
Clip
(x 2 )
Pin
(x 2)
Raise the modules
1
into the bracket.
Ensure module is ush
against bracket with
notch on outside wall.
Secure the modules
2
with the included
mounting pin and clip.
NOTE: Example installation shown with optional Cable
Cubby 1202 enclosure.
Cable Cubby Installation
Retractor SM modules can be mounted in the Cable Cubby enclosure using the Retractor SM Triple Brackets.
User Access
Cable Cubby 1402
User Access
Retractor SM modules can be installed using the Retractor SM Quad Brackets.
Cable Cubby 650 UT
4
Cable Cubby 650UTCable Cubby 1402
Page 5

Locking Screw
A locking screw on each Retractor SM and Retractor SM Filler Module prevents it from
rotating on the enclosure mounting pin during operation. Tighten each locking screw to
prevent movement of the module.
NOTE: Do not overtighten. The locking screw only needs to be snug.
Initial Adjustments
Once installed, proper Retractor operation must be veried and necessary adjustments performed.
Confirm Proper Cable Extension
To extend a cable, grasp the connector and pull it from the Retractor to its full length.
Confirm Proper Cable Retraction
To retract a cable:
1
Hold the cable taught
by the connector.
3
Slowly allow the cable
to be pulled back until
the stop collar (or connector)
seats against the cable
release assembly.
2
Press and hold the
cable release button.
CAUTION: Use one hand to control the cable as it
retracts. A cable allowed to retract too quickly and
without control can cause possible injury to the user or
damage the furniture surface, Cable Cubby, and nearby
items.
ATTENTION : Utilisez une main pour contrôler le câble
lorsqu’il se rétracte. Un câble qu’on laisse se rétracter
trop rapidement et qu’on ne contrôle pas peut provoquer
d’éventuelles blessures ou endommager la surface du
meuble, du CableCubby, ou des objets à proximité.
Tighten locking
screw (1 each).
• If the cable does not retract to suit your application, see the Speed Control Adjustment on the next page.
• When the Share button is seated against the cable release assembly, release the button and cable.
• If the Share button is not seated fully against the cable release assembly, conrm proper tension adjustment using the
instructions in the Retractor SM User Guide, available at www.extron.com.
5
Page 6

Speed Control Adjustment
The Retractor SM module is delivered with the speed control adjusted for nominal operation in all mounting orientations (vertical,
horizontal, and angular), however, speed control adjustment may be required in your application.
Speed
NOTES:
• Ensure the speed control knob remains fully seated, with the teeth of the knob engaged throughout adjustments.
• Retraction speed is affected by the installation orientation (vertical, horizontal, or angular). Always test speed
adjustments with the Retractor in its installed position.
The speed control adjusts the cable retraction speed:
• If the retraction is too fast, turn the speed control a quarter‑turn clockwise (the control clicks as it turns) to slow the cable
retraction. Test the speed after each quarter‑turn until the desired speed is reached.
• If the retraction is too slow after the nal quarter‑turn, turn the knob counterclockwise one click at a time, retesting after
each click, until the desired speed is reached.
• If the cable retraction is too slow, adjust the speed control counterclockwise in the same manner.
Retractor Operation
When initial adjustments are complete, the Retractor is ready for operation. To connect a cable, grasp the connector and pull
enough cable from the Retractor to connect it to the device. There is no need to press the cable release button. When you stop
pulling the cable, the Retractor xes the length automatically.
To retract the cable, grasp the connector to control the cable, press and hold the cable release button until the Share button is
seated on the cable release assembly.
Quick Installation Checklist
Planning (page 1)
If this is a new installation, refer to the enclosure Installation Guide.
Ensure there is adequate space available under the enclosure for the Retractor SM Modules.
Choose the Retractor orientation.
Obtain optional mounting brackets and accessories necessary for the application (see Required Tools and
Additional Accessories on page1).
Prepare the Retractors (page 3)
To mount the Retractors horizontally or at an angle, remove the two Retractor enclosure screws.
For angular installations, reinstall the enclosure screws in the angular mounting holes.
Prepare the Enclosure (page 3)
Disconnect all power to the enclosure.
Refer to the instructions included with the individual mounting brackets for installation.
Install the Retractors (page 4)
Connect all retraction system cables and other cables.
Tighten the locking screws (see Locking Screw on the previous page).
Initial Adjustments and Operation (page 5 and page 6)
Verify proper operation of each Retractor SM module. Adjust tension or speed control as necessary.
After the initial adjustments, the Retractor system is ready for normal operation.
© 2018 Extron Electronics — All rights reserved. www.extron.com
All trademarks mentioned are the property of their respective owners.
6
68-2663-51 Rev. A
02 18
 Loading...