

Page 1

Extron Mounting Bracket Installation Guide
This guide gives an overview of how to install the Extron mounting brackets listed
in the table below.
Bracket Type
One-gang mounting bracket/mud ring Gray 70-163-01
Black 70-163-11
White 70-163-21
RAL 9010 white 70-163-51
Two-gang mounting bracket/mud ring Gray 70-086-01
Black 70-086-11
White 70-086-21
RAL 9010 white 70-086-51
Two-gang MK mounting bracket Black 70-086-16
White 70-086-26
RAL 9010 white 70-086-56
Three-gang mounting bracket/mud ring Gray 70-086-02
Black 70-086-12
White 70-086-22
RAL 9010 white 70-086-52
Four-gang mounting bracket/mud ring Gray 70-086-03
Black 70-086-13
White 70-086-23
RAL 9010 white 70-086-53
Five-gang mounting bracket/mud ring Gray 70-086-04
Black 70-086-14
White 70-086-24
RAL 9010 white 70-086-54
Six-gang mounting bracket/mud ring Gray 70-385-01
Black 70-385-11
White 70-385-21
RAL 9010 white 70-385-51
Seven-gang mounting bracket/mud ring Gray 70-386-01
Black 70-386-11
White 70-386-21
RAL 9010 white 70-386-51
MLM 10 x 8 mounting bracket/mud ring Gray 70-164-01
Black 70-164-11
White 70-164-21
RAL 9010 white 70-164-51
Color Part #
68-426-01
Rev. F
04 05
1Extron Mounting Bracket • Installation Guide
Page 2

Installation Guide, cont’d
Determining the Installation Location
The mounting brackets do not require attachment to wall studs, so they can be
placed almost anywhere on a wall. When you determine where to install the device
and mounting bracket, consider cable placement and access. You may need to
install the cables before installing the bracket.
Preparing the Installation Site
1. Refer to the appropriate template diagram (later in this manual) to find out the
dimensions of the opening required for the size/type of mounting bracket you
have.
2. Using a ruler or tape measure and a soft pencil, draw guidelines on the
installation surface (wall) in the desired orientation and location where the
opening for the bracket will be cut.
CAUTION
3. Use a jigsaw or small hand saw to carefully cut away the material within the
guidelines that you drew.
4. Check the size of the opening by laying the mounting bracket against it. The
flat portion of the bracket should lie snugly on the wall, and the tabs through
which the screws will be inserted should fit easily into the opening. There
should not be noticeable play within the opening.
5. If needed, use a saw, file, or sandpaper to enlarge the hole. Smooth the edges
of the opening to avoid damage or injury to yourself or the cables during
installation.
The template diagrams in this guide are not full size. Do not trace
them or use them as patterns on the installation surface. Use these
diagrams only for reference to obtain the dimensions of the hole that needs
to be cut for your bracket. Use a ruler to measure and draw the cutting
guidelines.
Installing the Mounting Bracket
Fastening the bracket with backing clips
Use this installation method if the installation surface is wallboard, particle board,
or soft wood.
1. Place 1¼" (3.18 cm) long or ¾" (1.90 cm) #6-32 thread machine screws
(provided) through the holes in each corner of the mounting bracket. Use the
shortest possible screw needed. Loosely fasten (using 2-3 turns) the mounting
backing clip on the end of each screw.
2. Insert the mounting bracket into the opening in the wall.
3. Rotate each clip so that the tab will be behind the plywood, wallboard/sheet
rock, or other surface to hold the bracket snugly in place when the screw is
tightened. See Detail A and Detail B, below.
Wall Material
Backing Clip
0.75" #6-32 Screw
Detail A
Mounting Bracket
Wall Material
Backing Clip
1.25" #6-32 Screw
Mounting Bracket
Detail B
Extron Mounting Bracket • Installation Guide2
Page 3
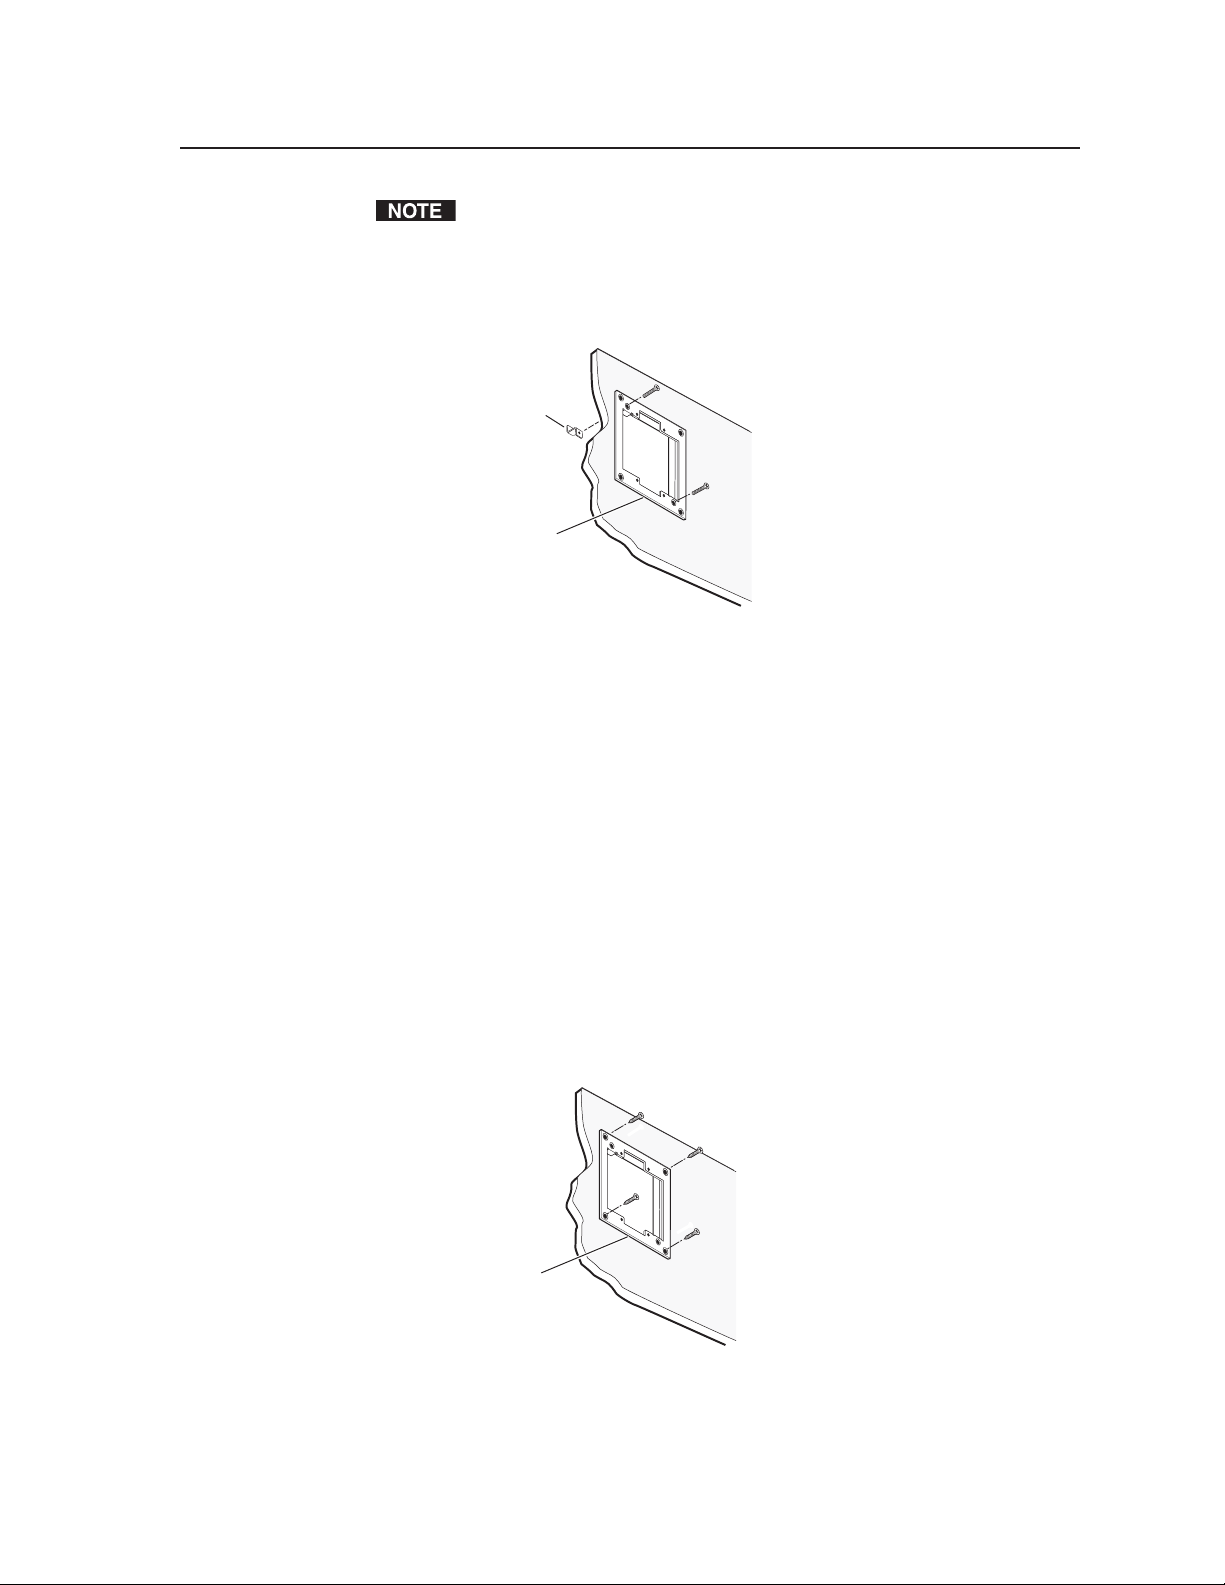
The backing clip can be in either orientation shown in the previous figure.
4. Use a cross-head (Phillips) screwdriver to hand tighten the screws to fasten the
mounting bracket in place. (Refer to the Detail A and Detail B diagrams in the
figure on the previous page.)
Backing clip can be
in either orientation.
Mounting Bracket
Fastening the bracket with backing clips
Fastening the bracket with wood or sheet metal screws
Use this installation method if the installation surface is a sturdy, dense material
such as sheet metal, plywood, or hard wood.
1. Insert the mounting bracket into the opening in the wall and hold it firmly in
place.
2. Mark the locations of the outermost/corner bracket holes on the installation
surface.
3. If desired, remove the mounting bracket and drill ¼" deep pilot holes (half the
width of the shaft of the screw) at the marked locations.
4. Insert the bracket back into the hole.
5. Use four ½" (1.3 cm) long, #6 flat headed wood screws (provided) to fasten the
bracket directly onto wood; or use self-tapping sheet metal screws to fasten
the bracket to metal. Hand tighten the screws. See the illustration below.
Mounting Bracket
Fastening the bracket with screws for wood or sheet metal
3Extron Mounting Bracket • Installation Guide
Page 4

Installation Guide, cont’d
Mounting Bracket Templates
One-gang mounting bracket
2.79" (7.1 cm)
4.50"
(11.4 cm)
3.76"
(9.6 cm)
2.20"
(5.6 cm)
SURFACE
CUT-OUT AREA
FOR
WALL MOUNT
Recommended
cut-out area
for the installation
surface.
Top Panel
TEMPLATE IS NOT FULL SIZE.
Extron Mounting Bracket • Installation Guide4
Page 5

MK mounting bracket (two-gang)
5.70" (14.5 cm)
4.94" (12.5 cm)
3.38"
(8.6 cm)
2.68"
(6.8 cm)
SURFACE
CUT-OUT AREA
FOR WALL MOUNT
Top Panel
Recommended
cut-out area
for the installation
surface.
TEMPLATE IS NOT FULL SIZE.
5Extron Mounting Bracket • Installation Guide
Page 6

Installation Guide, cont’d
Two-gang mounting bracket
4.50"
(11.4 cm)
3.875"
(9.9 cm)
4.60" (11.7 cm)
3.80" (9.7 cm)
Recommended
cut-out area
for the installation
surface.
SURFACE
CUT-OUT AREA
FOR WALL MOUNT
TEMPLATE IS NOT FULL SIZE.
Top Panel
Extron Mounting Bracket • Installation Guide6
Page 7

Three-gang mounting bracket
Recommended
cut-out area
for the installation
surface.
6.41"
(16.3 cm)
5.61"
(14.2 cm)
Top Panel
SURFACE
CUT-OUT AREA
FOR WALL MOUNT
3.875"
(9.9 cm)
4.50"
(11.4 cm)
TEMPLATE IS NOT FULL SIZE.
7Extron Mounting Bracket • Installation Guide
Page 8

Installation Guide, cont’d
Four-gang mounting bracket
4.50" (11.4 cm)
3.875" (9.9 cm)
Recommended
cut-out area
for the installation
surface.
8.33"
(21.2 cm)
Top Panel
7.53"
(19.1 cm)
SURFACE
CUT-OUT AREA
FOR WALL MOUNT
TEMPLATE IS NOT FULL SIZE.
Extron Mounting Bracket • Installation Guide8
Page 9

Five-gang mounting bracket
4.50" (11.4 cm)
3.875" (9.9 cm)
Recommended
cut-out area
for the installation
surface.
10.14"
(25.8 cm)
Top Panel
9.31"
(23.6 cm)
SURFACE
CUT-OUT AREA
FOR WALL MOUNT
TEMPLATE IS NOT
FULL SIZE.
9Extron Mounting Bracket • Installation Guide
Page 10

Installation Guide, cont’d
Six-gang mounting bracket
4.50" (11.4 cm)
Recommended
cut-out area
for the installation
surface.
4.00" (10.2 cm)
11.75"
(29.8 cm)
Top Panel
10.90"
(27.7 cm)
SURFACE
CUT-OUT AREA
FOR WALL MOUNT
TEMPLATE IS NOT
FULL SIZE.
Extron Mounting Bracket • Installation Guide10
Page 11

Seven-gang mounting bracket
4.50" (11.4 cm)
4.00" (10.2 cm)
Recommended
cut-out area
for the installation
surface.
Top Panel
13.57"
(34.5 cm)
12.71"
(32.3 cm)
SURFACE
CUT-OUT AREA
FOR WALL MOUNT
TEMPLATE IS NOT
FULL SIZE.
11Extron Mounting Bracket • Installation Guide
Page 12

Installation Guide, cont’d
8 by 10 inch mounting bracket
8.25" (21.0 cm)
7.53" (19.1 cm)
10.25"
(25.6 cm)
9.52"
(24.2 cm)
Top Panel
SURFACE
CUT-OUT AREA
FOR WALL MOUNT
Recommended cut-out area
for the installation surface.
TEMPLATE IS NOT FULL SIZE.
Extron Mounting Bracket • Installation Guide12
Page 13

This page intentionally left blank
13Extron Mounting Bracket • Installation Guide
Page 14

www.extron.com
Extron Electronics, USA
1230 South Lewis Street
Anaheim, CA 92805
USA
714.491.1500
Fax 714.491.1517
Extron Electronics, Europe
Beeldschermweg 6C
3821 AH Amersfoort
The Netherlands
+31.33.453.4040
Fax +31.33.453.4050
Extron Electronics, Asia
135 Joo Seng Road, #04-01
PM Industrial Building
Singapore 368363
+65.6383.4400
Fax +65.6383.4664
© 2005 Extron Electronics. All rights reserved.
Extron Electronics, Japan
Kyodo Building
16 Ichibancho
Chiyoda-ku, Tokyo 102-0082 Japan
+81.3.3511.7655
Fax +81.3.3511.7656
 Loading...