

Page 1
MLC 104 IP Plus Series • Setup Guide
P
SS
H
O
O
E
LAN
Display On and
Input Selection
The Extron MLC 104 IP Plus Series MediaLink® Controller integrates Ethernet connection into AV systems to allow users
to remotely control, monitor, and troubleshoot AV equipment, including display devices and switchers. It includes an
embedded web server, serial ports, and configurable digital I/O ports for use in applications that require control and
monitoring of multiple devices within an AV system.
The MLC 104 IP Plus series of controllers are configured using the free Extron Global Configurator (GC) software. The
MLCs integrate seamlessly with Extron GlobalViewer® Enterprise (GVE) software and the free GlobalViewer web-based AV
resource management softwarefor remote control applications. Global Configurator and other useful software applications
are available at www.extron.com.
A checklist of basic setup steps is provided at the end of this guide. For additional information see the help files and the
MLC 104 IP Plus Series User Guide, available at www.extron.com.
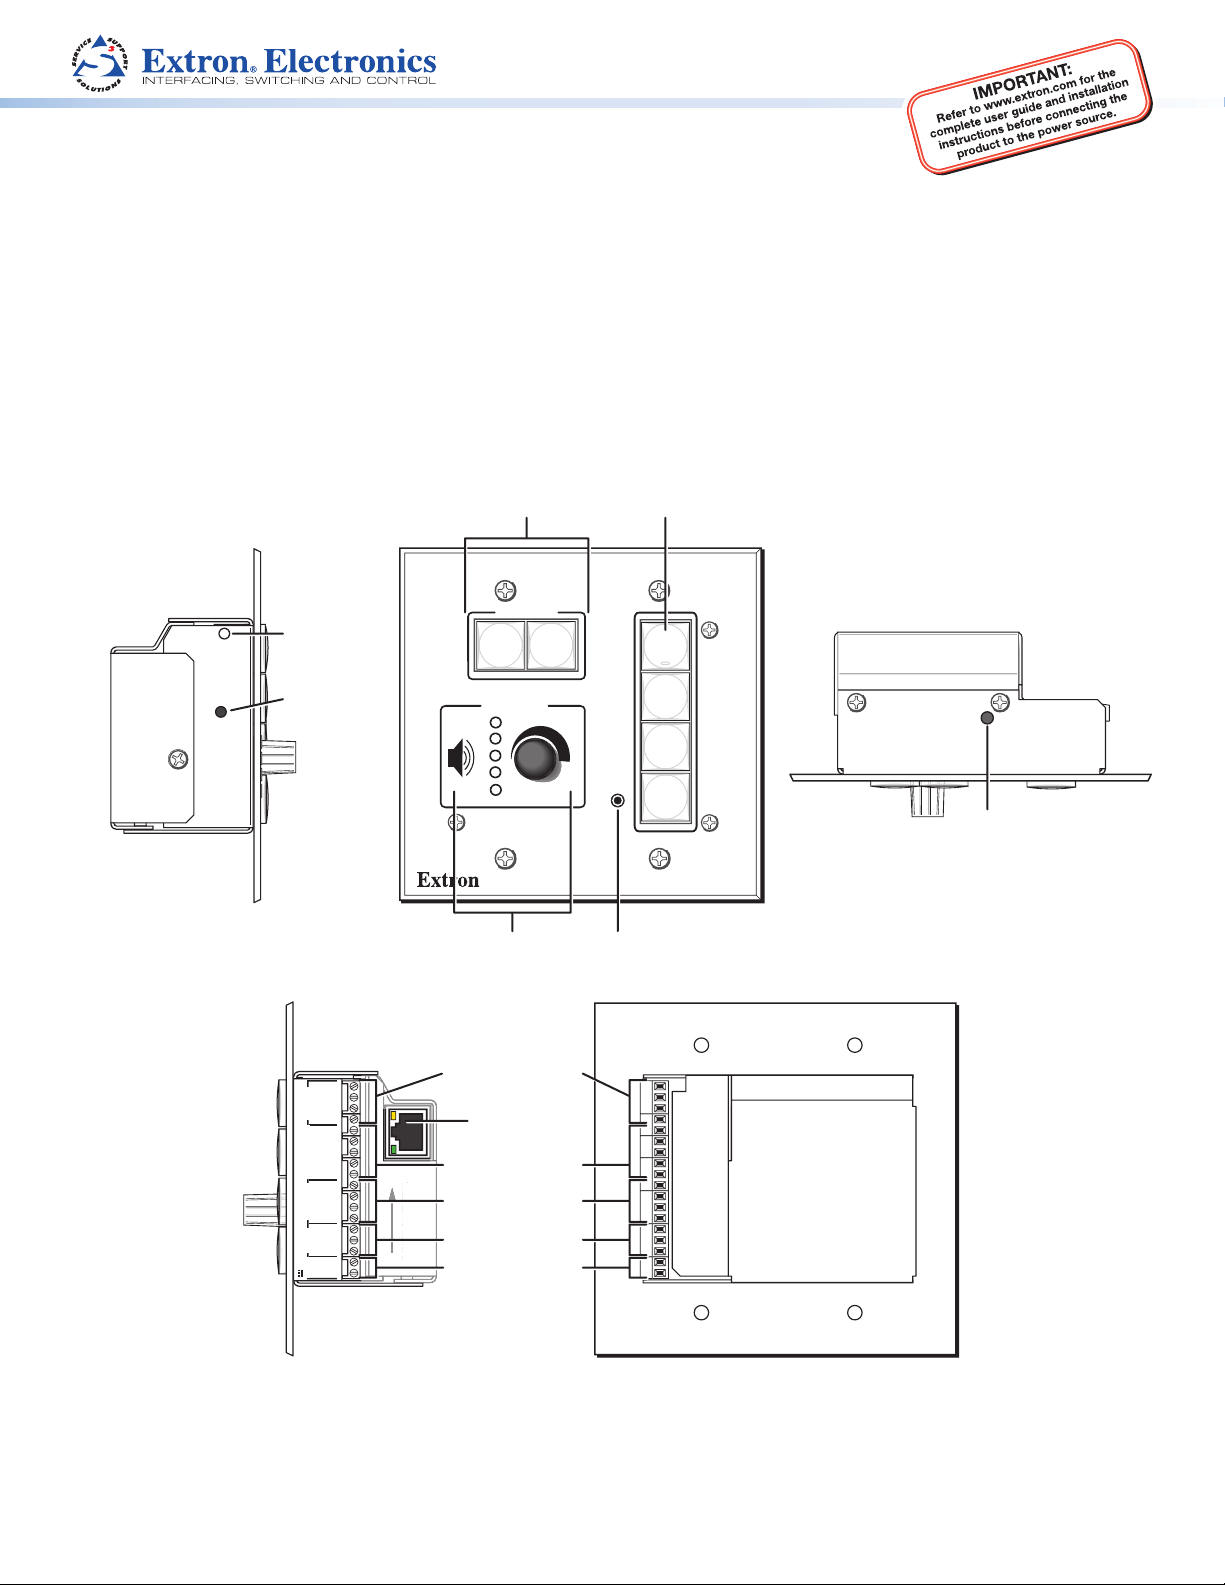
Panels and Features
Reset LED
Off Buttons
DISPLAY
ON
OFF
Buttons
VCR
1
Left Side
RESET
Reset Button
(recessed)
RS-232/IR
Tx
DISPLAY
Rx
GROUND
IR OUT
A B C D E
+V OUT
COMM LINK
GROUND
CM
IR IN
SCP
123
DIGITAL
I/O
GROUND
AB
RS-232
Rx
MLS
Tx
GROUND
POWER
12V
GROUND
+12V IN
Front
Panel
Projector Control Port
Control Module/IR/SCP
LAN
TWEEKER T
TWEEKER TO REMOVE
PRESS TAB WITH
RE
TAB WIT
REM
V
Power Input (12 VDC)
VOLUME
Volume Knob
and LEDs
Display or
LAN (IP) Port
Port (COMM LINK)
Digital I/O Ports (3)
MLS Switcher Port
CONFIG
MLC 104 IP PLUS
Config (RS-232
host control) Port
DVD
PC
2
IR
3
4
RUN
100
Top Panel
Top Panel
IR Learning
Receiver
Right Side
Rear Panel
1
Page 2
MLC 104 IP Plus Series • Setup Guide (Continued)
OUT
A B C D E
CO
IN
O
PRESS
A
O
N
3
DIGITAL
I/O
OU
OUT
DISPLAY
R
SCP 104
H
E
E
K
O
D
MLS
R
POWER
V
OU
D
V
IN
OUT
OU
D
OUT
OU
DISPLAY
R
A B C D E
C
IN
Cabling and Features
Attach cables using the following wiring diagrams as a guide. Full details are available in the MLC 104 IP Plus Series User Guide.
CAUTION: Installation and service must be performed by authorized personnel only.
Control — Projector or Display
Projector or
Display
RS-232 Port
Ground ( )
Receive (Rx)
Transmit (Tx)
Bidirectional
Ground ( )
Receive (Rx)
Transmit (Tx)
or
RS-232 IR
Ground ( )
IR Output Signal
LAN
(-)
(+)
Unidirectional
IR
(-)
(+)
(-)
(+)
Two Single IR Emitters
Projector
or Display
IR Receiver
Right
Side
Panel
Tx
Rx
DISPLAY
RS-232/IR
GROUND
Control — Control Modules, SCP Control Panels (COMM Link Port)
+12 VDC
A
Ground ( )
B
IRCM, ACM, RCM
C
D
SCP communication (IR)
E
PRESS TA
T
TWEEKER T
TWEEKER T
A
LAN
x
x
Tx
Rx
DISPLAY
RS-232/I
RS-232/IR
ND
IR
IR OUT
R
GROUND
CM/IR/SCP Port
• SCPs: Two maximum per system
• Control modules: four maximum (four module addresses)
• To tal distance from port to last device: 200 feet (61 m) maximum
CM
+V OUT
GROUND
A B C D E
COMM LINK
IR IN
SCP
123
DIGITAL
I/O
MLC
Right Side
GROUND
GRO UND
Panel
V
IR OUT
+V OUT
GROUND
GROUND
A B C D E
COMM LINK
MM LINK
M
CM
SCP
IR IN
IR
Select RS-232 protocol via
software or SIS command.
Signals are bidirectional, ±5 V.
RS-232 default protocol:
• 9600 baud
• 8 data bits • 1 stop bit
• no parity • no flow control
Projector RS-232 / IR Port(s)
Infrared:
• TTL level (0 to 5 V)
• Up to 1 MHz
DISPLAY
ON
VOLUME
OFF
VIDEO
AUX
VIDEO
PC
IMAGE
MUTE
SCP 104
C
IRCM/ACM/RCM
B
Ground ( )
A
+12 VDC
1
2
3
4
DVD & VCR CONTROL
TITLE MENU
ENTER
PREV/REW
NOTE: Each projector or display may
require different wiring. See the
manual that came with the projector
or display, or the Extron device driver
communication sheet for details.
DVD VCR
Tx
TUNER
TV/VCR
PLAY NEXT/FWD PAUSE STOP
IRCM-DV+
Control — Digital Input or Output (I/O)
TAB WIT
x
Rx
AB
A B
GROUND
RS-232
MLS
S-232
x
Tx
Digital I/O Ports
N
UN
12
R
R
+12V IN
GROUND
GROUND
POWER
12
12V
These three ports can be used as digital input or output, with or without +5 VDC pull-up.
Once configured, the digital input or output can monitor or trigger events and functions
(toggle relays, issue commands, send e-mail).
PRESS TAB WITH
PR
R TO REMOV
TWEE
TWEEKER TO REMOVE
LAN
x
x
M
ND
V
R
IR OUT
+V OUT
R
GROUND
A B C D E
COMM LINK
OMM LINK
123
CM
SCP
IR IN
DIGITAL
I/O
Tx
Rx
N
R
DISPLAY
RS-232/I
RS-232/IR
GROUND
RIght Side Panel
2
Digital I/O
Ground ( )
Switch,
Sensor,
Relay
Page 3

Control — MLS Switcher
H
E
N
POWER
V
V
IN
2
3
OU
OU
A B C D E
CO
DIGITAL
I/O
IN
MLC/IR
H
O
D E
MLS
RS
DIGITAL
I/O
O
D
Ground
12 VDC
SS
H
O
O
E
1
2
3
GRO
+V OUT
C
GROU
IR OUT
GROU
SCP
GROUND
Tx
DISPLAY
S
/
R
A B C D E
ABCDE
CO
A
B
MLS
RS
POWER
V
DIGITAL
DIGITAL
I/O
Tx
Rx
MA
(on top
on front panel
(MLS RS-232 Port)
Power
ABC
Rear Panel
MLC/IR port
on MLS Switcher
Heat Shrink
Over Ground
or Drain Wires
NOTES:
• You must connect a ground wire
between the MLC and MLS.
• If you use cable that has a drain wire,
tie the drain wire to ground at both ends.
Ground ( )
B
Receive (Rx)
A
Transmit (Tx)
MLC
Right
Side
Panel
Transmit (Tx)
Receive (Rx)
T
V
+V OUT
A B C D E
COMM LINK
CM
ND
R
GROUND
MM LINK
IR IN
B
A
PRESS TAB WITH
PRESS TAB WIT
TWEEKER TO REMOV
TWEEKER TO REMOVE
A
LAN
P
123
SCP
AB
ROUND
GROUND
DIGITAL
I/O
MLS Switcher RS-232 Port
Select RS-232 protocol via software or SIS
command. Signals are bidirectional, ±5 V.
RS-232 default protocol:
• 9600 baud • 8 data bits • 1 stop bit
• no parity • no flow control
Rx
MLS
RS-232
(ridged)
PRESS TAB WITH
PRESS TAB WIT
TWEEKER TO REMOVE
TWEEKER TO REMOVE
LAN
x
123
2 3
Rx
SCP
UND
AB
R
GROUND
DIGITAL
RS-232
I/O
Power Input
x
Tx
UN
R
+12V IN
GROUND
GROUND
MLS
POWER
-232
12V
Ground ( )
+12 VDC Input
Ground all devices.
• Connect to 12 VDC, 1 A power supply.
• Check the polarity of the power supply
wires before connecting it to the MLC.
• Front panel buttons light when the
MLC receives power.
IR IN
D E
LINK
LINK
Right
Side
Panel
Tx
12
+12V IN
GROUND
GRO UND
GROUND
POWER
12
12V
(smooth)
3/16"
(5 mm)
Max.
External
Power Supply
(12 VDC, 1 A max.)
Control — LAN (Ethernet)
C Address
, and
)
MAC: 00-05-A6-XX-XX-XX
S/N:
R
RS-232/IR
Tx
DISPLAY
-232
Rx
GROUND
ND
I
IR OUT
A B C D E
+V OUT
COMM LINK
MM LINK
GROUND
ND
CM
M
IR IN
SCP
123
DIGITAL
I/O
GROUND
UND
AB
RS-232
Rx
MLS
-232
Tx
GROUND
GROUND
POWER
12V
12
GROUND
+12V IN
+12V IN
Right Panel
TCP/IP
Network
PC
LAN
TWEEKER T
TWEEKER TO REMOVE
PRESS TAB WITH
PRE
TAB WIT
REM
V
Activity LED:
Blinks to indicate data
is being sent or received.
Link LED: Lights to indicate
a network connection.
Pins:
12345678
RJ-45
Insert Twisted
Pair Wires
Connector
Connect to an Ethernet network with a
straight through cable. This port must be
configured.
Default protocol:
• MLC IP address: 192.168.254.254
• Gateway IP address: 0.0.0.0
• Subnet mask: 255.255.0.0
• DHCP: off
• Link speed and duplex level: autodetected
(for connection to a switch, hub, or router)
End 1 End 2
Pin Wire Color Pin Wire Color
1 white-orange 1 white-orange
2 orange 2 orange
3 white-green 3 white-green
4 blue 4 blue
5 white-blue 5 white-blue
6 green 6 green
7 white-brown 7 white-brown
8 brown 8 brown
Both ends use the TIA/EIA T568A wiring standard. Wire end 1 following the TIA/EIA T568A wiring standard,
Ethernet (LAN)
Straight-through Cable
NOTE:
You must use this LAN port
to set up the MLC and
upload GC configuration
files and firmware. All
configuration can be
performed via this port.
Crossover Cable
(for direct connection to a PC)
End 1 End 2
Pin Wire Color Pin Wire Color
1 white-orange 1 white-green
2 orange 2 green
3 white-green 3 white-orange
4 blue 4 blue
5 white-blue 5 white-blue
6 green 6 orange
7 white-brown 7 white-brown
8 brown 8 brown
wire end 2 with the T568B wiring standard.
3
Page 4

MLC 104 IP Plus Series • Setup Guide (Continued)
Y
VO
S
VC
F
2
3
Control — Serial (Cong)
DISPLA
1
5
To/From the
RS-232 Port
on a PC
MLC104 IP Plus Front Panel
6 feet
(1.8 m)
6
9
9-pin D Connection TRS Plug
Pin 2 Computer Rx line Tip
Pin 3 Computer Tx line Ring
Pin 5 Computer signal ground Sleeve
Part #70-335-01
LUME
F
Tip
Ring
Sleeve (Gnd)
CONFIG
R
LC 104 IP PLU
Config Serial (RS-232) Port
This port supports bidirectional RS-232 (-5 - +5 VDC)
communication.
Protocol:
• 38400 baud • 8 data bits • 1 stop bit
• no parity • no flow control
Front panel Config port:
• RS-232 only (Tx, Rx, ground)
NOTES:
• Use the front panel Config port only for sending basic SIS
commands (such as those for IP setup and troubleshooting)
and checking unit information and responses.
• You must use the LAN port (not the Config port) to set up
the MLC and upload GC configuration files or firmware.
About Global Congurator (GC)
What It Does
Global Configurator is the software tool for setting up an MLC and the system it controls.
Global Configurator:
z Loads device drivers and uses commands from them for controlling other products
z Creates a single configuration file containing all the settings for the MLC and the products it interacts with in the AV system
z Generates a graphical user interface called GlobalViewer that is uploaded to the MLC (a GlobalViewer host device)
along with the completed configuration and can be accessed as a web page
By using GlobalViewer, users can manage, monitor, and control Extron and third-party equipment such as projectors,
displays, computer monitors, Blu-ray™ players, and DVD players.
What To Set Up in GC
Use GC software to create a configuration that tells the MLC how its ports will function; how to control other products;
what to monitor; when to do things; and whom to notify, how, when, and under what circumstances.
4
Page 5

Conguration
1. Download and install the latest versions of the following:
z Global Configurator software — for setting up the MLC and creating a single system configuration file
z Device driver package — for use with GC, to make control of other devices possible
All are avail able from www.extron.com or on the included Extron Software Products Disc.
2. Obtain IP address and subnet mask information for the MLC from the network administrator.
3. Cable devices to the MLC (see”Cabling and Features” in this guide), then power on all the devices.
4. Connect the MLC to a network, power it on, and use ARP (see “Network Configuration Using ARP“ below) to set the
IP address for the unit.
5. Using Global Configurator, create a project, configure the MLC and other IP Link devices, and upload the configuration
to the MLC.
6. Launch the GlobalViewer interface and test the configuration and the system.
NOTE: Additional information and step-by-step instructions on configuration tasks are available in the Global Configurator
Help file. The Global Configurator Help file includes an introduction to the software and how to start a GC project.
Resources
Obtaining Control Drivers
Extron provides an extensive selection of device drivers in the driver
package available on the Extron website. If the system requires a control
driver that is not part of the driver package, you have additional options:
z Request a new serial (RS-232) driver from Extron.
z Create your own custom IR device driver using Extron IR Learner
software. Follow the directions in the IR Learner Help file to create a
driver by using the remote control for that device and the IR receiver
port on the front panel of the MLC.
Instructions, Information, and Assistance
For additional information see the help
files and the MLC 104 IP Plus Series User
Guide, available at www.extron.com.
If you have questions during installation
and setup, call the Extron S3 Sales &
Technical Support Hotline or the Extron
S3 Control Systems Support Hotline.
Conguring for Network Communication
Network Conguration Options
When you power on the MLC for the first time, you have a choice of several ways to set up the IP address:
z Use the ARP (address resolution protocol) command — See the instructions below.
z Use a Web browser — See the MLC 104 IP Plus Series User Guide.
z Use the Global Configurator software — See the Global Configurator Help file.
z Use SIS commands via Telnet — See the MLC 104 IP Plus Series User Guide.
Network Conguration Using ARP
Use ARP to configure the IP address as follows:
1. Obtain a valid IP address for the MLC from the network administrator.
2. Obtain the MAC address of the MLC from the label on its rear panel. The MAC address should have this format:
00-05-A6-xx-xx-xx.
3. Connect the PC and the MLC to the same subnetwork.
4. At the PC, access the command prompt, then enter
the arp –s command. Type in the desired new
IP address for the unit and the MAC address of the
unit (listed on the rear panel of the MLC). For
example:
arp –s 10.13.197.7 00-05-A6-03-69-B0
5. Execute a ping command by entering “ping”
followed by a space and the new IP address at the
command prompt. For example:
ping 10.13.197.7
The response should show the new IP address, as
shown in the figure at right.
5
Page 6

MLC 104 IP Plus Series • Setup Guide (Continued)
Mounting
Attach cables using the preceding pages
as a guide, then securely mount the
MLC and other devices into the wall
or furniture. Optional mounting kits
(see part numbers at right) are
available for use with the MLC. Read
the instructions and UL guidelines
that come with the any mounting kit
for installation procedures.
Setup Checklist: How to Proceed With Installation
Get Ready
Familiarize yourself with the features of the MLC 104 IP Plus.
Download and install the latest version of the Extron Global Configurator (GC) software and the latest driver
package (avail able from www.extron.com or on the Extron Software Products Disc.)
Obtain IP setting information for the MLC from the network administrator.
Obtain model names and setup information for devices the MLC will control.
Optional mounting kits Part number
SMB 102 Two-gang Surface Mount Box (black) 60-640-02
SMB 104 Four-gang Surface Mount Box (black) 60-642-02
MLM 104 6GWP Six-Gang Wall Mounting Kit (black) 70-355-02
MLM 104 L Replacement Lectern Mounting Kit (black, white) 70-357-02, -03
MLM 104 LAAP Replacement Lectern Mounting Kit with AAP
opening (black )
70-358-02
Perform Physical Installation
Mount the unit.
Cable devices to ports on the MLC.
Connect power cords and turn on the devices in the following order: output devices (projectors, monitors,
speakers), the MLC, a PC (for setup), SCP panel (if desired), then all input devices (such as DVD players).
Congure the MLC
Connect the PC and the MLC to the same Ethernet subnetwork and use ARP via Telnet, Extron DataViewer, or a
similar application to configure the MLC for network communication.
Create a new GC project and configure the MLC. See the Global Configurator Help file.
Test the system.
If you have questions during installation and setup, you can call the Extron S3 Sales & Technical Support Hotline or the
Extron S3 Control Systems Support Hotline.
Extron Headquarters
+800.633.9876 Inside USA/Canada Only
Extron USA - West Extron USA - East
+1.714.491.1500 +1.919.863.1794
+1.714.491.1517 FAX +1.919.863.1797 FAX
6
© 2011 Extron Electronics All rights reserved. All trademarks mentioned are the property of their respective owners. www.extron.com
Extron Europe
+800.3987.6673
Inside Europe Only
+31.33.453.4040
+31.33.453.4050 FAX
Extron Asia
+800.7339.8766
Inside Asia Only
+65.6383.4400
+65.6383.4664 FAX
Extron Japan
+81.3.3511.7655
+81.3.3511.7656 FAX
Extron China
+4000.EXTRON
+4000.398766
Inside China Only
+86.21.3760.1568+86.
21.3760.1566 FAX
Extron Middle
East
+971.4.2991800
+971.4.2991880 FAX
Extron Korea
+82.2.3444.1571
+82.2.3444.1575 FAX
Extron India
1800.3070.3777
Inside India Only
+91-80-3055.3777
+91 80 3055 3737 FAX
68-1289-01 Rev. E
11 11
 Loading...