

Page 1
VNM Recorder
VN-Matrix® Recorder
User Guide
Streaming A/V Products
68-1998-01 Rev. C
04 13
Page 2
Safety Instructions
Safety Instructions • English
WARNING: This symbol,
to alert the user of the presence of uninsulated dangerous voltage
within the product’s enclosure that may present a risk of electric shock.
ATTENTION: This symbol,
intended to alert the user of important operating and maintenance
(servicing) instructions in the literature provided with the equipment.
For information on safety guidelines, regulatory compliances, EMI/EMF
compatibility, accessibility, and related topics, see the Extron Safety and
Regulatory Compliance Guide, part number 68-290-01, on the Extron
website, www.extron.com.
, when used on the product, is intended
D
, when used on the product, is
I
Instructions de sécurité • Français
avertissement: Ce pictogramme,
le produit, signale à l’utilisateur la présence à l’intérieur du boîtier du
produit d’une tension électrique dangereuse susceptible de provoquer
un choc électrique.
attention: Ce pictogramme,
signale à l’utilisateur des instructions d’utilisation ou de maintenance
importantes qui se trouvent dans la documentation fournie avec le
matériel.
Pour en savoir plus sur les règles de sécurité, la conformité à la
réglementation, la compatibilité EMI/EMF, l’accessibilité, et autres sujets
connexes, lisez les informations de sécurité et de conformité Extron,
réf. 68-290-01, sur le site Extron, www.extron.fr.
I
, lorsqu’il est utilisé sur
D
, lorsqu’il est utilisé sur le produit,
Sicherheitsanweisungen • Deutsch
WARNUNG: Dieses Symbol
darauf aufmerksam machen, dass im Inneren des Gehäuses dieses
Produktes gefährliche Spannungen herrschen, die nicht isoliert sind
und die einen elektrischen Schlag verursachen können.
VORSICHT: Dieses Symbol
in der im Lieferumfang enthaltenen Dokumentation besonders wichtige
Hinweise zur Bedienung und Wartung (Instandhaltung) geben.
Weitere Informationen über die Sicherheitsrichtlinien, Produkthandhabung,
EMI/EMF-Kompatibilität, Zugänglichkeit und verwandte Themen finden Sie
in den Extron-Richtlinien für Sicherheit und Handhabung (Artikelnummer
68-290-01) auf der Extron-Website, www.extron.de.
auf dem Produkt soll den Benutzer
D
auf dem Produkt soll dem Benutzer
I
Chinese Simplified(简体中文)
警告:D产品上的这个标志意在警告用户该产品机壳内有暴露的危险
电 压 ,有 触 电 危 险 。
注意:I 产品上的这个标志意在提示用户设备随附的用户手册中有
重要的操作和维护(维修)说明。
关于我们产品的安全指南、遵循的规范、
使用的特性等相关内容,敬请访问
安全规范指南,产品编号
68-290-01。
EMI/EMF 的兼容性、无障碍
Extron 网站 www.extron.cn,参见 Extron
Chinese Traditional(繁體中文)
警告: D若產品上使用此符號,是為了提醒使用者,產品機殼內存在著
可能會導致觸電之風險的未絕緣危險電壓。
注意I 若產品上使用此符號,是為了提醒使用者。
有關安全性指導方針、法規遵守、EMI/EMF 相容性、存取範圍和相關主題的詳細
資訊,請瀏覽 Extron 網站:www.extron.cn,然後參閱《Extron 安全性與法規遵
守手冊》,準則編號 68-290-01。
Japanese
警告: この記号 D が製品上に表示されている場合は、筐体内に絶縁されて
いない高電圧が流れ、感電の危険があることを示しています。
注意:この記号 I が 製 品 上 に 表 示 さ れ て い る 場 合 は 、本 機 の 取 扱 説 明 書 に 記 載 さ れ て
いる重要な操 作と保守(整備)の指 示につ いてユーザーの 注意を喚起するものです。
安全上のご注意、法令遵守、EMI/EMF適合性、その他の関連項目に
つ い て は 、エ クスト ロ ン の ウェブ サ イト www.extron.jpより
『Extron Safety and Regulatory Compliance Guide』 (P/N 68-290-01) をご覧く
ださい。
Instrucciones de seguridad • Español
ADVERTENCIA: Este símbolo,
avisa al usuario de la presencia de voltaje peligroso sin aislar dentro del
producto, lo que puede representar un riesgo de descarga eléctrica.
ATENCIÓN: Este símbolo,
avisa al usuario de la presencia de importantes instrucciones de uso y
mantenimiento recogidas en la documentación proporcionada con el
equipo.
Para obtener información sobre directrices de seguridad, cumplimiento
de normativas, compatibilidad electromagnética, accesibilidad y temas
relacionados, consulte la Guía de cumplimiento de normativas y seguridad de
Extron, referencia 68-290-01, en el sitio Web de Extron, www.extron.es.
, cuando se utiliza en el producto,
D
, cuando se utiliza en el producto,
I
Korean
경고: 이 기호 D, 가 제품에 사용될 경우, 제품의 인클로저 내에 있는
접지되지 않은 위험한 전류로 인해 사용자가 감전될 위험이 있음을
경고합니다.
주의: 이 기호 I, 가 제품에 사용될 경우, 장비와 함께 제공된 책자에 나와
있는 주요 운영 및 유지보수(정비) 지침을 경고합니다.
안전 가이드라인, 규제 준수, EMI/EMF 호환성, 접근성, 그리고 관련
항목에 대한 자세한 내용은 Extron 웹 사이트(www.extron.co.kr)의
Extron 안전 및 규제 준수 안내서, 68-290-01 조항을 참조하십시오.
ii
Page 3

FCC Class A Notice
This equipment has been tested and found to comply with the limits for a Class A digital
device, pursuant to part15 of the FCC rules. The ClassA limits provide reasonable
protection against harmful interference when the equipment is operated in a commercial
environment. This equipment generates, uses, and can radiate radio frequency energy and,
if not installed and used in accordance with the instruction manual, may cause harmful
interference to radio communications. Operation of this equipment in a residential area is
likely to cause interference; the user must correct the interference at his own expense.
NOTE: For more information on safety guidelines, regulatory compliances, EMI/EMF
compatibility, accessibility, and related topics, see the “Extron Safety and
Regulatory Compliance Guide” on the Extron website.
Specifications Availability
Product specifications are available on the Extron website, www.extron.com.
Copyright
© 2013 Extron Electronics. All rights reserved.
Trademarks
All trademarks mentioned in this guide are the properties of their respective owners.
The following registered trademarks(R), registered service marks(SM), and trademarks(TM) are the property of
RGBSystems, Inc. or Extron Electronics:
Registered Trademarks
AVTrac, Cable Cubby, CrossPoint, eBUS, EDID Manager, EDID Minder, Extron, Flat Field,GlobalViewer, Hideaway, Inline, IP Intercom, IP Link,
Key Minder, LockIt, MediaLink, PoleVault, PURE3, Quantum, SoundField, System Integrator, TouchLink, V‑Lock, VersaTools, VN‑Matrix,
VoiceLift, WallVault, WindoWall
(SM)
Registered Service Mark
AAP, AFL (Accu‑Rate Frame Lock), ADSP (Advanced Digital Sync Processing), AIS (Advanced Instruction Set), Auto‑Image, CDRS (Class D
Ripple Suppression), DDSP (Digital Display Sync Processing), DMI (Dynamic Motion Interpolation), Driver Configurator, DSP Configurator, DSVP
(Digital Sync Validation Processing), FastBite, FOXBOX, IP Intercom HelpDesk, MAAP, MicroDigital, PowerCage, ProDSP, QS‑FPC (QuickSwitch
Front Panel Controller), Scope‑Trigger, SIS, Simple Instruction Set, Skew‑Free, SpeedMount, SpeedNav, SpeedSwitch, TeamWork,
Triple‑ActionSwitching, XTP, XTP Systems, XTRA, ZipCaddy, ZipClip
: S3 Service Support Solutions
Trademarks (™
(®)
)
iii
Page 4

Conventions Used in this Guide
In this user guide, the following are used:
WARNING: A warning warns of things or actions that might cause injury, death, or
CAUTION: A caution warns of things or actions that might damage the equipment.
NOTE: A note draws attention to important information.
TIP: A tip provides a suggestion to make setting up or working with the device easier.
Commands are written in the fonts shown here:
^AR Merge Scene,,Op1 scene 1,1 ^B 51 ^W^C
[01] R 0004 00300 00400 00800 00600 [02] 35 [17] [03]
E X!*X1&*X2)*X2#*X2! CE}
NOTE: For commands and examples of computer or device responses mentioned
in this guide, the character “0” is used for the number zero and “O” represents the
capital letter “o”.
Computer responses and directory paths that do not have variables are written in the font
shown here:
Reply from 208.132.180.48: bytes=32 times=2ms TTL=32
C:\Program Files\Extron
Variables are written in slanted form as shown here:
ping xxx.xxx.xxx.xxx —t
SOH R Data STX Command ETB ETX
Selectable items, such as menu names, menu options, buttons, tabs, and field names are
written in the font shown here:
From the File menu, select New.
Click the OK button.
other severe consequences.
iv
Page 5

Contents
Introduction ............................................1
About this Guide .............................................. 1
About the VNM Recorder ................................ 1
Overview of Recorded Streams ................... 2
Overview of Stream Playback ...................... 2
About RAID5 Storage .................................. 3
Transport Protocols Used for Streaming .......... 3
Multicast RTP — An Overview ..................... 4
Unicast RTP — An Overview ....................... 5
Unicast TCP — An Overview ....................... 6
Definitions ........................................................ 7
Features .......................................................... 7
Panels and Cabling .................................8
Installation Overview ........................................ 8
Front Panel Features ........................................ 8
Rear Panel Features ...................................... 10
Recorder Configuration and Hardware
Setup ...................................................... 12
Setup Overview ............................................. 12
VNM Recorder Power Up Procedure ............. 13
Login Information ....................................... 14
VNM Recorder Power Down Procedure ......... 15
Using the Front Panel ................................ 15
Using the Keyboard and Mouse ................. 16
Choosing the Controller Device...................... 16
Configuring the VNM Recorder ...................... 17
Default Network Settings ........................... 17
Configuring the Network and
IP Address Settings .................................. 17
Configuring the VN‑Matrix Encoders
and Decoders ............................................... 22
About the
Web-based
User Interface ........................................ 23
Overview of the Web‑based User Interface .... 23
Accessing the Web‑based User Interface ...... 24
Web‑based User Interface Control Options .... 25
Device List Page ........................................ 26
Recorder Device Page ............................... 28
Recorder Page .......................................... 30
Navigate Page ........................................... 32
Player Page ............................................... 35
Advanced Configuration ................................ 38
Config Page ............................................... 38
Accounts Page .......................................... 41
VN‑Matrix Encoder and
Decoder Configuration .................................. 42
About the Content Directory ...............43
Overview ....................................................... 43
Content Directory Basics ............................... 44
Setting a Stream Storage Location ................ 45
Creating a Directory ....................................... 45
Understanding Saved Recordings
With Multiple Elements ................................. 46
Renaming a Stream or Directory .................... 47
Deleting a Stream or Directory ....................... 47
VNM Recorder • Contents v
Page 6

Recording and Playing Streams ........... 48
Initial Setup and Configuration ....................... 48
Setting up a VN‑Matrix Codec
as a Decoder ............................................ 48
Setting up a VN‑Matrix Codec
as an Encoder .......................................... 49
Switching a Codec
between Encoder and Decoder ................ 50
Recording a Stream ....................................... 50
Recording Preparation ............................... 50
Initialize Recording ..................................... 51
Stop Recording ......................................... 51
Playing a Recorded Stream ........................... 52
Playback Preparation ................................. 52
Initialize Playback ....................................... 53
Pause Playback ......................................... 53
Stop Playback ........................................... 53
Start and Finish Times ............................... 53
Auto Repeat .............................................. 53
Using Bookmarks .......................................... 54
File Structure ............................................. 54
Playback of Bookmarked Streams ............. 54
Deleting Bookmarks .................................. 54
Reference Information .........................62
Included Parts ............................................... 62
Firmware Updates ................................. 63
Preparing the Firmware .................................. 63
Gathering Firmware Installation Information .... 64
Installing the Firmware ................................... 65
Browser Configuration ......................... 68
Microsoft Internet Explorer
(version 7 or above) ...................................... 68
Mozilla Firefox (version 1.3 or above) ............. 71
Mounting ............................................... 72
Tower Installation ........................................... 72
Rack Installation ............................................ 72
UL Guidelines for Rack Mounting ............... 72
Rack Mounting .......................................... 73
About Alarms ........................................ 55
Overview ....................................................... 55
Alarms Page .................................................. 56
Filter Settings ............................................. 56
Alarm Type ................................................ 57
Alarm Severity............................................ 57
Applying Alarm Filter Settings .................... 57
Alarm List .................................................. 58
Alarm Logs Page ........................................... 59
Alarm Reference Tables ................................. 60
Alarm Type Description
— Encoder ............................................... 60
Alarm Type Description
— Decoder ............................................... 61
Alarm Type Description
— System Controller ................................ 61
VNM Recorder • Contents vi
Page 7

Introduction
This section provides an overview of the user guide and describes the Extron
VN‑Matrix (VNM) Recorder and its features. Topics that are covered include:
z About this Guide
z About the VNM Recorder
z Transport Protocols Used for Streaming
z Definitions
z Features
About this Guide
This guide contains installation, configuration, and operating information for the
VNM Recorder.
In this guide:
z The term "recorder" refers specifically to the VNM Recorder.
z The term "codec" refers to either a VN‑Matrix encoder or decoder.
z The term "stream" refers to multimedia that is constantly received by (and normally
presented to) an end‑user while being delivered by a VN‑Matrix encoding device.
z The term "element" refers to the video/graphics, audio, data, and whiteboard
(user data) content that is contained within a stream.
About the VNM Recorder
The VNM Recorder connects to a network and is used to digitally record and play back
multiple PURE3® streams via the IP network of VN‑Matrix encoders and decoders. The
VNM Recorder is used with any VN‑Matrix application to document, archive, review, and
play back highly sophisticated or demanding AV imagery.
The VNM Recorder has the ability to record PURE3 encoded IP streams on each channel.
Up to five PURE3 streams can be recorded or played back on a single recorder. PURE3
streams recorded together maintain proper synchronization on playback.
The VNM Recorder uses a network storage architecture which makes systems highly
scalable and flexible. Storage capacity can be increased or decreased based on the number
of inputs, recording time, and archiving requirements.
VNM Recorder • Introduction 1
Page 8
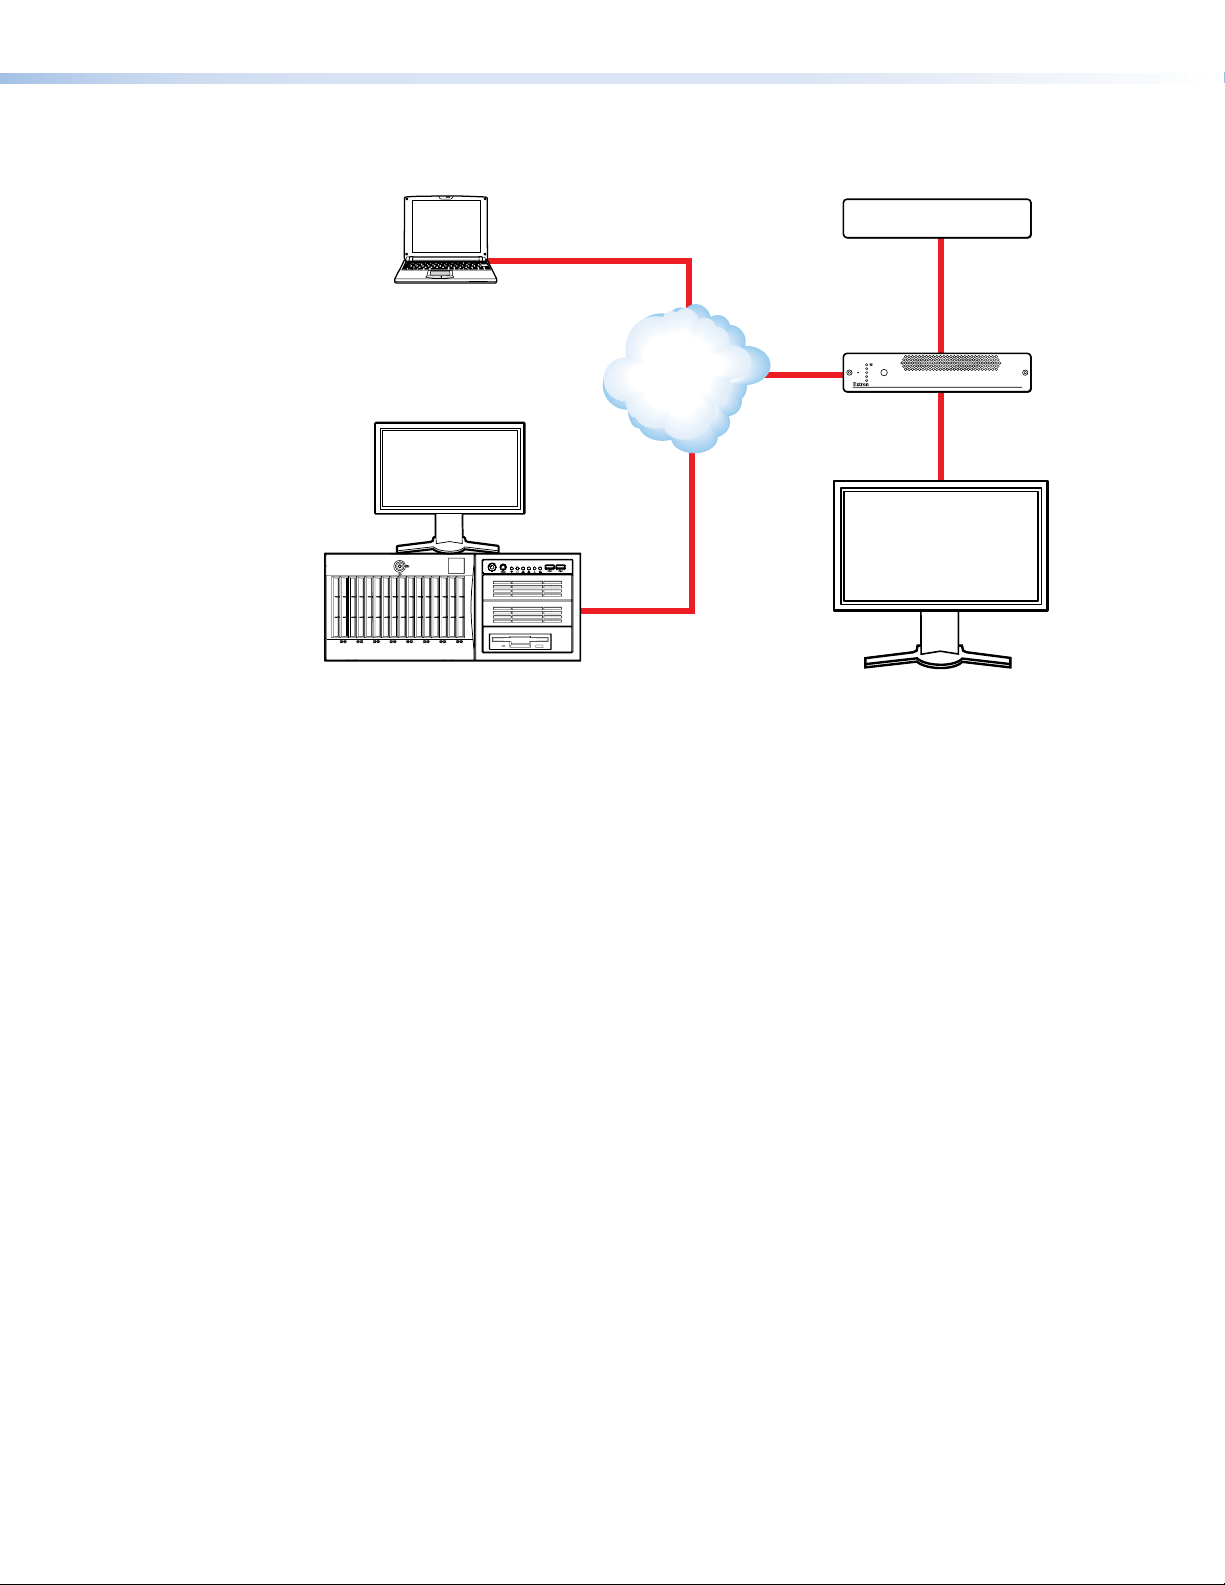
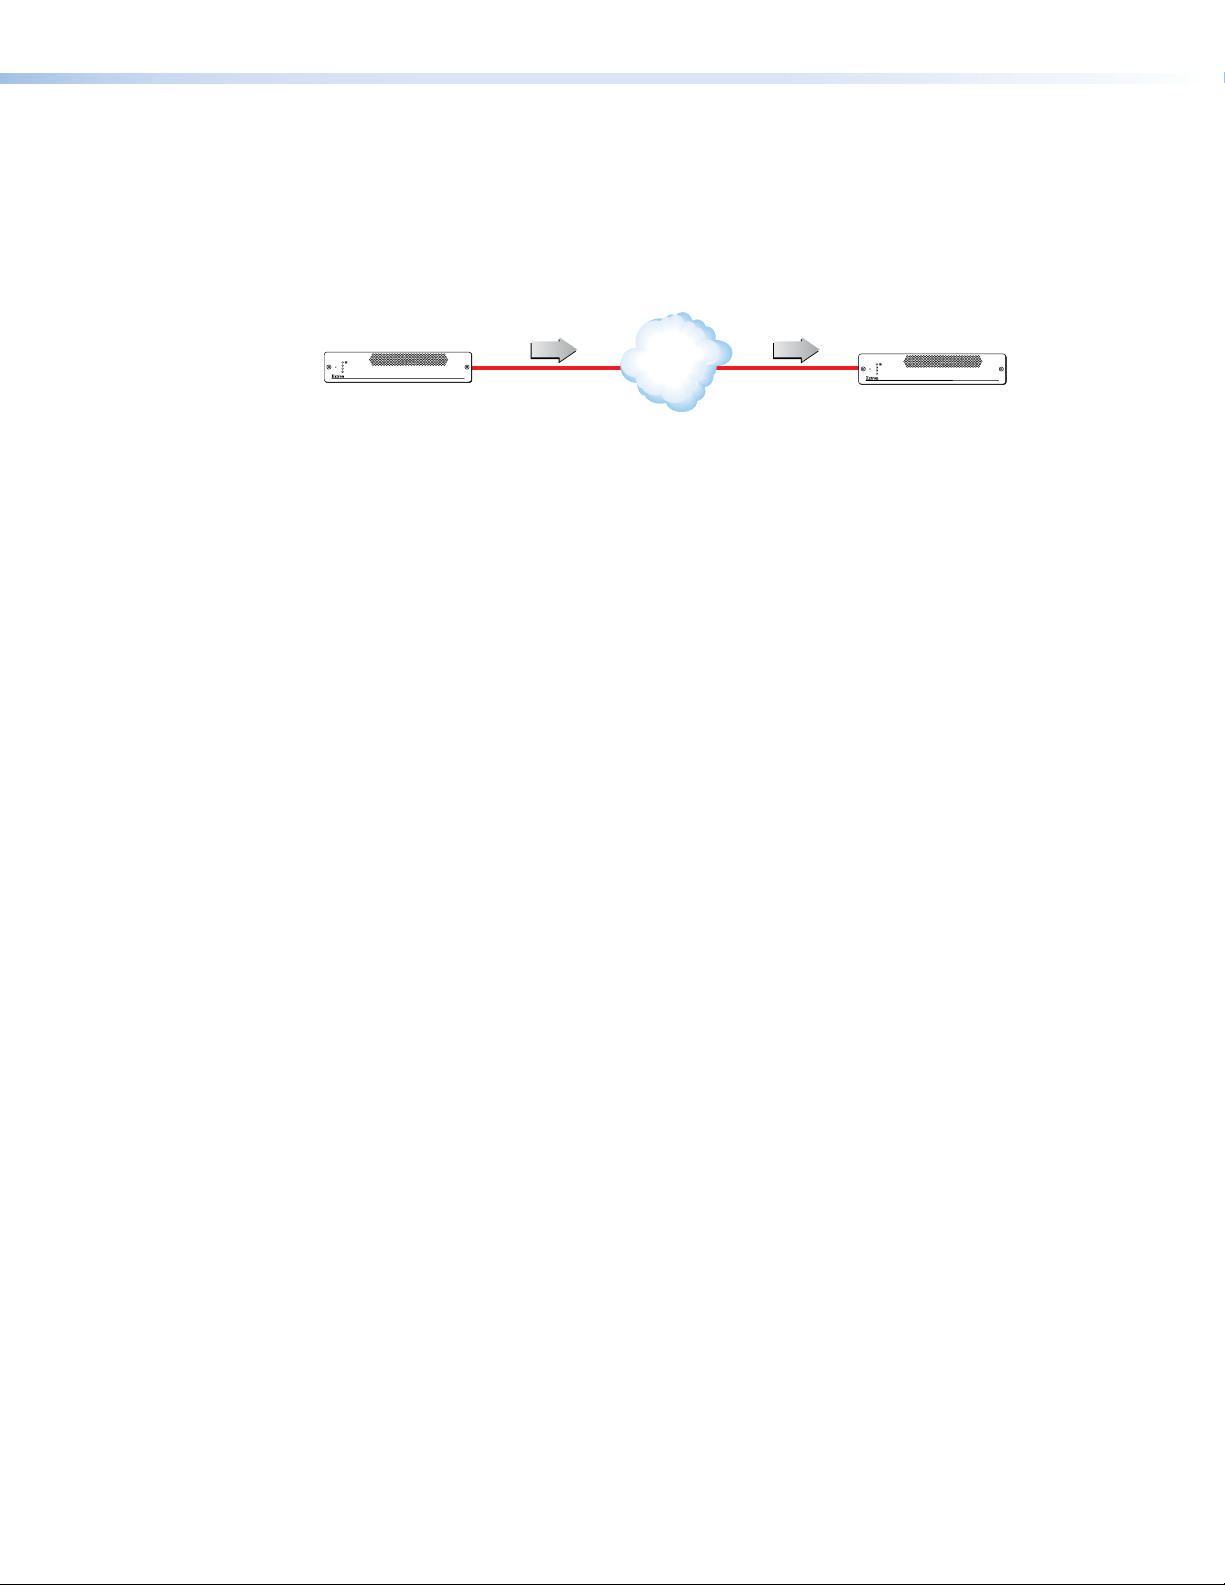
Figure 1 shows a typical VNM Recorder application, which includes a single VN‑Matrix
codec. The application shown in figure 1 can operate in recording mode or playback mode.
Source
TCP/RTP
Control PC
LAN-1
LAN-2
TEST
Network
STATUS
ALARM
VN-MATRIX 300 SERIES
SERIAL DIGITAL VIDEO OVER IP
VN-Matrix Codec
Target
Display
TCP/RTP
VNM Recorder
Figure 1. VNM Recorder Application Diagram
Overview of Recorded Streams
The following information is associated with recorded streams when using the
VNM Recorder.
z Recorded streams are stored as files on the VNM Recorder.
z Each recording contains (as a minimum) a video element.
z A recording may also include elements containing audio, data, and whiteboard
information (if these are present and enabled at the encoder). If these are selected
for storage, each element is stored as an individual file under the same directory.
z Each recording may contain up to five channels.
z Each channel originates from a VN‑Matrix encoder device (or a VN‑Matrix codec
configured as an encoder).
Overview of Stream Playback
The following information is associated with stream playback when using the VNM Recorder.
z When a recording is selected for playback that contains multiple elements, the
necessary files and channels (a maximum of five channels are supported) are loaded.
z The files that are loaded in each channel are treated as a single recording and may
not be split.
z The video content, which is assigned to channel 1, is always played.
z The audio, data, and whiteboard elements may be enabled or disabled for playback
(when present in the recording).
z During playback, the audio, whiteboard, and data elements are always slaved to
their respective video stream. In other words, all channels are slaved to the video
stream on channel 1.
VNM Recorder • Introduction 2
Page 9

About RAID5 Storage
RAID storage is a system which allows hard drives to be linked together to form a single
large capacity storage device that offers superior performance, storage capacity, and
reliability over other storage solutions.
The VNM Recorder uses RAID5 storage. RAID5 storage provides the following advantages.
z Increased storage performance.
z Full data redundancy which allows for data backup in the event of a hard drive failure.
z A hard drive is set aside as a hot spare drive which is used to automatically rebuild the
data of a failed drive and allow the system to recover.
Transport Protocols Used for Streaming
The source data from a VN‑Matrix encoder can be distributed to multiple displays/decoders
(one‑to‑many) or to a single display/decoder (point‑to‑point). A previously recorded stream
can be distributed in the same way and may be thought of as an encoder in this context.
A stream may be transported from the source (encoder, recorded stream) to the display
(decoder) using one of three methods:
z Multicast Real‑time Transport Protocol (RTP)
z Unicast Real‑time Transport Protocol (RTP)
z Unicast Transmission Control Protocol (TCP)
By default, the VNM Recorder provides a choice of unicast RTP or unicast TCP transport
protocols. A multicast transport protocol may be configured if required (see Multicast
Enable on page 40 of the Config Page section).
NOTES:
• During playback of a recorded stream, the default transport protocol used is unicast
R T P.
• When a stream is recording, the VNM Recorder may be considered as a display
(decoder) device.
VNM Recorder • Introduction 3
Page 10
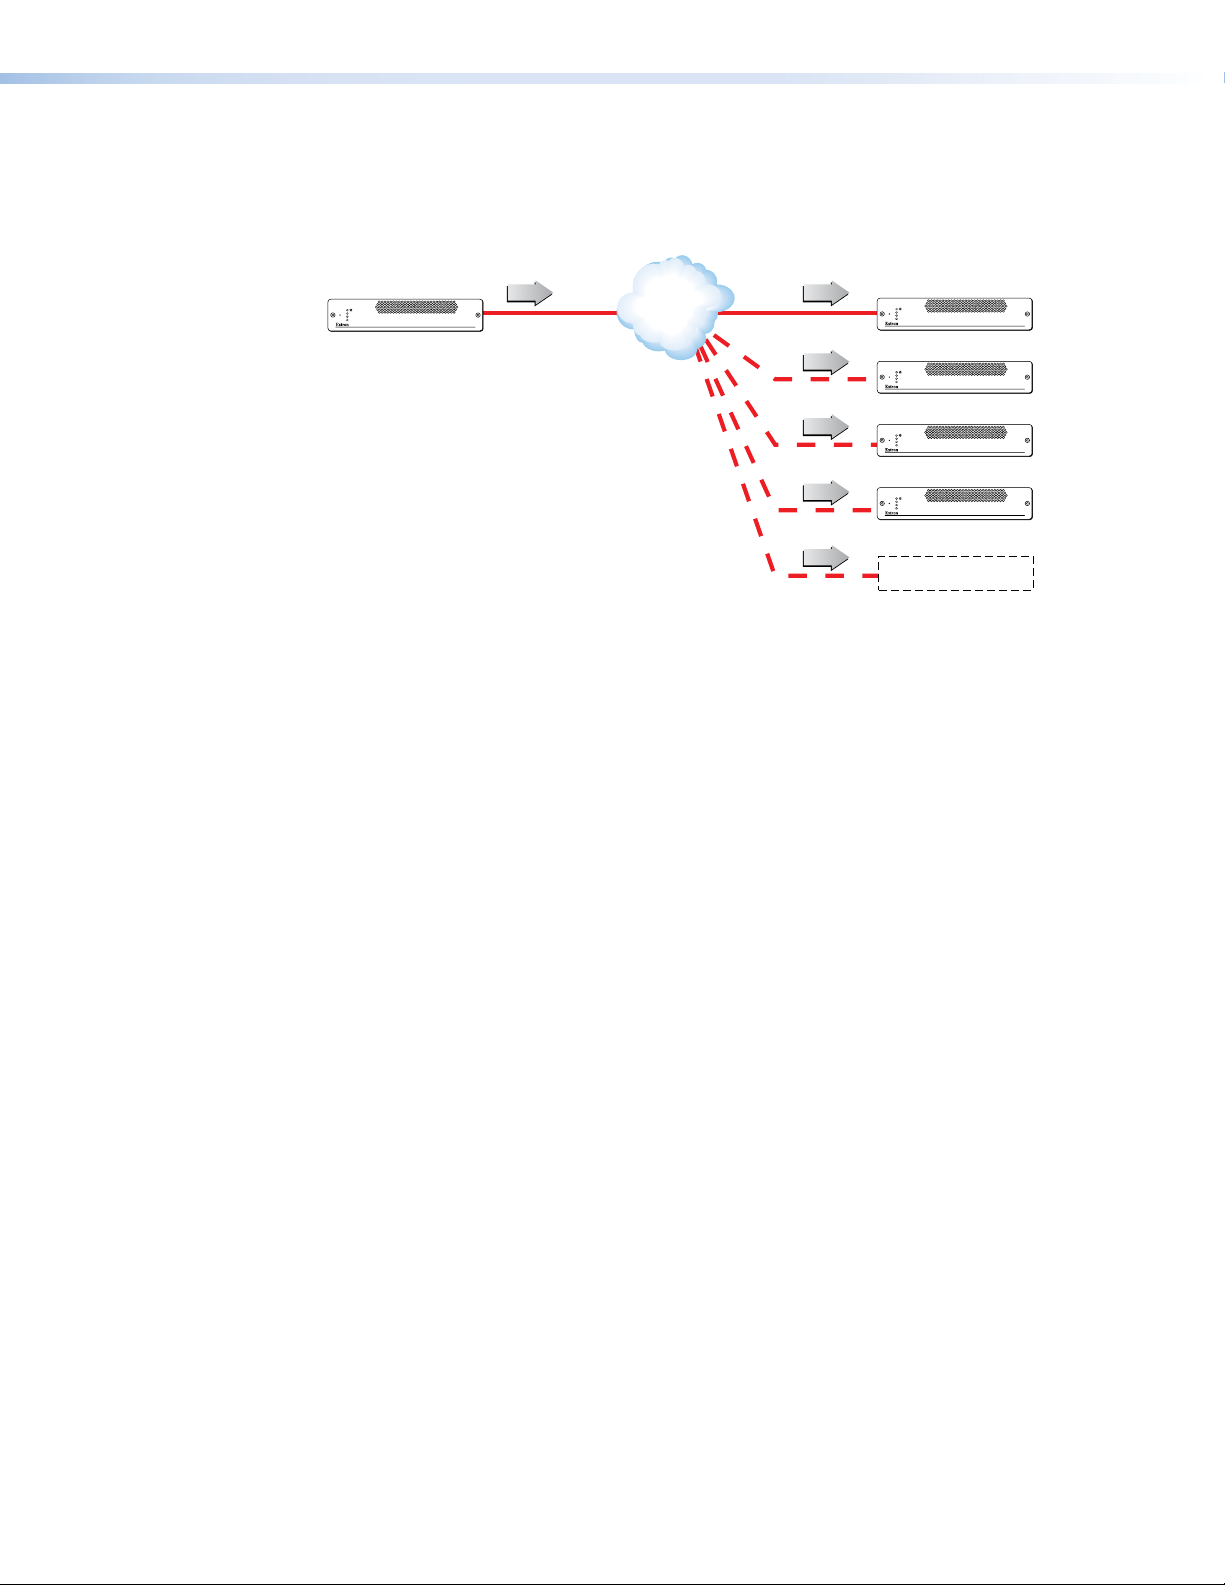
Multicast RTP — An Overview
Multicast RTP allows a source to be displayed on multiple displays. This method uses a
real‑time variation of UDP (User Datagram Protocol) called RTP (Real‑time Transport
Protocol).
LAN-1
LAN-2
STATUS
VN-MATRIX 225 SERIES
RGB/DVI OVER IP
Encoder sends data using RTP
to a multicast group.
SOURCE
RTP RTP
Network
RTP
RTP
RTP
LAN-1
LAN-2
STATUS
LAN-1
LAN-2
STATUS
LAN-1
LAN-2
STATUS
LAN-1
LAN-2
STATUS
VN-MATRIX 225 SERIES
RGB/DVI OVER IP
VN-MATRIX 225 SERIES
RGB/DVI OVER IP
VN-MATRIX 225 SERIES
RGB/DVI OVER IP
VN-MATRIX 225 SERIES
RGB/DVI OVER IP
RTP
Multiple decoders can be
part of the multicast group.
DISPLAYS
Figure 2. Multicast RTP Streaming
The source encoder uses RTP to send data to a multicast group. The source does not need
to know the IP address of the decoders that are using the source.
RTP provides very low latency which is important for video streaming. Unlike other
protocols, RTP packets include a time stamp. If packets are received in the wrong
order, they are sorted into the correct order for display or discarded if the time stamp is
out‑of‑date.
However, because RTP is a connectionless protocol, data delivery is not guaranteed.
When data packets are lost (for example, due to excessive network traffic), the
VN‑Matrix 200 / 225 / 300 / 325 devices carefully manage the data stream to minimize any
image disruption.
VNM Recorder • Introduction 4
Page 11

Unicast RTP — An Overview
Similar to multicast RTP, this method uses a real‑time variation of UDP protocol, called
unicast RTP. This method can be used where the network infrastructure does not support
multicast traffic. Typically, this protocol is used for point‑to‑point configuration (single source
to single display), but can be configured to use up to a maximum of four displays.
NOTE: The encoder sends an individual stream to each decoder. This means that the
total bandwidth of the VN‑Matrix system increases as more decoders are added.
LAN-1
LAN-2
STATUS
VN-MATRIX 225 SERIES
RGB/DVI OVER IP
RTP (1-4)
Encoder sends data using RTP
to up to 4 specified decoders.
SOURCE
Network
RTP 1
RTP 2
RTP 3
RTP 4
LAN-1
LAN-2
STATUS
LAN-1
LAN-2
STATUS
LAN-1
LAN-2
STATUS
LAN-1
LAN-2
STATUS
VN-MATRIX 225 SERIES
RGB/DVI OVER IP
VN-MATRIX 225 SERIES
RGB/DVI OVER IP
VN-MATRIX 225 SERIES
RGB/DVI OVER IP
VN-MATRIX 225 SERIES
RGB/DVI OVER IP
DISPLAYS
Figure 3. Unicast RTP Streaming
RTP provides very low latency which is important for video streaming. Unlike other
protocols, RTP packets include a time stamp. If packets are received in the wrong
order, they are sorted into the correct order for display or discarded if the time stamp is
out‑of‑date.
However, because RTP is a connectionless protocol, data delivery is not guaranteed.
When data packets are lost (for example, due to excessive network traffic), the
VN‑Matrix 200 / 225 / 300 / 325 devices carefully manage the data stream to minimize any
image disruption.
VNM Recorder • Introduction 5
Page 12
Unicast TCP — An Overview
This method transports data using standard TCP (Transport Control Protocol) and should
only be used for single point‑to‑point transfer of data.
TCP is a connection‑based protocol and, therefore, data is guaranteed to be delivered.
However, in the event of excessive network traffic, delivery may be delayed which will impact
real‑time performance.
LAN-1
LAN-2
STATUS
Encoder
SOURCE
VN-MATRIX 225 SERIES
RGB/DVI OVER IP
TCP
Network
TCP
LAN-1
LAN-2
STATUS
VN-MATRIX 225 SERIES
RGB/DVI OVER IP
Decoder makes a TCP
connection with a
specified encoder.
DISPLAYS
Figure 4. Unicast TCP Streaming
The decoder defines which source to connect to. Other than defining an IP address and
source type (if required), no special source encoder setup is required.
VNM Recorder • Introduction 6
Page 13

Denitions
PURE3 — PURE3 is specifically designed for network transmission of real time media (such
as video or graphics, audio, data, and whiteboard elements). It features both spatial and
temporal image compression, which allows for efficient bandwidth usage.
z PURE3 streams always contain video or graphic elements.
z PURE3 streams may contain audio, data, and whiteboard elements that are associated
with the video and graphic elements.
Streaming media (stream) — This term refers to multimedia that is constantly received
by (and normally presented to) an end‑user while being delivered by a streaming provider.
Internet television is a commonly streamed medium. Streaming media (stream) in this guide
refers to a PURE3 media stream that is produced by a VN‑Matrix encoding device.
Device license — This term refers to the number of licensed features that are available on
a device within a VN‑Matrix system. All devices contain a default license that offers a default
level of functionality. See Licensed Features panel on page 29 of the Recorder Device
Page section for information about device licenses.
NOTE: The VNM Recorder contains a default license that allows for five recorder
channels and five player channels. It is currently not possible to change the license on
the VNM Recorder.
Controller license — This term refers to the license that is supplied to the device
designated as the system controller. See Controller Licensing on page 42 of the
Accounts Page section for information about controller licenses.
Data — This refers to the transfer method of data between an encoder and a decoder. Data
input is created at the encoder, placed into the PURE3 stream, and sent to the decoder. The
data is received in the same form that it was transmitted. This method of data transfer is
unidirectional and can only be sent from an encoder to a decoder.
Whiteboard (wb) data — Also known as annotation data, whiteboard data outputs text
and/or simple pointer annotation onto local displays that are connected to VN‑Matrix
encoders or decoders. This type of data is bidirectional, which allows a decoder to send
whiteboard data to an encoder.
Features
z Record, synchronize, and play back up to five visually lossless PURE3 encoded VN‑
Matrix streams over IP.
z Digitally record and play back video/graphics, audio, and data.
z Virtual switching of video, graphics, and audio over IP.
z Point to point and long distance distribution.
z Link multiple recorder units together for applications requiring recording for more than
five streams.
z The VNM Recorder is a scalable and flexible system.
VNM Recorder • Introduction 7
Page 14
Panels and Cabling
This section provides information on:
z Installation Overview
z Front Panel Features
z Rear Panel Features
Installation Overview
1. Turn off and disconnect the VNM Recorder and all existing devices.
2. Mount the recorder, if necessary, as described in the Mounting section on page 72.
3. Connect any necessary devices to the recorder (see Front Panel Features below and
Rear Panel Features on page 10).
4. Reconnect and power on all devices.
Front Panel Features
NOTE: Some features listed in this user guide may not be available on some units. This
will not affect the overall functionality of the VNM Recorder.
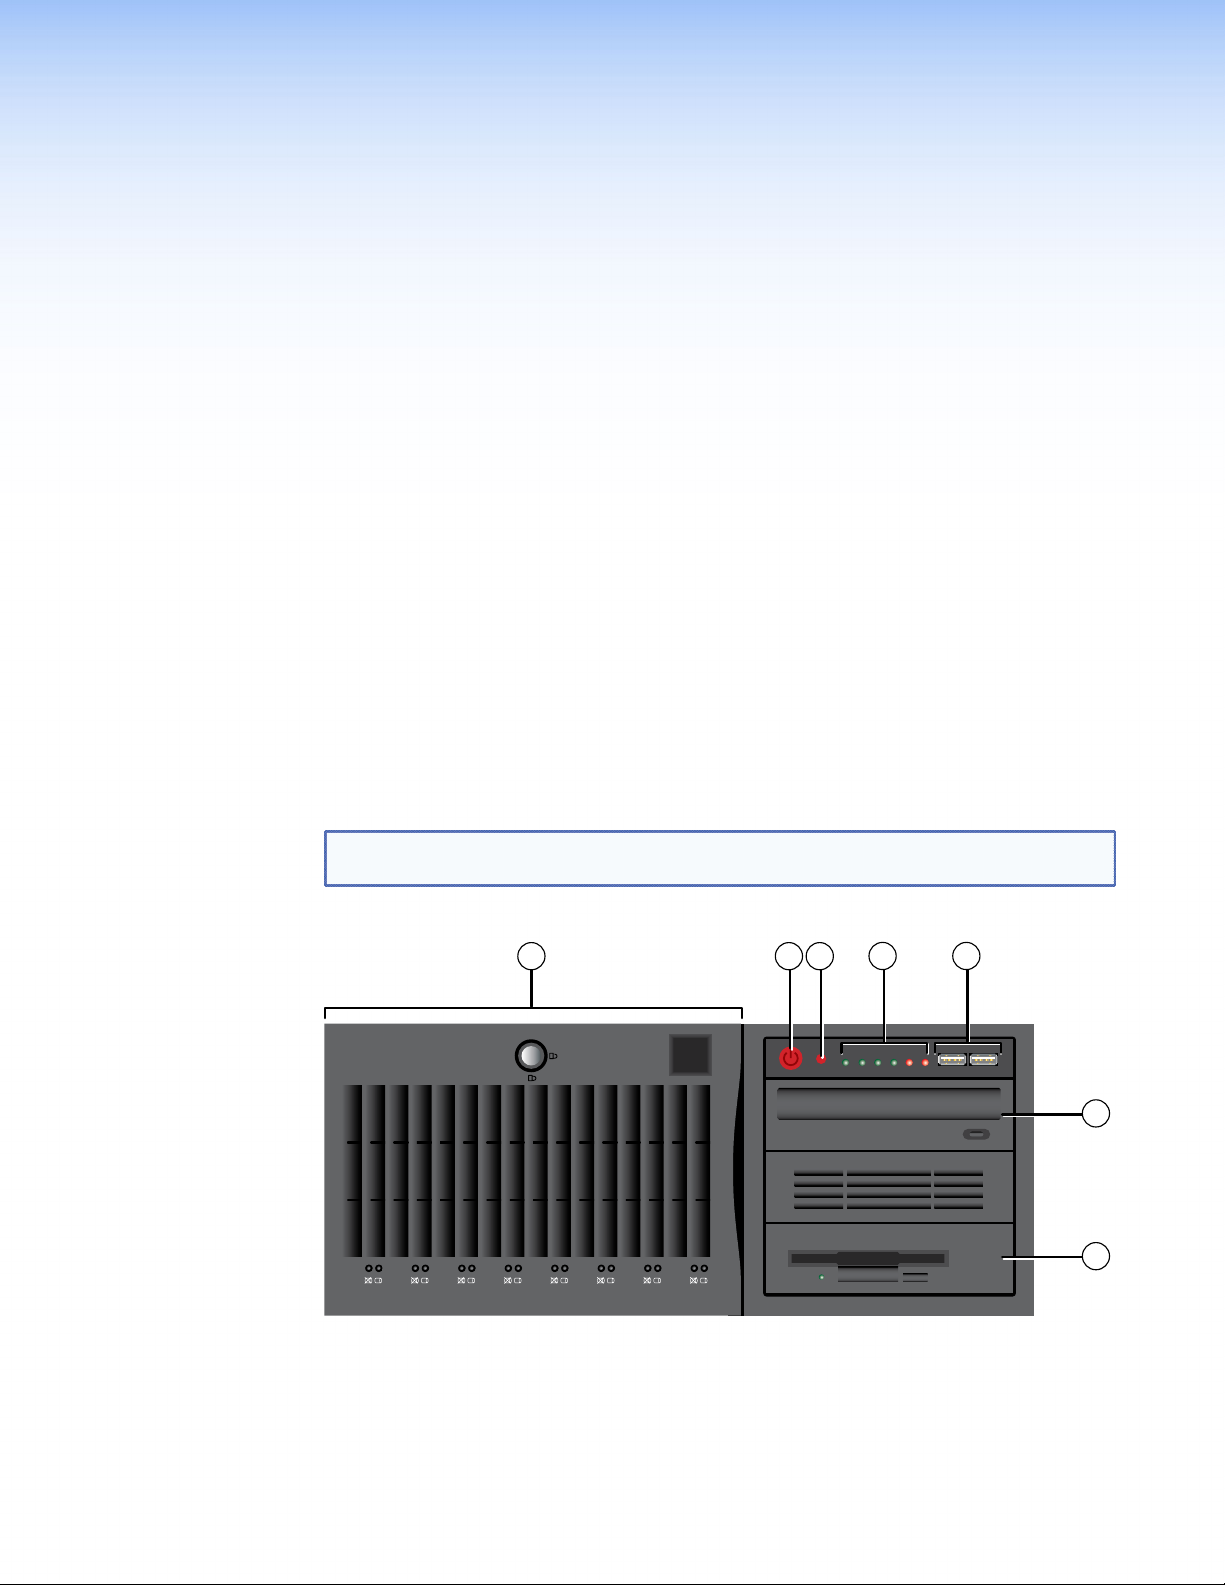
The front panel of the VNM Recorder is shown in figure 5.
Figure 5. VNM Recorder Front Panel
213
4 5
6
7
SCA / SATA drive panel — This panel houses the RAID5 hard drives. One hard drive
a
is referred to as a hot spare drive, which is a drive that is inactive until an active drive
fails. When an active drive fails, the hot spare drive rebuilds the data of the failed drive
so that the system can recover.
VNM Recorder • Panels and Cabling 8
Page 15

Power button — This is the main power button, which is used to apply or turn off the
1
2
b
main power. When the main power is turned off, standby power is actively supplied to
the recorder.
CAUTION: If the recorder requires service, disconnect the power supply from the
recorder before proceeding.
Reset button — Use this button to reboot the recorder.
c
Status LEDs — Six LEDs are used to provide the status of the VNM Recorder (see
d
figure 6).
Power
Drive Activity
Overheat/Fan Failure
Network Activity (1)
Power Supply/Fan Failure
Network Activity (2)
Figure 6. Status LED Icons
z Power LED — This LED lights when the recorder is receiving power.
z Drive Activity LED — This LED indicates drive activity when flashing or flickering.
NOTE: This light may not respond and an audible alarm may go off if a
hard drive has failed. Check to see if a hard drive has failed and replace if
necessary.
z Network Activity LED (1) — This LED flashes to indicate activity on the first
network.
z Network Activity LED (2) — This LED flashes to indicate activity on the second
network.
z Overheat and Fan Failure LED — When this LED is flashing, it indicates that a
fan has failed inside the recorder. When the LED is continuously lit, it indicates that
the recorder has achieved a condition which may cause it to overheat. This LED will
remain flashing or on for as long as these conditions exist.
NOTE: If the LED is continuously lit, the condition may be caused by cables
obstructing the airflow of the recorder or the ambient room temperature.
Check the routing of the cables and make sure all fans are operating
normally. If necessary, move the recorder to a cooler location or adjust the
room temperature.
z Power Supply/Fan Failure LED — When this LED is lit, it indicates a power
supply fan has failed. The power supply module has a redundant backup fan that
will increase its speed to compensate, but the power module should be replaced as
soon as possible.
NOTE: The recorder may operate louder than usual until the power supply is
replaced.
USB (Universal Serial Bus) ports — Insert any compatible USB device into these
e
ports. Use an external USB storage device with these ports to update the system.
VNM Recorder • Panels and Cabling 9
Page 16

CD/DVD drive — Insert any compatible CD or DVD into this drive. This drive is used for
f
system updates or software installation.
3.5 inch floppy drive — This drive accepts 3.5 inch floppy disks.
g
Rear Panel Features
NOTE: Some features listed in this user guide may not be available on all units. This will
not affect the overall functionality of the VNM Recorder.
The rear panel connections of the VNM Recorder are shown in figure 7.
17
2
1
3 6 95 11 12
4
Figure 7. VNM Recorder Rear Panel Connections
Power input (IEC connector) — Plug a standard IEC power cord into this connector
a
to connect the recorder to a 100 to 240 VAC, 50 Hz or 60 Hz power source.
Alarm Reset button and LED — When the recorder overheats or when a hard drive
b
fails, an audible alarm is activated and the LED turns on to indicate that there is a
problem with the device. Press this button to turn the alarm off.
PS/2 mouse connector (optional) — Connect a PS/2 mouse to this port.
c
PS/2 keyboard connector (optional) — Connect a PS/2 keyboard to this port.
d
USB (Universal Serial Bus) connectors — Insert any compatible USB device into
e
these ports.
7 8 1910 13 14
18
15 16
Parallel/Printer connector (not used)
f
COM1 serial connector (not required) — Connect a compatible device to this 9‑pin
g
serial port.
COM2 serial connector (not required) — Connect a compatible device to this 9‑pin
h
serial port.
Ethernet connector (eth0) — Connect a RJ‑45 cable to this port. This port connects
i
to a primary network and is the default network port that should be used to connect to
a VN‑Matrix network.
Ethernet connector (eth1) — Connect a RJ‑45 cable to this port. This port connects
j
to a secondary network.
VNM Recorder • Panels and Cabling 10
Page 17

Center/Subwoofer connector (not required; orange) — Connect a compatible
k
center speaker or subwoofer to this port.
Line in connector (not required; blue) — Connect a compatible line in device to
l
this 3.5 mm port. Use this port to play external audio through the sound card of the
recorder.
Rear speaker connector (not required; black) — Connect a compatible rear
m
speaker to this 3.5 mm port.
Front speaker connector (not required; lime) — Connect a compatible front
n
speaker to this 3.5 mm port.
Side speaker connector (not required; gray) — Connect a compatible side speaker
o
to this 3.5 mm port.
Microphone connector (not required; pink) — Connect a compatible microphone to
p
this port.
VGA connector — Connect a compatible VGA monitor to this port.
q
7-pin connector (not active/used)
r
DVI connector — Connect a compatible DVI monitor to this port.
s
VNM Recorder • Panels and Cabling 11
Page 18

Recorder
Conguration and
Hardware Setup
This section provides information on how to configure the VNM Recorder so that it will
work within a VN‑Matrix system. After completing this chapter, see the "About the
Web-based User Interface" section on page 23 for information about controlling the
VNM Recorder using a control PC.
Topics that are covered include:
z Setup Overview
z VNM Recorder Power Up Procedure
z VNM Recorder Power Down Procedure
z Choosing the Controller Device
z Configuring the VNM Recorder
z Configuring the VN-Matrix Encoders and Decoders
Setup Overview
1. Connect a mouse, a keyboard, and a computer monitor (for configuration purposes) to
the VNM Recorder (see the Rear Panel Features section on page 10).
2. Use a network switch to connect a primary VN‑Matrix network to the rear panel
Ethernet connector (eth0) of the VNM Recorder (see the Rear Panel Features
section on page 10).
3. Power on the VNM Recorder and all necessary devices (see the VNM Recorder
Power Up Procedure section on page 13).
4. Determine the device that will function as the controller (see the Choosing the
Controller Device section on page 16).
5. Configure the VNM Recorder network settings (see the Configuring the
VNM Recorder section on page 17).
6. Configure the network settings of each VN‑Matrix encoder and decoder (see the
Configuring the VN-Matrix Encoders and Decoders section on page 22).
7. Power down the VNM Recorder (see the VNM Recorder Power Down Procedure
section on page 15) and all configured devices. After a few seconds, power on the
VNM Recorder and all necessary devices.
VNM Recorder • Recorder Conguration and Hardware Setup 12
Page 19

VNM Recorder Power Up Procedure
Use the following procedure to power up the VNM Recorder.
NOTE: Before turning on the VNM Recorder, ensure that all necessary devices are
powered on and connected properly.
1. Press the power button on the front of the unit to initialize the bootup sequence.
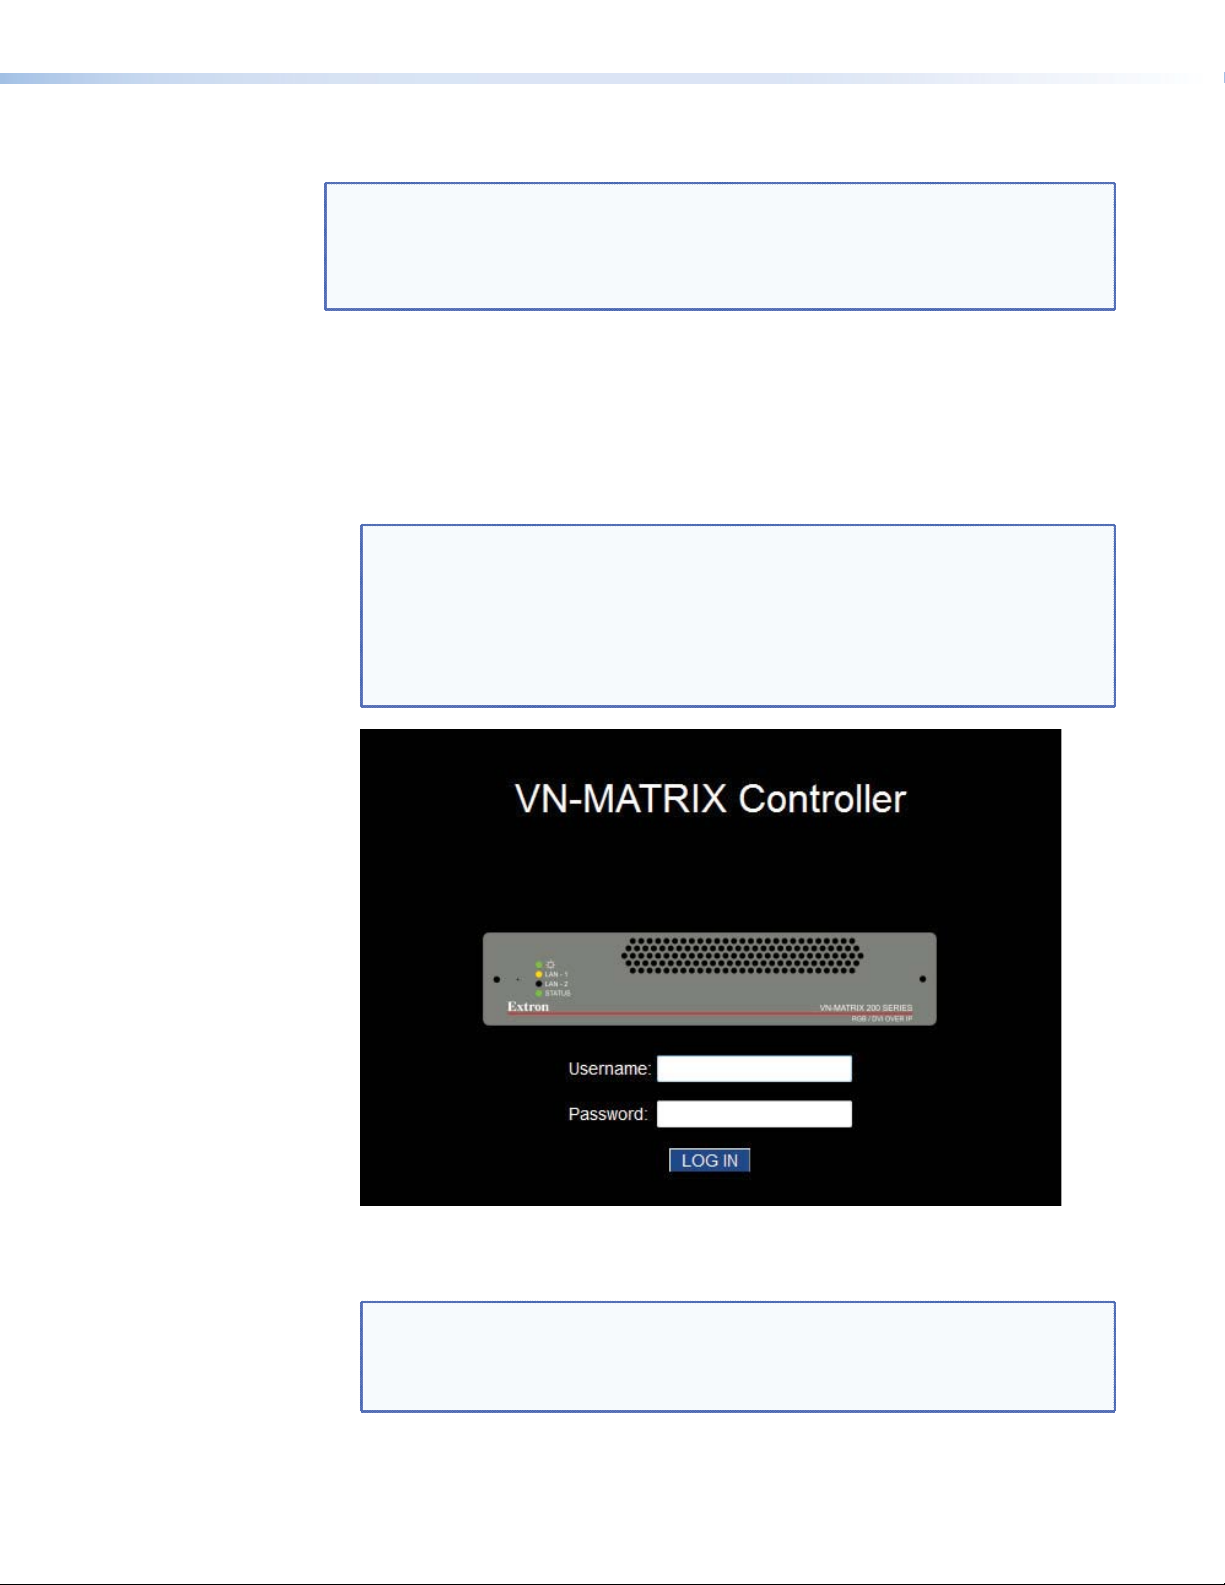
2. After bootup is complete, the following login screen appears if a local monitor is
connected. The VNM Recorder is now operational.
Figure 8. VNM Recorder Login Screen
VNM Recorder • Recorder Conguration and Hardware Setup 13
Page 20

Login Information
NOTES:
• A mouse, keyboard, and monitor must be connected to the VNM Recorder to log in to
the unit itself.
• Login information is case sensitive.
• It is only necessary to log in to the VNM Recorder when it requires configuration. The
VNM Recorder does not require login information for normal operation.
Log in to the VNM Recorder using the Red Hat
The default login information is as follows.
z Administrator username — root
z Administrator password — Extron2010
z Guest username — matrix_rec
z Guest password — matrix
If necessary, the administrator password, guest username, and guest password can
be changed. New usernames can also be added.
NOTE: The procedures detailed within this guide use the administrator username
and password to configure the recorder. It is recommended that the administrator
username
the guest login information (or a created personal login) to access the recorder so that
important configuration settings cannot be changed.
®
Enterprise Linux® login page (see figure 8).
and password is only given to those who require it. Others should be using
To change the administrator password:
1. From the menu bar on the desktop, select
RootPassword.
System > Administration >
2. If prompted for an administrator password, type in the appropriate password. The
default administrator password is listed above.
3. Follow the remaining prompts to change the password.
To add or change usernames and passwords:
1. From the menu bar on the desktop, select System > Administration >
Users
and Groups.
2. The User Manager window appears. Use this window to add, modify, or delete users.
Click on the Help menu for more information.
VNM Recorder • Recorder Conguration and Hardware Setup 14
Page 21
VNM Recorder Power Down Procedure
Use the following methods to safely power down the VNM Recorder.
Using the Front Panel
If the VNM Recorder is not logged into:
1. Press and release the front panel power button.
2. The recorder takes approximately 20 to 30 seconds to power‑down.
If the VNM Recorder is logged into:
1. Press and hold the power button until the LED of the power button turns off. This turns
the recorder off instantly.
- OR -
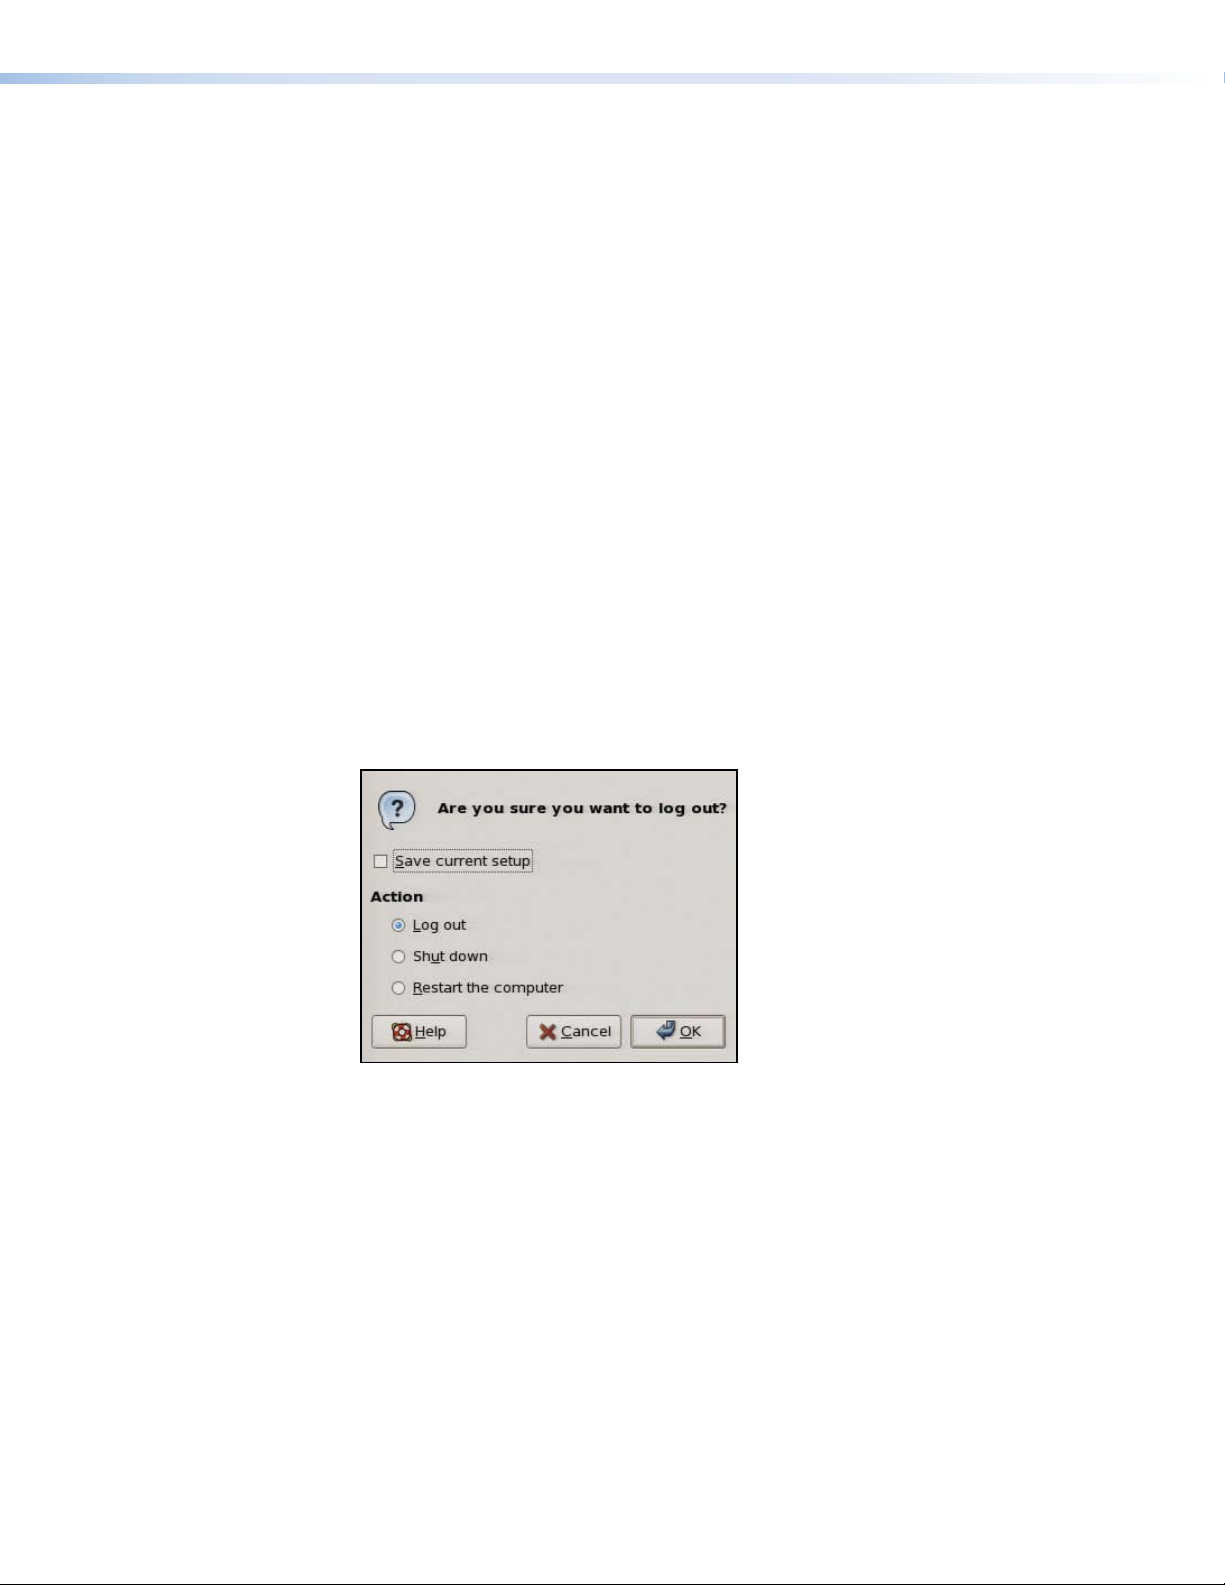
1. Press and release the front panel power button.
2. The recorder opens a prompt asking for a shut down confirmation. There are three
options to choose from.
z Log out
z Shut down
z Restart the computer
If desired, click on the Save current setup check box to save the desktop
configuration. Select the appropriate radio button and click OK (see figure 9). The
recorder takes approximately 20 to 30 seconds to shut down.
Figure 9. Front Panel Shut Down Confirmation Window
VNM Recorder • Recorder Conguration and Hardware Setup 15
Page 22
Using the Keyboard and Mouse
From the login screen:
1. Click on either Shut Down or Restart as required.
2. The recorder opens a prompt asking for confirmation of the selected request.
3. The recorder takes approximately 20 to 30 seconds to complete the request.
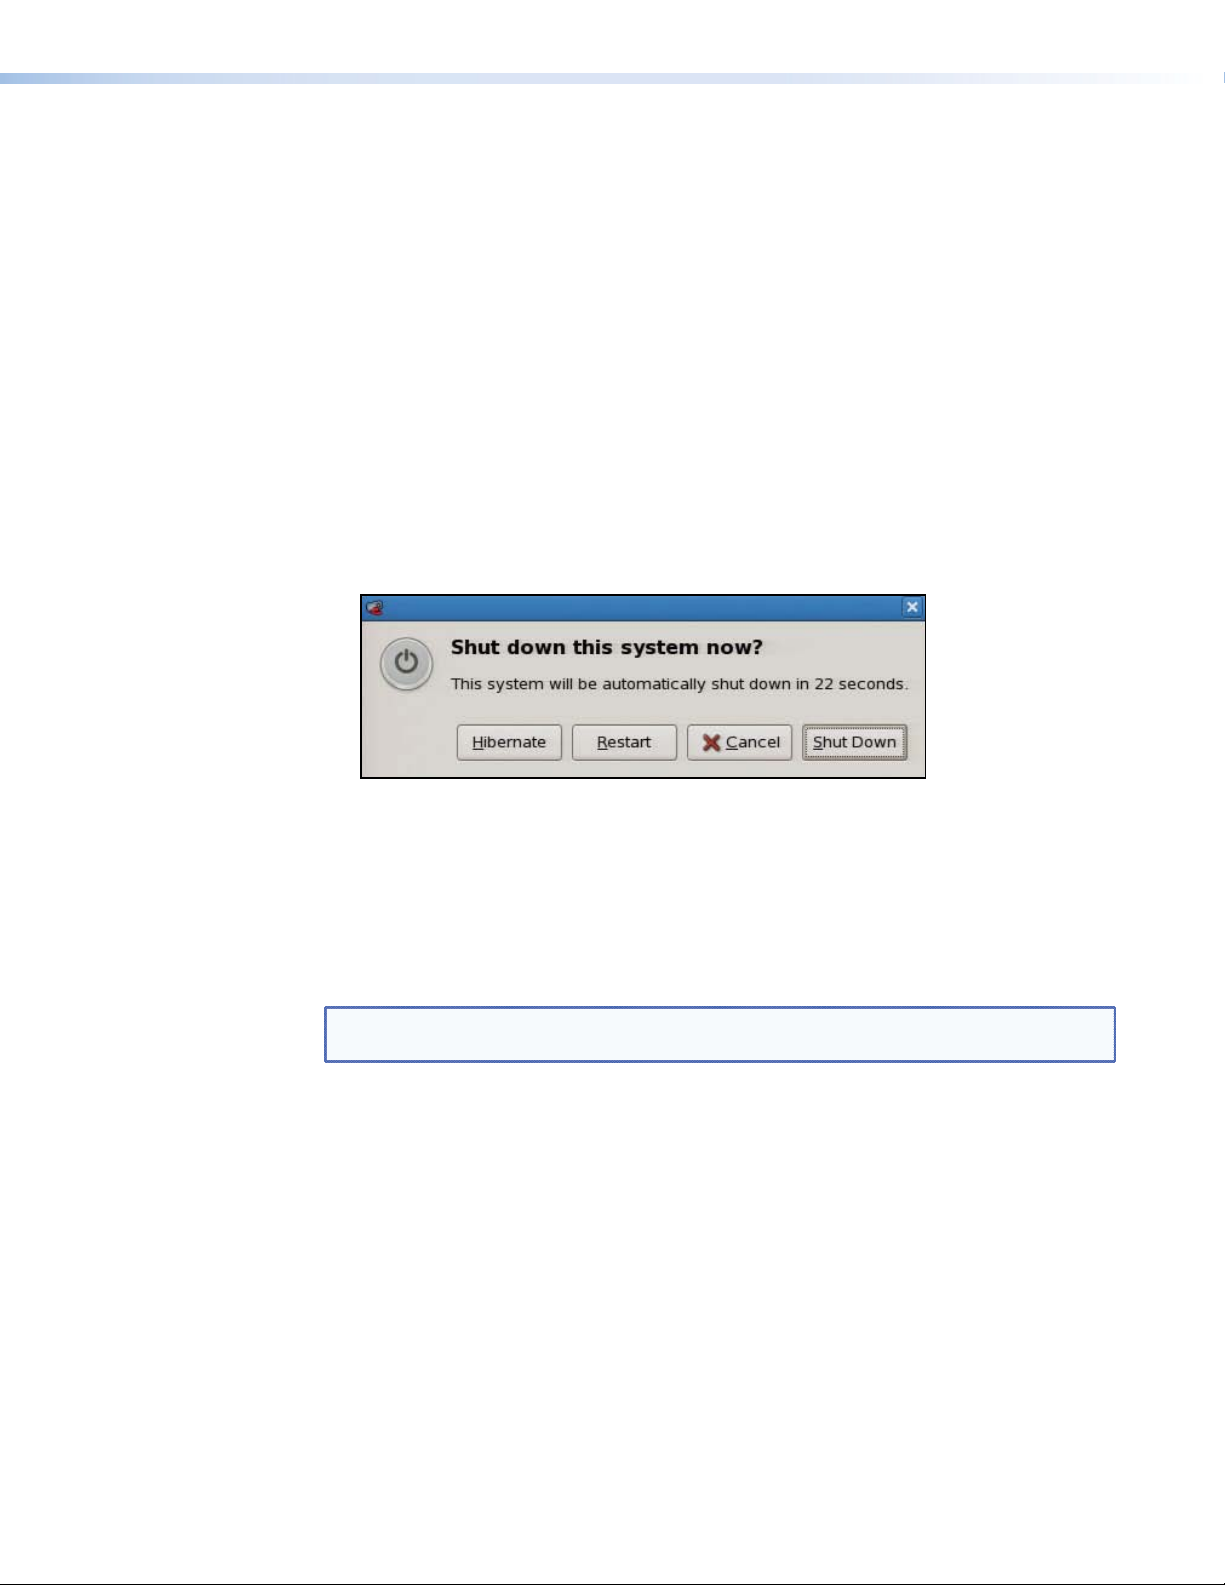
From the Linux desktop:
1. From the menu bar on the desktop, select System > Shut Down...
2. The recorder opens a prompt containing four options.
z Hibernate
z Restart
z Cancel
z Shut Down
Select one of the options as desired. If no option is selected within 60 seconds, the
recorder shuts itself down (see figure 10).
Figure 10. Mouse and Keyboard Shut Down Confirmation Window
Choosing the Controller Device
In any VN‑Matrix system, one device needs to be configured as a controller. The
controller acts as a central point of reference for each device, manages all of the system
communications to every matrix device present, and also serves the web‑based control
interface to the user.
NOTE: The VNM Recorder is configured as a controller when shipped. The controller
address is set to the same value as the eth0 port (192.168.254.254).
The controller can be one of the following devices.
z VN‑Matrix 200, 225, 300, or 325 device which is suitable for small network systems
z VNM Recorder which is suitable for small network systems
z VNM Enterprise Controller which is suitable for large network systems
When a controller device has been chosen, all devices within the VN‑Matrix system must
reference the IP address of the controller device. When configuration of the VN‑Matrix
system is complete, the IP address of the controller device can be entered into a suitable
web browser running on any PC or laptop connected to the VN‑Matrix network.
For information on how to configure the VNM Enterprise Controller, see the VNM Enterprise
Controller User Guide. For information on how to configure the VN‑Matrix encoders and
decoders, see the VN-Matrix 200 Series User Guide, VN-Matrix 225 Series User Guide,
VN-Matrix 300 User Guide, and the VN-Matrix 325 User Guide.
VNM Recorder • Recorder Conguration and Hardware Setup 16
Page 23
Conguring the VNM Recorder
NOTE: Initial configuration of the VNM Recorder requires a mouse, keyboard, and
monitor. When configuration is complete, it is not necessary to keep these devices
attached to the recorder. The recorder can be completely controlled using the web‑
based user interface.
Default Network Settings
The VNM Recorder is pre‑configured with the following network settings.
IP Address: 192.168.254.254
Subnet Mask: 255.255.255.0
Controller IP Address: 192.168.254.254
NOTE: Using these settings, the VN‑Matrix encoder/decoder unit(s) must use
IP addresses within the range 192.168.254.1 through 192.168.254.253 and use the
same subnet mask. The default network settings can also be changed to match an
existing network setup. This is explained in the following sections.
Conguring the Network and IP Address Settings
Use the following procedure to change the network settings on the VNM Recorder.
Stage 1 — Configure the network settings
1. If the recorder is not turned on already, power up the unit and wait for the login screen
to appear on the monitor (approximately two minutes and fifteen seconds).
2. Enter in the administrator username and password at the login screen. See the
"Login Information" section on page 14 for username and password information.
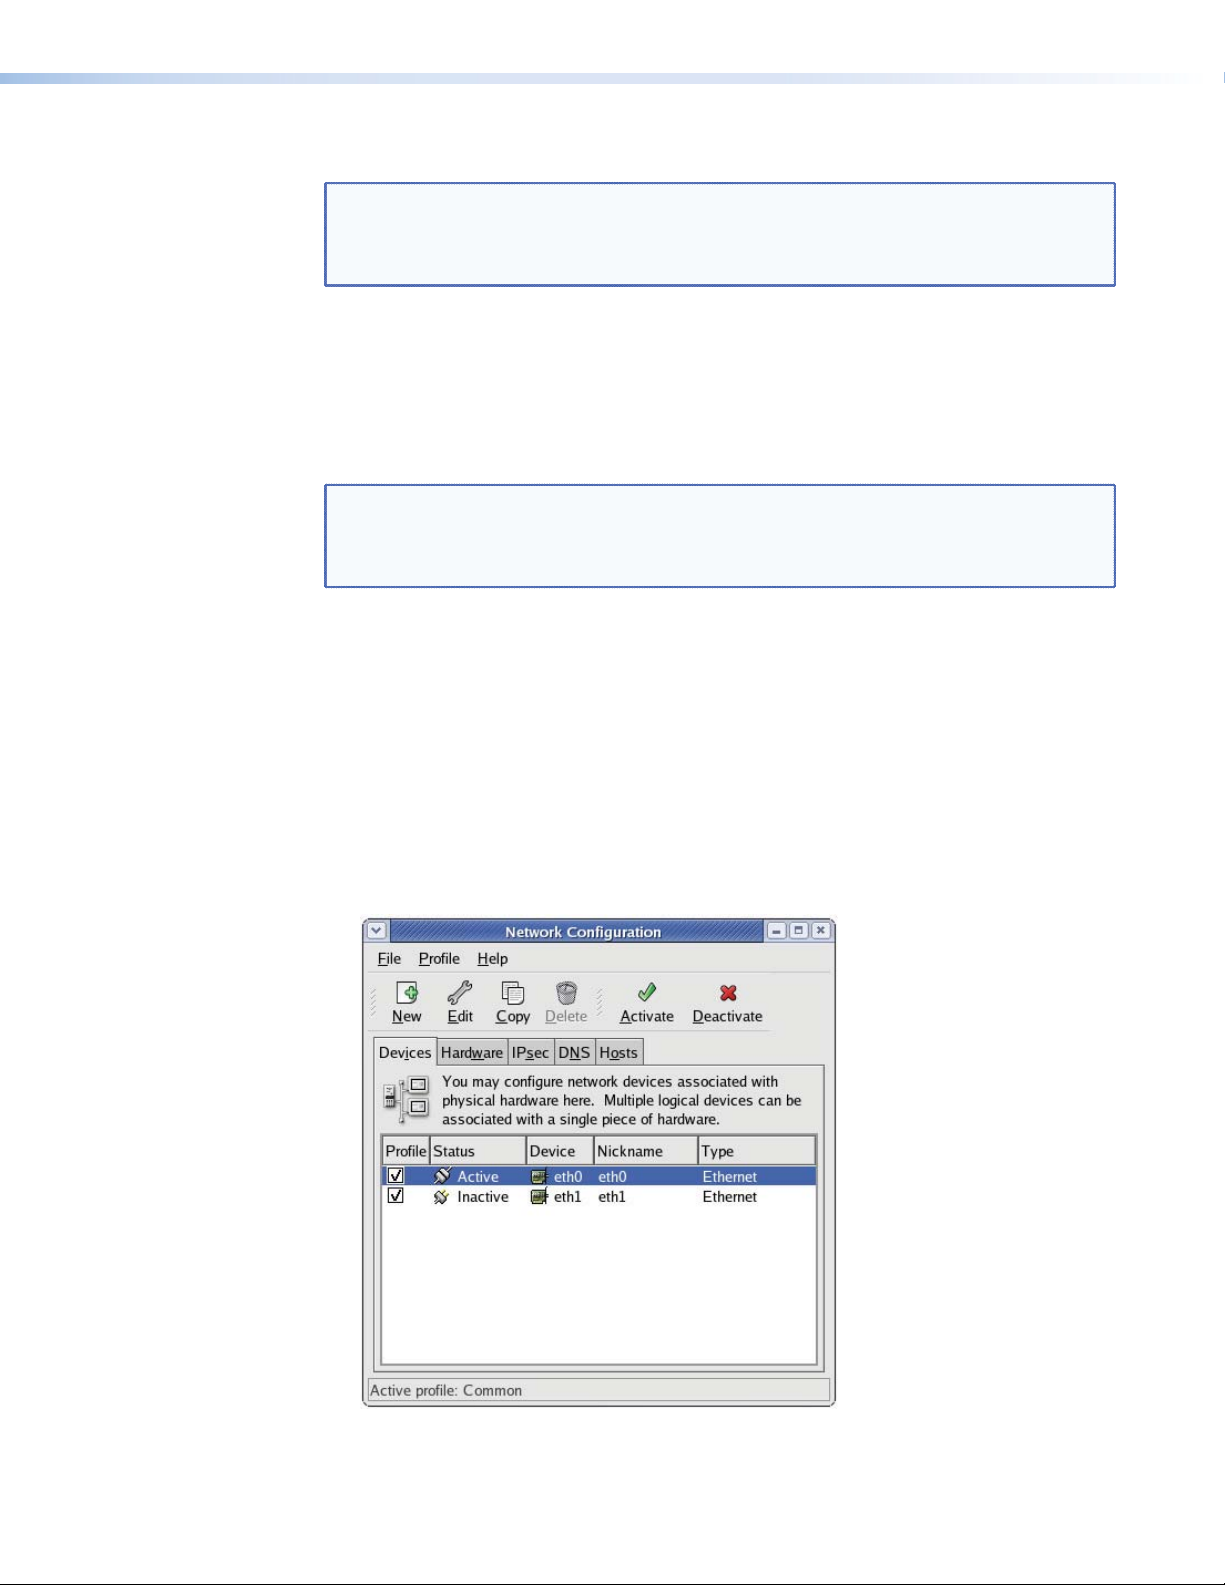
3. From the menu bar on the desktop, select System > Administration > Network.
The Network Configuration window appears (see figure 11).
Figure 11. Network Configuration Window
VNM Recorder • Recorder Conguration and Hardware Setup 17
Page 24
4. Select the eth0 (upper Ethernet connector; primary network) device line to highlight it. If
there is a network cable present and it is connected to a switch, the status should read
Active.
5. Click Deactivate. The status of the eth0 device should now read Inactive.
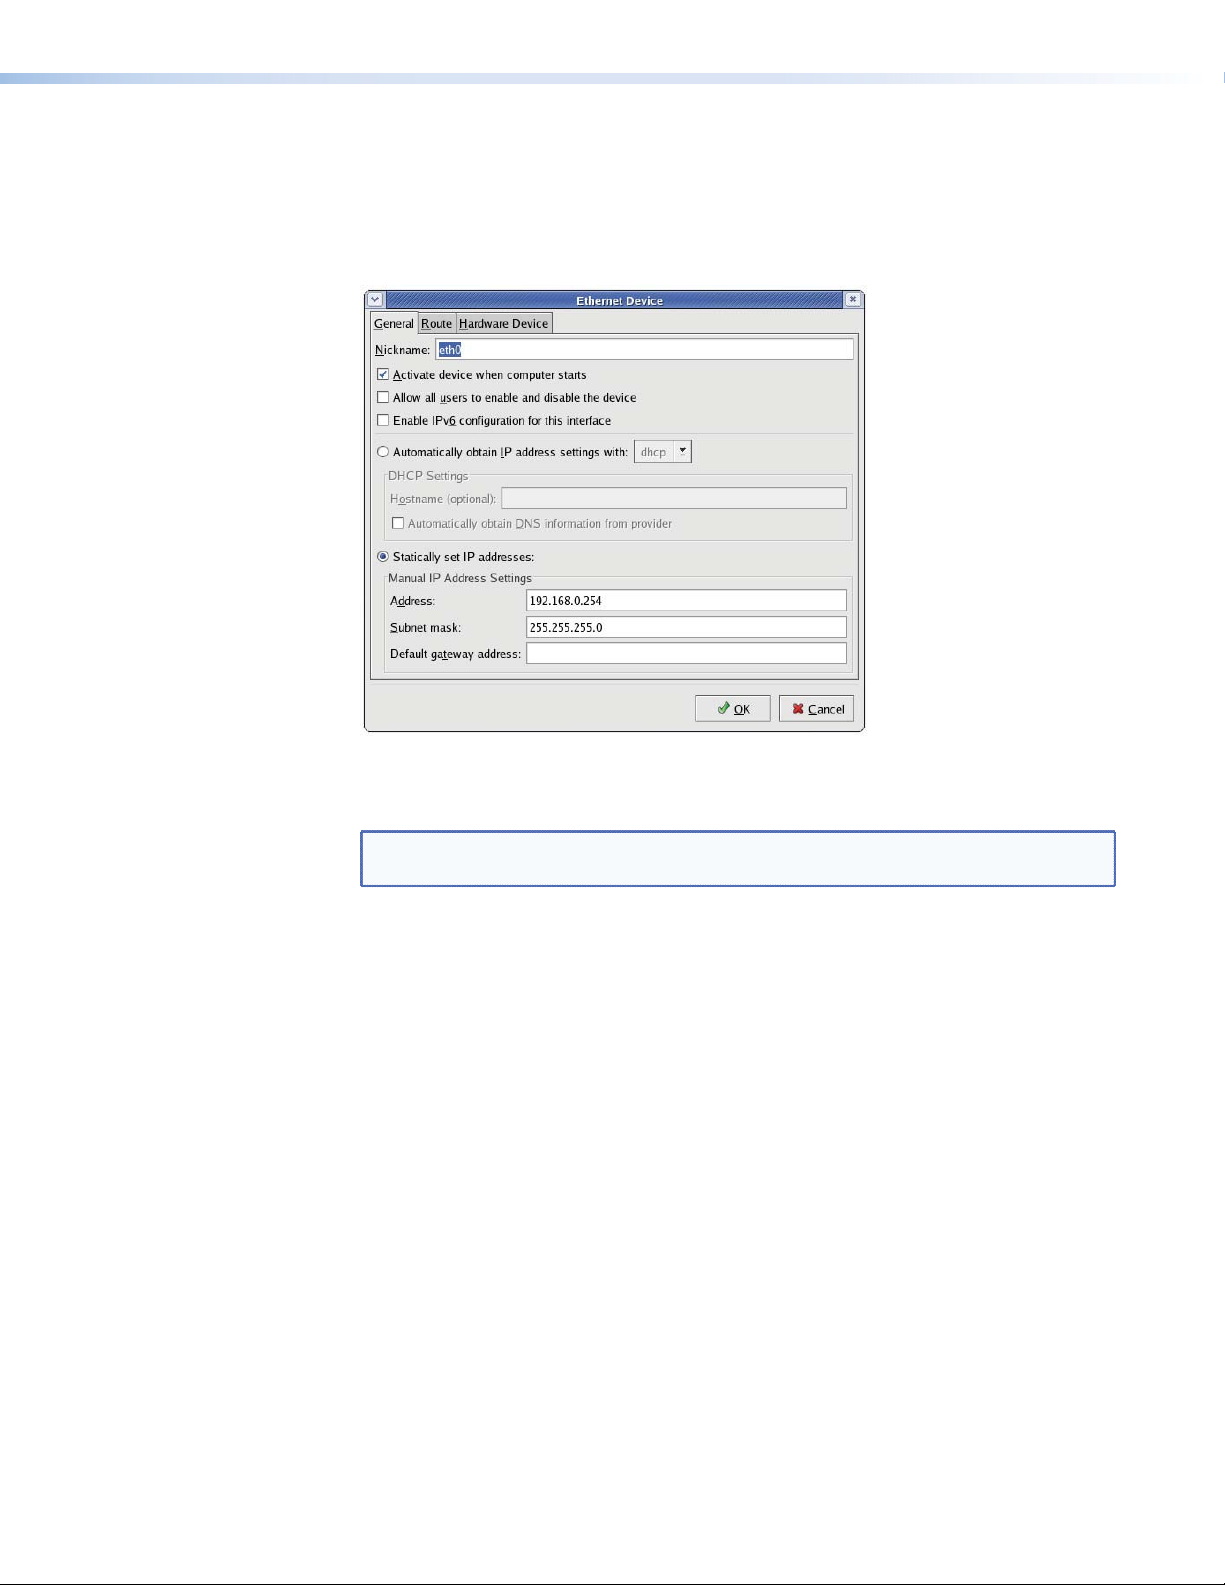
6. Double‑click on the eth0 device. The Ethernet Device window appears (see figure 12).
Figure 12. Ethernet Device Window
7. Change the Address and Subnet mask fields as required and then click OK.
NOTE: The Default gateway address field is only required if devices are on
different subnets.
8. Navigate back to the Network Configuration window (see figure 11). Select the
eth0 device and then click Activate.
VNM Recorder • Recorder Conguration and Hardware Setup 18
Page 25
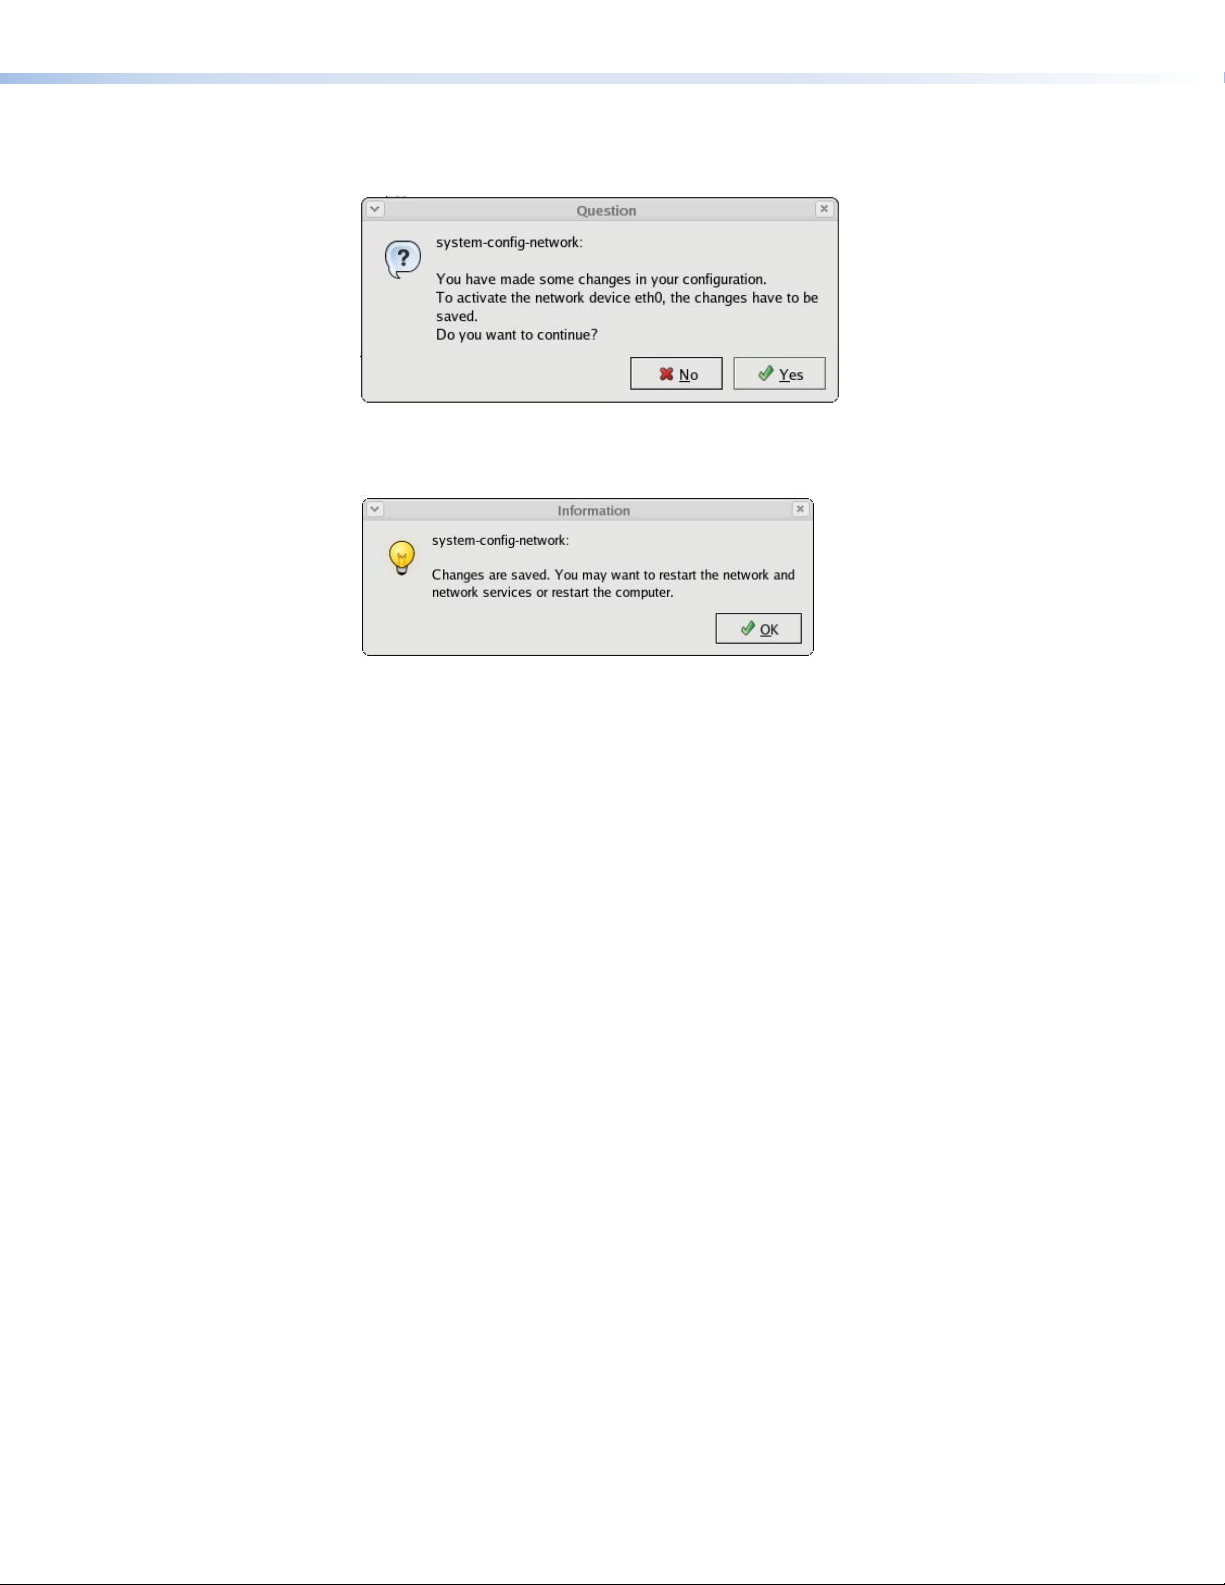
9. If changes were made, a dialog box appears asking to confirm the changes. Click Yes
to confirm and save the changes (see figure 13).
Figure 13. Confirm Settings Window
10. The following dialog box appears (see figure 14). Click OK to continue.
Figure 14. Settings Saved Window
11. A loading dialog box appears and the necessary changes are made to the system. After
the loading dialog box disappears, navigate back to the Network Configuration window
and check that the status of the eth0 device now reads Active.
12. Close the Network Configuration window.
VNM Recorder • Recorder Conguration and Hardware Setup 19
Page 26

Stage 2 — Setting the controller IP address
1. If necessary, enter the administrator username and password at the login screen. See
the
Login Information section on page 14 for username and password information.
2. From the desktop, double‑click on Computer > Filesystem > home > matrix_rec
(see figure 15).
3. Double‑click on the folder that contains that latest release of the recorder software (at
the time this guide was released, the latest software would be stored in the ver3.10.9
folder or in a folder with a similar name).
Figure 15. Navigating to the Recorder Software Folder
4. Click on the config.xml file to select it.
5. From the Edit menu, select Duplicate. This creates a backup copy (named
config (copy).xml) of the original config.xml file. Keep the backup copy for system
restoration purposes.
6. Right‑click on the config.xml file and select the Open with "Emacs Text Editor"
option.
VNM Recorder • Recorder Conguration and Hardware Setup 20
Page 27
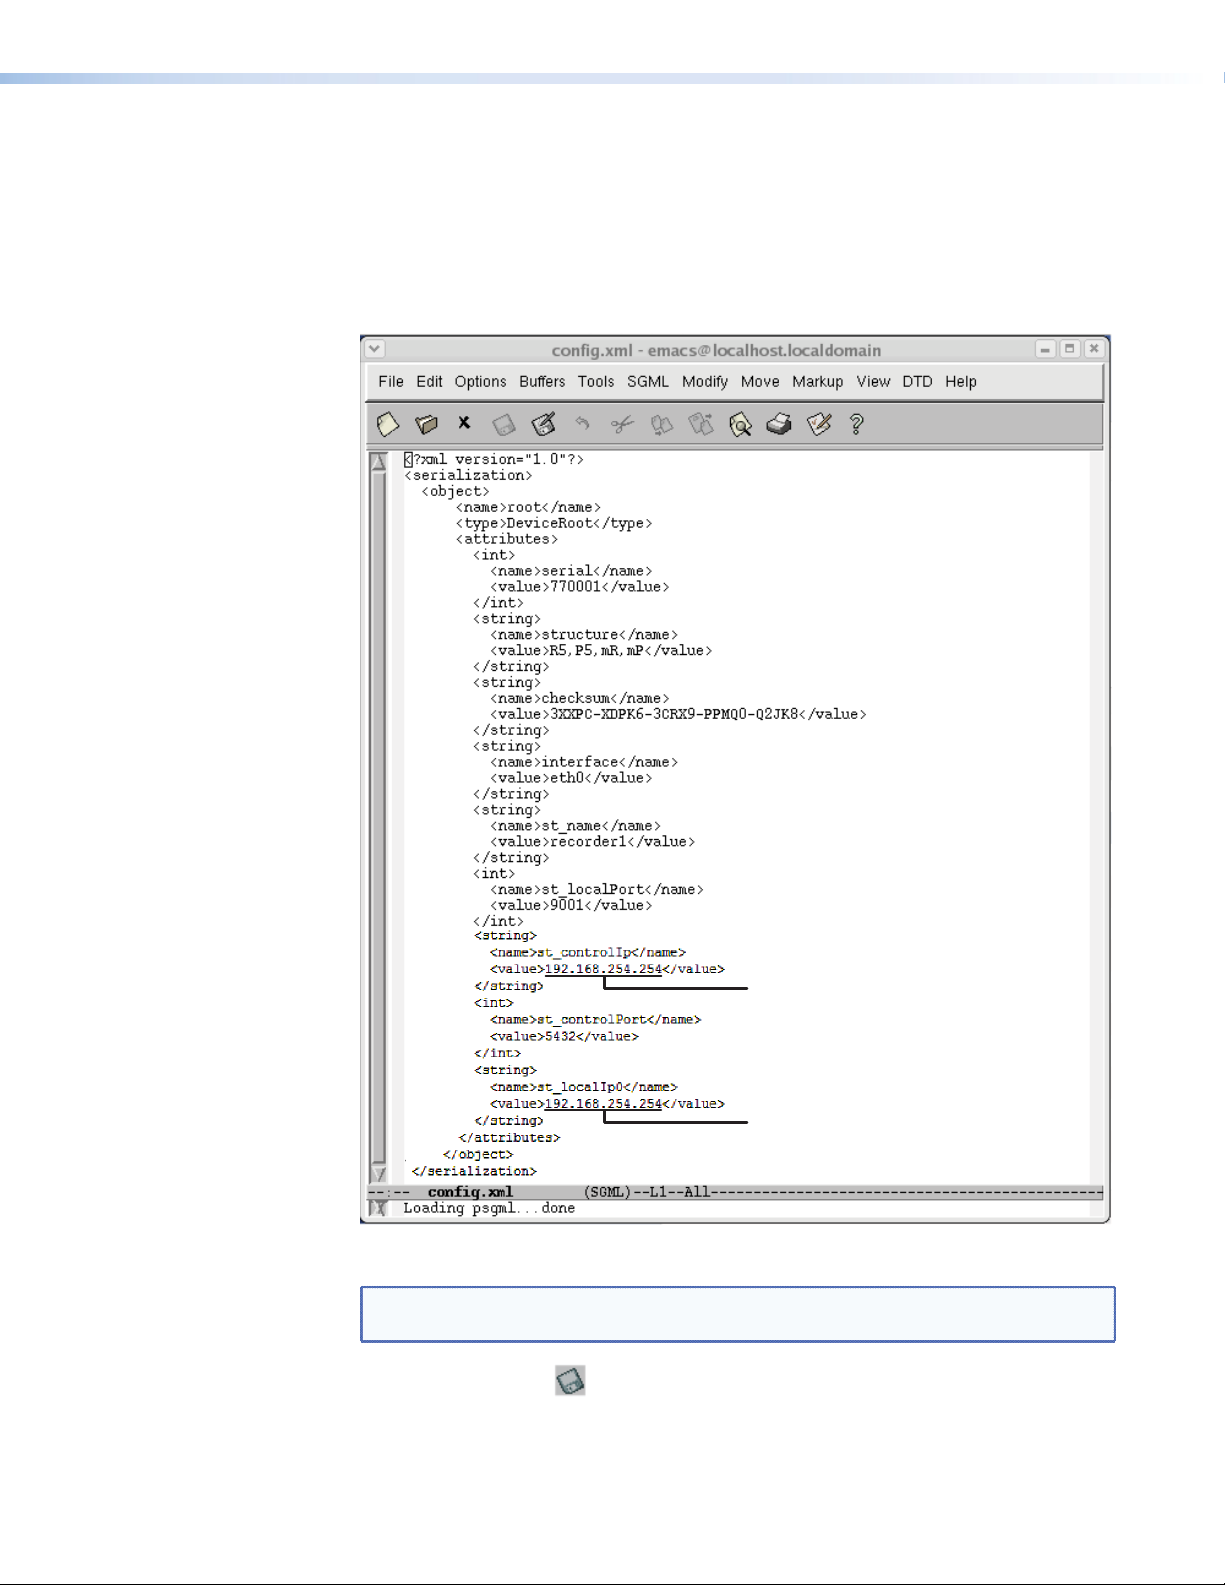
7. Near the bottom of this file are two values named st_controlIp and st_localIp0 with
an IP address listed under each (see figure 16). Edit these values as follows.
z If the VNM Recorder is the controller device, edit both values to match the
IP address (eth0) of the recorder.
z If the VNM Recorder is not the controller device, change the st_controlIp value
to match the IP address of the controller device. Change the st_localIp0 value to
match the IP address (eth0) of the recorder.
Edit this value to match
the IP address of the
controller device.
Edit this value to match
the IP address (eth0) of the
VNM Recorder.
Figure 16. Config.xml Text Window
NOTE: Be careful not to change any other values or remove any of the special
formatting characters in this file.
8. Click on the save icon
Save (current buffer) option.
9. Close the text editor window and all other folder windows.
VNM Recorder • Recorder Conguration and Hardware Setup 21
or click on the File menu and select the
Page 28

Stage 3 — Restart the VNM Recorder
Restart the VNM Recorder. See the VNM Recorder Power Down Procedure section on
page 15 for more information.
Conguring the VN-Matrix Encoders and Decoders
For the VNM Recorder to function properly, update each VN‑Matrix device to point to the
new IP address of the controller device. For information on how to configure the encoders
and decoders, see the VN-Matrix 200 Series User Guide, VN-Matrix 225 Series User Guide,
VN-Matrix 300 User Guide, and the VN-Matrix 325 User Guide.
NOTE: The VNM Recorder can operate with unicast (RTP and TCP) or multicast
streams. Keep this in mind when setting up and configuring the encoders on a
VN‑Matrix network.
VNM Recorder • Recorder Conguration and Hardware Setup 22
Page 29

About the
Web-based
User Interface
NOTE: It is important that all devices within the VN‑Matrix network contain the same
version of firmware to avoid communication and compatibility issues. Check that each
device contains the same version of firmware by using the Device List page (see
page 26) of the web‑based user interface. To update the VNM Recorder firmware,
see the Firmware Updates section on page 63.
This section provides information on:
z Overview of the Web-based User Interface
z Accessing the Web-based User Interface
z Web-based User Interface Control Options
z Advanced Configuration
z VN-Matrix Encoder and Decoder Configuration
Overview of the Web-based User Interface
The web‑based user interface is an application that is used to configure the devices in a
VN‑Matrix network. It is accessed by using a web browser and entering in the IP address
of the controller device. The user interface allows for system level configuration and can be
used with any VN‑Matrix device that is connected to the controller device. The following list
outlines the configuration options that are available.
z Configure all VN‑Matrix devices that are connected to the controller device.
z Switch all VN‑Matrix 200 / 225 / 300 / 325 codec devices from encoders to decoders
and vice versa.
z Configure the type of compression that is applied to a stream.
z Choose the appropriate transport protocol that will be used between an encoder and a
decoder.
z Configure the specific types of elements that are distributed over a PURE3 stream.
VNM Recorder • About the Web-based User Interface 23
Page 30
Accessing the Web-based User Interface
NOTE: The user interface shown in this guide is available when using VN‑Matrix 200,
225, 300, or 325 devices or a VNM Recorder. This interface is best used when
configuring small systems. For larger systems, using a VNM Enterprise Controller
interface is recommended. See the VNM Enterprise Controller User Guide for more
information.
The web‑based user interface can be accessed using a suitable web browser (for example,
®
Microsoft
Internet Explorer® v7 or above or Mozilla® Firefox® v1.3 or above) running on
any PC or laptop connected to the VN‑Matrix network. With a web browser open, use the
following steps to access the user interface.
1. Type in the IP address of the controller device into the address bar of the web browser
(for example, http://192.168.254.254). The web page shown in figure 17 appears in the
browser.
NOTES:
• If the VNM Recorder is configured as the controller device of the VN‑Matrix
network, the IP address must be appended with the port number that is used as
the web page server (for example, http://192.168.254.254:8090).
• If the web browser cannot access the web-based user interface, the security
settings of the web browser may need to be configured. See the Browser
Configuration section on page 68 for more information.
Figure 17. Controller Login Page
2. Enter the appropriate username and password.
NOTES:
• By default, these are both set to admin.
• For information on how to change the password, see the Accounts Page section
on page 41.
VNM Recorder • About the Web-based User Interface 24
Page 31

3. Click Log In or press <Enter> on the keyboard. The Device List page appears
(see figure 18).
Figure 18. Device List Page
For more information on how to control and navigate the user interface, see the
Web-based User Interface Control Options section below and the Advanced
Configuration section on page 38.
NOTES:
• The system can be logged out of at any time using any of the interface pages.
Click on the Logout tab to exit the user interface or simply close the web
browser.
• If configuration changes were made to the system, it is recommended to click on
the Save All tab before logging out.
Web-based User Interface Control Options
This section details the user interface pages that are associated with the VNM Recorder and
describes what they are commonly used for. The pages associated with the VNM Recorder
are listed below.
z Device List Page
z Recorder Device Page
z Recorder Page
z Navigate Page
z Player Page
VNM Recorder • About the Web-based User Interface 25
Page 32

Device List Page
The Device List page lists all of the VN‑Matrix devices detected on the network. This is also
the first page that is seen after logging in (see figure 19).
1
Figure 19. Device List Page
NOTE: If devices are added after the page has been displayed, they may not
automatically appear on this list. Refreshing the page or clicking on the Device List
tab updates the list.
When a VN‑Matrix device has been detected and listed on the Device List page, an entry
will be displayed even if the device is subsequently disconnected. All valid devices are listed
by device name and followed by their current IP address.
NOTE: Some listed devices may not show an IP address. These devices are known as
inactive devices. A device is considered inactive if it is disconnected from the network
or powered down.
2 3 4
5 6
7
Device Icons — There are seven types of device icons.
a
NOTE: VN‑Matrix 200 and 225 devices use the same icons shown below.
— A five channel VNM Recorder.
— A VN-Matrix 2xx series codec device with DVI input or output.
— A VN-Matrix 2xx series encoder device with DVI input or output.
— A VN-Matrix 2xx series decoder device with DVI input or output.
— A VN-Matrix 300 series codec device with 3GSDI input or output.
The text after the hyphen details the video signal type.
— A VN-Matrix 300 series decoder device with 3GSDI input or
output.
The text after the hyphen details the video signal type.
— A VN-Matrix 325 codec device.
VNM Recorder • About the Web-based User Interface 26
Page 33

Mode Icons — The current configuration status of each device is identified by an icon.
?
b
An undefined device.
A device configured as an encoder (source).
A device configured as a decoder (display).
A VNM Recorder.
Alarm Status Icons — The alarm status of a device is indicated by a colored icon.
c
For more information on alarm statuses, see the "About Alarms" section on page 55
or click on the Alarms tab and then click on the Help tab within the web‑based user
interface.
A device which has not contacted the controller this session.
A device under active control with no alarms.
A device under active control showing warning alarms.
A device under active control showing critical alarms.
Name — The device name is shown in this column. To change the name of the device,
d
see the "Recorder Device Page" section on page 28.
IP Address — The IP address of the device is shown in this column.
e
NOTE: The IP address of the device is only shown if the device is currently present
on the network and configured to use the controller.
Version — This column shows the current firmware version installed onto each device.
f
NOTE: To avoid compatibility issues, all devices must have the same version of
firmware installed onto each device.
Del — This column is used to remove devices from the VN‑Matrix network. Clicking on
g
the red X icon brings up a confirmation dialog. Click OK to delete the selected device
from the database. Devices can only be deleted when the physical device is not actively
being managed and when active connections have been disconnected from the device.
Before deleting the device, the system carries out an implicit "save all" action to ensure
that the current and persistent databases remain up‑to‑date.
VNM Recorder • About the Web-based User Interface 27
Page 34

Recorder Device Page
This page is accessed by selecting the VNM Recorder device on the Device List page
(see page 26).
1
3
2
4
Figure 20. Recorder Device Page
The Recorder Device page shows the basic status for a VNM Recorder device. The device
information is presented in four panels.
NOTE: This guide references the Device page for the VNM Recorder only. See the
other device user guides or click on the Help tab for information on device specific
control options.
Device Summary panel — This panel indicates the connection status of the device
a
and the status of the management link between the device and the system controller.
z Name — The device name can be modified by typing in a new name into this field
and clicking Update. The name should be comprised of letters, numbers and the
underscore character. Spaces should be avoided.
z Serial Number — The field displays the serial number of the device.
z Device Status — This field indicates the management state of the device. Normally
it should show Active, but if the device is missing or it cannot be contacted via the
controller it will show No Device.
z IP address:port(cport) — This field displays the IP address of the current device,
the UDP port the device is using to communicate with the controller, and the
controller UDP port it is contacting.
z Link Status — When a device is active, this field displays the quality of the
management link between the device and the system controller. A link status of
Good indicates little or no management packet loss. A link status of Fair indicates
a small amount of packet loss. A link status of Poor indicates a bad link; investigate
whether the link to the device has sufficient bandwidth to carry the data and
management traffic.
VNM Recorder • About the Web-based User Interface 28
Page 35

Device Setup panel — This panel controls various global actions for the device.
b
z Device Type — This field will always display storage as the device type for the
VNM Recorder and cannot be changed.
NOTE: When this field displays none, source, or display, it means that the
device is a codec, encoder, or decoder.
z Mode — A device can be configured using four modes.
NOTE: This configuration option is not available for the VNM Recorder. These
modes are detailed for reference purposes.
z enable — This is normal operation.
z disable — Using this mode on a source device stops streaming to the
network, but still shows pass‑through output. Using this mode on a display
device outputs a splash screen in place of normal data.
z standby — Using this mode on a source device stops streaming and disables
pass‑through output. Using this mode on a display device disables all output.
VN‑Matrix 300 / 325 devices do not support standby mode.
z test — Using this mode on a device (source or display) shows a splash screen
with the words "Test Mode". Normal streaming is suspended.
z Data Interface — This option allows the streaming interface to be specified.
Currently, the only option available is Cat6, which uses the eth0 (primary)
network interface.
z Multicast TTL — This field is used to specify the number of hops multicast traffic
will make between routed domains when it exits a source. It is not used for TCP or
unicast RTP traffic and is only used on a source.
Licensed Features panel — This panel is used to manage the device license and
c
indicates what features the user has access to. If the device has an incorrect checksum
for the licensed features, a license error message will be shown and the device will not
support streaming functions.
NOTE: The VNM Recorder contains a default license that allows for five recorder
channels and five player channels. It is currently not possible to change the
device license on the VNM Recorder.
CAUTION: DO NOT place controller license information into this panel. Doing
this may cause the VNM Recorder to stop responding. This panel is used for
device licenses only. See Controller Licensing on page 42 of the Accounts
Page section for information about controller licenses.
Configuration panel — This panel indicates what features the user is able to control.
d
Each device consists of a number of components which are accessed by clicking on
the appropriate links.
The Recorder icon accesses the pages that manage the recording of VN-Matrix
PURE3 streams to the VNM Recorder hard disk.
The Player icon accesses the pages that manage the playback of previously
recorded VN-Matrix PURE3 streams.
VNM Recorder • About the Web-based User Interface 29
Page 36

Recorder Page
This page is accessed by selecting the VNM Recorder device on the Device List page
(see page 26) and then clicking the Recorder icon located on the Configuration panel of the
Recorder Device page (see page 28).
1
4
5
Figure 21. Recorder Page
The Recorder page controls the recording functionality of the VNM Recorder. The recorder
is capable of recording up to five simultaneous channels. Each channel contains one video
stream. In addition, a channel may also contain audio and data elements if these are present
and enabled at the encoder.
NOTES:
• The audio and data elements can be recorded, but in order to do so, those elements
must be selected using the appropriate check boxes (audio, wb,
and data).
• The ability of the VNM Recorder to record multiple streams depends on the bandwidth
of the source data streams and the disc writing capability of the recorder hardware.
2
3
name — The device name can be modified by editing this field and clicking Update.
a
The name should be comprised of letters, numbers, and the underscore character.
Spaces can be used, but should be avoided if possible.
Storage Path — Data is recorded in the directory specified in this field. This is modified
b
on the Navigate page that can be accessed by clicking on either the Storage Path link
or the Navigate tab at the top of the Recorder page. For more information on changing
the storage path, see the Navigate Page section (see page 32).
Bookmark button — Clicking on this button during a recording sets a reference point
c
within the stream that can be retrieved later. A new reference point is placed within the
stream each time the button is pressed and allows for multiple reference points to be
set. See the Using Bookmarks section on page 54 for more information.
NOTE: The bookmark button on this page only works while recording a stream.
Bandwidth — This drop‑down menu is used with the Bandwidth tab. Select a channel
d
and a source element from the menu and use the Bandwidth tab to monitor bandwidth
statistics. For more information on monitoring bandwidth, see the VN-Matrix 200 Series
User Guide, VN-Matrix 225 Series User Guide, VN-Matrix 300 User Guide, and the
VN-Matrix 325 User Guide.
VNM Recorder • About the Web-based User Interface 30
Page 37

channel — There are five channels that can be used for recording. Each recorder
e
channel contains the following parameters.
NOTE: Channel 1 must always be used when recording. When using multiple
recording channels, use them in consecutive order and do not skip channels. For
example, assign three recordings to channels 1, 2, and 3. DO NOT assign the
recordings to channels 1, 3, and 5 or to a similar configuration where one or
more channels are skipped.
z source — This drop‑down menu is used to select the RTP or TCP stream of each
available VN‑Matrix stream.
z group — Checking this box allows channel recordings to be grouped together.
Grouped channels start, record, and stop together.
z audio — Checking this box enables synchronized recording of the audio channel.
z wb — Checking this box enables the recording of whiteboard (annotation) data.
See the Definitions section on page 7 for more information.
z data — Checking this box enables the recording of user data. See the Definitions
section on page 7 for more information.
z filename — This field is used to name the recording. The name of the file appears
in the Content Directory and is placed at the beginning of all recorded elements for
that channel.
z description — This field is used to enter important information about a recording.
This information is stored with the recorded stream and is visible on the Player
page (see page 35) under the Tag column.
z record — Check this box and click the Update button to start a recording.
Uncheck this box and click the Update button to stop a recording. Grouped
channels will start and stop together.
z time — While recording, the length of time that has been recorded is displayed.
z MB — While recording, the size of the recorded stream is displayed in megabytes.
VNM Recorder • About the Web-based User Interface 31
Page 38

Navigate Page
This page is accessed by selecting the VNM Recorder device on the Device List page
(see page 26), clicking the Recorder icon located on the Configuration panel of the
Recorder Device page (see page 28), and clicking on the Navigate tab.
2
3
1
4
5
6
7
Figure 22. Navigate Page
CAUTION: It is possible to access directories that contain critical files that should not
be modified at all. Care must be taken when using the control options available on
this page.
The Navigate page provides simple file manager capabilities for the VNM Recorder. This
page is primarily used to set the default location that is used to store recordings as well as
to create or delete directories and files.
Content Directory — The Content Directory allows for content selection and
a
navigation between directories. The Content Directory should be used when using the
configuration options on this page. See the About the Content Directory section on
page 43 for more information.
Update Storage Path — Clicking on this button takes the storage path specified in the
b
Update Path field and assigns it as the current file storage location.
Group Recordings — A recording file is made up of a group of files sharing a common
c
prefix all grouped together into a directory.
z When the Group Recordings box is checked, the content directory lists a logical
view of each type of stream that is present in the recording (this is the default
setting). Each stream type is represented by an icon in the Type column. The
Tag column contains the text that was entered in the description field on the
Recorder page (see the Recorder Page section on page 30).
z When the Group Recordings box is unchecked, the content directory lists the
actual directories that are created for each element type of a recording. In this view,
it is possible to access the individual files that make up the recorded stream.
NOTE: The Player page (see page 35) automatically enables group
recordings.
VNM Recorder • About the Web-based User Interface 32
Page 39

Update Path — Use this field to set the recording storage location.
d
NOTE: The default storage path of the VNM Recorder is set to
/home/matrix_rec/Recording_Files. This is the recommended path where all
recordings should be stored.
1. Use the Content Directory to navigate to the appropriate location. The
Path
field automatically updates to confirm the selected location.
2. Click the Update Storage Path button to assign the storage location.
3. Click the Save All tab to save and set the default storage location.
- OR -
1. Manually type in the location of the directory into this field.
NOTE: When typing in a directory or file location, it must contain the exact
characters. Characters are case sensitive.
2. Click the
3. Click the Update Storage Path button to assign the storage location.
4. Click the Save All tab to save and set the default storage location.
Delete Selection — Use this field to delete files or directories.
e
NOTES:
• Incorrect use of the delete function will cause the VNM Recorder to become
unstable. This feature should only be used by an experienced technician.
• A directory can only be deleted when it is empty.
1. Use the Content Directory to navigate to the appropriate location.
2. Click on the appropriate radio button in the Sel column to select the file that needs
to be deleted.
3. Click
4. A prompt appears asking to confirm the deletion. Click OK to delete the selection.
Update Path button to go directly to the specified location.
Delete Selection.
Update
- OR -
1. Manually type in the location of the file or directory into this field.
2. Click Delete Selection.
3. A prompt appears asking to confirm the deletion. Click OK to delete the selection.
VNM Recorder • About the Web-based User Interface 33
Page 40

Make Directory — Use this field to add a new directory.
f
NOTE: It is recommended that a new directory is created for each recording so
that they are easier to identify and retrieve for playback.
1. Use the Content Directory to navigate to the appropriate location.
2. Enter the name of the new directory into the
3. Click Make Directory to create the new directory.
- OR -
1. Manually type in the location of where the new directory will be placed, followed
by the name of the new directory (for example, /home/matrix_rec/
Recording_Files/test).
2. Click Make Directory to create the new directory. In the example above, the name
of the new directory is called test and is located in the Rec_Files directory.
Rename Selection — Use this field to rename a file or directory.
g
NOTE: Incorrect use of the rename function will cause the VNM Recorder to
become unstable. This feature should only be used by an experienced technician.
1. Use the Content Directory to navigate to the directory of the file to be renamed.
2. Click on the appropriate radio button in the Sel column to select the file that needs
to be renamed. The filename appears in the first text field next to the
Selection
3. Using the second field, type in the desired name for the file.
4. Click Rename Selection to rename the file.
button. DO NOT rename the file using this field.
Make Directory field.
Rename
VNM Recorder • About the Web-based User Interface 34
Page 41

Player Page
This page is accessed by selecting the VNM Recorder device on the Device List page
(see page 26) and then selecting the Player icon located on the Configuration panel of the
Recorder Device page (see page 28).
1
2
4
5
3
Figure 23. Player Page
The Player page is used to play back recorded media files that are stored on the
VNM Recorder. This page also allows for the configuration and operation of multiple
player channels.
VNM Recorder • About the Web-based User Interface 35
Page 42

Selecting a recording for replay
The initial selection of a recorded stream is made by clicking on the appropriate filename
shown in the Listing Directory (also known as the Content Directory; see e in figure 23
and the About the Content Directory section on page 43 for more information). This
loads all of the content that contains the same prefix name and that was recorded at the
same time as the selection. Up to five channels, each containing different sets of elements,
can be loaded. After the content has been loaded, the user can edit the playback start and
finish times. This is only permitted within the current bounds of the recording time displayed
on channel 1 (also known as video‑player0).
NOTES:
• If any streams in a recording are not required for playback, they can be removed by
unchecking their boxes and clicking Update.
• During replay, the audio, whiteboard, and data streams are always slaved to their
respective video stream. All streams are slaved to the video stream on channel 1.
• The default transport protocols that are used during replay are unicast RTP and
unicast TCP, depending on the selection made at the corresponding decoder device.
If necessary, the multicast RTP transport protocol may also be enabled (see Multicast
Enable on page 40 of the Config Page section).
The other features of the Player page are detailed below.
Playback Controls — When a media file as well as the start and finish times have
a
been selected, playback can be controlled using the play, pause, and stop buttons
(see the icons below). During active playback, a bookmark can be created using the
bookmark button (see the icons below). Clicking on this button sets a reference point
within the stream that can be retrieved later. A new reference point is placed within the
stream each time the button is pressed and allows for multiple reference points to be
set. For more information on bookmarks, see the Using Bookmarks section on
page 54.
Stop Pause Play Bookmark
NOTE: Attempts to create a bookmark while content is not playing will be ignored.
netSlave — When multiple player systems are managed by a single controller, it is
b
possible to synchronize their start and pause operations during playback. This can be
configured by selecting a suitable netSlave. The netSlave can be set to either Local
NetMaster
z When Local NetMaster is selected, the local player is either standalone or the
master of a group (if another player in the system selects it as netSlave). Figure 23
shows what a Player page would look like with Local NetMaster selected.
z When set to the name of another player, the local player becomes a network slave.
Playback sessions start and pause synchronously, but requires separate play and
pause commands to be issued on each local master player (for example,
a playback channel waiting for a remote system to start or pause will show the
NSYN status).
auto repeat — Checking this box will result in the current file restarting immediately
c
after the file has ended. Manually stopped files do not repeat automatically.
or to the name of another player in the system.
VNM Recorder • About the Web-based User Interface 36
Page 43

channel — There are five channels that can be used for playback. Each playback
d
channel contains the following parameters.
z prefix — Displays the name of the selected file. Only the first 11 characters of the
filename are displayed.
z sid — Displays the identification number of the filename.
z date — Displays the date when the file was recorded.
z start — Displays the time when the file started recording.
z finish — Displays the time when the file stopped recording.
z video — By default, this check box is always selected for video playback. Click on
the icon to the right of the check box to go to the video Config page (see page 38).
z audio — If audio is present in the recording, select this check box to play back
the audio stream. Click on the icon to the right of the check box to go to the audio
Config page (see page 38).
z wb — If whiteboard data (user annotation) is present in the recording, select this
box to play back the whiteboard stream. Click on the icon to the right of the check
box to go to the whiteboard Config page (see page 38).
z data — If data is present in the recording, select this box to play back the data
stream. Click on the icon to the right of the check box to go to the data Config
page (see page 38).
NOTE: For more information on the Config page, see the Config Page
section on page 38.
Listing Directory — Also known as the Content Directory, this panel allows for content
e
selection and navigation between directories. This panel also shows the current file
storage location. For more information on how to use this panel, see the About the
Content Directory section on page 43.
VNM Recorder • About the Web-based User Interface 37
Page 44
Advanced Conguration
This section provides information on the web‑based interface pages used for advanced
configuration of the VNM Recorder. The advanced configuration pages associated with the
VNM Recorder are listed below.
z Config Page
z Accounts Page
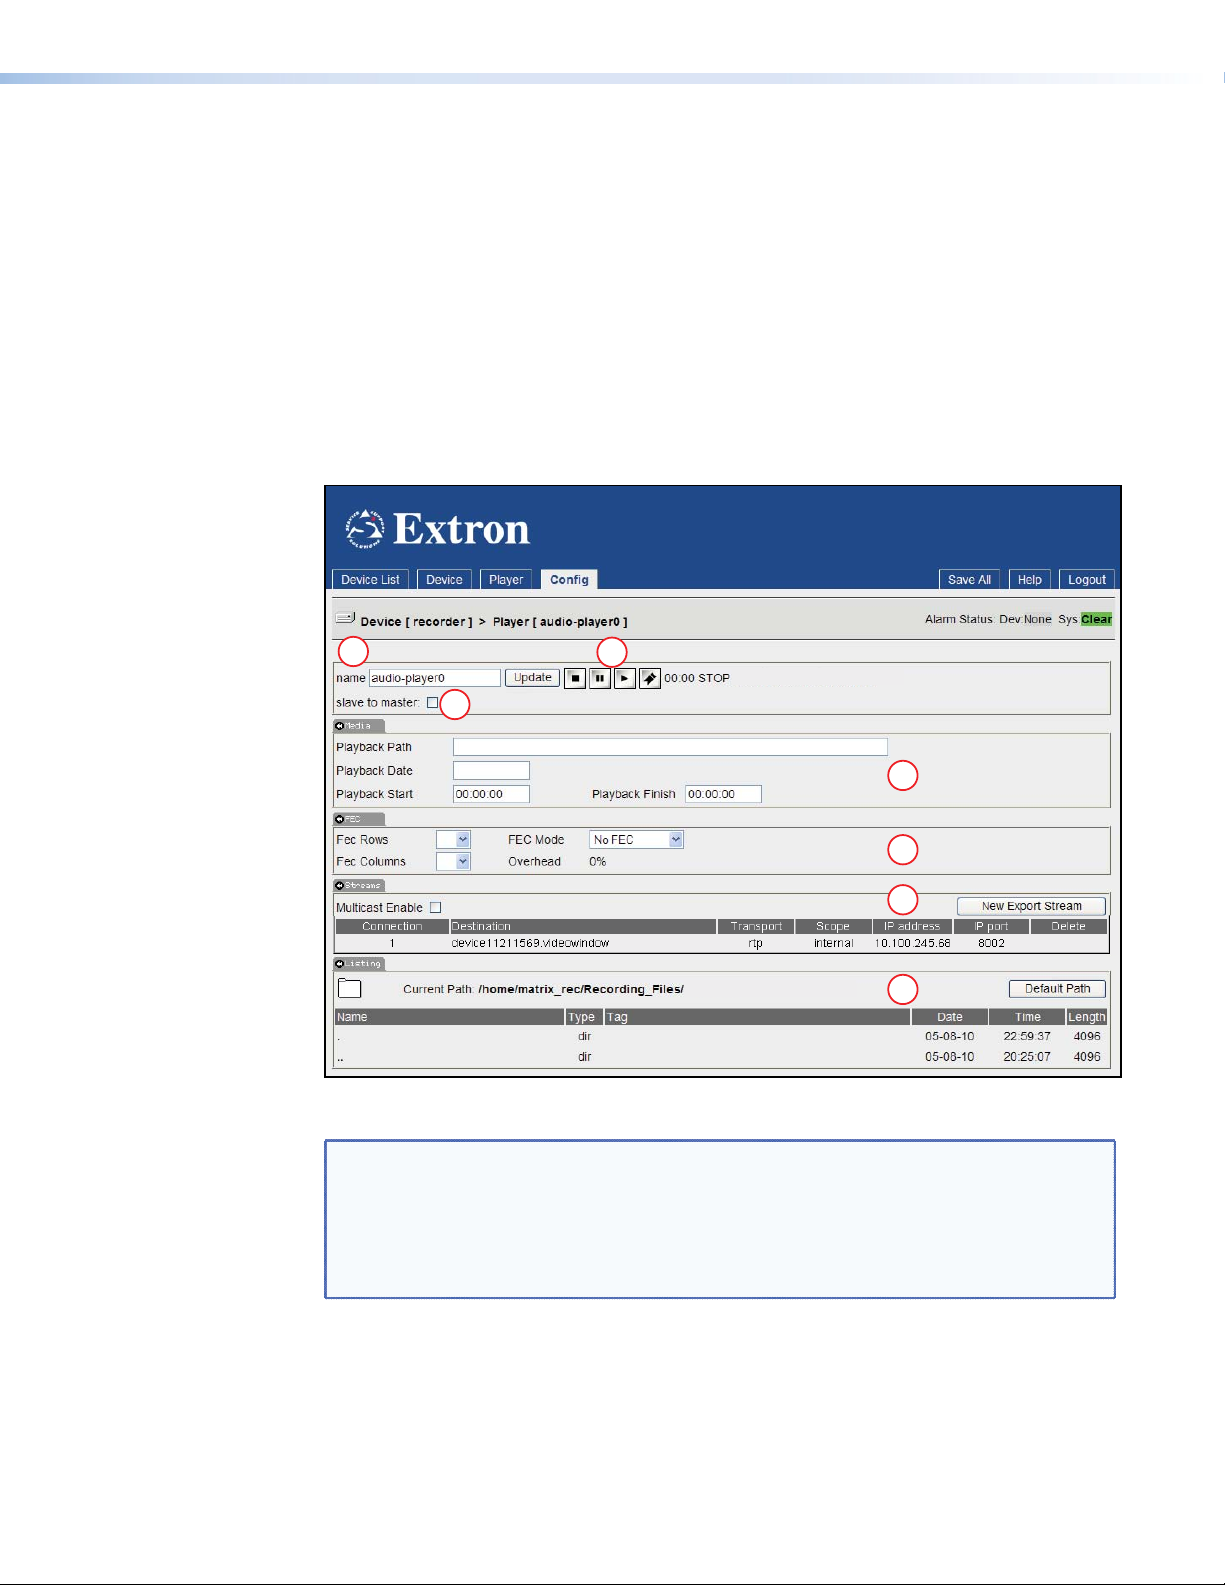
Cong Page
This page is accessed by selecting the VNM Recorder device on the Device List page
(see page 26), selecting the Player icon located on the Configuration panel of the
Recorder Device page (see page 28), and then clicking on one of the icons in the video,
audio, wb, and data columns (see channel on page 37 of the Player Page section).
1
3
2
4
5
6
7
Figure 24. Config Page
NOTES:
• The settings on this page should not be modified since most of the settings in a
recording are controlled from the Player page. The only exception to this is when
enabling multicast transport for a selected playback stream by selecting the
Multicast Enable check box.
• Transport protocols must be kept consistent between the video and audio elements.
The Config page modifies a single channel element of a VN‑Matrix stream. This page is
primarily used to monitor the current number of transport connections as well as to select
or unselect
Multicast Enable (see Streams panel on page 40) when using
RTP streaming. The other control options on this page are detailed for reference purposes.
The control options for the Config page are detailed on the next page.
VNM Recorder • About the Web-based User Interface 38
Page 45

name — The channel name can be modified by editing this field and clicking Update.
a
This name is visible during source selection on a decoder (display) as well as during file
selection on a recorder. The name should be comprised of letters, numbers and the
underscore character. Spaces can be used, but should be avoided if possible.
Playback Controls — See the Player Page section on page 35 for more information
b
on playback controls.
netSlave (not shown) — See the Player Page section on page 35 for more
.
information. This setting should not be modified on this page.
NOTE: The netSlave option is only available when video‑player0 is selected. For
all other selections, only slave to master is available.
slave to master — Checking this box causes the current player channel to synchronize
c
its playback control to its local master channel (Video channel‑0).
NOTES:
• This setting is enabled by default and should not be modified.
• The slave to master check box is available on all channels except
video-player0.
z When checked, all video channels are always synchronized to Video channel‑0. This
allows the playback controls to affect all of the playback channels simultaneously.
z When unchecked, individual playback channels can be controlled using the
playback controls.
NOTE: The audio, whiteboard, and data elements are always synchronized to
their associated video channel.
auto repeat (not shown) — See the Player Page section on page 35 for more
.
information.
NOTE: The auto repeat option is only available when video‑player0 is selected.
For all other selections, only slave to master is available.
Media panel — This panel contains the following parameters.
d
NOTE: The information contained in this panel is created from information supplied
by the Player page and should not be modified unless absolutely necessary.
z Playback Path — Type in the location of the file or directory or choose a file from
the Content Directory to automatically fill in this field.
NOTE: Typed in changes made to this field will only be implemented when
Update is clicked.
z Playback Date — This is automatically filled in when a file has been chosen from
the Content Directory or when a file location is manually entered into the Playback
Path
field.
z Playback Start — This is automatically filled in when a file has been chosen from
the Content Directory or when a file location is manually entered into the Playback
Path
field.
z Playback Finish — This is automatically filled in when a file has been chosen from
the Content Directory or when a file location is manually entered into the Playback
Path
field.
VNM Recorder • About the Web-based User Interface 39
Page 46

FEC (Forward Error Correction) panel — Currently not supported.
e
NOTES:
• The FEC panel is available on the audio configuration pages only.
• FEC is intended to be used for correcting network packet loss when using
VN‑Matrix 300 or 325 devices. This feature is currently not supported.
Streams panel — This panel contains the following parameters.
f
z Multicast Enable — Checking this box allows the user to control whether a player
channel transmits all RTP streams in multicast or unicast mode. When enabling
multicast, the user is prompted for the multicast group address. The address
should be within the range of 224.xxx.xxx.xxx to 239.xxx.xxx.xxx. There is no
maximum stream limit when using multicast mode.
When in unicast mode, only four RTP streams are supported. When more streams
than supported are provisioned, those streams which are not active are listed with
an (x) suffix.
NOTE: When modifying this check box for the video and audio elements of
a single channel recording, ensure that both check boxes are configured
similarly (both check boxes selected or both unselected).
z New Export Stream — Clicking this button provides a mechanism to export
streams to another controller domain. For more information, please contact
the Extron S3 Sales and Technical Support Hotline and ask for an Applications
Engineer.
NOTE: Export stream provisioning requires detailed knowledge of network
configuration. Contact Extron for details if export streams are required.
z Connection details — In the lower section of the Streams panel, each export
stream connection is listed with its destination, transport protocol, scope (local or
external stream), and IP information of the destination. Export streams can also be
g
deleted by clicking on the red cross.
Listing Directory — Also known as the Content Directory (see the About the
Content Directory section on page 43).
NOTE: The information contained in this panel is created from information supplied
by the Player and Navigation pages. DO NOT use the Config page to modify this
information.
VNM Recorder • About the Web-based User Interface 40
Page 47

Accounts Page
Access this page by selecting the Accounts tab on the Device List page (see page 26).
1
3
Figure 25. Accounts Page
The Accounts page is primarily used to change the password that is used for logging into
the designated controller device of the VN‑Matrix system. This page is also used to manage
the license that is assigned to the controller device and adjust the internal clock.
2
4
Changing User Login Passwords
There are two accounts that can be used for logging into the controller device.
Administrator — Allows full read and write access to all configuration options. The
a
default password for this account is admin (which is the same as the username).
Public — Allows read only access to configuration options. The default password for
b
this account is public (which is the same as the username).
NOTES:
• Passwords can only be modified when the user is logged in with the
Administrator account. If the user is logged in with the Public account,
password modification fields will be disabled.
• The username and password entries are case sensitive.
• The username entries cannot be changed.
• The Recorder GUI account is not required for normal operation. For information
on this account, call the Extron S3 Sales and Technical Support Hotline and ask for
an Applications Engineer.
Use the following procedure to change the password for either account.
1. Enter the current password in the
2. Enter the desired password in the New Password field. The password should consist of
letters, numbers, and the underscore character. Password entries are case sensitive.
3. Re‑enter the password in the Confirm field.
4. Save the new password by clicking Update Passwords.
NOTE: Account passwords can be changed simultaneously, if desired. Repeat
steps 1 through 3 above for each account that requires a different password.
Click on Update Passwords to update passwords simultaneously.
VNM Recorder • About the Web-based User Interface 41
Current Password field.
Page 48

Clock Management
c
The Current Time field displays the date and time the user interface page was served.
Use the New Time field to update the date and time. Use the following guidelines and
refer to figure 25 on the previous page when updating the date and time.
z The entry should be input in an identical format shown in the Current Time field:
year‑month‑date hours‑minutes‑seconds.
z The year should include the century (for example, 2012).
z The month is represented by a two digit number from 01 through 12.
z The date is represented by a two digit number from 01 through 31.
z Hours are represented by a 24 hour clock using two digit numbers from
00 through 23.
Click on Change Time to save the date and time entered in the New Time field.
Controller Licensing
d
CAUTION: DO NOT place information for a device license into this area. Doing
this may cause the VNM Recorder to stop responding. This area is used for
controller licenses only. See Licensed Features panel on page 29 of the
Recorder Device Page section for information about device licenses.
In addition to each device containing a device license, the VN-Matrix system also
includes a controller license. The controller license manages the number of
connections that can be made simultaneously when using the VNM Software Decoder
(part number 29-098-01).
To obtain a new controller license, follow the procedure below:
1. Contact the Extron S3 Sales and Technical Support Hotline and provide the following
information.
z The serial number of the VN‑Matrix device configured as the system
controller. This can be obtained from the back of the device.
z The order number of the VN‑Matrix device.
2. The Extron S3 Sales and Technical Support Hotline provides an options key and a
checksum.
z Enter the options key into the Options field.
z Enter the checksum into the Checksum field.
3. Click Change License to save the new license.
VN-Matrix Encoder and Decoder Conguration
The user interface pages discussed in this guide are associated with the VNM Recorder. The
VN‑Matrix encoders and decoders may need to be configured using the other pages of the
web‑based user interface for the system to operate properly. For more information on how
to configure the encoders and decoders, see the VN-Matrix 200 Series User Guide,
VN-Matrix 225 Series User Guide, VN-Matrix 300 User Guide, and the VN-Matrix 325
User Guide.
VNM Recorder • About the Web-based User Interface 42
Page 49

About the Content Directory
This section discusses how to use the Content Directory for organizing and locating
files. The following sections give an overview of how it is used and details some of the
functionality of the Content Directory.
This section provides information on:
z Overview
z Content Directory Basics
z Setting a Stream Storage Location
z Creating a Directory
z Understanding Saved Recordings With Multiple Elements
z Renaming a Stream or Directory
z Deleting a Stream or Directory
Overview
The Content Directory allows for content selection and navigation between directories. This
directory can also be used to see how the file structure of a recording system is set up.
NOTE: The Content Directory is shared between the Player page (see page 35),
Navigate page (see page 32), and Config page (see page 38). The Content
Directory may display incorrect information if the directories and files within these
pages are changed at the same time using different browser windows.
VNM Recorder • About the Content Directory 43
Page 50

Figure 26. Navigate Page — Content Directory
Figure 26 shows the Navigate page with a list of recorded files and contains the following
settings:
z The Group Recordings check box is selected (by default).
z The default storage path is initially set to /home/matrix_rec/Recording_Files. This is the
Content Directory Basics
A single directory or filename can be selected by clicking on the radio button to the left of
the directory or filename. Selecting directories or filenames using this method also fills in the
Delete Selection and Rename Selection fields and is a useful alternative to the user
having to manually type in the location of a directory or file.
To move around within the directory, use the following navigation controls.
z Click on a folder name to see the files within the folder.
z Click Default Path to return to the root directory.
z Click the . link to display the root directory.
z Click the .. link to move up to the parent directory.
z Click the folder icon to refresh the listing.
path where all recordings should be stored. To change the storage path, see Update
Path on page 33 of the Navigate Page section.
VNM Recorder • About the Content Directory 44
Page 51

Switching between directories may take some time and the folder icon changes to a loading
icon while waiting. After the directory has loaded, the Update Path field is updated with
the current location. If the directory is not made available after ten seconds, an alert icon is
displayed (see the icons below).
Folder Icon
Loading Icon
Alert Icon
NOTE: When a directory is not found or unable to be displayed, try refreshing the page
using the Navigate tab. Alternatively, click Default Path which resets the Content
Directory listing.
Bookmarks can also be viewed using the Content Directory. For more information on
bookmarks, see the Using Bookmarks section on page 54.
Setting a Stream Storage Location
See Update Path on page 33 of the Navigate Page section for information.
Creating a Directory
See Make Directory on page 34 of the Navigate Page section for information.
VNM Recorder • About the Content Directory 45
Page 52

Understanding Saved Recordings With Multiple Elements
Figure 27. Navigate Page — Multiple Element Recording
When a recording contains multiple elements (such as video, audio, data, and whiteboard),
the stream is saved as multiple directories containing multiple files.
Figure 27 shows an example of a stream that has been saved using multi‑channel
recording, viewed on the Navigate page of the web‑based user interface. Information to
note from figure 27 includes:
z The Tag column displays the text that was entered in the description column on the
Recorder page (see page 30).
z The Date, Time, and Length columns all show the same value, indicating that these
files are part of a single recording.
z The same encoder was used as a source for all five channels.
z The files are organized by channel and are listed in order from 1 to 5.
z The files for each channel are listed with the video content listed first, followed by the
audio content.
The file naming table on the next page explains how filenames are created by the
VNM Recorder software. This table can also be used to determine what element is
contained within the file.
VNM Recorder • About the Content Directory 46
Page 53

File Naming Table
Channel Number Filename Section Description
This is the text that was entered by
CH1_M_UXGA_Audio_M
the user in the filename column on
the Recorder page (see page 30).
This is entered automatically by the
VNM Recorder software.
620032.0.0_r0_s0
1
CH1_M_UXGA_Audio_M
z 620032 = The serial number of the
encoder unit
z 0.0_r0_s0 = This stream contains
video for channel 1
This is the text that was entered by
the user in the filename column on
the Recorder page (see page 30).
This is entered automatically by the
VNM Recorder software.
620032.A0.0_r1_s0
z 620032 = The serial number of the
encoder unit
z A0.0_r1_s0 = This stream contains
audio for channel 1
This is the text that was entered by
CH2_M_UXGA_Audio_M
the user in the filename column on
the Recorder page (see page 30).
This is entered automatically by the
VNM Recorder software.
620032.0.0_r6_s0
2
CH2_M_UXGA_Audio_M
z 620032 = The serial number of the
encoder unit
z 0.0_r6_s0 = This stream contains
video for channel 2
This is the text that was entered by
the user in the filename column on
the Recorder page (see page 30).
This is entered automatically by the
VNM Recorder software.
620032.A0.0_r7_s0
z 620032 = The serial number of the
encoder unit
z A0.0_r7_s0 = This stream contains
audio for channel 2
NOTE: This table only uses the first two channels to illustrate how filenames are
created by the VNM Recorder software.
Renaming a Stream or Directory
See Rename Selection on page 34 of the Navigate Page section for information.
Deleting a Stream or Directory
See Delete Selection on page 33 of the Navigate Page section for information.
VNM Recorder • About the Content Directory 47
Page 54

Recording and Playing Streams
NOTE: It is recommended that all devices within the VN‑Matrix network contain the
same version of firmware to avoid communication and compatibility issues. Check
that each device contains the same version of firmware by using the Device page
of the web‑based user interface. To update the VNM Recorder firmware, see the
Firmware Updates section on page 63.
This section provides information on:
z Initial Setup and Configuration
z Recording a Stream
z Playing a Recorded Stream
z Using Bookmarks
If necessary, refer to the information in the Web-based User Interface Control Options
section on page 25 while following the various procedures below.
Initial Setup and Conguration
This section talks about how to set up each VN‑Matrix as a decoder or encoder.
NOTE: All connections (streams) must be removed from the VN‑Matrix system before a
codec can be assigned as an encoder or a decoder.
Setting up a VN-Matrix Codec as a Decoder
1. From the Device List page (see page 26), click on a VN‑Matrix codec device. The
Device page appears.
2. Click create display (if necessary, click change device type first).
3. Click the display0 icon.
The Display page appears.
VNM Recorder • Recording and Playing Streams 48
Page 55

4. In the Source drop‑down menu, choose the appropriate source. This can be a
playback channel source streaming from the VNM Recorder device or a source
streaming from a VN‑Matrix encoder.
NOTE: The playback channels are identified by the recorder device name using the
names video-player0 to video-player4. For a single channel record or playback
system, always choose video-player0.
5. Click
6. Click the Save All tab.
Update.
The codec is now configured as a basic decoder. For information on advanced decoder
setup, see the VN-Matrix 200, 225, 300, or 325 user guides.
Setting up a VN-Matrix Codec as an Encoder
1. From the Device List page (see page 26), click on a VN‑Matrix codec device. The
Device page appears.
2. Click create source (if necessary, click change device type first).
3. Click the Save All tab.
The codec is now configured as a basic encoder with an auto-detect source input mode.
For information on advanced encoder setup, see the VN-Matrix 200, 225, 300, or 325
user guides.
VNM Recorder • Recording and Playing Streams 49
Page 56

Switching a Codec between Encoder and Decoder
1. From the Device List page (see page 26), click on a VN‑Matrix codec device. The
Device page appears.
2. Click change device type.
NOTE: All connections (streams) must be removed from the codec before it can be
3. Click create source to load the encoder configuration, or create display to load
the decoder configuration.
4. Click the Save All tab.
Recording a Stream
When a recording is created, each element that is present within a stream is stored as an
individual file under the same directory. A recording that contains a single element (such
as video) will only require a single file. When a recording contains multiple elements (such
as video, audio, data, and whiteboard), the stream will be saved as multiple files. See the
Understanding Saved Recordings With Multiple Elements section on page 46 for
more information.
assigned as an encoder or a decoder.
Recording Preparation
To prepare a stream for recording, follow the procedure below.
NOTES:
• Before recording, it is recommended to set the stream storage location. See Update
Path on page 33 of the Navigate Page section for information.
• It is recommended that a new directory is created for each recording so that
associated files are easier to locate. See Make Directory on page 34 of the Navigate
Page section for information.
1. Ensure that the VN‑Matrix codec is configured as an encoder (see the Setting up a
VN-Matrix Codec as an Encoder section on page 49).
2. From the Device List page (see page 26), click on the VNM Recorder device.
The Recorder Device page (see page 28) appears.
3. From the Recorder Device page (see page 28), click the Recorder icon.
The Recorder page (see page 30) appears.
VNM Recorder • Recording and Playing Streams 50
Page 57

4. Using the source drop‑down menus, choose the VN‑Matrix encoder devices that will
be recorded from.
NOTE: Channel 1 must always be used when recording. For a single channel
5. Enter a filename for the stream and an optional description.
6. To record an associated audio stream, check the audio box. The ability to record
associated whiteboard or data streams can also be checked if these elements are
available on the source.
NOTES:
• The timing relationship of the elements contained within the stream is maintained
• The information from each recorded element is placed into its own folder within
Initialize Recording
To start recording, select the record check box and click Update.
record/playback system, use channel 1 only.
by the recorder.
the chosen directory. If necessary, those folders can be opened and the individual
files of each recorded element can be viewed.
NOTE: Recording does not actually start until Update is clicked. While recording is in
progress, the time and MB (file size) values steadily increase.
Stop Recording
To stop recording, clear the record check box and click Update.
NOTE: Recording does not actually stop until Update is clicked.
VNM Recorder • Recording and Playing Streams 51
Page 58
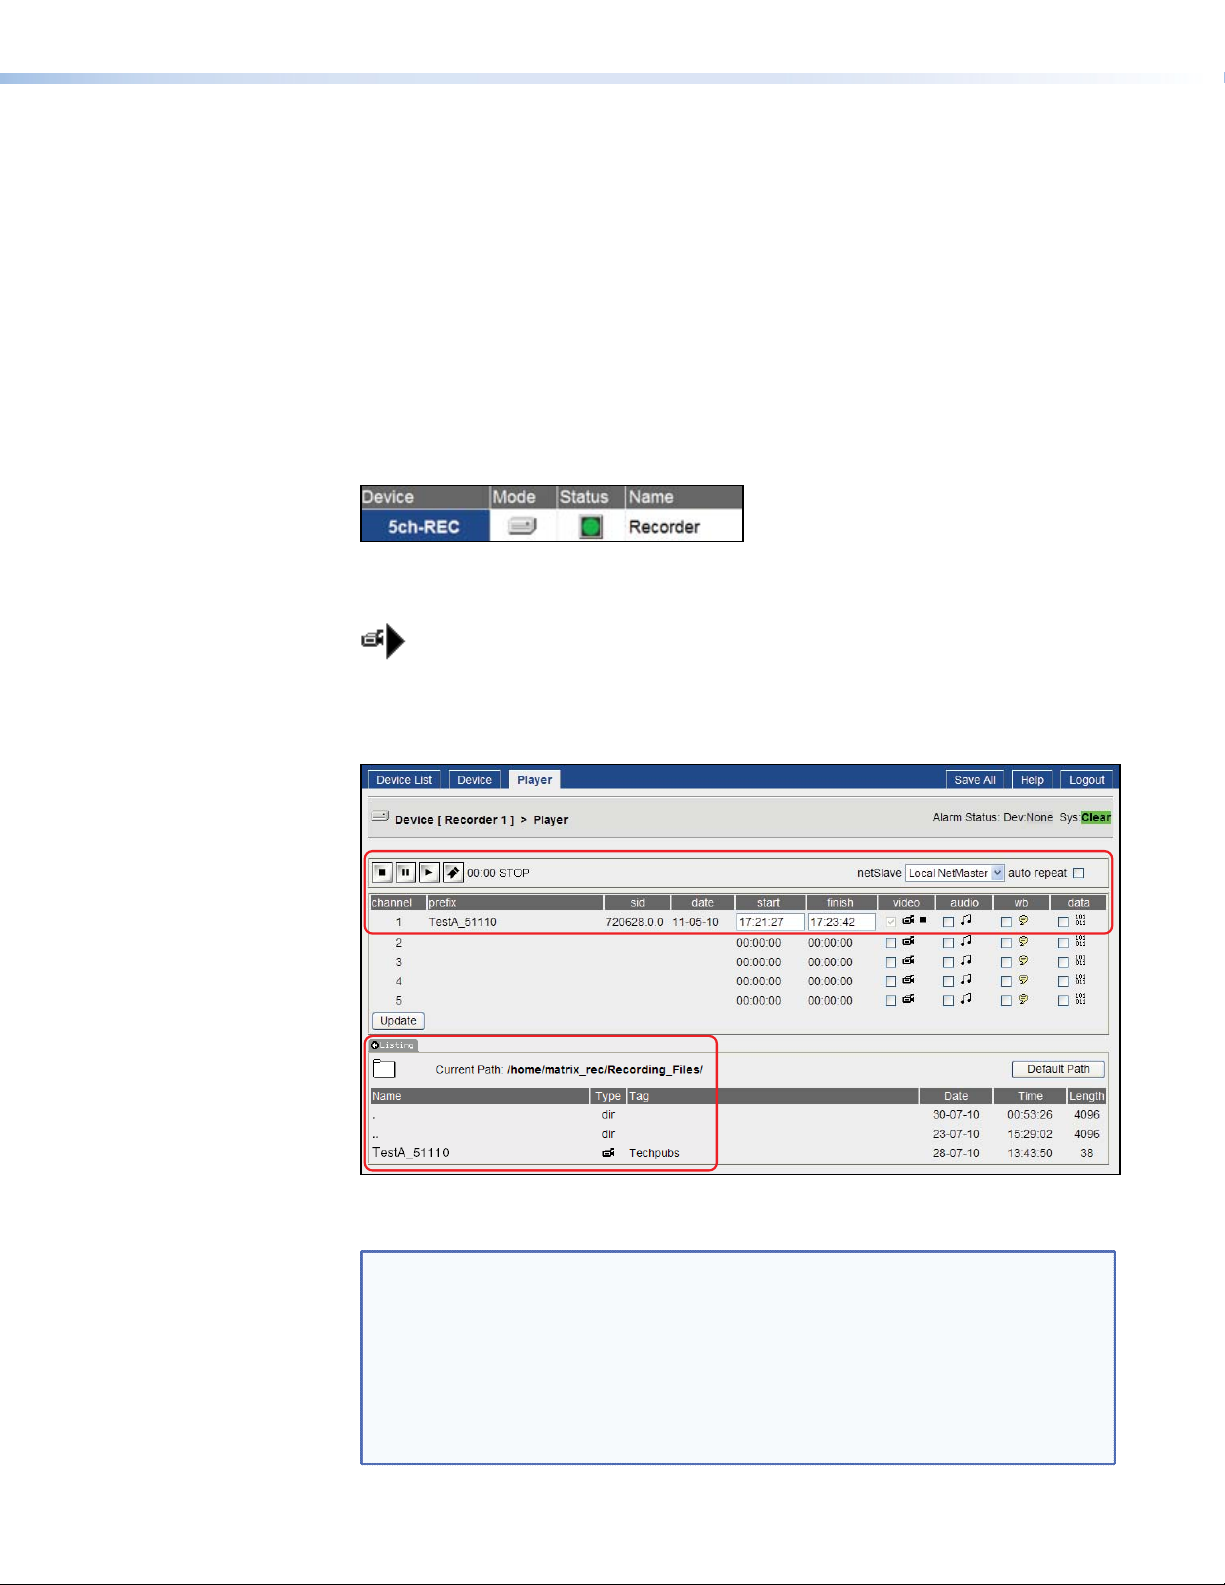
Playing a Recorded Stream
All elements of a recording are loaded when a recorded file is selected for replay at a later
time and cannot be separated from the recording. The video element is always replayed.
The optional elements may be enabled or disabled for replay, provided they are present in
the original recording.
Playback Preparation
To prepare a stream for playback, follow the procedure below.
1. Ensure that the VN‑Matrix codec is configured as a decoder with a VNM Recorder
channel set as the Source device (see the Setting up a VN-Matrix Codec as a
Decoder section on page 48).
2. From the Device List page (see page 26), click on the VNM Recorder device.
The Recorder Device page (see page 28) appears.
3. From the Recorder Device page (see page 28), click the Player icon.
The Player page (see page 35) appears.
4. In the Listing Directory, click on the media stream that will be played back. The stream
appears on channel 1.
See the About the Content Directory section on page 43 for more information on
how to navigate within the directory.
NOTES:
• If the listing section is empty, click the folder icon to refresh the list. Also be sure
to check that the listing section is not minimized by clicking on the Listing tab.
• The Listing Directory shows the contents of the location indicated by the Current
Path
field. This will be the last location visited on the Player page (page 35),
Navigate page (page 32), or Config page (page 38).
• The Current Path field defaults to the folder that is saved as the default storage
location (see the Setting a Stream Storage Location section on page 45).
VNM Recorder • Recording and Playing Streams 52
Page 59

Initialize Playback
z From the Player page (see page 35), play a media stream by clicking Play.
Pause Playback
z To pause a stream, click Pause.
z To resume playback, click Play. Playback will continue from the point where it was
paused.
Stop Playback
z To stop a stream, click Stop.
NOTE: Clicking Play following a Stop operation will initiate playback from the start
When playback is paused or stopped, the VN‑Matrix decoder will behave as if the source
data stream has stopped. If the
display will show the "No Source Datastream" message until playback resumes.
Disabling the NoData Splash feature will instead display the last frame of video received.
This has the effect of simulating a true pause of the playback.
of the media stream.
NoData Splash feature is enabled on the decoder, the
NOTE: For more information on the NoData Splash feature, see the
VN‑Matrix 200 / 225 / 300 / 325 user guides.
Start and Finish Times
When a stream is selected for playback, the start and finish times are populated with the
original start and finish times of the recording.
If required, it is possible to play back only a part of the original stream by entering different
start and finish times.
z Change the start and finish times as required and click Update.
z To recall the original times, reopen the file.
Auto Repeat
z By default, a stream will play through once from start to finish.
z By selecting the auto repeat check box, the stream will loop continuously.
VNM Recorder • Recording and Playing Streams 53
Page 60

Using Bookmarks
Bookmarks are used to set and quickly retrieve reference points within a stream. When
a bookmark is created, it is stored in the Content Directory. Bookmarks are created by
pressing the Bookmark button while recording a stream using the Recorder page (see page
30) or while playing back a previously recorded stream using the Player page (see page 35).
NOTES:
• Bookmarks are only visible in the same directory as their content material.
• Bookmarks cannot be renamed.
• Bookmarked streams are found on the Player page (see page 35) and the Navigate
File Structure
When a bookmark is created, the file consists of the name of the recorded content prefixed
by "BMn‑" and a bookmark icon is displayed under the file type.
NOTE: A bookmark is always represented as a single file while viewing the Content
Playback of Bookmarked Streams
Use the following procedure to play back a bookmarked stream.
1. From the Player page (see page 35), use the Content Directory to select a bookmark.
2. Press the Play button to play back the bookmarked stream.
page (see page 32).
Directory. This is also relevant to bookmarked files that were created using multiple
recording or playback channels.
This loads the recording and any additional channels that were used to create the
bookmark.
NOTE: If a bookmark is selected while a file is playing, it will not be activated until the
original file is stopped by pressing the Stop button, then pressing the Play button.
Deleting Bookmarks
See Delete Selection on page 33 of the Navigate Page section for information.
VNM Recorder • Recording and Playing Streams 54
Page 61

About Alarms
NOTE: Simple Network Management Protocol (SNMP) is not compatible with the
VNM Recorder and not covered in this user guide. For information on using SNMP,
see the VN-Matrix 200 Series User Guide, VN-Matrix 225 Series User Guide, VN-
Matrix 300 User Guide, and the VN-Matrix 325 User Guide.
This section provides information on:
z Overview
z Alarms Page
z Alarm Logs Page
z Alarm Reference Tables
Overview
The VN‑Matrix system is configured to generate alarms for error conditions. A list of these
error conditions and their meanings are presented on the following pages.
Alarms can be monitored using the web interface at the following locations.
z On the Alarms page in the list that is immediately below the Filter Settings box. This
details the alarm conditions that are currently active on the system.
z On the Alarm Logs page in the list that is immediately below the Filter Settings box. This
provides a historical log of when an alarm condition was raised and cleared.
z On the Device List page where a traffic light system represents the status of connected
devices.
z On the top right hand corner of each page in the web interface where the device status
and system status is displayed.
Alarm conditions, when triggered, remain active for the entire duration of the error condition
and for an additional five seconds after the error has cleared.
VNM Recorder • About Alarms 5555
Page 62

Alarms Page
This page is accessed by selecting the Alarms tab on the Device List page (see page 26).
Figure 28. Alarms Page
The Alarms page enables a user to define and monitor system alarms.
Filter Settings
Figure 29. Filter Settings Panel
The Filter Settings panel allows the default settings for each alarm type to be modified.
z Alarm Type — Select the particular alarm that is to have its default setting changed.
See the Alarm Type section on page 57 for more information.
z Alarm Source — Select the device where the alarm is to change. Alarm filters may be
set for either a single, specific unit or for all VN‑Matrix 200, 225, 300, or 325 devices in
the system.
z Alarm Severity — Set the alarm severity. Each alarm condition has a default severity
which may be overwritten using the filter controls. The default setting is shown in this
drop‑down menu. See the Alarm Severity section on page 57 for more information.
z Alarm Reporting — Set the alarm to be either "reporting" or "not reporting". Each
alarm condition has a default reporting setting. The default setting is shown in this
drop‑down menu.
VNM Recorder • About Alarms 56
Page 63

Alarm Type
This drop‑down menu lists the available alarm error conditions for all units. Alarm error
conditions are divided into two categories:
z Alarm errors that occur on an encoder
z Alarm errors that occur on a decoder
In addition, there is one alarm error that only occurs on the device that is configured as the
system controller.
See the Alarm Reference Tables section on page 60 for more information.
Alarm Severity
Alarms may be set to one of three severities.
Alarm Severity Description
Critical A red colored traffic light indicator for the device (see Alarm Status
Warning When triggered, a warning alarm will result. An amber colored traffic
None A setting of
Icons on page 27 of the Device List Page section) will be displayed.
light indicator for the device (see Alarm Status Icons on page 27 of
the Device List Page section) will be displayed.
Default (None) effectively filters the alarm condition.
The alarm still appears in the alarms list, but it will not affect any
colored indicators.
Applying Alarm Filter Settings
Apply the alarm filter settings by clicking Apply Filter Change.
NOTE: Changes will be lost after the VN‑Matrix system is powered down unless the
Save All tab is clicked to make changes permanent.
VNM Recorder • About Alarms 57
Page 64

Alarm List
The alarm list provides information on all alarm events that are currently active. The alarm list
is refreshed each time the Alarms tab is selected and is located at the bottom of the Alarms
page.
Alarm events that are listed may be sorted by Type, Raise Time, and Severity. To change
the order of the alarm list, left‑click the desired heading (see figure 30). The list is refreshed
each time the sorting criteria is applied.
Figure 30. Alarms Page — Alarm List Sorting
VNM Recorder • About Alarms 58
Page 65
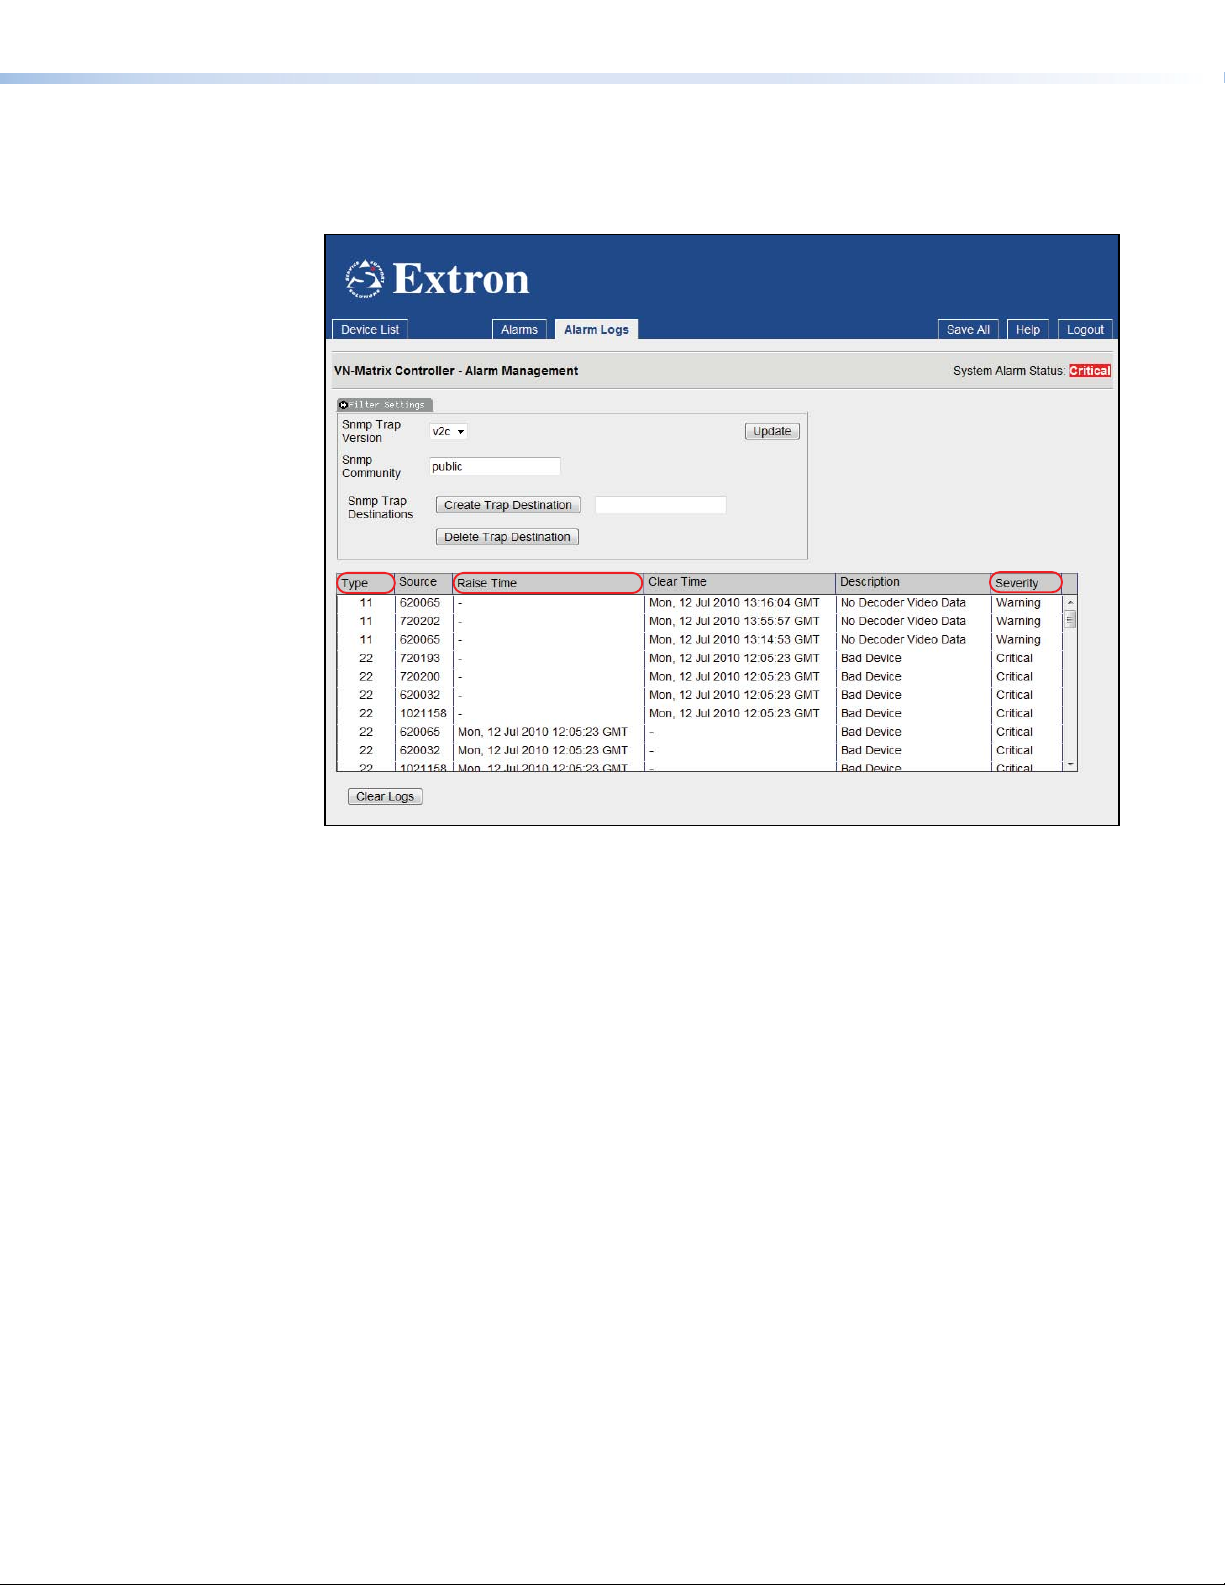
Alarm Logs Page
This page is accessed by selecting the Alarms tab on the Device List page (see page 26)
and then selecting the Alarm Logs tab.
Figure 31. Alarm Logs Page
The Alarm Logs page provides data on when an alarm condition was raised and cleared.
The log holds a historical record of the last 200 alarm events. When more than 200 events
occur, the oldest event is deleted from the log.
Alarm events that are listed may be sorted by Type, Raise Time, and Severity. To change
the order of the alarm list, left‑click the desired heading (see figure 31). The list is refreshed
each time the sorting criteria is applied.
VNM Recorder • About Alarms 59
Page 66

Alarm Reference Tables
Alarm Type Description — Encoder
Alarm Type Description Action Default Settings
No source No source present at the input. Check input connections; is
Bad source syncs Source is present, but
No SDI source
lock
Unsupported SDI
mode
Unsupported
mode
Bad source Critical, reporting
Analog phasing
error
Hardware
encoding error
Unsupported
audio source
Data rate overload The compressed data rate is too
Network overload The network is dropping too
unrecognized due to bad sync
measurement.
Source is present, unable to lock.
Applicable to the
VN‑Matrix 300 / 325,
ignore for VN‑Matrix 200 / 225.
Source is present, mode not
supported.
Applicable to the
VN‑Matrix 300 / 325,
ignore for VN‑Matrix 200 / 225.
Source is present, mode not
supported.
The hardware is unable to encode
the input signal.
high.
many packets.
there an output on the loop
through connector?
Increase the compression or
reduce the required bit rate.
Critical, reporting
Critical, reporting
Critical, reporting
Critical, reporting
Critical, reporting
Warning, reporting
Critical, reporting
Critical, reporting
Critical, reporting
Warning, reporting
VNM Recorder • About Alarms 60
Page 67

Alarm Type Description — Decoder
Alarm Type Description Action Default Settings
No decoder video
data
No decoder mode No matching decoder mode for
No source report Unable to detect the format of
Recovered audio Warning, reporting
No decoder audio
data
Bad audio at decoder Warning, reporting
Bad audio PLL Warning, reporting
Video network
packets dropped
Decoder buffer
overflow
Decoder buffer
underflow
Bad video PLL The decoder cannot synchronize
No decoder ANC data The decoder is not receiving any
Missing ANC at
decoder
Recovered ANC Error correction has recovered
No genlock source
present
No genlock source
lock
Genlock source
mismatch
Indicates that there is a valid
connection, no video data
present. Usually accompanied by
"no source data stream" message
in the web interface.
the incoming stream.
the received data stream.
Excessive network packet loss has
occurred.
The incoming data rate is high;
reduce the pipeline delay.
The incoming data rate is too low;
increase the pipeline delay.
to the video data.
embedded audio (ancillary) data.
The Decoder is receiving poor
quality ANC data.
corrupted / missing ANC.
Indicates that genlock is enabled,
but that there is no genlock
source connected.
Indicates that a signal is present
on the genlock connector, but it is
not within the expected range.
Indicates that the timing of the
genlock signal does not match the
format of the decoded source.
Connect a valid genlock
signal.
Check the format of the
genlock signal.
Connect a valid genlock
signal.
Warning, reporting
Warning, reporting
Warning, reporting
Warning, reporting
Warning, reporting
Warning, reporting
Warning, reporting
Warning, reporting
Warning, reporting
Warning, reporting
Warning, reporting
Warning, reporting
Warning, reporting
Warning, reporting
Alarm Type Description — System Controller
Alarm Type Description Action Default Settings
Bad device The controller is unable to contact
the specified device. The device is
not available or has failed.
Note that this alarm is only
generated on the controller.
Check the device in question.
Is power applied?
Is the network cable or
network connection present?
Has the unit been removed?
VNM Recorder • About Alarms 61
Critical, reporting
Page 68

Reference
Information
Included Parts
Description Part Number
VNM Recorder 60‑1121‑01
(4) feet (not attached)
(2) rail kits with mounting brackets
Setup Guide — VNM Recorder
VNM Recorder • Reference Information 62
Page 69

Firmware Updates
NOTE: The Update page on the web‑based user interface is unable to update the
firmware of the VNM Recorder directly. Use the procedure detailed in this section to
update the firmware.
This section provides information on:
z Preparing the Firmware
z Gathering Firmware Installation Information
z Installing the Firmware
Preparing the Firmware
Use the following procedure to prepare the firmware for installation.
NOTE: For device connection information, see Front Panel Features on page 8 and
Rear Panel Features on page 10.
1. Connect a mouse, a keyboard, and a computer monitor to the VNM recorder.
2. Plug a standard IEC power cord into the rear panel of the VNM Recorder and connect it
to a power source.
3. Login into the VNM Recorder using the Red Hat Enterprise Linux login page. Use the
following login information.
z Guest username — matrix_rec
z Guest password — matrix
4. Call the Extron S3 Sales and Technical Support Hotline and ask for an Applications
Engineer to supply an updated firmware package file.
NOTES:
• The Applications Engineer will provide a download link to the firmware package
file.
• The firmware package file contains tar.gz at the end of the filename.
• The firmware package file contains the version number of the file in the filename
(for example, VNRecorder_ver3.10.9.tar.gz).
5. Using a PC connected to the Internet, navigate to the provided download link and save
the firmware package file to a USB drive.
6. Plug the USB drive into one of the USB ports on the VNM Recorder.
7. From the desktop of the VNM Recorder, double‑click on
home > matrix_rec
8. Copy the firmware package file from the USB drive to the above location.
.
Computer > Filesystem >
VNM Recorder • Firmware Updates 6363
Page 70

9. From the matrix_rec window, right‑click on the firmware package file and select the
Extract Here option.
NOTE: The firmware files are extracted to a subdirectory that is automatically
named according to the package file, e.g. VNRecorder_verx.xx.x (where x
represents the version number). The directory path can be changed by renaming
the folder after extraction has been completed (optional).
Gathering Firmware Installation Information
It is important to gather the current manufacturing and license details before installing new
firmware onto the VNM Recorder. The config.xml and the admin.xml files are used for
reference when installing firmware. To access these files, use the following procedure.
1. From the VNM Recorder desktop, double‑click on Computer > Filesystem >
home > matrix_rec
2. Double‑click on the folder that contains that latest release of the recorder software
(at the time this guide was released, the latest software would be stored in the 3.10.9
folder or in a folder with a similar name).
3. Right‑click on the config.xml file and select the Open with "Emacs Text Editor"
option. A text window appears containing information needed to complete the firmware
installation. This text window should be kept open or printed out for reference.
4. Repeat steps 1 through 3 for the admin.xml file.
.
VNM Recorder • Firmware Updates 64
Page 71

Figure 32 shows example config.xml and admin.xml files. The text in bold and underlined
represents important information that will be needed during firmware installation.
Installing the Firmware
Figure 32. Config.xml and Admin.xml Text Files
Use the following procedure to install the firmware onto the VNM Recorder.
1. From the menu bar of the VNM Recorder desktop, select Applications >
Accessories > Terminal
.
2. Change to super user mode by typing in the following command and pressing the
<Enter> key.
z su
3. When prompted for a password, type in the following and press the <Enter> key.
z Extron2010
4. Change the directory of the terminal window by typing in the cd command followed by
the location of the extracted firmware (see the Preparing the Firmware section on
page 63). Then press the <Enter> key.
z For example: cd /home/matrix_rec/3.10.9
NOTE: This folder name is only an example to illustrate how to write the
command line. After typing in the cd command, you must enter the correct
folder location for your extracted firmware (see Preparing the Firmware -
Step9 on page 64).
VNM Recorder • Firmware Updates 65
Page 72

User name to run
application:
Serial number:
Licensed Recorder
channels:
Recorder GUI enabled
(yes/no):
License checksum:
Controller IP
address:
Controller port
number:
Local IP address:
Controller options:
Controller checksum:
Control port:
5. Run the installation program by typing in the following command and pressing the
<Enter> key.
./vnrecorder_install
6. A series of prompts will start to request configuration information. Use the
config.xml and the admin.xml files (see the Gathering Firmware Installation
Information section on page 64) while using the Firmware Installation Table below
to fill in the requested configuration information.
NOTES:
• The Controller options and Controller checksum prompts require an options
key and a checksum which is provided by Extron.
• If keys have been previously provided by Extron, they can be found within the
admin.xml file. See "Controller options:" and "Controller checksum:" in the
Firmware Installation Table below.
Firmware Installation Table
Prompt Value to Enter Xml File
Reference
matrix_rec none none
z
Serial number of the VNM Recorder config.xml serial
z
Check the R value (for example,
z
config.xml structure
R5, P5, mR, mP, mV determines that 5 is the
necessary value).
z 5 is the default value.
Check the mV value (for example,
z
config.xml structure
R5, P5, mR, mP, mV).
z If mV is present, answer Ye s . Otherwise, answer No.
Checksum of the VNM Recorder
z
z Copy and paste the value
The IP address of the device acting as the system
z
config.xml
config.xml
controller
The controller port number
z
z The default value is 5432
The IP address of the VNM Recorder config.xml
z
This is the options key provided by Extron for use in
z
config.xml
admin.xml
VNM Recorders acting as the system controller.
z If no data is provided or available, leave blank or
contact the Extron S3 Sales and Technical Support
Hotline and ask for a structure key.
This is the checksum provided by Extron for use in
z
admin.xml
VNM Recorders acting as the system controller.
z If no data is provided or available, leave blank or
contact the Extron S3 Sales and Technical Support
Hotline and ask for a license key.
The controller port number
z
z The default value is 5432
config.xml
Value
Reference
checksum
st_controlIP
st_controlPort
st_localIP0
options
checksum
st_controlPort
VNM Recorder • Firmware Updates 66
Page 73

7. The firmware installation is complete when the command prompt is displayed in the
terminal window. Manually close the terminal window.
NOTE: The recording application is a service, which means that no application
window will open after the installation has completed.
8. To finalize the firmware installation, reboot the VNM Recorder by powering down and
powering up the unit. See the VNM Recorder Power Down Procedure section on
page 15 and the VNM Recorder Power Up Procedure section on page 13 for more
information.
9. When the VNM Recorder has powered back on, it is necessary to set the folder location
where the recordings are stored. See Update Path on page 33 and Make Directory
on page 34 of the Navigate Page section for details.
VNM Recorder • Firmware Updates 67
Page 74

Browser
Conguration
This section provides information on configuring the following web browsers:
z Microsoft
z Mozilla
Microsoft Internet Explorer (version 7 or above)
1. Open Internet Explorer and select Tools > Internet Options. The Internet Options
window appears (see figure 33).
®
Internet Explorer® (version 7 or above)
®
Firefox® (version 1.3 or above)
Figure 33. Internet Options
2. To enable cookies, select the Privacy tab and (if required) adjust the slider control to
set the required security level. VN‑Matrix systems operate correctly when using security
that does not exceed the Medium High setting.
NOTE: Setting the security slider to block all cookies prevents the VN‑Matrix web
interface from operating.
VNM Recorder • Browser Conguration 6868
Page 75

TIP: If a high security level is required, click on the Edit button and allow the
VN‑Matrix web interface to use cookies (see figure 34).
Figure 34. Per Site Internet Options
3. To enable JavaScript, select the Security tab (see figure 35).
Figure 35. Security Options
4. Click the Custom Level button. The Security Settings window appears.
VNM Recorder • Browser Conguration 69
Page 76
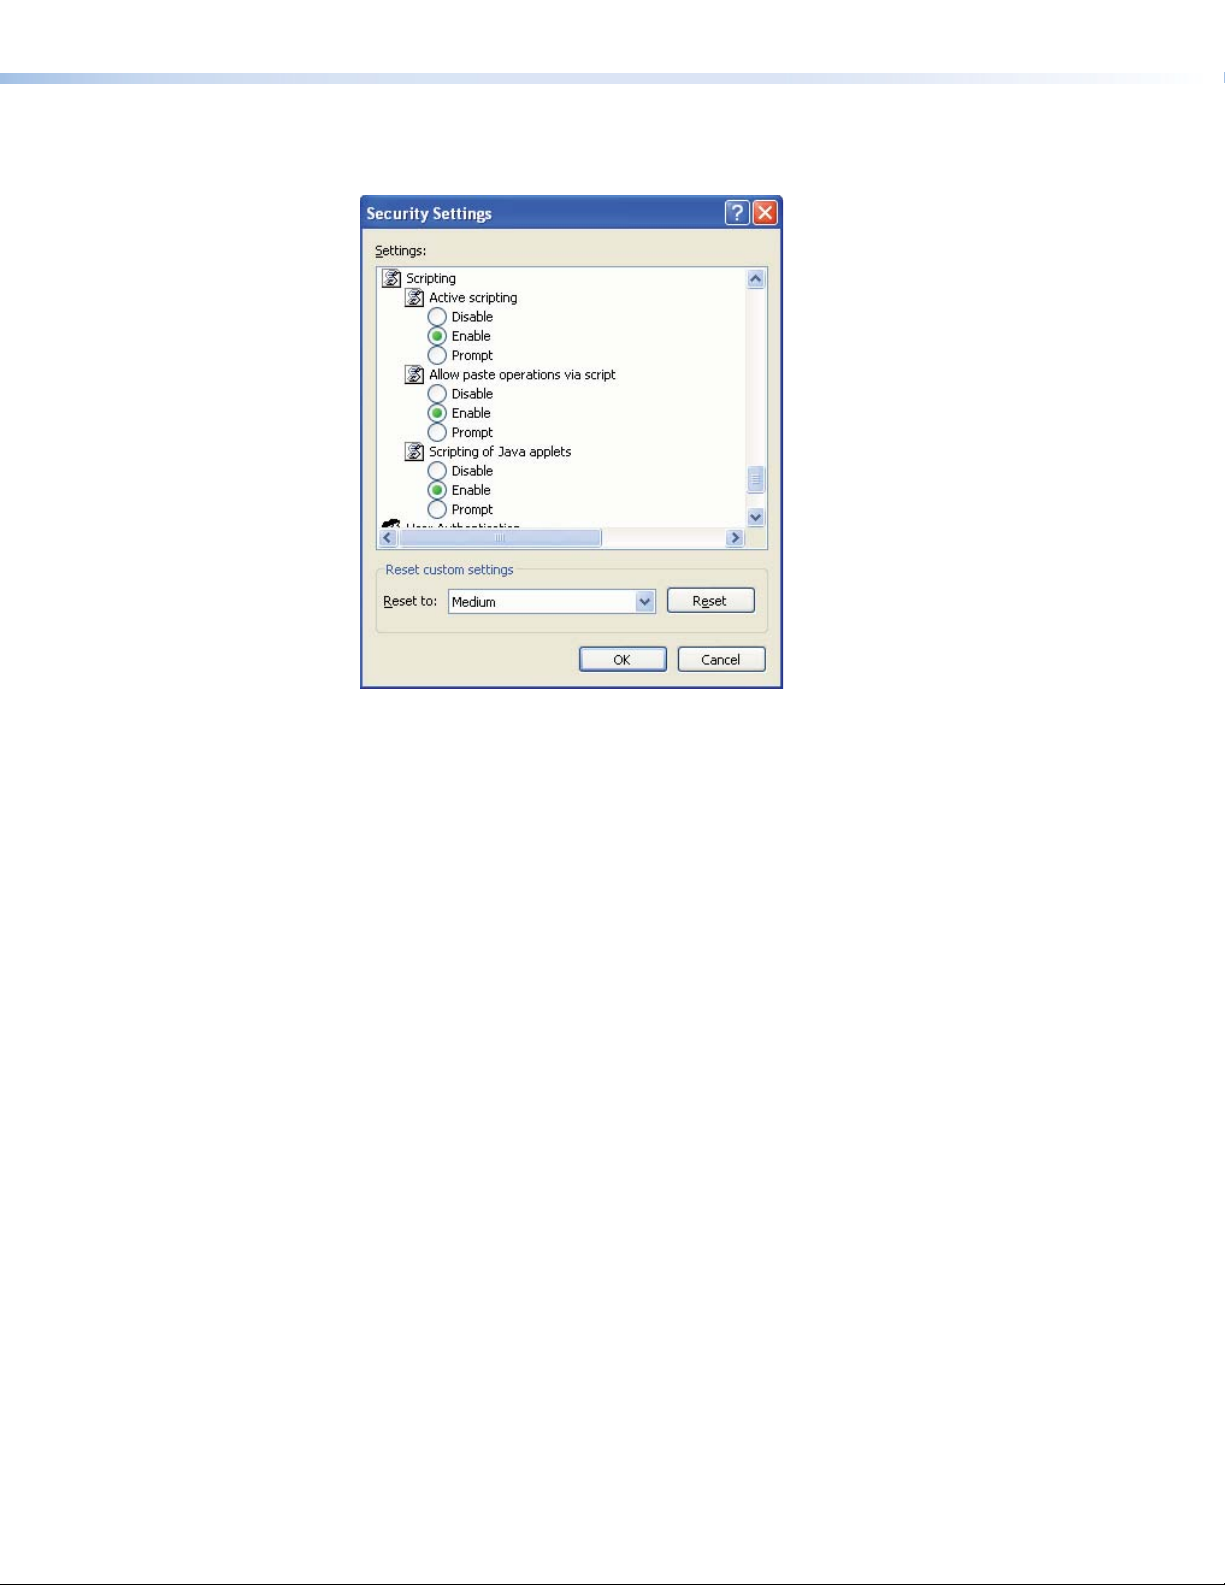
5. Scroll down to the Scripting setting and under Active scripting, select Enable
(see figure 36).
Figure 36. Custom Level Security Options
6. Click OK on both dialogs to close and save the new settings.
VNM Recorder • Browser Conguration 70
Page 77
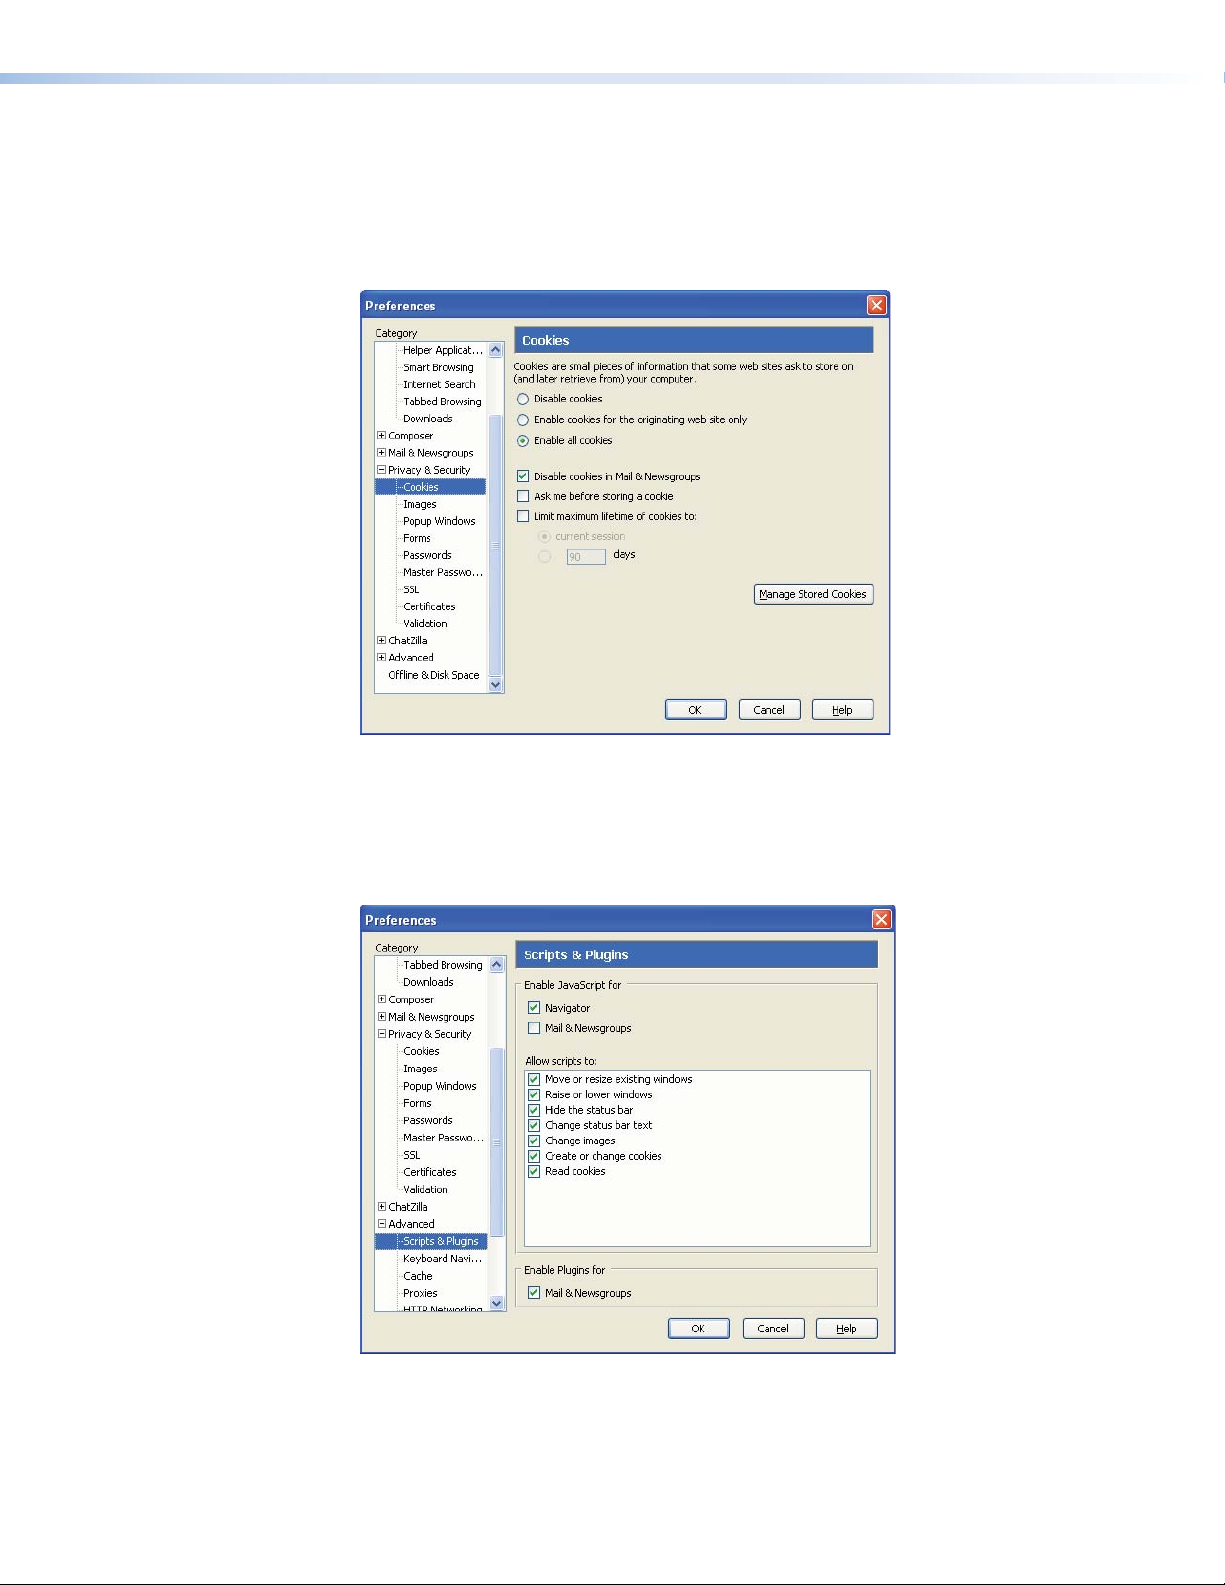
Mozilla Firefox (version 1.3 or above)
1. Open Mozilla Firefox and select Edit > Preferences. The Preferences window
appears.
2. To enable cookies, go to the Privacy & Security category and choose Cookies
(see figure 37).
Figure 37. Cookie Preferences
3. Ensure that either the Enable all cookies or Enable cookies for the
originating web site only
4. To enable JavaScript, go to the Advanced category and choose Scripts & Plugins
(see figure 38).
option is selected.
Figure 38. Scripts and Plugins Preferences
5. Ensure that the
6. Click OK to close the window and save the settings.
Enable JavaScript for Navigator option is selected.
VNM Recorder • Browser Conguration 71
Page 78

Mounting
This section outlines the various mounting options available for the VNM Recorder.
z Tower Installation
z Rack Installation
Tower Installation
Attach the appropriate feet to the unit and place it in a well ventilated area. The tower can
be placed on its side (horizontally) on a hard surface with the cover latch facing up or placed
standing up (vertically) on a flat surface.
Rack Installation
This section provides information on installing the recorder into a rack cabinet. Rack
installation requires the use of the rack mount kit, which is included with the VNM Recorder.
There are a variety of rack cabinets on the market, which may mean the assembly
procedure will differ slightly. If necessary, refer to the instructions that came with the rack
cabinet to complete the rack installation.
UL Guidelines for Rack Mounting
The following Underwriters Laboratories (UL) guidelines are relevant to the safe installation of
these products in a rack:
1. Elevated operating ambient temperature — If the unit is installed in a closed or
multi‑unit rack assembly, the operating ambient temperature of the rack environment
may be greater than room ambient temperature. Therefore, install the equipment in
an environment compatible with the maximum ambient temperature (TMA: +122 °F,
+50°C) specified by Extron.
2. Reduced air flow — Install the equipment in the rack so that the equipment gets
adequate air flow for safe operation.
3. Mechanical loading — Mount the equipment in the rack so that uneven mechanical
loading does not create a hazardous condition.
4. Circuit overloading — Connect the equipment to the supply circuit and consider the
effect that circuit overloading might have on overcurrent protection and supply wiring.
Consider the equipment nameplate ratings when addressing this concern.
5. Reliable earthing (grounding) — Maintain reliable grounding of rack‑mounted
equipment. Pay particular attention to supply connections other than direct
connections to the branch circuit (such as the use of power strips).
VNM Recorder • Mounting 72
Page 79

Rack Mounting
Outer rail
The supplied rack mount kit includes two rack rail assemblies. Each of these assemblies
consist of three sections: an inner fixed rail that secures to the recorder frame, an outer rack
rail that secures directly to the rack itself, and two rail brackets that also attach to the rack
(see figure 39).
Inner rail
Figure 39. Identifying the Sections of the Rack Rails
To install the recorder into a rack, follow the steps below.
1. Remove the inner rail by pulling it out as far as possible. The locking tab should lock the
Rail brackets
rail and make a clicking noise when fully extended. Depress the locking tab to pull the
inner rail completely out. Do this for both assemblies (one for each side).
NOTE: The rails have a locking tab, which serves two functions. The first is to lock
the recorder in place when installed and pushed fully into the rack. Secondly,
these tabs lock the recorder in place when fully extended from the rack to prevent
pulling the recorder completely out of the rack.
2. Place the recorder on its side (horizontally) on a hard surface with the cover latch
facing up.
3. Remove the top and right covers by first removing the screws that secure them to the
frame. Depress the button on the top of the frame to release and remove the cover.
Remove the screws from the feet and remove them from the frame (see figure 40).
VNM Recorder • Mounting 73
Page 80

Top Cover
Feet (4)
Figure 40. Preparing to Install the Rails
4. Attach the rack handles to the inner rails.
5. Align each inner rail (with the rack handle attached) to the screw holes located on the
left and right side of the recorder. Secure the rails to the sides of the recorder frame
(see figure 41).
NOTE: The two inner rail assemblies are left and right specific.
Figure 41. Installing the Rails onto the Recorder Frame
6. Determine where the recorder will be located within the rack (refer to the
UL Guidelines for Rack Mounting section on page 72 for safe rack installation).
7. Position the rail brackets at the desired location in the rack. Screw the rail brackets
securely to the rack. Attach the remaining rail brackets to the other side of the rack,
making sure both sets are at the exact same height.
NOTE: The smaller rail bracket should be positioned at the front of the rack and
the larger rail bracket should be positioned at the back of the rack.
VNM Recorder • Mounting 74
Page 81

8. Secure the outer rails to the rail brackets.
NOTE: The two outer rails are left and right specific.
9. Line up the inner rails on the recorder with the outer rails on the rack. Gently slide the
recorder into the outer rails of the rack (see figure 42). Depress the locking tabs, if
necessary, when sliding the recorder into the outer rails.
10. Connect the necessary devices to the recorder (see the Front Panel Features section
on page 8 and the Rear Panel Features section on page 10).
11. When the recorder is pushed completely into the rack, the locking tabs make a clicking
noise. If necessary, secure the rack handles to the rack to keep the recorder in a fixed
position.
Rail Brackets
Figure 42. Installing the VNM Recorder into a Rack
VNM Recorder • Mounting 75
Page 82

Extron Warranty
Extron Electronics warrants this product against defects in materials and workmanship for a period of three
years from the date of purchase. In the event of malfunction during the warranty period attributable directly to
faulty workmanship and/or materials, Extron Electronics will, at its option, repair or replace said products or
components, to whatever extent it shall deem necessary to restore said product to proper operating condition,
provided that it is returned within the warranty period, with proof of purchase and description of malfunction to:
USA, Canada, South America,
and Central America:
Extron Electronics
1230 South Lewis Street
Anaheim, CA 92805
U.S.A.
Europe and Africa:
Extron Europe
Hanzeboulevard 10
3825 PH Amersfoort
The Netherlands
Japan:
Extron Electronics, Japan
Kyodo Building, 16 Ichibancho
Chiyoda-ku, Tokyo 102-0082
Japan
China:
Extron China
686 Ronghua Road
Songjiang District
Shanghai 201611
China
Asia:
Extron Asia
135 Joo Seng Road, #04-01
PM Industrial Bldg.
Singapore 368363
Middle East:
Extron Middle East
Dubai Airport Free Zone
F12, PO Box 293666
United Arab Emirates, Dubai
Singapore
This Limited Warranty does not apply if the fault has been caused by misuse, improper handling care, electrical
or mechanical abuse, abnormal operating conditions, or if modications were made to the product that were not
authorized by Extron.
NOTE: If a product is defective, please call Extron and ask for an Application Engineer to receive an RA (Re-
turn Authorization) number. This will begin the repair process.
USA: 714.491.1500 or 800.633.9876 Europe: 31.33.453.4040
Asia: 65.6383.4400 Japan: 81.3.3511.7655
Units must be returned insured, with shipping charges prepaid. If not insured, you assume the risk of loss or
damage during shipment. Returned units must include the serial number and a description of the problem, as
well as the name of the person to contact in case there are any questions.
Extron Electronics makes no further warranties either expressed or implied with respect to the product and its
quality, performance, merchantability, or tness for any particular use. In no event will Extron Electronics be liable
for direct, indirect, or consequential damages resulting from any defect in this product even if Extron Electronics
has been advised of such damage.
Please note that laws vary from state to state and country to country, and that some provisions of this warranty
may not apply to you.
Extron Headquarters
+1.800.633.9876 (Inside USA/Canada Only)
Extron USA - West Extron USA - East
+1.714.491.1500 +1.919.850.1000
+1.714.491.1517 FAX +1.919.850.1001 FAX
Extron Europe
+800.3987.6673
(Inside Europe Only)
+31.33.453.4040
+31.33.453.4050 FAX
© 2013 Extron Electronics All rights reserved. www.extron.com
Extron Asia
+65.6383.4400
+65.6383.4664 FAX
Extron Japan
+81.3.3511.7655
+81.3.3511.7656 FAX
Extron China
+86.21.3760.1568
+86.21.3760.1566 FAX
Extron Middle East
+971.4.299.1800
+971.4.299.1880 FAX
Extron Korea
+82.2.3444.1571
+82.2.3444.1575 FAX
Extron India
1800.3070.3777
Inside India Only
+91.80.3055.3777
+91.80.3055.3737 FAX
 Loading...