

Page 1
IMPORTANT:
IMPORTANT:
Unbalanced Stereo Output Balanced Stereo Output
LR
LR
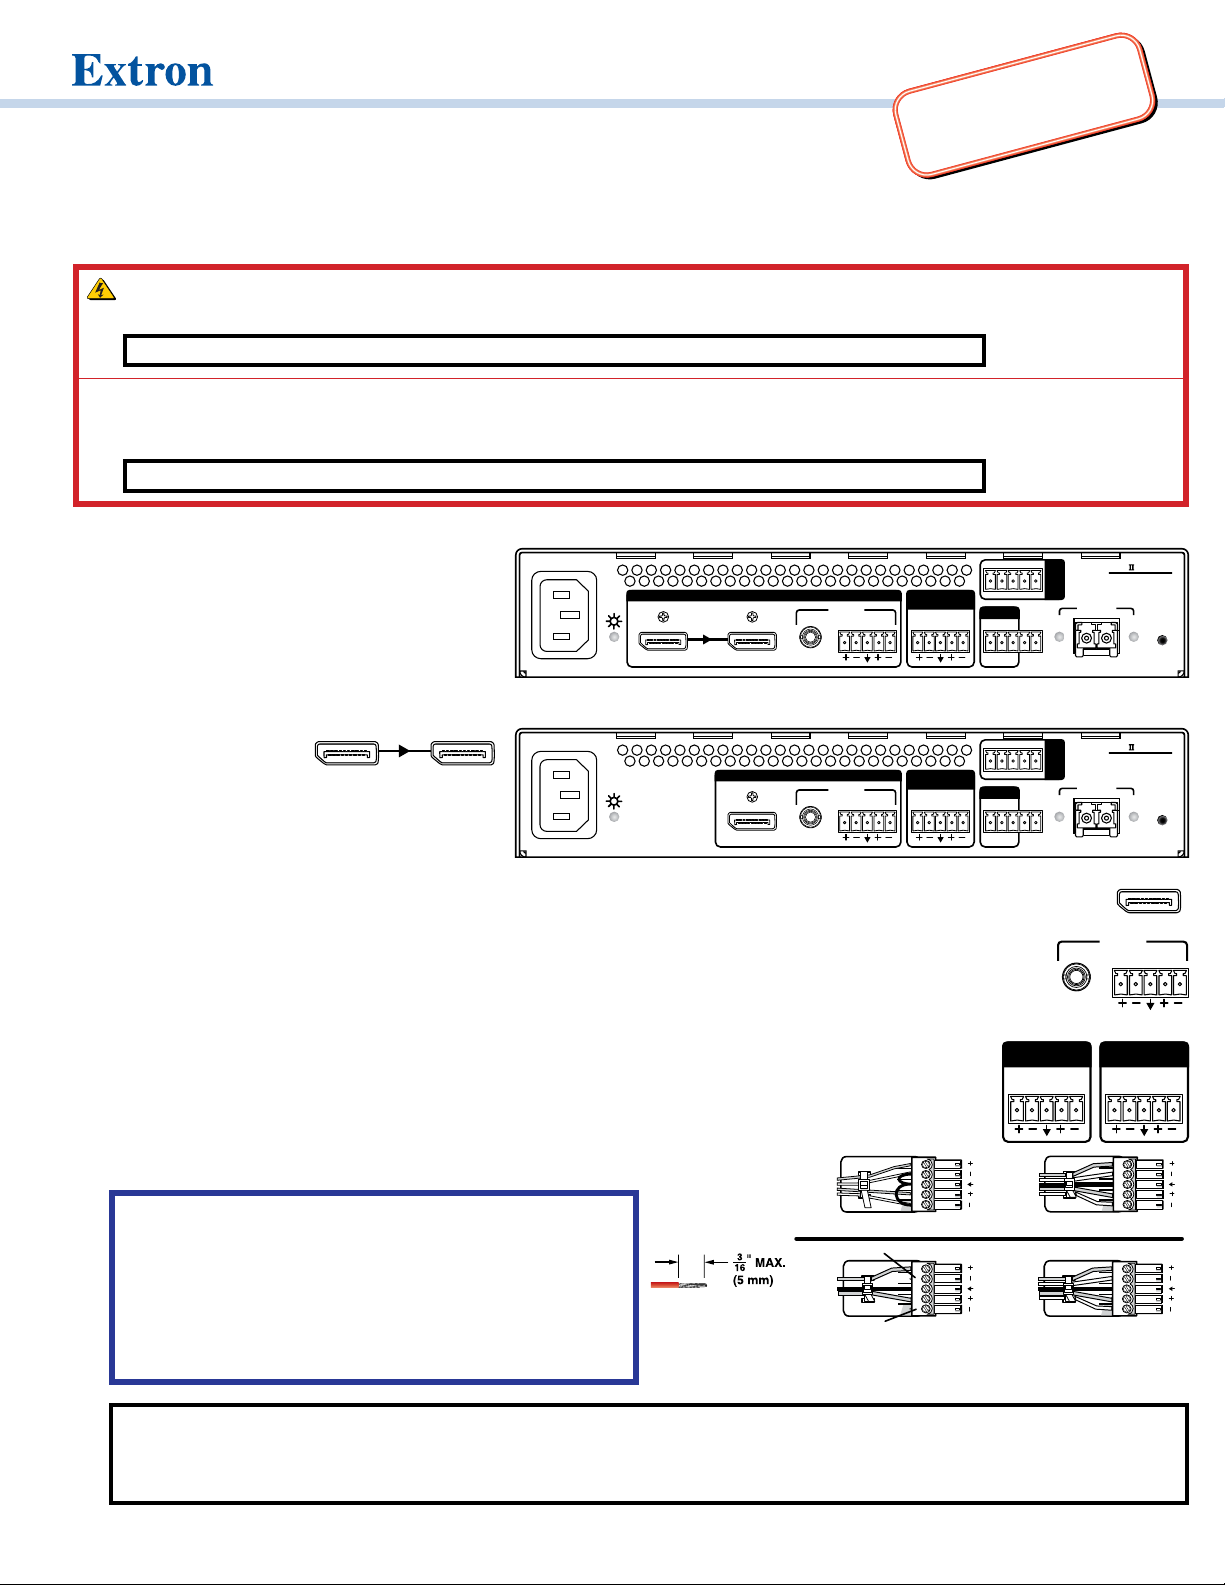
FOX II DP 4K Receiver Rear Panel
DISPLAYPORT LOOP THRU
DISPLAYPORT
LR
AUDIO
AUDIO
LR
AUDIO
Go to www.extron.com for the complete
FOX II T/R DP 4K • Setup Guide
user guide, installation instructions, and
specifications before connecting the
product to the power source.
This guide provides quick start instructions for an experienced installer to set up and operate the Extron FOX II T/R DP 4K ber optic
extenders.
WARNING: These units output continuous invisible light, which may be harmful to the eyes; use with caution. For additional
safety, plug the attached dust caps into the optical transceivers when the fiber optic cable is unplugged.
CLASS 1 LASER PRODUCT, see the FOX II T/R DP 4K User Guide, at www.extron.com.
AVERTISSEMENT : Le FOX II T/R DP 4K émet une lumière invisible en continu (conforme à la classe1) qui peut être dangereux
pour les yeux, à utiliser avec précaution. Branchez les protections contre la poussière dans l’ensemble émetteur/récepteur lorsque
le câble fibre optique est débranché.
Produit laser de classe1, voir le FOX II T/R DP 4K User Guide sur www.extron.com (en anglais).
Installation
Step 1 — Mounting
Turn off or disconnect all equipment power
sources and mount the transmitter as required.
For mounting details and considerations, see the
FOX II T/R DP 4K User Guide at
Step 2 — Input and Output Connections
a. Connect a DisplayPort
video source to the
transmitter DisplayPort input connector.
b. If desired, connect a DisplayPort video display
to the transmitter Loop-Thru connector for a
www.extron.com.
100-240V ~ -.-A MAX
50-60 Hz
DISPLAYPORT LOOP THRU
FOX II DP 4K Transmitter Rear Panel
100-240V ~ -.-A MAX
50-60 Hz
INPUTS
DISPLAYPORT
OUTPUTS
AUDIO
LR
AUDIO
LR
AUDIO
RETURN OUT
LR
AUDIO
RETURN IN
LR
local display.
c. Connect a DisplayPort video display to the receiver DisplayPort output connector.
d. Connect an audio input device to either the Audio 3.5 mm mini jack or the Audio 5-pole captive screw connector
on the transmitter. See the drawing below step 2g to make connections on the captive screw connector.
e. Connect an audio output device to either or both the 3.5 mm mini jack or the Audio 5-pole captive screw connector
on the receiver. See the drawing below step 2g to make connections on the captive screw connector.
f. For optional returned audio, connect an audio output device to the Audio Return Out 5-pole captive screw
connector on the transmitter. See the drawing below step 2g to make connections on the captive screw
connector.
g. For optional returned audio, connect an audio input device to the Audio Return In 5-pole captive screw
connector on the receiver. See the drawing below to make connections on the
captive screw connector.
ATTENTION:
• For unbalanced audio, connect the sleeves to the ground
contact. DO NOT connect the sleeves to the negative (-)
contacts.
• Pour l’audio asymétrique, connectez les manchons
Do not tin the wires!
Tip
Sleeve
Tip
Sleeve
Unbalanced Stereo Input
No Ground Here
Tip
Sleeves
Tip
No Ground Here
au contact au sol. NE PAS connecter les manchons
aux contacts négatifs (–).
NOTE: For returned audio, above, you must also do the following:
• Connect an audio input device to the Audio Return In 5-pole captive screw connector on the receiver.
• Install the optional Receiver-Tx-to-transmitter-Rx cable in step 3b.
RS-232 IR
Tx Rx Tx RxG
REMOTE
RS-232
Tx Rx G1 2
RS-232 IR
Tx Rx Tx RxG
REMOTE
RS-232
Tx Rx G1 2
LR
OVER
ALARM
OVER
ALARM
RETURN OUT
LR
Tip
Ring
Sleeves
Tip
Ring
Balanced Stereo Input
LR
Tip
Ring
Sleeves
Tip
Ring
FIBER
LINK
FIBER
LINK
Tx
OPTICAL
Tx
OPTICAL
FOX T DP 4K
Rx
LINK
FOX R DP 4K
Rx
LINK
RETURN IN
RESET
RESET
1
Page 2
FOX II T/R DP 4K • Setup Guide (Continued)
IR Device
RS-232 Device
12
REMOTE
CONFIG
M
12
T
Tx
LINK
Rx
OPTICAL
LINK
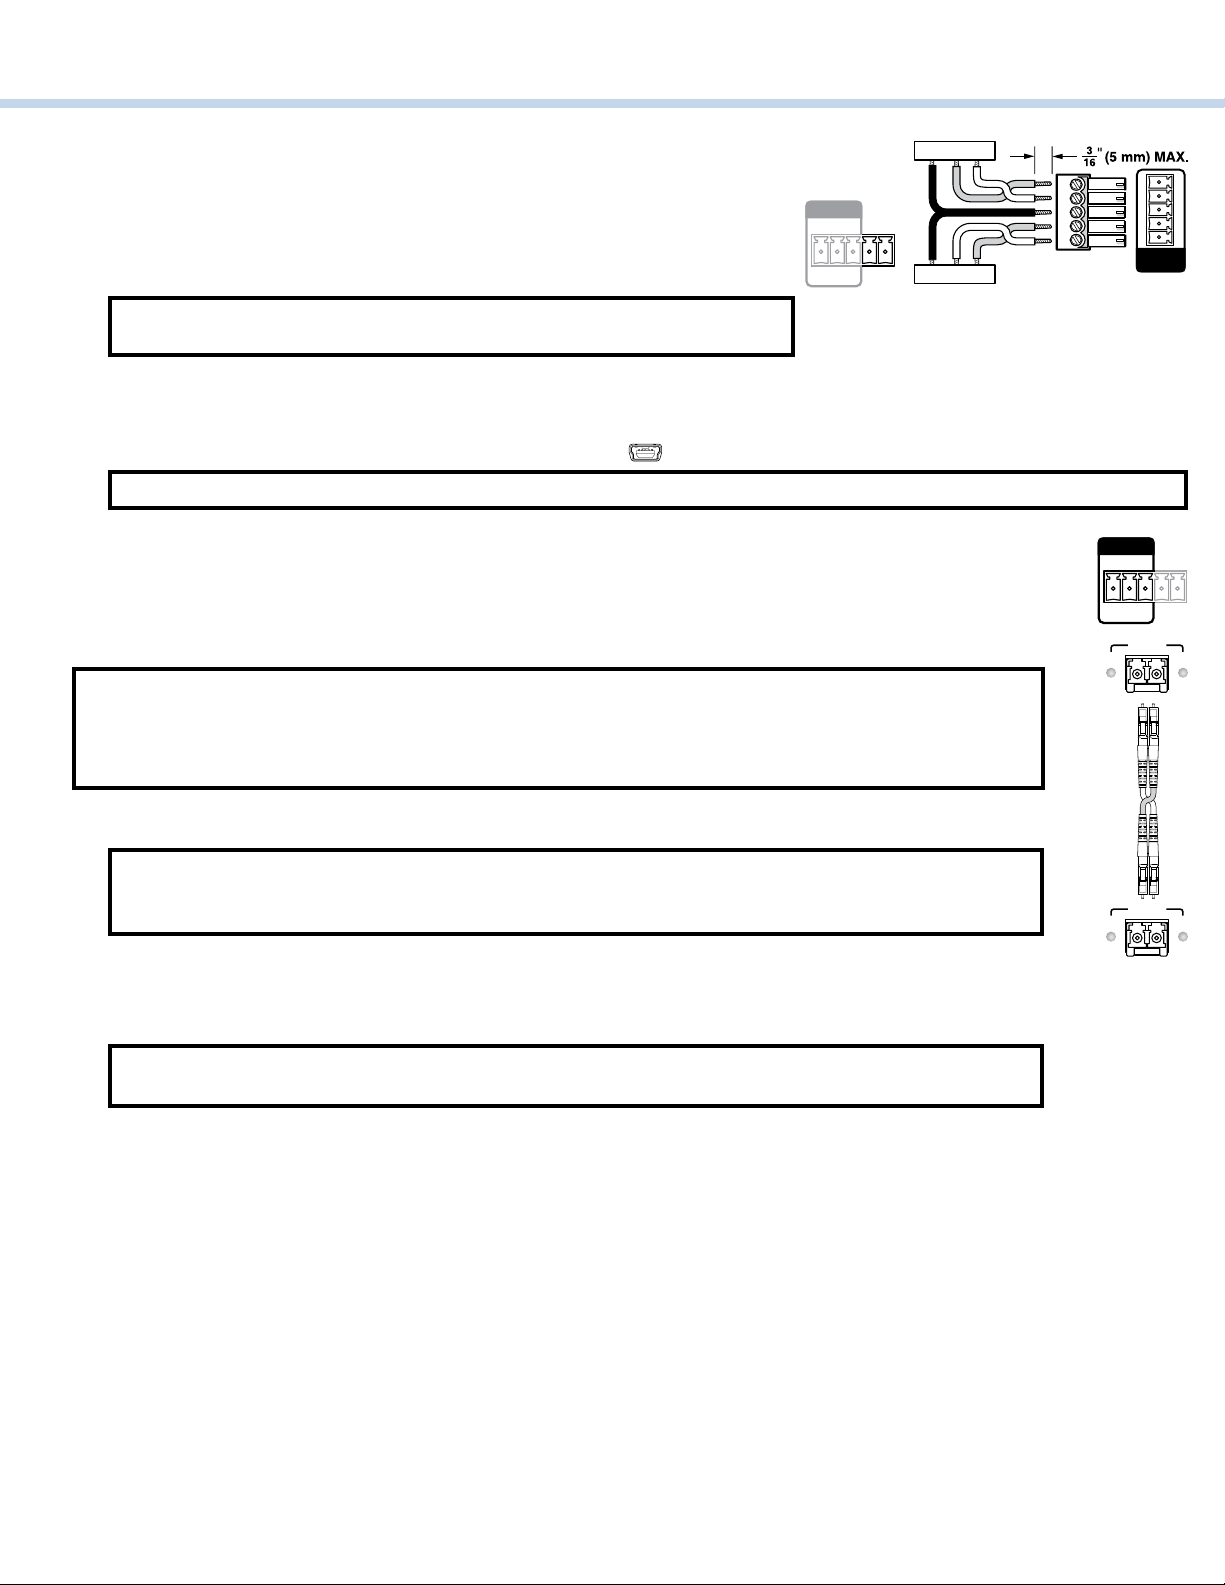
h. If you want the FOX II DP 4K units to pass serial or IR data or control signals, such as for serial
control of a projector, connect the primary device to the transmitter and the controlled device to
Rx TxGnd
the receiver via the Over Fiber 5-pole captive screw connectors on both units.
i. For remote monitoring of the status of the Rx optical link on either the transmitter or
receiver, connect a locally constructed or obtained device to the two rightmost poles
RS-232
ALARM
of the Alarm and Remote RS-232 5-pole captive screw connector on that unit. The
unit shorts both poles together when no light is detected.
Tx Rx G
Tx RxGnd
NOTE: The transmitter port reports the status of the link from the receiver.
The r
j. For remote control of a unit and for loading firmware, connect a host device, such as a computer or control system, to either of the
following ports on the unit to be controlled:
Configuration port — The front panel USB mini-B connector.
eceiver port reports the status of the link from the transmitter.
NOTE: Extron recommends performing firmware updates via the Configuration port only.
Remote RS-232 port — The rear panel Remote RS-232 port, the 3 leftmost poles of this 5-pole captive screw connector.
The protocol for the Remote port is as follows:
• 9600 baud • no parity • 8 data bits
• 1 stop bit • no flow control
REMOTE
RS-232
Tx Rx G
Step 3 — Throughput Connections
NOTE: See the two fiber cable connection drawings below. You can connect the transmitter to a compatible
receiver in one of two ways:
• One way (transmitter to receiver) only, perform step 3a.
• Two way (transmitter to receiver and return), perform steps 3a and 3b.
ransmitter
112222
LINK
Tx Rx Tx RxG
OVER
FIBER
OPTICAL
RS-232 IR
ALAR
a. Connect the fiber between the Tx port on the transmitter and the Rx port on the receiver (
b. If you want the receiver to return serial data (such as responses from a controlled device), IR data, or returned audio
Operation
After all receivers, the transmitter, and their connected devices are powered up, the system is fully operational. If any problems are
encountered, verify that the cables are routed and connected properly and that all display devices have identical resolutions and refresh
rates. If problems persist, call the Extron S3 Sales & Technical Support Hotline at the number that is closest to you. See the contact
numbers on the
, at right).
1
NOTE: Ensure that the transmitter and connected receiver are the same transmission mode,
singlemode (SM) or multimode (MM) and that you use the correct SM or MM fiber cable to connect the
devices
to the transmitter, connect a cable between the Tx port on the receiver and Rx port on the transmitter (
Tx Link and Rx Link LEDs — When lit, the link is active (light is output [Tx] or received [Rx]).
NOTE: The Link LEDs indicate transmission of light only, not whether there is data encoded in the
optical link
.
last page of this guide for the Extron ofce nearest you.
2
11
Tx
Rx
LINK
Receiver
).
2
Page 3

Indications
EDID
NOTE: The figure below right is of a receiver. A transmitter has similar indications.
Power (
) LED — Indicates that power is applied to the unit.
Video LEDs —
Signal LED — Lights when the unit detects an input video signal.
HDCP LED — Lights when the input signal is HDCP encrypted.
CONFIG
VIDEO AUDIO
SIGNAL
HDCP
Audio LEDs —
Input LED (transmitter) — Lights when an analog audio or PCM digital
audio signal remains above -35 dBV. The LED goes unlit if the audio
signal level drops below the threshold for 10 seconds or longer.
Output LED (receiver) — Lights when an analog audio or PCM digital audio signal remains above -35 dBV. The LED goes unlit if the
audio signal level drops below the threshold for 10 seconds or longer.
Return Out LED (transmitter) — Lights when analog audio is present on the transmitter Return Audio Output connector.
Return In LED (receiver) — Lights when analog audio is present on the receiver Return Audio Input connector.
EDID
EDID Minder switch — Set this switch to one of the positions at right to select the source of the DDC or a specic resolution.
Position 0 — An EDID that has previously been captured from a connected display or manually imported via an SIS
command or the Product Conguration Software.
Position 1 — The EDID is selected via the
Remote or USB port, using an SIS command or
the Extron Product Conguration Software.
Position
2 — Use the EDID from the display connected to
the receiver.
NOTE: EDID from the display connected
to the receiver requires connection of both
fiber cables.
Pos. Source or resolution Pos. Resolution Pos. Resolution
0 User recorded EDID 6 1366x768 C 2048x2160
1 Selected via RS-232 7 1440x900 D 2560x1600
2 Display on Rx output 8 1680x1050 E* 3840x2160
3 Display on Tx loop-through 9 1920x1080 F N/A
4 1280x720 A 1920x1200
5 1280x800 B 2048x1536
* 30 Hz
OUTPUT
RETURN IN
SELECT
Position 3 — Use the EDID from the display connected to the transmitter loop-through.
Positions 4 through E — Specify a resolution. The table at right identies the resolutions associated with the switch positions. All
resolutions are at 60 Hz with the exception of 4096x2160 (E), which is 30 Hz.
Position F — No EDID assigned.
Remote Control
See the FOX II T/R DP 4K User Guide, available at www.extron.com, for details on operating and monitoring the transmitter using either
SIS commands or the Extron Product Conguration Software.
3
Page 4

Application Diagram
02
Extron
0T
4K DisplayPort
PC
FOX T DP 4K
Fiber Optic Transmitter
FIBER
OVER
RS-232 IR
RxG
Tx
LINK
Tx Rx
ALARM
REMOTE
AUDIO
RS-232
RETURN OUT
Tx Rx G 1 2
L R
AUDIO
L R
INPUTS
100-240V ~ -.-A MAX
DISPLAYPORT LOOP THRU
50-60 Hz
4K DisplayPort
Local
Monitor
Audio
Tx
OPTICAL
FOX T DP 4K
Rx
Extron
IPCP Pro 250
IP Link Pro
Control Processor
IPCP PRO 250
DIGITAL I/O
2
G
OM
IR/S
C
4
2 3
Ethernet
1
LAN
G
eBUS
OM 1
C
Rx
G
x
T
-S
G
+S
S
S
CT
+V
S
T
R
RELAYS
C
G
6W
=
1 2
TxRx
OUT
OL
V
PWR
CG
V
ER
POW
12V
A MAX
-
RESET
LINK
-
TCP/IP
RS-232
Network
Up to 30 km (18.75 miles)
Singlemode Fiber
SM Model
Ethernet
2
1
TER/
MI
ECT
LI
Hz
0
T
-6
O
0
5
,
PR
A
3
NAL
1.
G
I
S
0V
-24
100
Extron
TLP Pro 72
7" Table To p
TouchLink Pro
Touchpanel
INPUTS
2
1
L
LEVE
2
1
0
0
PC
p
pto
a
L
Display
1
On
4
Off
7
Mute
oom
R
Control
Screen
H
ghting
Li
XPA 10
G
IRIN
2
UTPUT
O
W
2
S
1
S
A
L
C
TE
O
EM
R
mA
0
TE
5
U
0V
OL/M
1
V
Y
B
D
N
A
T
S
3
1 2
Tuner
c
o
D
m
a
C
Volume
VCR
VD
D
Presets
Channel
Tuner
3
2
ore
M
t
6
Presets
Las
5
m
9
Syste
Off
8
r
AM
Ente
8
3 - 7:5
1
0
r 15, 20
e
b
Decem
Extron
lp
e
Extron
Extron
XPA 10
Power
2
0
Amplier
Mute
Audio
Control
Extron
FOX R DP 4K
Fiber Optic Receiver
.-A MAX
0V ~ -
24
100-
50-60 Hz
4K DisplayPort
Extron
SI 28
Surface-mount
Speakers
DISPLAYPORT
OUTPUTS
FOX R DP 4K
ET
ES
R
Rx
FIBER
LINK
OVER
x
RS-232 IR
T
LINK
Tx Rx TxRxG
ICAL
ALARM
OPT
REMOTE
AUDIO
RS-232
URN IN
1 2
RET
Tx Rx G
L R
AUDIO
L R
Audio
RS-232
80
L
MODE
4K Display
For information on safety guidelines, regulatory compliances, EMI/EMF compatibility, accessibility, and related topics, see the
Extron Safety and Regulatory Compliance Guide on the Extron website.
© 2016-2020 Extron — All rights reserved. www.extron.com
All trademarks mentioned are the property of their respective owners.
4
Worldwide Headquarters: Extron USA West, 1025 E. Ball Road, Anaheim, CA 92805, 800.633.9876
68-2540-50 Rev. C
11 20
 Loading...