

Page 1

BlackDiamond 8800 Series Switches
Hardware Installation Guide
Extreme Networks, Inc.
3585 Monroe Street
Santa Clara, California 95051
(888) 257-3000
(408) 579-2800
http://www.extremenetworks.com
Published: August 2008
Part number: 100284-00 Rev. 02
Page 2

AccessAdapt, Alpine, BlackDiamond, ESRP, Ethernet Everywhere, Extreme Enabled, Extreme Ethernet Everywhere,
Extreme Networks, Extreme Standby Router Protocol, Extreme Turbodrive, Extreme Velocity, ExtremeWare,
ExtremeWorks, ExtremeXOS, the Go Purple Extreme Solution, Sentriant, ServiceWatch, ScreenPlay, Summit,
SummitStack, Unified Access Architecture, Unified Access RF Manager, UniStack, Universal Port, the Extreme
Networks logo, the Alpine logo, the BlackDiamond logo, the Extreme Turbodrive logo, the Summit logos, the
Powered by ExtremeXOS logo, and the Color Purple, among others, are trademarks or registered trademarks of
Extreme Networks, Inc. or its subsidiaries in the United States and/or other countries.
Adobe, Flash, and Macromedia are registered trademarks of Adobe Systems Incorporated in the U.S. and/or other
countries. AutoCell is a trademark of AutoCell. Avaya is a trademark of Avaya, Inc. Internet Explorer is a registered
vctrademark of Microsoft Corporation. Mozilla Firefox is a registered trademark of the Mozilla Foundation. sFlow is
a registered trademark of sFlow.org. Solaris and Java are trademarks of Sun Microsystems, Inc. in the U.S. and other
countries.
Specifications are subject to change without notice.
All other registered trademarks, trademarks, and service marks are property of their respective owners.
© 2008 Extreme Networks, Inc. All Rights Reserved.
2
BlackDiamond 8800 Series Switches Hardware Installation Guide
Page 3

Table of Contents
Preface........................................................................................................................................... 9
Introduction ...............................................................................................................................9
Conventions................................................................................................................................9
Related Publications .................................................................................................................10
Part 1: About the BlackDiamond 8800 Series Switches
Chapter 1: About the BlackDiamond 8800 Series Switches.............................................................. 15
Overview of the BlackDiamond 8800 Series Switches...................................................................15
Full-Duplex Support ..................................................................................................................16
Management Ports ....................................................................................................................16
External Compact Flash Memory Card .........................................................................................16
BlackDiamond 8806 Switch Chassis...........................................................................................16
BlackDiamond 8810 Switch Chassis...........................................................................................18
Chapter 2: BlackDiamond 8800 Series Modules ............................................................................. 21
Overview of the BlackDiamond 8800 Series Modules....................................................................21
Management Switch Modules (MSM) ..........................................................................................21
Redundant MSM Activity .....................................................................................................21
MSM Physical Features........................................................................................................22
MSM LEDs .........................................................................................................................24
I/O Modules..............................................................................................................................25
BlackDiamond 8800 Original Series I/O Modules ...................................................................25
G24X I/O Module ..........................................................................................................26
10G4X I/O Module ........................................................................................................26
G48T I/O Module ..........................................................................................................27
G48P I/O Module ..........................................................................................................28
BlackDiamond 8800 a-Series I/O Modules.............................................................................28
G48Ta I/O Module.........................................................................................................29
G48Xa I/O Module.........................................................................................................30
10G4Xa I/O Module.......................................................................................................31
10G4Ca I/O Module.......................................................................................................31
BlackDiamond 8800 c-Series I/O Modules.............................................................................32
G48Tc I/O Module.........................................................................................................32
10G4Xc I/O Module.......................................................................................................33
10G8Xc I/O Module.......................................................................................................34
G24Xc I/O Module.........................................................................................................34
G48Xc I/O Module.........................................................................................................35
BlackDiamond 8800 E-Series I/O Modules ............................................................................36
G48Te I/O Module.........................................................................................................36
G48Pe I/O Module.........................................................................................................37
G48Te2 I/O Module.......................................................................................................38
I/O Module LEDs.................................................................................................................38
Module LEDs ................................................................................................................39
BlackDiamond 8800 Series Switches Hardware Installation Guide
3
Page 4

Table of Contents
Port LEDs on Non-PoE Modules......................................................................................39
Port LEDs on PoE Modules (G48P, G48Pe, and G48Tc or G48Te2 with S-POE Card) ..........40
Chapter 3: Power Supply Units for BlackDiamond 8800 Series Switches.......................................... 41
Overview of BlackDiamond 8800 Series Power Supplies ...............................................................41
Extreme Networks 700/1200 W AC PSU .....................................................................................42
LEDs..................................................................................................................................42
Power Supply Cords.............................................................................................................43
Fuse ..................................................................................................................................43
Specifications.....................................................................................................................44
Extreme Networks 600/900 W AC PSU .......................................................................................45
Minimum Software Required ................................................................................................45
LEDs..................................................................................................................................46
Power Supply Cords.............................................................................................................46
Fuse ..................................................................................................................................47
Specifications.....................................................................................................................47
Combining Different AC PSU Models...........................................................................................47
Extreme Networks 1200 W DC PSU ............................................................................................48
Minimum Software Required ................................................................................................49
LEDs..................................................................................................................................49
Part 2: Installing BlackDiamond 8800 Series Switches and Modules
Chapter 4: Site Preparation............................................................................................................ 53
Planning Your Site ....................................................................................................................53
Meeting Site Requirements ........................................................................................................54
Operating Environment Requirements ...................................................................................54
Building and Electrical Codes.........................................................................................54
Wiring Closet Considerations ..........................................................................................55
Temperature .................................................................................................................55
Humidity ......................................................................................................................56
Chassis Spacing Requirements .......................................................................................56
Chassis Airflow Requirements.........................................................................................56
Electrostatic Discharge ..................................................................................................57
Rack Specifications and Recommendations ...........................................................................58
Mechanical Recommendations for the Rack .....................................................................58
Protective Grounding for the Rack...................................................................................58
Space Requirements for the Rack ...................................................................................59
Securing the Rack .........................................................................................................59
Evaluating and Meeting Cable Requirements ...............................................................................60
Cabling Standards ...............................................................................................................60
Cable Labeling and Record Keeping......................................................................................60
Installing Cable...................................................................................................................61
Fiber Optic Cable ..........................................................................................................63
Cable Distances ............................................................................................................63
RJ-45 Connector Jackets .....................................................................................................64
Radio Frequency Interference...............................................................................................65
Meeting Power Requirements .....................................................................................................66
PoE Devices .......................................................................................................................66
Power Supply Requirements.................................................................................................66
4
BlackDiamond 8800 Series Switches Hardware Installation Guide
Page 5

Table of Contents
AC Power Cable Requirements..............................................................................................67
Replacing the Power Cable.............................................................................................67
Uninterruptible Power Supply Requirements ..........................................................................67
Selecting a UPS............................................................................................................68
Calculating Volt-Amperage Requirements.........................................................................68
UPS Transition Time .....................................................................................................68
Applicable Industry Standards....................................................................................................68
Chapter 5: Installing the BlackDiamond 8800 Series Chassis .......................................................... 71
Unpacking the BlackDiamond 8806 Chassis................................................................................72
Unpacking the BlackDiamond 8810 Chassis................................................................................75
Pre-installation Requirements ....................................................................................................78
Attaching the Mid-Mount Brackets..............................................................................................78
Rack-Mounting the BlackDiamond 8800 Series Chassis ...............................................................80
Grounding the BlackDiamond 8800 Series Chassis ......................................................................83
Initial Management Access ........................................................................................................85
Chapter 6: Installing Power Supply Units in the BlackDiamond 8800 Series Switches....................... 87
Safety ......................................................................................................................................87
PSU Compatibility.....................................................................................................................88
Combining Different AC PSU Models.....................................................................................88
Minimum Software Requirements .........................................................................................89
Power Supply Cords for AC Power Supplies..................................................................................89
Installing an Extreme Networks AC PSU ......................................................................................90
Required Tools and Equipment.............................................................................................91
Installing the PSU...............................................................................................................91
Removing or Replacing an Extreme Networks AC PSU ............................................................92
LEDs on the 700/1200 W AC PSU........................................................................................93
Installing an Extreme Networks 1200 W DC PSU .........................................................................94
Required Tools and Equipment.............................................................................................94
Installing the DC Wiring .......................................................................................................94
Installing a 1200 W DC PSU................................................................................................95
Removing a 1200 W DC PSU ...............................................................................................98
LEDs..................................................................................................................................99
Chapter 7: Installing Modules and Establishing Initial Management Access.................................... 101
Module Slot Assignments.........................................................................................................101
Distinguishing an MSM from an I/O Module...............................................................................102
Installing a BlackDiamond 8800 Series Module .........................................................................102
Making Network Interface Cable Connections.............................................................................106
Connecting and Disconnecting Cables on the 10G4Ca Module...............................................106
Installing a Backup MSM.........................................................................................................108
Verifying the Module Installation ..............................................................................................108
Displaying Slot Status Information ......................................................................................108
Removing a BlackDiamond 8800 Series Module ........................................................................109
Blank Front Panels..................................................................................................................110
Installing a Blank Front Panel ............................................................................................111
Removing a Blank Front Panel............................................................................................111
Installing or Removing an External Compact Flash Memory Card..................................................113
BlackDiamond 8800 Series Switches Hardware Installation Guide
5
Page 6

Table of Contents
Initial Management Access ......................................................................................................114
Connecting Equipment to the Console Port ..........................................................................114
Logging In for the First Time ..............................................................................................114
Part 3: Installing BlackDiamond Switch Accessories
Chapter 8: Installing BlackDiamond 8800 Series Module Options .................................................. 119
Installing an S-POE Daughter Card ...........................................................................................119
Removing an S-POE Card.........................................................................................................121
Installing an Option Card in the MSM-48c.................................................................................122
Removing an MSM Option Card ................................................................................................124
Chapter 9: BlackDiamond AC Power Cord Retaining Brackets ........................................................ 125
BlackDiamond 8810 AC Power Cord Retaining Bracket ..............................................................125
Installing the BlackDiamond 8810 AC Power Cord Retaining Bracket.....................................125
Disconnecting a BlackDiamond 8810 AC Power Cord ...........................................................127
BlackDiamond 8806 AC Power Cord Retainer Channel ...............................................................128
Installing the BlackDiamond 8806 AC Power Cord Retainer Channel......................................128
Removing the BlackDiamond 8806 AC Power Cord Retainer Channel.....................................130
Chapter 10: BlackDiamond Cable Management ............................................................................. 131
About BlackDiamond Cable Management ..................................................................................131
Using the Cable Holders and Cable Clips...................................................................................131
Connecting Cable Holders ..................................................................................................132
Connecting Cable Clips ......................................................................................................133
Part 4: BlackDiamond Maintenance Procedures
Chapter 11: Replacing BlackDiamond 8800 Series Chassis Components........................................ 137
Replacing the Fan Tray ............................................................................................................137
Pre-Installation Requirements ............................................................................................137
Removing the Fan Tray ......................................................................................................137
Installing the Replacement BlackDiamond 8800 Series Fan Tray...........................................139
Replacing the PSU/Fan Controller.............................................................................................140
Pre-installation Requirements.............................................................................................140
Removing the PSU/Fan Controller .......................................................................................141
Installing the Replacement PSU/Fan Controller ....................................................................143
Chapter 12: Repacking a BlackDiamond 8800 Series Chassis ....................................................... 145
Safety Information ..................................................................................................................145
Required Tools and Equipment.................................................................................................145
Repacking the BlackDiamond 8810 Chassis ..............................................................................146
Repacking the BlackDiamond 8806 Chassis ..............................................................................150
Part 5: Appendixes
Appendix A: Safety Information .................................................................................................... 155
Considerations Before Installing ...............................................................................................155
6
BlackDiamond 8800 Series Switches Hardware Installation Guide
Page 7

Table of Contents
Installing Power Supply Units...................................................................................................155
Maintenance Safety.................................................................................................................156
General Safety Precautions ......................................................................................................157
Cable Routing for LAN Systems ..........................................................................................157
PoE Devices .....................................................................................................................158
Selecting Power Supply Cords ..................................................................................................158
Battery Replacement and Disposal............................................................................................159
Fiber Optic Ports—Optical Safety .............................................................................................159
GBIC, SFP (Mini-GBIC), XENPAK, and XFP Regulatory Compliance .......................................160
Appendix B: Technical Specifications .......................................................................................... 167
BlackDiamond 8810 Switch.....................................................................................................167
BlackDiamond 8806 Switch.....................................................................................................170
Power Supplies for BlackDiamond 8800 Series Switches ............................................................172
Connector Pinouts...................................................................................................................173
Index .............................................................................................................................................. 1
BlackDiamond 8800 Series Switches Hardware Installation Guide
7
Page 8

Table of Contents
8
BlackDiamond 8800 Series Switches Hardware Installation Guide
Page 9

Preface
This preface provides an overview of this guide, describes guide conventions, and lists other
publications that might be useful.
WARNING!
Service to all equipment should be performed by trained and qualified service personnel only. Before installing or
removing any components of the system, or before carrying out any maintenance procedures, you must thoroughly
read the safety information provided in Appendix A of this guide. Failure to follow this safety information can lead to
personal injury or damage to the equipment.
Introduction
This guide provides the required information to install Extreme Networks® BlackDiamond® 8800 series
switches. This guide also contains information about site preparation, switch functionality, and switch
operation.
This guide is intended for use by network administrators responsible for installing and setting up
network equipment. It assumes a basic working knowledge of:
● Local area networks (LANs)
● Ethernet concepts
● Ethernet switching and bridging concepts
● Routing concepts
● Simple Network Management Protocol (SNMP)
See the ExtremeXOS 12.1 Concepts Guide and the ExtremeXOS 12.1 Command Reference Guide for
information about configuring Extreme Networks BlackDiamond 8800 series switches.
NOTE
If the information in the installation note or release note shipped with your Extreme Networks switch differs from the
information in this guide, follow the installation or release note.
Conventions
Table 1 and Tab le 2 list conventions used in Extreme Networks customer documentation.
BlackDiamond 8800 Series Switches Hardware Installation Guide
9
Page 10
Preface
Table 1: Notice Icons
Icon Notice Type Alerts you to...
Note Important features or instructions.
Caution Risk of personal injury, system damage, or loss of data.
Warning Risk of severe personal injury.
Table 2: Text Conventions
Convention Description
Screen displays This typeface represents information as it appears on the screen, or command
The words “enter”
and “type”
[Key] names Key names appear in text in one of two ways:
Words in italicized type Italics emphasize a point of information or denote new terms at the place where
syntax.
When you see the word “enter” in this guide, you must type something, and then
press the Return or Enter key. Do not press the Return or Enter key when an
instruction simply says “type.”
• Referenced by their labels, such as “the Return key” or “the Escape key”
• Written with brackets, such as [Return] or [Esc]
If you must press two or more keys simultaneously, the key names are linked with a
plus sign (+). Example:
Press [Ctrl]+[Alt]+[Del].
they are defined in the text.
10
Related Publications
The Extreme Networks ExtremeXOS™ switch documentation set includes:
●
ExtremeXOS 12.1 Concepts Guide
●
ExtremeXOS 12.1 Command Reference Guide
●
ExtremeXOS 12.1 Release Notes
●
BlackDiamond 12800 Series Switches Hardware Installation Guide
●
BlackDiamond 10808 Switch Hardware Installation Guide
●
Summit Family Switches Hardware Installation Guide
●
Extreme Networks Pluggable Interface Modules Installation Guide
Documentation for Extreme Networks products is available from the Extreme Networks website at the
following location:
http://www.extremenetworks.com/services/documentation
BlackDiamond 8800 Series Switches Hardware Installation Guide
Page 11

Related Publications
You can select and download the following Extreme Networks documentation from the Documentation
Overview page:
● Software User Guides
● Hardware User Guides
You can find archived user guides for software at:
http://www.extremenetworks.com/services/documentation/swuserguides.asp
You can also find archived installation guides for hardware at:
http://www.extremenetworks.com/services/documentation/hwuserguides.asp
BlackDiamond 8800 Series Switches Hardware Installation Guide
11
Page 12

Preface
12
BlackDiamond 8800 Series Switches Hardware Installation Guide
Page 13

1 About the BlackDiamond 8800 Series Switches
Page 14

Page 15

1 About the BlackDiamond 8800 Series Switches
This chapter describes the Extreme Networks BlackDiamond 8800 series switches and includes the
following sections:
● Overview of the BlackDiamond 8800 Series Switches on page 15
● Full-Duplex Support on page 16
● Management Ports on page 16
● External Compact Flash Memory Card on page 16
● BlackDiamond 8806 Switch Chassis on page 16
● BlackDiamond 8810 Switch Chassis on page 18
For information about the I/O modules and management modules (MSMs) for the BlackDiamond 8800
series switches, see Chapter 2, “BlackDiamond 8800 Series Modules.”
For information about installing the BlackDiamond switches, see Chapter 5, “Installing the
BlackDiamond 8800 Series Chassis.”
Overview of the BlackDiamond 8800 Series Switches
The BlackDiamond switches are chassis-based, Ethernet service core switches designed for core
applications.
The features of these switches include:
● Hot-swappable I/O modules that include Gigabit Ethernet copper ports (10/100/1000) and Gigabit
Ethernet fiber ports (SFP), or 10 Gigabit Ethernet ports (XFP)
● Management Switch Fabric Modules (MSMs) that provide the active switching fabric and CPU
control subsystem
● Redundant, load-sharing, hot-swappable power supplies
● Field-replaceable, hot-swappable fan trays
● Auto-negotiation for half-duplex or full-duplex operation on 10/100/1000 Mbps ports
● Load sharing on multiple ports
The BlackDiamond 8800 series switches include two chassis models:
● BlackDiamond 8806 switch
● BlackDiamond 8810 switch
For more information about configuring a BlackDiamond switch, see the ExtremeXOS 12.1 Concepts
Guide and the ExtremeXOS 12.1 Command Reference Guide.
BlackDiamond 8800 Series Switches Hardware Installation Guide
15
Page 16

About the BlackDiamond 8800 Series Switches
Full-Duplex Support
Extreme Networks switches provide full-duplex support for all ports. Full-duplex support means that
frames can be transmitted and received simultaneously, effectively doubling the bandwidth available on
a link. Most ports on an Extreme Networks switch will auto-negotiate duplex operation in the default
configuration. Gigabit Ethernet fiber ports and 10-Gigabit Ethernet ports operate only in full-duplex
mode in accordance with technical standards.
Management Ports
Each BlackDiamond series Management Switch Fabric Module (MSM) has a 10/100BASE-TX Ethernet
management port. This port allows you to communicate directly with the central processing unit (CPU)
of the switch. You can plug an Ethernet cable directly from your laptop into the management port for
direct access into the switch. This access allows you to view and locally manage the switch
configurations.
External Compact Flash Memory Card
All MSMs in the BlackDiamond family include a compact flash slot next to the console port. This slot
accepts a compact flash memory card, which can be used to download a new version of ExtremeXOS
and for other functions, including capturing debug information and core dump files. See the
ExtremeXOS 12.1 Concepts Guide for more information regarding the use of the external compact flash
memory card.
The external compact flash slot supports third-party compact flash cards.
NOTE
You must use an industrial-grade compact flash card in the external compact flash slot of the MSM.
BlackDiamond 8806 Switch Chassis
The BlackDiamond 8806 chassis includes the following components:
● One 6-slot chassis with backplane
● Four dedicated I/O module slots, labeled 1, 2, 5, and 6
● One dedicated MSM slot, labeled 3/A
● One dual-use slot for either an I/O module or MSM, labeled 4/B
● Power supply bay that accommodates up to six power supplies, accessed from the front of the unit
● One fan tray, accessed from the front right of the unit
● One connector for an ESD-preventive wrist strap
16
When two MSMs are installed, the chassis can support up to 48 gigabits of bandwidth per slot.
BlackDiamond 8800 Series Switches Hardware Installation Guide
Page 17
BlackDiamond 8806 Switch Chassis
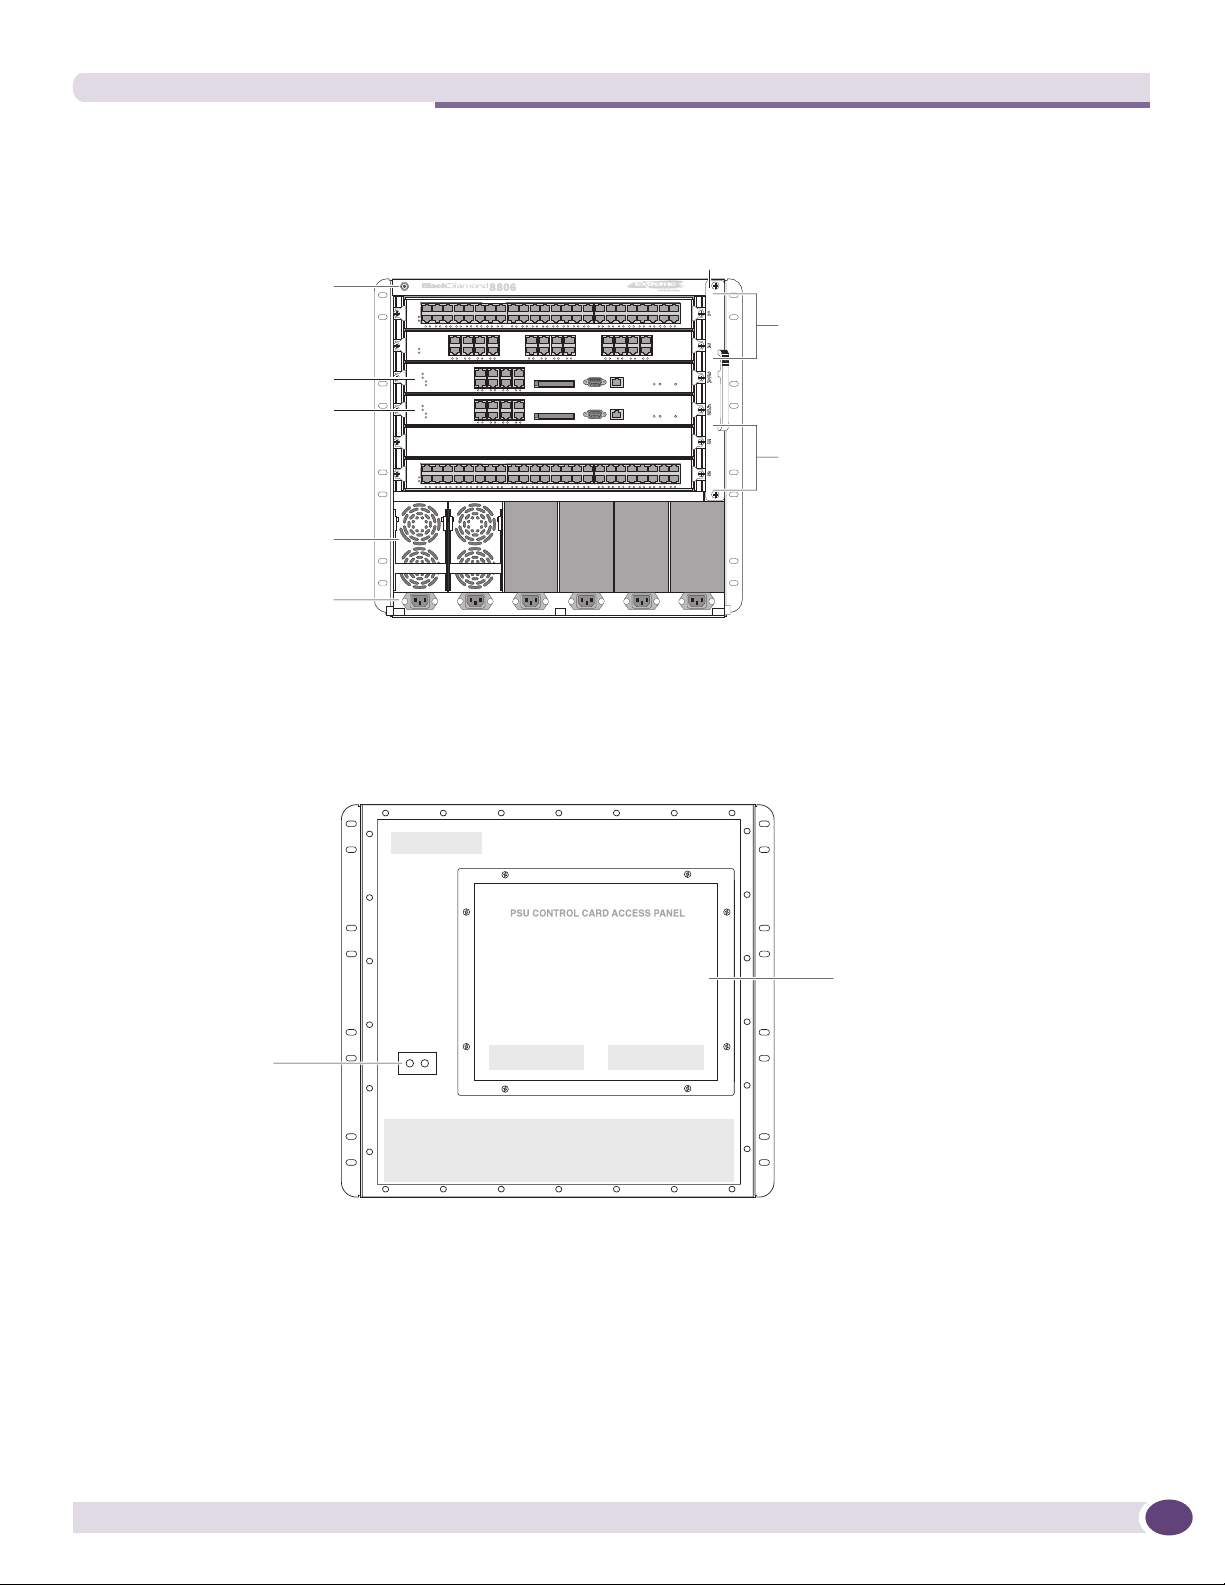
Figure 1 shows the front of a BlackDiamond 8806 chassis equipped with two MSMs and three optional
I/O modules.
Figure 1: Front of the BlackDiamond 8806 Chassis
ESD wrist strap
Fan tray
connector
MSM slot
I/O module or MSM slot
Power supplies
Power cord
connectors
Figure 2 shows the rear panel of the BlackDiamond 8806 chassis.
Figure 2: Rear Panel of the BlackDiamond 8806 Chassis
I/O module
slots
I/O module
slots
EX_127
Grounding point
The rear panel of the BlackDiamond 8806 chassis provides:
● Chassis serial number
● Ethernet MAC address of the switch
● Symbols of safety certification
● Access to the PSU/fan controllers
● Attachment point for optional chassis ground
BlackDiamond 8800 Series Switches Hardware Installation Guide
PSU / fan
controllers
EX_128A
17
Page 18
About the BlackDiamond 8800 Series Switches
BlackDiamond 8810 Switch Chassis
The BlackDiamond 8810 chassis consists of the following components:
● One 10-slot chassis with backplane
● Eight dedicated I/O module slots, labeled 1, 2, 3, 4, 7, 8, 9 and 10
● One dedicated MSM slot, labeled 5/A
● One dual-use slot for an I/O module or MSM, labeled 6/B
● Power supply bay that accommodates up to six power supplies, accessed from the front of the unit
● One fan tray, accessed from the front right of the unit
● One connector for an ESD-preventive wrist strap
When two MSMs are installed, the chassis can support up to 48 Gigabit bandwidth per slot.
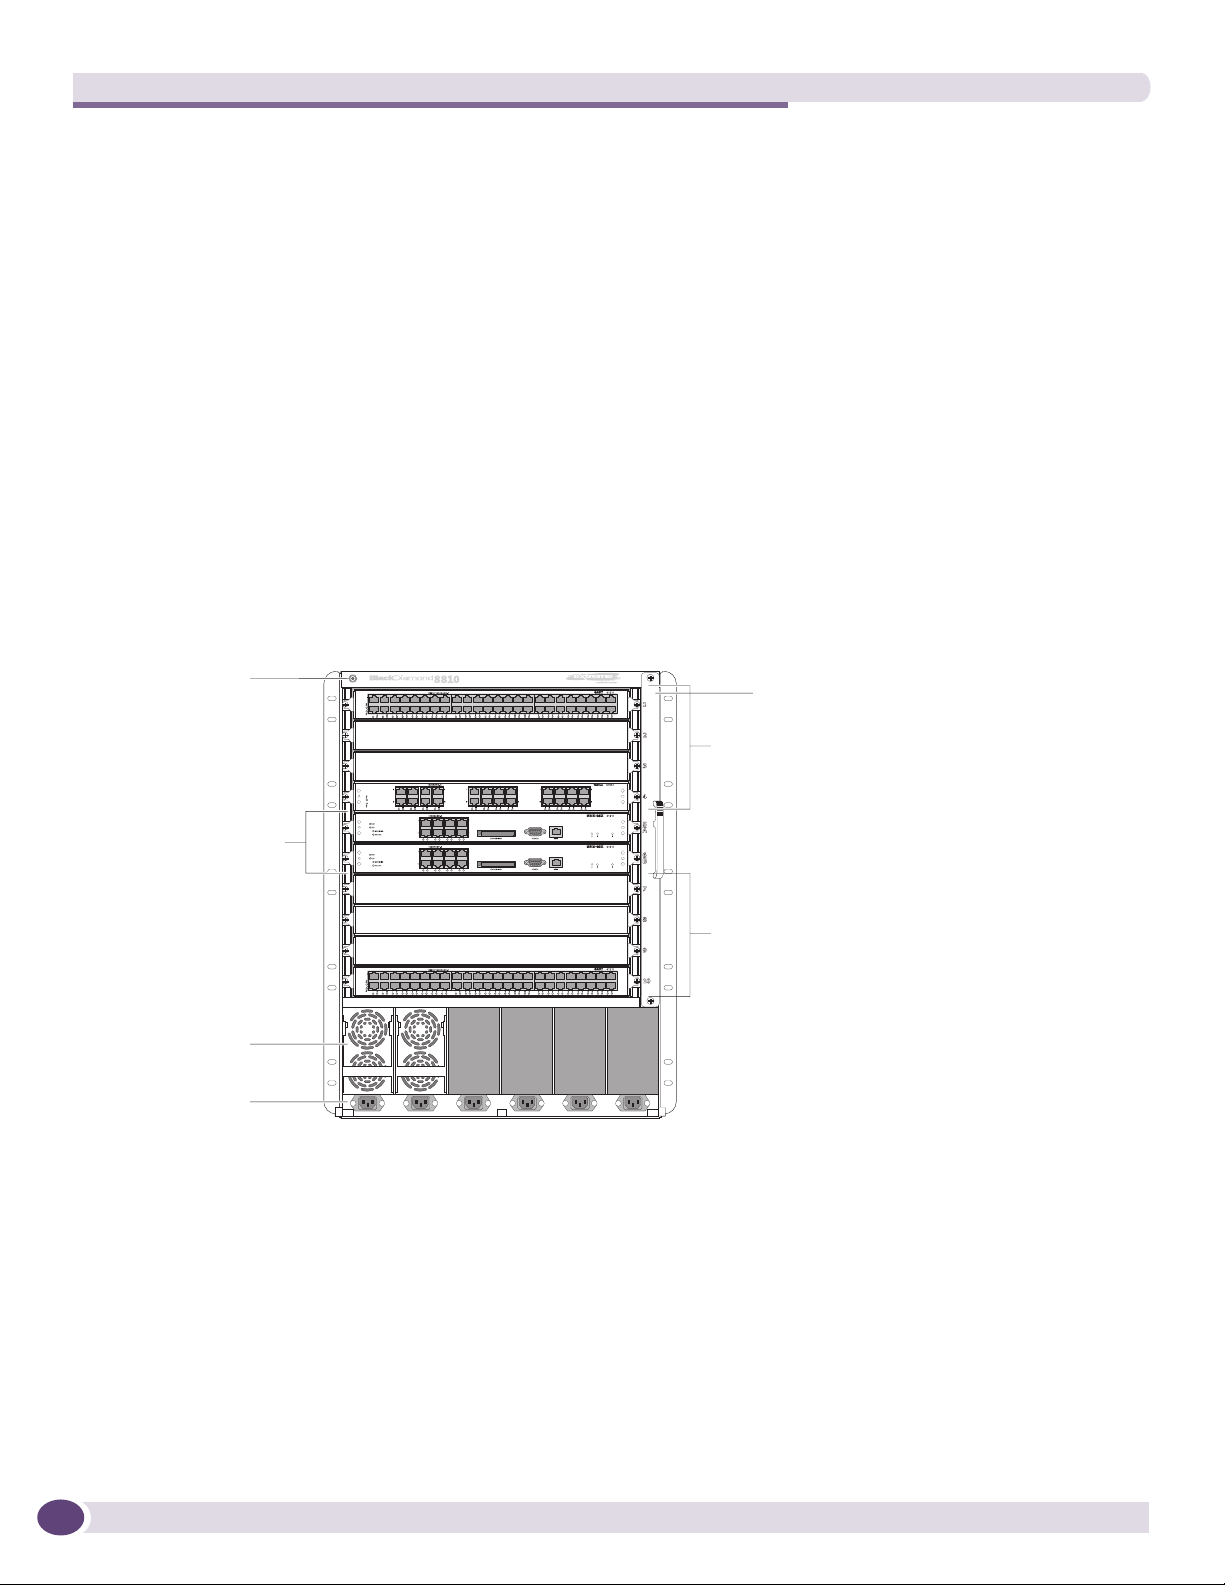
Figure 1 shows the front of a BlackDiamond 8810 chassis equipped with two MSMs and three optional
I/O modules.
Figure 3: Front of the BlackDiamond 8810 Chassis
ESD wrist strap
connector
MSM module slot
Power supplies
Power cord
connectors
Figure 2 shows the rear panel of the BlackDiamond 8810 chassis.
Fan tray
I/O module slots
I/O module slots
ASP042
18
BlackDiamond 8800 Series Switches Hardware Installation Guide
Page 19

Figure 4: Rear Panel of the BlackDiamond 8810 Chassis
Grounding point
BlackDiamond 8810 Switch Chassis
PSU/Fan
controllers
The rear panel of the BlackDiamond 8810 chassis provides:
● Chassis serial number
● Ethernet MAC address of the switch
● Symbols of safety certification
● Access to the PSU/fan controllers
● Attachment point for optional chassis ground
ASP044B
BlackDiamond 8800 Series Switches Hardware Installation Guide
19
Page 20

About the BlackDiamond 8800 Series Switches
20
BlackDiamond 8800 Series Switches Hardware Installation Guide
Page 21

2 BlackDiamond 8800 Series Modules
This chapter describes modules for the BlackDiamond 8800 series of switches and includes the
following sections:
● Overview of the BlackDiamond 8800 Series Modules on page 21
● Management Switch Modules (MSM) on page 21
● I/O Modules on page 25
Overview of the BlackDiamond 8800 Series Modules
Modules available for the BlackDiamond 8800 series switches include management switch modules
(MSMs) and I/O modules. A BlackDiamond module consists of a printed circuit board mounted on a
metal panel that acts as the insertion vehicle in the BlackDiamond 8800 series switches. The module
carrier also includes ejector/injector levers and captive retaining screws at each end of the module front
panel. LEDs on the module front panel provide information about the operating status of the modules.
CAUTION
Do not attempt to mix modules across Extreme Networks product lines. BlackDiamond 8800 series modules are for
use only in a BlackDiamond 8806 or 8810 switch. When a BlackDiamond 8800 series switch is in use,
ExtremeXOS software will not recognize a module from a different product line.
Management Switch Modules (MSM)
The following MSMs are available for the BlackDiamond 8800 series switches:
● MSM-G8X
● MSM-48
● MSM-48c
The MSMs provide the active switching fabric and CPU control subsystem for the switch. One MSM is
required for switch operation; however, adding a second MSM to the chassis increases reliability and
throughput. Each MSM provides 192 Gbps of switching throughput through three ASICs.
A compact flash slot allows you to insert an external compact flash memory card. (See Chapter 1 for
more information about Extreme Networks-supported compact flash cards.)
Redundant MSM Activity
The BlackDiamond 8800 series switches can run with a single MSM installed. When you install an
additional MSM, one of the MSMs operates as the primary MSM and the other becomes the backup
(secondary) MSM. The primary MSM is responsible for upper-layer protocol processing and system
management functions. Packet handling is distributed among the CPUs of all installed MSMs.
When you save the switch configuration, it is saved to all MSMs.
BlackDiamond 8800 Series Switches Hardware Installation Guide
21
Page 22
BlackDiamond 8800 Series Modules
Selection of the primary MSM occurs automatically. The following examples describe the selection
process:
● When a switch boots with two MSMs installed, the MSM in the lower-numbered slot becomes the
primary MSM. In the BlackDiamond 8810 switch this is slot 5; in the BlackDiamond 8806 switch, this
is slot 3.
● When a switch boots with a single MSM (regardless of the slot position), it is selected as the primary
MSM.
If a second MSM is added to the switch after it has been powered up, the added MSM becomes the
backup MSM. MSMs that operate as backup MSMs can be inserted and removed without disrupting
network services.
● If you remove the primary MSM while the switch is operating, the backup MSM performs a soft
reset and then becomes the primary MSM.
For example, in a BlackDiamond 8810 switch with a primary MSM in slot 5 and a backup MSM in
slot 6, if you remove the primary MSM from slot 5, the backup MSM in slot 6 becomes the primary
MSM.
MSM Physical Features
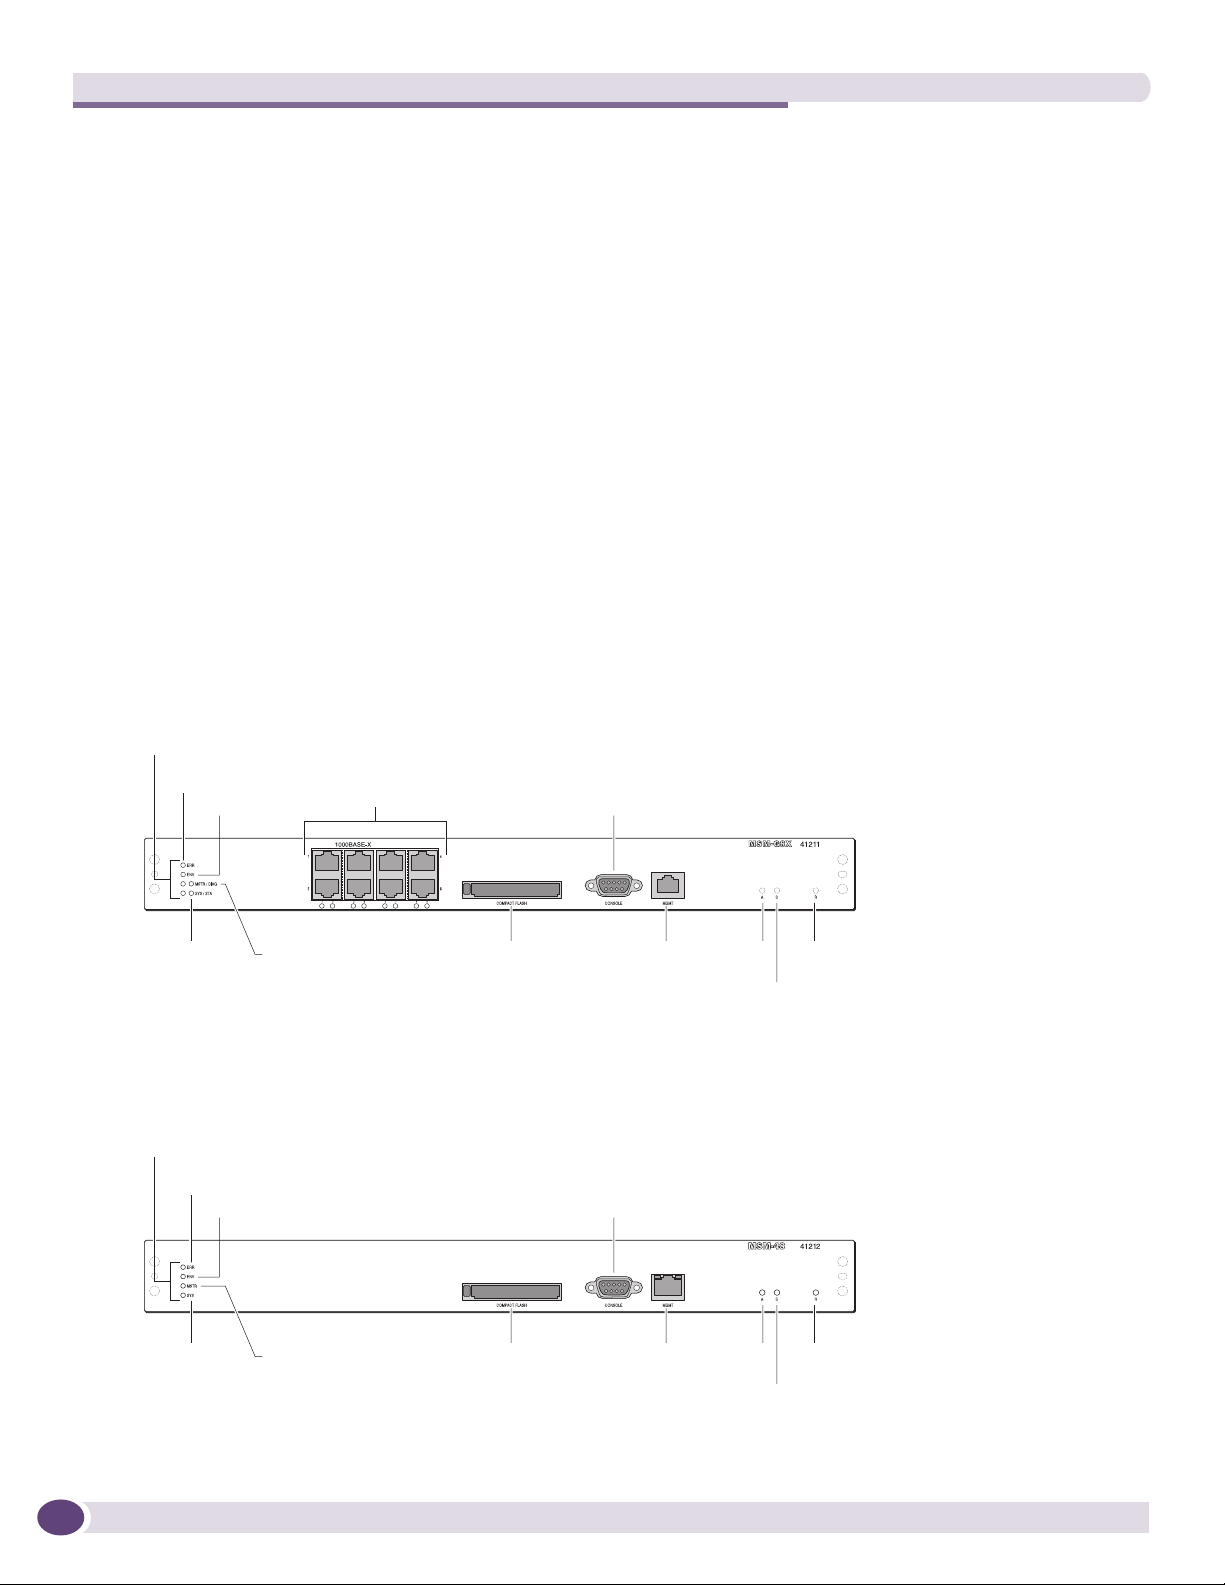
Figure 5 shows the MSM-G8X.
Figure 5: MSM-G8X
Module status LEDs
ERR
ENV
SYS/STA
MSTR/DIAG
Figure 6 shows the MSM-48.
Figure 6: MSM-48
Module status LEDs
ERR
ENV
Mini-GBIC
fiber ports
Compact flash
Console port
MGMT port A R
Console port
D
ASP038C
22
SYS
MSTR
Compact flash
MGMT port A R
D
ASP050
BlackDiamond 8800 Series Switches Hardware Installation Guide
Page 23
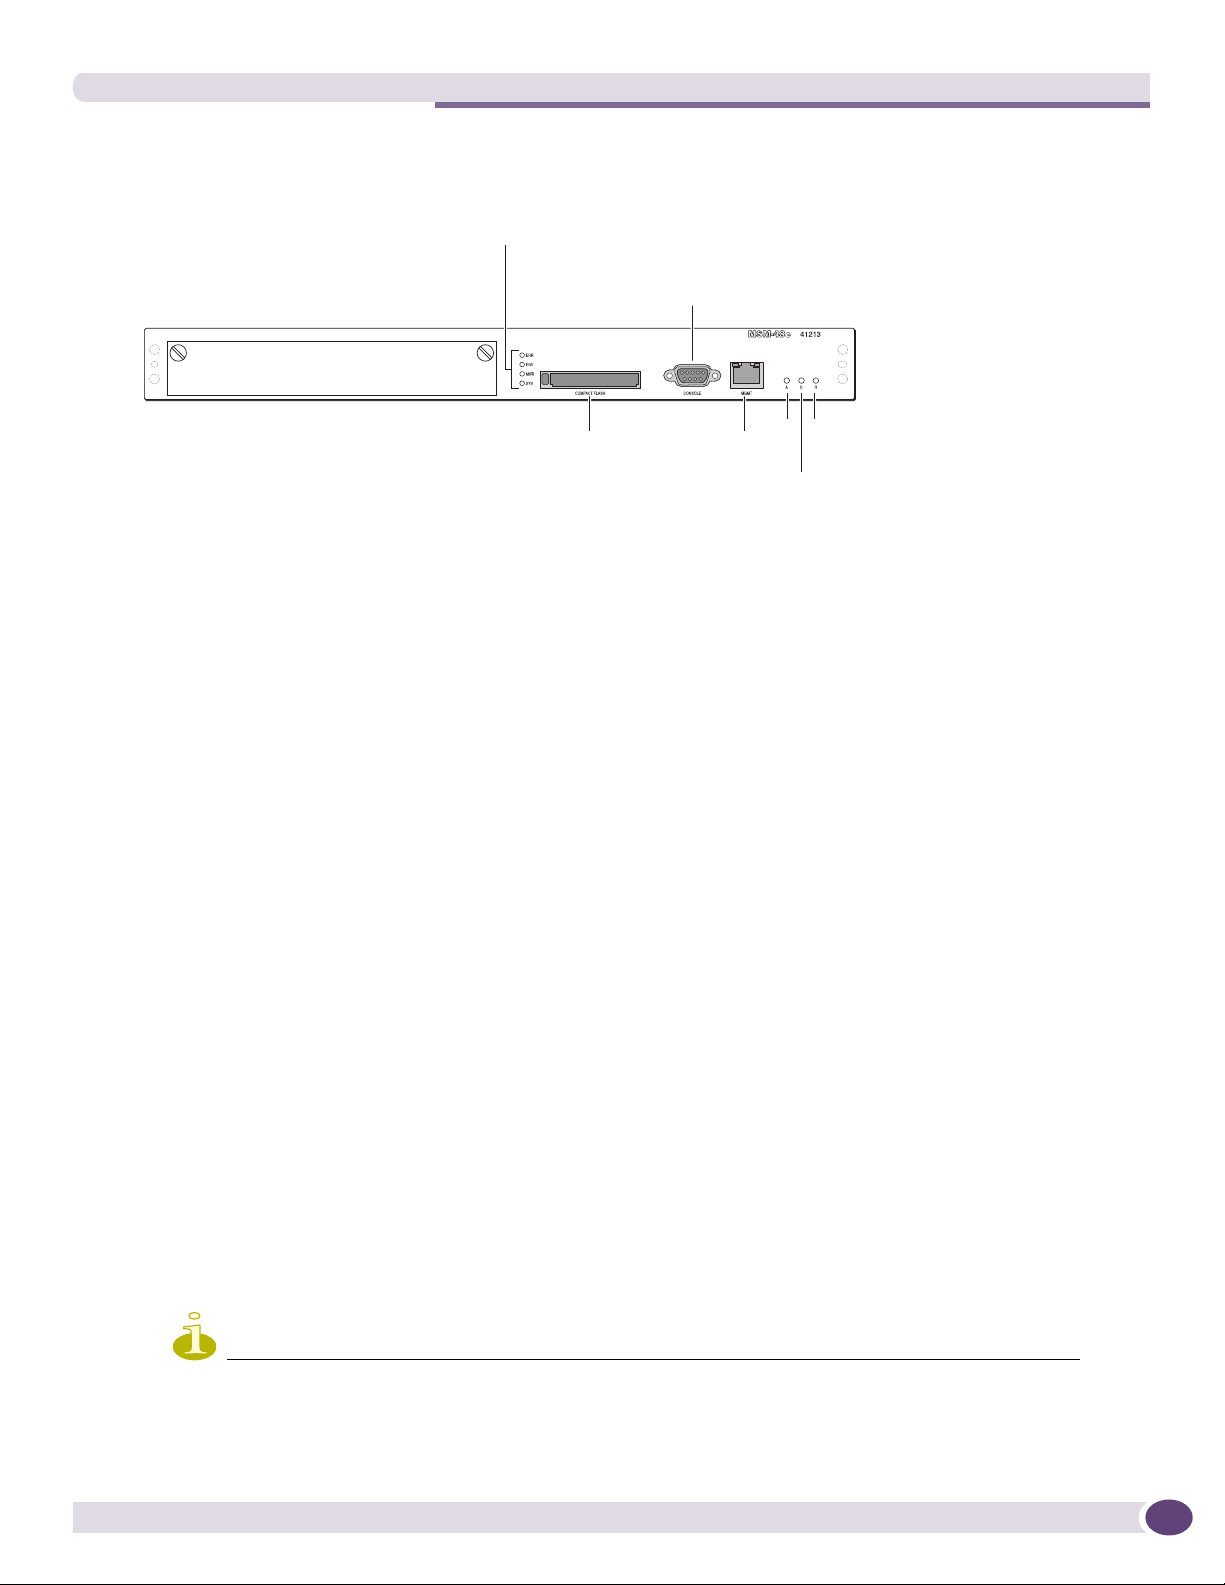
Figure 7 shows the MSM-48c.
Figure 7: MSM-48c
Management Switch Modules (MSM)
Module status LEDs
Console port
port
A R
D
ASP_051
Compact flash
MGMT
The BlackDiamond 8800 series MSMs have the following features on the front panel:
● Console port—DB-9 serial port used to connect a terminal and perform local management.
● Management port—A 10/100 Mbps Ethernet management port used to connect an Ethernet cable
directly from your laptop to the switch to view and locally manage the switch configurations. This
port can also be used to connect the system into a parallel management network for administration.
● A button—Allows you to select the alternate BootROM image when you power on the module. To
use the alternate BootROM image, you must hold the A button while pressing the R button
simultaneously.
● D button—Allows you to force a system dump that dumps the debug information into NVRAM.
This information is available on the next reboot. No core file is created.
● R button—Allows you to reset the MSM-G8X without removing the module from the chassis.
● Compact flash slot
The MSM-G8X has the following additional ports:
● Eight SFP data ports—These data ports operate the same as the ports on the G24X I/O module. (See
“G24X I/O Module” on page 26 for more information about these ports.) The eight data ports are
integrated into the MSM and managed by a separate I/O processor, which retains control of the
eight Ethernet ports on the MSM during a failover. The backup MSM can take control of the ports.
The MSM-48c has a slot for one of the following option cards:
● S-G8Xc—Adds eight 1-gigabit SFP data ports to the MSM-48c. These data ports operate the same as
the ports on the G24Xc I/O module. (See “G24Xc I/O Module” on page 34 for more information
about these ports.)
● S-10G1Xc—Adds one 10-gigabit XFP data port to the MSM-48c. This data port operates the same as
the ports on the 10G4Xc I/O module. (See “10G4Xc I/O Module” on page 33 for more information
about this port.)
The MSM-48c has more CPU memory than the other two MSM models. For details of feature support in
the MSM-48c, see the ExtremeXOS 12.1 Concepts Guide.
NOTE
See the ExtremeXOS 12.1 Concepts Guide and the ExtremeXOS 12.1 Command Reference Guide for more
information about numbering conventions for modules and ports, as well as configuration and display
information.
BlackDiamond 8800 Series Switches Hardware Installation Guide
23
Page 24
BlackDiamond 8800 Series Modules
MSM LEDs
Table 3 describes the LED activity on the BlackDiamond 8800 series MSMs.
Table 3: MSM-G8X, MSM-48. and MSM-48c LEDs
LED Color Indicates
SYS Green blinking Normal operation is occurring.
Off Switch is not receiving power or MSM is running diagnostics.
STA
(MSM-G8X only)
MSTR Green Module is operating as primary MSM.
DIAG
(MSM-G8X only)
ERR Amber A critical software error has been logged since power-up.
ENV Green Environment (temperature, fan, power supply) is operating properly.
Link on MSTR
Ethernet port
Activity on MSTR Amber Packet activity is occurring.
Amber blinking Diagnostic tests are running on the module. The LED resets if the
diagnostics are terminated.
Amber Diagnostic failure has occurred.
Off Normal operation for diagnostics.
Amber Module is operating as backup (secondary) MSM.
Off Normal operation for diagnostics.
Green blinking Power-on self-test (POST) is running.
Off Normal operation for diagnostics.
Off Normal operation is occurring.
Amber Environmental failure has occurred.
Green Link is up.
Off Link is down.
NOTE
The LEDs on the management Ethernet port are not labeled. On most modules, the LED on the right is the link
LED, and the one on the left is the activity LED. On the MSM-48c, the left LED indicates link status, and the right
LED indicates link activity by blinking green.
NOTE
The data port LEDs on the MSM-G8X operate the same as the port status LEDs on the G24X I/O module.
I/O Modules
The following series of I/O modules are available for the BlackDiamond 8800 series switches:
● BlackDiamond 8800 original series I/O modules (see page 25)
● BlackDiamond 8800 a-series I/O modules (see page 28)
● BlackDiamond 8800 c-series I/O modules (see page 32)
● BlackDiamond 8800 e-series I/O modules (see page 36)
24
BlackDiamond 8800 Series Switches Hardware Installation Guide
Page 25

I/O Modules
No configuration information is stored on the I/O modules; all configuration information is stored on
the MSMs.
When a BlackDiamond 8800 series switch is powered on, the software generates a default configuration
for any slots that contain I/O modules. The default configuration allows the I/O module ports to
participate in the VLAN named default. The default configuration for the I/O module is not preserved
unless you explicitly save the configuration to NVRAM.
You can configure parameters of an I/O module after it is installed, or preconfigure a slot for a certain
type of module and configuration. The preconfigured information is applied to the module after it is
inserted. If you preconfigure a slot for a specific module type and then insert a different type of module,
the inserted module reverts to its default configuration.
NOTE
See the ExtremeXOS 12.1 Concepts Guide and the ExtremeXOS 12.1 Command Reference Guide for feature-specific
information related to BlackDiamond 8800 series modules.
CAUTION
When BlackDiamond 8800 I/O modules from different series (original series, a-series, c-series, and e-series) are
installed in the same BlackDiamond 8800 series chassis, limitations on feature sets may occur. See the
ExtremeXOS 12.0 Concepts Guide and the ExtremeXOS 12.0 Command Reference Guide for more information about
these limitations.
BlackDiamond 8800 Original Series I/O Modules
The BlackDiamond 8800 original series of I/O modules consists of the following:
● G24X I/O Module on page 26
● 10G4X I/O Module on page 26
● G48T I/O Module on page 27
● G48P I/O Module on page 28
NOTE
The ports on the MSM-G8X also have the same operational features as the ports on the G24X I/O module and can
be included as part of the BlackDiamond 8800 original series I/O modules.
G24X I/O Module
The G24X I/O module (Figure 8) has 24 unpopulated SFP-based Gigabit Ethernet ports.
BlackDiamond 8800 Series Switches Hardware Installation Guide
25
Page 26
BlackDiamond 8800 Series Modules
Figure 8: G24X I/O Module
Module status LEDs
1000BASE-X
ports
ASP041A
The default configuration of the G24X module is as follows. All ports:
● Are added to the default VLAN as untagged
● Inherit the properties of the default VLAN (for example, protocol type and VLANid)
The G24X module has the following LEDs:
● Module status
● Module diagnostics
● Port status
For information about the LEDs and their activity on the G24X module, see “I/O Module LEDs” on
page 38. For information about the SFP modules, see the Extreme Networks Pluggable Interface Modules
Installation Guide.
10G4X I/O Module
The 10G4X I/O module (Figure 9) has four unpopulated XENPAK-based 10 Gigabit Ethernet ports.
Figure 9: 10G4X I/O Module
26
Module status LEDs 10 Gbs ports
ASP040A
The default configuration of the 10G4X I/O module is as follows. All ports:
● Are added to the default VLAN as untagged.
● Inherit the properties of the default VLAN (for example, protocol type and VLANid)
The 10G4X I/O module has the following LEDs:
● Module status
● Module diagnostics
● Port status
For information about the LEDs and their activity on the 10G4X I/O module, see “I/O Module LEDs”
on page 38. For information about the XENPAK interfaces, see the Extreme Networks Pluggable Interface
Modules Installation Guide.
BlackDiamond 8800 Series Switches Hardware Installation Guide
Page 27

I/O Modules
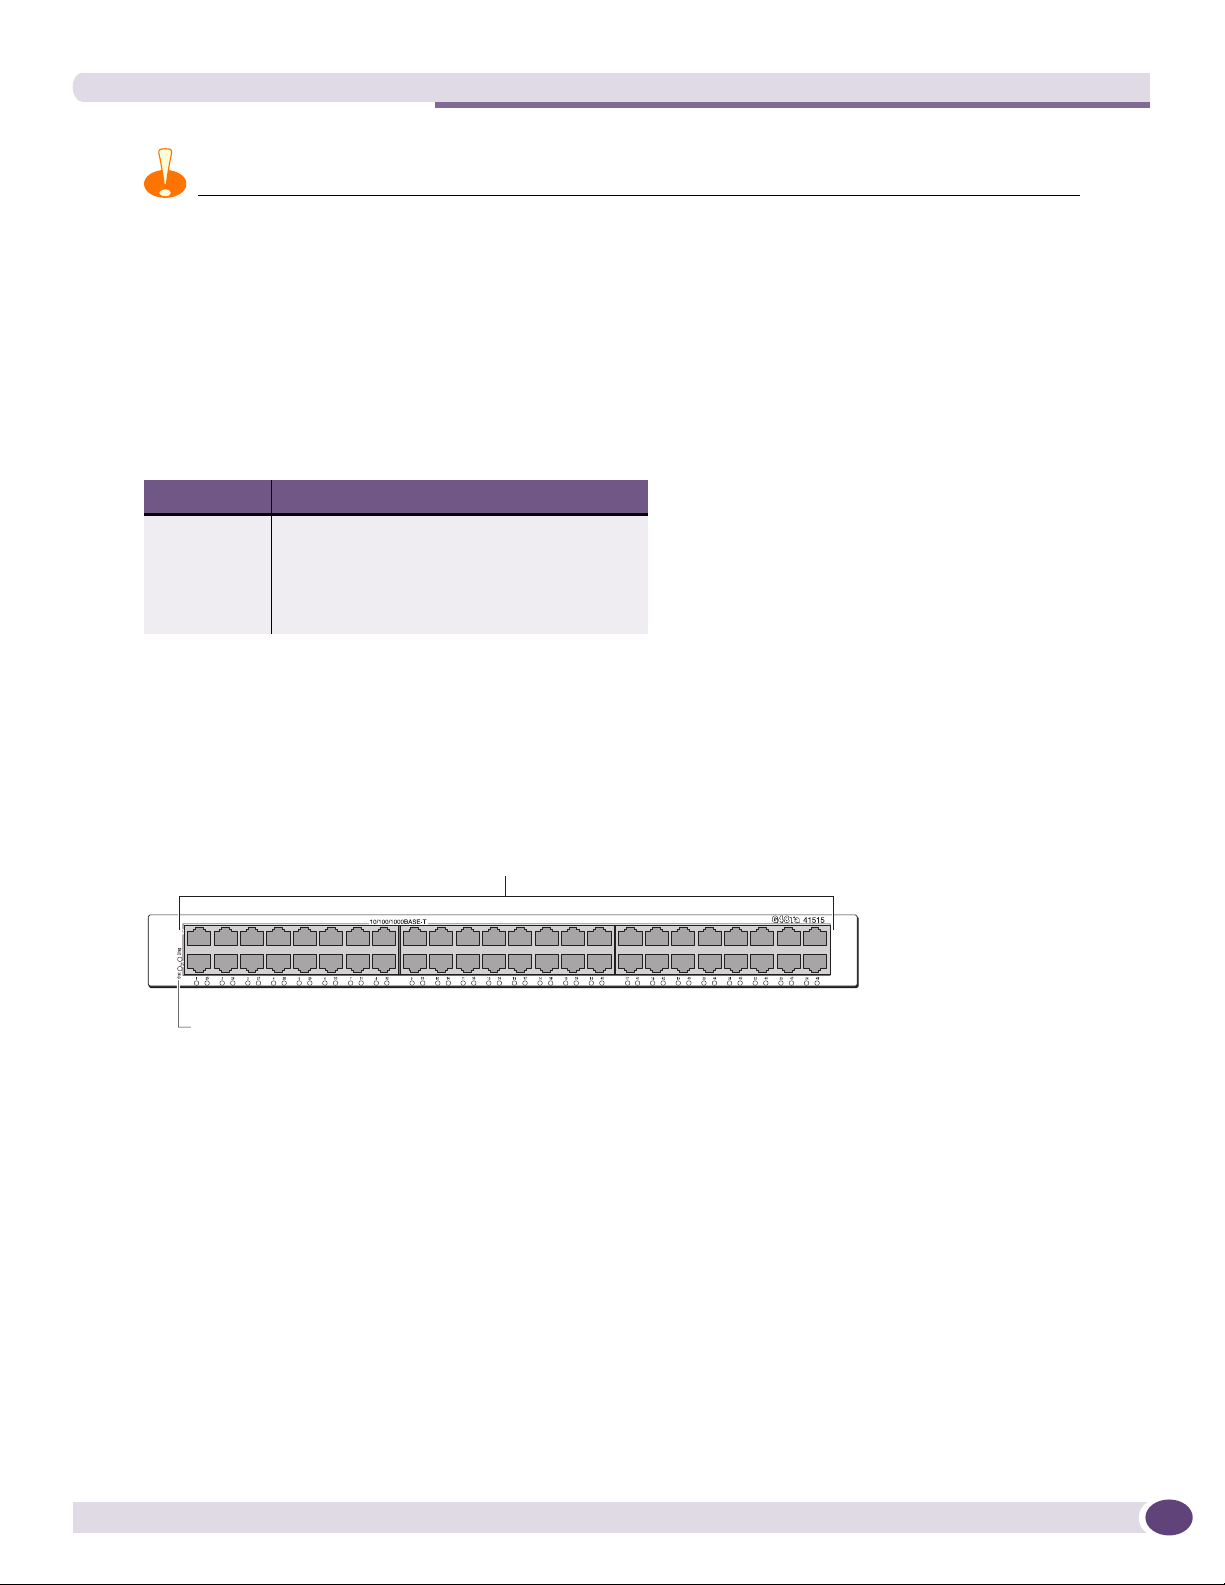
G48T I/O Module
The G48T I/O module (Figure 10) has 48 autosensing 10/100/1000BASE-T ports that use standard RJ-45
connectors.
Figure 10: G48T I/O Module
10/100/1000BASE-T
ports
Module status LEDs
ASP037A
The default configuration of the G48T I/O module is as follows. All ports:
● Are added to the default VLAN as untagged
● Inherit the properties of the default VLAN (for example, protocol type and VLANid)
● Operate in autonegotiation mode
The G48T I/O module has the following LEDs:
● Module status
● Module diagnostics
● Port status
For information about the LEDs and their activity on the G48T I/O module, see “I/O Module LEDs” on
page 38.
BlackDiamond 8800 Series Switches Hardware Installation Guide
27
Page 28
BlackDiamond 8800 Series Modules
G48P I/O Module
The G48P I/O module (Figure 11) has 48 autosensing 10/100/1000BASE-T ports that use standard RJ-45
connectors. In addition to the Ethernet connection, these ports can deliver Power over Ethernet (PoE) to
an attached device using the same cable. The G48P I/O module supports the IEEE 802.3af PoE
specification.
Figure 11: G48P I/O Module
10/100/1000BASE-T
PoE ports
Module status LEDs
ASP039A
When powered devices (PDs) are connected to a port, the PDs are discovered and classified as
802.3af-compliant or as legacy devices. ExtremeXOS implements the following functions:
● Enables the port for discovery, classification, and power delivery
● Enforces port power limits by denying power to a device exceeding the configured limit
● Enforces class limits by denying power to a device exceeding the class limit
● Reports and tracks port power faults
The default configuration of the G48P I/O module is as follows. All ports:
● Are added to the default VLAN as untagged
● Inherit the properties of the default VLAN (for example, protocol type and VLANid)
● Operate in autonegotiation mode
The G48P I/O module has the following LEDs:
● Module status
● Module diagnostics
● Port status
● Power status
For information about the LEDs and their activity on the G48P I/O module, see “I/O Module LEDs” on
page 38.
28
BlackDiamond 8800 a-Series I/O Modules
The BlackDiamond 8800 a-series I/O modules include:
● G48Ta I/O Module on page 29
● G48Xa I/O Module on page 30
● 10G4Xa I/O Module on page 31
● 10G4Ca I/O Module on page 31
BlackDiamond 8800 Series Switches Hardware Installation Guide
Page 29
I/O Modules
CAUTION
BlackDiamond a-series modules require specific minimum versions of ExtremeXOS software to be recognized by the
MSM (see Tabl e 4 ). Software builds earlier than the listed versions do not support the specified I/O modules.
If you attempt to install one of these I/O modules before upgrading the software on your MSM, the module will not
be recognized by the software and it will not power up. The following error messages are similar to the messages
that may be displayed on the console or in the log. (Samples represent an unrecognized module in slot 2.)
● On the console: ERROR: Unknown cardtype in slot 2 - please program the eeprom
● In the log: <Error: HAL.Card.Error> MSM-A: Unable to read cardtype for slot 2
Table 4: Minimum Software Versions for BlackDiamond 8800 a-Series Modules
Module Required ExtremeXOS version
G48Ta ExtremeXOS 11.5.0 or later
G48Xa ExtremeXOS 11.5.0 or later
10G4Xa ExtremeXOS 11.6.0 or later
10G4Ca ExtremeXOS 12.0.1 or later
G48Ta I/O Module
The G48Ta I/O module (Figure 12) has 48 autosensing 10/100/1000BASE-T ports that use standard
RJ-45 connectors.
Figure 12: G48Ta I/O Module
10/100/1000BASE-T
ports
Module status LEDs
The default configuration of the G48Ta I/O module is as follows. All ports:
● Are added to the default VLAN as untagged
● Inherit the properties of the default VLAN (for example, protocol type and VLANid)
● Operate in autonegotiation mode
The G48Ta I/O module has the following LEDs:
● Module status
● Module diagnostics
● Port status
ASP048
For information about the LEDs and their activity on the G48Ta I/O module, see “I/O Module LEDs”
on page 38.
BlackDiamond 8800 Series Switches Hardware Installation Guide
29
Page 30
BlackDiamond 8800 Series Modules
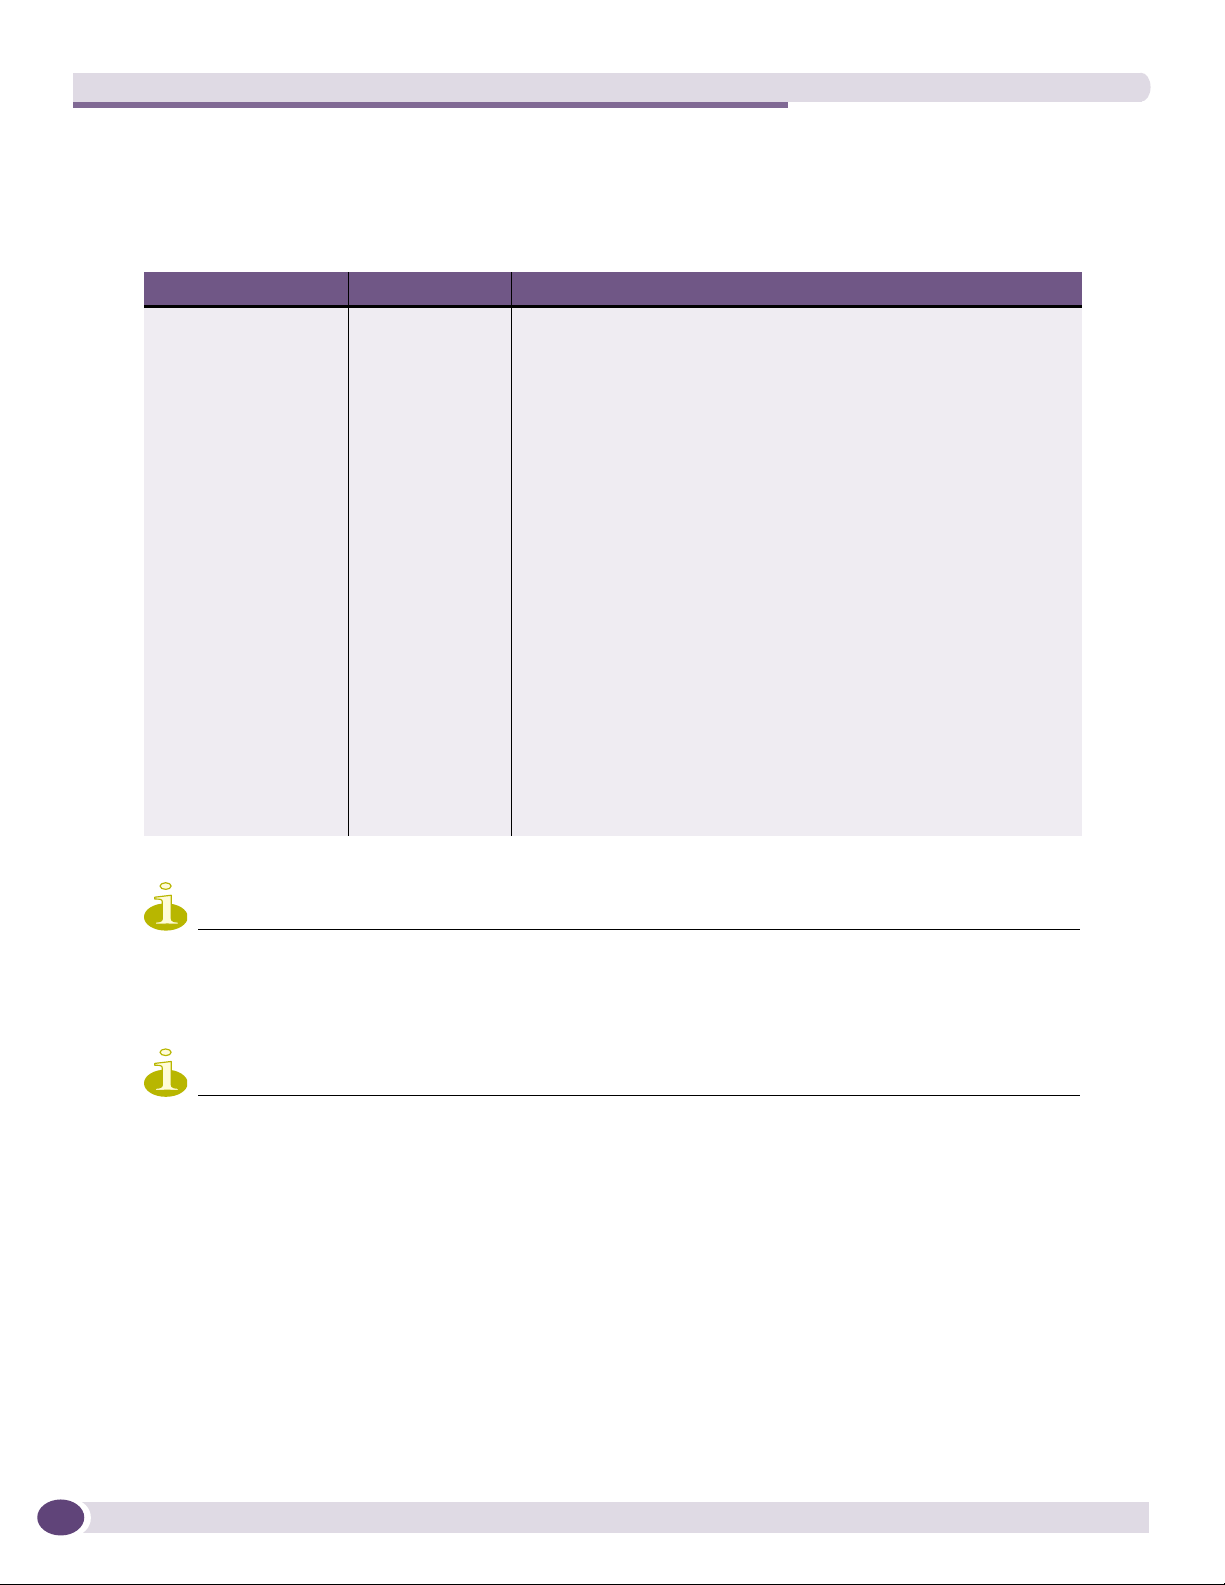
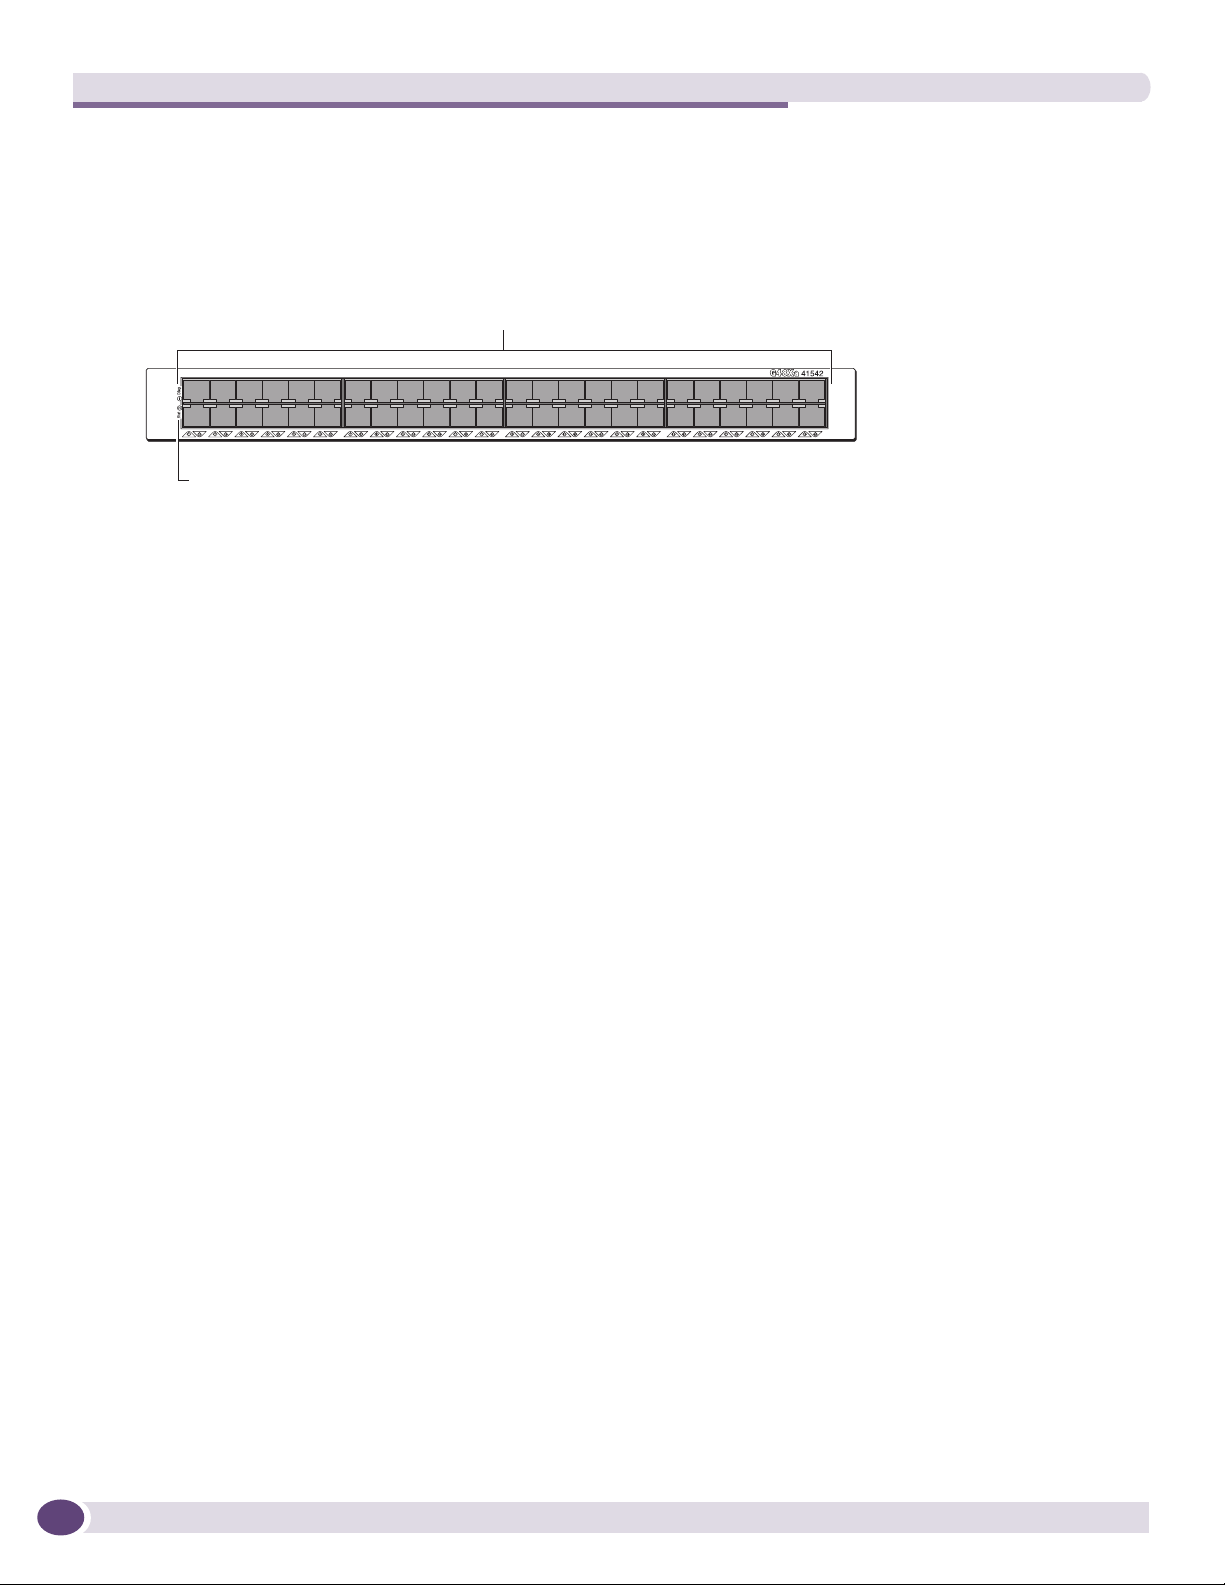
G48Xa I/O Module
The G48Xa I/O module (Figure 13) has 48 1000BASE-X ports that use SPF fiber SFP connectors.
Figure 13: G48Xa I/O Module
1000BASE-X
ports
Module status LEDs
ASP049A
The default configuration of the G48Xa module is as follows. All ports:
● Are added to the default VLAN as untagged
● Inherit the properties of the default VLAN (for example, protocol type and VLANid)
The G48Xa module has the following LEDs:
● Module status
● Module diagnostics
● Port status
For information about the LEDs and their activity on the G48Xa module, see “I/O Module LEDs” on
page 38. For information about SFPs, see the Extreme Networks Pluggable Interface Modules Installation
Guide.
30
BlackDiamond 8800 Series Switches Hardware Installation Guide
Page 31

10G 4Xa
10G 4Ca
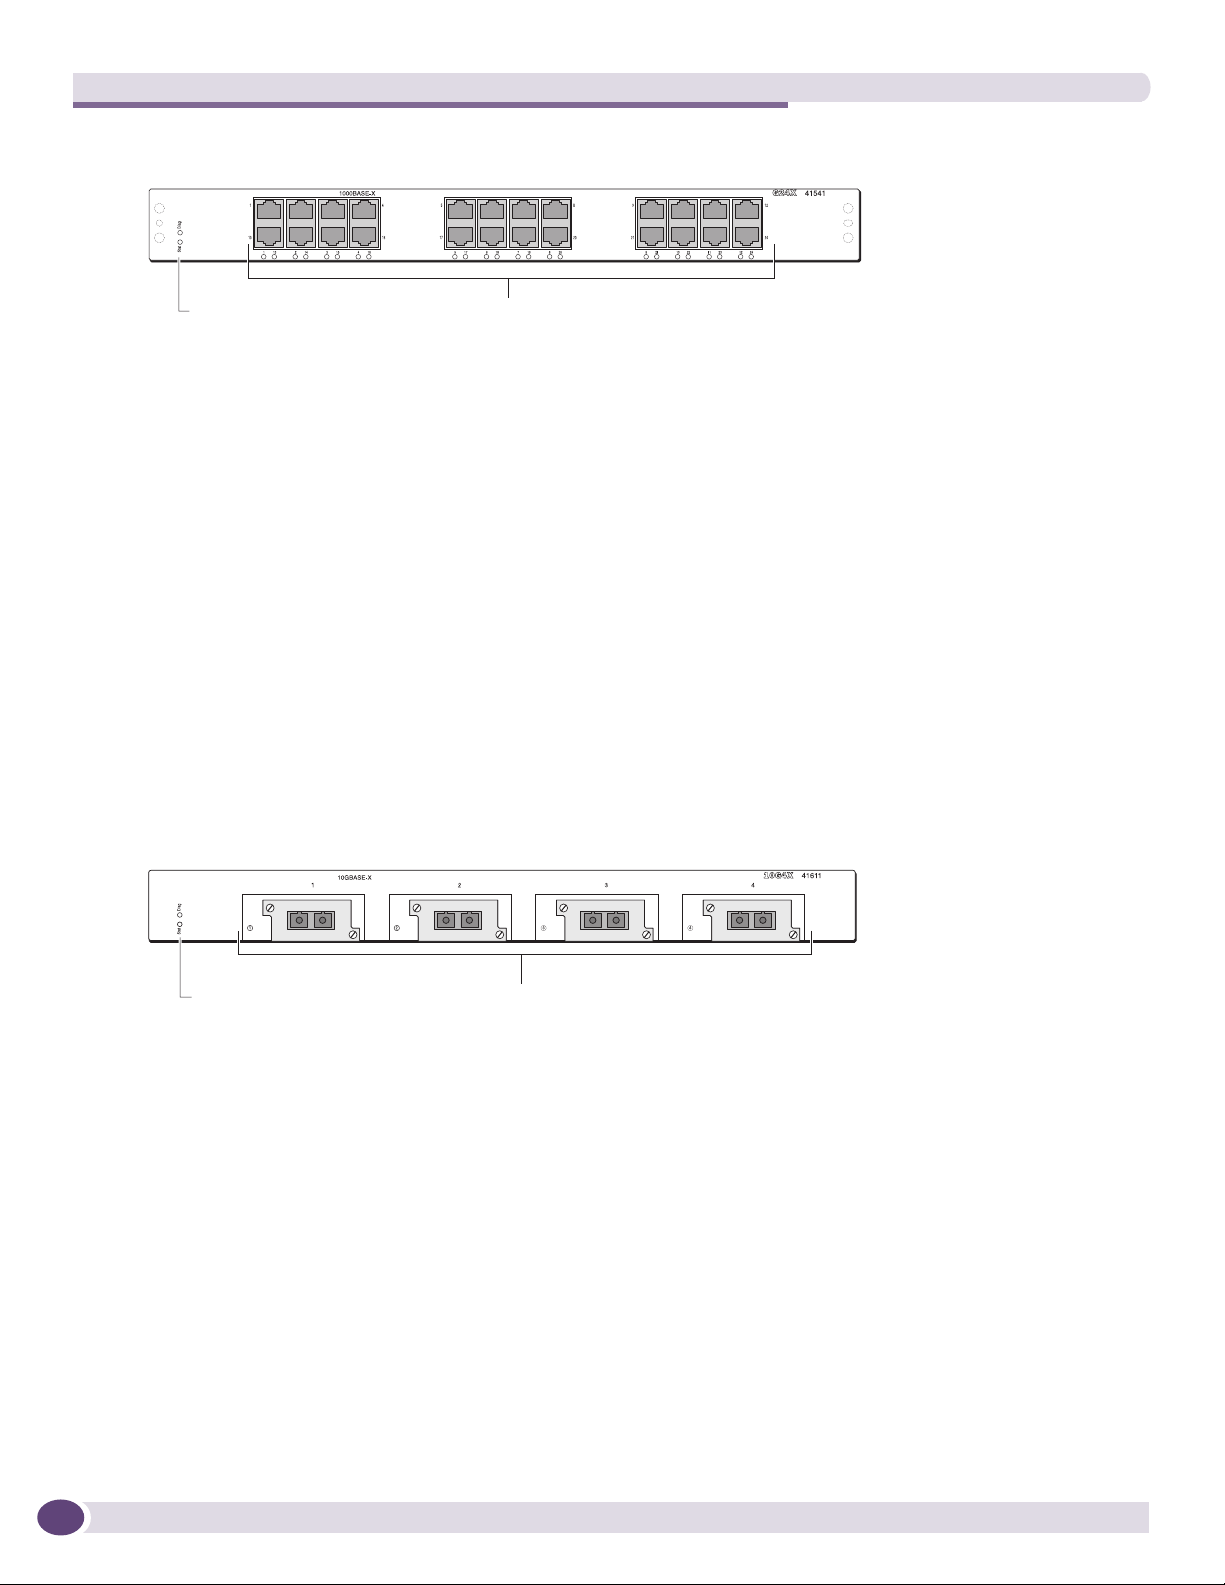
10G4Xa I/O Module
The 10G4Xa I/O module (Figure 14) has four XFP-based 10-gigabit Ethernet ports.
Figure 14: 10G4Xa I/O Module
41612
10GBASE-X XFP
10G4Xa
I/O Modules
Module status LEDs 10 Gbs ports
BD_155
The default configuration of the 10G4Xa I/O module is as follows. All ports:
● Are added to the default VLAN as untagged
● Inherit the properties of the default VLAN (for example, protocol type and VLANid)
The 10G4Xa I/O module has the following LEDs:
● Module status
● Module diagnostics
● Port status
For information about the LEDs and their activity on the 10G4Xa I/O module, see “I/O Module LEDs”
on page 38. For information about the XFP interfaces, see the Extreme Networks Pluggable Interface
Modules Installation Guide.
10G4Ca I/O Module
The 10G4Ca I/O module (Figure 14) has four 10-gigabit Ethernet ports that use CX4 interface
connectors.
Figure 15: 10G4Ca I/O Module
41613
10GBASE-CX4
10G4Ca
Module status LEDs 10 Gbs ports
BD_156
The default configuration of the 10G4Ca I/O module is as follows. All ports:
● Are added to the default VLAN as untagged
● Inherit the properties of the default VLAN (for example, protocol type and VLANid)
The 10G4Ca I/O module has the following LEDs:
● Module status
● Module diagnostics
● Port status
For information about the LEDs and their activity on the 10G4Ca I/O module, see “I/O Module LEDs”
on page 38.
BlackDiamond 8800 Series Switches Hardware Installation Guide
31
Page 32

BlackDiamond 8800 Series Modules
BlackDiamond 8800 c-Series I/O Modules
The BlackDiamond 8800 c-series of I/O modules consists of the following:
● G48Tc I/O Module on page 32
● 10G4Xc I/O Module on page 33
● 10G8Xc I/O Module on page 34
● G24Xc I/O Module on page 34
● G48Xc I/O Module on page 35
CAUTION
ExtremeXOS builds earlier than version 12.1 do not support the BlackDiamond 8800 c-series modules. If you
attempt to install one of these I/O modules before upgrading the software on your MSM the module will not be
recognized by the software and it will not power up. The following error messages are similar to the messages that
may be displayed on the console or in the log. (Samples represent an unrecognized module in slot 2.)
● Console: ERROR: Unknown cardtype in slot 2 - please program the eeprom
● Log: <Error: HAL.Card.Error> MSM-A: Unable to read cardtype for slot 2
G48Tc I/O Module
The G48Tc I/O module (Figure 16) has 48 autosensing 10/100/1000BASE-T ports that use standard
RJ-45 connectors.
Figure 16: G48Tc I/O Module
10/100/1000BASE-T
ports
Module status LEDs
You can add an optional S-POE daughter card to the G48Tc I/O module to provide Power over Ethernet
functions in this module. With an installed S-POE card, the ports can deliver Power over Ethernet (PoE)
to an attached device, as well as the usual Ethernet connection, using a single cable. The G48Tc I/O
module supports the IEEE 802.3af PoE specification.
The default configuration of the G48Tc I/O module is as follows. All ports:
● Are added to the default VLAN as untagged
● Inherit the properties of the default VLAN (for example, protocol type and VLANid)
● Operate in autonegotiation mode
ASP037A
32
BlackDiamond 8800 Series Switches Hardware Installation Guide
Page 33

10G 4Xc
I/O Modules
The G48Tc I/O module has the following LEDs:
● Module status
● Module diagnostics
● Port status
● POE present
For information about the LEDs and their activity on the G48Tc I/O module, see “I/O Module LEDs”
on page 38.
10G4Xc I/O Module
The 10G4Xc I/O module (Figure 17) has four unpopulated XFP-based 10-gigabit Ethernet ports.
Figure 17: 10G4Xc I/O Module
Module status LEDs
41614
10GBASE-X XFP
10G4Xc
10 Gbs ports
BD_155
The default configuration of the 10G4Xc I/O module is as follows. All ports:
● Are added to the default VLAN as untagged
● Inherit the properties of the default VLAN (for example, protocol type and VLANid)
The 10G4Xc I/O module has the following LEDs:
● Module status
● Module diagnostics
● Port status
For information about the LEDs and their activity on the 10G4Xc I/O module, see “I/O Module LEDs”
on page 38.
BlackDiamond 8800 Series Switches Hardware Installation Guide
33
Page 34

10G 8Xc
BlackDiamond 8800 Series Modules
10G8Xc I/O Module
The 10G8Xc I/O module Figure 18 has eight unpopulated XFP-based 10-gigabit Ethernet ports. This
module is over-subscribed 2:1.
Figure 18: 10G8Xc I/O Module
Module status LEDs
41615
10GBASE-X XFP
10G8Xc
10 Gbs ports
BD_155
The default configuration of the 10G8Xc I/O module is as follows. All ports:
● Are added to the default VLAN as untagged
● Inherit the properties of the default VLAN (for example, protocol type and VLANid)
The 10G8Xc I/O module has the following LEDs:
● Module status
● Module diagnostics
● Port status
For information about the LEDs and their activity on the 10G8Xc I/O module, see “I/O Module LEDs”
on page 38.
G24Xc I/O Module
The G24Xc I/O module Figure 19 has 24 unpopulated SFP-based 1-gigabit Ethernet ports.
Figure 19: G24Xc I/O Module
1000BASE-X
ports
34
Module status LEDs
ASP049B
The default configuration of the G24Xc I/O module is as follows. All ports:
● Are added to the default VLAN as untagged
● Inherit the properties of the default VLAN (for example, protocol type and VLANid)
BlackDiamond 8800 Series Switches Hardware Installation Guide
Page 35

I/O Modules
The G24Xc I/O module has the following LEDs:
● Module status
● Module diagnostics
● Port status
For information about the LEDs and their activity on the G24Xc I/O module, see “I/O Module LEDs”
on page 38.
G48Xc I/O Module
The G48Xc I/O module (Figure 20) has 48 unpopulated SFP-based 1-gigabit Ethernet ports.
Figure 20: G48Xc I/O Module
1000BASE-X
ports
Module status LEDs
ASP049A
The default configuration of the G48Xc I/O module is as follows. All ports:
● Are added to the default VLAN as untagged
● Inherit the properties of the default VLAN (for example, protocol type and VLANid)
The G48Xc I/O module has the following LEDs:
● Module status
● Module diagnostics
● Port status
For information about the LEDs and their activity on the G48Xc I/O module, see “I/O Module LEDs”
on page 38.
BlackDiamond 8800 Series Switches Hardware Installation Guide
35
Page 36

BlackDiamond 8800 Series Modules
BlackDiamond 8800 E-Series I/O Modules
The BlackDiamond 8800 e-series of I/O modules include:
● G48Te I/O Module on page 36
● G48Pe I/O Module on page 37
● G48Te2 I/O Module on page 38
CAUTION
ExtremeXOS software builds earlier than version 11.5.0 do not support G48Te or G48Pe I/O modules. ExtremeXOS
builds earlier than version 12.1 do not support the G48Te2 I/O module. If you attempt to install one of these I/O
modules before upgrading the software on your MSM to the required minimum version, the module will not be
recognized by the software and it will not power up. The following error messages are similar to the messages that
may be displayed on the console or in the log. (Samples represent an unrecognized module in slot 2.)
● Console: ERROR: Unknown cardtype in slot 2 - please program the eeprom
● Log: <Error: HAL.Card.Error> MSM-A: Unable to read cardtype for slot 2
G48Te I/O Module
The G48Te I/O module (Figure 21) has 48 autosensing 10/100/1000BASE-T ports that use standard
RJ-45 connectors. When an 8800 series switch is running in dual-MSM mode, this module will be
oversubscribed 2:1. When the switch is running a single MSM, this module will be oversubscribed 4:1.
Figure 21: G48Te I/O Module
10/100/1000BASE-T
ports
Module status LEDs
The default configuration of the G48Te I/O module is as follows. All ports:
● Are added to the default VLAN as untagged
● Inherit the properties of the default VLAN (for example, protocol type and VLANid)
● Operate in autonegotiation mode
ASP047
36
The G48Te I/O module has the following LEDs:
● Module status
● Module diagnostics
● Port status
For information about the LEDs and their activity on the G48Te I/O module, see “I/O Module LEDs”
on page 38.
BlackDiamond 8800 Series Switches Hardware Installation Guide
Page 37

I/O Modules
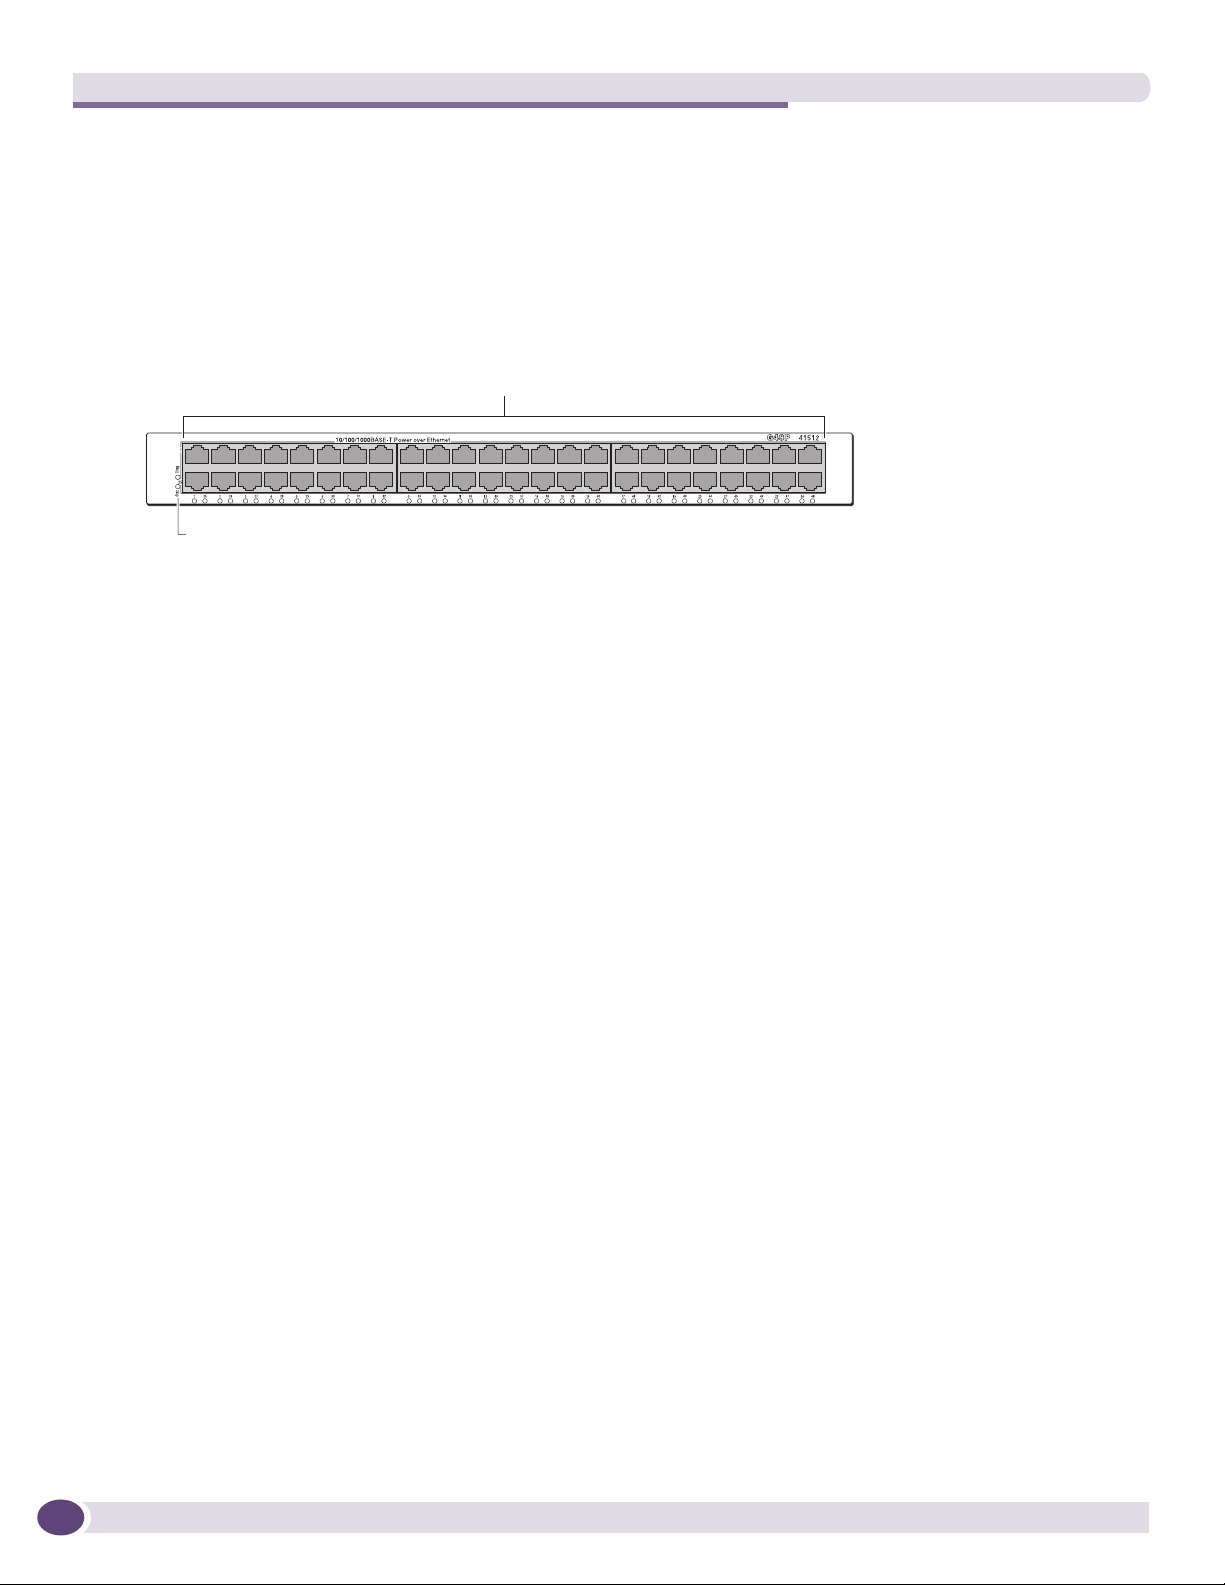
G48Pe I/O Module
The G48Pe I/O module (Figure 22) has 48 autosensing 10/100/1000BASE-T ports that use standard
RJ-45 connectors. In addition to the Ethernet connection, these ports can deliver Power over Ethernet
(PoE) to an attached device, using the same cable. The G48Pe I/O module supports the IEEE 802.3af
PoE specification. When an 8800 series switch is running in dual-MSM mode, this module will be
oversubscribed 2:1. When the switch is running a single MSM, this module will be oversubscribed 4:1.
Figure 22: G48Pe I/O Module
10/100/1000BASE-T
PoE ports
Module status LEDs
ASP046
When powered devices (PDs) are connected to a port, the PDs are discovered and classified as
802.3af-compliant or as legacy devices. ExtremeXOS implements the following functions:
● Enables the port for discovery, classification, and power delivery
● Enforces port power limits by denying power to a device exceeding the configured limit
● Enforces class limits by denying power to a device exceeding the class limit
● Reports and tracks port power faults
The default configuration of the G48Pe I/O module is as follows. All ports:
● Are added to the default VLAN as untagged
● Inherit the properties of the default VLAN (for example, protocol type and VLANid)
● Operate in autonegotiation mode
The G48Pe I/O module has the following LEDs:
● Module status
● Module diagnostics
● Port/Power status
For information about the LEDs and their activity on the G48Pe I/O module, see “I/O Module LEDs”
on page 38.
BlackDiamond 8800 Series Switches Hardware Installation Guide
37
Page 38

BlackDiamond 8800 Series Modules
G48Te2 I/O Module
The G48Te2 I/O module (Figure 21) has 48 autosensing 10/100/1000BASE-T ports that use standard
RJ-45 connectors.
Figure 23: G48Te2 I/O Module
10/100/1000BASE-T
ports
Module status LEDs
ASP047
You can add an optional S-POE daughter card to the G48Te2 I/O module to provide Power over
Ethernet functions in this module. With an installed S-POE card, the ports can deliver Power over
Ethernet (PoE) to an attached device as well as the usual Ethernet connection, using a single cable. The
G48Te2 I/O module supports the IEEE 802.3af PoE specification.
The default configuration of the G48Te2 I/O module is as follows. All ports:
● Are added to the default VLAN as untagged
● Inherit the properties of the default VLAN (for example, protocol type and VLANid)
● Operate in autonegotiation mode
The G48Te2 I/O module has the following LEDs:
● Module status
● Module diagnostics
● Port status
For information about the LEDs and their activity on the G48Te2 I/O module, see “I/O Module LEDs”
on page 38.
38
I/O Module LEDs
This section describes the LEDs for the module, for the port, and for inline power delivery status for
I/O modules in the BlackDiamond 8800 series of switches.
NOTE
Inline power delivery applies only to the ports on the G48P and G48Pe I/O modules or to a G48tc or G48Te2 I/O
module with an installed S-POE card.
BlackDiamond 8800 Series Switches Hardware Installation Guide
Page 39

I/O Modules
Module LEDs
Table 5 describes the LED activity for all BlackDiamond 8800 series I/O modules.
Table 5: BlackDiamond 8800 Series I/O Module LEDs
LED Color Indicates
Status Green blinking
Amber blinking
Off
DIAG Off
Amber blinking
Amber
Normal operation
Configuration error, code version error, diagnostic
failure, or other severe module error
No power
Normal operation
Diagnostics in progress
Diagnostic failure
Port LEDs on Non-PoE Modules
This section describes the port LEDs for non-PoE BlackDiamond 8800 series I/O modules and for port
option cards installed in the MSM-8c. These include the following modules and option cards:
● G24X ● G24Xc
● G48T ● G48Xc
● 10G4X ● 10G4Xc
● G48Ta ● 10G8Xc
● G48Xa ● G48Te
● 10G4Xa ● G48Te2 (without S-POE card)
● 10G4Ca ● S-10G1Xc option card
● G48Tc (without S-POE card) ● S-G8Xc option card
Table 6 describes the LED meanings for each port on the non-PoE BlackDiamond 8800 series I/O
modules and the port option cards for the MSM-8c.
Table 6: Port LEDs for the BlackDiamond 8800 Series Non-PoE I/O Modules and Port Option Cards
LED Color Indicates
Port Solid green
Slow green blinking
Amber blinking
Off
NOTE
Tabl e 6 describes port LED activity for the G48Tc and G48Te2 modules without an installed S-POE card. When
these modules have an S-POE card installed, the port LEDs operate as described in Tabl e 7.
Link up
Port disabled
Activity
Link down
BlackDiamond 8800 Series Switches Hardware Installation Guide
39
Page 40

BlackDiamond 8800 Series Modules
Port LEDs on PoE Modules (G48P, G48Pe, and G48Tc or G48Te2 with S-POE Card)
This section describes the port LEDs for BlackDiamond 8800 series I/O modules that support PoE.
These include the following modules:
● G48P
● G48Pe
● G48Tc I/O module with an installed S-POE card
● G48Te2 I/O module with an installed S-POE card
Port LEDs on these modules indicate the status of the inline power delivered through the ports.
Table 7 describes the LED meanings for each port on the PoE-capable I/O modules.
Table 7: Port LEDs for the PoE-capable I/O Modules
LED Color Indicates
Port with power enabled Solid amber Link up
Amber blinking Activity
Slow amber blinking Port disabled
or
Link down
Blinking amber/green Power fault or insufficient power
Port with power disabled Solid green Link up
Slow green blinking Port disabled
Green blinking Activity
Off Link down
Blinking amber/green Power fault or insufficient power
40
BlackDiamond 8800 Series Switches Hardware Installation Guide
Page 41

3 Power Supply Units for BlackDiamond 8800
Series Switches
This chapter includes the following sections:
● Overview of BlackDiamond 8800 Series Power Supplies on page 41
● Extreme Networks 700/1200 W AC PSU on page 42
● Extreme Networks 600/900 W AC PSU on page 45
● Combining Different AC PSU Models on page 47
● Extreme Networks 1200 W DC PSU on page 48
The chapter describes the power supply units used with the BlackDiamond 8800 series switches.
Overview of BlackDiamond 8800 Series Power Supplies
The BlackDiamond 8800 series switches can be powered by either AC or DC power supplies (PSUs).
AC power supplies in the BlackDiamond 8800 series switches are fully fault tolerant and load-sharing in
an N+1 configuration. For a switch using DC power supplies in an N+N configuration, each group of
power supplies can provide A/B feed redundancy for the system. After the system is properly
configured, if one PSU fails, the others will provide sufficient power to operate a fully loaded switch.
The BlackDiamond power supply units are intended for use in specific BlackDiamond switches only.
Table 8 lists the BlackDiamond 8800 series switches and their compatible power supply units.
Table 8: PSU Compatibility in BlackDiamond 8800 Series Switches
BlackDiamond Switch Compatible PSU Compatibility Notes
BlackDiamond 8806 600W/ 900W AC PSU
AND/OR
700W/ 1200W AC PSU
OR
1200W DC PSU
BlackDiamond 8810 700W/ 1200W AC PSU
OR
1200W DC PSU
The 700/1200 W AC PSU can be used in combination
with a 600/900 W AC PSU in the same BlackDiamond
8806 system only.
Extreme Networks does not recommended using the
600/900 W AC PSU or the 700/1200 W AC PSU in
combination with a 1200W DC PSU.
Extreme Networks does not recommended using the
700/1200 W AC PSU in combination with a
1200W DC PSU.
BlackDiamond 8800 Series Switches Hardware Installation Guide
41
Page 42

Power Supply Units for BlackDiamond 8800 Series Switches
Extreme Networks 700/1200 W AC PSU
Figure 24 shows the Extreme Networks 700/1200 W AC UL-listed accessory power supply unit
(Model # 60020/PS 2336). The power supply bay in a BlackDiamond 8800 series switch can
accommodate up to six hot-swappable Extreme Networks 700/1200 W AC PSUs.
Figure 24: Extreme Networks 700/1200 W AC PSU
EX_015
The front panel on each Extreme Networks 700/1200 W AC PSU contains two cooling fans and a handle
for insertion and removal of the unit. Airflow enters the front vents on the PSU and exits through the
rear vents of the switch. Airflow through the Extreme Networks 700/1200 W AC PSU is independent
from the airflow through the rest of the switch.
The AC input connection is located on the switch directly below each installed power supply.
NOTE
In a BlackDiamond 8806 system, the Extreme Networks 700W/1200 W AC PSU can be used with an Extreme
Networks 600/900 W AC PSU in the same chassis.
Extreme Networks does not recommended using the 700/1200 W AC PSU with an Extreme Networks 1200W DC
PSU in the same BlackDiamond 8800 series switch.
WARNING!
Field operators must not attempt to open the 700/1200 W AC PSU enclosure for any reason; the PSU does not
contain user-serviceable parts. In the event of failure, return the defective 700/1200 W AC PSU to Extreme
Networks for repair or replacement.
42
LEDs
The front panel of the Extreme Networks 700/1200 W AC PSU provides status LEDs. Table 9 describes
the LED activity.
BlackDiamond 8800 Series Switches Hardware Installation Guide
Page 43

Table 9: LEDs on the 700/1200 W AC PSU
Extreme Networks 700/1200 W AC PSU
Power
PSU Condition
Power supply AC outputs working normally On Off Off
AC input power present/standby output on Blinking Off Off
Current limit on 48 VDC output On Off Blinking
Predictive failure On Blinking Off
No input power to this PSU only Off Off On
No input power to any PSU Off Off Off
Power supply failure Off Off On
Green
Predictive Fail
Amber
Fail
Amber
Power Supply Cords
Extreme Networks 700/1200 W AC PSUs are shipped with both 110 V AC and 220 V AC power supply
cords. The 110 V AC power supply cord allows a maximum DC output power of 700 W. The 220V AC
power supply cord allows a maximum DC output power of 1200 W.
All power supply cords provided by Extreme Networks are designed for use only in the United States,
Canada, and Mexico. Power supply cords for use outside of North America are typically provided by a
third-party distribution center and must meet the following requirements:
● The power supply cord must be agency-certified for the country of use.
● The power supply cord must have an IEC 320 C13 plug to connect to the IEC320 C14 connector on
the power supply.
● The power supply cord must have an appropriately rated and approved wall plug applicable to the
country of installation.
● The power supply cord must be less than 5 meters long.
● The wire size must be a minimum of 16 AWG (1.0 mm
2
) copper-stranded.
WARNING!
Be sure that the source outlet is properly grounded before plugging the AC power cord into the Extreme Networks
AC PSU.
Fuse
The Extreme Networks 700/1200 W AC PSU line and neutral legs are both fused. Power to the switch
may still be live if the neutral fuse is open. This is not a field operator replaceable fuse. In the event of
failure, immediately return the Extreme Networks 700/1200 W AC PSU for a complete replacement.
WARNING!
Field operators must not attempt to configure or replace fuses in Extreme Networks 700/1200 W AC PSUs! In the
event of failure, immediately return the defective Extreme Networks 700/1200 W AC PSU for a complete
replacement.
BlackDiamond 8800 Series Switches Hardware Installation Guide
43
Page 44

Power Supply Units for BlackDiamond 8800 Series Switches
Specifications
The 700/1200 W AC PSU functions from 90 V to 264 V and 47 Hz to 63 Hz AC Input. Each PSU
provides 700 W to the system if the AC input is in the 110 V low-line output power range and 1200 W
to the system if the AC input is in the 220 V high-line output power range.
A greater number of PSUs are needed to support the load if the low-line power range is used to power
the switch. The software determines the maximum available power required for the switch and enables
the modules accordingly.
CAUTION
The 700/1200 W AC PSU does not have a switch for turning the unit on and off. Remove the plug from the
electrical outlet to disconnect power to the 700/1200 W AC PSU. Make sure that this connection is easily
accessible.
Make sure that the 700/1200 W AC PSU circuit is not overloaded. Use proper over-current protection, such as a
circuit-breaker, to prevent over-current conditions.
44
BlackDiamond 8800 Series Switches Hardware Installation Guide
Page 45

Extreme Networks 600/900 W AC PSU
Extreme Networks 600/900 W AC PSU
Figure 25 shows the Extreme Networks 600/900 W AC UL-listed accessory power supply unit (Model #
41050/ PS 2431). This power supply is compatible with the BlackDiamond 8806 switch. The power
supply bay can accommodate up to six hot-swappable Extreme Networks 600/900 W AC PSUs.
Figure 25: Extreme Networks 600/900 W AC PSU
EX_015
The front panel on each Extreme Networks 600/900 W AC PSU contains two cooling fans and a handle
for insertion and removal of the unit. Airflow enters the front vents of the PSU and exits through the
rear vents of the switch. Airflow through the PSU is independent of the airflow through the rest of the
switch.
The AC input is located on the switch directly below each installed power supply.
NOTE
The Extreme Networks 600/900 W AC PSU can be used in combination with an Extreme Networks 700W/1200W
AC PSU in the same BlackDiamond 8806 system.
Extreme Networks does not recommend using the 600W/900W AC PSU in combination with an Extreme Networks
1200W DC PSU in the same BlackDiamond 8806 system.
WARNING!
Field operators must not attempt to open the 600W/900W AC PSU enclosure for any reason; the PSU does not
contain user-serviceable parts. In the event of failure, return the defective 600W/900W AC PSU to Extreme
Networks for repair or replacement.
Minimum Software Required
The MSM running in your BlackDiamond 8806 switch requires ExtremeXOS version 11.6.1 (or later) in
order to recognize an Extreme Networks 600/900 W AC PSU. In ExtremeXOS releases 11.3.4, 11.4.2, and
11.5.1, the 600/900 W AC PSU is disabled on all chassis. In ExtremeXOS releases earlier than those, the
BlackDiamond 8800 Series Switches Hardware Installation Guide
45
Page 46

Power Supply Units for BlackDiamond 8800 Series Switches
software does not recognize the 600/900 W AC PSU and the PSU will not be budgeted properly,
possibly resulting in PSU shutdown and/or chassis reboot.
LEDs
The front panel of the Extreme Networks 600/900 W AC PSU provides status LEDs. Table 10 describes
the operation of these LEDs.
Table 10: LEDs on the Extreme Networks 600/900 W AC PSU
Power
PSU Condition
Power supply AC outputs working normally On Off Off
AC input power present/standby output on Blinking Off Off
Current limit on 48 VDC output On Off Blinking
Predictive failure On Blinking Off
No input power to this PSU only Off Off On
No input power to any PSU Off Off Off
Power supply failure Off Off On
Green
Predictive Fail
Amber
Fail
Amber
Power Supply Cords
Extreme Networks 600/900 W AC PSU(s) are shipped with both 110 V AC and 220 V AC power supply
cords. The 110 V AC power supply cord allows for a maximum DC output power of 600 W. The 220V
AC power supply cord allows for a maximum DC output power of 900 W.
All power supply cords provided by Extreme Networks are designed for use in the United States and
Canada only. Power supply cords for use outside of North America are typically provided by a
third-party distribution center and must meet the following requirements:
● The power supply cord must be agency-certified for the country of use.
● The power supply cord must have an IEC 320 C13 plug to connect to the IEC320 C14 connector on
the power supply.
● The power supply cord must have an appropriately rated and approved wall plug applicable to the
country of installation.
● The power supply cord must be less than 5 meters long.
● The wire size must be a minimum of 16 AWG (1.0 mm
2
) copper-stranded.
46
WARNING!
Be sure that the source outlet is properly grounded before plugging the AC power cord into the Extreme Networks
600/900 W AC PSU.
CAUTION
The 600/900 W AC PSU does not have a switch for turning the unit on and off. Remove the plug from the electrical
outlet to disconnect power to the 600/900 W AC PSU. Make sure that this connection is easily accessible.
BlackDiamond 8800 Series Switches Hardware Installation Guide
Page 47

Combining Different AC PSU Models
Make sure that the 600/900 W AC PSU circuit is not overloaded. Use proper over-current protection, such as a
circuit-breaker, to prevent over-current conditions.
Fuse
The Extreme Networks 600/900 W AC PSU line and neutral legs are both fused. Power to the system
may still be live if the neutral fuse is open. This is not a field operator replaceable fuse. In the event of
failure, immediately return the Extreme Networks 600/900 W AC PSU for a complete replacement.
WARNING!
Field operators must not attempt to configure or replace fuses in Extreme Networks 600/900 W AC PSUs! In the
event of failure, immediately return the defective Extreme Networks 600/900 W AC PSU for a complete
replacement.
Specifications
The 600/900 W AC PSU functions from 90 V to 264 V and 47 Hz to 63 Hz AC Input. Each PSU provides
600 W to the system if the AC input is in the 110 V low-line output power range and 900 W to the
system if the AC input is in the 220 V high-line output power range.
A greater number of PSUs are needed to support the load if the low-line power range is used to power
the switch. The software determines the maximum available power required for the switch and enables
the modules accordingly.
Combining Different AC PSU Models
When 600/900 W AC PSUs and 700/1200 W AC PSUs are combined in the same BlackDiamond 8806
chassis and are powered on, all PSUs will be budgeted down to the lower powered 600/900 W AC
output values to avoid PSU shutdown due to over-current. ExtremeXOS optimizes total system power,
avoiding the possibility of over-current, by deciding whether to budget down PSUs with 220 V AC
inputs when PSUs with 110 V AC inputs are present, or to keep 110 V AC PSUs disabled.
CAUTION
Even though this process avoids the possibility of over-current, an I/O module may be powered off if a 600/900 W
AC PSU is added to a BlackDiamond 8806 system running in the following configuration:
●
The system is powered by three 700/1200 W AC PSUs at 220 V AC.
●
The system includes four or more PoE I/O modules with a PoE power requirement that falls between 2391 W
and 2438 W of inline power.
To avoid causing an I/O module to be powered off, do not add a 600/900 W AC PSU to an existing
BlackDiamond 8806 system running in the configuration listed above. Extreme Networks also
recommends that you avoid mixing 220 V AC and 110 V AC inputs when both 600/900 W and
700/1200 W PSUs are present in the same system. When a combination of 220 V AC and 110 V AC
inputs is applied, ExtremeXOS is designed to optimize total chassis power for each individual PSU type
but not for a mixture of PSU types.
BlackDiamond 8800 Series Switches Hardware Installation Guide
47
Page 48

Power Supply Units for BlackDiamond 8800 Series Switches
Extreme Networks 1200 W DC PSU
Figure 26 shows the Extreme Networks 1200 W DC UL-listed accessory power supply unit
(Model # 60021/PS 2350). The power supply bays in the BlackDiamond 8800 series switch can
accommodate up to six hot-swappable 1200 W DC PSUs.
Figure 26: 1200 W DC PSU
BD_168
Airflow enters from the front vents on the 1200 W DC PSU and exits to the rear vents of the switch.
Airflow through the 1200 W DC PSU is independent of the airflow that exists through the rest of the
switch.
The input DC cable has an input connector on one end and precut wire on the other end that goes to
the DC power source (see Figure 27). The connector end has a locking mechanism that locks onto the
DC PSU to prevent accidental removal of the input DC cable.
Figure 27: Input DC Power Cable for the 1200 W DC PSU
Lock
Return
-48Vdc
Ground
10 ft.
To use the 1200 W DC PSU, you need a -48 V DC power source capable of providing 50 A dedicated
power to each 1200 W DC PSU installed in the switch.
Black: Return
Blue: -48V
Green/yellow:
Ground
EX_135
48
NOTE
Extreme Networks does not recommended using the 1200 W DC PSU in combination with any Extreme Networks
AC PSU in the same BlackDiamond 8800 series system. Extreme Networks recommends that DC and AC PSU units
BlackDiamond 8800 Series Switches Hardware Installation Guide
Page 49

Extreme Networks 1200 W DC PSU
not be used together in the same BlackDiamond switch.
For central DC power connections, the 1200 W DC PSU is intended to be installed only in restricted access
locations (dedicated equipment rooms, equipment closets, or the like) in accordance with Articles 110-16, 110-17,
and 110-18 of the National Electric Code, ANSI/NFPA-70.
WARNING!
Field operators must not attempt to open the 1200 W DC PSU enclosure for any reason; the PSU does not contain
user-serviceable parts. In the event of failure, return the defective 1200 W DC PSU to Extreme Networks for repair
or replacement.
Minimum Software Required
The MSM installed in your BlackDiamond 8800 series switch must be running ExtremeXOS version 11.3
or later for the system to recognize the DC PSU.
LEDs
The front panel of the 1200 W DC PSU provides status LEDs. Ta bl e 11 identifies the symbols and
describes the LED activity.
Table 11: LEDs on the Extreme Networks 1200 W DC PSU
Power
PSU Condition
Power supply DC outputs working normally On Off Off
DC input power present/standby output on Blinking Off Off
Current limit on 48 VDC output On Off Blinking
Predictive failure On Blinking Off
No input power to this PSU only Off Off On
No input power to any PSU Off Off Off
Power supply failure Off Off On
Green
Predictive Fail
Amber
Fail
Amber
BlackDiamond 8800 Series Switches Hardware Installation Guide
49
Page 50

Power Supply Units for BlackDiamond 8800 Series Switches
50
BlackDiamond 8800 Series Switches Hardware Installation Guide
Page 51

2 Installing BlackDiamond 8800 Series Switches
Page 52

and Modules
Page 53

4 Site Preparation
This chapter includes the following sections:
● Planning Your Site on page 53
● Meeting Site Requirements on page 54
● Evaluating and Meeting Cable Requirements on page 60
● Meeting Power Requirements on page 66
● Applicable Industry Standards on page 68
By carefully planning your site, you can maximize the performance of your existing network and ensure
that it is ready to migrate to future networking technologies.
The information in this chapter is intended for the system administrator, network equipment technician,
network manager, or facilities manager responsible for installing and managing the network hardware.
The chapter assumes a working knowledge of local area network (LAN) operations and a familiarity
with communications protocols that are used on interconnected LANs.
Installation, maintenance, and removal of a switch, chassis, or system components must be done by
qualified service personnel only. Qualified service personnel have had appropriate technical training
and experience that is necessary to be aware of the hazards to which they are exposed when performing
a task and of measures to minimize the danger to themselves or other people.
To learn more about safety issues and to ensure safety compliance, see Appendix A.
NOTE
Before installing or removing any components of the system, or before carrying out any maintenance procedures, you
must read the safety information provided in Appendix A of this guide.
Planning Your Site
To install your equipment successfully, you should plan your site carefully. The site planning process
has three major parts:
● Meeting site requirements
The physical installation site must meet the following requirements for a safe and successful
installation:
■ Building and electrical code requirements
■ Environmental, safety, and thermal requirements for the equipment you plan to install
■ Equipment rack requirements
● Evaluating and meeting cable requirements
After examining your physical site and verifying that all environment requirements are met, evaluate
and compare your existing cable plant with the requirements of the Extreme Networks equipment to
determine if you need to install new cables.
BlackDiamond 8800 Series Switches Hardware Installation Guide
53
Page 54

Site Preparation
● Meeting power requirements
To run your equipment safely, you must meet the specific power requirements for each power
supply unit installed in the system. For power supply specifications, see “Power Supplies for
BlackDiamond 8800 Series Switches” on page 172.
Meeting Site Requirements
This section describes requirements to consider when preparing your installation site, including:
● Operating Environment Requirements
● Rack Specifications and Recommendations
Operating Environment Requirements
Verify that your site meets all environmental and safety requirements.
Virtually all areas of the United States are regulated by building codes and standards. During the early
planning stages of installing or modifying your LAN, it is important that you develop a thorough
understanding of the regulations that pertain to your location and industry.
Building and Electrical Codes
Building and electrical codes vary depending on your location. Comply with all code specifications
when planning your site and installing cable. The following sections are provided as a resource to
obtain additional information.
Information about major building codes is located at the following websites:
● International Code Council (ICC); 5203 Leesburg Pike; Falls Church, Virginia 22041 USA.
http://www.iccsafe.org
http://www.sbcci.org
Five authorities on electrical codes are:
● National Electrical Code (NEC) Classification (USA only)—a recognized authority on safe electrical
wiring. Federal, state, and local governments use NEC standards to establish their own laws,
ordinances, and codes on wiring specifications. The NEC classification is published by the National
Fire Protection Association (NFPA). The address is NFPA; 1 Batterymarch Park; Quincy,
Massachusetts 02169 USA.
● Underwriters’ Laboratory (UL) (USA only)—an independent research and testing laboratory. UL
evaluates the performance and capability of electrical wiring and equipment to determine whether
they meet certain safety standards when properly used. Acceptance is usually indicated by the
words “UL Approved” or “UL Listed.” The address is UL; 333 Pfingsten Road; Northbrook, Illinois
60062-2096 USA.
● National Electrical Manufacturing Association (NEMA) (USA only)—an organization of electrical
http://www.ul.com
product manufacturers. Members develop consensus standards for cables, wiring, and electrical
components. The address is NEMA; 1300 N. 17th Street; Rosslyn, Virginia 22209.
● Electronics Industries Alliance (EIA)—a trade association that develops technical standards,
disseminates marketing data, and maintains contact with government agencies in matters relating to
http://www.nfpa.org
http://www.nema.org
54
BlackDiamond 8800 Series Switches Hardware Installation Guide
Page 55

Meeting Site Requirements
the electronics industry. The address is EIA; 2500 Wilson Boulevard; Arlington, Virginia 22201 USA.
http://www.eia.org
● Federal Communications Commission (FCC) (USA only)—a commission that regulates all interstate
and foreign electrical communication systems that originate in the United States according to the
Communications Act of 1934. The FCC regulates all U.S. telephone and cable systems. The address is
FCC; 445 12th Street S.W.; Washington, D.C. 20554 USA.
http://www.fcc.gov
Wiring Closet Considerations
Be aware of the following recommendations for your wiring closet:
● Be sure that your system is easily accessible for installation and service. See “Rack Specifications and
Recommendations” on page 58 for information.
● Use appropriate AC or DC power, power distribution, and grounding for your specific installation.
● Use a vinyl floor covering in your wiring closet. (Concrete floors accumulate dust, and carpets can
cause static electricity.)
● Prevent unauthorized access to wiring closets by providing door locks. Install the equipment in a
secured, enclosed, and restricted access location, ensuring that only qualified service personnel have
access to the equipment.
● Provide adequate overhead lighting for easy maintenance.
● Be sure that each wiring closet has a suitable ground. All distribution racks and equipment installed
in the closet should be grounded.
● Be sure that all system environmental requirements are met, such as ambient temperature and
humidity.
NOTE
Extreme Networks recommends that you consult an electrical contractor for commercial building and wiring
specifications.
Temperature
Extreme Networks equipment generates a significant amount of heat. It is essential that you provide a
temperature-controlled environment for both performance and safety.
Install the equipment only in a temperature- and humidity-controlled indoor area that is free of airborne
materials that can conduct electricity. Too much humidity can cause a fire. Too little humidity can
produce electrical shock and fire.
Follow these general thermal recommendations for your wiring closet:
● Be sure that the ventilation in the wiring closet is adequate to maintain a temperature below 104° F
(40° C).
● Install a reliable air conditioning and ventilation system.
● Keep the ventilation in the wiring closet running during non-business hours; otherwise, the
equipment can overheat.
● Maintain an ambient operating temperature of 32° to 104° F (0° to 40° C).
● Maintain a storage temperature of -40° to 158° F (-40° to 70° C).
BlackDiamond 8800 Series Switches Hardware Installation Guide
55
Page 56

Site Preparation
NOTE
As with all electrical equipment, Extreme Networks product lifetimes degrade with increased temperature. If
possible, temperatures should be kept at approximately 78° F (25° C) or lower.
Humidity
To maximize equipment life, keep operating humidity between 50% and 70% relative humidity (noncondensing) during typical operation. The equipment can operate between 10% and 95% relative
humidity (non-condensing) for short intervals.
Chassis Spacing Requirements
Extreme Networks recommends placing no more than three BlackDiamond chassis next to each other
because of to chassis-to-chassis heating. Use the following spacing guidelines when you install your
BlackDiamond 8800 series switch:
● Leave a minimum of one empty 19-inch rack between two sets of three adjacent BlackDiamond
switches.
or
● Place patch panels between two sets of three adjacent BlackDiamond switches. A patch panel does
not require any power and does not generate any heat.
NOTE
Up to five adjacent switches will continue to function without safety concerns. However, product lifetime may
degrade with continued exposure to high temperatures in close proximity, and long term reliability may be
compromised.
Chassis Airflow Requirements
To ensure proper airflow through a BlackDiamond switch, refer to the following recommendations
when you install the switch:
● BlackDiamond 8800 series switches require a minimum of 1.5 inches (4 cm) around both the left and
right sides of the chassis from any cabinet wall or other obstruction for proper airflow.
● Air temperature measured approximately 1 inch (2.5 cm) from the fan inlet should be less than
104 °F (40 °C).
In the BlackDiamond 8800 series switches, air moves through the power supplies independently of the
airflow through the modules, as shown in Figure 28.
56
BlackDiamond 8800 Series Switches Hardware Installation Guide
Page 57

Figure 28: Airflow Through the BlackDiamond 8810 Chassis
Airflow through
fan tray
Airflow at power
supply level
Meeting Site Requirements
ASP045
Electrostatic Discharge
Your system must be protected from static electricity or electrostatic discharge (ESD). Take the following
measures to ensure optimum system performance:
● Remove materials that can cause electrostatic generation (such as synthetic resins) from the wiring
closet. Check the appropriateness of floor mats and flooring.
● Connect metal chassis, conduit, and other metals to ground using dedicated grounding lines.
● Use electrostatically safe equipment and the ESD-preventive wrist strap that is provided with your
equipment. All switches have ESD-preventive wrist strap connectors and are shipped with an ESDpreventive wrist strap as shown in Figure 29.
BlackDiamond 8800 Series Switches Hardware Installation Guide
57
Page 58

Site Preparation
Figure 29: Using an ESD-preventive Wrist Strap
ESD ground
connection
ESD strap
EX_013
Rack Specifications and Recommendations
Racks should conform to conventional standards. In the United States, use EIA Standard RS-310C:
Racks, Panels, and Associated Equipment. In countries other than the United States, use IEC Standard
297. In addition, verify that your rack meets the basic mechanical, space, and earthquake requirements
that are described in this section.
Mechanical Recommendations for the Rack
Use equipment racks that meet the following mechanical recommendations:
● Use an open style, 19-inch rack to facilitate easy maintenance and to provide proper ventilation.
● Use a rack made of steel or aluminum.
● The rack should use the universal mounting rail hole pattern that is identified in IEC Standard 297.
● The rack should have designated earth grounding connections (typically on the base).
● The rack must meet earthquake safety requirements equal to that of the installed chassis.
● The mounting holes should be flush with the rails to accommodate the chassis.
● The rack should support approximately 600 pounds (272 kilograms).
Protective Grounding for the Rack
Use a rack grounding kit and a ground conductor that is carried back to earth or to another suitable
building ground.
58
All Extreme Networks switches are designed with mounting brackets that provide solid metal-to-metal
connection to the rack. If you do not use equipment racks, you can attach wiring terminals directly to
the mounting brackets for appropriate grounding. Extreme Networks switches have grounding
terminals that are mounted on the back of the chassis.
BlackDiamond 8800 Series Switches Hardware Installation Guide
Page 59

Meeting Site Requirements
At a minimum, follow these guidelines to ground equipment racks to the earth ground:
● CAD weld appropriate wire terminals to building I-beams or earth ground rods.
● Use the appropriate chassis grounding wire for your system, which is dependant upon the available
input current to the power supply.
■ For AC systems using a 20A breaker per PSU (SSI AC), the chassis ground can be as small as
14 AWG. The power cable ground should be the same size as the primary.
■ For DC systems using a 15A breaker per PSU (Summit X450a-48tDC switch), the chassis
ground can be as small as 14 AWG. The power cable ground should be the same size as the
primary.
■ For DC systems using a 40A breaker per PSU (SSI DC), the chassis ground can be as small as
10 AWG. The power cable ground should be the same size as the primary.
NOTE
For complete details on power supplies and power supply cords, refer to the following: Chapter 3, “Power Supply
Units for BlackDiamond 8800 Series Switches,” and “Selecting Power Supply Cords” on page 158 in Appendix
A, “Safety Information.” Drill and tap wire terminals to equipment racks.
● Position the earth ground as close to the equipment rack as possible to maintain the shortest wiring
distance possible.
● Use a ground impedance tester or micro-ohm meter to test the quality of earth ground connection at
the chassis. This will insure good grounding between the chassis, rack, and earth ground.
NOTE
Because building codes vary worldwide, Extreme Networks strongly recommends that you consult an electrical
contractor to ensure proper equipment grounding for your specific installation.
Space Requirements for the Rack
Provide enough space in front of and behind the switch so that you can service it easily. Allow a
minimum of 48 inches (122 cm) in front of the rack and 24 inches (61 cm) behind the rack. When using a
relay (two-post) rack, provide a minimum of 24 inches (61 cm) of space behind the mounted equipment.
Extra room on each side is optional.
WARNING!
The chassis does not have a switch for turning power to the unit on and off. For systems using an AC power supply,
power to the chassis is disconnected by removing the wall plug from the electrical outlet. For systems using a DC
SSI power supply, power to the chassis can be turned off by lifting the handle on the power supply or by deenergizing the circuit that feeds the power supply, which is usually accomplished by turning off a circuit breaker.
Securing the Rack
The rack should be attached to the wiring closet floor with 3/8-inch (9.5 mm) lag screws or equivalent
hardware. The floor under the rack should be level within 3/16-inch (5 mm). Use a floor-leveling
cement compound if necessary or bolt the racks to the floor as shown in Figure 30.
BlackDiamond 8800 Series Switches Hardware Installation Guide
59
Page 60

Site Preparation
Figure 30: Properly Secured Rack
BD8800_brace
Brace open equipment racks if the channel thickness is less than 1/4 inch (6.4 mm).
Evaluating and Meeting Cable Requirements
This section describes requirements for the cable you should use when installing your network
equipment. It includes:
● Cabling Standards
● Cable Labeling and Record Keeping
● Installing Cable
● RJ-45 Connector Jackets
● Radio Frequency Interference
Cabling Standards
Extreme Networks recommends using the Building Industry Consulting Service International (BICSI)
Registered Communications Distribution Designer (RCDD), which is globally recognized as a standard
in site planning and cabling. For information, go to:
http://www.bicsi.org
60
Cable Labeling and Record Keeping
A reliable cable labeling system is essential when planning and installing a network. Maintaining
accurate records helps you to:
● Relocate devices easily.
● Make changes quickly.
BlackDiamond 8800 Series Switches Hardware Installation Guide
Page 61

Evaluating and Meeting Cable Requirements
● Isolate faults in the distribution system.
● Locate the opposite end of any cable.
● Know the types of network devices that your cabling infrastructure can support.
Consider the following recommendations when setting up a cable labeling system suitable for your
installation:
● Identify cables by securely attaching a label to all cable ends.
● Assign a unique block of sequential numbers to the group of cables that run between each pair of
wiring closets.
● Assign a unique identification number to each distribution rack.
● Identify all wiring closets by labeling the front panel of your Extreme Networks equipment and
other hardware.
● Keep accurate and current cable identification records.
● Post records near each distribution rack. Include the following cable drop information: the cable
source, destination, and jumper location.
Installing Cable
Consider the following recommendations when you connect cable to your network equipment:
● Examine cable for cuts, bends, and nicks.
● Support cable using a cable manager that is mounted above connectors to avoid unnecessary weight
on the cable bundles.
● Use cable managers to route cable bundles to the left and right of the network equipment to
maximize accessibility to the connectors.
● Provide enough slack, approximately 2 to 3 inches (5.08 to 7.62 cm), to provide proper strain relief as
shown in Figure 31.
● Bundle cable using velcro straps to avoid injuring cables.
● If you build your own cable, be sure that cable is properly crimped.
● When installing a patch panel using twisted pair wiring, untwist no more than 1 inch (2.54 cm) of
the cable to avoid radio frequency (RF) interference.
● Discharge the RJ-45 Ethernet cable before plugging it into a port on the switch.
● Use plenum-rated cable when it is necessary for safety and fire rating requirements. Consult your
local building codes to determine when it is appropriate to use plenum-rated cable, or refer to IEC
standard 850.
● Keep all ports and connectors free of dust.
CAUTION
Unshielded twisted pair (UTP) cable can build up ESD charges when being pulled into a new installation. Before
connecting any category 5 UTP cable to the switch, discharge ESD from the cable by plugging the RJ-45 connector
into a LAN Static Discharge device or use an equivalent method.
BlackDiamond 8800 Series Switches Hardware Installation Guide
61
Page 62

Site Preparation
8
Figure 31: Properly Installed and Bundled Cable
Cable managers supporting
and directing cables
Proper
bundling
of cables
62
Adequate
slack, and
bend radius
SPG_00
BlackDiamond 8800 Series Switches Hardware Installation Guide
Page 63

Evaluating and Meeting Cable Requirements
Fiber Optic Cable
Fiber optic cable must be handled carefully during installation. Every cable has a minimum bend
radius, for example, and fibers will be damaged if the cables are bent too sharply. It is also important
not to stretch the cable during installation. We recommend that the bend radius for fiber optic cable
equal 2 inches (5.08 cm) minimum for each 90 degree turn as shown in Figure 32.
NOTE
Kinks and sharp bends can destroy or impair the cable’s ability to convey light pulses accurately from one end of the
cable to the other. Use care in dressing the optical fiber cables: provide satisfactory strain relief to support the cable
and maintain an adequate bend radius at all cable turns, particularly where the cable connects to the I/O module.
Figure 32: Bend Radius for Fiber Optic Cable
Minimum
2-in. (5.08-cm)
radius
in 90∞ bend
90∞
Optical fiber cable
SPG_002
Cable Distances
Table 12 shows cable media types and maximum distances that support reliable transmission in
accordance with international standards, except where noted.
Table 12: Media Types and Maximum Distances
Standard Media Type
1000BASE-SX
(850 nm optical
window)
1000BASE-LX
(1300 nm optical
window)
1000BASE-LX70
(1550 nm optical
window)
50/125 μm multimode fiber
50/125 μm multimode fiber
62.5/125 μm multimode fiber
62.5/125 μm multimode fiber
50/125 μm multimode fiber
50/125 μm multimode fiber
62.5/125 μm multimode fiber
10/125 μm single-mode fiber
10/125 μm single-mode fiber*
10/125 μm single-mode fiber – 70,000
Mhz•Km
Rating
400
500
160
200
400
500
500
–
–
Maximum Distance
(Meters)
500
550
220
275
550
550
550
5,000
10,000
BlackDiamond 8800 Series Switches Hardware Installation Guide
63
Page 64

Site Preparation
Table 12: Media Types and Maximum Distances (Continued)
Standard Media Type
1000BASE-T
100BASE-TX
10BASE-T
* Proprietary to Extreme Networks. Connections between two Extreme Networks 1000BASE-LX interfaces that use 10/125 μm
single-mode fiber can use a maximum distance of 10,000 meters.
Category 5 and higher UTP cable
Category 5 and higher UTP cable
Category 3 and higher UTP cable
Mhz•Km
Rating
–
–
–
Maximum Distance
(Meters)
100
100
100
RJ-45 Connector Jackets
Use RJ-45 cable with connector jackets that are flush with the connector or that have connectors with a
no-snag feature.
Using cable with jackets that are wider than the connectors can cause:
● Connectors that are not properly aligned with the port.
● Crowded cable installation, which can cause connectors to pop out of the port.
Figure 33 shows examples of connector jacket types that are not recommended, as well as those that are
recommended.
Figure 33: RJ-45 Connector Jacket Types
64
Not recommended
0.1" = 1mm actual
Best
Better
39.37% : 254%
BlackDiamond 8800 Series Switches Hardware Installation Guide
SPG_001
Page 65

Evaluating and Meeting Cable Requirements
Radio Frequency Interference
If you use UTP cabling in an installation, take precautions to avoid RF interference. RF interference can
cause degradation of signal quality, and, in an Ethernet network environment, can cause excessive
collisions, loss of link status, or other physical layer problems that can lead to poor performance or loss
of communication.
To prevent RF interference, avoid the following situations:
● Attaching UTP cable to AC power cables
● Routing UTP cable near antennas, such as a ham radio antenna
● Routing UTP cable near equipment that could exhibit RF interference, such as ARC welding
equipment
● Routing UTP cable near electrical motors that contain coils
● Routing UTP cable near air conditioner units
● Routing UTP cable near electrical transformers
In areas or applications where these situations cannot be avoided, use fiber optic cabling or shielded
twisted pair cabling (STP).
BlackDiamond 8800 Series Switches Hardware Installation Guide
65
Page 66

Site Preparation
Meeting Power Requirements
This section describes power requirements, including:
● PoE Devices
● Power Supply Requirements
● AC Power Cable Requirements
● Uninterruptible Power Supply Requirements
PoE Devices
When connecting power over Ethernet (PoE) devices to a PoE switch, all connections between the PoE
device and the switch must remain within the same building and must use a low-voltage power
distribution system per IEEE 802.3af.
Power Supply Requirements
Adhere to the following requirements to operate your Extreme Networks equipment safely:
● Be sure that your equipment is placed in an area that accommodates the power consumption and
component heat dissipation specifications.
● Be sure that your power supply meets the site power or AC power requirements of the network
equipment.
● When connecting power to installed equipment, avoid connecting through an extension cord or
power strip.
● If your switch includes more than one power supply, connect each power supply to different,
independent power sources.
If a power source fails, it will affect only the switch power supply to which it is connected. If all
switch power supplies are connected to a single power source, the entire switch is vulnerable to a
power source failure.
For power specifications of the BlackDiamond power supplies, see Appendix B, “Technical
Specifications.”
66
BlackDiamond 8800 Series Switches Hardware Installation Guide
Page 67

Meeting Power Requirements
AC Power Cable Requirements
Use an AC power cable appropriate for your country. Check your local electrical codes and regulatory
agencies for power cable requirements. The countries listed in Table 13 have additional requirements as
listed in the table.
Table 13: AC Power Cable Requirements
Country Requirements
USA and Canada • The cable set must be UL-approved and CSA-certified.
2
• The minimum specification for the flexible cable is No. 18 AWG (1.5 mm
Type SVT or SJT, 3-conductor.
• The cable set must have a rated current capacity of at least the amount rated for
each specific product.
• The attachment plug must be either an Earth-grounding type with a NEMA
5-15P (10 A, 110 V) configuration or a NEMA L6-15P (10 A, 208/240 V)
Denmark The supply plug must comply with section 107-2-D1, standard DK2-1a or DK2-5a.
Switzerland The supply plug must comply with SEV/ASE 1011.
Argentina The supply plug must comply with Argentinian standards.
),
NOTE
When using dual power supplies, make sure that each AC power supply attaches to an independent power source.
Replacing the Power Cable
If the power cable plug is unsuitable and must be replaced, connect the power supply wires for the
switch according to the following scheme:
● Brown wire to the Live (Line) plug terminal, which may be marked with the letter “L” or colored
red.
● Blue wire to the Neutral plug terminal, which may be marked with the letter “N” or colored black.
● Yellow/Green wire to the Ground plug terminal, which may be marked with the letter “E” (the
Earth symbol) or colored yellow/green.
Uninterruptible Power Supply Requirements
An uninterruptible power supply (UPS) is a device that sits between a power supply (such as a wall
outlet) and a device (such as a switch) to prevent outages, sags, surges, and bad harmonics from
adversely affecting the performance of the device.
A UPS traditionally can perform the following functions:
● Absorb relatively small power surges.
● Smooth out noisy power sources.
● Continue to provide power to equipment during line sags.
● Provide power for some time after a blackout has occurred.
In addition, some UPS or UPS plus software combinations provide the following functions:
● Automatically shut down equipment during long power outages.
BlackDiamond 8800 Series Switches Hardware Installation Guide
67
Page 68

Site Preparation
● Monitor and log power supply status.
● Display the voltage (current draw) of the equipment.
● Restart equipment after a long power outage.
● Display the voltage currently on the line.
● Provide alarms on certain error conditions.
● Provide short circuit protection.
Selecting a UPS
To determine UPS requirements for your switch, answer these questions:
● What are the amperage requirements?
● What is the longest potential time period that the UPS would be required to supply backup power?
● Where will the UPS be installed?
● What is the maximum transition time that your installation will allow?
NOTE
Extreme Networks recommends that you use a UPS that provides online protection.
Calculating Volt-Amperage Requirements
To determine the minimum volt-amperage requirements for your UPS:
1 Locate the voltage and amperage requirements for each piece of equipment. These numbers are
usually located on a sticker on the back or bottom of your equipment.
2 Multiply the numbers together to get Volt-Amps (VA):
VA = Volts x Amp e res
3 Add together the VA from all the pieces of equipment to find the total VA requirement.
To determine the minimum volt-amperage requirements for your UPS, we recommend that you add
30% to the total.
UPS Transition Time
Transition time is the time that is necessary for the UPS to transfer from utility power to full-load
battery power. For Extreme Networks products, a transition time of less than 20 milliseconds is required
for optimum performance.
68
Applicable Industry Standards
For more information, see the following ANSI/TIA/EIA standards:
● ANSI/TIA/EIA-568-A—discusses the six subsystems of a structured cabling system.
● ANSI/TIA/EIA-569-A—discusses design considerations.
● ANSI/TIA/EIA-606—discusses cabling system administration.
● ANSI/TIA/EIA-607—discusses commercial building grounding and bonding requirements.
BlackDiamond 8800 Series Switches Hardware Installation Guide
Page 69

You can access these standards at:
http://www.ansi.org
or
http://www.tiaonline.org
Applicable Industry Standards
BlackDiamond 8800 Series Switches Hardware Installation Guide
69
Page 70

Site Preparation
70
BlackDiamond 8800 Series Switches Hardware Installation Guide
Page 71

5 Installing the BlackDiamond 8800 Series
Chassis
This chapter includes the following sections:
● Unpacking the BlackDiamond 8806 Chassis on page 72
● Unpacking the BlackDiamond 8810 Chassis on page 75
● Pre-installation Requirements on page 78
● Attaching the Mid-Mount Brackets on page 78
● Rack-Mounting the BlackDiamond 8800 Series Chassis on page 80
● Grounding the BlackDiamond 8800 Series Chassis on page 83
● Initial Management Access on page 85
This chapter describes how to install the following BlackDiamond chassis models:
● BlackDiamond 8806 chassis
● BlackDiamond 8810 chassis
The BlackDiamond 8800 series chassis fits into a standard 19-inch (48.26 cm) rack. You can install the
switch either flush against the back of the rack or in a mid-mount position to give you more access
behind the rack.
NOTE
Read the information in this chapter thoroughly before you attempt to install the BlackDiamond 8806/12804
switch.
CAUTION
Correct lifting of the BlackDiamond 8800 series chassis requires two people.
Before you lift a BlackDiamond 8800 series chassis, make sure the chassis is empty to prevent unnecessary weight.
This will also prevent damage to the system components due to possible system chassis flex when lifting.
BlackDiamond 8800 Series Switches Hardware Installation Guide
71
Page 72

Installing the BlackDiamond 8800 Series Chassis
Unpacking the BlackDiamond 8806 Chassis
NOTE
Do not remove the nylon straps until you are ready to open the chassis package.
CAUTION
The BlackDiamond 8806 chassis weighs almost 65 pounds. Proper lifting and moving of the chassis requires two
people.
To unpack the BlackDiamond 8806 chassis:
1 Remove the nylon straps from around the shipping carton.
2 Open the top flaps and remove the accessories and documentation pack from the shipping carton
(see Figure 34). Lift out the packing foam.
Figure 34: Removing Accessories from the BlackDiamond 8806 Chassis Shipping Carton
19-inch helper bracket
3 Release the clip locks (see Figure 35).
a Place your thumb and index finger inside the clip lock to grasp the prongs.
b Squeeze the prongs inward, applying equal pressure on each side.
c Pull the prongs outward until the clip lock is released from the carton.
Repeat these steps to release each remaining clip lock.
Power cord retaining bracket
BlackDiamond documentation pack
with ESD-preventive wrist strap
EX_110
72
BlackDiamond 8800 Series Switches Hardware Installation Guide
Page 73

Unpacking the BlackDiamond 8806 Chassis
Figure 35: Clip Locks on the BlackDiamond 8806 Chassis Shipping Carton
Squeeze prongs
to unlock
Clip lock
Open
lock
EX_111A
4 Slide the shipping carton up over the BlackDiamond 8806 chassis (see Figure 36).
Figure 36: Removing the Carton from the BlackDiamond 8806 Chassis
Lift box
off
chassis
Open & remove
4 clip locks
to free box
EX_120A
5 Unwrap the chassis.
BlackDiamond 8800 Series Switches Hardware Installation Guide
73
Page 74

Installing the BlackDiamond 8800 Series Chassis
6 At each side of the chassis, place one hand in an empty power supply bay and the other hand in the
recessed hand-hold on the back panel of the chassis. Carefully lift the BlackDiamond 8806 chassis off
the foam cushion and onto the floor (see Figure 37).
Figure 37: Correct Method for Lifting the BlackDiamond 8806 Chassis
EX_112
CAUTION
Do not use the fan tray handle to lift or maneuver the BlackDiamond 8806 chassis. This handle is not designed to
support the weight of the chassis.
Verify that the following items are included in the shipping carton:
● BlackDiamond 8806 chassis with four installed blank front panels
● Power cord retaining bracket
● 19-inch helper bracket (installation tray)
● BlackDiamond documentation pack with ESD-preventive wrist strap
NOTE
Save all packaging, clip locks, and box pieces for future use in the event that the BlackDiamond 8806 chassis must
be moved to another location or returned to Extreme Networks, Inc.
74
BlackDiamond 8800 Series Switches Hardware Installation Guide
Page 75

Unpacking the BlackDiamond 8810 Chassis
Unpacking the BlackDiamond 8810 Chassis
CAUTION
The BlackDiamond 8810 chassis weighs almost 80 pounds. Proper lifting and moving of the chassis requires two
people.
To unpack the BlackDiamond 8810 chassis:
1 Verify that the Tilt Watch and Shock Watch indicators display a white state as shown in Figure 38.
Figure 38: Tilt Watch and Shock Watch Indicators
Tilt watch
Tilt watch
in white state
Tilt watch
in red state
Shock watch
in white state
Shock watch
in red state
Shock watch
EX_084
CAUTION
Do not proceed with unpacking the chassis if either the Tilt Watch indicator or the Shock Watch indicator displays a
red warning state. Immediately contact Extreme Networks if a red condition occurs.
2 Open the flaps and remove the contents from the upper shipping carton (see Figure 34).
BlackDiamond 8800 Series Switches Hardware Installation Guide
75
Page 76

Installing the BlackDiamond 8800 Series Chassis
Figure 39: Removing Contents from the BlackDiamond 8810 Upper Shipping Carton
ASP024
3 Release the clip locks as shown in Figure 35.
a Place your thumb and index finger inside the clip lock to grasp the prongs.
b Squeeze the prongs inward applying equal pressure on each side.
c Pull the prongs outward until the clip lock is released from the carton.
Repeat these steps to release each remaining clip lock.
Figure 40: Clip Locks on the BlackDiamond 8810 Shipping Carton
Squeeze prongs
to unlock
Clip lock
Open
lock
EX_087B
76
4 Lift the BlackDiamond 8810 shipping carton up and off the chassis (see Figure 41).
5 Remove all four restraining bolts that hold the BlackDiamond 8810 chassis to the shipping brackets
on the shipping pallet (see Figure 41).
BlackDiamond 8800 Series Switches Hardware Installation Guide
Page 77

Figure 41: Unpacking the BlackDiamond 8810 Chassis
Unpacking the BlackDiamond 8810 Chassis
ASP016B
6 At each side of the chassis, place one hand in an empty power supply bay and the other hand in the
recessed hand-hold on the back panel of the BlackDiamond 8810 chassis (see Figure 37).
CAUTION
Do not use the fan tray handle to lift or maneuver the BlackDiamond 8810 chassis. This handle is not designed to
support the weight of the chassis.
7 Carefully lift the BlackDiamond 8810 chassis off the shipping pallet and onto the floor as shown in
Figure 37.
Figure 42: Correct Method for Lifting the BlackDiamond 8810 Chassis
BlackDiamond 8800 Series Switches Hardware Installation Guide
ASP017A
77
Page 78

Installing the BlackDiamond 8800 Series Chassis
NOTE
Save all packaging, bolts, washers, and clip locks, as well as the box and pallet, for future use in the event that the
chassis must be moved to another location or returned to Extreme Networks.
Verify that the following items are included in the shipping carton:
● BlackDiamond 8810 chassis with eight installed blank front panels
● Power cord retaining bracket
● 19-inch helper bracket (installation tray)
● BlackDiamond documentation pack with ESD-preventive wrist strap
NOTE
Save all packaging, clip locks, and box pieces for future use in the event that the BlackDiamond 8810 chassis must
be moved to another location or returned to Extreme Networks, Inc.
Pre-installation Requirements
The following tools, equipment, and resources are required for installing the BlackDiamond 8800 series
chassis:
● ESD-preventive wrist strap (provided)
● 19-inch helper bracket (provided)
● For installing the chassis in a mid-mount position in the rack:
■ Optional BlackDiamond 8806/12804 mid-mount kit, part number 65046. Order this kit separately
from the chassis.
or
■ Optional BlackDiamond 8810 mid-mount kit, Model 41141. Order this kit separately from the
chassis.
■ #2 Phillips screwdriver
● Rack-mount screws appropriate for your organization’s rack system, as follows:
■ 4 screws to attach the helper bracket
■ 12 screws to secure the chassis in the rack
The screw size will vary based on your organization’s rack system; screws are not provided.
● Screwdriver appropriate for the rack-mounting screws you will use
The screwdriver size will vary based on the requirements of your organization’s rack system.
78
Attaching the Mid-Mount Brackets
The BlackDiamond 8800 series chassis has attached rack-mounting flanges for a front-mount rack
installation. To install the chassis in a mid-mount position in the rack, attach the optional mid-mount
brackets as described in this section.
BlackDiamond 8800 Series Switches Hardware Installation Guide
Page 79

Attaching the Mid-Mount Brackets
CAUTION
The BlackDiamond 8806 chassis weighs almost 65 pounds., and the BlackDiamond 8810 chassis weighs almost 80
pounds. Proper lifting and moving of the chassis requires two people.
To attach the mid-mount brackets:
1 Set the empty chassis in an upright position on a secure flat surface.
2 Determine the locations for the mid-mount brackets.
NOTE
Each side of the chassis has two sets of mounting holes to provide two positions for attaching the mid-mount
brackets.
3 Identify the left and right brackets.
Each mid-mount bracket is clearly marked for placement on either the right or left side, as viewed
from the front of the chassis.
4 On each side of the chassis, attach the appropriate mid-mount bracket using the eight screws
provided in the kit (see Figure 43 and Figure 44).
Figure 43: Attaching the Mid-mount Brackets to the BlackDiamond 8806 Chassis
Second mid-mount location
Mid-mount
bracket
EX_136
BlackDiamond 8800 Series Switches Hardware Installation Guide
79
Page 80

Installing the BlackDiamond 8800 Series Chassis
Figure 44: Attaching the Mid-mount Brackets to the BlackDiamond 8810 Chassis
Mid-Mount
Bracket
ASP034
Rack-Mounting the BlackDiamond 8800 Series Chassis
To mount the BlackDiamond 8800 series chassis in a rack:
1 Locate the 19-inch helper bracket that is shipped with the BlackDiamond 8800 series chassis.
2 Identify the rack location where the chassis will be installed.
3 Using four rack mounting screws, attach the helper bracket to the system rack immediately below
the chassis location (see Figure 45).
You must provide the screws for attaching the helper bracket.
80
BlackDiamond 8800 Series Switches Hardware Installation Guide
Page 81

Rack-Mounting the BlackDiamond 8800 Series Chassis
Figure 45: Mounting the 19-inch Helper Bracket onto the System Rack
EX_086A
4 Lift the back of the empty BlackDiamond 8800 series chassis onto the 19-inch helper bracket.
5 Slowly guide the chassis into the system rack until the mounting brackets are flush against the rack
uprights.
6 Secure the chassis to the system rack using eight rack mounting screws. (Screws are not provided.)
Be sure that the screws are secure. Refer to Figure 46 and figure for the screw locations.
NOTE
Figure 46 and figure show a standard rack mount. For mid-mount installation, use the same mounting locations
shown in the figure, but insert the screws through the designated slot locations of the mid-mount brackets.
BlackDiamond 8800 Series Switches Hardware Installation Guide
81
Page 82

Installing the BlackDiamond 8800 Series Chassis
Figure 46: Securing the BlackDiamond 8806 Chassis to a Rack
EX_171A
82
BlackDiamond 8800 Series Switches Hardware Installation Guide
Page 83

Grounding the BlackDiamond 8800 Series Chassis
Figure 47: Securing the BlackDiamond 8810 Chassis to a Rack
EX_172A
7 Remove the helper bracket from the system rack after the chassis is secured. Save the bracket for
future use if you remove the chassis from the rack.
Grounding the BlackDiamond 8800 Series Chassis
Although grounding the BlackDiamond 8800 series chassis is optional, it is recommended. A grounding
point with integrated pem-nuts is provided on the back of the chassis.
You need the following materials to ground the chassis:
● Two 10-24 screws
● One copper, standard barrel 2-hole compression grounding lug, type LDC, equivalent to Panduit
part number LCD4-14A-L or Thomas & Betts part number: LCN4-14
● Appropriate grounding wire for your system, based on the available input current for the power
supply:
■ For AC systems using a 20A breaker per PSU (SSI AC), the chassis ground can be as small as
14 AWG.
■ For DC systems using a 50A breaker per PSU (SSI DC), the chassis ground can be as small as
10 AWG.
BlackDiamond 8800 Series Switches Hardware Installation Guide
83
Page 84

Installing the BlackDiamond 8800 Series Chassis
To ground the chassis:
1 Locate the grounding point on the back of the chassis (Figure 48 and Figure 49).
Figure 48: Back of BlackDiamond 8806 Chassis
PSU / fan
controllers
Grounding point
Figure 49: Back of BlackDiamond 8810 Chassis
Grounding point
EX_128A
PSU/Fan
controllers
84
ASP044A
2 Strip 0.5-inch (1.2-cm) of insulation from the stranded copper wire cable.
3 Insert the stripped wire into the cable lug.
BlackDiamond 8800 Series Switches Hardware Installation Guide
Page 85

Initial Management Access
CAUTION
Be sure that no copper is visible between the lug and the cable insulation.
4 Crimp the lug onto the cable according to the manufacturer’s specifications.
5 Insert the screws through the lug and into the grounding point on the back of the chassis.
6 Connect the other end of the wire to a known reliable earth ground point at your site.
Initial Management Access
For instructions on accessing the switch for initial management setup, see “Initial Management Access”
on page 114.
BlackDiamond 8800 Series Switches Hardware Installation Guide
85
Page 86

Installing the BlackDiamond 8800 Series Chassis
86
BlackDiamond 8800 Series Switches Hardware Installation Guide
Page 87

6 Installing Power Supply Units in the
BlackDiamond 8800 Series Switches
This chapter includes the following topics:
● Safety on page 87
● PSU Compatibility on page 88
● Installing an Extreme Networks AC PSU on page 90
● Installing an Extreme Networks 1200 W DC PSU on page 94
The chapter describes how to install and remove each power supply model used with the
BlackDiamond 8800 series switches.
Safety
Only trained service personnel should perform service to Extreme Networks switches and their
components. Trained service personnel have read all related installation manuals, have the technical
training and experience necessary to be aware of the hazards to which they are exposed in performing a
task, and are aware of measures to minimize the danger to themselves or other persons.
Before installing an Extreme Networks PSU into your network:
● Read the latest installation and safety information provided in this chapter and in Appendix
A, “Safety Information.”
● See Appendix A, “Safety Information” for additional information regarding regulatory compliance
certifications.
NOTE
For central DC power connections, the 1200 W DC PSU is intended to be installed only in restricted access
locations (dedicated equipment rooms, equipment closets, or the like) in accordance with Articles 110-16, 110-17,
and 110-18 of the National Electric Code, ANSI/NFPA-70. All wiring methods involving the DC input cable assembly
must be performed according to the relevant articles of the National Electrical Code.
CAUTION
Building codes vary worldwide; therefore, Extreme Networks strongly recommends that you consult an electrical
contractor to ensure proper equipment grounding and power distribution for your specific installation.
WARNING!
Field operators must not attempt to open the PSU enclosure for any reason; the PSU does not contain
user-serviceable parts. In the event of failure, return the defective PSU to Extreme Networks for repair or
replacement.
BlackDiamond 8800 Series Switches Hardware Installation Guide
87
Page 88

Installing Power Supply Units in the BlackDiamond 8800 Series Switches
WARNING!
Extreme Networks AC PSUs do not have switches for turning the unit on and off. Remove the wall plug from the
electrical outlet to disconnect the power to an Extreme Networks AC PSU. Make sure that this connection is easily
accessible.
When the PSU is outside the chassis (not installed), do not plug the PSU into an electrical outlet. Plugging an
uninstalled AC PSU into an electrical outlet exposes you to a hazardous energy and is a potential fire hazard.
WARNING!
Extreme Networks DC PSUs do not have switches for turning the unit on and off. Make sure that the DC circuit is
de-energized before connecting or disconnecting the DC power cord at the DC power socket on an Extreme Networks
DC PSU.
PSU Compatibility
The BlackDiamond power supply units are intended for use in specific BlackDiamond switches.
Table 14 lists the BlackDiamond 8800 series switches and their compatible power supply units.
Table 14: PSU Compatibility in BlackDiamond 8800 Series Switches
BlackDiamond Switch Compatible PSU Compatibility Notes
BlackDiamond 8806 600W/900W AC PSU
AND/OR
700W/1200W AC PSU
OR
1200W DC PSU
BlackDiamond 8810 700W/1200W AC PSU
OR
1200W DC PSU
The 700/1200 W AC PSU and the 600/900 W AC PSU
can be used together in the same BlackDiamond 8806
system only.
Extreme Networks does not recommended using the
600/900 W AC PSU or the 700/1200 W AC PSU in
combination with a 1200W DC PSU.
Extreme Networks does not recommended using the
700/1200 W AC PSU in combination with a
1200W DC PSU.
Combining Different AC PSU Models
When 600/900 W AC PSUs and 700/1200 W AC PSUs are combined in the same BlackDiamond 8806
chassis and are powered on, all PSUs will be budgeted down to the lower-powered 600/900 W AC
output values to avoid PSU shutdown due to over-current.
ExtremeXOS optimizes total system power, avoiding the possibility of over-current, by deciding
whether to budget down PSUs with 220 V AC inputs when PSUs with 110 V AC inputs are present, or
to keep 110 V AC PSUs disabled.
88
CAUTION
Even though this process avoids the possibility of over-current, an I/O module may be powered off if a 600/900 W
AC PSU is added to a BlackDiamond 8806 system running in the following configuration:
●
The system is powered by three 700/1200 W AC PSUs at 220 V AC.
●
The system includes four or more PoE I/O modules with a PoE power requirement that falls between 2391 W
and 2438 W of inline power.
BlackDiamond 8800 Series Switches Hardware Installation Guide
Page 89

Power Supply Cords for AC Power Supplies
To avoid causing an I/O module to be powered off, do not add a 600/900 W AC PSU to an existing
BlackDiamond 8806 system running in the configuration listed above. Extreme Networks also
recommends that you avoid mixing 220 V AC and 110 V AC inputs when both 600/900 W and
700/1200 W PSUs are present in the same system. When a combination of 220 V AC and 110 V AC
inputs is applied, ExtremeXOS is designed to optimize total chassis power for each individual PSU type
but not for a mixture of PSU types.
NOTE
Extreme Networks does not recommended using the 1200 W DC PSU in combination with any Extreme Networks
AC PSU in the same BlackDiamond 8800 series system. Extreme Networks recommends that DC and AC PSU units
not be used together in the same BlackDiamond switch.
Minimum Software Requirements
In order for the system to recognize an Extreme Networks 600/900 W AC PSU, the MSM installed in
your BlackDiamond 8806 switch requires ExtremeXOS version 11.6.1 (or later). In ExtremeXOS releases
11.3.4, 11.4.2, and 11.5.1, the 600/900 W AC PSU is disabled on all chassis. In ExtremeXOS releases
earlier than those, the software does not recognize the 600/900 W AC PSU and the PSU will not be
budgeted properly, possibly resulting in PSU shutdown and/or chassis reboot.
The 700/1200 W AC PSU is supported by all versions of ExtremeXOS.
For the system to recognize the 1200W DC PSU, the MSM in your BlackDiamond 8800 series switch
must be running ExtremeXOS version 11.3 or later.
Power Supply Cords for AC Power Supplies
Extreme Networks AC PSU(s) are shipped with both 110 V AC and 220 V AC power supply cords.
Table 15 shows the maximum DC power output allowed by these power cords when used with each AC
power supply.
Table 15: AC Power Supply Cords
Maximum DC Output Power
Cord Type
110 V AC 600 W 700 W
220 V AC 900 W 1200 W
All power supply cords provided by Extreme Networks are designed for use only in the United States,
Canada, and Mexico. Power supply cords for use outside of North America are typically provided by a
third-party distribution center and must meet the following requirements:
● The power supply cord must be agency-certified for the country of use.
● The power supply cord must have an IEC 320 C13 plug to connect to the IEC320 C14 connector on
the power supply.
● The power supply cord must have an appropriately rated and approved wall plug applicable to the
country of installation.
600/900 W AC PSU 700/1200 W AC PSU
BlackDiamond 8800 Series Switches Hardware Installation Guide
89
Page 90

Installing Power Supply Units in the BlackDiamond 8800 Series Switches
● The power supply cord must be less than 5 meters long.
● The wire size must be a minimum of 16 AWG (1.0 mm
2
) copper-stranded.
WARNING!
Be sure that the source outlet is properly grounded before plugging the AC power cord into the Extreme Networks
AC PSU.
Installing an Extreme Networks AC PSU
This section describes how to install either of the following Extreme Networks UL-listed accessory
power supply units:
● 700/1200 W AC PSU (Model # 60020/PS 2336)
This power supply is compatible with the BlackDiamond 8806 switch and the BlackDiamond 8810
switch.
● 600/900 W AC PSU (Model # 41050/ PS 2431)
This power supply is compatible only with the BlackDiamond 8806 switch.
The power supply bay in the BlackDiamond 8800 series switch can accommodate up to six
hot-swappable AC PSUs.
NOTE
In a BlackDiamond 8806 system, the Extreme Networks 700W/1200 W AC PSU can be combined with an Extreme
Networks 600/900 W AC PSU in the same chassis.
Extreme Networks does not recommended using the 700/1200 W AC PSU with an Extreme Networks 1200 W DC
PSU in the same BlackDiamond 8800 series switch.
WARNING!
Field operators must not attempt to open the AC PSU enclosure for any reason; the PSU does not contain
user-serviceable parts. In the event of failure, return the defective 700/1200 W AC PSU to Extreme Networks for
repair or replacement.
CAUTION
To ensure proper cooling of the PSU, do not block the front vents of the PSU or the rear vents of the switch.
90
BlackDiamond 8800 Series Switches Hardware Installation Guide
Page 91

Installing an Extreme Networks AC PSU
Required Tools and Equipment
You need the following tools and equipment to install or remove an Extreme Networks AC PSU:
● ESD-preventive wrist strap
● Power supply cord (110 V AC, 220 V AC, or applicable to country of use)
A power cord for use in the United States is provided with each PSU. For use outside of the United
States, this PSU requires a power supply cord set certified for the country of use. See the input
specifications in Tabl e 2 2 on page 172.
● Thermal protective gloves (required for removal)
Installing the PSU
CAUTION
Make sure that the Extreme Networks AC PSU circuit is not overloaded. Use proper over-current protection, such as
a circuit-breaker, to prevent over-current conditions.
To install an Extreme Networks AC PSU:
1 Attach an ESD-preventive wrist strap to your bare wrist and connect the metal end to the ground
receptacle on the top-left corner of the switch front panel.
2 Verify that the PSU is right side up and the locking handle is open (see Figure 50).
Figure 50: Extreme Networks AC PSU with Locking Handle Open
EX_015
3 Carefully slide the AC PSU all the way into the power supply bay (see Figure 51).
CAUTION
Do not slam the AC PSU into the system switch backplane. Use the locking handle to secure the AC PSU in the
power supply bay.
BlackDiamond 8800 Series Switches Hardware Installation Guide
91
Page 92

Installing Power Supply Units in the BlackDiamond 8800 Series Switches
Figure 51: Inserting an AC PSU into the Power Supply Bay
EX_174
4 Secure the AC PSU in the power supply bay by pushing down on the locking handle until it clicks
into place.
5 If you are replacing a power supply, you do not need to unplug the AC power cord. For a newly
installed power supply, connect the AC power supply cord:
a If necessary, remove the power cord retaining bracket as described in Chapter 3, “BlackDiamond
AC Power Cord Retaining Brackets.”
b Connect the new AC power cord to the AC input on the front of the switch and to the wall outlet
on the other end. Then re-install the power cord retaining bracket.
c Re-install the power cord retaining bracket as described in Chapter 3, “BlackDiamond AC Power
Cord Retaining Brackets.”
To install additional Extreme Networks AC PSUs, repeat steps 2 through 5.
NOTE
Leave the ESD strap permanently connected to the switch, so that the strap is always available when you need to
handle ESD-sensitive components.
Removing or Replacing an Extreme Networks AC PSU
CAUTION
The AC PSU may be hot to the touch; use thermal protective gloves when handling the PSU during removal.
To remove or replace an Extreme Networks AC PSU:
1 Attach an ESD-preventive wrist strap to your bare wrist and connect the metal end to the ground
receptacle on the top-left corner of the switch front panel (if not already attached).
92
BlackDiamond 8800 Series Switches Hardware Installation Guide
Page 93

Installing an Extreme Networks AC PSU
2 For the AC power cord:
● If you are replacing only the power supply and you will use the existing AC power cord for the
new PSU, you do not need to unplug the AC power cord.
● If you are removing and replacing an AC power cord:
■ Remove the power cord retaining bracket as described in “Disconnecting a BlackDiamond
8810 AC Power Cord” on page 127 or “Removing the BlackDiamond 8806 AC Power Cord
Retainer Channel” on page 130.
■ Completely disconnect and remove the old power cord.
■ Connect the new AC power cord to the AC input on the front of the switch and then connect
the opposite end of the AC power cord to the wall outlet.
■ After the cord is connected, re-install the power cord retaining bracket.
3 Lift the handle on the PSU.
4 Pull the handle of the PSU to disconnect the PSU from the power connector at the back of the power
supply bay. Slide the PSU partway out of the bay.
5 Wearing thermal protective gloves, place both hands underneath the PSU to support the weight as it
is pulled out from the switch.
6 To install a replacement PSU, follow the steps under “Installing the PSU” on page 91.
NOTE
Leave the ESD strap permanently connected to the switch, so that the strap is always available when you need to
handle ESD-sensitive components.
LEDs on the 700/1200 W AC PSU
The front panel of the Extreme Networks 700/1200 W AC PSU provides status LEDs. Ta bl e 1 6 describes
the LED activity.
Table 16: LEDs on the 700/1200 W AC PSU
Power
PSU Condition
Power supply AC outputs working normally On Off Off
AC input power present/standby output on Blinking Off Off
Current limit on 48 VDC output On Off Blinking
Predictive failure On Blinking Off
No input power to this PSU only Off Off On
No input power to any PSU Off Off Off
Power supply failure Off Off On
Green
Predictive Fail
Amber
Fail
Amber
BlackDiamond 8800 Series Switches Hardware Installation Guide
93
Page 94

Installing Power Supply Units in the BlackDiamond 8800 Series Switches
Installing an Extreme Networks 1200 W DC PSU
The Extreme Networks 1200 W DC UL-listed accessory power supply unit (Model # 60021/PS 2350) is
compatible with the BlackDiamond 8806 switch and the BlackDiamond 8810 switch. The power supply
bay in the BlackDiamond 8800 series switch can accommodate up to six hot-swappable 1200 W DC
PSUs.
WARNING!
Field operators must not attempt to open the 1200 W DC PSU enclosure for any reason; the PSU does not contain
user-serviceable parts. In the event of failure, return the defective 1200 W DC PSU to Extreme Networks for repair
or replacement.
Required Tools and Equipment
You need the following tools and equipment to install or remove a 1200 W DC PSU:
● ESD-preventive wrist strap
● Input DC power cable (provided with the DC PSU)
● -48 V DC power source capable of providing 50 A dedicated power to each 1200 W DC PSU installed
in the switch
● Thermal protective gloves (required for removal)
Installing the DC Wiring
The input DC cable for the 1200 W DC PSU is shipped with the DC PSU (see Figure 52). You must use
this cable with the DC PSU. This section provides information about DC power specifications to be used
in connecting the DC cable to the DC source voltage.
Wiring the DC power cord to your facility DC source voltage must be performed by a qualified,
licensed electrician. After the DC power cord is connected to a permanent DC voltage source by a
qualified, licensed electrician, you can remove, replace, and maintain the 1200 W DC PSU without
further electrician assistance. However, make sure that the DC circuit is de-energized before connecting
or disconnecting the DC power cord on PSU.
All wiring methods involving the DC input cable assembly must be performed according to the relevant
articles of the National Electrical Code.
Figure 52: Input DC Power Cable for the 1200 W DC PSU
Lock
Return
-48Vdc
Ground
10 ft.
Black: Return
Blue: -48V
Green/yellow:
Ground
EX_135
94
BlackDiamond 8800 Series Switches Hardware Installation Guide
Page 95

Installing an Extreme Networks 1200 W DC PSU
Each 1200 W DC PSU must be powered by a 50 A dedicated power source that delivers -40 to -72 VDC
of constant power. Power distribution to the 1200 W DC PSU shall be provided using the -48 VDC
harness provided. Power to the 1200 W DC PSU can be from either a 50 A UL-approved overcurrent
protection breaker or an SELV- approved power source in accordance with IEC 60950-1 utilizing 50 A
overcurrent protection.
The input DC cable has an input connector on one end and precut wire on the other end that goes to
the DC power source. The input connector has a locking mechanism that locks onto the DC PSU to
prevent accidental removal of the input DC cable.
If necessary, use appropriate termination lugs for 8 AWG (10 mm
2
) copper-stranded wire on the ends of
the cable to connect to the DC power source.
The blue termination (-48 V) connects to a 50 A overcurrent protection circuit device, and the black
(return) termination connects directly to the RTN bus of the DC power source. The green/yellow
termination (ground) must connect to the same earth ground point as the switch.
Installing a 1200 W DC PSU
To install an Extreme Networks 1200 W DC PSU:
1 Attach an ESD-preventive wrist strap to your bare wrist and connect the metal end to the ground
receptacle on the top-left corner of the switch front panel.
CAUTION
Be sure that the grounding point on the back of the switch chassis is securely connected to earth ground. For
information about grounding the switch, see “Grounding the BlackDiamond 8800 Series Chassis” on page 83.
2 Verify that the 1200 W DC PSU is right side up, and press the yellow locking lever to the left while
lifting the handle (see Figure 53).
NOTE
Do not connect the input DC cable to the DC PSU before you install the DC PSU in the switch.
BlackDiamond 8800 Series Switches Hardware Installation Guide
95
Page 96

Installing Power Supply Units in the BlackDiamond 8800 Series Switches
Figure 53: Locking Handle on the 1200 W DC PSU
Open
Lock
Yellow
lever
EX_130
3 Carefully slide the 1200 W DC PSU all the way into the power supply bay (see Figure 54).
Be sure that the DC PSU is fully seated in the switch.
CAUTION
Do not slam the 1200 W DC PSU into the chassis backplane.
Figure 54: Installing the 1200 W DC PSU in the Power Supply Bay
EX_131
96
4 Verify that the DC power is turned off at the source.
CAUTION
Always verify that the DC circuit is de-energized before you connect the input cable to the 1200 W DC PSU.
BlackDiamond 8800 Series Switches Hardware Installation Guide
Page 97

Installing an Extreme Networks 1200 W DC PSU
5 Connect the input DC cable to the front of the 1200 W DC PSU as shown in Figure 55.
NOTE
An AC power cord is not required for proper functioning of the DC PSU.
6 Rotate the locking handle down to latch the input cable connector onto the DC PSU.
Figure 55: Connecting the Input Cable to the 1200 W DC PSU
Locking
handle
open
Yellow
lever
Locking handle closed
Remove/insert
DC plug
traps DC plug
EX_132
7 Secure the 1200 W DC PSU in the power supply bay by pushing down on the locking handle until it
clicks in place.
NOTE
The DC PSU does not energize until the locking handle latches.
CAUTION
When you route the DC cable harnesses, minimize stress on the cables. It is important to route each of the
outermost cables out the opposite side of installation to maximize the bend radius and to avoid stress on the cables.
For example, you should route the leftmost cable harness across the switch so that it exits through the right side of
the grate. Route the rightmost cable harness across the switch so that it exits through the left side of the grate. The
four middle cables can route in either direction.
8 Energize the DC circuit for the 1200 W DC PSU.
To install additional 1200 W DC PSUs, repeat steps 2 through 8.
BlackDiamond 8800 Series Switches Hardware Installation Guide
97
Page 98

Installing Power Supply Units in the BlackDiamond 8800 Series Switches
NOTE
Leave the ESD strap permanently connected to the switch, so that the strap is always available when you need to
handle ESD-sensitive components.
Removing a 1200 W DC PSU
CAUTION
The 1200 W DC PSU may be hot to the touch; use thermal protective gloves to handle the 1200 W DC PSU during
removal.
To remove an Extreme Networks 1200 W DC PSU:
1 Attach an ESD-preventive wrist strap to your bare wrist and connect the metal end to the ground
receptacle on the top-left corner of the switch front panel (if not already attached).
2 De-energize the DC circuit for the 1200 W DC PSU to be removed.
3 Press the yellow lever on the DC PSU to the left while you lift the handle on the PSU.
4 Disconnect the cable from the front of the DC PSU by pressing down the catch (see Figure 56) and
pulling out the cable.
Figure 56: DC Cable Connector on the 1200 W DC PSU
Squeeze catch
to release plug
EX_133
WARNING!
Always be sure that the 1200 W DC PSU does not have the input cabled connected at any time when the DC PSU
is not installed in the switch. Do not remove the DC PSU from the switch before disconnecting the input DC cable
from the PSU.
5 Pull the handle of the PSU to disconnect the PSU from the power connector at the back of the power
supply bay. Slide the PSU partway out of the bay.
6 Wearing thermal protective gloves, place both hands underneath the PSU to support the weight as it
is pulled out from the switch.
98
To remove additional 1200 W DC PSUs, repeat steps 2 through 6.
BlackDiamond 8800 Series Switches Hardware Installation Guide
Page 99

Installing an Extreme Networks 1200 W DC PSU
NOTE
Leave the ESD strap permanently connected to the switch, so that the strap is always available when you need to
handle ESD-sensitive components.
LEDs
The front panel of the 1200 W DC PSU provides status LEDs. Ta bl e 17 identifies the symbols and
describes the LED activity.
Table 17: Extreme Networks 1200 W DC PSU LEDs
Power
PSU Condition
Power supply DC outputs working normally On Off Off
DC input power present/standby output on Blinking Off Off
Current limit on 48 V DC output On Off Blinking
Predictive failure On Blinking Off
No input power to this PSU only Off Off On
No input power to any PSU Off Off Off
Power supply failure Off Off On
Green
Predictive Fail
Amber
Fail
Amber
BlackDiamond 8800 Series Switches Hardware Installation Guide
99
Page 100

Installing Power Supply Units in the BlackDiamond 8800 Series Switches
100
BlackDiamond 8800 Series Switches Hardware Installation Guide
 Loading...