

Page 1

User's Guide
Visit us at www.TestEquipmentDepot.com
CO2 Monitor and Datalogger
Model CO210
99 Washington Street
Melrose, MA 02176
Phone 781-665-1400
Toll Free 1-800-517-8431
Page 2

Introduction
Congratulations on your purchase of this Model CO210 Carbon Dioxide Meter. This meter
measures and datalogs CO
audible alarms, this is an ideal instrument for indoor air quality (IAQ) diagnosis. This meter is
shipped fully tested and calibrated and, with proper use, will provide years of reliable service.
2 level, air temperature, humidity, date and time. With visible and
Meter Description
Meter
1. CO
2, Temp and RH sensors (rear)
2. LCD display
3. Controls
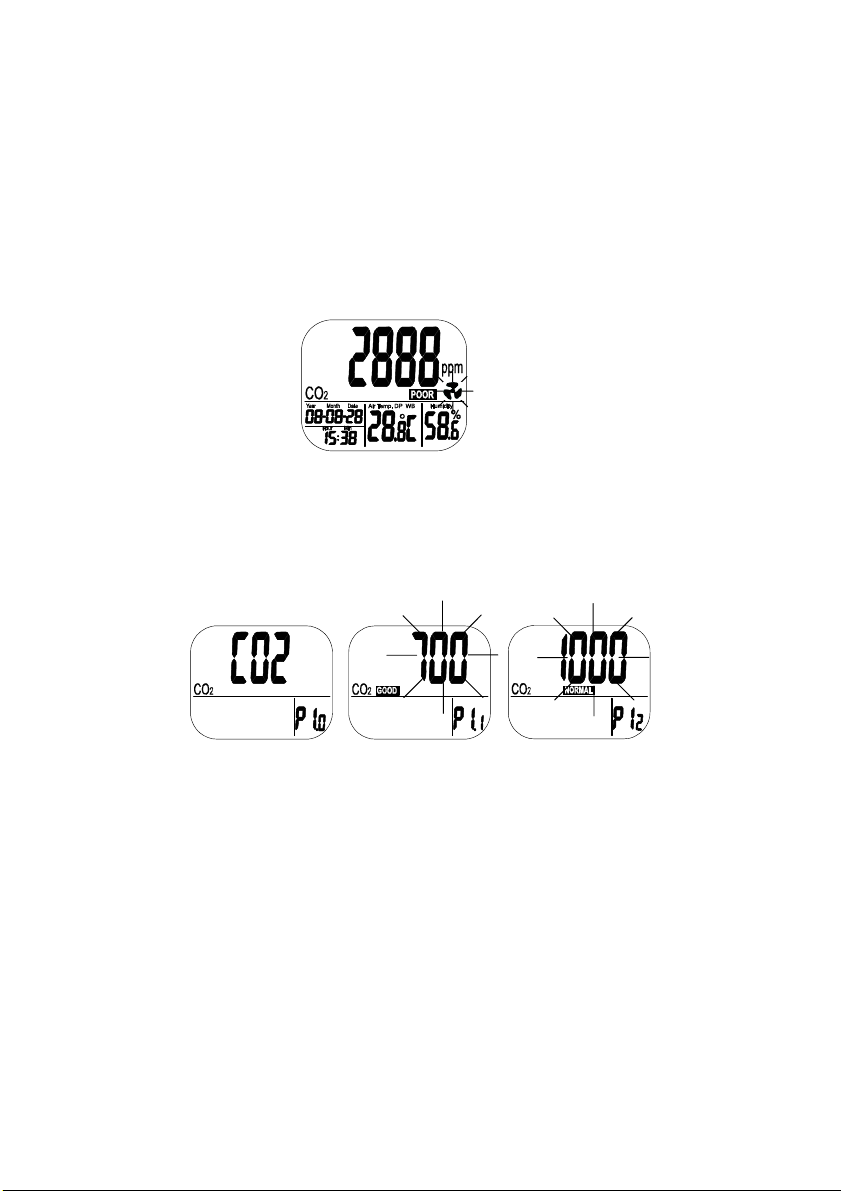
LCD Display
1. CO
2 concentration in ppm
2. Date and Time
3. Air Temperature
4. % Relative Humidity
Symbols
ppm CO
GOOD CO
NORMAL CO
POOR CO
2 value
2 air quality level
2 l air quality level
2 air quality level
Air Tem p Air Temperature
Humidity % Relative Humidity
°C or °F Celsius or Fahrenheit
MAX/MIN Maximum or Minimum reading
Controls
SET Enters setup mode.
Saves and finishes settings.
ESC Exits setup page/mode.
Terminates calibration / Datalogging
RESET Press to clear the MAX/MIN. -
Terminates during RH calibration.
LOG ▲ Selects mode or increases value in setup
Start Datalogging
MIN/MAX▼ Activates MAX, MIN function.
Enters CO
2
calibration with
SET
1
2
3
1
and ▲
MAX
MIN
TWA
STEL
GOOD
NORMAL
CO
2
Year Month Date
Hour Min
Air Temp.DP WB
POOR
o
234
Humidity
VENT.R
cfm/p
lps
ppm
%
2 CO210-EU-EN-V1.0-6/11
Page 3

Operation
POWER ON
Plug in the adaptor and the meter turns on automatically with a short beep. If the vo ltage is
too high or low, “bAt“ will displa y on the LCD and an LED will flash.
The LCD will display current CO
displayed as well
TAKING MEASUREMENT
The meter starts measurements when powered on and updates readings every second. If the
operating environment changes (ex. from high to low temp.), it takes 2 minutes for the CO
to respond and 10 minutes for RH change.
NOTE: Do not hold the meter close to your mouth or any other source of CO
MAX/MIN
In the normal mode, press the MIN/MAX button to see the minimum and maximum of CO2,
Temperature and Humidity. Each press of MIN/MAX button will sequence through the MIN, MAX
display and then returns to normal mode.
Press and hold the RESET button for more than 1 second to clear the minimum and maximum
value from memory.
DATA LOGGING
The meter can record readings of CO
monitoring. The memory capacity is 15999 points (5,333 RH, Temperature and CO
The sam pl e ra te is adj us ta ble fro m 1 s e c o n d t o 4 hours 59 minutes and 59 seconds.
After the sampling rate is selected, press the LOG button for 2 seconds in the normal
mode to start logging. The green LED light blinks to indicate the logging status and t he L CD
main display will alternate between real time CO
the real time temperature, humidity and clock.
To terminate data logging, press the
and the LC D m ai n d is pl ay will alternate between real time CO
the E SC b ut to n for 2 seconds again and it the meter returns to normal measurement mode.
Minimum and Maximum recall continues working during logging.
The memory is cleared whenever a new logging session is activated.
2
, temp., humidity, date and time. The air quality level is
2.
2,
, temperature and humidity for long time environ ment
2
value and “rEC”. The lower displays a r e
ESC
button
” for 2 seconds. The L ED will stops blinking
2
value and “End”. Ho l d do w n
2
2 sensor
records) .
3 CO210-EU-EN-V1.0-6/11
Page 4
ALARM
The meter features an audible alarm which will give warnings when the CO2 concentration exceeds
the set limit. There are two settable limits, an upper limit that initiates the alarm and a lower limit to
stop the alarm.
The meter emits beeps and displays the fan icon on the display when the CO
upper limit. The audible alarm can be stopped by pressing any key or it automatically stops when
CO
2 reading falls below the lower limit.
If the beeper is temporarily shut down, it will sound again when readings fall below lower limit and
then go over the upper limit again or it the user presses the RESET button for more than 1 second
to activate it.
The fan icon keeps flashing when beeps are manually shut down. It stops only when readings fall
under the lower limit
SETUP
(Alarm level, Temperature scale, Real Time clock)
Hold the SET button, in the normal mode, for more than 1 second to enter the setup mode.
1 CO2 ALARM: GOOD LEVEL
P1.
When entering the setup mode, P1.
again to go into P1.
1 for setting the CO2 upper limit for the GOOD level. The current set value will
0 and “CO2” are displayed on the LCD. Press the SET button
be blinking on the display.
Press the LOG/▲or MIN/MAX▼ button to increase or decrease the value. Each press adjusts in
100ppm increments. The alarm range is 0 to 700ppm.
When the value has been set, press the SET button to confirm the GOOD limit and to proceed to
2 for setting the upper NORMAL limit. Press the ESC button to exit without saving the setting.
P1.
P1.
2 CO2 ALARM: NORMAL LEVEL
P1.
2 is used for setting the CO2 upper limit for the NORMAL level. The current set value will be
blinking on the display.
Press the LOG/▲or MIN/MAX▼ button to increase or decrease the value. Each press adjusts in
100ppm increments. The alarm range is 700 to 1000ppm.
When the value has been set, press the SET button to confirm the NORMAL limit and to proceed to
3 for setting the upper POOR limit. Press the ESC button to exit without saving the setting.
P1.
2 level goes over the
4 CO210-EU-EN-V1.0-6/11
Page 5
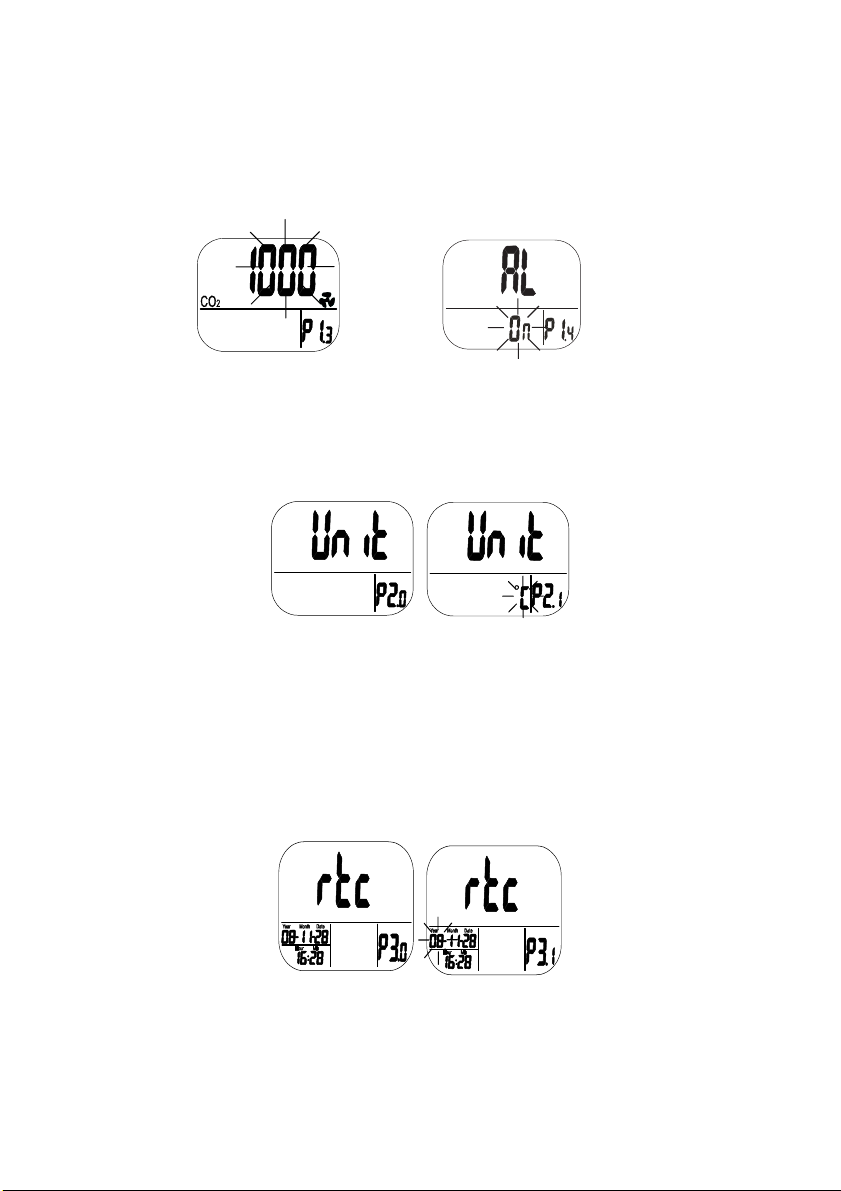
P1.
3 CO2 ALARM: BEEP ALARM
P1.
3 is used for setting the CO2 upper limit for the BEEPER ALARM level. The current set value
will be blinking on the display.
Press the LOG/▲or MIN/MAX▼ button to increase or decrease the value. Each press adjusts in
100ppm increments. The alarm range is 1000 to 5000ppm.
When the value has been set, press the SET button to confirm the limit and to proceed to P1.
p
ress the ESC button to return to P1.0.
4 or
CO
2
P2.
0 TEMPERATURE SCALE
Press the LOG/▲ button in P1.
0 mode to access P2.0 for setting the temperature scale.
Press the SET button to go into the P2.1setting mode. The °C or °F will blink.
Press the LOG/▲button to change the units. Press the SET button to confirm the setting or press
the ESC button to exit without saving and return to P2.
0.
P3.
0 REAL TIME CLOCK
Press the LOG/▲ button in P1.
button and the meter goes into P3.
0 twice to access P3.0 for setting up real time clock. Press the SET
1 with blinking year in the lower left display. To change the year,
press the LOG/▲ button or the MIN/MAX▼ button. Press the SET button to save the setting and
then enter P3.
Press the LOG/▲ button P3.
2 or press the ESC button return to P3.0 without saving the setting.
1 to access P3.2. The current month setting will blink. To change the
month, press the LOG/▲ button or the MIN/MAX▼ button. Press the SET button to save the setting
and then enter P3.
Repeat as above to finish the setting of P3.
3 or press the ESC button return to P3.0 without saving the setting.
3 (Date), P3.4 (Hour) and P3.5 (Minute)
5 CO210-EU-EN-V1.0-6/11
Page 6
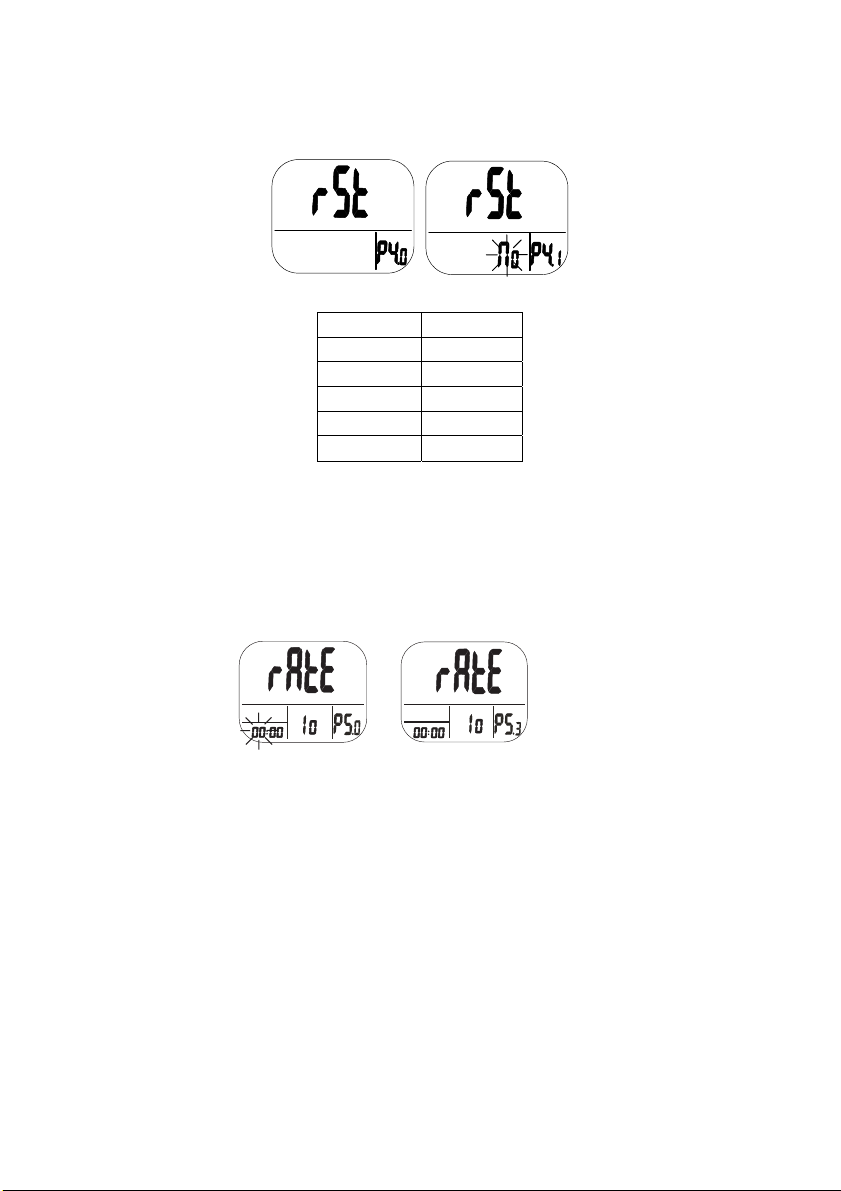
P4.0 RESET
Press the LOG/▲button in P1.
Press the SET button and the meter will go to P4.
0 three times to access P4.0 to reset the m eter to default settings.
1 with a blinking “No”. Press the LOG/▲ to
switch the status then press either the SET button to save the settings or the E SC bu tton to
exit without saving the settings.
If “Yes” is selected the meter defaults to the following settings:
Parameter Default
P1.
1
700ppm
P1.
2
1000ppm
P1.
3
1000ppm
P2.
P4.
1
1
°
C
No
P5.0 SAMPLING RATE
Press the LOG/▲button in P1.0 three times to access P5.0 to set the logging sample r ate. The
available range is 1 second to 4 hours 59 minutes. Press the SET button and the meter will go
1 with blinking hour digits. To change the hour, press the LOG/▲ button or the MIN/MAX▼
to P5.
button. Press the SET button to save the setting and then repeat the procedure for P5.
2 minutes and
P5.3 seconds. Press the ESC button return to P5.0 without saving the setting.
Year Month Date
Hour Min
Year Month Date
Hour Min
6 CO210-EU-EN-V1.0-6/11
Page 7

Calibration
CO2 CALIBRATION
The meter is calibrated to a standard 400ppm CO2 concentration at the factory
NOTE: When the accuracy becomes a concern or after a year of use, return the meter to Extech for
calibration.
CAUTION: Do not calibrate the meter in an atmosphere of unknown CO
ABC (Automatic Baseline Calibration)
ABC (Automatic Baseline Calibration) establishes a baseline calibration to eliminate the zero drift of
the infrared sensor. The ABC function is always “ON” when the meter is turned on. ABC is designed
to calibrate the meter at the minimum CO
2 reading detected during 7.5 days continuous monitoring
(power on). It assumes that the area being tested receives fresh air with a CO
approximately 400ppm at some period of time during the seven days. It is not suitable to use
desktop CO
2 in closed areas with consistently high CO2 levels 24 hours a day.
Manual Calibration
Manual calibration is suggested to be done outdoors on a sunny day with good ventilation and fresh
air where the CO
humidity will affect the CO
Do not calibrate in places crowded with people or close to where high CO
such as ventilating outlets or fireplaces.
Place the meter in the calibration site. Turn on the meter and hold down the SET, ▲ and
MIN/MAX▼ buttons simultaneously for more than 1 second to enter CO
“400ppm” and “CO
The calibration will take about 30 minutes. When the calibration is complete, the blinking stops and
the meter returns to normal operation. To abort the calibration, press the RESET button for more
than 1 second.
Note: Keep away from any animal, human or plant which might affect the CO
the calibration.
2 level is approximately 400 ppm. Do not calibrate on a rainy day because high
2 level in air.
2” will blink while the calibration is in process.
2 concentration.
2 level of
2 concentrations may exist
2 calibration mode.
2 concentration during
Software
The Windows based pc software provided is used to set-up the datalogger, download data and to
view the data in graphical or text format. After installing the software, view the HELP file for
operational information.
7 CO210-EU-EN-V1.0-6/11
Page 8

Maintenance
CLEANING AND STORAGE
1. The meter should be cleaned with a damp cloth and mild detergent when necessary. Do not use
solvents or abrasives.
2. Store the meter in an area with moderate temperature and humidity.
Specifications
Function Range Resolution Accuracy
CO2 0 to 9999ppm 1ppm ±(5%rdg +50ppm)
Temperature
Humidity 0.1 to 99.9% 0.1%
Display LCD
Sensor Type CO
Response CO
Datalogging Up to 15999 points
Sample rate 1 second to 4 hours-59 minutes-59 seconds
Operating Conditions -10 to 60°C (14 to 140°F); < 90% RH non-condensing
Storage Conditions -20 to 60°C (-4 to 140°F); <99% RH non-condensing
Power Supply 5VDC (±10%), ≥ 500mA (AC adaptor supplied)
Dimensions / Weight 117x102x102mm (4.6x4x4”); 204g (7.2 oz.)
-10 to 60°C
14 to 140°F
2: NDIR (non-dispersive infrared) technology
Humidity: Capacitance sensor;
Temperature (air): Thermistor
2: <2min for 90% step change
Temp: <2min for 90% step change
%RH: <10min for 90% step change
0.1° ±0.6°C/0.9°F
±3%(10 to 90%)
±5%(< 10% or > 90%)
8 CO210-EU-EN-V1.0-6/11
Page 9

TROUBLESHOOTING
Can’t power on: Check whether the adaptor is properly plugged in.
Slow response: Check whether the air flow channels on the rear of
"BAt” and green LED keep
flashing:
Error Codes:
2 Display
CO
the meter are blocked.
The adaptor output voltage is too high or too low.
Please use the adaptor with correct output.
E01 CO2 sensor is damaged Send back for repair
E02 CO2 reading is under the
lower limit
E03 CO2 reading is above the
upper limit
Re-calibrate the meter, if it still
appears, return for repair
Put the meter in fresh air and wait for
5minutes, if it still appear, re-calibrate
the meter. If above two methods faile,
return for repair
E17 ABC mode of CO2 senor
Send back for repair
has failed and might
cause wrong CO
2
readings
Temp
Display
E02 Air temp. measurement is
under the lower limit
Put the meter in regular room
temperature for 30 minutes, if it still
appears, return for repair
E03 Air temp. measurement is
over the upper limit
Put the meter in regular room
temperature for 30 minutes, if it still
appears, return for repair
E31 Temp. sensor or
Return for repair
measuring circuit is
damaged
Humidity
Display
E04 Air temp. measurement
has error code
E11 The RH calibration has
failed
E34 RH sensor or measuring
circuit has failed
Refer to temperature error code for
problem solving
Please return for repair
Return for repair
9 CO210-EU-EN-V1.0-6/11
Page 10

CO2 Levels and Guidelines
Non-Enforced Reference levels:
• 250 - 350 ppm – background (normal) outdoor air level
• 350- 1,000 ppm - typical level found in occupied spaces with good air exchange.
• 1,000 – 2,000 ppm - level associated with complaints of drowsiness and poor air.
• 2,000 – 5,000 ppm – level associated with headaches, sleepiness, and stagnant, stale,
stuffy air. Poor concentration, loss of attention, increased heart rate and slight nausea may
also be present.
• >5,000 ppm – Exposure may lead to serious oxygen deprivation resulting in permanent brain
damage, coma and even death.
Regulatory exposure limits:
ASHRAE Standard 62-1989: 1000ppm: CO
exceed 1000ppm.
OSHA: 5000ppm: Time weighted average over five 8-hour work days should not exceed
5000ppm
Building bulletin 101 (Bb101): 1500ppm. UK standards for schools say that CO
over the whole day (i.e. 9am to 3.30 pm) should not exceed 1500ppm.
Germany, Japan, Australia, UK: 5000ppm, 8 hours weighted average occupational exposure
limit is 5000ppm.
Copyright © 2011 Extech Instruments Corporation (a FLIR company)
All rights reserved including the right of reproduction in whole or in part in any form.
2 concentration in occupied building should not
2 at averaged
Test Equipment Depot - 800.517.8431 - 99 Washington Street Melrose, MA 02176 - TestEquipmentDepot.com
10 CO210-EU-EN-V1.0-6/11
 Loading...