

Page 1

Software User Guide
EA80 Indoor Air Quality Meter Datalogger
1
Model EA80 Software User Guide Version 1.1 October 2006
Page 2

Software Requirements and Setup
• Start WindowsTM 95 / 98 / 2000 / or XP operating system
• Close all oth e r ap p l i cations
• Insert supplied program disk in the PC CD-ROM drive
Wait for “Autorun” to start and follow the on-screen instructions
(If “autorun” does not start, click “Start” then “Run”. Type the drive letter
and “: \Disk1\Setup.exe” and click “OK” .)
Setup program will run automatically.
Click Next> button
2
Model EA80 Software User Guide Version 1.1 October 2006
Page 3

Click Next> to use the default folder or
Click Browse… to select a different folder
Click Next> button
Setup is complete.
3
Model EA80 Software User Guide Version 1.1 October 2006
Page 4

Software Operation
Run the software
Click "Start" from Start menu then move to "All Programs" (or “Programs”) then "EA80" and then
click the "EA80" icon.
Click an available COM port
The main software screen
4
Model EA80 Software User Guide Version 1.1 October 2006
Page 5

Downloading Logged Data
Push and hold the button on the meter for about 3 seconds. The Data Logger
window, shown below, will open.
Click on a SET number to view the logged data. In the window above, there are 4 sets from
which to choose. The list below is an example of an opened set.
Click
to save.
Page 6

Graphing Data
Click
to graph. The Graph will appear:
Click to edit plot range
Printing Data
Click
to print.
6
Model EA80 Software User Guide Version 1.1 October 2006
Page 7

Opening a Previously Saved File
Click the
button. The Open File window will appear:
Select the file and then click the Open button.
7
Model EA80 Software User Guide Version 1.1 October 2006
Page 8

Data Acquisition
In data acquisition mode the meter is connected to a PC.
Click to set the sampling rate.
Enter a sampling time and click OK then click on to view data in table format or to graph.
Saving A File
Click the button. The dialog box shown below will appear.
Input a file name and then click "Save" to begin saving data to the file.
Click the button to stop recording.
8
Model EA80 Software User Guide Version 1.1 October 2006
Page 9
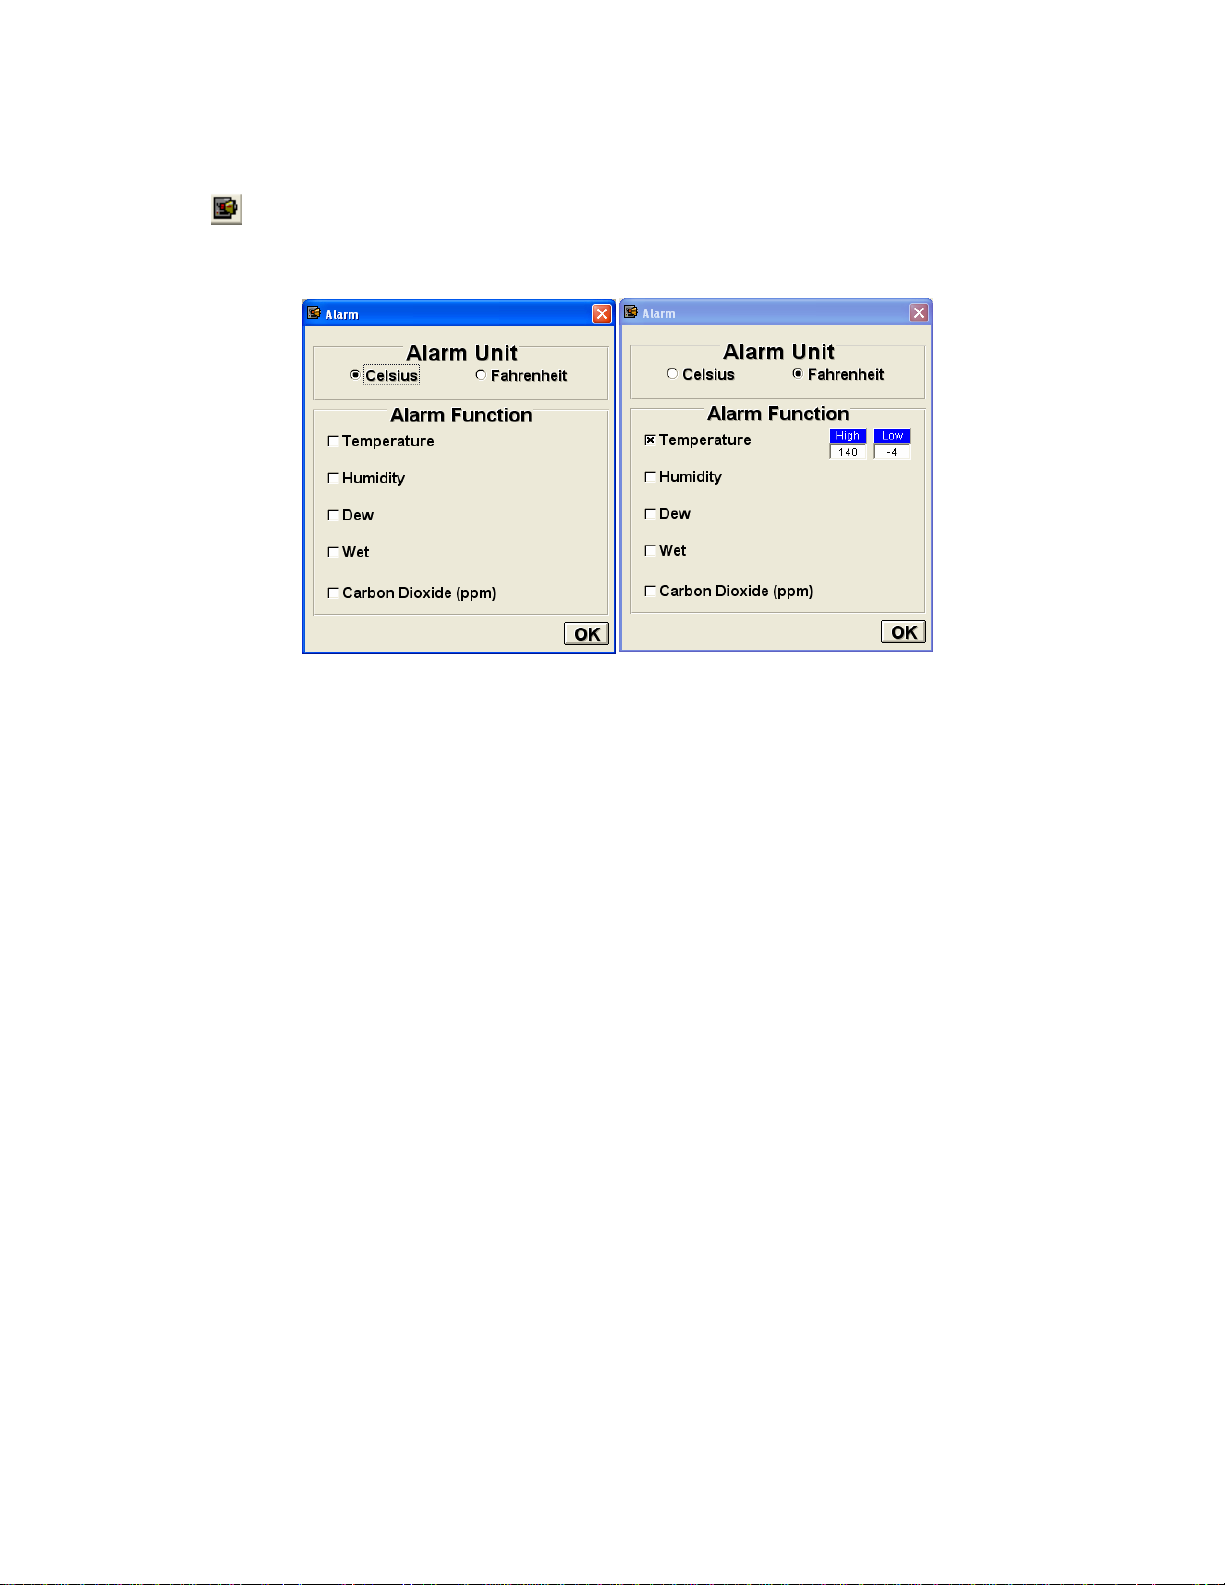
Alarm Function in Data Acquisition
Click the button to bring up the alarm menu. Select the desired alarm. Fill in the high and low
limits and click OK. The PC will sound an audible tone if the levels are exceeded.
9
Model EA80 Software User Guide Version 1.1 October 2006
Page 10

RS232 Wiring Hardware
PC Interface Cable
Meter side of PC Interface Cable
The RS-232 “phono” plug side of the PC Interface Cable connects to the meter’s RS-232 phono
jack. Refer to the diagram below for wiring information.
Computer’s Serial Port side of Interface Cable
The RS-232 “DB-9” side of the PC Interface Cable connects to the PC’s COM port. Refer to the
diagram below for wiring information. Note that a SERIAL to USB Adapter may be used.
RS232 Settings
28800, N, 8, 1
10
Model EA80 Software User Guide Version 1.1 October 2006
Page 11

RS232 Protocol
02 Flag ppm H ppm L RH H RH L Cel H Cel L 03
02:Starting Byte
Flag:(Reserved)
ppm(H、L): 0~6000
RH(H、L): 0~100
Celsius(H、L): -20.0~60.0
03:LCD Ending Byte
Calibration Used
0 N2_H N2_L AIR_H AIR_L FF
0:Marking Byte
N2:SENSER N2 Value
AIR:SENSER CO2 Value
FF:Marking Byte
Baud Rate:28800 (15 bytes data / 0.25 seconds)
Datalogging:(Maximum: 99 sets )
Head: AA 55 AA 55 AA 55 AA 55 AA 55 AA +Total Set+ Last Add+Any command
Record of 1
Record of 2
st set+Time+INTV+ Any command…Data…Any command
nd set+Time+INTV+ Any command …Data…Any command
After 256 bytes of data have been downloaded, the Meter waits for Any command from PC
The Last Recorded data…waits for Any command from PC
11
Model EA80 Software User Guide Version 1.1 October 2006
Page 12

Hardware Requirements and Setup
PC Hardware Requirements:
• 486 PC or above with available COM port and CD-ROM drive
• 4MB available hard-drive space
PC Hardware Setup:
1) Switch off all power related to the PC
2) Connect the DB9 (female) end of the supplied RS-232 cable to available COM port
3) Switch on all related power
4) Connect the phono plug end of the RS232 cable to the meter
Technical support: Extension 200; E-mail: support@extech.com
Repair & Returns: Extension 210; E-mail: repair@extech.com
Product specifications subject to change without notice
For the latest version of this User Guide, Software updates, and other
up-to-the- m inute product informatio n, visit our websi t e: www.extech . com
Extech Instru m e nt s C orp o ration, 285 Bear Hi l l Ro a d, Waltham, MA 02451
Support line (781) 890-7440
Copyright © 2006 Extech Instruments Corporation
All rights reserved including the right of reproduction in whole or in part in any form.
12
Model EA80 Software User Guide Version 1.1 October 2006
 Loading...