

Page 1

Video Borescope
Models BR200 and BR2 50
Additional User Manual Translations available at www.extech.com
User Manual
Page 2
2
Introduction
Congratulat ions on your purchase of this Extech BR200 (17mm camera head) or BR250 (9mm
cam era head) V ideo Bores cope. This i nstrument was des igned for use as a remote ins pect ion
devic e. It can be used to peer int o t i ght spot s and then suppl y real-time video and im ages t hat can
be recorded. Typic al appl icati ons inc lude HVAC inspec ti on, aut omoti ve ins pect ion, cabl e routing,
and automotive/boat/aircraft inspection. This met er is shipped fully test ed and, wi t h proper use, will
provide y ears of reli able service.
Features
• 3. 5 '' TFT-LCD palm LCD monit or with high resolution
• The image head and t he cable are water res ist ant when t he unit i s fully as s em bl ed (the
monit or and the c am era are not water res ist ant)
• Wireless and hard-wired functionality
• The monitor records video and i m ages
• Mic ro SD card m em ory (16G m ax . size).
Safety
• Do not expose i nst rument t o moist ure
• Shut off the i nstrument when not in us e
• Remove t he batt eries when c leaning t he ins trument
• Replace all bat t eri es at t he sam e time
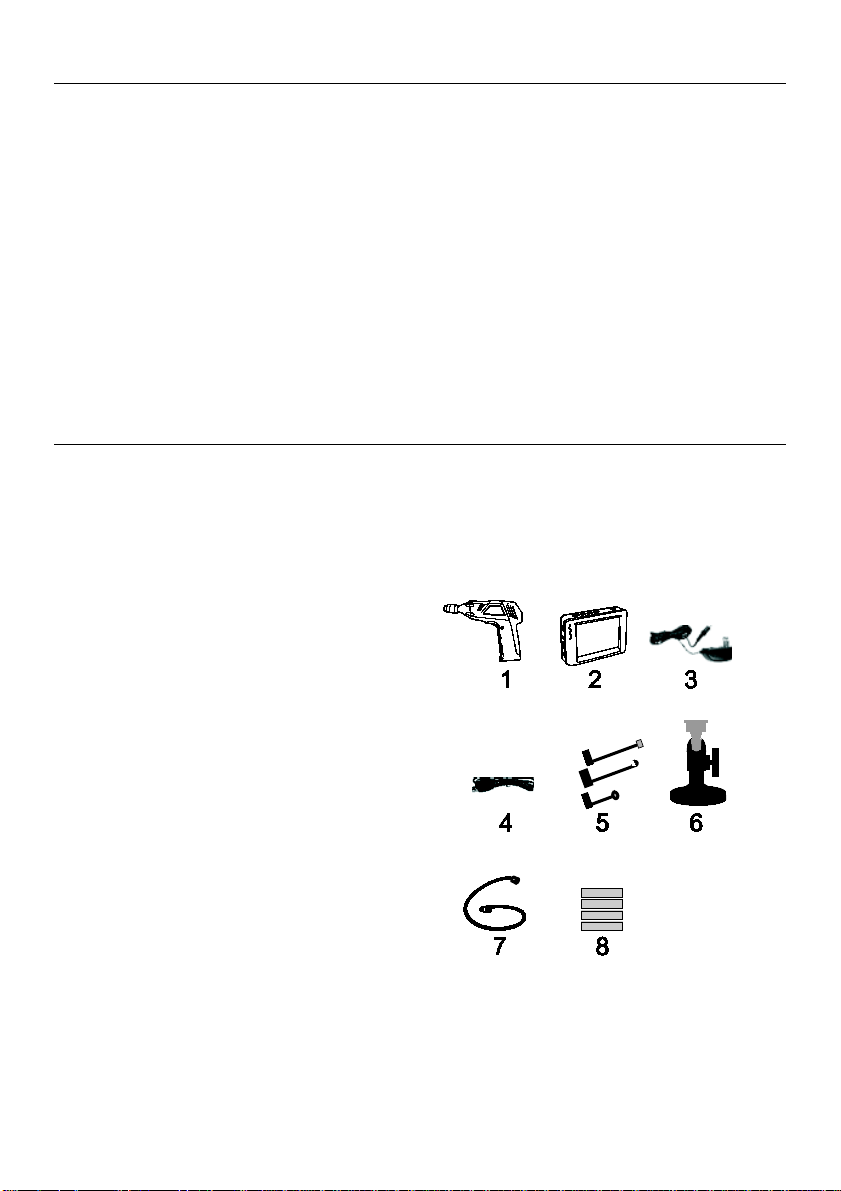
Supplied Equipment
1. Camera
2. LCD Monitor
3. Monit or Adaptor
4. Adapt or cable
5. Accessory Magnet / Hook / Mirror
6. Magneti c m ount
7. Flex cable and camera head
8. 4 AA Batteries
Note: Mi cro SD card and adapt or (not s hown)
BR200-BR250-en-GB_v7.6 7/17
Page 3
3
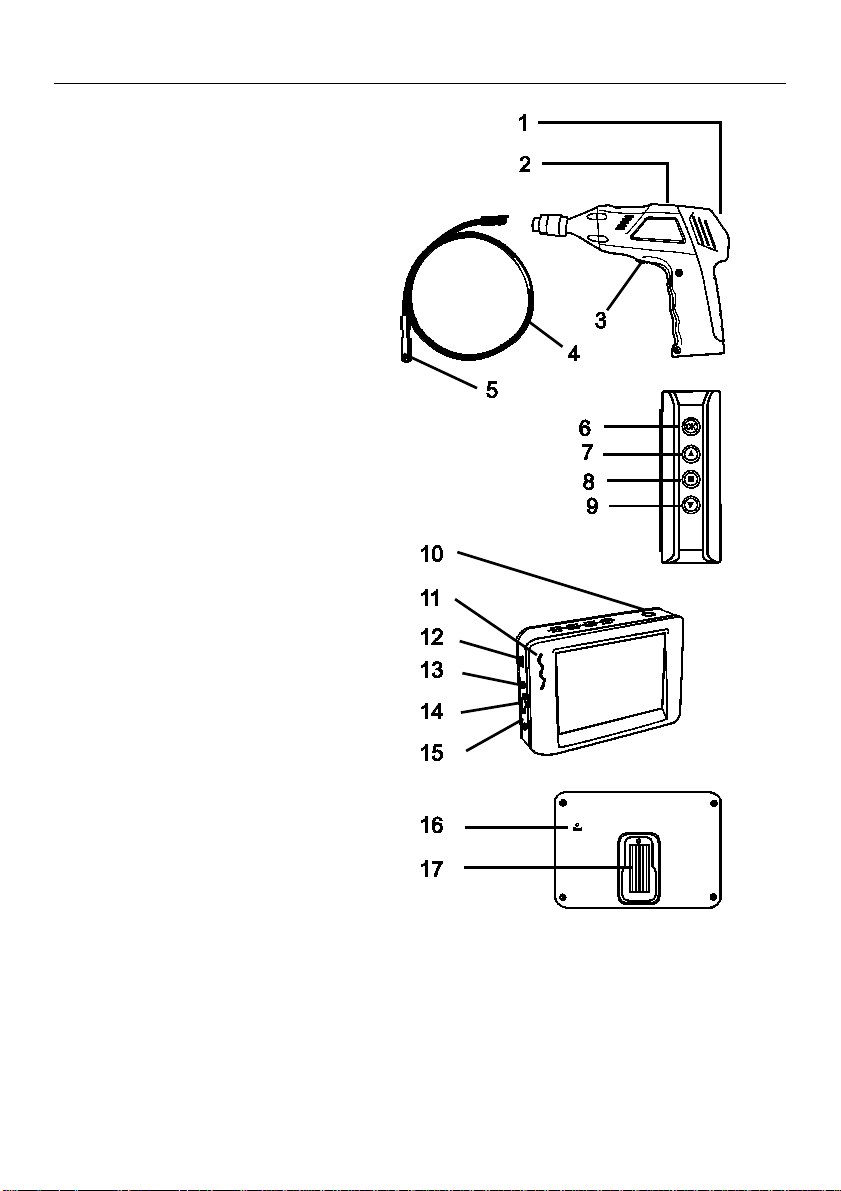
Description
1 Signal out put
2 Power Indicat or
3 Power On/O ff, Dimmer
4 Flex ible t ube
5 Camera head and LED’s
6 OK
7 Up arrow, video or jpg
8 Menu
9 Down arrow
10 Power On/O ff
11 Power Indicat or
12 USB Socket
13 Video out put
14 SD c ard soc ket
15 Power suppl y s ock et
16 Reset
17 Signal input
BR200-BR250-en-GB_v7.6 7/17
Page 4

4
Installation
Install the batteries into t he i nstrument body, c harge the moni tor bat tery, connect the camera and
flexibl e tube to the body, and insert t he micro SD card . Install any accessory as needed.
Battery Installation
Connect Monitor Power
The m oni t or has a rechargeable battery. Plug i n t he A C adaptor and connect t he cable to the
DC5V socket on the monitor. The power indicator will l i ght i n red (or the battery capacity icon on
LCD of monitor wil l blink , indic ating that it i s charging - and wil l turn off after a full c harge)
Connect the camera and flexible tube
Connect the c amera tube t o the inst rument body; ensure that the key ed ends are properly al igned.
Once al igned, t ighten t he knurled knob t o hold the connect ion firmly i n pl ace.
Warning. Per m anent dam age to t he flex tube and los s of operation will occur if the flex
Inserting the micro SD card
Insert c ard with arrow point ing toward slot. Gently apply press ure until card lock s into the s pring
loaded slot. To remove from unit, gent l y pus h t he card i nward and then releas e to eject it from the
card slot.
tube is subjected to narrow r adius or s harp angle bends .
BR200-BR250-en-GB_v7.6 7/17
Page 5

5
Installing the accessory tools (BR200)
The inc luded acc ess ories (mirror, hook and magnet ) all attac h to the c am era in the s am e m anner.
Refer to the diagram s below:
Installing the accessory tools (BR250)
Hook the at t achment into the hole i n the head and then sli de the rubber sleeve over the
att achment shaft
Attaching the Monitor to the instrument body
Connect the USB Cabl e
Use t he USB c abl e to connec t the monit or to a PC. The USB online ic on will appear on t he
PC. O pen My Computer on t he PC, and l ocate the Mobile Disk. The Mobile dis k can be
used and ac ces sed in the same manner as any external hard drive.
Video Output
Insert the video cable i nto the VIDEO OUT sock et on the monit or. Insert the other end of the
cable i nto the VIDEO IN jack of a TV or other moni tor. The LCD Monitor wi ll output a high
qualit y video image.
Installing the Magnetic bracket
The magnet ic brack et s lides onto the rear of the monitor for c onvenient pl acement and
viewing.
BR200-BR250-en-GB_v7.6 7/17
Page 6

6
Operation
Basic O pe r atio n
1. Turn the ON/OF F dial switch to power t he camera. The power indicator will s wi t ch on. The
switch t hen acts as a dimmer for the two LE Ds on the imager head of t he camera.
2. Pres s and hold the monitor power s wi t ch for at l east 2 s econds and the power i ndi c ator wi l l
illum inate green and a Welcome s creen wil l appear.
3. The real time image will then appear on the display LCD m oni t or.
Note. If the pict ure does not properly s ync ronize or has poor color, check that t he V i deo
System Settings are set to “NTSC”, not to ‘PA L” . This should fix t he condi t i on..
4. Use t he up arrow to select video
5. Turn t he O N/ OF F dial to adj us t the LE D light i ntensity as desired.
6. The tube can be easil y maneuvered into positi on. The tube c an be bent int o the shape of t he
area to be examined.
7. Use the suppl ied acc essories t o hel p retrieve smal l i t em s.
or photo mode.
LCD Reset
If the B R200/ BR250 LCD Monit or will not power ON, or if i t powers O FF duri ng use, follow the steps
below to perform a Power Reset:
1. Un-dock the LCD module from t he BR200/ BR250 pis tol -grip base uni t.
2. Connect the AC adapter t o the LCD modul e and to t he appropriate A C power source.
3. Locat e the Power Reset port on the reverse s ide of t he LCD module (labeled Reset).
4. Using a non-metal l i c obj ect, m om entarily press t he Power Reset but ton for a period of 2-to-5
seconds and t hen releas e.
5. Leaving t he AC adapter connec ted t o the LCD module, at tempt to power t he unit ON.
6. If the unit powers ON, al low it to fully re-charge (up t o 2 hours ) before removing the AC
adapter. If the LCD uni t does not power ON, repeat st eps 1 through 6.
If, after two att empt s to reset t he LCD, t he unit still does not power ON, c ontac t Technic al Support.
Taking a Picture
In Photo mode, press OK t o take a picture. The phot o will automat ical ly s ave to the SD
card.
Recording a Video
In Real-Time Monitoring (video) mode, press OK t o begi n recordi ng; refer to the following diagram
for display icon definit ions:
1. Bat t ery capac i ty
2. Funct ion ic on (video/photo)
3. Recording in progres s
4. ZOOM level
5. Current Date and Time
6. REC Time remaini ng
7. SD card
BR200-BR250-en-GB_v7.6 7/17
Page 7

7
Viewing a Photo or Video
1. In the Real-T ime Monitoring mode, press to display a list of
dated playback folders
2. Use the ▼▲keys to select the desired folder.
3. Press OK to open the selected folder and view a list of photo or
video files .
4. Files are listed by time followed by (VID”) for photos or (VID) for
videos
5. Use the ▼▲keys to select a file.
6. Press OK to displa y the selected photo or v ideo.
For video files:
Press OK to pause while playing.
Press again to resume.
▲ Fast Forwards the video
▼ Rewinds the video
Press to stop v ideo
7. Press to return to menu.
8. Press again to exit.
Note: Video automatically saves to file every 30 minutes. When the SD card is filled to capacity, the SD
card icon changes to ‘F’. No video will be recorded if the SD card is not inserted in the slot.
Delete a Single Video Or Photo
1. In the Real-T ime Monitoring mode, press to display a list of dated
playback folders
2. Use the ▼▲keys to select the desired folder.
3. Press OK to open the selected folder and view a list of photo or
video files .
4. Files are listed by time followed by (VID”) for photos or (VID) for
videos
5. Use the ▼▲keys to select a file.
6. Press and HOLD the button, the display will show ‘DELETE
CURRENT FI L E? ’
7. Use the arrow keys to select YES or NO
8. Press OK to accept selection.
9. Press twice to exit the Delete screen.
Del ete a File Folder
To delete a folder, use the same instructions for deleting a single video or photo. The only additional
concern is that if a folder is not empty it cannot be deleted. Delete all of the files in a folder before
deleting the folder. If the user attempts to delete a folder that is not empty, the following message will
appear: FOLDER NOT EMPTY
Video Display on a PC
Several methods are available to playback or to copy video files on a PC. When connected, the files will
become available as new drives on the PC.
1. SD card adaptor: Insert the SD card into the SD adaptor and then insert the adaptor into the PC
SD slot (if av ailable)
2. USB adaptor: Insert the SD card into a USB adaptor and plug into a USB port.
3. USB cable. Connect the USB cable from the camera to the PC.
BR200-BR250-en-GB_v7.6 7/17
Page 8

8
Settings Mode
Pres s and hol d for t wo s econds t o enter the Set t i ngs Mode.
Language Settings
1. In S et tings M ode, use the arrow keys to s el ect SYS TEM SE TTING (green ic on).
2. Pres s OK t o call up t he S YSTEM ic on l ist
3. Use t he arrow keys to highli ght the Language icon (gl obe)
4. Pres s OK and the Language icon lis t will appear (flags)
5. Use t he arrow keys to highli ght the desired language
6. Pres s OK t o select the highlight ed language and ex i t
Video Sys t em Settings
1. In S et tings M ode, use the arrow keys to s el ect SYS TEM SETTING (green icon).
2. Pres s OK t o call up t he S YSTEM ic on l ist
3. Use t he arrow keys to highli ght the Video Syst em icon (yellow)
4. Pres s OK and the V ideo format s electi ons wi l l appear (NTSC, PAL)
5. Use t he arrow keys to highlight NTSC
6. Press OK to select the highl ighted format and exit
Format and Erase Media
1. In S et tings M ode, use the arrow keys to s el ect SYS TEM SE TTING (green ic on).
2. Pres s OK t o call up t he S YSTEM ic on l ist
3. Use t he arrow keys to highli ght the FORMA T icon (blue)
4. Pres s OK and the FORM A T selection screen wi l l appear (YES, NO)
5. Use t he arrow keys to highli ght the desired respons e
6. Press OK to acc ept the s el ection and ex it
Restoring Fa ctory Defa ul t Se ttings
1. In S et tings M ode, use the arrow keys to s el ect SYS TEM SE TTING (green ic on).
2. Pres s OK t o call up t he S YSTEM ic on l i s t
3. Use t he arrow keys to highli ght the DEFA ULT icon (red)
4. Pres s OK and the DEFAULT selec ti on sc reen will appear (YE S, NO)
5. Use t he arrow keys to highli ght the desired respons e
6. Pres s OK t o accept t he selec tion and exit
View Version
1. In Sett ings M ode, use the arrow keys to sel ect SYS TEM SE TTING (green ic on).
2. Pres s OK t o call up t he S YSTEM ic on l ist
3. Use t he arrow keys to highli ght the VERSION i con (green)
4. Pres s OK t o view the version
5. Pres s OK again to exit
Fr am e Rate Settin g
1. In S et tings M ode, use the arrow keys to select RECORDER SETT I NG (red icon).
2. Pres s OK t o call up t he RE CORDER options
3. Use t he arrow keys to highli ght the FPS (frames per second) icon
4. Pres s OK t o open the FPS parameter
5. Use t he arrows to s el ect t he frame rate: 10, 15, 20, 25, or 30
6. Pres s OK t o confirm
BR200-BR250-en-GB_v7.6 7/17
Page 9

9
Time Stamp ON OFF S e tting
1. In S et tings M ode, use the arrow keys to s el ect RECORDER SE TTING (red i con).
2. Pres s OK t o call up t he RE CORDER options
3. Use t he arrow keys to highli ght the Time Stamp ic on (purpl e)
4. Pres s OK t o open the parameter
5. Use t he arrows to s el ect ON or O FF
6. Pres s OK t o confirm
D at e/ T i me S ettin g
1. In Settings Mode, use the arrow keys to sel ect DATE-TIME S ETTING (y ellow ic on).
2. Pres s OK t o call up Date and Time Settings window
3. Use OK t o tab through the fiel ds
4. Use t he arrow keys to c hange a field sett i ng
5. Pres s the button to exit
Battery Replacement
Never dis pose of us ed batt eries or rec hargeable bat teri es in household wast e.
As cons um ers, users are legall y requi red to tak e used batteries to appropriat e collection
sites, t he retai l st ore where t he batteries were purc hased, or wherever bat teri es are s old.
Disposal: Do not dispose of t hi s instrument i n househol d wast e. The us er i s obligat ed to
tak e end-of-life devic es to a designated coll ection poi nt for the disposal of elec tric al and
elect ronic equipment .
BR200-BR250-en-GB_v7.6 7/17
Page 10

10
Specifications
CAMERA
Imaging Sens or CMOS
Total Pi xels (NTSC) BR200: 712 x 486; BR250: 640 x 480
Horizont al View A ngl e BR200: 50 degrees
Transmis sion Frequency 2468MHz
Focus point BR200: 20cm (8”), BR250: 10cm (4”)
Minim um Illum inati on 0 Lux
Modulat ion Type FM
Bandwidth 18MHz
Power Suppl y 4 x AA batteries
Unobstructed E ffecti ve Range 10m
Waterproof Capacity IP67 (imager head only )
Dimens ions (W D H) 186 x 145 x 41(mm) (Ex cl ude Flexi bl e Tube)
Wei ght (approx) BR200: 530g
Camera head Diameter BR200: 17mm (0.67”)
Operating Temperature -10°C~+50°C
MONITOR
LCD Screen Type 3.5” TFT-LCD
Effective Pixels 320 (R.G. B.) x 240
Video S ys tem PAL/NTSC
Transmis sion Frequency 2468MHz (CH 4)
Ex terior Supply Voltage 5VDC
Consumpt ion Current (Max. ) 500mA
Charge Time 3 hours
Wor k Tim e 2 hours
Video Out put Level 0.9-1.3VP-P@75Ώ
Receiving Sensitivity ≤-85dBm
Dimensions (W x D x H) 100 x 70 x 25(mm)
Weight (Approx) 140g
Operating Temperature -10°C~+50°C
Operating Humidity (Max.) 15~85%RH
FCC Informa tion
This device compl ies with part 15 of the FCC rules.
BR250/200: FCC-ID TW5GB8802-GB8803
Operation is subjec t to t he following two conditi ons:
1. This device may not caus e harm ful i nt erferenc e
2. This device must acc ept any interference recei ved, inc ludi ng int erferenc e t hat may cause
undesired operat ion.
Copyright © 2014-2017 FLIR Systems, Inc.
Al l rights reserve d includi ng th e right of re production in w hole o r in p art in a ny form
BR250: 45 degrees
BR250: 450g
BR250: 9mm (0.36”)
+14°F~+122°F
+14°F~+122°F
ISO-9001 Certified
www.extech.com
BR200-BR250-en-GB_v7.6 7/17
 Loading...