

Page 1
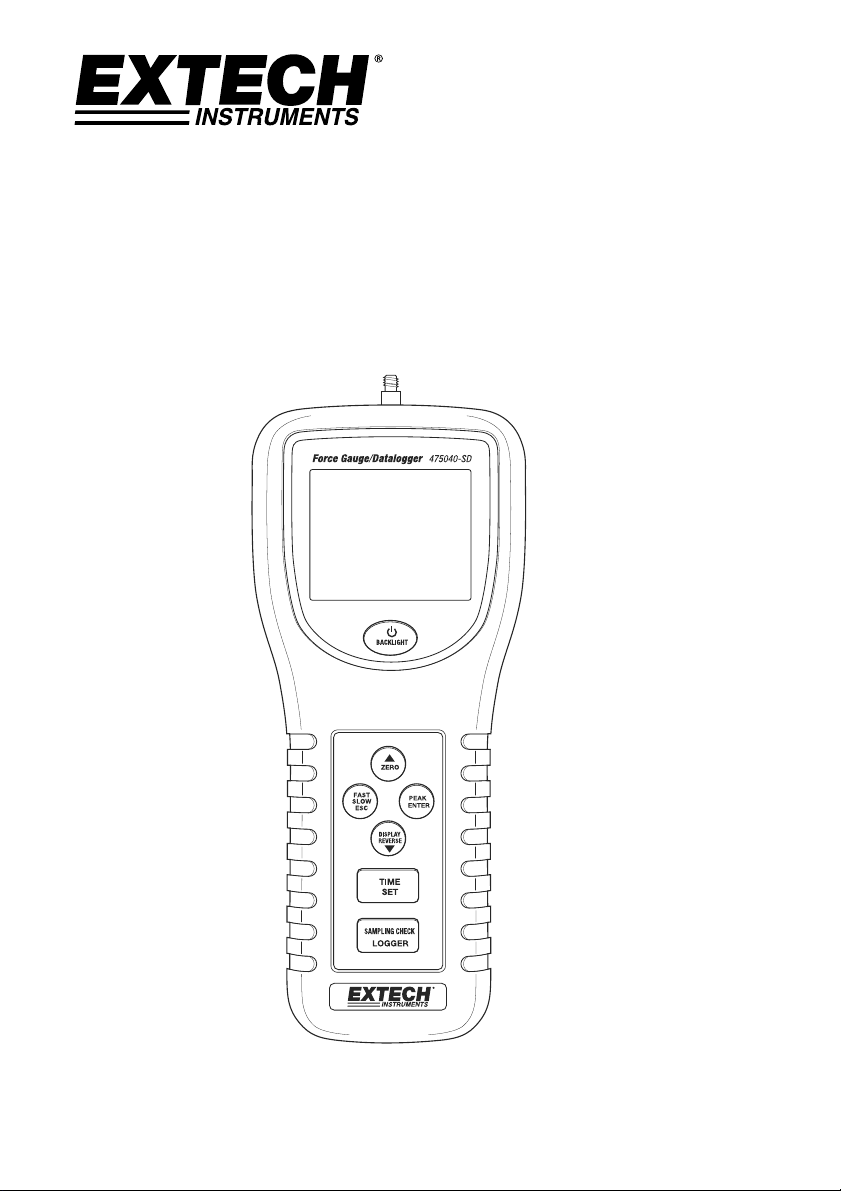
User's Guide
Digital Force Gauge with SD Memory
Models 475040-SD (5kg) and 475044-SD (20kg)
Page 2
Introduction
Congratulations on your purchase of this Extech Meter. This meter is shipped fully tested and
calibrated and, with proper use, will provide years of reliable service.
Meter Description
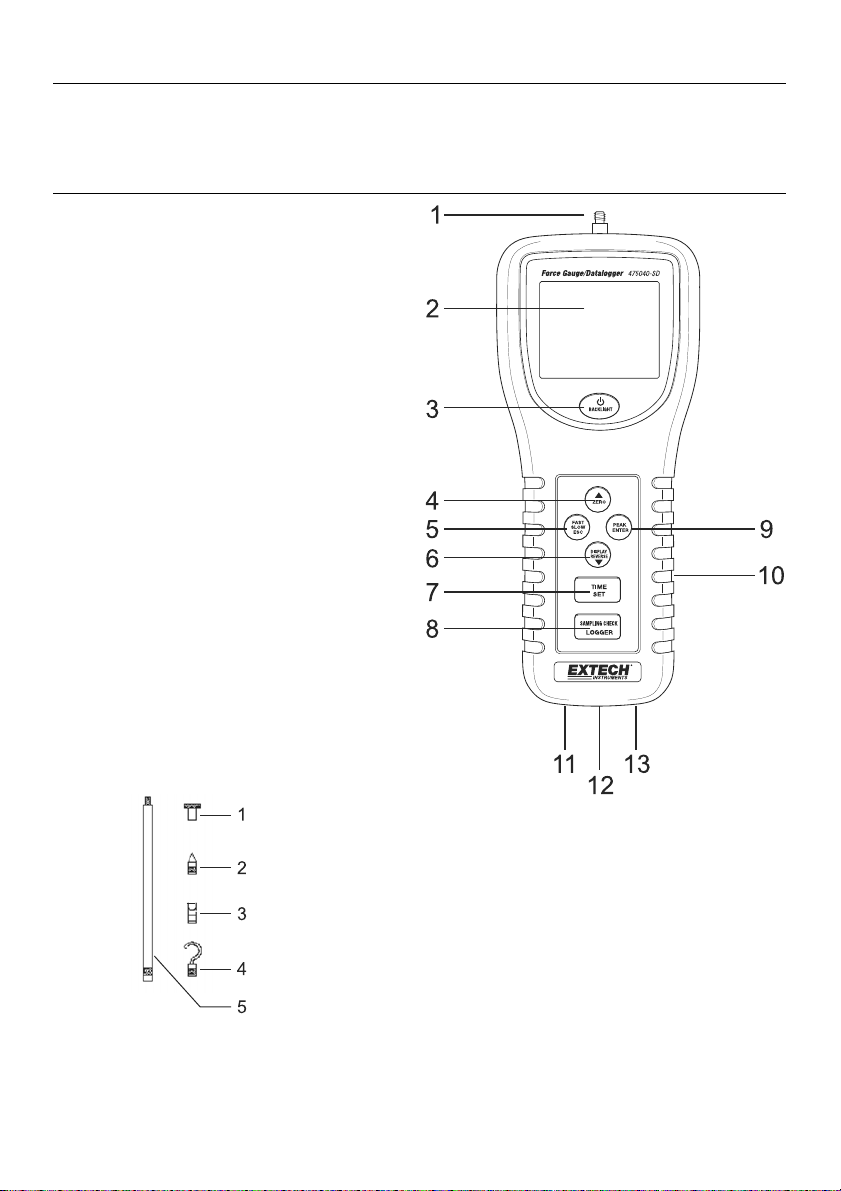
Accessories
Universal Sensing Head
1
2
LCD Display
3
Power/BACKLIGHT Button
4
▲/ZERO Button
5
Fast/SLOW/ESC Button
6
DISPLAY REVERSE/ ▼ Button
7
TIME/SET Button
8
LOGGER/SAMPLING CHECK Button
9
PEAK/ENTER Button
10
SD card socket (side)
11
RS-232 output terminal
12
Reset button
13
AC Adapter Input Socket
Flat-head Adapter
1
2
Cone adaptor
3
Chisel adaptor
4
Hook Adaptor
5
120mm Extension Rod
2 475040-044-SD-EU-EN v1.7 11/13
Page 3
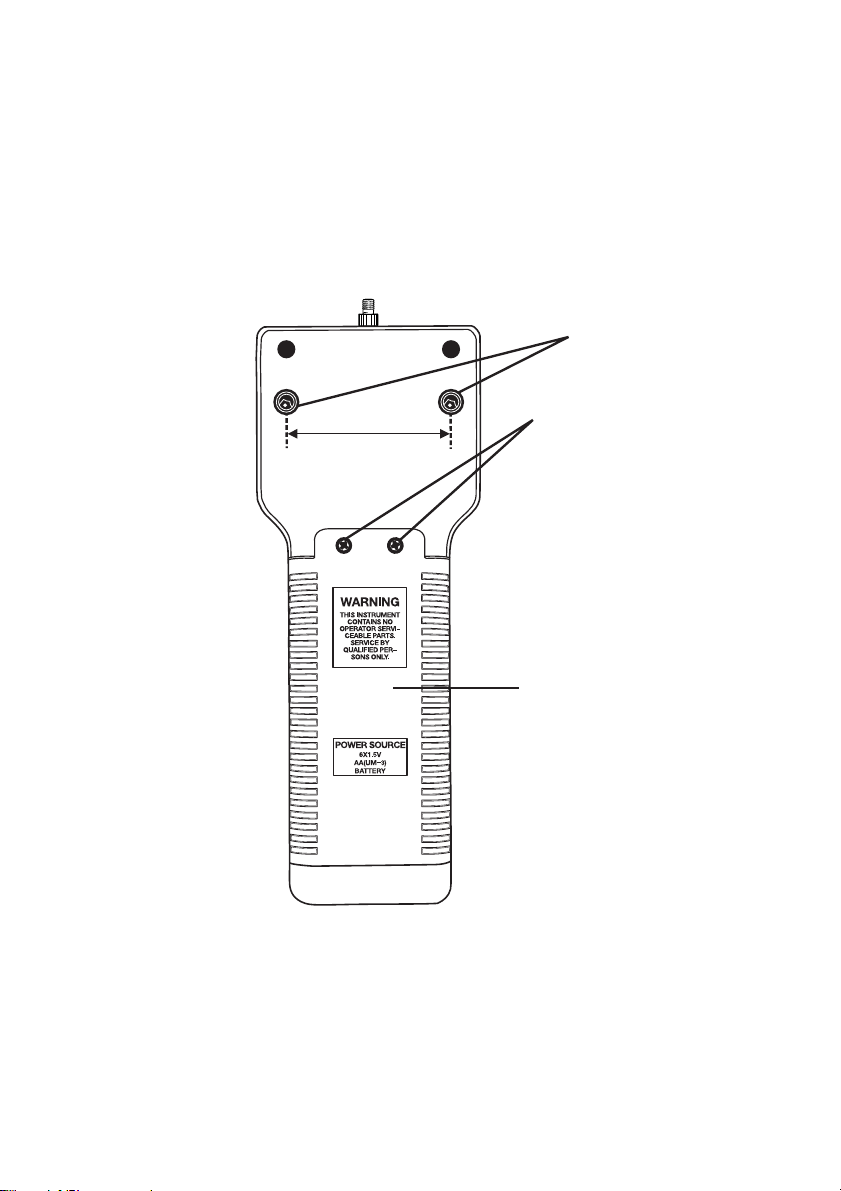
METER BACK AND MOUNTING SCREW DESCRIPTION
1. Mounting screws:
Hex head (#4 Allen wrench) with a thread size of metric
(ISO) M5 x 0.8. The spacing between screws is 60.0 mm
(2.36”)
2. Battery compartment access screws
3. Battery compartment
2
60mm (2.36”)
1
3
3 475040-044-SD-EU-EN v1.7 11/13
Page 4
Getting Started
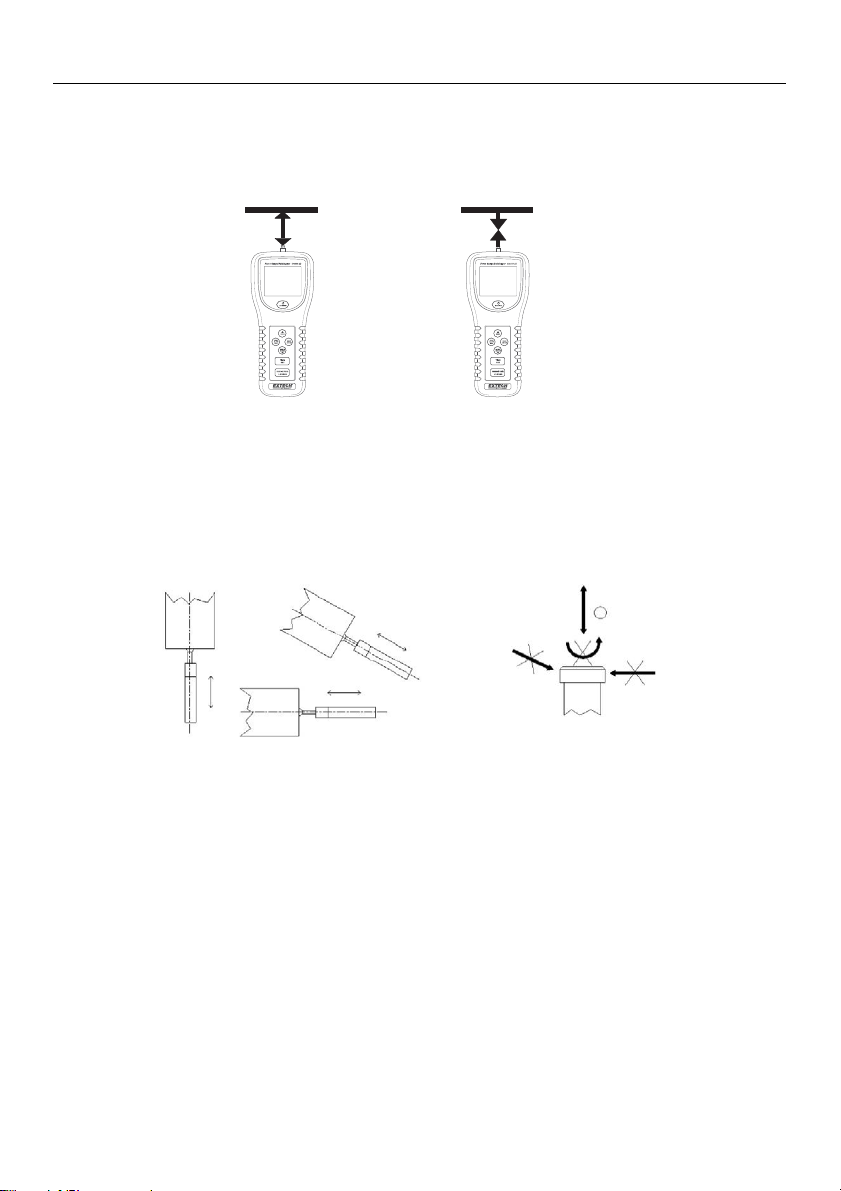
Tension and Compression
The meter automatically indicates TENSION (pull) or COMPRESSION (push) force during use.
Compression displays as a negative (-) value and Tension displays as a positive value.
Tension Compression
Attaching measurement Adaptors
Attach the adapter to the Sensing Head. Choose the adaptor to match the type of measurement to
be performed
Sensing Head Alignment
The sensing head with adapter must be in line with the object being measured. Avoid rotating the
sensing head.
Setup
Refer to the Setup Menu section of this manual to:
Format the SD memory card
Set the clock time
Set the sampling time for the record mode
Set the sampling time for the peak record mode
Set the auto-power off status
Set the beeper on/off
Set the measurement units
Set the SD card decimal character
4 475040-044-SD-EU-EN v1.7 11/13
Page 5

Operating Procedure
Normal Measurement
1. Press the Power button to turn the meter ON. Press and HOLD the Power button for
>2seconds to turn the meter OFF.
2. If necessary, change the displayed units. See the Setup Menu section
3. Zero the meter by pressing the ZERO button.
4. Apply the force and the average reading will be displayed on the LCD.
5. If necessary, press the DISPLAY REVERSE button to invert the display.
6. Press the FAST SLOW button to change the response time.
Peak Hold Measurement
1. Press the PEAK button to enter the Peak Hold mode. The “PEAK” icon will be displayed.
2. The operation in Peak mode is identical to the Normal mode except the peak measured
Over Range Display
LCD Back Light On/Off
Alarm Beeper
Display Reverse
System Reset
Auto Power Off
Mounting the Meter
RS232 Output
value will be held and displayed.
If the force measured exceeds the range of the meter, the display will indicate “¯ ¯ ¯ ¯ ¯ ¯ ¯ ¯ ¯” for tension or
“ˍ ˍ ˍ ˍ ˍ ˍ ˍ ˍ” for compression.
Press the BACKLIGHT button to turn the backlight ON. Press again to turn it OFF.
If the measured value exceeds the maximum range, the internal buzzer will sound a warning.
Press the display reverse button to invert the reading and provide readability in any position..
If the meter’s buttons freeze, press the RESET button on the bottom of to reset the CPU.
If auto power off is enabled in the setup mode, after 10 minutes of inactivity the meter will beep and
then shut down. This feature extends battery life.
Two mounting holes and hex screws are located on the rear of the meter to permit securing the
meter to a fixture or test stand.
The meter can stream data to a PC using the optional software.
5 475040-044-SD-EU-EN v1.7 11/13
Page 6

Datalogger
Preparation for datalogger
1. Insert an SD card (from 1G size up to 16G, ≤ 4G recommended) into the SD card slot at the
bottom of the meter. The card must be inserted with the front of the card (label side) facing
toward the rear of the meter.
2. If the SD card is being used for the first time it is recommended that the card be formatted and
the logger’s clock set to allow for accurate date/time stamping during datalogging sessions.
Refer to the Setup Mode section for SD card formatting and time/date setting instructions.
3. European and USA numerical formats differ. The data on the SD card can be formatted for
either format. The meter defaults to USA mode where a decimal point is used to separate units
from tenths, i.e. 20.00. The European format uses a comma, i.e. 20,00. To change this setting,
refer to the Setup Mode section.
Automatic Datalogging
In automatic datalogging mode the meter takes and stores a reading at a user-specified sampling
rate onto an SD memory card. The meter defaults to a sampling rate of two seconds. To change the
sampling rate, refer to the Setup Mode section (the sampling rate cannot be ‘0’ for automatic
datalogging):
1. To begin an automatic Datalogging session, press and hold the LOGGER button for at least 2
seconds.
2. The meter will scan for an SD card and verify that it can be used to store data. If a card is not
inserted or if the card is defective, the meter will display a blinking ‘EMPTY”. In this case,
switch the meter OFF and try again with a valid SD card.
3. If the SD card is valid, the display will display a flashing “DATA RECORD” icon and the meter
will beep (if the beeper is enabled) each time reading is stored at the programmed sample rate.
4. To pause the datalogger, momentarily press the LOGGER button. The REC icon will stop
flashing. To resume logging momentarily press the LOGGER button again.
5. To end the datalogging session press and hold the LOG button for at least 2 seconds.
Manual Datalogging
In the manual mode, data is logged when the LOGGER button is pressed.
1. Set the sampling rate to ‘0’ seconds as described in the Setup Mode section.
2. Press and hold the LOG button for at least 2 seconds; the lower portion of the display will show
p-n (n = memory position number 1-99).
3. Press the LOGGER button momentarily to log a reading into memory. The “DATA RECORD”
icon will flash each time a data point is stored.
4. Use the ▲ and ▼ buttons to select one of the 99 data memory positions in which to record.
5. To exit the manual datalogging mode, press and hold the LOGGER button for at least 2
seconds.
6 475040-044-SD-EU-EN v1.7 11/13
Page 7

Peak Hold Datalogging
1.
Power on the meter
2. Press the PEAK button. The display “PEAK” and “FAST” icons will appear.
3. Press the ZERO button to zero the display.
4.
Press the " LOGGER button. The LCD will indicate " DATA RECORD " at the programmed
peak hold sampling time, in milliseconds, will briefly appear on the bottom of the LCD. (for
example " 10 "). Now the meter is ready for the Peak Hold record mode ( Fast Datalogger
measurement )
5.
If a force is applied which is >1% of full capacity then measurements will be made and stored
at the sample rate.
6.
When the peak value is logged, the meter will exit the "DATA RECORD" mode and the peak
value will freeze on the Display
7.
On the bott om of the LCD the da ta record number will display and count down to zero. At the
same time, all the memory data will save into the SD memory card
Note: Peak measurements should be performed with the meter mounted on a stand.
Checking Time information
1.
Power on to the normal measurement mode
2. Press the TIME button and the lower display will indicate the Hour/Minute/Second.
3. Press TIME again and the lower display will indicate the Year/Month/Date.
4. Press TIME again to exit time information.
Checking Sampling Time information
Power on to the normal measurement mode
1.
2. Press the SAMPLING CHECK button and the set sampling time will briefly appear in the
lower display
7 475040-044-SD-EU-EN v1.7 11/13
Page 8

SD Card File and Data structure
1. When an SD card is used for the first time a folder is created on the card and named FGA01.
Up to 99 spreadsheet documents (each with 30,000 readings) can be stored in this folder.
2. When datalogging begins a new spreadsheet document named FGA01001.xls is created on
the SD card in the FGA01 folder. The data recorded will be placed in the FGA01001.xls
document until 30,000 readings are reached.
3. If the measurement session exceeds 30,000 readings, a new document will be created
(FGA01002.xls) where another 30,000 readings can be stored. This method continues for up to
99 documents, after which another folder is created (FGA02) where another 99 spreadsheet
documents can be stored. This process continues in this same fashion with folders FGA03
through FGA10 (last allowable folder).
SD Data Card to PC Data Transfer
1. Complete a datalogging session as detailed in above in the previous sections. Hint: For the
first test, simply record a small amount of test data. This is to ensure that the datalogging
process is well understood before committing to critical datalogging.
2. With the meter switched OFF, remove the SD Card.
3. Plug the SD Card directly into a PC SD card reader. If the PC does not have an SD card slot,
use an SD card adaptor
4. Power the PC and run a spreadsheet software program. Open the saved documents in the
spreadsheet software program
Example Excel data screen, Normal Mode
8 475040-044-SD-EU-EN v1.7 11/13
Page 9

Example Excel data screen, Peak Mode
Example Excel data screen
9 475040-044-SD-EU-EN v1.7 11/13
Page 10

Setup Menu
In the Normal mode, press and Hold the SET Button >2 seconds to enter the Setup mode. With
each press of the SET button the programmable functions will appear in this order:
Sd F - SD Card Formatting
dAtE
SP-t -
HSPt
Sd F
dAtE
SP-t
HSPt
PoFF
bEEP
unit
dEC
ESC
1. Use the arrow buttons to select “yES” to format the card (select “no” to exit).
Note: All data on the card will be lost if formatting is performed.
2. If “yES” is selected, press ENTER to confirm selection and then press ENTER a second time
to confirm the selection.
3. When the formatting is complete, the meter will return to the normal operating mode.
SD memory card Format
Set clock time ( Year/Month/Date, Hour/Minute/Second )
Set sampling time for normal record mode
Set sampling time for peak record mode
Auto power OFF enable/disable
Set beeper sound ON/OFF
Set the measurement unit
Set SD card Decimal character
Escape or exit from the setup mode
- Set Clock Time ( Year/Month/Date, Hour/Minute/ Second )
1. Use the ▲ button or ▼ button to adjust the flashing digits to the correct setting.
2. When the desired value is set, press the ENTER button and the adjustment will move to the
next value for adjustment.
3. Repeat this for the six values.
4. Press the SET button to save the setting and move to the next function.
Note: The clock data will remain set, even with power off, as long as the batteries are have a
charge.
Set Sampling Time ( normal record mode )
1. Use the ▲ button or ▼ button to adjust the flashing digits to the desired setting.
2. When the desired value is set, press the ENTER button and the adjustment will move to the
next value for adjustment.
3. Repeat this for the three values.
4. Press the SET button to save the setting and move to the next function.
Note: The default sample rate is 2 seconds.
- Set Peak Sampling Time (peak record mode)
1. Use the ▲ button or ▼ button to adjust the digits to the desired setting. The adjustment range
is 10ms to 500ms in 10ms steps.
2. When the desired value is set, press the ENTER button to store the setting.
3. Press the SET button to move to the next function.
Note: Maximum of 1000 data points can be stored in the Peak mode.
10 475040-044-SD-EU-EN v1.7 11/13
Page 11

PoFF - Auto Power ON/OFF
1. Use the
2.
▲ button or ▼ button
yES - Auto Power Off is enabled
no - Auto Power Off is disabled
When the desired condition is set, press the ENTER button to store the setting.
to select "yES" or "no".
bEEP - Beeper ON/OFF
1. Use the
2.
▲ button or ▼ button
yES - Beeper is enabled
no - Beeper is disabled
When the desired condition is set, press the ENTER button to store the setting.
to select "yES" or "no".
Unit - Set the Measurement Units
1. Use the
2.
▲ button or ▼ button
g (grams)
oz (ounce)
N (Newton)
When the desired units are set, press the ENTER button to store the setting.
to select the units.
dEC – SD Card Numerical Format (comma or decimal)
European and USA numerical formats differ. The meter defaults to USA mode where a decimal
point is used to separate units from tenths, i.e. 20.00; The European format uses a comma, i.e.
20,00 to separate units from tenths. To change this setting:
Use the
1.
2. When the desired format is set, press the ENTER button to store the setting.
▲ button or ▼ button
to select “USA” or “Euro”
.
ESC – Exit the Setting Mode
Press the SET or ESC Button to exit set mode.
Battery Replacement and Disposal
When the low battery icon
of accurate readings are still possible in this condition; however batteries should be replaced as
soon as possible:
Remove the two (2) Phillips screws and the compartment cover from the rear of the meter.
Replace the six (6) 1.5V ‘AA’ batteries observing polarity.
Replace the battery compartment cover and secure with the two (2) Phillips screws.
All EU users are legally bound by the battery ordinance to return all used batteries to
collection points in your community or wherever batteries / accumulators are sold!
Disposal in the household garbage is prohibited!
appears on the LCD, the batteries must be replaced. Several hours
WARNING: Do not dispose of the batteries in a fire. Batteries can explode or leak.
WARNING: Do not mix old and new batteries. Do not mix alkaline, standard (carbon-zinc) or
rechargeable (nickel-cadmium) batteries.
11 475040-044-SD-EU-EN v1.7 11/13
Page 12

Specifications
475040-SD Resolution 475044-SD Resolution
3 to 5000g 1 0.02 to 20.00kg 0.01
Range
Accuracy*
Display 5 digit backlit LCD 0.63" (16 mm) digit size.
Display Direction Positive or Reverse
Unit select g (grams), oz (ounces), N (Newtons) (475040-SD)
kg (kilograms), lb (pounds), N (Newtons) (475044-SD)
Update time Fast: Approx. 0.2 second, Slow: Approx. 0.6 second.
Over range Indicator " - - - - "
Sampling Time 0 sec to 8 hour 59 min. 59 sec.
Peak hold Sampling Time 10ms to 500ms. in 10ms steps.
Data error no. 0.1% of total saved data max.
Memory Card SD memory card. 1 GB to 16 GB.
Data output RS 232/USB PC computer interface. Optional software
Overload Capacity 475040: 7kg Max, 475044: 30kg Max
Full Scale Deflection 475040: Approx. 2mm max., 475044: Approx. 0.4mm max.,
Zero/tare Control Max. full capacity.
Transducer load cell.
Power Supply 6 AA 1.5V alkaline batteries (UM3 or equivalent) or optional 9V AC
Power Normal operation (no SD card), Backlight off:
Operating Temperature 32°F to 122°F (0°C to 50°C).
Operating Humidity Less than 80% RH.
Dimension 8.5 x 3.5 x 1.8 inch (215 x 90 x 45 mm).
Weight 1.43 LB (650 g)/with batteries.
0.10 to 176.40 oz 0.02 0.07 to 44.10lb 0.01
0.03 to 49.03N 0.01 0.3 to 196.12N 0.02
± (0.4% Rdg + 1 digit) ± (0.5% Rdg + 2 digit)
*@3000g & 5000g and
23 ± 5 °C
adaptor
With SD card, backlight off
With SD card, backlight on
*@10kg & 20kg and
:
Approx. DC 38 mA
:
Approx. DC 41 mA
23 ± 5 °C
Approx. DC 7 mA.
Copyright©2013FLIRSystems,Inc.
Allrightsreservedincludingtherightofreproductioninwholeorinpartinanyform
ISO‐9001Certified
www.extech.com
12 475040-044-SD-EU-EN v1.7 11/13
 Loading...