

Page 1
User's Guide
Vibration Meter and Laser
Combination Tachometer
Model 461880
Page 2

Introduction
Congratulations on your purchase of the Extech 461880 Vibration Meter and
Combination Laser Tachometer. The 461880 Vibration functions have a frequency
sensitivity that meets ISO-2954, and measure Acceleration, Velocity and Displacement.
A 1000 point datalogger allows recording of data for download to a pc with included
software. The Tachometer functions provide contact RPM and Linear Surface Speed, as
well as non-contact RPM measurements. The 461880 is shipped fully tested and
calibrated and, with proper use and care, will provide years of reliable service.
Features
Vibration Function Features:
• Measures Acceleration from 0.5 to 199.9 m/s
• Measures Velocity from 0.5 to 200 mm/s , 0.05 to 19.99 cm/s or 0.02 to 7.87 in/s
• Measures Displacement from 0.005 to 1.999 mm or 0.002 to 0.078 inches
• RMS measurements for Acceleration and Velocity
• Peak to Peak measurements for Displacement
• Peak function for Acceleration and Velocity
• Max Hold function for Acceleration (Peak), Velocity (Peak) and Displacement
(Peak to Peak)
• Frequency range from 10 Hz to 1 kHz meets ISO 2954 standards
• Zero function
• 1000 point datalogger with adjustable sample rate
• Hold function freezes measured value on display
• MAX/MIN function to record máximum and mínimum measured values
• Auto Power-Off conserves battery power
• Separate vibration sensor with magnetic mount included
Tachometer Function Features:
• Photo and Contact Tachometer functions
• Laser light source with long measuring distance, up to 1.5 meters (4.9 feet)
• Wide measurement range from 0.5 to 100,000 RPM
• 0.1 RPM resolution ,1000 RPM, 1 RPM resolution >1000 RPM
• Memory function with recall saved MAX, Min and Last Reading values
• Microprocessor with crystal time base provides 0.05% accuracy
General Features:
• Large LCD display
• Low Battery indicator
• High Performance microprocessor based circuitry
• Compact Heavy Duty housing
• Hard Carrying case
2
, 0.05 to 20.39 G or 2 to 656 ft/s2
2
461880 V1.0 5/09
Page 3
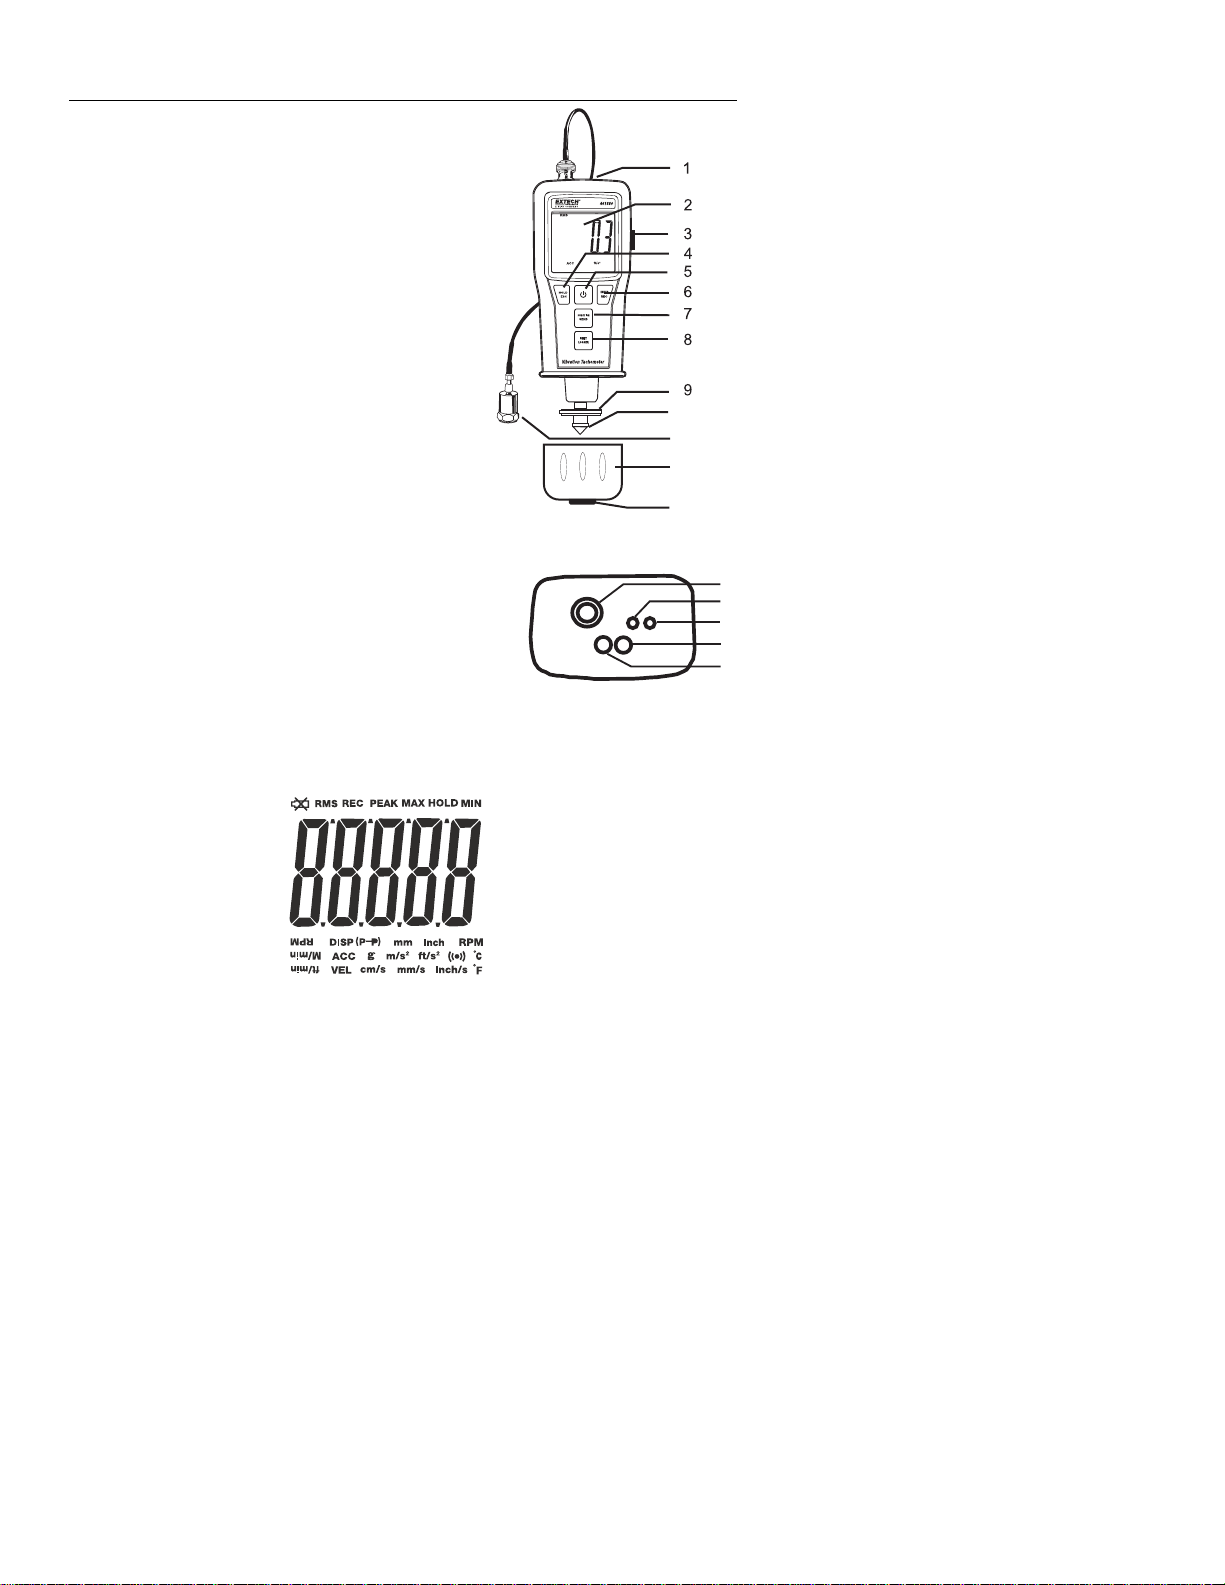
Meter Description
1. Meter Top (see Meter Top Callout below)
2. LCD display
3. Tachometer Function pushbutton
4. HOLD/ESCAPE pushbutton
5. Power pushbutton
6. ENTER/RECORD pushbutton
7. FUNCTION/SEND pushbutton
8. UNIT/LOGGER pushbutton
9. Contact Tachometer Surface Speed wheel
10. Contact Tachometer RPM adapter
11. Velocity Sensor and Magnetic Mount
12. Contact Tachometer Protective Cover
13. Access Screw for Protective Cover
Meter Top
1. BNC Connector
2. Photo Tachometer Laser Light source
3. Photo Tachometer Laser Detector
4. IR Temperature probe input (feature not supported)
5. RS232 Output Terminal
10
11
12
13
1
2
3
4
5
Meter LCD Display
3
461880 V1.0 5/09
Page 4
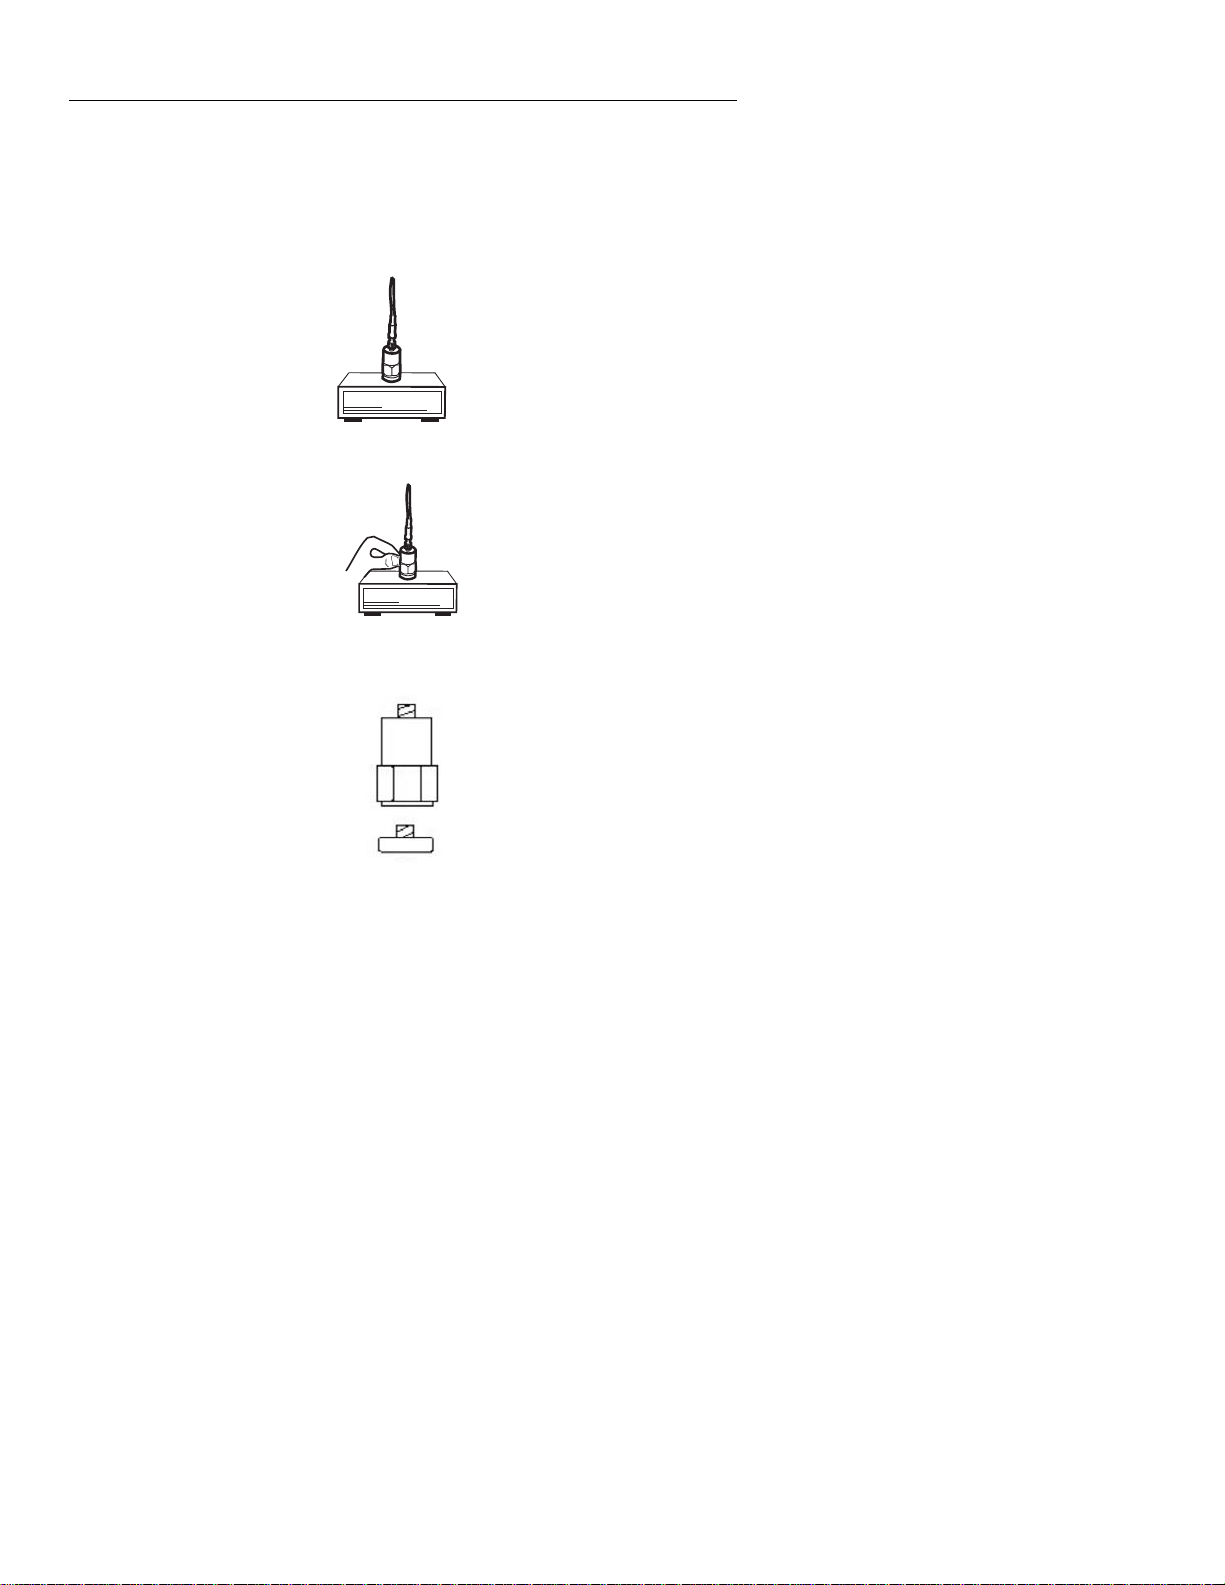
Vibration Meter Operation
Connecting Probe
1. Note that this meter accepts only the supplied vibration probe.
2. Plug the BNC connector end of the probe cable onto the BNC connector at the top of
the meter.
3. The probe can then be connected to the tested machinery in three ways:
a. Attach the magnetic end of the probe to a ferrous material on the equipment under
test.
b. Manually hold the probe in place against the equipment under test.
c. Unscrew the magnet from the probe end and use the threaded mount to connect to
a screw, bolt, or stud on the equipment under test.
4
461880 V1.0 5/09
Page 5

Powering the meter
1. Press the POWER key once to power the meter On. The meter will perform a short
self-test.
2. Press and hold the POWER key to power the unit Off. The unit will beep and display
OFF.
Selecting Units
2
1. The unit powers on in Acceleration mode (ACC ft/s
).
2. Use the UNIT/LOGGER key to scroll through the other available functions/units:
Velocity (VEL in/sec), Displacement (DISP inch).
3. The 461880 defaults to Imperial units (feet, inches, etc.). To change the readout to
metric units, press and hold the UNIT/LOGGER key for 2 seconds. The readout will
change to Metric units (meters, centimeters, etc.). To change back to Imperial units,
press and hold the UNIT/LOGGER key again for 2 seconds, or, power the unit OFF
and back ON.
RMS, PEAK, PEAK MAX HOLD, MAX HOLD
Press the FUNCTION/SEND key to select RMS, PEAK, or PEAK MAX HOLD (ACC and
VEL); or PEAK or PEAK MAX-HOLD (DISP).
1. RMS - Typical selection for vibration measurements. (PEAK to PEAK for
Displacement)
2. PEAK – For measurement of the peak value. Not available in the Displacement mode.
3. PEAK MAX HOLD – Holds and displays the maximum value. The display will update
only when a new maximum is measured. Not available in the Displacement mode.
4. MAX HOLD – Holds and displays the maximum Peak to Peak value. Available in
Displacement mode only.
5. To clear the MAX HOLD or PEAK MAX HOLD values, press the HOLD/ESCAPE key
for more than 2 seconds. This will zero the display and restart the MAX HOLD or
PEAK MAX HOLD function.
DATA HOLD
To freeze the LCD display, momentarily press the HOLD/ESC key. The HOLD icon will
appear on the upper right-hand corner of the LCD. Momentarily press the HOLD/ESC key
again to return to normal operation (the HOLD' hold icon will disappear).
MAX/MIN Record Function
1. Press the REC key to enter the MAX/MIN record mode. The REC icon will appear on
the display. Subsequent presses of the Record key will select the Max or MIN record
mode. Press and hold the RECORD key for more than 2 seconds.
2. To delete the MAX/MIN recorded values, press the HOLD button while the MAX/MIN
value to be erased is on the display. The value will be erased and the MAX or MIN
icon will disappear. The unit will remain in Record mode until the REC key is held for
more than 2 seconds.
5
461880 V1.0 5/09
Page 6

ZERO Adjustment Procedure
The meter may not indicate zero with no signal applied to the meter (no vibration).
Although this is usually not a problem, this procedure will bring the meter within a few digits
of zero and improve measurement precision.
1. Connect the vibration sensor to the meter.
2. Turn the meter on and set the function to ACC and RMS.
3. Make sure the vibration sensor is perfectly still (no vibration).
4. Press and hold the HOLD/ESC key for > 2 seconds to allow the display to reach the
zero value.
Advanced Vibration Functions
The Advanced Functions Menu allows adjustment for the Auto-Power Off feature and
Datalogging Sample Rate, as well as access to Memory status, and to Clear memory
1. Press and hold the HOLD/ESC key while powering the unit ON. Repeated presses of
the HOLD/ESC key will scroll through the available functions:
OFF – Auto-Power Off
SEC – Datalogger Sample Rate
Cnt – Number of data points available in memory
CLr – Clear Datalogger Memory
ESC – Exits the Advanced Functions Menu
2. Press the HOLD key to select the OFF function. Use the FUNCTION/SEND key or
UNIT/LOGGER key to toggle the setting between “0” and “1”. “0” disables the AutoPower Off function. “1” enables the function. Press the ENTER key to save the
setting.
3. Press the HOLD/ESC key to select the SEC function. Use the FUNCTION/SEND key
or UNIT/LOGGER key to scroll through the available sample rates: 1, 2, 10, 30, 60,
600, 1800, or 3600 seconds. Press the ENTER key to save the setting.
4. Press the HOLD/ESC key to select the Cnt function. The display will flash the
available Memory points available in the datalogger.
5. Press the HOLD/ESC key to select the CLr function. Use the FUNCTION/SEND key
or UNIT/LOGGER key to toggle the setting between “0” and “1”. Select “1” to clear the
datalogger memory. Select “0” to retain the data in memory. Press the ENTER key to
execute.
6. Press the HOLD/ESC key to select the ESC function. Press the HOLD/ESC key
again to exit the Advanced Functions menu. The meter will power OFF.
6
461880 V1.0 5/09
Page 7

Tachometer Operation
Safety
WARNING: Do not directly view or direct the laser pointer at
an eye. Low power visible lasers do not normally present a
hazard, but may present some potential for hazard if viewed
directly for extended periods of time.
Reversible LCD Display
The meter display indicates Photo Tachometer measurements in one direction and
Contact measurements in the opposite direction. This permits the user to easily read the
measurement digits in both measurement modes with the meter held in either direction.
Selecting Function and Units
Press and hold the Tachometer Function pushbutton on the right side of the 461880.
Repeated presses of the FUNCTION/SEND key will scroll through the available modes:
RPM – Contact RPM measurement.
M/min – Surface speed - Meters per Minute measurement.
Ft/min – Surface Speed - Feet per Minute measurement.
RPM – Non-contact RPM measurement.
NON-CONTACT PHOTO TACHOMETER MEASUREMENTS
1. Apply an appropriately sized square piece of reflective tape to the surface of the
object under test.
2. Point the laser pointer end of the meter toward the device under test. Press and hold
the Tachometer Function Pushbutton (located on the right side of the meter). Press
the FUNCTION/SEND key to select the non contact RPM mode. Align the laser
pointer beam with the reflective tape.
3. Verify that the ((●)) Monitor Indicator appears on the LCD when the object under test
passes through the light beam.
4. If the measurement is under 50 RPM, apply additional squares of reflective tape.
Divide the reading shown on the display by the number of pieces of reflective tape
squares used to calculate the actual reading.
5. When the reading on the display stabilizes, note the reading.
NOTE: Bright ambient light may interfere with the reflected light beam. Shading the target
area may be necessary in some cases.
CAUTION: Rotating objects can be dangerous. Use extreme care.
7
461880 V1.0 5/09
Page 8

CONTACT TACHOMETER RPM MEASUREMENTS
1. Remove the Tachometer Protective Cover by loosening the screw and gently pulling
the cap away from the unit.
2. Install one of the RPM contact tips (stored inside the Tachometer Protective Cover)
on the contact shaft.
3. Press and hold the Tachometer Function Pushbutton (located on the right side of the
meter). Press the FUNCTION/SEND key to select the contact RPM mode.
4. Lightly press the contact tip against the center of a rotating shaft.
5. When the reading on the display stabilizes, note the reading.
CONTACT LINEAR SURFACE SPEED (ft/min or m/min) MEASUREMENTS
1. Remove the Tachometer Protective Cover by loosening the screw and gently pulling
the cap away from the unit.
2. Press and hold the Tachometer Function Pushbutton (located on the right side of the
meter). Press the FUNCTION/SEND key to select one of the linear speed modes
(M/min or ft/min).
3. Lightly press the linear speed wheel on the moving surface to be measured.
4. When the reading on the display stabilizes, note the reading.
RECALLING CONTACT TACHOMETER READINGS
To recall Contact Tachometer readings, press and hold the ENTER/REC key. Values are
displayed in 3 modes:
LA – Last reading displayed.
UP – Maximum value recorded
dn – Minimum value recorded
Repeatedly pressing and holding the ENTER/REC key will scroll through the 3 modes. The
value will flash, alternating between the mode indicator and value.
8
461880 V1.0 5/09
Page 9

Datalogging
The internal datalogger memory can hold up to 1000 readings. Readings can be logged
manually, with a button press, or automatically, at a programmed sample rate.
Sample Rate
The sample rate can be set to 0 (manual), 1, 2, 5, 10, 30, 60, 600, 1800 or 3600 seconds.
See the Advanced Vibration Functions section for instructions on setting the sample rate.
Auto Data Logging
1. Set the desired sample rate as described (do not
2. Turn the meter off and back on.
3. Press the REC button to enter the datalogging function. The REC symbol will appear
in the display (upper left-hand corner).
4. Press the LOGGER button to start logging data. ((●)) indicator will flash in time with
the selected sample rate.
5. Press and Hold the LOGGER button for > 2 seconds to pause/resume datalogging.
6. Press and Hold the REC button > 2 seconds to exit the datalogging mode.
Manual Data Logging
1. Set the sample rate to ‘0’ as described earlier.
2. Turn the meter off and back on.
3. Press the REC to enter the datalogging function. The REC symbol will appear in the
display flashing.
4. Press the LOGGER button.
5. Press LOGGER again to log one data point. The ((●)) indicator will flash and an
audible tone will sound. Repeat this step to store the desired number of readings.
6. Press and Hold the REC button > 2 seconds to exit the datalogging mode.
select ‘0’).
9
461880 V1.0 5/09
Page 10

PC Interface
The meter is equipped with an RS-232 serial data port (located at the top of the meter next
to the probe input jack). This interface was designed to operate with the optional Extech
407001A software package, which includes two programs and the required meter to pc
interface cable.
1. 407001
2. DL2005 - Datalogger Download Software: This software allows the user to download
Download Stored Data to PC (requires DL2005 software)
The SEND button is used to send the contents of the meter’s internal datalogger memory
to the PC via the optional DL2005 software.
1. Connect the RS-232 cable to the PC
2. Install and run the DL2005 data logging software.
3. Press and hold the SEND button for > 2 seconds. “r-232” will flash repeatedly in the
4. In the DL2005 software, press START.
5. Press the SEND button again and the data will be sent to the meter’s RS-232 port
6. Press the ESC button to return to normal operation.
A - Extech Data Acquisition Software: This software allows the user to connect
the meter to a PC and view readings in real-time as they are taken (this software
does not download the contents of the meter’s memory to the PC)
the contents of the meter’s memory to the PC
display.
and onto the connected PC.
Specifications
Display Dual Display Multi-function LCD
Sampling Time Approximately 1 second
Datalogger memory 1000 point memory
Datalogger Sample Time 0 (manual), 1, 2, 10, 30, 60, 600, 1800 and 3600 sec.
Over range indication "OL" appears on the LCD
Open input indication "0" appears on the LCD
Low battery indication Battery symbol appears on the LCD
Power supply 4 x 1.5V AA Batteries
Power Consumption Vibration: approximately 10.5 mA
Tachometer: approximately 21 mA
Auto-Power Off On/Off selectable
Operating Temperature 32 to 122
Operating Humidity less than 80% RH
Storage Temperature 14 to 140
Storage Humidity 10 to 80% RH
Dimensions Meter: 7.4 x3.0x1.8" (188x75.5x46.8mm)
Probe: 18 mm diameter, 40 mm height
Weight Meter: 0.87 lbs (397g)
Probe: 0.24 lbs (110g)
o
F (0 to 50oC)
o
F (-10 to 60oC)
10
461880 V1.0 5/09
Page 11

Vibration Functions
Unit Range
Acceleration(RMS
or Peak)
Velocity
(RMS or Peak)
Displacement
(peak to peak)
Note: Accuracy stated from 80 to 160Hz @ 23 ± 5°C
Frequency Range 10 Hz to 1 kHz – meets ISO 2954
Tachometer Functions
Range Resolution Accuracy (%rdg)
m/s2 0.5 to 199.9m/s2
G 0.05 to 20.39G
ft/s2 2 to 656ft/s2
Calibration point: 50 m/s2 @ 160Hz
mm/s 0.5 to 199.9mm/s
cm/s 0.05 to 19.99cm/s
in/s 0.02 to 7.87in/s
Calibration point: 50mm/s @ 160Hz
mm
inch 0.002 to 0.078in
Calibration point: 0.14mm @ 160Hz
0.005 to 1.999mm
Accuracy
(% of reading)
±(5% + 2 digits)
±(5% + 2 digits)
±(5% + 2 digits)
Photo
Tachometer
Contact
Tachometer
Surface
Speed
Surface
Speed
Photo
Tachometer
Detecting
Distance
10 to 99,999 rpm
0.5 to 19,999 rpm
0.2 to 6560 ft/min
0.05 to 1999.9
m/min
2 to 59” (50 to 1,500mm) typical*
* specified using a 10mm square of reflecting tape at 1,800rpm. The
max and min detecting distance will change with environmental
conditions, reflecting tape, or speeds above 1800rpm.
0.1 rpm (<1000rpm)
1 rpm (>1000 rpm)
0.1 rpm (<1000rpm)
1 rpm (>1000 rpm)
0.1 ft/min (<1000ft/min)
1 ft/min (>1000ft/min)
0.01 m/min (<100m/min)
0.1 m/min (>100 m/min)
11
± (0.05% + 1d)
± (1% + 1d)
461880 V1.0 5/09
Page 12

Warranty
EXTECH INSTRUMENTS CORPORATION (A FLIR COMPANY) warrants this instrument to
be free of defects in parts and workmanship for one year from date of shipment (a six
month limited warranty applies to sensors and cables). If it should become necessary to
return the instrument for service during or beyond the warranty period, contact the
Customer Service Department at (781) 890-7440 ext. 210 for authorization or visit our
website www.extech.com for contact information. A Return Authorization (RA) number
must be issued before any product is returned to Extech. The sender is responsible for
shipping charges, freight, insurance and proper packaging to prevent damage in transit.
This warranty does not apply to defects resulting from action of the user such as misuse,
improper wiring, operation outside of specification, improper maintenance or repair, or
unauthorized modification. Extech specifically disclaims any implied warranties or
merchantability or fitness for a specific purpose and will not be liable for any direct, indirect,
incidental or consequential damages. Extech's total liability is limited to repair or
replacement of the product. The warranty set forth above is inclusive and no other
warranty, whether written or oral, is expressed or implied.
Calibration and Repair Services
Extech offers repair and calibration services for the products we sell. Extech also
provides NIST certification for most products. Call the Customer Care Department for
information on calibration services available for this product. Extech recommends that
annual calibrations be performed to verify meter performance and accuracy.
Copyright © 2009 Extech Instruments Corporation (a FLIR company)
All rights reserved including the right of reproduction in whole or in part in any form.
Technical Support: Extension 200; E-mail: support@extech.com
Repair & Returns: Extension 210; E-mail: repair@extech.com
Product specifications subject to change without notice
For the latest version of this User Guide, Software updates, and other
up-to-the-minute product information, visit our website: www.extech.com
Extech Instruments Corporation, 285 Bear Hill Road, Waltham, MA 02451
Support line (781) 890-7440
12
461880 V1.0 5/09
 Loading...