

INSTRUCTION MANUAL
Model 445580 & 445582 (kit)
Hygro-Thermometer Pen
1. INTRODUCTION
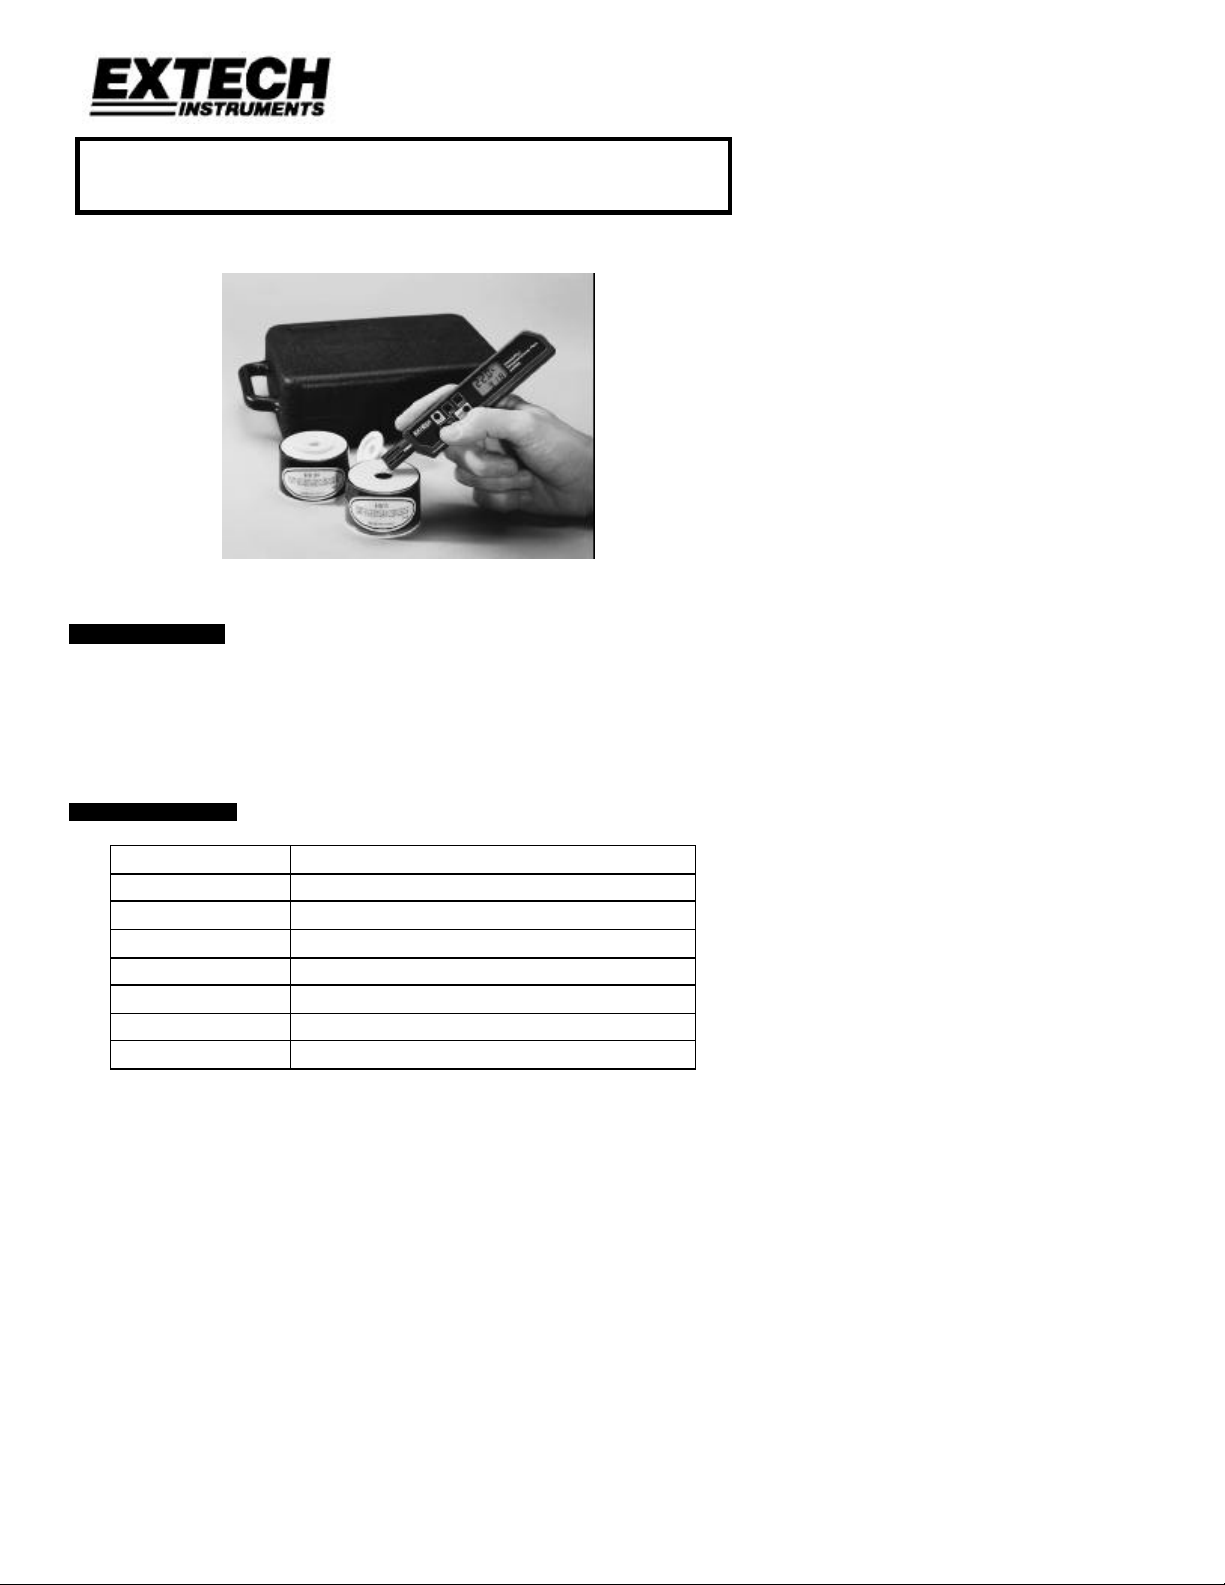
Congratulations on your purchase of the Extech Hygro-Thermometer Pen. This portable
meter can measure RH from 5% to 95% and Temperature from 14 to 113oF (-10 to 45oC).
Advanced features include MIN/MAX Memory, Push-button Calibration, Display Hold, and
Automatic Power Off. The Model 445582 kit includes Calibration bottles and hard shell
carrying case.
2. SPECIFICATIONS
RH Sensor High Precision thin-film capacitance type
Temperature Range 14 to 113oF (-10 to 45oC)
RH Range 5 to 95% RH
Resolution Temperature: 0.1o; RH: 0.1%
Accuracy Temperature: ±1.0oC; RH: ±5% (@25oC)
DC Power 2032 button battery (150 hour battery life)
Response time 120 seconds
Dimensions 6.9 x 1.6 x 0.6" (175x42x16mm)
1 445580/82 Ver. 1.7 02/01
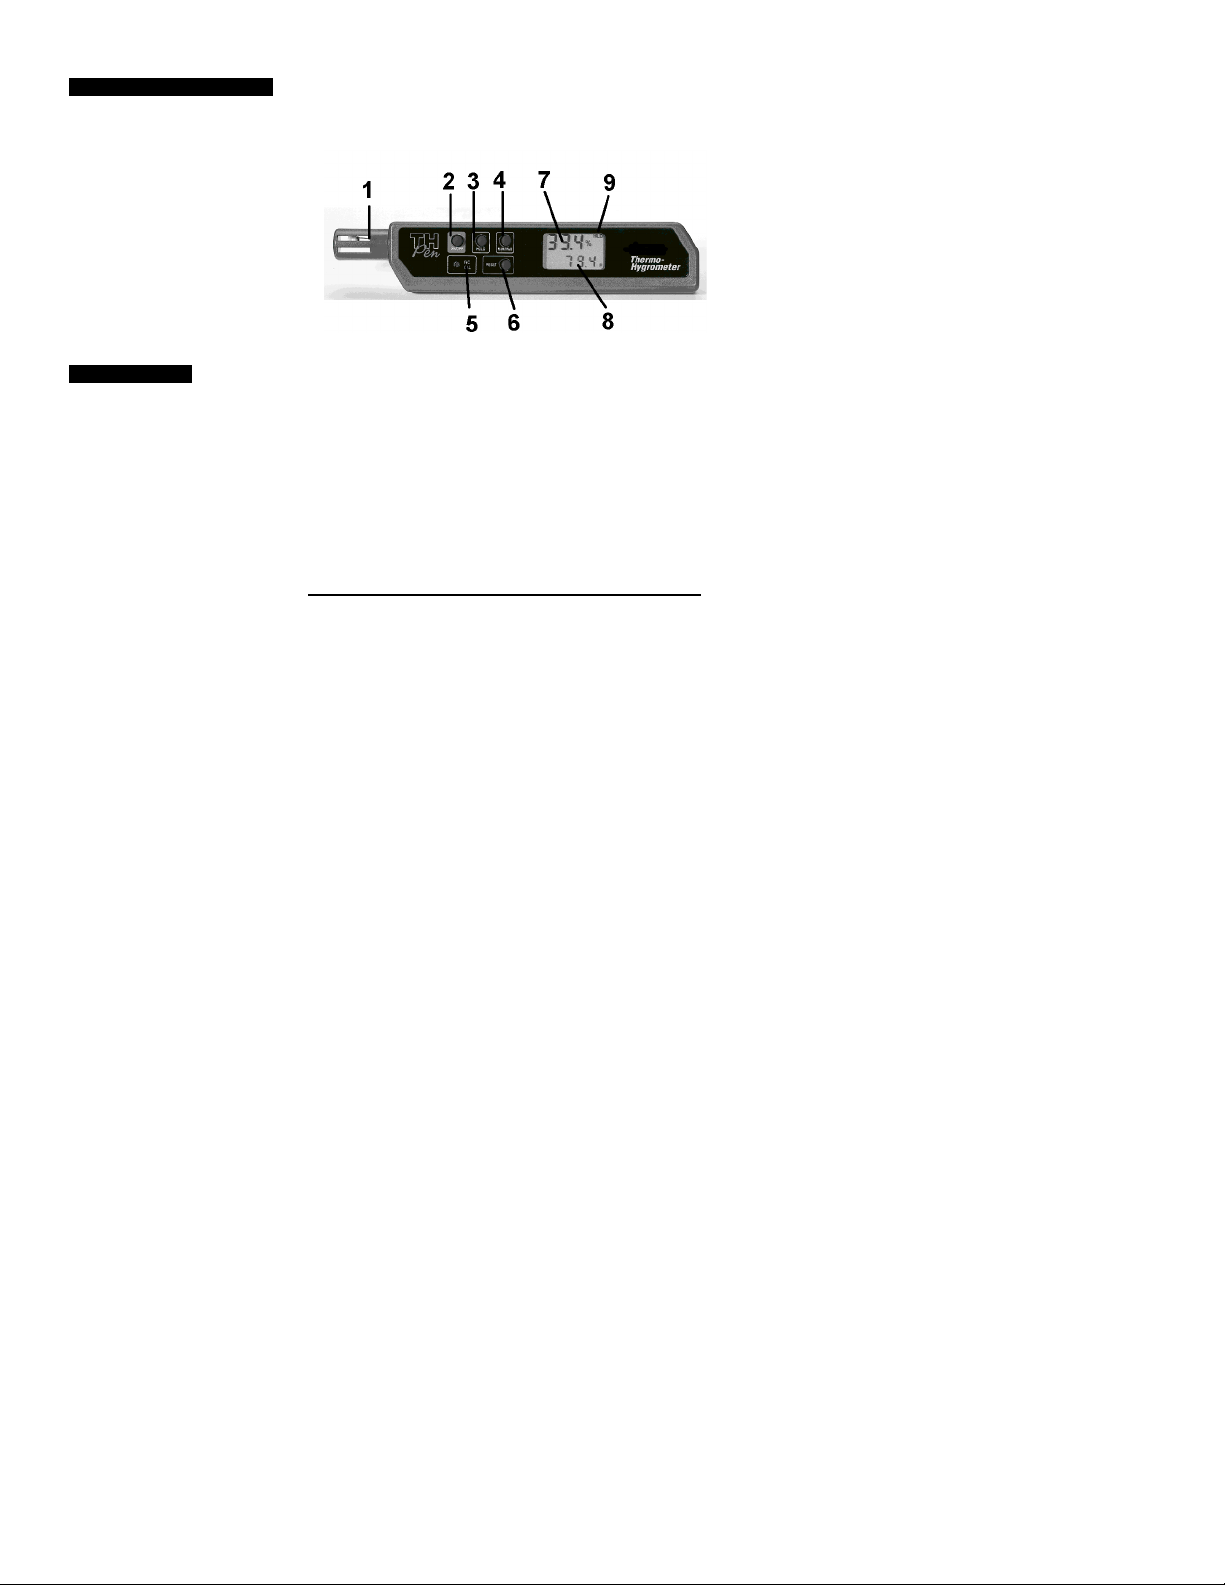
3. METER DESCRIPTION
1. RH/Temperature Sensor
2. POWER ON/OFF button
3. Data Hold button
4. MIN/MAX Memory button
5. Calibration and units
select push-button
6. Memory Reset button
7. RH Display
8. Temperature Display
9. Function Displays
4. OPERATION
4.1 Meter Power
Turn the meter ON by pressing the ON/FF button. If the display does not light up and
initialize, check the battery. Once powered, the meter will display RH in the upper portion
of the LCD. The temperature reading will appear (smaller) in the lower portion of the LCD
in oC or oF.
4.2 Default Temperature Units (C/F) Selection
Press and hold the F/C key (use a paper clip or similar object to press this key) while
turning power on. Release the F/C key when the F and C appear in the display. Press the
MIN/MAX key to select the small C or F on the display. Press the "F/C" key to save the
selection. Turn off the meter ensuring that the RESET key is not pressed by mistake
since this will corrupt the meter's calibration.
4.3 Data Hold
To freeze the displayed reading, press and hold the HOLD key until the “HLD” icon
appears on the display. The current reading will remain on the display. Press and hold
the RESET key until the “HLD” icon disappears from the display to return the meter to
normal operation.
4.4 MIN/MAX Memory
To view MIN/MAX readings, press and hold the MIN/MAX key until the “MIN” display icon
appears. The reading will then be the lowest humidity and temperature measurements
made since the meter was powered up or last reset. Press and hold the MIN/MAX key
until the “MAX” icon appears on the display to view the maximum humidity and
temperature readings since the meter was powered up or last reset. Press the MIN/MAX
key again to return to normal operation.
4.5 Memory Clear
To reset (clear) the MIN/MAX memory, press and hold the RESET key until the meter re-
initializes (all display icons appear at once). The MIN/MAX memory is now cleared.
4.6 Automatic Power Off (Sleep mode)
The meter will automatically shut down after a period of non-use (approx. 20 seconds). To
defeat this mode, press and hold the MIN/MAX key while powering the unit. Release the
ON/OFF key after the display initializes. 'n' will appear on the LCD indicating that the nonsleep mode has been activated. Sleep mode will be re-activated after the meter is
powered down however.
2 445580/82 Ver. 1.7 02/01

5. CALIBRATION
5.1 CALIBRATION VERIFICATION
5.1.1 Checking the 33% RH Calibration
a. Power the meter and insert meter sensor into the 33% salt reference bottle
b. Put the meter and bottle inside the meter case
c. Check the LCD reading after 40 minutes
d. A reading between 31.5 and 34.5% indicates an accurate reading, otherwise, the
meter should be recalibrated
5.1.2 Checking the 75% RH Calibration
a. Power the meter and insert meter sensor into the 75% salt reference bottle
b. Put the meter and bottle inside the meter case
c. Check the LCD reading after 40 minutes
d. A reading between 73.5 and 76.5% indicates an accurate reading, otherwise, the
meter should be recalibrated
5.2 RELATIVE HUMIDITY CALIBRATION (33% and 75%)
5.2.1 Calibration for 33% Relative Humidity
a. Insert the meter sensor into the 33% salt reference bottle and allow the meter to
stabilize for 40 minutes
b. Press and hold the "F/C CAL" key (use a paper clip or similar object to press this key)
while powering the meter. Release the "F/C CAL" key when the display blanks and
then displays only the small "c" and "f" symbols.
c. Press the "RESET" key. "% MIN" will appear in the display.
d. Press the "F/C CAL" key. "S" will appear in the display for two seconds and then
"%MAX" will appear.
e. Remove power to the meter. The 33% calibration is now complete.
5.2.2 Calibration for 75% Relative Humidity
a. Insert the meter sensor into the 75% salt reference bottle and allow the meter to
stabilize for 40 minutes
b. Press and hold the "F/C CAL" key while powering the meter. Release the "F/C CAL"
key when the display blanks and then displays only the small "c" and "f" symbols.
c. Press the "RESET" key twice. "% MIN" and then "%MAX" will appear in the display.
d. Press the "F/C CAL" key. "S" will appear in the display for two seconds and then the
meter will return to normal operation.
e. Remove power to the meter. The 75% calibration is now complete.
6. BATTERY REPLACEMENT
Use a coin to remove the battery compartment cover on the rear of the meter. Replace the
2032 lithium battery installing it face (+) up in the battery compartment.
3 445580/82 Ver. 1.7 02/01

7. WARRANTY
(
EXTECH INSTRUMENTS CORPORATION warrants the basic instrument to be free of defects in parts and
workmanship for one year from date of shipment (a six month limited warranty applies on sensors and cables).
If it should become necessary to return the instrument for service during or beyond the warranty period,
contact the Customer Service Department at (781) 890-7440 ext. 210 for authorization. A Return Authorization
(RA) number must be issued before any product is returned to Extech. The sender is responsible for shipping
charges, freight, insurance and proper packaging to prevent damage in transit. This warranty does not apply to
defects resulting from action of the user such as misuse, improper wiring, operation outside of specification,
improper maintenance or repair, or unauthorized modification. Extech specifically disclaims any implied
warranties or merchantability or fitness for a specific purpose and will not be liable for any direct, indirect,
incidental or consequential damages. Extech's total liability is limited to repair or replacement of the product.
The warranty set forth above is inclusive and no other warranty, whether written or oral, is expressed or
implied.
Copyright © 2001 Extech Instruments Corporation. All rights reserved
including the right of reproduction in whole or in part in any form.
Tech Support Hotlines
781-890-7440 ext. 200
extech@extech.com
4 445580/82 Ver. 1.7 02/01
 Loading...