

Page 1
User's Guide
Power Analyzer Model 380801
Power Analyzer Datalogger Model 380803
Introduction
Congratulations on your purchase of the Extech 380801 or 380803 Power Analyzer
Datalogger. This device offers the following features:
• Convenient front panel plug-in and testing
• Four displays for Watts, PF/VA, V/KHz, Amperes
• True power, true RMS for AC Voltage (V) and Current (A)
• Datalogger stores over 1000 readings (Model 380803)
• Auto Range for Watts and Volts
• RS-232 PC Interface
TM
• Windows
Careful use of this meter will provide years of reliable service.
Application Software
1
380801-380803 V7.0 8/06
Page 2

Warranty
EXTECH INSTRUMENTS CORPORATION warrants this instrument to be free of defects in parts and workmanship for one
year from date of shipment (a six month limited warranty applies on sensors and cables). If it should become necessary to
return the instrument for service during or beyond the warranty period, contact the Customer Service Department at (781)
890-7440 ext. 210 for authorization or visit our website at www.extech.com (click on ‘Contact Extech’ and go to ‘Service
Department’ to request an RA number). A Return Authorization (RA) number must be issued before any product is returned
to Extech. The sender is responsible for shipping charges, freight, insurance an d proper packaging to prevent damage in
transit. This warranty does not apply to defects resulting from action of the user such as misuse, improper wiring, operation
outside of specification, improper maintenance or repair, or unauthorized modificati on. Extech specifically disclaims any
implied warranties or merchantability or fitness for a specific purpose and will not be liable for any direct, indirect, incidental
or consequential damages. Extech's total liability is limited to repair o r replacement of the product. The warranty set forth
above is inclusive and no other warranty, whether written or oral, is expressed or implied.
Specifications
WATT (Auto Range, AC+DC, Crest Factor < 5)
Range Resolution Accuracy Input
200W 0.1W
2000W 1W
VOLTAGE (True RMS, Auto Range, AC+DC, Crest Factor < 5)
Range Resolution Accuracy Overload Protection
200V 0.1V
750V 1V
CURRENT (True RMS, AC+DC, Crest Factor < 5)
Range Resolution Accuracy (40 to 400Hz) Overload Protection
2 0.001A
20 0.01A
PF (Direct Calculation from W, V, A): PF = Watt / (V * A)
FREQUENCY (Sensitivity 5V)
Range Resolution Accuracy
40Hz to 20kHz 1Hz-10Hz ±(0.5% of rdg ±2digts
Memory Size (380803) 1012 x 4 readings (non-volatile)
Memory Life (380803) 100,000 memory writes
Display 2000 count LCD displays
Over Range Indication ‘OL’ displayed on LCD
Sampling Rate 2.5 times per second
Power Source Eight 1.5V ‘AA’ batteries or AC adaptor
Power Consumption 22 mA approx.
Operating conditions 32 to 122
Dimension 13.9"(L) x 11.8"(W) x 3.9" (H)
352(L) x 300(W) x 100(H)mm
Weight 3.6 lbs (1.637 Kg) approx.
±(0.9% reading + 5digts) (50/60Hz)
±(5% reading + 9digts) (40 to 400Hz)
0-300V, 0-20A,
PF=0.5 to 1
±(0.5% reading + 5digts) (40 to 400Hz) 1000VDC/750VAC
±(0.5% reading + 5digts) 20A, fused
o
F (0 to 40oC); Less than 80%
2
380801-380803 V7.0 8/06
Page 3
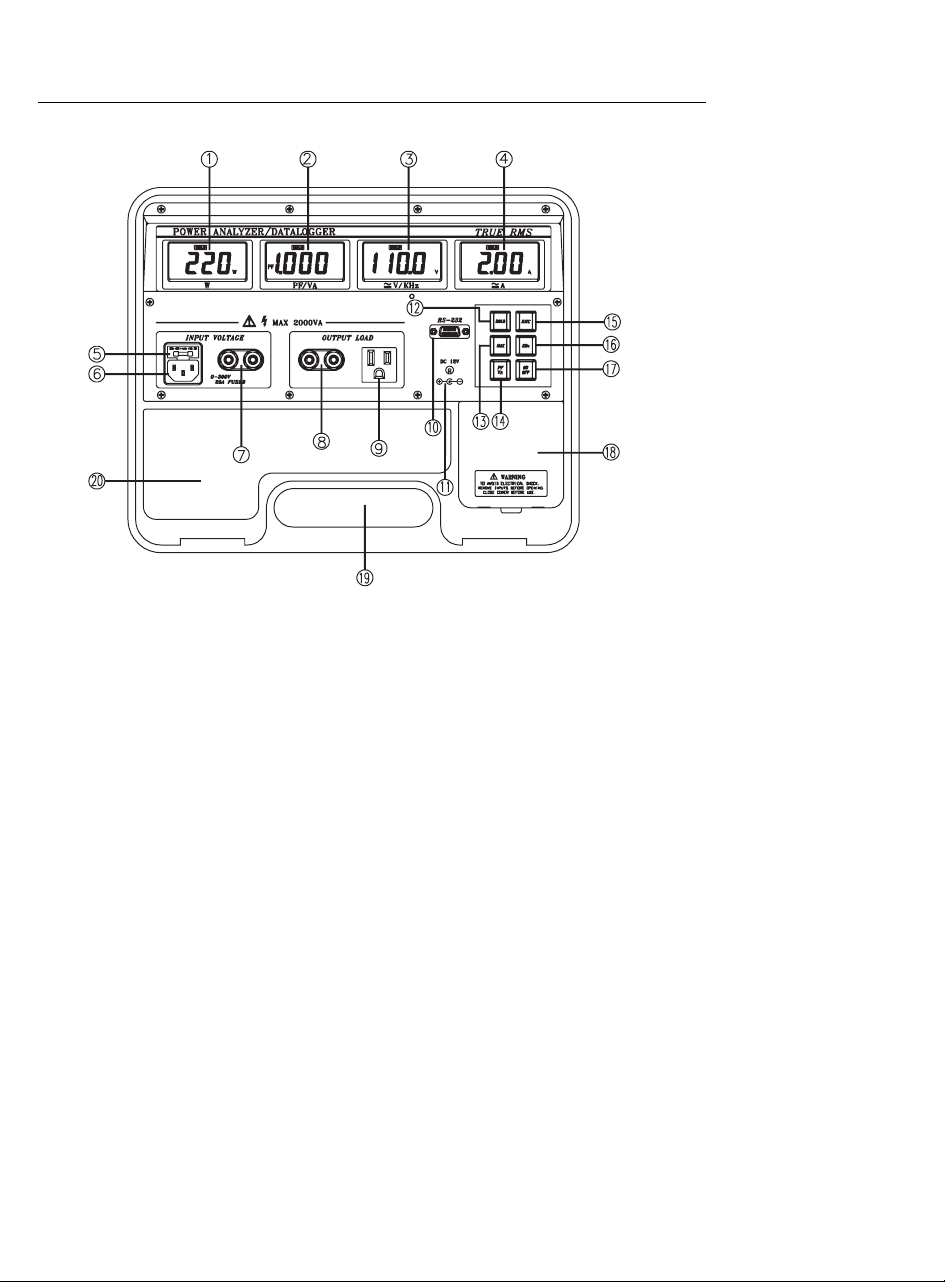
Meter Description
1. Watts display
11. DC 12V Adaptor Input
2. PF or VA display
3. V or KHz display
4. A display
5. 20A fuse
6. Input Receptacle
7. Input Terminal
8. Output Terminal
9. Output Receptacle
10. RS-232 Terminal
12. Hold
13. MAX button
14. PF/VA Select Button
15. REC button (380803)
16. KHz (frequency)
17. On/Off Button
18. Battery Compartment Cover
19. Carrying Handle
20. Storage Space for Accessories.
3
380801-380803 V7.0 8/06
Page 4

Basic Operation
Warning: If a power source of 220V is connected to the input voltage terminal/receptacle,
do not connect a110V device to the output load terminal/receptacle.
Using Receptacles
1. Plug one end of the power cord into the input receptacle and plug the other end into
the wall outlet.
2. Plug the device to be tested into the output load receptacle. The display will show the
W, PF, V, and A for the device under test.
Note 2: W= VA, 1KW = 1KVA = 1000W = 1000VA, when PF = 1.
Warning: The input receptacle and terminal are connected in parallel (as are the outputs).
To avoid electrical shock, do not touch any metal part of the receptacle or terminal.
Using Terminals
1. Plug one end of the power
leads into the input voltage
terminal (left) and connect
the other end of the test
leads to the power source.
2. Plug the device power
leads into the output load
terminals. W, PF, V, and A
will display for the device
under test.
Note 2: W=VA, 1KW = 1KVA = 1000W = 1000VA, when PF =1 at DC
Warning: The input and output receptacle and terminal are connected in parallel Do not
touch any metal part of the receptacle or terminal to avoid electrical shock.
4
380801-380803 V7.0 8/06
Page 5

Using a Current Transformer
Warning: Only personnel well trained in the principles of Current Transformers (CT)
should attempt this test connection. When connecting a CT, follow the wiring diagrams
and instructions below.
12W
Power Line
K
K
I
L
Motor
1. Connect the CT’s k terminal (entering the CT) to the power line that passes through the
CT, and connect this k terminal to the input voltage black terminal (ground).
2. Connect the other power line to the input voltage red terminal.
3. Connect the CT’s l terminal (leaving the CT) to the output load black terminal (ground).
4. The Watt reading and Amp reading should be multiplied by the CT ratio. The V and PF
readings do not need to be multiplied by the CT ratio.
Warning: The input receptacles and terminals are connected in parallel (as are the
outputs). Do not touch any metal part of the receptacle or terminal.
5
380801-380803 V7.0 8/06
Page 6

PC Interface for Data Acquisition & Datalogging Features
Data Acquisition
Models 380801 and 380803 can be connected to a PC where readings can be logged in realtime as they are taken. Transferred reading data can be viewed, plotted, statistically
analyzed, printed, saved, and imported in spreadsheet, database, word processing, and other
software programs. Instructions for Data Acquisition are included in the separate Data
Acquisition and Datalogging Manual on the software disc.
Datalogging (Model 380803 only)
The Model 380803 has built-in memory where over one thousand readings can be stored for
later transfer to PC. Once transferred, data can be viewed, plotted, statistically analyzed,
printed, saved as a text file, and imported in spreadsheet, database, word processing, and
other software programs Instructions for Datalogging are included in the separate Data
Acquisition and Datalogging Manual.
6
380801-380803 V7.0 8/06
Page 7

Replacement of Batteries and 20A Fuse
Battery Replacement
When the low battery symbol is displayed on any of
the LCDs, replace the eight (8) 1.5V ‘AA’ batteries.
1. Turn off the power analyzer.
2. Open the battery compartment by using a screw
driver (see diagram).
3. Replace the batteries.
4. Replace the battery compartment.
20A Fuse Replacement
To replace the 20A fuse, remove the fuse cover as
indicated in item (5) in the Meter Description section
earlier in this manual and replace the fuse if
necessary.
Warning: Do not replace the blown fuse with a fuse rating greater than 20A.
Measurement of 3-Phase 3-Wire Power
Using One Power Analyzer
Measure W
correctly identified)
1. Connect the R-phase of the power
2. Connect the S-phase of the power
3. Plug the R-phase of the device to be
4. Record the reading of W
Measure W
be correctly identified)
1. Connect the T-phase of the power
2. Connect S-phase of the power
3. Plug the T-phase of the device to be tested to the black terminal of the output
4. Record the reading of W
first (RST phases must be
RS
source to the black terminal of the
input voltage
source to the red terminal of the
input voltage
tested to the black terminal of the
output load. Do not short the Rphase of the device to be tested to
the R-phase of the input power
source.
displayed
RS
on the ‘W’ LCD.
secondly (RST phases must
TS
source to the black terminal of the
input voltage
source to the red terminal of the input voltage
load. Do not short the T-phase of the device to be tested to the T-phase of
the input power source.
displayed on the ‘W’ LCD.
TS
7
380801-380803 V7.0 8/06
Page 8

Using Two Power Analyzers
Measure W
and WTS (RST phases must be correctly identified)
RS
1. Connect the R-phase of the power source to the black terminal of the input
voltage of power analyzer 1.
2. Connect the S-phase of the power source to the red terminal of the input
voltage of power analyzer 1.
3. Plug the R-phase of the device to be tested to the black terminal of the output
load of power analyzer 1. Do not short the R-phase of the load to the R-phase
of the input power source.
4. Record the reading of W
displayed on the ‘W’ LCD of power analyzer 1.
RS
5. Connect the T-phase of the power source to the black terminal of the input
voltage of power analyzer 2.
6. Connect the S-phase of the power source to the red terminal of the input
voltage of power analyzer 2.
7. Plug the T-phase of the device to be tested to the black terminal of the output
load. Do not short the T-phase of the device to be tested to the T-phase of the
input power source.
8. Record the reading of W
displayed on the Watt LCD of power analyzer 2.
TS
8
380801-380803 V7.0 8/06
Page 9

Using Current Transformers (CT) with 2 Power Analyzers
Measure W
and WTS (RST phases must be correctly identified)
RS
1. Connect the R-Phase to the black terminal of the input voltage of power
analyzer 1.
2. Connect the S-phase to the red terminal of the input voltage of power
analyzer 1.
3. Connect the k terminal of CT1 to the R-phase.
4. Connect the l terminal of CT1 to the black terminal of the output load of
power analyzer 1.
5. The Watt reading of the power analyzer 1 is W
RS
6. Connect the T-phase to the black terminal of the input voltage of power
analyzer 2.
7. Connect the S-phase to the red terminal of the input voltage of power
analyzer 2.
8. Connect the k terminal of CT2 to the R-phase.
9. Connect the l terminal of CT2 with the black terminal of the output load of
power analyzer 1.
10. The Watt reading of the power analyzer 2 is W
TS
9
380801-380803 V7.0 8/06
Page 10

Glossary of Terms
W True Watt
PF Power Factor
V True RMS Voltage
A True RMS Ampere
Phase angle Time difference between V and A calculated by
cos
VA Apparent Power (V * A)
VAR Reactive Power (SQRT [VA
IR Equivalent current (through equivalent resistance)
Req Equivalent resistance
IL Equivalent current (through equivalent inductance)
XL Equivalent impedance of equivalent inductance
Leq Equivalent inductance
CAP Required capacitance
CR Carriage Return
LF Line Feed
EPS Datalogger Memory Self-test
EPE Erasing Datalogger Memory
W
True Power (3φ 3W)
3
φ
WRS Power of R phase with respect to S phase
WTS Power of T phase with respect to S phase
VA
Apparent Power (3φ 3W and Balanced Load)
3
φ
VAR
Reactive Power (3φ 3W and Balanced Load)
3
φ
PF
Power Factor (3φ 3W and Balanced Load)
3
φ
Mean Mean Value
Std Dev Standard Deviation
Best Fit A line drawn to fit a curve with minimum error
-1
(Power Factor)
2
– W2])
Calibration and Repair Services
Extech offers complete repair and calibration services for all of the products we sell.
For periodic calibration, NIST certification on most products or repair of any Extech
product, call customer service for details on services available. Extech recommends that
calibration be performed on an annual basis to ensure calibration integrity.
Support line (781) 890-7440
Technical support: Extension 200; E-mail: support@extech.com
Repair & Returns: Extension 210; E-mail: repair@extech.com
Product specifications subject to change without notice
For the latest version of this User’s Guide, Software updates, and other
up-to-the-minute product information, visit our website: www.extech.com
Extech Instruments Corporation, 285 Bear Hill Rd., Waltham, MA 02451
All rights reserved including the right of reproduction in whole or in part in any form.
Copyright © 2006 Extech Instruments Corporation.
10
380801-380803 V7.0 8/06
 Loading...