

Expobar BREWTUS IV, BREWTUS IV-R, BREWTUS IV-P Supplemental Instructions

1
EXPO
BAR
BREWTUS IV
Supplemental Instructions
for all
Expo
barBrewtus IV machines
Rotary Pump
(IV-R)
, Vibration Pump
(IV),Plumbable Vibration Pump (IV
-P)www.wholelattelove.com
888.411.5282

2
Congr
atulation
s
on the purchase of your new Brewtus
IV
. The Expo
barBrewtus
is a
very unique machine that is designed to provide you with the ultimate in brewing
temperature control and
,
there
fore, the best coffee extraction
.
Please read both the manufacturer
’s
instructions
as well as these supplemental
instructions
thoroughly before you start brewing.
Note:
Do not plug in the machine or perform any other start
-
up procedures until
you’ve read the
instructions.
Both boiler
s
must be primed
upon
start up or t
he heating
element in the bre
w
boiler
may be damaged.
Upon s
tartup,
make sure
the brew
-
group lever
is raised to
the up
position until water comes out of the brew group.
The steam boiler will fill on its own
using the machine
’
s controls.
Index
1.
Unpacking
the Machine
2.
Controls and Programming
3.
Water and D
rain Line Connections
4.
Incoming Water Pressure
5.
Brew Pressure Adjustments
6.
Accessories
7.
Initial Start
-
Up Instructions
8.
Water Softener Instructions
9.
Coffee Preparation
10.
Advanced Brewing and Operational Techniques
11.
Steaming and Frothing
12.
Dispensing Hot Water
13.
Cleaning the Brewing Components
14.
Cleaning the Housing
15.
Trouble Shooting Guide
16.
Recipes
17.
Coffee Education
and Terminology
18.
Cautions
3
1.
Unpacking the machine.
The Brewtus
IV is a very heavy machine
(over 60lbs
),so please use
cau
tion
when
unpacking the unit
.
To remove the Brewtus, turn
the box upside down, open the bottom
four flaps,
then
turn the box right
-
side-up and lift the box straight up. Then
,
lay the
machine down on its side and remo
ve the top layer of foam. C
arefully remo
ve the
machine from the bottom layer of foam. It is easier to have a second pers
on helping you
with the removal process,
as the machine is heavy and the bottom layer of foam may
stick to the machine.
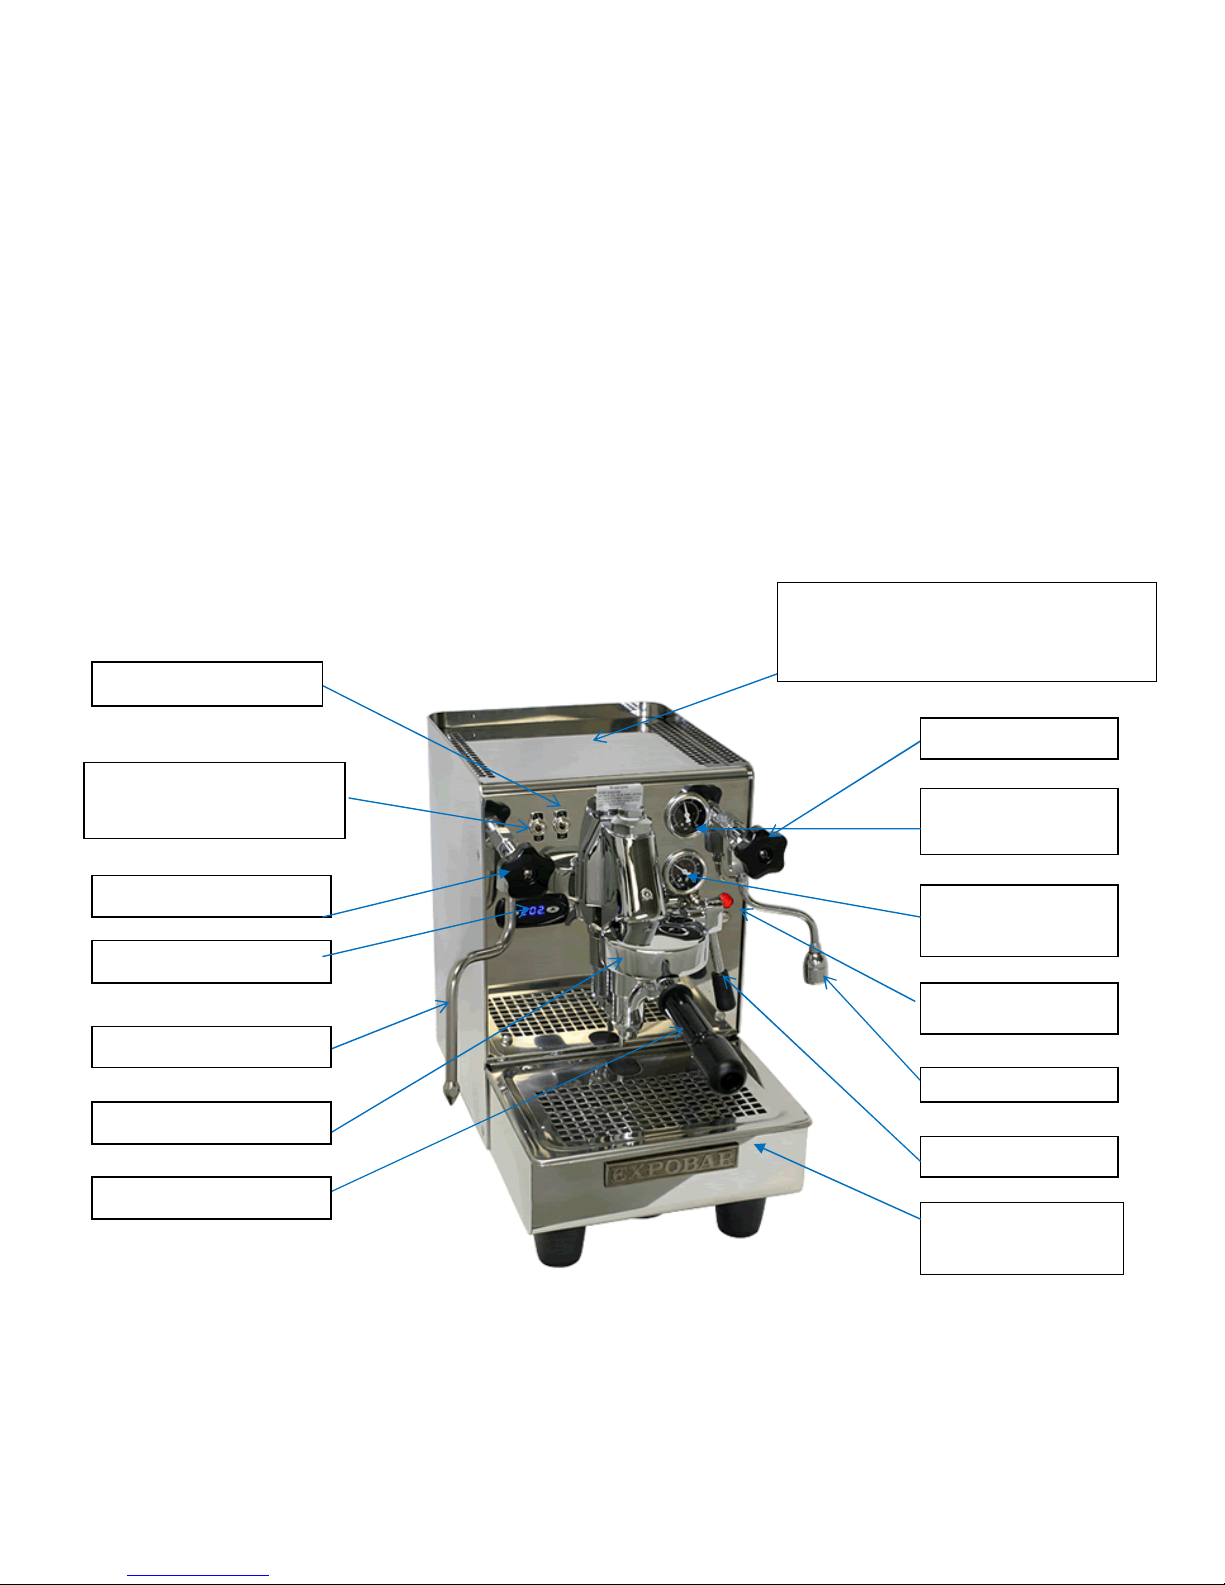
2.
Controls and Programming
Control Lever
Main Power Switch
PID Control Pane
l
Steam Boiler Light
Hot-Water Knob
Hot Water Wand
Steam Boiler
Pressure Gauge
No-Burn Steam Wand
Steam Boiler On/Off
Switch
E61 Brew Group
Cup Warmer and Reservoir A
ccess
forBrewtus
M
odels
E
quipped with a
Water R
eservoir.
Removable Drip
T
ray
Portafilter handle
Brew Pressure
Gauge
Steam Knob

4
Control Lever
The lever on the front of the machine controls a valve inside of the brew group and it
also controls the pump for brewing. The lever has three positions
:
raised, mid
-
level
and
lowered
.
1.
Raised
: When in the up position
,
the pump
turns on for brewing and the valve
inside the brew group opens and allows water to flow over the coffee.
2.
Mid-Level
:
This position is o
nly used for
coffee pre
-
infusion.
Do not leave the
lever in the middle position when
the machine is not in use or
idle.When
the
lever is
in the middle position
, the pump is
off but the pressure in the brew
group has not been released
,
so do not remove the portafilter.
3.
Lowered
: When the lever is lowered, the
pump
is
off and any water pressure
left on the coffee is released
and deposited into the drip tray through the tube
at
the bottom of the brew group.
Always
set
the lever to the down position
before removing the portafilter from the brew group
.
Main Power Switch
The main power switch is located on the top left side of
the front of the machine.
When turned on
,
the
Brewtus
will automatically start heating up and the water level
control system will
ensure
that the steam boiler is full of water. Note: When the main
power switch is turned on
, the pump may activate
for a few
seconds
,
even if the steam
boiler is full.
Steam B
oiler Switch
When in the
OFF
position
,
the steam boiler will
be inactive
. Only the brew boiler will
heat up. This will allow for a quicker
warm
up for when you only want to brew.
Steam Boiler Light
This
light goes on whenever the heating elem
ent in the steam boiler is on.
It is
perfectly normal for this light to go on and off with or without any discernable pattern
when the machine is in use.
Steam Pressure Gauge
This pressure gauge shows the pressure i
nside the steam boiler. The pressure come
s
set from the factory at
1.3 to 1.4
Bars. This is the proper boiler pressure and there
should be no need to make any adjustments. The needle on the pressure gauge will go
down during steaming
and
quickly rise up as
the steam boiler heating element is
activated.
Brew Pressure Gauge
This pressure gauge
display
s
the current
brew pressure.
Steam Knob (Left
S
ide of
M
achine)
When this knob is turned counter clockwise
,
the steam valve is opened
and high
-
pressure steam
w
ill
be dispensed
through the steam wand.
5
Hot Water K
nob (
Right Side of M
achine)
When this knob is turned counter clockwise
,
hot water and some steam
will be
dispensed through the
hot water wand.
Note
:
Exercise
caut
ion when using this
function;
boiling
wat
er exiting from the hot water wand can cause severe burns.
Steam Wand
Use this wand for fr
othing and steaming your milk.
Theno-
burn wand has been
insulated to remain cool to the touch
.
E61 Brew Group
The brew group will become very hot
. A
lways use caut
ion while working with the
machine.
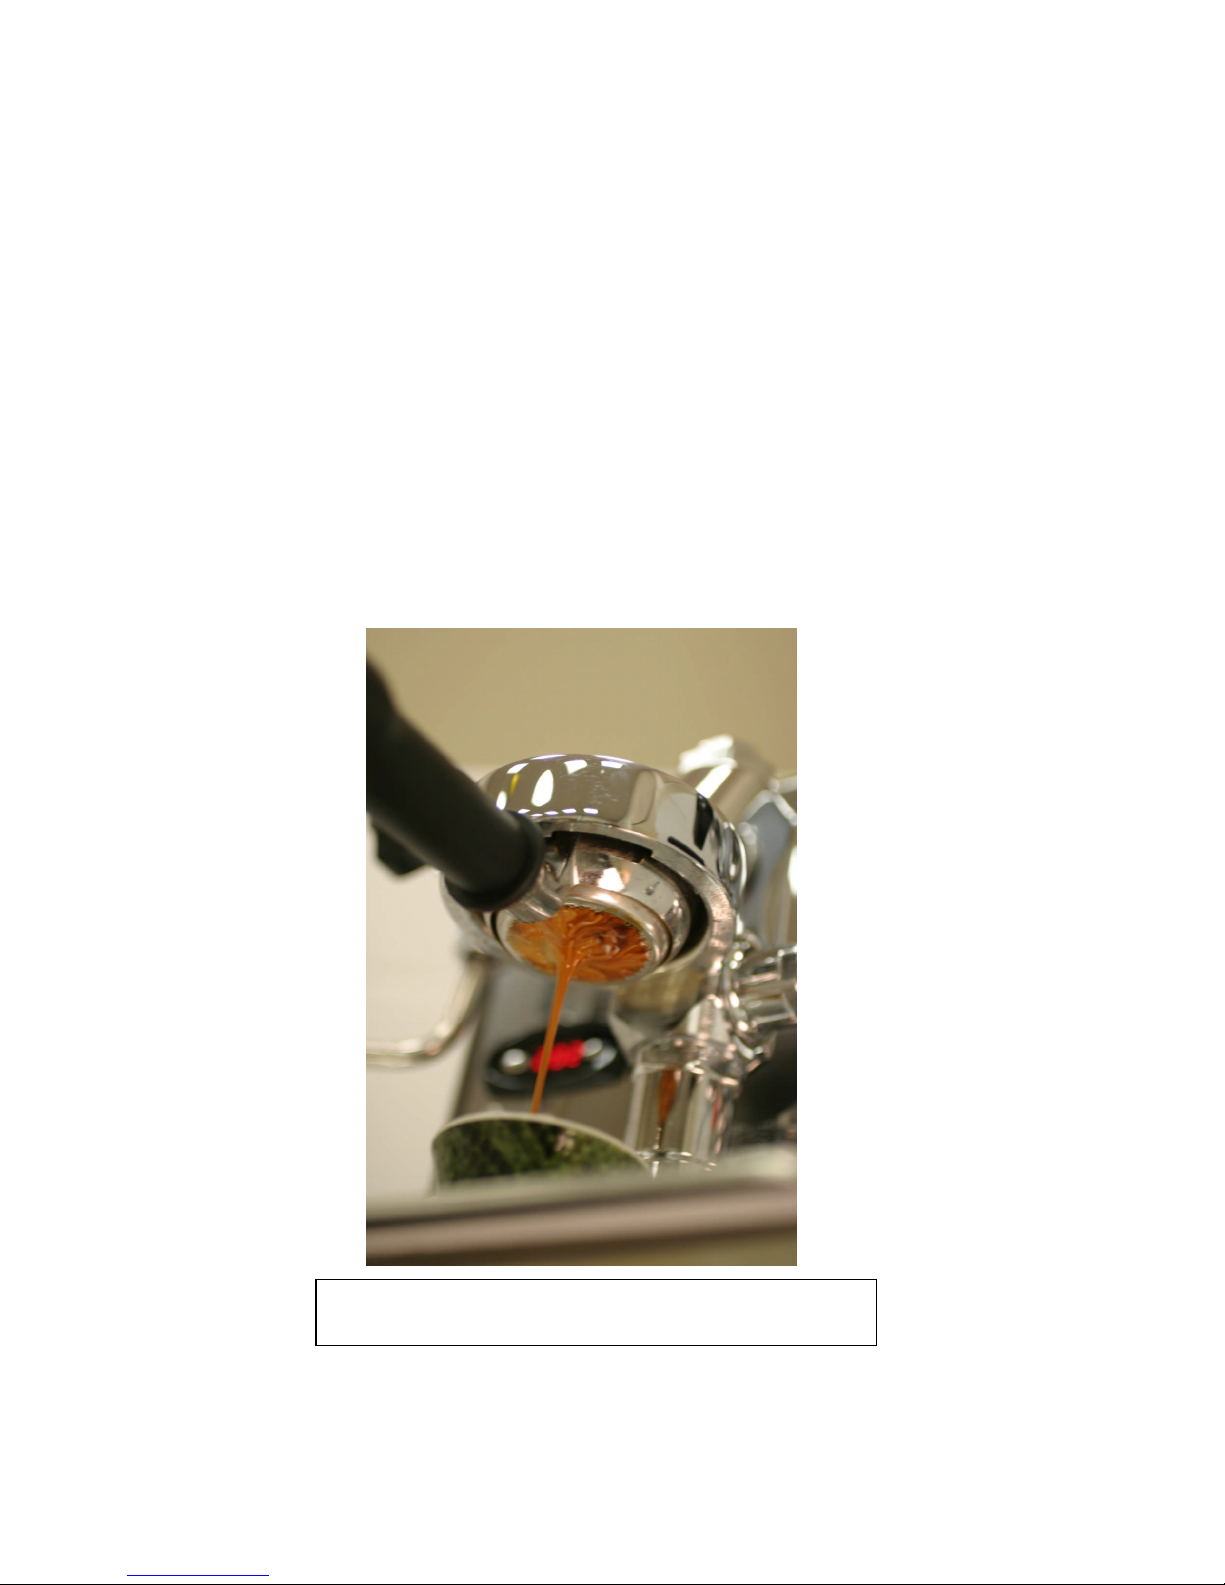
Optional Bottomless Portaf
ilter with a triple shot basket.
(Not included with machine)

6
Control Panel with PID Temperature Control
ThePID controller was
designed a
nd
programmed
exclusively
for the Expo
barBrewtus. Fahrenheit temperatures are
adjustable
in
one
-
degree
increments.
The
PID control
display
s
the
brewing temperature
and can be
used t
o adjust brew
-
boiler
temperature. It does not a
ffect
the steam boiler
,
which is controlled by a pressure stat.
Display functions:
1.
Upon
startup,
the digital displ
ay will show
the current brew boiler
temperature,
minus an offset factor.
2.
The small LED light will blink
,
as it sends power to the brew boiler.
Note: The steam boi
ler heats up first, which
will take about 8 to
10
minutes
.
Afterwards, the brew boiler wil
l turn on. Both b
oilers will not operate at the same
time.
Changing the Brewing Boiler Temperature
1.
Push and release the “Down Arrow” (left button), the display will
show
“PRG.”
2.
Push the “Up Arrow” and release. Then
, press
the UP
and
DOWN
arrows to
set
to your desired temperature.
It may take up to 5 or 10 minutes before the
new temperature is achieved.
To Turn off the Brew Boil
er
(the only reason t
o do this is if you just want to
steam milk
or dispense hot water
without brewing
)
Press
the UP arrow
f
or 2 seconds
;
the display
will
show “Off.”
To turn the brew boiler
back on
,
push
and hold the
UP arrow
for3seconds.
Steam boiler adjustments
:
We do not recommend maki
ng any adjustments to the
steam
-
boiler pressure. It is set to cycle between 1.2 and 1.4
Bars.Down Arrow for Temperature Control Adjustment
Boiler Temperature
Display
Up Arrow for Temperature Con
trol
Boiler Operation Light

7
3.
Water and Drain Line Connections
Water Line Connection
s for
Brewtus
-IVModels Equipped
with
a
Rotar
y pump
or
Vibration Pump with P
lumb K
it
The water line supplied with the machine is 3/8” braided stainless steel
and it
may vary in
length
.Itw
ill
include
a 3/8”
male
flair
fitting
for you to hook onto
.
Depending on your
water quality
,
you may want a good water f
ilter to condition your water, which will
help
with machine longevity. The taste of the coff
ee is affected by your water.
Drain Line Connection
(On Brewtus
-IVwith Drain L
ine)
Thedrain line measu
res 57” long from the drain pan. It
has an in
side diameter of 3/4
”
and an outside diameter of
7/8
”. You will want to have an open dr
ain line stand pipe
for it to drop into.
T
he end
of
the drain line
should not
be below the surface of the
water in the stand pipe or it may back up.
The drain pan supplied does not have a hole
it because many customers do not want to hook up the drain line
. If yo
u hook up a
drain line, drill a 1/4
” hole in the center of the drain pan.
8
Water line Adapter:
The machine comes equipped with a braided stainless steel water line. Included is a brass
adapter that has a 3/8” male flair fitting. You will nee
d to use a 3/8” female flair fitting to
hook up to it.
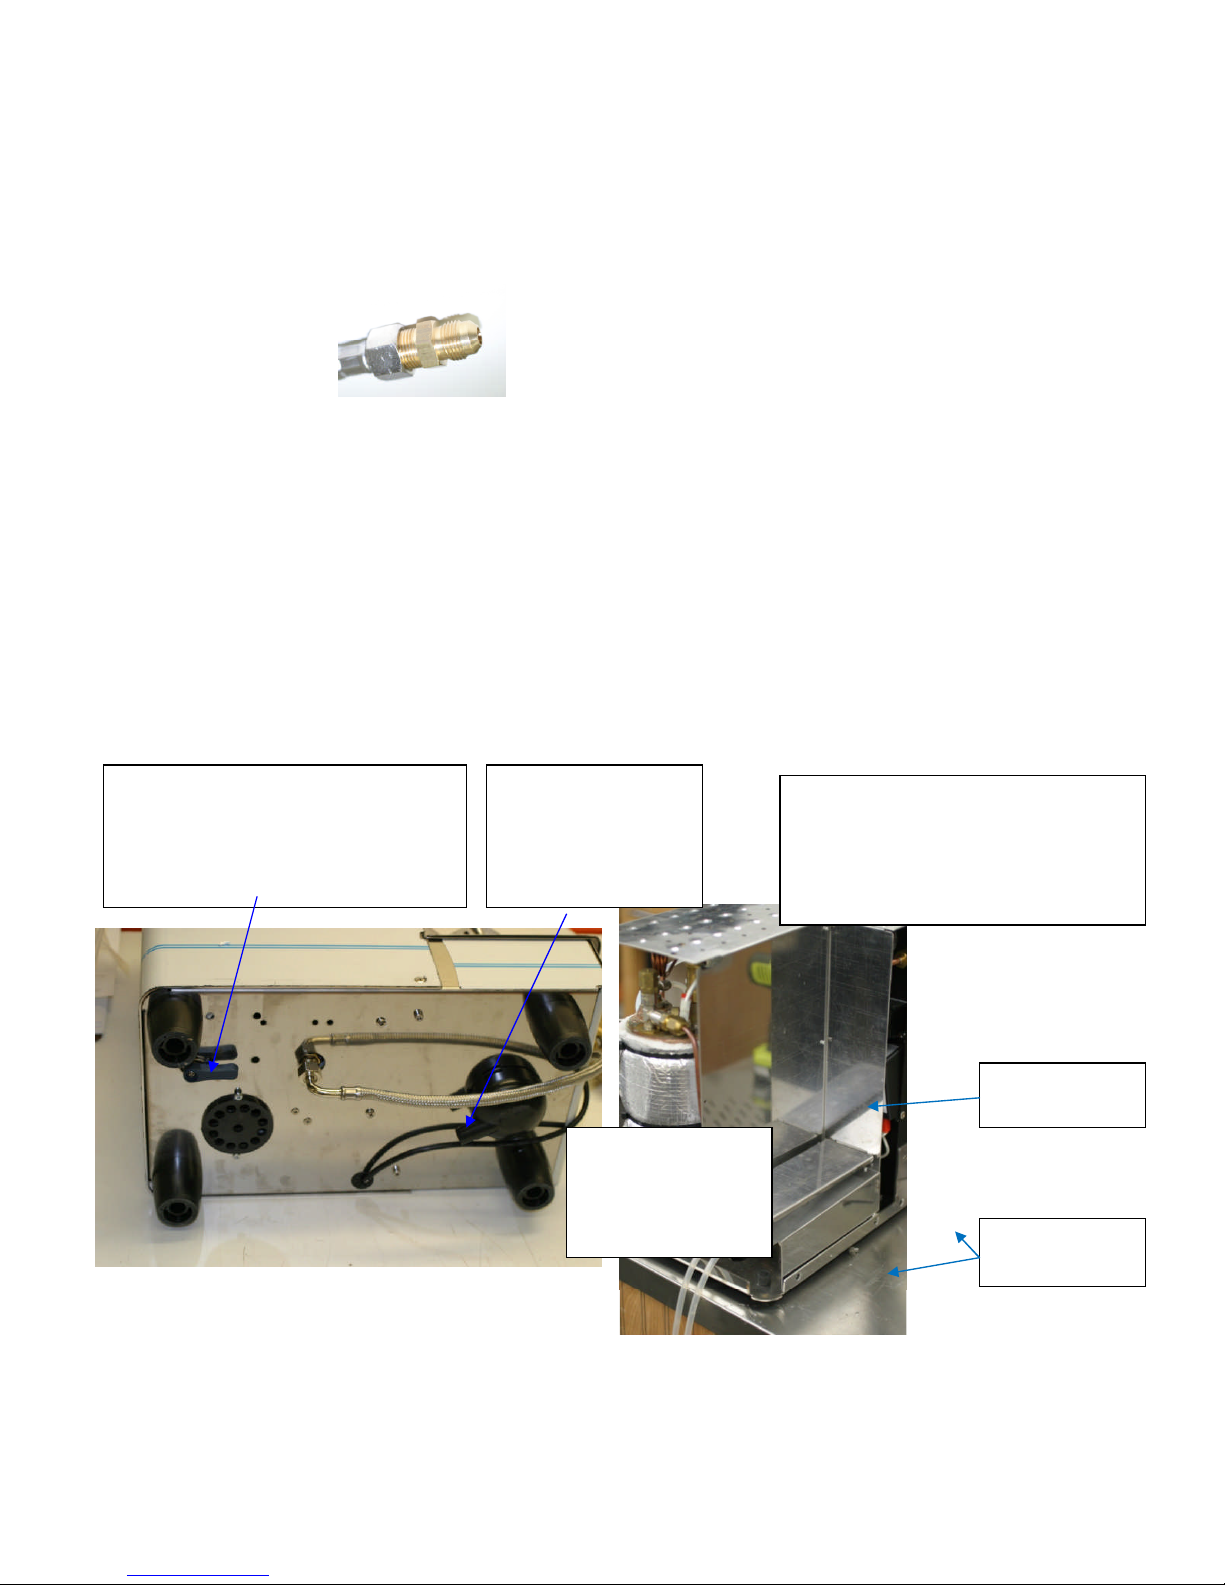
Brewtus IV
-Pwith Plumbing K
it
and Reservoir
The Br
ewtus IV
-Pcan be used
either with a water line hookup or the included reservoir.
There is
a
lever on the bottom of the machine that you ca
n use t
o alternate between the
plumbed line and water reservoir
.
The machine will be shipped from Whole Latte Love
ready to use with the reservoir. If you want to use it with the water line hook up
, you will
have to move the control lever
and
the wires on the Mic
ro Switch that senses the weight
of the reservoir
as shown below.
Turn this lever forward for water line
connection and
back for reservoir
connection. (T
he image below shows
it set up for a water line).
The flexible drain
line that was
supplied with the
machine sli
des over
this fitting.
To access the micro
switch under
the
reservoir remove the housing (5
screws) and the reservoir holding
plate
(two Philips head screws and
two 3
mm A
llen screws)
UNPLUG the
machine when
performing any of
these functions
.
Two 3mm
Allen screws
Reservoir
holding plate
 Loading...