

Page 1

®
Explorer
Digit al Video Recorder
User ’s Guide
Get More Out of Your TV…
Watch • Your favorite shows anytime you want...on your schedule
• Two programs (live or pre-recorded) at once with the PIP feature
Record • Two live programs at the same time
• All future episodes of your favorite programs by performing
a simple, one-time setup
Watch & Record • Watch one program while recording another
• Watch two programs at once (using the PIP feature)
and record one of them
• Watch two programs and record both of them
• Watch a pre-recorded program while recording
one or two other programs
Play Back • Use the Multi-Room
Recordings on recordings on up to 4 TVs at the same time
Other TVs • Use parental controls to block play back of recordings in
any room
*The MR-DVR feature is only available on the 8300 MR-DVR models.
®
DVR* (MR-DVR) system to play back
Page 2

Contents
Contents
Explore Your Entertainment Options .....................................1
Take Control of Live Programs .................................................................................... 2
Get Started................................................................................3
Connect the Explorer DVR to Your TV ........................................................................ 4
Prepare the Remote Control to Work With Your TV and DVR ................................... 5
Prepare the Explorer HD DVR To Work With Your TV ............................................... 6
Adjust Your HDTV Picture ........................................................................................... 8
Adjust Your Picture Format Using Quick Settings ...................................................... 8
Adjust Your HD Picture Using General Settings ......................................................... 9
Make the Most of Your Entertainment Options ........................................................... 12
Find Out When Your Favorite Programs Are On ................... 13
Display the Program Guide ......................................................................................... 13
Select a Program From the Program Guide ............................................................... 13
Search for a Program by Channel, Title, or Theme.................................................... 14
Search for a Program by Date .................................................................................... 15
Select a Future Program From the Program Guide ................................................... 15
Control Live TV and Recordings ............................................16
Pause a Live Program or a Recording........................................................................ 16
Use Instant Replay ...................................................................................................... 17
Rewind or Fast-Forward a Live or Recorded Program ............................................... 17
Use Slow Motion.......................................................................................................... 19
Watch Action Frame by Frame ................................................................................... 19
Catch Up With a Live TV Program.............................................................................. 19
Watch Two Programs At Once ................................................20
Turn PIP On and Off.....................................................................................................20
Activate PIP From the Program Guide ........................................................................20
Change the Channel of the PIP Screen....................................................................... 21
Move the Location of the PIP Screen ..........................................................................21
Swap the Main Screen and the PIP Screen ................................................................22
Record and Play Back Programs............................................24
Record a Program That You Are Watching Live ......................................................... 25
Record a Program From the Program Guide ............................................................. 26
Record Multiple Episodes of a Future Program.......................................................... 27
Record Two Programs at Once................................................................................... 28
Record a Pay-Per-View Event..................................................................................... 28
Schedule Future Pay-Per-View Recordings ............................................................... 28
Display a List of Your Recorded Programs ................................................................. 29
Play Back a Recording ................................................................................................ 29
Display a List of Programs You Have Scheduled To Be Recorded in the Future ...... 30
Cancel a Scheduled Recording................................................................................... 30
Cancel a Recording That Is in Progress ..................................................................... 30
Use Power-Save Mode................................................................................................ 31
iii
Page 3

Contents
Manage Programs and Recordings........................................32
Block Programs With Parental Control ....................................................................... 32
Block Recordings With Parental Control .................................................................... 35
Control the Viewing of Programs and Recordings in Your MR-DVR System ............. 37
Find Out How Much Recording Space Has Been Used ............................................. 40
Maximize Your Storage Space .................................................................................... 40
Automatically Erase Oldest Recordings ..................................................................... 41
Copy Recordings From Your DVR to a VCR Tape...................................................... 42
Change the Default Save Time Setting for Future Recordings .................................. 43
Change the Save Time of a Recording You Have Saved........................................... 44
Erase a Recording....................................................................................................... 44
Recording to a SATA Hard Disk Drive (Optional)........................................................ 45
Find Answers to Frequently Asked Questions......................47
Questions About the DVR ........................................................................................... 47
Questions About Controlling a Live Program or Recording........................................ 47
Questions About Watching Two Programs at Once ................................................... 48
Questions About Recording and Playing Back Programs .......................................... 48
Questions About the MR-DVR Client Set-Top ............................................................ 51
Questions About Watching, Recording, and Playing Back HD Programs ................. 51
Get More Information or Assistance ......................................53
Frequently Asked Questions ....................................................................................... 53
Online Documentation or the Explorer eClub ............................................................. 53
Customer Support ....................................................................................................... 53
Index..........................................................................................54
Quick Tips..........................................................
inside of back cover
Explorer Screens................................................inside of back cover
AllTouch® Remote Control................................ inside of foldout
iv
Page 4

Explore Your Entertainment Options
Explore Your Entertainment Options
With the Explorer® Digital Video Recorder (DVR), you can explore TV in a way
never possible before:
• Record your favorite programs when you’re busy
• Create your own personal video library by recording and storing your
favorite programs
• Watch your recordings anytime you want
• Pause live TV for up to 1 hour without missing a minute
• Use instant replay anytime you want on live TV or while playing back a
recording
• Share recordings with other Scientific-Atlanta digital set-tops in your
MR-DVR system
This guide describes how to use the following Explorer DVRs
• For standard-definition TVs (SDTVs): Explorer 8000™, Explorer 8240™,
Explorer 8300™, Explorer 8300MR
• For high-definition TVs (HDTVs): Explorer 8000HD™, Explorer 8240HD™,
Explorer 8300HD™, Explorer 8300HD MR
Note: Some features described in this document are not available on all DVR
models. For more information, contact your cable service provider.
Explorer Model *Storage Capacity
8000 Up to 50 hours of non-HD programs
8000HD Up to 90 hours of non-HD programs
8240, 8300, 8300MR Up to 50 hours of non-HD programs
8240HD, 8300HD, Up to 90 hours of non-HD programs
8300HD MR Up to 20 hours of HD programs
*The total program hours that can be stored depends upon the format and data rate of
the programming source, as well as the DVR hard drive storage capacity.
™
(based on an 80 GB capacity hard drive)
Up to 20 hours of HD programs
(based on a 160 GB capacity hard drive)
(based on an 80 GB capacity hard drive)
(based on a 160 GB capacity hard drive)
1
Page 5

Explore Your Entertainment Options
Take Control of Live Programs
Anytime you tune to a live program, the DVR begins buffering the program — that
is, making a temporary recording of it — so you can:
• Pause the live program for up to one hour
• Rewind the program up to the point when you tuned to the channel
• Fast-forward through the portion you have rewound
• Instantly replay the last eight seconds of TV anytime you want
• Save the buffered program to the DVR by recording it
Buffered Programs
The channel buffer automatically buffers the last hour of the channel
that you are watching and continues to buffer it until you:
Watch the channel for longer than an hour
After an hour, the DVR removes the earlier minutes of
the program from its buffer so that only the last hour is
kept in the buffer.
Tune to another program
When you change channels, the DVR begins to buffer
the program you have just tuned to. It removes the
program you were watching from the buffer.
Turn off the DVR
When you turn off the DVR, it erases everything from
its buffer.
Have the DVR record the program
When you press Record , the DVR records
the portion of the live program it has buffered, and begins
recording the rest of the live program as it is broadcast.
2
Page 6

Get Started
Get Started
Getting started is easy. After unpacking your DVR equipment, follow these steps
to set up your DVR.
1. Determine the types of connections you need to make, based on your TV
type (HDTV or SDTV) and home theater connection requirements.
2. Connect the DVR to your TV based on the connection information described
in “Connect the Explorer DVR to Your TV” on page 4.
Note: Your cable service provider may have already installed and connected
the DVR for you. If not, follow the instructions on page 4 to make the
appropriate connections.
3. Prepare the remote control as described in “Prepare the Remote Control to
Work With Your TV and DVR” on page 5.
4. Configure the picture display for your TV using the Setup Wizard. See
“Prepare the Explorer DVR to Work With Your TV” on page 6.
3
Page 7
Get Started
Connect the Explorer DVR to Your TV
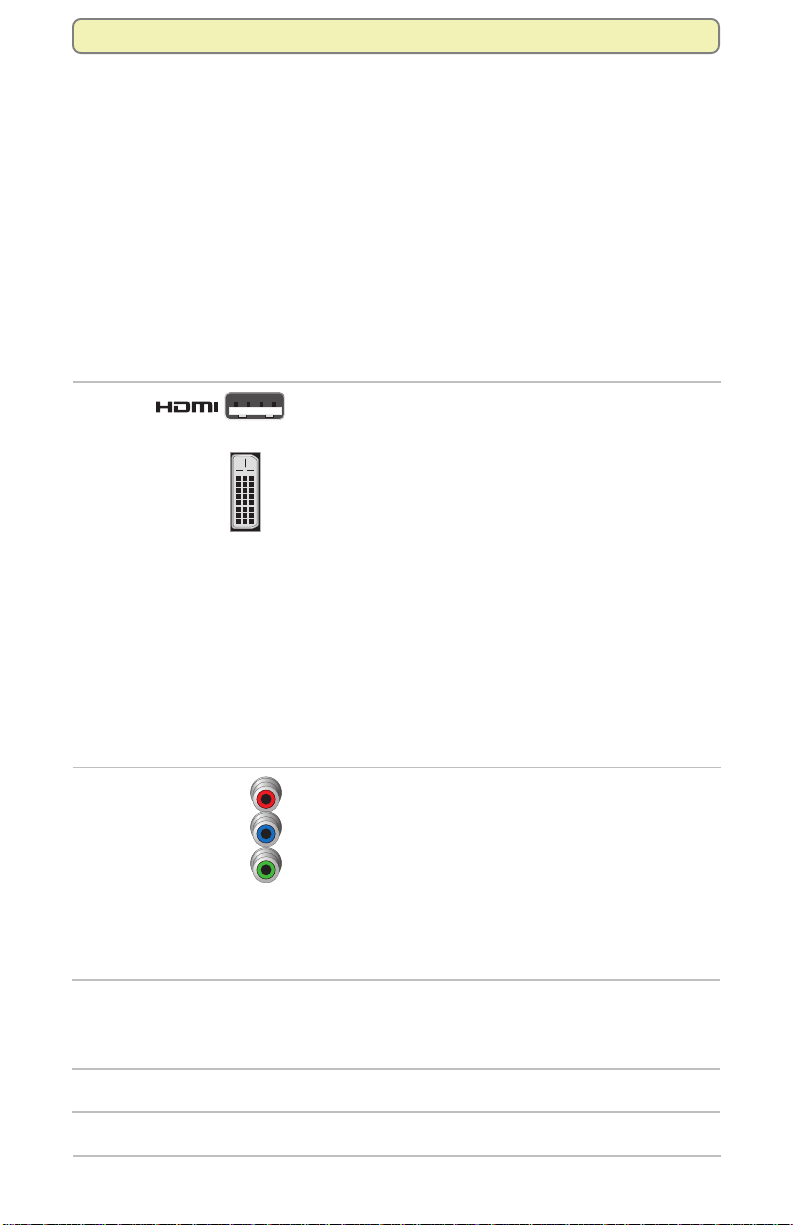
The DVR family supports a number of connection options to support connections
to older TVs, SDTVs with composite inputs, and HDTVs with component inputs
or DVI/HDMI inputs. The following table describes the available DVR outputs,
including when the output should be used.
For more information about connectivity requirements and connection diagrams,
refer to the connectivity guide for your DVR model:
• Connecting the Explorer
• Connecting the Explorer® 8300HD™ Digital Video Recorder, part number 4003986
• Explorer 8000 Home Entertainment Server User’s Installation Guide, part number
4002771
• Explorer 8000HD Home Entertainment Server User’s Guide, part number 4001025
Output Ty pe Description
HDMI
or
DVI
DVI
Pr, Pb, Y
Y Output
(on HD unit configured
for SD operation)
or TV Video Output
S-Video Out
Cable Out
Pr
Pb
®
8300™ Digital Video Recorder, part number 4003987
Some HDTVs have an High-Definition Multimedia
Interface (HDMI
connector. The HDMI connector provides both a digital
video and audio connection. The HDMI connector is
available only on the 8300HD DVR. The DVI connector
is available only on the 8000HD DVR.
The DVI connector provides a digital video connection.
If your HDTV has a DVI connector and you have an
8300HD DVR, you need an HDMI-to-DVI adaptor and
you need to connect a separate audio connection.
Notes:
When using the HDMI connection with TVs that do not
support Dolby
tion steps are needed. For more information, see
“Important Note Regarding the HDMI Interface on the
8300HD DVR” on the next page.
If you connect to an HDTV using the DVI or HDMI
ports, you are automatically placed in “HD” mode.
The PrPbY ports, or component outputs, can be used
with either an HDTV or a non-HDTV with component
inputs. If connecting to a TV using component
outputs, you must use the Setup Wizard to select the
Y
output formats that your particular TV supports. See
“Prepare the Explorer DVR to Work With Your TV” on
page 6.
Note: If connected to an HDTV using the component
or composite (Y output, only) outputs, the Setup
Wizard prompts you to choose “HD” or “SD” mode.
This connection is used for connecting to an SDTV .
This connection can be used for connecting to an
SDTV.
This connection can be used when connecting to an
SDTV .
™
) or Digital Video Interface (DVI )
®
Digital decoding, additional configura-
4
Page 8
Get Started
Important Note Regarding the HDMI Interface on the 8300HD DVR
The HDMI interface will automatically configure the audio output for a format
supported by the television. Because not all TVs support a Dolby Digital input,
the HDMI interface will automatically select a 2-channel stereo audio configuration instead of Dolby Digital. When the output is configured for 2-channel audio,
this configuration is carried over to the other digital audio outputs of the 8300HD.
This configuration prevents your Home Theater System or Dolby Digital decoder
from providing the full Dolby Digital surround sound effect.
On the 8300HD, you may override the automatic selection of audio by the HDMI
interface by completing the following steps.
1. Press Settings
2. Press Move Up
3. Press Move Right to select Dolby Digital. This setting will send Dolby
Digital audio to the HDMI, DIGITAL AUDIO OUT, and OPTICAL AUDIO OUT
connectors on the 8300HD.
4. Press
A
Accept to accept the option for the DVR.
5. Press Exit to return to normal viewing.
Note: If the TV (video/audio monitor) connected to the 8300HD using HDMI is
not Dolby Digital capable, it may not produce audio through its speakers when
the Audio: Digital Out setting on the 8300HD is set to Dolby Digital. You can
either switch the Audio: Digital Out setting back to HDMI when you are not using
the home theater or Dolby digital decoder, or you can connect the baseband
audio outputs (OUT 1 Audio Left and Right) to the TV.
Prepare the Remote Control to Work With Your TV and DVR
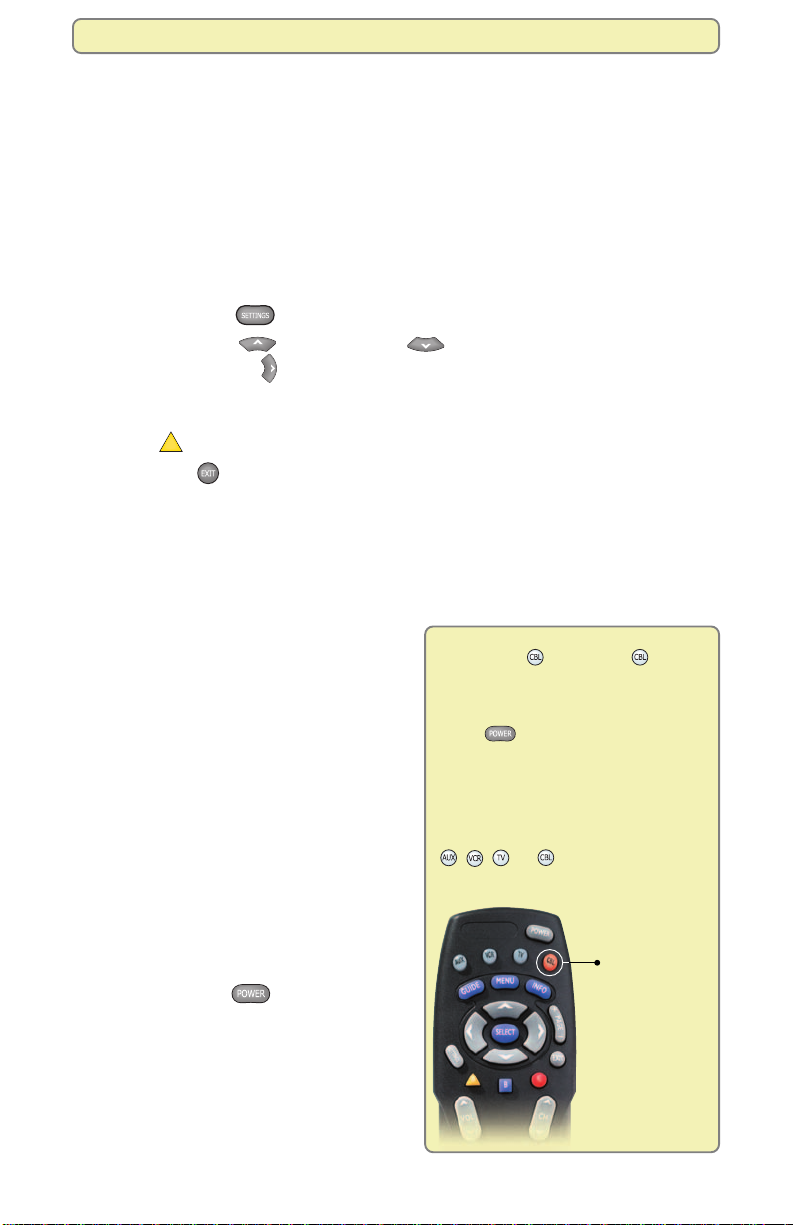
Set up the remote control (remote) in two
steps.
1. Prepare it to work with the make and
model of your TV. (For additional
information on preparing the remote to
work with your make and model of TV,
refer to the guide that is included with
your remote.)
2. Place it in Cable mode as described
in the picture at right.
Note: Your cable service provider may
have already placed the remote in Cable
mode for you. You can verify this by
pressing the Power
the DVR responds.
Tip: To find a key on the remote, open the
foldout on the back cover of this guide to
see the illustration of the remote.
twice. The General Settings menu appears.
or Move Down to select Audio: Digital Out.
To place the remote in Cable mode,
press Cable . The Cable key
blinks red when pressed to indicate
that it is in Cable mode. When the
remote is i n Cable mode and you press
Power , the green Power LED on
the front of the DVR turns on or off
depending on the current status of the
DVR.
Note: Each time you press a key on
the remote, one of the four mode keys
( , , , or ) blinks red to indicate
the mode the remote is in.
Cable Key
key to see how
5
Page 9
Get Started
Prepare the Explorer HD DVR to Work With Your TV
The Setup Wizard is a program that helps you set up your DVR to provide the best
picture quality that your TV supports. Based on the type of TV you have, the
Wizard allows you to select all picture formats supported by your SDTV or HDTV.
Note: If you are connecting an SD DVR to an SDTV, no setup is required. Skip this
section and go to “Make the Most of Your Entertainment Options” on page 12.
For more information about how programs are formatted and displayed on an
HDTV, refer to the Explorer HDTV Setup Wizard User’s Guide, part number
4003114.
Important: Any time that you change connections to use the component (PrPbY)
ports, you must run the Setup Wizard again to make sure your TV is receiving its
supported picture formats.
Start the Setup Wizard
To start the Setup Wizard, follow these steps:
1. Make sure that the DVR is powered OFF,
but still plugged into an active power outlet,
and properly connected to the TV. See
“Connect the Explorer DVR to Your TV” on
page 4.
2. Configure the TV to display the input where
the DVR is connected (see your TV user’s guide for more information).
3. Turn the TV ON.
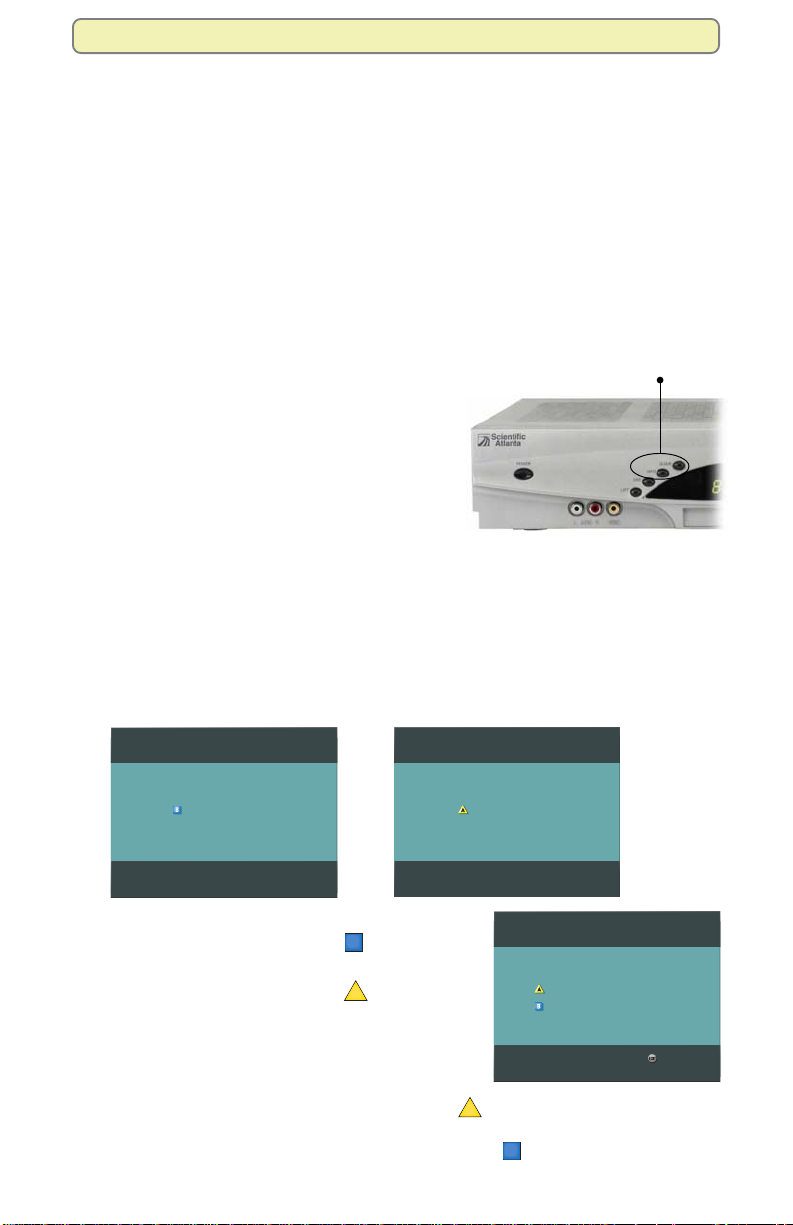
4. With the DVR powered OFF, press Guide and Info at the same time. The TV
Connection Set-up screen appears.
5. The TV Connection Set-up screen toggles between an HD and SD mode
selection screen every 20 seconds until you make a selection.
Note: The DVR front panel displays either HD or SD while the TV
Connection Set-up HD mode or SD mode screens display on the TV screen.
Press the Guide and Info
keys at the same time
TV Connection Set-up
Press to use High Definition (HDTV) mode.
TV Connection Set-up
Press to use Standard Definition mode.
6. Choose one of the following options:
• To choose HD mode, press
B
on the remote
to start the setup.
• To choose SD mode, press
to start the setup.
on the remote
A
Press for Easy Setup: Used by most TV viewers
Press for Advanced Setup: Used by advanced TV viewers
After selecting HD or SD mode, the Setup
Options screen appears.
7. Choose one of the following options:
• To choose the Easy Setup option, press
A
; then, go to the Easy Setup
Instructions on page 7.
• To choose the Advanced Setup option, press B; then, go to the
6
Advanced Setup Instructions on page 7.
Setup Options
Complete setup
Page 10
Easy Setup Instructions
Get Started
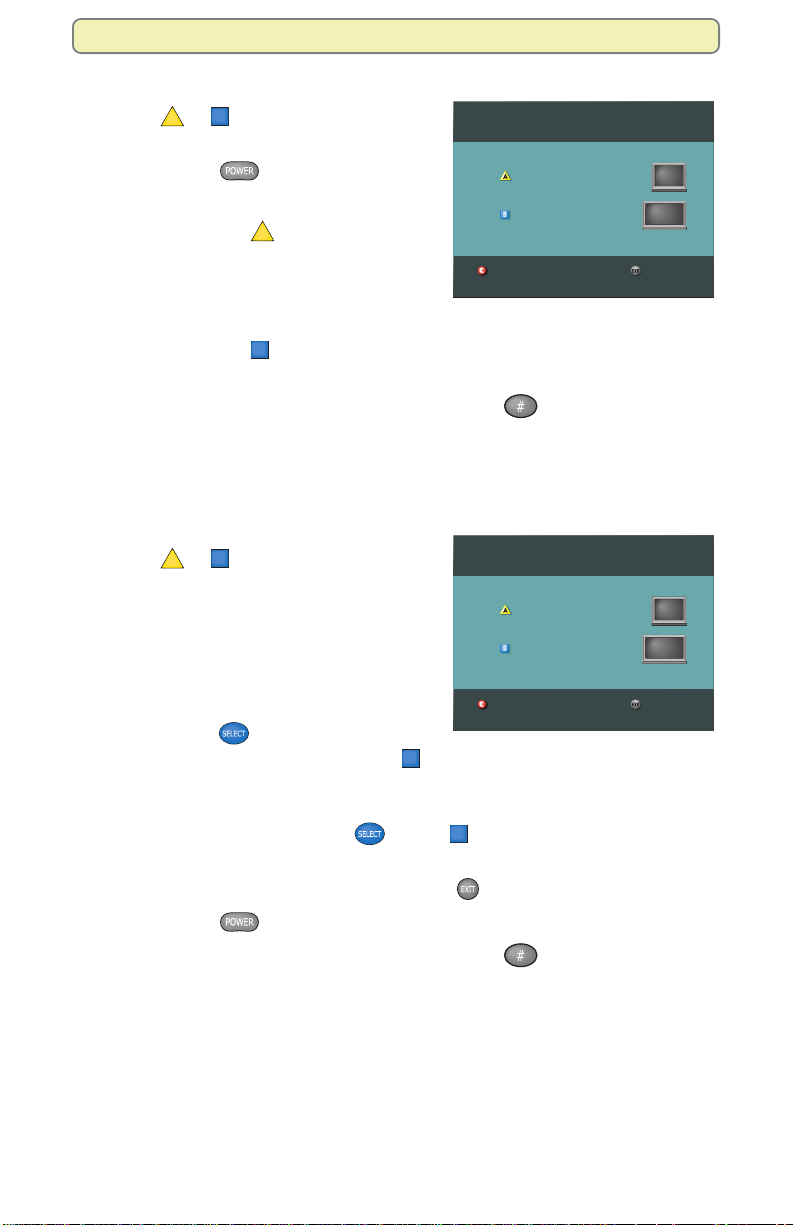
1. Press A or B to select the type of TV
screen you have. The setup is complete.
2. Press Power to begin watching TV.
Notes:
• If you pressed
for the standard
A
screen (4:3) TV setting, the TV is set
to receive programming in 480i format
Standard or Widescreen
Press if your TV has a standard screen (4:3)
Press if your TV has a widescreen (16:9)
Restart setup
Complete setup
on non-HD channels and 1080i
format on HD channels.
• If you pressed
B
for the widescreen (16:9) setting, the TV is set to only
receive programming in 1080i format (even on non-HD channels).
Tip: After you complete the setup, you can press
to stretch or zoom the
picture.
3. You’re ready to begin using your DVR to watch and record programs. Go to
“Make the Most of Your Entertainment Options” on page 12.
Advanced Setup Instructions
1. Press A or B to select the type of TV
screen you have.
2. Follow the on-screen instructions to
select your picture formats.
Note: Refer to the user’s guide that
came with your TV for information
about supported display formats.
3. Press Select
Save and Remove options, or press
to toggle between the
B
to see how the next format looks on
your TV screen.
Important: If you see a black screen or if the picture quality is not
optimal, do not press Select . Press B again to view the next
screen format.
Standard or Widescreen
Press if your TV has a standard screen (4:3)
Press if your TV has a widescreen (16:9)
Restart setup
Complete setup
4. After saving the picture formats, press Exit
5. Press Power
to begin watching TV.
Tip: After you complete the setup, you can press
. The setup is complete.
to stretch or zoom the
picture.
6. You’re ready to begin using your DVR to watch and record programs. Go to
“Make the Most of Your Entertainment Options” on page 12.
Note: If you need to make changes to your HDTV picture display, go to
“Adjust Your HDTV Picture” on page 8.
7
Page 11
Get Started
Adjust Your HDTV Picture
After using the Setup Wizard, if you feel that your HDTV picture quality needs
improvement, you can adjust the HDTV picture display using options within the
Quick Settings and General Settings menus.
If you do not need to make an adjustment to your picture quality, skip this section
and go to “Making the Most of Your Entertainment Options” on page 12.
Adjust Your Picture Format Using Quick Settings
Because the picture quality of a program is affected by many factors, such as
how the program was originally recorded and the method used to broadcast the
program, you may find that displaying certain programs in a specific picture
format provides the picture quality you prefer.
Note: If your HDTV uses a composite, DVI, or HDMI port, it automatically selects
the best picture format for the program you are watching. DVI ports, however,
can choose only from the picture formats that your HDTV supports.
Follow these steps to change the picture format.
1. Press Settings
2. Press Move Up
. The Quick Settings menu appears.
or Move Down to select Picture Format.
3. Press Move Right to select the picture format setting.
4. Press Move Right
again to display another picture format setting.
Each time you press Move Right , another setting displays.
Note: If you used the Setup Wizard to select picture format settings, those
that you selected are available here.
5. Press Select
to view the picture with this setting.
6. If necessary, repeat these steps to find a setting that you prefer.
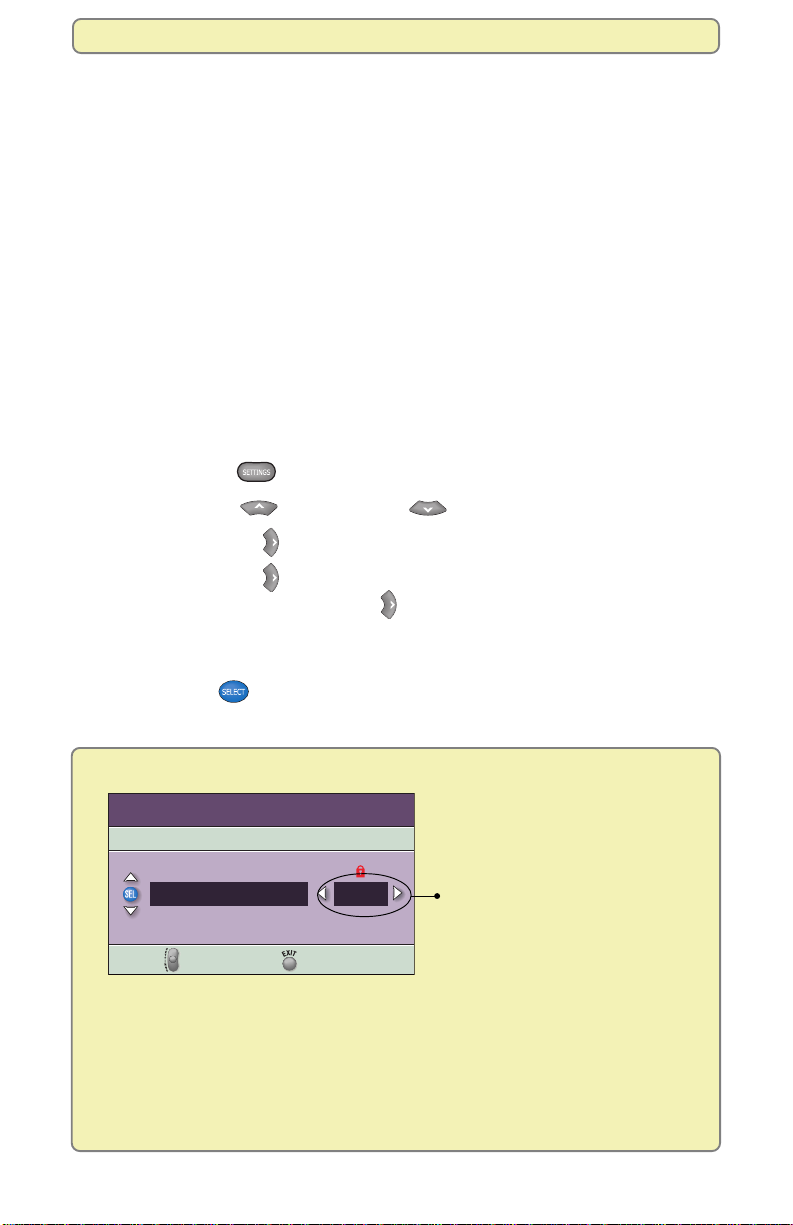
Quick Settings: Picture Format
Quick Settings
Highlight an option, then press SELECT.
Turn OFF Parental Control
Picture Format
Picture Size
720p
Normal
Return to TVMore Settings
Only the picture format settings that
you selected using the Setup Wizard
are available for selection. For
example, if you used the Setup
Wizard’s Easy Setup method, only
the settings 480i and 1080i are
available for you to select.
Note: If Pass-Through or Auto DVI/
HDMI are selected in the General
Settings: Set Picture Format (see
page 10), you cannot change the
Picture Format in the Quick Settings
menu. You can only stretch and
zoom the picture with the # key on
the remote or within Quick Settings.
8
Page 12

Get Started
Adjust Your HD Picture Using General Settings
You can adjust how your DVR displays pictures using the Picture Format and TV
Borders General Settings menu options.
Set Your Default Picture Format
By automating picture adjustments, the DVR uses a method that you choose to
automatically select the picture format that provides the best display possible.
The methods that you can select from depend partly on the type of video
connection your HDTV uses. (See the box on the next page for more details.)
Follow these steps to select a method the DVR will use to display pictures.
1. Press Settings
2. Press Move Up or Move Down to select Set: Picture Format.
twice. The General Settings menu appears.
3. Press Move Right
to select the picture format setting.
4. Press Move Up or Move Down to display each option.
Note: See the box on this page for an explanation of each option.
5. Press
A
Accept to accept the option for the DVR.
Note: The 8300 DVR front panel displays the selected option and scan rate.
For example, if you selected Pass-Through, the 8300 DVR front panel
displays AUTO and 1080i.
6. Press Exit
to return to normal viewing.
Display Formats for Digital Sources
The following table shows the relationship between the picture format method,
the signal the DVR receives, and the format of the picture that displays on your
TV screen.
If you chose this picture
format method:
Fixed
Pass-Through
or
Auto-DVI
Upconvert 1
Upconvert 2
And the DVR receives
this signal:
1080i, 720p, 480i, 480p
1080
720p
480i
480p
480i/480p
720p/1080i
480i/480p
720p/1080i
The HDTV displays the
picture in this format:
The picture format you
selected from the Quick
Settings menu. (For details,
see page 10.)
1080
720p
480i
480p
480p
1080i
480p
720p
9
Page 13
Get Started
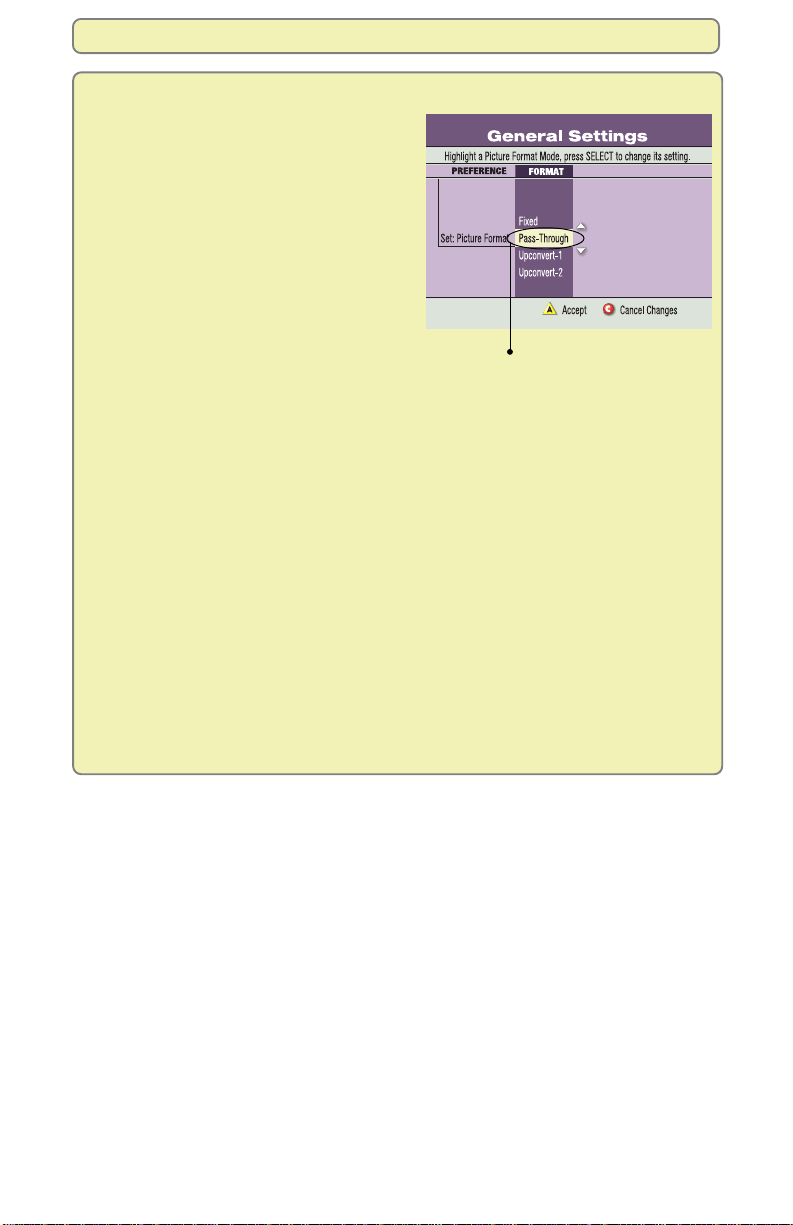
General Settings: Set Picture Format
Upconvert 1 and Upconvert 2 -
When possible, the DVR tries to improve
the display of a program by upconverting
the program.
Fixed - All programming is displayed using
the picture format you last selected. This
setting remains fixed until you select a new
picture format from the Quick Settings
menu. For details, see the previous page.
Pass-Through or Auto DVI - Programming
is automatically formatted with the picture
format that provides the best display. If your
HDTV uses a DVI port, select the Auto DVI
option.
Important: To realize the full benefit and functionality of the Pass-Through feature,
your TV must be capable of handling all six TV display modes (1080i, 720p, 480p
widescreen, 480i widescreen, 480p standard, and 480i standard). If your TV handles
less than six TV display modes, Pass-Through functionality will, in some cases,
operate like the Upconvert-1 or Upconvert-2 functions. Refer to the user’s guide that
came with your TV for information about supported display formats.
If you determine that your TV is capable of handling the six display modes, then you
must select all six picture formats using the Setup Wizard program. See “Advanced
Setup Instructions” on page 7 of this guide.
If your HDTV uses a DVI or HDMI
port, Auto DVI/HDMI appears
here instead of Pass-Through.
Important: Do not connect the HDMI (DVI) output to an HDTV that does not support
High-Definition Copy Protection (HDCP). If you connect the HDMI (DVI) output cable
to an HDTV that does not support HDCP, you cannot see any video output. A
message appears instructing you to disconnect the HDMI connection and watch video
output through the PrPbY component connectors.
For more details about these options, see the table on the previous page.
10
Page 14
Get Started
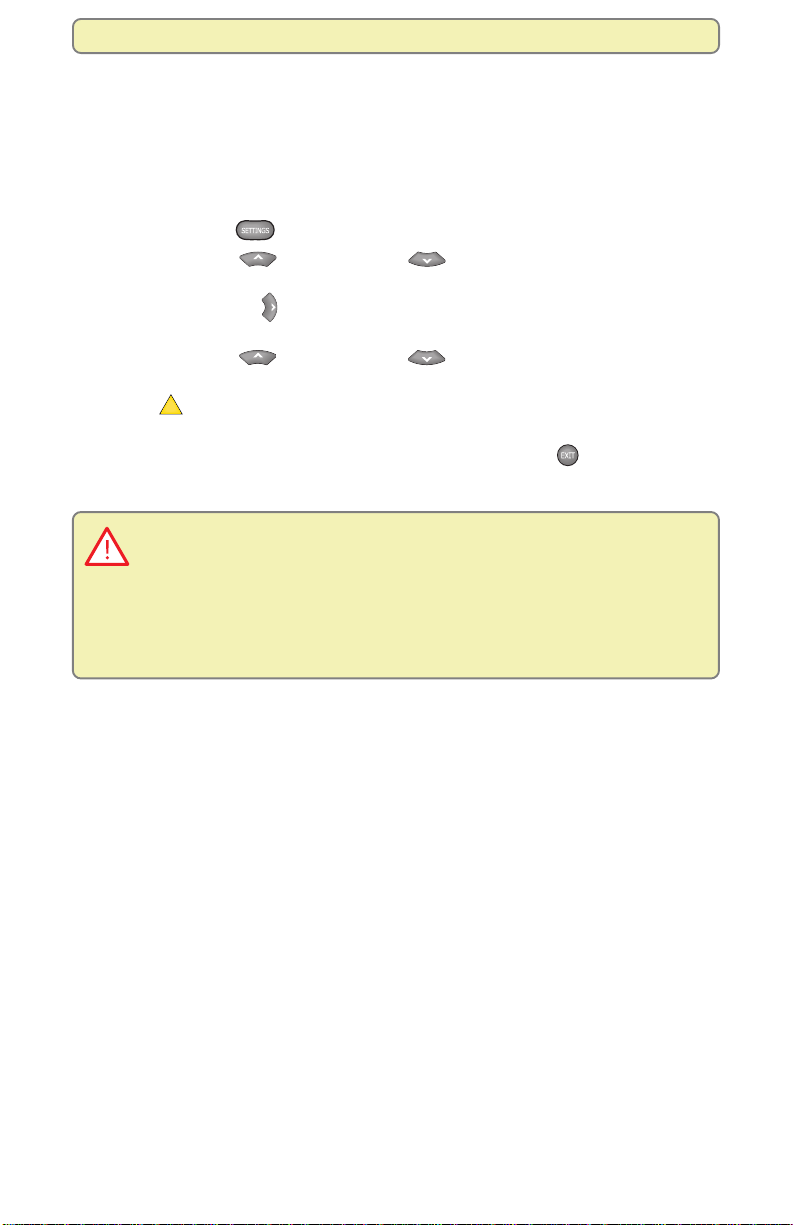
Change the Darkness of Bars Used in Picture Displays
The DVR automatically adds bars to certain types of program formats to improve
the picture’s display.
If you decide to use these automatic settings to watch programs, you can
change the darkness of the bars from Light (the default setting) to Medium or
Dark. To change the darkness of the bars that the DVR uses, follow these steps:
1. Press Settings
2. Press Move Up
Set: TV Borders.
3. Press Move Right
Dark).
4. Press Move Up
to apply to the bars (Light, Medium, or Dark).
5. Press
A
Accept so that the DVR accepts this setting. The DVR displays
the Set: TV Borders option with your selection shown.
6. To exit from this screen and return to live TV, press Exit
Caution: When displayed for too long, any fixed image, such as station logos,
Pillarbox bars, or Letterbox bars, can reduce the ability of HDTVs to display colors
evenly across the screen. When this occurs, the image becomes permanently burned
into the screen leaving a faint image of it on the screen. This occurrence is known as
“burn in.” For ways to reduce the effects of burn in, refer to the user’s guide that came
with your HDTV.
twice. The General Settings menu appears.
or Move Down to select the option
to display the Borders options (Light, Medium, or
or Move Down to select the shade you want
.
11
Page 15

Get Started
Make the Most of Your Entertainment Options
After you connect the DVR to your TV, set up the remote, and run the Setup
Wizard, you are ready to begin watching and recording programs using your
DVR.
In the following sections, discover how you can:
• Find out when programs are broadcast using the Program Guide
• Watch programs and pay-per-view events
• Control live TV and recordings
• Watch two programs at once with the PIP feature
• Record and play back programs
• Manage programs and recordings
12
 Loading...