

Page 1
LIGHT CYCLE
UNIT
Operating Instructions
Mode d’emploi
Gebrauchsanleitung
Manual de Instrucciones
Manuale d’istruzioni
Gebruiksaanwijzing
ART.# PT-2241-2243-2245
Page 2
INDEX
ENGLISH 3
FRANÇAIS 10
DEUTSCH 18
ESPAÑOL 25
ITALIANO 32
NEDERLANDS 39
2
LIGHT CYCLE UNIT
ART.# PT-2241
ART.# PT-2243
ART.# PT-2245
A
C US
Page 3

LIGHT CYCLE UNIT
Operating
Instructions
Electronic Dimming
Terrarium Lamp Controller
• Fits two fluorescent bulbs
• Ideal for use with Exo Terra Repti Glo
and other fluorescent bulbs
• More energy efficient than
conventional ballasts or light strips
• No flickering; less stressful for reptiles
and amphibians
• Long end-cap leads
• Dims fluorescent bulbs (dusk to dawn effect)
• Built-in timer
• On/Off Switch (A)
AVAILABLE IN 3 SIZES:
PT-2241 (max. 20 Watt)
PT-2243 (max. 30 Watt
PT-2245 (max. 40 Watt
INSTRUCTIONS PERTAINING TO A RISK OF FIRE, ELECTRIC
SHOCK, OR INJURY TO PERSONS
IMPORTANT SAFETY INSTRUCTIONS
WARNING: To guard against injury, basic safety precautions should
be observed when handling the Exo Terra® Light Cycle Unit,
including the following.
1. READ AND FOLLOW ALL SAFETY INSTRUCTIONS
and all important notices on the appliance before using. Failure
to do so may result in damage to the appliance.
2. WARNING: This appliance is NOT waterproof and MUST be
protected from coming in contact with water.
3. DANGER – To avoid possible electrical shock, special care should
be taken. For each of the following situations, do not attempt
repairs yourself; return the appliance to an authorized service
facility for service or discard the appliance.
A. If the appliance falls into the water, DON’T reach for it! First
unplug it and then retrieve it. If the electrical components of
the appliance get wet, unplug the appliance immediately.
)
)
ENGLISHFRANÇAISDEUTSCHESPAÑOLITALIANONEDERLANDS
Page 4
B. Carefully examine the appliance after installation. It should
not be plugged in if there is water on parts not intended to
be wet.
C. Do not operate any appliance if it has a damaged electrical
cord or plug, or if it is malfunctioning or if it is dropped or
damaged in any manner. The power cord of this appliance
cannot be replaced: if the cord is damaged, the appliance
should be discarded. Never cut the cord.
D. To avoid the possibility of the appliance plug or electrical
4
supplies power to the appliance, then unplug and examine for
presence of water in the outlet.
4. To reduce the risk of injury, close supervision is necessary when
the appliance is used by or near children.
5. To avoid injury, do not contact hot parts.
6. Always unplug an appliance from an outlet when not in use,
before putting on or taking off parts, and before cleaning. Never
yank cord to pull plug from outlet. Grasp the plug and pull to
disconnect.
7. Do not use the appliance for other than intended use. The use
of attachments not recommended or sold by the appliance
manufacturer may cause an unsafe condition.
8. Do not install or store the appliance where it will be exposed to
weather or to temperatures below freezing.
9. Do not install the light cycle unit housing near filter outputs or
expose it to water spray or humidity. Do not submerge in water.
Ensure sufficient air space around the heat vents. The safety
of this appliance is guaranteed only provided that the bulbs,
adaptors, and light cycle unit is properly installed.
10. If an extension cord is necessary, a cord with a proper rating
should be used. A cord rated for less amperes or watts than the
appliance rating may overheat. Care should be taken to arrange
the cord so that it will not be tripped over or pulled.
11. WARNING - For North American market only: This appliance has
a polarized plug (one blade is wider than the other). As a safety
feature, this plug will fit in a polarized outlet only one way. If
the plug does not fit fully in the outlet, reverse the plug. If it still
does not fit, contact a qualified electrician. Never use with an
extension cord unless plug can be fully inserted. Do not attempt
to defeat this safety feature.
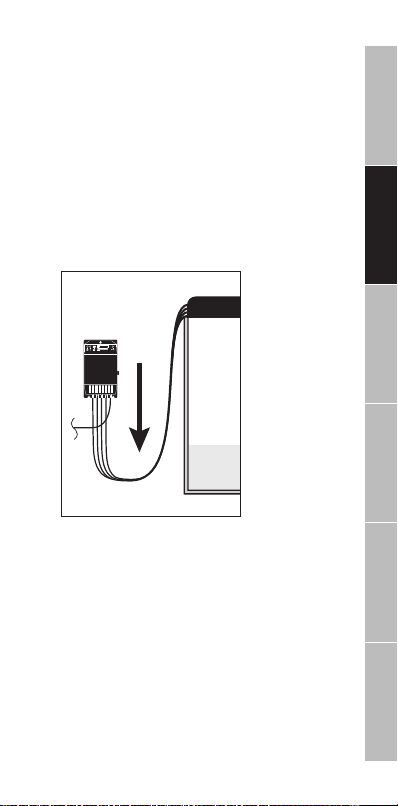
outlet getting wet,
position the appliance
to one side of a wall
mounted outlet to prevent
water from dripping onto
the outlet or plug.
A “drip-loop” should be
arranged. The “drip-loop”
is that part of the cord
below the level of the
unit and the outlet, or the
connector if an extension
cord is used, to prevent
water from traveling
along the cord and
coming in contact with
the outlet or light cycle
unit. If the plug or outlet
does get wet, DON’T
unplug the electrical cord.
Disconnect the fuse or
circuit breaker that
Page 5
SAVE THESE INSTRUCTIONS FOR FUTURE REFERENCE.
Only the faithful observation of these installation, electrical and
maintenance guidelines will ensure the safe and efficient use of
this appliance.
The Exo Terra® Light Cycle Unit is an electronic ballast, a timer
and a dusk-to-dawn simulator in one. The timer can be set for
three different lighting periods --10, 12, or 14 hours to simulate the
various seasonal daylight cycles found in nature. When a daytime
cycle is activated, it takes approximately 30 minutes for the light
output of the bulb to reach 100% -- simulating a natural dawn. At
the end of each daytime cycle, it takes approximately 30 minutes for
the bulb’s light output to go from 100% to 0% -- simulating a natural
dusk. This is less stressful for the animals as it gives them time to
retreat into their burrows and even stimulates breeding behaviour in
many species of reptiles.
Exo Terra® Light Cycle Unit Installation Instructions T8 Bulbs only - European/CE Market
Recommended: For use with T8 only (25 mm / 1” diameter)
fluorescent bulbs.
Follow these instructions whenever installing T8 fluorescent
tubes.
• This equipment is FOR INDOOR USE ONLY.
• Warning: Disconnect the plug of this light cycle unit, and any
other electrical equipment, used for the terrarium, paludarium or
aqua-terrarium before placing your hands in the water; and/or
performing any maintenance of any kind.
• Warning: Whenever installing, removing or changing
fluorescent tubes or maintaining, installing or removing the Exo
Terra® Light Cycle Unit or any other equipment, always ensure
that it is unplugged.
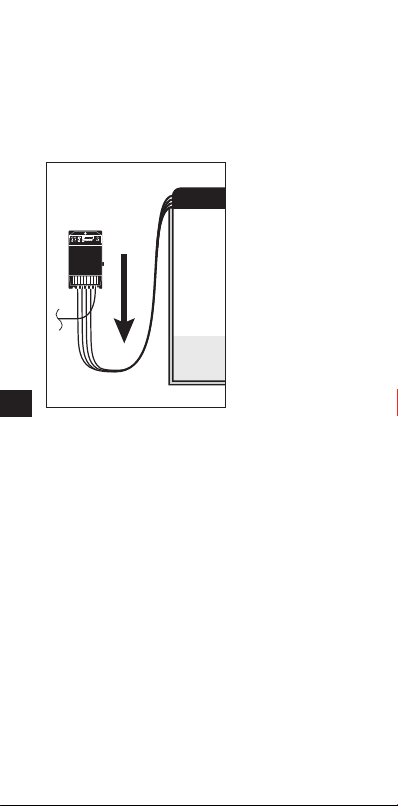
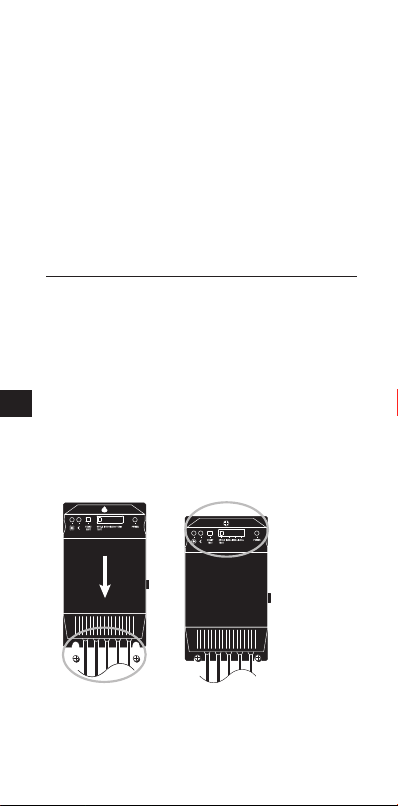
1. The Exo Terra® Light Cycle Unit housing provides a slot for
suspending the housing on a securely fastened screw head.
The light cycle
heat to escape, do not obstruct these vents in any way and
ensure that any dust or debris is promptly removed.
unit housing
should be
located in
a properly
ventilated
area, away
from humidity,
moisture,
flammable
objects,
and fragile
surfaces. The
light cycle
unit housing
is equipped
with ventilation
slots to allow
ENGLISHFRANÇAISDEUTSCHESPAÑOLITALIANONEDERLANDS
Page 6
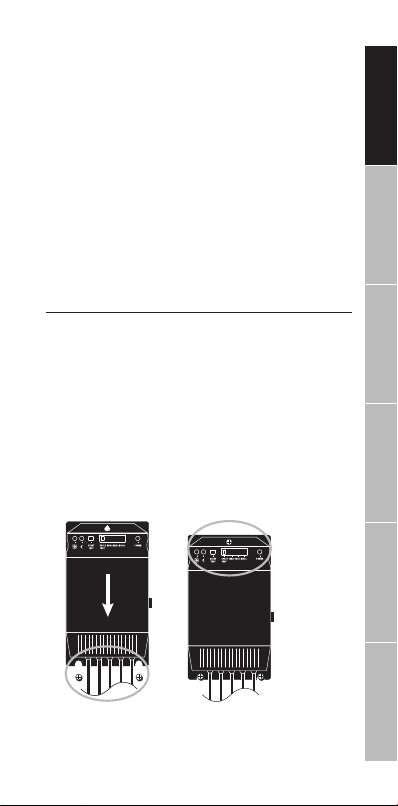
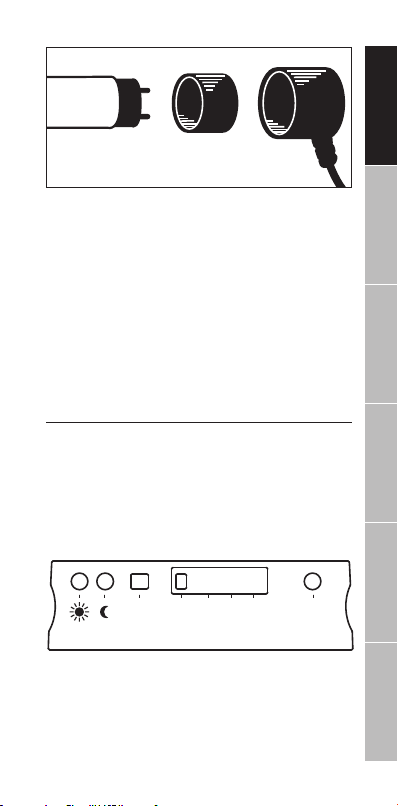
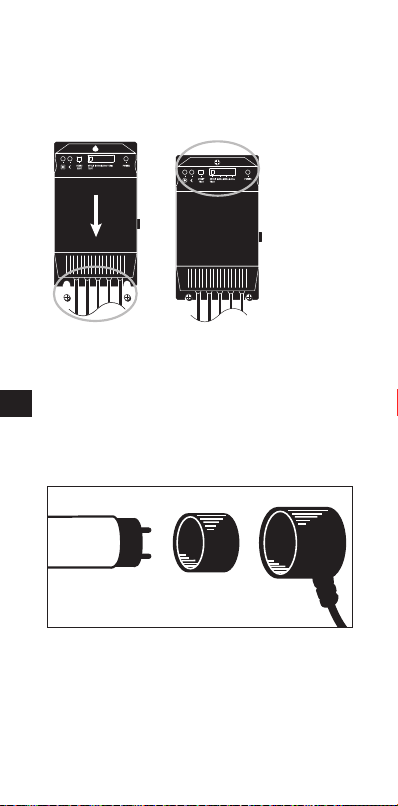
2. Install fluorescent bulbs of the correct diameter and wattage by
inserting the bulb into the end cap so that the pins align with the
internal sockets. Push while inserting the bulb into the end cap to
ensure a positive connection.
3. Once the fluorescent bulbs have been inserted into the end
caps, position the bulbs on top of the metal screen cover of the
terrarium (not over the glass as UVB light does not penetrate
glass). Ensure that the surface of the screen cover is flat and
even so that the bulbs will not roll. Ensure that the bulbs are
positioned over the top metal screen portion of the terrarium and
NOT over any glass, plastic parts, or other flammable material.
Failure to do so could result in a possible fire hazard.
4. Keep unit out of reach of children. Keep unit away from curtains
or other flammable objects.
Exo Terra® Light Cycle Unit Installation Instructions T8/T10 Bulbs - North American Market
Recommended: For use with T8 (25 mm / 1” diameter) or
T10 (32 mm / 1 1/4” diameter) fluorescent bulbs.
Follow these instructions whenever installing T8 / T10
fluorescent tubes.
• This equipment is FOR INDOOR USE ONLY.
• Warning: Disconnect the plug of this light cycle unit, and any
other electrical equipment, used for the terrarium, paludarium
or aqua-terrarium before placing your hands in the water;
and/or performing any maintenance of any kind.
6
• Warning: Whenever installing, removing or changing
fluorescent tubes or maintaining, installing or removing the
Exo Terra® Light Cycle Unit or any other equipment, always
ensure that it is unplugged.
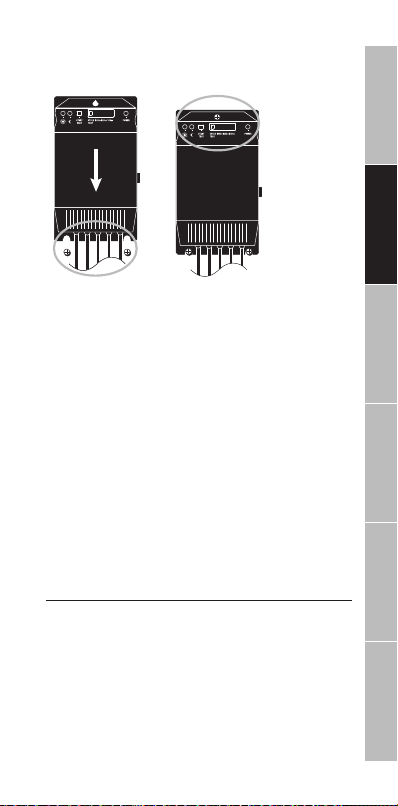
1. The light cycle unit housing provides a slot for suspending the
housing on a securely fastened screw head. The light cycle unit
housing should be located in a properly ventilated area, away
2. To install fluorescent bulbs of the correct diameter and wattage,
first determine which bulb diameter you wish to install (T8 or
T10). For T8 bulbs, adaptors are supplied for this purpose. The
adaptors should be snapped into the end caps before installing
the bulbs. T10 bulbs fit directly into the end caps supplied with
this unit.
from humidity,
moisture,
flammable
objects, and
fragile surfaces.
The light cycle
unit housing is
equipped with
ventilation slots
to allow heat
to escape, do
not obstruct
these vents in
any way and
ensure that any
dust or debris
is promptly
removed.
Page 7
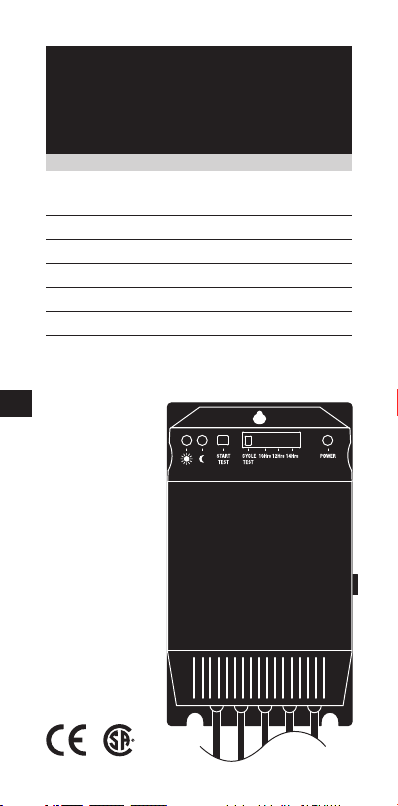
Note: For safety purposes it is recommended that either two T8
START
TEST
POWER CYCLE 10Hrs 12Hrs 14Hrs
TEST
bulbs or two T10 bulbs be installed. Do not install a combination
of T8 and T10 bulbs.
3. Insert the bulb into the end cap so that the pins align with the
internal sockets. Push while inserting the bulb into the end cap
to ensure a positive connection.
4. Once the fluorescent bulbs have been inserted into the end
caps, position the bulbs on top of the metal screen cover of the
terrarium (not over the glass as UVB light does not penetrate
glass). Ensure that the surface of the screen cover is flat and
even so that the bulbs will not roll. Ensure that the bulbs are
positioned over the top metal screen portion of the terrarium and
NOT over any glass, plastic parts, or other flammable material.
Failure to do so could result in a possible fire hazard.
5. Keep unit out of reach of children. Keep unit away from curtains
or other flammable objects.
Setting the timer:
1. Ensure that the unit is turned on.
2. To test if the unit is functioning properly, move the indicator to
“CYCLE TEST ” and press the “START TEST” button. This allows
the unit to perform an automatic internal check of its system.
The night/day light indicators will illuminate sequentially as the
unit performs the test (which takes about a minute).
3. When the test is completed, select preferred lighting period
(10, 12, or 14 hours) by moving the switch to the appropriate
indicator. (example: if “10 hours” is selected, it means that the
light will stay on for 10 hours, etc).
Note: the built-in timer is geared to begin activating the light
cycle at the same time each day. For example, if the unit is
turned on at 9:00 am on the first day of operation, then it will
automatically begin activating the light cycle at 9:00 am on every
subsequent day. It will continue activating the cycle daily at
the same time unless the power is interrupted (unit is switched
on/off, power failure, etc). When the power is restored, the timer
will automatically adjust and the cycle will re-activate based on
ENGLISHFRANÇAISDEUTSCHESPAÑOLITALIANONEDERLANDS
Page 8

the time that the power was restored. To change the timer’s
start cycle simply turn off the unit, then turn it back on at the
new time you want the light cycle to start activating.
Maintenance:
Warning:
• Disconnect the plug of this light cycle unit, and any other
electrical equipment, used for the terrarium, paludarium or
aqua-terrarium before placing your hands in the water; and/or
performing any maintenance of any kind.
• Whenever installing, removing or changing fluorescent tubes
or maintaining, installing or removing the Exo Terra® Light
Cycle Unit or any other equipment, always ensure that it is
unplugged.
• The electrical supply cords of this lighting system cannot be
replaced. If any of the cords are damaged the entire unit
should be discarded
Cleaning the Unit:
1. Do not place the light cycle unit housing near filter outputs or
expose it to water spray or humidity. Do not submerge in water.
2. Ensure that the heat vents are kept free and clear of any
obstruction, dust and debris. Use a cloth to wipe away any
debris that may obstruct the heat vents.
3. No special maintenance is required for the Exo Terra® Light
8
Cycle Unit, other than periodic cleaning with a cloth (never use
harsh chemical products or detergents). To remove calcareous
deposits (bulb sockets), it is recommended to use a mild acid
such as vinegar, followed by a thorough wipe down with a damp
cloth to remove any residues.
4. It is strongly recommended to always follow all the precautions
and procedures outlined in both the Important Safeguards and
Installation Instructions sections.
GUARANTEE
This product is guaranteed for defects in material or workmanship
for a period of 2 years from date of purchase. The guarantee is valid
with proof of purchase only. The guarantee is limited to repair or
replacement of the unit only and does not cover consequential loss
or damage of or to animate or inanimate objects. This guarantee
is valid only under normal operating conditions for which the unit
is intended. It excludes any damage caused by unreasonable use,
improper installation, negligence, tampering, or abuse of the unit.
For guarantee service or spare parts contact your local pet dealer or
write to the representative in your country. This guarantee does not
affect your statutory rights.
Page 9

Service
If you have any problem or question about the operation of this
product, please let us try to help you before you return the product
to your dealer. Most problems can be handled promptly with a
phone call. When you call (e-mail or write), please have all relevant
information such as model number and/or part numbers available,
as well as the nature of the problem. Call our Customer Service
Department:
Canada Only:
Toll Free Number 1-800-555HAGEN (1-800-554-2436)
Between 9:00 am and 4:30 pm (Eastern Time)
U.S.A. Only:
Toll Free Number 1-800-724-2436
Between 9:00 am and 4:00 pm (Eastern Time)
U.K. Only:
Helpline Number 01977 556622
Between 9:00 am and 5:00 pm
For Authorized Warranty Repair Service:
Return unit with dated receipt and reason for return to:
Canada:
Hagen Industries, 3235 Guenette, Montreal, QC H4S 1N2
Rolf C. Hagen Inc., 8770-24th Street, Edmonton AB T6P 1X8
U.S.A.:
Rolf C. Hagen (U.S.A.) Corp.
50 Hampden Road, Mansfield, MA. 02048-9107
U.K.:
Rolf C. Hagen (UK) Ltd.
California Dr. Whitwood Industrial Estate
Castleford, West Yorkshire WF10 5QH
For general information on our whole product range,
explore our websites at: www.exo-terra.com or www.hagen.com.
Distributed by:
Canada: Rolf C. Hagen Inc., Montreal, QC H9X 0A2
U.S.A.: Rolf C. Hagen (U.S.A.) Corp., Mansfield MA. 02048
U.K.: Rolf C. Hagen (U.K.) Ltd. Castleford, W. Yorkshire WF10 5QH
ENGLISHFRANÇAISDEUTSCHESPAÑOLITALIANONEDERLANDS
Page 10

SYSTÈME D’ÉCLAIRAGE
PAR CYCLES
Mode d’emploi
Régulateur électronique de
gradation de lumière pour
terrarium
• Pour deux tubes fluorescents
• Idéal pour utilisation avec les tubes
fluorescents Repti Glo Exo Terra et autres
• Plus éconergétique que les ballasts
conventionnels ou que les bandes d’éclairage
• Ne clignote pas, réduisant ainsi le stress des
reptiles et des amphibiens
• Bouchons de fermeture munis de longs
cordons d’alimentation
10
• Baisse l’éclairage des tubes fluorescents
(allumage crépusculaire)
• Minuterie encastrée
• Interrupteur marche/arrêt (A)
OFFERT EN TROIS GRANDEURS :
PT-2235 (20 watts max.)
PT-2237 (30 watts max.)
PT-2239 (40 watts max.)
INSTRUCTIONS RELATIVES À UN RISQUE D’INCENDIE, À UN CHOC
ÉLECTRIQUE OU À DES BLESSURES AUX PERSONNES
MESURES DE SÉCURITÉ IMPORTANTES
AVERTISSEMENT : Pour éviter toute blessure, il faut observer
des précautions élémentaires de sécurité lors de la manipulation
du système d’éclairage Exo Terra® par cycles, notamment les
suivantes :
1.
LIRE ET RESPECTER TOUTES LES CONSIGNES DE SÉCURITÉ
avant usage, ainsi que tous les avis importants apparaissant sur
l’appareil. Tout manquement à ces précautions pourrait entraîner
des dommages à l’appareil.
2. MISE EN GARDE : Cet appareil N’EST PAS étanche et DOIT être
protégé de tout contact avec l’eau.
3. DANGER : Pour éviter tout risque d’électrocution, une attention
Page 11
spéciale doit être portée au régulateur d’éclairage. Dans chacune
des situations suivantes, ne pas essayer de réparer l’appareil
soi-même; le retourner plutôt à un service de réparations
autorisé ou le jeter.
A. Si l’appareil tombe dans l’eau, NE PAS le ramasser!
Il faut d’abord le débrancher puis le récupérer. Si des pièces
électriques de l’appareil se mouillent, il faut le débrancher
immédiatement.
B. Examiner avec attention l’appareil après l’installation. Il ne
devrait pas être branché en présence d’eau sur des pièces ne
devant pas être mouillées.
C. Ne pas faire fonctionner un appareil dont le cordon ou la fiche
est endommagé, qui ne fonctionne pas correctement ou qui
est tombé ou a été endommagé d’une quelconque manière.
Le cordon d’alimentation de cet appareil ne peut pas être
remplacé; si le cordon est endommagé, il faut jeter l’appareil.
Ne jamais couper le cordon.
D. Afin d’éviter que la fiche ou la prise de courant de l’appareil
système d’éclairage par cycles. Si la fiche ou la prise de courant
est mouillée, NE PAS débrancher l’appareil. Mettre d’abord
hors circuit le fusible ou le disjoncteur qui fournit l’électricité à
l’appareil et le débrancher ensuite. Vérifier qu’il n’y a pas d’eau
dans la prise.
4. Pour réduire les risques de blessures, il est nécessaire de
surveiller étroitement les enfants qui utilisent cet appareil ou qui
s’en trouvent à proximité.
5. Pour éviter toute blessure, ne toucher aucune pièce chaude.
6. Toujours débrancher un appareil quand il n’est pas utilisé,
avant d’insérer ou de retirer des pièces et avant de le nettoyer.
Ne jamais tirer sur le cordon d’alimentation pour débrancher
l’appareil mais plutôt prendre la fiche entre les doigts et tirer.
7. Ne pas employer cet appareil pour un usage autre que celui
prévu. L’emploi de fixations ni recommandées ni vendues
par le fabricant de l’appareil peut être source de situations
dangereuses.
8. Ne pas installer ou ranger l’appareil où il sera exposé aux
intempéries ou à des températures sous le point de congélation.
9. Ne pas installer le boîtier du système d’éclairage par cycles près
soit mouillée, placer
l’appareil d’un côté
de la prise de courant
murale et faire en
sorte que l’eau ne
s’égoutte pas sur la
prise ou la fiche.
Une « boucle
d’égouttement »
devrait être
formée. La « boucle
d’égouttement » est
la partie du cordon
se trouvant sous la
prise de courant ou
le raccord, si une
rallonge est utilisée,
afin d’empêcher l’eau
de glisser le long du
cordon et d’entrer
en contact avec la
prise de courant ou le
ENGLISHFRANÇAISDEUTSCHESPAÑOLITALIANONEDERLANDS
Page 12

des sorties d’eau d’un filtre ni l’exposer à de l’eau diffusée ou à
de l’humidité. Ne pas le submerger dans l’eau. Vérifier qu’il y a
suffisamment d’espace pour l’air autour des sorties de chaleur.
La sécurité de cet appareil est garantie seulement à condition
que les tubes, les adapteurs et le système d’éclairage par cycles
soient correctement installés.
10. Si une rallonge électrique est nécessaire, vérifier qu’elle est d’un
calibre suffisant. Un cordon électrique de moins d’ampères ou de
watts que l’appareil peut surchauffer. Des précautions devraient
être prises afin d’éviter qu’on tire la rallonge ou qu’on trébuche
dessus.
11. MISE EN GARDE : Pour le marché nord-américain seulement :
cet appareil est muni d’une fiche polarisée (une lame est plus
large que l’autre). Par mesure de sécurité, cette fiche ne peut
être insérée dans une prise de courant polarisée que d’une seule
manière. Si la fiche n’entre pas correctement dans la prise,
l’insérer de l’autre côté. Si elle n’entre toujours pas, contacter un
électricien qualifié. Ne jamais utiliser avec une rallonge à moins
que la fiche puisse y être insérée complètement. Ne pas aller à
l’encontre de cette mesure de sécurité.
CONSERVER CES INSTRUCTIONS POUR CONSULTATION FUTURE.
Seule l’observation constante de ces directives d’installation,
d’électricité et d’entretien assurera l’emploi sûr et efficace de cet
appareil.
Le système d’éclairage Exo Terra® par cycles est composé d’un
ballast électronique, d’une minuterie et d’un simulateur d’allumage
crépusculaire. La minuterie peut être réglée pour trois périodes
12
différentes d’éclairage de 10, 12 ou 14 heures pour reproduire les
nombreux cycles saisonniers de lumière du jour dans la nature.
Lorsqu’un cycle d’éclairage de jour commence, il faut environ
30 minutes pour que le flot lumineux du tube atteigne 100 % de sa
capacité, simulant ainsi l’aube. À la fin de chaque cycle d’éclairage
de jour, il faut encore à peu près 30 minutes pour que le tube
s’éteigne complètement, reproduisant alors le crépuscule. Cela est
moins stressant pour les animaux, leur donne le temps de se retirer
dans leurs tanières et stimule même la reproduction chez bien des
espèces de reptiles.
Installation du système d’éclairage Exo Terra® par cycles Tubes fluorescents T8 seulement - Marché européen/CE
Recommandation : utiliser seulement des tubes fluorescents T8
(25 mm/1”de diamètre).
Suivre ces directives pour l’installation de tubes fluorescents T8.
• Cet équipement est POUR USAGE À L’INTÉRIEUR
SEULEMENT.
• Mise en garde : Débrancher la fiche de ce système
d’éclairage et tout autre équipement électrique utilisé pour le
terrarium, le paludarium ou l’aquaterrarium avant de mettre
les mains dans l’eau ou d’effectuer quelque entretien que
ce soit.
• Mise en garde : Avant d’installer, d’enlever ou de changer des
tubes fluorescents ou de faire l’entretien, d’installer ou
d’enlever le système d’éclairage Exo Terra® par cycles ou tout
autre équipement, toujours s’assurer que le tout est débranché.
Page 13
1. Le boîtier du système d’éclairage par cycles est muni d’une
fente pour le suspendre à la tête d’une vis solidement ancrée.
Ne pas obstruer ces fentes de quelque manière que ce soit et
s’assurer d’enlever toute poussière ou débris rapidement.
2. Installer des tubes fluorescents d’un diamètre et d’une
puissance en watts conformes en les insérant dans les bouchons
de fermeture de manière à ce que les broches s’alignent à
l’intérieur des douilles. Pousser tout en insérant le tube dans le
bouchon de fermeture pour assurer un raccordement positif.
3. Une fois les tubes fluorescents insérés dans les bouchons
de fermeture, les placer sur le dessus du couvercle grillagé
du terrarium (et non pas sur le verre car les rayons UVB ne
pénètrent pas le verre). S’assurer que la surface du couvercle
grillagé est de niveau et égale pour que les tubes ne puissent
pas rouler. S’assurer de placer les tubes fluorescents sur la
partie supérieure du couvercle grillagé du terrarium et NON
sur le verre, les pièces en plastique ou sur tout autre matière
inflammable. Tout manquement à ces précautions pourrait
entraîner un risque d’incendie.
4. Garder l’appareil hors de portée des enfants. Garder l’appareil
loin des rideaux et de tout autre objet inflammable.
Installation du système d’éclairage Exo Terra® par cycles Tubes fluorescents T8/T10 - Marché nord-américain
Recommandation : utiliser seulement des tubes fluorescents T8
(25 mm/1”de diamètre) ou T10 (32 mm/1 1/4” de diamètre).
Suivre ces directives pour l’installation de tubes fluorescents
T8 ou T10.
• Cet équipement est POUR USAGE À L’INTÉRIEUR
SEULEMENT.
• Mise en garde : Débrancher la fiche de ce système
d’éclairage et tout autre équipement électrique utilisé pour le
terrarium, le paludarium ou l’aquaterrarium avant de mettre
les mains dans l’eau ou d’effectuer quelque entretien que
ce soit.
• Mise en garde : Avant d’installer, d’enlever ou de changer des
Le boîtier
du système
d’éclairage par
cycles devrait
être placé à un
endroit bien
aéré, loin de
l’humidité, de la
buée, des objets
inflammables
et des surfaces
fragiles. Le boîtier
du système
d’éclairage
par cycles est
muni de fentes
de ventilation
pour permettre
à la chaleur
de s’échapper.
ENGLISHFRANÇAISDEUTSCHESPAÑOLITALIANONEDERLANDS
Page 14
tubes fluorescents ou de faire l’entretien, d’installer ou d’enlever
le système d’éclairage Exo Terra® par cycles ou tout autre
équipement, toujours s’assurer que le tout est débranché.
1. Le boîtier du système d’éclairage par cycles est muni d’une
fente pour le suspendre à la tête d’une vis solidement ancrée. Le
manière que ce soit et s’assurer d’enlever toute poussière ou
débris rapidement.
2. Pour installer des tubes fluorescents d’un diamètre et d’une
puissance en watts conformes, d’abord déterminer le diamètre du
14
tube fluorescent à installer (T8 ou T10). Pour les tubes fluorescents
T8, des adapteurs sont compris à cette fin. Les adapteurs
devraient être attachés aux bouchons de fermeture avant
d’installer les tubes fluorescents. Les tubes fluorescents T10 vont
s’insérer directement dans les bouchons de fermeture compris
avec l’appareil
boîtier du système
d’éclairage par
cycles devrait être
placé à un endroit
bien aéré, loin de
l’humidité, de la
buée, des objets
inflammables
et des surfaces
fragiles. Le boîtier
du système
d’éclairage
par cycles est
muni de fentes
de ventilation
pour permettre
à la chaleur de
s’échapper. Ne
pas obstruer ces
fentes de quelque
Note: Par mesure de sécurité, il est recommandé d’installer soit
deux tubes fluorescents T8, soit deux tubes fluorescents T10. Ne
pas installer une combinaison de tubes T8 et T10.
3. Insérer le tube fluorescent dans le bouchon de fermeture de
manière à ce que les broches s’alignent à l’intérieur des douilles.
Pousser tout en insérant le tube dans le bouchon de fermeture
pour assurer un raccordement positif.
4. Une fois les tubes fluorescents insérés dans les bouchons
de fermeture, les placer sur le dessus du couvercle grillagé
du terrarium (et non pas sur le verre car les rayons UVB ne
Page 15

pénètrent pas le verre). S’assurer que la surface du couvercle
START
TEST
POWER CYCLE 10Hrs 12Hrs 14Hrs
TEST
grillagé est de niveau et égale pour que les tubes ne puissent
pas rouler. S’assurer de placer les tubes fluorescents sur la
partie supérieure du couvercle grillagé du terrarium et NON
sur le verre, les pièces en plastique ou sur tout autre matière
inflammable. Tout manquement à ces précautions pourrait
entraîner un risque d’incendie.
5. Garder l’appareil hors de portée des enfants. Garder l’appareil
loin des rideaux et de tout autre objet inflammable.
Réglage de la minuterie :
1. S’assurer que la minuterie est en marche.
2. Pour vérifier si elle fonctionne convenablement, déplacer
l’indicateur à « CYCLE TEST » et presser le bouton « START
TEST ». Ainsi, la minuterie effectue une vérification intérieure
automatique de son système. Les indicateurs d’éclairage de jour
et de nuit seront illuminés séquentiellement durant la mise à
l’essai (qui prend environ une minute).
3. Une fois la vérification terminée, choisir la période d’éclairage
désirée (10, 12 ou 14 heures) en déplaçant le sélecteur à
l’indicateur approprié (p. ex. si « 10Hrs » est sélectionné, la
lumière sera allumée pendant 10 heures, etc.).
Note : La minuterie encastrée est conçue pour commencer à
activer le cycle de lumière au même moment, chaque jour. Par
exemple, si elle est mise en marche à 9 h le premier jour, elle
commencera à activer automatiquement le cycle de lumière à
9 h chaque jour suivant. Elle continuera à activer le cycle chaque
jour, au même moment, à moins d’une coupure de l’alimentation
(interrupteur en mode arrêt, panne de courant, etc.). Une fois le
courant rétabli, la minuterie sera ajustée automatiquement et
le cycle sera réactivé à l’heure où le courant a été rétabli. Pour
changer le cycle de départ de la minuterie, l’arrêter et la mettre
de nouveau en marche à la nouvelle heure à laquelle vous voulez
que le cycle de lumière soit activé.
Entretien :
Mise en garde :
• Débrancher la fiche de ce système d’éclairage par cycles
et tout autre équipement électrique utilisé pour le terrarium,
le paludarium ou l’aquaterrarium avant de mettre les mains
dans l’eau ou d’effectuer quelque entretien que ce soit.
• Avant d’installer, d’enlever ou de changer des tubes
fluorescents ou de faire l’entretien, d’installer ou d’enlever
le système d’éclairage Exo Terra® par cycles ou tout autre
équipement, toujours s’assurer que le tout est débranché.
ENGLISHFRANÇAISDEUTSCHESPAÑOLITALIANONEDERLANDS
Page 16

• Les cordons d’alimentation de cet appareil ne peuvent pas
être remplacés. Si un des cordons est endommagé, il faut
jeter l’appareil.
Nettoyage de l’appareil :
1. Ne pas placer le boîtier du système d’éclairage par cycles près
des sorties d’eau d’un filtre ni l’exposer à de l’eau diffusée ou à
de l’humidité. Ne pas le submerger dans l’eau.
2. S’assurer que les sorties de chaleur sont libres de toute
obstruction, poussière ou débris. Utiliser un linge pour essuyer
tout débris qui pourrait obstruer les sorties de chaleur.
3. Aucun entretien spécial n’est requis pour le système d’éclairage
Exo Terra® par cycles sauf un nettoyage périodique avec
un linge (ne jamais utiliser des produits chimiques ou des
détergents corrosifs). Afin d’enlever les dépôts calcaires (douilles
des tubes), il est recommandé d’utiliser un acide doux tel que du
vinaigre et de bien essuyer ensuite avec un linge humide pour
retirer tout résidu.
4. Il est fortement recommandé de toujours observer toutes les
précautions et les procédures décrites dans les Mesures de
sécurité importantes et dans les Instructions d’installation.
GARANTIE
Ce produit est garanti contre les défauts de matériel et de maind’œuvre pour une période de deux ans à partir de la date d’achat. La
garantie est valide seulement avec la preuve d’achat. La garantie est
limitée à la réparation ou au remplacement de l’appareil seulement
16
et exclut toute perte indirecte ou dommage aux objets animés
ou inanimés en contact avec l’appareil. Cette garantie est valide
seulement dans le cas de l’usage normal pour lequel il est conçu.
La garantie exclut tout dommage causé par un usage excessif,
une installation incorrecte de l’appareil, de la négligence, une
modification quelconque apportée à l’appareil ou un usage abusif.
Pour le service offert par la garantie ou pour des pièces de rechange,
prière de contacter votre détaillant d’animalerie locale ou d’écrire au
représentant de votre pays. Cette garantie ne modifie pas vos droits
prévus par la loi.
Service
Si cet appareil vous semble défectueux ou que vous vous posez
des questions quant à son fonctionnement, n’hésitez pas à
communiquer avec nous avant de le retourner au marchand. Notre
ligne téléphonique nous permet de régler la plupart des problèmes.
Lorsque vous téléphonez (courriel ou poste), S.V.P. ayez en main tous
les renseignements pertinents (p. ex. le numéro du modèle ou de la
pièce) ainsi qu’une description du problème. Contactez notre Service
à la clientèle.
Page 17

Canada seulement :
Numéro sans frais : 1 800 555HAGEN (1 800 554-2436)
Entre 9 h et 16 h 30 (heure de l’Est)
États-Unis seulement :
Numéro sans frais : 1 800 724-2436
Entre 9 h et 16 h (heure de l’Est)
Royaume-Uni seulement :
Numéro du service d’assistance : 01977 556622
Entre 9 h et 17 h
Pour réparation d’un article sous garantie :
Retournez l’appareil avec une preuve d’achat et la raison
du retour à :
Canada:
Industries Hagen ltée
3235, rue Guénette
Montréal QC H4S 1N2
Rolf C. Hagen Inc.
8770-24th Street
Edmonton AB T6P 1X8
États-Unis :
Rolf C. Hagen (U.S.A.) Corp.
50 Hampden Road, Mansfield, MA 02048-9107
Royaume-Uni :
Rolf C. Hagen (UK) Ltd.
California Dr. Withwood Industrial Estate
Castleford, West Yorkshire WF10 5QH
Pour toute information sur la gamme complète de nos produits,
explorez nos sites Web www.exo-terra.com et www.hagen.com.
Distribué par :
Canada: Rolf C. Hagen Inc., Montréal QC H9X 0A2
U.S.A.: Rolf C. Hagen (U.S.A.) Corp., Mansfield MA. 02048
U.K.: Rolf C. Hagen (U.K.) Ltd. Castleford, W. Yorkshire WF10 5QH
ENGLISHFRANÇAISDEUTSCHESPAÑOLITALIANONEDERLANDS
Page 18

LIGHT CYCLE UNIT
Gebrauchsanleitung
Elektronische
Lampensteuerung in
Terrarien
• Für zwei Leuchtstoffröhren
• Ideal für den Gebrauch mit Exo Terra Repti
Glo und anderen Leuchtstoffröhren
• Energieeffizienter als viele vergleichbare
Vorschaltgeräte und andere
Lichtanschlussstellen
• Kein Flackern; weniger Stress für Reptilien
und Amphibien
• Lange Anschlüsse an den Endkappen
18
• Dimmt Leuchtstoffröhren (simuliert die
Morgen- und Abenddämmerung!)
• Eingebauter Timer
• An/Aus-Schalter (A)
IN 3 GRÖSSEN ERHÄLTLICH:
PT-2235 (max. 20 Watt)
PT-2237 (max. 30 Watt
PT-2239 (max. 40 Watt
ANLEITUNGEN IM FALLE VON FEUER, ELEKTRISCHEN SCHLÄGEN
ODER VERLETZUNGEN AN PERSONEN
WIChTIgE SIChERhEITShINWEISE
WARNUNG: Zum Schutz vor Verletzungen sind beim Umgang mit der
Exo Terra® Light Cycle Unit grundlegende Sicherheitsvorkehrungen
zu beachten, einschließlich der folgenden Hinweise:
1.
LESEN UND BEFOLGEN SIE ALLE SICHERHEITSHINWEISE
und alle wichtigen Hinweise auf dem Gerät vor der
Inbetriebnahme des Gerätes. Bei Nichtbeachtung kann dies zu
Schäden an diesem Gerät führen.
2. WARNUNG: Dieses Gerät ist NICHT wasserdicht und darf NICHT
mit Wasser in Berührung kommen.
3. GEFAHR – Um einen möglichen elektrischen Schlag zu
vermeiden, sollten Sie besonders vorsichtig sein. Wenn eine der
)
)
Page 19

nachfolgenden Situationen eintritt, sollten Sie nicht versuchen,
das Gerät selber zu reparieren, sondern dieses an eine
autorisierte Kundendienststelle zur Reparatur geben oder das
Gerät entsorgen.
A. Wenn das Gerät ins Wasser fällt, NICHT danach greifen!
Erst die Netzsteckverbindung lösen und dann das Gerät
herausnehmen. Wenn die elektrischen Teile des Gerätes nass
werden, sofort die Netzsteckverbindung lösen.
B. Gerät nach dem Einbau sorgfältig überprüfen. Es darf nicht
an das Stromnetz angeschlossen werden, wenn sich Wasser
auf Teilen befindet, die nicht nass werden dürfen.
C. Kein Gerät mit beschädigtem Netzkabel oder beschädigtem
Stecker benutzen oder wenn dieses nicht richtig funktioniert
oder heruntergefallen oder anderweitig beschädigt wurde. Die
Netzschnur dieses Gerätes kann nicht ausgewechselt werden;
wenn die Schnur beschädigt ist, sollte das Gerät weggeworfen
werden. Niemals die Schnur abschneiden.
D. Um die Möglichkeit auszuschließen, dass der Gerätestecker
oder die Steckdose nass werden, soll das Gerät neben einer
Wandsteckdose so angeordnet werden, dass kein Wasser auf
Steckdose oder
NICHT aus der Steckdose ziehen. Sicherung oder Sicherungs schalter des Stromkreises für das Gerät ausschalten. Erst
danach das Netzkabel herausziehen und die Steckdose auf
Vorhandensein von Wasser überprüfen.
4. Sorgfältige Aufsicht ist notwendig, wenn das Gerät von Kindern
oder in der Nähe von Kindern benutzt wird.
5. Zur Vermeidung von Verletzungen keine heißen Teile berühren.
6. Trennen Sie immer alle Geräte vom Stromnetz, wenn sie nicht in
Gebrauch sind, bevor Teile angebracht oder entfernt werden und
vor der Reinigung. Nicht am Netzkabel ziehen, um den Stecker
aus der Steckdose zu lösen. Immer am Stecker anfassen und
herausziehen.
7. Benutzen Sie das Gerät nur für den vorgesehenen
Verwendungszweck. Die Verwendung von Anbauteilen, die nicht
vom Gerätehersteller empfohlen oder verkauft werden, kann zu
einem unsicheren Betriebszustand führen.
8. Installieren oder lagern Sie das Gerät nicht an Stellen, an denen
es der Witterung oder Temperaturen unter dem Frostpunkt
Stecker tröpfeln kann.
Eine „Tropfschleife“
sollte zur Steckdose
hin gebildet werden.
Die „Tropfschleife“
ist der Teil des
Netzkabels, der unter
dem Niveau der
Steckdose oder der
Anschlussdose bei
Verwendung einer
Verlängerungsschnur
liegt. Damit wird
verhindert, dass
Wasser die Schnur
entlang wandert und
mit der Steckdose in
Berührung kommt.
Wenn der Stecker oder
Steckdose nass
werden, Netzkabel
ENGLISHFRANÇAISDEUTSCHESPAÑOLITALIANONEDERLANDS
Page 20

ausgesetzt ist.
9. Installieren Sie die Light Cycle Unit nicht in der Nähe von
Filterauslassen oder dort, wo sie Wasserspritzern oder
Feuchtigkeit ausgesetzt sein könnte. Tauchen Sie die Einheit
nie in Wasser. Achten Sie darauf, dass genügend Luftraum um
die heißen Lüftungsschlitze vorhanden ist. Die Sicherheit dieses
Gerätes ist nur gewährleistet, wenn die Leuchtstoffröhren,
Adapter und die Light Cycle Unit selbst sicher und
ordnungsgemäß installiert sind.
10. Wenn ein Verlängerungskabel benötigt wird, muss ein Kabel
geeigneter Leistung benutzt werden. Ein Verlängerungskabel mit
einer kleineren Ampere- oder Wattzahl als das Gerät kann sich
überhitzen. Achten Sie darauf, das Verlängerungskabel so zu
verlegen, dass man nicht darüber stolpert oder es herauszieht.
BEWAHREN SIE DIESE ANLEITUNG AUF.
Nur die genaue Einhaltung dieser Anleitungen zu Installation,
elektrischen Daten und Wartung gewährleistet den sicheren und
effizienten Gebrauch dieses Gerätes.
Die Exo Terra® Light Cycle Unit, die elektronische DimmerLampensteuerung in Terrarien, ist eine Vorschaltvorrichtung, ein
Timer und ein Simulator für eine Morgen- und Abenddämmerung in
einem. Der Timer kann auf drei verschiedene Lichtperioden gestellt
werden – 10, 12 oder 14 Stunden – um verschiedene saisonale
Tageslichtzyklen der Natur zu simulieren. Wenn der Tageszyklus
beginnt, dauert es ca. 30 Minuten bis die Strahlung der Lampe bei
100% liegt. Eine natürliche Morgendämmerung wird simuliert. Am
Ende eines jeden Tageszykluses dauert es wieder etwa 30 Minuten,
20
bis die Lampe ausgeht. So wird eine natürliche Abenddämmerung
simuliert. Dies bedeutet weniger Stress für die Tiere, da sie
genügend Zeit haben, sich in ihre Verstecke zurückzuziehen und
stimuliert sogar das Brutverhalten bei vielen Reptilienarten.
Exo Terra® Light Cycle Unit Montageanleitungen
Nur für T8 Leuchtstoffröhren geeignet – Europäischer/CE-Markt
Empfohlen: Nur für den Gebrauch mit T8 (25 mm)
Leuchtstoffröhren
Befolgen Sie diese Anleitungen, wenn Sie T8 Leuchtstoffröhren
installieren
• Diese Einheit ist ausschließlich für den Gebrauch in
geschlossenen Räumen geeignet.
• Warnung: Trennen Sie diese Light Cycle Unit und alle anderen
elektrischen Einheiten, die in dem Terrarium, Paludarium oder
Aquarterrarium in Gebrauch sind, vom Stromnetz, bevor Sie
Ihre Hände ins Wasser tauchen und/oder bevor Sie
Wartungsvorgänge durchführen..
• Warnung: Achten Sie immer darauf, dass die Light Cycle Unit
vom Stromnetz getrennt ist, wenn die Exo Terra® Light Cycle
Unit, die Leuchtstoffröhren oder andere Geräte installieren,
entfernen, gewechselt oder gewartet werden.
Page 21

1. In dem Gehäuse der Light Cycle Unit befindet sich ein Schlitz,
damit man die Einheit sicher mit einer Schraube aufhängen
Hitze entweichen kann. Blockieren Sie diese Lüftungsschlitze
nicht und achten Sie darauf, dass Staub oder Schmutz immer
umgehend entfernt werden.
2. Um eine Leuchtstoffröhre mit dem korrekten Durchmesser
und der korrekten Wattzahl zu installieren, montieren Sie die
Röhre in den Endkappen, sodass die Anschlussstifte in die
inneren elektrischen Anschlüsse passen. Drücken Sie die
Röhre in die Endkappen, um eine ordnungsgemäße Verbindung
sicherzustellen.
3. Wenn die Leuchtstoffröhren in die Endkappen gesteckt wurden,
positionieren Sie die Röhren auf der Netzgitterabdeckung aus
Metall auf dem Terrarium (nicht über Glas, da UVB-Strahlen
nicht durch Glas dringen können). Achten Sie darauf, dass
die Oberfläche der Netzgitterabdeckung glatt und gerade ist,
sodass die Leuchtstoffröhren nicht herunterrollen können.
Achten Sie darauf, dass die Leuchtstoffröhren über der oberen
Netzgitterabdeckung des Terrariums positioniert sind und
NICHT über Glas, irgendwelchen Plastikteilen oder anderen
leicht entzündlichen Materialien. Bei Nichtbeachtung besteht
Feuergefahr.
4. Für Kinder unzugänglich in Betrieb nehmen und aufbewahren.
Halten Sie das Gerät außerhalb der Reichweite von Vorhängen
und anderen leicht entzündlichen Objekten.
Exo Terra® Light Cycle Unit Montageanleitungen Leuchtstoffröhren. T8/T10 Leuchtstoffröhren – Nordamerikanischer Markt
Befolgen Sie diese Anleitungen, wenn Sie T8 / T10
Leuchtstoffröhren installieren.
• Diese Einheit ist ausschließlich für den Gebrauch in
geschlossenen Räumen geeignet.
• Warnung: Trennen Sie diese Light Cycle Unit und alle anderen
elektrischen Einheiten, die in dem Terrarium, Paludarium oder
Aquarterrarium in Gebrauch sind, vom Stromnetz, bevor Sie
Ihre Hände ins Wasser tauchen und/oder bevor Sie
Wartungsvorgänge durchführen.
kann. Das
Gehäuse der
Light Cycle Unit
sollte an einer
gut gelüfteten
Stelle, entfernt
von Feuchtigkeit,
Nässe, leicht
entzündbaren
Objekten
und nicht auf
zerbrechlichen
Flächen
positioniert
werden. In dem
Gehäuse der
Light Cycle Unit
befinden sich
Lüftungsschlitze,
aus denen die
ENGLISHFRANÇAISDEUTSCHESPAÑOLITALIANONEDERLANDS
Page 22

• Warnung: Achten Sie immer darauf, dass die Light Cycle Unit
vom Stromnetz getrennt ist, wenn die Exo Terra® Light Cycle
Unit, die Leuchtstoffröhren oder andere Geräte installieren,
entfernen, gewechselt oder gewartet werden.
1. In dem Gehäuse der Light Cycle Unit befindet sich ein Schlitz,
damit man die Einheit sicher mit einer Schraube aufhängen
Hitze entweichen kann. Blockieren Sie diese Lüftungsschlitze
nicht und achten Sie darauf, dass Staub oder Schmutz immer
umgehend entfernt werden.
22
2. Um eine Leuchtstoffröhre mit dem korrekten Durchmesser und
der korrekten Wattzahl zu installieren, müssen Sie zuerst den
Durchmesser der Röhre festlegen, die Sie installieren möchten
(T8 oder T10). Für die T8 Röhren sind zu diesem Zweck Adapter
im Lieferumfang enthalten. Die Adapter sollten in die Endkappen
gesteckt werden, bevor die Röhren installiert werden.
Die T10 Röhren passen direkt in die mitgelieferten Endkappen.
kann. Das
Gehäuse der
Light Cycle Unit
sollte an einer
gut gelüfteten
Stelle, entfernt
von Feuchtigkeit,
Nässe, leicht
entzündbaren
Objekten
und nicht auf
zerbrechlichen
Flächen
positioniert
werden. In dem
Gehäuse der
Light Cycle Unit
befinden sich
Lüftungsschlitze,
aus denen die
Hinweis: Aus Sicherheitsgründen ist es empfehlenswert
entweder zwei T8 oder zwei T10 Röhren zu installieren.
Installieren Sie nie eine Kombination aus einer T8 und einer
T10 Röhre.
3. Montieren Sie die Röhre in den Endkappen, sodass die
Anschlussstifte in die inneren elektrischen Anschlüsse
passen. Drücken Sie die Röhre in die Endkappen, um eine
ordnungsgemäße Verbindung sicherzustellen.
Page 23

4. Wenn die Leuchtstoffröhren in die Endkappen gesteckt wurden,
START
TEST
POWER CYCLE 10Hrs 12Hrs 14Hrs
TEST
positionieren Sie die Röhren auf der Netzgitterabdeckung aus
Metall auf dem Terrarium (nicht über Glas, da UVB-Strahlen
nicht durch Glas dringen können). Achten Sie darauf, dass
die Oberfläche der Netzgitterabdeckung glatt und gerade ist,
sodass die Leuchtstoffröhren nicht herunterrollen können.
Achten Sie darauf, dass die Leuchtstoffröhren über der oberen
Netzgitterabdeckung des Terrariums positioniert sind und NICHT
über Glas, irgendwelchen Plastikteilen oder anderen leicht
entzündlichen Materialien. Bei Nichtbeachtung
besteht Feuergefahr.
5. Für Kinder unzugänglich in Betrieb nehmen und aufbewahren.
Halten Sie das Gerät außerhalb der Reichweite von Vorhängen
und anderen leicht entzündlichen Objekten.
Einstellung des Timers:
1. Überprüfen Sie, ob die Einheit angestellt ist.
2. Zur Überprüfung ob die Einheit ordnungsgemäß funktioniert,
stellen Sie die Anzeige auf „CYCLE TEST“ und drücken „START
TEST“. So kann die Einheit das System automatisch selbst
überprüfen. Während dieses Tests (der ca. 1 Minute dauert) wird
die Anzeige für das Nacht/Tag-Licht leuchten.
3. Wenn der Test abgeschlossen ist, wählen Sie die gewünschte
Lichtperiode (10, 12 oder 14 Stunden) aus, indem Sie den
Schalter auf die gewünschte Anzeige schieben. Beispiel: Wenn
„10 Stunden“ gewählt wird, wird das Licht für 10 Stunden an
sein etc.
Hinweis: Der eingebaute Timer ist so programmiert, dass er
den Tagzyklus jeden Tag zur selben Zeit beginnt. Wenn die
Einheit zum Beispiel am ersten Tag des Betriebes um 9.00 Uhr
eingestellt wird, stellt sie sich auch an den folgenden Tagen
um 9.00 Uhr an. Dies geschieht solange, bis der Stromkreis
unterbrochen wird (Einheit wird an/ausgeschaltet, Stromausfall
usw.). Wenn der Stromkreis wieder geschlossen wird, passt sich
der Timer automatisch an und der Zyklus wird mit der Zeit, zu
der die Einheit wieder mit Strom versorgt wurde, neu aktiviert.
Um die Startzeit des Tagzykluses am Timer zu verändern,
müssen Sie die Einheit einfach nur ausstellen und sie dann zu
der Zeit wieder anstellen, zu der Sie den Tagzyklus jeden Tag
beginnen lassen wollen.
Wartung:
Warnung:
• Trennen Sie diese Light Cycle Unit und alle anderen
elektrischen Einheiten, die in dem Terrarium, Paludarium oder
Aquarterrarium in Gebrauch sind, vom Stromnetz, bevor Sie
Ihre Hände ins Wasser tauchen und/oder bevor Sie
Wartungsvorgänge durchführen.
ENGLISHFRANÇAISDEUTSCHESPAÑOLITALIANONEDERLANDS
Page 24

• Achten Sie immer darauf, dass die Light Cycle Unit vom
Stromnetz getrennt ist, wenn die Exo Terra® Light Cycle
Unit, die Leuchtstoffröhren oder andere Geräte installieren,
entfernen, gewechselt oder gewartet werden
• Die Netzschnur dieses Gerätes kann nicht ausgewechselt
werden; wenn eine Schnur beschädigt ist, sollte das Gerät
weggeworfen werden.
Reinigung der Einheit:
1. Installieren Sie die Light Cycle Unit nicht in der Nähe von
Filterauslassen oder dort, wo sie Wasserspritzern oder
Feuchtigkeit ausgesetzt sein könnte. Tauchen Sie die Einheit nie
in Wasser.
2. Stellen Sie sicher, dass die Belüftungsschlitze nicht blockiert
werden und frei von Staub oder Schmutz sind. Wischen Sie
jeglichen Schmutz mit einem Lappen ab, der die Schlitze
blockieren könnte.
3. Für die Exo Terra® Light Cycle Unit ist keine besondere
Wartung notwendig; sie muss nur regelmäßig mit einem Lappen
abgewischt werden (benutzen Sie niemals aggressive chemische
Produkte oder Reinigungsmittel). Um kalkhaltige Ablagerungen
(Anschlussdose der Leuchtstoffröhre) zu entfernen, ist es
empfehlenswert, eine milde Säure, z.B. Essig, zu benutzen und
diese dann gründlich mit einem feuchten Lappen abzuwischen,
damit keine Rückstände zurückbleiben.
4. Es wird dringend empfohlen, immer alle Vorsichtsmaßnahmen
und –Vorgehensweisen zu befolgen, die sowohl in den
24
WICHTIGEN SICHERHEITSHINWEISEN als auch in den
MONTAGEANLEITUNGEN hervorgehoben werden.
GARANTIE
Dieses Produkt hat eine uneingeschränkte Garantie auf Mängel
in Material und Verarbeitung für die Dauer von zwei Jahren ab
Kaufdatum. Diese Garantie gilt nur mit Kaufbeleg. Diese Garantie
ist begrenzt auf Reparatur oder Ersatz und schließt Schäden an
Personen oder Gegenständen, die durch Berührung mit der Light
Cycle Unit entstehen, aus. Ausgeschlossen sind außerdem alle
Schäden, die durch unsachgemäße Verwendung oder Missbrauch
des Vorschaltgerätes verursacht werden. Für Garantieleistung oder
Ersatzteile werden Sie sich bitte an Ihren örtlichen Zoofachhändler
oder schreiben Sie an den Vertreter in Ihrem Land.
Kundendienst
Falls dieses Produkt fehlerhaft sein sollte, geben Sie es zusammen
mit dem Kaufnachweis entweder an Ihren örtlichen Zoofachhändler
oder senden Sie es mit im Voraus bezahlten Versandkosten an:
HAGEN Deutschland GmbH & Co. KG
Lehmweg 99-105, D-25488 Holm
Vertrieb durch:
Deutschland: HAGEN Deutschland GmbH & Co. KG, 25488 Holm
Page 25

EQUIPO DE ILUMINACION
Manual de
instrucciones
Lampara electrónica
controladora para terrarios
• Para 2 lámparas fluorescentes
• Es ideal para usar en conjunto con Exo Terra
Repti Glo y otras lámparas fluorescentes.
• Más eficiente que los balastos
convencionales u otros artefactos eléctricos.
• Sin parpadeos; es menos estresante para los
reptiles y anfibios.
• Guías amplias en extremos
• Tubos fluorescentes tenues
(para efecto amanecer y atardecer)
• Temporizador incorporado
• Interruptor de encendido/apagado (A)
DISPONIBLE EN 3 TAMAÑOS:
PT-2235 (max. 20 Watt)
PT-2237 (max. 30 Watt)
PT-2239 (max. 40 Watt)
INSTRUCCIONES REFERENTES A RIESGO DE INCENDIO, SHOCK
ELÉCTRICO O DAÑOS A PERSONAS
IMPORTANTES INSTRUCCIONES DE SEgURIDAD
PRECAUCIÓN: Para evitar lesiones, deben tomarse en cuentas
medidas de seguridad al momento de manipular el Equipo de
Iluminación de Exo Terra, lo cual incluye lo siguiente:
1. LEA Y SIGA LAS INSTRUCCIONES DE SEGURIDAD
y todas las indicaciones importantes en relación al aparato antes
de usar. Una falla podría dañar el equipo.
2. PRECAUCION: Este aparato NO es impermeable y DEBE evitarse
el contacto con el agua
3. PELIGRO: Pata evitar un choque eléctrico, se deber ser muy
cuidadoso. En las situaciones siguientes, no intente reparar el
equipo usted mismo; devuelva el equipo a un servicio autorizado
o deshágase del aparato.
A. Si el equipo cae en el agua, NO trate de sacarlo! Primero des conéctelo y luego sáquelo. Si los componentes eléctricos del
ENGLISHFRANÇAISDEUTSCHESPAÑOLITALIANONEDERLANDS
Page 26

equipo se llegan a mojar, desconecte el equipo de inmediato.
B. Revise Cuidadosamente el equipo después de instalar.
No deberá conectarse si hay agua en sus componentes.
C. No opere ningún aparato si tiene dañado el cable de conexión
o el enchufe, si está funcionando mal, o si se ha caído o
dañado de cualquier otra forma. El cable de corriente no
puede ser reemplazado; si el cable está dañado, el aparato
deberá desecharse. Nunca corte el cable.
D. Para evitar la posibilidad que el enchufe del equipo o tomas
electricas entren en contacto con el agua, colocar el equipo
a un lado del toma corriente para prevenir agua por goteo
través del cable entre
26
eléctrica al aparato, luego desconéctelo y revíselo para
confirmar la presencia de agua en la toma de corriente.
4. Para reducir el riesgo de daño, se requiere de supervisión
cuando el equipo es usado por niños.
5. Para evitar heridas, no toque las partes calientes.
6. Siempre desconecte el aparato cuando no esté en uso, antes de
colocar o quitar alguno de sus componentes y antes de limpiarlo.
Nunca hale el cable para desconectarlo de la toma de corriente.
7. Use este equipo sólo para lo que está destinado. El uso de
accesorios no recomendados o vendidos por el fabricante del
aparato podría causar una condición insegura.
8. No instale o coloque el equipo donde pueda quedar expuesto al
clima o a temperaturas muy bajas.
9. No instale la unidad de luz cerca de las salidas de los filtros
o exponerla a la humedad. No la sumerja en el agua. Asegure
suficiente espacio libre cerca de las rejillas de ventilación. La
seguridad de este equipo está garantizada siempre y cuando los
bombillos, adaptadores y unidades de luz estén correctamente
instalados.
10. Si se requiere de un cable de extensión, deberá emplearse
uno del tipo adecuado. Si se emplea una extensión con mejor
amperaje o voltaje que el del equipo, éste podría recalentarse.
Deberá tenerse cuidado al acomodar el cable de forma tal que
no pueda ser tropezado o halado.
entre en enchufes o
toma corrientes. Un
drip-loop deberá
emplearse. Un “driploop” es la parte del
cable que está entre
el aparato y la toma
de corriente, o del
conector si se emplea
una extensión; esto
para evitar que el
agua que se mueve a
en contacto con la
toma de corriente o
con el equipo.
Si el enchufe llegase
a mojarse, NO
desconecte el cable.
Desconecte el fusible
o el breaker que
suministra energía
Page 27

11. PRECAUCION: Sólo para el mercado Norteamericano: Este
equipo tiene un cable polarizado (el enchufe tiene una hoja más
ancha que la otra). Como medida de seguridad, este enchufe
podrá sólo entrar en una toma de corriente polarizada. Si el
enchufe no encaja en la toma de corriente, conéctelo a la
inversa. Si aún persiste el problema, contacte a un electricista
calificado. Nunca lo use como un cable de extensión a menos
que el enchufe pueda insertarse completamente. No pase por
alto esta medida de seguridad.
GUARDE ESTAS NORMAS DE SEGURIDAD PARA FUTURAS
REFERENCIAS
Solo siguiendo al pie de la letra los pasos de instalación, y las pautas
de mantenimiento y electricidad asegurarán el seguro y eficiente
uso de este equipo.
La Unidad de Ciclo de Luces Exo Terra es un balastro electrónico,
un temporizador y un simulator amanecer - atardecer en uno.
El temporizador puede ser programado para tres períodos de
iluminación - 10, 12 o 14 horas para simular varios ciclos de luz
según las estaciones como en la naturaleza. Cuando el ciclo de luz
diurna es activado, este toma aproximadamente 30 minutos para
que la potencia de luz del bombillo alcance un 100% - simulando
un amanecer natural. Al final de cada ciclo de luz diurna, este
toma aproximadamente 30 minutos para que la potencia de luz del
bombillo vaya de 100% a 0% - simulando un atardecer natural. Esto
es menos estresante para los animales, así dandole a ellos el tiempo
para retirarse a sus madrigueras y estimulando el comportamiento
natural de reproducción en muchas especies de reptiles.
Instrucciones de Instalación de la Unidad de Ciclo de Luces de
Exo Terra- solo bombillos T8 - Mercado Europeo/CE
Recomendados: Para usar solamente con bombillos
fluorescentes T8 (25 mm / 1” de diámetro)
Siga las siguientes instrucciones siempre que instale bombillos
fluorescentes T8.
• Este equipo es para usar
• Precaución: Desconecte el cable de la unidad de iluminación
y cualquier otro equipo usado para terrarios, paludarios o
acua-terrarios antes de introducir las manos en el agua y/o
llevar a cabo algún tipo de mantenimiento.
• Precaución: Siempre que instale, quite o cambie tubos
fluorescentes o realice mantenimiento, instale o quite la
Unidad de Iluminación de Exo Terra o cualquier otro equipo,
siempre asegúrese de que esté desconectado.
1. La Unidad de Iluminación posee una ranura para suspenderla
en un tornillo. Ésta debe ser colocada en un área ventilada, lejos
de la humedad, de objetos inflamables y superficies frágiles. La
Unidad de Iluminación está equipada con ranuras de ventilación
UNICAMENTE DENTRO DE LA CASA.
ENGLISHFRANÇAISDEUTSCHESPAÑOLITALIANONEDERLANDS
Page 28

para permitir la
salida del calor;
no obstruya
estas rejillas y
asegúrese de
eliminar cualquier
residuo de polvo o
escombros.
2.
Instale bombillos
fluorescentes
del diámetro y
vatiaje correctos
insertando el
bombillo en uno
de los extremos
de forma tal que
alineadas con las tomas eléctricas internas. Empuje mientras
inserta el bombillo en uno de los extremos para asegurar una
buena conexión.
3. Una vez que se han insertado los bombillos, colóquelos en
la parte superior del terrario (no sobre el vidrio ya que la luz
ultravioleta no atraviesa el vidrio) Asegúrese de que la superficie
de la rejilla superior esté colocada horizontalmente de forma
que el bombilla no pueda rodar. Asegúrese de que los bombillos
estén colocados sobre la parte metálica de la rejilla del terrario
y NO sobre algún vidrio, partes plásticas u otro material
inflamable. De lo contrario, podría resultar en riesgo de incendio.
4. Mantenga la unidad fuera del alcance de los niños. Coloque la
28
unidad lejos de cortinas u otros objetos inflamables.
Instrucciones de Instalación de la Unidad de Ciclo de Luces de
Exo Terra- bombillos T8/T10 - Mercado Norte Americano
Recomendados: Para usar solamente con bombillos fluorescentes T8 (25 mm / 1” de diámetro) o T10 (32 mm /1 1/4” de
diámetro)
Siga las siguientes instrucciones siempre que instale bombillos
fluorescentes T8 / T10.
• This equipment is UNICAMENTE DENTRO DE LA CASA.
• Precaución: Desconecte el cable de la unidad de iluminación
y cualquier otro equipo usado para terrarios, paludarios o
acua-terrarios antes de introducir las manos en el agua y/o
llevar a cabo algún tipo de mantenimiento.
• Precaución: Siempre que instale, quite o cambie tubos
fluorescentes o realice mantenimiento, instale o quite la
Unidad de Iluminación de Exo Terra o cualquier otro equipo,
siempre asegúrese de que esté desconectado.
1. La Unidad de Iluminación posee una ranura para suspenderla
en un tornillo. Ésta debe ser colocada en un área ventilada, lejos
de la humedad, de objetos inflamables y superficies frágiles. La
Unidad de Iluminación está equipada con ranuras de ventilación
para permitir la salida del calor; no obstruya estas rejillas y
las clavijas queden
Page 29

asegúrese de
eliminar cualquier
residuo de polvo o
escombros.
2.
Para instalar tubos
fluorescentes del
diámetro y vataje
correctos, primero
determine cuál
es el diámetro del
tubo que desea
instalar (T8 o
T10). Para tubos
T8, se suministran
adaptadores
para tal fin. Los
adaptadores
en los extremos del tubo antes de instalarlos. Los tubos T10
encajan directamente.
Nota: Por seguridad, se recomienda que se instalen 2 tubos T8 o
2 tubos T10.
3. Inserte los bombillos fluorescentes len uno de los extremos
de forma tal que las clavijas queden alineadas con las tomas
eléctricas internas. Empuje mientras inserta el bombillo en uno
de los extremos para asegurar una buena conexión.
4. Una vez que se han insertado los bombillos, colóquelos en
la parte superior del terrario (no sobre el vidrio ya que la luz
ultravioleta no atraviesa el vidrio) Asegúrese de que la superficie
de la rejilla superior esté colocada horizontalmente de forma que
el bombilla no pueda rodar. Asegúrese de que los bombillos esté
colocados sobre la parte metálica de la rejilla del terrario y NO
sobre algún vidrio, partes plásticas u otro material inflamable. De
lo contrario, podría resultar en riesgo de incendio
5. Mantenga la unidad fuera del alcance de los niños. Coloque la
unidad lejos de cortinas u otros objetos inflamables.
Ajuste del temporizador:
1. Asegurese quela unidad este encendida.
2. Para probar si la unidad funciona apropiadamente, mueva el
indicador de “CYCLE TEST” y presione el boton “START TEST”.
Esto permite que la unidad realice una verificación automática
interna de su sistema. Las luces indicadoras de noche/día se
iluminarán secuancialmente cuando la unidad realice la prueba
(el cual tomará alrededor de un minuto).
deben atornillarse
ENGLISHFRANÇAISDEUTSCHESPAÑOLITALIANONEDERLANDS
Page 30

3. Cuando la prueba es completada, seleccione el período de
START
TEST
POWER CYCLE 10Hrs 12Hrs 14Hrs
TEST
luz preferido (10, 12, o 14 horas) moviendo el interruptor al
indicador apropiado. (ejemplo: si “10 horas” es seleccionado,
esto significa que la luz estará encendida por 10 horas, etc.).
Nota: El temporadizador incorporado esta engranado para
comenzar activar el ciclo de luz a la misma hora cada día. Por
ejemplo, si la unidad es encendida a las 9:00 am en el primer
día de operación, entonces este comenzará automáticamente
activar el ciclo de luz a la 9:00 am todos los días subsequentes.
Este continuará activando el ciclo diariamente a la misma
hora a menos que la corriente sea interumpida ( unidad es
desconectada, falla de corriente, etc.) Cuando la corriente es
restablecida, el temporadizador se ajustará automáticamente y
el ciclo se reactivará con base a la hora en que se restableció la
corriente. Para cambiar el comienzo del ciclo del temporadizador,
simplemente apague la unidad, luego regreselo al nuevo tiempo
que desea el ciclo de luz y empieze la activación.
Mantenimiento:
Precaución:
30
• Desconecte el cable de la unidad de iluminación y cualquier
otro equipo usado para terrarios, paludarios o acua-terrarios
antes de introducir las manos en el agua y/o llevar a cabo
algún tipo de mantenimiento.
• Siempre que instale, quite o cambie tubos fluorescentes o
realice mantenimiento, instale o quite la Unidad de Iluminación
de Exo Terra o cualquier otro equipo, siempre asegúrese de
que esté desconectado.
• Los cables de corriente de este sistema de iluminación no
pueden ser reemplazados. Si alguno de ellos se daña, toda la
unidad debe ser descartada.
Limpieza de la unidad:
1. No coloque el equipo cerca de la salida de los filtros o exponerlo
a la humedad o al agua. No lo sumerja en agua.
2. Asegúrese que las rejillas de ventilación estén libres y libres
de cualquier obstrucción, polvo o escombros. Use un trapo
para eliminar cualquier sucio que pueda obstruir las rejillas de
ventilación.
3. No se requiere de mantenimiento especial; solo una limpieza
periódica con un trapo (nunca use productos químicos
fuertes o detergentes) Para eliminar los depósitos calcáreos,
se recomienda usar un ácido suave, como el vinagre, y
posteriormente limpiar profundamente con un paño húmedo
para eliminar cualquier residuos.
Page 31

4. Se recomienda encarecidamente acatar todas las precauciones y
procedimientos esbozados tanto en la parte de Seguridad como
de Instalación.
GARANTIA:
Este producto está garantizado por defectos del material o mano
de obra por un período de 2 años a partir de la fecha de compra.
La garantía es válida sólo con la prueba de la compra. La garantía
está limitada a reparar o reemplazar la unidad únicamente y no
cubre pérdida o daño consecuente de o por objetos animados o
inanimados. Esta garantía es válida sólo bajo condiciones normales
de operabilidad para lo cual está destinado el equipo. Ésta excluye
cualquier daño causado por uso irracional, instalación inapropiada,
negligencia, forzamiento o abuso de la unidad. Para servicio de
garantía o repuestos, contacte a su comerciante preferido o escriba
al representante en su país. Esta garantía no afecta sus derechos
legales.
SERVICIO:
Si tiene algún problema o duda respecto a la operación de este
producto, por favor, permítanos ayudarle antes que devuelva el
producto a su proveedor. La mayoría de los problemas pueden
manejarse prontamente mediante una llamada telefónica. Cuando
usted llame (envíe un e-mail o nos escriba), por favor, tenga a
mano toda la información relevante, como el número del modelo y/o
número de los componentes, así como también la naturaleza del
problema. Llame a nuestro Departamento de Atención al Cliente:
En Canadá:
Número de Teléfono Gratuito 1-800-555HAGEN (1-800-554-2436)
Entre 9:00 am y 4:30 pm (Hora del Este)
En Estados Unidos:
Número de Teléfono Gratuito 1-800-724-2436
Entre 9:00 am y 4:00 pm (Hora del Este)
En Reino Unido:
Ayuda Telefónica 01977 55662
Entre 9:00 am y 5:00 pm
Para Servicio de Reparación Autorizado:
Devuelva la unidad con el recibo y el motivo de devolución a:
Canada:
Hagen Industries, 3235 Guenette, Montreal, QC H4S 1N2
Rolf C. Hagen Inc., 8770-24th Street, Edmonton AB T6P 1X8
Estados Unidos.:
Rolf C. Hagen (U.S.A.) Corp.
50 Hampden Road, Mansfield, MA. 02048-9107
Reino Unido:
Rolf C. Hagen (UK) Ltd.
California Dr. Whitwood Industrial Estate
Castleford, West Yorkshire WF10 5QH
Para información general sobre todos nuestros productos,
visite nuestro sitio Web: www.exo-terra.com o www.hagen.com.
Distribuido por:
Canada: Rolf C. Hagen Inc., Montreal, QC H9X 0A2
Estados Unidos: Rolf C. Hagen (U.S.A.) Corp., Mansfield MA. 02048
Reino Unido:
España:
Rolf C. Hagen (U.K.) Ltd. Castleford, W. Yorkshire WF10 5QH
Rolf C. Hagen ( España) Avda. de Beniparrel, 11 y 13 – Silla Valencia
ENGLISHFRANÇAISDEUTSCHESPAÑOLITALIANONEDERLANDS
Page 32

LIGHT CYCLE UNIT
Manuale
d’istruzioni
Controllo Elettronico di
Lampada giorno-notte
• Per due neon
• Ideale per l’Exo Terra Repti Glo e altre
lampade a fluorescenza
• Più energia rispetto agli alimentatori
convenzionali o altre lampade fluorescenti
• Nessun tremolio di luce; meno stress per
rettili e anfibi
• Terminali lunghi
• Lampade tenui fluorescenti
(effetto alba - tramonto)
32
• Timer interno
• Non necessita starter (A)
DISPONIBILE IN 3 FORMATI:
PT-2235 (max. 20 Watt)
PT-2237 (max. 30 Watt
PT-2239 (max. 40 Watt
ISTRUZIONI RELATIVE A RISCHIO DI INCENDIO, SCOSSE
ELETTRICHE, O DANNI ALLE PERSONE
IMPORTANTI ISTRUZIONI DI SICUREZZA
ATTENZIONE: Per un corretto utilizzo dell’Exo Terra® Light, è
necessario osservare delle precauzioni di sicurezza basilari, incluse
le seguenti.
1. LEGGERE E SEGUIRE TUTTE LE ISTRUZIONI DI
SICUREZZA e tutte le avvertenze relative all’unità prima
del suo utilizzo. La non osservanza di tali istruzioni potrebbe
provocare danni all’unità.
2. ATTENZIONE: Quest’apparecchio NON è impermeabile e DEVE
essere protetto dal contatto con l’acqua.
3. PERICOLO – Per evitare possibili scosse elettriche, bisogna
osservare delle precauzioni particolari. Per ognuna delle situazioni seguenti, non tentare di riparare l’unità da soli: rivolgersi ad
un servizio d’assistenza convenzionato oppure gettarla via.
)
)
Page 33

A. Se l’unità cade nell’acqua, NON tentare di raccoglierla senza
prima aver tolto la presa! Se i componenti elettrici si bagnano,
togliere la presa immediatamente.
B.
Esaminare attentamente l’unità dopo l’installazione. Essa non
deve essere collegata se i suoi componenti elettrici sono bagnati.
C. Non utilizzare l’unità con un cavo o una spina danneggiati,
se presenta anomalie di funzionamento o se è stata bagnata
o danneggiata. Il cavo di alimentazione di quest’unità non può
essere sostituito; se il cavo è danneggiato, non è più possibile
utilizzare l’unità. Non tagliare mai il cavo.
D. L’attacco elettrico deve essere sempre sopra il livello dell’
controllare la presenza di acqua nell’attacco.
4. Per ridurre il rischio di incidenti, è necessaria la massima
supervisione quando l’unità viene utilizzata da o in presenza di
un bambino.
5. Per evitare incidenti, non toccare le parti calde.
6. Togliere sempre la presa dalla corrente dopo aver utilizzato la
lampada, prima dell’inserimento o della sostituzione di eventuali
componenti, e prima della pulizia. Non tirare mai il cavo per
togliere la spina dalla corrente. Afferrare la spina e tirare.
7. Non utilizzare l’unità per un uso diverso da quello per cui è stata
concepita. L’utilizzo di parti non consigliate o non vendute dal
fabbricante dell’unità potrebbe causare situazioni a rischio.
8. Non installare o conservare l’unità in luoghi esposti alle
intemperie o a temperature troppo basse.
9. Non installare l’unità vicino alle bocche dei filtri e non esporla
vicino a spruzzi di acqua. Non immergerla nell’acqua. Assicurare
spazi d’aria sufficienti attorno agli sfiati di calore. La sicurezza di
quest’unità è garantita solo se le lampade, gli adattatori e l’unità
sono stati installati in modo corretto.
10. Nel caso fosse necessaria una prolunga, essa deve avere
un amperaggio appropriato, poiché una prolunga con meno
amperes o watts provocherebbe il surriscaldamento della
lampada. Riavvolgere i cavi in modo da non accavallarli o tirarli.
CONSERVARE QUESTE ISTRUZIONI PER EVENTUALI
CONSULTAZIONI FUTURE.
unità. Per evitare il
rischio che la spina o
l’attacco si bagnino,
si consiglia di utilizzare
un “drip loop”. Un
“drip-loop” è la parte
del cavo sotto il livello
dell’unità e della spina,
o del connettore se si
utilizza una prolunga,
che evita che l’acqua
entri nel cavo e
venga in contatto con
l’attacco o la lampada.
Se la spina o l’attacco
si bagnano, NON
scollegare la prolunga.
Disconnettere il fusibile
o l’interruttore che
alimentano l’unità,
poi scollegare e
ENGLISHFRANÇAISDEUTSCHESPAÑOLITALIANONEDERLANDS
Page 34

Solo l’attenta osservazione di queste istruzioni elettriche, di
installazione e manutenzione assicurano la sicurezza e l’efficienza
di quest’unità.
L’Exo Terra® Light Cycle Unit è composta da un regolatore di corrente
elettronico, un timer ed un simulatore alba-tramonto. Il timer può
essere impostato su tre diversi periodi di luce: 10, 12, o 14 ore
per simulare i vari cicli diurni stagionali presenti in natura. Quando
un ciclo diurno viene attivato, la luce impiega circa 30 minuti per
raggiungere il 100% di luminosità, il che simula un’alba naturale. Alla
fine di ogni ciclo diurno, la luce della lampada impiega circa 30 minuti
per passare dal 100% allo 0%, simulando un tramonto naturale.
Queto processo è meno stressante per gli animali poiché da’ loro
il tempo di ritirarsi nelle loro tane e permette inoltre di stimolare il
comportamento di accoppiamento in molte specie di rettili.
Istruzioni di Installazione Exo Terra® Light Cycle Unit –
Solo lampade T8 - Mercato Europeo/CE
Raccomandato: Per uso con T8 (25 mm / 1” diametro), Lampade
fluorescenti.
Seguire le seguenti istruzioni per installare neon T8.
• SOLO PER USO INTERNO.
• Attenzione: Scollegare la spina dell’unità di luce, o qualsiasi
altro dispositivo elettrico utilizzato per terrario, paludario o
acqua-terrario, prima di immergere le mani in acqua e/o
iniziare una manutenzione di qualsiasi tipo.
• Attenzione: Quando si installano, rimuovono o sostituiscono
34
i neon, l’Exo Terra® Light Cycle Unit o qualsiasi altro
accessorio, assicurarsi sempre che il dispositivo sia scollegato.
1. Il portalampada deve essere posizionato in una zona ventilata,
lontano dall’umidità, da oggetti infiammabili e superfici fragili. Il
la lampada nell’alloggio in modo che il piedino terminale sia
allineato con il portalampada. Spingere mentre si inserisce la
lampadina nel portalampada per assicurare la connessione.
3. Una volta inserite le lampadine, posizionarle al di sopra dello
schermo metallico del terrario (non sopra il vetro poiché i raggi
portalampada è
provvisto di fori
di ventilazione
per permettere
al calore di
fuoriuscire; non
ostruire questi
fori e rimuovere
eventuali depositi
di polvere o
detriti.
2.
Installare
lampade
fluorescenti
del diametro e
del wattaggio
corretti inserendo
Page 35

UV non passano attraverso il vetro.) Assicurarsi che la superficie
dello schermo sia piana ed uniforme. Posizionare le lampade
sopra lo schermo in metallo e NON sopra materiali di vetro,
plastica, o altri materiali infiammabili. Il mancato rispetto di tale
precauzione potrebbe provocare un possibile rischio di incendio.
4. Tenere l’unità fuori dalla portata dei bambini. Mantenere l’unità
lontano da tende o oggetti infiammabili.
Istruzioni di Installazione Exo Terra® Light Cycle Unit –
Lampade T8/T10 – Mercato Nord Americano
Raccomandato: Per uso con T8 (25 mm / 1” diametro) o T10
(32 mm / 1 1/4” diametro), Lampade fluorescenti.
Seguire le seguenti istruzioni per installare neon T8 / T10.
• SOLO PER USO INTERNO.
• Attenzione: Scollegare la spina dell’unità di luce, o qualsiasi
altro dispositivo elettrico utilizzato per terrario, paludario o
acqua-terrario, prima di immergere le mani in acqua e/o
iniziare una manutenzione di qualsiasi tipo.
• Attenzione: Quando si installano, rimuovono o sostituiscono
i neon, l’Exo Terra® Light Cycle Unit o qualsiasi altro
accessorio,
assicurarsi sempre che il dispositivo sia scollegato.
1. Il portalampada deve essere posizionato in una zona ventilata,
lontano dall’umidità, da oggetti infiammabili e superfici fragili. Il
quale diametro si intende installare (T8 o T10). Per lampade T8,
esistono degli appositi adattatori. Gli adattatori vanno avvitati
prima di installare la lampadina. Le lampade T10 si inseriscono
direttamente nei portalampade.
N.B: Per motivi di sicurezza si consiglia di installare due T8
oppure due T10. Non installare mai una combinazione di T8 e
T10 contemporaneamente.
3. Inserire la lampada nel portalampada in modo che il piedino
terminale sia allineato. Spingere mentre si inserisce la lampadina
nel portalampada per assicurare la connessione.
portalampada è
provvisto di fori
di ventilazione
per permettere
al calore di
fuoriuscire; non
ostruire questi
fori e rimuovere
eventuali
depositi di
polvere o detriti.
2.
Per installare
le lampade
fluorescenti
con il diametro
e il wattaggio
corretti,
prima di tutto
determinare
ENGLISHFRANÇAISDEUTSCHESPAÑOLITALIANONEDERLANDS
Page 36

4. Una volta inserite le lampadine, posizionarle al di sopra dello
START
TEST
POWER CYCLE 10Hrs 12Hrs 14Hrs
TEST
schermo metallico del terrario (non sopra il vetro poiché i raggi
UV non passano attraverso il vetro.) Assicurarsi che la superficie
dello schermo sia piana ed uniforme. Posizionare le lampade
sopra lo schermo in metallo e NON sopra materiali di vetro,
plastica, o altri materiali infiammabili. Il mancato rispetto di tale
precauzione potrebbe provocare un possibile rischio di incendio.
5. Tenere l’unità fuori dalla portata dei bambini. Mantenere l’unità
lontano da tende o oggetti infiammabili.
Impostazione del timer:
1. Assicurarsi che l’unità sia accesa.
2. Per verificare che l’unità stia funzionando correttamente,
spostare l’indicatore su “CYCLE TEST ” e premere il tasto “START
TEST”. Ciò permette all’unità di efettuare un controllo interno
automatico del sistema. In fase di test, gli indicatori giorno/notte
36
si illumineranno alternativamente (il che dura almeno un minuto).
3. Quando il test è completato, selezionare il periodo di luce
desiderato (10, 12, o 14 ore) muovendo l’interruttore
sull’indicatore appropriatoro. (esempio: se si seleziona “10 ore”,
la luce resterà accesa per 10 ore, ecc).
Nota: il timer è impostato per attivare il ciclo di luce alla
stessa ora ogni giorno. Ad esempio, se l’unità si accende
alle 9 del primo giorno dell’operazione, essa si accenderà
automaticamente alla stessa ora nei giorni successivi. Il ciclo
diurno inizierà sempre alla stessa ora a meno che non venga a
mancare la corrente. (se l’unità viene spenta, se va via la luce,
etc). Quando la corrente torna, il timer ricomincerà il ciclo. Per
modificare l’ora d’inizio del ciclo, spegnere l’unità e riaccenderla
nuovamente all’ora desiderata.
Page 37

Manutenzione:
Attenzione:
• Togliere la presa dell’unità o di altri dispositivi elettrici utilizzati
nel terrario, paludario o acqua-terrario prima di immergere le
mani nell’acqua e/o iniziare una manutenzione di
qualsiasi tipo.
• Durante l’installazione, la rimozione o la sostituzione di neon o
di Exo Terra® Light Cycle Unit o qualsiasi altro dispositivo,
assicurarsi che la spina sia disinserita..
• I cavi elettrici di questo sistema d’illuminazione non possono
essere sostituiti. Se sono danneggiati, l’intera unità deve
essere gettata.
Pulizia dell’Unità:
1. Non posizionare la lampada vicino ai filtri e non esporla vicino a
spruzzi d’acqua o umidità. Non immergere in acqua.
2. Assicurarsi che le ventole siano libere e pulirle da ogni deposito
di polvere o detriti. Utilizzare un panno per asportare i detriti che
potrebbero ostruire le ventole.
3. L’Exo Terra® Light Cycle Unit non necessita manutenzioni
particolari, all’infuori di tale pulizia periodica con un panno
(non utilizzare mai prodotti chimici o detergenti abrasivi). Per
rimuovere i depositi di calcare, si raccomanda di utilizzare un
acido dolce come l’aceto e un panno morbido.
4. Si consiglia vivamente di osservare tutte le precauzioni e
le procedure descritte nelle sezioni Istruzioni di Sicurezza e
Istruzioni di Installazione.
GARANZIA
Questo prodotto è garantito per i difetti di materiale o fabbricazione
per un periodo di 2 anni dalla data di acquisto. La garanzia è valida
solo dietro presentazione di una prova d’acquisto. La garanzia è
limitata alla riparazione o sostituzione dell’unità e non copre danni a
persone, animali o oggetti. La garanzia è valida solo se l’unità è stata
utilizzata in modo appropriato. Essa esclude ogni danno causato da
un uso irragionevole, da un’installazione impropria, da negligenza,
o abuso dell’unità. Per servizi di garanzia o assistenza tecnica,
contattare il proprio rivenditore di animali domestici o scrivere al
rappresentante della propria città.
Servizio
In caso di problemi o domande sull’utilizzo di questo prodotto,
contattateci prima di rivolgervi al vostro rivenditore. La maggior
parte dei problemi può essere risolta con un colpo di telefono.
(Quando chiami (scrivi o invii un email), cerca di fornire tutte le
informazioni importanti, quali il numero del modello e/o i numeri
delle parti disponibili, così come la natura del problema. Chiama il
Nostro Servizio di Assistenza al Cliente:
ENGLISHFRANÇAISDEUTSCHESPAÑOLITALIANONEDERLANDS
Page 38

Per Centri di Assistenza Autorizzati:
Riconsegnare l’unità con lo scontrino specificando il motivo della
richiesta di assistenza:
Canada:
Rolf C. Hagen Inc.
3225 Sartelon St., Montreal Quebec H4R 1E8
U.S.A.:
Rolf C. Hagen (U.S.A.) Corp.
50 Hampden Road, Mansfield, MA. 02048-9107
U.K.:
Rolf C. Hagen (UK) Ltd.
California Dr. Whitwood Industrial Estate
Castleford, West Yorkshire WF10 5QH
Per informazioni generali sulla nostra gamma di prodotti, visita il
nostro sito al : www.exo-terra.com or www.hagen.com.
Distribuito da:
Canada: Rolf C. Hagen Inc., Montreal, QC H9X 0A2
U.S.A.: Rolf C. Hagen (U.S.A.) Corp., Mansfield MA. 02048
U.K.: Rolf C. Hagen (U.K.) Ltd. Castleford, W. Yorkshire WF10 5QH
38
Page 39

LIGHT CYCLE UNIT
Gebruiksaanwijzing
Electronische Terrarium
Lamp Controller
• Voor twee buislampen
• Ideaal voor de Exo Terra Repti Glo serie en
andere buislampen
• Gaat efficiënter met energie om dan
conventionele voorschakelapparatuur
• Knippert niet; minder stresserend voor
reptielen en amfibiën
• Lange bedrading
• Dimt buislampen (zonsopgang tot
zonsondergang effect)
• Ingebouwde timer
• Aan en uit schakelaar (A)
VERKRIJGBAAR IN 3 MATEN:
PT-2235 (max. 20 Watt)
PT-2237 (max. 30 Watt
PT-2239 (max. 40 Watt
LEES VOOR DE INSTALLATIE EN DE INBEDRIJFSTELLING AANDACHTIG DE INSTRUCTIES.
BELANgRIJKE VEILIghEIDSVOORSChRIFTEN
WAARSCHUWING: Om u te beschermen tegen verwondingen,
moeten minimale voorzorgsmaatregelen in acht worden genomen
bij het gebruik van de Exo Terra® Light Cycle Unit, met inbegrip van
het volgende.
1. LEES EN VOLG ALLE VEILIGHEIDSVOORSCHRIFTEN
en alle belangrijke aantekeningen op het toestel voor gebruik.
Als u nalaat dit te doen, kan dit resulteren in schade aan de
eenheid.
2. WAARSCHUWING: De Exo Terra® Light Cycle Unit is NIET
waterdicht en mag niet in contact komen met water.
3. GEVAAR – Om een electrische schok te vermijden dienen
bepaalde voorzorgen te worden genomen. Vermijd in één van de
volgen gevallen het toestel zelf te herstellen; stuur het toestel
terug naar de service-dienst.
)
)
ENGLISHFRANÇAISDEUTSCHESPAÑOLITALIANONEDERLANDS
Page 40

A. Valt het toestel in het water, probeer het niet te grijpen,
alvorens de stekker uit te trekken. Trek ook onmiddelijk de
stekker uit als één van de electronische onderdelen van het
toestel nat geworden zijn.
B. Onderzoek het toestel na installatie. Steek nooit de stekker in
als er nog water op één van de onderdelen zou zitten.
C. Sluit het toestel niet aan als één van de snoeren of de stekker
beschadigd zijn, of als het toestel zelf schade vertoont of
gevallen is. Het snoer kan niet vervangen worden: als
de stroomkabel beschadigd is mag je het toestel niet meer
gebruiken. Nooit de stroomkabel doorknippen.
D. Om te voorkomen dat het toestel of de electrische bedrading
nat worden, is het best het toestel aan de muur te bevestigen.
40
4. UIT DE BUURT VAN KINDEREN HOUDEN
5. Om ongevallen te vermijden, raak geen hete onderdelen aan
6. Trek steeds de stekker uit als het toestel niet in gebruik is, als je
het wil reinigen of als je een onderdeel wil vervangen. Nooit aan
het snoer trekken om het toestel uit het stopcontact te halen,
steeds met de stekker werken.
7. Gebruik dit toestel alleen voor het gestelde doel.
8. Zie dat het toestel nooit blootgesteld is aan vrieskou.
9. Installeer de Light Cycle Unit niet dichtbij filters of
waterverstuivers. Niet onder water dompelen. Voorzie genoeg
ruimte rondom de warme elementen. De veiligheid van dit
toestel is enkel gegarandeerd als het juist geïnstalleerd werd.
10. Als een verlengingssnoer noodzakelijk is, moet een snoer met
een aangepast toelaatbaar vermogen worden gebruikt. Een
snoer dat een vermogen toelaat voor minder ampère of watt
dan het vermogen van het toestel kan oververhitten. Let erop
dat het snoer zo bevestigd wordt, dat er niet kan worden over
gestruikeld of aan getrokken.
BEWAAR DEZE INSTRUCTIES.
Alleen de juiste installatie verzekerd de veiligheid van het toestel.
De Exo Terra® Light Cycle Unit is een electronische ballast,
een timer en een van zonsopgang tot zonsondergang simulator
tegelijk. De timer kan ingesteld worden voor drie verschillende
Als je een “druiplus”
gebruikt vermijd je
dat er water op het
toestel of de
stekker druppelt
langs het snoer. Een
“druiplus” is een lus
onder het toestel,
connector en de
stekker, zodanig
dat er geen water
langs het snoer kan
sijpelen om zo
in contact te komen
met elektrische
elementen. Als het
toestel of de stekker
toch nat wordt, trek
dan NIET de stekker
uit maar schakel
eerst de stroom uit.
Page 41

lichtperiodes --10, 12, of 14 uur om de vele seizoensgebonden
daglicht cycli van de natuur te simuleren. Als een daglicht cyclus is
geactiveerd, duurt het ongeveer 30 minuten om 100% daglicht te
verkrijgen -- natuurlijk ochtendlicht simulerend. Aan het eind van
de daglicht cyclus, duurt het ongeveer 30 minuten om van 100%
daglicht naar 0% te gaan -- natuurlijk avondlicht simulerend. Dit
is minder stresserend voor de dieren en het geeft hen tijd om naar
hun schuilplaats te gaan, het stimuleert zelfs het broedgedrag bij
vele reptielen.
Exo Terra® Light Cycle Unit Installatie Instructies - alleen T8
lampen - Europese/CE Markt
Aanbevolen: Voor gebruik enkel met T8 (25 mm / 1” diameter)
lampen.
Volg deze instructies als je T8 lampen wil installeren.
• Dit materiaal is voor gebruik BINNENSHUIS.
• Waarschuwing: Trek de stekker uit van deze Light Cycle
Unit, en elk ander electrisch apparaat, gebruikt voor terrarium,
paludarium of aqua-terrarium alvorens je handen in het water
te steken om één of andere onderhoudshandeling te doen.
• Waarschuwing: Bij het installeren, verwijderen of vervangen
van lampen, de Exo Terra® Light Cycle Unit of ander
materiaal, verzeker je er altijd van dat de stekker
uitgetrokken is.
1. The Light Cycle Unit housing provides a slot for suspending the
2. Installeer buislampen met de juiste diameter en wattage, de
lampen passen dan perfect in de pinnen van de einddoppen.
Voor een positieve connectie duw nog even op de einddoppen
wanneer je de lamp bevestigd.
3. Eens de lamp geïnstalleerd in de einddopen plaats je ze boven
op de metalen screen cover van het terrarium (niet boven glas
want glas laat geen UVB licht door). Verzeker je ervan dat de
screencover mooi vlak is zodanig dat de lampen niet kunnen
wegrollen. Verzeker je ervan dat de lampen NIET geïnstalleerd
zijn boven glas, plastic onderdelen, of andere brandbare
materialen. Dit nalaten zou brand kunnen veroorzaken.
housing on a
securely fastened
screw head. De
Light Cycle Unit
moet gebruikt
worden in een
goed verluchte
ruimte, weg van
vocht, brandbare
objecten
en fragiele
oppervlakken.
De Light Cycle
Unit is voorzien
van luchtgaten
zodanig dat
de hitte kan
ontsnappen, zorg
ervoor dat deze
vrij zijn.
ENGLISHFRANÇAISDEUTSCHESPAÑOLITALIANONEDERLANDS
Page 42

4. Buiten bereik van kinderen houden en buiten bereik van
gordijnen en andere brandbare objecten.
Exo Terra® Light Cycle Unit Installatie Instructies T8/T10 lampen - Noord Amerikaanse Markt
Aanbevolen: Voor gebruik met T8 (25 mm / 1” diameter) of
T10 (32 mm / 1 1/4” diameter) lampen.
Volg deze instructies als je T8 / T10 lampen wil installeren.
• Dit materiaal is voor gebruik BINNENSHUIS.
• Waarschuwing: Trek de stekker uit van deze Light Cycle
Unit, en elk ander electrisch apparaat, gebruikt voor terrarium,
paludarium of aqua-terrarium alvorens je handen in het water
te steken om één of andere onderhoudshandeling te doen.
• Waarschuwing: Bij het installeren, verwijderen of vervangen
van lampen, de Exo Terra® Light Cycle Unit of ander
materiaal, verzeker je er altijd van dat de stekker
uitgetrokken is.
1. The Light Cycle Unit housing provides a slot for suspending the
42
2. Installeer buislampen met de juiste diameter en wattage, kijk
eerst welke lamp diameter je wil installeren (T8 of T10). Voor T8
lampen zijn er adaptors voorzien. De adaptors moeten eerst in de
einddoppen geklikt worden vooraleer de lampen te bevestigen.
T10 lampen passen perfect in de pinnen van de einddoppen
geleverd bij deze Light Cycle Unit.
housing on a
securely fastened
screw head. De
Light Cycle Unit
moet gebruikt
worden in een
goed verluchte
ruimte, weg van
vocht, brandbare
objecten
en fragiele
oppervlakken.
De Light Cycle
Unit is voorzien
van luchtgaten
zodanig dat
de hitte kan
ontsnappen, zorg
ervoor dat deze
vrij zijn.
Page 43

Nota: Om veiligheidsredenen is het aanbevolen alleen T8 of T10
START
TEST
POWER CYCLE 10Hrs 12Hrs 14Hrs
TEST
lampen te gebruiken. Installeer geen combinatie van T8 en T10.
3. Voor een positieve connectie duw nog even op de einddoppen
wanneer je de lamp bevestigd.
4. Eens de lamp geïnstalleerd in de einddopen plaats je ze boven
op de metalen screen cover van het terrarium (niet boven glas
want glas laat geen UVB licht door). Verzeker je ervan dat de
screencover mooi vlak is zodanig dat de lampen niet kunnen
wegrollen. Verzeker je ervan dat de lampen NIET geïnstalleerd
zijn boven glas, plastic onderdelen, of andere brandbare
materialen. Dit nalaten zou brand kunnen veroorzaken.
5. Buiten bereik van kinderen houden en buiten bereik van
gordijnen en andere brandbare objecten.
Instellen van de timer:
1. Zet het toestel aan.
2. Om te testen of het toestel goed functionneert, zet de indicator
op “CYCLE TEST ” en duw de “START TEST” knop in. Op deze
manier wordt er automatische check-up gedaan. De nacht/dag
licht indicators zullen opflakkeren zolang de test bezig is (de test
duurt ongeveer 1 minuut).
3. Is de test afgelopen, selecteer dan de gewenste lichtperiode,
(10, 12, of 14 uur) door de knop te verschuiven. (bv: als “10
hours” geselecteerd is, wil dit zeggen dat het licht aan blijft voor
10 uur, enz).
Nota: de ingebouwde timer is zo ingesteld dat het daglicht
altijd op dezelfde moment van de dag wordt geactiveerd. Bij
voorbeeld, als hij ingesteld is op 9:00u op de eerste dag, zal
hij de volgende dagen ook om 9:00u geactiveerd worden.
Het toestel zal dus elke dag op dezelfde moment geactiveerd
worden behalve als de stroom onderbroken werd (toestel af en
aan gezet, enz). Als de stroom terug aangezet is, zal de timer
automatisch deze tijd nemen om het toestel te activeren. Om de
start van de timer te veranderen hoef je dus gewoon het toestel
uit te zetten en terug aan te zetten op het moment dat je wil dat
de timercyclus begint.
Onderhoud:
Waarschuwing:
• Trek de stekker uit van deze Light Cycle Unit, en elk
ander electrisch apparaat, gebruikt voor terrarium, paludarium
of aqua-terrarium alvorens je handen in het water te steken
om één of andere onderhoudshandeling te doen.
• Bij het installeren, verwijderen of vervangen
van lampen, de Exo Terra® Light Cycle Unit of ander
materiaal, verzeker je er altijd van dat de stekker
uitgetrokken is.
ENGLISHFRANÇAISDEUTSCHESPAÑOLITALIANONEDERLANDS
Page 44

• De electrische bedrading van dit toestel kan niet vervangen
worden. Als één van de snoeren beschadigd is, mag je het
toestel niet meer gebruiken
Cleaning the Unit:
1. Installeer de Light Cycle Unit niet dichtbij filters of
waterverstuivers. Niet onder water dompelen.
2. De Light Cycle Unit is voorzien van luchtgaten zodanig dat de
hitte kan ontsnappen, zorg ervoor dat deze vrij zijn.
3. Er zijn geen speciale onderhoudsproducten nodig voor de Exo
Terra® Light Cycle Unit, regelmatig reinigen met een doek
is voldoende (nooit chemische producten of detergenten
gebruiken). Om kalkaanslag (op de lamphouders) te verwijderen,
gebruik je best een mild zuur zoals azijn, vervolgens met een
vochtige doek de restanten verwijderen.
4. Het is aanbevolen de waarschuwingen en instructies hier
beschreven op te volgen.
GUARANTEE
Deze garantie is beperkt tot louter de Light Cycle Unit. De Light
Cycle Unit is onvoorwaardelijk onder garantie voor defecten aan
het materiaal of aan de afwerking voor een periode van 2 jaar
vanaf de datum van aankoop. De garantie is slechts geldig met een
aankoopbewijs. De garantie dekt geen bijkomend verlies of schade
van of aan levende of niet levende objecten. Deze garantie is slechts
geldig onder normale omstandigheden van de inbedrijfstelling
44
waarvoor de Light Cycle Unit is bedoeld. Deze garantie zal niet van
toepassing zijn op elke Light Cycle Unit die onderhevig is aan onjuist
gebruik, onachtzaamheid of geknoei. De motor werd verzegeld in de
fabriek, geknoei zorgt ervoor dat de garantie ongeldig wordt. Deze
garantie heeft geen invloed op uw wettelijke rechten.
Voor algemene informatie over onze gehele reeks producten,
verken onze websites op:
www.exo-terra.com of www.hagen.com.
Distributed by:
Canada: Rolf C. Hagen Inc., Montreal, QC H9X 0A2
U.S.A.: Rolf C. Hagen (U.S.A.) Corp., Mansfield MA. 02048
U.K.: Rolf C. Hagen (U.K.) Ltd. Castleford, W. Yorkshire WF10 5QH
Page 45

48
 Loading...