

Page 1
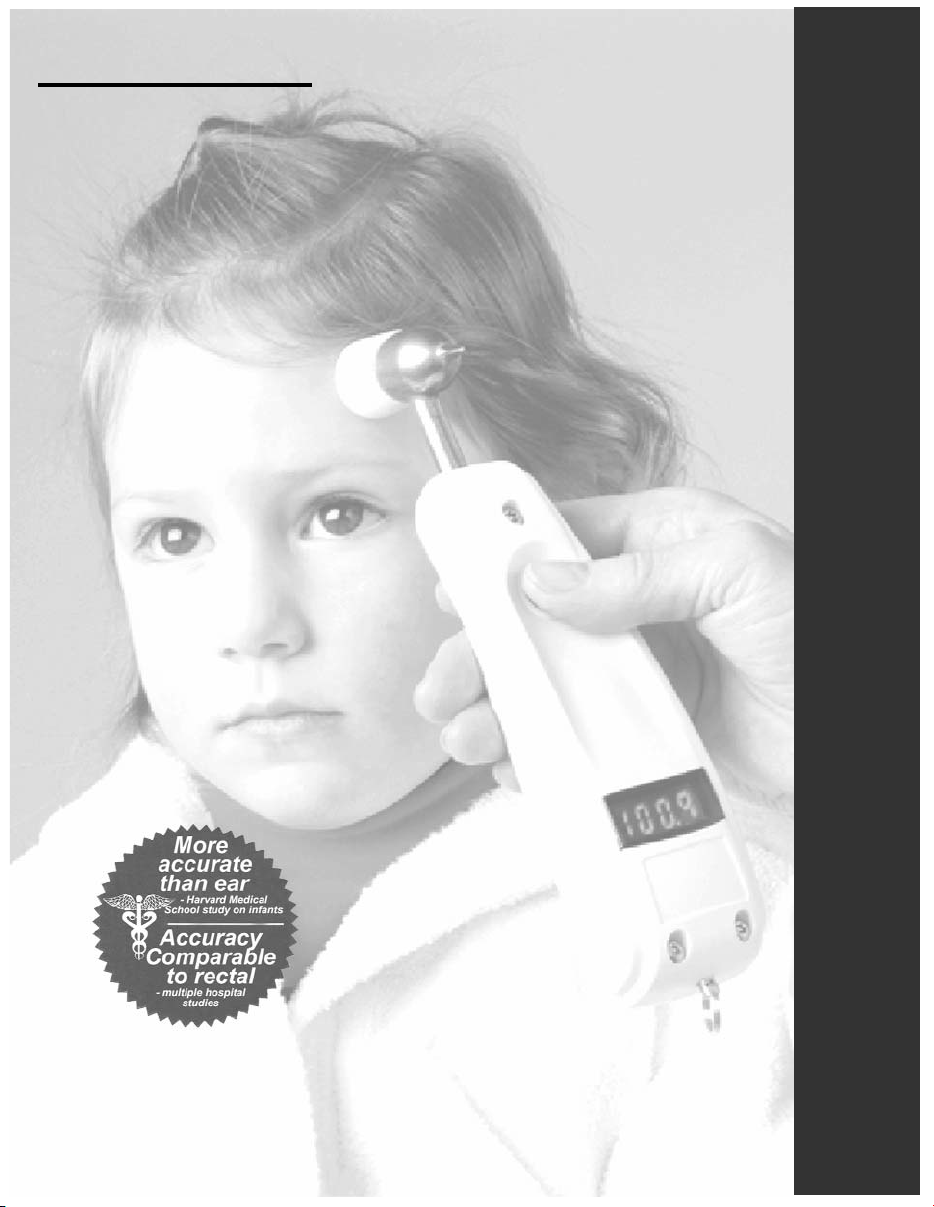
EXERGEN
TemporalScanner
A kinder, gentler way to take temperature
TM
1
1. Greenes DS, Fleisher, Accuracy of a noninvasive temporal artery thermometer for use in infants, Arch Pediatr Med 2001 Mar; 155(3):376-381
Model TAT-5000
Reference Manual
Page 2

Page 3

Important Safety Instructions
READ ALL INSTRUCTIONS BEFORE USING
When using the product, especially when children are present, basic safety precautions should
always be followed, including the following:
If you have any additional questions regarding use or care of the thermometer, please see
www.exergen.com or call customer service at 617-923-9900.
Use this product only for its intended use as described in this manual.
Do not take temperature over scar tissue, open sores or abrasions.
The operating environmental temperature range for this product is 60 to 104°F (15.5 to
40°C).
Always store this thermometer in a clean, dry place where it will not become excessively
cold (-4°F/-20°C), or hot (122°F/50°C).
The thermometer is not shockproof. Do not drop it or expose it to electrical shocks.
Do not Autoclave - Please note cleaning and sterilizing procedures in this manual.
Do not use this thermometer if it is not working properly, if it has been exposed to
temperature extremes, damaged, been subject to electrical shocks or immersed in
water.
There are no parts that you can service yourself except for the battery, which you
should replace when low following the instructions in this manual. For service,
repair, or adjustments, return your thermometer to Exergen.
Never drop or insert any object into any opening.
If your thermometer will not be used regularly, remove the battery to prevent possible
damage due to chemical leakage. If the battery leaks, remove carefully. Do not allow
bare skin to touch leaking fluid.
Dispose of used batteries properly. Do not wrap them in metal or aluminum foil. Wrap
them in newspaper before disposing of them. Do not burn them. Battery may explode
if overheated.
Not suitable for use in the presence of flammable anaesthetic mixtures.
SAVE THESE INSTRUCTIONS.
1
Page 4
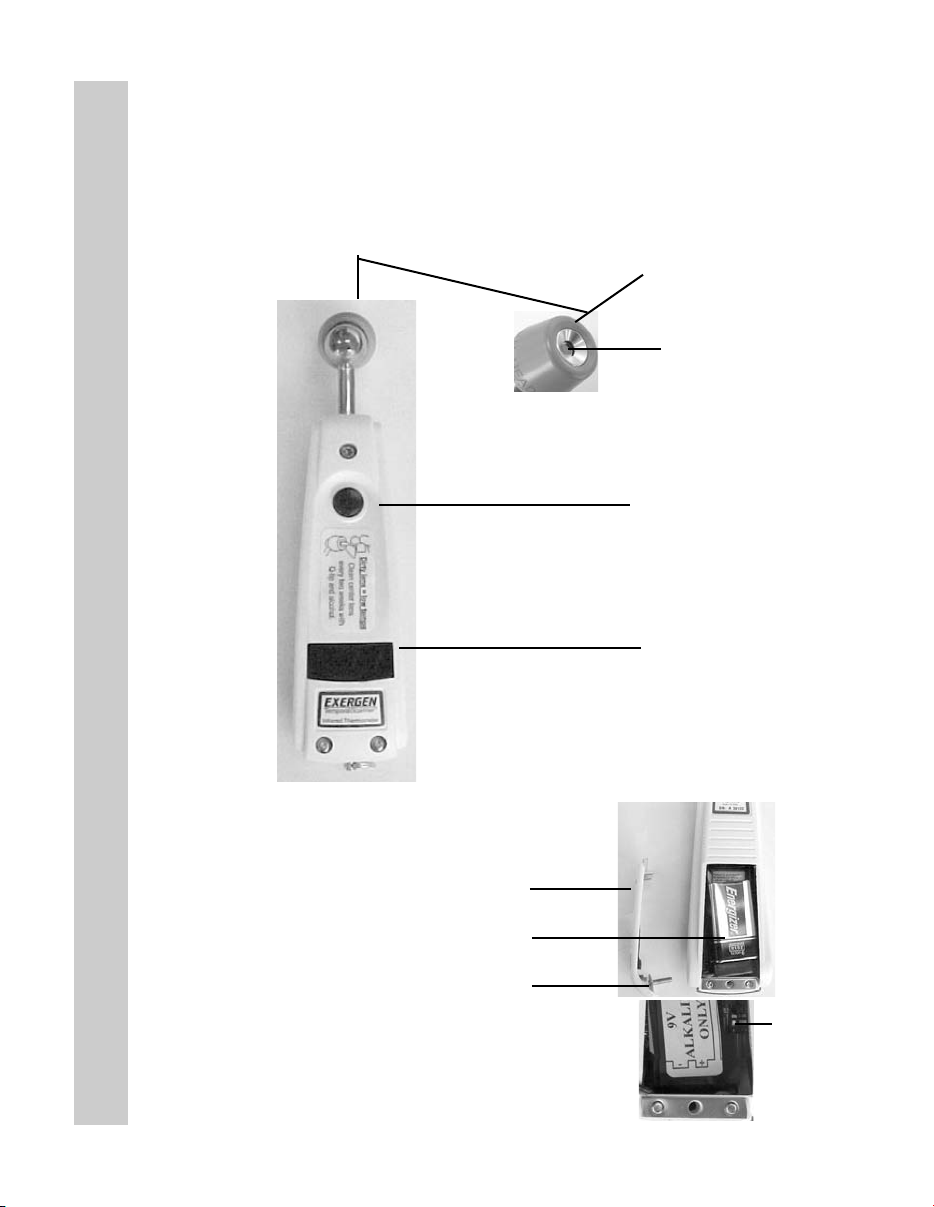
Product Map
Product Map
Battery Compartment
Probe Cone
Probe Lens
ON Button
Automatic turn-off in
30 seconds (when
measuring in body
temperature range,
otherwise 5 seconds)
LED Display Screen
9-volt battery
Battery Compartment Door
9-Volt Battery
Compartment Door Screw
2
F/C Switch
Page 5

Introduction to Temporal Artery Thermometry
The Method
Temporal artery thermometry (TAT) is a completely new method of temperature
assessment, using infrared technology to detect the heat naturally emitting from
the skin surface. In addition, and of key importance, the method incorporates a
patented arterial heat balance system to automatically account for the effects of
ambient temperature on the skin.
This method of temperature assessment has been shown to improve results
and reduce costs by non-invasively measuring body temperature with a degree
of clinical accuracy unachievable with any other thermometry method.
Temperatures are more reliable than with other methods. Fevers are identified
sooner. Treatment can be initiated sooner. We trust you will find temporal
artery thermometry is simply a better method.
Why the Temporal Artery
The TAT method was developed in response to the clinical requirements for a
truly non-invasive, accurate method of thermometry. Oral thermometry is subject to many artifactual errors; rectal temperature meets with strong resistance
from patients, parents, and even many clinicians. Ear thermometers, although
convenient, are sensitive to technique. Some brands are known to miss fevers,
and it’s difficult to consider the use of an aural thermometer when 95% of pediatric visits concern ear infections.
Introduction
A site for detecting fevers with roots dating back to centuries before Christ, the
temporal artery demonstrated the necessary requirements to meet the stringent
demands of clinical medicine today: it is easily accessible, contains no mucous
membranes, and notably, maintains a relatively constant perfusion rate, ensuring the stability of blood flow required for the measurement method.
As a site for temperature measurement, the temporal artery presents many benefits: it poses no risk of injury for patient or clinician, eliminates any need for disrobing or unbundling, and is suitable for all ages.
3
Page 6

Table of Contents
Table of Contents
Page(s)
Important Safety Instructions 1
Product Map 2
Introduction to Temporal Artery Thermometry 3
Familiarize Yourself with the TemporalScanner 5-6
Using the Instrument 7
Using the Instrument on a New Mother 8
Using the Instrument on an Infant 9
Frequently Asked Questions 10-13
Disposable Cover Options 13
Accessories 13
Guidelines for Patient Temperature Assessment
Comparing with other methods of thermometry 14-15
Determining a Fever Threshold 16
Body Sites for Temperature Assessment
An overview of temperature measuring sites 17-18
Reproducibility in Temperature Measurement 19
Forgotten Physiology 20-21
For Kids Only 22
Care and Maintenance of the Instrument 23-25
4
Page 7

Before Using, Familiarize Yourself with the Instrument
• To Scan: Depress the red button. The instrument will continually scan for the highest temperature
(peak) as long as the button is depressed.
• Clicking: Each fast click indicates a rise to a higher temperature, similar to a radar detector. Slow
clicking indicates that the instrument is still scanning, but not finding any higher temperature.
• To Retain or Lock Reading: The reading will remain on the display for 30 seconds after button is
released. If measuring room temperature, the temperature will remain on the display for only 5 seconds.
• To Restart: Depress the button to restart. It is not necessary to wait until the display is clear, the
thermometer will immediately begin a new scan each time the button is depressed.
• Pulse Timer: The thermometer has a built-in pulse timer. To activate, you should touch something
>90 oF (32 oC) (skin), press the red button once and release. The display will remain on for 30 seconds.
The Scan
One of the most important features of the thermometer is its ability to scan. It is a patented feature of
the instrument. Scanning is critical in obtaining the correct temperature, since there are temperature
gradients present not only inside the body, but across the entire surface of the body.
The object of scanning is to capture the highest temperature, the peak, in the area being scanned. As
long as the button is depressed, the thermometer will be continually sampling and recording the highest
temperature it measures.
Familiarize Yourself with the Instrument
Test it first on your hand to get comfortable with the concept.
Depress the red button, and keep it depressed. Scan the probe over the center area of your palm,
keeping the probe about a half an inch off the surface to avoid cooling the skin. The display will flash
SCAN, and there will be a soft but rapid clicking sound each time the sensor detects a temperature
higher than the one before. When the flashing and clicking slow to a little less than 1 per second, the
peak temperature has been reached. Any of the above indications can be used to assure the peak
temperature has been reached.
Remove the instrument from your palm and release the button and note the reading on the display.
The reading will be locked on the display for 30 seconds unless you press the button before that time.
Repeat the above steps and you should get the same, or very close to the same number, since your
hand will usually not appreciably change temperature very quickly.
5
Page 8
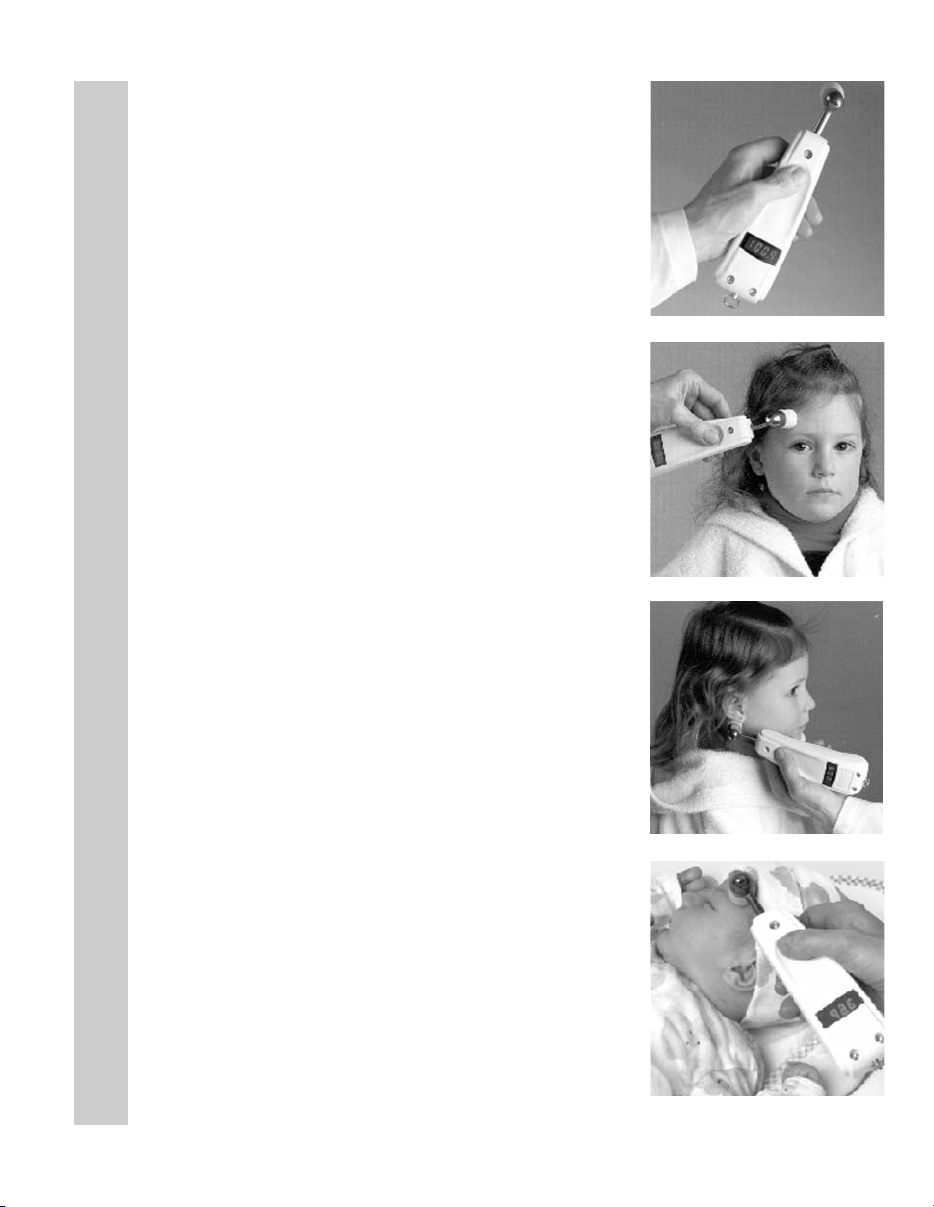
Practice Holding Your TemporalScanner
The TemporalScanner is ergonomically designed specifically for its
application. It’s best to hold the instrument with your thumb on the
red button, much like you would hold a remote control. Along with
allowing you to easily read the temperature display, you will automatically be using finger dexterity to gently position the probe, providing comfort and safety for your patient, and consistently accurate temperature readings.
Things To Know Before Taking Temperatures
• Measure only the exposed side. Anything covering the area to be
measured would insulate it and prevent the heat from dissipating,
resulting in falsely high readings. Brush hair aside if covering the
TA, or the area behind the ear.
• Slide the thermometer straight across the forehead (midline),
and not down the side of the face. Midline over the TA area,
the TA is less than 2mm below skin surface, whereas as the TA
winds down the side of the face, it is further from the skin
surface. Although anatomically correct, sliding downwards
would result in falsely low readings.
• It is preferable to hold the instrument sideways, as illustrated in
Familiarize Yourself with the Instrument
Figure 2. Approaching your patient with the instrument straight
up and down could be somewhat intimidating.
1
2
• When making the measurement behind the ear as in Figure 3,
tuck the thermometer under the ear lobe in the soft conical
depression on the neck just below the mastoid. This is the
place where a dab of perfume is typically applied.
Using on an Infant
• An infant is apt to present bundled, with blankets and clothing
covering the neck area. Fortunately, the perfusion rate is
normally strong for infants, and unless visibly diaphoretic, one
measurement at the TA is typically all that is required.
Should you feel the temperature is low, then push aside any
clothing or blankets covering the neck area for ~30 seconds or
so, and repeat the measurement behind the ear.
6
3
4
Page 9

Basics of Using the TemporalScanner
Using the TemporalScanner
Measure only the exposed side.
Brush hair aside if covering the
TA area.
1. With probe flush on the
center of forehead, depress
red button, keep depressed…
2. Slowly slide probe midline
across forehead to the hair
line, not down side of face.
Alternate sites when TA or BE are unavailable:
• Femoral artery: slowly slide the probe across groin.
• Lateral thoracic artery: slowly scan side-to-side in the
∼midway between the axilla and the nipple.
area
• Axilla: insert probe in apex of axilla for 2-3 seconds.
Questions? Please call us at 800-422-3006
Brush hair away if covering ear.
3. Lift probe from forehead
and touch on the neck just
behind the ear lobe.
4. Release the button, read,
and record temperature.
7
Page 10
Using the TemporalScanner on a New Mother
• Measure exposed skin
• Keep the red button
depressed throughout
measurement
(Brush bangs aside if present)
1. With probe flush on center of forehead, depress red button.
2. Slowly slide probe across the forehead into the hair line.
3. Lift probe from forehead.
(Brush hair away if covering ear)
Using the TemporalScanner on a New Mother
4. Touch probe to neck just behind the ear lobe.
5. Release button, read, and record temperature.
• Temperature will remain on display for 30 seconds after the
red button is released.
• Sequence can be restarted at any time without waiting for
display to clear.
Questions? Please call us at 800-422-3006
8
Page 11

Temping Baby in Bassinette, Open Crib, or with Mom
• Instrument should be in same temperature environment as the
baby for approximately 20 minutes.
• Measurement site must be exposed.
• One measurement, preferably at the TA, is all that is required.
Using the TemporalScanner on an Infant
Preferred site is the temporal
artery area. In this case,
behind the ear could be
alternate site, as both are
exposed.
Temperature at the Temporal Artery Area
1) Gently touch probe to center of forehead.
♥ Depress red button and keep depressed.
2) Slide probe over the TA area into hairline.
♥ If more convenient, slide from hairline towards center
of forehead.
3) Release button, remove from head, and record.
Temperature Behind the Ear
1) Gently nestle probe on neck behind the ear.
♥ Depress red button and keep depressed.
2) Maintain skin contact until numbers stop.
3) Release button, remove from head, and record.
Questions? Please call us at 800-422-3006
Temporal artery area is
the only option in this
case, as the neck area is
not exposed.
9
Page 12

Frequently Asked Questions
What is the TemporalScanner?
The TemporalScanner is an infrared thermometer designed for accurate, completely
non-invasive temperature assessment by scanning the temporal artery (TA). It is
breakthrough technology.
How does it work?
Temperature is measured by gently stroking the TemporalScanner across the forehead,
and includes a momentary touch of the probe to the neck area behind the ear lobe, to
account for any cooling of the forehead as a result of diaphoresis. The patented arterial
heat balance technology (AHB™) automatically measures the temperature of the skin
surface over the artery and the ambient temperature. It samples these readings some
1000 times a second, ultimately recording the highest temperature measured (peak)
during the course of the measurement. The TemporalScanner emits nothing - it only
senses the natural thermal radiation emitted from the skin.
How accurate is it?
Frequently Asked Questions
It has been clinically proven in premier university hospitals to be more accurate than ear
thermometry, and better tolerated than rectal thermometry. It is a superior method for
patient and clinician alike.
What if the TA area has been traumatized by burns or lacerations,
or is completely covered with dressings?
With head trauma, surgical or accidental, the temperature can be obtained from the
alternative site behind the ear lobe. As with diaphoresis, the perfusion will be high in the
presence of head trauma.
Why measure behind the ear lobe?
Sweat causes evaporative cooling of the skin on the forehead, and introduces the possibility of a false low temperature. Fortunately for the method, during diaphoresis the area
on the head behind the ear lobe will always exhibit the high blood flow necessary for the
arterial measurement.
10
Page 13

Why not use only the area behind the ear lobe?
Since the arterial branch is deeper behind the ear lobe than at the temple, under normal
conditions it is less accurate because of its variability. But under diaphoretic conditions,
the blood flow behind the ear lobe is as high as at the TA, making it as accurate as the TA,
but only during diaphoresis or with head trauma as previously mentioned.
What are the benefits of using temporal artery thermometry?
Besides the inherent accuracy of the method, TAT presents no risk of injury for patient or
clinician, eliminates the need for disrobing or unbundling, and is suitable for all ages.
What is arterial temperature?
Arterial temperature is the same temperature as the blood flowing from the heart via the
pulmonary artery. It is the best determinant of body temperature, and unaffected by the
artifactual errors and time delays present with oral and rectal methods.
How does the TemporalScanner compare to our old method?
Arterial temperature is close to rectal temperature, approximately 0.8ºF (0.4°C) higher than
oral temps. Expect larger differences at times, however, as the dynamics of thermoregulation favor the temporal artery method.
High readings?
Temperatures measured with TemporalScanner may be higher than your current method,
especially if you are used to oral or axillary temps. Oral and axillary temperatures can be
misleadingly lowered due to patient activity such as mouth breathing, drinking, tachypnea,
coughing, talking, etc, and periods of vasoconstriction during the fever process. Any or all
of these conditions may even mask fevers that the TemporalScanner will detect.
Frequently Asked Questions
Low readings?
A patient’s temperature measured with the TemporalScanner is normally never appreciably
lower than oral temperature. Lower temperatures are usually from scanning too fast, not
keeping the button depressed, a dirty lens, or a sweaty forehead.
What else should I know?
False high readings:
• Measure only skin that is exposed to the environment. Any covering, hair, hat, bandages,
etc, would prevent the heat from dissipating, causing the reading to be falsely high.
11
Page 14

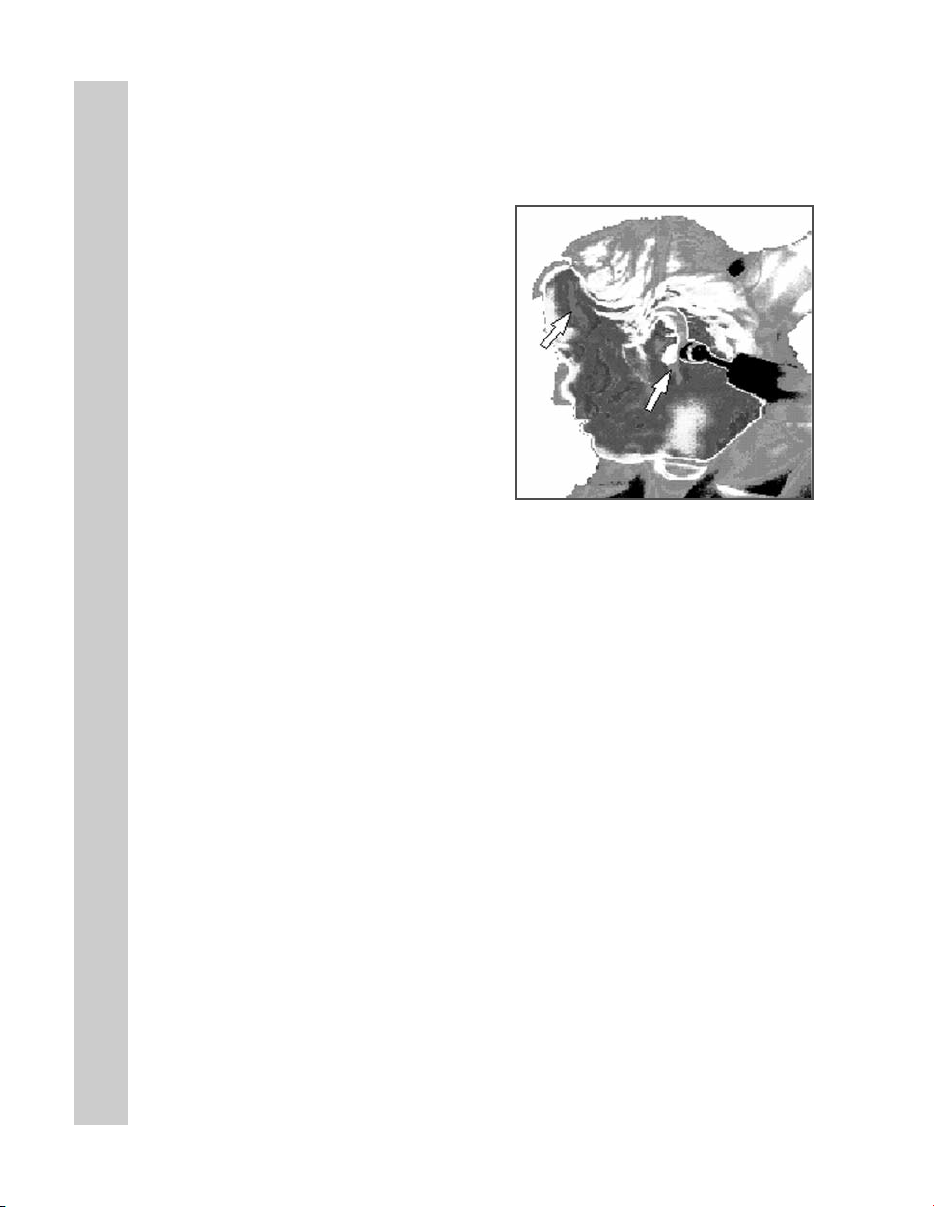
False low readings:
• Multiple readings can cool the skin, so if you take another
measurement immediately, expect a slightly lower reading.
• Slide the thermometer straight across the forehead, not
down the side of the face where the TA could be embedded
under cartilage or fat.
• Keep the probe flush on the skin, as in the picture on the
right. If angled, you will be measuring ambient air as well
as the TA area
.
Memorable solutions?
• Measure only the side exposed to the environment. The TemporalScanner assumes
the skin it measures has equilibrated to ambient, so a down or covered side could be
falsely high as heat is trapped and the skin is unable to equilibrate.
Frequently Asked Questions
• If the up side is not the side closest to you, try scanning from the hairline towards
the center of the forehead.
• Scan slowly across the TA area; if you scan too quickly you can miss the peak.
Conditions that could affect a reading
• Bandages or pressure dressings covering the
forehead.
• Forehead abrasions, burns, sweat.
• Agitated or combative patient.
• Patient’s forehead in direct draft from vent
or fan.
• Thermometer in different ambient temperature
than patient: i.e. window ledge directly
exposed to hot sun or cold weather, or in direct
line of air conditioning or fan.
12
...and their solutions
• If accessible and dry, measure on the
area behind the ear lobe only.
• Consider using the alternate sites:
femoral artery, lateral thoracic, or
axillary areas.
• The TemporalScanner should be kept
in the same ambient temperature as
your patient. Each 10° difference in
ambient can cause a 1° error in the
reading.
Page 15

What should I know about the instrument?
• TAT-5000 can be used with either
disposable caps or full sheath.
Can be used without disposables
if terminally cleaned between patients.
• Can be cleaned with any hospital
approved disinfectant, alcohol, and
even bleach solutions. Use only
alcohol solution for sensor lens.
• ”bAtt” on the display indicates a low
battery. Replace with a 9-volt alkaline
battery.
• Probe lens should be shiny clean. If
• A low or high reading outside body
• Can be used in either ºC or ºF.
Disposable Cover Options
(Model Illustrated: TAT-5000)
Frequently Asked Questions
not, wipe with an alcohol prep or Qtip dipped in alcohol. Occassionally
follow with a damp wipe of water to
remove any alcohol residue buildup.
temperature range is indicative of
the instrument’s failsafe mode,
signifying a mechanical failure.
No Cover No Cover Probe Cap Full Sheath
Terminal Disinfectant Covers Entire Covers Entire
Cleaning at Wipe Between Probe. Instrument.
Patient. Patients.
Model TAT-5000 All Options
Accessories
1. Combination Unit
PN 134200
2. Instrument Holder (shown with security cable)
PN 134201
3. Cap Dispenser
PN 134202
4. Disposable Caps
PN 134203
5. Security Cables
8 ft. coiled cable PN 124309
8 ft. coiled cable - Latex free - PN 124311
6 ft. vinyl-covered steel - PN 134302
8 ft. vinyl-covered steel - PN 134030
6. Keyless Self-Locking Wall Mount
PN 124305
7. Keyless Self-Locking Wall Mount
(shown with resposable cap dispenser)
PN 124306
13
Page 16

Guidelines for Patient Temperature Assessment
Comparing with Other Methods of Thermometry: Expect the Differences
Unless you are using PA catheters or Exergen aural thermometers with AHB for
temperature assessment, expect to see differences compared to your current thermometers. Arterial temperature measurement leads all other methods in identifying fever or defervescence, and is unaffected by patient activity. Accordingly, it will
be sometimes be different — but correct.
The following chart presents the mean normal temperature at the common temperature measurement sites under normal resting conditions.
Arterial
97.4 - 100.1 oF
(36.3 - 37.8 oC)
Oronasal
96.6 - 99.0 oF
(35.9 - 37.2
95.5 - 98.8 oF
(35.3 - 37.1
Guidelines for Patient Temperature Assessment
Normal BT is not a single temperature, but a range of temperatures influenced by age,
On a stable, resting patient, rectal temperature is ∼2°F (1°C) higher than axillary and
On a stable, resting patient, arterial temperature ∼ rectal temperature.
Arterial temperature measurement (PA Catheter, TA Thermometry) leads all other methods
in identifying fever or defervescence, unaffected by activities of daily living. It will some-
Oral
96.6 - 99.5 oF
(35.9 - 37.5 oC)
Esophageal
98.4 - 100.0 oF
(36.9 - 37.8 oC)
Axillary
o
C)
o
C)
Rectal
97.7 - 100.3 oF
(36.5 - 37.9 oC)
Normal Body Temperature (BT)
time of day, and the measurement site.
General Rule of Thumb
∼1°F (0.5°C ) higher than oral temperature.
1
Expect the Differences
times be different from your present methods — but accurate.
14
Page 17

Guidelines for Patient Temperature Assessment
1. Fever Definition: Clinically, fever is defined as a BT =1.8°F (1°C) above the
mean standard deviation at the site of recording.2A single oral temperature of
101°F (38.3°C ) in the absence of obvious environmental causes is usually
considered fever. An oral temperature of 100.4°F (38.0°C) over at least 1 hour
indicates a fever state.
2. Oral Temperature Risks: Oral temperature can be clinically misleading, and
many febrile patients can have a “normal” temperature, even when tachypnea
was unobserved.
3. Rectal Temperature Risks: Rectal temperature should only be considered as a
good approximation of core temperature when the patient’s thermal balance is
stable. When monitored during or after surgery, rectal temperature measurement
is not suitable, and the possible delay in diagnosis of a thermal abnormality could
lead to an irreversible crisis.
4. Axillary Temperature Risks: Axillary temperature is contraindicated in critically
ill adults, and its use in the general patient population should be discouraged due
to its unreliable correlation with core temperature and its poor reproducibility.
5. Temporal Artery Temperature (TAT) Values: On a stable resting patient, TAT is
∼0.8°F (0.4°C) higher than an optimum oral temperature, and close to a rectal
temperature.7However, during febrile episodes, the difference can be much
higher, mainly because of the artifacts of oral and rectal sites.
3
4
5
6
Guidelines for Patient Temperature Assessment
6. Comparison Between Sites: Review of published literature reveals mean
differences between non-TA sites of 0.4° to 3.1°F (0.2° to 1.7°C) with the actual
differences of up to 6.5°F (3.6°C) routinely reported, especially in febrile patients.
References:
1 Kuzucu EY. Measurement of temperature. Int Anesthesiol Clin, 3(3):435-49, May, 1965.
2 El-Radhi AS, Carroll JE. Fever in Paediatric Practice, Ch 2, pp 15-49, Oxford Blackwell Scientific
Publications, 1994.
3 Hughes WT et al. 1997 Guidelines for the use of antimicrobial agents in neutropenic patients with
unexplained fever. Infectious Diseases Society of America (IDSA).
4 Tandberg D et al. Effect of tachypnea on the estimation of body temperature by an oral thermometer.
NE J Med, 308, 945-46,1983.
5 O’Grady NP, Barie PS, Bartlett JG, et al. Practice guidelines for evaluating new fever in critically ill
adult patients. Task Force of the Society of Critical Care Medicine and the Infectious Diseases
Society of America. Clin Infect Dis 1998 May: 26(5):1042-59.
6 Houdas Y, et al. Human body temperature. Ch 5, p89 Plenum Press, 1982, USA, UK.
7 Exergen Corporation. Manufacturer’s data on file.
8 Review of subject material peer-reviewed journals.
15
8
Page 18

Determining a Fever Threshold for Temporal Artery Thermometry
Threshold Defining Fever
• A threshold for defining fever is the temperature level above which false
positives due to normal variations in temperature, including range of normal
mean + circadian effects + other effects (metabolic, ovulation, etc.) are unlikely.
Threshold for Fever Workup
• Not all fevers require a fever workup. A fever workup is an early management
tool in assessment of the likelihood of septicemia or bacteremia, and initiated
whenever an infectious source is suspected. The level of temperature triggering
such that investigatory workup is sufficiently high to avoid false positives
resulting in unnecessary discomfort and expense for the patient, but low
enough for early identification and intervention.
Primary Points
• Temperatures measured with temporal artery thermometry may be higher
than normally seen with other clinical methods, and therefore require an
adjustment in both protocol and perception.
• No one value can apply to every temperature measurement site. Note old
Determining a Fever Threshold
rule of thumb: Rectal temperature is ~1°F higher than oral temperature and
~2°F higher than axillary temperature.
• Recommended threshold for fever workup using arterial temperature assessment
is a single temperature >101.8°F, or a temperature >101.2°F sustained for
more than 1 hour.
• Adjustment of ~1°F is necessary to raise the temperature level normally
mandated for fever workups to prevent false positives, unnecessary cultures and
blood tests, etc.
Physician Recommended Guidelines for Fever Workup
Oral & Temporal
Artery in Oral
Calibration
Single value >101
Sustained values
(>1h) >100.4
Temperature Site
Fever Workup
Recommendation
Core &
Temporal Artery
Single value
>101.8
Sustained values
(>1h) >101.2
16
1
Axillary
Single value >99
1
Source on file at Exergen Corporation
Page 19

Body Sites for Temperature Assessment
An Overview of Temperature Measuring Sites
Oral Temperature
Oral temperature measurement is by far the most common clinical method in use today, and
is responsible for masking the greatest number of fevers. Oral temperature can be misleadingly lowered by patient activity such as tachypnea, coughing, moaning, drinking, eating,
mouthbreathing, snoring, talking, etc. Alarmingly, another cause of low oral temperatures is
the fever itself. For each 0.6°C (1°F) temperature elevation, the pulse rate usually increases
approximately 10 beats per minute, there is a 7% increase in oxygen consumption, increasing the respiratory rate approximately 2 cycles per
minute. The resulting increase in respiration can further
lower oral temperature sufficiently to mask a fever.
Figure 1 is of interest as it illustrates fever masking even
when clinicians had eliminated all obvious mouthbreathers from the study. This emergency room study
presents the temperature difference (rectal minus oral) in
310 patients with a wide range of respiratory rates. The
straight line of best fit is shown. The stippled area
demonstrates the traditional normal difference between
rectal and oral temperature (0.3°- 0.65°C). The investigators concluded that many patients with tachypnea
would have oral temperatures in the normal range
despite the presence of clinical fever, seriously misleading the clinician.
Rectal Temperature
Generally, rectal temperature is considered an indicator of
deep tissue and critical tissue temperatures, but long standing data demonstrate that rectal
temperature can be a lagging and unsatisfactory index. Fifty years ago, Eichna et al reported
differences between intracardiac, intravascular and rectal temperatures on afebrile patients to
be so insignificant that for all practical purposes, the temperatures may be considered to be the
same. Certainly rectal temperature is far less invasive than a pulmonary artery catheter, however, in the same study, data on febrile patients support sizeable differences.
Figure 1 Temperature Difference (Rectal
minus Oral) in 310 Patients with a Wide
Range of Respiratory Rates. The straight
line of best fit is shown. The stippled area
demonstrates the traditional “normal” difference between rectal and oral temperature
(0.3 to 0.65°C).
Body Sites for Temperature Assessment
Other comparisons between rectal, esophageal and aortic temperatures undertaken on
hypothermic patients by different researchers also confirm similar differences. Subsequent
but equally comprehensive comparisons on healthy volunteers further confirmed not only
temperature differences, but also quantified significant lags in rectal temperature vs. hypothalamic temperature by times of order one hour. This is of interest since the blood as it
enters and affects the critical tissue in the hypothalamus should have considerable significance in thermal homeostasis. However, this early data on hypothalamic temperature was
measured by a thermocouple inserted against (and often times perforating) the tympanic
membrane. With significant improvements in the methodology, more recent clinical observations show that the time constant of rectal temperature in critically ill patients may be considerably longer, and in some cases, as much as a day.
17
Page 20

Under certain conditions, rectal temperature is even contraindicated; for example, severe
arterial insufficiency in one or both legs might be associated with falsely low readings, or in
conditions affecting peripheral blood flow such as cardiogenic shock. More common contraindications include neutropenia, severe hemorrhoids, and recent anorectal surgery. A
less common but serious complication of rectal temperature measurement is perforation of
the rectum, which has even occurred in the absence of predisposing rectal pathology.
Rectal temperature measurement is not well tolerated, by either the patient or the caregivers, and is uncomfortable and embarrassing. Rectal temperature is subject to inaccuracies of placement, environment, and time of insertion. And although it is well established
that a rectal temperature requires two to five minutes or more to reach optimum measurement with a glass mercury thermometer, in practice many are withdrawn in just one minute,
a technique responsible for misleadingly low readings.
In fact, it is difficult to attribute any thermal significance at all to the rectal area. It is not known
to contain any thermoreceptive elements and its geographical location distances it from both the
CNS and the crossroads of circulation at the heart, which are the vital informational elements.
Tympanic Membrane and Ear Temperature
A temperature site of more recent onset is the ear. It is a compelling site, accessible, free from
bodily fluids, and not easily influenced by patient activity. This temperature is measured using
infrared technology, and there are three types of infrared thermometers: tympanic, ear, and
arterial heat balance. It has, however, become common practice to refer to any thermometer
making the measurement at the ear as a tympanic thermometer. Although the terms tympanic
and ear may be used interchangeably, they actually describe quite different measurements.
True Tympanic Membrane Temperature
The tympanic membrane is deep inside the skull, and is not subject to the artifactual errors
that can affect oral, rectal, axillary and ear temperatures. True tympanic thermometers provide an uncorrected, direct reading of the temperature of the tympanic membrane, and are
Body Sites for Temperature Assessment
preferred for continual measurement during certain surgical procedures, and for use in
extreme conditions such as military use, research, and sporting events.
There are two types of instruments used to make the measurement. One is a long thin thermocouple probe, usually fitted with cotton at the end, that must come in contact the tympanic
membrane. There is much historical data on the efficacy of tympanic thermometry using contact thermocouples, stemming originally from work done over thirty years ago. However, this
method never gained wide acceptance due to the risk of injury to the delicate membrane.
The second is an infrared device, the Exergen Ototemp 3000SD, which is inserted deep into
the ear canal and scanned to view the membrane, and is used in military and sports medicine.
Ear Temperature
Ear thermometry is a method of measuring the temperature of the external portion of the ear
canal. For routine clinical use, ear thermometry has been preferred as a simpler, faster, and
more convenient alternative to true tympanic thermometry. The absolute temperature of the
outer ear, however, is lower, and more variable than tympanic membrane temperature. It is
subject to a cooling effect resulting from the body heat being radiated to the environment, and
a heat balance method is required in order to produce the requisite accuracy. When combined
with an arterial heat balance method, ear thermometry provides a highly accurate indication of
body temperature, but those ear thermometers without it have high rates of missed fevers.
18
Page 21

Reproducibility in Temperature Measurement
Multiple temperature readings in the same area, mouth, rectum, axilla, ear or temporal artery, make
for variability with each separate measurement. This can be confusing for clinicians, since they
expect the same number with each measurement. The non-reproducibility of the readings, however,
is not a function of the devices, but simply a function of physiology. The human body is a myriad of
small gradients, and variability of readings will occur on every method of temperature measurement.
In addition, thermometers are at room temperature, nearly 30°F (17°C) cooler than the tissue being
measured. That said, it is then easily recognized how time of insertion, probe placement, and tissue
cool down all affect reproducibility of temperature readings, no matter what device is employed.
Oral Temperature
By far, the most common method of temperature measurement
is sublingual measurements. Placement of the probe under the
tongue, however, can result in substantial differences, and
caused by just a slight repositioning of the probe. The standard
heat chart commonly used by manufacturers of electronic thermometers on the right illustrates a difference of nearly 2°F (1°C)
depending on exactly what area is being touched by the probe.
Differences from repeated oral temperatures can vary even further,
as they can superimpose artifactual errors over the thermal gradients. Patient activities also affect the reading, these varying by
individual and activity. In fact, one large manufacturer cautions
waiting at least 15 minutes after ingesting hot or cold food or drink,
after exposure to extremely hot or cold weather, and after smoking.
Ear Temperature
The journals abound with citations addressing the lack of reproducibility of ear thermometers. In
fact, Thermoscan instructs the user to take three separate temperature measurements, and to
select the highest of the three. While much of this has to do with the device, physiology also plays
a large part. In such a small area, the difference of 30°F (17°C) between the room temperature
probe and the temperature of the ear being measured results in a noticeable tissue cool down.
Geriatric patients typically have a lower rate of perfusion than a younger individual, and it can take
several minutes for the ear to equilibrate following the use of an ear thermometer.
Rectal Temperature
Time and placement is critical for rectal temperature measurement. It has long been recommended that the measurement be taken for at least five minutes or more for accuracy. The measurement is also dependent on the depth of insertion, and just a few centimeters can result in a noticeable difference.
Temporal Artery Temperature
Because of the expanse of area being measured, and the normally strong perfusion of the artery
in particular, temporal artery temperatures should be as reproducible as any other method. There
may be slightly more variability observed in normothermic conditions compared to febrile conditions, but it is minimal. Of interest, the temporal artery area will equilibrate in the shortest period
of time compared to any other site. For absolute accuracy, however, it is recommended to wait
30-60 seconds before repeating a temperature on the same side, although, depending on the
individual, the time involved can certainly be much shorter. The limitation in time is almost entirely the behind-the-ear measurement, as the perfusion rate per tissue mass is not quite as high as
the temporal artery. Since the method employs the area behind-the-ear with every measurement,
this area is the time limitation.
Reproducibility of Readings
19
Page 22

Your Temperature
Normal Temperature
Normal human temperature is
around 98.6 degrees. But did
you know that only 8% of the
people in the world have a normal temperature of exactly
98.6?
A temperature that is normal
for you may even be a whole
degree or so above or below
"normal." It is good to know
what is normal for you. Try
taking your temperature at different times, like in the morn-
Forgotten Physiology
ing, after a cold shower, or a
five-mile hike.
Fever
Fever is when your body's
temperature control is set
above normal. Fever is a sign
that your body is fighting off an
infection. It is thought that
fever does two things.
When the temperature rises,
the body's chemical actions
speed up so that damaged tissues can be repaired more
quickly. Also, virus or bacteria
invaders don't survive well at
high temperatures. Perhaps
fever is the body's attempt to
cook them into submission.
Chills
You have a high temperature
and cold skin. You are hot
inside, but still you shiver. Chills
are your body's way of creating
a fever. The muscle action from
shivering produces heat, which
raises your temperature in an
effort to fight off infection. When
the crisis is over, your temperature is set back to normal, the
skin warms, and you sweat.
Hot Blood or Cold
Blood?
A frog in a 70 degree pond is a
70 degree frog. A frog in a 40
degree pond is a 40 degree frog,
and is moving very slowly, if at
all.
A kid in a 70 degree pond is a 98
degree kid. A kid in a 40 degree
pond is still a 98 degree kid,
although you can bet he's swimming as fast as he can to get
out.
One difference between kids and
frogs is the difference between
warm-blooded and cold-blooded
beings. People have automatic
climate control inside their
.
bodies
1
Excerpts from Blood and Guts: A Working Guide to Your Own Insides, Allison L. Katz., Little , Brown and Company, Boston, New York, Toronto, London
Their bodies keep themselves at
an even temperature by carefully controlling the rate of burning
in their cells.
Frogs are cold blooded,
their temperature changes
depending
on where
they are.
20
Cold blooded creatures have no
internal temperature control.
Their rate of metabolism is determined by their environment.
When the outside temperature
drops way down, all their body
processes slow way down.
Humans, and all mammals, are
souped-up hot-blooded beings.
Their metabolisms are speedy,
but are kept at an even keel. So
no matter what the temperature
is outside, the climate on the
inside is ever warm and ready for
1
action.
Page 23

Perspiration
The TemporalScanner relies on the skin over the temporal artery to help provide an accurate body temperature. In fact, it is measuring the inside by measuring the outside. Your
skin is a sensor, controlling body temperature in two ways: radiation and evaporation.
Since most of us don’t think about our skin as a sensor, this might be a good time to discuss a little physiology.
We live our entire lives with a body temperature that changes only a few degrees. This is
thanks to a very sophisticated climate control, of which the skin is a very important part.
Sweating, goose bumps, and heat loss from the skin all help maintain our normal temperature, keeping us comfortable.
When your internal temperature rises, your brain signals your blood to increase circulation
to the skin. In this way, the body’s internal heat is carried to the surface by the blood,
where it is lost by radiation.
If this is not sufficient, your sweat glands sprint into action, and perspiration is released
through the pores. This liquid evaporates on your skin and you cool right down. When
your temperature drops, your brain signals that heat must now be saved. Less blood circulates to the skin, and sweating stops.
Since there is a lot of cooling going on when you are sweating, both inside and out, it is a
good idea to wait till your forehead is dry before taking your temperature with the
TemporalScanner. If your forehead is sweaty, the reading would be low. Drying your forehead could help shorten the wait, but there is another place to measure an accurate temperature when perspiring. It is still on the head, but in the little soft depression just behind
the ear lobe, the place where young ladies are usually taught to apply perfume.
Forgotten Physiology
During perspiration, taking a temperature with the TemporalScanner in the area behind the
ear lobe has been proven to be as accurate as a temperature taken at the temporal artery
area, were it not wet. Since we sweat first on the forehead, then on the hands and feet,
the chances of the area behind the ear lobe remaining dry for the measurement are excellent. And since we already have increased circulation to the skin during perspiration, this
area will have the high blood flow necessary for the measurement.
Another instance when a high rate of blood flow on the neck can be assured is following
head trauma, either surgical and accidental. At such times the neck area behind the ear
lobe can be used as a primary site if the forehead is not available.
If perspiration or head trauma is not present, the area on the neck behind the ear lobe may
not have sufficient blood flow to be reliable, and should not be used as the primary measurement site.
If there is heavy perspiration, including moisture behind the ears, wait until area is dry.
For use on exercising athletes or other non-clinical subjects, contact Exergen.
21
Page 24

For Kids Only
Did you know you always have a temperature? Bet you thought you only had a temperature when you were sick. Absolutely
everything has a temperature, even icicles.
Brrrrrr!
When you don't feel well, your mom or a
nurse might say "let's see if you have a
temperature," but what they really mean is "let’s see if your
temperature is different from normal."
So, when you have your temperature taken, don't be
fooled. Your mom and your doctor already know you have
a temperature, and are just getting an idea of how things
are going inside your body.
Places to measure
your temperature.
Your bum. Babies and little
kids get their temperature
taken is in their bum. Poor
little kids, how embarrass-
ing! The temperature taken
in your bum is the hottest of all the places to take temperature. It’s around 99.6°F most of the time.
Your armpit. When kids get a little bit older, they might have their
temp taken under the arm instead
of the bum. This is better, but you
have to keep the thermometer in
your armpit with your arm tight
against your chest for a long time.
It’s hard to keep it from falling out
and breaking, especially if you fly!
I wonder if flying causes the armpit temperature to be the
lowest in your body. It’s around 97.6°F most of the time.
Your mouth. Now, if you’re reading this, you’re probably a
big kid and so you would most
likely have your temperature
taken in your mouth. Not too
bad, but everyone knows you
can trick your mom or your doctor into thinking you’re sick by
doing stuff with that thermometer. Bet you already know of
ways to do that! Most of the
time, a temperature in your mouth is about 98.6°F. Well
sort of...
Your ears. Now we’re down to ears. And please
pardon us, ears beat
rears. But, having your
ear pulled sure isn’t
fun, and when you
have an ear infection, it
even hurts.
Temperature taken in
your ear should be
higher than in your
mouth, but not as high as in your rear.
Your heart. If we were to pick the best place to measure
temperature it would be in the center of your heart. But
that’s pretty dangerous, and surely not
be something you would think was fun.
Arrrrghhh! In case you’d like to know,
though, temperature in your heart is
around 99.4°F.
Your temporal arteries.
There is a special place on
your head where we can
measure the same temperature as the blood in the middle of your heart. This is
because blood is pumped
directly from your heart to
your head through little tubes
called arteries that carry
blood up the sides of your
neck, up the side of your face just under your skin, and
stop at at a place on your forehead called your temple.
Guess what they’re called?
Wow! Isn’t this the same place your mom touches
with her hand when you don't feel good?
Did you know that the forehead has been used to detect
fevers as far back in time that anyone can remember,
over 2000 years? There’s a new technology that scans
the same place your mom touches, and it’s almost as
gentle. It's an infrared thermometer called the
TemporalScanner. It measures your temperature with a
quick and gentle scan across your forehead. Most of the
time, temperature here is around 99.4°F, same as your
heart. Nothing goes in your mouth, your ear, or your rear,
and in just a second or two, done!
Now, where is the best place to take
your temperature?
22
Page 25

Care and Maintenance
• Battery: A standard alkaline 9V battery provides
approximately 15,000 readings. **
To replace, loosen the single screw at the bottom
of the instrument and remove the battery cover.
Disconnect the old battery and replace with a
new one in the same location. Replace the
cover, and tighten the screw. Use only high
quality alkaline batteries or equivalent.
• Handling: The TemporalScanner is designed and built to industrial durability
standards in order to provide long and trouble-free service. However, it is
also a high precision optical instrument, and should be accorded the same
degree of care in handling as you would provide other precision optical
instruments, such as cameras or otoscopes.
• Cleaning the case: The TemoralScanner case can be wiped down with any
hospital approved disinfectant, including bleach.
• Cleaning the sensor lens: With normal use, the only maintenance required
is to keep the lens on the end of the probe clean. It is made of special
mirror-like, coated silicon infrared-transmitting material. However, dirt,
greasy films or moisture on the lens will interfere with the passage of infrared
heat and affect the accuracy of the instrument. Regularly clean the lens with
a cotton swab dipped in alcohol in accordance with the instruction label on
the instrument (see below). Use only light force for cleaning, to avoid
damaging the lens. Water can be used to remove any residual film left by
the alcohol. Do not use bleach or other cleaning solutions on the sensor lens.
Care and Maintenance
CLEANING INSTRUCTIONS
ON THE TAT-5000
• Sterilization: The industrial grade housing and design of the electronic
components allow for completely safe disinfecting with any accepted solution.
• Calibration: Factory calibration data is installed via a computer which
communicates with the TemporalScanner’s microprocessor. The instrument
automatically self-calibrates each time it is turned on using this data, and will
never require recalibration. If readings are not correct, the instrument should
be returned for repair.
23
Page 26

Instructions for Fahrenheit or Celsius Conversion
The TemporalScanner can be used in either °F or °C. To convert from one scale
to the other, the only tool necessary is a paper clip or the tip of a small screwdriver.
For °F/°C Conversion:
• Loosen single screw on bottom of case and
remove battery cover.
• Lift battery out of the way.
• Locate the little switch to the right of the
battery as indicated in the drawing, and with
Care and Maintenance
the tip of the paper clip or screwdriver, slide up
or down to the opposite position.
• Remove the paper clip or screwdriver.
• Replace battery and cover.
DISPLAY DIAGNOSTICS CHART
The following chart summarizes the fault conditions, and the associated indications:
o
F
Switch
o
C
Condition Display Range
High Target
Low Target
High Ambient
Low Ambient
Low Battery
Dead Battery
Processing Error
HI
LO
HI A
LO A
bAtt
blank display
Err
>110
<61
>104
<60
Restart. Return
to Exergen for
repair if error
24
o
F (43 oC)
o
F (16 oC)
o
F (40 oC)
o
F (16 oC)
message
persists.
Page 27

Care and Maintenance
*Automatically applied when temperature is within
normal body temperature range, otherwise
reads surface temperature.
** Approximate number of readings when scanning for
5 seconds and reading the temperature display for
3 seconds before turning thermometer off.
Calibration Verification Procedure
All Exergen infrared thermometers are designed to permanently maintain their accuracy and normally recalibration is not required unless the thermometer has been physically damaged or experiences component failure. In the unlikely event recalibration might be required, the thermometer must be returned to Exergen for
the procedure.
However, calibration can be verified in the lab or clinical units quite easily using a device known as a portable
blackbody. A portable blackbody is a reference heat generator (Figure 1), which is a self-contained device
providing a stable reference target temperature in the clinical temperature range.
The device is then used to verify the calibration of any Exergen thermometer in question, or for quality checks
done on a routine basis. The verifier operates with either a 9-volt power supply plugged directly into any 120
vac wall receptacle, allowing extended use in the laboratory, or it can be completely powered by a 9-volt battery for portable use on the nursing floors.
There are two ways to use the portable blackbody to verify the calibration accuracy of the thermometer in
question, either (1) with a certified master reference infrared thermometer, or (2) by using two identical thermometers as a reference against the one in question.
25
Page 28

Using the Portable Blackbody
1. Turn on the verifier device, using either a 9-volt battery or the power supply.
Make sure the red LED is illuminated.
2. Allow device ~5 minutes for warm-up and stabilization time.
3. Allow certified master or the two reference thermometers and the instrument to
be tested to acclimate in the same ambient temperature for at least 10 minutes.
4. For all instruments, make sure the lens at the tip of the probe is clean. To
clean, use an alcohol prep or a swab dipped in alcohol, followed by a damp
wipe with water to remove any residue.
Care and Maintenance
5. Alternately insert the reference instrument(s) and the instrument being verified
into the aperture opening, comparing the readings.
2
1
3
4
Using a Certified Master Reference
Thermometer in a Portable
Blackbody to Verify Calibration
Figure 1
26
Portable Blackbody
Calibration Verifier
1. Power On LED
2. ON/OFF Switch
3. Battery Compartment
4. Power Supply Jack
Page 29

• Accuracy Limits: Comparison between the reference instrument(s) and the
instrument being verified should be within ±0.4 ºF (0.2 ºC) for acceptable limits.
If not, repeat the process. In the event they still differ by more than the acceptable
limits, call Exergen for repair or replacement of the failed instrument.
Verifier Specifications:
Power Source 9-volt battery, or 9-volt power supply.
Battery Life Approximately 1 hour continuous use.
Low Voltage Indicator Red LED shuts off when battery voltage drops below
~5 volts.
Temperature Range 97-104 ºF (36-40 ºC)
Cleaning Wipe down with alcohol or any hospital approved
disinfectant. Do not immerse.
Repair
If repair is required:
• Contact Exergen at (617) 923-9900 for a Return Materials
Authorization (RMA) Number.
Care and Maintenance
• Mark the RMA number on the outside of your package and packing
slips.
• Include a description of the fault if possible.
• Send the instrument freight/postage prepaid to:
Exergen Corporation
400 Pleasant Street
Watertown, MA 02472
• The instrument will be returned freight/postage prepaid.
27
Page 30

Page 31

Page 32

EXERGEN
Straight From the Heart
o
EXERGEN CORPORATION • 400 PLEASANT STREET • WATERTOWN, MA 02472 • PH 617.923.9900
www.exergen.com
p/n 818528 r5
 Loading...