

Page 1
Instructions for Use
Save These Instructions
s
Questions:
Temporalscanner.com
medical@exergen.com
1-800-422-3006
Clinical studies, multiple
language videos, & user
manuals: exergen.com/s
Clinically proven
accuracy for
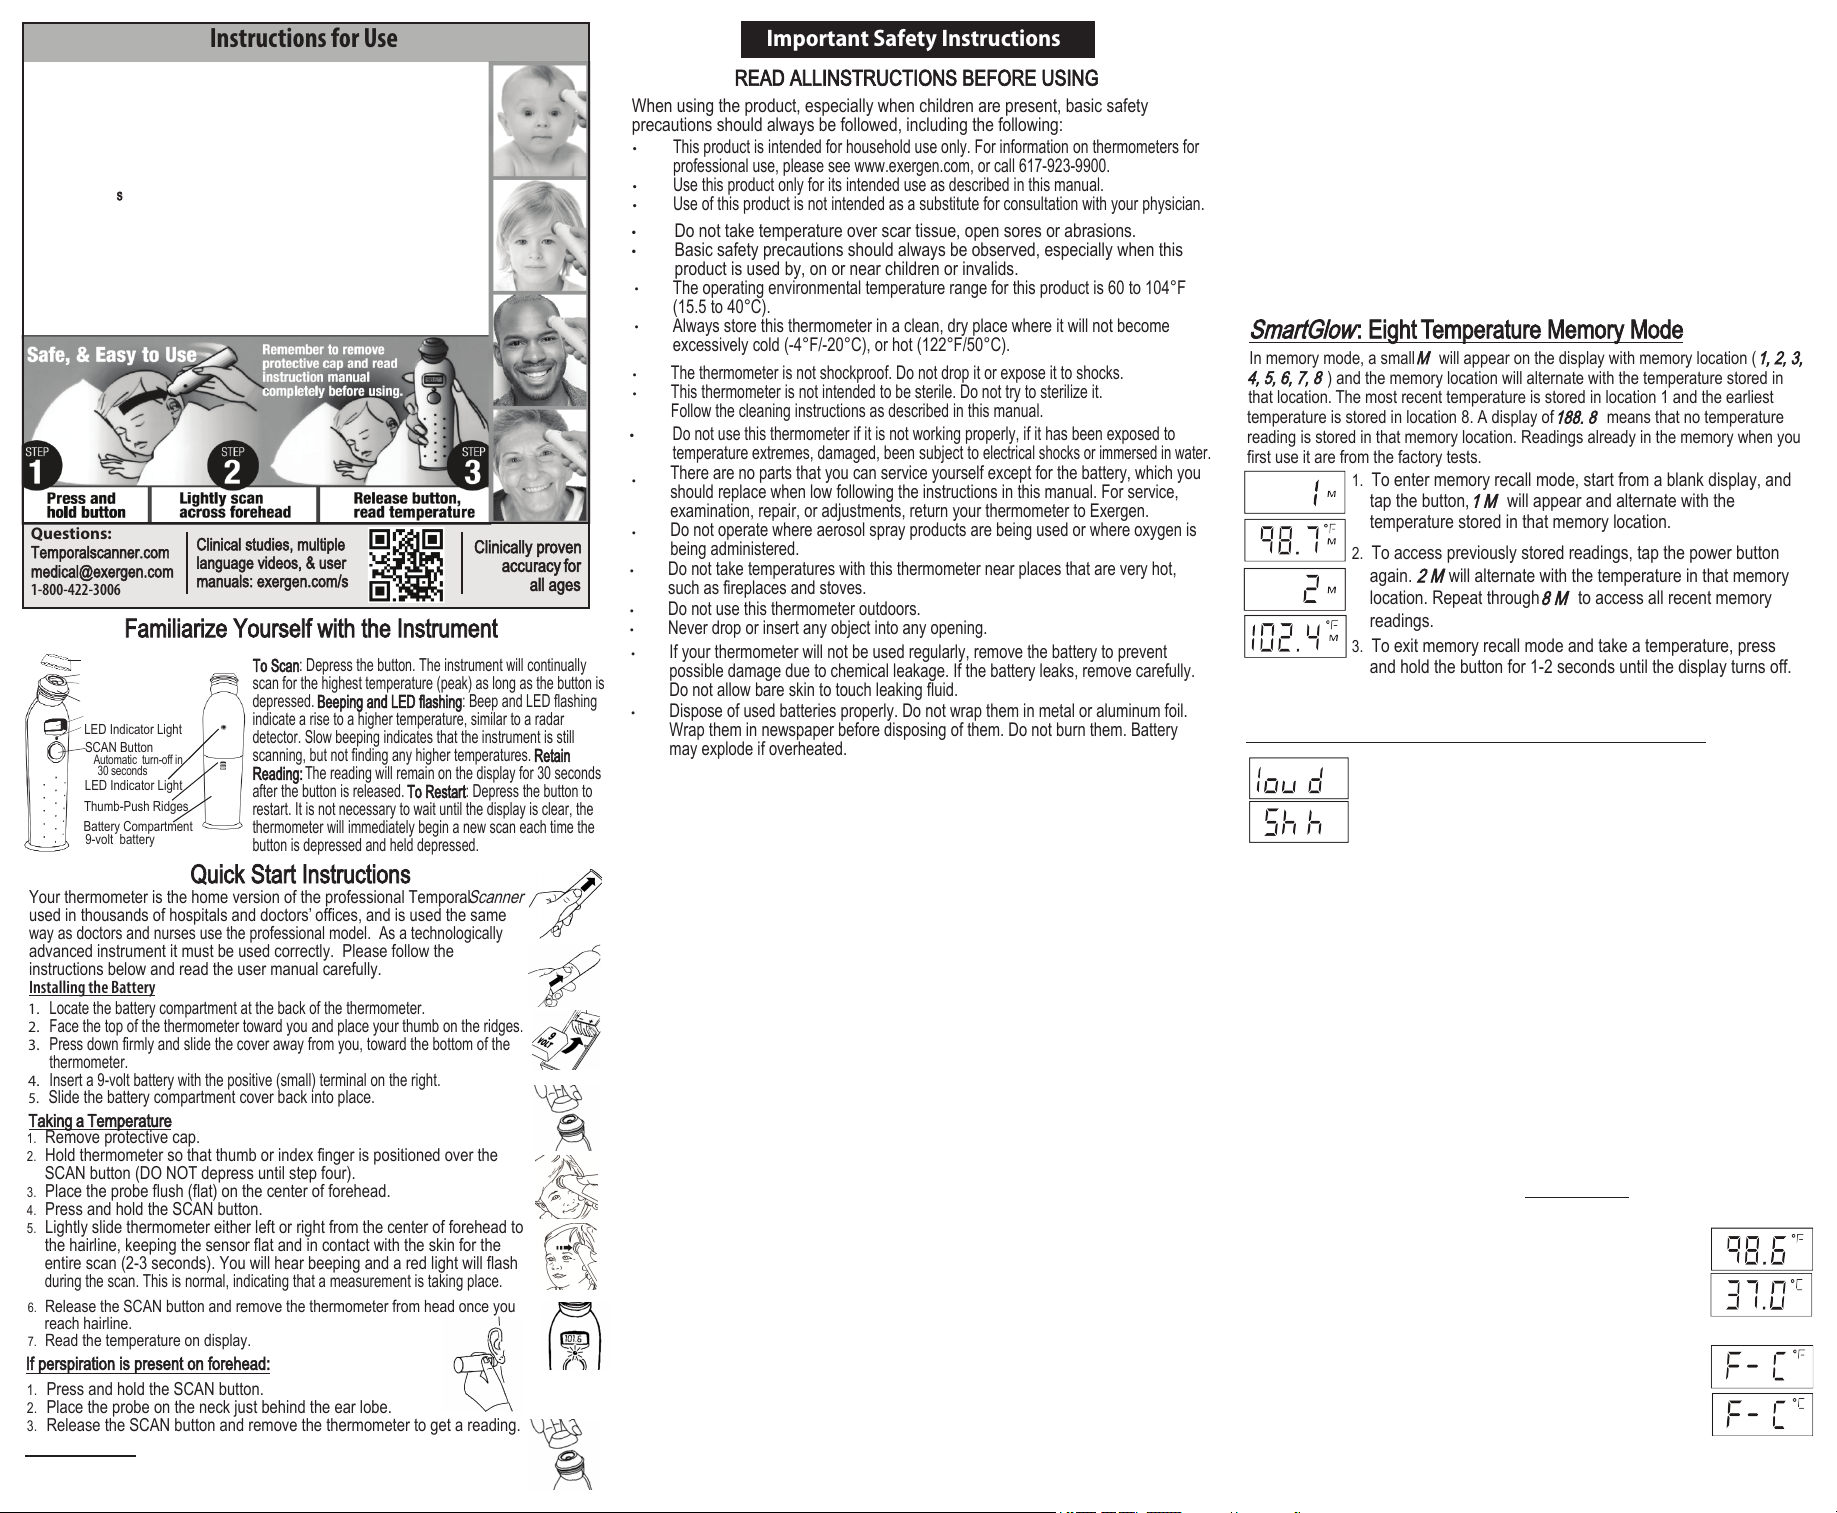
Familiarize Yourself with the Instrument
Protective Cap (remove during use)
Probe Cone
Probe Sensor Lens
Probe
LCD Display Screen
LED Indicator Light
SCAN Button
Automatic turn-off in
30 seconds
LED Indicator Light
Thumb-Push Ridges
Battery Compartment
9-volt battery
To Scan: Depress the button. The instrument will continually
scan for the highest temperature (peak) as long as the button is
depressed. Beeping and LED flashing: Beep and LED flashing
indicate a rise to a higher temperature, similar to a radar
detector. Slow beeping indicates that the instrument is still
scanning, but not finding any higher temperatures. Retain
Reading: The reading will remain on the display for 30 seconds
after the button is released. To Restart: Depress the button to
restart. It is not necessary to wait until the display is clear, the
thermometer will immediately begin a new scan each time the
button is depressed and held depressed.
Quick Start Instructions
Your thermometer is the home version of the professional Temporal
used in thousands of hospitals and doctors’ offices, and is used the same
way as doctors and nurses use the professional model. As a technologically
advanced instrument it must be used correctly. Please follow the
instructions below and read the user manual carefully.
Installing the Battery
1.
Locate the battery compartment at the back of the thermometer.
2.
Face the top of the thermometer toward you and place your thumb on the ridges.
3.
Press down firmly and slide the cover away from you, toward the bottom of the
thermometer.
4.
Insert a 9-volt battery with the positive (small) terminal on the right.
5.
Slide the battery compartment cover back into place.
Taking a Temperature
1. Remove protective cap.
2. Hold thermometer so that thumb or index finger is positioned over the
SCAN button (DO NOT depress until step four).
3. Place the probe flush (flat) on the center of forehead.
4. Press and hold the SCAN button.
5. Lightly slide thermometer either left or right from the center of forehead to
the hairline, keeping the sensor flat and in contact with the skin for the
entire scan (2-3 seconds). You will hear beeping and a red light will flash
during the scan. This is normal, indicating that a measurement is taking place.
6. Release the SCAN button and remove the thermometer from head once you
reach hairline.
7. Read the temperature on display.
If perspiration is present on forehead:
1. Press and hold the SCAN button.
2. Place the probe on the neck just behind the ear lobe.
3. Release the SCAN button and remove the thermometer to get a reading.
When not in use: Thermometer will shut off automatically after 30 seconds.
To turn off immediately, press and release the SCAN button quickly. Always
replace the cap to protect the sensor when not in use.
Scanner
all ages
Important Safety Instructions
READ ALLINSTRUCTIONS BEFORE USING
When using the product, especially when children are present, basic safety
precautions should always be followed, including the following:
•
This product is intended for household use only. For information on thermometers for
professional use, please see www.exergen.com, or call 617-923-9900.
•
Use this product only for its intended use as described in this manual.
•
Use of this product is not intended as a substitute for consultation with your physician.
• Do not take temperature over scar tissue, open sores or abrasions.
• Basic safety precautions should always be observed, especially when this
product is used by, on or near children or invalids.
•
The operating environmental temperature range for this product is 60 to 104°F
(15.5 to 40°C).
•
Always store this thermometer in a clean, dry place where it will not become
excessively cold (-4°F/-20°C), or hot (122°F/50°C).
•
The thermometer is not shockproof. Do not drop it or expose it to shocks.
•
This thermometer is not intended to be sterile. Do not try to sterilize it.
Follow the cleaning instructions as described in this manual.
•
Do not use this thermometer if it is not working properly, if it has been exposed to
temperature extremes, damaged, been subject to
There are no parts that you can service yourself except for the battery, which you
•
should replace when low following the instructions in this manual. For service,
examination, repair, or adjustments, return your thermometer to Exergen.
Do not operate where aerosol spray products are being used or where oxygen is
•
being administered.
•
Do not take temperatures with this thermometer near places that are very hot,
such as fireplaces and stoves.
•
Do not use this thermometer outdoors.
•
Never drop or insert any object into any opening.
•
If your thermometer will not be used regularly, remove the battery to prevent
possible damage due to chemical leakage. If the battery leaks, remove carefully.
Do not allow bare skin to touch leaking fluid.
•
Dispose of used batteries properly. Do not wrap them in metal or aluminum foil.
Wrap them in newspaper before disposing of them. Do not burn them. Battery
may explode if overheated.
electrical shocks or immersed in water.
Scanning the Temporal Artery (TA)
Measure only the side of the head exposed to the environment. Anything
covering the area to be measured (hair, hat, wig, bandages) would insulate the
area, resulting in falsely high readings. Slide the thermometer straight across the
forehead, not down the side of the face. Midline on the forehead, the TA is
about a millimeter below the skin, whereas at the side of the face, the TA is
much deeper, and measuring there would result in falsely low readings. When
taking the temperature behind the ear (if there is perspiration on the forehead), first
push away any hair, exposing the area. Then, tuck the thermometer on the
neck below the ear lobe, in the soft conical depression, (the place where
perfume might be applied). Wait about 60 seconds before measuring the same
person again to avoid excessive cooling of the skin. An infant is frequently
swaddled in blankets and clothing covering the neck area. Unless visibly sweaty,
one measurement at the TA area is typically all that is required. Should you feel
the temperature is low, then push aside any clothing or blankets covering the
neck area for ~30 seconds or so, and repeat the measurement on the neck
behind the ear. Factors that may affect measurement accuracy: The patented
Arterial Heat Balance (AHB) technology in your TemporalScanner actually
makes two separate measurements (1) the temperature of the skin over the
temporal artery, and (2) the temperature of the room. To determine the most
accurate reading, it measures skin temperatures some 1000 times a second as
you sweep the TemporalScanner across the forehead. The AHB system then
calculates how much the blood has cooled down during its journey from the
heart to the skin over the temporal artery and makes allowance for this in the
temperature it displays. The result is a highly accurate reading - delivered
extremely fast and with no discomfort.
Are there environmental effects?
As part of its Arterial Heat Balance system, the Temporal
temperature of the surrounding environment. For this measurement to be
accurate, it needs to have become acclimatized to the temperature of the room
in which it is to be used. If it is taken from a cold room into a hot room, or vice
versa, allow it to acclimate for at least 30 minutes before using it. Avoid holding
the Temporal
Scanner
by the head, as it will mistake the temperature of your
hand for that of the room.
Scanner
measures the
SmartGlow
• Soft Glow Display:
Features -
SmartGlow
Model
Soft lighting for easy reading in any light.
Perfect for checking the temperature of a sleeping infant
(or adult) in a darkened room.
• Eight Temperature Memory: Automatically retains the
last 8 temperature readings for instant recall to check on fever progression.
• Programmable Beeper: Beeping sound indicating scanning can be turned off
or on to avoid waking a sleeping child (or adult). The flashing LED facing the
forehead while scanning turns off when the beeper is turned off.
• Programmable °F or °C: Select most convenient temperature scale.
• Elegant one-button programming and memory access.
SmartGlow
In memory mode, a small
4, 5, 6, 7, 8
that location. The most recent temperature is stored in location 1 and the earliest
temperature is stored in location 8. A display of
reading is stored in that memory location. Readings already in the memory when you
first use it are from the factory tests.
: Eight Temperature Memory Mode
M
) and the memory location will alternate with the temperature stored in
1. To enter memory recall mode, start from a blank display, and
will appear on the display with memory location (
188. 8
means that no temperature
tap the button,
1 M
will appear and alternate with the
1, 2, 3,
temperature stored in that memory location.
2. To access previously stored readings, tap the power button
again.
2 M
will alternate with the temperature in that memory
location. Repeat through
8 M
to access all recent memory
readings.
3. To exit memory recall mode and take a temperature, press
and hold the button for 1-2 seconds until the display turns off.
SmartGlow
: Turn the Audible Beeper OFF or ON
Your Temporal
Scanner
is equipped with a beeper and front/back
flashing LED’s which gives you a soft audible and visual
feedback as you scan over the temporal artery on the forehead.
The original factory setting is with the beeper and LED’s ON.
If the beeper is on and you are concerned that the sound or flashing LED may wake a
sleeping child (or adult), the beeper and front LED can be turned off as follows:
1. Starting with a blank display, tap the power button until the display flashes
loud,(tap 10 times, past the 8 memory locations and the F-C display)
2. Press and hold the button until
Shh
is displayed, indicating the quiet mode. A
beep will indicate that the setting has been changed, and the
TemporaI
3. To turn the beeper and front LED back on, repeat step 1 to find
2 to change into
Scanner
will automatically shut off.
loud
.
Shh
then step
The TemporalScanner will automatically shut off 30 seconds after the last button
press, from any mode of operation. The TemporalScanner must be OFF (blank
screen) before taking a temperature. The TemporalScanner can be turned off
from any programming mode by pressing and holding the button for 3 seconds.
Selecting
°F
or °C Mode -
SmartGlow
Model
1. Starting from a blank display tap the button until the flashing
F - C
appears after the 8 memory locations (9 taps). The current
temperature mode will appear in the upper right indicated by the
small
°F or °C.
2. To change from the
The factory setting is
°F
to the °C mode, press and hold button
°F.
until the small °F in the upper right of the display changes to °C. A
beep will indicate that the setting has been changed, and the
TemporalScanner will automatically shut off.
3. To change from the °C to the °F mode, repeat step 2, and
press and hold the button until the small °C in the upper right of
the display changes to
°F
.
Page 2
Selecting °F or °C Mode -
The factory setting is
the steps below:
1. Take a temperature. While the temperature is displayed, tap
the button three times rapidly. A flashing
with
°
C
will appear. This indicates that the mode has changed
to °C.
2. Take a new temperature. You will see that it is displaying in
the
°
C
mode, and the small upper right indication is
3. To change from the
°
F
. If you wish to change it to °C, follow
°C
mode to the
Original
Model
F - C
alternating
°C.
°F
mode, repeat steps 1 and 2.
Frequently Asked Questions
Why take temperature measurements at the skin surface over the temporal artery?
The best place to measure temperature is the center of the heart, but this can be
done only under a doctor’s supervision. Doctors know that measurement of the
blood temperature in a major artery accurately reflects true body temperature. The
TemporalScanner Thermometer is designed to measure the temperature of the
skin surface over the temporal artery, a major artery of the head. The temporal
artery is connected to the heart via the carotid artery, directly leading from the
aorta, the main trunk of the arterial system. It offers constant blood flow. It is the
only such artery positioned close enough to the skin surface to provide the access
needed to take an accurate measurement. It is easy to use because it is ideally
located at the front portion of the forehead. The TemporalScanner is easier and
gentler to use than other types of measurement devices such as oral, rectal,
underarm and in-ear thermometers because it is truly non-invasive.
What is the correct technique? When you use the TemporalScanner, make sure to
start with a blank screen, then keeping the button depressed, touch the center of
the forehead and scan horizontally in a straight line over to the hairline, before
releasing the button. Do not curve down to the temple or you could miss the
important part of the temporal artery which is up in the forehead and naturally
trapped between the skin and the skull, so is never too deep. At the temple, the
artery can go deep, even on an infant, and will not provide the correct temperature.
Why am I getting low readings? Smudgy/dirty lens: The most common reason for
low readings is a smudgy/dirty lens. To resolve, an alcohol dampened Q-tip should
be twirled directly on the lens every 2-3 weeks. Like a camera or eyeglasses, the
TemporalScanner uses optical technology. In the case of the scanner, the infrared
sensor (which is behind the lens) must “see” the heat in order to measure it. If you
have had the TemporalScanner a little while, it might just need a lens cleaning
Make sure you use a Q-tip or generic cotton tipped stick applicator, not a twisted
paper towel or tissue. Following the alcohol cleaning, let the scanner recover
from the coldness of the alcohol for about 5 minutes before using it again. The
little lens should be cleaned as follows below:
1. Dampen the Q-Tip with either an alcohol prep/swab, or dip the Q-
Tip in a little alcohol, but do not use the alcohol prep/swab to
clean the lens as it will not provide the leverage needed.
2. Twirl the Q-Tip directly on the little lens deep in the center of the
probehead.
3. This preventive maintenance should be routinely done (every few
weeks).
4. Following the alcohol cleaning, wait about five minutes to let the
infrared sensor behind the little lens recover from the coldness of
the alcohol cleaning.
Sweat will cause low temperature readings: If the individual is sweaty,
the effect of evaporative cooling on the forehead will result in low
temperatures when using the scanner. However, sweat is a sign the
fever has broken and, as a result, the temperature is rapidly falling
back to normal. If sweaty, wait until the forehead has dried before
taking a temperature. Wiping the forehead will not work. However,
when the individual is just beginning to sweat, taking the temperature
in the little soft depression on the neck just below the earlobe will work
since we sweat last on the neck. But if both forehead and neck are
wet/moist, wait until the sweating has subsided before taking a temp.
Why do the readings differ from rectal temperature? Unlike rectal temperature, the
TemporalScanner identifies a change in temperature immediately, since it is
measuring the heat from the blood coming directly from the heart (a true core
temperature). Even on an infant, when temperature is changing, it can take 60-90
minutes for rectal temperature to identify the change, and considerably longer on
older children and adults.
Why am I getting a high reading? The Temporal
temperature. Like a rectal temperature, temperature taken with the
Temporal
oral temperature. With the exception of an infant up to about 6 months, the
Temporal
(under the arm) temperature. Temperature on an infant up to about 6 months will
be about the same as an axillary and rectal temperature as the infant’s body
temperature is close to being uniform regardless of where the temperature is taken.
Should I believe my hand or the Temporal
not an accurate method (although we all do it). Many studies have proven that the
hand (or a kiss on the forehead) will be correct 98% of the time when there is no
fever, but wrong half of the time when the individual actually has a fever. The
reason is that body heat is released or retained to keep our body temperature in
the normal range. This contributes to the erroneous assessment as felt by the
hand or lips. The core body temperature stays normal by the release of heat (like
opening the windows when the house is too hot) or by retention of the heat (closing
the windows when the house is too cold).
Why do I get a different reading with each scan?
Multiple scans in rapid succession will change the temperature of the skin and
result in variability of the readings. It is important to wait a full minute before
repeating the scan to allow the skin over the temporal artery to recover from the
cooler temperature of the probe head. The probe head is at room temperature and
about 30 degrees lower than body temperature.
Scanner,
Scanner
on average, will be about a degree Fahrenheit higher than an
, on average, will be about two degrees higher than an axillary
Scanner
is measuring a core
Scanner
? Touching the forehead is just
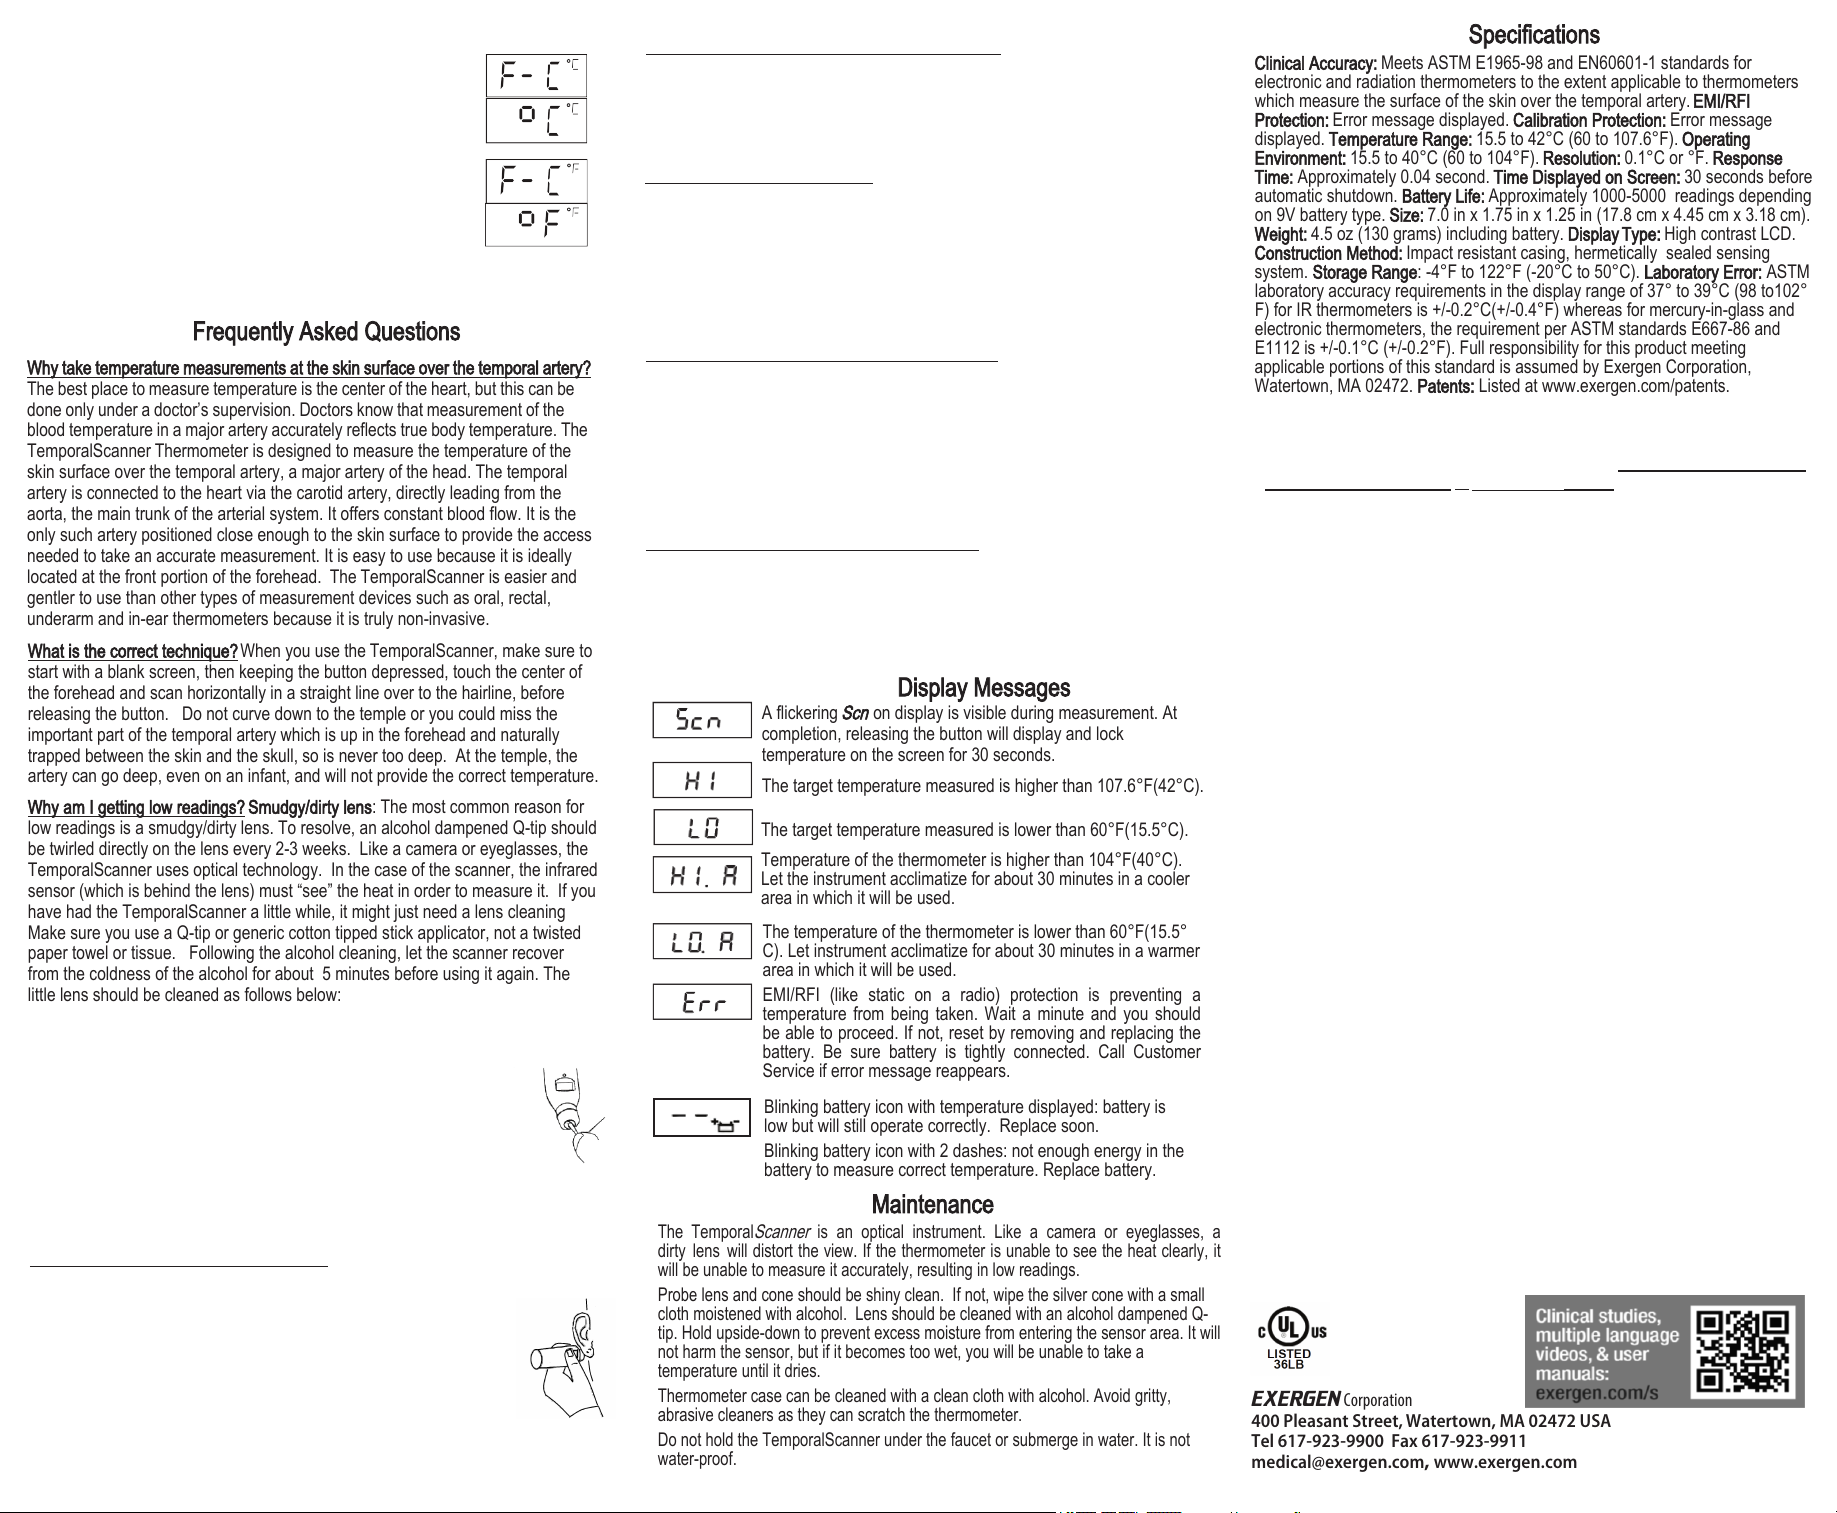
Display Messages
Scn
A flickering
completion, releasing the button will display and lock
temperature on the screen for 30 seconds.
The target temperature measured is higher than 107.6°F(42°C).
The target temperature measured is lower than 60°F(15.5°C).
Temperature of the thermometer is higher than 104°F(40°C).
Let the instrument acclimatize for about 30 minutes in a cooler
area in which it will be used.
The temperature of the thermometer is lower than 60°F(15.5°
C). Let instrument acclimatize for about 30 minutes in a warmer
area in which it will be used.
EMI/RFI (like static on a radio) protection is preventing a
temperature from being taken. Wait a minute and you should
be able to proceed. If not, reset by removing and replacing the
battery. Be sure battery is tightly connected. Call Customer
Service if error message reappears.
Blinking battery icon with temperature displayed: battery is
low but will still operate correctly. Replace soon.
Blinking battery icon with 2 dashes: not enough energy in the
battery to measure correct temperature. Replace battery.
on display is visible during measurement. At
Maintenance
The Temporal
dirty lens will distort the view. If the thermometer is unable to see the heat clearly, it
will be unable to measure it accurately, resulting in low readings.
Probe lens and cone should be shiny clean. If not, wipe the silver cone with a small
cloth moistened with alcohol. Lens should be cleaned with an alcohol dampened Q-
tip. Hold upside-down to prevent excess moisture from entering the sensor area. It will
not harm the sensor, but if it becomes too wet, you will be unable to take a
temperature until it dries.
Thermometer case can be cleaned with a clean cloth with alcohol. Avoid gritty,
abrasive cleaners as they can scratch the thermometer.
Do not hold the TemporalScanner under the faucet or submerge in water. It is not
water-proof.
Scanner
is an optical instrument. Like a camera or eyeglasses, a
Specifications
Clinical Accuracy: Meets ASTM E1965-98 and EN60601-1 standards for
electronic and radiation thermometers to the extent applicable to thermometers
which measure the surface of the skin over the temporal artery. EMI/RFI
Protection: Error message displayed. Calibration Protection: Error message
displayed. Temperature Range: 15.5 to 42°C (60 to 107.6°F). Operating
Environment: 15.5 to 40°C (60 to 104°F). Resolution: 0.1°C or °F. Response
Time: Approximately 0.04 second. Time Displayed on Screen: 30 seconds before
automatic shutdown. Battery Life: Approximately 1000-5000 readings depending
on 9V battery type. Size: 7.0 in x 1.75 in x 1.25 in (17.8 cm x 4.45 cm x 3.18 cm).
Weight: 4.5 oz (130 grams) including battery. Display Type: High contrast LCD.
Construction Method: Impact resistant casing, hermetically sealed sensing
system. Storage Range: -4°F to 122°F (-20°C to 50°C). Laboratory Error: ASTM
laboratory accuracy requirements in the display range of 37° to 39°C (98 to102°
F) for IR thermometers is +/-0.2°C(+/-0.4°F) whereas for mercury-in-glass and
electronic thermometers, the requirement per ASTM standards E667-86 and
E1112 is +/-0.1°C (+/-0.2°F). Full responsibility for this product meeting
applicable portions of this standard is assumed by Exergen Corporation,
Watertown, MA 02472. Patents: Listed at www.exergen.com/patents.
Five and Three Year Warranty
Exergen Corporation warrants each new Exergen TemporalScanner against
defects in materials or workmanship for a period of 5 years for the TAT-2000C/
SmartGlow
and agrees to repair or replace any defective product without charge.
IMPORTANT: This warranty does not cover damage resulting from accident,
misuse or abuse, lack of reasonable care, the affixing of any attachment not
provided with the product or loss of parts or subjecting the product to any but the
specified battery.* Use of unauthorized replacement parts will void this warranty.
Exergen Corporation will not pay for warranty service performed by a nonauthorized repair service and will not reimburse the customer for damage
resulting from warranty service performed by a non-authorized repair service.
No responsibility is assumed for any special, incidental or consequential
damages. For warranty service, call Exergen Corporation Customer Service,
800-422-3006 or email RMA@exergen.com for a Return Material Authorization
number (RMA). Then send the product, postage or shipping prepaid, to Exergen
in accordance with the instructions given with the RMA number. NOTE: No other
warranty, written or verbal, is authorized by Exergen Corporation. This warranty
gives you specific legal rights and you may also have other rights which vary
from state to state. Some states do not allow the exclusion or limitation of
incidental or consequential damages, so the above exclusion and limitations
may not apply to you.*Read enclosed instructions carefully.
Used and Recommended by Millions of Doctors and Nurses
EXERGEN Corporation
400 Pleasant Street, Watertown, MA 02472 USA
Tel 617-923-9900 Fax 617-923-9911
medical@exergen.com, www.exergen.com
and 3 years for the TAT-2000C/
This symbol on the product’s
nameplate means it is listed by
Underwriters’Laboratories, Inc.
Original
, from the date of purchase,
 Loading...