

Page 1
D501
Microscanner
D-Series
D501-RS
™
High-Performance Models
Instruction Manual
Page 2

Welcome to Infrared!
Exergen’s high-performance microprocessor-based infrared thermometers
have been designed to provide you with new dimensions of accuracy and
versatility. They literally put the power and speed of infrared in your hand!
By combining computer calibration and advanced software technology with
our patented Automatic Emissivity Compensation System, this generation
of Microscanner™ D-Series provides precision temperature measurements
over a wide range of environmental and target temperatures.
For added versatility, your high-performance Microscanner™
D-Series features:
• Full range resolution to 0.1 °F or °C
• SCAN, MAX and MIN modes of operation
• A 10-second display lock
• An audible beeper to signal functional or conditional changes
• Fahrenheit/Celsius Conversion
This manual provides complete instructions on how to operate and use
your Microscanner - the fastest, most accurate instrument for measuring
temperature available.
Table of Contents
Operation and Controls 1
Understanding How Your Microscanner™ Operates 2
Taking Exact Temperature Measurements 3
Moving Targets 3
High Temperature Targets 4
Thermal Scanning 5
Measuring Relative Humidity 6
Display Messages 7
Helpful Hints 8
Maintenance 9
Troubleshooting 10
Warranty & Repair 10
Specifications 11
Page 3

Operations and Controls
Your high-performance Microscanner™ D-Series is equipped with an ON/OFF
power pushbutton and a mode selector switch. The mode selector switch allows
you to choose one of three modes of operation: SCAN, MAX or MIN.
On/Off, Lock and Reset:
• TO TURN the unit ON, PUSH and HOLD the ON/OFF power pushbutton.
The display will momentarily read 8888, an indication that the microprocessor is performing its self-diagnostic testing. After the test, the unit will
measure and display temperature in the selected mode of operation for
as long as the power button is depressed.
• RELEASE the power pushbutton TO LOCK the display on the last reading.
A single beep will audibly indicate that the display is locked. The instrument will hold the last reading on the display for 10 seconds before it
automatically turns itself OFF.
• To RESET the display and initiate a new set of readings, PUSH the power
pushbutton at any time.
Operation Mode:
• SCAN - In the SCAN mode, the target’s instantaneous temperature is
continuously displayed and updates 10 times per second for as long as
you hold the power button down. After you release the power button, the
display will lock on the last temperature measured and hold that reading
for 10 seconds.
• MAX - In the MAX mode, the display will lock on the highest temperature
measured for as long as you hold the power button down. Each time a
new peak temperature is measured or repeated an audible beep will
sound. After you release the power button, the display will lock on the
maximum recorded temperature and hold that reading for 10 seconds.
• MIN - In the MIN mode, the display will lock on the lowest temperature
measured for as long as you hold the power button down. Each time
a new low temperature is measured or repeated, an audible beep will
sound. After you release the power button, the display will lock on the
minimum recorded temperature and hold that reading for 10 seconds.
1
Page 4

Understanding How Your
Microscanner™ Operates
The ability of an infrared thermometer to measure an accurate temperature depends
on the following:
1. The ability of the object’s surface to emit heat.
In general, infrared thermometers can easily measure non-metallic surfaces
because they emit most of their potential heat. Metallic surfaces, on the
other hand, are poor emitters and require special treatment before infrared
thermometers can accurately measure their tem perature. Fortunately, that
special treatment is simple and can be easily accomplished by mark ing the
metallic surface you wish to measure with a non-metallic substance such as
paint, grease, oil or even transparent tape. We recom mend marking metallic
surfaces with a solid paint marker.* To make things easy, Exergen provides a
marker with each unit.
* It is only necessary to mark an area slightly larger than your Microscanner’s nosepiece. In the MAX
or MIN mode you may want to check several points over an area. In this case, it may be more efficient
to coat the entire area with a non-metallic finish.
2. The ability of the instrument to properly detect and interpret the
object’s emitted heat signal.
Measuring and interpreting an object’s emitted heat signal can be complex.
Once again, Exergen’s innovative design makes it simple.
If you look at the Microscanner’s nosepiece, you will see that it is really
a small reflective cup with the sensor’s window at its base. When the
Microscanner’s nosepiece touches the surface of an object, that reflective
cup automatically controls what the sensor sees by eliminating variables
such as target emissivity and extraneous radiation. Patented by Exergen as
our Automatic Emissivity Compensation System (AECS), this unique design
ensures ac curate readings every time.
2
Page 5

Taking Exact Temperature
Measurements
CAUTION...Shock Hazard.
Do Not Touch the Instrument to
Electrical Conductors*
The Microscanner™ D-Series measures tem perature very quickly.
An accurate reading is almost instantaneous. It is only necessary to touch
the surface for a fraction of a second.
For exact surface temperature measurements, simply:
• Press the power button
• Touch the nosepiece to the target surface**
• Read the temperature on the LED display
• Release the power button
* Exergen manufactures specific instruments for safe and conve nient inspection of electrical
equipment. If electrical inspection is of particular importance, contact Exergen for more informa tion
relative to the dedicated electrical inspection instruments.
** If the surface is metallic, be sure to mark it as previously described (see pg. 2).
Taking Exact Temperature of
Moving Targets
For moving targets which are not possible to touch even for an instant, simply
• Set slide switch to MAX for targets warmer than ambient, or MIN for
targets cooler than ambient.
• Point at target
• Press the power button
• Bring nosepiece as close as possible to the target, preferably within
1/32 inch (1mm)
• Release power button
• Read the temperature
3
Page 6
High Temperature Targets
When using the D501 on high tem perature targets, momentarily touch the target’s
surface - a fraction of a second is long enough to get an accurate reading.
If these instruments are used in contact with a hot surface for an extended
time (10 seconds or more) the target’s heat will be conducted into the nosepiece. Although this will not harm the unit, the indicated temperature may be a
few degrees too high. If this happens, allow a few minutes between readings
for the nosepiece to cool down and stabilize.
If the instrument is used in contact with a hot surface and the display
message reads (HI), remove the instrument from the object immedi ately.
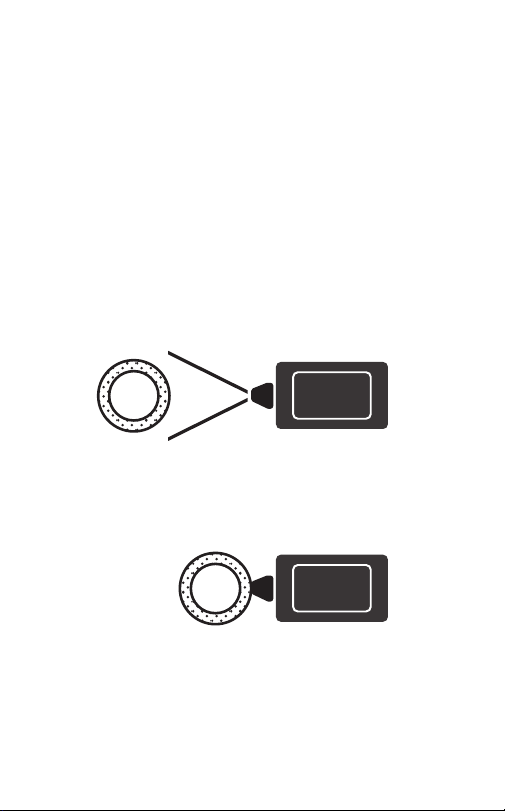
At a distance, the D-Series operates as a high-speed infrared
scanning thermometer.
Contact the nosepiece to the surface and the D-Series will display
an accurate surface temperature.
4
Page 7

Thermal Scanning
The high-performance Microscanner™ D-Series can also be used to
measure tempera tures at a distance.
When not touching or close to a surface:
• The Microscanner™ is a wide-angle ther mal scanner with a fixed
emissivity of .98.
• The displayed reading is an average tem perature of everything that the
sensor sees within its field of view.
Thermal scanning is very useful in many applications such as evaluating
insulation, monitoring machinery, and inspecting electrical equipment.
The MAX or MIN modes of operation can be particularly useful in thermal
scanning. The highest (or lowest) temperature measured dur ing a scan is
indicated by the audible beeper. Once a hot spot (or cold spot) is identified,
the exact temperature of that spot can be measured by touching the
surface as previously ex plained.
When using the D-Series as a scanner, keep the following in mind:
• The instrument’s field of view is 1:1. Also referred to as a distance-tospot ratio, 1:1 field of view means that the sensor sees a cir cular area
with a diameter equal to the distance between the sensor and target.
For example, at a 6-inch distance, the sensor sees a 6-inch diameter
spot; at a 10-foot distance, the sensor sees a 10-foot diameter spot.
• The Microscanner™ measures the average temperature of everything
in its field of view.
• A small hot spot may get lost in a large viewing area. The closer you
hold the instru ment to a surface, the better its target resolu tion.
5
Page 8

Measuring Relative Humidity with the
Microscanner™ D501
A unique benefit of the Microscanner™ D501 is its ability to measure wet
and dry bulb tem peratures faster and more accurately than ever before.
A Relative Humidity Kit is available as an accessory. Contact Industrial Sales
Customer Support for more information. This kit is comprised of a calculator
card and a tube of water. The calculator card incorporates two circular
membranes, an RH calculator and a Dew Point calculator.
The Microscanner™ is used to measure the wet bulb and dry bulb
temperatures of the atmo sphere. From these two temperatures, both the
relative humidity and the dew point can be calculated.
To calculate Relative Humidity:
1. Wet the absorbent membrane identified as WET with a few drops of water
(a small tube of tap water is provided with the kit).
2. Rapidly wave the card in the air for several seconds. This assures that the
water on the wet membrane is evaporating at its maximum rate.
3. With the Microscanner™ in the MIN mode, quickly measure the
temperature of the WET membrane immediately after you stop waving it.
This is the atmosphere’s wet bulb temperature.
4. Set the Microscanner™ in the SCAN mode and measure the DRY spot.
This is the atmo sphere’s dry bulb temperature.
5. Use the calculator card as directed to com pute the relative humidity and
dew point.
Fahrenheit to Celsius Conversion
The D501 Microscanners™ are equipped with a convenient method for
Fahrenheit/Celsius conversion:
1. Find the small hole on the left side of the red display filter.
2. Insert the end of a straightened paper clip into the hole and push to
activate the small switch underneath.
3. While holding the paper clip pressed into the switch, turn the instrument on
by pressing the red POWER ON button.
4. Remove the paper clip.
5. The instrument now reads °C instead of °F. To return to the original
setting, simply repeat the process. Each time you repeat the process, the
instrument switches between °F and °C.
6
Page 9

The Display Messages
The high-performance D-Series Microscanner™ continuously monitors its
ability to pro duce accurate temperature readings. If either the target’s
temperature or the unit’s ambient temperature exceeds the operational
limits, the beeper will sound one beep per second and the LED display will
default to a display message.
For example, the D501 is designed to display temperature only if that
temperature is within its specified measure ment range. If the target
temperature is greater than 565°F (296°C), the display will read “HI.”
The battery voltage is also monitored. A low battery is indicated by a double
beep each second. Temperatures will continue to be displayed as long as
accuracy can be assured. If the battery drops below 5.7 volts the battery is
considered “dead” and the display defaults to [----].
If a problem is discovered during the initial self-diagnostic test, the instrument will display an error message (E-01), (E-02), etc. If any (E-##) error
message is displayed, the unit will not function and must be returned to the
factory for repair. (See section on Warranty for return instruction).
The following chart summarizes the fault conditions, and the
associated indications:
Condition Display Sound Range
High Target
Low Target
High Ambient
Low Ambient
Low Battery
Dead Battery
Processing Error
[HI] 1/sec >565°F (296°C)
[LO] 1/sec <-65°F (-54°C)
[HI A] 1/sec >122°F (50°C)
[LO A] 1/sec <32°F (0°C)
2/sec <6.2v
[----] 2/sec <5.7v
[E-##] Return Instrument to Exergen for Repair
7
Page 10

Helpful Hints
Although transparent materials pass vis ible light, many visible transparent
materials are opaque in the infrared and can be directly measured by the
Microscanner™ D-Series.
To test for infrared transparency, touch the Microscanner™ to the surface
and pass a heat source, such as your hand, through the sensor’s field of
view on the other side of the material. If the Microscanner™ responds to the
heat source, the material is transparent in the infrared.
To measure a transparent surface, use one of the following techniques:
1. Mark the surface with an opaque nonmetal lic coating.
2. Put a shiny metallic surface such as alumi num foil behind the transparent material. The shiny metal will reflect the transparent materi al’s heat
back to the Microscanner™.
Wet or icy surfaces may interfere with the Microscanner’s readings. Water
and other liquids are good targets, but evaporation lowers their surface
temperatures.
Frost forms on a surface at the freezing point of water. Frozen foods or
similar targets will form frost unless the environment is controlled. If frost
forms, the Microscanner™ will read the temperature of the frost instead of
the subsur face (object’s) temperature.
Melting ice will read slightly higher than 32°F (0°C) because the instrument
actually measures the air condensing on the ice, a reaction which generates
a small amount of heat. As long as the ice is not melting, the Microscanner™ will ac curately read its temperature. For true object temperature,
remove any ice or moisture before measuring.
8
Page 11
Maintenance
The high performance Microscanner™ D-Series products are rugged and
durable instruments. They are designed to be used as a tool with long
temperature measurement reliability.
• Calibration
Calibration is performed by a computer through an optical link with the
unit’s micro processor. Because there are no mechanical adjustments,
the instrument is able to maintain its calibration through normal use.
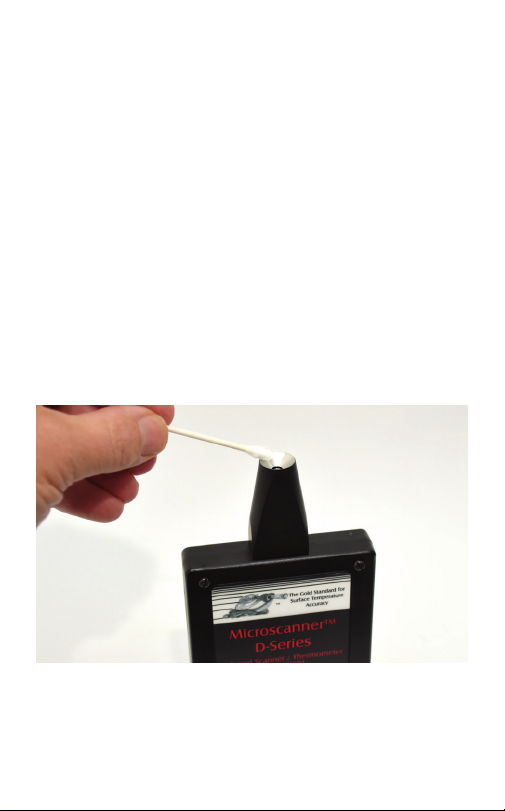
• Cleaning
The only maintenance required is to keep the sensor window clean. This
window, located at the base of the nosepiece’s reflective cup, is made of
a special crystal which passes infrared heat. Dirt, greasy films or moisture
on the win dow will interfere with the passage of infrared heat and affect
the accuracy of the instrument. If necessary, clean the sensor window
and reflective cup with a cotton swab dipped in alcohol or water. Periodic
cleaning is a good practice. When not in use, store in a clean environment.
• Battery
The battery is accessed by removing the instrument’s cover. Loosen the
four screws on the body of the instrument to remove the cover.
9
Page 12

Troubleshooting
If the accuracy of the measurement is in ques tion, check the following:
Is the sensor window clean?
Check the sensor window and reflective cup for cleanliness and remeasure.
Is the target’s surface non-metallic?
Coat metallic surfaces with a non-metallic finish and remeasure.
Is the target’s surface transparent?
• Coat transparent surfaces with an opaque non-metallic finish and
remeasure.
• Put a shiny metallic surface such as aluminum foil behind the
transparent target and remeasure.
Was the instrument’s nosepiece in contact with the surface?
Touch the nosepiece flush to the target’s surface and remeasure.
If after applying all of the above solutions the instrument’s accuracy is still
in question, contact Exergen for further directions.
Warranty
Exergen warrants the Microscanner™ D-Series to be free of defects in
material and workmanship for a period of one year from the date of
purchase, and will repair or replace the returned instrument (at Exergen’s
discretion) at no charge during the period. No other warranties are implied.
If repair is required:
• Contact the factory for a Return Material Authorization (RMA) Number.
• Mark the RMA number on both the shipping box and the packing slip.
• Include a description of the unit’s problem.
• Ship the instrument prepaid. Exergen will return ship prepaid.
• After you have received an RMA Number, send to:
Exergen Corporation
Repair Department
400 Pleasant Street
Watertown, MA 02472 U.S.A.
10
Page 13

Specifications
Target Temperature Range
D501: -50°F to 550°F or -45°C to 287°C
Absolute accuracy for any non-metallic, non transparent surface
+/- (1 + 0.02 (Reading less ambient)) deg F
+/- (0.6 + 0.02 (Reading less ambient)) deg C
Minimum spot size diameter Approx. ¼” (6.4mm)
Repeatability +/- .02% of absolute temperature
Display Resolution 0.1°F or 0.1°C
Display Update 10 times /second
Response Time Constant 60 mSec
Field of View 1:1 (53 degrees)
Spectral Sensitivity 2 to 20 microns
Battery One 9 volt alkaline
Battery life 5000 readings (10 seconds each)
Instrument Ambient Temperature
Operating Range: 32° to 122 °F (0° to 50 °C)
Storage Range: -22° to 140 °F (-30° to 60 °C)*
*Extended storage at temperature extremes will reduce battery life.
11
Page 14

Microscanner™ D-Series - Features Overview
Model D501
Sensor Window
Nosepiece with
Reflective Cup
(AECS)
Mode
Selector
Switch
On/Off Power
Pushbutton
High-impact
ABS Case
Digital LED
Display
Page 15
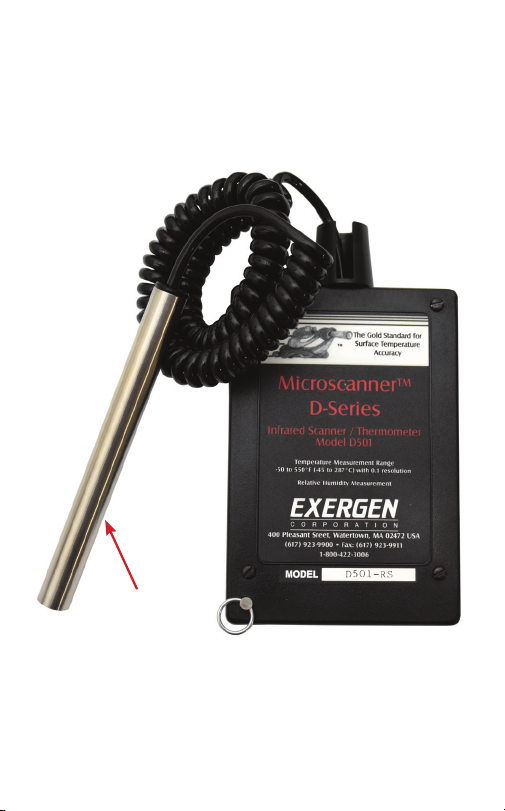
Microscanner™ D-Series - Features Overview
Model D501-RS
Remote
Sensor
Probe
Page 16

Microscanner™ D-Series
Exergen Corporation
400 Pleasant Street
Watertown, MA 02472 U.S.A.
617-923-9900
www.exergen.com
818098 Rev 3
 Loading...