

Page 1
EXERGEN
51 Water Street • Watertown, MA 02472
Phone: 617-923-9900 Fax: 617-923-9911
www.exergen.com
e-mail: industrial@exergen.com
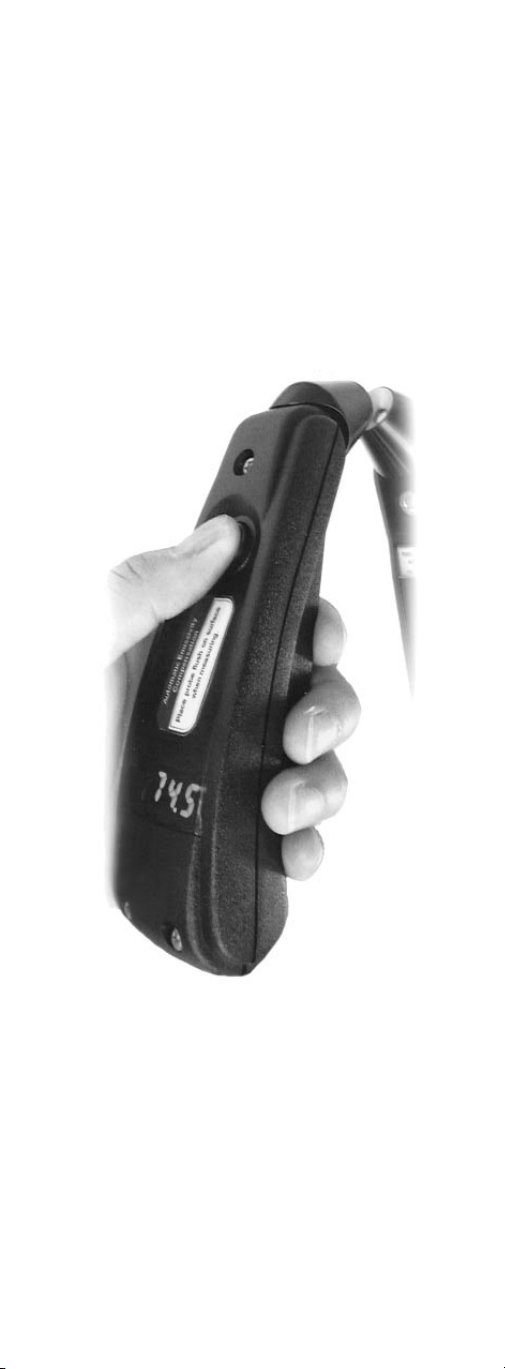
DX SERIES
Handheld Infrared
Thermometers
User’s Guide
Page 2

Page 3

Table of Contents
Chapter One - Welcome to Infrared Thermometry . . . .1
1.1 Introduction . . . . . . . . . . . . . . . . . . . . . . . . . . .1
1.2 Product Features . . . . . . . . . . . . . . . . . . . . . . .1
1.3 Models and Ordering Information . . . . . . . . . . .1
Chapter Two - Operation . . . . . . . . . . . . . . . . . . . . . . .2
2.1 DX Controls . . . . . . . . . . . . . . . . . . . . . . . . . . .2
2.2 To Change Display Measurement Units . . . . . .2
2.3 To Change Mode of Operation . . . . . . . . . . . . .3
2.4 Temperature Measurements . . . . . . . . . . . . . . .3
2.4.1 General Operation . . . . . . . . . . . . . . . . .3
2.4.2 Temperature Measurement of
Moving Targets . . . . . . . . . . . . . . . . . .4
2.4.3 High Temperature Targets . . . . . . . . . . .4
2.5 MAX Mode Temperature Measurements . . . . . .4
2.5.1 General Operation . . . . . . . . . . . . . . . . .4
2.6 SCAN Mode Temperature Measurements . . . . .5
2.6.1 General Operation . . . . . . . . . . . . . . . . .5
Chapter Three - Measurement Tips . . . . . . . . . . . . . . . .5
3.1 Optimizing Target Area Measurements . . . . . . .5
3.2 Measuring Metallic Targets . . . . . . . . . . . . . . . .6
3.3 Optimizing AESC Measurements for
NIST Traceability . . . . . . . . . . . . . . . . . . . . . . .6
3.4 Measuring Transparent Materials . . . . . . . . . . .6
3.5 Measuring Wet or Icy Surfaces . . . . . . . . . . . . .6
Chapter Four - Maintentance . . . . . . . . . . . . . . . . . . . . .7
4.1 Battery Replacement . . . . . . . . . . . . . . . . . . . .7
4.2 Cleaning . . . . . . . . . . . . . . . . . . . . . . . . . . . . . .7
4.3 Storage . . . . . . . . . . . . . . . . . . . . . . . . . . . . . .7
4.4 Calibration . . . . . . . . . . . . . . . . . . . . . . . . . . . .7
Chapter Five - Troubleshooting . . . . . . . . . . . . . . . . . . .7
5.1 Diagnostic Codes . . . . . . . . . . . . . . . . . . . . . . .7
5.2 Troubleshooting Measurement Difficulties . . . . .9
Chapter Six - DX™ Specifications . . . . . . . . . . . . . . . . .9
Chapter Seven - Warranty . . . . . . . . . . . . . . . . . . . . . . .10
Page 4

Chapter One - Welcome to Infrared
Thermometry
1.1 Introduction
Exergen Corporation, the world's leading manufacturer of
infrared temperature systems, presents the low cost DX
Series™ of hand held infrared thermometers. These dualpurpose systems function as both NIST traceable temperature calibrators and thermal scanning devices. Make fast,
accurate, and reliable temperature measurements using
advanced non-contact IR technology.
Meet your company's product quality conformance needs
with the DX's patented Automatic Emissivity Compensation
System (AECS). In this mode, the unit will provide precision temperature measurements of spot targets, without
knowing the target's emissivity value, and without errors
caused by other sources of incident radiation. Since the
DX is NIST traceable, it can function as a primary temperature calibrator for other temperature measuring devices,
serving your corporate quality instrument calibration programs. Operate the DX in SCAN mode, for thermal scanning measurements over a range of target temperatures.
Thermal Scanning is very useful in many applications such
as evaluating insulation, monitoring machinery, and inspecting electrical equipment. Or the DX may be operated in the
MAX mode where the highest temperature measured while
monitoring is presented.
This manual provides complete instructions on how to operate and use your DX--to provide fast, accurate, reliable
temperature measurements for your application needs.
1.2 Product Features
Designed for ease of use and measurement flexibility, the
DX features:
• Dual purpose, AECS as well as MAX and SCAN
measurement modes
• Measurement resolution to 0.1 °F or 0.1°C
• Factory calibration for precise results
• A 10 second display reading hold
• Internal self test and error diagnostic codes to insure
proper function
1.3 Models and Ordering Information
DX 501 -50 to 550°F (-45 to 287°C) Unit includes a 9 V
DC Alkaline Battery and DX Instruction Manual.
Also available with a Remote Sensor, RS232
Digital Output and an Analog Output.
DX 1001 0 to 1000°F (-18 to 538°C) Unit includes a 9 V
DC Alkaline Battery and DX Instruction Manual.
Also available with a Remote Sensor, RS232
Digital Output and an Analog Output.
DX 1201 0 to 1207°F (86 to 653°C) Unit includes a
Remote Sensor, 9 V DC Alkaline Battery and DX
Instruction Manual. Also available with an RS232
Digital Output and an Analog Output.
1
Page 5
DX 1601 0 to 1600°F (86 to 871°C) Unit includes a
Remote Sensor, 9 V DC Alkaline Battery and DX
Instruction Manual. Also available with an RS232
Digital Output and an Analog Output.
Chapter Two - Operation
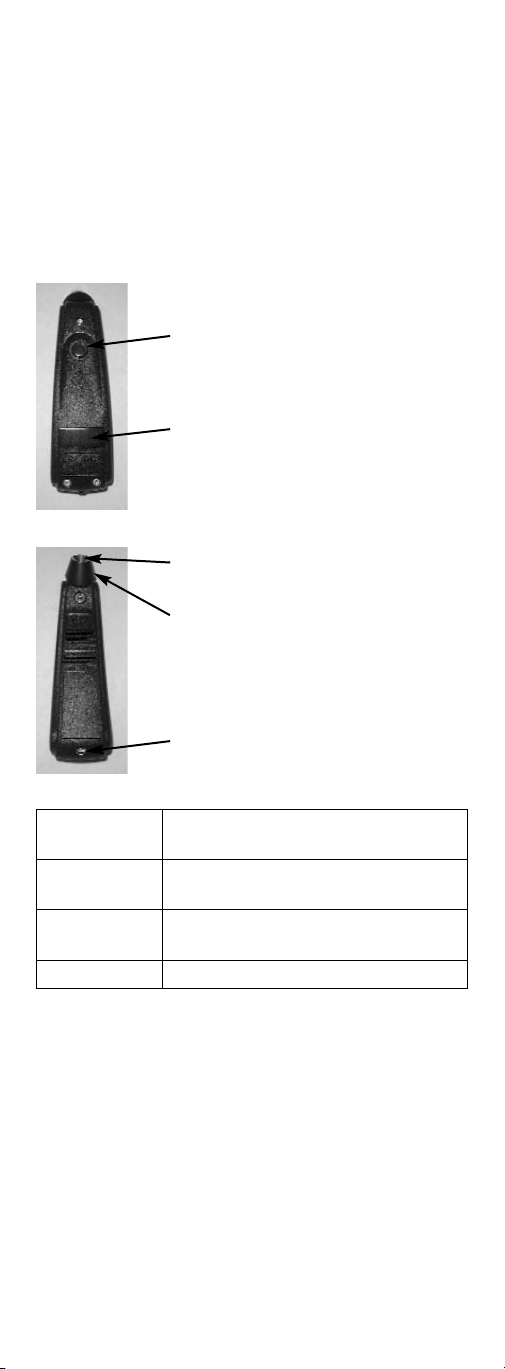
2.1 DX Controls
2.2 To Change Display Measurement Units
The DX Models come from the factory displaying temperature in units of Fahrenheit. To display readings in units of
Celsius, perform the following steps:
1. Remove the screw from the underside of the case.
2. Remove the cover, exposing the battery area.
3. Locate the push button switch as shown in the picture.
4. With the unit off (display is blank), push the push button in.
5. Holding the push button in, turn the unit on with the
MEASUREMENT button.
LED Display
MEASUREMENT
button
LED Display
Sensor Window
AECS Cup
Battery Cover
Screw
Displays target temperature and diagnostic codes
Measurement
button
To turn on and start temperature measurement
Nosepiece
w/AECS cup
Sensor window
Automatic emissitivity compensation
system nosepiece to contact target
Sensor viewing area for IR detector
2
Page 6

The instrument now reads in °C instead of °F. To return to
the original setting, simply repeat the process.
2.3 To Change Mode of Operation
The DX Models come from the factory operating in the MAX
mode. To change to the SCAN mode perform the following
steps:
1. Remove the screw from the underside of the case.
2. Remove the cover, exposing the battery area.
3. Locate the slide switch as shown in the picture.
4. Change the position of the slide switch from 1 to ON.
The unit will now operate in the SCAN mode. ON Î SCAN,
1 Î MAX.
2.4 Temperature Measurements
2.4.1 General Operation
CAUTION... SHOCK HAZARD
DO NOT TOUCH THE INSTRUMENT
TO ELECTRICAL CONDUCTORS*
The DX™ measures temperature very quickly. To obtain an
accurate measurement, it is only necessary to touch the
surface for a fraction of a second.
For exact surface temperature measurements that are NIST
traceable, use the following procedure:
1. Press and hold the MEASURE button.
2. The display will briefly show [8888].
3. Touch the nosepiece to the target surface.
4. The display may or may not change, but the "beeping"
sound will indicate that measurements are being
made.
5. Record the temperature from the display.
6. Release the MEASURE button. The last reading will
remain locked on the display for 10 seconds after
releasing the button.
*If the target is electrical equipment, Exergen manufactures
the Model E Microscanner instruments for safe andconvenient inspection of electrical equipment. Contact Exergen
for more information on the Model E line of instruments and
electrical inspection. If the surface is metallic, be sure to
mark it as described in the Measurement Tips section in
Chapter Three.
ºF/ºC Switch
MAX/SCAN Switch
3
Page 7

2.4.2 Temperature Measurement of Moving
Targets
To measure moving targets that are not possible to touch,
use the following procedure:
1. Press and hold the MEASURE button.
2. The display will briefly show [8888].
3. Bring the nosepiece as close as possible to the target,
preferably within 1/32 inch (1 mm). **
4. The display may or may not change, but the "beeping"
sound will indicate that measurements are being
made.
5. Record the temperature from the display.
6. Release the MEASURE button. The last reading will
remain locked on the display for 10 seconds after
releasing the button.
** If the surface is metallic, be sure to mark it as described
in the Measurement Tips section in Chapter Three.
2.4.3 High Temperature Targets
When using the DX™ to measure high temperature targets,
above 100 °F, quickly touch the target's surface -- one second is long enough to get an accurate reading.
Follow the procedures described above under 2.4.1
General Operation (see pg. 5). If the DX makes contact
with a hot surface for an extended time (10 seconds or
more) the target will conduct heat. Although this will not
harm the unit, the indicated temperature may be a few
degrees too high. Allow a few minutes between readings
for the nosepiece to cool down and stabilize.
If the DX makes contact with a hot surface and an error
message [HI] shows on the display remove the instrument
from the object immediately.
2.5 MAX Mode Temperature Measurements
Use this measurement mode when making contact with the
target or when the target is large. The DX is a wide-angle
thermal scanner with a fixed emissivity of 0.9. The target's
temperature is continuously displayed and updated 10
times per second for as long as you hold the MEASURE
button down.
The DX displays the average temperature of everything
within the sensor's field of view measurement area. The
size of the measuring area depends on the distance of the
device from the target. The DX has a 1:1 field of view,
which means that this unit will measure a 1"diameter target
area when the device is 1" from the target.
2.5.1 General Operation
For continuous temperature measurement of a target or for
temperature measurement at a distance, use the following
procedure.
1. Determine the appropriate measurement distance from
your desired target. Best measurements are made
when the DX is in contact with the target.
2. Make sure the MODE switch is on MAX.
3. Point the nosepiece at the target.
4. Press and hold the MEASURE button.
4
Page 8

5. Record the temperature from the display.
6. Release the MEASURE button. The last reading will
remain locked on the display for 10 seconds after
releasing the button.
2.6 SCAN Mode Temperature Measurements
Use this measurement mode for thermal scanning of a target or when measuring targets located at a distance. The
DX is a wide-angle thermal scanner with a fixed emissivity
of 0.9. The target's temperature is continuously displayed
and updated 10 times per second for as long as you hold
the MEASURE button down.
The DX displays the average temperature of everything
within the sensor's field of view measurement area. The
size of the measuring area depends on the distance of the
device from the target. The DX has a 1:1 field of view,
which
means that this unit will measure a 1"diameter target area
when the device is 1" from the target.
2.6.1 General Operation
For continuous temperature measurement of a target or for
temperature measurement at a distance, use the following
procedure.
1. Determine the appropriate measurement distance from
your desired target.
2. Make sure the MODE switch is on SCAN.
3. Point the nosepiece at the target.
4. Press and hold the MEASURE button.
5. Record the temperature from the display.
6. Release the MEASURE button. The last reading will
remain locked on the display for 10 seconds after
releasing the button.
Chapter Three - Measurement Tips
3.1 Optimizing Target Area Measurements
When performing a continuous thermal scan of a target, or
measuring a target located at a distance, proper target
alignment will help assure accurate results. Since the DX's
sensor measurement area is fixed at a field of view of 1 to
1, it is important to properly determine the best measuring
distance from the target, to optimize the reading. A field of
view of 1 to 1 means that the DX’s viewing area is 1" diameter for 1" distance from target. Optimize optical alignment,
so that the DX views only the target and does not overlap
the measurement area. See Figure below for examples of
proper optical alignment.
5
POOR POOR GOOD
Page 9

3.2 Measuring Metallic Targets
In general, infrared thermometers can easily measure nonmetallic surfaces because they emit most of their potential
heat. Metallic surfaces, on the other hand, are poor emitters and require special treatment before infrared thermometers can accurately measure their temperature.
Fortunately, that special treatment is simple and can be
easily accomplished by marking the metallic surface you
wish to measure with a non-metallic substance such as a
solid paint marker. Other substances such as grease, oil,
or tape may also be used. It is only necessary to mark an
area slightly larger that the DX nosepiece, when operating
in AECS mode. When operating in MAX or SCAN modes,
mark the appropriate target area for the measuring distance
from the target, based on a 1 to 1 Field of View.
3.3 Optimizing AESC Measurements for
NIST Traceablity
If you look at the DX's nosepiece, you will see that it is really a small reflective cup with the sensor's window at its
base. When the DX's nosepiece touches the surface of an
object, that reflective cup automatically controls what the
sensor sees by eliminating variables such as target emissivity and extraneous radiation. Patented by Exergen as
the Automatic Emissivity Compensation System (AECS),
this unique design ensures accurate readings every time.
To optimize results, make sure that the nosepiece is flush
with the target when possible, so that the reflective cone
can complete trap out any light or incident radiation from
the environment.
3.4 Measuring Transparent Materials
Although transparent materials pass visible light, many visibly transparent materials are opaque in the infrared and
can be directly measured by the DX.
To test for infrared transparency, touch the DX to the target's surface and pass a heat source such as your hand or
a penlight through the sensor's field of view on the other
side of the material. If the DX responds to the heat source,
the material is transparent in the infrared, and requires
marking the surface for proper measurement. Mark the
surface with an opaque non-metallic coating, such as paint
or grease.
Alternatively, place a shiny metallic object, such as aluminum foil, behind the transparent material. The shiny
metal will reflect the target's heat back to the DX.
3.5 Measuring Wet or Icy Surfaces
Wet or icy surfaces may interfere with the DX's readings.
Water and other liquids are good targets, but evaporation
lowers their surface temperatures.
Frost forms on a surface at the freezing point of water.
Frozen foods or similar targets will form frost unless the
environment is controlled. If frost forms, the DX will measure the temperature of the frost instead of the object's temperature.
Melting ice will read slightly higher than 32 °F (0°C)
because the instrument actually measures the air condensing on the ice, a reaction that generates a small amount of
6
Page 10

heat. As long as the ice is not melting, the DX will accurately read its temperature.
To make an accurate target measurement, remove any ice
or moisture before measuring.
Chapter Four - Maintenance
The high-performance DX is a rugged and durable instrument, designed for long term performance reliability.
4.1 Battery Replacement
Open the instrument's cover to access the battery by loosening the screw on the back of the instrument. Remove the
old battery and replace it with one fresh, 9 V alkaline battery. Align the battery contacts as indicated on the case.
4.2 Cleaning
The only maintenance required involves keeping the sensor
window clean. This window, located at the base of the
nosepiece's reflective cup, is made of a special crystal that
passes infrared heat. Dirt, greasy films, or moisture on the
window will interfere with the passage of infrared heat and
affect the accuracy of the instrument.
If necessary, clean the sensor window and reflective cup
with a cotton swab dipped in alcohol. Periodic cleaning is a
good practice.
4.3 Storage
When not in use, store the DX in a container, to protect the
unit from dirt and dust. Do not store the unit in areas of
extreme heat, cold, or humidity. If not using the DX for a
long period, remove the battery from the unit.
4.4 Calibration
The DX is factory calibrated under high quality standards.
Because there are no mechanical adjustments, the instrument is able to maintain its calibration through vibration and
normal use. No field calibration is necessary.
Chapter Five - Troubleshooting
5.1 Diagnostic Codes
The high-performance DX™ continuously monitors its ability
to produce accurate temperature readings. If either the target's temperature or the unit's ambient temperature
exceeds the operational limits, the display will default to an
error message.
The battery voltage is also monitored. A low battery is indicated by a separate error code. The unit will continue to
operate as long as accuracy can be assured. If the battery
drops below 5.7 volts, the battery is considered "dead" and
the display defaults to [----].
7
Page 11

If the [E-##] or [Err] error messages are displayed, the unit
will not function and must be returned to the factory for
repair. (See section on Warranty for return instruction).
The following charts summarize the fault condition, and the
associated indication.
5.2
Model DX 501 [LO] Target < -50 °F
(-45 °C)
Contact
Exergen
Model DX 1001 [LO] Target <0 °F (-
18 °C)
Use lower DX
Model DX 1201 [LO] Target <186 °F
(86 °C)
Use lower DX
Model DX 1601 [LO] Target <186 °F
(86 °C)
Use DX 501
or DX 1001
Low Target Temperature
Condition Error
Code
RemedyMeasurement
Fault
High Ambient
Temperature
[HI A] Ambient > 122
°F (50 °C)
Move to
alternate
location
Low Ambient
Temperature
[LO A] Ambient < 32
°F (0 °C)
Move to
alternate
location
Low Battery [N/A] Battery power
low
Replace
battery
Dead Battery [----] Dead battery Replace
battery
Other Errors
Condition Error
Code
RemedyMeasurement
Fault
Processing
Error
[E-##]
or [Err}
Internal fault
Repeat
measurement,
if error
remains,
contact
Exergen
8
Model DX 501 [HI] Target >550°F
(287 °C)
Use higher
DX
Model DX 1001 [HI] Target >1000
°F (538 °C)
Use higher
DX
Model DX 1201 [HI] Target >1207
°F (653 °C)
Use higher
DX
Model DX 1601 [HI] Target >1600
°F (871 °C)
Contact
Exergen
High Target Temperature
Condition Error
Code
RemedyMeasurement
Fault
Page 12

5.2 Troubleshooting Measurement
Difficulties
If you experience measurement problems, review the following troubleshooting steps:
Is the sensor window clean?
Clean the sensor window and reflective cup and repeat the
measurement.
Is the target's surface non-metallic?
Coat metallic surfaces with a non-metallic finish and repeat
the measurement.
Is the target's surface transparent?
Coat transparent surfaces with an opaque non-metallic finish and repeat the measurement.
Alternatively, put a shiny metallic surface such as aluminum
foil behind the transparent target and repeat the measurement.
Was the instrument's nosepiece in contact with the surface?
Touch the nosepiece flush to the target's surface and repeat
the measurement.
If after applying all of the above solutions, the instrument's
accuracy is still in question, contact Exergen for further
help.
Chapter Six - DX™ Specifications
Target Temperature Range
DX 501 -50 to 550°F (-45 to 287°C)
DX 1001 0 to 1000°C (-18 to 538°C)
DX 1201 186 to 1207°F (86 to 653°C)
DX 1601 186 to 1600°F (86 to 871°C)
Linearity Error
DX 501 ± 1% of reading
DX 1001 ±3% of reading
DX 1201 ±3% of reading
DX 1601 ±3% of reading
Emissivity Error
±1% of max. difference between target temperature and
instrument temperature when touching, for emissivity of 0.8
to 1.0
Minimum spot size diameter
Approx. 1/4" (6.4 mm)
Repeatability
± 0.1 °F/°C
NIST Traceablity
In AECS Mode
Display Resolution
0.1 °F or 0.1 °C
9
Page 13

Display Update
10 times/second
Measurement Response Time
Approximately 0.1 seconds
Field of View
1:1 0.63" (15.9 mm) Diameter Spot Area in AECS Mode
Spectral Sensitivity
2 to 20 microns
Battery
One 9 volt
Battery Life
5000 readings (10 seconds each)
Instrument Ambient Temperature
Operating Range: 32 to 122°F (0 to 50°C)
Storage Range: -22 to 140°F (-30 to 60°C)*
*Extended storage at temperature extremes will reduce battery life.
Chapter Seven - Warranty
Exergen warrants the DX to be free of defects in material
and workmanship for a period of one year from the date of
purchase, and will repair or replace the returned instrument
at no charge during the period. No other warranties are
implied.
If repair is required:
Contact the factory for a Return Material Authorization
(RMA) Number. Mark the RMA number on both the shipping box and the packing slip. Include a description of the
unit's problem. Ship the instrument prepaid. Exergen will
return ship prepaid. After you have received an RMA
Number, send to:
EXERGEN CORPORATION
Repair Department
RMA ________________
51 Water Street
Watertown, MA 02472
10
Page 14

Page 15

Page 16

 Loading...