

Page 1

User’s Manual
- 1 -
E
Page 2
IMPORTANT
Before Reading This Manual
Thank you for purchasing the Caplio RR120.
To ensure that you use this camera safely and correctly, read this User’s Manual carefully before you start using the
camera. Once you have finished reading this User’s Manual, keep it handy at all times.
E
Trademark Information
• MS-DOS, Windows, Windows 98, Windows 2000,
Windows ME, Windows XP are registered
trademarks of the Microsoft Corporation of the U.S.
registered in the USA and other countries.
Windows is an abbreviated term referring to the
Microsoft Windows Operating System.
• Macintosh is a trademark of Apple Computer, Inc.
• MGI PhotoSuite and MGI PhotoVista are registered
trademarks of the MGI Software Corp.
• Acrobat Reader is a registered trademark of Adobe
Systems Inc.
• SmartMedia is a trademark of Toshiba Corporation.
• Other companies or product names are trademarks or
registered trademarks of the respective companies.
Conventions Used In This Manual
• Indicates items or details that you should observe to
prevent loss of data, malfunction and impaired
performance. Also indicates information relating to
specifications and functions.
Note
• Indicates extra useful information.
About OS Abbreviations
• Windows 98
This abbreviation stands for the Microsoft
Windows® 98 operating system.
• Windows 2000
This abbreviation stands for the Microsoft
Windows® 2000 operating system.
• Windows ME
This abbreviation stands for the Microsoft
Windows® ME operating system.
• Windows XP
This abbreviation stands for the Microsoft
Windows® XP operation system.
- 2 -
®
®
®
®
Page 3
Contents
Preface
Before Reading This Manual ............................... 2
Contents............................................................... 3
Safety Precautions ............................................... 5
Using Your Camera Correctly .............................. 11
Features ............................................................... 13
Getting Ready
Accessories.......................................................... 14
Names of Parts .................................................... 15
Attaching the Strap .............................................. 19
Installing the Batteries.......................................... 20
Loading the Batteries ...................................... 20
Removing the Batteries ................................... 21
Using a Power Outlet ........................................... 23
About SmartMedia™ Cards ................................. 24
Notes on SmartMedia™ Cards ....................... 24
Loading the SmartMedia™ Card ..................... 25
Removing the SmartMedia™ Card ................. 26
Write Protection ............................................... 27
Turning the Power ON/OFF ................................. 28
Turning the Power ON..................................... 28
Turning the Power OFF ................................... 28
LCD Monitor Display ............................................ 29
In Photography Mode ...................................... 29
In Manual Photography Mode ......................... 30
In Playback Mode ............................................ 31
Basic Photography
How to Hold Your Camera ................................... 32
How to Press the Shutter Button.......................... 33
About the Viewfinder Lamp .................................. 35
Auto Photography ................................................ 36
Using the Viewfinder........................................ 36
Using the LCD Monitor .................................... 37
Setting the Image Size and Quality...................... 39
Zoom Photography .............................................. 41
Digital Zoom Photography ................................... 42
Macro (Close-up) Photography ............................ 43
Self-timer Photography ........................................ 44
Flash Photography ............................................... 45
Multi-Image Photography ..................................... 48
Long Exposure Photography ............................... 49
Manual Photography ............................................ 50
W.B. (White Balance) ...................................... 51
E.V. (Exposure Compensation) ....................... 52
Changing the Preset Conditions (REC MENU).... 53
REC. MODE .................................................... 54
PREVIEW ........................................................ 55
ISO .................................................................. 55
BULB ............................................................... 55
SELF-TIMER ................................................... 55
DISPLAY.......................................................... 56
LCD ................................................................. 56
E
- 3 -
Page 4

Contents (continued)
Playing Back/Erasing Images
Playing Back Photographed Images
(Single-Frame Playback) ..................................... 57
Enlarging Photographed Images
(Zoom Playback) ................................................. 58
Displaying a List of Image Thumbnails ................ 59
Slideshow Playback ............................................. 60
E
Reducing the Image Size (Resize) ...................... 61
Compressing Images (Quality) ............................ 63
Selecting the Folder to Play Back ........................ 65
Erasing Images (Erase Frame) ............................ 67
Erasing All Images in a Folder (Erase All)............ 69
Formatting the SmartMedia™ Card ..................... 70
Protecting Images ................................................ 71
Protecting an Image ........................................ 71
Removing the Protection ................................. 73
Changing the Display Setting in Playback Mode . 74
Changing the LCD Setting in Playback Mode ...... 75
Other Applications
Basic Photographic Settings (SETUP mode)....... 76
LANGUAGE .................................................... 77
SOUND ........................................................... 77
TIME ................................................................ 78
AUTO-OFF ...................................................... 78
TV .................................................................... 79
IMAGE No. ...................................................... 79
DEFAULT......................................................... 80
Adjusting the LCD Monitor Brightness ................. 81
Taking and Playing Back Photographs on a TV ... 82
About the CD-ROM .............................................. 84
Transferring Images to a PC ................................ 85
System Requirements ..................................... 85
Installing the USB Driver (For Windows 98 Only) .
Installing the USB Driver
(For MAC OS 9.0 or higher) ............................ 86
Downloading Images ....................................... 86
Editing Images ..................................................... 87
Using MGI PhotoSuite ..................................... 87
Using MGI PhotoVista ..................................... 88
Installing Acrobat Reader ..................................... 91
Installing the User’s Manual ................................. 92
Connecting to Other Devices ............................... 93
85
Additional Information
Specifications ....................................................... 94
Warnings and Messages Displayed on
LCD Monitor ......................................................... 97
Troubleshooting ................................................... 98
Glossary ............................................................... 100
Telephone Support Numbers in Europe ............... 101
Ricoh Service Offices........................................... 102
- 4 -
Page 5
Safety Precautions
Read these safety precautions carefully before using the camera. These instructions contain valuable information on
safe and proper use that will prevent harm and damage to the operator and other persons.
Make sure that you fully understand the following details (indications) before proceeding to the main descriptions in
this manual.
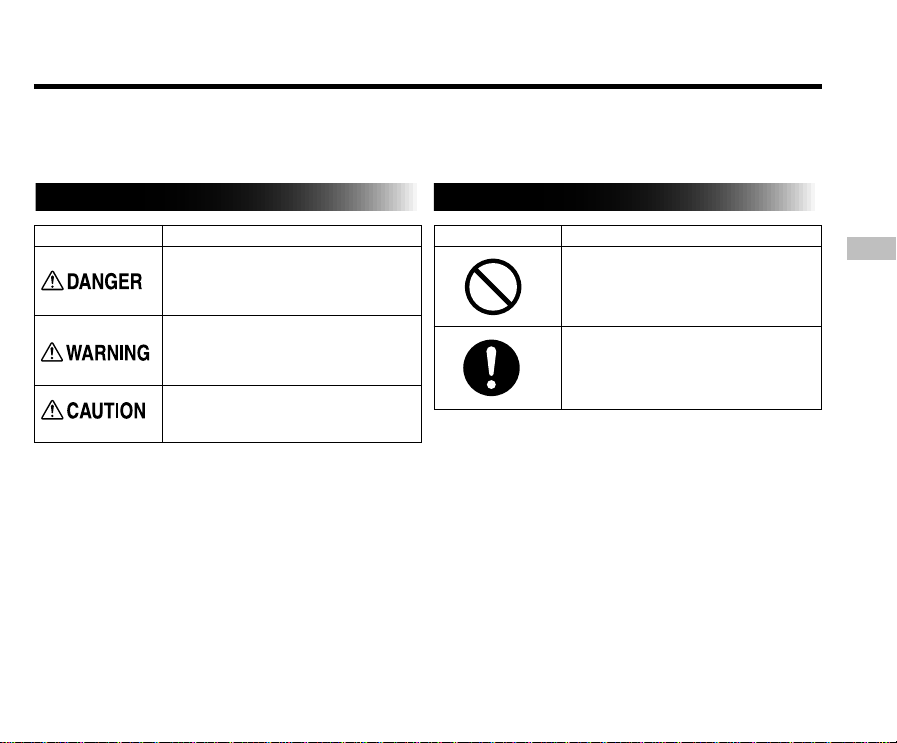
Indication definitions
Indication Meaning
This indicates the existence of a hazard
that could result in death or serious
bodily injury
not observed.
This indicates the existence of a hazard
that could result in bodily injury
safety instruction is not observed.
This indicates the existence of a hazard
that could result in bodily injury
or property damage*2.
*1: “Bodily injury” means injuries, burns, and shock which
does not require hospitalization or prolonged treatment.
*2: “Property damage” means extended harm to home,
household effects, domesticated animals, and pets.
*1
, if the safety instruction is
*1
, if the
*1
Graphic symbol definitions
Graphic symbol Meaning
Indicates a prohibited action that must
not be carried out.
The prohibited action is indicated
graphically in or near the symbol or
described in text.
Indicates a necessary action that must
be carried out.
The necessary action is indicated
graphically in or near the symbol or
described in text
- 5 -
E
Page 6
Safety Precautions (continued)
Do not heat, disassemble or throw the
batteries into fire or water.
Doing this might cause them to rupture, ignite or
heat up, resulting in fire or major injury.
E
Do not strike the batteries with a hammer,
or step on, drop, or subject the battery to
strong impact.
Doing this might cause them to rupture, ignite or
heat up, resulting in fire or major injury.
Should you ever notice smoke, a strange
odor or excessive heat coming from the
camera, immediately turn OFF the power
and remove the batteries and AC adapter.
Continued use in this state might cause fire,
electric shock or burns. For details on repair,
consult the store of purchase, or please contact
the technical support number.
If foreign objects or water have entered the
camera, immediately turn the power OFF
and remove the batteries and AC adapter.
Continued use in this state might cause fire or
electric shock. For details on repair, consult the
store of purchase, or please contact the technical
support number.
If the camera has fallen or its case is
damaged, immediately turn the power OFF
and remove the batteries and AC adapter.
Continued use in this state might cause fire or
electric shock. For details on repair, consult the
store of purchase, or please contact the technical
support number.
- 6 -
Page 7
Safety Precautions (continued)
Do not place the camera on wobbly,
inclined or unstable surfaces.
This might cause the camera to fall or tilt over.
Do not use in areas near water.
This might cause fire or electric shock. Take
special care during rain, snow, on the beach or
near the shore.
Do not use the camera in the bath or
shower.
This might cause a fire or electric shock.
Do not allow metallic objects or other
flammable foreign matter inside the
camera.
This might cause a fire or electric shock. Do not
open the SmartMedia™ cover, and insert or allow
such objects to fall inside.
(continued)
Do not disassemble, change or repair the
camera.
This might cause fire or electric shock. For details
on repair and internal inspection, consult the
store of purchase, or please contact the technical
support number.
Do not touch power or TV antenna cords
during a thunderstorm.
This might cause electric shock.
Do not use the camera while you are
walking, driving or riding a motorcycle.
This might cause you to fall over or result in a
traffic accident.
Use only the specified batteries or the
specified AC adapter.
Use of a battery or AC adapter other than
specified might cause fire, defects or
malfunctions.
- 7 -
(continued)
E
Page 8

Safety Precautions (continued)
(continued)
Keep the batteries out of the reach of
children.
If a child swallows a battery, this might result in
poisoning. If a child swallows a battery,
immediately consult a physician.
E
If battery fluid enters the eyes, immediately
rinse with fresh water and consult a
physician to receive treatment.
If left untreated, damage to the eye could be
permanent.
Use the AC adapter only with the indicated
power supply voltage (120V, 230V AC).
Use with any other power supply voltage might
cause fire or electric shock.
If you want to use the camera on an
airplane, consult the airline and follow their
instructions.
Use of this camera is sometimes restricted due to
potential radio interference.
Do not use the camera in humid, steamy,
smoky or dusty places.
This might cause fire or electric shock.
Do not leave the camera in places where
the temperature may rise significantly, such
as inside a car.
This might adversely affect the case or the parts
inside, resulting in fire.
Do not place or wrap the camera in cloth or
blankets.
This might cause heat to build up and deform the
case, resulting in fire. Use the camera in a well
ventilated place.
- 8 -
Page 9
Safety Precautions (continued)
(continued)
Before you move the camera, disconnect
cords and cables.
Failure to do this might damage cords and
cables, resulting in fire or electric shock.
Do not drop or subject the camera to strong
impact.
This might cause fire, electric shock or
malfunctions.
Before you carry out maintenance on the
camera, remove the batteries and AC
adapter.
Leaving these attached might cause electric
shock.
Remove the batteries and AC adapter if
you plan not to use the camera for a long
time.
This might cause fire.
Insert the batteries paying careful attention
to the polarity (+ or –) of the terminals.
Inserting the batteries with polarities inverted
might cause fire and injury, or damage the
surrounding areas.
Do not look at the sun through the camera
viewfinder.
This could damage the eyes.
Do not use the flash close to eyes.
This might cause temporary damage to eyesight.
Do not walk around with the camera
swinging from the strap.
This might subject the camera to shock as it
bumps into a person or an object, damaging the
camera or causing an injury.
Before you store or dispose of used
batteries tape the plus (+) and (–) terminals
with insulating tape.
If stored or disposed of without doing this, the
batteries may make contact with metal objects,
resulting in fire or injury due to leaking of battery
fluid, overheating or bursting of the battery.
- 9 -
(continued)
E
Page 10
Safety Precautions (continued)
Do not subject the status display to impact.
If the status display is impacted, the glass on the
screen may be broken and internal fluid may
leak.
If the internal fluid enters your eyes or sticks to
E
your body or clothes, immediately rinse with fresh
water. If the internal fluid enters your eyes,
immediately consult a physician to receive
treatment.
Consult your dealer regarding the internal
cleaning of the camera once every two
years.
If dust is allowed to accumulate inside the
camera for a long time, this might result in fire or
defects. Consult your dealer regarding the
cleaning costs.
When replacing the batteries, replace all
four batteries with new ones.
Not doing so might cause them to rupture, ignite
or heat up, resulting in fire or major injury or
damaging the camera.
The new batteries mean “unused batteries
recently purchased” for alkaline batteries or
lithium batteries, and “batteries recently
recharged at the same time” for nickel metal
hydride batteries or nickel-cadmium batteries.
(continued)
(continued)
Do not use different types of batteries
together, or mix old and new batteries.
Not doing so might cause them to rupture, ignite
or heat up, resulting in fire or major injury or
damaging the camera.
Do not remove the batteries immediately
after a prolonged use of the camera.
This might cause burns.
Do not leave dead or exhausted batteries
in the camera.
Not doing so might cause them to rupture, ignite
or heat up, resulting in fire, major injury or
damaging the camera.
- 10 -
Page 11

Using Your Camera Correctly
Notes On Handling Your Camera
● Avoid using or storing the camera in the following places:
• Places subject to humidity, dust and dirt
• Places subject to direct sunlight
• Places subject to high or low temperature
• Places filled with highly flammable gas
• Places near gasoline, benzene or paint thinner
• Places subject to strong vibrations
• Places subject to smoke or steam
• Places subject to strong magnetic fields (such as near motors, transformers or magnets)
• Places contacting chemicals such as pesticides or next to rubber or vinyl products
● Do not expose the camera to sand.
The camera is particularly sensitive to sand. If the camera comes into contact with sand, not only will the
camera become damaged, it will also no longer be repairable.
Pay special attention when using the camera at the beach or where sand or sand dust is likely to be
present.
● Notes On Condensation
Due to a sudden change in temperature, such as when you move the camera from a cold location to a
warm one, water droplets (condensation) may form on the inside of the camera or on the lens. When this
occurs, switch the camera OFF, and wait an hour before using the camera. Condensation may also form
on the SmartMedia™ card. If this happens, remove the SmartMedia™ card, wipe off any water droplets
and wait a short time before using it again.
● Carrying Out Maintenance on Your Camera
• To prevent the lens, surface of the status display or viewfinder from being scratched, blow off any dust
on these parts with a blower brush and lightly wipe with a soft dry cloth.
• Clean the body of the camera with a soft dry cloth. Do not use volatile liquids such as paint thinner,
benzene or insecticide, as these may react with the camera body and cause deformation or remove the
coating.
- 11 -
E
Page 12

Using Your Camera Correctly (continued)
Notes On Handling the AC Adapter
Be sure to use only the specified AC adapter (sold separately). Using a different AC adapter might cause the camera
to malfunction.
When you use the AC adapter, carefully read and strictly observe the Safety Precautions and the notes described
below.
E
• Use the AC adapter with the rating of the country/region where the camera is used.
• Be sure that you do not allow the AC adapter to contact any other metal object as this might cause a
short circuit.
• To connect the AC adapter, firmly insert the plug on the end of the cable into the DC IN 5V terminal. Do
not insert the plug into other terminals. This might cause the camera to malfunction.
• Before you disconnect the connector cable, turn the camera OFF and then disconnect the cable holding
it by its plug. Do not disconnect the connector cable by pulling the actual cable.
• Do not drop the AC adapter or subject it to strong impacts.
• Do not use the AC adapter in very hot and humid locations.
• Do not plug in the AC adapter while you are using the battery. Switch the camera OFF first.
• The AC adapter is for indoor use only.
• Use only the specified AC adapter. Do not use other AC adapters.
• The AC adapter may sometimes become warm during use. This is normal and not a malfunction.
• Buzzing or whirring noises may come from inside the camera. This is normal and not a malfunction.
• Do not use the AC adapter near a radio as it could interfere with radio signal reception.
• If you remove the battery or AC adapter while the camera is in operation, the date may be lost from
memory. If this happens, reset the date.
- 12 -
Page 13
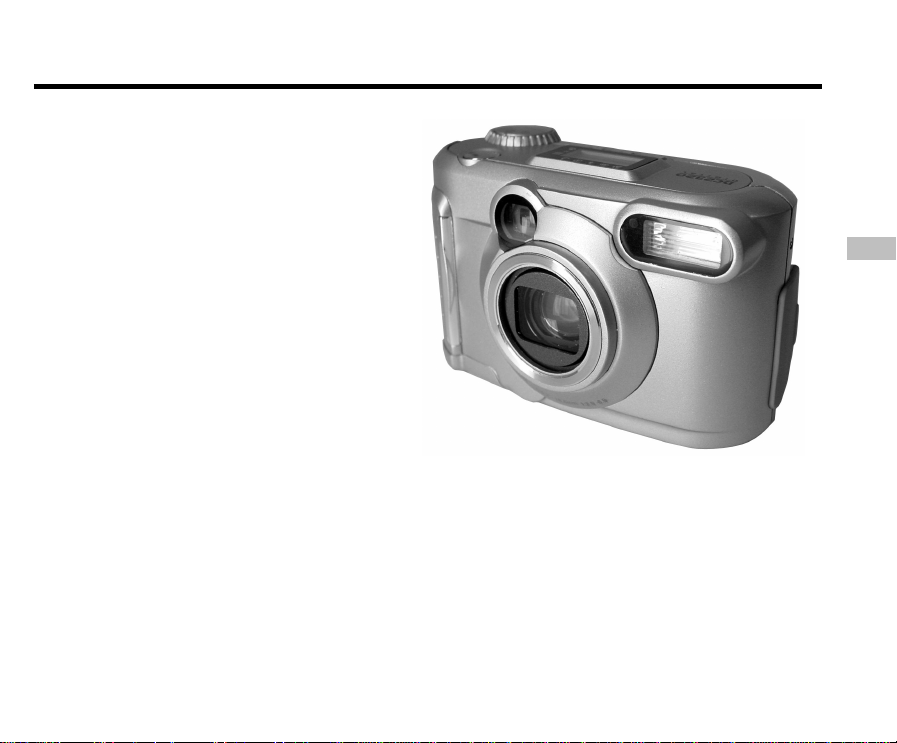
Features
● 3X zoom lens
● USB interface compatible
● High definition 2.2 million pixels
● Extensive photographic functions
• Auto/Flash/Macro/Self-timer
• Multi mode (16 continuous images in one frame)
• Bulb mode for night and creative photography
• Color/Black-and-white photography, etc.
● Image size and quality easily selectable
• Size (1792 x 1200 or 896 x 600 pixels)
• Quality (FINE/NORMAL/BASIC)
● Status display
• Settings can be verified even when LCD monitor is OFF.
● SmartMedia™ card
• Up to 128MB capacity
● Compatibility
• Image recording method compliant with DCF.
E
- 13 -
Page 14
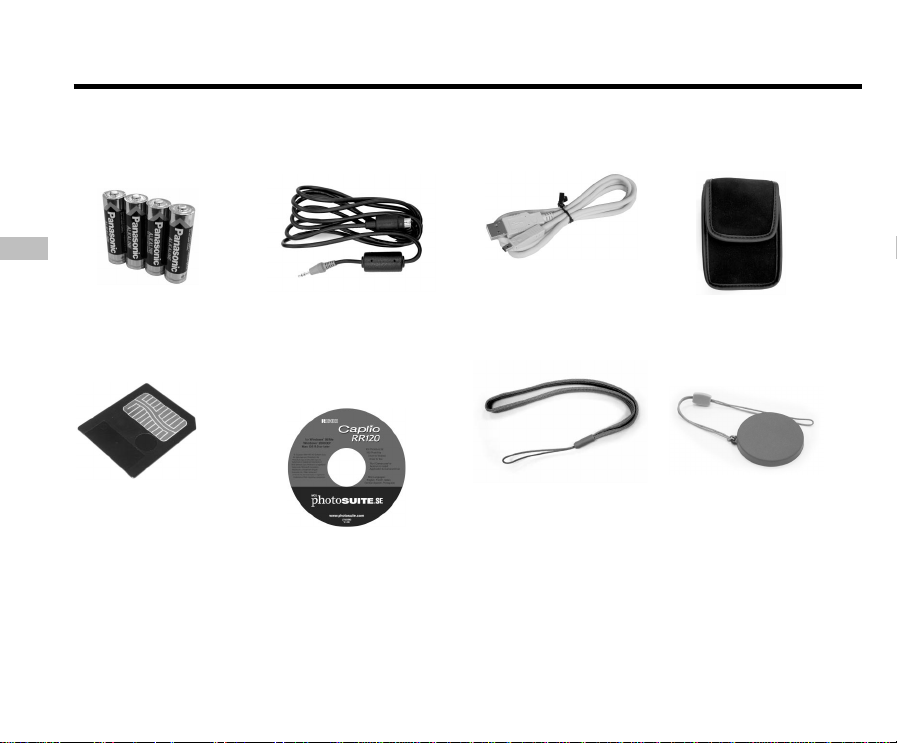
Accessories
Make sure that you have all of the items below before you start using your camera.
Batteries (4 size AA)
Alkaline
E
SmartMedia™ card
(8MB, 3.3V) (1)
• Anti-static case (1)
• Index labels (2)
• Write-protect stickers (4)
Video cable
CD-ROM
• USB driver (for Windows 98)
• Software application
• User's manual • Acrobat reader
- 14 -
USB cable
Wrist strap
Soft case
Lens cap
(with lens strap)
AC adapter
(Optional)
Page 15

Names of Parts
Status
LCD
Mode dial
Shutter button
Viewfinder window
Lens
Image Quality button
Flash button
Self-timer button
Macro button/
E
Self-timer lamp
Flash
Terminal cover
• DIGITAL terminal
• VIDEO terminal
• DC IN 5V terminal
- 15 -
Page 16
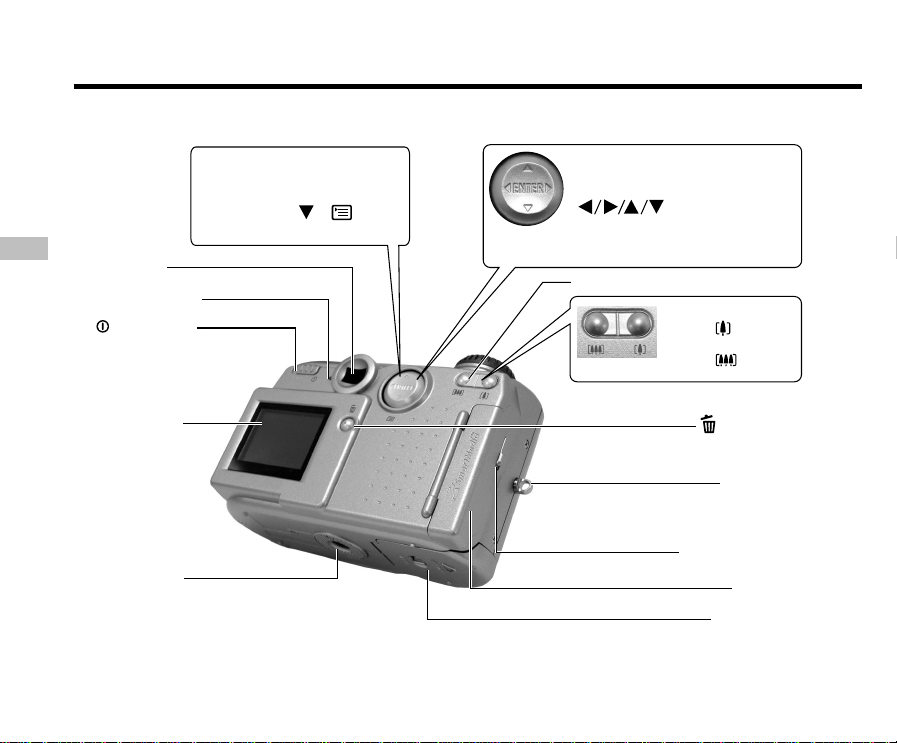
Names of Parts (continued)
MENU button
In Manual Photography mode, Auto
Photography mode or Playback
mode, press the
to display MENU.
E
Viewfinder
( ) button
Viewfinder lamp
Power switch
LCD monitor
ENTER button
Press the center of the button.
(Use this button to comfirm a selection.)
Press the button on the required side.
(Use these buttons to select an item or
an image.)
(cross pad) button
Zoom key
Telephoto (zoom)
Press .
Wide
Press .
Erase button
Strap eyelet
Card door release
Tripod mount
Card door
Battery cover
- 16 -
Page 17
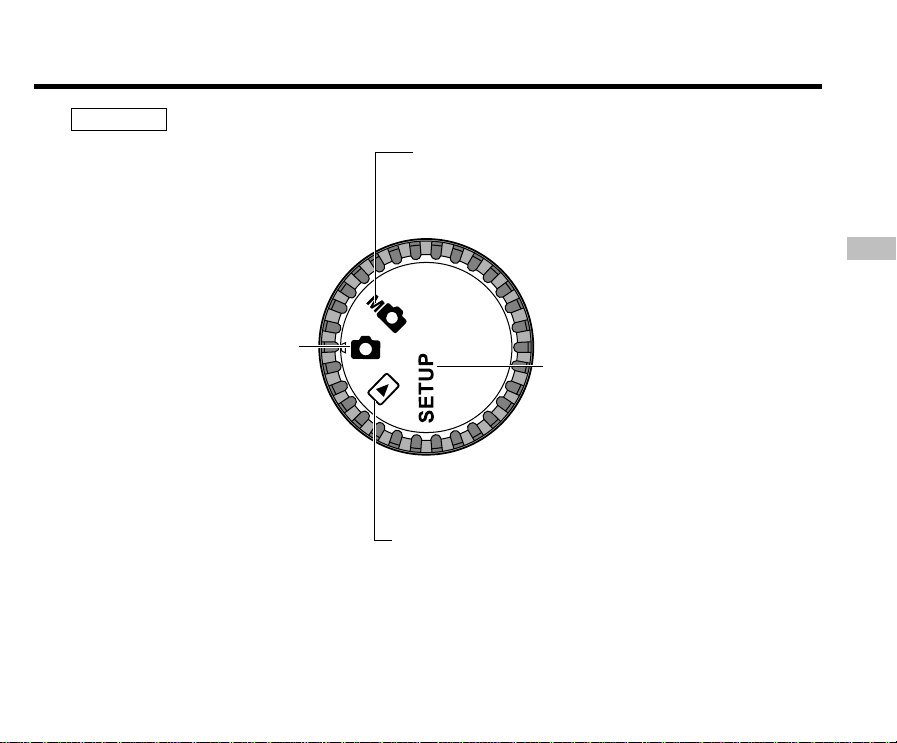
Names of Parts (continued)
Mode dial
Auto Photography mode
This is the most commonly used
photography mode.
In this mode, exposure
(combination of shutter speed and
aperture) is automatically
controlled to facilitate photography.
Manual Photography mode
Allows white balance and exposure to
be set manually.
SETUP mode
Sets basic camera settings
(power OFF time, sound, time,
display language, image number,
TV setting and reset).
Playback mode
Selects the image playback or
protect mode, resize,
compression and other settings.
E
- 17 -
Page 18
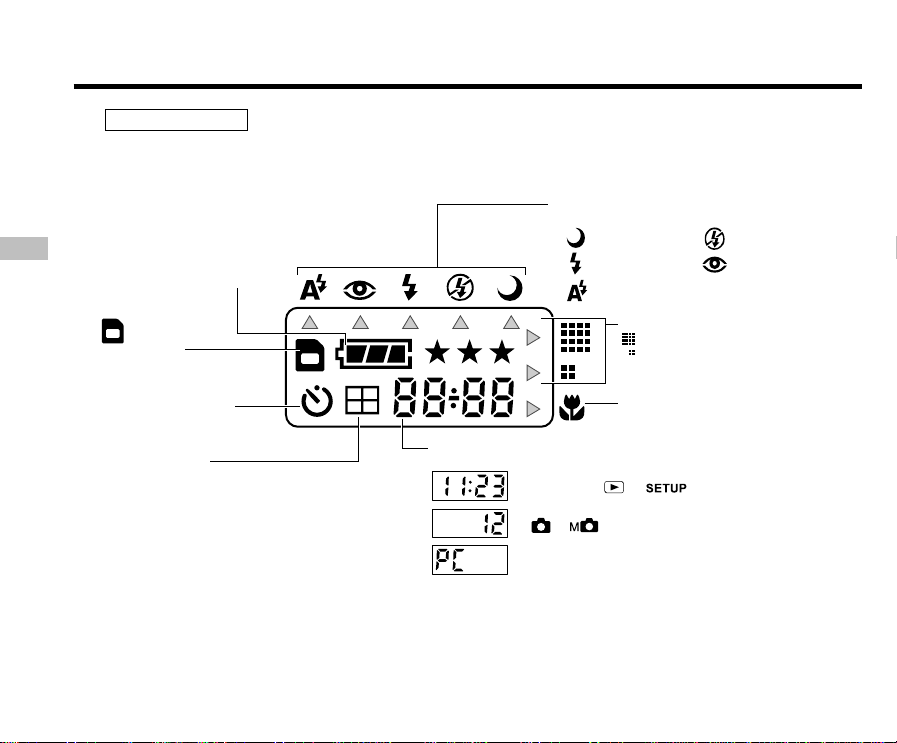
Names of Parts (continued)
Status display
This display indicates the camera’s status. You can verify the camera’s status even if the LCD monitor is
not on.
The text, numbers and icons that are displayed vary according to the settings.
E
Remaining battery power
SmartMedia™
loaded symbol
Flash photography
No indication: Auto
: Slow sync
: Forced flash
: Auto
Image quality
1792x1200 pixels
896x600 pixels
: Suppressed flash
: Red-eye reduction
★★★: FINE
★★: NORMAL
★: BASIC
Self-timer photography
Multi photography
Macro photography
Example of counter display
(The display varies according to the mode dial setting.)
Time display (in or mode)
Possible number of shots
(in or mode: during
image photography)
PC indicator
(appears when camera is connected to PC via USB cable)
- 18 -
Page 19
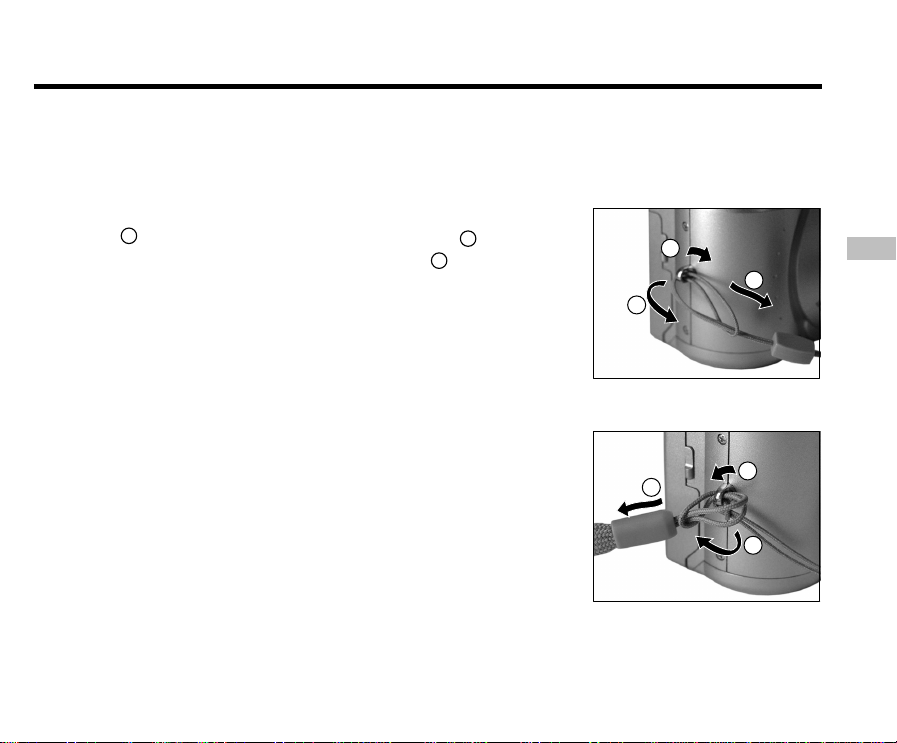
Attaching the Strap
The two figures below illustrate how to attach the lens strap and wrist strap.
Attach the lens strap and cover the camera lens with the lens cap to protect the camera lens from any unexpected
damages while the camera is not being used.
Attach the wrist strap and put it around your wrist to prevent your camera from slipping during use.
1.Thread one end of the lens strap through the strap eyelet
1
and pull the other end through the loop
loop fits tightly against the strap eyelet
2. Attach the wrist strap in the same way.
3
2
.
until the
1
3
2
1
3
2
E
- 19 -
Page 20
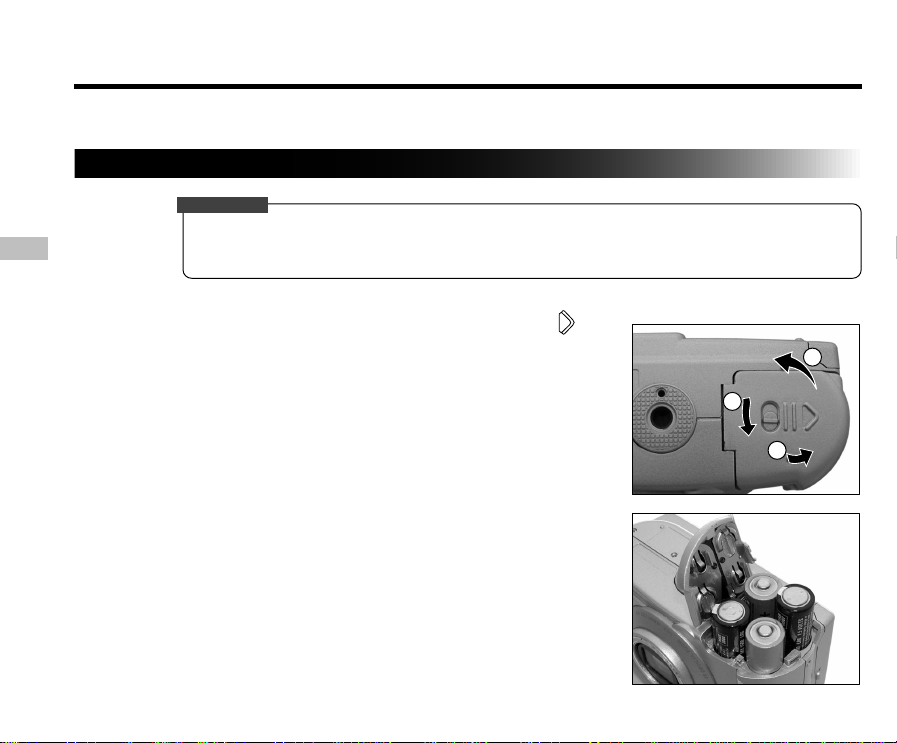
Installing the Batteries
This camera uses four (4) size AA batteries.
Loading the Batteries
IMPORTANT
• Before you load or remove the batteries, be sure to turn the camera off.
E
• The camera may not start normally if you load batteries with the power on. If this happens, turn the
camera off, then turn it on again.
1. Slide the battery door in the direction of the arrow to
open.
2. Load the batteries in the battery compartment, making
sure that the polarities (+ and - signs) are correct.
3
1
2
- 20 -
Page 21
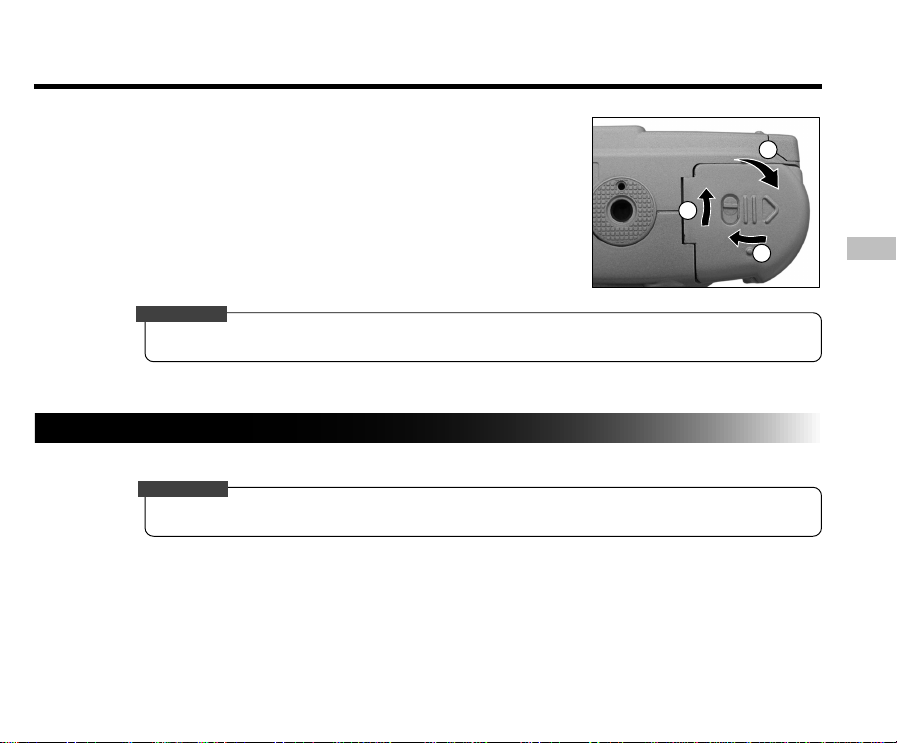
Installing the Batteries (continued)
3. Close the battery door and move the lock switch in the
direction of the Lock arrow.
1
3
IMPORTANT
• Make sure that the battery door is firmly closed.
Removing the Batteries
Reverse the procedure for "Loading the Batteries" to remove the batteries.
IMPORTANT
• When removing the batteries, take care not to drop the camera or the batteries by mistake.
- 21 -
2
E
Page 22
Installing the Batteries (continued)
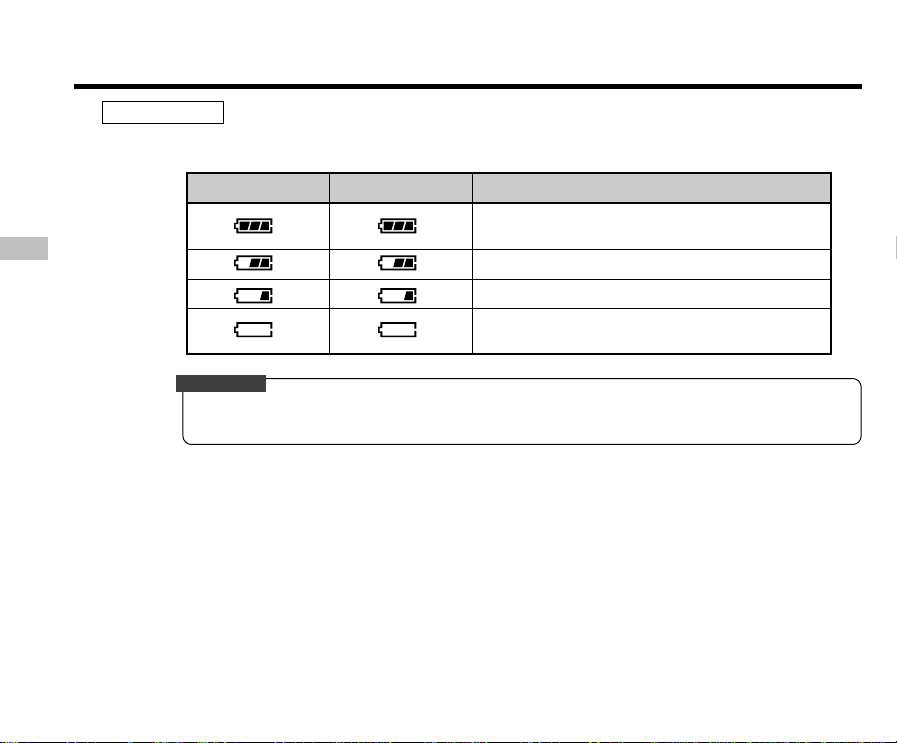
Battery Wear
When the power is ON, the remaining battery power is displayed on the LCD monitor and the status
display.
LCD Monitor
E
IMPORTANT
• When you remove the batteries, the date and time may return to the default setting. If this happens, set
them again when using the camera.
Status Display
[FULL] Sufficient battery power, or the AC
adapter is connected.
[HALF] Half battery power or less
[LITTLE] Little battery power left
[EMPTY] No battery power left. Replace with
new batteries.
Remaining Battery Power
- 22 -
Page 23
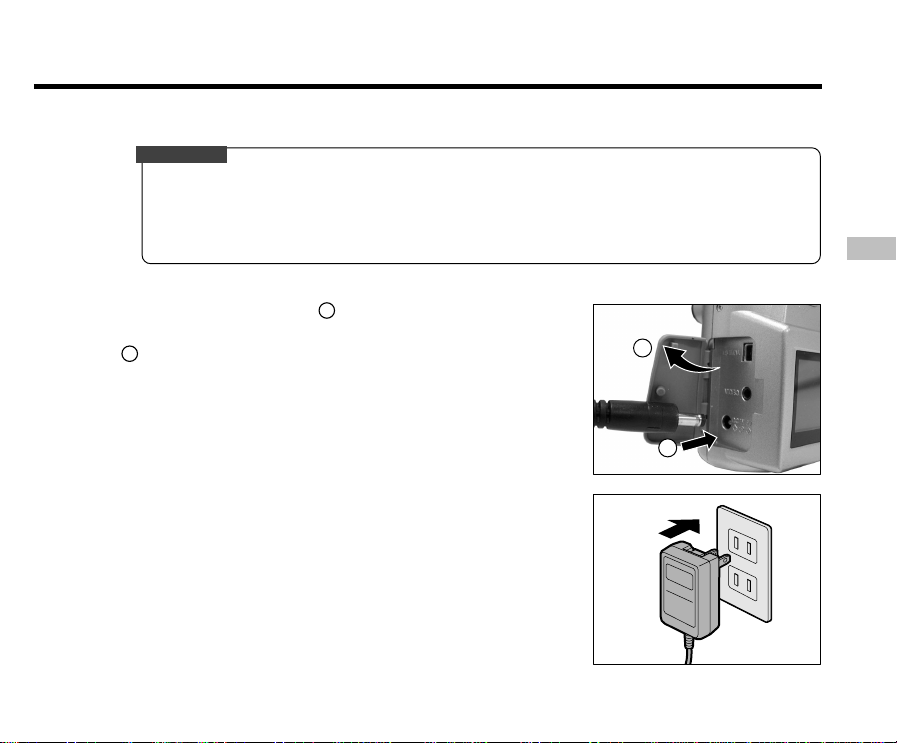
Using a Power Outlet
If you use the AC adapter in a room with a power outlet, you can take photographs for an extended period of time.
This also prevents mechanical failures or data transfer failures due to battery wear.
IMPORTANT
• Before you connect or disconnect the AC adapter, be sure to turn the camera off. If the AC adapter is
connected or disconnected with the power ON, the camera may malfunction or the recorded data may be
erased (destroyed) even if the batteries are loaded.
• The camera may not start normally if you load batteries with the power on. If this happens, turn the
camera off, then turn it on again.
E
1. Open the terminal cover , and insert the AC adapter
1
connector plug into the DC IN 5V terminal on the camera
2
.
2. Insert the AC adapter power plug into the power outlet.
- 23 -
1
2
Page 24
About SmartMedia™ Cards
The SmartMedia™ card is a storage medium for saving images that you have photographed. Even if the camera’s
power is turned OFF, the images saved on the SmartMedia™ card are not erased. SmartMedia™ cards can be
repeatedly read and written.
SmartMedia™ cards having the following storage capacity can be used on your camera.
4MB/8MB (standard accessory)/16MB/32MB/64MB/128MB (all 3.3 V types)
E
Notes on SmartMedia™ Cards
• Recorded data may be erased (destroyed) in the situations listed below.
- When the SmartMedia™ card is used incorrectly by the user or a third party
- When the SmartMedia™ card is exposed to static electricity or electrical noise
- When the SmartMedia™ card is removed or the camera is then switched OFF during data
recording, data erasing, frame advance when images are being played back or during formatting
of the SmartMedia™ card.
• We recommend copying and saving important data onto another storage medium (floppy disk, hard
disk, MO disk, etc.).
• Never remove the SmartMedia™ card or switch the camera OFF during data recording or during data
erasing (SmartMedia™ card formatting). These actions might damage the SmartMedia™card.
• Use only the SmartMedia™ cards specified for use with the camera. The use of other SmartMedia™
cards could damage the camera.
• SmartMedia™ cards are precision electronic devices. Do not bend, drop, or subject SmartMedia™
cards to excessive shocks. Also, do not carry SmartMedia™ cards in locations such as a trouser
pocket. This might subject the SmartMedia™ card to excessive force when you sit down, damaging the
SmartMedia™ card.
• Do not use or store SmartMedia™ cards in environments likely to be affected by strong static electricity
or electrical noise.
• Do not use or store SmartMedia™ cards in very hot, humid or corrosive environments.
- 24 -
Page 25
About SmartMedia™ Cards (continued)
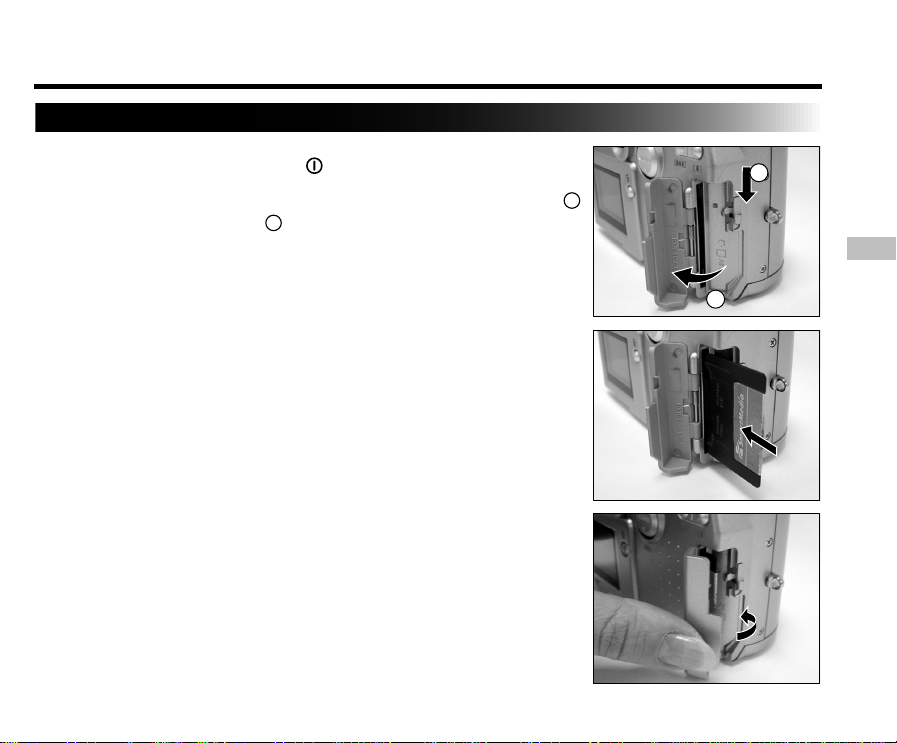
Loading the SmartMedia™ Card
1. Slide the power switch
2. Slide the card door release in the direction of the arrow
to open the cover 2 .
3. Gently insert the SmartMedia™ card as far as it can go
with the SmartMedia™ card electrodes (metal contacts)
facing the front of the camera.
4. Close the card door.
Before you use a new SmartMedia™ card, be sure to
format the SmartMedia™ card.
to turn off the power.
1
1
E
2
- 25 -
Page 26
About SmartMedia™ Cards (continued)
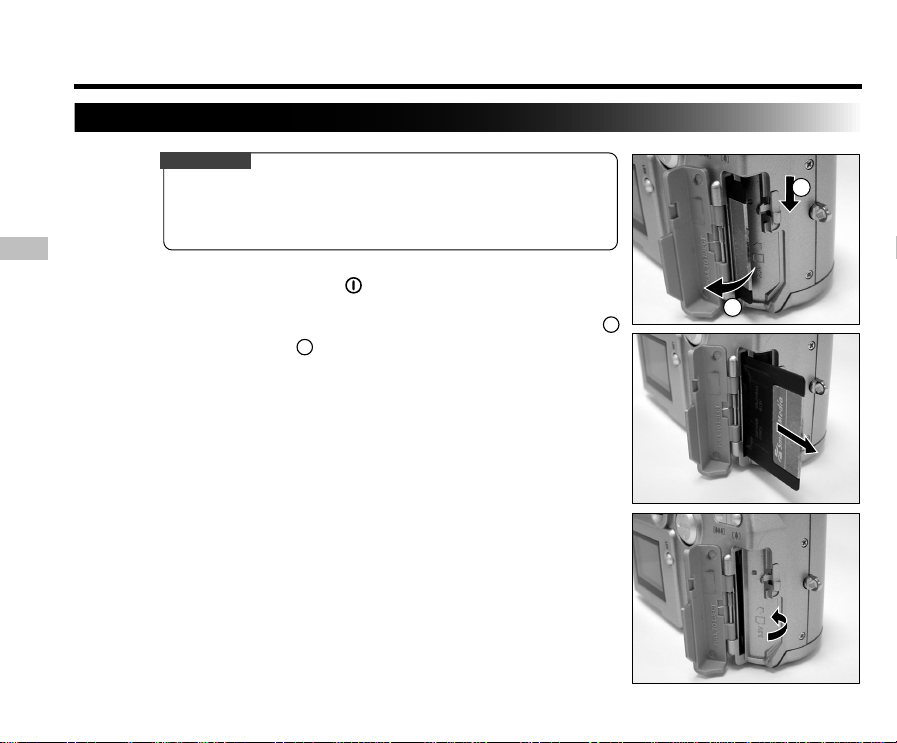
Removing the SmartMedia™ Card
IMPORTANT
• Never open the card door or remove the SmartMedia™ card while
data is being recorded to the SmartMedia™ card (viewfinder lamp
flashes). This might damage the SmartMedia™ card or corrupt the
data on the SmartMedia™ card.
E
1. Slide the power switch
2. Slide the card door release in the direction of the arrow
to open the door 2 .
3. Pull the SmartMedia™ card out with your fingers.
4. Close the card door.
to turn off the power.
1
2
1
- 26 -
Page 27
About SmartMedia™ Cards (continued)
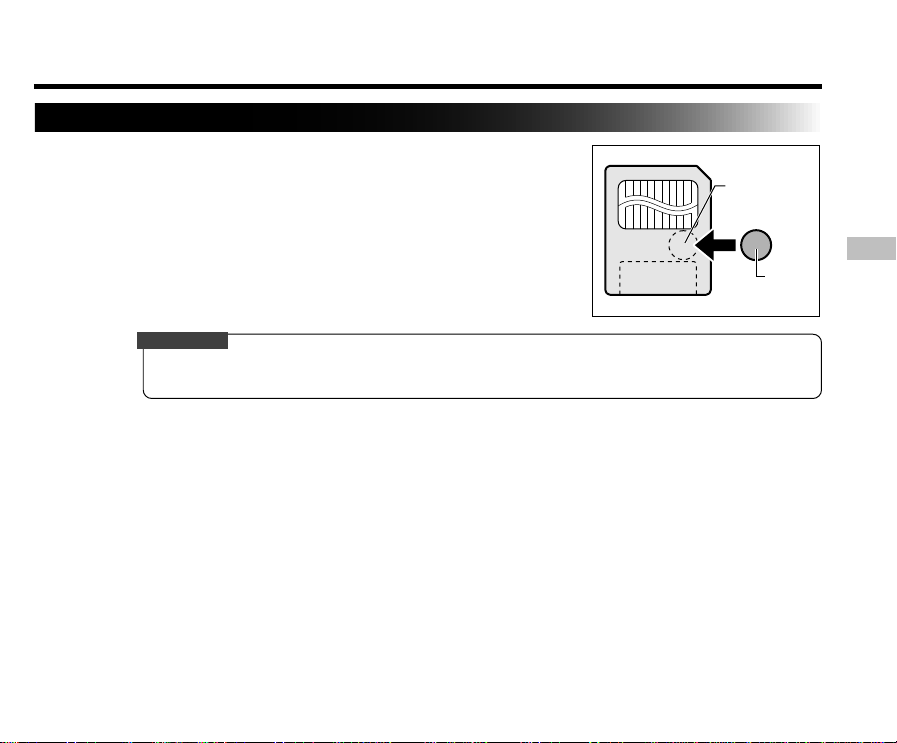
Write Protection
To prevent valuable data from being erased inadvertently, attach the
write-protect sticker at the write-protect area. Data can no longer be
recorded or erased from the SmartMedia™ card. To write or erase
data from the SmartMedia™ card, peel off the sticker.
IMPORTANT
• The write protection may not function if the write-protect sticker becomes dirty. Use a soft dry cloth to
wipe away any dirt. Once a sticker is peeled off it cannot be used again.
Write-protect
area
Sticker
E
- 27 -
Page 28

Turning the Power ON/OFF
Turning the Power ON
1. Make sure that the SmartMedia™ card is correctly loaded.
2. Slide the power switch
the mode dial to the desired mode.
E
Remove the lens cap during photography.
In the or modes, the lens extends from the camera body.
When the camera is turned ON, the Auto Power OFF function starts
to work.
IMPORTANT
• If no operation is carried out for a fixed amount of time (default: about 1 minute), the power is turned off
to prevent battery wear. This is called “Auto Power OFF”.
Turning the Power OFF
to turn on the power and set
1. Slide the power switch
The power is turned off, and the lens returns to its original position in
the body.
to turn off the power.
- 28 -
Page 29
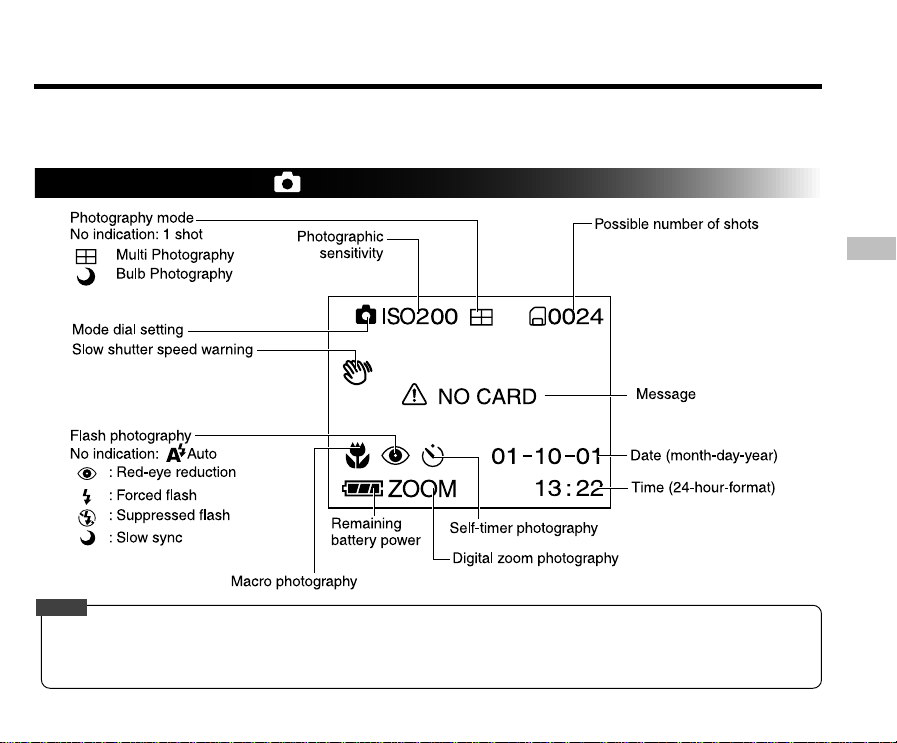
LCD Monitor Display
The text, numbers and icons that are displayed on the LCD monitor vary according to the current settings.
To erase text currently displayed on the LCD monitor, use the DISPLAY function in the MENU.
The LCD monitor automatically turns ON if necessary even if it is set to OFF.
In Photography Mode
(at current size and quality)
Appears when shutter speed is too
slow to prevent blurring of images
Note
• The size of the data to be recorded varies according to the amount of detail in the subject image. So, the number of images
that can be photographed after an image is recorded decreases. Sometimes this amount decreases by two images.
• The display is momentarily disrupted after recording an image or the mode is switched. This does not affect photography.
- 29 -
E
Page 30
LCD Monitor Display (continued)
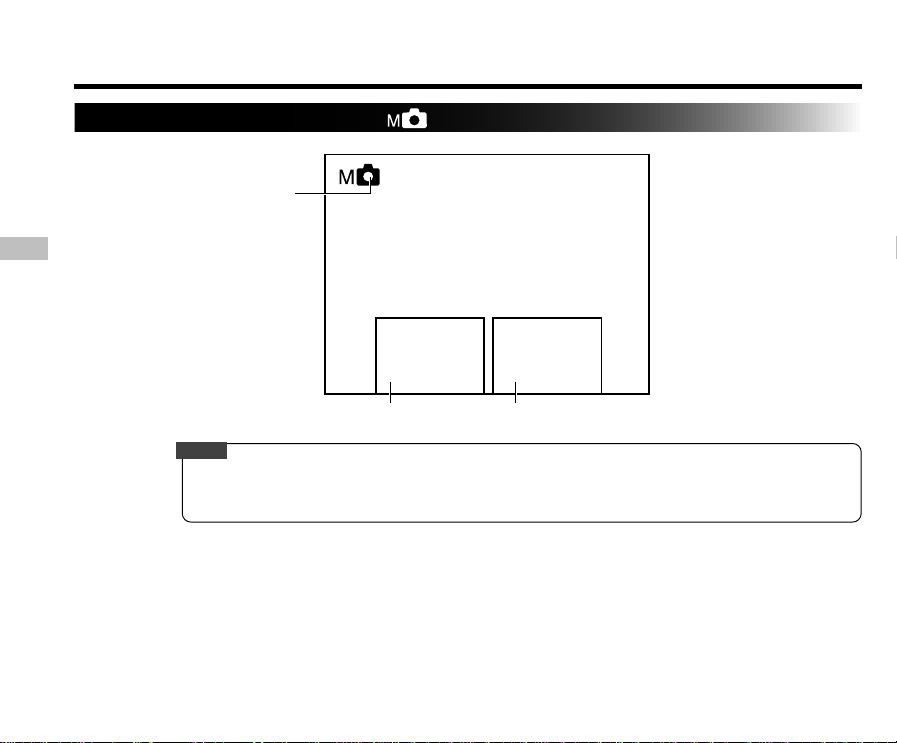
In Manual Photography Mode
Mode dial setting
E
W.B.
AUTO
White Balance Setting Exposure Compensation Setting
Note
• The display is momentarily disrupted after recording an image or the mode is switched. This does not
affect photography.
- 30 -
E.V.
0
Page 31
LCD Monitor Display (continued)
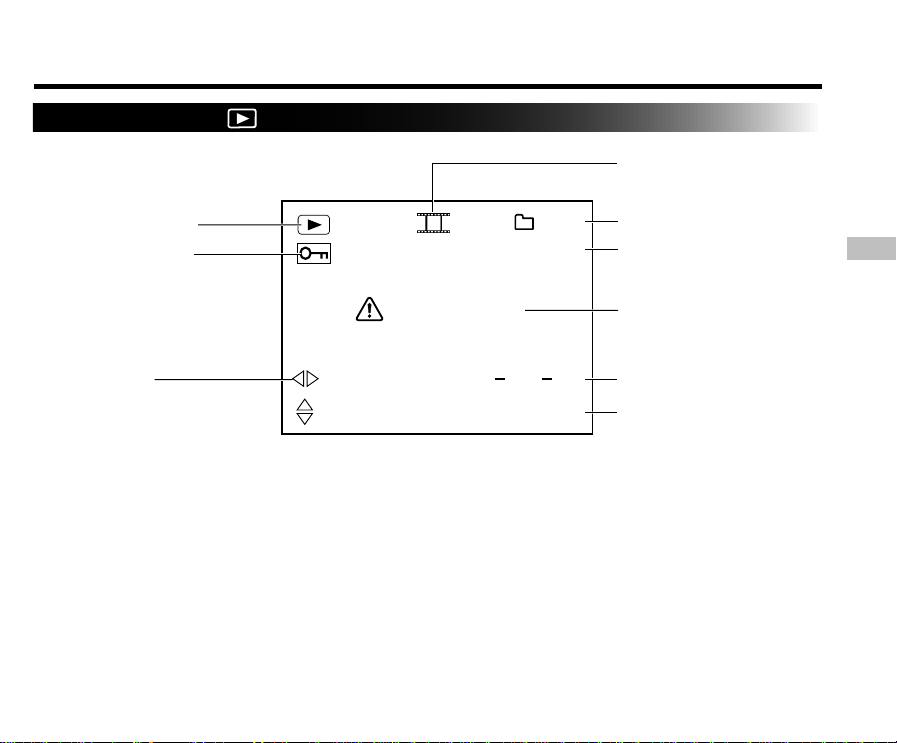
In Playback Mode
Slideshow
Mode dial setting
Protected image
Image size
1792
1200
NO IMAGE
01 10 01
- 31 -
100
0003
13:22
Folder number
Image number
Message
Date (month-day-year)
Time (24-hour-format)
E
Page 32
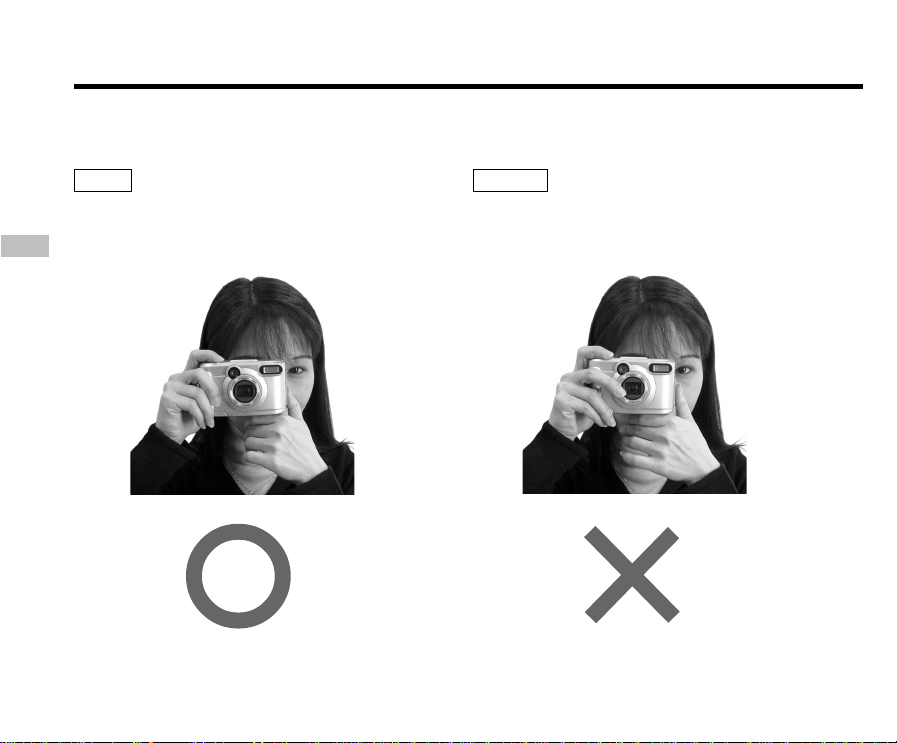
How to Hold Your Camera
When taking a photograph, hold the camera firmly and prevent your finger or straps from covering the lens or flash.
Right
Camera held with both hands with your arms
firmly held against the sides of your chest
E
Wrong
Fingers held over the lens
- 32 -
Page 33
How to Press the Shutter Button
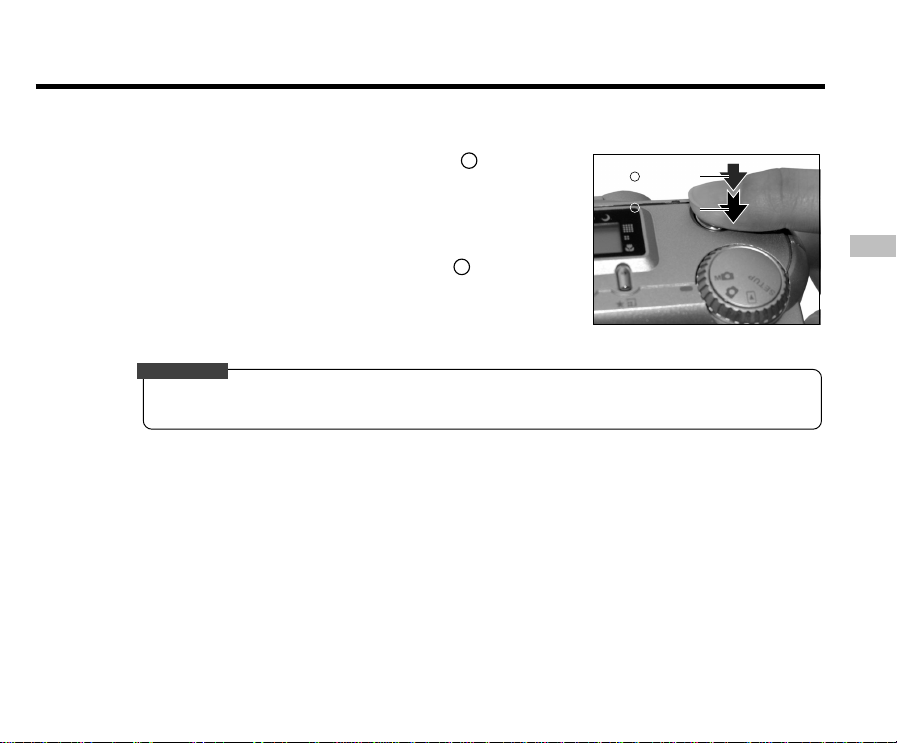
The shutter button can be pressed down in two stages: halfway down and fully down. When pressed halfway down,
AF (auto-focus) and AE (auto exposure) are carried out. When pressed fully down, the camera takes a picture.
1. Press the shutter button down halfway .
AF (auto-focus) and AE (auto exposure) start to function.
When AF or AE are locked, the beep tone sounds and the viewfinder
lamp lights.
1
1
Press down
halfway.
2
Press down
fully.
2. Then press it the rest of the way down 2 .
The camera takes a picture.
The viewfinder lamp flashes while image data is being recorded onto
the SmartMedia™ card.
IMPORTANT
• Never open the card door or remove the SmartMedia™ card while an image is being recorded. This may
corrupt the data on the SmartMedia™ card or damage the SmartMedia™ card itself.
- 33 -
E
Page 34
How to Press the Shutter Button (continued)
Note
• If the shutter button is pressed all the way down, photographs cannot be taken until AF and AE are
locked.
• The image in the LCD monitor sometimes darkens from the time that the shutter button is pressed down
half way until the image becomes focused.
• To focus or expose a position outside the center of the screen frame, move the subject you are taking to
the center of the screen frame, and press down the shutter button halfway and hold it until the camera
E
beeps. Now, with the shutter button held down, return to the original picture that you composed and
press the shutter button the rest of the way down. Moving the camera as you press the shutter button will
result in a blurred image.
• The camera uses an accurate auto focus mechanism. However, the camera may have difficulty focusing
or not be able to focus at all for subjects and situations such as the following:
- Subjects moving at high speed
- Very shiny subjects such as a mirror or car
body
- Extremely low contrast subjects
- Subjects that have low contrast and merge into
the background (such as white walls or
subjects dressed in the same color as the
background)
• If the image cannot be focused, the focus is automatically fixed to infinity. When the flash is necessary at
this time, it is simultaneously fixed to illuminate objects five feet (1.5 meters) away.
- When the subject is distant and dark
- When there are objects in front of or behind the
subject (such as an animal in a cage or a person
in front of a tree)
- Subjects with little reflection, such as a hair or fur
- Subjects with no solidity, such as smoke or flames
- Subjects viewed through glass
- 34 -
Page 35
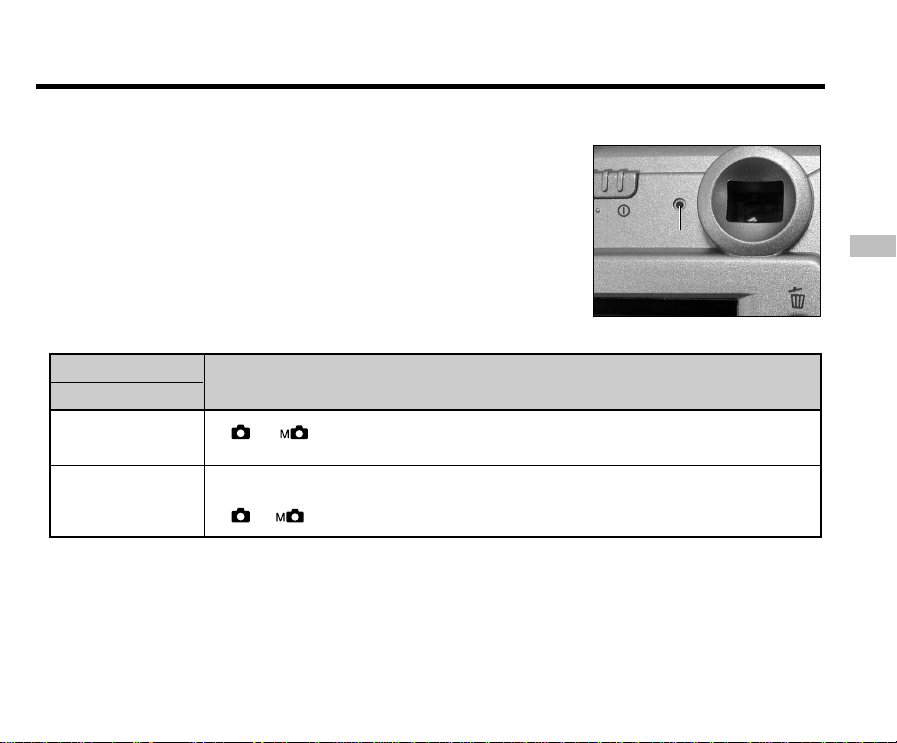
About the Viewfinder Lamp
The viewfinder lamp indicates the state of the camera. The meaning of the lamp may differ according to the mode
dial setting.
Viewfinder Lamp
State
ON
Flashing
Viewfinder Lamp
Meaning
or AE or AF are locked with the shutter button held halfway down.
[Power ON] Writing to SmartMedia card in progress
Do not turn off the power
or Lens cannot focus because of obstacle.
- 35 -
E
Page 36
Auto Photography
This is the most commonly used photography mode.
In this mode, exposure (combination of shutter speed and aperture) is automatically controlled to facilitate
photography. There are two ways of taking photographs in this mode: using the viewfinder and using the LCD
monitor.
Using the Viewfinder
E
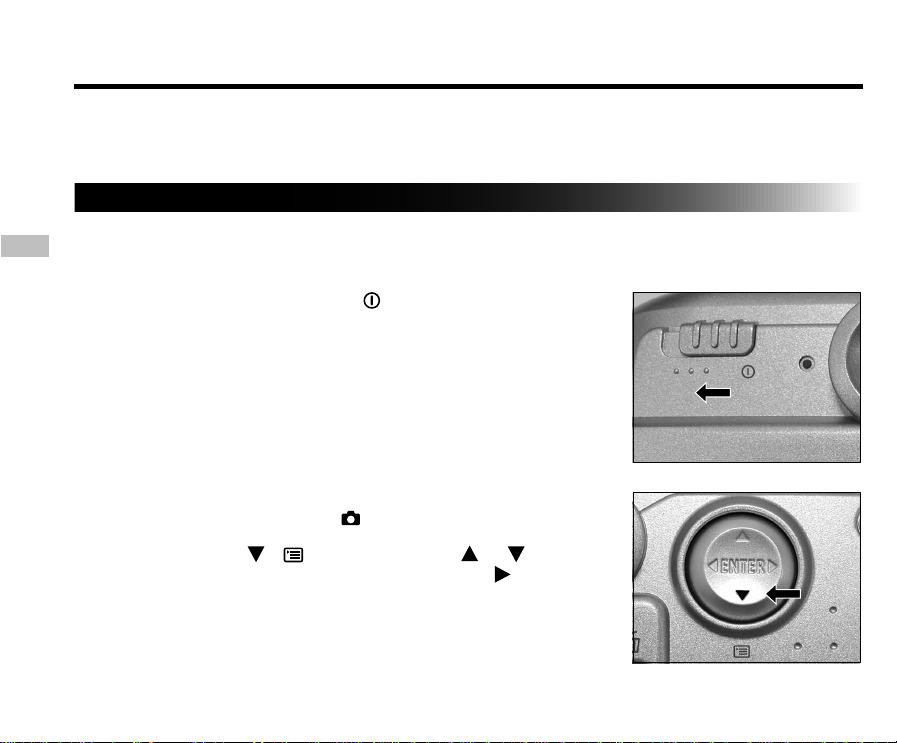
1. Get ready to take the photograph.
Load the batteries and the SmartMedia™ card into the camera.
2. Slide the power switch
3. Set the mode dial to .
4. Press the
select the DISPLAY item and press the
Select OFF to turn the LCD monitor display off.
To reduce the amount of battery wear, we recommend turning the LCD
monitor display OFF, and using the viewfinder to take photographs.
( ) button. Use the or buttons to
to turn on the power.
button.
- 36 -
Page 37
Auto Photography (continued)
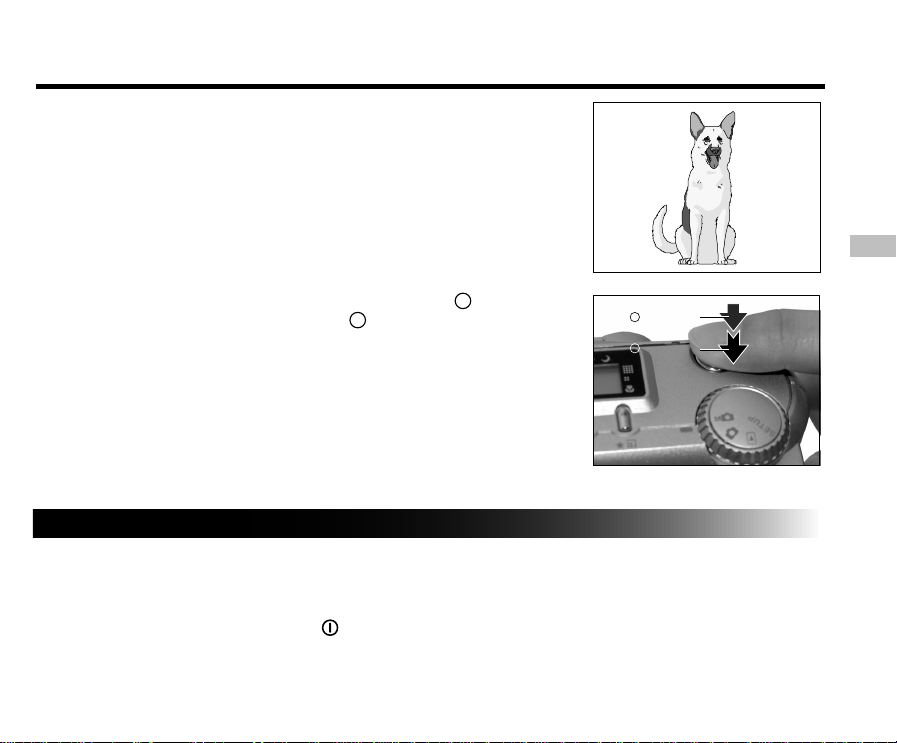
5. Look through the viewfinder to compose the picture.
6. Press the shutter button down halfway
it the rest of the way down
• Pressing the shutter button down halfway adjusts the exposure, and
pressing the shutter button the rest of the way down takes the shot.
• When the focus and exposure are adjusted, the viewfinder lamp
lights.
• If you shoot a picture when preview is ON, a preview image is
displayed on screen for about two seconds.
• The viewfinder lamp flashes while image data is being recorded onto
the SmartMedia™card.
Using the LCD Monitor
1. Get ready to take the photograph.
Load the batteries and the SmartMedia™ card into the camera.
2. Slide the power switch
2
.
to turn on the power.
, then press
1
1
Press down
halfway.
2
Press down
fully.
E
- 37 -
Page 38
Auto Photography (continued)
3. Set the mode dial to .
4. Look at the image on the LCD monitor to compose the picture.
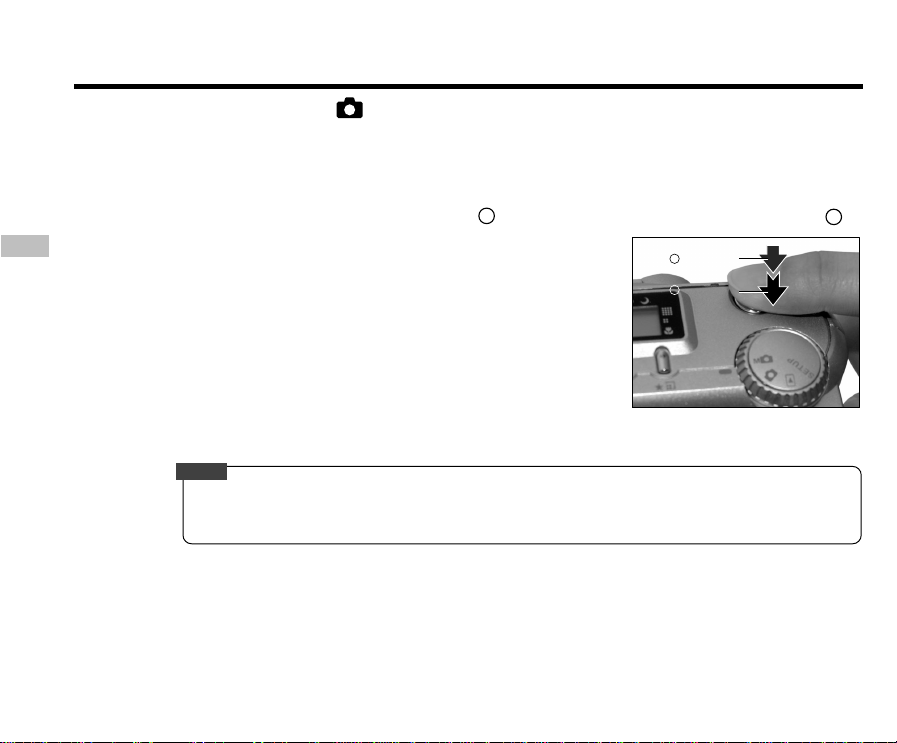
5.
Press the shutter button down halfway
E
• Pressing the shutter button down halfway adjusts the exposure, and
pressing the shutter button the rest of the way down takes the shot.
• When the focus and exposure are adjusted, the viewfinder lamp
lights.
• If you shoot a picture when preview is ON, a preview image is
displayed on screen for about two seconds.
• The viewfinder lamp flashes while image data is being recorded
onto the SmartMedia™ card.
Note
• The LCD monitor sometimes displays bright, dark or colored spots at all times. This is not a malfunction.
These spots do not appear in the photographed image.
• The image is not displayed on the LCD monitor while the shutter button is pressed down fully.
1
, then press it the rest of the way down 2 .
1
Press down
halfway.
2
Press down
fully.
- 38 -
Page 39
Setting the Image Size and Quality
Set the size (number of pixels) and quality (compression ratio) of the image to be photographed.
Change the setting according to how the image is to be used and the remaining amount of space in the
SmartMedia™ card.
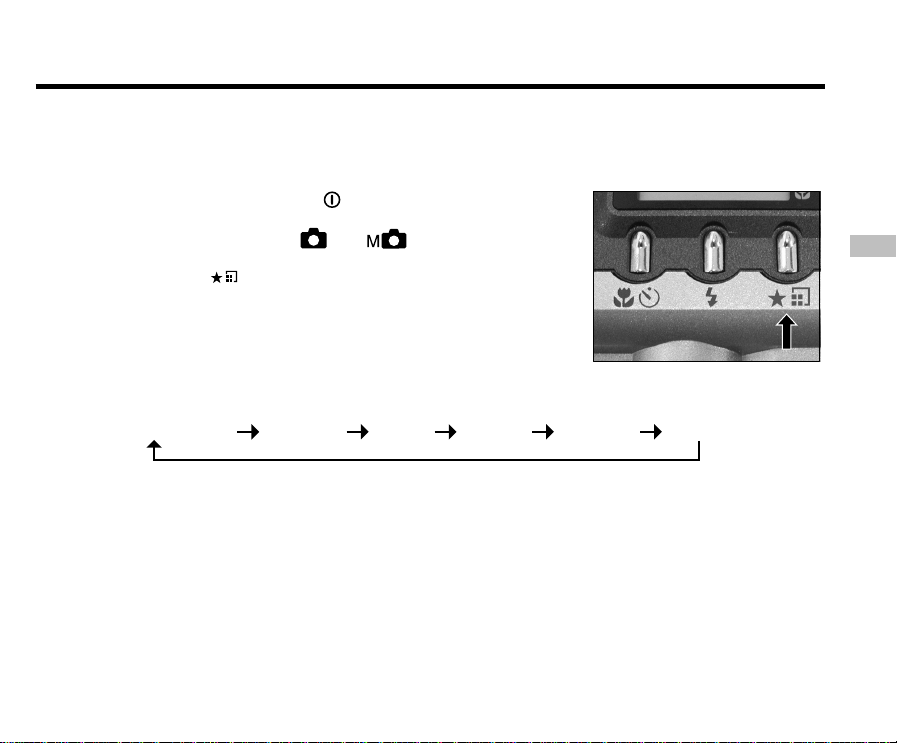
1. Slide the power switch
2. Set the mode dial to
3. Press the
image quality button to set the required
to turn on the power.
or .
quality and size while viewing the image on the status
display.
Pressing the image quality button displays the available qualities and
sizes in order. Select from the available combinations of quality and
size.
★★FULL (default) ★★★FULL ★FULL★★★HALF★★HALF★HALF
Quality [★★★] FINE : Low compression
Size [FULL] 1792 x 1200 pixels, [HALF] 896 x 600 pixels
[H★★] NORMAL : Middle compression
[HH★] BASIC : High compression
The more stars there are, the better image quality becomes. Higher quality images, however,
take up more memory space, reducing the number of images that can be taken.
The FULL setting improves the quality of the image. Higher quality images, however, take up
more space, reducing the number of images that can be taken.
- 39 -
E
Page 40
Setting the Image Size and Quality (continued)
4. Take the photograph.
Note
• To make the image become smaller, it is recommended that you reduce the image size first. If this step
cannot meet your needs, then you can reduce the image quality as an additional means.
E
• After you have taken a photograph, you can change its size and quality.
• The size of the image varies according to the subject.
• The settings are not canceled even if the camera is turned off or the Auto Power OFF function is
activated.
• The settings are canceled when you remove or insert the batteries or disconnect or connect the AC
adapter.
- 40 -
Page 41
Zoom Photography
Zoom photography allows you to take telephoto and wide-angle shots.
1. Slide the power switch
2. Set the mode dial to
to turn on the power.
or .
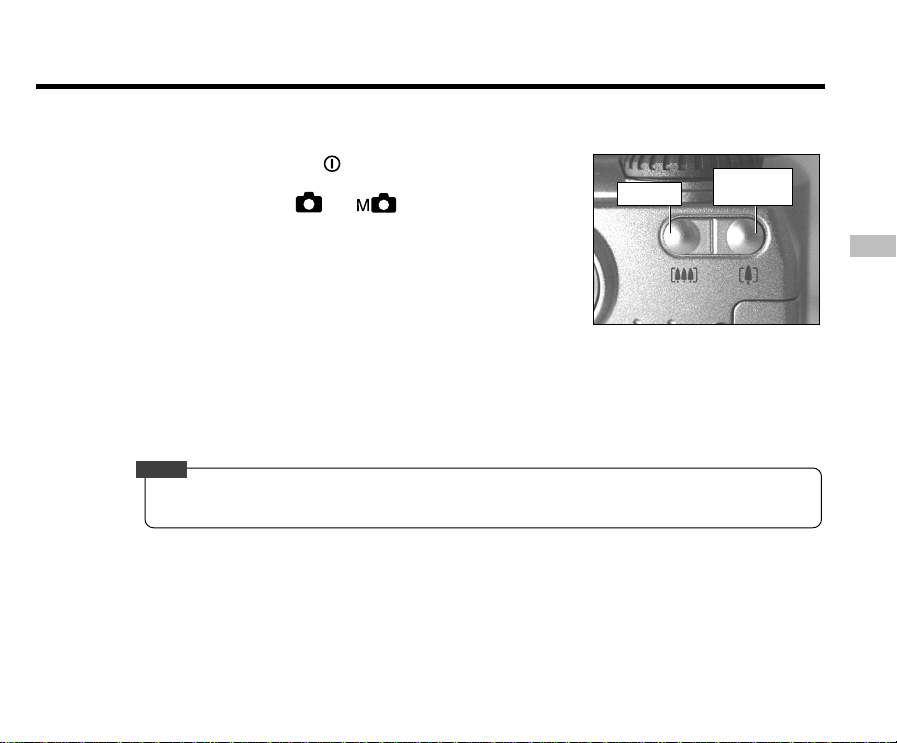
Wide key
T elephoto
(zoom) key
3. Compose the picture using the Zoom key.
• Pressing the Telephoto (zoom) key zooms in on the subject, and
enlarges the subject on the LCD monitor.
• Pressing the Wide key provides a wider angle picture.
• The lens position moves according to the Zoom key setting.
4. Press the shutter button down halfway, then press it the rest of the way down.
Note
• The Zoom key setting is automatically canceled by either turning the camera off or by the activation of
the Auto Power OFF function.
- 41 -
E
Page 42
Digital Zoom Photography
This function enlarges the center of the image displayed on the screen so that it appears that the photographed
image is enlarged twice its size.
The LCD monitor automatically turns ON in this mode. Take pictures while viewing the image in the LCD monitor.
1. Set the mode dial to or .
In the Manual Photography mode, press the ENTER button to set the manual setup screen to non-
E
display.
2. Press the Telephoto (zoom) key as far as it can go.
ZOOM is displayed in the LCD monitor and the center of the screen is enlarged to twice the original size.
3. Look at the image on the LCD monitor to compose the picture.
4. Press the shutter button down halfway, then press it the rest of the way down.
5. To cancel digital zoom photography, press the Wide key.
Note
• The image size is fixed to HALF (896 x 600 pixels) in the Digital Zoom Photography mode. However, in
the MULTI mode, you can take pictures even at FULL (1792 x 1200 pixels).
• Digital zoom photography is automatically canceled by either turning the camera off or by the activation
of the Auto Power OFF function.
- 42 -
Page 43
Macro (Close-up) Photography
The macro photography mode is used when the distance to the subject is between 8 cm and infinity at wide angle.
In the macro photography mode, the LCD monitor automatically turns ON. Take the photograph while viewing the
LCD monitor.
1. Set the mode dial to or .
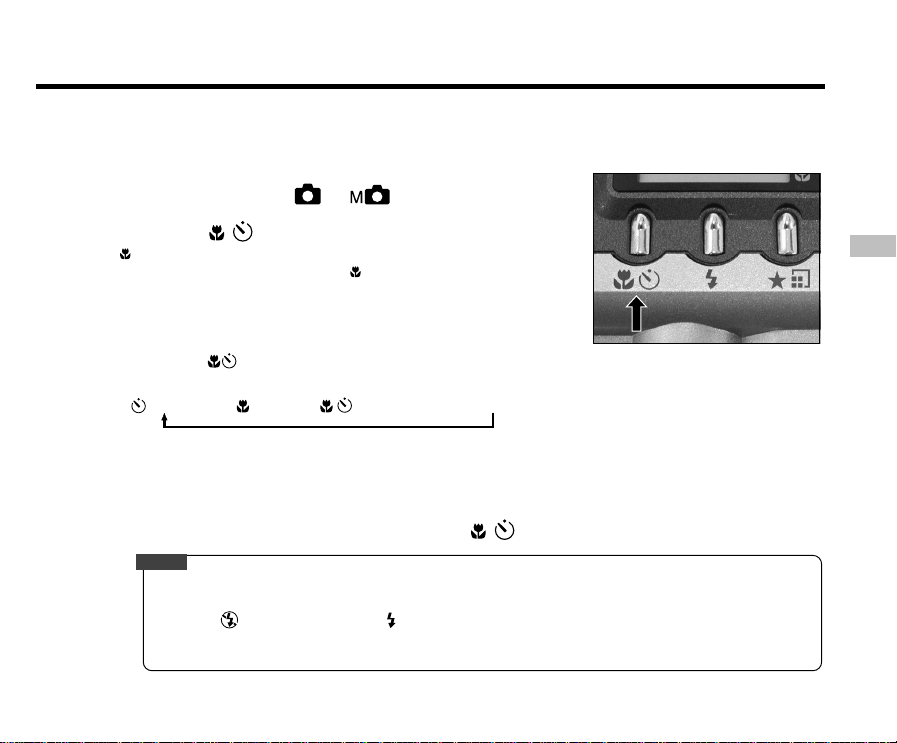
2. Press the
is displayed on the LCD and the arrow points to the Macro icon.
In the Manual Photography mode, is not displayed on the LCD
monitor when the manual setup screen is displayed.
Press the ENTER button to set the manual setup screen to
not display.
Pressing the button displays the available Self-timer and Macro modes in order.
Self-timer ➔ Macro ➔ Self-timer & Macro ➔ Off
button to set to the macro mode.
3. Look at the image on the LCD monitor to compose the picture.
4. Press the shutter button down halfway, then press it the rest of the way down.
5. To cancel macro photography, press the button until it turns off.
Note
• Macro photography is not canceled even if the camera is turned off or the Auto Power OFF function is
activated.
• Only the
• The settings are canceled when you remove or insert the batteries or disconnect or connect the AC
adapter.
Suppressed Flash and Forced Flash modes can be set for flash photography.
- 43 -
E
Page 44
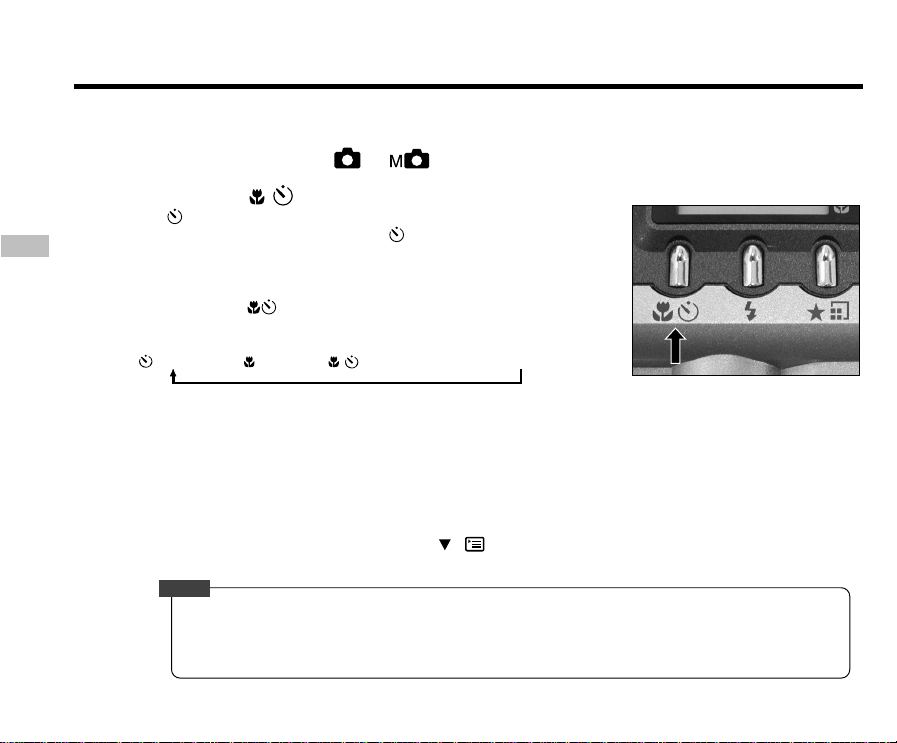
Self-timer Photography
When the self-timer is used, the shutter is automatically released after the preset time (two or ten seconds).
1. Set the mode dial to or .
2. Press the
[ ] is displayed on the LCD monitor and the status display.
E
In the Manual Photography mode, is not displayed on the LCD
monitor when the manual setup screen is displayed.
Press the ENTER button to set the manual setup screen to
not display.
Pressing the button displays the available Self-timer and
Macro modes in order.
Self-timer ➔ Macro ➔ Self-timer & Macro ➔ Off
button to set to the self-timer mode.
3. Compose the picture.
4. Press the shutter button down halfway, then press it the rest of the way down.
The self-timer lamp will turn red, then start flashing. The photograph is then taken after the preset time
(two or ten seconds).
When photographs are taken using the LCD monitor, the count down is displayed.
To cancel photography midway, press the ( ) button.
Note
• After you have set the self-timer, the setting is not canceled even if the camera is turned off or the Auto
Power OFF function is activated.
• The setting is canceled when you execute the self-timer photography, remove or insert the batteries or
disconnect or connect the AC adapter.
- 44 -
Page 45
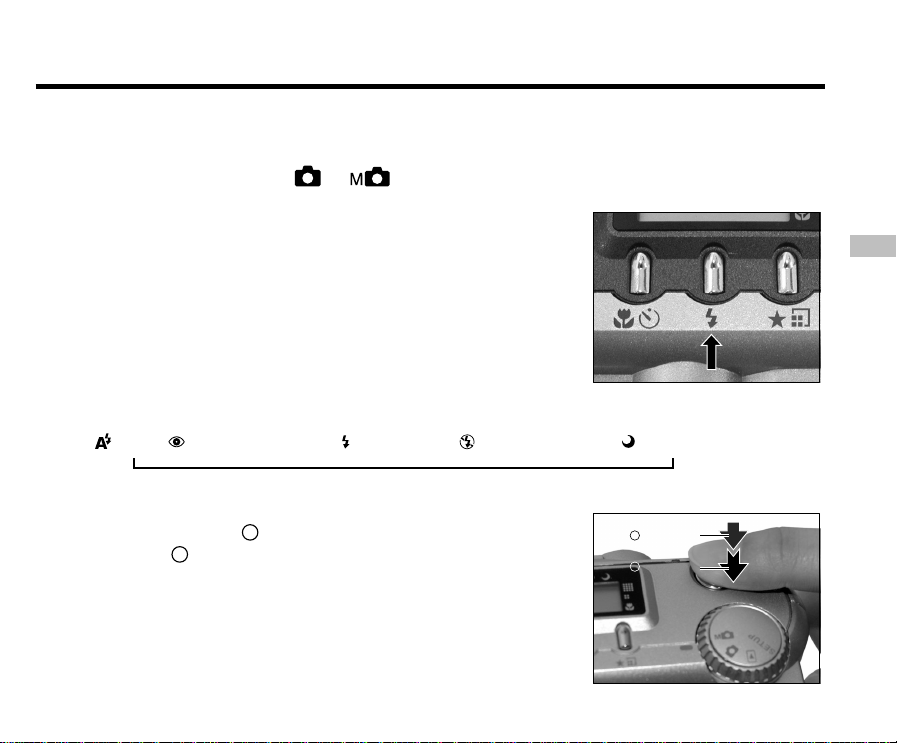
Flash Photography
In the default setting, the flash will be automatically set to function in dark places. No special setting is needed to set
off the flash. The flash firing mode can be set to suit the conditions where the flash is to be fired.
The effective range of the flash is approximately 1.3 ft (0.4 m) to 8.2 ft (2.5 m).
1. Set the mode dial to or .
2. Press the flash button to set to the desired mode
while viewing the image on the LCD monitor or the
status display.
The icon for the mode that you selected is displayed in the LCD
monitor or the status display.
In the Manual Photography mode, the icon for the mode that you
selected is not displayed on the LCD monitor when the manual setup
screen is displayed.
Press the ENTER button to set the manual setup screen to not
display.
Pressing the flash button displays the available flash modes in order.
Auto ➔ Red-Eye Reduction ➔ Forced Flash➔ Suppressed Flash ➔ Slow Sync
➔
E
3. Compose the picture. Press the shutter button
1
down halfway
2
down
.
, then press it the rest of the way
- 45 -
1
Press down
halfway.
2
Press down
fully.
Page 46
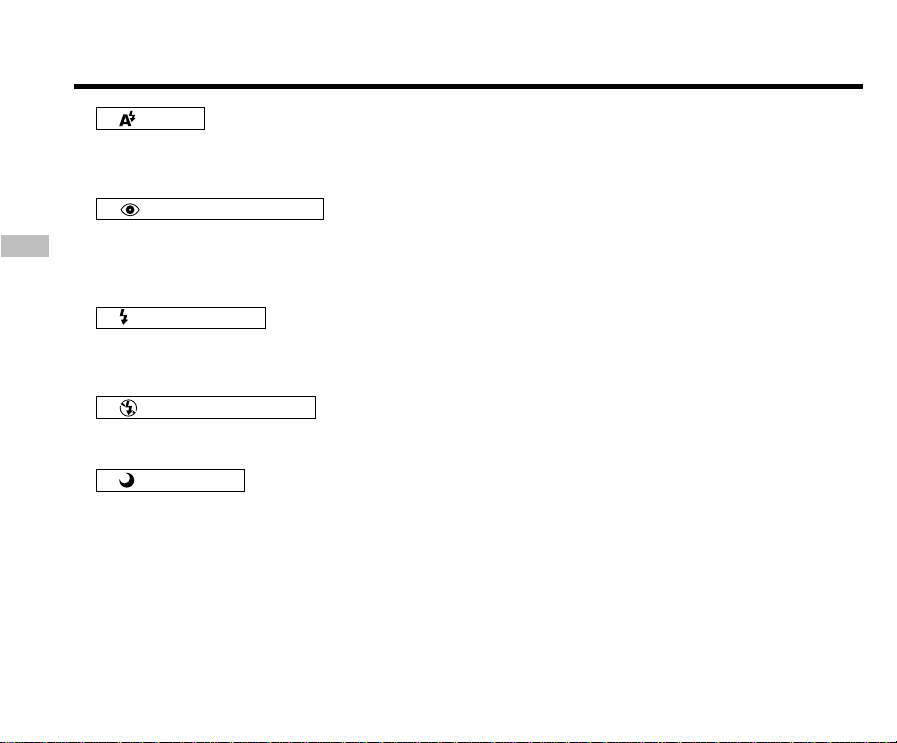
Flash photography (continued)
Auto
In this mode, the flash fires automatically according to the ambient conditions. This mode is ideal for general
photography where you are not trying to achieve any particular effect (when using macro photography, the flash
does not fire).
Red-Eye Reduction
E
Use this mode to avoid the red-eye effect when photographing people in low-light conditions.
The flash emits a pre-flash just before the picture is taken and then flashes again to take the actual picture.
Red-eye is reduced more effectively if the camera is pointed at the line of sight of the subject at as close a
distance as possible.
Forced Flash
In this mode, the flash always fires. Use the Forced Flash mode to shoot pictures in artificial light (backlighting,
fluorescent lighting, etc.).
The flash also fires during macro photography.
Suppressed Flash
Use the Suppressed Flash mode when you are taking pictures in indoor lighting at distances too great for the
flash to have any effect, such as theater performances or indoor sporting events.
Slow Sync
The flash is fired at a slower shutter speed.
- 46 -
Page 47
Flash photography (continued)
Note
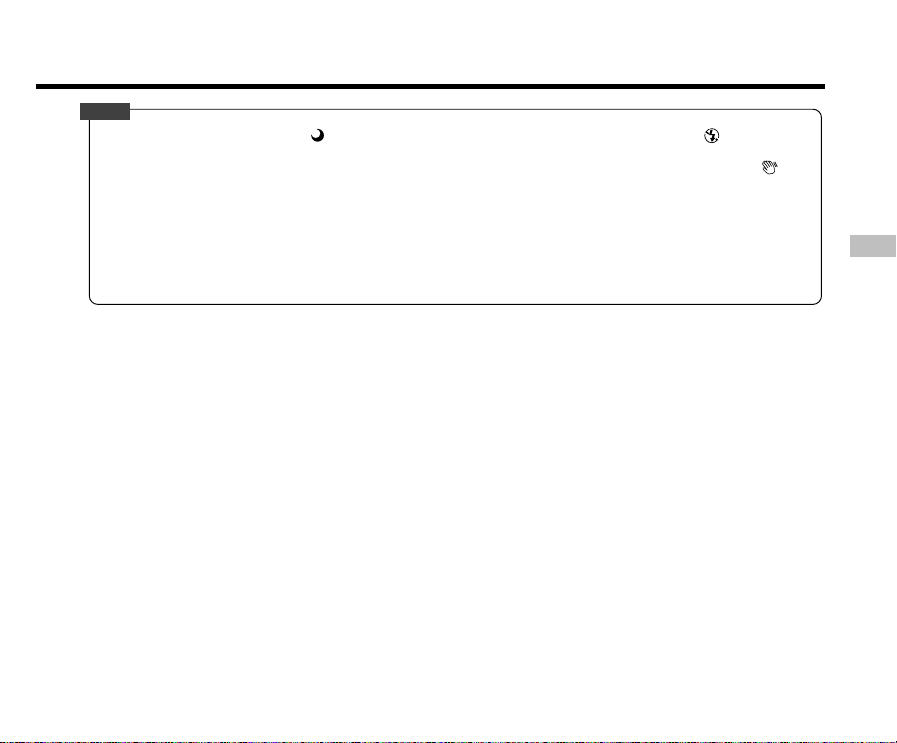
• If you take a photograph in the Slow Sync mode at a place with a dark background or in the Suppressed
Flash mode at a dark place, the shutter speed slows down, and the slow shutter speed warning is displayed.
(When the shutter is pressed halfway down, the viewfinder lamp lights and the slow shutter speed mark
displayed in the LCD monitor.) We recommend using a tripod to prevent blurred image caused by shaking.
• Using the flash during multi-image photography and bulb photography is not possible.
• The flash setting is not canceled even if the camera is turned off or the Auto Power OFF function is activated.
• The settings are canceled when you remove or insert the batteries or disconnect or connect the AC adapter.
• It may take a few seconds to charge the flash. Photography by using the flash is not possible while the charging
is in progress. Please wait until the charging is completed.
is
E
- 47 -
Page 48
Multi-Image Photography
This mode takes 16 shots continuously at 0.25-second intervals. The 16 photographed images are saved as one
image.
This mode is effective for continuously photographing moving subjects.
1. Set the mode dial to or .
E
2. Set the REC. mode to MULTI.
1. Press the ( ) button.
2. Use the or buttons to select REC.MODE and press the button.
3. Use the or buttons to select MULTI and press the ENTER button.
4. Press the ENTER button.
is displayed in the LCD monitor or the status display.
In the Manual Photography mode, is not displayed on the LCD monitor when the manual setup screen
is displayed.
Press the ENTER button to set the manual setup screen to not display.
3. Compose the picture, press the shutter button down halfway, then press it
the rest of the way down.
The shutter is opened and closed 16 times.
Note
• The photography interval changes according to the photographic conditions.
• Flash photography is not possible.
• The settings are not canceled even if the camera is turned off or the Auto Power OFF function is
activated.
• The settings are canceled when you remove or insert the batteries or disconnect or connect the AC
adapter.
- 48 -
Page 49
Long Exposure Photography
This mode is used for taking subjects that require several seconds to photograph such as firework displays at night.
When using this mode, be sure to use a tripod to keep the camera stable and prevent distorted images.
1. Set the mode dial to or .
2. Set the REC mode to BULB.
1. Press the ( ) button.
2. Use the or buttons to select REC.MODE and press the button.
3. Use the or buttons to select BULB and press the ENTER button.
4. Press the ENTER button.
and are displayed in the LCD monitor and the arrow points to their icons.
In the Manual Photography mode, and are not displayed on the LCD monitor when the manual
setup screen is displayed.
Press the ENTER button to set the manual setup screen to not display.
3. Compose the picture, press the shutter button down halfway, then press it the
rest of the way down.
The camera takes the picture at the set exposure time.
During the exposure, the viewfinder lamp flashes.
It takes about twice the set time to complete taking the photograph due to processing of the captured
image.
Note
• Flash photography is not possible.
• The settings are not canceled even if the camera is turned off or the Auto Power OFF function is
activated.
• The settings are canceled when you remove or insert the batteries or disconnect or connect the AC
adapter.
E
- 49 -
Page 50
Manual Photography
You can manually adjust conditions such as white balance and exposure compensation, and take photographs at
these conditions. This is called “manual photography.” Settings made in this mode are saved even if the camera is
turned off.
IMPORTANT
• If you remove or insert the batteries or disconnect or connect the AC adapter, the manual photography
settings will return to their defaults. If this happens, manually set the conditions again.
E
• The settings are not canceled even if the camera is turned off or the Auto Power off function is activated.
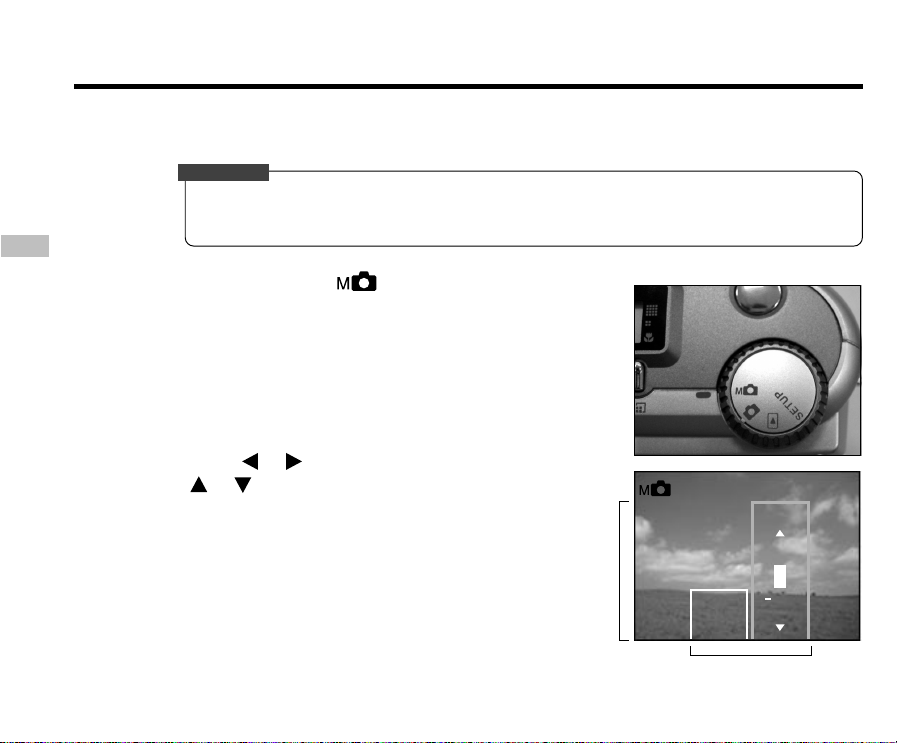
1. Set the mode dial to .
The manual setup screen is displayed.
Display or not display of the manual setup screen is toggled at each
press of the ENTER button.
2. Press the or buttons to select the setting item and
or buttons to select the set value.
the
Set values
W.B.
AUTO
E.V.
+0.3
0
0.3
- 50 -
Setting items
Page 51
Manual Photography (continued)
3. Press the ENTER button.
This confirms the setting.
The camera is ready to take photographs.
4. Compose the picture, press the shutter button down
2
halfway, then press it the rest of the way down
The camera takes the picture.
Note
• Photography is also possible with the manual setup screen displayed.
.
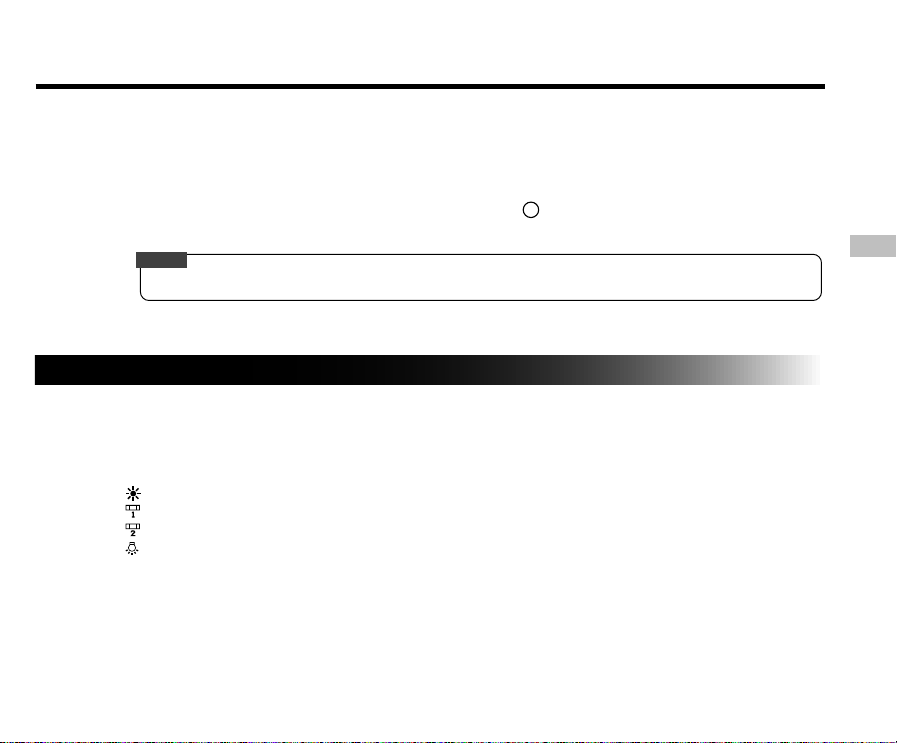
W.B. (White Balance)
The camera determines the white balance by averaging the various kinds of light that enters the lens. This
setting allows you to set the white balance when taking photographs under specific lighting conditions.
This setting does not function when the flash is used to take photographs.
[ AUTO] : Automatic adjustment (default)
[ ] : Photography outdoors
[ ] : Photography in cool white fluorescent light
[ ] : Photography in standard fluorescent light
[ ] : Photography in incandescent light
- 51 -
E
Page 52
Manual Photography (continued)
E.V. (Exposure Compensation)
This setting allows you to lighten or darken the entire screen. Use this setting when the optimum
brightness (exposure) cannot be obtained, for example, when there is a lot of contrast between the
subject and the background or when the subject to photograph occupies only an extremely small part of
the screen. Increasing E.V. lightens the screen, while decreasing E.V. darkens the screen.
E
[+1.5/+1.2/+0.9/+0.6/+0.3/0 (default)/–0.3/–0.6/–0.9/–1.2/–1.5]
The ideal brightness sometimes cannot be obtained even if a large E.V. value is set in dark photographic
conditions.
Also, the brightness of moving images before they are photographed sometimes does not change if the
subject itself is dark. In this case, press the shutter button, and check the brightness in the preview image
(photographed image).
Effective Subjects and Set Values
● Positive (+) Compensation
• Copying of printed text (black characters on white paper) (+1.5)
• Backlit portraits (+0.6 to +1.5)
• Very bright scenes (such as snowfields) and highly reflective subjects (+0.9)
• Shots made up predominantly of sky (+0.9)
● Negative (–) Compensation
• Spotlit subjects, particularly against dark backgrounds (–0.6)
• Copying of printed text (white characters on black paper) (–0.6)
• Scenes with low reflectivity, such as shots of green or dark foliage (–0.6)
- 52 -
Page 53
Changing the Preset Conditions (REC MENU)
1
2
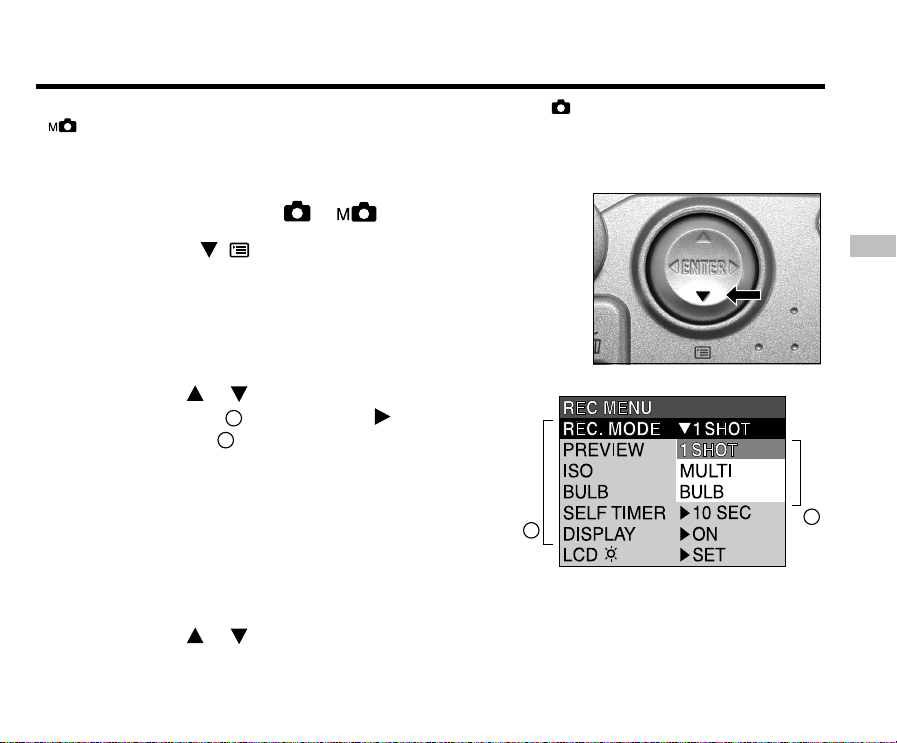
This menu is for setting the basic settings to be used for photography in the automatic photography and
manual photography mode.
The settings are not canceled even if the camera is turned OFF or the Auto Power OFF function is activated. The
settings (except the LCD monitor brightness) are canceled when you remove or insert the batteries or disconnect or
connect the AC adapter.
1. Set the mode dial to or .
2. Press the
The REC MENU is displayed.
3. Use the or buttons to select the desired
setting item
The tab menu 2 is displayed.
The image before the photograph is taken is displayed
on the LCD monitor when selecting LCD.
REC. MODE
PREVIEW
ISO
BULB
SELF-TIMER
DISPLAY
LCD
4. Use the or buttons to select the desired setting from the tab menu, and press the
ENTER button.
This saves the settings, and returns the display to the REC MENU.
( ) button.
and press the button.
1
Setting item
- 53 -
E
Tab menu
Page 54
Changing the Preset Conditions (REC MENU) (continued)
5. To quit the REC MENU, press the ENTER button.
The camera is now ready to take photographs.
REC. MODE
Select from the following photography modes:
[ 1SHOT ] : Regular photography, one shot at a time (default)
E
[ MULTI ] : Continuously taking 16 photographs as a single image
[ BULB ] : Taking photographs at a longer exposure time
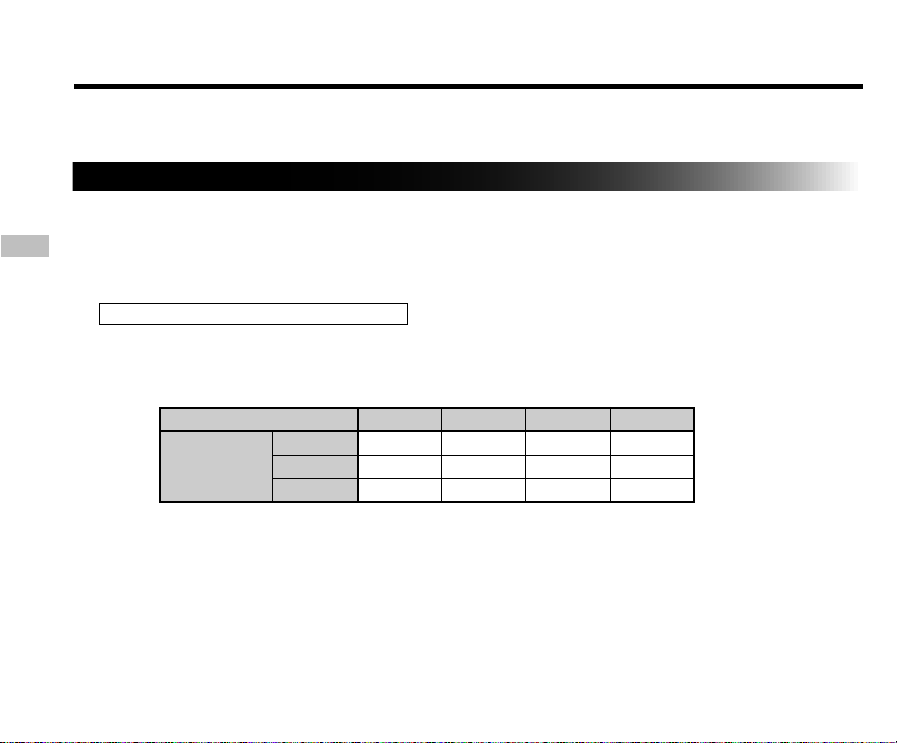
Photography Mode and Functions
You can combine photography modes and the various functions for extra flexibility.
The following table shows the possible combinations of photography mode functions:
Photography
Mode
1SHOT
MULTI
BULB
Macro
O
O
O
Self-timer
O
O
O
- 54 -
Digital zoom
O
O
O
Flash
O
X
X
O: Possible
X: Not possible
Page 55

Changing the Preset Conditions (REC MENU) (continued)
PREVIEW
This setting allows you to display a photographed image on the LCD monitor for two seconds immediately
after you have taken the shot.
This allows you check the composition and brightness of the photographed image.
[ ON ] : Display preview (default)
[ OFF ] : Do not display preview
ISO
Sets the color mode and photographic sensitivity at which the image is to be recorded.
Warning: The amount of noise in the image increases when the ISO is changed to a higher setting.
[ ISO100 ]: Equivalent to color ISO100 (default)
[ ISO200 ]: High-sensitive photography equivalent to color ISO200
[ ISO400 ]: High-sensitive photography equivalent to color ISO400
[ B&W ] : Black and white
BULB
Sets the exposure time when taking pictures in the bulb photography mode.
[ 1SEC ] : Opens shutter for about 1 second (default)
[ 2SEC ] : Opens shutter for about 2 seconds
SELF-TIMER
Sets the delay time for when the photograph is taken after the shutter button is pressed during self-timer
photography.
[ 10SEC ] : Picture taken after a 10-second delay (default)
[ 2SEC ] : Picture taken after a 2-second delay
E
- 55 -
Page 56

Changing the Preset Conditions (REC MENU) (continued)
DISPLAY
Sets the on-screen display status in REC MODE and PLAY MODE.
[ OFF ] : Both the LCD monitor and the on-screen display are turned off.
[ ON ] : Only the LCD monitor is turned on.
[ ALL ] : Both the LCD monitor and the on-screen display.
LCD
E
Adjusts the brightness of the LCD monitor. This adjustment does not adjust the brightness of the image to
be recorded.
[ -5 to +5 ]
- 56 -
Page 57
Playing Back Photographed Images (Single-Frame Playback)
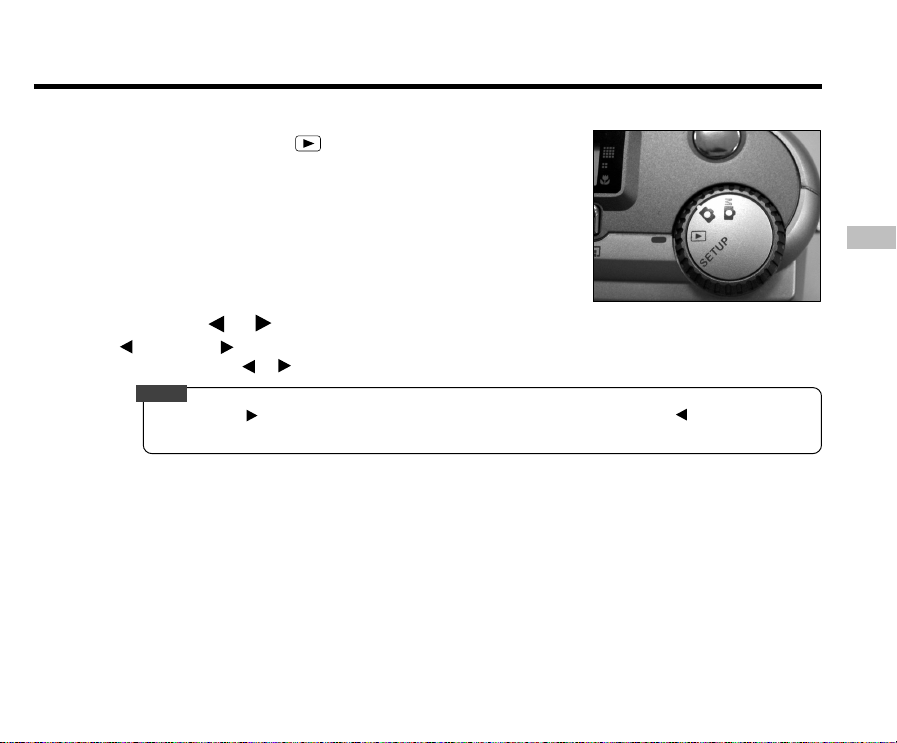
Play back photographed images one image at a time.
1. Set the mode dial to .
The last image frame appears on the LCD monitor.
E
2. Press the or buttons to move back and ahead.
Move back/ Move ahead
Holding down the or buttons moves back or ahead continuously one frame at a time.
Note
• Pressing the button at the last image displays the first image, and pressing the button at the first
image displays the last image.
- 57 -
Page 58
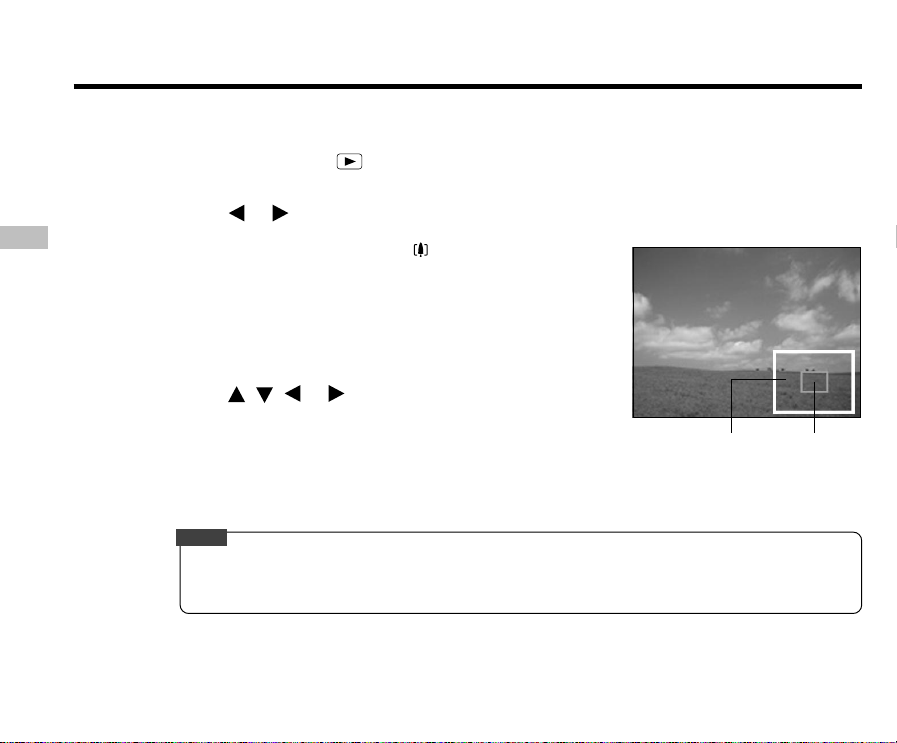
Enlarging Photographed Images (Zoom Playback)
Enlarges selected portions of images being played back 3 times actual size. Images can be displayed enlarged
when being played back one image at a time.
1. Set the mode dial to .
The last image frame appears on the LCD monitor.
2. Use the or buttons to select the frame you want to enlarge.
E
3. Enlarge the image by using the
Pressing the Telephoto (zoom) key zooms to 3X.
The image is displayed enlarged, and a white frame and green frame
are displayed on the LCD monitor.
The white frame indicates the entire image, while the green frame
shows the location of the currently enlarged area.
4. Use the , , or buttons to select the area to
enlarge.
Adjust the display area to enlarge while viewing the white and green
frames.
5. To return to the regular display, press the ENTER button.
Note
• This function is not supported during TV playback.
• The Zoom Playback function is automatically canceled by either turning the camera off or by the
activation of the Auto Power OFF function.
Zoom key.
Entire image
Current
position of
enlargement
- 58 -
Page 59
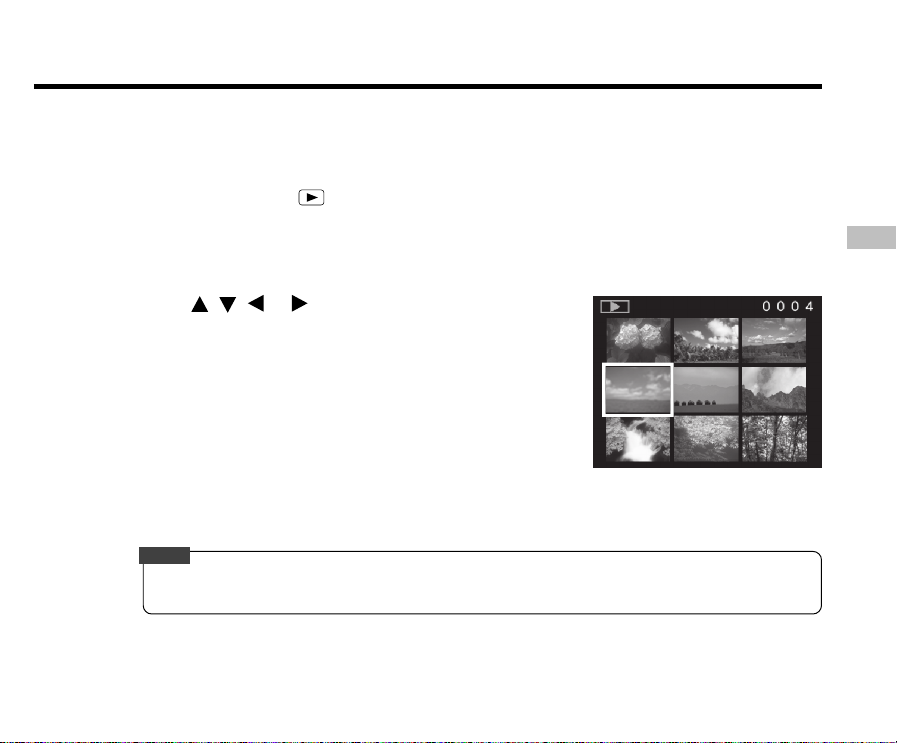
Displaying a List of Image Thumbnails
Nine reduced images are simultaneously displayed on the LCD monitor. This manual calls this display “thumbnail
display.”
This feature is useful when there are many images. After you have displayed the image thumbnails, you can select
the desired image and display it in the regular display.
1. Set the mode dial to .
The last image frame appears on the LCD monitor.
2. Press the ENTER button.
Nine images are displayed simultaneously.
3. Use the , , or buttons to move the cursor to
select the image to be displayed at regular size.
The cursor lies on top of the image surrounded by a frame.
Pressing the buttons continuously moves the cursor continuously.
4. Press the ENTER button.
The selected image is displayed at its regular size.
Note
•
The Thumbnail Display
activation of the Auto Power OFF function.
function is automatically canceled by either turning the camera off or by the
E
- 59 -
Page 60
Slideshow Playback
Automatically play back one image at a time in order.
1. Set the mode dial to .
The last image frame appears on the LCD monitor.
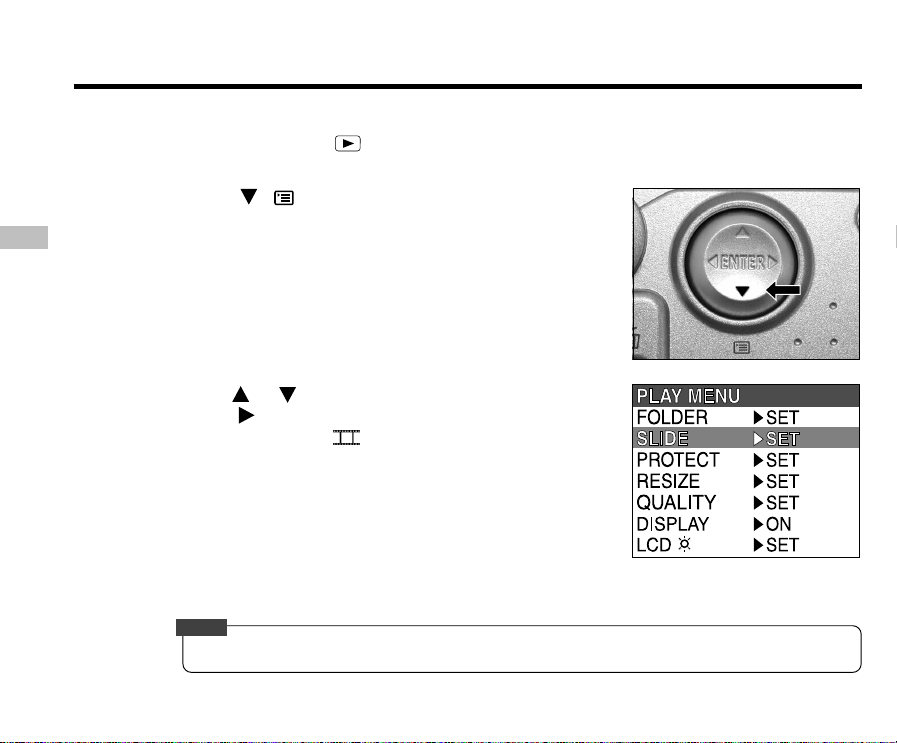
2. Press the ( ) button.
The PLAY MENU is displayed.
E
3. Use the or buttons to select SLIDE and
press the button.
The slideshow begins and is displayed on the LCD monitor.
The next image is displayed every three seconds.
4. To quit the slideshow, press the ENTER button.
The slideshow is repeated until the ENTER button is pressed.
The LCD monitor displays the image when the ENTER button is pressed.
Note
• The Auto Power OFF function does not operate during automatic playback.
➡
- 60 -
Page 61
Reducing the Image Size (Resize)
Changes the size of FULL size (1792 x 1200 pixels) images to half the size (896 x 600 pixels) in the horizontal and
vertical directions, and overwrites the old FULL size image with the new size image. This is called “resizing” in this
manual.
Resizing a previously saved image when the SmartMedia™ card has run out of storage space during photography
increases space on SmartMedia™ so that you can continue taking photographs.
The following images cannot be resized:
• HALF size images
• Images taken with another camera
• Protected images
• Images cannot be resized when the SmartMedia™ card is write-protected.
1. Set the mode dial to .
The last image frame appears on the LCD monitor.
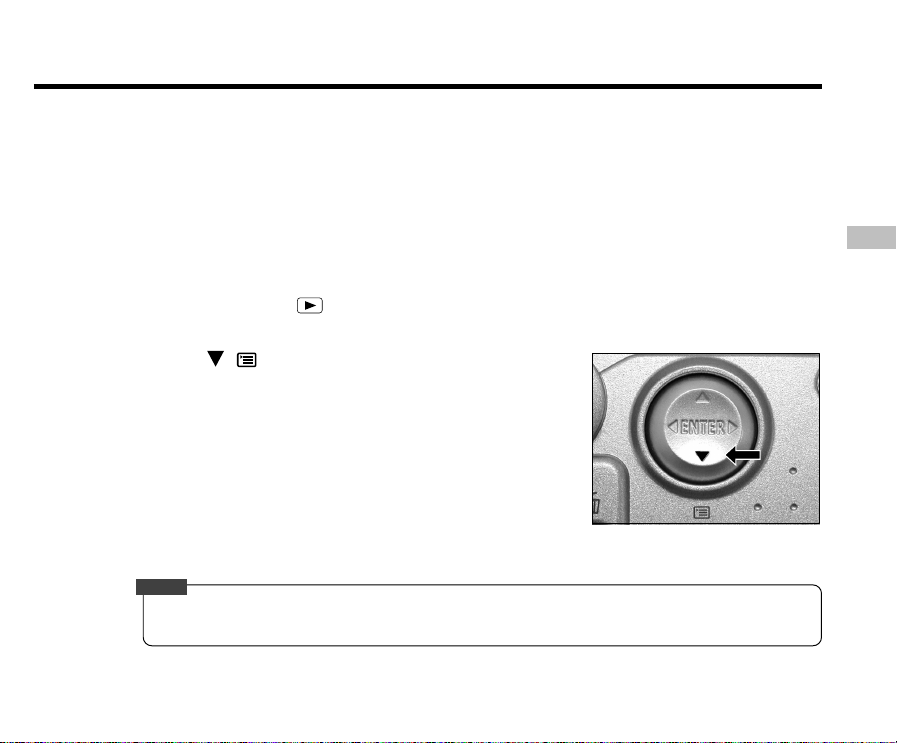
2. Press the ( ) button.
The PLAY MENU is displayed.
Note
• Only FULL size (1792 x 1200 pixels) images can be reduced. Further reduction of HALF size (896 x 600
pixels) images is not possible.
E
- 61 -
Page 62
Reducing the Image Size (Resize) (continued)
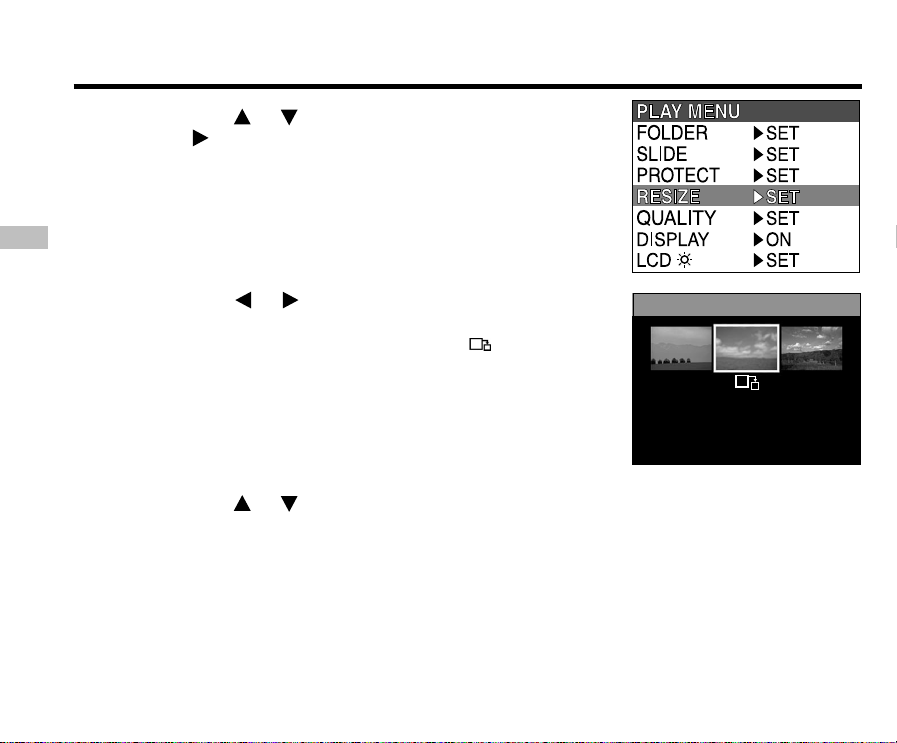
3. Use the or buttons to select RESIZE and press
the button.
The RESIZE menu is displayed.
If there are no images that can be resized, a message
appears on screen and the screen returns to the PLAY MENU.
E
➡
4. Use the or buttons to select the image and
press the ENTER button.
This confirms the image to be displayed, and is displayed under
the image.
To cancel the selection, press the ENTER button again.
If you want to resize two or more images, repeat the procedure for
each image.
RESIZE
CANCEL
EXEC
5. Use the or buttons to select EXEC, and press the ENTER button.
The screen indicating that the image is being resized appears.
To quit resizing, select CANCEL.
When resizing ends, the screen returns to the PLAY MENU.
To quit the PLAY MENU, press the ENTER button.
- 62 -
Page 63
Compressing Images (Quality)
Compresses images to half their size, and overwrites the old size image with the new compressed image.
Compressing a previously saved image when the SmartMedia™ card has run out of storage space during
photography increases space on SmartMedia™ card so that you can continue taking photographs.
The following images cannot be compressed:
• ★ (BASIC) image quality images
• Images taken with another camera
• Protected images
• Images cannot also be compressed when the SmartMedia™ is write-protected.
1. Set the mode dial to .
The last image frame appears on the LCD monitor.
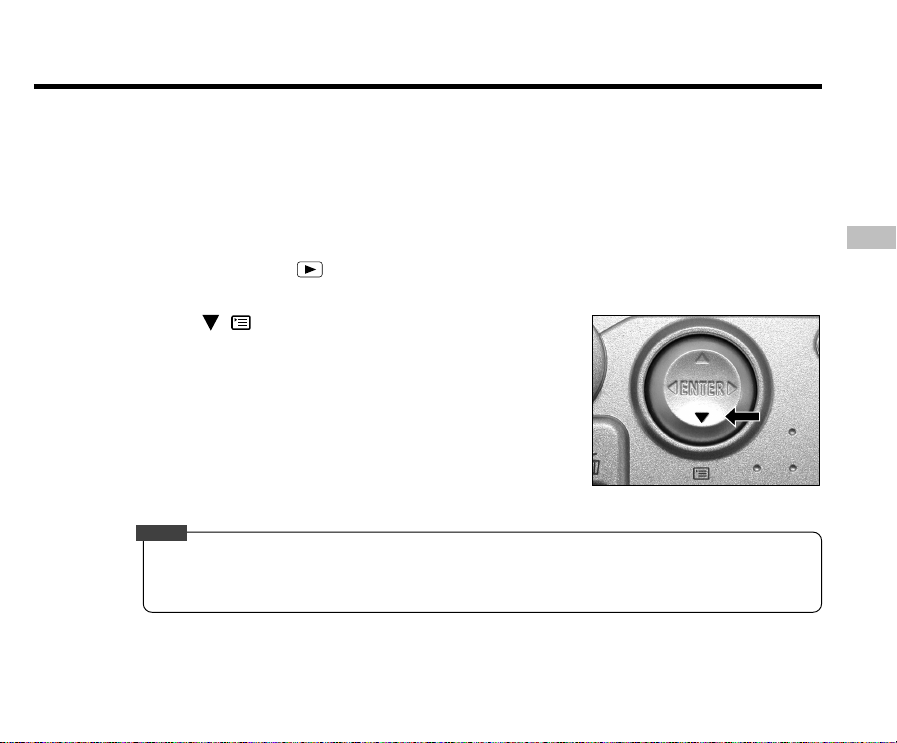
2. Press the ( ) button.
The PLAY MENU is displayed.
Note
• Compression of images can be accomplished only in the following order:
★★★(FINE) ➔ ★★(NORMAL) ➔ ★(BASIC).
The reverse is not possible.
E
- 63 -
Page 64
Compressing Images (Quality) (continued)
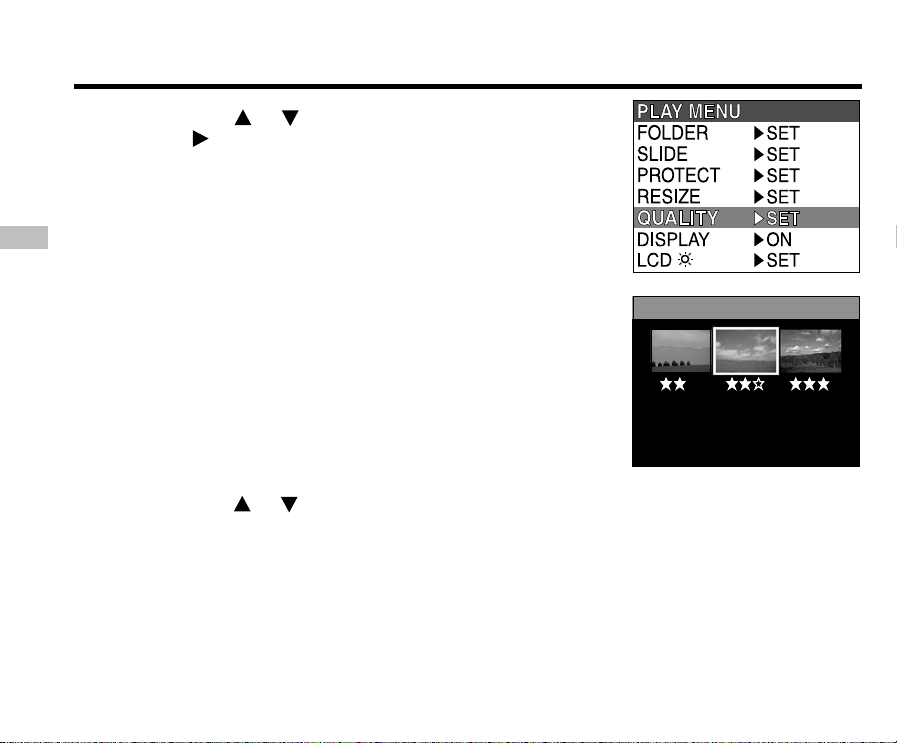
3. Use the or buttons to select QUALITY, and press
button.
the
The QUALITY menu is displayed.
If there are no images that can be compressed, a message
appears on screen and the screen returns to the PLAY MENU.
E
➡
4. The current compression ratio (quality) is displayed
under the image.
Each press of the ENTER button changes the number of stars as
follows:
[★★★] : FINE
[★★] : NORMAL
[★] : BASIC
If you want to compress two or more images, repeat the procedure for
each image.
5. Use the or buttons to select EXEC, and press
the ENTER button.
The screen indicating that the image is being compressed appears.
To quit compression, select CANCEL.
When compression ends, the screen returns to the PLAY MENU.
To quit the PLAY MENU, press the ENTER button.
- 64 -
QUALITY
CANCEL
EXEC
Page 65
Selecting the Folder to Play Back
Select the folder to play back when the currently loaded SmartMedia™ card contains two or more folders.
1. Set the mode dial to .
The last image frame or the thumbnail display appears on the LCD monitor.
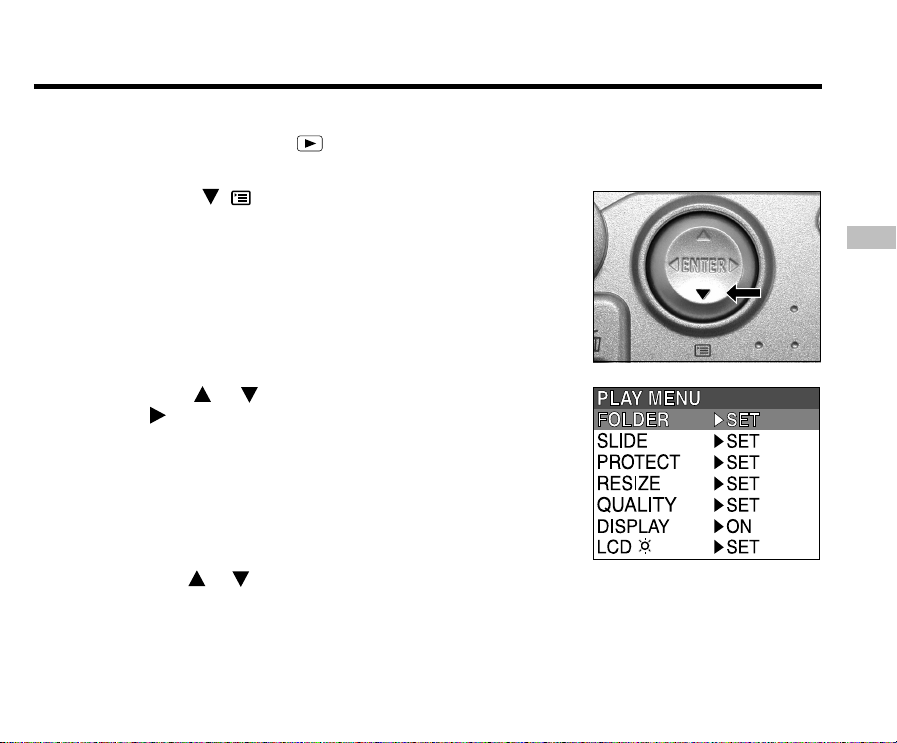
2. Press the ( ) button.
The PLAY MENU is displayed.
3. Use the or buttons to select FOLDER, and press
the button.
The names of the folders in the currently loaded SmartMedia™
card are displayed.
4. Use the or buttons to select the folder to be displayed, and press the ENTER
button.
➡
E
- 65 -
Page 66
Selecting the Folder to Play Back (continued)
About Folder Names
Images photographed on this camera are recorded to a folder. You cannot choose in which folder to store
images. The [100] folder is created when you have photographed images. When the number of images
reaches the largest number (9999), a new folder [101] is created.
When there are two or more folders, the playback folder default is the one whose folder number is
E
greater.
- 66 -
Page 67
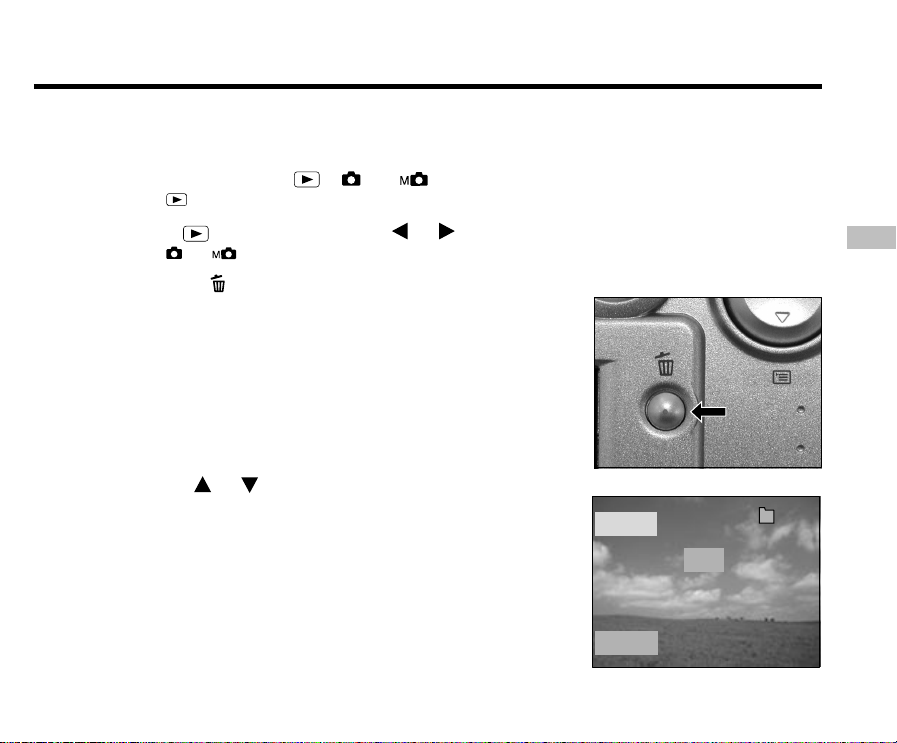
Erasing Images (Erase Frame)
Erases one image at a time.
Note, however, that images cannot be erased when they are protected or the SmartMedia™ card is write-protected.
1. Set the mode dial to , or .
When is selected, the last image frame appears on the LCD monitor.
2. When is selected, use the or buttons to select the image to be erased.
When or is selected, the last image is selected.
3. Press the erase button.
FRAME or LAST is displayed at the bottom left of the screen.
4. Use the or buttons to select YES, and press the
ENTER button.
This erases the image and returns to the previous mode.
To cancel, select NO, and press the ENTER button.
ERASE
100
0004
YES
NO
FRAME
- 67 -
E
Page 68
Erasing Images (Erase Frame)
5. To continue erasing images, repeat the above procedure from step 2.
Note
• When [ PROTECT ] is displayed on the LCD monitor, cancel the protection.
• If you take a photograph after erasing an image, a number continuing from the last photographed image
is assigned as the image number.
E
- 68 -
Page 69
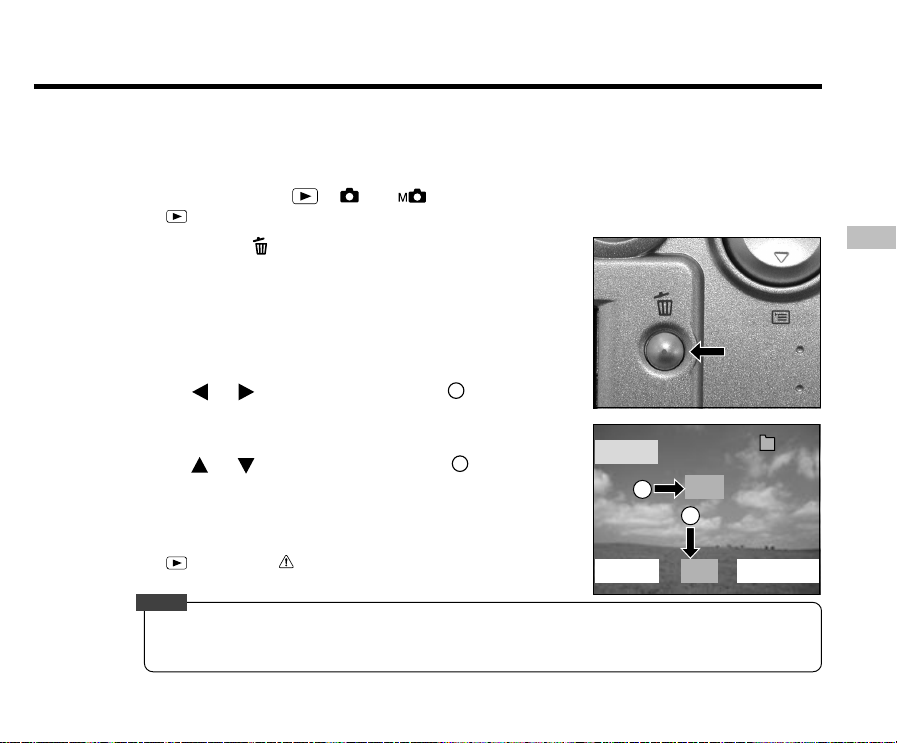
Erasing All Images in a Folder (Erase All)
Erases all images within the currently selected folder.
For details on folders, see “Selecting the Folder to Play Back”.
Note, however, that images cannot be erased when they are protected or when the SmartMedia™card is writeprotected.
1. Set the mode dial to , or .
When is selected, the last image frame appears on the LCD monitor.
2. Hold down the erase button for two seconds.
The ERASE menu is displayed.
E
3. Use the or buttons to select ALL .
Make sure that [ALL] at the bottom center of the image is displayed in
yellow.
4. Use the or buttons to select YES
the ENTER button.
This erases the images and returns to the previous mode.
To cancel erasing of image data, select NO, and press the ENTER
button.
When is selected, NO IMAGE is displayed after the images
are erased (unless the SmartMedia™ contains protected images).
Note
• The folder is not erased even if you execute ERASE ALL. The camera does not display folders that do
not contain any images.
• To erase the images in another folder, first specify the folder and then erase the images.
1
2
, and press
ERASE
2
FRAME
- 69 -
YES
1
NO
ALL
100
0004
FORMAT
Page 70
Formatting the SmartMedia™ Card
Formatting erases all images currently recorded on the SmartMedia™ card loaded on your camera. Protected
images are also erased. The SmartMedia™ card cannot be formatted if it is write-protected.
IMPORTANT
• The SmartMedia™ card must be formatted on the camera before use.
E
1. Set the mode dial to , or .
When is selected, the last image frame appears on the LCD monitor.
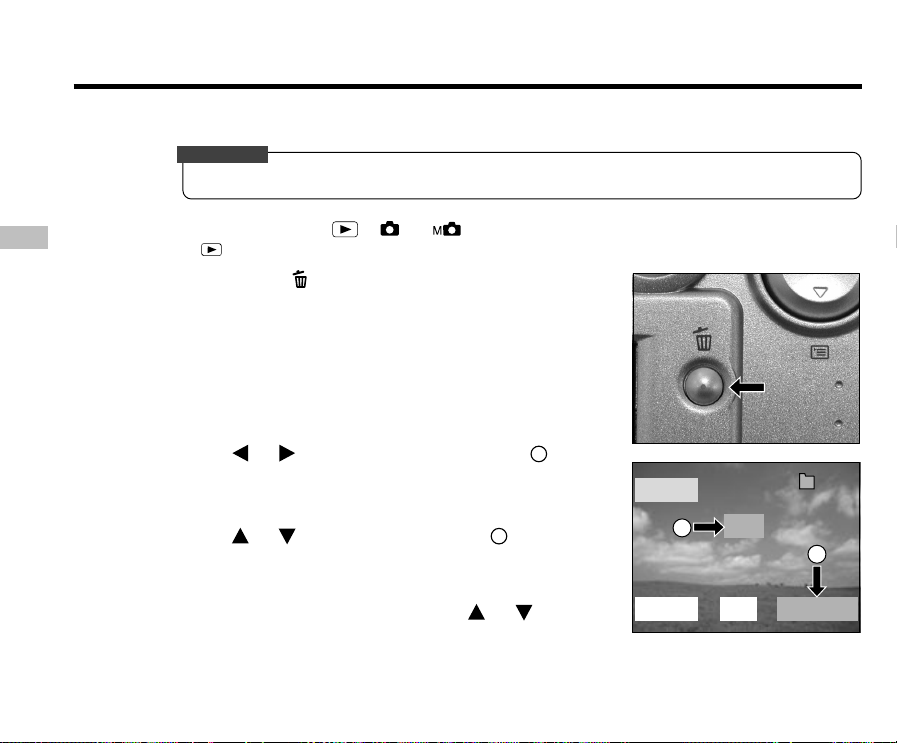
2. Hold down the erase button for two seconds.
The ERASE menu is displayed.
3. Use the or buttons to select FORMAT 1.
Make sure that [FORMAT] is displayed in yellow at the bottom right of
the screen.
4. Use the or buttons to select YES 2, and press
the ENTER button.
To cancel formatting, select NO, and press the ENTER button.
5. To reset the image number, use the or buttons to
select YES, and press the ENTER button.
To cancel resetting of image numbers, select NO, and press the
ENTER button.
ERASE
2
FRAME
YES
NO
ALL
100
0004
1
FORMAT
- 70 -
Page 71
Protecting Images
This feature prevents images from being erased.
IMPORTANT
• Formatting erases all the images on a SmartMedia™ card, regardless of whether they are protected or
not.
•To protect the entire SmartMedia™ card, see “Write Protection”.
Protecting an Image
1. Set the mode dial to .
The last image frame appears on the LCD monitor.
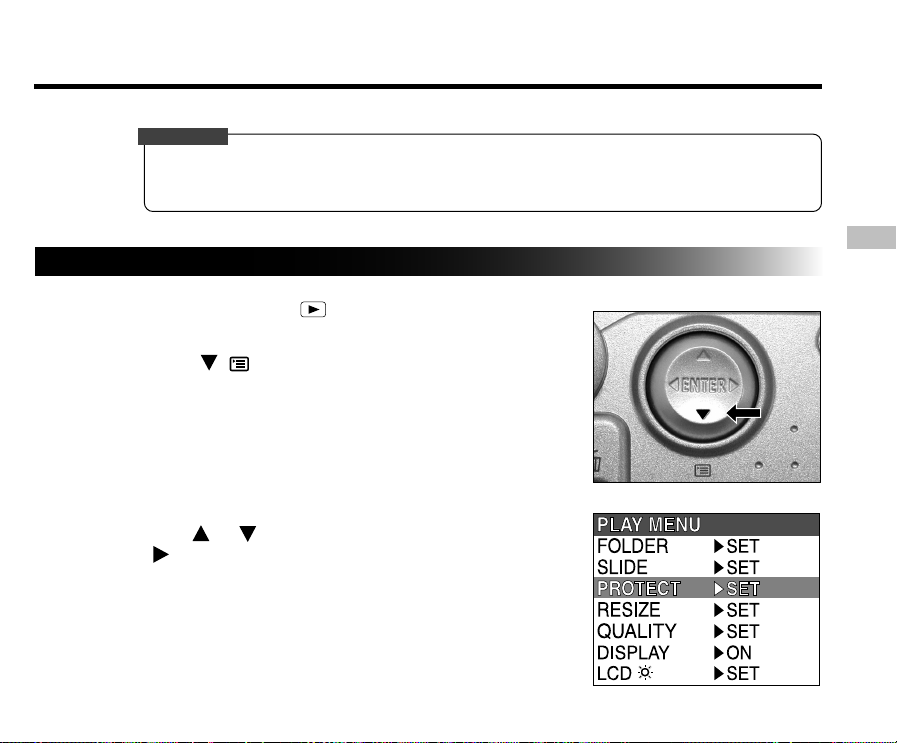
2. Press the ( ) button.
The PLAY MENU is displayed.
3. Use the or buttons to select PROTECT and press
button.
the
The PROTECT menu is displayed.
E
➡
- 71 -
Page 72
Protecting Images (continued)
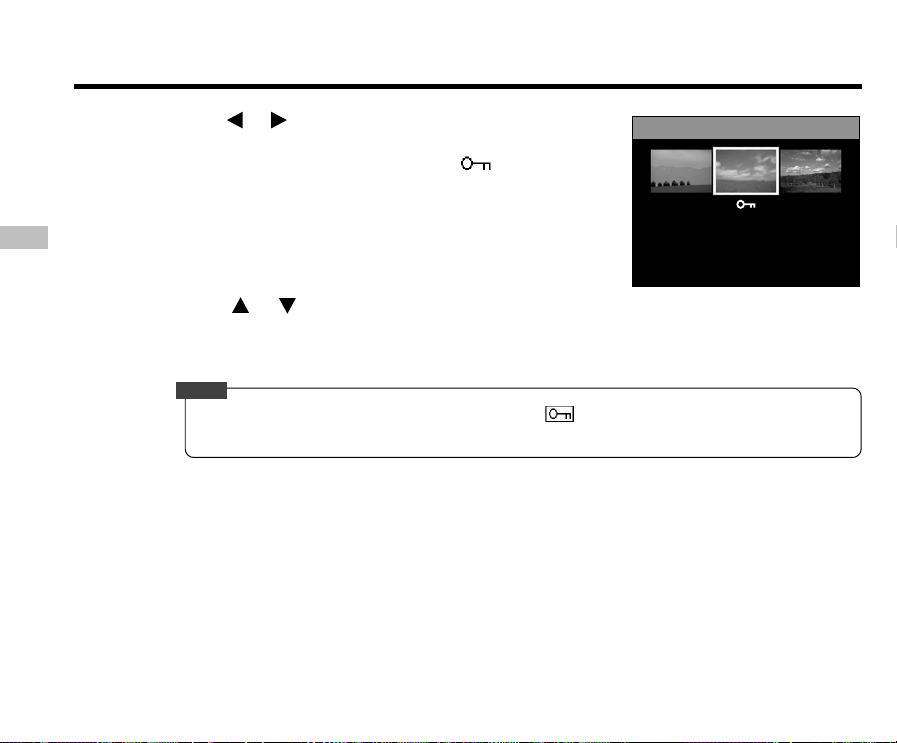
4. Use the or buttons to select the desired image to
protect, and press the ENTER button.
This confirms the image to be protected, and is displayed under
the image.
To cancel the selection, press the ENTER button again.
To write-protect two or more images, repeat this procedure for each
E
image.
PROTECT
CANCEL
EXEC
5. Use the or buttons to select EXEC, and press the ENTER button.
To quit write-protection, select CANCEL.
When write-protection ends, the screen returns to the PLAY MENU.
To quit the PLAY MENU, press the ENTER button.
Note
• When the PROTECT setup screen is displayed again, is displayed under protected images.
•To remove the write-protection from an image, select the image, use the arrow keys to select EXEC,
then press the ENTER button.
- 72 -
Page 73
Protecting Images (continued)
Removing the Protection
1. Carry out steps 1 to 3 in “Protecting An Image”.
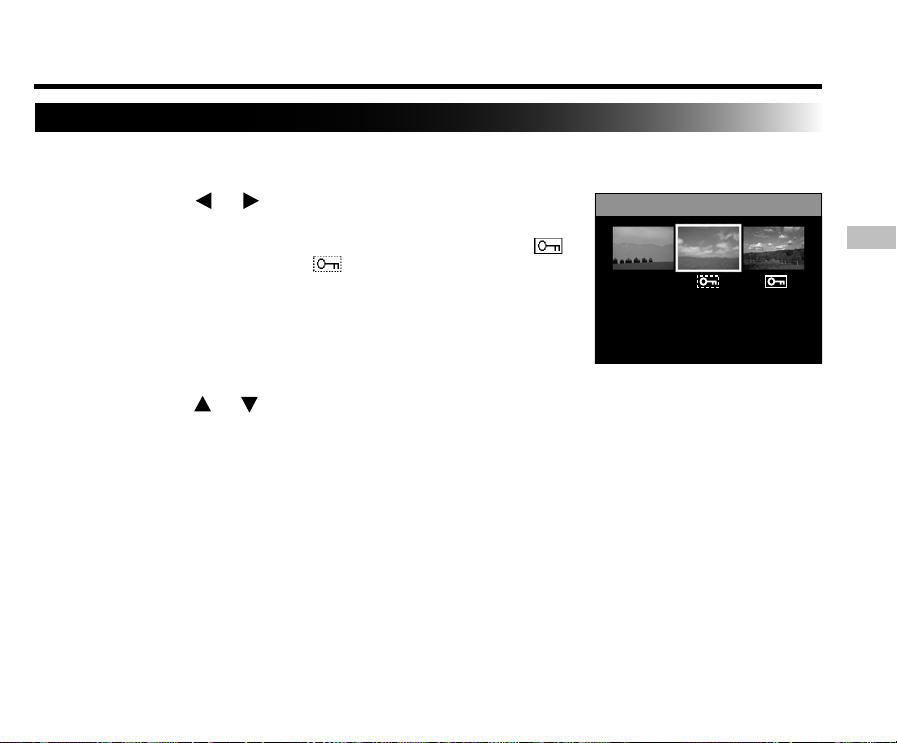
2. Use the
or buttons to select the image to
PROTECT
unprotect, and press the ENTER button.
This fixes the images whose protection is to be removed, and
under the image changes to .
To remove the protection from an image, press the ENTER button
again.
To remove the protection from two or more images, repeat this
procedure for the necessary number of images.
CANCEL
EXEC
3. Use the or buttons to select EXEC, and press the ENTER button.
To quit write-protection, select CANCEL.
When write-protection ends, the screen returns to the PLAY MENU.
To quit the PLAY MENU, press the ENTER button.
- 73 -
E
Page 74
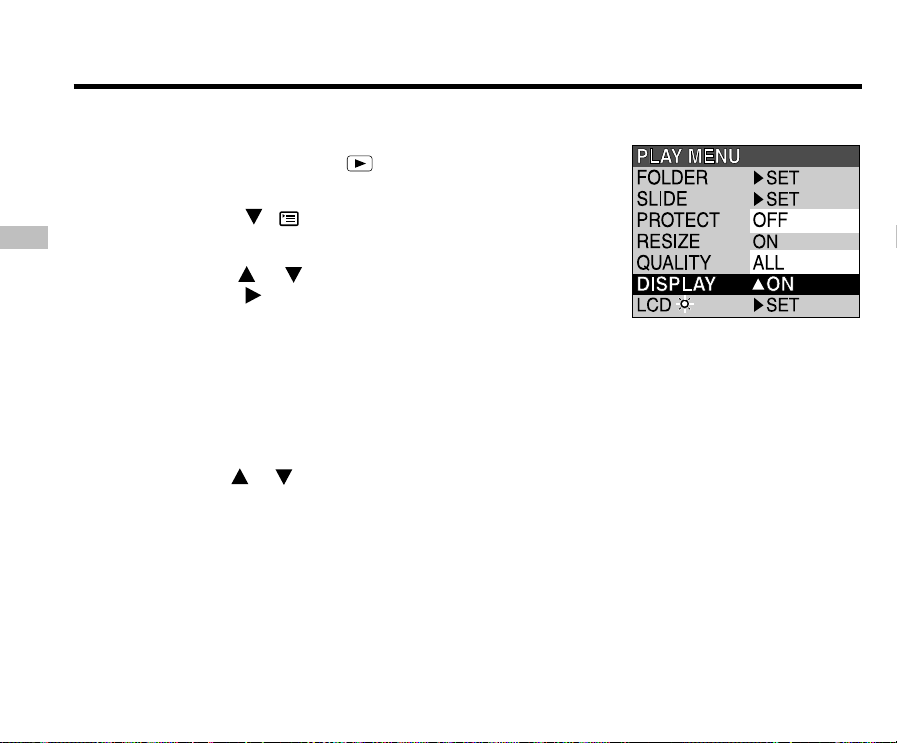
Changing the Display Setting in Playback Mode
This setting allows you to switch the on-screen display.
1. Set the mode dial to [ ]
The last image frame appears on the LCD monitor.
2. Press the ( ) button.
E
The PLAY MENU is displayed.
3. Use the or buttons to select [DISPLAY] and
press the
The tab menu is displayed.
[OFF] : Only the LCD monitor is turned on.
[ON] : Both the LCD monitor and the on-screen display (Simplified) are turned on.
[ALL] : Both the LCD monitor and the on-screen display (Detailed) are turned on.
4. Use the or buttons to select the desired setting from the tab menu, and press the
ENTER button.
This saves the settings, and returns the display to the PLAY MENU.
button.
(To display the image only.)
(To display the folder No. and image No.)
(To display the full on-screen display.)
➡
- 74 -
Page 75

Changing the LCD Setting in Playback Mode
This setting allows you to adjust the brightness of the LCD monitor. This adjustment does not adjust the brightness
of the image to be recorded. [-5 to +5]
E
- 75 -
Page 76
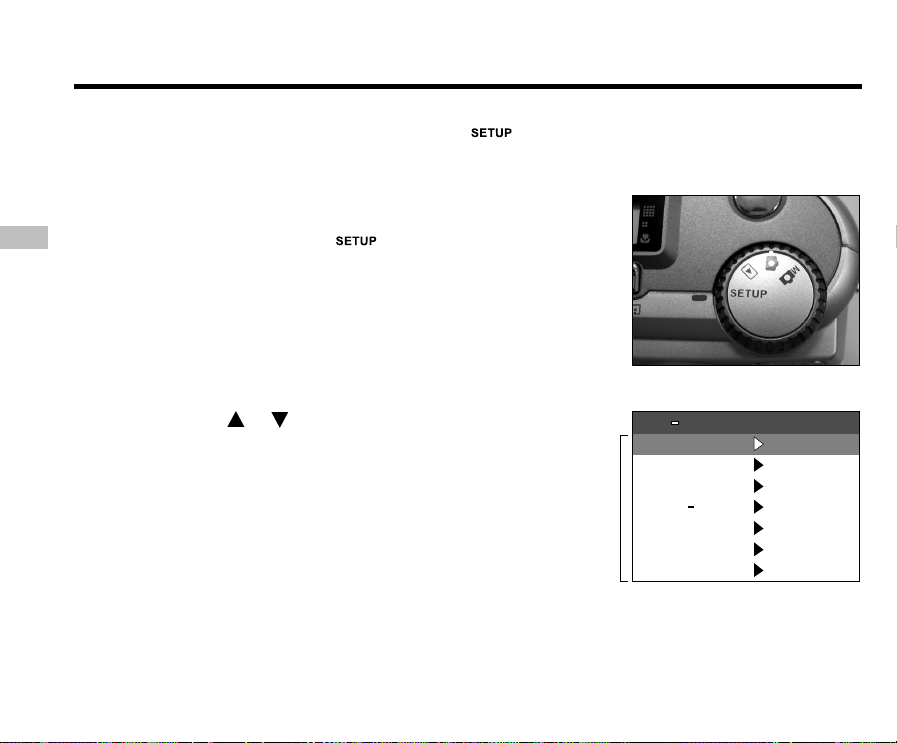
Basic Photographic Settings (SETUP mode)
This feature allows you to set up the environment for using your camera in addition to image-related settings. This is
called “setup”. The following items can be changed in the mode:
LANGUAGE/SOUND/TIME/AUTO-OFF/TV/IMAGE No./DEFAULT
The details set here are held in memory even if the camera is turned OFF.
E
1. Set the mode dial to .
The SET-UP menu appears.
2. Use the or buttons to select the item you want to
set.
LANGUAGE
SOUND
TIME
AUTO-OFF
TV
IMAGE No.
DEFAULT
SET UP
LANGUAGE
SOUND
TIME
AUTO OFF
TV
Setting item
IMAGE No.
DEFAULT
English
ON
SET
1MIN
PAL
SET
SET
- 76 -
Page 77
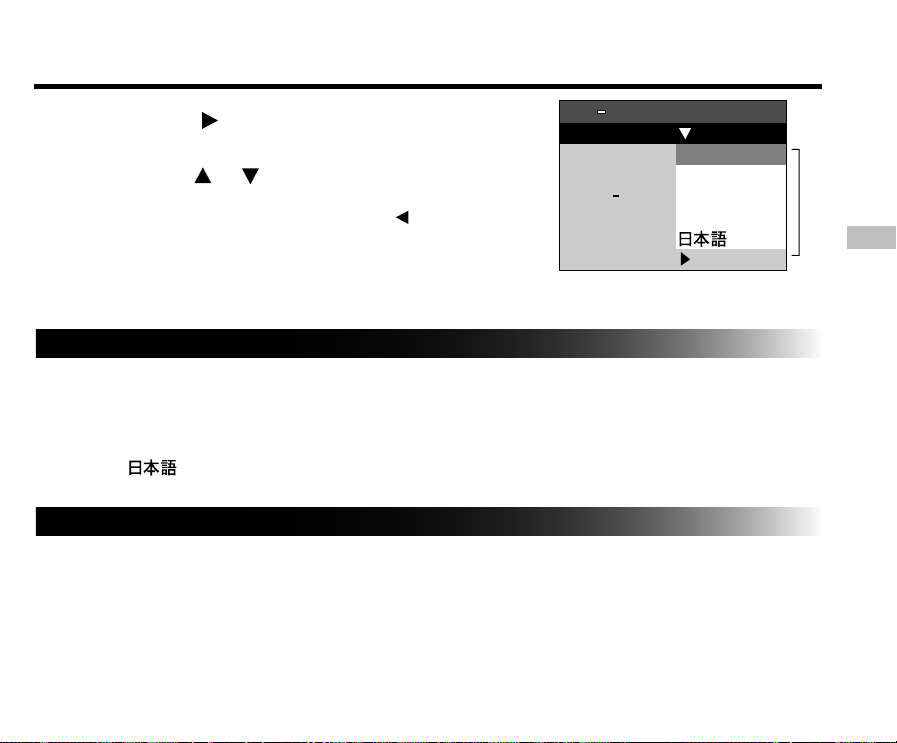
Basic Photographic Settings (SETUP mode) (continued)
3. Press the button.
The tab menu is displayed.
4. Use the or buttons to change the setting in
the tab menu, and press the ENTER button.
To cancel changing of settings, press the button.
5. To quit the SETUP menu, change the mode dial setting.
LANGUAGE
Sets the display language for menus displayed on the LCD monitor.
[English] (default) : English
[Deutsch] : German
[Français] : French
[Español] : Spanish
[ ] : Japanese
SOUND
Sets whether or not to sound the beep tone.
[ON] (default) : Sounds the beep tone according to the operating state or operation.
[OFF] : Does not sound the beep tone in any state.
SET UP
LANGUAGE
SOUND
TIME
AUTO OFF
TV
IMAGE No.
DEFAULT
English
English
Deutsch
Français
Español
SET
Tab menu
E
- 77 -
Page 78
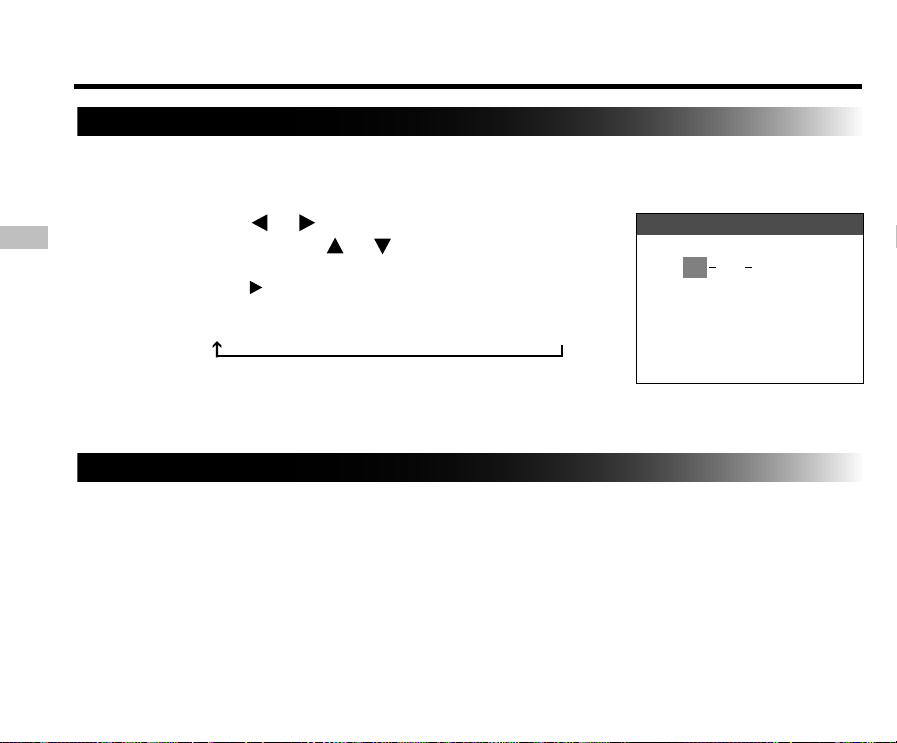
Basic Photographic Settings (SETUP mode) (continued)
200101 10
::
005512
CANCELSET
TIME
TIME
Sets the date and time.
(Seconds cannot be set.)
E
1. Using the or buttons to select the item you want
to set, and use the
or buttons to set the value for
each item.
Pressing the button advances the selection in the following order:
Month ➔ Day ➔ Year ➔ Hour ➔ Minute ➔ SET ➔ CANCEL
2. Select SET and press the ENTER button.
To quit setting, select CANCEL.
AUTO-OFF
If no operation is carried out for a fixed amount of time (default: about one minute), power consumption is
set to its minimum state (power almost turned off) to prevent battery wear. This is called the Auto Power
OFF mode. This setting allows you to set the time until the camera is set to the Auto Power OFF mode.
This function is not activated during automatic playback or when transferring images to computers. To
return to the normal state from the Auto Power OFF mode, either change the mode dial or press the
shutter button down fully.
[1 MIN] (default)
[2 MIN]
[3 MIN]
- 78 -
Page 79

Basic Photographic Settings (SETUP mode) (continued)
TV
Sets the video output format.
[NTSC] : NTSC video format (US, CANADA, JAPAN)
[PAL] : PAL video format (EUROPE)
IMAGE No.
Sets whether or not to reset the image number when you take photographs.
[CANCEL] : Does not reset the image number.
[RESET] : Reset the image number.
About Image Numbers and Folder Numbers
• When image numbering is reset, images are assigned a number starting from 0001 and stored in an
empty folder. This folder will be assigned the lowest number available on the inserted SmartMedia™
card.
The folder number varies according to the state of the inserted SmartMedia™card. To also reset the
folder number, format the SmartMedia™ card first and reset the image number.
• A consecutive number continuing from the last photographed image is assigned as the image number
regardless of whether or not only one image or all images were erased.
• The largest image number is 9999. When this number is reached, a new folder is created, and the
image number is assigned starting from 0001.
• The largest folder number is 999. When the folder number reaches 999, format the SmartMedia™ card.
• When you use SmartMedia™ card that was used for taking photographs on another camera, or swap
between two or more SmartMedia™card, the data held by this camera is given priority as the image
number. The folder number is assigned according to the state of your camera or the SmartMedia™card.
E
- 79 -
Page 80

Basic Photographic Settings (SETUP mode) (continued)
DEFAULT
Sets whether or not to return the settings (except TIME, LANGUAGE, TV (video output format) and the
LCD monitor brightness) to their defaults.
[CANCEL] : Does not return settings to their defaults.
[OK] : Returns settings to their defaults.
E
- 80 -
Page 81
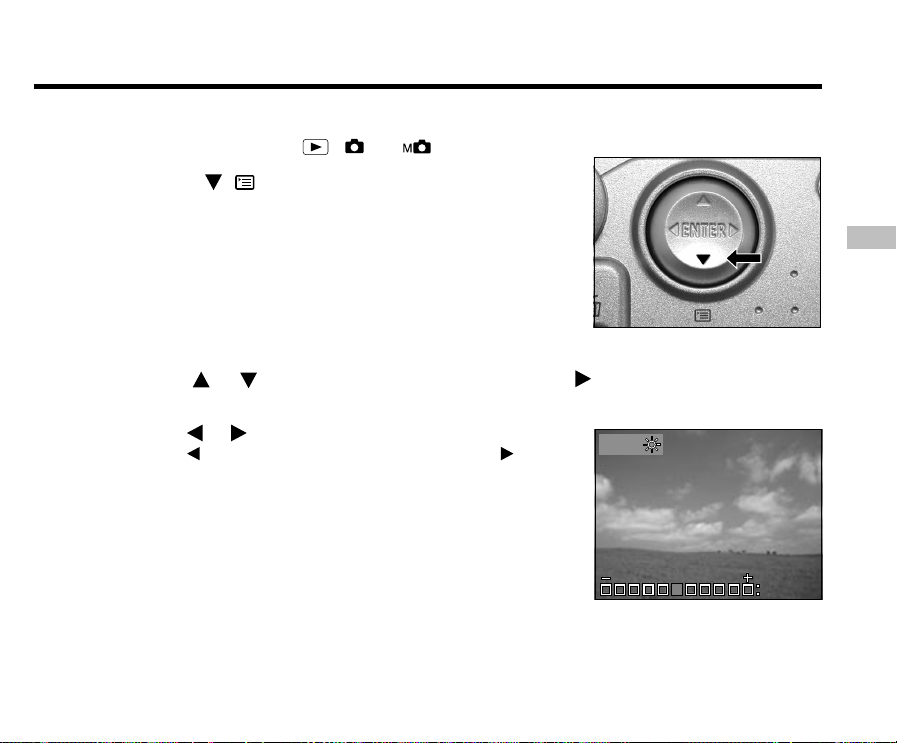
Adjusting the LCD Monitor Brightness
This adjusts the brightness of the LCD monitor and not the brightness of the recorded image.
1. Set the mode dial to , or .
2. Press the
The REC MENU or PLAY MENU is displayed.
You can set the LCD monitor brightness in either of these menus.
3. Use the or buttons to select LCD and press the button.
The image and the LCD menu are displayed.
4. Use the or buttons to adjust the brightness.
Press the button to darken (–) the LCD monitor, or the button to
lighten (+) the LCD monitor.
The LCD monitor can be adjusted within the range [–5] to [+5].
(Default is 0.)
5. Press the ENTER button.
This returns the camera to the previous mode.
( ) button.
LCD
- 81 -
E
o
Page 82
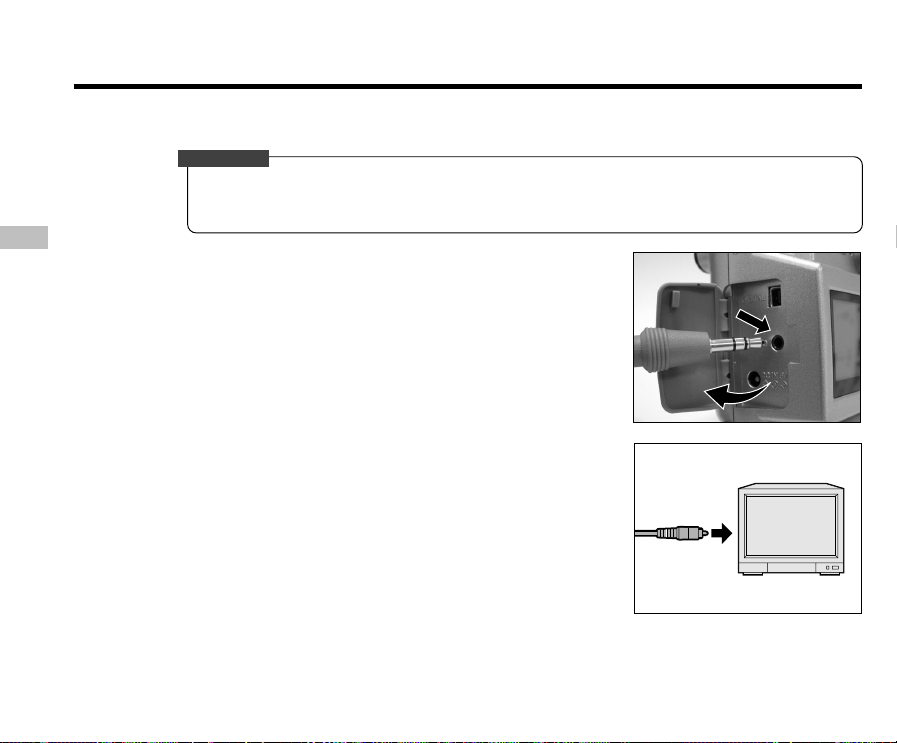
Taking and Playing Back Photographs on a TV
Television sets can be used to compose images for photography or playback. To do this, the camera must first be
connected to the TV. We recommend using the AC adapter on an indoor power outlet when available.
IMPORTANT
• Before you connect your camera to other equipment, be sure to turn all other connected equipment OFF.
If you connect your camera to other equipment with the power still ON, the screen may flicker or the
image may not be displayed normally.
E
1. Connect the plug of the video cable (provided) to the
VIDEO terminal on the camera.
2. Connect the video cable plug to the VIDEO IN terminal on
the TV.
- 82 -
Page 83
Taking and Playing Back Photographs on a TV (continued)
3. Take photographs or play them back.
Details of operation are the same as taking photographs and playing them back on the LCD monitor.
Note
• Nothing is displayed on the TV when the LCD monitor is set to OFF by turning the on-screen display off.
(To turn off the LCD monitor, switch the mode dial to REC
button. Use the
buttons to select OFF, and press the ENTER button.
• Live images (moving image before photography) are less clear than playback images. (This is because
they are displayed at a lower resolution.)
or buttons to select [DISPLAY] and press the button. Use the or
/PLAY mode. Press the ( )
E
- 83 -
Page 84

About the CD-ROM
You can install the following from the included CD-ROM.
• USB driver (for Windows 98 only)
• MGI PhotoSuite
E
• MGI PhotoVista
• User’s manual
• Acrobat Reader
Install this driver when you use the USB connector on your personal computer to import images.
The USB driver provided on the CD-ROM is exclusively for Windows 98. It is not necessary to install this
driver on computers running Windows 2000, Windows ME, Windows XP or Mac OS 9.0 or higher.
This software allows you to edit and print imported still images.
This software allows you to create spectacular 360o panoramic images.
Install this user’s manual on your computer to view or print additional instructions about the camera.
Adobe Acrobat must be installed to view or print the user's manual.
- 84 -
Page 85
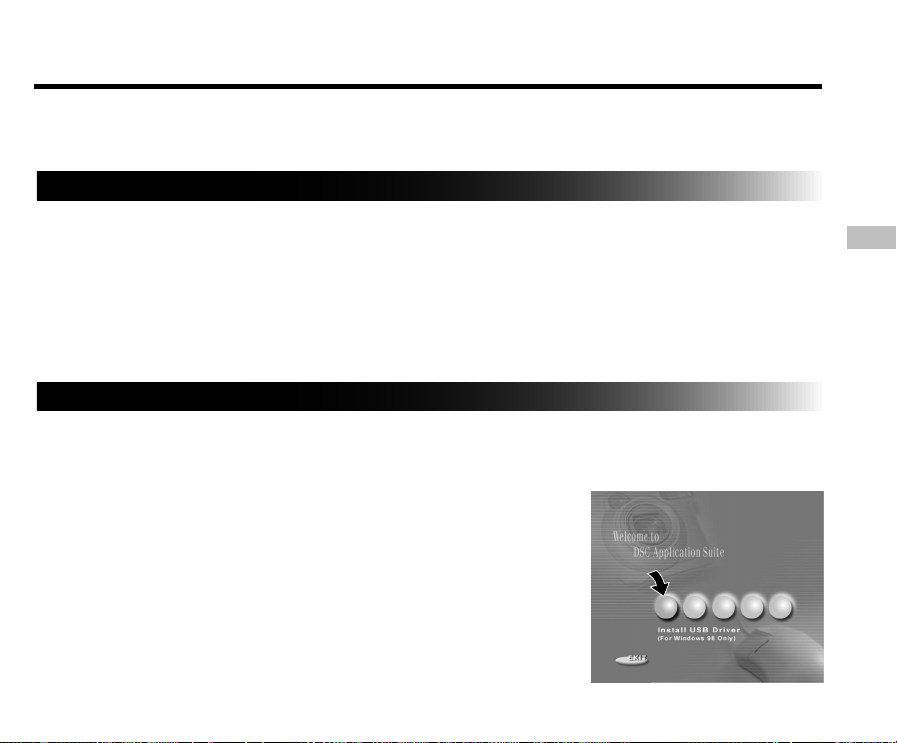
Transferring Images to a PC
You can transfer images photographed on your camera to a PC using the packaged CD-ROM and cable set.
The software and USB driver included on the CD-ROM must be installed to transfer images to a PC.
Before transferring the images, make sure that your system meets the following minimum system requirements.
System Requirements
• Pentium 166 MHz processor or higher
• Windows 98/ME/2000/XP
• PowerPC G3/G4
• MAC OS 9.0 or higher
• An available USB port
• At least 32MB RAM
• 80 MB available hard disk space
• A CD-ROM drive
• Color monitor (800 x 600 24-bit or higher recommended)
Installing the USB Driver (For Windows 98 Only)
Install this driver to use the USB cable. The USB driver provided on the CD-ROM is exclusively for Windows 98.
Installing the USB driver for use in Windows 2000/ME/XP is not necessary.
1. Insert the CD-ROM supplied with the package into the
CD-ROM drive.
The welcome screen appears.
E
- 85 -
Page 86
Transferring Images to a PC (continued)
2. Click “Install USB Driver”.
Follow the on-screen instructions to complete the installation.
After the USB driver installation is complete, restart the computer.
Installing the USB Driver (For MAC OS 9.0 or higher)
E
A mass storage class-compliant USB driver is already installed on the MAC OS 9.0 or higher. The USB driver
installation is not necessary.
Downloading Images
1. Connect one end of the USB cable to your computer.
2. Slide the power switch to turn on the camera power.
3. Connect the other end of the USB cable to the camera.
4. Double-click “My Computer” on the Desktop and find the removable disk.
(For MAC users, double-click the removable disk on the desktop.)
5. Drag and drop all the images in the removable disk to your computer.
- 86 -
Page 87
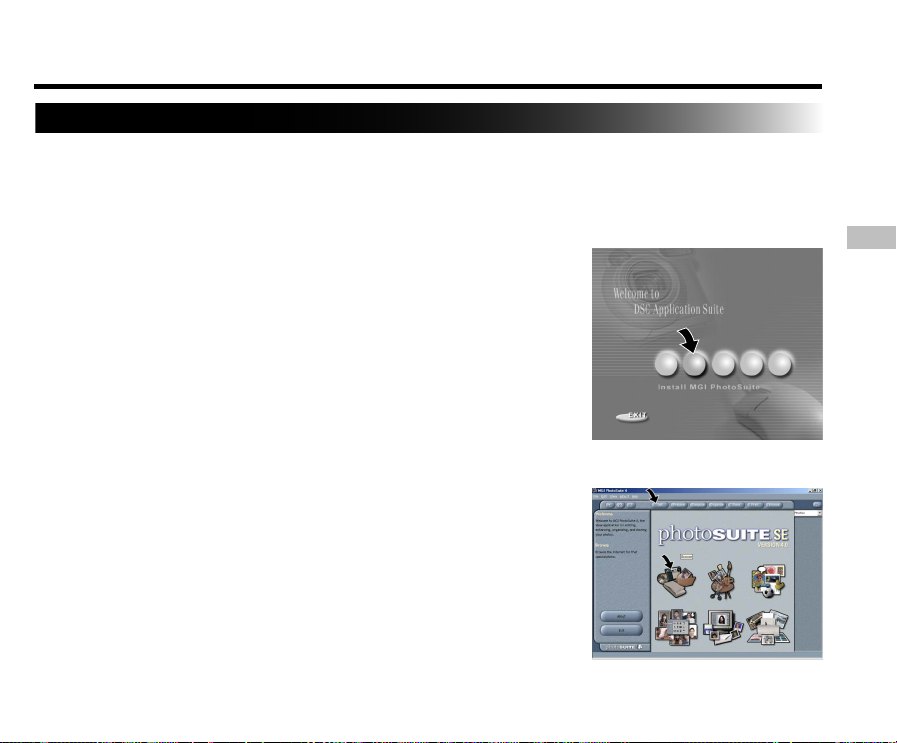
Editing Images
Using MGI PhotoSuite
MGI PhotoSuite is a very user-friendly image-editing program. With PhotoSuite, you can breezily retouch, compose
and organize your images in just seconds. It contains a variety of templates, such as photo frames, birthday cards,
calendars and other fun stuff. Get your images ready and go explore this amazing program.
To install MGI PhotoSuite, follow the steps below:
1. Insert the CD-ROM supplied with the package into the
CD-ROM drive.
The welcome screen appears.
2. Click “Install MGI PhotoSuite”.
Follow the on-screen instructions to complete the installation.
To use the program, follow the steps below:
1. Launch MGI PhotoSuite.
2. Click the large “Get” button on the Welcome
screen, or the “Get” button on the Navigation
bar.
- 87 -
E
Page 88
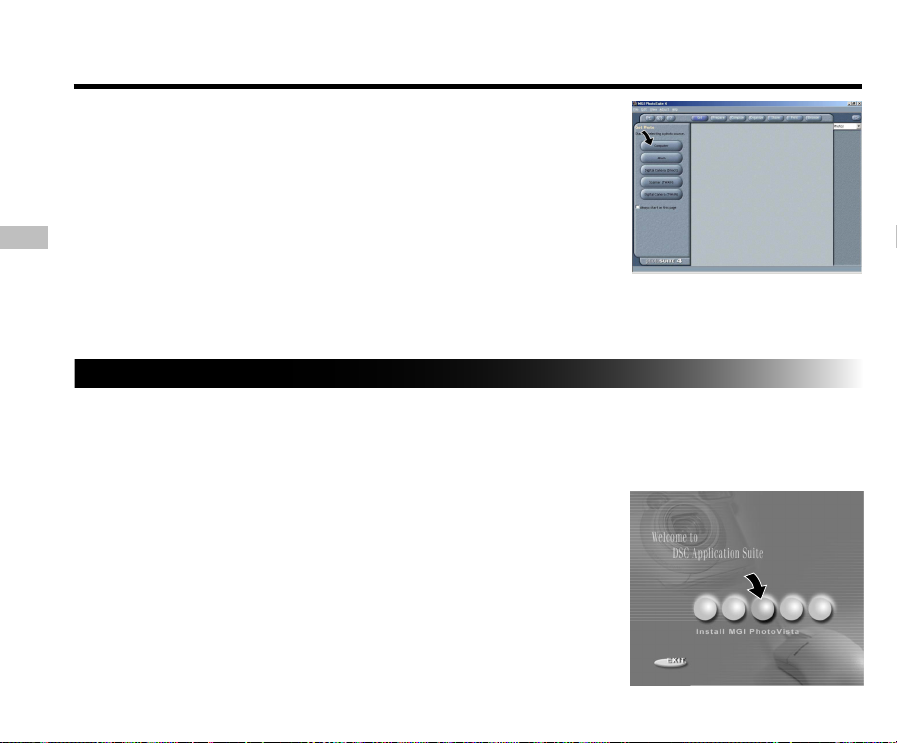
Editing Images (continued)
3. Choose a photo source (e.g. “Computer”) and click the
“Open” button.
E
4. Now you are able to process your images with all the
tools provided by PhotoSuite.
Using MGI PhotoVista
MGI PhotoVista is an easy-to-use program that lets you create spectacular 360o panoramic images in a snap. When
you view these panoramas, you get the experience of being totally immersed in a realistic environment. PhotoVista’s
powerful engine quickly and automatically stitches images together, and its intuitive interface will let even a novice
get great results in minutes.
To install MGI PhotoVista, follow the steps below:
1. Insert the CD-ROM supplied with the package into the
CD-ROM drive.
The welcome screen appears.
2. Click “Install MGI PhotoVista”.
Follow the on-screen instructions to complete the installation.
- 88 -
Page 89
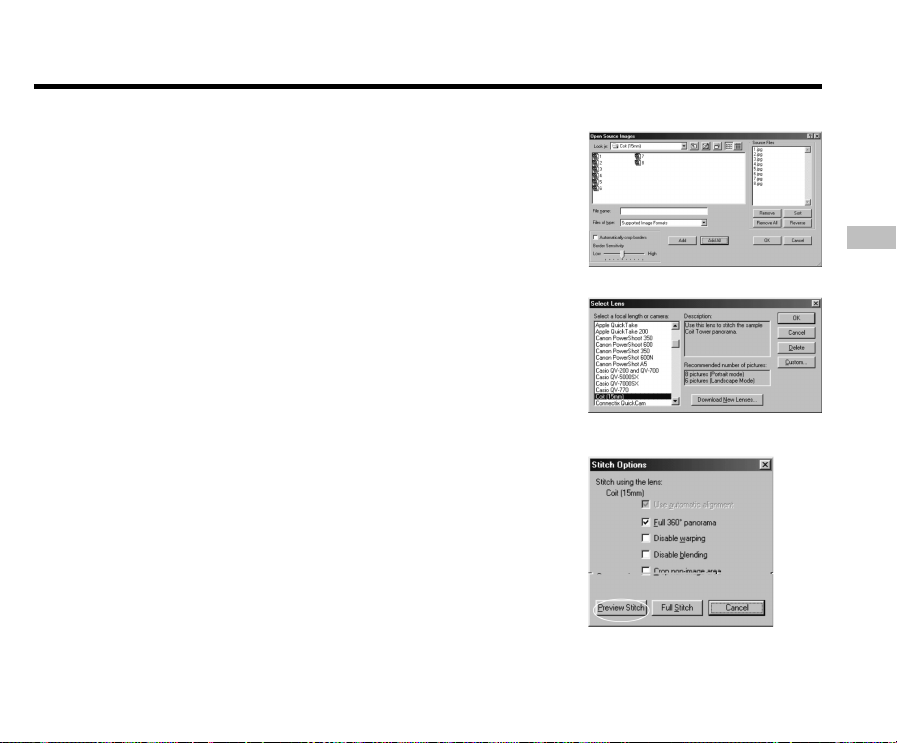
Editing Images (continued)
To use the program, follow the steps below:
1. Open Source Images in MGI PhotoVista
MGI PhotoVista requires some overlap of source images to properly
align them before a stitch. For best results, use a 20% to 50%
overlap. The number of photos you need to shoot to achieve this
overlap depends on the lens type you’re using.
2. Select the Lens
Click the “Select Lens” icon. The “Select Lens” dialog box appears.
Select the proper lens type.
3. Preview the Stitch
Click the “Stitch Panorama” icon. The “Stitch Options” dialog box
appears. Click “Preview Stitch” button.
E
- 89 -
Page 90
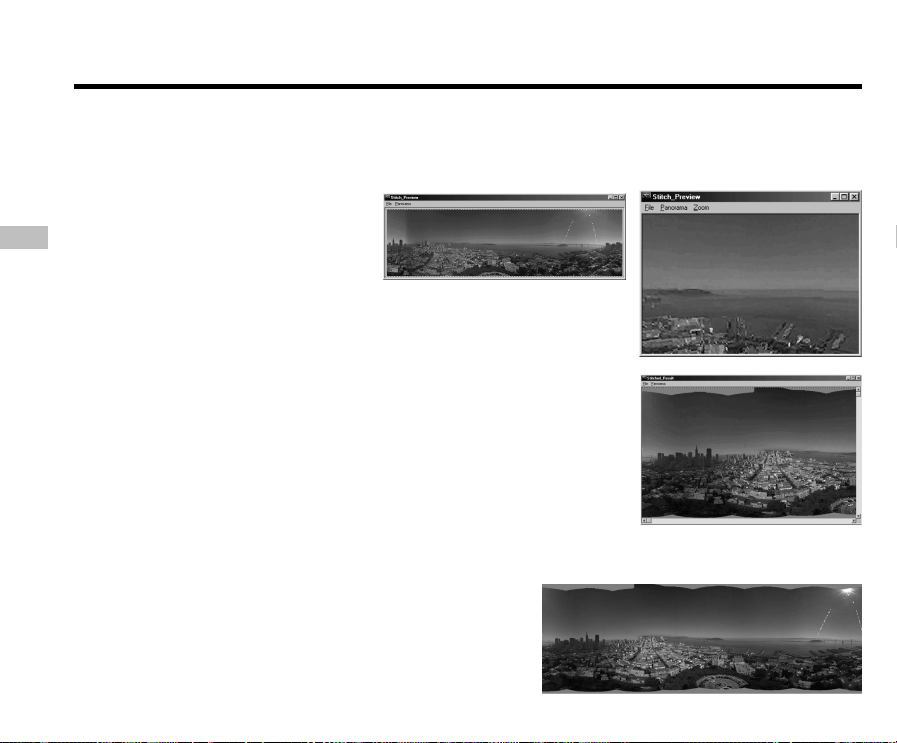
Editing Images (continued)
4. View the Panorama In Action
Choose “Show Viewer” from the “Panorama” menu. The “Stitch Preview” window changes to viewer
mode. Press and drag the pointer over the panorama vertically and horizontally. Press “SHIFT” to zoom
in or press “CTRL” to zoom out. Close the viewer window when you’re done to return to the preview stitch.
E
5. Create a Full Stitch
Click the Stitch “Panorama” icon. The “Stitch Options” dialog box
appears. Click “Full Stitch” button. The “Stitch Progress” dialog box
displays the progress of the stitch. Follow the procedure in Step 4 to
view the panorama in action.
6. Save a Panorama
After Step 5, you can save the panorama from the “Stitched Result”
window as a BMP, Flashpix (FPX), or JPEG file. MGI PhotoVista also
automatically creates an IVR file for you, which you use to play the
panorama.
- 90 -
Page 91
Installing Acrobat Reader
To view or print the user’s manual in PDF format, you have to install the Acrobat Reader first. See the steps below:
1. Insert the CD-ROM supplied with the package into the
CD-ROM drive.
The welcome screen appears.
2. Click “Install Acrobat Reader”.
Follow the on-screen instructions to complete the installation.
Steps for MAC users:
1. Insert the CD-ROM supplied with the package into the CD-ROM drive.
2. Select and double-click “Acrobat Reader”.
3. Double-click the language you want to install.
4. Double-click the setup program and follow the on-screen instructions to complete the installation.
E
- 91 -
Page 92
Installing the User’s Manual
The user’s manual on the supplied CD-ROM provides more information and advanced instructions about the
camera. Before reading the user’s manual, make sure to install the Acrobat Reader first. With Acrobat Reader, you
can view or print exact copies of the original manual on any (supported) operating system.
Follow the steps below to install user’s manual.
E
1. Insert the CD-ROM supplied with the package into the
CD-ROM drive.
The welcome screen appears.
2. Click “Install User’s Manual”.
Follow the on-screen instructions to complete the installation.
Steps for MAC users:
1. Insert the CD-ROM supplied with the package into the CD-ROM drive.
2. Select and double-click “User’s Manual”.
3. Double-click the language you want to install.
4. Double-click the PDF file to open the full version of user’s manual.
5. Copy the user’s manual to your computer if necessary.
- 92 -
Page 93
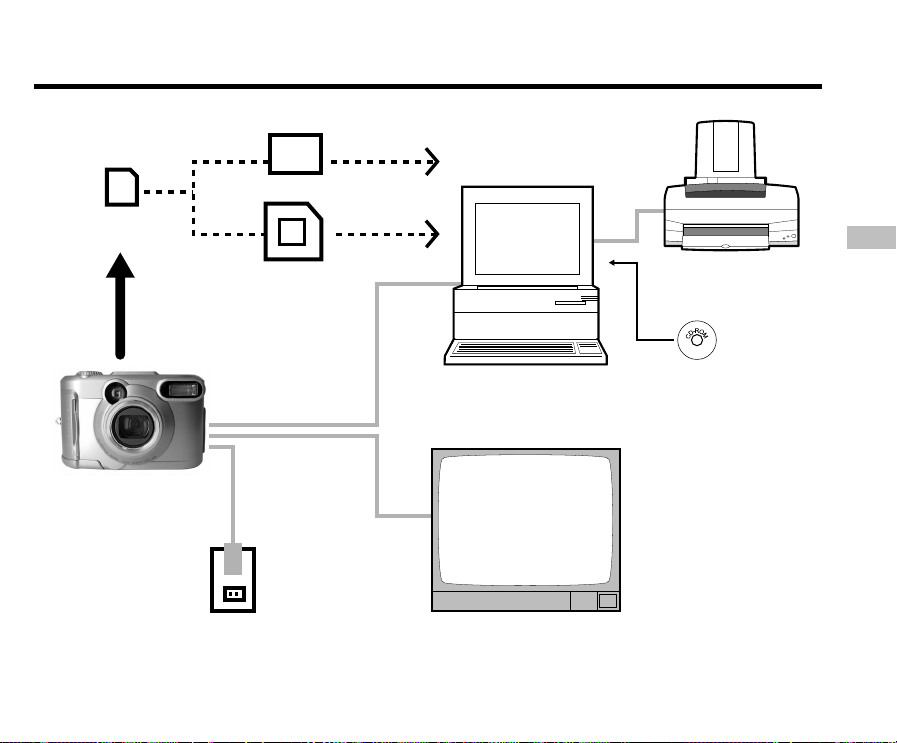
Connecting to Other Devices
PC card Adapter
SmartMedia™
card
Floppy disk Adapter
E
Printer
PC
USB cable
Video cable
AC adapter
Power outlet TV monitor
- 93 -
Software application
(CD-ROM)
Page 94
Specifications
Camera Body
Model
Recording medium
Compression system
Image file format
E
Number of frames
(Approx.)
FULL size:
1792 x 1200 pixels
HALF size:
896 x 600 pixels
Conversion rules
IMPORTANT
• The number of images that can be photographed in the table above is only for reference. Actual capacity
varies according to use.
• The size of the data to be recorded varies according to the amount of detail in the subject image. So, the
number of images that can be photographed after an image is recorded decreases. Sometimes this
amount decreases by two images.
Digital Still Camera
SmartMedia™ card (3.3V) 4/8/16/32/64/128MB compatible
JPEG-compliant
Exif Ver.2.1-compliant
Quality
Mode
★★★
FINE
★★
NORMAL
★
BASIC
DCF Ver. 1.0-compliant
Image
Size
FULL
HALF
FULL
HALF
FULL
HALF
4MB
3
14
7
28
14
55
8MB
7
29
14
58
29
112
16MB
15
60
30
117
60
225
32MB
32
121
60
236
121
453
64MB
65
243
122
475
243
907
128MB
131
486
246
951
486
1817
- 94 -
Page 95
Specifications (continued)
Pickup elements
Sensitivity
Lens
Focal length
Viewfinder
Auto-focus
Metering system
Exposure control
Shutter
White balance
Focal range
Self-Timer
Modes
Flash Flash intensity control
Effective range
Standard
Macro
1/2.6" CCD sensor (effective pixels: approx. 2.2 million)
Equivalent to ISO 100/200/400
3X zoom lens W=F2.9/F6.9, T=F3.02/F6.9
f=6.2 mm – 18.6 mm (equivalent to 38mm - 114mm on a 35mm camera)
Real image type zoom finder
TTL system AF, focus adjusting range: approximately 3.15 in. (8 cm) to infinity
Detection system: Contrast detection system
TTL metering by image capture system
Program AE (exposure compensation available in Manual mode)
1/1000 to 1 sec.
Auto selected
Selectable in manual photography mode (outdoors, standard/cool white
fluorescent light, incandescent light)
Approx. 15.7 in. (40 cm) to infinity
Approx. 3.15 in. (8cm) to infinity at wide angle
2 seconds/10 seconds selectable
Auto, Red-Eye Reduction, Forced Flash, Suppressed Flash, Slow Sync
Automatic
Approx. 1.3 ft. (0.4 m) - 8.2 ft. (2.5 m)
E
- 95 -
Page 96
Specifications (continued)
Date/Time
Automatic calendar function
LCD monitor
*1
DC IN terminal
I/O terminal
DIGITAL terminal
VIDEO terminal
E
Power supply
Operating
conditions
Temperature
Humidity
Camera dimensions
Weight
*1
The LCD monitor on your digital camera is manufactured using advanced high-precision technology.
Simultaneously recorded to image data (Exif file format)
Automatically adjusted until the year 2037
1.5" TFT(61,600 pixels)
DC 5 V
USB
NTSC or PAL system
4 x AA (Alkaline, Nickel Metal Hydride or Lithium) battery *2 or AC adapter
+41°F (+5°C) to +104°F (+40°C) (during operation)/–4°F (–20°C) to
+140°F (+60°C) (during storage)
30 to 80% (during operation) no condensation
4.13 in. (105 mm) (W) x 2.68 in. ( 68 mm) (H) x 2.17 in. (55 mm) (D)
(excluding protrusions)
Approx.8.1 oz (230 g) (excluding accessories, batteries and SmartMedia
card
)
TM
Though fine spots may appear on the LCD monitor, this is not a malfunction. The LCD monitor can be
used as it is.
*2
You cannot use manganese dry batteries in this camera.
SmartMedia™ card
Type Image memory card for digital cameras (SmartMediaTM card)
Type of memory NAND flash memory
Operating conditions Temperature +32°F (0°C) to +104°F (+40°C)
Humidity 80% or less (no condensation)
Dimensions
1-4/9 in. (37 mm) (W) x 3/
in. (0.76 mm) (H) x 1-7/9 in. (45 mm) (D)
100
Accessories Anti-static case ( x1), index labels ( x2), write-protect stickers ( x4)
- 96 -
Page 97
Warnings and Messages Displayed on LCD Monitor
The following warnings, messages and icons are displayed on the LCD monitor and the status display.
LCD monitor
NO CARD
CARD FULL
NO IMAGE
UNFORMATED CARD
CARD ERROR
PROTECTED CARD
FRAME ERROR
UNMATCHED DATA
FRAME No. FULL
PROTECT
FOLDER No. ERROR
IMAGE No. ERROR
Display
Status display
Flashing (photography mode)
Nothing displayed (playback
mode)
Flashing (photography mode)
Number of images displays 0
–––
–––
–––
–––
–––
–––
–––
–––
–––
–––
Remaining battery power half or less
Little battery power left
No battery power left
No SmartMedia™ card is loaded
SmartMedia™ card is loaded incorrectly
No more space on the SmartMedia™ card.
Recording is not possible.
Nothing is recorded to the SmartMedia™ card.
The SmartMedia™ card is not formatted. (A
message prompting you to format the
SmartMedia™ card is displayed.)
The SmartMedia™ card is damaged.
The SmartMedia™ card format is incorrect.
The SmartMedia™ card is write-protected.
An attempt was made to playback incorrectly
recorded data.
An attempt was made to playback a frame not
recorded on this camera.
The frame number has reached 999-9999.
An attempt was made to erase a protected
image.
A folder with the same number already exists.
An image with the same frame number already
exists in the folder.
Meaning
E
- 97 -
Page 98
Troubleshooting
First check the warning displayed on the LCD monitor and the viewfinder lamp. Then check the following items.
Problem
No power supply
E
The camera turns OFF
during operation.
The battery runs out
quickly.
No photograph is taken
when the shutter button
is pressed.
The batteries are exhausted.
The AC adapter plug has come out of
the power outlet.
The power switch is not turned on.
The batteries are exhausted.
You are using the camera in extremely
cold conditions.
The terminals are dirty.
The battery has reached the end of its
effective life.
No SmartMedia™ card is loaded.
The SmartMedia™ card is loaded
incorrectly.
Not enough space on the
SmartMedia™ card
The SmartMedia™ card is writeprotected.
The SmartMedia™ card is not formatted.
The SmartMedia™ card is damaged.
The Auto Power OFF function is
activated.
Causes
Replace with new batteries.
Plug the adapter back in.
Turn on the power switch.
Replace with new batteries.
Put the battery in your pocket or another warm
place to heat it and then load it into the camera
just before you take a picture.
Wipe the battery terminals with a clean, dry cloth.
Replace with new batteries.
Load a SmartMedia™ card.
Load the SmartMedia™ card correctly.
• Load a new SmartMedia™ card.
• Erase photographed images or change the size
and quality to increase space on the
SmartMedia™ card.
Remove the write-protection or replace with a new
SmartMedia™ card.
Format the SmartMedia™ card.
Load a new SmartMedia™ card.
Either press the shutter button fully down, or
change the mode dial setting.
Remedy
- 98 -
Page 99
Troubleshooting (continued)
Problem
I cannot use the flash to
take pictures.
The flash will not charge.
Images cannot be played
back.
The playback image is
too dark even though I
used the flash.
The playback image is
blurred.
I cannot format the
SmartMedia™ card.
I cannot erase all the
frames.
Nothing happens when I
use the buttons and
switches.
The set date and time
disappears.
Causes
The mode dial has been changed to
another setting.
The flash is set to Suppressed Flash
mode.
You pressed the shutter button while
the flash was charging.
The camera is set to Suppressed Flash
mode.
The batteries are exhausted.
No images in selected folder.
The subject is too far away.
The lens is not clean.
The image is out of focus.
The SmartMedia™ card is
write-protected.
The frame is protected.
The SmartMedia™ card is
write-protected
Camera malfunction.
The mode dial is not at the correct
position.
The camera is in the Auto Power OFF
mode.
Both the batteries and AC adapter are
removed with the power still ON.
- 99 -
Remedy
Set the mode dial to the correct setting.
Set the flash to Auto, Red-Eye Reduction or
Forced Flash mode.
Wait until charging is completed before pressing
the shutter button.
Set the flash to Auto, Red-Eye Reduction or
Forced Flash mode.
Replace with new batteries.
Select a different folder to play back.
Move closer to the subject.
(Approx. 1.3 ft.(0.4 m)-8.2 ft.(2.5 m))
Clean the lens.
Set macro photography to ON or OFF according to
the distance up to the subject.
Remove the write-protection.
Remove the write-protection.
Remove the write-protection.
Turn the power OFF and remove the batteries
once, and try again.
Set the mode dial to the correct setting.
Either press the shutter button fully down, or
change the mode dial setting.
Set the date and time again.
E
Page 100

Glossary
● AF/AE
AF (auto-focus) ··· A function for automatically
focusing your camera.
AE ··· A function for automatically setting your
camera’s exposure.
AF/AE lock ··· Locking of the focus and exposure
E
settings.
● DCF (Design rule for Camera File System)
A file system standard defined by the JEIDA (Japan
Electronic Industry Development Association) that is
required for exchanging data between digital still
cameras or a digital camera and a printer. This
standard defines the hierarchy and file names used
when storing image files on memory cards or other
recording media.
● Exif File Format (Exchangeable Image File
Format)
A color still image format for digital still cameras
approved by the JEIDA (Japan Electronic Industry
Development Association). JPEG-compliant, this
format is compatible with TIFF and JPEG and can be
used in image processing software for most personal
computers.
● JPEG
A file format used for compressing and saving color
images. The compression ratio can be selected, but
the higher the compression ratio, the worse image
quality becomes. This format is widely used in
imaging software for PCs.
● PC Card
A generic term for cards that meet the PC Card
Standard.
● Red-Eye Effect
The phenomenon where people’s eyes sometimes
appear red in the picture when you use a flash to
photograph them in low-light conditions. This is
caused by the light of the flash reflecting off the inside
of the eye.
● White Balance
When the brightness of the light changes, the human
eye adapts so that a white object still looks white. On
the other hand, devices such as digital still cameras
see a white subject as white by first adjusting the
balance to suit the color of the ambient light around
the subject. This adjustment process is referred to as
matching the white balance.
● SmartMedia™ card
Name of a recording medium defined by the SSFDC
Forum. This recording medium can be used over and
over again.
● Formatting
Transforming the contents of the SmartMedia™ to a
recordable state. (This is sometimes called
“initialization”.)
● Exposure Compensation
When the screen contains an extremely bright or dark
object, the camera automatically adjusts the
brightness, resulting in the subject being reproduced
darker or lighter. Exposure compensation adjusts for
- 100 -
this.
 Loading...