

Page 1
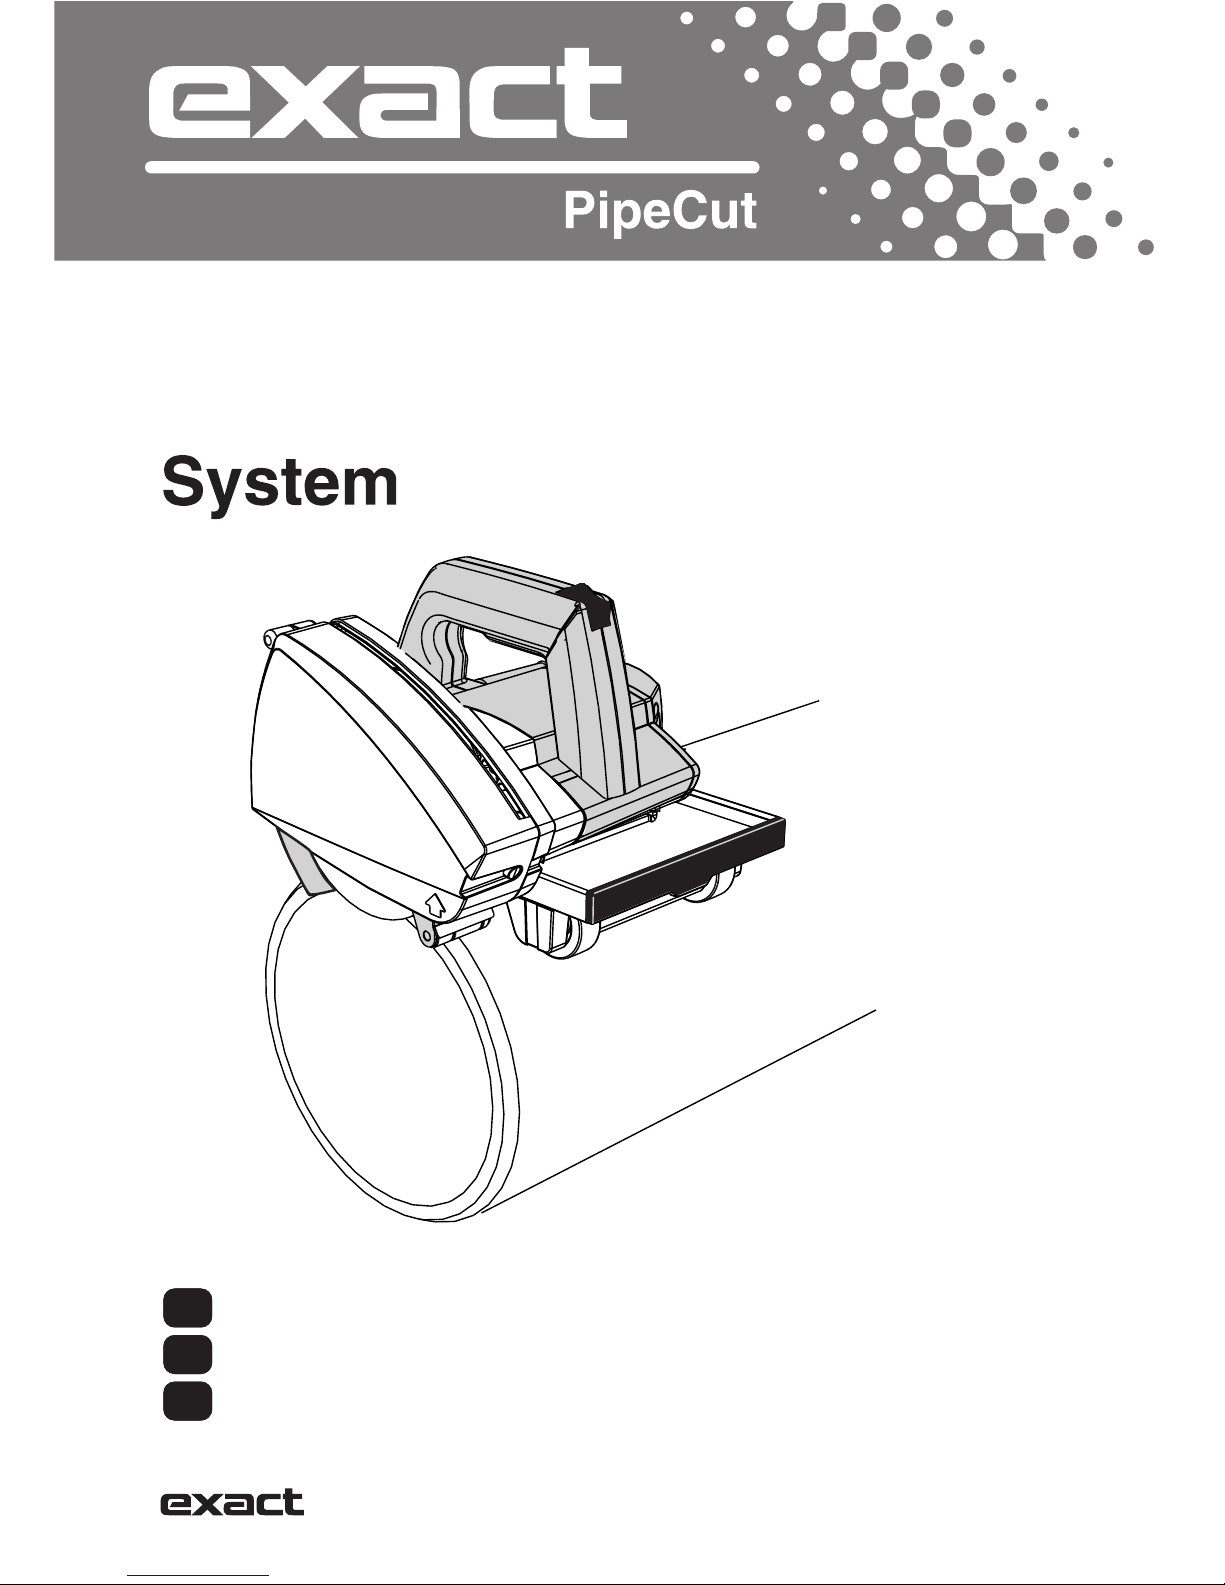
PipeCut P400 Plastic
EN Operating Instructions 5-16
FR Conseils d'emploi 17-28
ES Instrucciones de manejo 29-40
Pat. pending
Page 2

Exact PipeCut P400
Blade information for Exact PipeCut saws
There are two types of blades for Exact PipeCut P400 pipe saw:
1) TCT P150 blade is designed for cutting plastic pipes with P400 pipe saw. TCT blades
can be reshapened few times.
2) Cut Bevel blade is designed to cut and bevel plastic pipes in one process.
The bevelling tips can be turned around for to get new sharp cutting edge. There is also an
upgrade kit available to Cut Bevel blade . It contains one cutting blade and 8 pcs bevelling
blades and the screws needed to fix these blades to the blade body. By changeing these
one gets a blade that works like a new.
Informations concernant la lame des scies Exact PipeCut
Il existe deux types de lames pour la scie à tuyaux Exact PipeCut P400 :
1) La lame TCT P150 est conçue pour découper des tuyaux en plastique avec la scie à
tuyaux P400. Les lames TCT nécessitent peu d’affûtage.
2) La lame de coupe chanfreinée est conçue pour couper et chanfreiner les tuyaux en
plastique en une seule opération. Les pointes de chanfreinage peuvent être inversées
lorsqu’elles sont usées pour obtenir un nouveau bord de coupe affûté. Un kit est également
disponible pour améliorer la lame de coupe chanfreinée. Il comprend une lame de coupe
et 8 pointes de chanfreinage, ainsi que les vis nécessaires pour fi xer cette lame et les
pointes au corps de la lame. Ce kit d’amélioration fournit à l’utilisateur une lame de coupe
chanfreinée comme neuve.
Información de cuchilla para las sierras Exact PipeCut
Existen dos tipos de cuchillas para la sierra de tubos Exact PipeCut P400:
1) La cuchilla TCT P150 está diseñada para el corte de tubos de plástico con la sierra de
tubos P400. Las cuchillas TCT pueden afi larse varias veces.
2) La cuchilla CutBevel está diseñada para realizar cortes normales y de bisel de tubos
de plástico en un solo proceso. Las puntas de bisel pueden invertirse cuando están gastadas
para obtener un nuevo borde de corte afi lado. También se encuentra disponible un equipo
para actualizar la cuchilla de corte de bisel. Está formado por una cuchilla de corte y 8
puntas de bisel y los tornillos necesarios para fi jar esta cuchilla y las puntas al cuerpo de
la hoja. Este equipo de actualización ofrece al operador una cuchilla de corte de bisel tan
buena como una nueva.
2
Page 3
A
3
20.
21.
Page 4
4
120 V 25 ft 50 ft 100 ft 150 ft
7,6 m 15,2 m 30,5 m 45,7 m
240 V 50 ft 100 ft 200 ft 300 ft
15,2 m 30,5 m 61,0 m 91,4 m
AWG AWG AWG AWG
0-6 A 18 16 16 14
6-10 A 18 16 14 12
10-12 A 16 16 14 12
12-16 A 14 12
Total length of chord
Longueur totale de la rallonge
Longitud total del cable
Not recommended
Non recommandé
No recomendado
Ampere rating
Courant
Amperios
Extension chord sets minimum gauge
Calibre (gauge) minimal pour les cordons de rallonges
Calibre (gauge) mínimo para juegos de cables
1.
2.
3.
4.
5.
6.
7.
Page 5

Contents
5
english
Contents
Technical data
Package contents
Safety
Safety instructions
Operation
Functional description
Product features
Before operating the tool
Connection to the mains power supply
Precise setting of the cutting point
Setting the pipe on supports
Attaching the pipe saw to the pipe
Piercing the pipe wall
Sawing around a pipe
Overload protection
Straightness of cut and adjusting wheel
Installing and changing the saw blade
Service and maintenance instructions
Environment /Disposal
Guarantee/Guarantee conditions
Tips for users
Exploded view (separate attachment)
6.
6.
7.
10.
10.
11.
11.
11.
11.
12.
12.
12.
13.
13.
14.
14.
16.
16.
16.
Definitions: Safety guidelines
The definitions below describe the level of severity for each signal word. Please read the manual and pay
attention to these symbols.
DANGER: Indicates an imminently hazardous situation which, if not avoided, will result in death or
serious injury.
WARNING: Indicates a potentially hazardous situation which, if not avoided, could result in death or
serious injury.
CAUTION: Indicates a potentially hazardous situation which, if not avoided, may result in minor or
moderate injury.
NOTICE: Indicates a practice not related to personal injury which, if not avoided, may result in
property damage.
Denotes risk of electric shock.
The label on your tool or this manual may include symbols. The symbols and their definitions are
listed on page 41.
Page 6

Operating, safety, and servicing instructions
Please read this operating, safety, and servicing instructions carefully before
using the pipe saw. Also store this instruction book somewhere accessible to
everyone using the pipe saw. In addition to these instructions, always follow
the official work, health and safety regulations. The Exact PipeCut is meant for
professional use only.
Technical data
Kuva A
Information
6
Model
Voltage
Current
Power
No-Load speed
Intermittent operation
Blade diameter
Mounting bore
Weight
Range of use Ø
Max. pipe wall cutting
Max. pipe wall bevel cut
Protection class
Spindle lock
Speed preselection
Constant electronic control
Overload Protection
Reduced starting current
english
Pipecut P400
120 V / 60 Hz
8,4 A
950 W
4000 /min
2,5 min ON / 7,5 min OFF (S3 25%)
5,8”-5,9” (148 /150 mm)
2,44” (62 mm)
12 lbs (5,7 kg)
4”- 16” (100 mm – 400 mm)
0,9” (23 mm)
0,8” (20 mm)
/ II
YES
NO
NO
YES
NO
Exact PipeCut P400 pipe saw
Package contents:
Please check the package contains the following items (page 4):
1. PipeCut System shoulder bag
2. Exact PipeCut P400 pipe saw
3. Pipe holders 1+2
4. Operating instructions
5. Allen key 5 mm
6. TCT P150 blade fitted on the machine
7. Cut Bevel blade (in the bag)
Page 7

7
Safety
General power tool safety
warnings
WARNING: Read all safety warnings and
all instructions. Failure to follow the
warnings and instructions may result in
electric shock, fire and/or serious injury
Save all warnings and instructions for future
reference.
The term “power tool” in the warnings refers to your
mains-operated (corded) power tool or batteryoperated (cordless) power tool.
1. Work area safety
a) Keep work area clean and well lit. Cluttered
or dark areas invite accidents.
b) Do not operate power tools in explosive
atmospheres, such as in the presence of
flammable liquids, gases or dust. Power tools
create sparks which may ignite the dust or fumes.
c) Keep children and bystanders away while
operating a power tool. Distractions can cause
you to lose control.
2. Electrical safety
a) Power tool plugs must match the outlet. Never
modify the plug in any way. Do not use any
adapter plugs with earthed (grounded) power
tools. Unmodified plugs and matching outlets
will reduce risk of electric shock.
b) A void body cont act with earthed or grounded
surfaces, such as pipes, radiators, ranges
and refrigerators. There is an increased risk of
electric shock if your body is earthed or grounded.
c) Do not expose power tools to rain or wet
conditions. Water entering a power tool will
increase the risk of electric shock.
d) Do not abuse the cord. Never use the cord
for carrying, pulling or unplugging the power
tool. Keep cord away from heat, oil, sharp
edges and moving parts. Damaged or entangled
cords increase the risk of electric shock.
e) When operating a power tool outdoors, use
an extension cord suitable for outdoor use.
Use of a cord suitable for outdoor use reduces
the risk of electric shock.
f) If operating a power tool in a damp location
is unavoidable, use a residual current device
(RCD) protected supply . Use of an RCD reduces
the risk of electric shock.
NOTE: The term "residual current device (RCD)"
may be replaced by the term "ground fault circuit
interrupter (GFCI)" or "earth leakage circuit breaker
(ELCB)
3. Personal safety
a) Stay alert, watch what you are doing and use
common sense when operating a power tool.
Do not use a power tool while you are tired
or under the influence of drugs, alcohol or
medication. A moment of inattention while
operating power tools may result in serious
personal injury.
b) Use personal protective equipment. Always
wear eye protection. Protective equipment such
as dust mask, non-skid safety shoes, hard hat,
or hearing protection used for appropriate
conditions will reduce personal injuries.
c) Prevent unintentional starting. Ensure the
switch is in the off-position before connecting
to power source, picking up or carrying the
tool. Carrying power tools with your finger on
the switch or energising power tools that have
the switch on invites accidents.
d) Remove any adjusting key or wrench before
turning the power tool on. A wrench or a key
left attached to a rotating part of the power tool
may result in personal injury.
e) Do not overreach. Keep proper footing and
balance at all times. This enables better control
of the power tool in unexpected situations.
f) Dress properly. Do not wear loose clothing
or jewellery. Keep your hair, clothing and
gloves away from moving parts. Loose clothes,
jewellery or long hair can be caught in moving
parts.
g) If devices are provided for the connection of
dust extraction and collection facilities, ensure
these are connected and properly used. Use
of dust collection can reduce dust-related hazards.
4. Power tool use and care
a) Do not force the power tool. Use the correct
power tool for your application. The correct
power tool will do the job better and safer at the
rate for which it was designed.
b) Do not use the power tool if the switch does
not turn it on and off. Any power tool that cannot
be controlled with the switch is dangerous and
must be repaired.
c) Disconnect the plug from the power source
from the power tool before making any
adjustments, changing accessories, or storing
power tools. Such preventive safety measures
reduce the risk of starting the power tool
accidentally.
d) Store idle power tools out of the reach of
children and do not allow persons unfamiliar
with the power tool or these instructions to
operate the power tool. Power tools are
dangerous in the hands of untrained users.
e) Maintain power tools. Check for misalignment
or binding of moving parts, breakage of p art s
and any other condition that may affect the
power tool’s operation. If damaged, have the
power tool repaired before use. Many accidents
are caused by poorly maintained power tools.
english
Page 8

8
Safety
f) Keep cutting tools sharp and clean. Properly
maintained cutting tools with sharp cutting edges
are less likely to bind and are easier to control.
g) Use the power tool, accessories and tool bits
etc. in accordance with these instructions,
taking into account the working conditions
and the work to be performed. Use of the
power tool for operations different from those
intended could result in a hazardous situation.
5. Service
Have your power tool serviced by a qualified
repair person using only identical
replacement parts. This will ensure that the
safety of the power tool is maintained.
Safety warnings for circular
saws
a) DANGER: Keep hands away from
cutting area and the blade. Keep your
second hand on motor housing. If
both hands are holding the saw, they cannot be
cut by the blade.
NOTE: For circular saws with 140 mm or smaller
diameter blades, the "Keep your second hand on
auxiliary handle, or motor housing" may be omitted.
b) Do not reach underneath the workpiece. The
guard cannot protect you from the blade below
the workpiece.
c) Adjust the cutting depth to the thickness
of the workpiece. Less than a full tooth of the
blade teeth should be visible below the workpiece.
d) Never hold the workpiece being cut in your
hands or across your leg. Secure the
workpiece to a stable platform. It is important
to support the work properly to minimize body
exposure, blade binding, or loss of control.
e) Hold the power tool only by the insulated
gripping surfaces when performing an
operation where the cutting tool may contact
hidden wiring or its own cord. Contact with a
“live” wire will also make exposed metal parts of
the power tool “live” and shock the operator.
f) When ripping always use a rip fence or
straight edge guide. This improves the accuracy
of cut and reduces the chance of blade binding
g) Always use blades with correct size and shape
(diamond versus round) of arbour holes.
Blades that do not match the mounting hardware
of the saw will run eccentrically, causing loss of
control.
h) Never use damaged or incorrect blade
washers or bolt. The blade washers and bolt
were specially designed for your saw, for optimum
performance and safety of operation.
i) Do not reach into the saw dust ejector with
your hands. They could be injured by rotating
parts.
j) Do not work overhead with the saw. In this
manner you do not have sufficient control over
the power tool.
k) Do not operate the power tool stationary. It
is not designed for operation with a saw table.
l) Do not use high speed steel (HSS) saw blades.
Such saw blades can easily break.
m)When working with the machine, always hold
it firmly with both hands and provide for a
secure stance. The power tool is guided more
secure with both hands.
n) Secure the workpiece. A workpiece supported
by pipe holders is held more secure than by
hand.
o) Always wait until the machine has come to
a complete stop before placing it down. The
tool insert can jam and lead to loss of control
over the power tool.
p) Never use the machine with a damaged cable.
Do not touch the damaged cable and pull
the mains plug when the cable is damaged
while working. Damaged cables increase the
risk of an electric shock.
Further safety instructions for
all saws
Causes and operator prevention of kickback:
- Kickback is a sudden reaction to a pinched,
bound or misaligned saw blade, causing an
uncontrolled saw to lift up and out of the workpiece
toward the operator;
- When the blade is pinched or bound tightly by
the kerf closing down, the blade stalls and the
motor reaction drives the unit rapidly back toward
the operator;
- If the blade becomes twisted or misaligned in
the cut, the teeth at the back edge of the blade
can dig into the top surface of the wood causing
the blade to climb out of the kerf and jump back
toward the operator.
Kickback is the result of saw misuse and/or incorrect
operating procedures or conditions and can be
avoided by taking proper precautions as given below:
a) Maintain a firm grip with both hands on the
saw and position your arms to resist kickback
forces. Position your body to either side of
the blade, but not in line with the blade.
Kickback could cause the saw to jump backwards,
but kickback forces can be controlled by the
operator, if proper precautions are taken.
NOTE: For circular saws with 140 mm or smaller
diameter blades, the words "with both hands" may
be omitted.
b) When blade is binding, or when interrupting
a cut for any reason, release the trigger and
hold the saw motionless in the material until
the blade comes to a complete stop. Never
attempt to remove the saw from the work or pull
the saw backward while the blade is in motion
or kickback may occur. Investigate and take
corrective actions to eliminate the cause of blade
binding.
english
Page 9

9
Safety
c) When restarting a saw in the workpiece,
centre the saw blade in the kerf and check
that saw teeth are not engaged into the
material. If saw blade is binding, it may walk up
or kickback from the workpiece as the saw is
restarted.
d) Support large panels to minimise the risk of
blade pinching and kickback. Large panels
tend to sag under their own weight. Supports
must be placed under the panel on both sides,
near the line of cut and near the edge of the
panel.
e) Do not use dull or damaged blades.
Unsharpened or improperly set blades produce
narrow kerf causing excessive friction, blade
binding and kickback.
f) Blade depth and bevel adjusting locking
levers must be tight and secure before making
cut. If blade adjustment shifts while cutting, it
may cause binding and kickback.
g) Use extra caution when making a "plunge
cut" into existing walls or other blind areas.
The protruding blade may cut objects that can
cause kickback.
Safety instructions for plunge
type saws
a) Check guard for proper closing before each
use. Do not operate the saw if guard does not
move freely and enclose the blade instantly.
Never clamp or tie the guard with the blade
exposed. If saw is accidentally dropped, guard
may be bent. Check to make sure that guard
moves freely and does not touch the blade or
any other part, in all angles and depths of cut.
b) Check the operation and condition of the
guard return spring. If the guard and the spring
are not operating properly, they must be
serviced before use. Guard may operate
sluggishly due to damaged parts, gummy deposits,
or a build-up of debris.
c) Assure that the guide plate of the saw will
not shift while performing the “plunge
cut” when the blade bevel setting is not at
90°. Blade shifting sideways will cause binding
and likely kick back.
d) Always observe that the guard is covering
the blade before placing saw down on bench
or floor. An unprotected, coasting blade will
cause the saw to walk backwards, cutting
whatever is in its bath. Be aware of the time it
takes for the blade to stop after switch is released.
Additional specific safety rules
The pipe saw must never be used in the following
cases, if:
• There is water or another liquid, explosive gases
or poisonous chemicals inside the pipe to be cut.
• The power switch is faulty.
• The power cable is faulty,
• The blade is bent.
• The blade is blunt or in poor condition.
• The plastic components are cracked or have parts
missing.
• The gripper unit is not properly tightened around
the pipe or if it is warped.
• The blade guard cover or moving blade guard
has been damaged or removed from the machine.
• The locking mechanisms do not work properly
(UNLOCK-button).
• The pipe saw has become wet.
When using the pipe saw, the following factors
must always be taken into consideration:
• Support tubes to minimise the risk of blade
pinching.
• Ensure that the pipe to be cut is empty.
• Ensure that the blade is correctly installed.
• Ensure that the diameter and thickness of the
blade are suitable for the pipe saw and that the
blade is suitable for the rpm-range of the machine.
• Never use sideways force to stop the blade, always
allow the blade to stop freely.
• Check the attachments of the blade guards.
• Never use excessive force when using the pipe
saw.
• Never use the pipe saw to lift the pipe while it is
still attached to the pipe.
• Avoid overloading the electric motor.
• Always follow the safety and operating instructions
and current regulations.
Air vents often cover moving parts and should
be avoided. Loose clothes, jewellery or long hair
can be caught in moving parts.
Accessories must be rated for at least the speed
recommended on the tool warning label. Accessories
running over rated speed can fly apart and cause
injury . Accessory ratings must always be above tool
speed as shown on tool nameplate.
WARNING: ALWAYS wear proper
personal hearing protection that
conforms to ANSI S12.6 (S3.19) during use. Under
some conditions and duration of use, noise from
this product may contribute to hearing loss. When
working with various materials, the sound level may
vary and at times exceed the 85 dB(A) limit. Always
use ear protectors to protect yourself.
WARNING: ALWA YS use safety glasses.
Everyday eyeglasses are NOT safety
glasses. Always use safety goggles to prevent injury
to your eyes from particles thrown up when using
the pipe saw. Also use face or dust mask if cutting
operation is dusty (cast iron cutting). ALWAYS
WEAR CERTIFIED SAFETY EQUIPMENT:
• ANSI Z87.1 eye protection (CAN/CSA Z94.3),
• ANSI S12.6 (S3.19) hearing protection,
• NIOSH/OSHA/MSHA respiratory protection.
english
Page 10

10
Safety, Operation
WARNING: ALWAYS use safety gloves
as the edges of cut pipes are sharp and
can cause cuts.
WARNING: Some dust created by power
sanding, sawing, grinding, drilling, and
other construction activities contains chemicals
known to cause cancer, birth defects or other
reproductive harm. Some examples of these
chemicals are:
• lead from lead-based paints,
• crystalline silica from bricks and cement and other
masonry products, and
• arsenic and chromium from chemically-treated
lumber (CCA).
Your risk from these exposures varies, depending
on how often you do this type of work. To reduce
your exposure to these chemicals: work in a well
ventilated area, and work with approved safety
equipment, such as those dust masks that are
specially designed to filter out microscopic particles.
Avoid prolonged contact with dust from power
sanding, sawing, grinding, drilling, and other
construction activities.
Wear protective clothing and wash exposed
areas with soap and water. Allowing dust to get
into your mouth, eyes, or lay on the skin may
promote absorption of harmful chemicals.
WARNING: Use of this tool can generate
and/or disbursedust, which may cause
serious and permanent respiratory or other injury .
Always use NIOSH/OSHA approved respiratory
protection appropriate for the dust exposure.
Direct particles away from face and body.
Extension cords
An extension cord must have adequate wire
size (AWG or American Wire Gauge) for safety.
The smaller the gauge number of the wire, the
greater the capacity of the cable, that is 16 gauge
has more capacity than 18 gauge. An undersized
cord will cause a drop in line voltage resulting in
loss of power and overheating. When using more
than one extension to make up the total length, be
sure each individual extension contains at least the
minimum wire size. The following table shows the
correct size to use depending on cord length and
nameplate ampere rating. If in doubt, use the next
heavier gauge. The smaller the gauge number , the
heavier the cord.(see page 4).
Motor
Be sure your power supply agrees with nameplate
marking. As little as 10% lower voltage can cause
loss of power and can result in overheating. All
Exact Tools products are factory-tested; if this tool
does not operate, check the power supply.
WARNING: Accessories must be rated
for at least the speed recommended on
the tool warning label. Accessories
running over rated speed can fly apart and cause
injury. Accessory ratings must always be above
tool speed as shown on tool nameplate.
DANGER: Avoid contact with the blade
teeth to prevent personal injury.
Functional Description
Read all safety warnings and all instructions.
Failure to follow the warnings and instructions may
result in electric shock, fire and/or serious injury.
Intended Use
PipeCut P400:
The Exact Pipe Cut P400 is intended for professional
use at any kind of construction sites.
The Exact PipeCut P400 is designed to be used
only for plastic pipes with dimensions 100 mm (4’)
- 400 mm (16”).The maximum wall thickness that
the Exact Pipe Cut P400 can cut through is 25 mm
(1”). With a Cut Bevel blade the maximum wall
thickness is 22 mm ( 0,9”) With the Exact PipeCut
P 400 you can cut pipes made from the different
plastic materials, such as PP, PE, PVC, etc.
PipeCut P400 pipe saw is intended for short,
intermittent use. The machine may be loaded for
2,5 minutes during a 10-minute period (S3 25 %).
PipeCut P400 pipe saw is not intended for use in
industrial serie production.
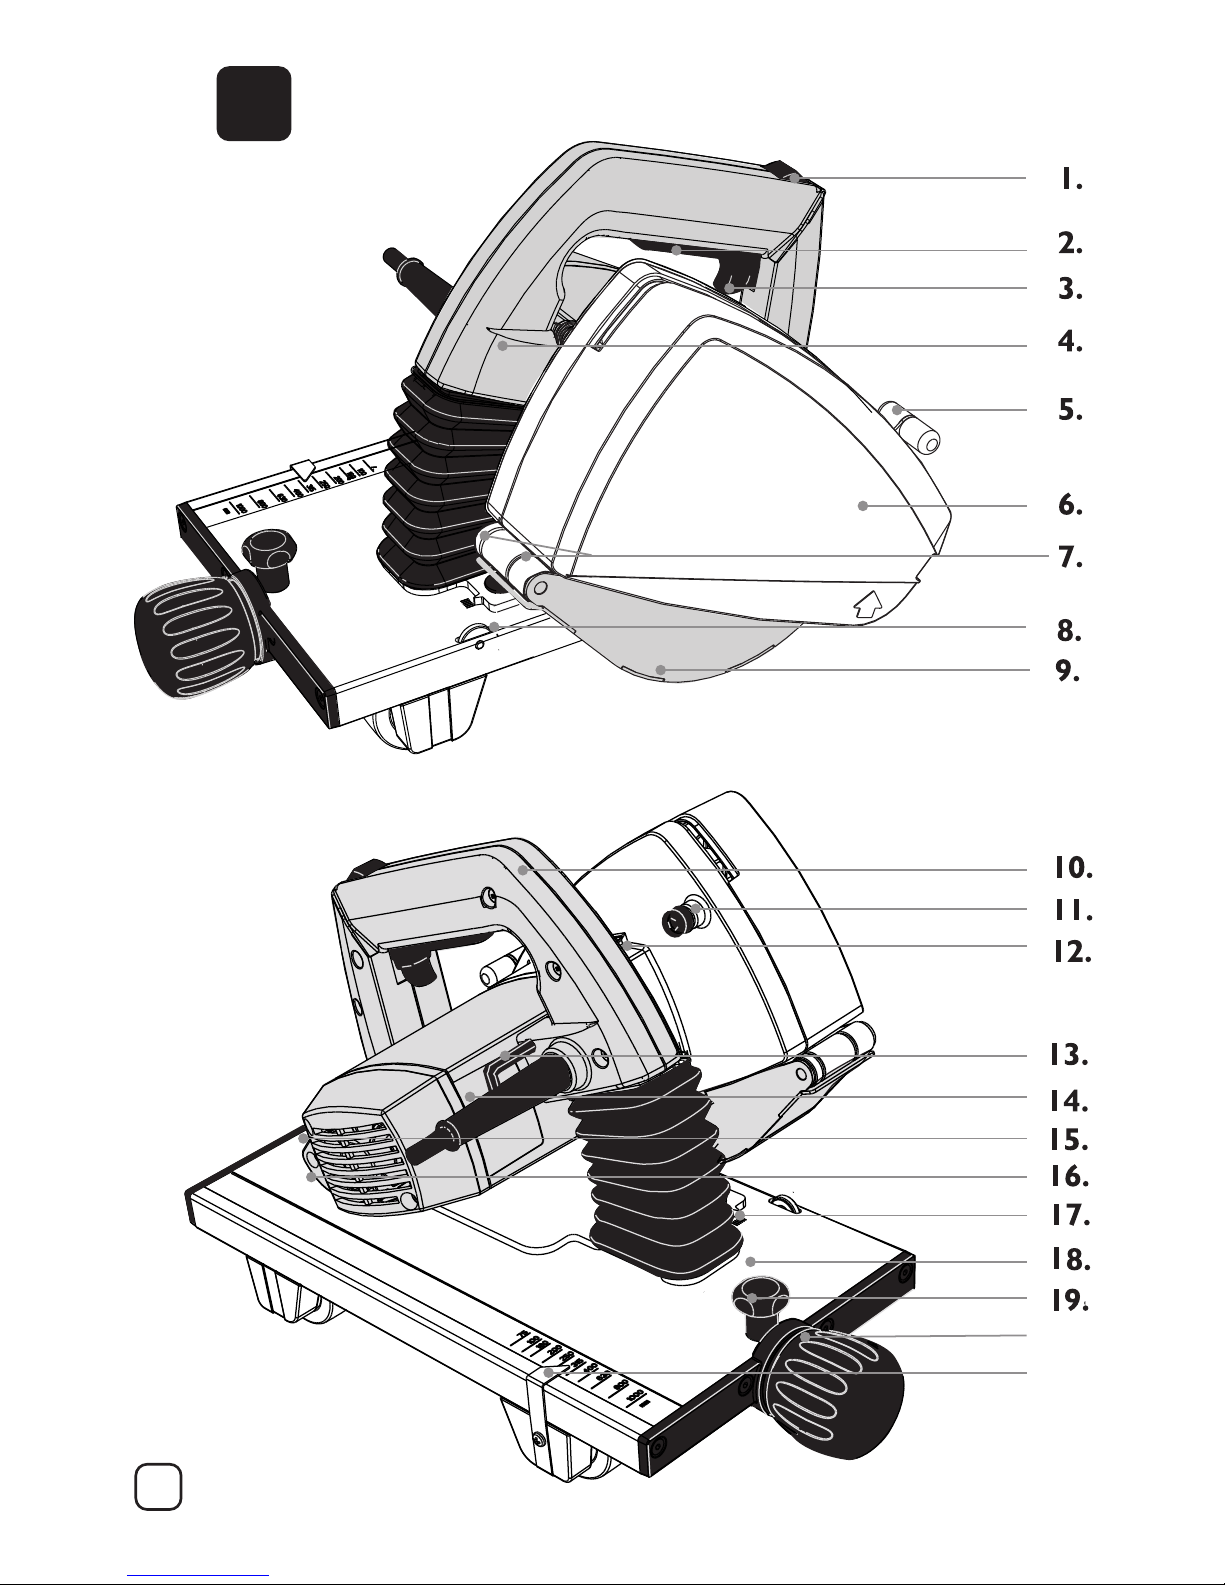
Product Features
While reading the operating instructions, unfold the
graphics page for the machine and leave it open.
This page is folded under the cover of this manual
(page 4). The following numbering of the product
features refers to this illustration.
Figure A
1. UNLOCK button
2. Power switch
3. Power switch locking lever
4. Motor unit
5. Moving blade guard lever
6. Blade guard cover
7. Setting points
8. Straight adjustment screw
9. Moving blade guard
10. Operating handle
11. Blade guard screw
12. Spindle lock button
13. Allen key
14. Rating plate
15. Overload protection
16. Manufacturing date (mmyy)
17. Straight adjustment screw inicator
18. Steering unit
19. Safe for the steering unit
20. Adjustment knob for the steering unit
21 Steering unit indicator
english
Page 11
Exact P400
pipecutting system
operating instructions
Before operating the Exact P400 please do as
follows
Check that the motor unit is in the upright position
so that the yellow mark on the
UNLOCK button is visible.
Check that the there is correct blade in the machine.
Check that the blade is correctly in place and that it
is in good condition.
Check that the guide wheels are rotating.
Check that the support wheels are rotating.
Check that the lower blade guard is moving correctly .
Check that the pipe intended to be cut is empty.
Connecting the Exact P400 to the main power
supply
Ensure that the mains voltage is the same as
indicated on the rating plate (Figure A/14)
Connect the Exact P400 to the power outlet only
after having checked the list above.
Setting the supports for the pipe to be cut.
Always use Exact pipe supports when sawing. The
supports maximise safety and optimise the cutting
result. The cutting should always be done on a flat
surface. Place the pipe on the sawing support so
that the cutting point is between the wheel pairs.
Place the single supports underneath both ends of
the pipe. Make sure that all of the wheels are in
contact with the pipe. If necessary wedge the holders
with a piece of wood. (Fig. B) Shorter sections (under
25cm/10”) can be cut with two supports placed so
that the cutting point is outside the supports. (Fig.
C) By sawing in the correct order you prevent the
saw blade from jamming in the pipe in the final stage
of the cutting process.
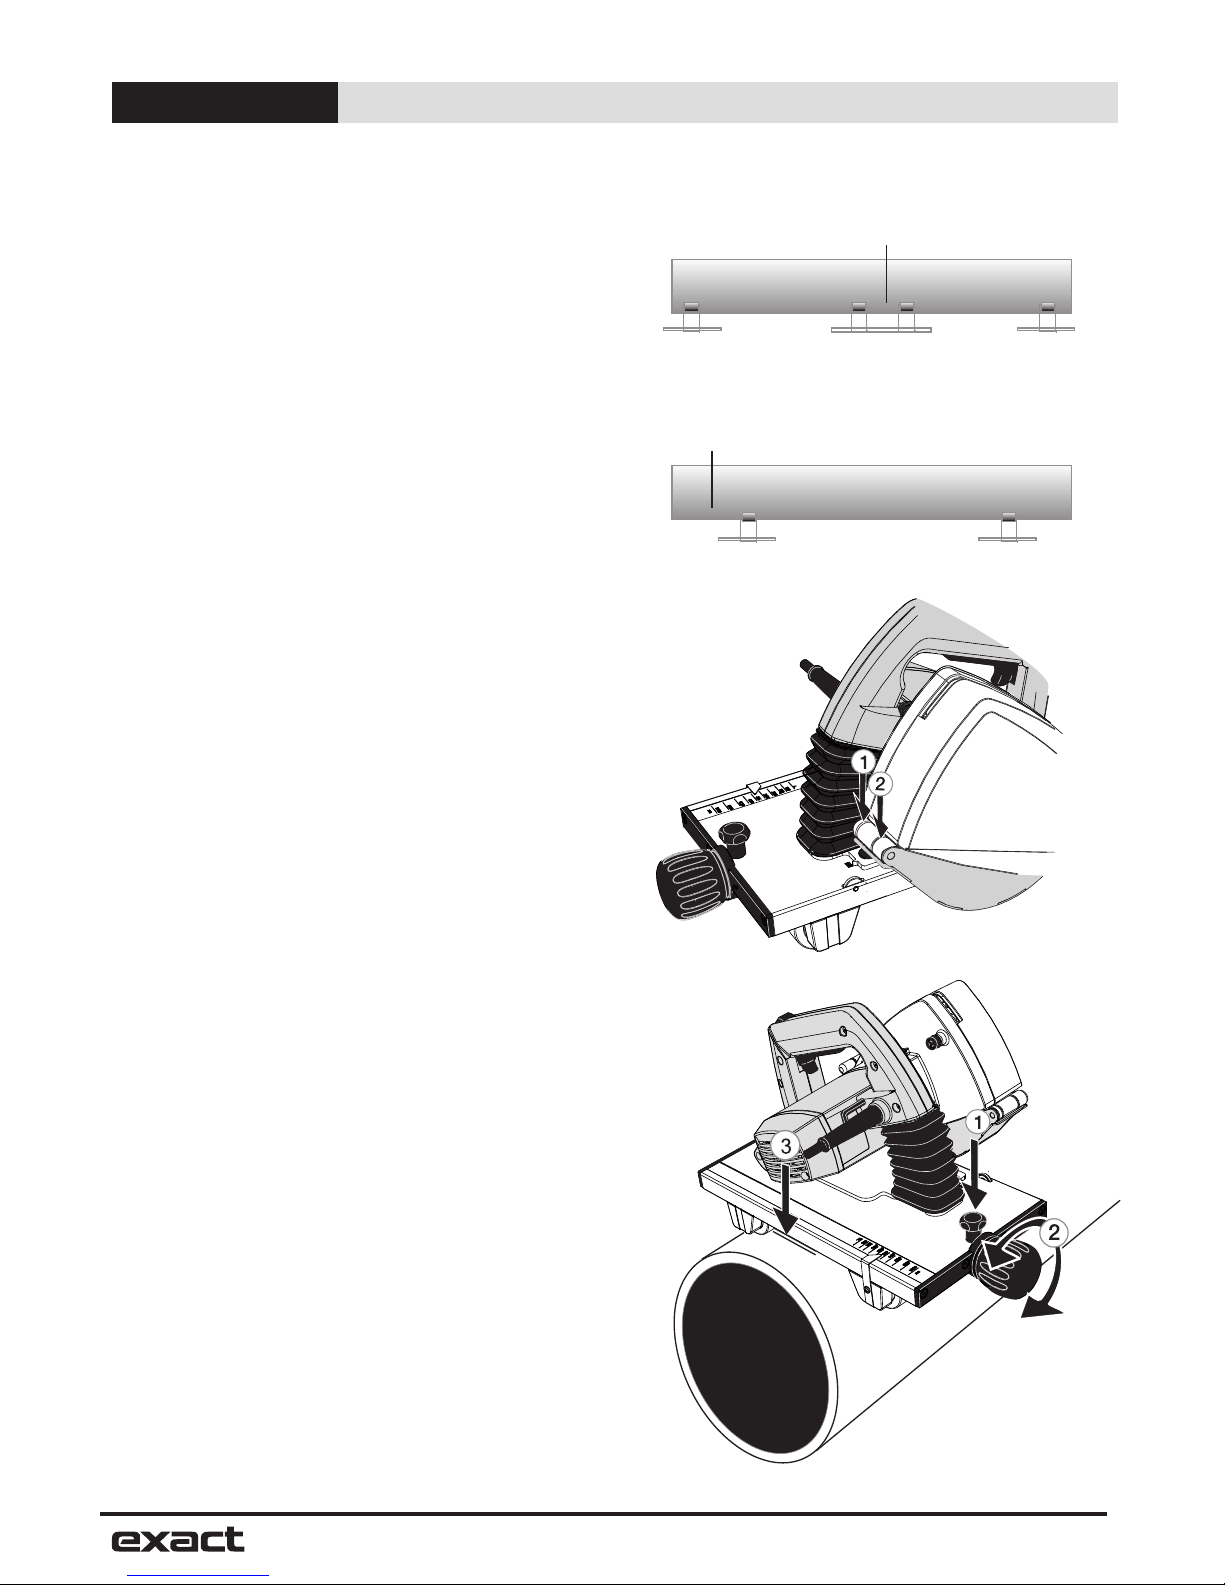
Setting and marking the cutting point
Use a marker to mark the cutting point. There are
two setting points on the moving blade-guard of the
saw. One is for the blade that only cuts the pipe off
(Fig. D/1) while the other is for the blade that cuts
and provides a bevel on the end of the pipe. (Fig.
D/2)
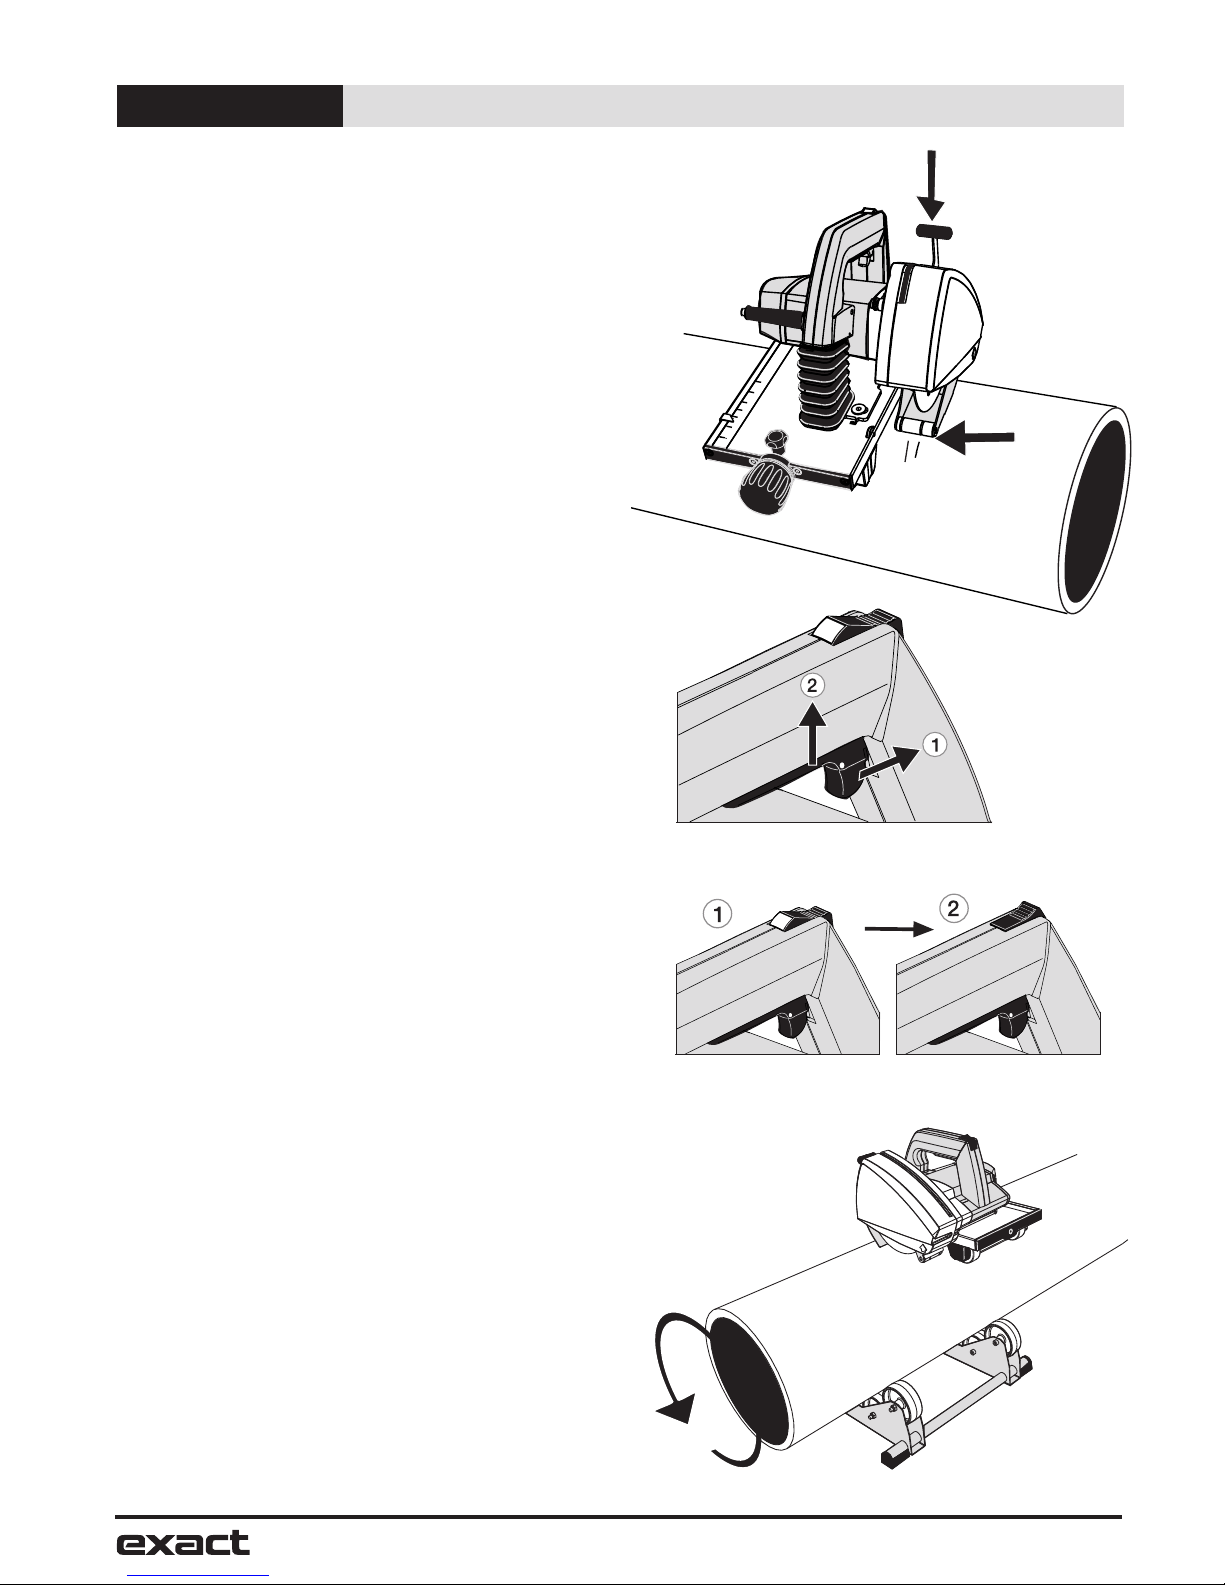
To start sawing
Open the safety screw (Fig. E1) and adjust the wheel
pairs in the Exact P400 steering device according
to the diameter of the pipe by rotating the adjustment
knob on the back of the Exact P400 (Fig. E2). The
scale on the saw is approximate. User can fine tune
the length of the bevel with the adjustment knob.
Please notice that the smaller the diameter of the
pipe the more sensitive the adjustment of the depth
of the bevel will be.
11
Operation
english
Fig. C
Fig. B
Fig. D
Fig. E
Cutting point
Cutting point
Page 12
It is most important that the base of the steering
device does not touch the pipe but rather that the
wheel pairs support the saw (Fig. E3). Finally lock
the adjustment with the safety screw (Fig. E1) so
that the adjustments do not alter during the sawing.
Pull the lever on the moving bladeguard to an
towards you. (Fig. F and A/5) Place the Exact P400
horizontally on top of the pipe so that a suitable
setting mark for the blade that is in the machine is
positioned at the cutting point (Fig F). Hold the pipe
in place and ensure that the Exact P400 moves
freely in the direction the pipe is fed. To ensure
safety the Exact P400 leads should be to the left
and front of the pipe. The Exact P400 is now ready
for use.
Piercing the pipe wall
Strive to keep the P400 in a horizontal position on
top of the pipe during the entire sawing process.
Take a firm hold of the operating handle with your
right hand, start the motor by releasing the locking
lever on the power switch (Fig. G/1) and push the
power switch all the way down(Fig. G/2). Before
starting to saw wait until the blade reaches full
speed. Pierce the pipe wall by pressing the operating
handle down slowly until the blade has cut through
the pipe wall (at this stage the pipe must not rotate)
and the motor unit has locked into sawing position.
When the UNLOCK button is locked, i.e. the yellow
mark disappears (Fig. H), the Exact P400 is locked
and you can safely start sawing around the pipe.
When using a CutBevel blade piercing must be
performed especially calmly.
Sawing around the pipe
Start sawing by rotating the pipe with your left
hand towards yourself (Fig. I) and keep the Exact
P400 stable and in a horizontal position in relation
to the pipe (Fig. J). Continue sawing by rotating
the pipe calmly and at the most even speed
possible towards yourself until the pipe is cut off.
If you use a CutBevel blade continue sawing
approximately 5 cm after the pipe has been cut
off. This will ensure an even bevel around the
entire pipe. If you bevel an additional round you
will get even better result.
The saw can also be steered manually if the
blade does not coincide with the initial cut. When
you see the starting point of the cut, turn the saw
at a gentle angle towards the initial cut until the
pipe is cut off (Fig. L)
12
Operation
english
suomi
Fig. F
Fig. G
Fig. H
Fig. I
Page 13

When the pipe is cut off, push the UNLOCK button
forward until the yellow mark is visible and the locking
is released (Fig. L). Now raise the motor unit to starting
position. Release the power switch. After the saw is
lifted away from the pipe ensure that the moving blade
guard has turned into safety position (Fig. M).
Select the feeding speed as per the material and the
thickness of the wall. Too high speed can damage
the blade, overload the Exact P400 and give a poor
sawing result. Especially when using a CutBevel blade
the feed rate should be fairly slow to ensure a quality
bevel finish.
The Exact P400 can also be used for making only a
bevel to the end of plastic pipe. First position the saw
on top of the pipe so that the cutting blade of the
CutBevel blade is at the end of the pipe. (Fig. N) Now
you can work the pipe as previously described.
Should there be problems during piercing or sawing,
abnormal sounds or vibrations due to which you have
to interrupt sawing before the pipe is cut through,
release the blade by pushing the UNLOCK button
forward until the UNLOCK button is released and lift
the motor unit up. Once the problem is cleared, start
sawing again.
Never start the motor when the motor unit is locked
in sawing position or the teeth of the blade are in
contact with the sawn pipe.
Always clean the steering device and the guide wheels
after use. This will ensure that plastic chips caught in
the wheels do not skew the unit and cause a lobsided
cut.
The Exact P400 is equipped with overload protection.
When the blade is dull or the cutting speed is too
high, the overload protection cuts power automatically .
Restore the power by pushing the overload protection
switch (Fig. A/15).
Straightness of the cut and the adjustment
The cut is affected by many factors, e.g. the size of
the pipe, the material, the wall thickness, the quality
of the pipe’s surface, the roundness, blade condition,
feed rate, the operator’s experience. The cutting result
may vary and a gap may result on the cutting surface
either to the right or left i.e. the difference between
the start and end point of the cut (Fig. O).
There is a feature in the steering device of the Exact
P400 (Fig. A/8) which, if needed, can improve the
sawing result and facilitate to reach the placement of
the initial cut.
13
Operation
english
Fig. J
Fig. K
Fig. L
Fig. M
Page 14

Loosen the locking screw (Fig.P/1) with the M5 allen
key on the handle of the Exact P400. There is an
adjustment wheel on the right hand side of the
steering device (Fig. P/2). Turn the wheel with your
finger either clockwise or anti clockwise. The direction
depends on the direction of the misalignment. This
adjustment turns the entire motor unit in relation to
the steering unit. There is also an arrow and a dial
on the steering unit. (Fig. P/2) These will help to
gauge the extent of the adjustment. Adjust the motor
unit to the desired direction to correct the sawing
error. The extent of the adjustment depends on the
extent of the error, pipe diameter as well as the
strength and material of the pipe wall. Tighten the
locking screw (Fig. P/1) after the adjustment.
Installing and changing the
saw blade
WARNING: To reduce the risk of injury,
turn unit off and disconnect it from power
source before installing and removing
accessories, before adjusting or when making
repairs. An accidental start-up can cause injury.
Remove the power plug from the socket. Check that
the motor unit is locked in the upper position.
Remove the blade guard cover (Fig. Q/1) by opening
the screw (Fig. Q/2). Press the spindle-lock button
(Fig. A/12) and simultaneously rotate the blade by
hand until the spindle-lock button drops a further
distance of about 4 mm. Now the rotation of the
blade is prevented. Use the blade key to open the
blade attachment bolt. Remove the securing bolt
(Fig. Q/3), the washer (Fig.Q/4), the blade flange
(Fig. Q/5), and the blade (Fig. Q/6).
Before installing a new blade, check that both blade
flange discs are clean. Place a new or sharpened
blade on the lower blade flange (Fig. Q/7), so that
the marked side of the blade is facing outwards and
the arrows on the blade are facing in the same
direction as the rotation direction markings on the
inside of the blade case. Ensure that the new blade
goes right to the bottom in the lower blade flange.
Put the blade flange, the washer, and the securing
bolt back in place. Press the spindle lock button and
tighten the blade securing bolt. Put the blade guard
cover back in place and tighten the screw.
14
Operation, Maintenance
english
Fig. O
Fig. P
Fig. Q
Fig. N
Page 15

15
Maintenance and servicing
instructions
WARNING: To reduce the risk of injury,
turn unit off and disconnect it from power
source before installing and removing
accessories, before adjusting or when making
repairs. An accidental start-up can cause injury.
WARNING: To reduce the risk of injury, DO
NOT TIE, TAPE, OR OTHERWISE LOCK
THE ON/OFF SWITCH ON while “running in”. HOLD
BY HAND ONLY.
Cleaning
WARNING: Periodically blowing dust and
chips out of the motor housing using clean, dry
compressed air is a suggested maintenance
procedure. To reduce the risk of serious personal
injury, ALWAYS wear ANSI Z87.1 safety glasses
while using compressed air.
WARNING: When cleaning, use only mild
soap and a damp cloth on plastic parts. Many
household cleaners contain chemicals which could
seriously damage plastic. Also, do not use gasoline,
turpentine, lacquer or paint thinner, dry cleaning
fluids or similar products which may seriously damage
plastic parts. Never let any liquid get inside the tool;
never immerse any part of the tool into a liquid.
Steering unit
Clean the steering unit regularly with compressed
air and after every cut wipe out the chips with a
brush.
Blade guard
Make it a rule to clean the blade guard regularly,
and pay special attention to keep the moving blade
guard movement from becoming hampered.
Motor
Keep the motors cooling vents clean.
Power cable
WARNING: Check the condition of the power
cable regularly. A faulty power cable should
always be replaced at an approved service
center.
Correct use and regular servicing and cleaning will
ensure the continued operation of the pipe saw.
Accessories
WARNING: Since accessories, other than
those offered by Exact Tools, have not been
tested with this product, use of such
accessories with this tool could be hazardous. To
reduce the risk of injury, only Exact Tools,
recommended accessories should be used with this
product.
Recommended accessories for use with your tool
are available at extra cost from your local dealer or
authorized service center. If you need assistance in
locating any accessory, please visit our website
www.exacttools.com.
Blades
WARNING: VISUALLY EXAMINE CARBIDE
BLADES BEFORE USE. REPLACE IF
DAMAGED
WARNING: To minimize the risk of eye injury,
always wear ANSI Z87.1 approved eye
protection. Carbide is a hard but brittle
material. Foreign objects in the work piece such as
wire or nails can cause tips to crack or break. Only
operate saw when proper saw blade guard is in
place. Mount blade securely in proper rotation before
using, and always use a clean, sharp blade.
A dull blade will cause inefficient cutting, overload
on the saw motor.
Change blades when it is no longer easy to push
the saw through the cut, when the motor is straining,
or when excessive heat is built up in the blade. It is
a good practice to keep extra blades on hand so
that sharp blades are available for immediate use.
Dull blades can be sharpened in most areas; see
SAWS-SHARPENING in the yellow pages.
Your PipeCut pipe saw is designed for use with 5,9”
(150 mm) diameter blades that have a 2.44" (62
mm) diameter bore. Blades must be rated for 4200
RPM operation (or higher). DO NOT use any abrasive
wheels.
See blade selection on page 2
Repairs
To assure product SAFETY and RELIABILITY,
repairs, maintenance and adjustments should be
performed by a authorized service center or other
qualified service personnel. Always use identical
replacement parts.
Maintenance
english
Page 16

16
Environment, Guarantee, Tips
Environment
Separate collection. This product must
not be disposed of with normal household
waste. When your Exact PipeCut
170/170E machine is worn out, do not
dispose of it with normal household waste. This
product must be recycled separately. Separate
recycling of used products and packaging facilitate
recycling and recovery of materials. Reusing of
recycled materials helps prevent pollution of
environment. According to local regulations it is
possible to deliver household appliances to municipal
rubbish depositories or to the dealer when buying
a new product.
Guarantee
If the Exact PipeCut pipe saw becomes unusable
due to material or manufacturing faults within 24
months of the date of purchase, we will replace the
damaged parts with new ones or supply an entirely
new or factory-reconditioned pipe saw to replace
the damaged one.
The guarantee is only valid if:
The guarantee card or a dated purchase receipt is
returned to the manufacturer or retailer.
The pipe saw has not been misused.
No attempt has been made by non-approved persons
to repair the saw.
The pipe saw has been used in accordance with
these operating, safety, and servicing instructions.
The guarantee does not apply to blades or the
overload protection.
Tip s for using Exact PipeCut
saws
All these tips may not consern all Exact models.
Diamond blade should only be used for cutting cast
iron pipe. It is not recommended to cut cast iron with
TCT or Cermet blades.
Clean the inside of the blade guards after cutting
plastic pipe.
Smaller pipe is easily cut by rotating the pipe by
hand either on a table or on the floor. Please note:
rotate pipe towards you when rotating by hand and
be careful not to rotate too fast.
Check the condition of the blade regularly.
The cutting procedure is divided into two stages;
first saw through the pipe wall, then complete the
cut by sawing around it.
Do not overload the saw by cutting continuously.
The saw will be overheated and the metal parts can
become burning hot. This will also damage the motor
and the blade. The rule is 2.5 minutes in use and
7.5 minutes rest.
Keep the feeding speed constant. This will extend
the lifetime of the blade.For example cutting time
for a steel pipe diameter of 6’’ (170mm), and a wall
thickness of 1/5’’ (5mm), is 15-20 seconds, and for
a cast-iron pipe diameter of 4’’ (1 10mm), with a wall
thickness of 1/6’’ (4mm) is 20 to 25 seconds.
Always keep the motor unit in the upright position.
The yellow mark of the unlock button is then visible.
Never place the Pipe Cut Saw on the pipe in the
locked / cutting position.
Factors that affect the lifetime of the saw blade:
• material of the pipe
• correct blade type for material being cut
• correct motor speed setting
• wall thickness of the pipe
• feeding speed
• smoothness of the pipe
• user’s general skills
• cleanness of the pipe
• rust on the pipe
• welded seam in the pipe
• blade speed
Factors that affect the straightness of the cut:
• condition of the saw blade
• wall thickness of the pipe
• feeding speed
• smoothness of the feed
• user’s general skills
• cleanness of the pipe
• roundness of the pipe
• gripper unit too loose or too tight
• blade assembled too tight
Due to continuous product development, the
information in this instruction manual may
change. We do not give separate notification of
changes.
english
Page 17

Sommaire
17
français
Sommaire
Données techniques
Contenu du kit
Sécurité
Précautions d'emploi
Opération
Description du fonctionnement
Usage prévu
Avant de mettre en marche l'outil
Relier l'outil à l'alimentation
Régler le point de coupe avec précision
Placer le tuyau sur les supports
Attacher la scie au tuyau
Percer la paroi du tuyau
Scier autour du tuyau
Protection anti-surcharge
Précision de coupe et roulette de réglagel
Installer et changer la lame de la scie
Dépannage et conseils d'entretien
Environnement / Recyclage
Garantie / Conditions de la garantie
Trucs pour les utilisateurs
Vue éclatée (voir document séparé)
18.
18.
19.
22.
22.
23.
23.
23.
23.
24.
24.
24.
25.
25.
26.
27.
28.
28.
28.
Définitions: consignes de sécurité
Les définitions ci-dessous décrivent le niveau de gravité pour chaque mention d’avertissement. Veuillez lire
attentivement ce manuel en portant une attention particulière à ces symboles.
DANGERÊ: Indique une situation au danger imminent qui, si elle n’est pas évitée, entraînera la mort
ou des blessures graves.
AVERTISSEMENTÊ: Indique une situation potentiellement dangereuse qui, si elle n’est pas évitée,
pourrait entraîner la mort ou des blessures graves.
ATTENTIONÊ: Indique une situation potentiellement dangereuse qui, si elle n’est pas évitée, peut
entraîner des blessures mineures ou peu graves.
AVISÊ: Indique un énoncé non relié à un dommage corporel qui, s’il n’est pas évité, peut causer
des dommages à la propriété.
Dénote un risque de choc électrique.
L'étiquette apposée sur votre outil ou de ce manuel peuvent inclure des symboles. Les symboles
et leurs définitions sont énumérées à la page 41.
Page 18

Mode d'emploi, consignes de sécurité et de
dépannage
Veuillez lire attentivement ce mode d'emploi et les consignes de sécurité
et de dépannage avant d'utiliser la scie. Assurez-vous de conserver ce
manuel à un endroit accessible à toute personne qui souhaiterait utiliser
la scie. Indépendamment de ces consignes, respectez les directives
concernant le travail, la santé et la sécurité. L'utilisation de la scie Exact
PipeCut est exclusivement réservée aux professionnels.
Caractéristiques techniques
Information
18
Modèle
Tension
Courant
Alimentation
Vitesse si déchargée
Fonctionnement discontinu
Diamètre de la lame
Trou de fixation de la lame
Poids
Plage d'utilisation Ø
Épaisseur max. en coupe,
Épaisseur max. en coupe chanfreinée
Classe de protection
Verrouillage
Présélection de la vitesse
Contrôle électronique constant
Protection de surcharge
Courant de démarrage réduit
français
Pipecut P400
120 V / 60 Hz
8,4 A
950 W
4000 /min
2,5 min ON / 7,5 min OFF (S3 25%)
5,8”-5,9” (148 /150 mm)
2,44” (62 mm)
12 lbs (5,7 kg)
4”- 16” (100 mm – 400 mm)
0,9” (23 mm)
0,8” (20 mm)
/ II
OUI
NON
NON
OUI
NO
Scie à tuyaux Exact PipeCut P400
Contenu du kit:
Veuillez contrôler que l’emb allage contienne les éléments suivants:
1. Sac de transport PipeCut
2. Scie à tuyaux Exact PipeCut P400
3. Supports de tuyau : 1 double et 2 simples
4. Mode d’emploi
5. Clé Allen de 5 mm fi xée à la poignée
6. Lame TCT 150 x 62 montée sur la machine
7. Lame de coupe chanfreinée dans le sac
Page 19

19
Sécurité
Règles générales de sécurité
pour les outils électriques
Lire toutes les règles de sécurité et toutes les
instructions. Le non respect de ces consignes et
instructions peut provoquer choc électrique, incendie et/ou
blessures graves.
Conserver toutes les consignes et instructions pour
référence ultérieure.
Le terme “outil électrique” dans les consignes désigne vos
outils électriques alimentés sur secteur (avec cordon) ou
sur batterie (sans fil).
1. Sécurité de la zone de travail
a) Garder la zone de travail propre et bien éclairée. Les
établis mal rangés et les zones sombres invitent aux
accidents.
b) Ne pas utiliser les outils électriques dans une
atmosphère explosive, telle qu’en présence de
liquides inflammables, de gaz ou de poussières. Les
outils électriques créent des étincelles qui risquent
d’enflammer la poussière ou les vapeurs.
c) Tenir les enfants et les spectateurs éloignés, lors
de l’utilisation de l’outil électrique. Une distraction
peut faire perdre le contrôle de la machine.
2. Sécurité électrique
a) La fiche de secteur de l’outil électrique doit être
appropriée à la prise de courant. Ne modifier en
aucun cas la fiche. Ne pas utiliser de fiches
d’adaptateur avec des outils avec mise à la terre.
Les fiches non modifiées et les prises de courant
appropriées réduisent le risque de choc électrique.
b) Éviter le contact physique avec des surfaces mises
à la terre telles que tuyaux, radiateurs, fours et
réfrigérateurs. Il y a un risque élevé de choc électrique
au cas où votre corps serait relié à la terre.
c) Ne pas exposer l’outil électrique à la pluie ou à
l’humidité. La pénétration d’eau dans un outil électrique
augmente le risque d’un choc électrique.
d) Ne pas utiliser le câble à d’autres fins que celles
prévues Ne pas utiliser le câble pour porter l’outil,
pour l’accrocher ou encore pour le débrancher de
la prise de courant. Maintenir le câble éloigné des
sources de chaleur, des p arties grasses, des bords
tranchants ou des parties de l’outil en rotation. Un
câble endommagé ou torsadé augmente le risque d’un
choc électrique.
e) En cas d’usage à l’extérieur, utiliser une rallonge
autorisée homologuée pour les applications
extérieures. L’utilisation d’une rallonge électrique
homologuée pour les applications extérieures réduit le
risque d’un choc électrique.
f) Si l’usage d’un outil dans un emplacement humide
est inévitable, utiliser un disjoncteur de fuite à la
terre. L’utilisation d’un disjoncteur de fuite à la terre
réduit le risque de choc électrique.
3. Sécurité personnelle
a) Être vigilant, surveiller le travail effectué et faire
preuve de jugement lors de l’utilisation d’un outil
électrique. Ne pas utiliser un outil en état de fatigue
ou sous l’influence de drogues, d’alcool ou de
médicaments Un moment d’inattention lors de l’utilisation
de l’outil électrique peut entraîner des dommages
corporels graves.
b) Utiliser un équipement de protection personnel.
Toujours utiliser des lunettes de sécurité L’utilisation
d’équipements de protection tels que les masques antipoussière, les chaussures de sécurité antidérapantes,
les casques ou les protections auditives dans des
conditions appropriées réduisent les risques de blessures.
c) Empêcher tout démarrage accidentel. S’assurer que
l’interrupteur se trouve à la position d’arrêt avant
de relier l’outil à la source d’alimentation électrique,
de ramasser ou de transporter l’outil. Transporter un
outil électrique alors que le doigt repose sur l’interrupteur
ou brancher un outil électrique dont l’interrupteur est à
la position de marche risque de provoquer un accident.
d) Retirer toute clé de réglage ou clé avant de démarrer
l’outil. Une clé qui est laissée attachée à une partie
pivotante de l’outil électrique peut provoquer des
dommages corporels.
e) Ne pas trop tendre les bras. Garder en permanence
une position et un équilibre corrects. Cela permet de
mieux maîtriser l’outil électrique dans des situations
imprévues.
f) S’habiller correctement. Ne pas porter des vêtements
larges ou des bijoux. Tenir ses cheveux, vêtements
et gants éloignés des parties mobiles. Les vêtements
larges, les bijoux et les cheveux longs peuvent se prendre
dans les parties mobiles.
g) Lorsque un dispositif de connexion à un système
de dépoussiérage ou d’élimination est fourni,
s’assurer qu’il est relié et utilisé correctement.
L’utilisation d’un dispositif de dépoussiérage peut réduire
les risques engendrés par les poussières.
4.Utilisation et entretien des outils
électriques
a) Ne pas forcer un outil électrique Utiliser l’outil
approprié au travail en cours. L’outil approprié
effectuera un meilleur travail, de façon plus sûre et à la
vitesse pour laquelle il a été conçu.
b) Ne pas utiliser un outil électrique dont l’interrupteur
est défectueux. Tout appareil dont l’interrupteur est
défectueux est dangereux et doit être réparé.
c) Débrancher la fiche de la source d’alimentation de
l’outil électrique avant de faire tout réglage ou
changement d’accessoire, ou avant de ranger ce
dernier. Ces mesures préventives réduisent les risques
de démarrage accidentel de l’appareil.
d) Après usage, ranger les outils électriques hors de
la portée des enfants, et ne permettre à aucune
personne n’étant pas familière avec un outil électrique
ou les présentes instructions d’utiliser ce dernier.
Les outils électriques sont dangereux entre les mains
des novices.
e) Entretenir les outils électriques. Vérifier les pièces
mobiles pour s’assurer qu’elles sont bien alignées
et tournent librement, qu’elles sont en bon état et
ne sont affectées d’aucune condition susceptible
de nuire au bon fonctionnement de l’outil. En cas
de dommage, faire réparer l’outil électrique avant
toute nouvelle utilisation. Bien des accidents sont
causés par des outils mal entretenus.
f) Maintenir tout outil de coupe bien aiguisé et propre.
Les outils de coupe bien entretenus et affûtés sont moins
susceptibles de se coincer et sont plus faciles à contrôler.
g) Utiliser un outil électrique, ses accessoires, mèches,
etc., conformément aux présentes instructions et
suivant la manière prévue pour ce type particulier
d’outil électrique, en tenant compte des conditions
de travail et du travail à effectuer. L’utilisation d’un
outil électrique pour toute opération autre que celle pour
laquelle il a été conçu est dangereuse.
français
Page 20

20
Sécurité
5. Entretien
Faire entretenir les outils électriques par un
réparateur qualifié en n’utilisant que des pièces de
rechange identiques. Cela permettra d’assurer l’intégrité
de l’outil électrique et la sécurité de l’utilisateur.
Consignes de sécurité pour les
scies circulaires
a) DANGERÊ: Ne pas approcher les mains de
la zone de coupe ni de la lame. Mettre la
seconde main sur le carter moteur. Si les deux mains
tiennent la lame, elles risquent d’être coupées par la
lame.
b) Ne pas passer la main sous la pièce. La protection ne
protégera pas l’opérateur de la lame sous la pièce.
c) Ne jamais tenir la pièce à couper avec les mains ou
sur le genou. Maintenir la pièce à usiner sur une
plate-forme stable. Il est important de soutenir la pièce
correctement pour éviter tout risque d’exposition du
corps, tout voilage de la lame et toute perte de contrôle
de l’outil.
d) Tenir l’outil par ses surfaces de saisie isolées lors
d’un travail dans un endroit où la lame risque d’entrer
en contact avec des fils cachés ou son propre cordon.
Tout contact avec un fil sous tension transmettra du
courant dans les parties métalliques de l’outil et
électrocutera l’utilisateur.
e) Toujours utiliser des lames avec des orifices
d’alésage de la taille et de la forme correctes (carrés
ou ronds). Des lames ne correspondant pas au système
de montage de la scie auront une rotation excentrée, ce
qui provoquera une perte de contrôle de l’outil.
f) Ne jamais utiliser de rondelles ni de boulons de lame
endommagés ou incorrects. Les rondelles et le boulon
de lame ont été spécialement conçus pour la scie, et ils
garantiront les performances et la sécurité maximales.
g) Si la lame est voilée, ou si la coupe est interrompue
pour une raison ou pour une autre, relâcher la
gâchette et tenir la scie sans bouger dans le matériau
jusqu’à ce que la lame arrive à un arrêt complet. Ne
jamais tenter de retirer la scie du matériau ni tirer la
scie vers l’arrière si la lame tourne. Rechercher la
cause du voilage de la lame et corriger le problème.
h) Lorsqu’on remet la scie en marche alors que la lame
est enfoncée dans la pièce, centrer la lame sur le
plateau de découpe et vérifier que les dents ne sont
pas engagées dans le matériau. Si la lame est voilée,
elle risque de se relever lorsque la scie sera remise en
marche.
i) Ne pas utiliser de lame émoussée ou endommagée.
Une lame non affûtée ou incorrectement montée
engendrera des traits de scie étroits, provoquant une
friction excessive et un voilage de la lame.
j) Faire particulièrement attention lors d’une “coupe
en plongée” dans une paroi existante ou tout autre
endroit aveugle. La lame pourrait couper des objets,
ce qui risque de provoquer un retour de lame.
k) Vérifier que la protection inférieure se referme bien
avant chaque utilisation. Ne pas faire fonctionner la
lame si la protection inférieure ne se déplace pas
librement et ne se referme pas instantanément. Ne
jamais fixer ni attacher la protection inférieure en
position ouverte. Si la lame tombe accidentellement,
la protection inférieure risque de se voiler. Relever la
protection inférieure avec la poignée de rétraction et
s’assurer qu’elle se déplace librement et qu’elle ne
touche pas la lame ni aucune autre pièce à tous les
angles et toutes les profondeurs de coupe.
l) Si la protection fonctionnent pas correctement, il
faudra les faire réparer avant de les utiliser. Le
fonctionnement de la protection inférieure risque d’être
lent s’il y a des pièces endommagées, des dépôts gluants
ou une accumulation de débris.
m)Ne pas mettre les mains dans l’éjecteur de sciure.
Elles pourraient être blessées par les parties pivotantes.
n) Ne pas travailler la scie au dessus de la tête. Cela
ne donnerait pas de contrôle suffisant sur l’outil.
o)Ne pas faire fonctionner l’outil électrique immobile.
Il n’est pas conçu pour fonctionner avec une table d’appui.
p) Ne pas utiliser de lames en acier à coupe rapide. De
telles lames peuvent casser facilement.
q) L’opérateur utilisant la machine doit toujours la tenir
fermement des deux mains et adopter une position
stable. Le guidage de l’outil électrique est plus sûr à
deux mains.
r) Fixer la pièce. Une pièce maintenue par des porte-
tubes est plus stable que tenue avec les mains.
s) Avant de déposer l’outil électrique, toujours attendre
que celui-ci soit complètement à l’arrêt. L’outil risque
de se coincer, ce qui entraîne une perte de contrôle de
l’outil électrique.
t) Ne jamais utiliser une machine dont le câble est
endommagé. Ne pas toucher à un câble endommagé
et retirer la fiche du câble d’alimentation de la prise
du courant, au cas où le câble serait endommagé
lors du travail. Un câble endommagé augmente le
risque d’un choc électrique.
Consignes de sécurité
supplémentaires pour toutes les
scies
Causes et prévention du rebond pour l’utilisateur :
- Le rebond est une réaction soudaine d’une lame pincée,
coincée ou mal alignée, entraînant un soulèvement
incontrôlé de la scie hors de l’ouvrage vers l’utilisateur ;
- Lorsque la lame est pincée ou coincée par la fente de
coupe qui se referme, la lame se bloque et la réaction
du moteur entraîne rapidement l’appareil en arrière vers
l’utilisateur ;
- Si la lame se tord ou n’est plus alignée dans la coupe,
les dents sur le bord arrière de la lame peuvent
s’accrocher dans la surface supérieure du bois et
entraîner une remontée de la lame hors de la fente, la
faisant sauter en arrière vers l’utilisateur.
Le rebond est le résultat d’une mauvaise utilisation de
la scie et/ou de procédures ou conditions d’utilisation
incorrecte et il peut être évité en prenant les précautions
nécessaires indiquées ci-dessous :
a) Maintenez une prise ferme avec les deux mains
sur la scie et placez vos bras de manière à résister
aux forces de rebond. Positionnez votre corps d’un
côté ou de l’autre de la lame, mais pas dans son
alignement. Le rebond pourrait entraîner un saut vers
l’arrière de la scie, mais les forces de rebond peuvent
être contrôlées par l’utilisateur, si des précautions sont
prises.
REMARQUE : Pour les scies circulaires avec une lame d’un
diamètre maximum de 140 mm, la mention « avec les deux
mains » peut être omise.
Sécurité
français
Page 21

21
Sécurité
b) Si la lame est voilée, ou si la coupe est interrompue
pour une raison ou pour une autre, relâcher la
gâchette et tenir la scie sans bouger dans le
matériau jusqu’à ce que la lame arrive à un arrêt
complet. Ne tentez jamais de retirer la scie de
l’ouvrage ou de tirer la scie vers l’arrière alors de
la lame est encore en mouvement, sans quoi un
rebond pourrait se produire. Rechercher la cause du
voilage de la lame et corriger le problème.
c) Lors du redémarrage d’une scie dans l’ouvrage,
centrer la lame de scie dans la fente et vérifi ez
que les dents de la scie ne sont pas engagées
dans le matériau. Si la lame de scie se coince, elle
peut remonter ou rebondir de la pièce lorsque la scie
redémarre.
d) Soutenez les grands panneaux pour réduire le
risque de pincement de la lame et de rebond. Les
grands panneaux tendent à fl échir sous leur propre
poids. Les supports doivent être placés sous le
panneau des deux côtés, proches de la ligne de coupe
et du bord du panneau.
e) N’utilisez pas de lames émoussées ou
endommagées. Les lames émoussées ou mal montées
produisent des fentes étroites qui entraînent une friction
excessive, le coincement de la lame et un rebond.
f) Les leviers de verrouillage du réglage de
profondeur et de chanfrein de la lame doivent être
bien serrés et fi xés avant d’effectuer la coupe. Si le
réglage de la lame se décale durant la coupe, elle peut
se coincer et entraîner un rebond.
g) Faites particulièrement attention de la réalisation
d’une coupe en plongée dans des parois existantes
ou d’autres zones borgnes. La lame qui dépasse peut
couper des objets pouvant provoquer un rebond.
Consignes de sécurité pour les
scies type plonger
a) Vérifier que la protection ferme bien avant toute
utilisation. Ne pas faire fonctionner la scie si la protection
ne se déplace pas librement pour protéger
immédiatement la lame. Ne jamais fixer ou bloquer la
protection en laissant la lame accessible. Si la scie
tombe accidentellement, la protection peut être faussée.
Vérifier que la protection bouge librement et ne touche
ni la lame, ni un autre élément, quelle que soit l'angle
et la profondeur de coupe.
b) Vérifier le fonctionnement et l'état du ressort de
rappel de la protection. Si la protection et le ressort
ne fonctionnent pas correctement, ils doivent être réparés
avant utilisation. La protection peut ne pas bien
fonctionner en raison de pièces endommagées, de
dépôts de gomme ou une accumulation de débris.
c) S'assurer que la plaque de guidage de la scie ne se
décale pas lors de la coupe plongeante si la lame
n'est pas réglée à 90°. Le déplacement latéral de la
lame provoquera un blocage et probablement un retour
de lame.
d) Toujours veiller à ce que la protection couvre la
lame avant de déposer la scie sur l'établi ou le sol.
Une lame en rotation non protégée entraînera un
mouvement de recul de la scie, en coupant tout sur son
passage.
Autres règles spécifiques de
sécurité
Ne jamais utiliser la scie pour tubes dans les cas
suivants:
• S’il y a de l’eau ou un autre liquide, des gaz explosifs ou
des produits chimiques nocifs à l’intérieur du tube à
couper.
• Si l’interrupteur est défectueux.
• Si le câble d’alimentation est défectueux.
• Si la lame est pliée.
• Si la lame est émoussée ou en mauvais état.
• Si les composants en plastique sont cassés ou incomplets.
• Si l’unité de serrage n’est pas correctement serrée autour
du tube ou si elle est déformée.
• Si l’enveloppe protectrice du carter de la lame ou le carter
de lame mobile a été endommagé ou retiré de la machine.
• Si les mécanismes de verrouillage ne fonctionnent pas
correctement (bouton DÉVERROUILLER).
• Si la scie est mouillée.
Lors de l’utilisation de la scie, il faut toujours prendre
en compte les facteurs suivants:
• Soutenir les tubes de façon à réduire les risques de
pincement de la lame.
• S’assurer que le tube à couper est vide.
• S’assurer que la lame est correctement montée.
• S’assurer que le diamètre et l’épaisseur de la lame sont
adaptés à la scie et que la lame est adaptée à la plage
rpm de la machine.
• Ne jamais forcer la lame à s’arrêter de force, la laisser
s’arrêter toute seule.
• Contrôler les fixations des carters de lame.
• Ne pas forcer sur la scie lors de son utilisateur.
• Ne jamais utiliser la scie pour soulever le tube si elle est
toujours attachée dessus.
• Éviter de surcharger le moteur électrique.
• T oujours respecter les conseils d’utilisation et précautions
d’emploi, ainsi que les directives en vigueur.
Prendre des précautions autour des évents car ils
recouvrent des pièces mobiles. Les vêtements larges,
les bijoux et les cheveux longs peuvent se prendre dans
les parties mobiles.
La vitesse nominale des accessoires doit être équivalente
ou supérieure à celle recommandée sur l’étiquette
d’avertissement de l’outil. Les accessoires tournant à une
vitesse supérieure à sa vitesse nominale peuvent se briser
et occasionner des blessures lorsque des fragments de
métal sont projetés. L’intensité nominale des accessoires
doit toujours être supérieure à la vitesse de l’outil indiquée
sur la plaque signalétique.
AVERTISSEMENTÊ: TOUJOURS porter une
protection auditive personnelle appropriée
conforme à la norme ANSI S12.6 (S3.19) durant
l’utilisation. Sous certaines conditions et selon la durée
d’utilisation, le bruit émanant de ce produit pourrait contribuer
à la perte d’audition. Travaillant avec divers matériaux, il
se peut que le niveau sonore varie et dépasse parfois la
limite des 85 dB(A). Toujours utiliser des protections
auditives pour se protéger.
AVERTISSEMENTÊ: TOUJOURS porter des
lunettes de sécurité. Les lunettes ordinaires ne sont PAS
des lunettes de sécurité. Utiliser également un écran facial
ou un masque antipoussières en cas d'opération de coupe
poussiéreuse. TOUJOURS PORTER UN ÉQUIPEMENT
DE SÉCURITÉ CERTIFIÉÊ:
• ANSI Z87.1 protection oculaire (CAN/CSA Z94.3),
• ANSI S12.6 (S3.19) protection auditive,
• NIOSH/OSHA/MSHA protection respiratoire.
AVERTISSEMENTÊ: Utiliser des gants de
sécurité. Toujours utiliser des gants de sécurité car les
bords des tubes coupés sont tranchants et peuvent causer
des coupures.
AVERTISSEMENTÊ: Certaines poussières
dégagées par le sablage mécanique, le sciage, le
meulage, le perçage et autres opérations de
construction contiennent des substances chimiques
dont on sait qu’elles causent des cancers, des
anomalies congénitales ou d’autres dommages liés à
la reproduction. Voici quelques exemples de
substances chimiques:
français
Page 22

22
Sécurité, Opération
• le plomb contenu dans les peintures à base de plomb,
• la silice cristalline continue dans les briques, le ciment et
autres produits de maçonnerie et
• l’arsenic et le chrome contenus dans le bois d’œuvre
traité par des moyens chimiques.
Le risque résultant de l’exposition à ces substances est
variable et dépend de la fréquence à laquelle on fait ce
genre de travail. Pour réduire son exposition à ces
substances, il fautÊ: travailler dans un endroit bien ventilé
et porter un équipement de sécurité agréé, comme ces
masques antipoussières spécialement conçus pour retenir
les particules microscopiques.
Éviter tout contact prolongé avec les poussières
dégagées par le sablage mécanique, le sciage, le
meulage, le perçage et autres opérations de
construction.
Porter des vêtements de protection et nettoyer les
parties exposées du corps avec de l’eau savonneuse.
S’assurer de bien se protéger afin d’éviter d’absorber par
la bouche, les yeux ou la peau des produits chimiques
nocifs.
AVERTISSEMENTÊ: Cet outil peut produire et
répandre de la poussière susceptible de causer
des dommages sérieux et permanents au système
respiratoire. Toujours utiliser un appareil respiratoire
anti-poussières approuvé par le NIOSH ou l’OSHA.
Diriger les particules dans le sens opposé du visage
et du corps.
Rallonges
Pour des raisons de sécurité, la rallonge doit comporter
un diamètre de fil (AWG ou American Wire Gauge,
norme américaine des dimensions de fils) approprié.
Plus le numéro de jauge du fil est petit, plus la capacité du
câble est grandeÊ; par exemple, un numéro de jauge égal
à 16 correspond à une capacité plus grande qu'un numéro
de jauge égal à 18. L’usage d’une rallonge de calibre
insuffisant causera une chute de tension entraînant perte
de puissance et surchauffe. Lorsqu'on utilise plusieurs
rallonges pour obtenir la longueur totale, on doit s'assurer
que les fils de chacune d'elles sont au moins du calibre
minimum nécessaire. Le tableau ci-dessous illustre les
calibres à utiliser selon la longueur de rallonge et l’intensité
nominale indiquée sur la plaque signalétique. En cas de
doutes, utiliser le calibre suivant. Plus le calibre est petit,
plus la rallonge peut supporter de courant. (oir page 4)
Moteur
Veiller à ce que la tension d’alimentation soit conforme aux
exigences de la plaque signalétique de l’outil. Une baisse
de tension de plus de 10% entraîne une perte de puissance
et la surchauffe. Tous les produits Exact Tools sont testés
avant de quitter l’usine; lorsque celui-ci refuse de fonctionner,
vérifier la source de courant électrique.
AVERTISSEMENTÊ: La vitesse nominale des
accessoires doit être équivalente ou supérieure
à celle recommandée sur l’étiquette d’avertissement
de l’outil. Les accessoires tournant à une vitesse supérieure
à sa vitesse nominale peuvent se briser et occasionner
des blessures. L’intensité nominale des accessoires doit
toujours être supérieure à la vitesse de l’outil indiquée sur
la plaque signalétique.
ATTENTIONÊ: Éviter tout contact direct avec
les dents de scie pour prévenir tout dommage
corporel.
Description du
fonctionnement
DANGER :Lire toutes les règles de
sécurité et toutes les instructions.
Le non respect de ces consignes et
instructions peut ‘provoquer choc
électrique, incendie et/ou blessures graves.
Utilisation prévue
PipeCut P400:
La scie Exact PipeCut P400 est prévue pour une
utilisation professionnelle sur tous types de chantiers
de construction. La scie Exact PipeCut P400 est
conçue pour l’utilisation exclusive avec des tuyaux en
plastique de 100 mm (4’) à 400 mm (16”). L’épaisseur
maximum de la paroi que la scie Exact PipeCut P400
peut couper est de 25 mm (1”). Avec une lame de
coupe chanfreinée, l’épaisseur maximum de paroi est
de 22 mm (0,9”). La scie Exact PipeCut P400 vous
permet de couper des tuyaux en différents matériaux
plastiques, par exemple PP, PE, PVC, etc. La scie
à tuyaux PipeCut P400 est prévue pour une utilisation
courte et intermittente. La machine peut être en
charge pendant 2,5 minutes pendant une période de
10 minutes (S3 25 %). La scie à tuyau PipeCut P200
n’est pas prévue pour l’utilisation dans la production
industrielle de série.
Caractéristiques du produit
Pendant la lecture des instructions d’utilisation, dépliez
la page des illustrations de la machine et laissez-la
ouverte. Cette page est repliée dans la couverture de
ce manuel (page 4). La numérotation suivante des
caractéristiques du produit se réfère à cette illustration.
Figure A
1. Bouton UNLOCK
2. Interrupteur d’alimentation
3. Levier de blocage de l’interrupteur
d’alimentation
4. Moteur
5. Lever du carter de lame mobile
6. Couvercle du carter de lame
7. Points de réglage
8. Vis de réglage de rectitude
9. Carter de lame mobile
10. Poignée d’actionnement
11. Vis du carter de lame
12. Bouton de blocage de broche
13. Clé Allen
14. Plaque signalétique
15. Protection contre la surcharge
16. Indicateur de vis de réglage de rectitude
17. Unité mobile
18. Sécurité de l’unité mobile
19. Bouton de réglage de l’unité mobile
20. Indicateur de l’unité mobile
français
Page 23

23
Opération
schéma
H
français
schéma
C
schéma
B
schéma
. D
schéma
E
Mode d’emploi du système de
coupe de tuyaux Exact P400
Avant d’utiliser la scie Exact P400, veuillez
procéder comme suit
Vérifi ez que l’unité motrice se trouve en position droite
de sorte que le repère jaune sur le bouton UNLOCK
soit visible.
Vérifi ez que la lame dans la machine est correcte.
Vérifi ez que la lame est bien en place, qu’elle est bien
fi xée et qu’elle est en bon état.
La lame de coupe chanfreinée peut se desserrer en
raison des vibrations durant la coupe.
Vérifi ez que les roulettes de guidage pivotent.
Vérifi ez que les roulettes de support pivotent.
Vérifi ez que le carter de lame inférieur se déplace
correctement.
Vérifi ez que le tuyau à couper est vide.
Raccordement de la scie Exact P400 au secteur
Assurez-vous que la tension d’alimentation est la
même que celle indiquée sur la plaque signalétique
(Figure A/14)
Branchez la scie Exact P400 à la prise de courant
uniquement après avoir effectué les contrôles de la liste
ci-dessus.
Placement des supports pour le tuyau à couper
Utilisez toujours des supports de tuyau Exact lors
du sciage. Les supports maximisent la sécurité et
optimisent les résultats de découpe. La découpe doit
toujours être effectuée sur une surface plane. Placez le
tuyau sur le support de sciage de sorte que le point de
coupe se trouve entre les paires de roues. Placez les
supports simples sous les deux extrémités du tuyau.
Assurez-vous que toutes les roues sont en contact
avec le tuyau. Si nécessaire, calez les supports avec
un morceau de bois. (Fig. B) Les sections plus courtes
(moins de 25 cm/10”) peuvent être coupées avec deux
supports placées de sorte que le point de coupe se
trouve à l’extérieur des supports. (Fig. C) En sciant
dans l’ordre correct, vous éviterez de coincer la lame
de scie dans le tuyau lors de la fi n de l’opération de
découpe.
Placement et marquage du point de coupe
Utilisez un marqueur pour repérer le point de coupe. Le
carter de lame mobile de la scie possède deux points
de réglage. Un pour la lame qui découpe simplement
le tuyau (Fig. D/1) et l’autre pour la lame qui coupe et
chanfreine l’extrémité du tuyau. (Fig. D/2)
Pour commencer à scier
Ouvrez la vis de sécurité (Fig. E1) et réglez la paires
de roulettes dans l’unité mobile de la scie Exact P400
en fonction du diamètre du tuyau, en faisant pivoter
le bouton de réglage à l’arrière de la scie Exact P400
(Fig. E2). L’échelle sur la scie est approximative.
L’utilisateur peut ajuster précisément la longueur du
chanfrein avec le bouton de réglage. Veuillez noter que
plus le diamètre du tuyau est petit, plus le réglage de la
profondeur de chanfrein sera sensible.
le point de coupe
le point de coupe
Page 24

24
Opération
français
Il est très important que la base de l’unité mobile ne
touche pas le tuyau, mais seulement que les paires de
roues supportent la scie (Fig. E3). Verrouillez enfi n le
réglage avec la vis de sécurité (Fig. E1) de sorte que le
réglage ne change pas durant le sciage.
Tirez vers vous le levier sur le carter de lame
mobile. (Fig. F et A/5) Placez la scie Exact P400
horizontalement au-dessus du tuyau de sorte qu’un
repère de réglage approprié pour la lame se trouvant
dans la machine soit positionné au point de coupe
(Fig F). Tenez le tuyau en position et assurez-vous
que la scie Exact P400 se déplace librement dans la
direction d’avance du tuyau. Pour assurer la sécurité,
le cordon d’alimentation de la scie Exact P400 doit
se trouver face au tuyau sur la gauche. La scie Exact
P400 est maintenant prête à l’emploi.
Perçage de la paroi du tuyau
Efforcez-vous de maintenir la scie Exact P400 dans
une position horizontale au-dessus du tuyau durant
toute l’opération de découpe. Saisissez fermement
la poignée d’actionnement avec votre main droite,
démarrez le moteur en relâchant le levier de verrouillage
sur l’interrupteur d’alimentation (Fig. G/1) et enfoncez
l’interrupteur d’alimentation à fond (Fig. G/2). Avant
de démarrer la scie, attendez que la lame atteigne le
régime maximum. Percez la paroi du tuyau en enfonçant
lentement et régulièrement la poignée d’actionnement
jusqu’à ce que la lame soit passée à travers la paroi du
tuyau (à ce stade, le tuyau ne doit pas pivoter) et que le
moteur soit verrouillé en position de sciage. Lorsque le
bouton UNLOCK est verrouillé, c’est-à-dire que le repère
jaune disparaît (Fig H), la scie Exact P400 est bloquée
et vous pouvez scier en toute sécurité autour du tuyau.
Lors de l’utilisation d’une lame de coupe chanfreinée, le
perçage doit être effectué très lentement.
Sciage autour du tuyau
Commencez pas scie en faisant tourner la conduite
vers vous avec votre main gauche (Fig. I) et maintenez
la scie Exact P400 stable et en position horizontale par
rapport au tuyau (Fig. J). Continuez à scier en tournant
lentement le tuyau le plus régulièrement possible vers
vous jusqu’à ce qu’il soit découpé.
Si vous utilisez une lame de coupe chanfreinée,
continuez à scier approximativement 5 cm après
la découpe du tuyau. Cela permettra d’assurer un
chanfrein égal tout autour du tuyau. Si vous chanfreinez
une nouvelle fois, vous obtiendrez un résultat encore
meilleur. Les grands chanfreins doivent toujours être
réalisés en deux fois. La première opération doit être
la coupe avec un chanfrein incomplet et, lors de la
deuxième opération, l’unité mobile doit être réglée à la
longueur de chanfrein désirée. Veuillez noter que la
température infl ue sur la dureté du plastique
La scie peut être aussi déplacée manuellement si la
lame ne coïncide pas avec la coupe initiale. Lorsque
vous voyez le point de départ de la coupe, inclinez
légèrement la scie vers la coupe initiale jusqu’à ce que
le tuyau soit découpé (Fig. L).
schéma F
schéma G
schéma H
schéma I
Page 25

25
Opération
français
Lorsque le tuyau est coupé, poussez le bouton UNLOCK
vers l’avant jusqu’à ce que le repère jaune soit visible
et que le verrouillage soit libéré (Fig L). Soulevez
maintenant le moteur en position de démarrage.
Relâchez l’interrupteur d’alimentation. Une fois la scie
relevée du tuyau, assurez-vous que le carter de lame
mobile est revenu en position de sécurité (Fig. M).
Sélectionnez la vitesse de sciage en fonction du matériau
et de l’épaisseur de la paroi. Une vitesse trop élevée
peut endommager la lame, surcharger la scie Exact P400
et fournir un mauvais résultat de sciage. La vitesse de
sciage doit être particulièrement lente notamment lors
de l’utilisation d’une lame de coupe chanfreinée pour
assurer une fi nition chanfreinée de qualité.
La scie Exact P400 peut aussi être utilisée pour effectuée
uniquement le chanfreinage sur l’extrémité d’un tuyau en
plastique. Positionnez d’abord la scie au-dessus du tuyau
de sorte que la lame de coupe chanfreinée se trouve
à l’extrémité du tuyau. (Fig. N) Vous pouvez maintenant
couper le tuyau comme décrit auparavant.
En cas de problème pendant le perçage ou le sciage,
de sons ou de vibrations anormaux en raison desquels
vous devez interrompre le sciage avant que le tuyau
ne soit coupé, libérez la lame en poussant le bouton
UNLOCK vers l’avant jusqu’à ce qu’il soit libéré et
soulevez le moteur. Lorsque le problème est réglé,
reprenez le sciage.
Ne démarrez jamais le moteur lorsqu’il est verrouillé en
position de sciage ou si les dents de la lame sont en
contact avec le tuyau scié.
Nettoyez toujours l’unité mobile et les roues de guidage
après l’utilisation. Cela évitera que les copeaux de
plastique coincés dans les roues ne décalent l’unité
provoquant une coupe de travers.
Protection contre la surcharge
La scie Exact P400 est équipée d’une protection contre
les surcharges. Lorsque la lame est émoussée ou la
vitesse de coupe est trop élevée, la protection contre
les surcharge coupe automatiquement l’alimentation.
Rétablissez l’alimentation en appuyant sur l’interrupteur
de protection contre les surcharges (Fig. A/15).
Rectitude de la coupe et réglage
La coupe est affectée par de nombreux facteurs, par
ex. la taille du tuyau, le matériau, l’épaisseur de la
paroi, la qualité de la surface du tuyau, la rondeur,
l’état de la lame, la vitesse de progression, l’expérience
de l’utilisateur. Le résultat de la coupe peut varier et
un intervalle (c’est-à-dire une différence entre le point
de départ et de fi n de la coupe) peut se former sur la
surface de coupe à droite ou à gauche (Fig. O).
Une fonction de l’unité mobile de la scie Exact P400
(Fig. A/8) vous permet, si nécessaire, d’améliorer les
résultats de coupe et d’atteindre plus facilement la
position de coupe initiale.
schéma J
schéma K
schéma L
schéma M
Page 26

26
Opération
français
Desserrez la vis de verrouillage (Fig. P/1) avec
la clé Allen M5 sur la poignée de la scie Exact
P400. Une molette de réglage se trouve à droite
de l’unité mobile (Fig. P/2). Tournez la molette
avec vos doigts vers la droite ou la gauche.
La direction dépend de la direction de l’erreur
d’alignement. Ce réglage fait tourner l’ensemble
du moteur rapport à l’unité mobile. Une fl èche
et un cadran se trouvent également sur l’unité
mobile. (Fig. P/2) Ils vous aideront à jauger
l’étendue du réglage. Ajustez l’unité motrice
selon la direction voulue pour corriger l’erreur
de sciage. L’étendue du réglage dépend de
l’étendue de l’erreur, du diamètre du tuyau, ainsi
que de la résistance et du matériau de la paroi
du tuyau. Serrez la vis de verrouillage (Fig. P/1)
après le réglage.
Installer et changer la lame de
la scie
AVERTISSEMENT : Pour réduire
tout risque de dommages corporels,
arrêter et débrancher la scie du
secteur avant d’installer ou retirer tout
accessoire, avant tout réglage ou pour faire
toute réparation. Tout démarrage accidentel
comporte des risques de dommages corporels.
Retirez le capot de carter de lame (Fig. Q/1) en
desserrant les deux vis (Fig. Q/2). Appuyez sur
le bouton de blocage de la broche (Fig. A/12)
et tournez simultanément la lame à la main
jusqu’à ce que le bouton de blocage de la
broche descende d’un distance supplémentaire
d’environ 4 mm. Maintenant, la rotation de la
lame est bloquée. Utilisez la clé de lame pour
ouvrir le boulon de fi xation de la lame. Retirez
le boulon de fi xation (Fig. Q/3), la rondelle
(Fig. Q/4), la bride de la lame (Fig. Q/5) et la
lame (Fig. Q/6).
Avant d’installer une nouvelle lame, vérifi ez
que les deux disques de la lame sont propres.
Placez une lame neuve ou affûtée sur la bride
de lame inférieure (Fig. Q/7) de sorte que le côté
marqué de la lame soit tourné vers l’extérieur
et que les fl èches sur la lame soient tournées
dans la même direction que les repères de
sens de rotation sur l’intérieur du logement de
la lame. Assurez-vous que la nouvelle lame va
jusqu’au fond de la bride de lame inférieure.
Remettez en place la bride de lame, la rondelle
et le boulon de fi xation. Appuyez sur le bouton
de verrouillage et resserrez la vis de sécurité de
la lame. Remettez en place le capot de carter de
lame et serrer la vis
schéma O
schéma P
schéma Q
schéma N
Page 27

27
Entretien
AVERTISSEMENTÊ: Pour réduire tout
risque de dommages corporels, arrêter
et débrancher la scie du secteur avant d’installer
ou retirer tout accessoire, avant tout réglage ou
pour faire toute réparation. Tout démarrage
accidentel comporte des risques de dommages
corporels.
A VERTISSEMENTÊ: Pour réduire tout risque
de dommages corporels, NE PAS
ATTACHER, COLLER NI BLOQUER DE TOUTE
AUTRE FAÇON LE BOUTON MARCHE / ARRÊT
pendant le «ÊfonctionnementÊ». LE TENIR À LA
MAIN SEULEMENT.
Nettoyage
AVERTISSEMENTÊ: Pour maintenir l’outil
en bon état, il est conseillé d’éliminer régulièrement
la poussière et les débris du boîtier du moteur à
l’aide d’un jet d’air comprimé sec et net. Pour réduire
tout risque de dommages corporels graves, porter
SYSTÉMATIQUEMENT une protection oculaire
homologuée ANSI Z87.1 pendant l’utilisation d’air
comprimé.
AVERTISSEMENTÊ: Pour l’entretien des
parties en plastique de l’outil, utiliser seulement
un savon doux et un chiffon humide. De nombreux
nettoyants domestiques contiennent des produits
chimiques qui pourraient sérieusement endommager
le plastique. De plus, ne pas utiliser d’essence, de
térébenthine, ou de diluant, de produits de nettoyage
à sec, ou tout autre produit similaire qui pourrait
sérieusement endommager les pièces en plastique.
S’assurer qu’aucun liquide ne pénètre dans l’outil
; ne jamais immerger aucune partie de l’outil dans
un liquide.
Unité mobile
Nettoyez régulièrement l’unité mobile avec de
l’air comprimé et essuyez les copeaux avec une
brosse après chaque coupe.
Carter de lame
Prenez l’habitude de nettoyer régulièrement le
carter de lame et prenez soin que le mouvement
du carter de lame mobile ne soit pas entravé.
Moteur
Maintenez les clapets de refroidissement du
moteur propres.
Pièces plastiques
Nettoyez-les à l’aide d’un chiffon doux. Utilisez
uniquement des détergents doux. N’utilisez pas
de solvants ou d’autres types de détergents
agressifs qui pourraient endommager les pièces
en plastique et les surfaces peintes.
Câble d'alimentation
A VERTISSEMENTÊ:Vérifiez son état régulièrement.
Un câble défectueux doit toujours être remplacé
directement auprès d'un service de
maintenance homologué.
Accessoires
A VERTISSEMENTÊ: Comme les accessoires autres
que ceux offerts par Exact Tools n’ont pas
été testés avec ce produit, leur utilisation
avec cet appareil pourrait comporter un
danger. Pour réduire tout risque de dommages
corporels, seuls des accessoires Exact Tools
recommandés doivent être utilisés avec cet appareil.
Les accessoires recommandés pour cet outil sont
vendus séparément chez les distributeurs locaux
ou dans les centres de réparation agréés. Si vous
avez besoin d’aide pour localiser ces accessoires,
veuillez visiter notre site web www.exacttools.com.
Lames
AVERTISSEMENTÊ: VÉRIFIER VISUELLEMENT
LES LAMES AU CARBURE A VANT TOUTE
UTILISATION. LES CHANGER SI
NÉCESSAIRE.
AVERTISSEMENTÊ: Pour réduire tout risque de
lésions oculaires, porter systématiquement une
protection oculaire homologuée ANSI Z87.1. Le
carbure est un matériau dur mais cassant.
Tout objet étranger dans la pièce à usiner,
tels que des fils ou des clous, pourrait faire
craquer ou casser les dents de scie. Utiliser la scie
seulement avec son carter de lame installé de façon
adéquate. Installer la lame soigneusement, vérifier
sa rotation, sa propreté et son affutage avant toute
utilisation.
Une lame émoussée causera des coupes grossières
et surchargera le moteur de la scie.
Changez les lames lorsqu’elles ne traversent plus
le bois facilement, lorsque le moteur peine ou lorsque
la lame chauffe excessivement. Il est conseillé d’avoir
des lames de rechange pour ne jamais en manquer.
Les lames émoussées peuvent être affutées un peu
partout ; se reporter à la section des pages jaunes
SCIES-AIGUISER/AFFÛTER.
La scie pour tubes PipeCut a été conçue pour être
utilisée avec des lames de 5,9" (150 mm) de diamètre
pour un diamètre d’alésage de 2,44" (62 mm). Les
lames doivent pouvoir fonctionner à 4200 r/min (ou
plus). NE PAS utiliser de meules abrasives.
Sélection de la lame page 2.
Opération Environnement, Garantie, Trucs
français
Page 28

28
Réparations
Pour assurer votre SÉCURITÉ et la FIABILITÉ du
produit, les réparations, la maintenance et les
réglages doivent être effectués par un centre de
réparation agréé ou tout personnel de réparation
qualifié. Toujours utiliser des pièces de rechange
d’origine.
Environnement
Respectez le tri des déchets. Ce produit ne
doit pas être jeté avec les ordures
ménagères.
Si votre machine Pipe Cut est usée il est interdit de
la jeter dans les ordures ménagères. Ce produit doit
être recyclé séparément. Le recyclage séparé de
produits usés et emballages facilite le recyclage et
la récupération de matériaux. La réutilisation de
matériaux recyclés permet d'éviter la pollution de
l'environnement. Conformément aux dispositions
locales, il est possible de remettre les objets de ce
type directement dans une déchetterie ou à votre
revendeur.
Garantie
Si votre scie xx devient inutilisable suite à une
défaillance technique ou un défaut de fabrication
dans les 24 mois suivant l'achat de l'appareil, nous
vous remplaçons les pièces défectueuses par de
nouvelles pièces ou vous changeons la scie si la
vôtre est hors d'usage.
La garantie ne peut s'appliquer que si :
la carte de garantie ou le ticket de caisse (avec la
date d'achat figurant sur le ticket) est retourné (e)
au fabricant ou au revendeur,
la scie n'a pas été utilisée de manière incorrecte,
aucune tentative de réparation n'a été effectuée par
une personne non homologuée,
la scie a été utilisée conformément aux présentes
consignes de sécurité, entretien et fonctionnement.
La garantie ne s'applique pas aux lames et au
système de protection anti-surcharge.
Trucs pour les utilisateurs
N’utiliser que des lames diamantées pour couper
des tubes en fonte. Il n’est pas recommandé de
couper des tubes en fonte avec des lames TCT ou
Cermet.
Nettoyer l’intérieur des carters de lame après avoir
coupé un tube en plastique.
On coupe plus facilement un tube de plus petite
taille en le tournant manuellement sur une table ou
par terre. À noter: lors d’une rotation manuelle,
orienter le tube vers soi et faire attention à ne le
faire tourner trop vite.
Vérifier régulièrement l’état de la lame.
La procédure de coupe se divise en deux étapes:
scier la paroi du tube, puis achever la coupe en
sciant autour.
Ne pas surcharger la scie en coupant en continu.
Sous l’effet de la surchauffe, les parties métalliques
de la scie pourraient devenir bouillantes. Cela
endommagerait également le moteur et la lame. Le
principe est d’avoir 2,5 minutes d’utilisation pour 7,5
minutes de repos.
Maintenir une vitesse d’alimentation constante. Cela
prolongera la durée de vie de la lame.
Ainsi, le temps de coupe pour un diamètre de tube
en acier de 6’’ (170 mm) ayant une épaisseur de
paroi de 1/5’’ (5 mm), est de 15 à 20 secondes,
contre 20 à 25 secondes pour un diamètre de tube
en fonte de 4’’ (110mm) ayant une épaisseur de
paroi de 1/6’’ (4 mm).
Toujours maintenir le moteur à la position verticale.
La marque jaune du bouton de déverrouillage est
alors visible. Ne jamais placer la scie sur le tube
dans la position de coupe / verrouillée.
Facteurs affectant la durée de vie d’une lame de
scie:
• le matériau du tube
• le type de lame correct pour le matériau coupé
• le bon réglage de vitesse du moteur
• l’épaisseur de paroi du tube
• la vitesse d’alimentation
• le caractère régulier du tube
• les compétences générales de l’utilisateur
• la propreté du tube
• la rouille sur le tube
• une soudure en continu dans le tube
• la vitesse de la lame
Facteurs affectant la linéarité de la coupe:
• l’état de la lame de la scie
• l’épaisseur de paroi du tube
• la vitesse d’alimentation
• le caractère régulier de l’alimentation
• les compétences générales de l’utilisateur
• la propreté du tube
• la rondeur du tube
• l’unité de serrage trop lâche ou trop serrée
• le montage trop serré de la lame
En raison du développement continuel de
nouveaux produits, il est possible que le contenu
de ce mode d'emploi varie. Aucune notification
de modification séparée ne sera fournie.
Environnement, Garantie, Trucs
français
Page 29

Índice
29
español
Índice
Datos técnicos
Contenido del paquete
Seguridad
Instrucciones de seguridad
Funcionamiento
Descripción funcional
Características del producto
Antes de operar la herramienta
Conexión de alimentación eléctrica
Ajuste preciso del punto de corte
Colocación de la tubería sobre soportes
Sujeción de la sierra a la tubería
Corte de la tubería
Aserrar alrededor de la tubería
Protección frente a sobrecargas
Alineación del corte y rueda de regulación
Colocación y cambio de la hoja de sierra
Instrucciones de servicio y mantenimiento
Medio ambiente / Eliminación
Garantía/ Condiciones de garantía
Consejos para usar las Exact PipeCut
Vista despiezada (anexo independiente)
30.
30.
31.
34.
34.
35.
35.
35.
35.
36.
36.
36.
37.
37.
38.
39.
40.
40.
40.
Definiciones: Directrices de seguridad
Las siguientes definiciones explican el nivel de intensidad de las palabras de las señalizaciones. Lea
detenidamente el manual y preste atención a estos símbolos.
PELIGRO: Indica una situación inminentemente peligrosa que, si no se evita, causará la muerte o
lesiones graves.
ADVERTENCIA: Indica una situación potencialmente peligrosa que, si no se evita, podría causar
la muerte o lesiones graves.
CUIDADO: Indica una situación potencialmente peligrosa que, si no se evita, podría causar lesiones
leves o moderadas.
ATENCIÓN: Indica una práctica no relativa a lesiones personales que, si no se evita, podría
provocar daños materiales.
Denota riesgo de descarga eléctrica.
La etiqueta de la herramienta o en este manual pueden incluir símbolos. Los símbolos y sus
definiciones se enumeran en la página 41.
Page 30

Instrucciones de funcionamiento, seguridad y
mantenimiento
Antes de usar la sierra de tubos, lea atentamente estas instrucciones de
funcionamiento, seguridad y mantenimiento y guarde este manual en un lugar
accesible a quienquiera que utilice la máquina. Además de est as instrucciones, siga
siempre las normas oficiales sobre seguridad e higiene en el trabajo. La Exact
PipeCut 170/170E está concebida exclusivamente para uso profesional.
Datos técnicos
30
Modelo
Tensión
Actual
Potencia
Velocidad sin carga
Funcionamiento Intermitente
Diámetro de la hoja
Orificio de fijación de la hoja
Peso
Campo de corte Ø
Máximo espesor corte
Máximo espesor corte de bisel
Clase de protección
Bloqueo de eje
Preselección de velocidad
Control electrónico constante
Protección de sobrecarga
Corriente de arranque reducida
español
Pipecut P400
120 V / 60 Hz
8,4 A
950 W
4000 /min
2,5 min ON / 7,5 min OFF (S3 25%)
5,8”-5,9” (148 /150 mm)
2,44” (62 mm)
12 lbs (5,7 kg)
4”- 16” (100 mm – 400 mm)
0,9” (23 mm)
0,8” (20 mm)
/ II
SI
NO
NO
SI
NO
Datos técnicos
Sierra para tubos Exact PipeCut P400
Contenido del paquete:
Por favor, compruebe que el paquete contenga los siguientes artículos:
1. Bolsa de la sierra PipeCut
2. Sierra para tubos Exact PipeCut P400
3. Soportes de tubo: 1 doble y 2 individuales
4. Instrucciones de funcionamiento
5. Llave Allen de 5 mm fi jada en la empuñadura
6. Cuchilla CTC de 150 x 62 ajustada a la máquina
7. Cuchilla de corte de bisel en la bolsa
Page 31

31
Seguridad
Indicaciones generales de
seguridad para herramientas
con motor
ADVERTENCIA: Lea todas las advertencias de
seguridad y todas las instrucciones. Si no se
siguen las advertencias y las instrucciones, podrían
provocarse descargas eléctricas, incendios o lesiones
graves.
Conserve todas las advertencias e instrucciones para
futuras referencias.
El término “herramienta con motor” de las advertencias se
refiere a su máquina herramienta con cables (cableada)
o batería (inalámbrica).
1) Seguridad en la zona de trabajo
a) Mantenga la zona de trabajo limpia y ordenada. Las
zonas desordenadas o sucias son una invitación a los
accidentes.
b) No use las herramientas con motor en atmósferas
explosivas, como por ejemplo si hay líquidos, gases
o polvo inflamables. Las herramientas con motor
generan chispas que podrían encender el polvo o los
vapores.
c) Mantenga a los niños y espectadores alejados
mientras use la herramienta con motor. Las
distracciones pueden hacer que pierda el control.
2) Seguridad eléctrica
a) Las clavijas de las herramientas con motor deben
encajar en los enchufes. No modifique las clavijas
bajo ninguna circunstancia. No use clavijasadaptadoras con herramientas con motor con toma
a tierra. Si usa las clavijas sin modificar y los enchufes
correspondientes, se reducirá el riesgo de descarga
eléctrica.
b) Evite tocar las superficies con toma a tierra, como
tuberías, radiadores, cadenas o refrigeradores. El
riesgo de descarga eléctrica aumenta si el cuerpo está
conectado a tierra.
c) No exponga las herramientas con motor a la lluvia
o condiciones húmedas. Si el agua penetra en una
herramienta con motor, aument ará el riesgo de descarga
eléctrica.
d) No maltrate el cable. No use el cable para mover,
arrastrar o desconectar la herramienta con motor.
Mantenga el cable alejado del calor, aceite,
bordes afilados y piezas móviles. Los cables dañados
o enredados incrementan el riesgo de descarga
eléctrica.
e) Para utilizar una herramienta con motor al aire libre,
use un cable alargador indicado para usos
exteriores. Al usar un cable adecuado para exteriores,
se reduce el riesgo de descarga eléctrica.
f) Si la herramienta con motor debe usarse en un
entorno húmedo inevitablemente, use suministro
protegido mediante dispositivo diferencial residual
(DDR). Al usar un DDR, se reduce el riesgo de descarga
eléctrica.
3) Seguridad personal
a) Manténgase alerta, compruebe lo que está haciendo
y use el sentido común para manejar una herramienta
con motor. No use herramientas con motor si está
cansado o bajo la influencia de drogas, alcohol o
medicamentos. Un momento de distracción mientras
maneja herramientas con motor puede causar lesiones
personales graves.
b) Use el equipamiento de protección personal. Siempre
utilice gafas de seguridad. El equipamiento de
protección, como máscara antipolvo, calzado antideslizante, casco o protección auditiva, puede reducir
las lesiones personales.
c) Asegúrese de que ningún dispositivo puede ponerse
en marcha accidentalmente. Asegúrese de que el
interruptor está en la posición apagada antes de
conectar el suministro eléctrico o de levantar o
desplazar la herramienta. T rasladar las herramientas
con motor con el dedo sobre el interruptor o conectar
al suministro eléctrico herramientas con motor que
tienen el interruptor encendido es una clara invitación
a accidentes.
d) Retire todas las llaves de ajuste o de tuerca antes
de encender la herramienta con motor. Dejar una
llave de tuerca o de ajuste acoplada a una pieza giratoria
de la herramienta podría provocar lesiones personales.
e) Evite las posiciones inestables. Mantenga un
equilibrio correcto y los pies afianzados en todo
momento. De este modo, podrá controlar mejor la
herramienta con motor en situaciones imprevistas.
f) Lleve ropa adecuada. Evite la ropa floja y las joyas.
Mantenga el pelo, la ropa y los guantes alejados de
las piezas móviles. El pelo largo y suelto, las joyas y
la ropa floja se pueden quedar atrapados en las piezas
móviles.
g) Si se han suministrado dispositivos para la conexión
de los sistemas de extracción y captación de polvo,
asegúrese de que están conectados y de que se
usan correctamente. Usar la captación de polvos
puede reducir los riesgos relativos al polvo
4) Uso y mantenimiento de la herramienta
con motor
a) No fuerce la herramienta con motor. Use la
herramienta con motor adecuada para su aplicación
en concreto. La herramienta con motor correcta realizará
el trabajo mejor y con mayor seguridad, a la velocidad
para la que fue diseñada.
b) No use la herramienta con motor si el interruptor
no enciende y apaga. Todas aquellas herramientas
con motor que no se puedan controlar con el interruptor
son peligrosas y deben repararse de inmediato.
c) Desconecte la clavija del suministro eléctrico de la
herramienta antes de realizar cualquier ajuste,
cambiar accesorios o guardarla. Estas medidas
preventivas reducen el riesgo de que la herramienta
con motor se ponga en marcha accidentalmente.
d) Mantenga las herramientas con motor paradas fuera
del alcance de los niños. No permita que las
personas que no estén familiarizadas con la
herramienta con motor o estas instrucciones usen
la herramienta. Las herramientas con motor son
peligrosas en manos de usuarios sin formación.
e) Mantenimiento de las herramientas con motor.
Revise las herramientas en busca de
desalineaciones o acoplamiento de piezas móviles,
piezas rotas o cualquier otro defecto que pudiera
afectar al funcionamiento de la herramienta con
motor. Si el cable de alimentación está dañado,
repárelo antes de usarlo. Son muchos los accidentes
causados por cables de alimentación mal cuidados.
f) Conserve las herramientas de corte afiladas y
limpias. Es menos probable que las herramientas de
corte bien cuidadas, con bordes de corte afilados se
traben, por lo que son más fáciles de controlar.
g) Use la herramienta con motor, los accesorios, los
componentes, etc. conforme a estas instrucciones,
teniendo en cuenta las condiciones operativas y el
trabajo que va a realizar. Si se usa la herramienta con
motor para operaciones distintas a las convencionales,
podrían provocarse situaciones peligrosas.
Mantenimiento de las herramientas con motor.
Revise las herramientas en busca de desalineaciones
o acoplamiento de piezas móviles, piezas rotas o
cualquier otro defecto que pudiera afectar al
funcionamiento de la herramienta con motor. Si el
cable de alimentación está dañado, repárelo antes
de usarlo. Son muchos los accidentes causados por
cables de alimentación mal cuidados.
español
Page 32

32
Seguridad
5) Mantenimiento técnico
Encargue la revisión y el mantenimiento de su
herramienta con motor a personal de reparación
cualificado. Deben emplearse únicamente piezas
de repuesto idénticas. Esta es la única forma de
garantizar que se mantiene la seguridad de la
herramienta con motor.
Advertencias de seguridad para
sierras circulares
a) PELIGRO: Mantenga las manos alejadas de
la zona de corte y de la hoja. Mantenga la otra
mano en la carcasa del motor. Si está sujetando
la sierra con ambas manos, la hoja no podrá cortarlas.
b) No toque por debajo de la pieza de trabajo. La
guarnición no puede protegerle frente a la hoja por
debajo de la pieza de trabajo.
c) No sujete jamás la pieza de trabajo con las manos
ni sobre el regazo. Fije la pieza a una plataforma
estable. Es importante fijar la pieza bien para minimizar
la exposición corporal, problemas con la hoja o la pérdida
de control.
d) Sujete la herramienta con motor sólo por las
superficies de agarre aisladas mientras realice una
operación en la que la herramienta de corte podría
estar en contacto con cables ocultos o su propio
cable. Tocar un hilo conductor haría que las piezas
metálicas expuestas de la herramienta con motor también
fuesen conductoras y provocarían una descarga al
usuario.
e) Use siempre hojas del tamaño y la forma
correspondientes (diamante o redondas) al orificio
del eje. Las hojas que no coinciden con el soporte de
montaje de la sierra, girarán excéntricamente, lo que
provoca la pérdida del control.
f) No use arandelas o pernos para la hoja que no sean
los adecuados. Las arandelas y los pernos de las hojas
han sido específicamente diseñados para la sierra:
rendimiento óptimo y seguridad de uso.
g) Si la hoja está trabada o si se interrumpe un corte
por el motivo que sea, suelte el gatillo y sujete la
sierra sin que se mueva en el material hasta que la
hoja se detenga por completo. No intente bajo
ninguna circunstancia sacar la sierra de la pieza o
tirar de ella hacia atrás mientras la hoja todavía esté
en movimiento. Busque el problema y corrija la causa
por la que se traba la hoja.
h) Al reiniciar la sierra en la pieza de trabajo, centre la
hoja en el corte y compruebe que los dientes de la
sierra no se han enganchado en el material. Si la
hoja de sierra está trabada, aléjese de la pieza para
reiniciar la sierra.
i) No use hojas romas ni dañadas. Las hojas poco
afiladas o mal colocadas producen un corte estrecho lo
que causa un exceso de fricción y que se trabe la hoja.
j) Preste especial atención al realizar un “corte por
penetración” en paredes existentes u otras zonas
ciegas. La hoja saliente podría cortar objetos que
pueden producir contragolpes.
k) Asegúrese de que la guarnición inferior cierra
correctamente antes de cada uso. No utilice la sierra
si la guarnición inferior no se mueve libremente o
si no se cierra instantáneamente. No afiance ni fije
la guarnición inferior en la posición abierta. Si la
sierra se cae por accidente, la guarnición podría doblarse.
Levante la guarnición inferior con el asa de retracción
y asegúrese de que se mueve libremente y de que no
toca ni la hoja ni otra parte, en cualquiera de los ángulos
y las profundidades de corte.
l) Si la guarnición no funcionan correctamente, deberán
arreglarse antes de usarlos. La guarnición inferior
podría funcionar lentamente a causa de piezas dañadas,
depósitos gomosos o acumulación de restos.
m)No toque el expulsor de polvo de la sierra con las
manos. Podría lesionarse con las piezas giratorias.
n) No trabaje suspendido con la sierra. En esta posición
no tendría suficiente control sobre la herramienta con
motor.
o) No use la herramienta con motor inmóvil. No está
diseñada para usarse con una mesa de sierra.
p) No use hojas de sierra de acero de alta velocidad.
Estas hojas se pueden romper fácilmente.
q) Al trabajar con la máquina, sujétela siempre
firmemente con ambas manos y en una posición
segura. La herramienta con motor se guía con mayor
seguridad si usa las dos manos.
r) Fije la pieza de trabajo. Una pieza fijada con soportes
para tubos estará más segura que si la sujeta con las
manos.
s) Espere hasta que la máquina se haya detenido por
completo antes de bajarla. El inserto se podría atascar
y perdería el control sobre la herramienta con motor.
t) No use la máquina si el cable está dañado. Mientras
esté trabajando, no toque el cable dañado ni tire de
la clavija del cable de suministro de red si el cable
está dañado. Los cables dañados aumentan el riesgo
de descarga eléctrica.
Instrucciones de seguridad
adicionales para todas las
sierras
Causas y prevención del operador del efecto rebote:
- El efecto rebote consiste en una reacción repentina
de una cuchilla de sierra comprimida, apresada o mal
alineada, que hace que una sierra se levante de forma
incontrolada y se aleje de la pieza de trabajo saliendo
disparada hacia el operador;
- Cuando la cuchilla está comprimida o apresada
ceñidamente por la entalladura al cerrarse, se atasca
y la reacción del motor empuja la unidad rápidamente
hacia atrás en dirección al operador;
- Si la cuchilla se retuerce o está mal alineada en el
corte, los dientes del borde posterior de la cuchilla
pueden clavarse en la zona superior de la madera, lo
que hará que la hoja remonte la entalladura y salte
hacia atrás en dirección al operador.
El rebote es el resultado del mal uso de la sierra o de
procedimientos o condiciones de funcionamiento
incorrectos y puede ser evitado si se toman las
precauciones debidas, enumeradas a continuación:
a) Sujete la sierra fi rmemente con las dos manos
y coloque los brazos de forma que ofrezcan
resistencia a las fuerzas de la inversión de giro.
Coloque el cuerpo a ambos lados de la cuchilla,
pero nunca en línea con ella. La inversión de giro
puede provocar que la sierra salte hacia atrás. No
obstante, el operador puede controlar las fuerzas de
inversión de giro si toma las precauciones adecuadas.
NOTA: Para las sierras circulares cuya cuchilla tenga
un diámetro igual o inferior a 140 mm, podrá omitirse la
expresión „con ambas manos“.
español
Page 33

33
Seguridad
b) Si la hoja está trabada o si se interrumpe un corte
por el motivo que sea, suelte el gatillo y sujete la
sierra sin que se mueva en el material hasta que
la hoja se detenga por completo. No intente nunca
retirar la sierra del trabajo ni tire de la sierra hacia
detrás mientras que la cuchilla está en movimiento,
ya que podrá registrarse un efecto de rebote.
Busque el problema y corrija la causa por la que se
traba la hoja.
c) Cuando reinicie una sierra en la pieza de trabajo,
centre la cuchilla de la sierra en la hendidura
y compruebe que los dientes de la sierra no están
introducidos en el material. Si la cuchilla está
doblada, podrá dispararse o rebotar desde la pieza de
trabajo cuando se arranque la sierra.
d) Sujete los paneles grandes de madera para reducir
al mínimo el riesgo de que la cuchilla se comprima
e invierta el giro. Los paneles grandes tienden
a ondularse bajo su propio peso. Los soportes deben
colocarse bajo el panel en ambos lados, junto a la línea
de corte y junto al borde del panel.
e) No utilice cuchillas dañadas o embotadas. Las
cuchillas no afi ladas o incorrectamente fi jadas producen
hendiduras estrechas que provocan una fricción, doblez
y rebotes excesivos de la cuchilla.
f) Las palancas de bloqueo del ajuste de bisel
y de profundidad de la cuchilla deben estar bien
apretadas y seguras antes de realizar el corte. Si el
ajuste de la cuchilla cambia durante el corte, pueden
producirse cimbreos e inversiones de giro.
g) Preste especial atención cuando realice un „corte
de profundidad“ en los muros existentes u otras
zonas ciegas. La cuchilla que se salga podrá cortar
objetos que podrán provocar el rebote.
Advertencias de seguridad para
sierras tipo de penetración
a) Asegúrese de que la guarnición cierra correctamente
antes de cada uso. No utilice la sierra si la guarnición
no se mueve libremente o si no encierra la hoja
instantáneamente. No fije ni afiance la guarnición si la
hoja está expuesta. Si la sierra se cae por accidente,
la guarnición podría doblarse. Revísela para asegurarse
de que guarnición se mueve libremente y no toca la
hoja ni otra parte, en cualquiera de los ángulos y
profundidades de corte.
b) Revise el resorte de retorno de la guarnición y
asegúrese de que funciona. Si la guarnición y el
resorte no funcionan correctamente, deberán arreglarse
antes de usarlos. La guarnición podría funcionar
lentamente a causa de piezas dañadas, depósitos
gomosos o acumulación de restos.
c) Asegúrese de que la placa guía de la sierra no girará
durante el “corte por penetración” cuando el ajuste
del bisel de la hoja no está en 90º. Si la hoja se
desplaza lateralmente, se trabaría la hoja y,
posiblemente, se producirían contragolpes.
d) Asegúrese siempre de que la guarnición cubre la
hoja, antes de bajar la sierra sobre el banco o el
suelo. Una hoja sin proteger y deslizada haría que la
sierra retrocediese y cortase así lo que encontrase a
su paso.
Normas de seguridad
específi cas adicionales
La sierra para tubos no se debe usar si:
• hay agua u otro líquido, gas explosivo o agentes
químicos venenosos en el tubo que se va a cortar.
• el interruptor del suministro eléctrico está defectuoso.
• el cable del suministro eléctrico está defectuoso.
• la hoja está doblada.
• la hoja está roma o en mal estado.
• los componentes de plástico están agrietados o les
faltan piezas.
• la mordaza no está bien tensada alrededor del tubo
o está combada.
• la tapa de la guarnición o la guarnición de la hoja móvil
está dañada o se ha retirado de la máquina.
• los mecanismos de bloqueo no funcionan
correctamente (botón UNLOCK).
• la sierra para tubos está húmeda.
Al usar la sierra para tubos, se deben tener siempre en
cuenta los siguientes factores:
• Sujete los tubos para minimizar el riesgo de que se
pellizque la hoja.
• Asegúrese de que el tubo que va a cortar está vacío.
• Asegúrese de que la hoja está bien colocada.
• Asegúrese de que el diámetro y el espesor de la hoja
son adecuados para la sierra para tubos y de que la
hoja es adecuada para el rango de rpm de la máquina.
• No aplique bajo ninguna circunstancia fuerza lateral
para detener la hoja. Deje que la hoja se detenga
libremente.
• Compruebe los accesorios de las guarniciones de las
hojas.
• No haga demasiada fuerza mientras usa la sierra para
tubos.
• No use la sierra para tubos para levantar el tubo
mientras está unida al tubo.
• Evite sobrecargar el motor eléctrico.
• Siga siempre las instrucciones operativas y de
seguridad y las normas vigentes.
A menudo, los orificios de ventilación cubren las piezas
móviles y, por lo tanto, deberían evitarse. El pelo largo
y suelto, las joyas y la ropa floja se pueden quedar atrapados
en las piezas móviles.
Los accesorios deben estar clasificados con al menos la
velocidad recomendada en la etiqueta de advertencias de
la herramienta. Los accesorios que sobrepasen la velocidad
nominal podrían desprenderse y provocar lesiones. La
especificación de los accesorios debe ser siempre superior
a la velocidad de la herramienta tal y como se indica en
la placa de esta.
ADVERTENCIA: Use SIEMPRE protección
auditiva personal adecuada conforme a ANSI
S12.6 (S3.19) mientras utilice la herramienta. En algunas
circunstancias y duración de uso, el ruido procedente de
este producto podría contribuir a pérdidas de capacidad
auditiva. Al trabajar con distintos materiales, el nivel sonoro
podría variar y superar, a veces, el límite de 85 dB(A). Use
siempre los protectores auditivos.
ADVERTENCIA: Utilice SIEMPRE gafas de
seguridad. Las gafas de corrección óptica NO son
gafas de seguridad. Use también máscara antipolvo o
facial si la operación de corte genera polvo. USE SIEMPRE
EQUIPAMIENTO DE SEGURIDAD CERTIFICADO:
español
Page 34

34
Seguridad, Funcionamiento
• Protección ocular ANSI Z87.1 (CAN/CSA Z94.3),
• Protección auditiva ANSI S12.6 (S3.19),
• Protección respiratoria NIOSH/OSHA/MSHA.
ADVERTENCIA: Use guantes de seguridad. Use siempre
los guantes de seguridad, ya que los bordes de los tubos
cortados son afilados y pueden provocarle cortes.
ADVERTENCIA: Parte del polvo generado por las
operaciones de limar, cortar, moler, perforar y otras
actividades de construcción contiene agentes químicos que
causan cáncer, defectos en el feto y otras lesiones reproductivas.
Algunos ejemplos de dichos agentes químicos serían:
• plomo de pinturas a base de plomo,
• silicio cristalino de ladrillos y cemento y otros productos de albañilería,
y
• arsénico y cromo de madera industrial con tratamiento químico
(CCA).
El riesgo al que se enfrenta por estas exposiciones varía en función
de la frecuencia con la que realiza este tipo de trabajo. Para reducir
su exposición a estos agentes químicos: trabaje en una zona bien
ventilada y use equipamiento de seguridad aprobado (por ejemplo,
máscaras antipolvo diseñadas especialmente para filtrar partículas
microscópicas).
Evite el contacto prolongado con polvo procedente de
operaciones de limar, cortar, moler, perforar y otras actividades
de construcción.
Use indumentaria protectora y lave las zonas expuestas con
jabón y agua. Si deja que el polvo penetre en su boca u ojos o se
deposite en su piel, podría absorber los agentes químicos perjudiciales.
ADVERTENCIA: El uso de esta herramienta puede
producir y/o liberar polvo que podría causar daños
graves y permanentes respiratorios o de otro tipo. Use siempre
protección respiratoria aprobada por NIOSH/OSHA adecuada
para la exposición al polvo. Mantenga cara y cuerpo alejados
de las partículas.
Cables alargadores
Por motivos de seguridad, los cables alargadores deben tener
hilos del tamaño adecuado (AWG o sistema americano de
calibres de alambres). Cuanto menor sea el número de calibre del
cable, mayor será la capacidad de este. Es decir, el calibre 16 tiene
mayor capacidad que el 18. Un cable menor de lo necesario provocaría
la caída de la tensión de línea que a su vez causaría pérdida de
potencia y sobrecalentamiento. Si se usa más de un alargador hasta
componer la longitud total, asegúrese de que cada alargador contiene
al menos el tamaño mínimo de alambre. En la siguiente tabla se
muestra el tamaño correcto que se debe usar en función de la
longitud del cable y los amperios especificados en la placa. En caso
de duda, use el siguiente calibre más potente. Cuanto menor sea
el número de calibre, más potente el cable. (pág. 4).
Motor
Asegúrese de que su suministro eléctrico coincide con el que se
especifica en la placa de características. Un voltaje tan sólo un 10%
inferior puede provocar pérdida de potencia y causar
sobrecalentamiento. Todos los productos Exact Tools son
comprobados en fábrica. Si esta herramienta no funciona, revise el
suministro eléctrico.
ADVERTENCIA: Los accesorios deben estar clasificados
con al menos la velocidad recomendada en la etiqueta
de advertencias de la herramienta. Los accesorios que sobrepasen
la velocidad nominal podrían desprenderse y provocar lesiones. La
especificación de los accesorios debe ser siempre superior a la
velocidad de la herramienta tal y como se indica en la placa de esta.
CUIDADO: Para evitar lesiones personales, no toque los
dientes de la hoja.
Descripción funcional
Lea todas las advertencias de seguridad
y todas las instrucciones. Si no se siguen
las advertencias y las instrucciones, podrían
provocarse descargas eléctricas, incendios
o lesiones graves.
Uso previsto PipeCut P400:
La Exact Pipe Cut P400 se destina al uso profesional en
todo tipo de centros de construcción. La Exact PipeCut
P400 está diseñada para ser utilizada exclusivamente
con tubos de plástico de una dimensión de 100 mm (4‘)
- 400 mm (16”). El grosor máximo de pared que la Exact
Pipe Cut P400 puede cortar es de 25 mm (1”). Con una
cuchilla de bisel, el grosor máximo de pared es de 22 mm
(0,9‘‘). Con la Exact PipeCut P 400 podrá cortar tubos
elaborados con distintos materiales de plástico,k como el
PP, PE, PVC, etc. La sierra de tubos PipeCut P400 está
prevista para un uso corto e intermitente. La máquina
puede cargarse para 2,5 minutos durante un periodo de
10 minutos (S3 25 %). La sierra para tubos PipeCut P400
no se ha previsto para un uso en la producción industrial
en serie.
Características del producto
Mientras lee las instrucciones de funcionamiento, abra la
página de gráfi cos para la máquina y déjela abierta. Esta
página se encuentra plegada bajo la portada del presente
manual (página 4). Los siguientes números que describen
las características del producto hacen referencia a dicha
ilustración.
Figura A
1. Botón de DESBLOQUEO
2. Interruptor de alimentación
3. Palanca de bloqueo del interruptor de
encendido
4. Unidad del motor
5. Palanca de protección del movimiento de
cuchilla
6. Cubierta del protector de la cuchilla
7. Puntos de confi guración
8. Tuerca de ajuste recto
9. Protector del movimiento de cuchilla
10. Asa de funcionamiento
11. Tornillo del protector de la cuchilla
12. Botón de bloqueo del eje
13. Llave Allen
14. Placa de características
15. Protección contra las sobrecargas
16. Indicador de tuerca de ajuste recto
17. Unidad de dirección
18. Seguridad para la unidad de dirección
19. Perno de ajuste para la unidad de
dirección
20. Indicador de la unidad de dirección
español
Page 35

35
Funcionamiento
español
Instrucciones de
funcionamiento para el sistema
de corte de tubos Exact P400
Antes de operar con el Exact P400, haga lo siguiente
Compruebe que la unidad del motor se encuentra en
posición vertical de forma que la marca amarilla sobre
el botón de DESBLOQUEO esté visible.
Compruebe que se haya instalado la cuchilla adecuada
en la máquina.
Compruebe que la cuchilla se ha colocado
correctamente en su lugar, que se haya fi jado bien
y que está en buen estado.
La cuchilla de bisel podrá afl ojarse con motivo de las
vibraciones durante el corte.
Compruebe que las ruedas de guía giran.
Compruebe que las ruedas de soporte giran.
Compruebe que el protector de la cuchilla inferior se
mueve correctamente.
Compruebe que el tubo que va a cortar esté vacío.
Conectar la Exact P400 a la red
Compruebe que el voltaje de red es el mismo que se
indica en la placa de datos (Figura A/14)
Conecte la Exact P400 a la toma de alimentación
solamente tras haber comprobado la lista anterior.
Fijar los soportes del tubo que va a cortar.
Utilice siempre los soportes de tubo Exact cuando corte.
Los soportes aumentan la seguridad y optimizan el
resultado del corte. El corte debe realizarse siempre en
una superfi cie plana. Coloque el tubo en el soporte de
corte para que el punto de corte se encuentre entre el par
de ruedas. Coloque los soportes individuales bajo ambos
extremos del tubo. Compruebe que todas las ruedas
están en contacto con el tubo. Si es necesario, ajuste los
soportes con una pieza de madera. (Fig. B) Las secciones
más cortas (inferiores a 25cm/10”) pueden cortarse con
dos soportes ubicados de forma que el punto de corte
quede fuera de los soportes. (Fig. C) Al cortar en el orden
adecuado, evitará que la cuchilla de la sierra se atasque
en el tubo en la etapa fi nal del proceso de corte.
Fijación y marcado del punto de corte
Utilice un marcador para marcar el punto de corte.
Existen dos puntos de confi guración en el protector del
movimiento de cuchilla de la sierra. Uno se utiliza para
la cuchilla que sólo corta el tubo (Fig. D/1) mientras
que el otro se utiliza para la cuchilla que corta y bisela
el extremo del tubo. (Fig. D/2)
Para empezar a cortar
Abra la tuerca de seguridad(Fig. E1) y ajuste los
pares de ruedas en el dispositivo de dirección de la
Exact P400 según el diámetro del tubo, girando el
perno de ajuste ubicado en la parte trasera de la Exact
P400 para tubos (Fig. E2). La escala en la sierra es
aproximada. El usuario podrá afi nar la longitud del bisel
con el perno de ajuste. Tenga en cuenta que cuanto
más pequeño sea el diámetro del tubo, más sensible
será el ajuste de la profundidad del bisel.
Fig. C
Fig. B
Fig. D
Fig. E
punto de corté
punto de corté
Page 36

Es más importante que la base del dispositivo de
dirección no toque el tubo, sino en su lugar, que los
pares de ruedas soporten la sierra (Fig. E3). Por último,
bloquee el ajuste con la tuerca de seguridad (Fig. E1) ,
de forma que los ajustes no varíen durante el corte.
Tire de la palanca del protector del movimiento de
cuchilla hacia Ud. (Fig. F y A/5) Coloque la Exact
P400 horizontalmente sobre el tubo, de forma que una
marca de confi guración adecuada para la cuchilla de
la máquina quede posicionada en el punto de corte
(Fig F). Sostenga el tubo en su lugar y compruebe que
la Exact P400 se mueve libremente en la dirección de
alimentación del tubo. Para garantizar la seguridad
de la Exact P400, los cables deberán ubicarse a la
izquierda y al frente del tubo. La Exact P400 ya está
lista para ser utilizada.
Perforar la pared del tubo
Esfuércese en mantener la Exact P400 en posición
horizontal sobre el tubo durante todo el proceso de
corte. Sostenga fi rmemente la empuñadura con su
mano derecha, arranque el motor soltando la palanca
de bloqueo en el interruptor de encendido (Fig.
G/1) y pulse el interruptor de encendido hacia abajo
(Fig. G/2). Antes de empezar a cortar, espere a que la
cuchilla alcance su velocidad máxima. Perfore la pared
del tubo, pulsando el asa de funcionamiento hacia
abajo lentamente, hasta que la cuchilla haya cortado
todo el muro del tubo (en esta etapa, el tubo no debe
girar) y la unidad del motor quede bloqueada en la
posición de corte. Cuando se haya bloqueado el botón
de DESBLOQUEO, es decir, desaparezca la marca
amarilla (Fig. H), la Exact P400 se bloquea y podrá
empezar a cortar con seguridad alrededor del tubo.
Cuando utilice una cuchilla de corte de bisel, deberá
realizar el perforado de forma especialmente despacio.
Cortar alrededor de un tubo
Empiece a cortar girando el tubo con su mano
izquierda hacia sí mismo (Fig. I) y mantenga la Exact
P400 de forma estable y en posición horizontal en
relación con el tubo (Fig. J). Siga cortando girando
el tubo tranquilamente y a la velocidad más uniforme
posible hacia sí mismo hasta que el tubo se corte.
Si utiliza una cuchilla de corte de bisel, siga cortando
aproximadamente unos 5 cm después de que se haya
cortado el tubo. De este modo garantizará un biselado
uniforme alrededor de todo el tubo. Si bisela dando
otra vuelta adicional, obtendrá un resultado aún mejor.
Los biseles grandes deben realizarse siempre en dos
rondas. En la primera ronda, deberá realizar el corte,
por lo que el bisel no se habrá completado y en la
segunda ronda, la unidad de dirección deberá ajustarse
a la longitud de bisel deseada. Tenga en cuenta que la
temperatura infl uye en la dureza del plástico
La sierra también puede dirigirse manualmente si la
cuchilla no coincide con corte inicial. Cuando observe
el punto inicial del corte, gire la sierra en un ángulo
suave hacia el corte inicial, hasta que se corte el tubo
(Fig. L
36
español
FuncionamientoFuncionamiento
Fig. F
Fig. G
Fig. H
Fig. I
Page 37

Cuando haya cortado el tubo al completo, pulse el
botón de DESBLOQUEO hacia delante, hasta que
la marca amarilla esté visible y se suelte el bloqueo
(Fig. L). Ahora, levante la unidad del motor hasta la
posición de inicio. Suelte el interruptor de alimentación.
Una vez que se levante la sierra del tubo, compruebe
que el protector del movimiento de cuchilla se haya
colocado en posición de seguridad (Fig. M).
Seleccione la velocidad de alimentación en función
del material y del grosor del muro. Una velocidad
demasiado alta puede dañar la cuchilla, sobrecargar
la Exact P400 y dar un resultado de corte incorrecto.
Especialmente cuando utilice una cuchilla de corte de
bisel la velocidad de introducción deberá ser bastante
baja para garantizar un acabado de calidad del bisel.
La Exact P400 también puede utilizarse para realizar
exclusivamente un bisel en el extremo de un tubo
de plástico. Coloque primeramente la sierra sobre el
tubo para que la cuchilla de sierra de corte de bisel se
encuentre al fi nal del tubo. (Fig. N) Ahora podrá operar
con el tubo del modo descrito anteriormente.
Si registrase algún problema durante la operación de
perforado o de corte, sonidos o vibraciones anormales
que le obliguen a interrumpir el corte antes de acabar
con el corte del tubo, suelte la cuchilla pulsando el
botón de DESBLOQUEO hacia delante, hasta que se
suelte el botón de DESBLOQUEO y levante la unidad
del motor. Una vez que haya resuelto el problema,
empiece a cortar de nuevo.
Nunca arranque el motor cuando la unidad del motor
esté bloqueada en la posición de corte o los dientes de
la cuchilla estén en contacto con el tubo cortado.
Limpie siempre el dispositivo de dirección y las ruedas
de guía tras su uso. De este modo garantizará que los
restos de plástico atrapados en las ruedas no atascan
la unidad y no provocarán un corte incorrecto.
Protección contra las sobrecargas
La Exact P400 está equipada con una protección contra
las sobrecargas. Cuando la cuchilla está obtusa o la
velocidad de corte es demasiado alta, la protección contra
las sobrecargas corta la alimentación automáticamente.
Reinicie la alimentación pulsando el interruptor de
protección contra las sobrecargas (Fig A/15).
Rectitud de corte y ajuste
El corte está afectado por muchos factores, como por
ejemplo, el tamaño del tubo, el material, el grosor del
muro, la calidad de la superfi cie del tubo, la redondez,
la condición de la cuchilla, la velocidad de alimentación
y la experiencia del operador. El resultado de corte
podrá variar y podrá observarse una diferencia en la
superfi cie de corte a la izquierda o a la derecha, es
decir, la diferencia entre punto de corte inicial y fi nal
(Fig. O).
El dispositivo de dirección de la Exact P400 (Fig.A/8)
tiene una función que cuando es necesario, puede
mejorar el resultado de corte y facilitar el alcance del
lugar de dicho punto de inicio.
37
español
Funcionamiento
Fig. J
Fig. K
Fig. L
Fig. M
Page 38

Afl oje la tuerca de bloqueo (Fig. P/1) con la llave
allen M5 en la empuñadura de la Exact P400. Existe
una rueda de ajuste a la derecha del dispositivo de
dirección (Fig. P/2). Gire la rueda con sus dedos en
sentido de las agujas del reloj o en sentido contrario
al de las agujas del reloj. La dirección depende de
la dirección del fallo de alineación. Este ajuste gira
toda la unidad del motor en relación con la unidad
de dirección. Del mismo modo, existe una fl echa
y un disco en la unidad de dirección. (Fig. P/2) Estos
elementos le ayudarán a calibrar el alcance del ajuste.
Ajuste la unidad del motor en la dirección deseada
para corregir el error de la sierra. El alcance del ajuste
depende del alcance del error, del diámetro del tubo
y de la dureza y del material de la pared del tubo.
Ajuste la tuerca de bloqueo (Fig. P/1) después de
realizar el ajuste.
Colocación y cambio de la
hoja de sierra
ADVERTENCIA: Para reducir el riesgo de
lesiones, apague la unidad y desconéctela
del suministro eléctrico antes de instalar
o retirar accesorios y antes de realizar ajustes
o reparaciones. Una puesta en marcha accidental
puede provocar lesiones.
Desenchufe la máquina y compruebe que el motor está
bloqueado en la posición superior.
Retire la cubierta del protector de la cuchilla (Fig. Q/1)
abriendo la tuerca (Fig. Q/2). Pulse el botón de
bloqueo del eje (Fig. A/12) y gire simultáneamente la
cuchilla con la mano hasta que el botón de bloqueo
del eje caiga en una distancia superior a unos 4 mm.
ahora, se evitará el giro de la cuchilla. Utilice la llave de
la cuchilla para abrir el perno de unión de la cuchilla.
Retire el perno de sujeción (Fig. Q/3), la arandela
(Fig. Q/4), la brida de la cuchilla (Fig. Q/5), y la cuchilla
(Fig. Q/6).
Antes de colocar una hoja de sierra nueva, compruebe
que ambas bridas de la hoja están limpias. Coloque
una cuchilla nueva o afi lada en la brida de la cuchilla
inferior (Fig. Q/7), para que la zona marcada de la
cuchilla esté orientada hacia fuera y que las fl echas
de la cuchilla se dirijan en la misma dirección que las
marcas de dirección de giro ubicadas en el interior de
la carcasa de la cuchilla. Compruebe que la nueva
cuchilla está recta con respecto a la parte inferior en
la brida de la cuchilla inferior. Vuelva a colocar la brida
de la cuchilla, la arandela y el perno de sujeción en
su lugar. Pulse el botón de bloqueo del eje y apriete
el tomillo de fi jación de la hoja. Coloque de nuevo
la cubierta del protector de la cuchilla en su lugar
y apriete la tuerca.
38
Funcionamiento, Mantenimiento
español
Fig. O
Fig. P
Fig. Q
Fig. N
Page 39

39
Instrucciones de servicio y
mantenimiento
ADVERTENCIA: Para reducir el riesgo de
lesiones, apague la unidad y desconéctela
del suministro eléctrico antes de instalar
o retirar accesorios y antes de realizar ajustes
o reparaciones. Una puesta en marcha accidental
puede provocar lesiones.
ADVERTENCIA: Con el fin de reducir el
riesgo de lesiones, NO ATE, PEGUE NI
BLOQUEE DE NINGUNA OTRA FORMA EL
INTERRUPTOR EN LA POSICIÓN ENCENDIDA
mientras está en marcha. SUJÉTELO
EXCLUSIVAMENTE CON LAS MANOS.
Limpieza
ADVERTENCIA: Es aconsejable limpiar el
polvo y las virutas de la carcasa del motor
periódicamente usando aire comprimido seco y
limpio, como mantenimiento. Para reducir el riesgo
de lesiones personales graves, utilice SIEMPRE
gafas de seguridad ANSI Z87.1 mientras use aire
comprimido.
ADVERTENCIA: Al limpiar las piezas de
plástico, use únicamente jabón suave y un
paño húmedo. Muchos detergentes domésticos
contienen agentes químicos que podrían dañar
gravemente el plástico. Además, tampoco debe usar
gasolina, trementina, laca ni disolvente de pintura,
detergentes líquidos en seco ni productos similares
que podrían dañar gravemente las piezas de plástico.
No deje que penetre líquido en la herramienta. No
sumerja ninguna pieza de la herramienta en líquido.
Unidad de dirección
Limpie la unidad de dirección frecuentemente
con aire comprimido y tras cada corte, retire los
restos con un cepillo.
Protector de la cuchilla
Fije como norma la limpieza del protector de la
cuchilla a menudo, y preste especial atención
en evitar la obstaculización del movimiento del
protector de la cuchilla.
Motor
Mantenha limpos os orifi cios de arrefecimento
do motor.
Peças de plástico
Limpe as pegas de plástico com um trapo
macio. Use somente detergentes suaves. Não
use solventes ou outros detergentes fortes
pois podem danifi car as peças de plástico e as
superfi cies pintadas.
Cable de alimentación
ADVERTENCIA:Compruebe periódicamente
el estado del cable. La sustitución de un
cable defectuoso debe realizarla siempre un
centro de servicio técnico autorizado.
El uso correcto y la limpieza y el mantenimiento
periódicos garantizan la continua disponibilidad de
la sierra.
Accesorios
ADVERTENCIA: Puesto que los accesorios
que no ofrece Exact Tools no han sido
comprobados con este producto, usar dichos
accesorios con esta herramienta podría ser peligroso.
Para reducir el riesgo de lesiones, con este producto
deberían emplearse exclusivamente accesorios
recomendados de Exact Tools.
ADVERTENCIA: REVISE VISUALMENTE LAS
HOJAS DE CARBURO ANTES DE USARLAS.
CÁMBIELAS SI ESTÁN DAÑADAS.
Los accesorios recomendados para esta
herramienta están disponibles (se pagan
aparte) en su comercio habitual o centro de asistencia
técnica autorizado. Si necesita ayuda para encontrar
un accesorio, visite nuestro sitio Web
www.exacttools.com.
Hojas
ADVERTENCIA: REVISE VISUALMENTE
LAS HOJAS DE CARBURO ANTES DE
USARLAS. CÁMBIELAS SI ESTÁN DAÑADAS.
ADVERTENCIA: Con el fin de minimizar los
riesgos de lesiones oculares, utilice siempre
protección ocular aprobada por ANSI Z87.1. El
carburo es un material duro pero frágil. Los objetos
extraños en la pieza de trabajo, como cables o
clavos, pueden hacer que las puntas se agrieten o
rompan. Use la sierra exclusivamente si la guarnición
de la hoja está colocada. Monte la hoja
correctamente con la rotación adecuada antes de
usar la sierra. Utilice siempre una hoja afilada y
limpia.
Una hoja roma puede restar eficacia al corte lo que
sobrecargaría el motor de la sierra.
Cambie las hojas cuando ya no sea fácil pasar la
sierra por el corte, cuando el motor esté forzado o
cuando se acumule demasiado calor en la hoja. Es
aconsejable tener hojas adicionales a mano para
que haya hojas afiladas disponibles en cualquier
momento. Las hojas romas suelen poder afilarse,
consulte AFILADO DE SIERRAS en las páginas
amarillas.
Mantenimiento
español
Page 40

40
Su sierra para tubos PipeCut ha sido diseñada para
usarse con hojas de 5,51” (140 mm) de diámetro
con un orificio de 2,44” (62 mm) de diámetro. Las
hojas deben estar clasificadas para operaciones a
4.200 rpm (o superior). NO USE muelas abrasivas
en ningún caso. Selección de hojas pág. 2
Medio ambiente
Separación de residuos. No tire este
producto junto con la basura doméstica
normal. Cuando la vida útil de su máquina
Exact PipeCut haya llegado a su fin, no
la elimine junto con la basura doméstica. Este
producto debe reciclarse por separado. El reciclaje
por separado de los productos usados y del embalaje
facilita el reciclado y la recuperación de los materiales.
El reciclaje de estos materiales ayuda a prevenir la
contaminación del medio ambiente. De acuerdo con
la normativa legal vigente, está permitido depositar
electrodomésticos en la basura municipal, en lugares
adecuados para ello o bien, entregarlos en el
distribuidor al adquirir un producto nuevo.
Garantía
Si la sierra de tubos Exact 220u quedase inutilizada
a causa de defectos del material o de fabricación,
dentro de los primeros 12 meses a partir de la fecha
de compra, sustituiremos las piezas dañadas por
otras nuevas o entregaremos una sierra totalmente
nueva o reparada en fábrica en sustitución de la
averiada.
La garantía sólo es válida si:
Se envía al fabricante o al proveedor la ficha de
garantía o un recibo de compra con la fecha
correspondiente.
No se ha utilizado la sierra incorrectamente.
No se ha intentado su reparación por personas no
autorizadas para ello.
La sierra ha sido utilizada de acuerdo con estas
instrucciones de funcionamiento, seguridad y
mantenimiento.
La garantía no se aplica a los discos ni al protector
frente a sobrecargas.
Consejos para usar las
Exact PipeCut
La hoja de diamante debería usarse sólo para cortar
tubos de hierro fundido. No se recomienda cortar
hierro fundido con hojas TCT ni Cermet.
Limpie el interior de las guarniciones de la hoja
después de cortar tuberías de plástico.
Cortar tuberías más pequeñas resulta más fácil
girando el tubo manualmente sobre una mesa o en
el suelo. Nota: gire el tubo hacia usted cuando lo
haga manualmente y tenga cuidado para no girarlo
demasiado deprisa.
Compruebe el estado de la hoja periódicamente.
El procedimiento de corte está compuesto por dos
fases: primero, sierre a través de la pared del tubo
y después complete el corte serrando alrededor.
No sobrecargue la sierra cortando de forma continua.
De lo contrario, la sierra se sobrecalentará y las
piezas metálicas podrían calentarse en exceso. Esto
dañaría el motor y la hoja. La norma es 2,5 minutos
de uso y 7,5 minutos de pausa.
Mantenga la velocidad de avance constante. De
este modo, se alargará la vida útil de la hoja.
Por ejemplo, el tiempo de corte para un tubo de
acero de 6” (170 mm) de diámetro y un espesor de
pared de 1/5” (5 mm) es de 15-20 segundos y para
un tubo de hierro fundido de 4” (1 10 mm) de diámetro
con un espesor de pared de 1/6” (4 mm) es de 2025 segundos.
Mantenga la unidad del motor siempre en vertical.
Así, la marca amarilla del botón de desbloqueo
estará visible. No acerque la sierra al tubo en la
posición bloqueada/corte.
Factores que afectan a la vida útil de la hoja de
la sierra:
• material del tubo
• tipo de hoja correcto para el material que se está
cortando
• configuración correcta de la velocidad del motor
• espesor de la pared del tubo
• velocidad de avance
• suavidad del tubo
• destrezas generales del usuario
• limpieza del tubo
• óxido en el tubo
• cordón de soldadura en el tubo
• velocidad de la hoja
Factores que afectan a la rectitud del corte:
• estado de la hoja de sierra
• espesor de la pared del tubo
• velocidad de avance
• suavidad de avance
• destrezas generales del usuario
• limpieza del tubo
• redondez del tubo
• pinzas demasiado apretadas/flojas
• hoja montada demasiado apretada
Debido al continuo perfeccionamiento del
producto, la información contenida en este
manual puede ser objeto de modificación.
No facilitamos información expresa de tales
modificaciones.
español
Ambiente, Garantía, Consejos
 Loading...