

Evolution Rage Twin, RAGETWIN1251, RAGETWIN1252, RAGETWIN1252EU Original Instructions Manual
Page 1
125mm (5˝) Twin Blade Saw
Original
Instructions
Read instructions before operating this tool.
Manuel D’Instruction Original
Lisez attentivement ces consignes avant
d’utiliser cet outil.
Manual de instrucciones
Lea las instrucciones antes de hacer funcionar
esta herramienta.
www.evolutionbuild.com
FR
ES
Page 2

2
www.evolutionbuild.com
3
www.evolutionbuild.com
®
FIG 1 FIG 2
EC - DECLARATION OF CONFORMITY
EC - Declaration of Conformity 3
Important Information 3
12 Month Limited Warranty 4
General Safety Rules 4
Safety Instructions for all Saws 5
Symbols 6
Additional Specific Safety Rules 6
Specification 7
Assembly 7
Operation 7
Maintenance 9
Environmental Protection 9
Service Parts Lists 10
We, the importer
Evolution Power Tools Ltd.
Venture One
Longacre Close
Sheffield
S20 3FR
Declare that the product
Part numbers: RAGETWIN1251, RAGETWIN1252,
RAGETWIN1252EU
Evolution: RAGE125mm (5˝) Twin Blade Cutter
Complies with the essential requirements of the following
European Directives:
2006/42/EC – Machine Directive
2006/95/EC – Low Voltage Directive
2004/108/EC – EMC Directive
2002/95/EC – Restriction of the use of Certain Hazardous
Substances in Electrical and Electric equipment.
These power tools have been designed in compliance with
the Council Directives:
2006/42/EC
2004/108/EC
2002/95/EC
2002/96/EC
The following standards have been applied:
EN55014-1
EN55014-2
EN61000-3-2 & EN61000-3-3
EN60745-1
EN60745-2-5
NOISE & VIBRATION DATA
LpA (sound pressure) dB(A) 90.0
LwA (acoustic power) dB(A) 101.0
KpA (sound pressure uncertainty) dB(A) 3
KwA (acoustic power uncertainty) dB(A) 3
WEIGHTED RMS ACCELERATION VALUE
Front Handle m/s2 1.383
Rear Handle m/s2 1.5
VIBRATION m/s2 5.18
K m/s2 1.5
The declared vibration value has been measured in
accordance with a standard test method (EN60745) and may
be used for comparing one tool with another. The declared
vibration value may also be used in a preliminary assessment
of exposure.
WARNING: The vibration emission value during actual
use of the power tool can differ from the declared value
depending on the ways in which the tool is used. Identify
safety measures to protect the operator that are based on an
estimation of the exposure in the actual conditions of use.
Take into account all parts of the operating cycle including
the times when the tool is switched off and when it is
running at idle in addition to actual trigger time.
Authorised Signatory
Date: 1/8 /2010
Name: Mr Matthew J Gavins
Position: Managing Director
Year of Manufacture: 2010
IMPORTANT
Please read these operating and safety instructions carefully
and completely. For your own safety, before using this
equipment check that the voltage is correct and that all
handles and parts are firmly secured. If you are uncertain
about any aspect of using this equipment, please contact our
Technical Helpline.
Technical Helpline UK 0870 609 2297
Technical Helpline USA 1-866-EVO-TOOL
TABLE OF CONTENTS
GB
EC - DECLARATION OF CONFORMITY
GB
FIG 5 FIG 6 FIG 7
FIG 8 FIG 9 FIG 10
FIG 11 FIG 12 FIG 13
FIG 3
FIG 4
B
B
A
A
Page 3

4
www.evolutionbuild.com
5
www.evolutionbuild.com
®
14. Maintain tools in good working condition. Keep
cutting tools sharp and clean for better performance and
optimum safety. Follow instructions for lubricating and
changing accessories. Inspect power cables regularly
and, if damaged, have them replaced by an authorised
service centre. Inspect extension cables regularly and
replace immediately if damaged. Keep handles dry, clean
and free from oil and grease at all times.
15. Disconnect tools. Disconnect tools from the power
supply when not in use, before any maintenance
operation and when changing accessories such as
blades, bits, cutters, etc.
16. Remove adjusting keys and spanners. Get into the
habit of checking that adjusting keys and spanners have
been removed from the machine before turning it on.
17. Avoid unintentional starting. Ensure switch is in
“off” position before plugging in the machine.
18. Use proper extension leads. When the tool is used
outdoors, use only extension leads intended for outdoor
use and labelled as such.
19. Stay alert. Concentrate on what you are doing, use
common sense and do not operate the tool when you
are tired.
20. Check that no part is damaged. Before using a tool,
make sure that it is in good working order. Check the
alignment and condition of moving parts, mounting
and any other aspect that may affect its operation. A
guard or other part that is damaged should be properly
repaired or replaced by an authorised service centre
unless otherwise indicated in this instruction manu al. Do
not use the tool
if the switch does not turn on and off.
21. Warning. The use of any accessory or attachment
other than one recommended in this instruct ion manual
may present a risk of personal injury.
22. Have your tool repaired at an authorised service centre.
This electric tool complies with current safety rules. Repairs
should only be carried out by an authorised service centre
using original spare parts. Failing this, the user could
expose themselves to considerable danger.
HEALTH ADVICE
WARNING!
When drilling, sanding, sawing or grinding, dust particles will
be produced. In some instances, depending on the materials
you are working with, this dust can be particularly harmful
to you (e.g. lead from old gloss paint).You are advised to
consider the risks associated with the materials you are
working with and to reduce the risk of exposure.
You should:
-Work in a well-ventilated area.
-Work with approved safety equipment, such as dust masks
that are specially designed to filter microscopic particles.
SAFETY INSTRUCTIONS FOR ALL SAWS
a) DANGER: Keep hands away from cutting area and
the blade. Keep your second hand on the auxiliary handle,
or motor housing. If both hands are holding the saw, they
cannot be cut by the blade.
b) Do not reach underneath the workpiece. The guard
cannot protect you from the blade below the workpiece.
c) Adjust the cutting depth to the thickness of the
workpiece. Less than a full tooth of the blade teeth should
be visible below the workpiece.
d) Never hold piece being cut in your hands or across
your leg. Secure the workpiece to a stable platform. It is
important to support the work properly to minimize body
exposure, blade binding, or loss of control.
e) Hold power tool by insulated gripping surfaces when
performing an operation where the cutting tool may
contact hidden wiring or its own cord. Contact with a
“live” wire will also make exposed metal parts of the power
tool “live” and shock the operator.
f) When ripping always use a rip fence or straight edge
guide. This improves the accuracy of cut and reduces the
chance of blade binding.
g) Always use blades with correct size and shape
(diamond versus round) of arbor holes. Blades that
do not match the mounting hardware of the saw will run
eccentrically, causing loss of control.
h) Never use damaged or incorrect blade washers or
bolt. The blade washers and bolt were specially designed for
your saw, for optimum performance and safety of operation.
Further safety instructions for all saws
Causes and operator prevention of kickback:
Kickback is a sudden reaction to a pinched, bound or
misaligned saw blade, causing an uncontrolled saw to lift up
and out of the workpiece toward the operator:
1. When the blade is pinched or bound tightly by the kerf
closing down, the blade stalls and the motor reaction drives
the unit rapidly back toward the operator;
2. If the blade becomes twisted or misaligned in the cut,
the teeth at the back edge of the blade can dig into the top
surface of the workpiece causing the blade to climb out of
the kerf and jump back towards the operator.
SAFETY INSTRUCTIONS FOR ALL SAWS
GB
HEALTH ADVICE
GB
RAGETWIN
Congratulations on your purchase of an Evolution Power
Tools RAGE125mm Twin Blade Saw. Please complete
your product registration online to validate your machine’s
warranty period and ensure prompt service if needed. We
sincerely thank you for selecting a product from Evolution
Power Tools.
12 MONTH LIMITED WARRANTY. Evolution power tools
reserves the right to make improvements and modifications
to design without prior notice.
Evolution Power Tools will, within twelve (12) months from
the original date of purchase, repair or replace any goods found
to be defective in materials or workmanship. This warranty is
void if the tool being returned has been used to cut materials
beyond the recommendations in the Instruction Manual or if
the saw has been damaged by accident, neglect, or improper
service. This warranty does not apply to machines and / or
components which have been altered, changed, or modified
in any way, or subjected to use beyond recommended
capacities and specifications. Electrical components are
subject to respective manufacturers’ warranties. All goods
returned defective shall be returned prepaid freight to
Evolution Power Tools. Evolution Power Tools reserves
the right to optionally repair or replace it with the same or
equivalent item. There is no warranty – written or verbal
– for saw blades. In no event shall Evolution Power Tools
be liable for loss or damage resulting directly or indirectly
from the use of our merchandise or from any other cause.
Evolution Power Tools is not liable for any costs incurred on
such goods or consequential damages. No officer, employee
or agent of Evolution Power Tools is authorised to make oral
representations of fitness or to waive any of the foregoing
terms of sale and none shall be binding on Evolution Power
Tools. Questions relating to this limited warranty should be
directed to the company’s head office, or call the appropriate
Helpline number.
IMPORTANT SAFETY INSTRUCTIONS
To reduce the risk of electric shock, this equipment is fitted
with an approved cord and plug for its intended country of
use. Do not change the cord or plug in any way.
GENERAL SAFETY RULES
Please read all of these instructions before
attempting to operate this machine.
Save this manual for future reference.
1. Keep work area clear. Cluttered work areas invite
accidents.
2. Consider work area environment. Do not expose
tools to rain. Do not use tools in damp or wet locations.
Keep work area well lit. Never use tools near flammable
liquids or gases.
3. Protect yourself against electric shock. Avoid body
contact with earthed or grounded surfaces.
4. Keep other people away. Do not let others, especially
children, come close to the work, and touch the tool or the
extension lead. Keep them away from the work area.
5. Store idle tools. When not in use, tools should be
stored in a dry locked-up place, out of children’s reach.
6. Never force the tools. Your tools will be more efficient
and safer when used at the rate for which they were
intended.
7. Use the right tool. Do not force small tools to do the
job of a heavy duty tool. Do not use tools for purposes
not intended; for example do not use circular saws to
cut tree limbs or logs.
8. Dress properly. Do not wear loose clothing or
jewellery which may get caught in moving parts. Nonskid footwear is recommended when working outdoors.
If you have long hair, tie it back and wear protective hair
covering.
9. Use protective equipment. Use safety glasses. Use
face or dust mask if cutting operations create dust.
10. Connect dust extraction equipment.
If the machines have a connection for dust extraction
equipment, ensure these are connected and properly
used.
11. Do not damage the cable. Never pull the power
cable to disconnect the machine. Keep the cable away
from heat, oil and sharp edges.
12. Secure workpiece. Where possible,
use clamps or a vice to hold the workpiece. It’s much safer
than using your hands.
13. Don’t over reach. Keep proper footing and balance
at all times.
Page 4

6
www.evolutionbuild.com
7
www.evolutionbuild.com
®
c) Keep work area clean. Cluttered areas and benches
invite accidents.
d) Don’t use in dangerous environment. Don’t use power
tools in damp or wet locations, or expose them to rain. Keep
work area well lit.
e) Keep children away. All visitors should be kept a safe
distance from the work area.
f) Don’t force the tool. It will do the job better and safer if
used at the rate for which it was designed.
g) Use proper extension cord. Make sure your extension
cord is in good condition. When using an extension cord,
be sure to use one heavy enough to carry the current your
machine will draw. An undersized cord will cause a drop in line
voltage resulting in loss of power and possible overheating.
h) Wear proper apparel. Do not wear loose clothing, gloves,
neckties, rings, bracelets, or other jewellery which may get
caught in moving parts. Nonslip footwear is recommended.
Wear protective hair covering to contain long hair.
i) Always use safety glasses. Also use face or dust mask
if cutting operation is dusty. Everyday eyeglasses only have
impact resistant lenses, they are NOT safety glasses.
j) Secure work. Use clamps to hold work when practical.
k) Don’t overreach. Keep proper footing and balance at all times.
l) Maintain tools with care. Keep tools sharp and clean
for best and safest performance. Follow instructions for
lubricating and changing accessories.
m) Disconnect tools before servicing and when changing
accessories, such as blades.
n) Reduce the risk of unintentional starting. Make sure
switch is in off position before plugging in.
o) Use recommended accessories. Only use genuine
Evolution accessories.
p) Check for damaged parts. Before further use of the tool,
a guard or other part that is damaged should be carefully
checked to determine that it will operate properly and perform
its intended function - check for alignment of moving parts,
binding of moving parts, breakage of parts, mounting, and any
other conditions that may affect its operation. A guard or other
part that is damaged should be properly repaired or replaced.
q) Keep hands out of the path of the saw blades.
r) Never reach around the saw blades.
s) Turn off tool and wait for saw blades to stop before
moving workpiece.
t) Disconnect power before changing blades, servicing
or cleaning.
u) Never carry the tool by the power cord. Carrying the
tool by the power cord could cause damage to the insulation
or the wire connections resulting in the possibility of electric
shock or fire.
SPECIFICATIONS
RAGETWIN 125mm (5˝)
Motor (230V or 110V 50Hz) (Watts): 850W
RPM No Load (min-1): 5500min
-1
Max Cut Depth: 28mm
Weight: 3.2kg
Blade Dimensions
Maximum Diameter: 125mm
Thickness: Blade A: 1.5mm
Blade B: 1.7mm
ASSEMBLY
Your Evolution Power Tools Twin Blade Saw is shipped
complete. Remove all the contents from the box and inspect
to ensure no damage has occurred during shipping, and that
the items listed below are included:
Description Qty
Instruction Manual 1
125mm TCT Blade (Fitted) 1 Pair
Spanner 1
Assist Handle 1
Lubrication Unit (Fitted) 1
CAUTION! ALWAYS DISCONNECT THE TWIN BLADE
SAW FROM THE POWER SOURCE BEFORE MAKING ANY
ADJUSTMENTS.
OPERATION
Before commencing any operations, please check the
following:
1. Power source
Ensure that the power source to be utalized conforms to the
power requirements specified on the machines nameplate.
2. Power Switch
Ensure that the power switch is in the OFF position. If the
plug is connected to a power source with the switch in the
ON position, the machine will start operating immediately.
This could cause a serious accident.
3. Extension cord
When the work is remote from the power source, use an
extension cord of sufficient thickness and rated capacity. The
extension cord should be kept as short as possible, and routed
so that it does not constitute a trip or other safety hazard.
4. Checking the Blades
Check that the blades are the specified ones, and are not
cracked, broken or bent. Do not use the machine if there is
any doubt about the integrity of the blades.
OPERATION
GB
Kickback is the result of saw misuse and/or incorrect
operating procedures or conditions and can be avoided by
taking proper precautions as given below.
a) Maintain a firm grip with both hands on the saw and
position your arms to resist kickback forces. Position
your body to either side of the blade, but not in line with the
blade. Kickback could cause the saw to jump backwards, but
kickback forces can be controlled by the operator, if proper
precautions are taken.
b) If the blades are binding, or when interrupting a cut
for any reason, release the trigger and hold the saw
motionless in the material until the blades come to a
complete stop. Never attempt to remove the saw from the
work or pull the saw backward while the blades are in motion
or kickback may occur. Investigate and take corrective actions
to eliminate the cause of blade binding.
c) When restarting a saw in the workpiece, centre the saw
blade in the kerf and check that saw teeth are not engaged
into the material. If saw blade is binding, it may walk up or
kickback from the workpiece as the saw is restarted.
d) Support large panels to minimise the risk of blade
pinching and kickback. Large panels tend to sag under their
own weight. Supports must be placed under the panel on
both sides, near the line of cut and near the edge of the panel.
e) Blade depth and bevel adjusting locking levers must be
tight and secure before making a cut. If blade adjustment
shifts while cutting. it may cause binding and kickback.
f) Do not use dull or damaged blades. Unsharpened
or improperly set blades produce a narrow kerf causing
excessive friction, blade binding and kickback.
g) Use extra caution when making a “plunge cut” into
existing walls or other blind areas. The protruding blade
may cut objects that can cause kickback.
Safety instructions for saws
a) Check lower guard for proper closing before each use.
Do not operate the saw if lower guard does not move freely
and close instantly. Never clamp or tie the lower guard into
the open position. If saw is accidentally dropped, the lower
guard may be bent. Raise the lower guard with the retracting
handle and make sure it moves freely and does not touch
the blade or any other part, in all angles and depths of cut.
b) Check the operation of the lower guard spring. If the
guard and the spring are not operating properly, they must be
serviced before use. Lower guard may operate sluggishly due
to damaged parts, gummy deposits, or a build-up of debris.
c) Lower guard may be retracted manually only for
special cuts such as “plunge cuts” and “compound
cuts.” Raise lower guard by the retracting handle and as
soon as the blade enters the material, the lower guard
must be released. For all other sawing, the lower guard
should operate automatically.
d) Always observe that the lower guard is covering
the blade before placing saw down on bench or floor.
An unprotected, coasting blade will cause the saw to walk
backwards, cutting whatever is in its path. Be aware of the
time it takes for the blade to stop after switch is released.
Symbol Description
V Volts
A Amperes
Hz Hertz
min
-1
Speed
~ Alternating Current
No
No Load Speed
Double Insulated
Wear Safety Goggles
Wear Ear Protection
Do Not Touch
Wear Dust Protection
Restriction of Hazardous
Substances Directive
CE certification
Waste electrical and
electronic equipment
Only use genuine Evolution replacement blades. Unauthorised
blades may be dangerous! Keep the blades securely fastened.
Check for debris before installing any new blades and do
not use dull or broken blades. Check the blades regularly
for condition and wear. Damaged or worn blades should be
replaced immediately. Never use any abrasive wheels. Loose
fitting or damaged guards must be replaced immediately.
Beware of ejecting chips as they may be HOT. Always make
provisions for safe handling of excess material.
To obtain an additional copy of your manual, please contact
Evolution Power Tools at:
UK 0870 609 2297
USA 1-866-EVO-TOOL
WEB www.evolutionbuild.com
a) Keep guards in place and in working order.
b) Remove adjusting keys and wrenches. Form the habit
of checking to see that keys and adjusting wrenches are
removed from the machine before turning it on.
SPECIFICATIONS
GB
ADDITIONAL SPECIFIC SAFETY RULES
GB
Page 5

8
www.evolutionbuild.com
9
www.evolutionbuild.com
®
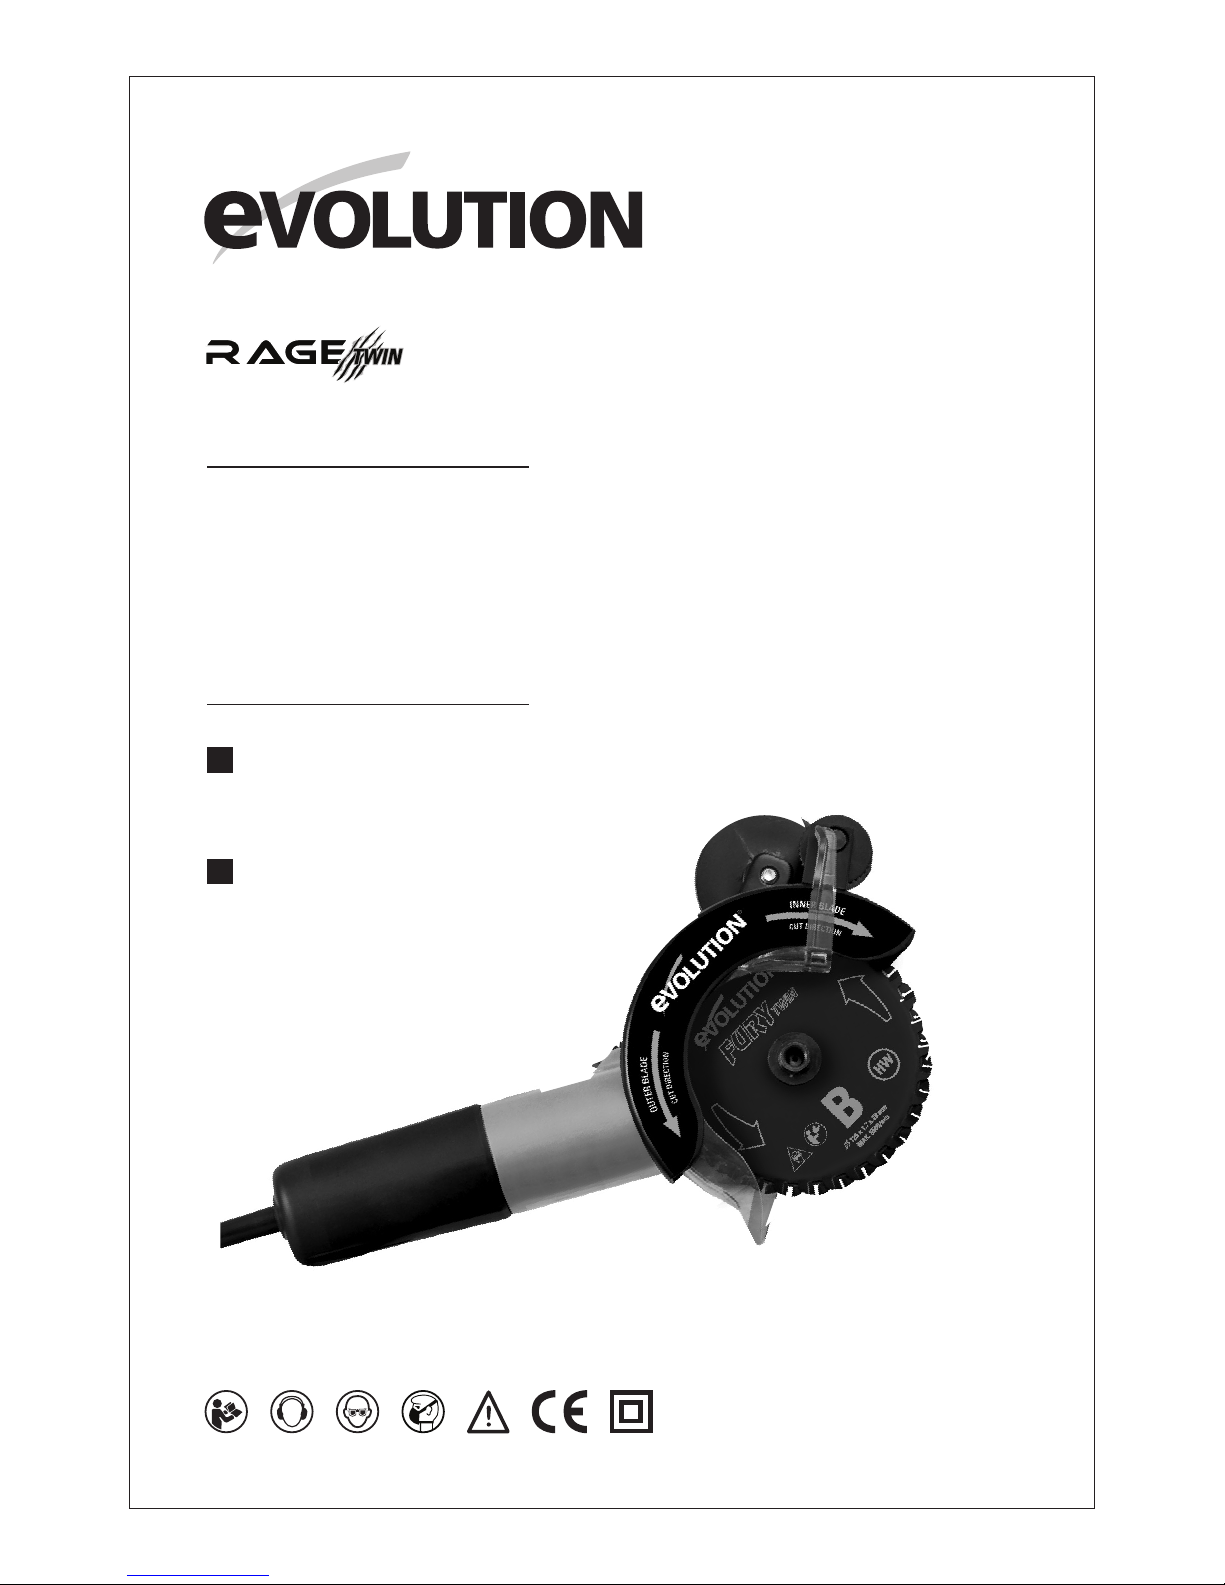
INSTALLING/REMOVING THE TCT BLADES
NOTE: It is recommended that the operator considers
wearing protective gloves when handling the blades during
installation or when changing the blades.
1. Installation
1. Ensure that the machine is not connected to any power
source.
2. Lay the saw down on a bench with the blade arbor
pointing upwards.
3. Open the lower guard (see fig 2)
4. Place blade A onto the flange with the letter ‘A’ clearly
visible (see fig 1)
5. Align the two offset cut-outs in the blade with the drive
pins on the flange and securely fit the blade onto the flange.
6. Place blade ‘B’ onto the adaptor with the letter ‘B’ clearly
visible, and then thread the locknut onto the shaft. (see fig 3)
HAND TIGHTEN only.
7. Turn the blades so that the holes in both blades are lined up.
8. Place the pin (included with the wrench) into the aligned
holes.
9. Tighten the locknut clockwise with a wrench, and then
remove the pin from the blades (see fig 4). This will allow
the blades to rotate freely.
10. Carefully turn the blades by hand to ensure that they
rotate easily in opposite directions.
2. Removal
1. Ensure that the machine is disconnected from the mains
supply.
2. Allow the blades to cool.
3. Rotate the blades until the holes in both blades are in
alignment.
4. Place the pin attached to the wrench through the holes
in the blades.
5. Unscrew the locknut by rotating it counter clockwise, and
remove it (see fig 4).
6. Open the lower guard (see fig 2)
7. Lift and remove blade ‘B’.
8. Lift and remove blade ‘A’.
CUTTING PROCEDURES
1. Mark out the material to be cut (use an appropriate pencil
etc) with clear, precise cutting lines.
2. Offer the saw up to the material to be cut and align the
blades with a pre-marked cutting line. Do not start the
machine until correct alignment has been achieved
3. Ensuring that the blades are not touching the material to be
cut, turn on the machine and allow to run up to full speed.
4. Gently feed the saw blades into the workpiece. Cutting can
be preformed smoothly if you cut straight ahead and allow the
saw time to work without forcing or pressing the blade.
CAUTION
• AlwayschecktheTCTbladesbeforestartingwork.
• Neveruseacracked,brokenorbentTCTblade.
• DonotapplywaterorcoolanttoaTCTblade.
• Startcuttingonlywhenthemachinereachesfulloperating
speed.
• If the blade seizes or there is any abnormal noise,
immediately turn the power off.
• NeveruseaTCTbladetocutzigzagorcurvedlines.
• NeverusethesidesurfaceoftheTCTblade.Neveruseto
perform inclination cutting.
• Ifexcessive force is applied to the TCT bladeto make
it align with a pre-marked line during cutting, this could
overload the motor, cause burn damage and may overheat
the blades and shorten their service life.
• Takecarenottoallowthemachines powercordtocome
into contact with the rotating TCT blades during cutting
operations.
• Supporttheworkpieceinsuchaway thatitispossibleto
predict what will happen, and so that the cut remains open
while cutting.
• Feedthemachinedowninlinewiththeblades.Sideways
pressure on the blades can damage them and can be
dangerous.
• When the work is completed, turn off the power and
disconnect the power plug from the power supply.
CUTTING CROSS SECTIONAL MATERIALS
The life span of the blades and the quality of the cutting edge
is dependent upon vibration being kept to a minimum. For
this reason the material should always be clamped in place
before work begins.
Flat bar iron
The blade is fed at an angle of 900 to the work surface
(see fig 5).
Corner piece
The blade is fed diagonally through the work surface
(see fig 6).
Rectangular pipe
The blade is fed from corner to corner (see fig 7).
U Section
The blade is fed from corner to corner (see fig 8)
Aluminium / Copper
This machine is equipped with a lubricating unit and this
should be used when cutting all kinds of aluminium and copper
(see fig 9). Refer to the section ‘Lubricating Instructions’.
Shaped plate
Plate must always rest on at least three mounts, with one on
either side of the cut (see fig 10).
Pipes
The blade is fed through the object until it reaches the lower
edge, angled as it goes so that the blade hits the material at
an angle of 900 (see fig 11).
Spiral tube and longitudinal cutting
Feed the blade into the material, so that the blade protrudes
through by approximately 10mm. Do not drive the blade
as far as its entire cutting edge. When the blade is through
the materials wall, start to feed the blade forwards and
backwards (see fig 12).
Thin plate
Only feed the blade down approximately 10mm. Then start
cutting (see fig 13)
LUBRICATION INSTRUCTIONS
1. The blades are equipped with ‘Dry Cut’ teeth and as a
general rule these need not be lubricated. However, with
some materials and in some extreme conditions, cutting
paste can be applied.
2. When cutting Aluminium / Copper / Stainless Steel and
Cast Iron, the lubricating device should be used.
3. Insert the cutting paste rod (not included) into the hole in
the lubrication unit. This unit is located on the top of the steel
blade guard. Push the lubricant rod down firmly, and rotate
the lubricant feed hand-wheel until it grips the lubricant rod.
4. Switch on the cutter, and using the feed hand-wheel,
bring the lubricant rod to gently bear on the rotating teeth
of the blades.
5. Operator discretion will be required to determine the
frequency of lubrication application. To apply extra lubricant,
turn the lubricant feed hand wheel.
NOTE: We recommend that you use cutting paste in rod
form, available from your Evolution Power Tool retailer.
MAINTENANCE
1. Inspecting the TCT Blades. A worn blade overloads the
motor and reduces working efficiency. If either blade shows
signs of wear replace with a new pair.
2. Inspecting the mounting screws. Regularly inspect all
mounting screws and ensure they are properly tightened.
Should any of the screws be loose, retighten them immediately.
Failure to do so could result in a serious hazard.
3. Maintenance of the motor. Exercise due care to ensure
that the winding does not become damaged and/or wet with
oil or water.
4. Keep machine clean and free from debris. Avoid using cleaning
products which include benzene, trichloroethylene, chloride or
ammonia as these can damage plastic components.
5. In the case of electrical or mechanical malfunction
immediately switch off the machine and disconnect the plug
from the power supply.
6. Excessive sparking may indicate the presence of dirt in the
motor or worn out carbon brushes. Check the brushes for
wear and replace when they reach ¼ ˝ (6mm)
7. If the supply cord of this power tool is damaged, it must
be replaced by a specially prepared cord available through
the service organisation.
8. For all other service take the machine to your local dealer,
or if bought in the USA to Evolution Power Tools USA, Iowa.
ACCESSORIES
Evolution Blades
2 x 125mm TCT Blades
ENVIRONMENTAL PROTECTION
Waste electrical products should not be disposed of
with household waste. Please recycle where facilities exist.
Check with your Local Authority or retailer for recycling
advice.
Page 6

10
www.evolutionbuild.com
11
www.evolutionbuild.com
®
EC - DECLARATION OF CONFORMITY
Déclaration de conformité CE 11
Informations importantes 11
Garantie limitée de 12 mois 12
Règles de sécurité générales 12
Consignes de sécurité pour toutes les scies 13
Symboles 14
Règles de sécurité particulières supplémentaires 15
Caractéristiques techniques 15
Assemblage 15
Fonctionnement 16
Maintenance 17
Protection environnementale 18
Listes de pièces de rechange 18
Nous, fabricant et importateur,
Evolution Power Tools Ltd.
Venture One
Sheffield
S20 3FR
déclarons que le produit
N° de référence : RAGETWIN1251, RAGETWIN1252,
RAGETWIN1252EU
Evolution : Scie à double lame RAGE125 mm
est conforme aux prescriptions essentielles des directives
européennes suivantes :
2006/42/CE – Directive relative aux machines
2006/95/CE – Directive relative aux basses tensions
2004/108/CE – Directive relative à la compatibilité
électromagnétique
2002/95/CE – Restrictions d’utilisation de certaines
substances dangereuses dans les équipements électriques
et électroniques
Ces outils électriques ont été conçus conformément aux
directives du Conseil suivantes :
2006/42/CE
2004/108/CE
2002/95/CE
2002/96/CE.
Cet outil est conforme aux normes européennes suivantes :
EN55014-1
EN55014-2
EN61000-3-2 et EN61000-3-3
EN60745-1 et EN60745-2-5.
LpA (pression sonore) 90,0 dB(A)
LwA (puissance acoustique) 101,0 dB(A)
KpA (incertitude de pression sonore) 3 dB(A)
KwA (incertitude de puissance acoustique) 3 dB(A)
VIBRATIONS 5,18 m/s
2
K 1,5 m/s2
La valeur de vibrations déclarée a été mesurée selon une
méthode d’essai standard (EN60745) et peut être utilisée
pour comparer un outil avec un autre. La valeur de vibrations
déclarée peut également servir d’évaluation d’exposition
préliminaire.
AVERTISSEMENT : la valeur d’émission de vibrations
pendant l’utilisation de l’outil électrique peut être différente
de la valeur déclarée, selon la façon dont l’outil est utilisé.
Déterminez les mesures de sécurité à adopter pour protéger
l’opérateur en fonction d’une estimation de l’exposition
dans les conditions effectives d’utilisation. Tenez compte
de toutes les parties du cycle d’exploitation, y compris les
périodes d’arrêt de l’outil et ses périodes de ralenti en plus
du temps de déclenchement réel.
Autorisé par
M. Matthew J. Gavins
Directeur général
1er août 2010
Toute la documentation est conservée à l’adresse ci-dessus
et est disponible pour consultation sur demande.
IMPORTANT
Lisez attentivement et intégralement ces consignes
d’utilisation et de sécurité avant toute utilisation de l’outil. Pour
votre sécurité, vous devez vérifier, avant toute utilisation, que la
tension d’alimentation est correcte et que toutes les poignées
et pièces de l’outil sont bien fixées. Si vous avez la moindre
incertitude concernant l’utilisation de cet outil, n’hésitez pas à
contacter notre Service d’assistance technique par téléphone.
Service d’assistance technique par téléphone pour le
Royaume-Uni 0870 609 2297
Service d’assistance technique par téléphone pour les
États-Unis 1-866-EVO-TOOL
RAGETWIN
Nous vous félicitons d’avoir acheté une scie à double lame
RAGE125 mm, d’Evolution Power Tools. Enregistrez votre
produit en ligne pour valider la période de garantie de votre
outil et bénéficier d’un service rapide en cas de besoin.
Nous vous remercions sincèrement d’avoir choisi un produit
Evolution Power Tools.
TABLE DES MATIÈRES
FR
DÉCLARATION DE CONFORMITÉ CE
FR
TWIN BLADE DISC CUTTER SERVICE PARTS LIST (REV. 1. 00)
GB
230V ~ 50Hz
Page 7

12
www.evolutionbuild.com
13
www.evolutionbuild.com
®
12 MONTH LIMITED WARRANTY. Evolution power tools
reserves the right to make improvements and modifications
to design without prior notice.
Evolution Power Tools réparera ou remplacera, dans les
douze (12) mois suivant la date d’achat d’origine, tout article
présentant un vice de matériau ou un défaut de fabrication. La
présente garantie s’annulera si l’outil retourné a été utilisé pour
découper des matériaux non conformes aux recommandations
figurant dans le présent manuel d’utilisation ou si la scie a été
endommagée par accident, par négligence ou en raison d’un
entretien insuffisant. La présente garantie ne s’applique pas aux
machines et/ou aux composants qui ont été altérés, changés ou
modifiés d’une quelconque manière ou qui ont été utilisés sans
respecter les capacités et les spécifications recommandées. Les
composants électriques sont couverts par les garanties offertes
par leurs fabricants respectifs. Tous les articles défectueux
doivent être retournés à Evolution Power Tools en port prépayé.
Evolution Power Tools se réserve le droit de réparer l’outil ou de
le remplacer par un produit identique ou équivalent. Aucune
garantie – écrite ou verbale – ne couvre les lames des scies.
Evolution Power Tools ne saurait en aucun cas être tenue pour
responsable des pertes ou dommages découlant directement ou
indirectement de l’utilisation du produit ou de toute autre cause.
Evolution Power Tools ne saurait être tenue pour responsable
des coûts relatifs à ce produit ou aux dommages accessoires y
afférents. Aucun responsable, employé ou agent de la société
Evolution Power Tools n’est habilité à faire de déclarations
verbales d’adéquation à un usage particulier ou à déroger à
l’une quelconque des conditions de vente qui précèdent :
les déclarations de ce type ne sauraient en aucun cas être
opposées à Evolution Power Tools. Toute question relative à la
présente garantie limitée doit être adressée au siège social de la
société. Vous pouvez également appeler le Service d’assistance
technique par téléphone approprié.
CONSIGNES DE SÉCURITÉ IMPORTANTES
Afin de réduire le risque d’électrocution, cet équipement est
équipé d’un cordon électrique et d’une fiche approuvés pour
le pays d’utilisation auquel il est destiné. Vous ne devez en
aucun cas changer le cordon ou la fiche.
RÈGLES DE SÉCURITÉ D’ORDRE GÉNÉRAL
AVERTISSEMENT ! Lors de l’utilisation
d’outils électriques, les mesures de sécurité
de base devraient toujours être suivies afin
de réduire le risque d’incendie, de décharge
électrique et de blessures.
Lisez toutes ces consignes avant de tenter
d’utiliser cette machine. Conservez ce manuel
pour référence future.
1. Tenez votre lieu de travail propre.
Les endroits encombrés sont propices aux accidents.
2. Pensez à l’environnement de votre lieu de travail.
N’exposez pas les outils à la pluie. N’utilisez pas les outils
dans des endroits humides ou mouillés. Votre lieu de travail
doit être bien éclairé. N’utilisez jamais d’outils à proximité de
liquides ou de gaz inflammables.
3. Protégez-vous contre les décharges électriques. Évitez
le contact du corps avec des surfaces mises à la terre ou à
la masse.
4. Tenez les autres personnes à distance. Ne laissez pas
les autres, les enfants surtout, s’approcher de votre travail et
toucher l’outil ou la rallonge. Tenez-les éloignés de votre lieu
de travail.
5. Rangez les outils quand vous avez fini de vous en servir.
Lorsque vous ne vous en servez pas, rangez les outils dans un
endroit sec fermant à clé, hors de la portée des enfants.
6. Ne forcez jamais les outils. Vos outils seront plus efficaces
et moins dangereux si vous les utilisez à la puissance à
laquelle ils sont censés être utilisés.
7. Utilisez le bon outil. N’utilisez pas un petit outil pour faire
le travail d’un gros outil plus puissant. N’utilisez pas les outils
pour des travaux pour lesquels ils ne sont pas prévus. Par
exemple, n’utilisez pas une scie circulaire pour couper des
arbres ou du bois.
8. Portez une tenue adaptée. Ne portez pas de vêtements
lâches ou de bijoux, car ils pourraient se prendre dans des
composants mobiles. Portez de préférence des chaussures
antidérapantes lorsque vous travaillez à l’extérieur. Si vous
avez des cheveux longs, attachez-les et couvrez-les.
9. Portez un équipement de protection. Portez des
lunettes de sécurité. Portez un masque facial ou un masque à
poussière si le travail prévu va faire de la poussière.
10. Branchez un système d’extraction de la poussière.
Si la machine possède un branchement pour un dispositif
d’extraction de la poussière, branchez-le et utilisez-le
correctement.
11. N’endommagez pas le cordon électrique. Ne tirez
jamais sur le cordon électrique pour débrancher la machine.
Conservez le cordon éloigné de la chaleur, de l’huile et des
bords tranchants.
12. Bloquez la pièce. Si possible, utilisez des pinces ou un
étau pour la bloquer. Cela est nettement moins dangereux que
d’utiliser vos mains.
13. N’essayez pas d’atteindre les endroits inaccessibles.
Veillez à toujours garder votre équilibre.
14. Gardez vos outils en bon état de marche. Gardez vos
outils propres et affûtés pour des résultats optimaux et pour
travailler en toute sécurité. Suivez les consignes de graissage
et de changement des accessoires. Inspectez régulièrement
les cordons d’alimentation. En cas de dommage, faites-les
remplacer par un réparateur agréé. Inspectez les rallonges
périodiquement. Si elles sont abîmées, remplacez-les. Gardez
toujours les poignées propres, sèches et sans huile ni graisse.
15. Débranchez les outils. Débranchez les outils de la prise
électrique lorsque vous ne vous en servez pas, avant les
révisions/réparations et lors du changement d’accessoires
(lames, embouts, disques de coupe, etc.).
16. Retirez les clavettes et clés de réglage. Prenez pour
habitude de contrôler que les clavettes et clés de réglage ont
été retirées de l’outil avant de le mettre en marche.
17. Évitez les démarrages accidentels. Contrôlez que
l’interrupteur Marche/Arrêt est sur la position Arrêt avant de
brancher l’outil.
18. Utilisez des rallonges adaptées. Si vous utilisez l’outil
à l’extérieur, utilisez uniquement une rallonge adaptée à une
utilisation à l’extérieur, ce qui doit être indiqué sur l’étiquette
de la rallonge.
19. Restez alerte. Concentrez-vous sur ce que vous faites,
faites preuve de bon sens et n’utilisez pas l’outil si vous êtes
fatigué.
20. Contrôlez qu’aucun composant n’est endommagé.
Avant d’utiliser un outil, assurez-vous qu’il est en bon état
de marche. Contrôlez l’alignement et l’état des pièces
en mouvement, les fixations et tous les autres aspects
susceptibles d’affecter son fonctionnement. Si un carter de
protection ou un autre composant est endommagé, faites-le
réparer ou remplacer dans un centre de réparation agréé, sauf
indication contraire figurant dans ce manuel. N’utilisez pas
l’outil si l’interrupteur ne le met pas en marche et à l’arrêt.
21. Avertissement. L’utilisation d’accessoires autres que ceux
recommandés dans ce manuel peut entraîner un risque de
dommage corporel.
22. Faites réparer votre outil dans un centre de réparation
agréé. Cet outil électrique est conforme aux règles de sécurité
en vigueur. Les réparations ne doivent être effectuées que par
un réparateur agréé et avec des pièces de rechange d’origine.
Le non-respect de cette consigne pourrait mettre l’utilisateur
de l’outil dans une situation très dangereuse.
Tenez
AVERTISSEMENT !
Lorsque vous percez, poncez, sciez ou meulez, des particules de
poussières sont produites. Dans certains cas, selon le matériau
utilisé, ces poussières peuvent être très dangereuses pour la
santé (plomb contenu dans les anciennes peintures brillantes,
par exemple). Il est conseillé de réfléchir aux risques associés
aux matériaux utilisés et de réduire le risque d’exposition.
Vous devriez :
- Travailler dans un endroit bien aéré.
- Travailler avec l’équipement de sécurité approuvé, comme,
par exemple, les masques à poussière spécialement conçus
pour filtrer les particules microscopiques.
a) DANGER : tenez vos mains éloignées de la zone de
coupe et de la lame. Placez votre seconde main sur la poignée
auxiliaire ou sur le bloc moteur. En tenant la scie des deux
mains, vous ne courrez aucun risque d’être blessé par la lame.
b) Ne mettez pas vos mains sous la pièce à couper. Le
carter de protection ne peut pas vous protéger de la lame
dans ce cas.
c) Réglez la profondeur de coupe en fonction de
l’épaisseur de la pièce à couper. Moins d’une dent entière
de la lame devrait être visible sous la pièce à couper.
d) Ne tenez jamais la pièce à couper dans vos mains ou
sur votre jambe. Bloquez la pièce à couper sur un établi
stable. Il importe de soutenir correctement la pièce de façon
à réduire au minimum l’exposition du corps et le risque de
blocage de la lame ou de perte de contrôle.
e) Tenez votre outil électrique par ses surfaces de prise
isolées lorsqu’il est possible que l’outil de coupe entre
en contact avec des fils cachés ou son propre cordon
électrique. Le contact avec un fil « sous tension » peut
également mettre les parties métalliques exposées de
l’outil électrique « sous tension » et vous risqueriez alors de
recevoir une décharge électrique.
f) Pour le sciage en long, utilisez toujours un guide
longitudinal ou un guide de chant. Vous obtiendrez ainsi une
coupe plus précise et la lame risquera moins de se bloquer.
g) Utilisez toujours des lames avec des trous d’arbre de
la taille correcte et de la forme appropriée (en losange/
ronds). Les lames qui ne sont pas adaptées au dispositif de
montage de la scie tourneront excentriquement, ce qui vous
fera perdre le contrôle de l’outil.
h) N’utilisez jamais de rondelles ou de boulons de lame
endommagés ou inadaptés. Les rondelles et le boulon de
lame ont été spécialement conçus pour votre scie et pour
lui permettre d’offrir des performances et une sécurité
d’utilisation optimales.
Autres consignes de sécurité pour toutes les scies
Causes des reculs et comment les éviter :
Le recul est une réaction soudaine à une lame de scie
pincée, bloquée ou mal alignée, qui amène une scie non
contrôlée à se soulever vers l’opérateur :
1. Lorsque la lame est pincée ou complètement bloquée
dans la saignée qui se referme, la lame cale et la réaction du
moteur ramène rapidement la scie vers l’opérateur.
2. Si la lame se déforme ou devient mal alignée dans la
coupe, les dents du bord arrière de la lame peuvent entrer
dans la surface supérieure de la pièce, ce qui peut amener la
lame à sortir de la saignée et à sauter vers l’opérateur.
Le recul est le résultat d’une mauvaise utilisation de la scie et/ou
de conditions ou procédures d’utilisation incorrectes. Il peut être
évité en prenant les mesures de précaution décrites ci-dessous.
a) Vérifiez que le protecteur inférieur soit bien fermé avant
chaque utilisation. Ne mettez pas la scie en marche si le
protecteur inférieur ne se déplace pas librement et ne se ferme
pas instantanément. Ne serrez jamais ou n’attachez jamais
le protecteur inférieur en position ouverte. Si la scie tombe
accidentellement, le protecteur inférieur peut se tordre. Soulevez
le protecteur inférieur avec la poignée rétractive et assurez-vous
qu’il bouge librement et n’est pas en contact avec la lame ou
toute autre partie, à tous les angles et profondeurs de coupe.
NOTE Une autre formulation peut remplacer «poignée
rétractive».
b) Vérifiez le fonctionnement du ressort du protecteur
inférieur. Si le protecteur et le ressort ne fonctionnent
pas correctement, ils doivent être révisés avant utilisation.
CONSEILS DE SANTÉ
FR
CONSIGNES DE SÉCURITÉ POUR
TOUTES LES SCIES
FR
Page 8

14
www.evolutionbuild.com
15
www.evolutionbuild.com
®
une éventuelle surchauffe de votre outil.
h) Portez une tenue adaptée. Ne portez pas de vêtements
flottants, de gants, de foulards, de bagues, de bracelets ou
autres bijoux susceptibles de se prendre dans les pièces en
mouvement. Il est conseillé de porter des chaussures non
glissantes. Portez quelque chose sur la tête pour maintenir
vos cheveux attachés s’ils sont longs.
i) Portez toujours des lunettes de sécurité. Portez
également un masque facial ou un masque à poussière si le
travail prévu va faire de la poussière. Les verres des lunettes
ordinaires offrent une résistance aux chocs uniquement. Ce
NE sont PAS des lunettes de sécurité.
j) Bloquez la pièce à découper. Utilisez des pinces pour
bloquer la pièce à découper lorsque cela est possible.
k) N’essayez pas d’atteindre les endroits inaccessibles.
Veillez à toujours garder votre équilibre.
l) Prenez soin de vos outils. Gardez vos outils propres et
affûtés pour des résultats optimaux et pour travailler en
toute sécurité. Suivez les consignes de graissage et de
changement des accessoires.
m) Débranchez l’outil avant toute réparation et avant de
changer des accessoires (lames, etc.).
n) Réduisez le risque de démarRAGEaccidentel. Contrôlez
que l’interrupteur Marche/Arrêt est sur la position Arrêt avant
de brancher l’outil.
o) Utilisez les accessoires recommandés. Utilisez
uniquement des accessoires d’origine Evolution garantie.
p) Contrôlez qu’il n’y a pas de composants endommagés.
Si vous constatez qu’un carter de protection ou un autre
composant est endommagé, examinez-le soigneusement afin
de déterminer s’il fonctionnera correctement et s’acquittera de
sa fonction avant de continuer à utiliser l’outil. Contrôlez que les
pièces en mouvement sont correctement alignées et qu’elles
ne sont pas bloquées, qu’il n’y a pas de composants de cassés,
que la monture est en parfait état et qu’il n’y a pas d’autres
problèmes susceptibles de nuire au fonctionnement. Si un
carter de protection ou un autre composant est endommagé,
faites-le réparer par un réparateur agréé ou remplacez-le.
q) Éloignez vos mains du parcours de la lame de la scie.
r) N’approchez jamais vos mains de la lame.
s) Mettez l’outil hors tension et attendez que la lame se soit
arrêtée avant de changer les pièces à découper de position.
t) Débranchez l’outil de la prise électrique avant de changer
la lame, d’effectuer des réparations ou de nettoyer l’outil.
u) Ne portez jamais l’outil en le tenant par le cordon
électrique. Si vous le portez par le cordon, vous risquez
d’endommager l’isolation ou les branchements des fils, ce
dont il peut résulter une électrocution ou un incendie.
CARACTÉRISTIQUES TECHNIQUES
Scie circulaire RAGETwin 125 mm
Moteur (230 V ou 110 V, 50 Hz) (Watts) : 850 W
Vitesse de rotation à vide (min-1) : 5 500 min-1
Profondeur de coupe max. : 28 mm
Poids : 3,2 kg
Dimensions de la lame
Diamètre maximal : 125 mm
Épaisseur : Lame A : 1,5 mm
Lame B : 1,7 mm
ASSEMBLAGE
Votre scie à double lame Evolution Power Tools est livrée
complète. Videz le carton et inspectez-en le contenu afin de
vous assurer qu’il n’a pas été endommagé lors du transport et
qu’aucun des composants énumérés ci-dessous ne manque.
DESCRIPTION QTÉ
MANUEL D’UTILISATION 1
LAME TCT (MONTÉE) de 125 mm 1 paire
CLÉ 1
POIGNÉE AUXILIAIRE 1
DISPOSITIF DE GRAISSAGE (MONTÉ) 1
MISE EN GARDE ! DÉBRANCHEZ TOUJOURS LA SCIE
À DOUBLE LAME DU SECTEUR AVANT DE PROCÉDER
AU MOINDRE RÉGLAGE.
Avant de commencer à utiliser votre outil, contrôlez ce qui suit :
1. Alimentation
Assurez-vous que la source d’alimentation utilisée est
conforme aux spécifications électriques indiquées sur la
plaque signalétique de l’outil.
2. Interrupteur marche/arrêt
Assurez-vous que l’interrupteur marche/arrêt est en position
OFF (arrêt). Si l’interrupteur marche/arrêt est en position
ON (marche) lorsque le cordon d’alimentation de l’outil est
branché sur la prise murale, l’outil se mettra en marche
immédiatement. Il pourra en résulter un accident grave.
3. Rallonge électrique
Lorsque la zone de travail est éloignée de la source
d’alimentation, utilisez une rallonge électrique d’une
épaisseur et d’une capacité nominale suffisantes. La rallonge
électrique doit être aussi courte que possible. Évitez de la
faire passer à un endroit où il est possible de se prendre
dedans ou présentant tout autre risque.
4. Contrôle des lames
Vérifiez que les lames utilisées sont bien du modèle indiqué et
qu’elles ne sont pas fissurées, cassées ou tordues. N’utilisez
pas cet outil si vous doutez de l’intégrité des lames.
INSTALLATION/RETRAIT DES LAMES TCT
REMARQUE : il est conseillé à l’opérateur d’envisager le
port de gants de protection lors de la manipulation des lames
pendant la pose ou le changement des lames.
SYMBOLES DE SÉCURITÉ
FR
RÈGLES DE SÉCURITÉ PARTICULIÈRES
SUPPLÉMENTAIRES
FR
Le protecteur inférieur peut fonctionner lentement en
raison d’éléments endommagés, de dépôts collants ou de
l’accumulation de débris.
c) Le protecteur inférieur peut revenir se loger manuellement
uniquement pour les coupes particulières telles que les
«coupes plongeantes» et les «coupes complexes». Soulevez
le protecteur inférieur par la poignée rétractive et dès que la lame
entre dans le matériau, le protecteur inférieur doit être relâché.
Pour toutes les autres découpes, il convient que le protecteur
inférieur fonctionne automatiquement.
NOTE Une autre formulation peut remplacer « poignée
rétractive ».
d) Vérifiez toujours que le protecteur inférieur recouvre
la lame avant de poser la scie sur un établi ou sur le sol.
Une lame non protégée et continuant à fonctionner par inertie
entraînera la scie en arrière, et coupera alors tout ce qui se
trouve sur sa trajectoire. Soyez conscient du temps nécessaire
à la lame pour s’arrêter après que l’interrupteur est relâché.
e) Contrôlez que les leviers de verrouillage du réglage du
biseau et de la profondeur de la lame sont bien serrés et
bloqués avant de couper. Si le réglage de la lame change
pendant la coupe, il pourra y avoir blocage et recul.
f) N’utilisez jamais de lames émoussées ou endommagées.
Des lames de scie mal affutées ou mal posées produiront une
saignée étroite, ce dont il résultera une friction excessive. La
lame se bloquera alors et reculera.
g) Faites extrêmement attention pendant le « sciage en
plongée » dans des murs ou autres zones aveugles. La lame
en saillie peut couper des objets, ce qui peut provoquer un recul.
AVERTISSEMENT !
N’utilisez en aucun cas la scie s’il manque des autocollants
contenant des avertissements et/ou des consignes ou si ces
autocollants sont endommagés. Contactez Evolution Power
Tools pour obtenir des autocollants de rechange.
Symbole Description
V Volts
A Ampères
Hz Hertz
Min
-1
Vitesse
~
Courant alternatif
No Vitesse à vide
Double isolation
Portez des lunettes
de sécurité
Portez des protections
auditives
Ne pas toucher
Portez une protection
contre la poussière
Directive relative à la
restriction d'utilisation
de certaines substances
dangereuses
Certification CE
Déchets d'équipements
électriques et électroniques
Utilisez uniquement des lames de rechange d’origine Evolution
garantie. Les lames non autorisées peuvent être dangereuses
! Les lames de la scie doivent être solidement fixées. Avant de
poser de nouvelles lames, contrôlez qu’il n’y a pas de débris.
N’utilisez pas des lames émoussées ou cassées.
Vérifiez fréquemment l’état et le degré d’usure des lames.
Les lames endommagées ou usées doivent être remplacées
immédiatement. Si un carter est mal ajusté ou endommagé,
il faut le remplacer immédiatement. N’ulitisez jamais des
disques abrasifs. Faites attention aux copeaux qui sont
éjectés. Ils sont peut-être CHAUDS. Manipulez toujours
l’excédent de matériau avec précaution.
Pour obtenir un nouvel exemplaire du présent manuel
d’utilisation, contactez Evolution Power Tools à :
Royaume-Uni 0870 609 2297
États-Unis 1-866-EVO-TOOL
SITE WEB www.evolutionbuild.com
a) Conservez tous les carters de protection en place et en
bon état de marche.
b) Retirez les clavettes et clés de réglage. Prenez pour
habitude de contrôler que les clavettes et clés de réglage ont
été retirées de l’outil avant de le mettre en marche.
c) Tenez votre lieu de travail propre. Les endroits et les
établis encombrés sont propices aux accidents.
d) N’utilisez pas l’outil dans les lieux dangereux. N’utilisez
pas les outils électriques dans des endroits humides ou
mouillés et ne les exposez pas à la pluie. Votre lieu de travail
doit être bien éclairé.
e) Tenez les enfants à l’écart. Tous les visiteurs devraient
être tenus à bonne distance du lieu de travail.
f) Ne forcez pas l’outil. Il fera un meilleur travail et sera
moins dangereux s’il est utilisé à la puissance pour laquelle
il a été conçu.
g) Utilisez une rallonge appropriée. Si vous utilisez une
rallonge, contrôlez qu’elle est en bon état. Si vous utilisez
une rallonge, assurez-vous qu’elle est suffisamment forte
pour transporter le courant que votre outil tirera. Si elle
est trop faible, cela entraînera une chute de la tension
sectorielle, ce qui se traduira par une perte de puissance et
CARACTÉRISTIQUES TECHNIQUES
FR
FONCTIONNEMENT
FR
Page 9

16
www.evolutionbuild.com
17
www.evolutionbuild.com
®
Tube en hélice et découpe longitudinale
Faites entrer la lame dans le matériau de façon telle que la
lame dépasse d’environ 10 mm. Ne faites pas entrer la lame
sur tout son bord de coupe. Lorsque la lame a entièrement
traversé la paroi du matériau, commencez à faire avancer et
reculer la lame (cf. fig. 12).
Tôle plate
Faites entrer la lame dans le matériau d’environ 10 mm
seulement. Puis commencez la découpe (cf. fig. 13).
CONSIGNES DE GRAISSAGE
1. Les lames sont munies de dents de type « à sec ». En
règle générale, elles ne nécessitent aucun graissage. Il est
toutefois possible d’appliquer de la pâte de coupe avec
certains matériaux et dans des conditions extrêmes.
2. Il faut utiliser le dispositif de graissage lorsque vous découpez
de l’aluminium, du cuivre, de l’acier inoxydable ou de la fonte.
3.Insérez la tige de lubrification dans le trou prévu à cet effet.
Cette unité est placée sur le sommet de la protection de la
lame. Poussez la tige de lubrifiant en bas fermement et faites
tourner la roue d’alimentation du lubrifiant manuellement
jusqu’à ce qu’il saisisse la tige de lubrifiant.
4. Allumez la machine et utilisez la roue d’alimentation
manuellement, amenez la tige de lubrifiant en appuyant
doucement afin d’atteindre les dents des lames .
5. La vigilence de l’opérateur sera exigée afin de déterminer
la fréquence d’application du lubrifiant. Pour appliquer le
lubrifiant supplémentaire, tournez la roue d’alimentation de
lubrifiant manuellement.
NOTEZ : Nous recommandons que vous utilisiez le lubrifiant
sous forme de tige, disponible chez votre détaillant qui
distribue la marque Evolution Power Tools.
MAINTENANCE
1. Inspection des lames TCT. Une lame usée surcharge le
moteur et réduit l’efficacité de l’outil. Si une des lames présente
des signes d’usure, remplacez les lames par une paire neuve.
2. Inspection des vis de montage. Inspectez régulièrement
toutes les vis de montage et assurez-vous qu’elles sont
bien serrées. Si l’une des vis est desserrée, resserrez-la
immédiatement. Le non-respect de cette consigne peut
mettre l’utilisateur dans une situation dangereuse.
3. Entretien du moteur. Veillez tout particulièrement à ce que
le bobinage ne soit pas endommagé et/ou exposé à de l’eau
ou à de l’huile.
4. Veillez à ce que l’outil soit toujours propre et exempt de
débris. Évitez d’utiliser des produits de nettoyage contenant
du benzène, du trichloréthylène, du chlorure ou de l’ammoniac
: ces substances risquent d’endommager les composants en
plastique.
5. En cas de dysfonctionnement électrique ou mécanique,
éteignez immédiatement l’outil et débranchez-le de la prise
murale.
6. Des projections d’étincelles trop importantes peuvent
indiquer un encrassement du moteur ou une usure des
balais en carbone. Contrôlez le degré d’usure des balais et
remplacez-les lorsqu’ils ne font plus que 6 mm.
7. Si le cordon électrique de l’outil est endommagé, il doit être
remplacé par un cordon spécialement étudié. Contactez le
centre de réparation à ce sujet.
8. Pour toute autre réparation, portez la machine à votre
revendeur local ou à Evolution Power Tools USA, Iowa, si vous
l’avez achetée aux États-Unis.
ACCESSOIRES
Lames Evolution
2 X Lames TCT 125mm
PROTECTION ENVIRONNEMENTALE
Les produits électriques usés ne doivent pas être
jetés avec les ordures ménagères. Recyclez-les si possible.
Contactez les autorités locales ou votre revendeur pour tous
conseils sur le recyclage.
1. Installation
1. Contrôlez que la machine n’est branchée sur aucune
source d’alimentation électrique.
2. Posez la scie sur l’établi en veillant à ce que l’arbre de la
lame soit dirigé vers le haut.
3. Ouvrez le carter inférieur (cf. fig. 2).
4. Posez la lame A sur la flasque portant la lettre « A » (cf. fig. 1).
5. Alignez les deux trous présents sur la lame avec les ergots
d’entraînement de la flasque, puis mettez la lame solidement
en place sur la flasque (cf. fig. 3).
6. Posez la lame B sur l’adaptateur portant la lettre « B » et serrez
le contre-écrou sur l’arbre. SERREZ À LA MAIN uniquement.
7. Faites tourner les lames de façon à ce que les trous des
deux lames soient alignés.
8. Insérez la goupille (fournie avec la clé) dans les trous alignés.
9. Serrez le contre-écrou dans le sens des aiguilles d’une
montre à l’aide d’une clé, puis retirez la goupille des lames
(cf. fig. 4). Cela permettra aux lames de tourner librement.
10. Tournez délicatement les lames manuellement pour vous
assurer qu’elles tournent facilement dans les deux sens opposés.
2. Retrait
1. Contrôlez que la machine est débranchée du secteur.
2. Laissez les lames refroidir.
3. Faites tourner les lames jusqu’à ce que les trous des deux
lames soient alignés.
4. Insérez la goupille fixée sur la clé dans les trous des lames.
5. Dévissez le contre-écrou en le tournant dans le sens
contraire des aiguilles d’une montre et déposez-le (cf. fig. 4).
6. Ouvrez le carter inférieur (cf. fig. 2).
7. Soulevez la lame « B » et retirez-la.
8. Soulevez la lame « A » et retirez-la.
PROCÉDURES DE DÉCOUPE
1. Tracez des lignes de coupe claires et précises sur la pièce à
découper (à l’aide d’un crayon de bois approprié, etc.).
2. Amenez la scie près du matériau à découper et placez les lames
dans l’alignement de la ligne de coupe tracée. Ne démarrez pas
la machine avant d’avoir obtenu l’alignement correct.
3. En veillant à ce que les lames ne touchent pas le matériau
à découper, mettez la machine en marche et attendez qu’elle
ait atteint la vitesse de pleine marche.
4. Mettez délicatement les lames de la scie en contact avec la
pièce. La coupe se déroulera dans les meilleures conditions si
vous coupez droit devant et laissez à la scie le temps de faire
son travail sans forcer la lame.
MISE EN GARDE
• Vérieztoujoursl’étatdeslamesTCTavantdecommencer
le travail.
• N’utilisezjamaisunelameTCTssurée,casséeoutordue.
• N’appliquezjamaisd’eauoudeliquidederefroidissement
sur une lame TCT.
• Commencezàcouperuniquementlorsquelascieaatteint
sa vitesse de pleine marche.
• Silalamesebloqueousivousentendezunbruitanormal,
éteignez immédiatement la machine.
• N’utilisez jamais une lame TCT pour effectuer des
découpes en zigzag ou incurvées.
• N’utilisez jamais la surface latérale de la lame TCT.
N’effectuez jamais de découpes en inclinant la machine.
• SipendantladécoupevousforceztropsurlalameTCTpour
l’aligner avec la ligne tracée, vous risquez non seulement de
surcharger le moteur, mais aussi d’entraîner une surchauffe
des lames et de raccourcir leur durée de vie.
• Veillezà ceque le cordond’alimentation n’entrepas en
contact avec les lames TCT pendant la découpe.
• Soutenezlapièceàdécouperdemanièreàpouvoirprévoir
ce qui va se passer et à ce que la découpe reste ouverte
pendant le travail.
• Faitesavancer la machinedans l’alignement deslames.
Une pression latérale sur les lames peut les endommager et
s’avérer dangereux.
• Une fois la découpe terminée, éteignez la machine et
débranchez la fiche d’alimentation de la prise murale.
COUPE DE SECTIONS
Pour garantir la durée de vie des lames et la qualité du
tranchant, le niveau de vibration doit être réduit au minimum.
C’est la raison pour laquelle le matériau doit toujours être fixé
solidement avant de commencer le travail.
Fer plat
La lame avance selon un angle de 90º par rapport à la surface
de travail (cf. fig. 5).
Pièce présentant une encoignure
La lame avance en diagonale sur la surface de travail (cf. fig. 6).
Tuyau de section rectangulaire
La lame avance d’un coin à l’autre (cf. fig. 7).
Profilé en U
La lame avance d’un coin à l’autre (cf. fig. 8).
Aluminium / cuivre
Cette machine est équipée d’un dispositif de graissage qui
devrait être utilisé pour la découpe de l’aluminium et du
cuivre en tous genres (cf. fig. 9). Reportez-vous à la section
« Consignes de graissage ».
Tôle ondulée
La plate doit toujours reposer sur au moins trois points, dont
un de chaque côté de la découpe (cf. fig. 10).
Tuyaux
La lame avance dans l’objet jusqu’à ce qu’elle atteigne le
bord inférieur, selon un angle permettant d’attaquer le
matériau selon un angle de 90º (cf. fig. 11).
Page 10

18
www.evolutionbuild.com
19
www.evolutionbuild.com
®
NOMENCLATURE DES PIECES DE RECHANGE DE LA SCIE CIRCULAIRE A DOUBLE LAME (REV. 1. 00)
FR
230V ~ 50Hz
EC - DECLARATION OF CONFORMITY
CE – Declaración de conformidad 19
Información importante 19
Garantía limitada de 12 meses 20
Normas de seguridad generales 20
Instrucciones de seguridad para todas las sierras 22
Símbolos 23
Normas de seguridad específicas adicionales 23
Especificaciones 24
Montaje 24
Funcionamiento 24
Mantenimiento 26
Protección medioambiental 26
Listas de piezas de servicio 27
Nosotros, los importadores,
Evolution Power Tools Ltd.
Venture One
Longacre Close
Sheffield
S20 3FR
Declaramos que el producto
Números de referencia: RAGETWIN1251, RAGETWIN1252,
RAGETWIN1252EU
Evolution: Cortadora de doble hoja RAGE125mm (5˝)
Cumple los requisitos fundamentales de las siguientes
directrices europeas:
2006/42/CE – Directriz de máquinas
2006/95/CE – Directriz de bajo voltaje
2004/108/CE – Directriz de EMC
2002/95/CE – Restricción del uso de ciertas sustancias
peligrosas en equipos eléctricos y electrónicos
Estas herramientas mecánicas se han diseñado cumpliendo
las directivas del consejo:
2006/42/EC
2004/108/EC
2002/95/EC
2002/96/EC
Se han aplicado las normas siguientes:
EN55014-1
EN55014-2
EN61000-3-2 & EN61000-3-3
EN60745-1
EN60745-2-5
La valeur de vibrations déclarée a été mesurée selon une
méthode d’essai standard (EN60745) et peut être utilisée pour
comparer un outil avec un autre. La valeur de vibrations déclarée
peut également servir d’évaluation d’exposition préliminaire.
AVERTISSEMENT : la valeur d’émission de vibrations
pendant l’utilisation de l’outil électrique peut être différente
de la valeur déclarée, selon la façon dont l’outil est utilisé.
Déterminez les mesures de sécurité à adopter pour protéger
l’opérateur en fonction d’une estimation de l’exposition
dans les conditions effectives d’utilisation. Tenez compte
de toutes les parties du cycle d’exploitation, y compris les
périodes d’arrêt de l’outil et ses périodes de ralenti en plus
du temps de déclenchement réel.
DATOS DE RUIDO Y VIBRACIONES
LpA (presión sonora) dB(A) 90,0
LwA (presión acústica) dB(A) 101,0
KpA (incertidumbre de presión acústica) dB(A) 3
KwA (incertidumbre de potencia acústica) dB(A) 3
Valor de aceleración ponderado efectivo
Asa delantera m/s2 1,383
Asa trasera m/s2 1,56
K m/s2 1,5
VIBRACIÓN m/s2 5,18
El valor declarado de vibración ha sido medido de acuerdo
con un método de prueba estándar (EN60745) y puede
utilizarse para comparar una herramienta con otra. El valor
de vibración declarado también puede utilizarse en una
evaluación preliminar de la exposición.
ADVERTENCIA: El valor de emisión de vibración durante el
uso real de la herramienta mecánica puede diferir del valor
declarado dependiendo de las formas en las cuales se utilice
la herramienta. Identifique las medidas de seguridad para
proteger al operador que se basan en una estimación de la
exposición en las condiciones de uso reales. Tenga en cuenta
todas las piezas del ciclo operativo, incluidos los tiempos en
los que la herramienta está desconectada y cuando está
funcionando al ralentí además del tiempo de activación real.
Firmante autorizado
Fecha: 1/8/2010
Nombre: Sr. Matthew J Gavins
Cargo: Director general
Año de fabricación: 2010
IMPORTANTE! Por favor, lea estas instrucciones de
funcionamiento y seguridad atentamente y hasta el final. Por
su propia seguridad, antes de utilizar este equipo, compruebe
que el voltaje sea correcto y que todas las asas y piezas
estén firmemente fijadas. Si no está convencido de algún
aspecto de la utilización de este equipo, por favor póngase
en contacto con nuestra línea de asistencia telefónica.
ÍNDICE
ES
CE – DECLARACIÓN DE CONFORMIDAD
ES
Page 11

20
www.evolutionbuild.com
21
www.evolutionbuild.com
®
Línea de asistencia telefónica en el Reino Unido
0870 609 2297
Línea de asistencia telefónica en los Estados Unidos
1-866-EVO-TOOL
RAGETWIN
Felicidades por su compra de una sierra de doble hoja
Evolution Power Tools Rage de 125mm. Complete su registro
del producto online para validar el período de garantía de su
máquina y para asegurarse de recibir un rápido servicio en
caso de necesitarlo. Le agradecemos sinceramente que se
haya decidido por un producto de Evolution Power Tools.
GARANTÍA LIMITADA DE 12 MESES. Evolution Power Tools
se reserva el derecho a realizar mejoras y modificaciones en
el diseño sin previo aviso.
Evolution Power Tools, en los doce (12) meses siguientes
a la fecha de compra original, reparará o cambiará cualquier
producto donde sea patente que hay un defecto de
material o de mano de obra. Esta garantía no es válida si
la herramienta que se está devolviendo ha sido utilizada
para cortar materiales más allá de las recomendaciones
del manual de instrucciones o si la sierra ha sufrido daños
por accidentes, negligencia o un servicio inadecuado. Esta
garantía no se aplica a las máquinas y / o componentes que
se hayan alterado, cambiado o modificado de alguna forma, o
hayan estado sujetos a uso más allá de las especificaciones
y capacidades recomendadas. Los componentes eléctricos
están sujetos a las garantías respectivas de los fabricantes.
Todos los productos defectuosos que se devuelvan se
devolverán con portes pagados a Evolution Power Tools.
Evolution Power Tools se reserva el derecho a repararlos
o cambiarlos opcionalmente por el mismo elemento o uno
equivalente. No hay garantía – escrita ni verbal – para las
hojas de sierra. Evolution Power Tools no será en ningún
caso responsable de las pérdidas o daños resultantes
directa o indirectamente del uso de nuestras mercancías
o por cualquier otra causa. Evolution Power Tools no es
responsable de ningún coste en el que hayan incurrido
dichos productos o daños derivados. Ningún directivo,
empleado o agente de Evolution Power Tools está autorizado
para realizar declaraciones verbales sobre la idoneidad o no
aplicar alguno de los términos de venta siguientes y ninguno
será vinculante para Evolution Power Tools. Las cuestiones
referentes a esta garantía limitada deberían dirigirse a las
oficinas centrales de la empresa o llamando al número de
asistencia telefónica apropiado.
IMPORTANTES INSTRUCCIONES DE SEGURIDAD
Para reducir el riesgo de descarga eléctrica, este equipo dispone
de un cable y un enchufe autorizados para el país de uso
deseado. No cambie el enchufe ni el cable de ninguna forma.
NORMAS DE SEGURIDAD GENERALES
ADVERTENCIA: Por su propia seguridad,
leael manual de instrucciones antes de
poner en funcionamiento la sierra de ingletes.
1. MANTENGA LAS PROTECCIONES EN SU LUGAR y en
buen funcionamiento.
2. RETIRE LAS LLAVES DE MONTAJE Y DE AJUSTE.
Adquiera el hábito de comprobar que las llaves de montaje
y de ajuste se encuentran fuera de la herramienta antes de
encenderla.
3. MANTENGA LIMPIO EL LUGAR DE TRABAJO. Una
mesa y zona de trabajo abarrotadas invitan a los accidentes.
4. NO UTILICE EN AMBIENTES PELIGROSOS. No utilice
herramientas eléctricas en lugares húmedos o mojados, ni las
exponga a la lluvia. Mantenga el lugar de trabajo bien iluminado.
5. MANTENGA ALEJADO DEL ALCANCE DE LOS NIÑOS.
Cualquier visitante debe guardar una distancia de seguridad
con la zona de trabajo.
6. NO FUERCE LA MÁQUINA. Trabajará mejor y más segura
al ritmo para el que fue diseñada.
7. UTILICE UNA ALARGADERA APROPIADA. Asegúrese
de que la alargadera está en buen estado. Al utilizar una
alargadera, cerciórese de que tiene la resistencia suficiente
para transportar la corriente del producto. Un cable corto
causará cortes de corriente resultando en la pérdida de
energía y sobrecalentamiento.
8. UTILICE LA INDUMENTARIA APROPIADA. No lleve
ropas holgadas, guantes, corbatas, anillos, pulseras u otras
piezas de bisutería que pudiesen engancharse en partes en
movimiento. Se recomienda utilizar calzado anti-deslizante.
Utilice protección para el pelo si lo tiene largo.
9. UTILICE SIEMPRE GAFAS DE SEGURIDAD. Utilice
también careta o máscara contra el polvo si el proceso de
cortado emite residuos. Las gafas habituales sólo poseen
lentes resistentes a impactos, NO son gafas de seguridad.
10. TRABAJE SEGURO. Utilice abrazaderas para sujetar la
pieza de trabajo cuando resulte práctico. Será más seguro
que utilizar la mano y tendrá las dos manos libres para operar
la máquina.
11. NO INTENTE HACER DEMASIADO. Mantenga el
balance apropiado y una posición firme en todo momento.
12. CUIDE LAS HERRAMIENTAS. Mantenga las
herramientas afiladas y limpias para un rendimiento más
seguro y óptimo. Siga las instrucciones sobre lubricación y
cambio de accesorios.
13. DESCONECTE LAS HERRAMIENTAS antes de realizar
tareas de mantenimiento y al cambiar accesorios, como
hojas.
14. REDUZCA EL RIESGO DE INICIO INVOLUNTARIO.
Asegúrese de que el interruptor se encuentra en posición de
apagado antes de conectar la máquina.
15. UTILICE LOS ACCESORIOS RECOMENDADOS. Utilice
sólo accesorios Evolution originales.
16. NUNCA SE COLOQUE SOBRE LA HERRAMIENTA. El
operador podría sufrir lesiones graves si la herramienta se
inclina o si la herramienta de corte se activa de manera no
intencionada.
17. COMPRUEBE LAS PARTES DAÑADAS. Antes de volver
a utilizar la herramienta, debe comprobar cuidadosamente
las protecciones o cualquier otra pieza dañada para
determinar si funcionará correctamente y si ofrecerá la
función deseada; compruebe la alineación y la unión de las
partes en movimiento, rotura de piezas, montaje y cualquier
otra condición que pueda afectar su funcionamiento. Una
protección u otra pieza que haya resultado dañada deben
repararse o sustituirse oportunamente.
18. Mantenga las manos fuera del paso de la hoja de la sierra.
19. Nunca rodee la hoja de la sierra con los brazos.
20. Apague la herramienta y espere a que la hoja de la sierra
se detenga antes de mover la pieza de trabajo o realizar
cambios.
21. Desconecte el suministro eléctrico antes de cambiar,
reparar o limpiar la hoja.
22. Para reducir el riesgo de lesión, ponga el carro en la
posición más trasera después de cada operación de corte
transversal.
CONSEJO PARA SU SALUD
¡ADVERTENCIA!
Al taladrar, lijar, serrar o rectificar, se producirán partículas de
polvo. En algunos casos, dependiendo de los materiales con
los cuales esté trabajando, este polvo puede ser especialmente
nocivo para usted (por ejemplo, el plomo de la pintura brillante
antigua). Se le aconseja que considere los riesgos asociados a
los materiales con los cuales esté trabajando y que reduzca el
riesgo de exposición.
Debería:
-Trabajar en una zona bien ventilada.
-Trabajar con un equipo de seguridad autorizado, como
mascarillas antipolvo que estén especialmente diseñadas para
filtrar partículas microscópicas.
a) PELIGRO: Mantenga las manos alejadas de la zona de
corte y de la hoja. Mantenga la otra mano sobre el asa auxiliar,
o en la carcasa del motor. Si sujeta la sierra con ambas manos,
no habrá peligro de que la hoja las corte.
b) No se ponga debajo de la pieza de trabajo. El protector no
podrá protegerle de la hoja debajo de la pieza de trabajo.
c) Ajuste la profundidad de corte al grosor de la pieza de
trabajo. Por debajo de la pieza de trabajo debería verse menos
de un diente entero de la hoja.
d) No sujete nunca la pieza que esté cortando en las
manos o entre sus piernas. Fije la pieza de trabajo en una
plataforma estable. Es importante apoyar bien el trabajo para
minimizar la exposición del cuerpo, el estancamiento de la
hoja o la pérdida de control.
e) Cuando realice una operación donde la herramienta de
corte pueda entrar en contacto con cableado oculto o con
su propio cable, sujete la herramienta mecánica por las
superficies de asimiento aisladas. El contacto con un cable
‘activo’ también expondrá las partes metálicas expuestas de
la herramienta pudiendo electrocutar al operario.
f) Cuando haga cortes al hilo, utilice siempre una guía
lateral o un listón recto. Esto mejora la precisión del corte y
reduce la posibilidad de que la hoja se bloquee.
g) Utilice siempre hojas con orificios de husillo del tamaño
y la forma (rómbica o redonda) correctos. Las hojas que no
encajen con las piezas de montaje de la sierra girarán de forma
excéntrica y producirán una pérdida de control.
h) No utilice nunca arandelas o pernos de hoja dañados
o defectuosos. Las arandelas y el perno de la hoja se han
diseñado especialmente para su sierra, para un rendimiento, un
funcionamiento y un nivel de seguridad óptimos.
Instrucciones de seguridad adicionales para todas las sierras
Causas y prevención para el operador de retrocesos bruscos:
El retroceso brusco es una reacción repentina debida a un
aprisionamiento, atascamiento o desalineación de la hoja de la
sierra, que hace que ésta se levante y salga descontrolada de la
pieza de trabajo hacia el operario;
1. Cuando la hoja queda aprisionada o atascada firmemente
debido al cierre de la hendidura, ésta se inmoviliza y la reacción
del motor empuja la sierra bruscamente hacia atrás contra el
operario;
2. Si la hoja se retuerce o desalinea en el corte, los dientes del
borde trasero de la hoja pueden morder la superficie de la pieza
de trabajo haciendo que la hoja se salga de la hendidura y salte
hacia atrás contra el operario.
Los retrocesos bruscos se deben a un mal uso de la
herramienta y/o a procedimientos o condiciones de trabajo
incorrectos y pueden evitarse tomando las precauciones
indicadas a continuación:
a) Mantenga la sierra firmemente sujeta con ambas
manos y posicione sus brazos para resistir la fuerza del
retroceso brusco. Posicione su cuerpo a uno de los lados
de la hoja, pero no en línea con ella. El retroceso brusco
podría hacer saltar la hoja hacia atrás, pero el operario puede
controlarlo si toma las precauciones apropiadas.
b) Cuando las hojas se atasquen, o cuando interrumpa un
corte por cualquier razón, suelte el gatillo y mantenga la
sierra inmóvil en el material hasta que las hojas se paren
por completo. No intente nunca extraer la hoja de la pieza
de trabajo ni tirar de la sierra hacia atrás mientras las hojas
estén en movimiento, ya que podría ocasionar un retroceso
brusco. Investigue y tome medidas correctoras para eliminar
la causa del atascamiento de la hoja.
c) Cuando vuelva a poner en marcha la sierra en la pieza
de trabajo, centre la hoja en la hendidura y compruebe que
los dientes no estén enganchados al material. Si la hoja está
atascada, podría salirse o retroceder bruscamente de la pieza de
trabajo al poner la sierra en marcha de nuevo.
CONSEJO PARA SU SALUD
ES
INSTRUCCIONES DE SEGURIDAD
PARA TODAS LAS SIERRAS
ES
Page 12

22
www.evolutionbuild.com
23
www.evolutionbuild.com
®
d) Apoye los paneles grandes para minimizar el riesgo
de que la hoja se atasque y retroceda bruscamente. Los
paneles grandes tienden a combarse con su propio peso.
Deberá poner apoyos debajo del panel a ambos lados, cerca
de la línea de corte y cerca de los bordes del panel.
f) Las palancas de fijación de los ajustes de profundidad y
de bisel del disco deben ser apretadas y sujetadas antes de
realizar el corte. Si el ajuste de la hoja cambia durante el corte,
podría ocasionar un atascamiento y un retroceso brusco.
e) No utilice hojas melladas o dañadas. Las hojas desafiladas
o mal ajustadas producen una hendidura estrecha que ocasiona
excesiva fricción, atascamiento de la hoja y retrocesos bruscos.
g) Extreme las precauciones cuando haga un “corte
de cavidad” en paredes u otras zonas ciegas. La parte
sobresaliente del disco podría cortar objetos que podrían
ocasionar un retroceso brusco.
Instrucciones de seguridad para sierras
a) Compruebe el cierre adecuado del protector inferior antes
de cada uso. No utilice la sierra si el protector inferior no se
mueve libremente y se cierra instantáneamente. Nunca sujete
ni ate el protector inferior en la posición abierta. Si la sierra cae
accidentalmente, el protector inferior podría doblarse. Levante el
protector inferior con la manivela retráctil y asegúrese de que se
mueve libremente y que no toca la hoja ni ninguna otra parte, en
todos los ángulos y profundidades de corte.
b) Compruebe el funcionamiento del resorte del protector
inferior. Si el protector y el resorte no funcionan como es
debido, deberá repararlos antes de utilizar la herramienta. El
protector inferior podrá funcionar lentamente debido a las
partes dañadas y a acumulaciones pegajosas o de residuos.
c) El protector inferior deberá retraerse manualmente
sólo para cortes especiales como “cortes de cavidades”
y “cortes compuestos”. Levante el protector inferior con la
manivela retráctil y suéltelo en cuanto el disco penetre en el
material. Para el resto de cortes, el protector inferior deberá
funcionar automáticamente.
d) Antes de dejar la sierra en el banco o en el suelo, observe
siempre que el protector inferior esté cubriendo la hoja.
Una hoja desprotegida, girando por inercia, hará que la sierra
se desplace hacia atrás, cortando todo lo que encuentre a su
paso. Tenga en cuenta el tiempo que tarda la hoja en detenerse
después de soltar el interruptor.
AVERTISSEMENT ! N’utilisez en aucun cas la scie s’il manque
des autocollants contenant des avertissements et/ou des
consignes ou si ces autocollants sont endommagés. Contactez
Evolution Power Tools pour obtenir des autocollants de rechange.
Símbolo Descripción
V Voltios
A Amperios
Hz Hercios
Min
-1
Velocidad
~ Corriente alterna
No Velocidad sin carga
Doble aislamiento
Lleve gafas de seguridad
Lleve protectores auditivos
No tocar
Llevar protección contra
el polvo
Directiva de restricción de
sustancias peligrosas
Marcado CE
Residuos de Aparatos
Eléctricos y Electrónicos
Utilice sólo hojas de repuesto originales Evolution. ¡Las hojas
no autorizadas pueden ser peligrosas! Mantenga las hojas bien
sujetas. Compruebe si hay residuos antes de instalar ninguna
hoja nueva y no utilice hojas romas o rotas. Compruebe las
hojas regularmente en cuanto al estado y desgaste. Las hojas
dañadas o gastadas deberán cambiarse inmediatamente. Los
protectores dañados o flojos deben cambiarse inmediatamente.
Tenga cuidado con las astillas que salen despedidas ya que
pueden estar CALIENTES. Realice siempre una manipulación
segura del material en exceso.
Para obtener una copia adicional de su manual, por favor
póngase en contacto con Evolution Power Tools en:
Reino Unido 0870 609 2297
Estados Unidos 1-866-EVO-TOOL
INTERNET www.evolutionbuild.com
a) Mantenga los protectores en su lugar y en buen estado
de funcionamiento.
b) Retire las llaves de ajuste y llaves inglesas. Adquiera
el hábito de comprobar que las llaves de ajuste y las llaves
inglesas se hayan retirado de la máquina antes de conectarla.
c) Mantenga la zona de trabajo limpia. Las zonas y los
bancos abarrotados facilitan los accidentes.
d) No las utilice en entornos peligrosos. No utilice las
herramientas mecánicas en lugares mojados o húmedos, ni las
exponga a la lluvia. Mantenga la zona de trabajo bien iluminada.
e) Mantenga a los niños alejados. Todos los visitantes deberán
mantenerse a una distancia segura de la zona de trabajo.
f) No fuerce la herramienta Hará el trabajo mejor y de forma
más segura a la velocidad para la cual se ha diseñado.
g) Utilice una extensión de cable adecuada. Asegúrese de
que su extensión de cable esté en buen estado. Al utilizar una
extensión de cable, asegúrese de utilizar una con suficiente
capacidad para llevar la corriente que consumirá su máquina.
Un cable de un tamaño demasiado pequeño ocasionará una
reducción del voltaje de la línea dando como resultado una
pérdida de alimentación y sobrecalentamiento.
h) Lleve puesto un equipo apropiado. No lleve ropa suelta,
guantes, corbatas, anillos, brazaletes u otras joyas que puedan
quedar atrapadas en las piezas móviles. Se recomienda llevar
calzado no deslizante. Lleve una malla de protección para
recoger el pelo largo.
i) Utilice siempre gafas de seguridad. Utilice también una
mascarilla antipolvo si en la operación de corte se desprende
polvo. Las gafas de uso diario sólo tienen lentes resistentes a
los impactos, NO son gafas de seguridad.
j) Trabajo seguro. Utilice abrazaderas para sujetar el trabajo
cuando sea práctico.
k) No intente nada por encima de sus posibilidades.
Mantenga una posición estable y un correcto equilibrio en
todo momento.
l) Realice el mantenimiento de las herramientas con
cuidado. Mantenga las herramientas afiladas y limpias para un
funcionamiento mejor y más seguro. Siga las instrucciones para
lubricar y cambiar los accesorios.
m) Desconecte las herramientas antes de realizar el
servicio y cuando se cambien accesorios, como las hojas.
n) Reduzca el riesgo de puesta en marcha accidental.
Asegúrese de que el interruptor esté en la posición off antes de
enchufar la herramienta.
o) Utilice los accesorios recomendados. Utilice sólo
accesorios originales Evolution.
p) Compruebe las piezas dañadas. Antes de seguir utilizando
la herramienta, se debe comprobar cuidadosamente el protector
o cualquier otra pieza que esté dañada para determinar si seguirá
funcionando debidamente y llevando a cabo su función prevista;
compruebe la alineación de las piezas móviles, la rotura de las
piezas, el montaje y cualquier otra condición que pueda afectar
su funcionamiento. Un protector o cualquier otra pieza que esté
dañada deberá repararse o cambiarse debidamente.
q) Mantenga las manos fuera de la trayectoria de las
hojas de sierra.
r) No ponga nunca las manos alrededor de las hojas de
sierra.
s) Desconecte la sierra y espere a que las hojas se paren
antes de mover la pieza de trabajo.
t) Desconecte la alimentación antes de cambiar las hojas,
realizar el servicio o la limpieza.
u) No transporte nunca la herramienta por el cable
eléctrico. Transportar la herramienta por el cable eléctrico
podría ocasionar daños en el aislamiento o las conexiones de
cable dando como resultado la posibilidad de una descarga
eléctrica o un incendio.
CARACTRISTIQUES TECHNIQUES
RAGETWIN 125mm (5˝)
Motor (230v o 110v 50Hz) (Vatios): 850W
RPM sin carga (min-1): 5500min
-1
Profundidad de corte máx.: 28mm
Peso: 3,2kg
Dimensiones de la hoja
Diámetro máximo: 125mm
Grosor: Hoja A: 1,5mm
Hoja B: 1,7mm
MONTAJE
Su sierra de doble hoja Evolution Power Tools se
envía completa. Retire todo el contenido de la caja e
inspecciónelo para asegurarse de que no haya sufrido
ningún daño durante el envío y que se incluyan los
elementos que se relacionan a continuación.
Descripción Cantidad
Manual de instrucciones 1
Hoja TCT de 125 mm (si existe) 1 par
Llave 1
Asa de apoyo 1
Unidad de lubricación (existe) 1
¡PRECAUCIÓN! DESCONECTE SIEMPRE LA SIERRA DEL
SUMINISTRO ELÉCTRICO ANTES DE REALIZAR AJUSTES.
Antes de iniciar cualquier operación, realice las
comprobaciones siguientes:
1. Suministro eléctrico
Asegúrese de que el suministro eléctrico a utilizar cumpla
los requisitos de alimentación especificados en la placa de
datos de la máquina.
2. Interruptor de alimentación
Asegúrese de que el interruptor de alimentación esté en la
posición OFF. Si el enchufe está conectado a un suministro
eléctrico con el interruptor en la posición ON, la máquina
empezará a funcionar inmediatamente. Esto podría ocasionar
un grave accidente.
3. Cable de extensión
Cuando el trabajo esté lejos del suministro eléctrico, utilice
un cable de extensión con un grosor suficiente y capacidad
nominal. El cable de extensión debería mantenerse lo
más corto posible y hacerse pasar de forma que no pueda
tropezarse con el mismo ni suponga un riesgo de ningún tipo.
4. Comprobación de las hojas
Compruebe que las hojas sean las especificadas y que no
estén agrietadas, rotas o curvadas. No utilice la máquina si
tiene alguna duda sobre la integridad de las hojas.
INSTALACIÓN / RETIRADA DE LAS HOJAS TCT
NOTA: Se recomienda que el operario considere llevar
guantes de protección al manipular las hojas durante la
instalación o al cambiar las hojas.
NORMAS DE SEGURIDAD
ESPECÍFICAS ADICIONALES
ES
ESPECIFICACIONES
ES
FUNCIONAMIENTO
ES
Page 13

24
www.evolutionbuild.com
25
www.evolutionbuild.com
®
1. Instalación
1. Asegúrese de que la máquina no esté conectada a
ningún suministro eléctrico.
2. Ponga la sierra sobre un banco con el husillo de la hoja
hacia arriba.
3. Abra el protector inferior (vea la fig. 2).
4. Ponga la hoja A en la brida con la letra “A” claramente
visible (vea la fig. 1).
5. Alinee los dos cortes desviados en la hoja con los dedos
de arrastre en la brida y fije bien la hoja en la brida.
6. Ponga la hoja “B” en el adaptador con la letra “B”
claramente visible y a continuación enrosque la contratuerca
en el eje. (vea la fig. 3) Sólo APRIETE CON LA MANO.
7. Gire las hojas de forma que los orificios en ambas hojas
estén alineados.
8. Ponga el pasador (incluido con la llave inglesa) en los
orificios alineados.
9. Apriete la contratuerca en sentido horario con una llave
inglesa y a continuación retire el pasador de las hojas (vea la
fig. 4). Esto permitirá que las hojas giren libremente.
10. Gire las hojas con cuidado para asegurar que giren
fácilmente en direcciones opuestas.
2. Retirada
1. Asegúrese de que la máquina esté desconectada del
suministro de red.
2. Deje que las hojas se enfríen.
3. Gire las hojas hasta que los orificios en ambas hojas
estén alineados.
4. Ponga el pasador acoplado a la llave a través de los
orificios en las hojas.
5. Desenrosque la contratuerca girándola en sentido
antihorario y sáquela (vea la fig. 4).
6. Abra el protector inferior (vea la fig. 2).
7. Levante y retire la hoja “B”.
8. Levante y retire la hoja “A”.
PROCEDIMIENTOS DE CORTE
1. Marque el material que tenga que cortarse (utilice un lápiz,
etc. apropiado) con unas líneas de corte claras y precisas.
2. Suba la sierra hasta el material que tenga que cortarse
y alinee las hojas con una línea de corte previamente
marcada. No ponga en marcha la máquina hasta que se haya
conseguido la alineación correcta.
3. Asegúrese de que las hojas no estén en contacto con el
material que deba cortarse, conecte la máquina y déjela en
funcionamiento hasta alcanzar la velocidad máxima.
4. Introduzca suavemente las hojas de sierra en la pieza de
trabajo. El corte puede realizarse suavemente si corta recto
hacia delante y de un tiempo a la sierra para trabajar si forzar
ni presionar la hoja.
PRECAUCIÓN
• CompruebesiemprelashojasTCTantesdeempezara
trabajar.
• NoutilicenuncaunahojaTCTagrietada,rotaocurvada.
• NoapliqueaguanirefrigeranteaunahojaTCT.
• Empieceacortarsólocuandolamáquinaalcancela
velocidad de funcionamiento máxima.
• Silahojaseagarrotaohayalgúnruidoanómalo,desconecte
inmediatamente la alimentación.
• NoutilicenuncaunahojaTCTparacortarlíneascurvaso
en zigzag.
• NoutilicenuncalasupercielateraldelahojaTCT.Nola
utilice nunca para realizar cortes inclinados.
• SiseaplicaunafuerzaexcesivaalahojaTCTparaque
se alinee con una línea previamente marcada durante el
corte, se podría sobrecargar el motor, ocasionar daños
por quemaduras y sobrecalentar las hojas, reduciendo
así su vida útil.
• Procurenodejarqueelcableeléctricodelasmáquinas
entre en contacto con las hojas TCT giratorios durante las
operaciones de corte.
• Apoyelapiezadetrabajodeformaqueseaposiblepredecir
lo que puede pasar y para que el corte permanezca abierto
durante el proceso.
• Introduzcalamáquinabajaalineadaconlashojas.Una
presión lateral en las hojas puede dañarlas y es peligroso.
• Cuandosehayacompletadoeltrabajo,desconecte
la alimentación y desconecte el enchufe eléctrico del
suministro eléctrico.
CORTE TRANSVERSAL DE MATERIALES
La duración de las hojas y la calidad del borde de corte
dependen de que la vibración se mantenga a un valor
mínimo. Por esta razón, el material debería siempre sujetarse
en su lugar antes de iniciarse el trabajo.
Barras planas de hierro
La hoja se introduce formando un ángulo de 90º con la
superficie de trabajo (vea la fig. 5).
Pieza esquinera
La hoja se introduce diagonalmente a través de la superficie
de trabajo (vea la fig. 6).
Tubo rectangular
La hoja se introduce de esquina a esquina (vea la fig. 7).
Sección en U
La hoja se introduce de esquina a esquina (vea la fig. 8).
Aluminio / cobre
Esta máquina está equipada con una unidad de lubricación y
debe utilizarse al cortar todo tipo de material de aluminio y cobre
(vea la fig. 9). Consulte la sección “Instrucciones de lubricación”.
Placa conformada
La placa debe apoyarse siempre al menos en tres soportes,
con uno a cada lado del corte (vea la fig. 10).
Tubos
La hoja se introduce a través del objeto hasta que alcanza el
borde inferior, inclinándose según vaya avanzando de forma
que la hoja entre en contacto con el material formando un
ángulo de 90º (vea la fig. 11).
Tubo espiral y corte longitudinal
Introduzca la hoja en el material, de forma que la hoja
sobresalga aproximadamente 10 mm. No introduzca la hoja
hasta todo su borde de corte. Al introducir hoja en la pared
del material, empiece a desplazar la hoja hacia adelante y
hacia atrás (vea la fig. 12).
Placa delgada
Introduzca la hoja hacia abajo aproximadamente 10 mm. A
continuación empiece a cortar (vea la fig. 13).
INSTRUCCIONES DE LUBRICACIÓN
1. Las hojas están equipadas con dientes de “corte en
seco” y como norma general no es necesario lubricarlas. Sin
embargo, con algunos materiales y en algunas condiciones
extremas, puede aplicarse pasta de corte.
2. Al cortar aluminio, cobre, acero inoxidable y hierro colado,
debe utilizarse el dispositivo de lubricación.
3. Inserte la barra de pasta de corte en el orificio en la unidad
de lubricación. Esta unidad se encuentra en la parte superior
de protector de la hoja de acero. Presione la barra de lubricante
firmemente hacia abajo y haga girar la rueda de alimentación
de lubricante hasta que agarre la barra de lubricante.
4. Conecte la cortadora, y utilizando la rueda de alimentación,
desplace la barra de lubricante hasta que se apoye
suavemente sobre los dientes giratorios de las hojas.
5. Queda a criterio del operador determinar la frecuencia de
aplicación de lubricación. Para aplicar lubricante adicional,
gire la rueda de alimentación de lubricante.
NOTA: Recomendamos que utilice pasta de corte en forma
de barra, disponible a través de su distribuidor de Evolution
Power Tool.
MANTENIMIENTO
1. Inspección de las hojas TCT. Una hoja gastada sobrecarga el
motor y reduce la eficiencia del trabajo. Si cualquiera de las hojas
muestra signos de desgaste, cámbiela por un nuevo par.
2. Inspeccione los tornillos de montaje. Inspeccione regularmente
todos los tornillos de montaje y asegúrese de que estén bien
apretados. Si alguno de los tornillos se afloja, vuelva a apretarlo
inmediatamente. No hacerlo podría suponer un grave riesgo.
3. Mantenimiento del motor. Vaya con el debido cuidado para
que el devanado no resulte dañado ni se moje con aceite o agua.
4. Mantenga la máquina limpia y libre de residuos. Evite la
utilización de productos de limpieza, incluidos el benceno,
tricloroetileno, cloruro y amoníaco dado que pueden dañar las
piezas de plástico.
5. En caso de mal funcionamiento eléctrico o mecánico, apague
la máquina inmediatamente y desconecte el enchufe del
suministro eléctrico.
6. Un exceso de chispas puede indicar la presencia de suciedad en
el motor o escobillas de carbón gastadas. Compruebe el desgaste
de las escobillas y cámbielas cuando lleguen a ¼ ˝ (6mm).
7. Si el cable eléctrico de esta herramienta mecánica resulta
dañado, debe cambiarse por un cable especialmente preparado
disponible en la empresa de servicio.
8. Para todas las otras operaciones de servicio, lleve la máquina a
su distribuidor local, o si la ha comprado en los Estados Unidos, a
Evolution Power Tools USA, Iowa.
ACCESORIOS
Hojas Evolution
Par de hojas TCT de 125mm
PROTECCIÓN MEDIOAMBIENTAL
Los productos eléctricos residuales no deberían
desecharse con los residuos domésticos. Recicle donde haya
instalaciones previstas para ello. Consulte a su vendedor o
autoridad local para obtener asesoramiento sobre reciclaje.
Page 14

26
www.evolutionbuild.com
27
www.evolutionbuild.com
®
LISTA DE PIEZAS DE SERVICIO DE LA CORTADORA DE DISCO DE HOJA DOBLE (REV. 1. 00)
ES
230V ~ 50Hz
Page 15

®
 Loading...