

Page 1
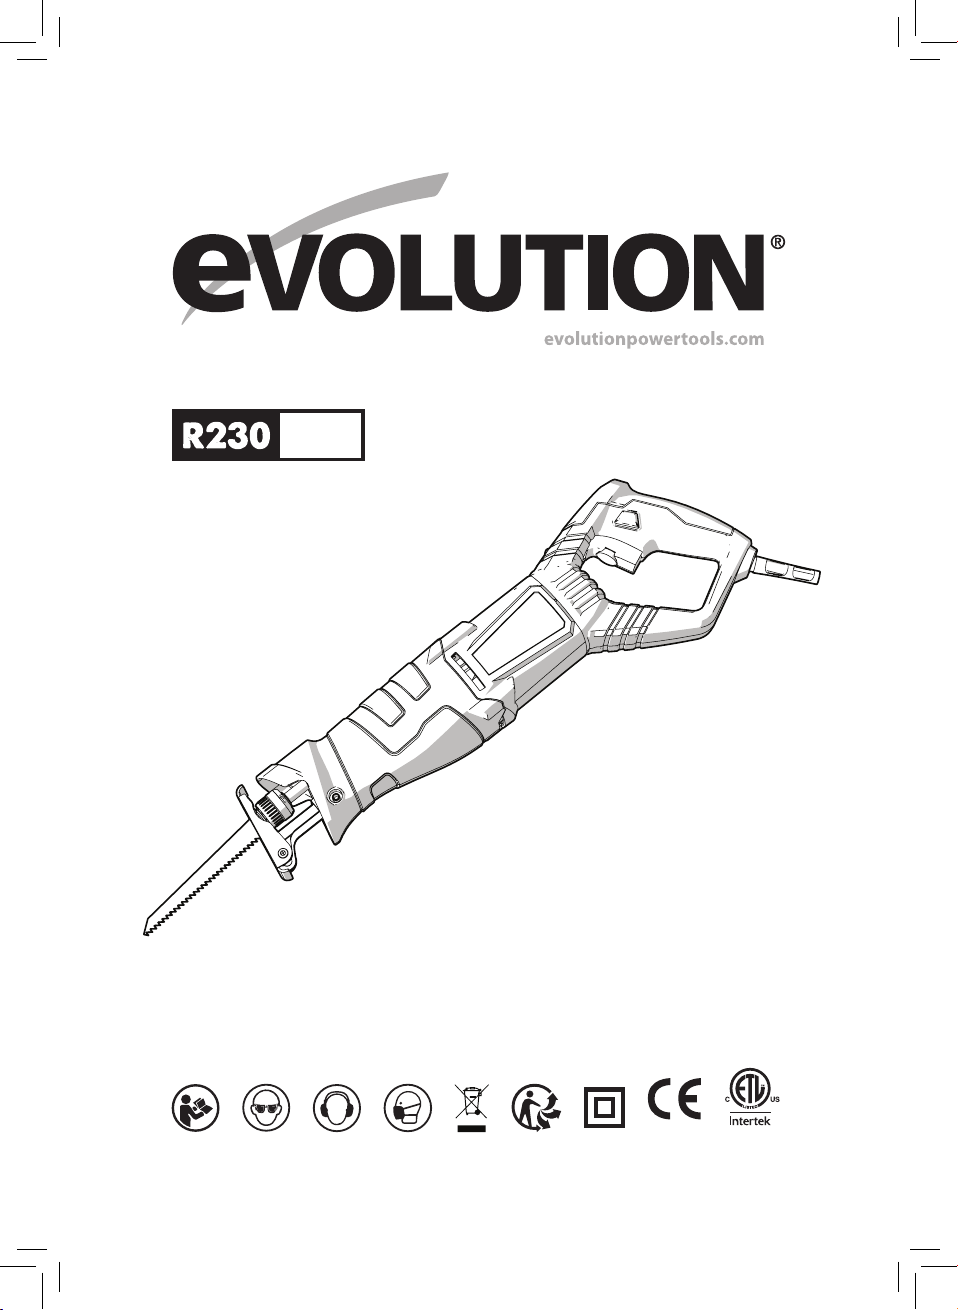
RCP
Original Instructions
Instrucciones originales
Instructions originales
GB2438285
Originally written in UK English Date Published: 20/06/2019
308 7464
Page 2

www.evolutionpowertools.com
TABLE OF CONTENTS
INTRODUCTION
Machine Specification Page 4
Vibration Page 5
Labels and Symbols Page 5
Intended use of this Power Tool Page 6
Prohibited use of this Power Tool Page 6
SAFETY PRECAUTIONS
Electrical Safety Page 7
Outdoor Use Page 7
General Power Tool Safety Instructions Page 7
Additional Safety Instructions Page 9
GETTING STARTED
Unpacking Page 10
Machine Overview Page 11
Operating Instructions Page 12
MAINTENANCE
Environmental Protection Page 17
DECLARATION OF CONFORMITY Page 18
2
Page 3

www.evolutionpowertools.com
EN
THIS INSTRUCTION MANUAL WAS
ORIGINALLY WRITTEN IN ENGLISH
IMPORTANT
Please read these operating and safety
instructions carefully and completely.
For your own safety, if you are uncertain
about any aspect of using this equipment
please access the relevant technical helpline,
the number of which can be found on the
Evolution Power Tools website. We operate
several helplines throughout our worldwide
organization, but technical help is also
available from your supplier.
WEB
www.evolutionpowertools.com
EMAIL
enquiries@evolutionpowertools.com
Congratulations on your purchase of an
Evolution Power Tools Machine. Please
complete your product registration ‘online’
as explained in the A5 online guarantee
registration leaflet included with this machine.
You can also scan the QR code found on the
A5 leaflet with a Smart Phone. This will enable
you to validate your machine’s guarantee
period via Evolutions website by entering your
details and thus ensure prompt service if ever
needed. We sincerely thank you for selecting
a product from Evolution Power Tools.
3
Page 4

www.evolutionpowertools.com
SPECIFICATIONS
MACHINE SPECIFICATIONS METRIC IMPERIAL
Motor EU (230V ~ 50 Hz) 850W 3.7A
Motor USA (120V ~ 60 Hz) 850W 7A
Stroke Length 28mm 1-1/8"
Variable Speed (Strokes Per Minute) 0 - 2800spm 0 - 2800spm
Weight 2.7kg 5.9lbs
CUTTING CAPACITIES METRIC IMPERIAL
Mild Steel (Max Thickness) 20mm 3/4”
Wood (Max Thickness) 230mm 9-1/16”
Plastic (Max Thickness) 150mm 5-7/8”
NOISE & VIBRATION DATA
Sound Pressure L
Sound Power Level L
Vibration Level (Under Load) - Main Handle Wood - 10.357m/s
Vibration Level (Under Load) - Auxiliary Handle Wood - 19.151m/s2 , Metal - 19.905m/s
(Under Load) 90.39 dB(A) K=3dB(A)
PA
(Under Load) 101.39 dB(A) K=3dB(A)
WA
2
, Metal - 21.223m/s
2
K=1.5m/s
2
K=1.5m/s
4
2
2
Page 5

www.evolutionpowertools.com
EN
Note: The vibration measurement was made
under standard conditions in accordance
with: EN 62841-1:2015
The declared vibration total value
has been measured in accordance with
a standard test method and may be used
for comparing one tool with another.
The declared vibration total value may
also be used in a preliminary assessment
of exposure.
VIBRATION
WARNING: When using this machine the
operator can be exposed to high levels of
vibration transmitted to the hand and arm.
It is possible that the operator could develop
“Vibration white nger disease” (Raynaud
syndrome). This condition can reduce the
sensitivity of the hand to temperature as well
as producing general numbness. Prolonged
or regular users of this machine should
monitor the condition of their hands and
ngers closely. If any of the symptoms become
evident, seek immediate medical advice.
• The measurement and assessment of
human exposure to hand-transmitted
vibration in the workplace is given in:
BS EN ISO 5349-1:2001 and
BS EN ISO 5349-2:2002
• Many factors can inuence the actual
vibration level during operation e.g. the
work surfaces condition and orientation
and the type and condition of the machine
being used. Before each use, such factors
should be assessed, and where possible
appropriate working practices adopted.
Managing these factors can help reduce
the eects of vibration:
Handling
• Handle the machine with care, allowing
the machine to do the work.
• Avoid using excessive physical eort on
any of the machines controls.
• Consider your security and stability, and
the orientation of the machine during use.
Work Surface
• Consider the work surface material;
its condition, density, strength,
rigidity and orientation.
WARNING: The vibration emission during
actual use of the power tool can dier from
the declared total value depending on the
ways in which the tool is used. The need
to identify safety measures and to protect
the operator are based on an estimation
of exposure in the actual conditions of use
(taking account of all parts of the operating
cycle, such as the times the tool is switched
o, when it is running idle, in addition to
trigger time).
LABELS & SYMBOLS
WARNING: Do not operate this machine
if warning and/or instruction labels are
missing or damaged. Contact Evolution
Power Tools for replacement labels.
Note: All or some of the following symbols
may appear in the manual or on the product.
5
Page 6
www.evolutionpowertools.com
Symbol Description
Volts
Amperes
Hertz
Speed
Alternating Current
No Load Speed
Wear Safety Goggles
Wear Ear Protection
Wear Dust Protection
Read Instructions
Hz
Min
n
V
A
-1
~
o
INTENDED USE OF THIS POWER TOOL
WARNING: This product is a hand held
reciprocating saw and has been designed
to be used with special Evolution blades.
Only use accessories designed for use in
this machine and/or those recommended
specically by Evolution Power Tools Ltd.
When tted with an appropriate blade,
and with the workpiece contact plate
rmly on the workpiece, this machine can
be used to cut:
Wood
Mild Steel, Aluminium, and
many other non-ferrous metals.
Most plastics.
PROHIBITED USE OF THIS POWER TOOL
WARNING: This product is a hand held
reciprocating saw and must only be used
as such. It must not be modied in any way,
or used to power any other equipment or
drive any other accessories other than those
mentioned in this instruction manual.
WARNING: This machine must not be used to
cut any material that may contain asbestos.
If the presence of asbestos is suspected,
consult the relevant authorities for advice.
Double Insulation Protection
CE Certification
CSA Certification
Waste Electrical &
Electronic Equipment
Warning
WARNING: This machine is not intended
for use by persons (including children) with
reduced physical, sensory or mental capabilities,
or lack of experience and knowledge, unless
they have been given supervision or instruction
concerning the safe use of the machine by a
person responsible for their safety and who is
competent in its safe use.
Children should be supervised to ensure
that they do not have access to, and are not
allowed to play with, this machine.
6
Page 7

www.evolutionpowertools.com
EN
ELECTRICAL SAFETY
This machine is tted with the correct
moulded plug and mains lead for the
designated market. If the mains lead or
the plug are damaged in any way, they
must be replaced with original replacement
parts by a competent technician.
OUTDOOR USE
WARNING: For your protection if this tool is to
be used outdoors it should not be exposed to
rain, or used in damp locations. Do not place
the tool on damp surfaces. Use a clean, dry
workbench if available. For added protection
use a residual current device (R.C.D.) that will
interrupt the supply if the leakage current to
earth exceeds 30mA for 30ms. Always check
the operation of the residual current device
(R.C.D.) before using the machine.
If an extension cable is required it must be a
suitable type for use outdoors and so labelled.
The manufacturers instructions should be
followed when using an extension cable.
POWER TOOL GENERAL
SAFETY INSTRUCTIONS
(These General Power Tool Safety Instructions
are as specified in EN 62841-1:2015,
EN 62841-2-11:2016)
WARNING: Read all safety warnings and
instructions. Failure to follow the warnings and
instructions may result in electric shock, re
and/or serious injury.
of ammable liquids, gasses or dust.
Power tools create sparks which may ignite
the dust or fumes.
c) Keep children and bystanders
away while operating power tool.
Distractions can cause you to lose control.
2) General Power Tool Safety
Warnings [Electrical Safety]
a) Power tool plugs must match the outlet.
Never modify the plug in any way. Do not use
any adapter plugs with earthed (grounded)
power tools. Unmodied plugs and matching
outlets will reduce the risk of electric shock.
b) Avoid body contact with earthed
or grounded surfaces, such as pipes,
radiators, ranges and refrigerators.
There is an increased risk of electric shock
if your body is earthed or grounded.
c) Do not expose power tools to rain or
wet conditions. Water entering a power tool
will increase the risk of electric shock.
d) Do not abuse the cord. Never use the cord
for carrying, pulling or unplugging the power
tool. Keep cord away from heat, oil, sharp
edges or moving parts. Damaged or entangled
cords increase the risk of electric shock.
e) When operating a power tool outdoors, use
an extension cord suitable for outdoor use.
Use of a cord suitable for outdoor use reduces
the risk of electric shock.
f) If operating a power tool in a damp
location is unavoidable, use a residual
current device (RCD) protected supply.
Use of an RCD reduces the risk of electric shock.
Save all warnings and instructions for
future reference. The term “power tool”
in the warnings refers to your mainsoperated (corded) power tool or batteryoperated (cordless) power tool.
1) General Power Tool Safety
Warnings [Work Area Safety]
a) Keep work area clean and well lit.
Cluttered or dark areas invite accidents.
b) Do not operate power tools in explosive
atmospheres, such as in the presence
3) General Power Tool Safety
Warnings [Personal Safety].
a) Stay alert, watch what you are doing
and use common sense when operating
a power tool. Do not use a power tool
while you are tired or under the influence of
drugs, alcohol or medication. A moment of
inattention while operating power tools may
result in serious personal injury.
b) Use personal protective equipment.
Always wear eye protection. Protective
7
Page 8

www.evolutionpowertools.com
equipment such as dust masks, non-skid
safety shoes, hard hat or hearing protection
used for appropriate conditions will reduce
personal injuries.
c) Prevent unintentional starting.
Ensure the switch is in the off-position before
connecting to power source and or battery
pack, picking up or carrying the tool. Carrying
power tools with your finger on the switch
or energising the power tools that have the
switch on invites accidents.
d) Remove any adjusting key or wrench
before turning the power tool on.
A wrench or key left attached to a rotating part
of a power tool may result in personal injury.
e) Do not overreach. Keep proper footing and
balance at all times. This enables better control
of the power tool in unexpected situations.
f) Dress properly. Do not wear loose
clothing or jewelry. Keep your hair, clothing
and gloves away from moving parts. Loose
clothes, jewelry or long hair can be caught in
moving parts.
g) If devices are provided for the
connection of dust extraction and
collection facilities, ensure that these are
connected and properly used. Use of dust
collection can reduce dust-related hazards.
4) General Power Tool Safety Warnings
[Power Tool Use and Care].
a) Do not force the power tool. Use the
correct power tool for your application.
The correct power tool will do the job better
and safer at a rate for which it was designed.
b) Do not use the power tool if the switch
does not turn it on or o. Any power tool
that cannot be controlled with the switch is
dangerous and must be repaired.
c) Disconnect the power tool from the
power source and/or battery pack from
the power tool before making any
adjustments, changing accessories, or
storing power tools. Such preventative
safety measures reduce the risk of starting the
power tool accidentally.
d) Store idle power tools out of the reach of
children and do not allow persons unfamiliar
with the power tool or these instructions
to operate the power tool. Power tools are
dangerous in the hands of untrained users.
e) Maintain power tools. Check for
misalignment or binding of moving parts,
breakage of moving parts and any other
condition that may affect the power tools
operation. If damaged, have the power tool
repaired before use. Many accidents are
caused by poorly maintained power tools.
f) Keep cutting tools sharp and clean.
Properly maintained cutting tools with sharp
cutting edges are less likely to bind and are
easier to control.
g) Use the power tool, accessories and
tool bits, etc, in accordance with these
instructions, taking into account the
working conditions and the work to
be performed. Use of the power tool for
operations dierent from those intended
could result in a hazardous situation.
5) General Power Tool Safety Warnings
[Service]
a) Have your power tool serviced by
a qualied repair person using only
identical replacement parts. This will ensure
that the safety of the power tool is maintained.
HEALTH ADVICE
WARNING: When using this machine, dust
particles may be produced. In some instances,
depending on the materials you are working with,
this dust can be particularly harmful.
If you suspect that paint on the surface of material
you wish to cut contains lead, seek professional
advice. Lead based paints should only be removed
by a professional and you should not attempt
to remove it yourself. Once the dust has been
deposited on surfaces, hand to mouth contact can
result in the ingestion of lead. Exposure to even
low levels of lead can cause irreversible brain and
nervous system damage. The young and unborn
children are particularly vulnerable.
8
Page 9

www.evolutionpowertools.com
EN
You are advised to consider the risks
associated with the materials you are working
with and to reduce the risk of exposure.
As some materials can produce dust that may
be hazardous to your health, we recommend
the use of an approved face mask with
replaceable lters when using this machine.
You should always:
• Work in a well-ventilated area.
• Work with approved safety equipment,
such as dust masks that are specially
designed to lter microscopic particles.
WARNING: The operation of any power tool
can result in foreign objects being thrown
towards your eyes, which could result in
severe eye damage. Before beginning power
tool operation, always wear safety goggles
or safety glasses with side shield or a full face
shield where necessary.
ADDITIONAL SAFETY INSTRUCTIONS
WARNING: Always disconnect the
reciprocating saw from the mains supply
before changing blades, servicing, cleaning
or adjusting the reciprocating saw.
• Keep your hands away from the cutting
area and the cutting blade. Hold the
machine by gripping the insulated hand hold areas with both hands. If both hands
are holding the machine, they cannot come
into contact with the blade.
• Do not use dull or damaged blades. Dull or
damaged blades can break easily and are
prone to ‘jamming’ which can cause ‘kickback’.
• Always check that the blade is correctly
installed within the machines blade holder.
Wear protective gloves when handling a
blade and conduct a ‘tug test’ when a new
blade is installed to ensure the blade has been
successfully ‘captured’ by the blade holder.
• Do not use excessive force. Excessive force
overloads the motor and reduces working
eciency and service life.
• Always wear the relevant PPE (Personal
Protective Equipment) for the job at hand.
This could typically include safety glasses or
eye shields, dust masks, protective clothing
and safety shoes, ear defenders and safety
helmet, etc.
• The operator should always be aware of
the routing of the mains power cable. The
cable should be routed in such a way that
it cannot become a trip or other type of
hazard and cannot come into contact with
the machines blade.
• Always check walls, oors and ceilings for
hidden power cables, water and/or gas
pipes or other services. Striking hidden
services could be extremely dangerous to
the operator, and could cause considerable
property damage. Detectors that can
determine the position of hidden utilities
within or behind a wall, etc, are readily
available at most tool retailers.
• Only withdraw the blade from a cut when
the machine has been switched ‘o’, and
the blade has come to a complete stop.
Withdrawing a moving blade from a cut
could lead to the moving blade striking
a nearby surface causing the operator to
experience severe ‘kick back’.
• If possible, ensure that any work-piece
is rmly clamped to prevent movement
during the cutting operation.
• Never try to stop the cutting blade by
applying sideways pressure to the blade.
Allow the blade come to a halt by turning
the machine ‘O ’, allowing the motor to
slow and stop normally.
• Always check that the mains supply voltage
is the same as the indicated supply voltage
shown on the machines rating plate. Using
this machine with a supply voltage that is
dierent from that shown on the machines
rating plate could damage the machine and
could potentially cause the machine to be
electrically unsafe.
9
Page 10

www.evolutionpowertools.com
• Do not alter or modify the power cord. This
saw is equipped with an approved cord and
plug for its intended country of use. If the
moulded plug or the power cord is damaged
in any way it must be replaced with an
identical type by a competent technician.
WARNING: This machine must not be used to
cut any material that may contain asbestos. If the
presence of asbestos is suspected, consult the
relevant authorities for advice. Do not attempt
to cut any suspect material until it has been
declared safe to do so by the relevant authorities.
GETTING STARTED
UNPACKING
Caution: This packaging contains sharp
objects. Take care when unpacking. Remove
the machine, together with the accessories
supplied from the packaging. Check carefully
to ensure that the machine is in good condition
and account for all the accessories listed in this
manual. Also make sure that all the accessories
are complete. If any parts are found to be
missing, the machine and its accessories should
be returned together in their original packaging
to the retailer. Do not throw the packaging
away; keep it safe throughout the guarantee
period. Dispose of the packaging in an
environmentally responsible manner. Recycle
if possible. Do not let children play with empty
plastic bags due to the risk of suocation.
ITEMS SUPPLIED
Description Quantity
R230RCP Reciprocating Saw 1
Multipurpose Blade 2 Pack
(Includes 1 x Thin Steel
& 1 x Multipurpose Blade)
Wood Cutting Blade 2 Pack
(Includes 1 x Green Wood
& 1 x General Wood Blade)
Instruction Manual 1
ADDITIONAL ACCESSORIES
In addition to the standard items supplied
with this machine, the following accessories
are also available from the Evolution online
shop at www.evolutionpowertools.com
or from your local retailer.
Description Part No
Multipurpose Blade Pack 2
(Includes 1 x Thin Steel
& 1 x Multipurpose Blade)
Wood Cutting Blade Pack 2
(Includes 1 x Green Wood
& 1 x General Wood Blade)
1
1
045-0255
045-0254
10
Page 11
www.evolutionpowertools.com
EN
MACHINE OVERVIEW
4
2
1
3
1. Blade
2. Workpiece Contact Plate
3. Contact Plate Locking Lever
4. Blade Clamp Dial
5. Trigger Switch
6. Variable Speed Control
7. Trigger Lock-On Button
8. Handle Rotation Button
8
A. Multipurpose Blade
B. General Wood Blade
C. Green Wood Blade
D. Thin Steel Blade
5
7
6
A
B
C
D
11
Page 12
www.evolutionpowertools.com
Fig. 1
Fig. 2
INSTALLING OR REMOVING A BLADE
WARNING: Only attempt these procedures with the machine
disconnected from the mains power supply.
Note: We recommend that the operator wears protective gloves
when handling blades. Care should be exercised as a recently
used blade could be hot and/or contaminated with debris.
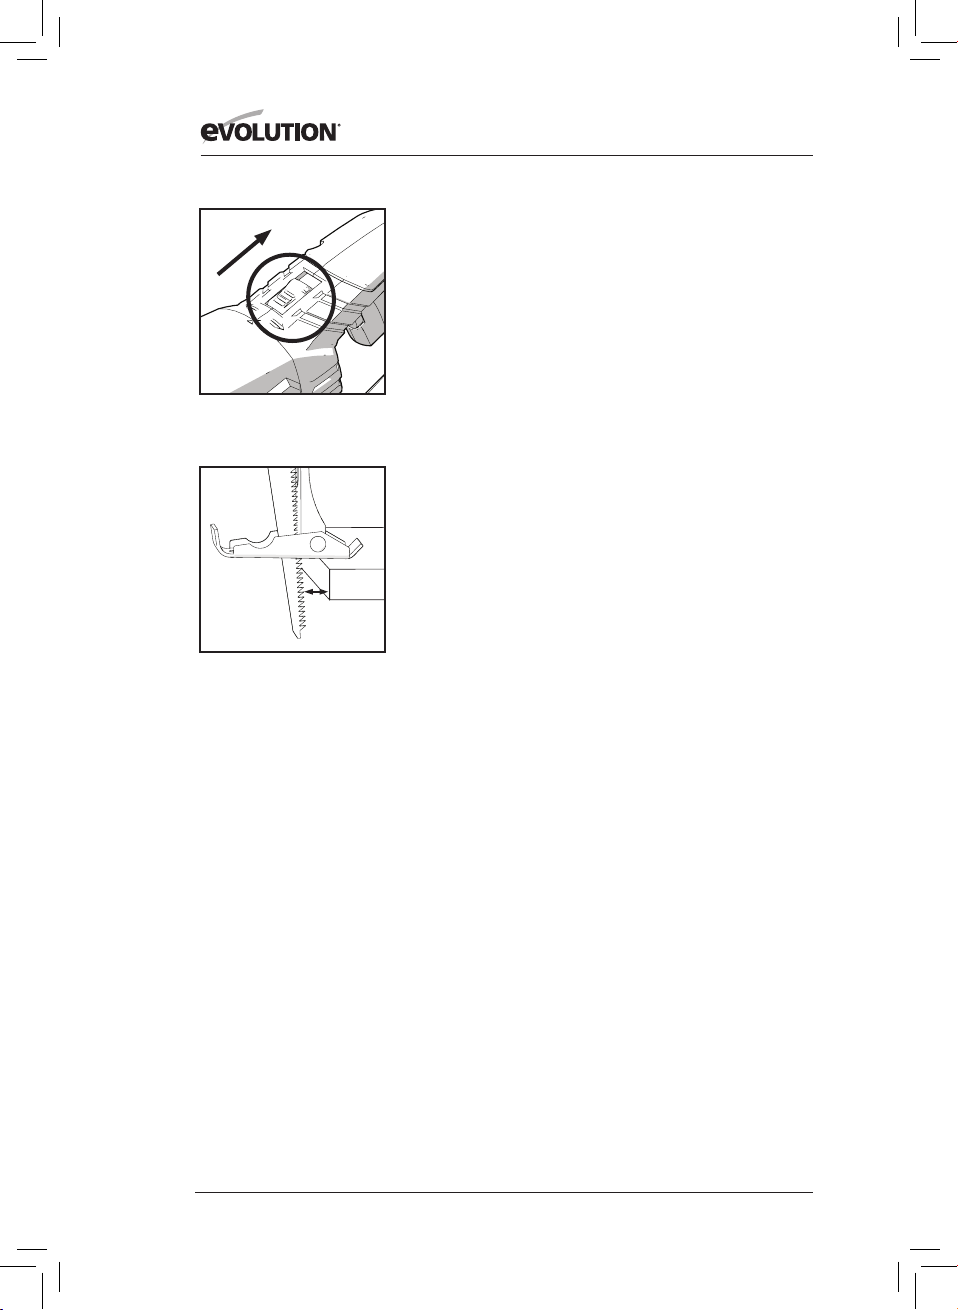
To install a blade:
• Ensure that the blade holder is clean and free from debris or
other contaminates.
• Twist and hold the blade clamping dial anti-clockwise.
(Fig. 1)
• Fully insert the shank of the blade into the blade holder.
• Release the blade clamp so it returns to its original position.
• Check that the blade is secure.
WARNING: It is important that the hole in the tang of the blade
engages with the ‘spigot’ located inside the blade holder.
To remove a blade:
• If recently used allow the blade to cool down.
• Ensure that the machine is facing downwards to allow
any debris to fall out.
• Twist and hold the blade clamping dial anti-clockwise.
• Gently pull the blade from the blade holder.
Note: If a blade is being removed because it is at the end of its
service life eject it straight into a recycling bin.
Fig. 3
WORKPIECE CONTACT PLATE (Fig. 2)
WARNING: To achieve the best cutting eciency, minimise
the risk of vibration, and blade jumping and/or breakage, the
workpiece contact plate must be kept rmly in contact with the
workpiece.
Note: The workpiece contact plate is pivoted and adjustable.
This feature allows the contact plate to adjust and lie ush on a
workpiece surface even when the machines main body is at a
slight angle to that surface.
CUTTING REACH & CAPACITY
By using dierent length blades and/or altering the service
position of the workpiece contact plate, it is possible to increase or
decrease the overall ‘reach’ and cutting capacity of the machine.
(Fig. 3)
12
Page 13
www.evolutionpowertools.com
EN
To adjust the position of the contact plate:
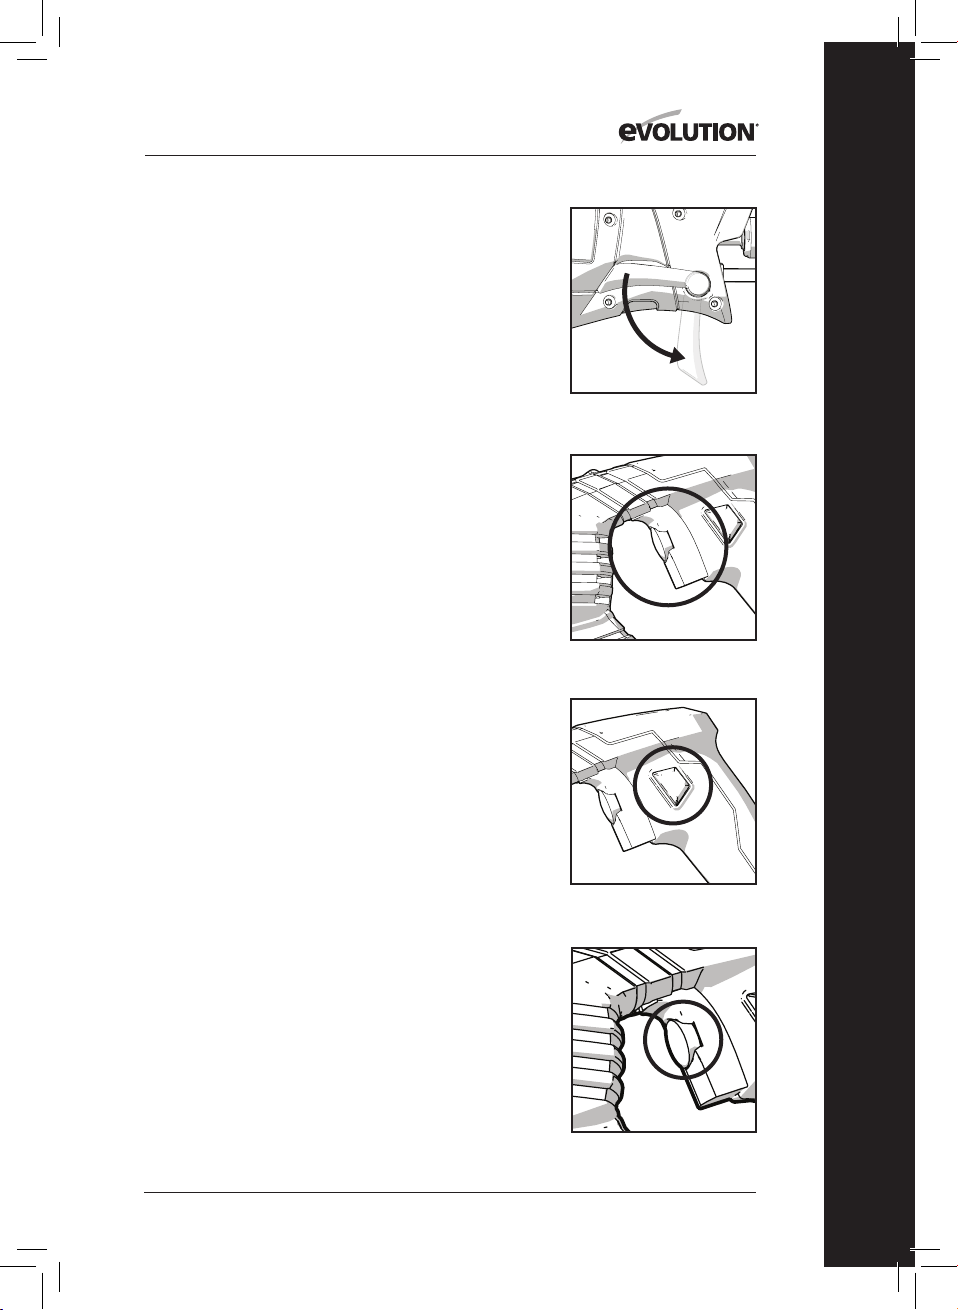
• Release the contact plate locking lever. (Fig. 4)
• Pull out or push in the contact plate as required.
• Once the plate is in the desired position, push the locking
lever back into its original position to lock the plate in place.
• Check that it is secure.
THE TRIGGER SWITCH
The ON/OFF trigger switch is located within the machines rear
handle. (Fig. 5).
• Squeeze the trigger switch to start the machines motor.
• Release the trigger switch to stop the machines motor.
LOCK-ON SWITCH
The trigger is equipped with a lock-on switch. To operate the
lock-on feature:
• Fully squeeze the trigger to start the machines motor.
• Press and hold the lock-on switch. (Fig. 6)
• Release the trigger then release the lock-on switch.
WARNING: The motor will run continuously until the trigger is
pressed and the lock-on switch is tripped.
Fig. 4
Fig. 5
THE STROKE RATE CONTROL DIAL
The stroke rate of the machine can be varied. A stroke rate
control dial is located on the trigger. (Fig. 7).
Note: The ergonomic positioning of this control dial allows a
skilled operator to adjust the stroke rate of the machine during
cutting operations.
Rotating this dial will alter the stroke rate of the machine from
approximately 800 strokes a minute up to a maximum of 2800
strokes per minute.
Note: We recommend that the operator begins any cutting
operation using a slow stroke rate, and increases the stroke rate
to achieve optimum performance as cutting progresses.
A practical trial on scrap material may be useful to determine
the best stroke rate for any particular material or application.
13
Fig. 6
Fig. 7
Page 14
www.evolutionpowertools.com
Fig. 8
Fig. 9
180˚ ROTATING HANDLE
The handle of the machine can be rotated through 180˚ and has
3 positions to achieve maximum control during cutting.
To rotate the handle:
• Slide and hold the handle rotation button backwards.
(Fig. 8)
• Twist the handle through 90˚ into the desired position.
• Release the rotation button.
• Check the handle is secure and the button is fully engaged.
WARNING: Handle adjustments must only be made when the
motor is o. Adjusting the handle while the tool is in use can
lead to serious injury.
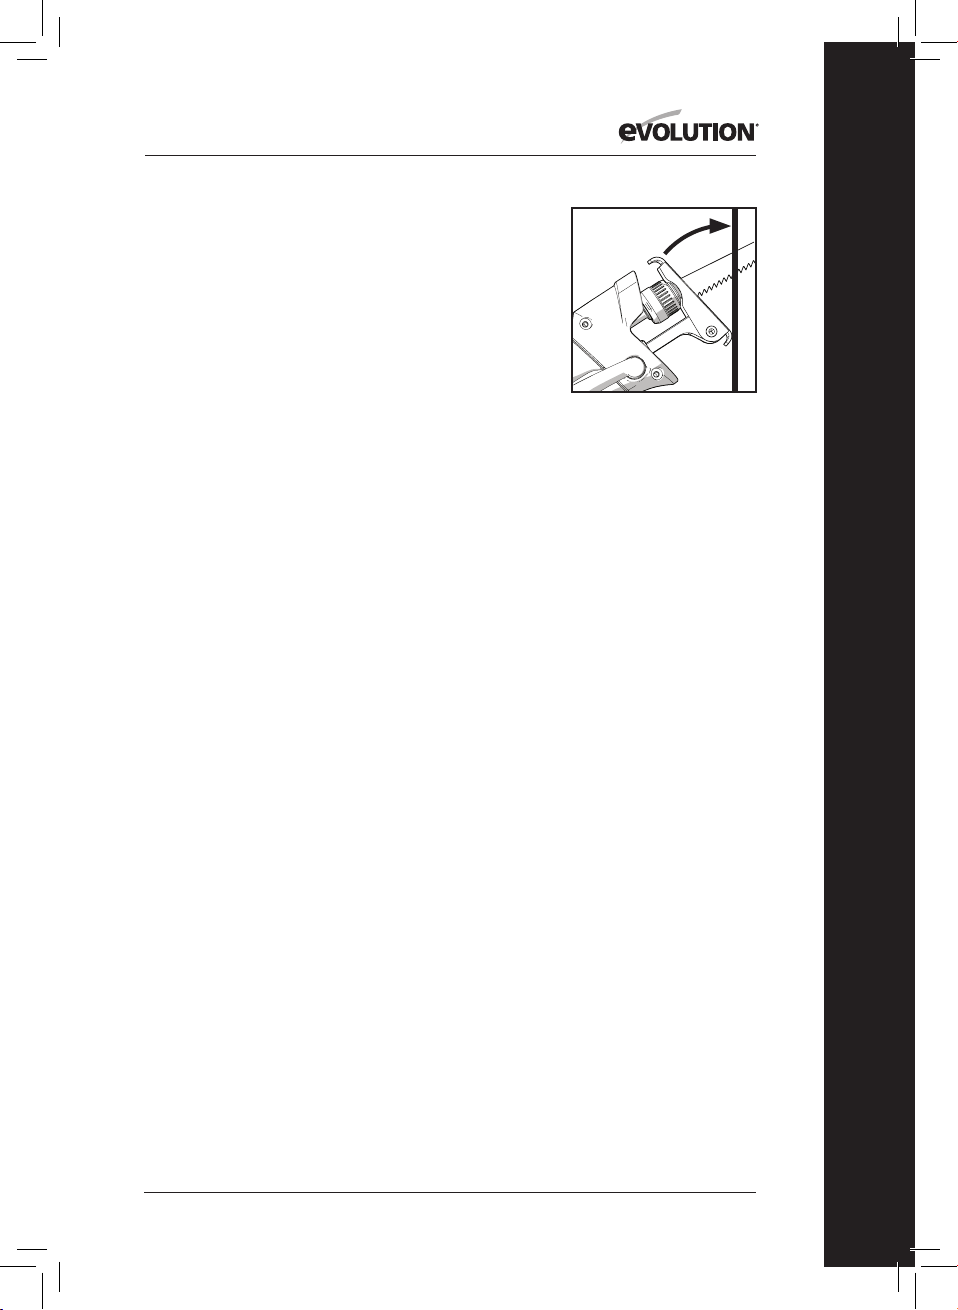
GENERAL CUTTING
WARNING: Never start the machine with the blade in contact
with the workpiece.
• Select a low stroke rate.
• Hold the machine with both hands.
• Ensure that the workpiece contact plate is rmly in contact
with the workpiece but that the blade is not. (Fig. 9).
• Switch on the machine.
• Very gradually, and holding the machine rmly, introduce the
blade into the workpiece until it is cutting successfully.
• Operate the stroke rate control dial until optimum cutting
performance is achieved.
• Never ‘force’ the blade. Allow the blade to cut through the
workpiece without applying undue pressure. Forcing the
blade will reduce blade life, increase the likelihood of blade
breakage, and put strain on the machines motor.
WARNING: If the saw blade should jam, switch o the machine
immediately and disconnect from the mains supply.
JAMMED BLADES
WARNING: Jammed blades may be very hot and/or
contaminated with debris. The operator should exercise great
caution when attempting to remove a ‘jammed’ blade,
and employ all necessary PPE.
To remove a jammed blade the kerf (the saw cut made by the
blade) will have to be widened.
• Remove the machine from the blade by operating the blade
clamping dial, and carefully easing the machine from the
jammed blade.
• Widen the kerf with a suitable tool until the blade can be
pulled from the workpiece.
14
Page 15
www.evolutionpowertools.com
EN
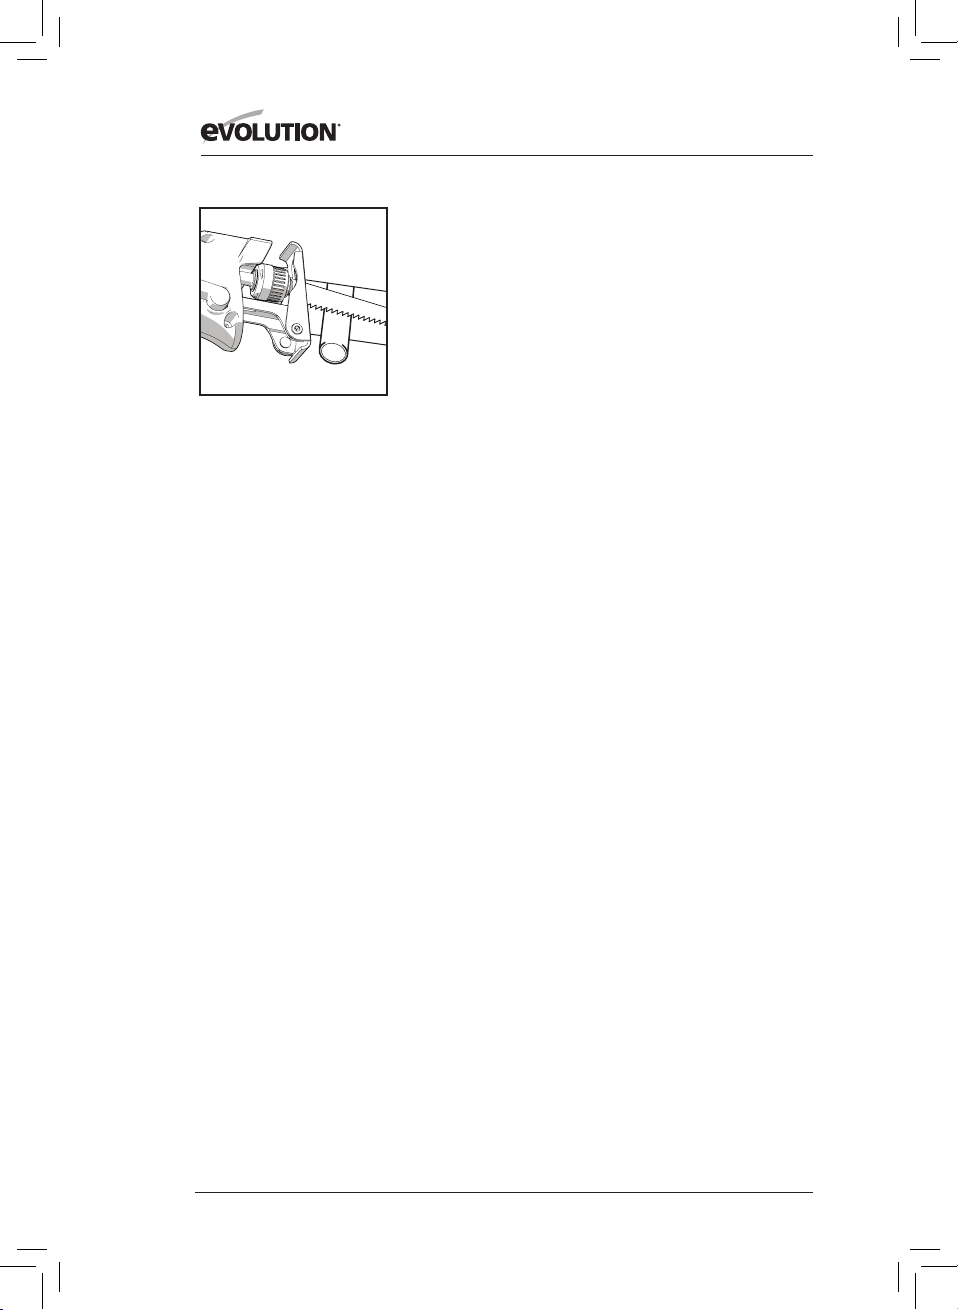
PLUNGE CUTTING
WARNING: Plunge cutting is a technique that must only be
used on soft building materials such as plasterboard etc. It is
not a suitable procedure for use on harder materials, and must
never be employed on metallic materials.
Note: This technique should not be attempted by
inexperienced operatives.
Note: Only dedicated plunge cutting blades must be used
when attempting a plunge cut.
Note: To reduce the risk of blade kickback when plunge cutting.
It is recommended to drill a pilot hole and plunge cut into the
hole as a starting point, giving you extra control and stability.
To plunge cut:
• Complete any/all marking out of the cutting lines using
a pencil, marker pen, etc, on the workpiece before
commencing operations.
• Hold the machine at an angle to the workpiece with the
bottom edge of the workpiece contact plate resting rmly
against the workpiece. (Fig. 10).
Note: The blade must not be in contact with the workpiece at this
stage. The operator must also be satised that the blade will not
contact the workpiece immediately the machine is switched on.
• Set stroke rate to its maximum setting.
• Switch the machine on.
• Very slowly rotate the machine using the bottom edge of
the workpiece contact plate as a fulcrum. Allow the blade
to very gradually ingress into the workpiece.
• When the contact plate is lying at against the workpiece
continue cutting as normal.
• Adjust the stroke rate for optimum cutting performance.
Fig. 10
FLUSH CUTTING
Flush cutting is cutting very close to a surface such as a oor,
wall or ceiling etc. This technique allows the operator to cut
o unwanted protruding material such as redundant joists,
brackets pipes, etc, from a building.
WARNING: The operator should ensure that any redundant
architectural objects etc, are not ‘live’ and it is safe to cut
through them.
Note: Flush cutting is only possible when using highly exible
bi-metal blades.
15
Page 16
www.evolutionpowertools.com
Fig. 11
To ush cut:
• Select and insert the correct saw blade into the machine.
• Position the side of saw blade directly against the oor, wall, etc.
• A side edge of the workpiece contact plate should be in
contact with the oor, wall, etc.
• Switch on the machine and gradually introduce the blade
into the workpiece.
• Adjust the stroke rate for optimum perfomance.
• Cut through the workpiece slowly allowing the exible blade
to curve as required. (Fig. 11).
• Allow the side of the exible blade to gently glide across the
oor, wall, etc.
CLEANING
WARNING: Any cleaning must only be attempted with the
machine disconnected from the mains power supply.
Clean the saw blade holder and remove any dirt and/or debris
build up. The saw blade should be removed from the machine
to facilitate proper and thorough cleaning.
Remove any contaminants by using a soft haired brush.
Compressed air can also be used. If this is the case the operator
should take all the necessary safety precautions to safeguard the
surrounding environment and any bystanders that may be present.
The operator should use all relevant PPE.
Safety glasses should be worn to protect the operators eyes
from blown debris.
MAINTENANCE
WARNING: Any maintenance must be carried out with the
machine switched o and disconnected from the mains/battery
power supply.
Check that all safety features and guards are operating correctly
on a regular basis. Only use this machine if all guards/safety
features are fully operational.
All motor bearings in this machine are lubricated for life. No further
lubrication is required.
Use a clean, slightly damp cloth to clean the plastic parts of the
machine. Do not use solvents or similar products which could
damage the plastic parts.
16
Page 17
www.evolutionpowertools.com
EN
WARNING: Do not attempt to clean by inserting
pointed objects through openings in the
machines casings, etc. The machines air vents
should be cleaned using compressed dry air.
Excessive sparking may indicate the presence of
dirt in the motor or worn out carbon brushes.
If this is suspected have the machine serviced and
the brushes replaced by a qualied technician.
ENVIRONMENTAL PROTECTION
Waste electrical products should not be
disposed of with household waste. Please
recycle where facilities exist.
Check with your local authority or retailer for
recycling advice.
17
Page 18

www.evolutionpowertools.com
EC DECLARATION OF CONFORMITY
In accordance with EN ISO 17050-1:2004
The manufacturer of the product covered by this declaration is:
UK: Evolution Power Tools Ltd, Venture One, Longacre Close, Holbrook Industrial Estate, Sheeld, S20 3FR.
FR: Evolution Power Tools SAS, 61 Avenue Lafontaine, 33560, Carbon-Blanc, Bordeaux, France.
The manufacturer hereby declares that the machine as detailed in this declaration fulfils all
the relevant provisions of the Machinery Directive and other appropriate directives as detailed
below. The manufacture further declares that the machine as detailed in this declaration, where
applicable, fulfils the relevant provisions of the Essential Health and Safety requirements.
The Directives covered by this Declaration are as detailed below:
2006/42/EC Machinery Directive.
2014/30/EU Electromagnetic Compatibility Directive.
The Restriction of the Use of certain Hazardous
2011/65/EU. &
2015/863/EU.
Substances in Electrical Equipment (RoHS) Directive.
2002/96/EC as The Waste Electrical and Electronic Equipment (WEEE) Directive.
amended by
2003/108/EC
And is in conformity with the applicable requirements of the following documents:
EN 62841-1:2015, EN 62841-2-11:2016, EN 55014-1:2017, EN 55014-2:2015,
EN 61000-3-2:2014, EN 61000-3-3:2013
Product Details
Description: R230RCP RECIPROCATING SAW
Evolution Model No: 0450001 230V UK, 0450003 230V EU, 045 0004 120V US
Brand Name: EVOLUTION
Voltage: 230V ~ 50 Hz, 120V ~ 60 Hz
Input: 850W
The technical documentation required to demonstrate that the product meets the requirements
of directive has been compiled and is available for inspection by the relevant enforcement
authorities, and verifies that our technical file contains the documents listed above
and that they are the correct standards for the product as detailed above.
Name and address of technical documentation holder.
Signed: Print: Barry Bloomer - Supply Chain & Procurement Director
Date: 20/06/2019
UK: Evolution Power Tools Ltd, Venture One, Longacre Close, Holbrook Industrial Estate, Sheeld, S20 3FR.
FR: Evolution Power Tools SAS, 61 Avenue Lafontaine, 33560, Carbon-Blanc, Bordeaux, France.
18
Page 19

www.evolutionpowertools.com
EN
Notes
19
Page 20

www.evolutionpowertools.com
ÍNDICE
INTRODUCCIÓN
Características técnicas de la máquina Página 22
Vibraciones Página 23
Etiquetas y símbolos Página 23
Uso previsto de esta herramienta eléctrica Página 24
Uso prohibido de esta herramienta eléctrica Página 24
PRECAUCIONES DE SEGURIDAD
Seguridad eléctrica Página 25
Uso en exteriores Página 25
Instrucciones generales de seguridad de la herramienta eléctrica Página 25
Instrucciones adicionales de seguridad Página 27
PRIMEROS PASOS
Desembalaje Página 28
Descripción general de la máquina Página 29
Instrucciones de funcionamiento Página 30
MANTENIMIENTO
Protección medioambiental Página 35
DECLARACIÓN DE CONFORMIDAD Página 36
20
Page 21

www.evolutionpowertools.com
ES
ESTE MANUAL DE INSTRUCCIONES SE
ESCRIBIÓ ORIGINALMENTE EN INGLÉS.
IMPORTANTE
Lea estas instrucciones de uso y seguridad
detenidamente y por completo.
Por su propia seguridad, si no está seguro
de algún aspecto sobre el uso de este equipo
contacte con el servicio de asistencia técnica.
Puede encontrar el número de teléfono en la
página web de Evolution Power Tools. Nuestra
organización dispone de varios teléfonos de
asistencia en todo el mundo. Su proveedor
también puede ofrecerle asistencia técnica.
PÁGINA WEB
www.evolutionpowertools.com
CORREO ELECTRÓNICO
enquiries@evolutionpowertools.com
Enhorabuena por adquirir una máquina de
Evolution Power Tools. Complete el registro
de su producto en línea como se explica
en el formulario de registro de garantía en
línea A5 que acompaña a esta máquina.
También puede escanear el código QR
impreso en el formulario A5 con un Smart
Phone. Esto le permitirá validar el periodo
de garantía de su máquina a través de la
página web de Evolution al introducir sus
datos y, así, disponer de un servicio rápido
si fuera necesario. Le estamos sinceramente
agradecidos por escoger
uno de nuestros productos Evolution Power
Tools.
21
Page 22

www.evolutionpowertools.com
ESPECIFICACIONES
CARACTERÍSTICAS TÉCNICAS
MÉTRICO IMPERIAL
DE LA MÁQUINA
Motor UE (230V ~ 50 Hz) 850W 3,7 A
Motor EE. UU. (120V ~ 60Hz) 850W 7A
Longitud de desplazamiento 28mm 1-1/8"
Velocidad variable (carreras por minuto) 0 - 2800cpm 0 - 2800cpm
Peso 2,7kg 5,9 lbs
CAPACIDADES DE CORTE MÉTRICO IMPERIAL
Acero dulce (grosor máximo) 20mm 3/4”
Madera (grosor máximo) 230mm 9-1/16”
Plástico (grosor máx.) 150mm 5-7/8”
DATOS DE RUIDO Y VIBRACIÓN
Nivel de presión acústica L
Potencia acústica L
Nivel de vibración (bajo carga) - Mango principal Madera - 10,357 m/s
Nivel de vibración (bajo carga) - Mango adicional Madera - 19,151 m/s2 , metal - 19,905 m/s
(bajo carga) 90,39 dB(A) K=3dB(A)
PA
(bajo carga) 101,39 dB(A) K=3dB(A)
WA
2
, metal - 21,223 m/s
K=1,5m/s
K=1,5m/s
2
2
2
2
22
Page 23

www.evolutionpowertools.com
ES
Nota: La medición de la vibración se hizo
en condiciones normales de acuerdo con la
norma EN 62841-1:2015
El valor total de vibración citado
se ha medido según un
método normal de examen y puede usarse
para comparar una herramienta con otra.
El valor total de vibración citado también
puede usarse en la evaluación preliminar
de la exposición humana
.
VIBRACIONES
ADVERTENCIA: al utilizar esta máquina, el
operario puede estar expuesto a altos niveles
de vibración transmitidos a la mano y al brazo.
Es posible que el operario pueda desarrollar
la «enfermedad de los dedos blancos» debido
a la vibración (síndrome de Raynaud). Esta
enfermedad puede reducir la sensibilidad de
la mano a la temperatura, así como producir
entumecimiento general. Los usuarios que
utilicen esta máquina de manera prolongada
o regular deben vigilar de cerca el estado de
sus manos y dedos. Si aparece alguno de los
síntomas, busque atención médica inmediata.
• La medición y la evaluación de la exposición
humana a las vibraciones transmitidas por
la mano en el lugar de trabajo se indican en
las normas:
BS EN ISO 5349-1:2001 y
BS EN ISO 5349-2:2002
• Muchos factores pueden inuir en
el nivel de vibración real durante el
funcionamiento, p. ej., el estado y la
orientación de las supercies de trabajo,
y el tipo y el estado de la máquina que se
está usando. Antes de cada uso, se deben
evaluar dichos factores y adoptar prácticas
de trabajo adecuadas donde sea posible. La
gestión de estos factores puede ayudar a
reducir los efectos de la vibración:
Manipulación
• Manipule la máquina con cuidado,
permitiendo que esta haga el trabajo.
• Evite un esfuerzo físico excesivo en
cualquiera de los controles de las
máquinas.
• Tenga en cuenta su seguridad y
estabilidad, así como la orientación de la
máquina durante su uso.
Supercie de trabajo
• Tenga en cuenta el material de la
supercie de trabajo, su estado,
densidad, resistencia, rigidez y
orientación.
ADVERTENCIA: la emisión de vibraciones al
usar la herramienta eléctrica puede variar del
valor total citado en función de la forma en
la que se use la herramienta. La necesidad de
identicar medidas de seguridad y de proteger
al operario se basa en una estimación de las
condiciones reales de uso (teniendo en cuenta
todas las partes del ciclo operativo, como las
veces que se desconecta la máquina
y cuando está en reposo, además del tiempo
que está funcionando de forma continuada).
ETIQUETAS Y SÍMBOLOS
ADVERTENCIA: no utilice la máquina
si faltan etiquetas de instrucciones y/o
advertencia, o si están dañadas. Póngase en
contacto con Evolution
Power Tools para sustituir las etiquetas.
Nota: todos o algunos de los siguientes
símbolos pueden aparecer en el manual o en
el producto.
23
Page 24

www.evolutionpowertools.com
Símbolo Descripción
Voltios
Amperios
Hercios
Velocidad
Corriente alterna
Velocidad sin carga
Utilice gafas protectoras
Utilice protección auditiva
Lea las instrucciones
Certificado CE
Certificado CSA
Residuos de Aparatos
Eléctricos y Electrónicos
Advertencia
Hz
Min
n
V
A
-1
~
o
Utilice protección contra el polvo
Protección de doble aislamiento
USO PREVISTO DE ESTA HERRAMIENTA
ELÉCTRICA
ADVERTENCIA: Este producto es una sierra
manual de movimiento alternativo y ha sido
diseñada para usarse con hojas especiales
de Evolution. Solamente utilice accesorios
diseñados para el uso de esta máquina y/o
aquellos recomendados especícamente por
Evolution Power Tools Ltd.
Esta máquina se puede usar para cortar,
si está equipada con una hoja adecuada,
y con la placa de contacto de la pieza de
trabajo rmemente sobre la pieza de
trabajor:
Madera
Acero dulce, aluminio y
muchos otros metales no ferrosos.
La mayoría de los plásticos.
USO PROHIBIDO DE ESTA HERRAMIENTA
ELÉCTRICA
ADVERTENCIA: Este producto es una sierra
manual de movimiento alternativo y debe
usarse solo como tal. No debe ser modicada
de ninguna manera ni usada para alimentar
ningún otro equipo, tampoco debe llevar
ningún otro accesorio que no aparezca en el
manual de instrucciones.
ADVERTENCIA: esta máquina no se debe
usar para cortar ningún material que pueda
contener amianto.
Si se sospecha de la presencia de amianto,
pida consejo a las autoridades pertinentes.
ADVERTENCIA: esta máquina no está
diseñada para ser utilizada por personas
(niños incluidos) con discapacidad psíquica,
sensorial o mental, o con falta de experiencia
y conocimiento, a no ser que hayan sido
supervisadas o instruidas en el uso seguro de
la máquina por una persona responsable de
su seguridad y competente en el uso seguro
de esta.
Debe supervisarse a los niños para asegurarse
de que no tienen acceso a la máquina ni
pueden jugar con ella.
24
Page 25

www.evolutionpowertools.com
ES
SEGURIDAD ELÉCTRICA
Esta máquina está equipada con el
enchufe moldeado y el cable de red
correctos para el mercado designado. Si
los hilos del cable de alimentación o
el enchufe están dañados de cualquier
modo, los debe sustituir un técnico
cualicado con repuestos originales.
USO EN EXTERIORES
ADVERTENCIA: para su protección, si va
a usar esta herramienta en exteriores no
debe exponerla a la lluvia o usarla en lugares
húmedos. No coloque la herramienta en
supercies húmedas. Si es posible, use un
banco de trabajo limpio y seco. Para obtener
una mayor protección, utilice un dispositivo
de corriente residual que interrumpa el
suministro si la corriente de fuga a tierra es
superior a 30 mA durante 30 ms. Compruebe
siempre el funcionamiento del dispositivo de
corriente residual antes de usar la máquina.
Si es necesario un alargador, debe ser de un
tipo adecuado para exteriores y etiquetado
para tal n.
Se deben seguir las instrucciones de los
fabricantes al utilizar un alargador.
INSTRUCCIONES GENERALES DE
SEGURIDAD PARA HERRAMIENTAS
ELÉCTRICAS
(Estas instrucciones generales de seguridad
para herramientas eléctricas son las que se
especifican en las normas EN 62841-1:2015, EN
62841-2-11:2016)
ADVERTENCIA: lea todas las advertencias e
instrucciones de seguridad. El no seguir las
instrucciones y advertencias puede provocar
una descarga eléctrica, incendios y/o lesiones
graves.
Guarde todas las advertencias e
instrucciones para poder consultarlas
en el futuro. El término «herramienta
eléctrica» de las advertencias se reere
a la herramienta alimentada por la
red eléctrica (con cable) o con baterías
(inalámbrica).
1) Advertencias generales de seguridad de
la herramienta eléctrica
[seguridad en la zona de trabajo]
a) Mantenga la zona de trabajo limpia y
bien iluminada. Las zonas desordenadas u
oscuras pueden provocar accidentes.
b) No utilice las herramientas eléctricas en
atmósferas explosivas, como cuando haya
líquidos inamables, gases o polvo.
Las herramientas eléctricas producen chispas
que pueden incendiar el polvo o los gases.
c) Mantenga a los niños y transeúntes
alejados cuando utilice una herramienta
eléctrica.
Las distracciones pueden hacerle perder el
control.
2) Advertencias generales de seguridad de
la herramienta eléctrica
[Seguridad eléctrica]
a) Los enchufes de la herramienta eléctrica
deben coincidir con las tomas de corriente.
No modique el enchufe de ningún modo.
No utilice adaptadores de enchufe con
las herramientas eléctricas conectadas
a tierra. Si las tomas de corriente coinciden
y los enchufes no se modican, se reduce
el riesgo de que se produzca una descarga
eléctrica.
b) Evite el contacto corporal con
supercies conectadas a tierra tales
como tuberías, radiadores, estufas y
refrigeradores.
El riesgo de descarga eléctrica aumenta
si su cuerpo está conectado a tierra.
c) No exponga las herramientas eléctricas
a la lluvia o a la humedad. Si se introduce
agua en una herramienta eléctrica aumentará
el riesgo de descarga eléctrica.
d) No utilice cable de forma incorrecta.
Nunca use el cable para transportar, tirar
o desenchufar la herramienta eléctrica.
Mantenga el cable lejos del calor, el aceite,
las esquinas cortantes o piezas móviles.
Los cables dañados o enredados aumentan
el riesgo de que se produzca una descarga
eléctrica.
e) Cuando trabaje con una herramienta
eléctrica en exteriores, use un alargador
adecuado para uso en exteriores. El uso
de un cable adecuado para uso en exteriores
reduce el riesgo de que se produzca una
descarga eléctrica.
f) Si es inevitable tener que usar una
herramienta eléctrica en un lugar húmedo,
es necesario utilizar una toma de corriente
residual (RCD) protegida.
El uso de un dispositivo de corriente residual
reduce el riesgo de que se produzca una
descarga eléctrica.
3) Advertencias generales de seguridad de
25
Page 26

www.evolutionpowertools.com
la herramienta eléctrica
[Seguridad personal].
a) Manténgase alerta, tenga cuidado
con lo que hace y use el sentido común
al utilizar una herramienta eléctrica. No
utilice una herramienta eléctrica cuando
esté cansado o haya tomado alcohol, o algún
tipo de fármaco o medicación. Un momento
de distracción mientras utiliza herramientas
eléctricas puede ocasionar lesiones personales
graves.
b) Utilice el equipo de protección
individual. Utilice siempre protección para
los ojos. El uso del equipo de seguridad, como
máscaras para el polvo, calzado antideslizante,
casco o protección auditiva para condiciones
adecuadas reducirá el riesgo de que se
produzcan lesiones personales.
c) Evite el encendido accidental.
Compruebe que el interruptor está en la
posición off (apagado) antes de conectar a la
fuente de alimentación o a las baterías, o de
coger o transportar la herramienta. Transportar
herramientas eléctricas con el dedo sobre el
interruptor o enchufar herramientas eléctricas
con el interruptor encendido puede ocasionar
accidentes.
d) Quite las llaves de ajuste o inglesa antes
de encender la herramienta eléctrica.
Una llave, por ejemplo una llave inglesa,
colocada en una pieza giratoria de la
herramienta eléctrica puede ocasionar
lesiones personales.
e) No se extralimite. Mantenga una
postura y equilibrio adecuados en todo
momento. Esto permitirá un mejor control
de la herramienta eléctrica en situaciones
inesperadas.
f) Vístase de manera adecuada. No use
ropa suelta ni joyas. Mantenga el pelo,
la ropa y los guantes alejados de las piezas
móviles. Las joyas, la ropa holgada y el cabello
largo pueden quedar atrapados en las piezas
móviles.
g) Si se proporcionan dispositivos para
la conexión de unidades de extracción y
recogida de polvo, asegúrese de que están
conectados y de que se usan de forma
adecuada. El uso de estos dispositivos puede
reducir los riesgos derivados del polvo.
4) Advertencias generales de seguridad de
la herramienta eléctrica
[Uso y cuidado de la herramienta
eléctrica].
a) No fuerce la herramienta eléctrica.
Utilice la herramienta eléctrica correcta
para su aplicación. La herramienta correcta
realizará el trabajo de una forma más precisa y
segura al ritmo para el que ha sido diseñada.
b) No utilice la herramienta eléctrica si el
interruptor no se enciende ni se apaga.
Las herramientas eléctricas que no se puedan
controlar con el interruptor son peligrosas y se
deben reparar.
c) Desconecte la herramienta eléctrica
de la fuente de alimentación y/o el
paquete de baterías de la herramienta
eléctrica antes de efectuar algún tipo de
ajuste, cambiar accesorios o almacenar
las herramientas eléctricas. Este tipo de
medidas de seguridad preventivas reducen
el riesgo de que la herramienta eléctrica
arranque por accidente.
d) Guarde las herramientas eléctricas
fuera del alcance de los niños y no permita
que personas que no estén familiarizadas
con la herramienta eléctrica o estas
instrucciones la usen. Las herramientas
eléctricas son peligrosas en manos de
personas inexpertas.
e) Realice un mantenimiento regular de
las herramientas eléctricas. Compruebe la
alineación incorrecta y la fijación de las piezas
móviles, la rotura de las piezas móviles y
cualquier otra condición que pueda afectar al
funcionamiento de las herramientas eléctricas.
Si está dañada, repare la herramienta
eléctrica antes de usarla. Muchos accidentes
se producen debido a un mantenimiento
deciente de las herramientas eléctricas.
f) Mantenga las herramientas de corte
limpias y aladas. Las herramientas de corte
con buen mantenimiento y bordes de corte
alados son menos propensas a trabarse y son
más fáciles de controlar.
g) Use la herramienta eléctrica, accesorios
y útiles, etc., de acuerdo con estas
instrucciones y teniendo en cuenta las
condiciones de funcionamiento y el
trabajo que se va a realizar. El uso de
la herramienta eléctrica para operaciones
diferentes a las previstas podría provocar una
situación peligrosa.
5) Advertencias generales de seguridad de
la herramienta eléctrica
[Servicio técnico]
a) Lleve la herramienta eléctrica a reparar
a un experto cualicado que utilice
solo piezas de repuesto originales. Esto
garantizará que se mantenga la seguridad de
26
Page 27

www.evolutionpowertools.com
ES
la herramienta eléctrica correctamente.
CONSEJOS PARA SU SALUD
ADVERTENCIA: al utilizar esta máquina
se pueden producir partículas de polvo. En
ocasiones, según los materiales con los que
trabaje, este polvo puede ser especialmente
perjudicial.
Si sospecha que la pintura de la supercie del
material que desea cortar contiene plomo,
busque ayuda profesional. No intente quitar
pintura a base de plomo. Solamente un
profesional debería hacerlo. Una vez que el
polvo se ha depositado en una supercie,
el contacto de la mano con la boca puede
llevar a la ingestión de plomo. Incluso la
exposición a niveles bajos de plomo puede
causar daños irreversibles en el cerebro y el
sistema nervioso. Los niños y los nonatos son
especialmente vulnerables.
Se recomienda que considere el riesgo
asociado a los materiales con los que trabaja
para reducir el riesgo de exposición.
Algunos materiales pueden producir polvo
dañino para su salud. Recomendamos el
uso de mascarillas reguladas con ltros
reemplazables cuando use esta máquina.
Siempre debe:
• Trabajar en una zona bien ventilada.
• Trabajar con un equipo de seguridad
aprobado, como mascarillas para el polvo
que hayan sido diseñadas especialmente
para ltrar partículas microscópicas.
ADVERTENCIA: la manipulación de cualquier
herramienta eléctrica puede provocar que se
lancen objetos externos contra los ojos, lo que
puede ocasionar daños graves en los mismos.
Antes de empezar a utilizar una herramienta
eléctrica, póngase siempre gafas con
protección lateral o una máscara que cubra
toda la cara cuando sea necesario.
INSTRUCCIONES ADICIONALES DE
SEGURIDAD
ADVERTENCIA: desconecte siempre la sierra
de movimiento alternativo de la red eléctrica
antes de cambiar las hojas, realizar el servicio
técnico, la limpieza o el ajuste de la sierra de
movimiento alternativo.
• Mantenga las manos lejos de la zona
de corte y de la hoja de corte. Sujete la
máquina agarrando las zonas de sujeción
aisladas con ambas manos. Si sujeta la sierra
con las dos manos, estas no podrán entrar
en contacto con la hoja.
• No use hojas desaladas o dañadas. Las
hojas dañadas o desaladas pueden
romperse fácilmente y son propensas
a atascarse, lo cual puede provocar
contragolpes.
• Compruebe siempre que la hoja está
instalada correctamente dentro del soporte
de hoja de la sierra. Lleve guantes de
protección al manipular una hoja y realice
una prueba dando un «tirón» cuando se
instale una nueva hoja para asegurarse de
que esta se ha «encajado» correctamente
en el soporte de la hoja.
• No use demasiada fuerza. El uso de fuerza
excesiva sobrecarga el motor y reduce la
eciencia de trabajo y la vida útil.
• Lleve siempre el EPI (Equipo de Protección
Individual) necesario para el trabajo que
vaya a realizar. Normalmente, este incluiría
gafas de seguridad o máscaras que cubren
toda la cara, máscaras para el polvo, ropa
de protección y calzado de seguridad,
protección para los oídos y casco de
seguridad, etc.
• El operario debe tener siempre en cuenta
el tendido del cable de alimentación de la
red eléctrica. El cable se debe tender de
modo que no pueda suponer un peligro de
tropiezo ni de ninguna otra clase y de modo
que no pueda entrar en contacto con la
hoja de la máquina.
• Compruebe siempre las paredes, los
suelos y los techos en busca de cables
eléctricos ocultos, tuberías de gas y/o agua
u otros servicios. El contacto con servicios
ocultos podría ser extremadamente
peligroso para el operario y podría causar
daños importantes en la propiedad. En la
mayoría de proveedores de herramientas
hay disponibles detectores que pueden
determinar la posición de los servicios
ocultos dentro o detrás de una pared, etc.
• Retire la hoja de un corte solamente cuando
la máquina se haya apagado y la hoja se
haya detenido completamente. La retirada
de una hoja en movimiento de un corte
podría provocar que la hoja en movimiento
golpee una supercie cercana, haciendo
que el operario experimente un fuerte
retroceso.
• A ser posible, asegúrese de que cualquier
pieza de trabajo esté rmemente sujeta
27
Page 28

www.evolutionpowertools.com
para evitar movimientos durante la
operación de corte.
• Nunca intente detener la hoja de corte
aplicando presión lateral a la hoja. Permita
que la hoja se detenga completamente
apagando la máquina y permita que el
motor se ralentice y se detenga de forma
normal.
• Compruebe siempre que la tensión del
suministro eléctrico es igual que la tensión
de suministro indicada en la placa de
características de la máquina. El uso de esta
máquina con una tensión de suministro
distinta a la que se indica en la placa de
características de la máquina podría dañar
la máquina y hacer que no fuera segura
desde el punto de vista eléctrico.
• No altere ni modique el cable de
alimentación. Esta sierra está equipada con
cable y enchufe aprobados para su país de
uso previsto. Si el cable de alimentación
o el enchufe moldeado están dañados de
cualquier modo, un técnico cualicado
debe sustituirlos por un modelo idéntico.
ADVERTENCIA: esta máquina no se debe
usar para cortar ningún material que pueda
contener amianto. Si se sospecha de la
presencia de amianto, pida consejo a las
autoridades pertinentes. No intente cortar
ningún material sospechoso hasta que las
autoridades pertinentes hayan declarado que
es seguro.
PRIMEROS PASOS
DESEMBALAJE
Precaución: este paquete contiene objetos
punzantes. Tenga cuidado al desembalarlo.
Saque la máquina del embalaje junto con
los accesorios suministrados. Revise con
atención para comprobar que la máquina
está en buenas condiciones y que cuenta con
todos los accesorios que se enumeran en este
manual. Asegúrese también de que todos los
accesorios estén completos. Si falta alguna
de las piezas, la máquina y los accesorios se
deben devolver juntos en su embalaje original
a su distribuidor. No tire el embalaje, guárdelo
durante todo el período de garantía. Deseche
el embalaje de forma respetuosa con el medio
ambiente. Si fuese posible, recíclelo. No
deje que los niños jueguen con las bolsas de
plástico vacías debido al riesgo de asxia.
ITEMS SUPPLIED
Descripción Cantidad
Sierra de movimiento
alternativo R230RCP
Paquete de 2 hojas
multiusos
(Incluye 1 hoja de acero fina
y 1 hoja multiusos)
Paquete de 2 hojas de
corte para madera
(Incluye 1 hoja para madera
verde
y 1 hoja para madera
general)
Manual de instrucciones 1
ACCESORIOS ADICIONALES
Además de los elementos estándar
suministrados con esta máquina, también
ponemos a su disposición los siguientes
accesorios que encontrará en la tienda en línea
de Evolution en
www.evolutionpowertools.com o en su
distribuidor local.
Descripción N.º de
Paquete de 2 hojas
multiusos
(Incluye 1 hoja de acero fina
y 1 hoja multiusos)
Paquete de 2 hojas de
corte para madera
(Incluye 1 hoja para madera
verde
y 1 hoja para madera
general)
1
1
1
pieza
045-0255
045-0254
28
Page 29

www.evolutionpowertools.com
ES
DESCRIPCIÓN GENERAL DE LA MÁQUINA
4
2
1
3
1. Hoja
2. Placa de contacto de la pieza de trabajo
3. Palanca de bloqueo de la placa de contacto
4. Selector de sujeción de la hoja
5. Gatillo interruptor
6. Control de la velocidad variable
7. Botón de bloqueo del gatillo
8. Botón de rotación del mango
8
5
6
A. Hoja multiusos
B. Hoja para madera general
C. Hoja para madera verde
D. Hoja de acero fina
7
A
B
C
D
29
Page 30

www.evolutionpowertools.com
Fig. 1
Fig. 2
INSTALAR O DESMONTAR UNA HOJA
ADVERTENCIA: realice estos procedimientos tan solo cuando
la máquina esté desconectada de la red de alimentación
eléctrica.
Nota: se recomienda que el operario lleve guantes protectores
cuando manipule las hojas. Se debe tener cuidado, ya que
una hoja usada recientemente podría estar caliente y/o
contaminada con residuos.
Para instalar una hoja:
• Asegúrese de que el soporte de la hoja está limpio y que no
contiene residuos u otros contaminantes.
• Gire hacia la izquierda y sujete el selector de sujeción de la
hoja.
(Fig. 1)
• Inserte completamente el vástago de la hoja en el soporte de
la hoja.
• Suelte la mordaza de la hoja para que vuelva a su posición
original.
• Compruebe que la hoja está segura.
ADVERTENCIA: es importante que el oricio en la espiga de
la hoja engrane con la espiga situada dentro del soporte de la
hoja.
Para desmontar una hoja:
• Si se ha usado recientemente, deje que la hoja se enfríe.
• Asegúrese de que la máquina está apuntando hacia abajo
para permitir que cualquier posible residuo se caiga.
• Gire hacia la izquierda y sujete el selector de sujeción de la
hoja.
• Tire suavemente de la hoja para sacarla del soporte de la
hoja.
Fig. 3
Nota: si se está sustituyendo la hoja porque ha llegado al nal
de su vida útil, échela directamente a un cubo de reciclaje.
PLACA DE CONTACTO DE LA PIEZA DE TRABAJO (Fig. 2)
ADVERTENCIA: para lograr la mayor ecacia de corte,
minimizar el riesgo de vibración y de saltos y/o rotura de la hoja,
la placa de contacto de la pieza de trabajo se debe mantener
rmemente en contacto con la pieza de trabajo.
Nota: la placa de trabajo de la pieza de trabajo se puede girar
y ajustar. Esta característica permite que la placa de contacto
se ajuste y esté a ras sobre la supercie de la pieza de trabajo,
incluso cuando el cuerpo principal de la máquina está situado
con un ligero ángulo respecto a dicha supercie.
ALCANCE Y CAPACIDAD DE CORTE
Al usar hojas de diferentes longitudes o alterar la posición de
mantenimiento de la placa de contacto de la pieza de trabajo,
es posible aumentar o disminuir el «alcance» general y la
capacidad de corte de la máquina.
(Fig. 3)
30
Page 31

www.evolutionpowertools.com
ES
Para ajustar la posición de la placa de contacto:
• Suelte la palanca de bloqueo de la placa de contacto. (Fig. 4)
• Empuje hacia dentro o tire hacia fuera de la placa de
contacto, según se requiera.
• Una vez que la placa esté en la posición deseada, empuje
la palanca de bloqueo de vuelta a su posición original para
bloquear la placa en posición.
• Compruebe que sea seguro.
EL GATILLO INTERRUPTOR
El gatillo interruptor on/o está situado dentro del mango
trasero de la máquina. (Fig. 5).
• Presione el gatillo interruptor para arrancar el motor de la
máquina.
• Suelte el gatillo interruptor para detener el motor de la
máquina.
INTERRUPTOR DE BLOQUEO
El gatillo está equipado con un interruptor de bloqueo. Para
utilizar la función de bloqueo:
• Presione completamente el gatillo para arrancar el motor de
la máquina.
• Mantenga presionado el interruptor de bloqueo. (Fig. 6)
• Suelte el gatillo y después suelte el interruptor de bloqueo.
Fig. 4
ADVERTENCIA: el motor funcionará de forma continua hasta
que se presione el gatillo y se active el interruptor de bloqueo.
EL SELECTOR DE CONTROL DEL ÍNDICE DE
DESPLAZAMIENTO
Se puede modicar el índice de desplazamiento de la máquina.
Hay un selector de control del índice de desplazamiento en el
gatillo. (Fig. 7).
Nota: la ubicación ergonómica de este selector de control
permite que un operario cualicado pueda ajustar el índice
de desplazamiento de la máquina durante las operaciones de
corte.
Al girar este selector se modicará el índice de desplazamiento
de la máquina desde aproximadamente 800 carreras por
minuto hasta un máximo de 2800 carreras por minuto.
Nota: recomendamos que el operario empiece cualquier
operación de corte usando un índice de desplazamiento lento
y que aumente el índice de desplazamiento para lograr un
rendimiento óptimo a medida que progrese el corte.
Una prueba práctica en un resto de material puede ser útil para
determinar la mejor tasa de carrera para cualquier aplicación o
material particular.
31
Fig. 5
Fig. 6
Fig. 7
Page 32

www.evolutionpowertools.com
Fig. 8
Fig. 9
MANGO GIRATORIO DE 180˚
El mango de la máquina se puede girar 180˚ y tiene 3 posiciones
para lograr el máximo control durante el corte.
Para girar el mango:
• Deslice y sujete el botón de rotación del mango hacia atrás.
(Fig. 8)
• Gire el mango 90˚ hasta la posición deseada.
• Suelte el botón de rotación.
• Compruebe que el mango es seguro y que el botón está
completamente enganchado.
ADVERTENCIA: los ajustes del mango solamente se pueden
realizar cuando el motor está apagado. Ajustar el mango
mientras se está usando la herramienta puede provocar
lesiones graves.
CORTE GENERAL
ADVERTENCIA: nunca arranque la máquina con la hoja en
contacto con la pieza de trabajo.
• Seleccione un índice de desplazamiento bajo.
• Sujete la máquina con ambas manos.
• Asegúrese de que la placa de contacto de la pieza de trabajo
está tocando rmemente la pieza de trabajo, pero no la hoja.
(Fig. 9).
• Encienda la máquina.
• Sujetando la máquina rmemente, introduzca muy poco
a poco la hoja en la pieza de trabajo hasta que corte
correctamente.
• Utilice el selector de control del índice de desplazamiento
hasta lograr el rendimiento de corte óptimo.
• Nunca «fuerce» la hoja. Permita que la hoja corte la pieza de
trabajo sin aplicar demasiada presión. Forzar la hoja reducirá
la vida útil de la misma, aumentará la probabilidad de rotura
de la hoja y sobrecargará el motor de la máquina.
ADVERTENCIA: si se atasca la hoja de la sierra, apague la
máquina de inmediato y desconéctela de la red eléctrica.
HOJAS ATASCADAS
ADVERTENCIA: las hojas atascadas pueden estar muy calientes
y/o contaminadas con residuos. El operario debe tener mucho
cuidado al intentar sacar una hoja atascada y emplear todo el
EPI necesario.
Para sacar una hoja atascara, habrá que ensanchar la ranura (el
corte de la sierra hecho por la hoja).
• Separe la máquina de la hoja usando el selector de sujeción
de la hoja y aoje la máquina con cuidado alejándola de la
hoja atascada.
• Ensanche la ranura con una herramienta apropiada hasta
que se pueda sacar la hoja de la pieza de trabajo.
32
Page 33

www.evolutionpowertools.com
ES
CORTE DE INMERSIÓN
ADVERTENCIA: el corte de inmersión es una técnica que solo
debe usarse en materiales de construcción blandos, como
placas de yeso, etc. No es un procedimiento adecuado para
materiales más duros y nunca se debe emplear en materiales
metálicos.
Nota: operarios no experimentados no deben intentar realizar
esta técnica.
Nota: solo se pueden usar hojas de corte de inmersión
especicas para tal n al intentar realizar un corte de inmersión.
Nota: Para reducir el riesgo de retroceso al realizar un corte de
inmersión. Se recomienda taladrar un agujero piloto y hacer el
corte de inmersión en el agujero como punto de partida, lo que
proporciona control y estabilidad adicional.
Para realizar cortes de inmersión:
• Complete cualquier marcado o todos los marcados de las
líneas de corte usando un lapicero, un marcador, etc. en la
pieza de trabajo antes de comenzar las operaciones.
• Sujete la máquina en ángulo respecto a la pieza de trabajo
con el borde inferior de la placa de contacto de la pieza
de trabajo apoyado rmemente contra la pieza de trabajo.
(Fig. 10).
Nota: la hoja no debe estar en contacto con la pieza de trabajo
en este momento. El operario también debe estar seguro de
que la hoja no entrará en contacto con la pieza de trabajo de
inmediato cuando se encienda la máquina.
• Ajuste la tasa de carrera al máximo.
• Encienda la máquina.
• Gire muy despacio la máquina usando el borde inferior de
la placa de contacto de la pieza de trabajo como apoyo.
Permita que la hoja entre gradualmente en la pieza de
trabajo.
• Cuando la placa de contacto descanse de forma plana sobre
la pieza de trabajo, prosiga con el corte de la forma habitual.
• Ajuste el índice de desplazamiento para un rendimiento de
corte óptimo.
Fig. 10
CORTE A RAS
El corte a ras es un corte muy cerca de una supercie como el
suelo, la pared o el techo, etc. Esta técnica permite al operario
cortar un material no deseado que sobresale, como vigas
redundantes, tuberías de soporte, etc. de un edicio.
ADVERTENCIA: el operario debe asegurarse de que cualquier
objeto arquitectónico redundante, etc. no esté «sometido a
corriente eléctrica» y que sea seguro cortarlo.
Nota: el corte a ras solo es posible con las hojas bimetálicas
superexibles.
33
Page 34

www.evolutionpowertools.com
Fig. 11
Para realizar un corte a ras:
• Seleccione e inserte la hoja de sierra correcta en la máquina.
• Coloque el lateral de la hoja de sierra directamente contra el
suelo, la pared, etc.
• Un borde lateral de la placa de contacto de la pieza de
trabajo debe estar en contacto con el suelo, la pared, etc.
• Encienda la máquina e introduzca poco a poco la hoja en la
pieza de trabajo.
• Ajuste el índice de desplazamiento para un rendimiento
óptimo.
• Corte la pieza de trabajo lentamente, permitiendo que la
hoja exible se curve según sea necesario. (Fig. 11).
• Permita que el lateral de la hoja exible se deslice
suavemente por el suelo, la pared, etc.
LIMPIEZA
ADVERTENCIA: la limpieza solo se puede realizar con la
máquina desconectada de la red de alimentación eléctrica.
Limpie el soporte de la hoja de la sierra y retire la suciedad
y/o residuos acumulados. Se debe retirar la hoja de la sierra
de la máquina para poder realizar una limpieza adecuada y
minuciosa más fácilmente.
Retire cualquier contaminante usando un cepillo de cerdas
blandas.
También se puede usar aire comprimido. En este caso, el
operario debe tomar todas las precauciones de seguridad
necesarias para salvaguardar el entorno circundante y a
cualquier persona que pueda estar presente. El operario debe
usar todo el EPI relevante.
El operario deben llevar gafas de protección para proteger sus
ojos de los residuos soplados.
MANTENIMIENTO
ADVERTENCIA: cualquier actividad de mantenimiento se debe
llevar a cabo con la máquina apagada y desconectada de la red
de suministro de energía eléctrica o de la batería.
Compruebe que todas las características de seguridad y las
protecciones están funcionando correctamente de forma
regular. Solo utilice esta máquina si las protecciones o
características de seguridad funcionan por completo.
Todos los cojinetes del motor de esta máquina están lubricados
de forma permanente. No es necesario volver a lubricarlos.
Utilice un paño limpio y ligeramente húmedo para limpiar
las partes de plástico de la máquina. No utilice disolventes ni
productos similares que podrían dañarlas.
34
Page 35

www.evolutionpowertools.com
ES
ADVERTENCIA: no intente limpiar
introduciendo objetos puntiagudos a través
de las aberturas de las cubiertas de las
máquinas, etc. Los conductos de ventilación se
deben limpiar con aire comprimido seco.
El exceso de chispas puede indicar que el
motor está sucio o que las escobillas de
carbono están desgastadas.
Si se tiene alguna sospecha de que esto
ocurra, lleve la máquina a servicio técnico
para que el personal cualicado reemplace los
cepillos.
PROTECCIÓN MEDIOAMBIENTAL
Los productos eléctricos no se deben tirar
con la basura doméstica. Recicle en los sitios
destinados para este n.
Consulte con la autoridad local o el
distribuidor para obtener información sobre
el reciclaje.
35
Page 36

www.evolutionpowertools.com
DECLARACIÓN DE CONFORMIDAD DE LA CE
De conformidad con EN ISO 17050-1:2004
El fabricante del producto cubierto por esta declaración es el siguiente:
UK: Evolution Power Tools Ltd, Venture One, Longacre Close, Holbrook Industrial Estate, Sheeld, S20 3FR.
FR: Evolution Power Tools SAS, 61 Avenue Lafontaine, 33560, Carbon-Blanc, Bordeaux, France.
El fabricante declara que la máquina, tal como se detalla en la presente declaración, cumple todas
las disposiciones pertinentes de la Directiva de Máquinas y otras directivas apropiadas, como
se detalla a continuación. El fabricante declara además, que la máquina, según se indica
detalladamente en la presente declaración, en los casos en los que sea aplicable, cumple con las
disposiciones pertinentes sobre los requisitos esenciales de seguridad y salud.
Las Directivas incluidas en esta declaración son las que se detallan a continuación:
2006/42/CE Directiva de máquinas.
2014/30/UE Directiva de Compatibilidad Electromagnética.
Directiva sobre las restricciones a la utilización de determinadas
2011/65/UE. y
2015/863/UE.
sustancias peligrosas en aparatos eléctricos y electrónicos (RoHS).
2002/96/CE como Directiva de Residuos de Aparatos Eléctricos y Electrónicos (WEEE).
Modificada por
2003/108/CE
Y está en conformidad con los requisitos aplicables de los siguientes documentos:
EN 62841-1:2015, EN 62841-2-11:2016, EN 55014-1:2017, EN 55014-2:2015, EN 610003-2:2014, EN 61000-3-3:2013
Detalles del producto
Descripción: SIERRA RECIPROCANTE R230RCP
N.º de modelo Evolution: 0450001 230V REINO UNI DO, 0450003 230V UE, 0450004 120V EE.UU.
Marca comercial: EVOLUTION
Voltaje: 230V ~ 50 Hz, 120V ~ 60 Hz
Entrada: 850 W
La documentación técnica necesaria para demostrar que el producto cumple con los requisitos de
la directiva se ha elaborado y está disponible para su inspección por las autoridades pertinentes, y
verifica que nuestro archivo técnico contiene los documentos enumerados anteriormente
y que estas son las regulaciones normales para el producto, como se detalla antes.
Nombre y dirección del titular de la documentación técnica.
Firmado: Impresión: Barry Bloomer - Director de adquisiciones y
cadena de suministro
Fecha: 20/06/2019
UK: Evolution Power Tools Ltd, Venture One, Longacre Close, Holbrook Industrial Estate, Sheeld, S20 3FR.
FR: Evolution Power Tools SAS, 61 Avenue Lafontaine, 33560, Carbon-Blanc, Bordeaux, France.
36
Page 37

www.evolutionpowertools.com
ES
Notas
37
Page 38

www.evolutionpowertools.com
SOMMAIRE
INTRODUCTION
Particularités de la machine Page 40
Vibration Page 41
Étiquettes et symboles Page 41
Usage prévu de cet outil électrique Page 42
Usage proscrit de cet outil électrique Page 42
MESURES DE SÉCURITÉ
Sécurité électrique Page 43
Utilisation en plein air Page 43
Consignes générales de sécurité pour les outils électriques Page 43
Consignes de sécurité supplémentaires Page 45
PRISE EN MAIN
Déballage Page 46
Présentation de la machine Page 47
Instructions d'utilisation Page 48
ENTRETIEN
Protection de l’environnement Page 53
DÉCLARATION DE CONFORMITÉ Page 54
38
Page 39

www.evolutionpowertools.com
FR
CE MANUEL D’INSTRUCTIONS A ÉTÉ
INITIALEMENT RÉDIGÉ EN ANGLAIS
IMPORTANT
Veuillez lire attentivement ces consignes
de fonctionnement et de sécurité dans leur
intégralité.
Pour votre propre sécurité, si vous avez des
doutes concernant un aspect de l’utilisation
de cet appareil, veuillez contacter l’assistance
technique appropriée dont le numéro se
trouve sur le site Internet d’Evolution Power
Tools. Nous assurons différentes lignes
d’assistance téléphoniques au sein de notre
organisation à l’échelle mondiale, mais de
l’aide technique est également disponible
auprès de votre fournisseur.
WEB
www.evolutionpowertools.com
EMAIL
enquiries@evolutionpowertools.com
Félicitations pour votre achat d’un appareil
d’Evolution Power Tools. Veuillez enregistrer
votre produit «en ligne» comme expliqué
dans la brochure A5 d’enregistrement en ligne
de la garantie fournie avec la machine. Vous
pouvez également scanner le code QR situé
sur la brochure A5 à l’aide d’un smartphone.
Cela vous permettra de valider la période
de garantie de l’appareil via le site Internet
d’Evolution en saisissant vos coordonnées,
garantissant ainsi un service rapide si
nécessaire. Nous vous remercions sincèrement
d’avoir choisi un produit Evolution Power
Tools.
39
Page 40

www.evolutionpowertools.com
PARTICULARITÉS
SPÉCIFICATIONS DE LA MACHINE MÉTRIQUE IMPÉRIAL
Moteur UE (230V ~ 50Hz) 850W 3,7A
Moteur USA (120V ~ 60 Hz) 850W 7A
Longueur de coup 28mm 1-1/8”
Vitesse variable (coups par minute) 0 - 2800 cpm 0 - 2800 cpm
Poids 2,7kg 5,9 lbs
CAPACITÉS DE COUPE MÉTRIQUE IMPÉRIAL
Acier doux (épaisseur max.) 20mm 3/4”
Bois (épaisseur maximale) 230mm 9-1/16”
Plastique (épaisseur maximale) 150mm 5-7/8”
NIVEAUX SONORES ET VIBRATOIRES
Pression acoustique L
Niveau de puissance sonore L
(sous charge) 90,39 dB(A) K=3 dB(A)
PA
(sous charge) 101,39 dB(A) K=3 dB(A)
WA
Niveau de vibration (sous charge) - poignée
principale
Niveau de vibration (sous charge) - poignée
auxiliaire
2
Bois - 10,357 m/s
, Métal - 21,223 m/s 2 K =
1,5 m/s
Bois - 19,151m/s 2, Métal - 19,905m/s 2 K =
1,5 m/s
40
2
2
Page 41

www.evolutionpowertools.com
FR
Remarque: La mesure des vibrations a
été eectuée dans des conditions standard
conformément à : EN 62841-1:2015
La valeur totale de vibration déclarée
a été mesurée conformément à une
méthode de test standard et peut être
utilisée pour comparer un outil à un autre.
La valeur totale de vibration déclarée peut
également être utilisée pour l’évaluation
préliminaire de l’exposition.
VIBRATION
ATTENTION: Lors de l’utilisation de cette
machine, l’opérateur peut être exposé à de
hauts niveaux de vibrations transmises à sa
main et à son bras.
Il se peut que l’opérateur développe le
syndrome de Raynaud. Ce syndrome
peut diminuer la sensibilité de la main
à la température et provoquer un
engourdissement général. Les personnes
utilisant cette machine de manière régulière
ou prolongée doivent surveiller attentivement
l’état de leurs mains et de leurs doigts. Si l’un
des symptômes devient apparent, consultez
immédiatement un médecin.
• La mesure de l’évaluation de l’exposition
de l’être humain aux vibrations transmises
par les mains en milieu professionnel sont
précisées dans les normes suivantes :
BS EN ISO 5349-1:2001 et
BS EN ISO 5349-2:2002
• Plusieurs facteurs peuvent inuencer
le niveau de vibration eectif lors de
l’utilisation, comme l’état et l’orientation des
surfaces de travail et le type et l’état de la
machine utilisée. Avant chaque utilisation,
vous devez évaluer de tels facteurs
et si possible, adopter des pratiques
professionnelles appropriées. La gestion de
ces facteurs peut aider à réduire
les eets des vibrations :
Manipulation
• Manipulez la machine avec soin
en lui laissant faire le travail.
• Évitez les eorts physiques excessifs sur
toutes les commandes de la machine.
• Prenez en considération votre sécurité et
votre stabilité ainsi que l’orientation de la
machine durant son utilisation.
Surface de travail
• Prenez en compte la matière de la
surface de travail,
son état, sa densité, sa résistance,
sa rigidité et son orientation.
ATTENTION: Les vibrations émises lors
de l’utilisation de l’outil électrique peuvent
diérer de la valeur totale déclarée, selon
les utilisations de l’outil. Il est nécessaire
d’identier les mesures de sécurité à adopter
et de protéger l’opérateur à partir d’une
estimation de l’exposition dans les conditions
eectives d’utilisation (en tenant compte de
toutes les étapes du cycle d’opération, par
exemple lorsque l’outil est mis à
l’arrêt, lorsqu’il tourne au ralenti, en plus du
déclenchement).
ÉTIQUETTES ET SYMBOLES
AVERTISSEMENT : N’utilisez pas cette
machine si les étiquettes d’avertissement
et/ou d’instructions sont manquantes ou
endommagées. Contactez Evolution
Power Tools pour le remplacement des
étiquettes.
Remarque: Tous les symboles suivants ou
certains d’entre eux peuvent apparaître dans
le manuel ou sur le produit.
41
Page 42

www.evolutionpowertools.com
Symbole Description
Volts
Ampères
Hertz
Vitesse
Courant alternatif
Vitesse à vide
poussière
Lire les instructions
Hz
Min
n
V
A
-1
~
o
Portez des lunettes de sécurité
Portez des protections auditives
Portez des protections contre la
USAGE PRÉVU DE CET OUTIL ÉLECTRIQUE
ATTENTION: Ce produit est une scie
alternative à commande manuelle conçue
pour fonctionner avec des lames Evolution
spéciques. Utilisez uniquement des
accessoires conçus pour l’utilisation avec
cette machine et/ou ceux spéciquement
recommandés par Evolution Power Tools Ltd.
Lorsqu’elle est équipée d’une lame
appropriée, et lorsque la plaque de
contact est fermement installée, la
machine peut être utilisée pour couper:
Bois
Acier doux, aluminium, et
beaucoup d’autres métaux non ferreux.
La plupart des plastiques.
USAGE PROSCRIT DE CET OUTIL
ÉLECTRIQUE
ATTENTION: Ce produit est une scie
alternative à commande manuelle et doit
être uniquement utilisé en tant que tel. Il ne
doit en aucun cas être modié ou utilisé pour
alimenter tout autre appareil ou entraîner tout
accessoire autre que ceux mentionnés dans le
présent manuel d’instructions.
ATTENTION: Cette machine ne doit pas être
utilisée pour couper des matériaux pouvant
contenir de l’amiante.
Si vous suspectez la présence d’amiante,
veuillez consulter les autorités compétentes
pour leur demander conseil.
Protection à double isolation
Certification CE
Certification CSA
Déchets d'équipements
électriques
et électroniques
Avertissement
ATTENTION: Cette machine n’est pas conçue
pour être utilisée par des personnes (y compris
les enfants) dont les capacités physiques,
sensorielles ou mentales sont réduites, ou
dénuées d’expérience ou de connaissances,
sauf si elles ont pu bénécier, par
l’intermédiaire d’une personne responsable de
leur sécurité et capable d’utiliser la machine en
sécurité, d’une surveillance ou d’instructions
préalables concernant l’utilisation de la
machine.
Les enfants doivent être surveillés pour
garantir qu’ils n’aient pas accès à cette
machine et qu’ils ne soient pas autorisés à
jouer avec.
42
Page 43

www.evolutionpowertools.com
FR
SÉCURITÉ ÉLECTRIQUE
Cette machine est équipée de la che
moulée et du câble électrique adéquats
pour le marché désigné. Si le câble
électrique ou la che sont endommagés
de quelque façon qui soit, ils doivent être
remplacés par des pièces d’origine par un
technicien compétent.
UTILISATION EN EXTÉRIEUR
ATTENTION: Si vous utilisez cet outil en
extérieur, ne l’exposez pas à la pluie et ne
l’utilisez pas dans des lieux humides pour
assurer votre protection. Ne placez pas l’outil
sur des surfaces humides. Utilisez un établi
sec et propre, si possible. Pour une protection
supplémentaire, utilisez un dispositif de
courant diérentiel résiduel (DCR) qui
interrompra l’alimentation si le courant de
fuite vers la terre excède 30 mA pour 30 ms.
Vériez toujours le bon fonctionnement du
dispositif diérentiel résiduel (DCR) avant
d’utiliser la machine.
Si vous devez utiliser une rallonge, celle-ci doit
convenir à l’utilisation en extérieur et cette
mention doit gurer sur l’étiquette.
Les instructions du fabricant doivent être
respectées lors de l’utilisation d’une rallonge.
CONSIGNES GÉNÉRALES DE SÉCURITÉ
POUR LES OUTILS ÉLECTRIQUES
(Ces consignes générales de sécurité pour les
outils électriques sont telles que spécifiées
dans EN 62841-1:2015, EN 62841-2-11:2016)
ATTENTION: Lisez tous les avertissements de
sécurité et les instructions. Le non-respect des
avertissements et des instructions peut causer
des électrocutions, des incendies et/ou des
blessures graves.
Conservez tous les avertissements de
sécurité et les instructions pour future
référence. Le terme « outil électrique »
dans les avertissements fait référence aux
outils électriques fonctionnant sur secteur
(avec l) ou sur batterie (sans l).
1) Avertissements généraux relatifs à la
sécurité de l’outil électrique
[sécurité de l’espace de travail]
a) L’espace de travail doit être propre et
susamment éclairé. Les espaces sombres
et encombrés sont propices aux accidents.
b) N’utilisez pas les outils électriques
dans des environnements présentant
des risques d’explosion, notamment en
présence
de liquides inammables, de gaz ou de
poussière.
Les outils électriques produisent des étincelles
qui peuvent enammer la poussière ou les
vapeurs.
c) Tenez les enfants et les autres personnes
présentes éloignés lorsque vous utilisez
un outil électrique.
Les distractions peuvent causer une perte de
contrôle.
2) Avertissements généraux relatifs à la
sécurité de l’outil électrique
[Sécurité électrique]
a) Les ches des outils électriques doivent
correspondre à la prise secteur utilisée. Ne
modiez jamais la che, de quelque façon
que ce soit. N’utilisez jamais d’adaptateurs
de che avec des outils reliés à la terre.
Les ches et prises non modiées réduisent le
risque d’électrocution.
b) Évitez tout contact du corps avec
des surfaces reliées à la terre, telles
que tuyaux, radiateurs, cuisinières et
réfrigérateurs.
Il existe un risque accru de choc
électrique si votre corps est en contact avec
la terre.
c) N’exposez pas les outils électriques ni à
la pluie ni à l’humidité. La pénétration d’eau
dans ces outils accroît le risque d’électrocution.
d) Ne maltraitez pas le cordon
d’alimentation. N’utilisez jamais le cordon
d’alimentation pour transporter l’outil et
ne débranchez jamais l’appareil en tirant
sur le cordon. Gardez le cordon à l’écart de
la chaleur, de l’huile, d’objets tranchants
et des pièces en mouvement. Un cordon
endommagé ou emmêlé accroît le risque de
choc électrique.
e) Pour les travaux à l’extérieur, utilisez
un cordon spécialement conçu à cet eet.
L’utilisation d’un cordon conçu pour l’usage
extérieur réduit le risque d’électrocution.
f) Si l’utilisation de l’outil électrique dans
des endroits humides est inévitable,
utilisez une prise protégée par un
dispositif de courant diérentiel résiduel
(DCR).
L’utilisation d’un dispositif de courant
43
Page 44

www.evolutionpowertools.com
diérentiel résiduel (DCR) réduit le risque
d’électrocution.
3) Avertissements généraux relatifs à la
sécurité de l’outil électrique
[Sécurité électrique]
a) Restez attentif, prêtez attention au
travail que vous êtes en train d’eectuer
et faites preuve de bon sens lors de
l’utilisation de tout outil électrique.
N’utilisez pas d’outil électrique en état de
fatigue ou sous l’influence de l’alcool, de
drogues ou de médicaments. Un moment
d’inattention pendant l’utilisation d’un outil
électrique peut entraîner de graves blessures.
b) Utilisez un équipement de protection
individuel. Portez toujours une protection
oculaire. L’équipement de sécurité, tel qu’un
masque ltrant, des chaussures de sécurité, un
casque ou une protection auditive, utilisé dans
des conditions appropriées réduira le risque
de blessures.
c) Prévenez les démarrages impromptus.
Assurez-vous que l’interrupteur est en position
d’arrêt avant de brancher l’outil à une prise
secteur et/ou un bloc-piles, de ramasser ou de
transporter l’outil. Porter un outil électrique
doigt sur l’interrupteur ou brancher
avec le
un outil électrique dont l’interrupteur est en
position de marche peut causer un accident.
d) Retirez les clés de réglage ou les clés à
écrous avant de mettre l’outil en marche.
Un outil ou une clé laissée sur une pièce
rotative d’un outil électrique pourrait entraîner
de graves dommages corporels.
e) Ne travaillez pas hors de portée. Gardez
un bon appui et un bon équilibre à tout
moment. Ceci permettra de mieux contrôler
l’outil en cas de situation imprévue.
f) Portez une tenue appropriée. Ne portez
pas de vêtements amples ni de bijoux.
Gardez les cheveux, les vêtements et les
gants à l’écart des pièces en mouvement. Les
vêtements amples, les bijoux ou les cheveux
longs peuvent être happés par les pièces en
mouvement.
g) Si les outils sont équipés de dispositifs
de dépoussiérage, assurez-vous qu’ils
soient connectés et correctement utilisés.
L’usage de ces dispositifs de collecte des
poussières peut réduire les dangers présentés
par la poussière.
4) Avertissements généraux relatifs à la
sécurité de l’outil électrique
[Utilisation et entretien des outils
électriques].
a) Ne forcez pas sur l’outil électrique.
Utilisez l’outil approprié pour le travail. Un
outil approprié exécutera le travail mieux et de
façon moins dangereuse s’il est utilisé dans les
limites prévues de son utilisation.
b) N’utilisez pas l’outil électrique si
l’interrupteur ne permet pas de le mettre
en marche ou de l’arrêter. Tout outil
électrique qui ne peut pas être contrôlé par
son interrupteur est dangereux et doit être
réparé.
c) Débranchez l’outil de sa source
électrique et/ ou de son bloc-piles avant
d’eectuer des réglages, de changer
les accessoires ou de ranger l’outil. Ces
mesures de sécurité préventives réduisent les
risques de démarrage accidentel de l’outil.
d) Lorsque vous avez ni de vous en
servir, rangez les outils électriques hors
de portée des enfants et empêchez les
personnes qui ne connaissent pas l’outil
électrique ou les présentes instructions
de l’utiliser. Les outils électriques sont
dangereux lorsqu’ils sont utilisés par des
personnes non initiées.
e) Entretenez les outils électriques. Vérifiez
qu’aucune pièce mobile n’est mal alignée
ou bloquée, qu’aucune pièce n’est brisée et
assurez-vous qu’aucun autre problème ne
risque d’affecter le bon fonctionnement de
l’outil. En cas de dommages, faites réparer
l’outil avant de l’utiliser de nouveau. Beaucoup
d’accidents sont causés par des outils
électriques mal entretenus.
f) Gardez les outils de coupe bien aûtés
et propres. Des outils correctement
entretenus et dont les tranchants sont bien
aûtés risquent moins de se bloquer et sont
plus faciles à contrôler.
g) Utilisez l’outil, les accessoires et les
embouts, etc., conformément à ces
instructions , en tenant compte des
conditions et du type de travail à exécuter.
L’usage d’un outil électrique pour des
applications pour lesquelles il n’est pas conçu
peut être dangereux.
5) Avertissements généraux relatifs à la
sécurité de l’outil électrique
[Réparation]
a) Les réparations doivent être conées
44
Page 45

www.evolutionpowertools.com
FR
à un technicien qualié, utilisant
exclusivement des pièces identiques à
celles d’origine. Ceci assurera le maintien de
la sécurité de l’appareil.
CONSEILS DE SANTÉ
ATTENTION: Lors de l’utilisation de cette
machine, des particules de poussière peuvent
être engendrées. Dans certains cas, en
fonction des matériaux avec lesquels vous
travaillez, cette poussière peut se révéler
particulièrement néfaste.
Si vous suspectez que la peinture à la surface
du matériau que vous souhaitez couper
contient du plomb, demandez les conseils
d’un professionnel. Les peintures au plomb
doivent être retirées uniquement par un
professionnel. Vous ne devez pas tenter de les
retirer vous-même. Une fois que la poussière
s’est déposée sur les surfaces, un contact
entre la main et la bouche peut donner lieu à
l’ingestion de plomb. L’exposition au plomb,
même en faible quantité, est susceptible de
provoquer des lésions irréversibles du cerveau
ou du système nerveux. Les jeunes enfants
et les enfants à naître sont particulièrement
vulnérables.
Il est conseillé de considérer les risques
associés aux matériaux avec lesquels vous
travaillez et de réduire les risques d’exposition.
Certains matériaux pouvant engendrer des
poussières potentiellement dangereuses
pour votre santé, nous vous conseillons
d’utiliser un masque agréé avec des ltres
interchangeables lors de l’utilisation de cette
machine.
Vous devriez toujours :
• Travailler dans un endroit bien aéré.
• Travailler en portant un équipement de
protection agréé tel que des masques antipoussière spécialement conçus pour ltrer
les particules microscopiques.
ATTENTION: L’utilisation de tout outil
électrique peut donner lieu à la projection
de corps étrangers vers vos yeux, risquant
de les endommager gravement. Avant de
commencer à utiliser un outil électrique,
portez toujours des lunettes de protection
munies d’écrans latéraux ou un masque facial
intégral si nécessaire.
CONSIGNES DE SÉCURITÉ
SUPPLÉMENTAIRES
ATTENTION: Toujours déconnecter la scie
alternative de la che d’alimentation avant le
changement de lame, l’entretien, le nettoyage
ou l’ajustement de la machine.
• N’approchez pas vos mains de la zone de
coupe ou de la lame. Tenez la machine par
les poignées isolées en utilisant vos deux
mains. Si vos deux mains tiennent la scie,
elles ne pourront pas être en contact avec la
lame.
• N’utilisez pas de lames émoussées ou
endommagées. Des lames émoussées
ou endommagées peuvent se casser
facilement et sont susceptibles de se
« bloquer », ce qui peut provoquer un
«recul».
• Toujours vérier que la lame est
correctement installée dans le support de
lame de la machine. Portez des gants de
protection lorsque vous tenez une lame et
réalisez un test lorsqu’une nouvelle lame est
installée pour vous assurer que la lame est
correctement «capturée» par le support de
lame.
• Ne forcez pas trop. Trop forcer entraîne une
surcharge du moteur et diminue l’ecacité
et la durée de vie de l’appareil.
• Toujours porter l’équipement de protection
individuel adéquat pour la tâche à exécuter.
Cela inclut, par exemple, les lunettes de
protection ou des protections oculaires, des
masques pour la poussière, des vêtements
de protection et des chaussures de sécurité,
une protection auditive et un casque de
protection, etc.
• L’opérateur doit toujours être conscient
de l’acheminement du câble électrique
principal. Le câble doit être acheminé de
telle manière qu’il ne peut provoquer une
chute ou un autre type de danger et qu’il
ne peut entrer en contact avec la lame de la
machine.
• Toujours vérier les murs, les sols et les
plafonds pour vérier la présence de
câbles cachés, de tuyaux d’eau ou de gaz
ou d’autres services. Toucher des câbles
cachés peut être extrêmement dangereux
pour l’opérateur, et peut causer de graves
dommages. Des détecteurs pouvant
déterminer la position de câbles cachés à
l’intérieur ou derrière les murs, etc… sont
45
Page 46

www.evolutionpowertools.com
disponibles chez la plupart des revendeurs.
• Ne retirer la lame d’une coupe que lorsque
la machine a été mise à l’arrêt, et que la
lame s’est complètement arrêtée. Retirer
une lame en mouvement d’une coupe peut
conduire la lame à toucher une surface
à proximité et causer à l’opérateur un
important «recul».
• Si possible, assurez-vous que la pièce à
usiner est fermement xée pour éviter les
mouvements pendant la coupe.
• Ne jamais essayer de stopper la lame en
coupe en appliquant une pression latérale
sur la lame. Laisser la lame s’arrêter en
stoppant la machine, permettant ainsi
au moteur de ralentir et de s’arrêter
normalement.
• Toujours vérier que la tension
d’alimentation de la che est la même que
celle indiquée sur la che signalétique de
la machine. Utiliser la machine avec une
tension d’alimentation diérente de celle
indiquée sur la che signalétique peut
endommager la machine et peut rendre
l’utilisation de la machine dangereuse d’un
point de vue électrique.
• N’altérez pas le cordon d’alimentation et ne
le modiez pas. Cette scie est équipée d’un
cordon et d’une prise d’alimentation agréés
pour le pays dans lequel elle sera utilisée. Si
la che moulée ou le cordon d’alimentation
sont endommagés de quelque façon
que ce soit ils doivent être remplacés par
des pièces d’origine par un technicien
compétent.
ATTENTION: Cette machine ne doit pas être
utilisée pour couper des matériaux pouvant
contenir de l’amiante. Si vous suspectez la
présence d’amiante, veuillez consulter les
autorités compétentes pour leur demander
conseil. Ne tentez pas de couper des matériaux
suspects avant que ceux-ci n’aient été déclarés
totalement sûrs par les autorités compétentes.
PRISE EN MAIN - DÉBALLAGE
Mise en garde : Cet emballage contient
des objets tranchants. Faites attention lors
du déballage. Retirez la machine et les
accessoires fournis de l’emballage. Vériez
soigneusement que la machine est en
bonne condition et que vous disposez de
tous les accessoires listés dans ce manuel.
Assurez-vous que tous les accessoires sont
complets. S’il manque une ou plusieurs pièces,
renvoyez la machine et ses accessoires dans
leur emballage d’origine au revendeur. Ne
jetez pas l’emballage. Conservez-le en bon
état tout au long de la période de garantie.
Jetez l’emballage d’une manière responsable
pour l’environnement. Recyclez si possible.
Ne laissez pas les enfants jouer avec des
sacs plastiques vides, en raison du risque de
suocation.
ARTICLES FOURNIS
Description Quantité
Scie alternative R230RCP 1
Paquet de 2 lames
polyvalentes
(Comprend 1 x lame acier
mince
et 1 x lame multi-usage)
Pack de 2 lames de coupe
de bois
(Comprend 1 x lame bois
vert
et 1 x lame bois général)
Manuel d’instructions 1
ACCESSOIRES COMPLÉMENTAIRES
En plus des articles standards fournis avec
cette machine, vous trouverez les accessoires
suivants dans la boutique en ligne d’Evolution
sur www.evolutionpowertools.com
ou chez votre revendeur local.
Description Pièce N°
Paquet de 2 lames
polyvalentes
(Comprend 1 x lame acier
mince et 1 x lame multiusage)
Pack de 2 lames de coupe
de bois
(Comprend 1 x lame
bois vert et 1 x lame bois
général)
1
1
045-0255
045-0254
46
Page 47

www.evolutionpowertools.com
FR
VUE D’ENSEMBLE DE LA MACHINE
4
2
1
3
1. Lame
2. PLAQUE de contact de la pièce
3. Levier de verrouillage de la plaque de
contact
4. Cadran de serrage de lame
5. Interrupteur à gâchette
6. Commande de vitesse variable
7. Bouton de verrouillage à gâchette
8. Bouton de rotation de poignée
8
A. Lame à usages multiples
B. Lame à bois général
C. Lame à bois vert
D. Lame en acier fin
5
7
6
A
B
C
D
47
Page 48

www.evolutionpowertools.com
INSTALLATION OU RETRAIT D’UNE LAME
ATTENTION: Ces procédures doivent être essayées
uniquement quand la machine est débranchée de sa source
d’alimentation.
Remarque: Nous recommandons à l’opérateur de porter des
gants lorsqu’il manipule les lames. Faites attention car une lame
récemment utilisée peut être chaude et/ou contaminée par des
débris.
Fig. 1
Fig. 2
Fig. 3
Pour installer une lame:
• S’assurer que le support de lame est propre et sans débris ou
autres contaminations.
• Tournez et maintenez le cadran de serrage de la lame dans le
sens contraire des aiguilles d’une montre.
(Fig. 1)
• Insérez complètement la tige de la lame dans le support.
• Relâchez la pince de lame an qu’elle retrouve sa position
initiale.
• Vériez que la lame est bien xée.
ATTENTION: Il est important que le trou dans la soie de la
lame soit bien en contact avec la «bonde» située à l’intérieur
du support de lame.
Pour enlever une lame:
• Si elle vient d’être utilisée, laisser la lame se refroidir.
• S’assurer que la machine soit tournée vers le bas pour laisser
tomber les débris.
• Tournez et maintenez le cadran de serrage de la lame dans le
sens contraire des aiguilles d’une montre.
• Retirez doucement la lame du support de lame.
Remarque: Si une lame doit être retirée car elle est à la n de
son cycle d’utilisation, jetez-la directement dans une poubelle
à recycler.
PLAQUE DE CONTACT DE LA PIÈCE (Fig. 2)
ATTENTION: Pour parvenir à la meilleure ecacité de coupe
possible et pour minimiser les risques de vibration, le saut et/ou
la cassure de la lame, la plaque de contact de la pièce doit être
maintenue fermement en contact avec la pièce.
Remarque: La plaque de contact de la pièce est pivotante
et réglable. Cela permet à la plaque de contact de s’ajuster et
de reposer sur une surface de la pièce même quand le corps
principal de la machine forme un angle faible par rapport à
cette surface.
48
Page 49

www.evolutionpowertools.com
FR
PORTÉE ET CAPACITÉ DE COUPE
En utilisant des lames de longueur diérentes et/ou en altérant
la position de fonctionnement de la plaque de contact, il est
possible d’augmenter ou de réduire la portée globale et la
capacité de coupe de la machine.
(Fig. 3)
Pour ajuster la position de la plaque de contact :
• Relâchez le levier de verrouillage de la plaque de contact.
(Fig. 4)
• Tirez ou poussez la plaque de contact si nécessaire.
• Une fois la plaque dans la position souhaitée, repoussez
le levier de verrouillage dans sa position d’origine pour
verrouiller la plaque.
• Vériez qu’elle soit bien xée.
L’INTERRUPTEUR À GÂCHETTE
L’interrupteur à gâchette ON/OFF est situé à l’intérieur de la
poignée arrière de la machine. (Fig. 5).
• Pressez l’interrupteur à gâchette pour mettre en marche le
moteur de la machine.
• Relâchez l’interrupteur à gâchette pour stopper le moteur de
la machine.
Fig. 4
Fig. 5
INTERRUPTEUR DE VERROUILLAGE
La gâchette est équipée d’un interrupteur de verrouillage. Pour
utiliser la fonction de verrouillage:
• Pressez complètement la gâchette pour mettre en marche le
moteur de la machine.
• Appuyez sur l’interrupteur de verrouillage et maintenez-le
enfoncé. (Fig. 6)
Relâchez la gâchette puis relâchez l’interrupteur de verrouillage.
ATTENTION: Le moteur fonctionnera de manière continue
jusqu’à ce que vous appuyiez sur la gâchette et que
l’interrupteur de verrouillage se déclenche.
LE BOUTON DE CONTRÔLE DE LA CADENCE DE COUP
La cadence de coup de la machine peut être variable. Un cadran
de contrôle de la fréquence de coup est situé sur la gâchette.
(Fig. 7).
Remarque: La position ergonomique du bouton de contrôle
permet à un opérateur qualié d’ajuster la cadence de coup de
la machine pendant les opérations de coupe.
Faire tourner le bouton altèrera la cadence de coup de la
machine d’environ 800 coups minute jusqu’à 2800 coups
49
Fig. 6
Fig. 7
Page 50

www.evolutionpowertools.com
Fig. 8
Fig. 9
minute.
Remarque: Nous recommandons à l’opérateur de commencer
une opération de coupe en utilisant une cadence lente, et
d’augmenter cette cadence de coup an d’atteindre une
performance optimale au fur et à mesure de l’opération de
coupe.
Un test pratique sur des petits morceaux de matériaux peut être
utile an de déterminer la meilleure cadence de coup pour tout
matériau ou application particuliers.
POIGNÉE ROTATIVE À 180˚
La poignée de la machine peut être pivotée de 180° et dispose
de 3 positions pour obtenir un contrôle maximal pendant la
coupe.
Pour faire pivoter la poignée:
• Faites glisser et maintenez le bouton de rotation de la
poignée vers l’arrière.
(Fig. 8)
• Faites pivoter la poignée de 90° dans la position souhaitée.
• Relâchez le bouton de rotation.
• Vériez que la poignée est sécurisée et que le bouton est
complètement engagé.
ATTENTION: Les réglages de la poignée ne doivent être
eectués que lorsque le moteur est éteint. Le réglage de la
poignée pendant l’utilisation de l’outil peut entraîner de graves
blessures.
COUPE GÉNÉRALE
ATTENTION: Ne jamais mettre en marche la machine avec une
lame en contact avec la pièce.
• Sélectionner une cadence de coup lente.
• Tenir la machine à deux mains.
• S’assurer que la plaque de contact de la pièce est bien en
contact avec la pièce mais que la lame ne l’est pas. (Fig. 9).
• Allumez la machine.
• De manière progressive, et en tenant fermement la machine,
introduisez la lame dans la pièce jusqu’à ce que la coupe soit
réussie.
• Actionner le bouton de contrôle de la cadence de coup
jusqu’à ce que la performance de coupe optimale soit
atteinte.
• Ne forcez jamais sur la lame. Laissez la lame couper la pièce
sans appliquer une force excessive. Forcer sur la lame réduira
sa durée d’utilisation, augmentera la probabilité de cassure
de la lame et pèsera sur le moteur de la machine.
50
Page 51

www.evolutionpowertools.com
FR
ATTENTION: Si la lame de la scie se bloque, éteignez la
machine immédiatement et déconnectez-la de la prise
électrique.
LAME BLOQUÉE
ATTENTION: Une lame coincée peut être très chaude et/ou
contaminée par des débris. L’opérateur doit faire très attention
lorsqu’il tente de retirer une lame coincée et utiliser tout
l’équipement de protection individuel nécessaire.
Pour retirer une lame coincée, le trait de scie (la coupe de scie
réalisée par la lame) devra être élargi.
• Retirez la lame de la machine en actionnant le cadran de
serrage de la lame, et fairtes doucement sortir la lame
coincée de la machine.
• Élargissez le trait de scie avec un outil adéquat jusqu’à ce que
la lame puisse être retirée de la pièce.
COUPE PLONGEANTE
ATTENTION: La coupe plongeante est une technique qui doit
uniquement être utilisée sur des matériaux de construction
souples tels que des plaques de plâtre, etc. Ce n’est pas une
technique appropriée pour des matériaux plus durs, et elle ne
doit jamais être utilisée sur des matériaux métalliques.
Fig. 10
Remarque: Cette technique ne doit pas être tentée par un
opérateur inexpérimenté.
Remarque: Seules des lames de coupe plongeante adéquates
doivent être utilisées lorsque l’on réalise une coupe plongeante.
Remarque: Pour réduire le risque de recul de la lame lors de la
coupe en plongée. Il est recommandé de percer un trou pilote
et de le couper en plongée comme point de départ, pour plus
de contrôle et de stabilité.
Pour réaliser une coupe plongeante:
• Réalisez le marquage de traits de découpe en utilisant un
crayon, un marqueur etc. sur la pièce avant de commencer
l’opération.
• Tenez la machine selon un angle de la pièce avec le bord
inférieur de la plaque de contact reposant fermement sur la
pièce. (Fig. 10).
Remarque: Lors de cette étape, la lame ne doit pas être en
contact avec la pièce. L’opérateur doit également s’assurer que
la lame n’entrera pas immédiatement en contact avec la pièce
lors de la mise en route de la machine.
• Réglez la cadence de la coupe à son niveau maximal.
51
Page 52

www.evolutionpowertools.com
• Mettez la machine en route.
• Faites pivoter la machine très lentement en utilisant le bord
inférieur de la plaque de contact de la pièce comme point
d’appui. Laissez la lame pénétrer progressivement dans la
pièce.
• Lorsque la plaque de contact est bien à plat contre la pièce,
la coupe se poursuit normalement.
• Ajustez la cadence de coup pour une performance de coupe
optimale.
Fig. 11
COUPE À RAS
La coupe à aeurement consiste à couper très près d’une
surface telle qu’un sol, un mur ou un plafond, etc. Cette
technique permet à l’opérateur de couper des matériaux en
saillie indésirables tels que des solives redondantes, des tuyaux,
etc., d’un bâtiment.
ATTENTION: L’opérateur doit s’assurer qu’aucun objet
redondant d’architecture etc. ne soit sous tension et qu’il est
sécurisé de le couper.
Remarque: Une coupe à ras est possible seulement en utilisant
les lames bi-métalliques extra souples fournies.
Pour réaliser une coupe à ras:
• Sélectionner et insérer la lame de scie adéquate dans la
machine.
• Positionner le côté de la lame directement contre le sol, le
mur, etc.
• Le bord de la plaque de contact de la pièce doit être en
contact avec le sol, le mur, etc.
• Mettre en marche la machine et introduire progressivement
la lame dans la pièce.
• Ajuster la cadence de coup pour une performance optimale.
• Couper la pièce lentement an de permettre à la lame souple
de se courber comme voulu. (Fig. 11).
• Permettre au côté de la lame souple de doucement glisser à
travers le mur, le sol, etc.
NETTOYAGE
ATTENTION: Tout nettoyage doit être réalisé uniquement
quand la machine est débranchée de sa source d’alimentation.
Nettoyer le support de lame et retirer toutes saletés et/
ou débris accumulés. La lame de scie doit être retirée de la
machine pour faciliter un nettoyage propre et rigoureux.
52
Page 53

www.evolutionpowertools.com
FR
Retirer tous contaminants en utilisant une
brosse à poils doux.
Il est également possible d’utiliser de l’air
comprimé. Si tel est le cas, l’opérateur
devra prendre toutes les précautions de
sécurité nécessaires pour protéger le milieu
environnant et les personnes alentour.
L’opérateur devra utiliser tout l’équipement de
protection individuel nécessaire.
Des lunettes de protection devront être
portées par l’opérateur an de se protéger des
débris projetés.
ENTRETIEN
ATTENTION: Toute opération d’entretien
doit être réalisée une fois la machine éteinte
et débranchée de la prise murale ou de la
batterie qui l’alimente.
Vériez régulièrement que tous les éléments
de sécurité et les protections fonctionnent
correctement. Utilisez cette machine
uniquement si tous les carters et dispositifs de
sécurité sont opérationnels.
Tous les paliers du moteur de cette machine
sont lubriés à vie. Aucune autre lubrication
n’est requise.
demandez à un technicien d’eectuer la
maintenance de la machine et de remplacer
les brosses.
PROTECTION ENVIRONNEMENTALELes
déchets électriques et les produits
mécaniques ne doivent pas être jetés avec les
ordures ménagères. Veuillez les jeter dans les
infrastructures de recyclage adéquates.
Contactez votre municipalité ou votre
revendeur pour des conseils sur le recyclage.
Nettoyez les pièces en plastique de la
machine à l’aide d’un chion propre
légèrement humide. N’utilisez pas de solvants
ou de produits similaires qui pourraient
endommager les parties en plastique.
ATTENTION: Ne tentez pas de nettoyer la
machine en insérant des objets pointus dans
les ouvertures de son carter, etc. Les évents
de la machine doivent être régulièrement
nettoyés à l’aide d’air sec comprimé.
Une quantité excessive d’étincelles peut
indiquer la présence de saletés dans le moteur
ou être un signe d’usure des balais en carbone.
Si vous suspectez un tel dysfonctionnement,
53
Page 54

www.evolutionpowertools.com
DÉCLARATION CE DE CONFORMITÉ
En accord avec EN ISO 17050-1:2004
Le fabricant du produit couvert par cette déclaration est :
UK: Evolution Power Tools Ltd, Venture One, Longacre Close, Holbrook Industrial Estate, Sheeld, S20 3FR.
FR: Evolution Power Tools SAS, 61 Avenue Lafontaine, 33560, Carbon-Blanc, Bordeaux, France.
Le fabricant déclare par la présente que la machine décrite dans cette déclaration remplit toutes
les dispositions pertinentes de la directive machines et d'autres directives appropriées, comme
détaillé ci-dessous. Le fabricant déclare en outre que la machine, comme décrite dans la présente
déclaration, satisfait aux dispositions concernées des exigences de base de santé et de sécurité.
Les directives couvertes par cette déclaration sont comme listées ci-après :
2006/42/CE Directive concernant les machines.
2014/30/UE Directive concernant la compatibilité électromagnétique.
Limitation de l’utilisation de certaines substances dangereuses
2011/65/UE. et
2015/863/UE.
dans les équipements électriques (directive RoHS).
2002/96/CE as Directive relative aux déchets d'équipements électriques et
modifiée par électroniques (DEEE).
2003/108/CE
Conforme aux dispositions prévues par les documents suivants :
EN 62841-1:2015, EN 62841-2-11:2016, EN 55014-1:2017, EN 55014-2:2015,
EN 61000-3-2:2014, EN 61000-3-3:2013
Détails du produit
Description : SCIE ALTERNATIVE R230RCP
Modèle Evolution n°: 0450001 230V RU, 0450003 230V UE, 0450004 120V USA
Nom du fabricant : EVOLUTION
Tension : 230V ~ 50 Hz, 120V ~ 60 Hz
Entrée : 850W
La documentation technique prouvant que le produit est conforme aux exigences de la directive
peut être consultée auprès des autorités de contrôle. Elle permet de vérifier que notre dossier
technique contient tous les documents répertoriés ci-dessus et qu’ils sont la norme pour le
produit, comme détaillé ci-dessus.
Nom et adresse du détenteur de la documentation technique.
Signature : Nom : Barry Bloomer - Directeur de la chaîne logistique
et de l’approvisionnement
Date : 20/06/2019
UK: Evolution Power Tools Ltd, Venture One, Longacre Close, Holbrook Industrial Estate, Sheeld, S20 3FR.
FR: Evolution Power Tools SAS, 61 Avenue Lafontaine, 33560, Carbon-Blanc, Bordeaux, France.
54
Page 55

www.evolutionpowertools.com
FR
Remarques
55
Page 56

AUS
Total Tools (Importing) Pty Ltd
20 Thackray Road
Port Melbourne
Vic 3207
FR
Evolution Power Tools SAS
61 Avenue Lafontaine
33560, Carbon-Blanc
Bordeaux
T: 03 9261 1900
UK
Evolution Power Tools Ltd
Venture One, Longacre Close
Holbrook Industrial Estate
Sheffield, S20 3FR
T: +44 (0)114 251 1022
DE +44 (0)114 251 1022
ES +34 91 114 73 85
NL +44 (0)114 251 1022
PL +48 33 822 09 22
PT +34 91 114 73 85
RO +44 (0) 114 2050458
RU +33 (0)5 57 30 61 89
TR +90 (0) 312 9001810
T: +33 (0)5 57 30 61 89
USA
Evolution Power Tools LLC
8363 Research Drive
Davenport, IA
52806
T: 1-833-MULTI SAW (TOLL FREE)
EPT QR CODE
V1 - BK6
 Loading...