

Page 1

STEALTH
185
Original written in UK English Date Published: 01 / 03 / 2016
EN
FR
DE
IT
Original Instructions
Originalanweisungen
Instructions originales
Istruzioni originali
Page 2

EN
FR
DE
IT
ENGLISH
Original Instructions
Page 3

4 5
www.evolutionpowertools.com www.evolutionpowertools.com
EN
FR
DE
IT
1.2 THIS INSTRUCTION MANUAL
WAS ORIGINALLY WRITTEN IN ENGLISH
(1.3)
IMPORTANT
Please read these operating and safety
instructions carefully and completely.
For your own safety, if you are uncertain
about any aspect of using this equipment
please access the relevant Technical Helpline,
the number of which can be found on the
Evolution Power Tools website. We operate
several Helplines throughout our worldwide
organization, but Technical help is also
available from your supplier.
WEB
www.evolutionpowertools.com
(1.4) Congratulations on your purchase of
an Evolution Power Tools Machine. Please
complete your product registration ‘online’
as explained in the A4 online guarantee
registration leaflet included with this machine.
You can also scan the QR code found on the
A4 leaflet with a Smart Phone. This will enable
you to validate your machine’s guarantee
period via Evolutions website by entering your
details and thus ensure prompt service if ever
needed. We sincerely thank you for selecting
a product from Evolution Power Tools.
EVOLUTION LIMITED GUARANTEE
Evolution Power Tools reserves the right
to make improvements and modifications
to the product design without prior notice.
Please refer to the guarantee registration
leaflet and/or the packaging for details of
the terms and conditions of the guarantee.
(1.5) Evolution Power Tools will, within
the guarantee period, and from the original
date of purchase, repair or replace any
goods found to be defective in materials or
workmanship. This guarantee is void if the
tool being returned has been used beyond the
recommendations in the Instruction Manual or
if the machine has been damaged by accident,
neglect, or improper service.
This guarantee does not apply to machines
and / or components which have been altered,
changed, or modified in any way, or subjected
to use beyond recommended capacities
and specifications. Electrical components
are subject to respective manufacturers’
warranties. All goods returned defective shall
be returned prepaid freight to Evolution Power
Tools. Evolution Power Tools reserves the right
to optionally repair or replace it with the same
or equivalent item.
There is no warranty – written or verbal –
for consumable accessories such as (following
list not exhaustive) blades, cutters, drills,
chisels or paddles etc. In no event shall
Evolution Power Tools be liable for loss or
damage resulting directly or indirectly from
the use of our merchandise or from any other
cause. Evolution Power Tools is not liable
for any costs incurred on such goods
or consequential damages.
No officer, employee or agent of Evolution
Power Tools is authorized to make oral
representations of fitness or to waive any
of the foregoing terms of sale and none
shall be binding on Evolution Power Tools.
Questions relating to this limited
guarantee should be directed to the
company’s head office, or call the
appropriate Helpline number.
TABLE OF CONTENTS
INTRODUCTION
Guarantee Page 5
Machine Specification Page 6
Vibration Page 7
Labels and Symbols Page 7
Intended use of this Power Tool Page 8
Prohibited use of this Power Tool Page 8
SAFETY PRECAUTIONS
Electrical Safety Page 9
Outdoor Use Page 9
General Power Tool Safety Instructions Page 9
Additional Safety Instructions Page 11
GETTING STARTED
Unpacking Page 13
Machine Overview Page 14
Assembly and Preparation Page 15
Operating Instructions Page 15
MAINTENANCE
Environmental Protection Page 19
Service Parts Diagram Page 20
DECLARATION OF CONFORMITY Page 21
English Page 2
Deutsch Seite 22
Français Page 42
Italiano Pagina 64
Page 4

6 7
www.evolutionpowertools.com www.evolutionpowertools.com
EN
FR
DE
IT
FURY SPECIFICATIONS
MACHINE SPECIFICATIONS METRIC IMPERIAL
Motor UK/EU (220-240V ~ 50Hz) 1200W 5A
Motor USA (120V ~ 60Hz) 1200W 10A
No Load Speed 3700min
-1
3700rpm
Weight 5.4kg 12lbs
CUTTING CAPACITIES METRIC IMPERIAL
Mild Steel Plate (Max Thickness) 3mm 1/8”
Mild Steel Box Section (Max Wall Thickness) 3mm 1/8”
Max Cutting Thickness (Wood 90
0
) 60mm 2-3/8”
Max Cutting Thickness (Wood 45
0
) 40mm 1-1/2”
BLADE SPECIFICATIONS METRIC IMPERIAL
Diameter 185mm 7-1/4”
Bore Diameter 20mm 3/4”
Number of Teeth 16 16
Max Blade Speed 3900min
-1
3900rpm
Thickness 1.7mm .067”
NOISE & VIBRATION DATA
Sound Pressure L
PA
(Under Load) 98,83dB(A) K=3dB(A)
Sound Power Level L
WA
(Under Load) 109,83dB(A) K=3dB(A)
Vibration Level (Under Load)
a
h,W=3,78 m/s
2
ah,M=1,596 m/s
2
K=1,5 m/s
2
(1.6) Note: The vibration measurement
was made under standard conditions in
accordance with: EN60745-1.
The declared vibration total value has been
measured in accordance with a standard test
method and may be used for comparing one
tool with another.
The declared vibration total value may also be
used in a preliminary assessment of exposure.
(1.7)
VIBRATION
WARNING: When using this machine the
operator can be exposed to high levels of
vibration transmitted to the hand and arm.
It is possible that the operator could develop
“Vibration white finger disease” (Raynaud
syndrome). This condition can reduce the
sensitivity of the hand to temperature as
well as producing general numbness.
Prolonged or regular users of this machine
should monitor the condition of their hands
and fingers closely. If any of the symptoms
become evident, seek immediate
medical advice.
• The measurement and assessment of
human exposure to hand-transmitted
vibration in the workplace is given in:
BS EN ISO 5349-1:2001 and
BS EN ISO 5349-2:2002.
• Many factors can influence the actual
vibration level during operation e.g. the
work surfaces condition and orientation
and the type and condition of the machine
being used. Before each use, such factors
should be assessed, and where possible
appropriate working practices adopted.
Managing these factors can help reduce the
effects of vibration:
Handling
• Handle the machine with care, allowing
the machine to do the work.
• Avoid using excessive physical effort on
any of the machines controls.
• Consider your security and stability,
and the orientation of the machine
during use.
Work Surface
• Consider the work surface material;
its condition, density, strength,
rigidity and orientation.
WARNING: The vibration emission during
actual use of the power tool can differ from
the declared total value depending on the
ways in which the tool is used.
The need to identify safety measures
and to protect the operator are based on
an estimation of exposure in the actual
conditions of use (taking account of all parts
of the operating cycle, such as the times the
tool is switched off, when it is running idle,
in addition to trigger time).
(1.8)
LABELS & SYMBOLS
WARNING: Do not operate this machine
if warning and/or instruction labels are
missing or damaged. Contact Evolution
Power Tools for replacement labels.
Note: All or some of the following symbols
may appear in the manual or on the product.
WARNING: Due to the power input of this product on start up, voltage drops may occur and
this can influence other equipment (e.g. dimming lights). So for technical reasons we advise,
if the mains-impedance is Zmax<0.431Ohm, these disturbances are not expected. If you require
further clarification, you may contact your local power supply authority.
Page 5

8 9
www.evolutionpowertools.com www.evolutionpowertools.com
EN
FR
DE
IT
(1.9)
Symbol Description
V
Volts
A
Amperes
Hz
Hertz
Min
-1
Speed
~
Alternating Current
n
o
No Load Speed
Wear Safety Goggles
Wear Ear Protection
Wear Dust Protection
Read Instructions
CE Certification
EAC Certification
CSA Certification
Waste Electrical &
Electronic Equipment
Triman - Waste Collection
& Recycling
Warning
(1.10)
INTENDED USE
OF THIS POWER TOOL
WARNING: This product is a Hand Operated
Circular Saw and has been designed to be
used with special Evolution blades. Only use
accessories designed for use in this machine
and/or those recommended specifically
by Evolution Power Tools Ltd.
When fitted with an appropriate blade
this machine can be used to cut:
Mild Steel
Aluminium
Wood
(1.11)
PROHIBITED USE
OF THIS POWER TOOL
WARNING: This product is a Hand Operated
Circular Saw and must only be used as such.
It must not be modified in any way, or used to
power any other equipment or drive any other
accessories other than those mentioned in this
Instruction Manual.
(1.13) WARNING: This machine is not
intended for use by persons (including
children) with reduced physical, sensory
or mental capabilities, or lack of experience
and knowledge, unless they have been given
supervision or instruction concerning the safe
use of the machine by a person responsible
for their safety and who is competent
in its safe use.
Children should be supervised to ensure
that they do not have access to, and are
not allowed to play with, this machine.
(1.14)
ELECTRICAL SAFETY
This machine is fitted with the correct
moulded plug and mains lead for the
designated market. If the supply cord is
damaged, it must be replaced by a special
cord or assembly available from the
manufacturers or its service agent.
(1.15)
OUTDOOR USE
WARNING: For your protection if this tool is to
be used outdoors it should not be exposed to
rain, or used in damp locations. Do not place
the tool on damp surfaces. Use a clean, dry
workbench if available. For added protection
use a residual current device (R.C.D.) that will
interrupt the supply if the leakage current to
earth exceeds 30mA for 30ms. Always check
the operation of the residual current device
(R.C.D.) before using the machine.
If an extension cable is required it must be a
suitable type for use outdoors and so labelled.
The manufacturers instructions should be
followed when using an extension cable.
(2.1)
POWER TOOL GENERAL
SAFETY INSTRUCTIONS
(These General Power Tool Safety Instructions
are as specified in EN 60745-1:2009).
WARNING: Read all safety warnings and
instructions. Failure to follow the warnings
and instructions may result in electric shock,
fire and/ or serious injury.
Save all warnings and instructions for
future reference. The term “power tool” in
the warnings refers to your mains-operated
(corded) power tool or battery-operated
(cordless) power tool.
(2.2) 1) General Power Tool
Safety Warnings [Work area safety]
a) Keep work area clean and well lit.
Cluttered or dark areas invite accidents.
b) Do not operate power tools in explosive
atmospheres, such as in the presence of
flammable liquids, gasses or dust. Power
tools create sparks which may ignite the
dust or fumes.
c) Keep children and bystanders away while
operating power tool. Distractions can cause
you to lose control.
(2.3) 2) General Power Tool Safety
Warnings [Electrical Safety]
a) Power tool plugs must match the outlet.
Never modify the plug in any way. Do not use
any adapter plugs with earthed (grounded)
power tools. Unmodified plugs and matching
outlets will reduce the risk of electric shock.
b) Avoid body contact with earthed or
grounded surfaces, such as pipes, radiators,
ranges and refrigerators. There is an
increased risk of electric shock if your body
is earthed or grounded.
c) Do not expose power tools to rain or wet
conditions. Water entering a power tool will
increase the risk of electric shock.
d) Do not abuse the cord. Never use the cord
for carrying, pulling or unplugging the power
tool. Keep cord away from heat, oil, sharp edges
or moving parts. Damaged or entangled cords
increase the risk of electric shock.
e) When operating a power tool outdoors,
use an extension cord suitable for outdoor
use. Use of a cord suitable for outdoor use
reduces the risk of electric shock.
f) If operating a power tool in a damp
location is unavoidable, use a residual
current device (RCD) protected supply.
Use of an RCD reduces the risk of
electric shock.
Page 6

10 11
www.evolutionpowertools.com www.evolutionpowertools.com
EN
FR
DE
IT
(2.4) 3) General Power Tool Safety
Warnings [Personal Safety].
a) Stay alert, watch what you are doing and
use common sense when operating a power
tool. Do not use a power tool while you are
tired or under the influence of drugs, alcohol
or medication. A moment of inattention while
operating power tools may result in serious
personal injury.
b) Use personal protective equipment.
Always wear eye protection. Protective
equipment such as dust masks, non-skid safety
shoes, hard hat or hearing protection used
for appropriate conditions will reduce
personal injuries.
c) Prevent unintentional starting. Ensure the
switch is in the off-position before connecting
to power source and or battery pack, picking
up or carrying the tool. Carrying power tools
with your finger on the switch or energising
the power tools that have the switch on
invites accidents.
d) Remove any adjusting key or wrench
before turning the power tool on. A wrench
or key left attached to a rotating part of
a power tool may result in personal injury.
e) Do not overreach. Keep proper footing
and balance at all times. This enables better
control of the power tool in unexpected
situations.
f) Dress properly. Do not wear loose clothing
or jewellery. Keep your hair, clothing and
gloves away from moving parts. Loose clothes,
jewellery or long hair can be caught in
moving parts.
g) If devices are provided for the connection
of dust extraction and collection facilities,
ensure that these are connected and
properly used. Use of dust collection
can reduce dust-related hazards.
(2.5) 4) General Power Tool Safety
Warnings [Power tool use and care].
a) Do not force the power tool. Use the
correct power tool for your application. The
correct power tool will do the job better and
safer at a rate for which it was designed.
b) Do not use the power tool if the switch
does not turn it on or off. Any power tool
that cannot be controlled with the switch
is dangerous and must be repaired.
c) Disconnect the power tool from the
power source and/or battery pack from the
power tool before making any adjustments,
changing accessories, or storing power
tools. Such preventative safety measures
reduce the risk of starting the power
tool accidentally.
d) Store idle power tools out of the reach
of children and do not allow persons
unfamiliar with the power tool or these
Instructions to operate the power tool.
Power tools are dangerous in the hands of
untrained users.
e) Maintain power tools. Check for
misalignment or binding of moving parts,
breakage of moving parts and any other
condition that may affect the power tools
operation. If damaged, have the power tool
repaired before use. Many accidents are
caused by poorly maintained power tools.
f) Keep cutting tools sharp and clean.
Properly maintained cutting tools with
sharp cutting edges are less likely to bind
and are easier to control.
g) Use the power tool, accessories and
tool bits etc. in accordance with these
instructions, taking into account the
working conditions and the work to
be performed. Use of the power tool for
operations different from those intended
could result in a hazardous situation.
(2.6) 5) General Power Tool
Safety Warnings [Service]
a) Have your power tool serviced by a
qualified repair person using only identical
replacement parts. This will ensure that the
safety of the power tool is maintained.
(2.7)
HEALTH ADVICE
WARNING: When using this machine,
dust particles may be produced. In some
instances, depending on the materials you
are working with, this dust can be particularly
harmful. If you suspect that paint on the
surface of material you wish to cut contains
lead, seek professional advice. Lead based
paints should only be removed by
a professional and you should not
attempt to remove it yourself.
Once the dust has been deposited on
surfaces, hand to mouth contact can result
in the ingestion of lead. Exposure to even
low levels of lead can cause irreversible brain
and nervous system damage. The young and
unborn children are particularly vulnerable.
You are advised to consider the risks
associated with the materials you are working
with and to reduce the risk of exposure.
As some materials can produce dust that may
be hazardous to your health, we recommend
the use of an approved face mask with
replaceable filters when using this machine.
You should always:
• Work in a well-ventilated area.
• Work with approved safety equipment, such
as dust masks that are specially designed to
filter microscopic particles.
(2.8) WARNING: the operation of any power
tool can result in foreign objects being thrown
towards your eyes, which could result in
severe eye damage. Before beginning power
tool operation, always wear safety goggles
or safety glasses with side shield or a full face
shield where necessary.
(3.0)
ADDITIONAL SAFETY
INSTRUCTIONS
(3.1) a) DANGER: Keep hands away from
cutting area and the blade. Keep your
second hand on auxiliary handle, or motor
housing. If both hands are holding the saw,
they cannot be cut by the blade.
b) Do not reach underneath the workpiece.
The guard cannot protect you from the blade
below the workpiece.
c) Adjust the cutting depth to the thickness
of the workpiece. Less than a full tooth of
the blade teeth should be visible below the
workpiece.
d) Never hold piece being cut in your hands
or across your leg. Secure the workpiece to
a stable platform. It is important to support
the work properly to minimize body exposure,
blade binding, or loss of control.
e) Hold power tool by insulated gripping
surfaces when performing an operation
where the cutting tool may contact hidden
wiring or its own cord. Contact with a “live”
wire will also make exposed metal parts of the
power tool “live” and shock the operator.
f) When ripping always use a rip fence
or straight edge guide. This improves the
accuracy of cut and reduces the chance
of blade binding.
g) Always use blades with correct size and
shape (diamond versus round) of arbor
holes. Blades that do not match the mounting
hardware of the saw will run eccentrically,
causing loss of control.
h) Never use damaged or incorrect blade
washers or bolt. The blade washers and
bolt were specially designed for your saw,
Page 7
12 13
www.evolutionpowertools.com www.evolutionpowertools.com
EN
FR
DE
IT
for optimum performance and safety
of operation.
i) Do not use High Speed Steel (HSS)
saw blades.
j) Inspect the machine and the blade
before each use. Do not use deformed,
cracked, worn or otherwise damaged blades.
k) Never use the saw without the original
guard protection system. Do not lock
the moving guard in the open position.
Ensure that the guard operates freely
without jamming.
l) Only use blades that comply with the
characteristics specified in this manual.
Before using accessories, always compare
the maximum allowed RPM of the
accessory with the RPM of the machine.
(3.2) Causes and operator
prevention of kickback:
Kickback is a sudden reaction to a pinched,
bound or misaligned saw blade, causing an
uncontrolled saw to lift up and out of the
workpiece toward the operator:
1. When the blade is pinched or bound
tightly by the kerf closing down, the blade
stalls and the motor reaction drives the
unit rapidly back toward the operator;
2. If the blade becomes twisted or
misaligned in the cut, the teeth at the
back edge of the blade can dig into the top
surface of the workpiece causing the blade
to climb out of the kerf and jump back
towards the operator.
(3.3) Kickback is the result of saw misuse
and/or incorrect operating procedures or
conditions and can be avoided by taking
proper precautions as given below.
a) Maintain a firm grip with both hands
on the saw and position your arms to
resist kickback forces. Position your body
to either side of the blade, but not in line
with the blade. Kickback could cause the
saw to jump backwards, but kickback forces
can be controlled by the operator, if proper
precautions are taken.
b) If the blades are binding, or when
interrupting a cut for any reason, release
the trigger and hold the saw motionless
in the material until the blades come to a
complete stop. Never attempt to remove the
saw from the work or pull the saw backward
while the blades are in motion or kickback may
occur. Investigate and take corrective actions
to eliminate the cause of blade binding.
c) When restarting a saw in the workpiece,
centre the saw blade in the kerf and check that
saw teeth are not engaged into the material. If
saw blade is binding, it may walk up or kickback
from the workpiece as the saw is restarted.
d) Support large panels to minimise
the risk of blade pinching and kickback.
Large panels tend to sag under their own
weight. Supports must be placed under
the panel on both sides, near the line
of cut and near the edge of the panel.
e) Blade depth and bevel adjusting locking
levers must be tight and secure before
making a cut. If the blade adjustment
shifts while cutting it may cause binding
and kickback.
f) Do not use dull or damaged blades.
Unsharpened or improperly set blades
produce a narrow kerf causing excessive
friction, blade binding and kickback.
g) Use extra caution when making a “plunge
cut” into existing walls or other blind areas.
The protruding blade may cut objects that
can cause kickback.
h) Check lower guard for proper closing
before each use. Do not operate the saw if
lower guard does not move freely and close
instantly. Never clamp or tie the lower guard into
the open position. If saw is accidentally dropped,
lower guard may be bent. Raise the lower guard
with the retracting handle and make sure it
moves freely and does not touch the blade or
any other part, in all angles and depths of cut.
i) Check the operation of the lower guard
spring. If the guard and the spring are not
operating properly, they must be serviced
before use. Lower guard may operate
sluggishly due to damaged parts, gummy
deposits, or a build-up of debris.
j) Lower guard may be retracted manually
only for special cuts such as “plunge cuts”
and “compound cuts.” Raise lower guard
by retracting handle and as soon as blade
enters the material, the lower guard must be
released. For all other sawing, the lower guard
should operate automatically.
k) Always observe that the lower
guard is covering the blade before
placing saw down on a bench or the floor.
An unprotected, coasting blade will cause the
saw to walk backwards, cutting whatever is in
its path. Be aware of the time it takes for the
blade to stop after switch is released.
(3.4) WARNING: If any parts are missing, do
not operate your machine until the missing
parts are replaced. Failure to follow this rule
could result in serious personal injury.
(4.1)
GETTING STARTED - UNPACKING
Caution: This packaging contains sharp
objects. Take care when unpacking. Remove
the machine, together with the accessories
supplied from the packaging. Check carefully
to ensure that the machine is in good
condition and account for all the accessories
listed in this manual. Also make sure that all
the accessories are complete.
If any parts are found to be missing,
the machine and its accessories should
be returned together in their original
packaging to the retailer.
Do not throw the packaging away; keep it safe
throughout the guarantee period. Dispose
of the packaging in an environmentally
responsible manner. Recycle if possible.
Do not let children play with empty plastic
bags due to the risk of suffocation.
(4.2)
ITEMS SUPPLIED
Description Quantity
Instruction Manual 1
Multipurpose Blade (Fitted) 1
Hex Key (Blade Change) 1
Parallel Edge Guide 1
4.3
ADDITIONAL ACCESSORIES
In addition to the standard items supplied
with this machine the following accessories
are also available from the Evolution online
shop at www.evolutionpowertools.com
or from your local retailer.
(4.4)
Description Part No
Multipurpose Blade FURY
185
Diamond Blade DIAMOND
185
Page 8
14 15
www.evolutionpowertools.com www.evolutionpowertools.com
EN
FR
DE
IT
5
4
3
6
1
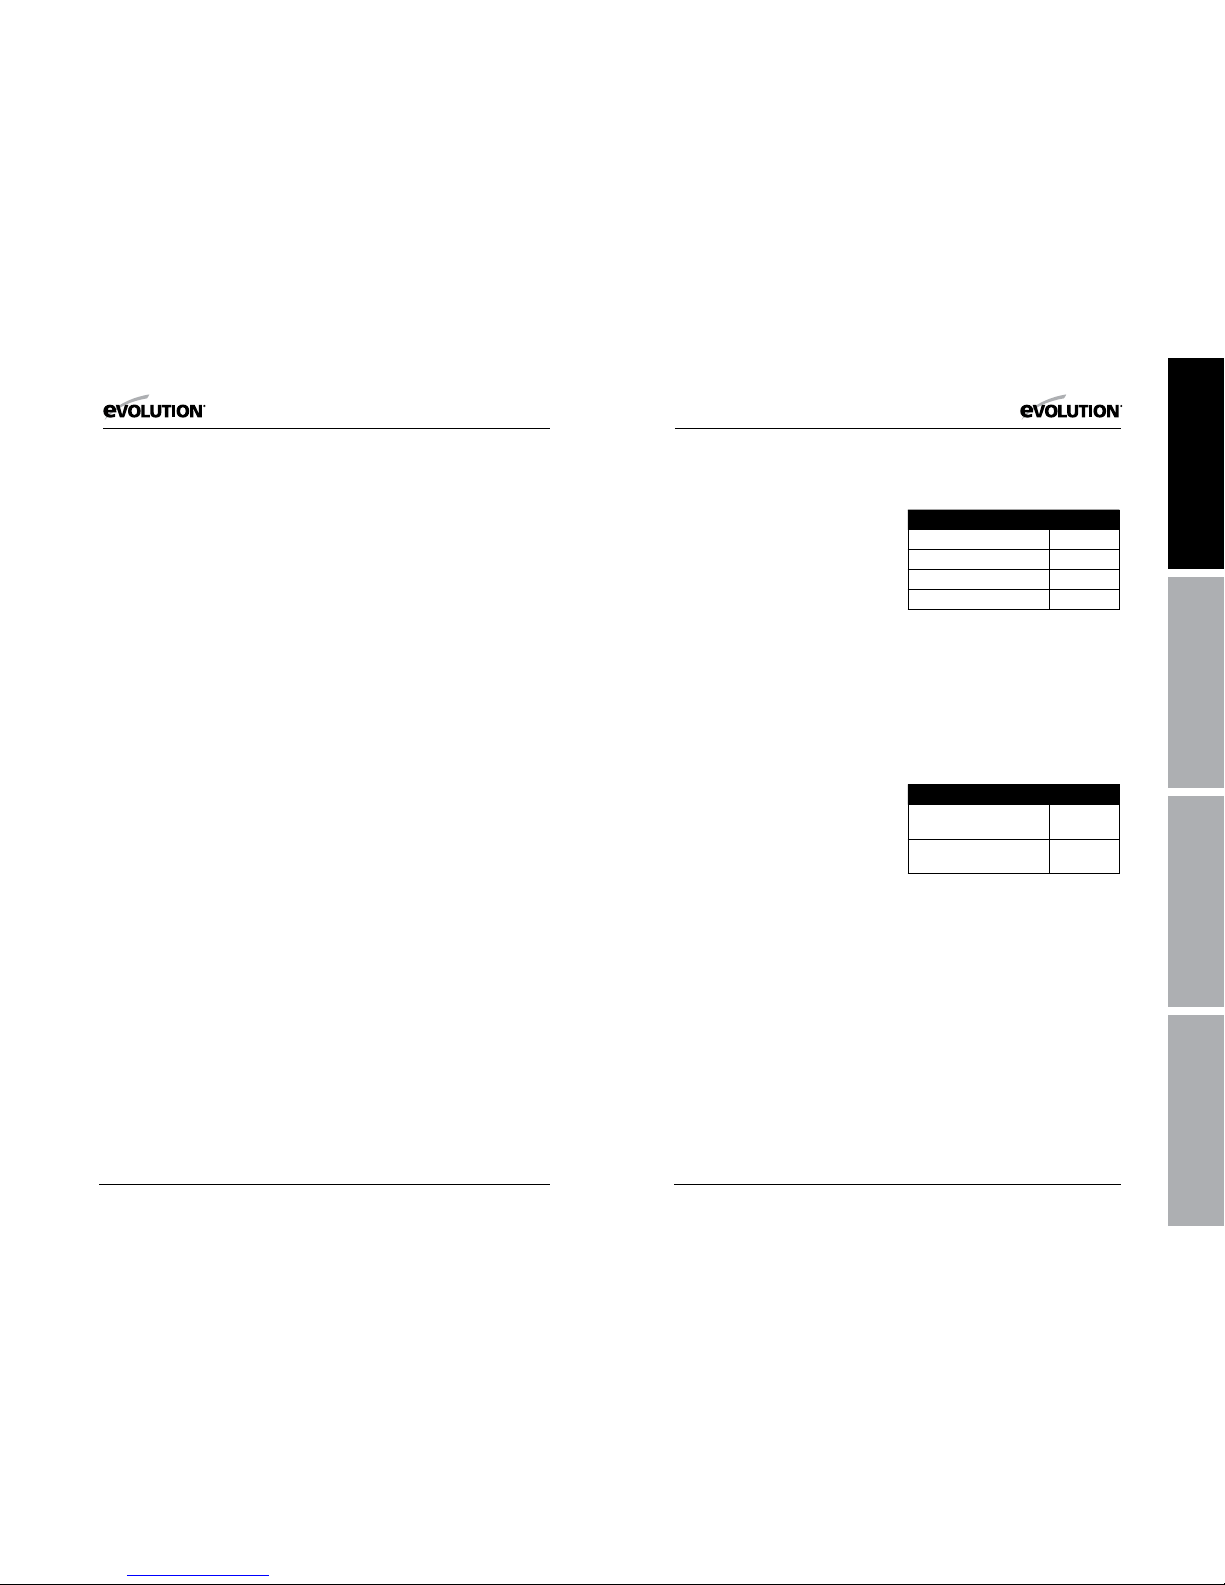
MACHINE OVERVIEW
1. REAR HANDLE
2. FRONT HANDLE
3. UPPER BLADE GUARD
4. LOWER BLADE GUARD
5. SOLE PLATE
6. CHIP EXHAUST PORT
(10)
GETTING STARTED - PREPARATION
WARNING: Always disconnect the saw from
the power source before making any adjustments.
This saw is equipped with an approved mains
lead and plug for its intended Country of use.
Do not alter or modify the mains lead.
(<10.1) INSTALLING/REMOVING A BLADE
WARNING: Only use genuine Evolution blades which
are designed for this machine. Ensure that the maximum
speed of the blade is compatible with the machine.
Only perform this operation with the machine
disconnected from the power supply.
Note: It is recommended that the operator considers wearing
protective gloves when handling the blade during installation
or when changing the machines blade. (>10.1)
• Place saw on a level, secure surface.
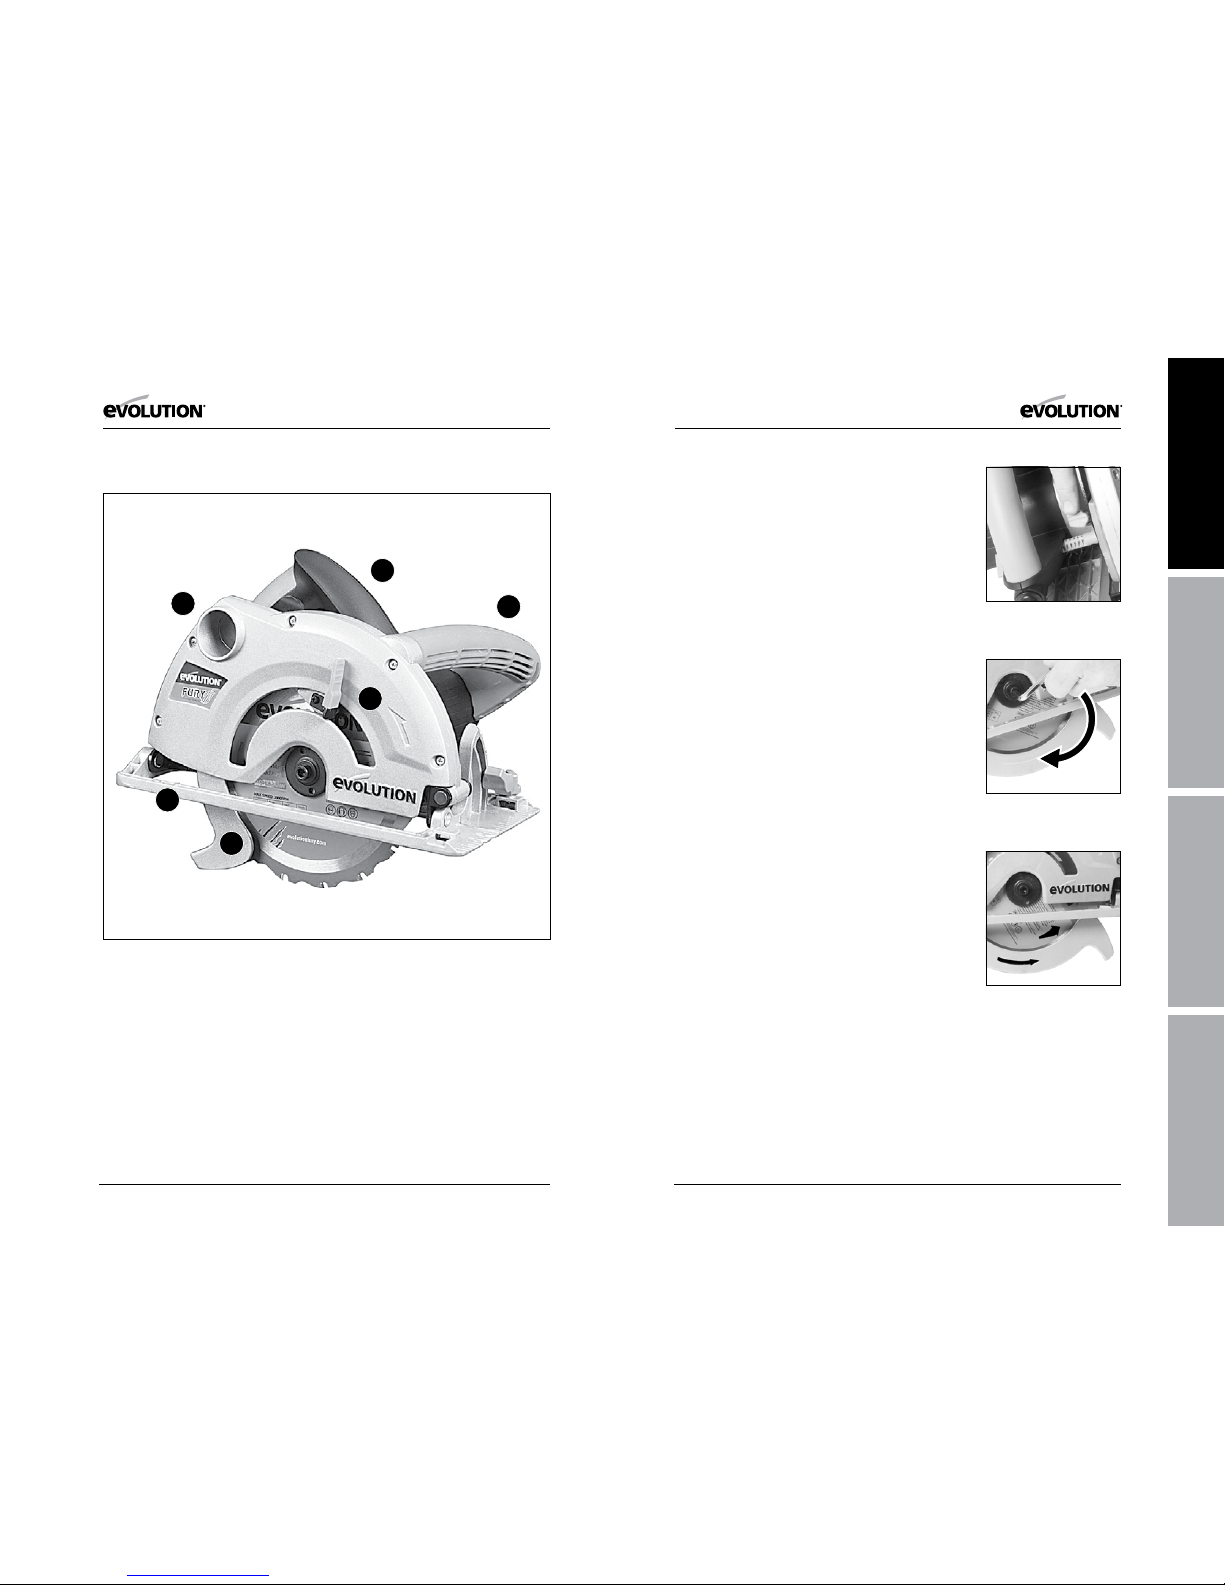
• Lock the machine arbor by engaging the arbor lock. (Fig. 1)
• Using the supplied Hex Key loosen and remove the arbor
socket headed screw, washer and outer blade drive flange.
(Fig. 2)
Note: The socket headed arbor screw has a Right Hand thread.
Turn clockwise to tighten. Turn counter clockwise to loosen.
• Remove the saw blade, leaving the inner blade flange in its
service position.
• Thoroughly clean inner and outer blade drive flanges and
blade mounting surface before installing a new blade.
• Ensure that the direction of rotation arrows printed on the
blade, match the direction of the rotation arrows found on
the machines upper and lower guards. (Fig. 3)
• Reinstall the outer drive flange, washer and the arbor socket
headed screw.
• Engage the arbor lock and tighten the arbor socket headed
screw using the hex key.
• Check that the arbor lock is fully released by manually
rotating the blade.
• Check the operation of the lower blade guard.
Fig. 1
Fig. 3
2
Fig. 2
TighTen
Page 9

16 17
www.evolutionpowertools.com www.evolutionpowertools.com
EN
FR
DE
IT
Parallel Edge Guide
A parallel guide (for help when rip cutting) can be fitted to the
sole plate of the machine. The guide arm should be inserted
into the rectangular slots found at the front of the sole plate,
and slid under the locking thumb screw. (Fig. 4)
Note: The parallel edge guide can be fitted to either side of
the sole plate and should only be fitted and adjusted with the
machine disconnected from the power supply.
• Adjust the parallel edge guide so that it is at the required
distance from the blade and tighten the thumb screw. Check
that the parallel edge guide is parallel to the saw blade.
Adjustment of the Cutting Depth
• Loosen the Depth Adjustment Locking Screw (Fig. 5)
to adjust to the required cutting depth.
• A scale can be found on the depth bracket and an index mark
is incorporated into the machines upper guard to aid setting.
• Adjust the cutting depth to the thickness of the workpiece.
Less than a full tooth of the blade teeth should be visible
below the workpiece.
Note: Always check to see if there are any obstructions
below the work surface that could influence the setting
of the cutting depth.
• Tighten the Depth Adjustment Screw securely to lock in the
required position.
Adjustment of the Cutting Angle
• Loosen the Bevel Locking Screw found at the front
of the saw (Fig. 6).
• Tilt the blade to the required angle (Fig. 7).
• Tighten the Bevel Locking Screw securely.
Note: An angle scale (0
0
– 450) is incorporated
into the Bevel Locking Quadrant to aid setting.
(<10.2) OPERATING ADVICE
Carry out routine safety checks each time you use the machine.
Check that all safety guards are operating correctly, and that all
adjustment handles/screws are tightened securely.
Check that the blade is secure and installed correctly. Also check
that it is the correct blade for the material being cut.
Check the integrity of the power cord.
Always clamp the workpiece to a rigid support such as a bench
or saw horse whenever possible. (10.2>)
(5.4)
THE ON/OFF TRIGGER SWITCH
This machine is equipped with a safety start trigger switch. (Fig. 8)
To start the tool:
• Push in the safety lock button on the side of the
handle with your thumb.
• Depress the main trigger switch to start the motor.
WARNING: Never start the saw with the cutting edge of the
saw blade in contact with the workpiece surface.
Fig. 5
Fig. 4
Fig. 6
0-45
o
Fig. 7
Fig. 8
Page 10

18 19
www.evolutionpowertools.com www.evolutionpowertools.com
EN
FR
DE
IT
(10.3)
CUTTING ADVICE
WARNING: The operator should wear all
relevant PPE (Personal Protection Equipment)
necessary for the job at hand. This could
include safety glasses, dust masks, safety shoes
etc. The operator should always be aware of
the position and routing of the power cable.
(10.4)
• Do not force the machine.
• Allow the speed of the saw blade do the
work. Cutting performance will not be
improved by applying excessive pressure to
the machine, and blade life will be reduced.
• When using the parallel edge guide, ensure
that it is parallel with the blade. The blade
and/or motor could become damaged if
the machine is used with an incorrectly
adjusted parallel edge guide.
• Place the front edge of sole plate squarely
on the workpiece, ensuring that the saw
blade is not in contact with the workpiece,
before starting the motor.
• When starting a cut, sight the cutting line
with the line of cut guide, taking care to
introduce the blade to the material slowly,
so as not to damage its teeth.
Note: Two (2) line of cut guides (for 0
0
and 450
bevel angle only) are positioned on the front
edge of the sole plate.
• Use both hands to move the saw forwards
through the workpiece.
• Apply smooth, constant pressure to move
the saw forwards through the workpiece.
When a cut has been completed release the
ON/OFF trigger switch and allow the blade to
come to a complete halt. Do not apply lateral
pressure to the blade disc in an attempt to
slow it down more quickly.
(10.5) WARNING: If the motor should stop
or stall whilst a cut is being attempted release
the trigger switch immediately and disconnect
the machine from the power supply. Remove
the machine from the workpiece before
investigating the cause and attempting
to restart the motor.
(6)
MAINTENANCE
(6.1) Note: Any maintenance must be
carried out with the machine switched off
and disconnected from the mains/battery
power supply.
Check that all safety features and guards
are operating correctly on a regular basis.
Only use this machine if all guards/safety
features are fully operational.
All motor bearings in this machine are
lubricated for life. No further lubrication
is required.
Use a clean, slightly damp cloth to clean
the plastic parts of the machine. Do not use
solvents or similar products which could
damage the plastic parts.
WARNING: Do not attempt to clean by
inserting pointed objects through openings
in the machines casings etc. The machines
air vents should be cleaned using
compressed dry air.
Excessive sparking may indicate the presence of
dirt in the motor or worn out carbon brushes.
(>6.2) If this is suspected have the machine
serviced and the brushes replaced by
a qualified technician. (<6.2)
(6.4)
ENVIRONMENTAL PROTECTION
Waste electrical products should not be
disposed of with household waste. Please
recycle where facilities exist. Check with your
Local Authority or retailer for recycling advice
Page 11

20 21
www.evolutionpowertools.com www.evolutionpowertools.com
EN
FR
DE
IT
PARTS DIAGRAM EC DECLARATION OF CONFORMITY
In accordance with EN ISO 17050-1:2004
The manufacturer of the product covered by this Declaration is:
Evolution Power Tools, Venture One, Longacre Close, Holbrook Industrial Estate, Sheffield, S20 3FR.
The manufacturer hereby declares that the machine as detailed in this declaration fulfils all the
relevant provisions of the Machinery Directive and other appropriate directives as detailed below.
The manufacture further declares that the machine as detailed in this declaration, where
applicable, fulfils the relevant provisions of the Essential Health and Safety requirements.
The Directives covered by this Declaration are as detailed below:
2006/42/EC. Machinery Directive.
2004/108/EC. (until Apr 19th 2016) Electromagnetic Compatibility Directive.
2014/30/EU. (starting from Apr 20th 2016) Electromagnetic Compatibility Directive.
2011/65/EU. The Restriction of the Use of certain Hazardous
Substances in Electrical Equipment (RoHS) Directive.
2012/19/EU. The Waste Electrical and Electronic Equipment (WEEE) Directive.
And is in conformity with the applicable requirements of the following documents:
EN55014-1:2006+A1+A2 • EN55014-2:1997+A1+A2 • EN61000-3-2:2014
EN61000-3-11:2000 • EN60745-1:2009+A11 • EN60745-2-5:2010
Product Details
Description: FURYB/STEALTH 185mm (7-1/4”) MULTIPURPOSE CIRCULAR SAW
Evolution Model No: FURYB1851 / FU RYB1852 / FURYB1852EU /
STEALTH1851 / STEALTH1852 / STEALTH1852EU
Brand Name: EVOLUTION
Voltage: 220-240V ~ 50Hz
Input: 1200W
The technical documentation required to demonstrate that the product meets the requirements
of directive has been compiled and is available for inspection by the relevant enforcement
authorities, and verifies that our technical file contains the documents listed above
and that they are the correct standards for the product as detailed above.
Name and address of technical documentation holder.
Signed: Print: Matthew Gavins: Group Chief Executive.
Date: 01/03/2016
STEALTH
185
Page 12

EN
FR
DE
IT
®
DEUTSCH
Übersetzung ursprünglichen Anweisungen
Page 13
24 25
www.evolutionpowertools.com www.evolutionpowertools.com
EN
FR
DE
IT
INHALTSVERZEICHNIS
(1.2) DIESE BEDIENUNGSANLEITUNG WURDE
IM ORIGINAL AUF ENGLISCH VERFASST
(1.3)
WICHTIG
Bitte lesen Sie die folgende Bedienungsanleitung
und die Sicherheitshinweise vollständig durch.
Wenden Sie sich zu Ihrer eigenen Sicherheit an
die entsprechende Technische Helpline, deren
Nummer Sie auf der Webseite von Evolution
Power Tools nden, wenn Sie über irgendeinen
Aspekt bei der Verwendung dieses Geräts
unsicher sind. Wir betreiben mehrere Helplines in
unserer weltweiten Organisation, aber sie erhalten
Technische Hilfe auch von Ihrem Lieferanten.
WEB
www.evolutionpowertools.com
(1.4) Glückwunsch zum Kauf einer Maschine
von Evolution Power Tools. Bitte füllen Sie
Ihre Produktregistrierung ‘online’ wie es in der
A4-Broschüre zur Online-Garantieregistrierung
erklärt ist, die dieser Maschine beiliegt.
Sie können auch den QR-Code, der sich
auf der A4-Broschüre bendet, mit einem
Smartphone scannen. Damit können Sie
die Garantielaufzeit Ihrer Maschine über die
Webseite von Evolution validieren, indem
Sie Ihre Angaben eingeben und somit einen
umgehenden Service sicherstellen, falls dieser
einmal notwendig werden sollte. Wir danken
Ihnen sehr, dass Sie sich für ein Produkt von
Evolution Power Tools entschieden haben.
EVOLUTION BESCHRÄNKTE GARANTIE
Evolution Power Tools behält sich das
Recht vor, Verbesserungen und
Veränderungen am Produktdesign ohne
Vorankündigung vorzunehmen.
Sehen Sie in die roduktregistrierungsbroschüre
und/oder auf die Verpackung für Einzelheiten
der Garantiebedingungen.
(1.5) Evolution Power Tools repariert oder
ersetzt innerhalb der Garantielaufzeit und ab
Originalkaufdatum alle Waren, die Materialoder Verarbeitungsmängel aufweisen. Diese
Garantie ist ungültig, wenn das zurückgeschickte
Werkzeug zum Schneiden von Werkstoen
verwendet wurde, die außerhalb der in dieser
Betriebsanleitung enthaltenen Empfehlungen
liegen, oder wenn die Maschine aufgrund eines
Unfalls, durch Nachlässigkeit oder durch falsche
Wartung beschädigt wurde.
Diese Garantie gilt nicht bei Maschinen und/
oder Teilen, die in irgendeiner Weise verändert
oder jenseits der empfohlenen Kapazitäten und
Spezikationen verwendet wurden. Elektroteile
unterliegen den Garantien der jeweiligen
Hersteller. Alle als schadhaft zurückzugebenden
Waren sind frachtfrei an Evolution Power Tools
zu retournieren. Evolution Power Tools behält
sich das Recht vor, sie nach eigenem Ermessen
zu reparieren oder durch identische oder
gleichwertige Artikel zu ersetzen.
Es besteht weder eine schriftliche noch eine
mündliche Garantie für Verbrauchsmaterialien,
wie (folgende Liste ist nicht vollständig)
Sägeblätter, Schneiden, Bohrer, Meißel oder
Schaufeln, etc. In keine Fall ist Evolution Power
Tools haftbar für Verluste oder Beschädigungen,
die direkt oder indirekt durch die Verwendung
unserer Waren oder aus irgendeinem anderen
Grund entstehen. Evolution Power Tools haftet
für keine bei derartigen Waren entstandenen
Kosten oder Folgeschäden.
Kein Bediensteter, Mitarbeiter oder Vertreter
von Evolution Power Tools ist befugt,
mündliche Erklärungen zur Eignung abzugeben
oder auf jedwede der vorgenannten
Verkaufsbedingungen zu verzichten, und für
Evolution Power Tools sind keine bindend.
Fragen zu dieser beschränkten Garantie
richten Sie bitte an die Zentrale des
Unternehmens, oder rufen Sie die
entsprechende Helpline-Nummer an.
EINFÜHRUNG
Garantie Seite 25
Maschinenspezikation Seite 26
Vibration Seite 27
Aufkleber und Symbole Seite 27
Bestimmungsgemäße Verwendung dieses Elektrowerkzeugs Seite 28
Verbotene Verwendung dieses Elektrowerkzeugs Seite 28
SICHERHEITSVORKEHRUNGEN
Elektrische Sicherheit Seite 29
Verwendung im Freien Seite 29
Allgemeine Sicherheitshinweise für Elektrowerkzeuge Seite 29
Zusätzliche Sicherheitshinweise Seite 31
ERSTE SCHRITTE
Auspacken Seite 34
Maschinenübersicht Seite 35
Montage und Vorbereitung Seite 36
Betriebsanleitung Seite 37
WARTUNG
Umweltschutz Seite 39
Serviceteilzeichnung Seite 40
KONFORMITÄTSERKLÄRUNG Seite 41
English Page 2
Deutsch Seite 22
Français Page 42
Italiano Pagina 64
Page 14

26 27
www.evolutionpowertools.com www.evolutionpowertools.com
EN
FR
DE
IT
(1.6) Hinweis: Die Vibrationsmessung erfolgte
unter Standardbedingungen gemäß:
EN60745-1.
Der erklärte Vibrationsgesamtwert wurde im
Einklang mit einem Standard-Prüfverfahren
gemessen und kann für den Vergleich eines
Werkzeugs mit einem anderen benutzt werden.
Der erklärte Vibrationsgesamtwert kann auch
bei einer vorläugen Expositionsbeurteilung
benutzt werden.
(1.7)
VIBRATION
WARNUNG: Beim Verwenden dieser Maschine
kann der Bediener starken Vibrationen
ausgesetzt sein, die auf die Hand und den Arm
übertragen werden.
Es ist möglich, dass der Bediener die
„Vibrations-Weißngerkrankheit“ (RaynaudSyndrom) bekommt. Dieser Zustand kann die
Temperaturempndlichkeit der Hand herabsetzen
sowie eine allgemeine Taubheit erzeugen.
Längere oder regelmäßige Anwender dieser
Maschine sollten den Zustand ihrer Hände
und Finger genau überwachen. Suchen
Sie sofort einen Arzt auf, wenn eines der
Symptome auftaucht.
• Die Messung und Beurteilung der
Aussetzung eines Menschen gegenüber
handübertragenen Vibrationen am
Arbeitsplatz ist geregelt in: BS EN ISO 53491:2001 und BS EN ISO 5349-2:2002.
• Viele Faktoren können das tatsächliche
Vibrationsniveau beeinussen, z.B.
der Zustand und die Orientierung der
Bearbeitungsächen und die Art und der
Zustand der verwendeten Maschine. Solche
Faktoren können vor jeder Verwendung
beurteilt werden und wenn erforderlich
können entsprechende Arbeitsrichtlinien
umgesetzt werden. Eine Kontrolle
dieser Faktoren kann dabei helfen, die
Auswirkungen der Vibrationen zu reduzieren.
Handhabung
• Gehen Sie mit der Maschine vorsichtig
um und lassen Sie die Maschine die
Arbeit machen.
• Üben Sie keine übermäßige körperliche
Kraft auf irgendwelche Bedienelemente
der Maschine aus.
• Berücksichtigen Sie Ihre Sicherheit und
Standfestigkeit sowie die Ausrichtung
der Maschine während der Verwendung.
Bearbeitungsäche
• Berücksichtigen Sie das Material der
Bearbeitungsäche, ihren Zustand, Dichte,
Festigkeit, Steigkeit und Ausrichtung.
WARNUNG: Die Vibrationsemission
während der eigentlichen Verwendung des
Elektrowerkzeugs kann sich vom erklärten
Gesamtwert unterscheiden – je nachdem, auf
welche Weise das Werkzeug benutzt wird.
Die Notwendigkeit, Sicherheitsmaßnahmen zu
identizieren und den Bediener zu schützen,
beruht auf einer Schätzung der Exposition bei
den eigentlichen Nutzungsbedingungen (unter
Berücksichtigung aller Teile des Betriebszyklus
wie z. B. Abschaltzeiten des Werkzeugs, wenn es
leer läuft, zusätzlich zur Auslösezeit).
(1.8)
AUFKLEBER UND SYMBOLE
WARNUNG: Bedienen Sie diese Maschine
nicht, wenn Warn- und/oder Hinweisschilder
fehlen oder beschädigt sind. Für Ersatzaufkleber
wenden Sie sich bitte an Evolution Power Tools.
Hinweis: Alle oder einige der folgenden
Symbole können im Handbuch oder auf dem
Produkt erscheinen.
FURY DATEN
TECHNISCHE DATEN METRISCH IMPERIAL
Motor UK / EU (220-240V ~ 50Hz) 1200W 5A
Motor USA (120V ~ 60Hz) 1200W 10A
Leerlaufdrehzahl 3700min
-1
3700rpm
Gewicht 5.4kg 12lbs
SCHNEIDKAPAZITÄTEN METRISCH IMPERIAL
Stahlblech - Max Dicke 3mm 1/8”
Baustahl Profile - Max Wandstärke 3mm 1/8”
Max Schnittstärke (Holz 90
0
) 60mm 2-3/8”
Max Schnittstärke (Holz 45
0
) 40mm 1-1/2”
SÄGEBLATT ABMESSUNGEN METRISCH IMPERIAL
Durchmesser 185mm 7-1/4”
Bohrdurchmesser 20mm 3/4”
Anzahl der Zähne 16 16
Max Geschwindigkeit 3900min
-1
3900rpm
Dicke 1.7mm .067”
GERÄUSCH & VIBRATION DATEN
Schalldruckpegel 98,83dB(A) K=3dB(A)
Schallleistungspegel 109,83dB(A) K=3dB(A)
Vibration Niveau
a
h,W=3,78 m/s
2
ah,M=1,596 m/s
2
K=1,5 m/s
2
WARNUNG: Aufgrund der Stromaufnahme davon auf Start-up, kann Spannungsabfälle auftreten,
und Dies kann andere Geräte (zB Dimmen der Beleuchtung) zu beeinflussen. So technischen
Gründen empfehlen wir, wenn die Netzimpedanz ist Zmax <0.431Ohm werden diese Störungen
nicht zu erwarten. Wenn Sie weitere Informationen benötigen, können Sie Ihre lokalen
Stromversorgungsbehörde zu kontaktieren.
Page 15

28 29
www.evolutionpowertools.com www.evolutionpowertools.com
EN
FR
DE
IT
(1.9)
Symbol Beschreibung
V
Volt
A
Ampere
Hz
Hertz
Min
-1
Drehzahl
~
Wechselstrom
n
o
Leerlaufdrehzahl
Schutzbrille tragen
Gehörschutz tragen
Staubschutz tragen
Anleitungen lesen
CE-Zertizierung
EAC-Zertizierung
CSA-Zertizierung
Elektro- und
Elektronikaltgeräte
Triman - Abfallsammlung
& Recycling
Warnung
(1.10)
BESTIMMUNGSGEMÄSSE
VERWENDUNG DIESES
ELEKTROWERKZEUGS
WARNUNG: Dieses Produkt ist eine manuell
bediente Kreissäge und sie wurde für die
Verwendung mit speziellen Sägeblättern
von Evolution entwickelt. Verwenden Sie
nur Zubehör, das für die Verwendung in
dieser Maschine entwickelt wurde und/oder
solches, das speziell dafür empfohlen wird von
Evolution Power Tools Ltd.
Wenn diese Maschine mit einem geeigneten
Sägeblatt ausgerüstet ist, kann diese Maschine
verwendet werden zum Schneiden von:
Baustahl
Aluminium
Holz
(1.11)
VERBOTENE VERWENDUNG
DIESES ELEKTROWERKZEUGS
WARNUNG: Dieses Produkt ist eine manuell
bediente Kreissäge und darf nur als solches
verwendet werden. Es darf in keinster Weise
modiziert oder zum Antrieb anderer Geräte
verwendet werden oder irgendwelches
anderes Zubehör antreiben, als solches, das in
dieser Bedienungsanleitung erwähnt ist.
(1.13) WARNUNG: Dieses Gerät ist nicht dafür
geeignet, dass es von Personen (einschließlich
Kindern) mit eingeschränkten körperlichen,
sensorischen oder geistigen Fähigkeiten bzw.
Personen, die unerfahren sind und nicht über
die hierfür nötigen Kenntnisse verfügen,
verwendet wird, es sei denn, diese werden
zuvor in der sicheren Benutzung des Geräts
von einer Person betreut oder angeleitet, die
für ihre Sicherheit verantwortlich ist und für
ihre sichere Verwendung fachkundig ist.
Kinder sollten beaufsichtigt werden, um zu
gewährleisten, dass sie zu dem Gerät keinen
Zugang haben; ihnen darf auf keinen Fall
erlaubt werden, mit dem Gerät zu spielen.
(1.14)
ELEKTRISCHE SICHERHEIT
Diese Maschine ist mit dem für den
ausgewiesenen Markt passenden angeformten
Stecker und Netzkabel ausgerüstet. Wenn das
Netzkabel beschädigt ist, muss es durch ein
spezielles Kabel oder eine Baugruppe ersetzt
werden, die vom Hersteller oder seinem
Kundendienstvertreter erhältlich sind.
(1.15)
VERWENDUNG IM FREIEN
WARNUNG: Bei einer Verwendung im Freien
sollte dieses Werkzeug zu Ihrem Schutz nicht
Regen ausgesetzt oder an feuchten Orten
verwendet werden. Stellen Sie das Werkzeug
nicht auf feuchte Flächen. Verwenden Sie wenn
möglich eine saubere, trockene Werkbank.
Verwenden Sie für einen zusätzlichen Schutz
eine Fehlerstrom-Schutzeinrichtung (RCD),
welche die Versorgung unterbricht, wenn
der Fehlerstrom gegen Erde 30mA für 30ms
übersteigt. Prüfen Sie immer die Funktion der
Fehlerstrom-Schutzeinrichtung (RCD) bevor Sie
die Maschine verwenden.
Wenn ein Verlängerungskabel erforderlich ist,
muss es für die Verwendung im Freien geeignet
und so gekennzeichnet sein. Die Anweisungen
des Herstellers sind bei Verwendung eines
Verlängerungskabels zu befolgen.
(2.1)
ALLGEMEINE ELEKTROWERKZEUGSICHERHEITSHINWEISE
(Diese Allgemeinen Sicherheitshinweise für
Elektrowerkzeuge sind angegeben in der
EN 60745-1:2009).
WARNUNG: Lesen Sie alle Sicherheitshinweise
und Anweisungen. Wenn die Warnungen und
Anweisungen nicht befolgt werden, so kann
dies Stromschlag, Feuer und/oder schwere
Verletzungen zur Folge haben. Heben Sie alle
Warnungen und Anweisungen für eine spätere
Einsichtnahme auf. Der in den Warnungen
enthaltene Begri, Elektrowerkzeug“ bezieht
sich auf Ihr netzbetriebenes Elektrowerkzeug
(mit Kabel) oder Ihr batteriebetriebenes
(schnurloses) Elektrowerkzeug.
(2.2) 1) Allgemeine Sicherheitswarnungen
für Elektrowerkzeuge
[Arbeitsbereichssicherheit]
a) Halten Sie Ihren Arbeitsbereich sauber und
gut beleuchtet. Unordnung und unbeleuchtete
Arbeitsbereiche können zu Unfällen führen.
b) Arbeiten Sie mit dem Elektrowerkzeug
nicht in explosionsgefährdeter
Umgebung, in der sich entammbare
Flüssigkeiten, Gase oder Stäube benden.
Elektrowerkzeuge erzeugen Funken, die den
Staub oder die Dämpfe entzünden können.
c) Halten Sie Kinder und andere
Personen während der Benutzung eines
Elektrowerkzeugs fern. Bei Ablenkung können
Sie die Kontrolle über das Gerät verlieren.
(2.3) 2) Allgemeine Sicherheitswarnungen
für Elektrowerkzeuge [Elektrische Sicherheit]
a) Der Anschlussstecker des Geräts muss
in die Steckdose passen. Der Stecker darf in
keiner Weise verändert werden. Verwenden Sie
bei schutzgeerdeten Elektrowerkzeugen keine
Adapterstecker. Unveränderte Stecker und
passende Steckdosen verringern das Risiko
eines Stromschlags.
b) Vermeiden Sie direkten Körperkontakt
mit geerdeten Oberächen, wie z.B. Rohren,
Heizungen, Herden und Kühlschränken. Das
Risiko für einen Stromschlag ist erhöht, wenn Ihr
Körper geerdet ist.
c) Halten Sie Elektrowerkzeuge von
Regen oder Nässe fern. Das Eindringen von
Wasser in ein Elektrowerkzeug erhöht das
Risiko eines Stromschlags.
Page 16

30 31
www.evolutionpowertools.com www.evolutionpowertools.com
EN
FR
DE
IT
d) Zweckentfremden Sie nicht das Kabel.
Verwenden Sie das Kabel nie, um das
Elektrowerkzeug damit zu tragen, zu
schleppen oder um den Stecker daran aus
der Steckdose zu ziehen. Halten Sie das Kabel
von Hitze, Öl, scharfen Kanten und bewegten
Teilen fern. Beschädigte oder verwickelte Kabel
erhöhen das Risiko eines Stromschlags.
e) Wenn Sie mit einem Elektrowerkzeug
im Freien arbeiten, verwenden Sie nur
Verlängerungskabel, die auch für den
Außenbereich zugelassen sind. Die
Verwendung eines für den Außenbereich
geeigneten Verlängerungskabels verringert
das Risiko eines Stromschlags.
f) Falls sich der Betrieb des Elektrowerkzeugs
in einer feuchten Umgebung nicht
vermeiden lässt, verwenden Sie
unbedingt eine Stromversorgung mit
Fehlerstromschutzeinrichtung. Durch Einsatz
einer Fehlerstromschutzeinrichtung wird das
Risiko eines Stromschlags verringert.
(2.4) 3) Allgemeine Sicherheitswarnungen für
Elektrowerkzeuge [Persönliche Sicherheit]
a) Seien Sie wachsam, achten Sie darauf, was
Sie tun, und gebrauchen Sie Ihren gesunden
Menschenverstand, wenn Sie mit einem
Elektrowerkzeug arbeiten. Benutzen Sie das
Gerät nicht, wenn Sie müde sind oder unter dem
Einuss von Drogen, Alkohol oder Medikamenten
stehen. Ein Moment der Unachtsamkeit beim
Gebrauch eines Elektrowerkzeugs kann zu
schweren Verletzungen führen.
b) Tragen Sie persönliche Schutzausrüstung.
Verwenden Sie immer eine Schutzbrille. Das
Tragen von persönlicher Schutzausrüstung, wie
z.B. Staubmasken, rutschfeste Sicherheitsschuhe,
Schutzhelm oder Gehörschutz, je nach Art und
Einsatz des Elektrowerkzeugs, verringert das
Risiko von Verletzungen.
c) Vermeiden Sie eine unbeabsichtigte
Inbetriebnahme. Vergewissern Sie sich,
dass der Ein/Aus-Schalter in der Position
„AUS“ ist, bevor Sie den Stecker in die
Steckdose stecken, den Akku einsetzen bzw.
das Werkzeug hoch heben oder tragen.
Wenn Sie beim Tragen des Geräts den Finger
am Ein/Aus-Schalter haben oder das Gerät
eingeschaltet an die Stromversorgung
anschließen, kann dies zu Unfällen führen.
d) Entfernen Sie Einstellwerkzeuge
oder Schraubenschlüssel, bevor Sie das
Werkzeug einschalten. Ein Handwerkzeug
oder Schlüssel, das bzw. der sich in einem
drehenden Geräteteil bendet, kann zu
Verletzungen führen.
e) Sorgen Sie für einen festen Stand.
Achten Sie auf jederzeit sicheren Stand
und gutes Gleichgewicht. Dadurch können
Sie das Elektrowerkzeug in unerwarteten
Situationen besser kontrollieren.
f) Tragen Sie geeignete Kleidung. Tragen
Sie keine lockere Kleidung oder Schmuck.
Halten Sie Haare, Kleidung und Handschuhe
von beweglichen Teilen fern. Lockere Kleidung,
Schmuck oder lange Haare können von sich
bewegenden Teilen erfasst werden.
g) Wenn Staubabsaug- und –
auangeinrichtungen zur Verfügung
stehen, vergewissern Sie sich, dass diese
angeschlossen sind und richtig verwendet
werden. Das Verwenden dieser Einrichtungen
verringert Gefährdungen durch Staub.
(2.5) 4) Allgemeine Sicherheitswarnungen
für Elektrowerkzeuge [Verwendung und
Pege des Elektrowerkzeugs].
a) Überlasten Sie das Elektrowerkzeug
nicht. Verwenden Sie für Ihre Arbeit das
richtige Elektrowerkzeug. Mit dem passenden
Elektrowerkzeug arbeiten Sie besser und
sicherer im angegebenen Leistungsbereich.
b) Benutzen Sie kein Elektrowerkzeug,
dessen Ein/Aus-Schalter defekt ist. Ein
Elektrowerkzeug, das sich nicht mehr einoder ausschalten lässt, ist gefährlich und
muss repariert werden.
c) Trennen Sie das Elektrowerkzeug von
der Steckdose bzw. nehmen Sie den
Akku aus dem Elektrowerkzeug, bevor
Sie Geräteeinstellungen vornehmen,
Zubehörteile wechseln oder das
Elektrowerkzeug verstauen. Diese
Vorsichtsmaßnahmen verhindern den
unbeabsichtigten Start des Elektrowerkzeugs.
d) Bewahren Sie unbenutzte
Elektrowerkzeuge außerhalb der
Reichweite von Kindern auf. Lassen Sie
keine Personen das Werkzeug benutzen,
die nicht damit vertraut sind oder die
diese Anweisungen nicht gelesen haben.
Elektrowerkzeuge sind gefährlich, wenn sie
von unerfahrenen Personen benutzt werden.
e) Pegen Sie das Elektrowerkzeug.
Stellen Sie sicher, dass bewegliche Geräteteile
einwandfrei funktionieren und nicht klemmen,
gebrochen oder so beschädigt sind, dass die
Funktion des Elektrowerkzeugs beeinträchtigt
ist. Lassen Sie beschädigte Teile vor dem
Einsatz des Elektrowerkzeugs reparieren.
Viele Unfälle haben ihre Ursache in schlecht
gewarteten Elektrowerkzeugen.
f) Halten Sie Schneidwerkzeuge scharf und
sauber. Sorgfältig gepegte Schneidwerkzeuge
mit scharfen Schneidkanten verklemmen sich
weniger und sind leichter zu führen.
g) Verwenden Sie Elektrowerkzeug,
Zubehör, Werkzeugeinsätze usw.
entsprechend diesen Anweisungen und
so, wie es für diesen speziellen Gerätetyp
vorgeschrieben ist. Berücksichtigen
Sie dabei die Arbeitsbedingungen und
die auszuführende Tätigkeit. Der Einsatz
von Elektrowerkzeugen für andere als die
vorgesehenen Anwendungen kann zu
gefährlichen Situationen führen.
(2.6) 5) Allgemeine Sicherheitswarnungen
für Elektrowerkzeuge [Wartung]
Lassen Sie Ihr Elektrowerkzeug von
einem qualizierten Techniker warten,
der nur identische Ersatzteile verwendet.
Dies stellt sicher, dass die Sicherheit des
Elektrowerkzeugs aufrecht erhalten wird.
(2.7)
HINWEISE ZUM
GESUNDHEITSSCHUTZ
WARNUNG: Bei der Verwendung dieser
Maschine können Staubpartikel entstehen.
Manchmal kann dieser Staub, je nach
bearbeitetem Material, besonders schädlich sein.
Wenn Sie den Verdacht haben, dass Farbe auf der
Oberäche eines Materials, das Sie schneiden
möchten, Blei enthält, ersuchen Sie um
fachkundigen Rat. Farbe auf Bleibasis sollte nur
von einem Fachmann entfernt werden uns Sie
sollten nicht versuchen, sie selbst zu entfernen.
Sobald sich der Staub auf Oberächen
abgesetzt hat, kann ein Kontakt von der Hand
zum Mund zur Aufnahme von Blei führen.
Schon die Aufnahme von geringen Mengen
Blei kann zu einer irreversiblen Schädigung
des Gehirns und des Nervensystems führen.
Kleine und ungeborene Kinder sind besonders
gefährdet. Es ist empfehlenswert, dass Sie die
Risiken im Zusammenhang mit den Materialien,
die Sie bearbeiten, berücksichtigen und das
Risiko einer Aussetzung reduzieren.
Da einige Materialien gesundheitsgefährdenden
Staub erzeugen können, empfehlen wir die
Verwendung einer zugelassenen Gesichtsmaske
mit austauschbaren Filtern, wenn Sie diese
Maschine einsetzen.
Sie sollten immer:
• In einem gut belüfteten Bereich arbeiten.
• Mit zugelassener Schutzausrüstung wie z. B.
Staubschutzmasken arbeiten, die besonders
für das Herausltern mikroskopischer
Partikel konstruiert sind.
(2.8) WARNUNG: Der Betrieb jedes
Elektrowerkzeugs kann zur Folge haben, dass
Fremdkörper in Ihre Augen geschleudert werden;
dies kann in schweren Augenschäden resultieren.
Vor Beginn der Arbeit mit Elektrowerkzeugen:
legen Sie stets eine Schutzbrille bzw. eine
Schutzbrille mit Seitenschutz oder eine Vollmaske
an, falls erforderlich.
Page 17

32 33
www.evolutionpowertools.com www.evolutionpowertools.com
EN
FR
DE
IT
(3.0)
ZUSÄTZLICHE
SICHERHEITSHINWEISE
a) GEFAHR: Kommen Sie mit Ihren Händen
nicht in den Sägebereich bzw. in die Nähe
des Sägeblatts. Halten Sie mit Ihrer zweiten
Hand den Hilfsgri oder das Motorgehäuse.
Wenn Sie die Säge mit beiden Händen halten,
können sie nicht vom Sägeblatt verletzt werden.
b) Greifen Sie nicht unter das Werkstück.
Unter dem Werkstück kann die Schutzhaube
Sie nämlich nicht vor dem Sägeblatt schützen.
c) Passen Sie die Schnitttiefe an die Dicke
des Werkstücks an. Unter dem Werkstück
sollte weniger als eine volle Zahnhöhe der
Sägeblattzähne zu sehen sein.
d) Halten Sie das zu sägende Werkstück
niemals in der Hand oder über dem Bein fest.
Befestigen Sie das Werkstück auf einer stabilen
Abstützvorrichtung. Es ist wichtig, dass das
Werkstück gut abgestützt wird, um die Gefahr von
Körperkontakt, eines Klemmens des Sägeblatts
oder des Verlusts der Kontrolle zu minimieren.
e) Halten Sie das Elektrowerkzeug
nur an den isolierten Griächen fest,
wenn Sie Arbeiten ausführen, bei denen
das Schneidewerkzeug verborgene
Stromleitungen oder sein eigenes
Netzkabel treen könnte. Die Kontakt mit
einer spannungsführenden Leitung setzt
auch die freiliegenden metallenen Teile des
Elektrowerkzeugs unter Spannung und kann
somit einen Stromschlag versetzen.
f) Verwenden Sie beim Längsschneiden
immer einen Anschlag oder eine
gerade Kantenführung. Dadurch wird
die Schnittgenauigkeit verbessert und die
Wahrscheinlichkeit verringert, dass das
Sägeblatt klemmt.
g) Verwenden Sie nur Sägeblätter in
der richtigen Größe und mit passender
Aufnahmebohrung (rautenförmig im
Gegensatz zu rund). Sägeblätter, die nicht zu
den Montageteilen der Säge passen, laufen
unrund und verursachen, dass man leicht die
Kontrolle über das Gerät verliert.
h) Verwenden Sie nie beschädigte oder
falsche Sägeblatt-Unterlegscheiben oder
-Schrauben. Die Sägeblatt-Unterlegscheiben
und -Schrauben wurden speziell für Ihre Säge
konstruiert und sorgen für optimale Leistung
und Betriebssicherheit. Verwenden Sie keine
Sägeblätter aus Schnellarbeitsstahl (HSS).
j) Kontrollieren Sie die Maschine und
das Sägeblatt vor jeder Verwendung.
Verwenden Sie keine verformten,
gesprungenen, verschlissenen oder
anderweitig beschädigte Sägeblätter.
k) Arbeiten Sie mit der Säge niemals ohne
die originalen Schutzvorrichtungen. Die
Pendelschutzhaube darf nicht in geönetem
Zustand arretiert werden. Stellen Sie sicher,
dass die Schutzhaube sich frei bewegen kann,
ohne festzuklemmen.
l) Verwenden Sie nur Sägeblätter, die
den in diesem Handbuch angegebenen
Kenndaten entsprechen. Vergewissern Sie
sich vor dem Verwenden von Zubehörteilen,
dass das Zubehör für die maximale Drehzahl
der Maschine geeignet ist.
(3.2) Ursachen und Vermeidung
von Rückschlägen:
Ein Rückschlag ist die plötzliche Reaktion
aufgrund eines hakenden, klemmenden oder
falsch ausgerichteten Sägeblatts, wodurch
verursacht wird, dass die Säge unkontrolliert
abhebt und aus dem Werkstück heraus hin
zur Bedienperson schlägt.
1. Wenn sich das Sägeblatt in dem sich
schließenden Sägespalt stark verhakt
oder verklemmt, blockiert es, und
die Motorkraft schlägt die Säge zur
Bedienperson hin zurück.
2. Wenn sich das Sägeblatt verzieht oder
sich im Schnitt falsch ausrichtet, können die
Zähne an der Hinterkante des Sägeblatts
in die Oberseite des Werkstücks graben,
wodurch das Blatt aus dem Sägespalt klettert
und in Richtung des Bedieners zurückspringt.
(3.3) Der Rückschlageekt tritt infolge
eines fehlerhaften Gebrauchs der Säge
und/oder falscher Betriebsverfahren
oder -bedingungen auf; er lässt sich
vermeiden, indem man vorschriftsgemäße
Sicherheitsmaßnahmen ergreift, wie
unten beschrieben.
a) Halten Sie die Säge mit beiden Händen
gut fest und bringen Ihre Arme in eine
Position, in der Sie die Rückschlagkräfte
abfangen können. Halten Sie sich mit Ihrem
Körper immer seitlich des Sägeblatts; niemals
sollten Sie das Sägeblatt in eine Linie mit Ihrem
Körper bringen. Ein Rückschlag könnte bewirken,
dass die Säge rückwärts springt; jedoch lassen
sich Rückschlagkräfte von der Bedienperson
kontrollieren, wenn vorschriftsgemäße
Sicherheitsmaßnahmen ergrien werden.
b) Wenn sich die Sägeblätter verklemmen
oder ein Sägevorgang aus irgendeinem Grund
unterbrochen wird, schalten Sie die Säge
aus und halten sie im Werkstück so lange
ruhig, bis die Sägeblätter vollkommen zum
Stillstand gekommen sind. Versuchen Sie nie,
die Säge aus dem Werkstück zu entfernen oder
rückwärts zu ziehen, solange die Sägeblätter noch
in Bewegung sind, da in diesem Fall ein Rückschlag
erfolgen könnte. Erwägen und ergreifen Sie
Abhilfemaßnahmen, um die Ursachen für das
Verklemmen des Sägeblatts zu beheben.
c) Wenn Sie eine Säge, die im Werkstück
steckt, wieder anschalten wollen, richten Sie
das Sägeblatt in der Schnittfuge mittig aus
und vergewissern sich, dass die Sägezähne
nicht im Werkstück verhakt sind. Wenn das
Sägeblatt klemmt, kann es sich vom Werkstück
aus empor erheben oder zurückschlagen, sobald
die Säge wieder angeschaltet wird.
d) Große Platten müssen gut abgestützt
werden, um das Risiko zu verringern, das
durch ein klemmendes Sägeblatt oder
einen Rückschlag verursacht wird. Denn
große Platten tendieren dazu, sich unter ihrem
Eigengewicht durchzubiegen. Platten müssen
auf beiden Seiten abgestützt werden, sowohl
in der Nähe des Sägespalts als auch in der
Nähe der Plattenkante.
e) Die Hebel für die Schnitttiefen- und
Schnittwinkeleinstellungen müssen vor dem
Sägen gut festgezogen werden. Wenn sich
während des Sägens die Sägeblatt-Einstellungen
verändern, kann sich das Sägeblatt verklemmen
und ein Rückschlag auftreten.
f) Verwenden Sie keine stumpfen oder
beschädigten Sägeblätter. Sägeblätter mit
stumpfen oder falsch ausgerichteten Zähnen
bewirken durch einen zu schmalen Sägespalt
übermäßige Reibung, das Klemmen des
Sägeblatts und den Rückschlageekt.
g) Seien Sie besonders vorsichtig bei
„Tauchschnitten“ in bestehende Wände
oder andere nicht einsehbare Bereiche.
Das eintauchende Sägeblatt kann beim Sägen
in verborgene Objekte blockieren und einen
Rückschlag verursachen.
h) Überprüfen Sie vor jedem Gebrauch, ob
sich die untere Schutzhaube einwandfrei
schließen lässt. Verwenden Sie die Säge nicht,
wenn die untere Schutzhaube nicht frei beweglich
ist und sich nicht sofort schließt. Klemmen oder
binden Sie die untere Schutzhaube niemals
in geöneter Position fest. Sollte die Säge
unbeabsichtigt zu Boden fallen, könnte die untere
Schutzhaube verbogen werden. Önen Sie die
untere Schutzhaube mit dem Rückziehhebel und
vergewissern Sie sich, dass sie frei beweglich ist
und bei allen Schnittwinkeln und -tiefen weder
das Sägeblatt noch andere Teile berührt.
i) Überprüfen Sie die Funktion der
Feder für die untere Schutzhaube. Falls
die Schutzhaube und die Feder nicht
einwandfrei arbeiten, müssen sie vor dem
Gebrauch gewartet werden. Wenn Teile
beschädigt wurden, klebrige Ablagerungen
vorhanden sind oder sich Späne angesammelt
haben, arbeitet die untere Schutzhaube
langsamer als vorgesehen.
j) Die untere Schutzhaube lässt sich von
Hand nur bei besonderen Schnitten wie
„Tauch- und Compoundschnitten“ önen.
Önen Sie die untere Schutzhaube mit dem
Rückziehhebel und lassen ihn los, sobald das
Sägeblatt in das Werkstück eingetaucht ist. Bei
allen anderen Sägearbeiten sollte die untere
Schutzhaube automatisch arbeiten.
Page 18

34 35
www.evolutionpowertools.com www.evolutionpowertools.com
EN
FR
DE
IT
5
4
3
6
1
MASCHINENÜBERSICHT
1. HINTERER GRIFF
2. VORDERER GRIFF
3. OBERER SÄGEBLATTSCHUTZ
4. UNTERER SÄGEBLATTSCHUTZ
5. GRUNDPLATTE
6. SPANAUSLASSÖFFNUNG
2
k) Achten Sie stets darauf, dass die untere
Schutzhaube das Sägeblatt bedeckt, bevor
Sie die Säge auf einer Werkbank oder
dem Boden ablegen. Ein ungeschütztes,
nachlaufendes Sägeblatt bewegt die Säge
entgegen der Schnittrichtung und sägt,
was ihm im Weg ist. Beachten Sie dabei die
Nachlaufzeit der Säge.
(3.4) WARNUNG: Wenn irgendwelche Teile
fehlen, bedienen Sie Ihre Maschine erst, wenn
die fehlenden Teile wieder angebracht sind.
Wird diese Vorschrift nicht beachtet, könnte dies
schwere Körperverletzung zur Folge haben.
(4.1)
ERSTE SCHRITTE - AUSPACKEN
Vorsicht: Diese Verpackung enthält scharfe
Objekte. Packen Sie sie vorsichtig aus.
Nehmen Sie die Maschine zusammen mit dem
mitgelieferten Zubehör aus der Verpackung
heraus. Prüfen Sie die Maschine sorgfältig,
um sicherzustellen, dass die Maschine in
gutem Zustand ist und berücksichtigen Sie
dabei alle in diesem Handbuch aufgeführten
Zubehörteile. Vergewissern Sie sich auch, dass
das gesamte Zubehör vollständig ist.
Sollten irgendwelche Teile fehlen, ist die Maschine
und ihr Zubehör in der Originalverpackung an
den Händler zurückzugeben. Werfen Sie die
Verpackung nicht weg; heben Sie sie während
der Garantiedauer gut auf. Entsorgen Sie die
Verpackung auf unweltfreundliche Weise. Führen
Sie sie wenn möglich der Wiederverwertung zu.
Lassen Sie auf Grund der Erstickungsgefahr
keine Kinder mit leeren Plastikbeuteln spülen.
(4.2)
LIEFERUMFANG
Beschreibung Menge
Bedienungsanleitung 1
Vielzwecksägeblatt
(eingebaut)
1
Sechskantschlüssel
(Sägeblattwechsel)
1
Parallelkantenführung 1
(4.3)
ZUSÄTZLICHES ZUBEHÖR
Zusätzlich zu den mit dieser Maschine
mitgelieferten Standardpositionen sind auch
folgende Zubehörteile im Evolution OnlineShop unter www.evolutionpowertools.com
oder von Ihrem Händler vor Ort erhältlich.
(4.4)
Beschreibung Teile-Nr.
Vielzwecksägeblätter FURY
185
Diamantsägeblätter DIAMOND
185
Page 19

36 37
www.evolutionpowertools.com www.evolutionpowertools.com
EN
FR
DE
IT
Parallelkantenführung
Eine Parallelführung kann (zur Hilfe beim Längsschneiden)
an die Grundplatte der Maschine angebracht werden. Der
Führungsarm muss in die rechteckigen Aussparungen an
der Vorderseite der Grundplatte eingesetzt und unter die
Rändelschraube zur Arretierung geschoben werden. (Abb. 4)
Hinweis: Die Parallelkantenführung kann an beiden Seiten
der Grundplatte angebracht werden und darf nur montiert
und eingestellt werden, wenn die Maschine von der
Spannungsversorgung getrennt ist.
• Stellen Sie die Parallelkantenführung so ein, dass sie
sich im erforderlichen Abstand vom Sägeblatt bendet
und ziehen Sie die Rändelschraube an. Prüfen Sie, ob die
Parallelkantenführung parallel zum Sägeblatt ist.
Einstellen der Schnitttiefe
• Lösen Sie die Arretierungsschraube zur Tiefeneinstellung
(Abb. 5), um die erforderliche Schnitttiefe einzustellen.
• An der Tiefenhalterung ndet sich eine Skala und eine
Indexmarkierung zur Erleichterung der Einstellung ist Teil der
oberen Schutzabdeckung der Maschine.
• Einstellen der Schneidetiefe, die der Dicke des Werkstücks.
Weniger als eine volle Zahn der Messerzähne unter dem
Werkstück sichtbar sein.
Hinweis: Stellen Sie immer sicher, dass sich keine Hindernisse
unter der Arbeitsäche benden, welche die Einstellung der
Schnitttiefe beeinussen könnten.
• Ziehen Sie die Arretierungsschraube zur Tiefeneinstellung an,
um die erforderliche Position zu arretieren.
Einstellen des Schnittwinkels
• Lösen Sie die Winkelarretierungsschraube an der Vorderseite
der Säge (Abb. 6).
• Kippen Sie das Sägeblatt im erforderlichen Winkel (Abb. 7).
• Ziehen Sie die Winkelarretierungsschraube fest an.
Hinweis: Am Winkelarretierungssegment bendet sich eine
Winkelskala (0
0
- 450) zur Erleichterung der Einstellung.
Abb. 5
Abb. 4
(10)
ERSTE SCHRITTE - VORBEREITUNG
WARNUNG: Trennen Sie die Säge stets von der Stromquelle,
bevor Sie Einstellungen vornehmen.
Netzkabel und Gerätestecker dieser Säge sind für das
Bestimmungsland zugelassen. Verändern oder modizieren
Sie das Netzkabel nicht.
(<10.1) SÄGEBLATT MONTIEREN/DEMONTIEREN
WARNUNG: Verwenden Sie ausschließlich originale Evolution-
Sägeblätter, die für diese Maschine konstruiert sind. Achten
Sie darauf, dass die Höchstdrehzahl des Sägeblatts mit der
Maschine kompatibel ist. Führen Sie diese Tätigkeit nur durch,
wenn die Maschine von der Stromversorgung getrennt ist.
Hinweis: Es wird empfohlen, dass die Bedienperson beim
Umgang mit dem Sägeblatt während der Montage oder beim
Auswechseln des Sägeblatts Schutzhandschuhe trägt. (>10.1)
• Stellen Sie die Säge auf eine ebene, sichere Oberäche.
• Rasten Sie die Nabenarretierung ein, um die Nabe der
Maschine zu arretieren. (Abb. 1)
• Lösen Sie die Innensechskantschraube in der Nabe mit dem
mitgelieferten Sechskantschlüssel und entfernen Sie Schraube,
Scheibe und äußeren Sägeblattantriebsansch. (Abb. 2)
Hinweis: Die Innensechskant-Nabenschraube hat ein
Rechtsgewinde. Drehen Sie sie zum Anziehen im Uhrzeigersinn.
Drehen Sie sie zum Lösen gegen den Uhrzeigersinn.
• Entfernen Sie das Sägeblatt und lassen Sie den inneren
Sägeblattansch in seiner Betriebsposition.
• Reinigen Sie die inneren und äußeren Sägeblattantriebsansche
und die Sägeblattbefestigungsäche vor der Montage
eines neuen Sägeblatts.
• Stellen Sie sicher, dass die auf das Sägeblatt aufgedruckten
Drehrichtungspfeile und die Drehrichtungspfeile auf
dem oberen und unteren Sägeblattschutz der Maschine
übereinstimmen. (Abb. 3)
• Montieren Sie äußeren Antriebsansch, Scheibe und
Innensechskant-Nabenschraube wieder.
• Rasten Sie die Nabenarretierung ein und ziehen Sie die
Innensechskant-Nabenschraube mit dem Sechskantschlüssel an.
• Kontrollieren Sie, ob die Nabenarretierung vollständig gelöst
ist, indem Sie das Sägeblatt von Hand drehen.
• Überprüfen Sie die Funktion des unteren Sägeblattschutz.
Abb. 1
Abb. 3
Abb. 2
sTraffen
Abb. 6
0-45
o
Abb. 7
Page 20

38 39
www.evolutionpowertools.com www.evolutionpowertools.com
EN
FR
DE
IT
Motor können beschädigt werden, wenn
die Maschine mit einer falsch eingestellten
Parallelkantenführung verwendet wird.
• Platzieren Sie die Vorderkante der
Grundplatte rechtwinklig zum Werkstück
und stellen Sie dabei sicher, dass das
Sägeblatt nicht das Werkstück berührt,
bevor Sie den Motor starten.
• Bringen Sie vor dem Schneiden die Schnittlinie
mit der Schnittlinienführung in eine Linie
und führen Sie das Sägeblatt langsam in das
Werkstück ein, um eine Beschädigung der
Sägeblattzähne zu vermeiden.
Hinweis: An der Vorderkante der Grundplatte
benden sich zwei (2) Schnittlinienführungen
(nur für 0
0
und 450 Schnittwinkel).
• Schieben Sie die Säge mit beiden Händen
vorwärts durch das Werkstück.
• Verwenden Sie sanften, konstanten Druck,
um die Säge vorwärts durch das Werkstück
zu schieben.
Lassen Sie den EIN/AUS-Schalter los und
lassen Sie das Sägeblatt vollständig stoppen
wenn der Schnitt beendet ist. Drücken
Sie nicht seitlich auf das Sägeblatt, um es
schneller abzubremsen.
(10.5) WARNUNG: Wenn der Motor stoppt oder
stecken bleibt,während ein Schnitt versucht wird,
lösen Sie sofort den Startschalter und stecken
Sie die Maschine von der Spannungsversorgung
ab. Entfernen Sie die Maschine vom Werkstück
bevor Sie die Ursache untersuchen und
versuchen, den Motor wieder zu starten.
(6)
WARTUNG
(6.1) Hinweis: Jegliche Wartung muss
bei abgeschalteter und von der Netz-/
Batterieversorgung getrennter Maschine erfolgen.
Überprüfen Sie die vorschriftsmäßige
Funktion aller Sicherheitsmerkmale und
Schutzvorrichtungen auf regelmäßiger Basis.
Benutzen Sie diese Maschine nur, wenn alle
Schutzvorrichtungen/Sicherheitsfunktionen
voll funktionsfähig sind.
Alle Motorlager in diesem Gerät weisen eine
Dauerschmierung auf. Daher ist keine weitere
Schmierung erforderlich.
Reinigen Sie die Plastikteile des Geräts unter
Verwendung eines sauberen, leicht feuchten
Tuchs. Verwenden Sie keine Lösungsmittel
oder ähnlichen Produkte, die die Plastikteile
beschädigen könnten.
WARNUNG: Versuchen Sie nicht zu reinigen,
indem Sie spitze Gegenstände durch die
Önungen in den Gehäuseteilen etc. des Geräts
stecken. Die Belüftungsönungen des Geräts
sollten mit trockener Pressluft gereinigt werden.
Bei übermäßigem Funkenug kann sich
Schmutz im Motor angesammelt haben oder
sind die Kohlebürsten verschlissen.
(>6.2) Wenn dafür Anzeichen auftauchen,
lassen Sie die Maschine von einem
qualizierten Techniker warten und die
Bürsten ersetzen. (<6.2)
(6.4)
UMWELTSCHUTZ
Elektroabfälle sollten nicht mit dem
normalen Hausmüll entsorgt werden. Bitte
recyclen Sie, wenn die entsprechenden
Recyclingeinrichtungen bei Ihnen vor Ort
vorhanden sind. Bitte erkundigen Sie sich in
Ihrer Gemeinde oder bei Ihrem Einzelhändler
und lassen sich hinsichtlich Recycling beraten.
(<10.2) HINWEISE ZUM BETRIEB
Führen Sie bei jeder Verwendung der Maschine routinemäßige
Sicherheitsprüfungen durch.
Stellen Sie sicher, dass alle Schutzabdeckungen richtig funktionieren
und ziehen Sie dann alle Einstellgrie/-schrauben fest an.
Stellen Sie sicher, dass das Sägeblatt fest und richtig montiert
ist. Stellen Sie auch sicher, dass das richtige Sägeblatt für das zu
schneidende Material montiert ist.
Stellen Sie die Unversehrtheit des Netzkabels sicher.
Wo möglich sollten Sie das Werkstück immer fest einspannen,
beispielsweise in eine Werkbank oder zwischen Sägeböcken.
(10.2>)
(5.4)
DER EIN/AUS-SCHALTER
Diese Maschine ist mit einem Sicherheitsstartschalter
ausgestattet. (Abb. 8)
Einschalten des Werkzeugs:
• Drücken Sie die Sicherheitsverriegelungstaste an der Seite
des Gris mit Ihrem Daumen.
• Drücken Sie den Hauptschalter, um den Motor zu starten.
WARNUNG: Starten Sie die Säge nie wenn die Schneidkante
des Sägeblatts die Oberäche des Werkstücks berührt.
(10.3)
HINWEISE ZUM SCHNEIDEN
WARNUNG: Der Bediener muss sämtliche einschlägige PSA
(persönliche Schutzausrüstung) tragen, die für die durchzuführende
Aufgabe erforderlich ist. Dies kann Schutzbrillen, Staubmasken,
Sicherheitsschuhe, etc. beinhalten. Der Bediener muss sich immer
über die Position und Führung des Netzkabels im Klaren sein.
(10.4)
• Überlasten Sie die Maschine nicht.
• Lassen Sie die Drehzahl des Sägeblatts die Arbeit verrichten. Die
Schnittleistung wird durch mehr Druck auf die Maschine nicht
verbessert, dies reduziert jedoch die Lebensdauer des Sägeblatts.
• Stellen Sie bei Verwendung der Parallelkantenführung sicher,
dass Sie parallel zum Sägeblatt ist. Das Sägeblatt und/oder der
Abb. 8
Page 21

40 41
www.evolutionpowertools.com www.evolutionpowertools.com
EN
FR
DE
IT
EG-KONFORMITÄTSERKLÄRUNG
gemäß EN ISO 17050-1:2004
Der Hersteller des von dieser Erklärung behandelten Produkts ist:
Evolution Power Tools Ltd. Venture 0ne, Longacre Close, Holbrook Industrial Estate, Sheeld S20 3FR.
Der Hersteller erklärt hiermit, dass die Maschine wie in dieser Erklärung angegeben alle relevanten
Bestimmungen der Maschinenrichtlinie und andere einschlägige Richtlinien wie unten angegeben erfüllt.
Der Hersteller erklärt weiter, dass die Maschine wie in dieser Erklärung angegeben
wenn zutreend die relevanten Bestimmungen der grundlegenden Gesundheits- und
Sicherheitsanforderungen erfüllt.
Die von dieser Erklärung betroenen Richtlinien sind wie unten ausgeführt:
2006/42/EC. Maschinenrichtlinie.
2004/108/EC. (until Apr 19th 2016) EMV-Richtlinie.
2014/30/EU. (starting from Apr 20th 2016) EMV-Richtlinie.
2011/65/EU. Die Richtlinie (RoHS) zur Beschränkung der Verwendung bestimmter
gefährlicher Stoe in Elektro- und Elektronikgeräten.
2012/19/EU. Die WEEE-Richtlinie über Elektro- und Elektronik-Altgeräte.
Und entspricht den zutreenden Anforderungen der folgenden Dokumente:
EN55014-1:2006+A1+A2 • EN55014-2:1997+A1+A2 • EN61000-3-2:2014
EN61000-3-11:2000 • EN60745-1:2009+A11 • EN60745-2-5:2010
Produktangaben
Beschreibung: FURYB/STEALTH 185mm (7-1/4”) MEHRZWECK-KREISSÄGE
Evolution-Modell-Nr: FURYB1851 / FURYB1852 / FURYB1852EU /
STEALTH1851 / STEALTH1852 / STEALTH1852EU
Markenname: EVOLUTION
Netzspannung: 220-240V ~ 50Hz
Eingang: 1200W
Die technischen Unterlagen, die erforderlich sind, um zu belegen, dass das Produkt die Anforderungen
der Richtlinie erfüllt, wurden zusammengestellt und stehen den entsprechenden Verfolgungsbehörden
zur Verfügung; sie belegen, dass unsere technische Dokumentation oben angeführte Dokumente enthält
und sie die richtigen Normen für das oben angegebene Produkt darstellen.
Name und Adresse des Eigentümers der technischen Dokumentation.
Gezeichnet: Druck: Matthew Gavins: Group Chief Executive.
Datum: 01/03/2016
PARTS DIAGRAM
STEALTH
185
Page 22

EN
FR
DE
IT
FRANÇAIS
Traduction D’original
Page 23

44 45
www.evolutionpowertools.com www.evolutionpowertools.com
EN
FR
DE
IT
SOMMAIRE
(1.2) Ce manuel d’instructions
a été initialement rédigé en anglais.
(1.3) IMPORTANT
Veuillez lire attentivement ces instructions
de fonctionnement et de sécurité, dans leur
intégralité. Pour votre propre sécurité, si vous
avez des doutes concernant un aspect de
l’utilisation de cet appareil, veuillez contacter
l’assistance technique dont le numéro se
trouve sur le site internet d’Evolution Power
Tools. Nous assurons différentes lignes
d’assistance téléphoniques au sein de notre
organisation à l’échelle mondiale, mais de
l’aide technique est également disponible
auprès de votre fournisseur.
INTERNET
www.evolutionpowertools.com
(1.4) Félicitations pour votre achat d’un
appareil d’Evolution Power Tools. Veuillez
enregistrer votre produit « en ligne » comme
expliqué dans la brochure A4 d’enregistrement
en ligne de la garantie fournie avec l’appareil.
Vous pouvez également scanner le code
QR situé sur la brochure A4 à l’aide d’un
smartphone. Cela vous permettra de valider
la période de garantie de l’appareil via le
site internet Evolutions en saisissant vos
coordonnées, garantissant ainsi un service
rapide si nécessaire. Nous vous remercions
sincèrement d’avoir choisi un produit
d’Evolution Power Tools..
GARANTIE LIMITEE D’EVOLUTION
Evolution Power Tools se réserve le droit
d’apporter des modifications et des
améliorations au produit, sans avis préalable.
Veuillez vous reporter à la brochure
de l’enregistrement de la garantie et/ou
l’emballage pour les détails des modalités
et conditions de la garantie.
(1.5) Durant la période de la garantie à
compter de la date d’achat d’origine, Evolution
Power Tools réparera ou remplacera toute
marchandise présentant un défaut de
matériau ou de fabrication. Cette garantie
ne s’applique pas si la machine renvoyée
a été utilisée de manière non conforme
au Manuel d’Instructions ou si elle a été
endommagée par accident, par négligence
ou en raison d’un entretien inadéquat. Cette
garantie ne s’applique pas aux machines et/
ou composants qui ont été altérés, changés ou
modifiés de quelque manière que ce soit, ou
sujets à une utilisation contraire aux capacités
et spécifications recommandées.
Les composants électriques sont soumis
à la garantie de leurs fabricants respectifs.
Toute marchandise retournée pour cause de
défaut doit être envoyée en port prépayé à
Evolution Power Tools. Evolution Power Tools
se réserve le droit de refuser de réparer ou
de remplacer un produit défectueux avec un
article identique ou équivalent. Il n’existe
pas de garantie – écrite ou verbale – pour les
accessoires consommables tels que (la liste
suivante n’est pas exhaustive) lames, fraises,
perceuses, ciseaux, palettes, etc. Evolution
Power Tools ne saurait en aucun cas être
tenu responsable de la perte ou des dégâts
résultant directement ou indirectement
de l’utilisation de notre marchandise
ou de toute autre cause.
Evolution Power Tools ne peut être
tenu responsable des coûts payés sur ces
marchandises ou des dommages en résultant.
Aucun membre, employé ou agent d’Evolution
Power Tools n’est autorisé à formuler
oralement une adéquation de la machine
ou à abolir tout terme susdit de la vente,
et Evolution Power Tools ne peut pas être
obligé à s’y tenir. Toute question relative
à cette garantie limitée doit être adressée
au siège social de l’entreprise ou au service
d’assistance téléphonique correspondant.
INTRODUCTION
Garantie Page 45
Particularités de la machine Page 46
Vibration Page 47
Étiquettes et symboles Page 47
Usage prévu de cet outil électrique Page 48
Usage proscrit de cet outil électrique Page 48
PRÉCAUTIONS DE SÉCURITÉ
Sécurité électrique Page 49
Utilisation en extérieur Page 49
Instructions générales de sécurité pour les outils électriques Page 49
Instructions de sécurité supplémentaires Page 51
DÉMARFURY
Déballer Page 53
Vue d'ensemble de l'appareil Page 54
Assemblage et préparation Page 55
Instructions d’utilisation Page 55
ENTRETIEN
Protection de l’environnement Page 61
Schéma des pièces de rechange Page 62
DECLARATION OF CONFORMITY Page 63
English Page 2
Deutsch Seite 22
Français Page 42
Italiano Pagina 64
Page 24

46 47
www.evolutionpowertools.com www.evolutionpowertools.com
EN
FR
DE
IT
CARACTÉRISTIQUES DE FURY
SPÉCIFICATIONS DE LA MACHINE MÉTRIQUE IMPÉRIAL
Moteur UK/EU (220-240V ~ 50Hz) 1200W 5A
Moteur USA (120V ~ 60Hz) 1200W 10A
Vitesse De Charge 3700min
-1
3700rpm
Poids 5.4kg 12lbs
COUPE DES CAPACITÉS MÉTRIQUE IMPÉRIAL
Acier Doux Plaque (Épaisseur Max) 3mm 1/8”
Section Boîte Acier Doux (Max Épaisseur De Paroi) 3mm 1/8”
Epaisseur Max De Coupe (Bois 90
0
) 60mm 2-3/8”
Epaisseur Max De Coupe (Bois 45
0
) 40mm 1-1/2”
CARACTÉRISTIQUES DE LA LAME MÉTRIQUE IMPÉRIAL
Diamètre 185mm 7-1/4”
Diamètre Du Trou 20mm 3/4”
Nombre De Dents 16 16
Max Lame Vitesse 3900min
-1
3900rpm
Épaisseur 1.7mm .067”
NOISE & VIBRATION DONNÉES
L
PA
De Pression Acoustique (En Charge) 98,83dB(A) K=3dB(A)
Niveau De Puissance Acoustique L
WA
(Sous Charge) 109,83dB(A) K=3dB(A)
Niveau De Vibration (Sous Charge)
a
h,W=3,78 m/s
2
ah,M=1,596 m/s
2
K=1,5 m/s
2
(1.6) Remarque : La mesure des vibrations
a été effectuée dans des conditions standard
conformément à : EN60745-1.
La valeur totale des vibrations déclarée a été
mesurée conformément à la méthode de test
standard et peut être utilisée pour comparer
un outil avec un autre.
La valeur totale des vibrations déclarée peut
également être utilisée lors d’une évaluation
préliminaire d’exposition.
(1.7)
VIBRATION
AVERTISSEMENT : Lors de l’utilisation de cette
machine, l’opérateur peut être exposé à de hauts
niveaux de vibrations transmises à sa main et
son bras. Il se peut que l’opérateur développe
le syndrome de Raynaud. Cet état peut réduire
la sensibilité de la main au froid et au chaud,
et aussi créer un endolorissement général. Les
personnes utilisant cet appareil de manière
régulière ou prolongée doivent surveiller
attentivement l’état de leurs mains et de leurs
doigts. Si l’un des symptômes devient apparent,
consultez immédiatement un médecin.
• La mesure et l’évaluation de l’exposition
humaine sur le lieu de travail aux vibrations
transmises à la main sont fournies dans:
BS EN ISO 5349-1:2001
et BS EN ISO 5349-2:2002.
• De nombreux facteurs peuvent influencer
le niveau réel des vibrations durant
l’utilisation, comme par exemple l’état et
l’orientation des surfaces de travail, le type
et l’état de l’appareil utilisé. Avant chaque
utilisation, de tels facteurs doivent être
évalués et quand cela est possible, des
pratiques de travail adéquates doivent être
adoptées. La gestion de ces facteurs peut
aider à réduire les effets des vibrations :
Manipulation
• Manipulez la machine avec soin,
lui laissant faire le travail.
• Évitez d’utiliser une force physique
excessive sur les contrôles de la machine.
• Prenez en considération votre sécurité et
votre stabilité ainsi que l’orientation de la
machine durant son utilisation.
Surface de travail
• Prenez en considération le matériau de la
surface de travail ; son état, sa densité, sa
solidité, sa rigidité et son orientation.
AVERTISSEMENT : L’émission de vibrations
durant l’utilisation effective de l’outil
électrique peut différer de la valeur totale
déclarée en fonction de la manière dont
l’outil est utilisé. La nécessité d’identifier les
mesures de sécurité et de protéger l’utilisateur
est basée sur l’estimation d’exposition en
conditions réelles d’utilisation (en prenant
en compte toutes les phases du cycle de
fonctionnement telles que les périodes où
l’outil est éteint, lorsqu’il est allumé mais
inactif, en plus du temps de déclenchement).
(1.8)
ÉTIQUETTES ET SYMBOLES
AVERTISSEMENT : N’utilisez pas cette
machine si les étiquettes d’avertissement
et/ou d’instructions sont manquantes ou
endommagées. Contactez Evolution Power
Tools pour le remplacement des étiquettes.
Remarque : Tous les symboles suivants ou
certains d’entre eux peuvent apparaître
dans le manuel ou sur le produit.
AVERTISSEMENT: En raison de la puissance de ce produit au démarrage, les chutes de tension
peuvent se produire et cela peut influencer d’autres équipements (par exemple des feux de gradation).
Donc, pour des raisons techniques, nous conseillons, si le secteur impédance est Zmax <0.431Ohm,
ces perturbations ne sont pas attendus. Si vous désirez de plus amples précisions, vous pouvez
contacter votre autorité d’alimentation locale.
Page 25

48 49
www.evolutionpowertools.com www.evolutionpowertools.com
EN
FR
DE
IT
(1.9)
Symbole Description
V
Volts
A
Ampères
Hz
Hertz
Min
-1
Accélérer
~
Courant Alternatif
N
o
Vitesse À Vide
Portez Des Lunettes De Sécurité
Portez Des Protections Auditives
Protection Contre L'usure
De La Poussière
Lisez Les Instructions
Certification CE
Certification EAC
Certification CSA
Déchets D'équipements Électriques
Et Équipement Électronique
Triman - Collecte des déchets
& Recyclage
Avertissement
(1.10)
USAGE PRÉVU
DE CET OUTIL ÉLECTRIQUE
AVERTISSEMENT : Ce produit est une scie
circulaire à commande manuelle conçue
pour fonctionner avec des lames Evolution
spécifiques. Utilisez uniquement des
accessoires conçus pour l’utilisation avec
cette machine et/ou ceux spécifiquement
recommandés par Evolution Power Tools Ltd.
Cette machine, lorsqu’elle est équipée
d’une lame appropriée, peut être
utilisée pour découper :
Acier doux
Aluminium
Bois
(1.11)
USAGE PROSCRIT
DE CET OUTIL ÉLECTRIQUE
AVERTISSEMENT : Ce produit est une scie
circulaire à commande manuelle et il doit être
uniquement utilisé en tant que tel. Il ne doit
être modifié d’aucune manière ni utilisé pour
alimenter des équipements ou actionner des
accessoires autres que ceux mentionnés dans
ce manuel d’instructions.
(1.13) AVERTISSEMENT : Cette machine
n’est pas conçue pour être utilisée par des
personnes (y compris les enfants) dotées de
capacités physiques, sensorielles ou mentales
réduites, ou manquant d’expérience ou
de connaissances, à moins qu’elles soient
surveillées ou qu’elles aient reçu
des instructions concernant l’utilisation
de la machine en toute sécurité par une
personne responsable de leur sécurité et
capable de l’utiliser sans risques. Les enfants
doivent être surveillés pour garantir qu’ils
n’ont pas accès à cette machine et qu’ils
ne sont pas autorisés à jouer avec.
(1.14)
SÉCURITÉ ÉLECTRIQUE
Cette machine est équipée de la fiche moulée
et du câble électrique adéquats pour le
marché désigné. Si le cordon d’alimentation
est détérioré, il doit être remplacé par un
cordon spécifique disponible auprès du
fabricant ou de son agent de maintenance.
(1.15)
UTILISATION EN EXTÉRIEUR
AVERTISSEMENT : Dans le cas où cet outil
doit être utilisé en extérieur, il ne doit pas,
pour votre protection, être exposé à la pluie
ou utilisé dans des endroits humides. Ne
placez pas l’outil sur des surfaces humides.
Utilisez un établi sec et propre, si possible.
Pour une protection renforcée, utilisez un
disjoncteur différentiel qui coupera le courant
si les courants de fuite vers la terre excèdent
30 mA pour 30 ms. Vérifiez toujours le bon
fonctionnement du disjoncteur différentiel
avant d’utiliser la machine. Si vous avez besoin
d’un câble de rallonge, il doit être adapté à
un usage extérieur et étiqueté de la sorte.
Les instructions du fabricant doivent être
respectées lors de l’utilisation d’une rallonge.
(2.1)
CONSIGNES GÉNÉRALES
DE SÉCURITÉ POUR LES
OUTILS ÉLECTRIQUES
(Ces consignes générales de sécurité
pour les outils électriques sont telles que
spécifiées dans EN 60745-1:2009.
AVERTISSEMENT : Lisez tous les
avertissements de sécurité et les instructions.
Le non-respect des avertissements et des
instructions peut causer des électrocutions,
des incendies et/ou des blessures graves.
Conservez tous les avertissements de sécurité
et les instructions pour future référence.
Le terme « outil électrique » dans les
avertissements fait référence aux outils
électriques fonctionnant sur secteur
(avec fil) ou sur batterie (sans fil).
(2.2) 1) Avertissements de sécurité
générale pour les outils électriques
[Sécurité de l’espace de travail]
a) L’espace de travail doit être propre et
suffisamment éclairé. Les espaces sombres
et encombrés sont propices aux accidents.
b) N’utilisez pas les outils électriques dans
des atmosphères explosives, notamment
en présence de liquides inflammables, de
gaz ou de poussière. Les outils électriques
produisent des étincelles qui peuvent
enflammer les poussières ou les vapeurs.
c) Tenez les enfants et les autres personnes
présentes à distance lorsque vous utilisez
un outil électrique. Les distractions peuvent
causer une perte de contrôle.
(2.3) 2) Avertissements de sécurité
générale pour les outils électriques
[Sécurité électrique]
a) Les fiches des outils électriques doivent
correspondre à la prise secteur utilisée. Ne
modifiez jamais la fiche, de quelque façon
que ce soit. N’utilisez jamais d’adaptateurs de
fiche avec des outils mis à la terre. Les fiches
et prises non modifiées réduisent le risque
d’électrocution.
b) Évitez tout contact du corps avec des
surfaces mises à la terre telles que tuyaux,
radiateurs, cuisinières et réfrigérateurs.
Il existe un risque accru de choc électrique
si votre corps est en contact avec la terre.
Page 26

50 51
www.evolutionpowertools.com www.evolutionpowertools.com
EN
FR
DE
IT
c) N’exposez pas les outils électriques
à la pluie ou à l’humidité. De l’eau pénétrant
dans un outil électrique accroît le risque
de choc électrique.
d) Ne maltraitez pas le cordon
d’alimentation. N’utilisez jamais le cordon
d’alimentation pour transporter l’outil
électrique ou le tirer et ne débranchez
jamais l’appareil en tirant sur le cordon.
Gardez le cordon à l’abri de la chaleur, de
l’huile, des objets tranchants et des pièces
en mouvement. Un cordon endommagé ou
emmêlé accroît le risque de choc électrique.
e) Lors de l’utilisation d’un outil électrique
en extérieur, utilisez une rallonge
spécialement conçue à cet effet. L’utilisation
d’un cordon conçu pour l’usage extérieur
réduit le risque de choc électrique.
f) Si le fonctionnement de l’outil électrique
dans des endroits humides est inévitable,
utilisez une prise protégée par un
disjoncteur différentiel. L’utilisation
d’un disjoncteur différentiel réduit
le risque de choc électrique.
(2.4) 3) Avertissements de sécurité
générale pour les outils électriques
[Sécurité personnelle].
a) Restez attentif, prêtez attention au travail
que vous êtes en train d’effectuer et faites
preuve de bon sens lors de l’utilisation de
tout outil électrique. N’utilisez pas d’outil
électrique lorsque vous êtes fatigué ou que
vous êtes sous l’influence de drogues, de
l’alcool ou de médicaments. Un moment
d’inattention pendant l’utilisation d’un outil
électrique peut entraîner des blessures graves.
b) Utilisez un équipement de protection
individuelle. Portez toujours une protection
oculaire. Des équipements de protection
tels que masques anti-poussière, chaussures
antidérapantes, casque ou protections
auditives utilisés dans des conditions
adéquates réduisent les blessures.
c) Prévenez les démarFURYs impromptus.
Assurez-vous que l’interrupteur est sur la
position arrêt avant de brancher l’appareil
sur la source d’alimentation ou sur la
batterie, de le ramasser ou de le porter.
Porter des outils électriques avec le doigt
sur l’interrupteur ou brancher des outils
électriques alors que l’interrupteur est sur
marche est propice aux accidents.
d) Retirez les clés de réglage ou les clés à
écrous avant de mettre l’outil en marche.
Une clé laissée sur une pièce rotative de l’outil
électrique peut causer des blessures.
e) Ne travaillez pas hors de votre portée.
Gardez un bon appui et un bon équilibre
à tout moment. Ceci permettra de mieux
contrôler l’outil électrique en cas
de situation imprévue.
f) Portez une tenue appropriée.
Ne portez ni vêtements amples, ni bijoux.
Gardez les cheveux, les vêtements et les
gants à l’écart des pièces en mouvement.
Les vêtements amples, les bijoux et les
cheveux longs peuvent se prendre dans
les pièces en mouvement.
g) Si les appareils sont prévus pour
raccorder des dispositifs d’extraction
et de collecte des poussières,
assurez-vous que ceux-ci sont
reliés et correctement utilisés.
L’usage de ces dispositifs peut réduire
les dangers présentés par la poussière.
(2.5) 4) Avertissements de
sécurité générale pour les outils
électriques [Utilisation et entretien
des outils électriques].
a) Ne forcez pas l’outil électrique. Utilisez
l’outil approprié pour le travail. Un outil
approprié exécutera le travail mieux et
de façon moins dangereuse s’il est utilisé
dans les limites prévues.
b) N’utilisez pas l’outil si l’interrupteur ne
permet pas de le mettre en marche ou de
l’arrêter. Tout outil électrique qui ne peut
pas être contrôlé par son interrupteur est
dangereux et doit être réparé.
c) Débranchez l’outil électrique de la source
d’alimentation et/ou la batterie de l’outil
électrique avant de procéder au réglage
ou au changement des accessoires ou au
rangement des outils électriques.
Ces mesures de sécurité préventives
réduisent le risque de démarFURY
accidentel de l’outil électrique.
d) Rangez les outils électriques à l’arrêt
hors de portée des enfants et n’autorisez
pas les personnes qui ne sont pas familières
avec l’outil électrique ou ces instructions
à utiliser l’outil électrique. Dans les
mains de personnes n’ayant pas reçu
d’instructions adéquates, les outils
électriques sont dangereux.
e) Entretenez les outils électriques.
Vérifiez la dérive d’alignement ou l’attache
des pièces mobiles, la rupture des pièces
et toute autre condition qui pourrait
affecter l’utilisation de l’outil électrique.
En cas de dommages, faites réparer l’outil
avant de l’utiliser de nouveau. Beaucoup
d’accidents sont causés par des outils
électriques mal entretenus.
f) Gardez les outils de coupe bien affûtés
et propres. Des outils de coupe correctement
entretenus et dont les tranchants sont bien
affûtés risquent moins de se bloquer et sont
plus faciles à contrôler.
g) Utilisez l’outil électrique, les accessoires
et embouts, etc. conformément à ces
instructions, prenant en considération les
conditions de travail et le travail à effectuer.
L’utilisation de cet outil électrique pour des
travaux autres que ceux pour lesquels
il a été conçu peut engendrer une
situation dangereuse.
(2.6) 5) Avertissements de
sécurité générale pour les outils
électriques [Réparation]
a) Les réparations doivent être confiées
à un technicien qualifié, utilisant
exclusivement des pièces identiques
à celles d’origine. Ceci assurera le maintien
de la sécurité de l’appareil.
(2.7)
CONSEILS DE SANTÉ
AVERTISSEMENT : Lors de l’utilisation de
cette machine, des particules de poussière
peuvent être engendrées. Dans certains cas,
en fonction des matériaux avec lesquels vous
travaillez, cette poussière peut se révéler
particulièrement néfaste.
Si vous suspectez que la peinture à la surface
du matériau que vous souhaitez couper
contient du plomb, demandez les conseils
d’un professionnel. Les peintures à base de
plomb doivent uniquement être retirées par
un professionnel. Ne tentez pas de les enlever
par vous-même. Une fois que la poussière s’est
déposée sur les surfaces, un contact entre la
main et la bouche peut donner lieu à l’ingestion
de plomb. Une exposition même à des faibles
niveaux de plomb peut provoquer des lésions
irréversibles au cerveau et au système nerveux.
Les jeunes enfants et les enfants à naître sont
particulièrement vulnérables.
Page 27

52 53
www.evolutionpowertools.com www.evolutionpowertools.com
EN
FR
DE
IT
Il vous est conseillé de considérer les risques
associés aux matériaux avec lesquels vous
travaillez et de réduire les risques d’exposition.
Certains matériaux pouvant engendrer des
poussières potentiellement dangereuses
pour votre santé, nous vous conseillons
donc d’utiliser un masque agréé avec
filtres interchangeables lors de
l’utilisation de cette machine.
Vous devez toujours :
• Travailler dans un endroit bien aéré.
• Travailler en portant un équipement de
protection agréé tel que des masques
anti-poussière spécialement conçus pour
filtrer les particules microscopiques.
(2.8) AVERTISSEMENT : l’utilisation
d’un outil électrique peut entraîner la
projection d’objets étrangers, qui peuvent être
à l’origine de lésions oculaires graves. Avant de
commencer à utiliser l’outil électrique, portez
constamment des lunettes de protection
munies d’écrans latéraux ou un masque
facial intégral si nécessaire.
(3.0)
CONSIGNES DE SÉCURITÉ
COMPLÉMENTAIRES
(3.1) a) DANGER : N’approchez pas vos
mains de la zone de coupe ou de la lame.
Laissez votre seconde main sur la poignée
auxiliaire, ou sur le boîtier moteur. Si vos deux
mains tiennent la scie, elles ne pourront pas
être coupées par la lame.
b) Ne placez pas vos mains sous la pièce
à usiner. Le carter ne peut pas vous protéger
de la lame sous la pièce à usiner.
c) Adaptez la profondeur de la coupe
à l’épaisseur de la pièce à usiner.
Les dents de la lame ne doivent pas
entièrement dépasser de la pièce à usiner.
d) Ne tenez jamais la pièce à couper dans
vos mains ou sur vos jambes. Fixez la pièce
à usiner à un support stable. Il est important
de fixer correctement la pièce pour réduire
les risques d’accident corporel, de grippage
de la lame ou de perte de contrôle.
e) Tenez l’appareil électrique par les
surfaces de prises isolées lorsqu’il est
susceptible d’entrer en contact avec
des câbles cachés ou son propre cordon
d’alimentation. Tout contact avec un câble
sous tension entraînerait une mise sous
tension des parties métalliques exposées de
l’outil et l’électrocution de l’opérateur.
f) Lors d’un sciage en long, utilisez toujours
un guide à refendre ou longitudinal.
Cela augmente la précision de la coupe et
réduit les risques de grippage de la lame.
g) Utilisez constamment des lames
possédant un alésage central aux bonnes
dimensions et de forme adaptée (losange
contre circulaire). Les lames non adaptées
au système de montage de la scie
fonctionneront de manière excentrée
et engendreront une perte de contrôle.
h) N’utilisez jamais de rondelles ou
de boulons de lame endommagés ou
inadaptés. Les boulons et rondelles ont
été spécialement conçus pour votre scie afin
d’assurer des performances optimales et la
sécurité de fonctionnement de l’appareil.
i) N’utilisez pas de lames en acier à coupe
rapide (HSS).
j) Contrôlez la machine et la lame avant
chaque utilisation. N’utilisez pas de lames
déformées, fendues, usées ou endommagées
de quelque façon que ce soit.
k) N’utilisez jamais la scie sans le système
de carter de protection d’origine. Ne
verrouillez pas le carter mobile en position
ouverte. Assurez-vous que le carter fonctionne
librement sans se bloquer.
l) N’utilisez que des lames correspondant
aux caractéristiques indiquées dans ce
manuel. Avant d’utiliser des accessoires,
assurez-vous toujours que le nombre maximal
de tours par minute autorisé d’un accessoire
correspond à celui de la machine.
(3.2) Causes de l’effet de recul
et protection de l’opérateur :
L’effet de recul se traduit par une réaction
soudaine à un coincement, un grippage
ou une dérive d’alignement de la lame
qui soulève la scie et libère la lame de
la pièce à usiner en direction de l’opérateur.
1. La lame peut se coincer ou se gripper
fermement lorsque le trait de scie se
resserre. Si cela se produit, la lame cale et
le moteur réagit en repoussant rapidement
l’appareil vers l’opérateur.
2. Si la lame se tord ou dérive de
l’alignement de la coupe, les dents situées
sur le tranchant arrière de la lame peuvent
s’enfoncer dans la surface supérieure de la
pièce, éjectant ainsi la lame du trait de scie
vers l’opérateur.
(3.3) L’effet de recul résulte d’une mauvaise
utilisation de la scie et/ou du non-respect
des procédures ou conditions de
fonctionnement. Cet effet de recul peut
être évité en prenant les précautions
adéquates indiquées ci-dessous.
a) Tenez fermement la scie avec vos deux
mains et positionnez vos bras de façon
à résister aux forces de l’effet de recul.
Placez-vous sur l’un des côtés de la lame, mais
pas dans son alignement. Même si l’effet de
recul peut entraîner l’éjection de la lame vers
l’arrière, il peut être contrôlé par l’opérateur si
les précautions adéquates sont prises.
b) Si les lames se grippent ou si
l’interruption de la coupe est nécessaire,
quelle qu’en soit la raison, relâchez la
gâchette et maintenez la scie immobile
dans le matériau jusqu’à l’arrêt complet
de la lame. Pour éviter tout effet de recul,
n’essayez jamais de retirer la scie de la pièce,
ni de la tirer en arrière lorsque les lames sont
encore en mouvement. Examinez les lames
et prenez les mesures correctives nécessaires
pour éviter tout grippage.
c) Lorsque vous redémarrez une scie dans
une pièce à usiner, placez la lame au centre
du trait de scie et vérifiez que les dents ne
sont pas engagées dans le matériau.
Si la lame se grippe, elle peut se soulever
ou être envoyée en arrière lors du
redémarFURY de la scie.
d) Utilisez un support pour les grands
panneaux afin de réduire les risques
de coincement et de recul de la lame.
Les grands panneaux ont tendance à s’affaisser
sous leur propre poids. Les supports doivent
être placés sous les deux côtés du panneau,
à proximité de la ligne de coupe et de
l’extrémité du panneau.
e) Les leviers d’ajustement et de
verrouillage de la profondeur de la lame
et du biseau doivent être serrés et sécurisés
avant de procéder à la coupe.
Un changement de réglage de la lame
durant la coupe peut entraîner le grippage
et un effet de recul.
f) N’utilisez pas de lames émoussées ou
endommagées. Les lames mal affûtées ou
mal réglées créeront une saignée étroite qui
entraînera une friction excessive, un grippage
de la lame et un effet de recul.
Page 28

54 55
www.evolutionpowertools.com www.evolutionpowertools.com
EN
FR
DE
IT
g) Redoublez de prudence lorsque vous
effectuez une « coupe en plongée » dans
des murs existants ou dans des zones où la
visibilité est mauvaise. La coupe d’objets due
à une lame en saillie peut provoquer un effet
de recul.
h) Vérifiez que le carter inférieur se verrouille
correctement avant chaque utilisation.
Ne démarrez pas la scie si le carter inférieur
ne bouge pas librement et ne se ferme pas
instantanément. Ne maintenez et ne bloquez
jamais le carter inférieur en position ouverte.
En cas de chute accidentelle, le carter inférieur
peut se déformer. Relevez le carter inférieur
avec la poignée de rétractation, puis assurezvous qu’il bouge librement et qu’il ne touche
pas la lame ni aucune autre pièce, quels que
soient l’angle et la profondeur de coupe.
i) Vérifiez le bon fonctionnement du
ressort du carter inférieur. Si le carter et le
ressort ne fonctionnent pas correctement,
ils doivent être soumis à une opération
d’entretien avant toute utilisation. Des pièces
endommagées, des dépôts gommeux ou une
accumulation de débris peuvent ralentir le
fonctionnement du carter inférieur.
j) Ne rétractez manuellement le carter inférieur
que pour réaliser des « coupes en plongée »
et des « coupes composées ». Relevez le carter
inférieur en rétractant la poignée, puis relâchez-le
dès que la lame entre dans le matériau. Pour tous
les autres types de coupes, le carter inférieur doit
fonctionner automatiquement.
k) Vérifiez toujours que le carter inférieur
couvre la lame avant de poser la scie sur un
établi ou sur le sol. Une lame non protégée
et en roue libre peut entraîner le basculement
de la scie en arrière qui coupera tout sur son
passage. Tenez compte du temps d’arrêt de la
lame après le relâchement de la gâchette.
(3.4) AVERTISSEMENT : S’il manque des
pièces, n’utilisez pas la machine jusqu’à ce que
les pièces manquantes soient remplacées. Le
non-respect de cette règle pourrait provoquer
des blessures graves.
(4.1)
DÉMARFURY - DÉBALLAGE
Attention : Cet emballage contient des objets
tranchants. Faites attention lors du déballage.
Déballez la machine et les accessoires fournis.
Vérifiez soigneusement que la machine est en
bonne condition et que vous disposez de tous
les accessoires listés dans ce manuel.
Assurez-vous que tous les accessoires sont
complets. Si une pièce se trouve manquante,
retournez la machine et ses accessoires dans
leur emballage d’origine au revendeur. Ne
jetez pas l’emballage aux ordures ; gardez-
le en sécurité pendant toute la période de
garantie. Éliminez l’emballage d’une manière
responsable pour l’environnement.
Recyclez si possible. Ne laissez pas les enfants
jouer avec des sacs plastiques vides, en raison
du risque d’étouffement.
(4.2)
ARTICLES FOURNIS
Description Quantité
Manuel d'instructions 1
Lame polyvalente (ajusté) 1
Clé Hexagonale
(changer la lame)
1
Guide de bord parallèle 1
4.3
ACCESSOIRES SUPPLÉMENTAIRES
En plus des articles standards fournis
avec cette machine, les accessoires
suivants sont également disponibles
dans le magasin en ligne Evolution sur
www.evolutionpowertools.com
ou chez votre fournisseur local.
(4.4)
Description Part No
Lame En Acier FURY
185
Lame De Diamant DIAMOND
185
Page 29

56 57
www.evolutionpowertools.com www.evolutionpowertools.com
EN
FR
DE
IT
VUE GLOBALE DE LA MACHINE
1. POIGNÉE ARRIÈRE
2. POIGNÉE AVANT
3. PROTÈGELAME SUPÉRIEUR
4. PROTÈGELAME INFÉRIEUR
5. RAIL DE GUIDAGE
6. ORIFICE DE SORTIE DES COPEAUX
METTRE EN MARCHE L’OUTIL
ATTENTION! Débranchez toujours la scie de la source
d’alimentation avant de procéder à des réglages . Référez-vous
au “Schéma de la liste des pièces de rechange”. Si nécessaire,
montez le guide de chant au socle et réglez le guide de chant
sur la position souhaitée. Fixez à l’aide de la vis à papillon.
Si une lame n’a pas été installée, installé une lame pour scie
FURY comme indiqué dans la section “Changement des
lames de scie”.
AVERTISSEMENT! Ne démarrez jamais la scie avec le
tranchant de la lame en contact avec la surface de la pièce
à travailler. Ne retirez pas la protection de lame à la main.
La protection se retire automatiquement. Cet appareil est
équipé d’un cordon d’alimentation et d’une prise conforme
pour son pays de désignation. Ne modifier en aucun cas
le cordon ou la prise.
CHANGER OU RETIRER LA LAME
AVERTISSEMENT: Seules des lames fabriquées par
Evolution sont compatibles sur cette machine. Assurez-vous
que la vitesse maximale de la lame est compatble avec
la machine. N’entreprenez cette vérification que lorsque
la machine est débranchée.
N.B: Il est fortement recommandé à l’utilisateur de porter des gants
de protection lors de toute manipulation de la lame (changement
de lame par exemple).
1. Placer la scie sur une surface plate et sécurisée.
2. Verrouiller le tronc de la machine en poussant
le bouton de verrouillage correspondant. (Fig. 1)
3. Avec la clé Allen fournie, dévisser et retirer la vis à tête creuse
puis la bride extérieure d’entraînement de la lame. (Fig. 2)
4. Retirer la lame de la scie.
5. Nettoyez minutieusement les brides d’entraînement intérieures
et extérieures et les surfaces de montage delame avant d’installer
la nouvelle lame.
6. Assurez-vous que le sens des flèches de rotation visibles
sur la lame corresponde au sens de rotation montré sur les
protège-lames supérieur et inférieur de la machine. (Fig. 3)
7. Remettre la bride extérieure d’entraînement
et la vis à tête creuse .
8. Appuyer sur le bouton de verrouillage du tronc et
resserrer la vis à tête creuse du tronc avec la clé Allen.
Fig. 1
Fig. 3
5
4
3
6
1
2
Fig. 2
TighTen
Page 30

58 59
www.evolutionpowertools.com www.evolutionpowertools.com
EN
FR
DE
IT
N.B: La vis à tête creuse du tronc est adaptée aux droitiers.
9. Contrôler que le bouton de verrouillage est complètement
relâché en faisant tourner la lame.
10. Contrôler le bon fonctionnement du protège-lame.
GUIDE DE CHANT
Un guide de chant (aide pour raboter des bords) peut être
installé sur le rail de guidage. La tige du guide doit être inséré
à l’intérieur des crans rectangulaires visibles à l’avant du rail
de guidage, et glissés sous la vis moletée. (Fig. 4)
N.B: Le guide de chant peut être installé de n’importe quel côté
du rail de guidage et devrait seulement être installé et ajusté
sur la machine lorsque celle-ci est débranchée.
Ajuster le guide de chant à la distance désirée par rapport
à la lame et resserrer les deux vis moletées. Vérifier que le
guide de chant est parallèle à la lame.
Ajustement de la profondeur de coupe
Desserrer la vis de verrouillage et d’ajustement de la profondeur
de coupe afin d’ajuster le rail de guidage à la profondeur de
coupe souhaitée. Vous pouvez vous aider de la règle dessinée
sur le rapporteur de profondeur et de l’index de mesure intégrés
sur la machine. Ajuster la profondeur de coupe à l’épaisseur de la
pièce à usiner. Moins d’une pleine dent des dents de la lame soit
visible sous la pièce. Resserrer fermement la vis de verrouillage
et d’ajustement de la profondeur de coupe afin de verrouiller la
position souhaitée. (Fig. 5)
Ajustement de l’angle de coupe
1. Desserrer la vis de verrouillage de l’inclinaison du
rail de guidage qui se trouve à l’avant de la scie. (Fig. 6)
2. Incliner la lame jusqu’à obtenir l’angle souhaité. (Fig. 7)
3. Serrer fermement la vis de verrouillage de l’inclinaison
du rail de guidage.
N.B: Un système de mesure d’angle (0
0
- 450) est intégré au
cadran du plateau de verrouillage pour faciliter le réglage.
Conseil d’utilisation
Par sécurité, procéder à des vérifications de routine
avant chaque utilisation de la machine. Contrôler toutes les
protections sur la machine et leur état de fonctionnement,
que toutes les vis et poignées sont fermement vissées. Vérifier
que la lame est correctement installée et sécurisée. Vérifier
aussi que la lame installée est appropriée pour couper le
matériau choisi. Vérifier le bon état du cordon d’alimentation.
Verrouiller aussi souvent que possible la pièce de travail
sur un support rigide tel qu’un établi ou un étau.
Bouton d’alimentation ON/OFF
Cette machine est équipée d’un bouton interrupteur
de démarFURY/ arrêt sécurisé.
Pour démarrer l’outil:
• P ousser du pouce le bouton de verrouillage de sécurité situé
sur le côté de la poignée.
• Relâcher l’interrupteur principal pour démarrer le moteur.
(Fig. 8)
Fig. 5
Fig. 4
Fig. 6
0-45
o
Fig. 7
Fig. 8
Page 31

60 61
www.evolutionpowertools.com www.evolutionpowertools.com
EN
FR
DE
IT
Conseil d’utilisation
L’utilisateur doit porter toute protection
PPE (Personal Protection Equipment)
nécessaire pour le travail à accomplir.
Cela peut inclure des lunettes de protection,
des masques anti-poussière, des chaussures
de sécurité etc. L’utilisateur doit toujours faire
attention à la position et à l’emplacement
du cordon d’alimentation.
• Ne pas forcer sur l’outil.
• Faire le travail au rythme de la vitesse de la
lame. Exercer une pression excessive sur l’outil
n’améliorera pas la performance de coupe,
et la durée de vie de la lame en sera réduite.
• Lors de l’utilisation du guide de chant,
s’assurer que ce dernier est parallèle à la
lame. La lame et/ou le moteur pourrait être
endommagé si l’outil est utilisé avec un
ajustement incorrect du guide de chant.
• Pour régler le guide de chant, desserrer la
vis de verrouillage et ajuster le guide sur
la position souhaitée. Puis, resserrer la vis.
• Placer l’avant du rail de guidage en coin
d’angle sur la pièce à travailler avant
d’allumer le moteur.
• Lors d’un début de coupe, aligner la ligne
de coupe souhaitée avec la ligne de coupe
du guide de chant, en faisant attention
à introduire doucement la lame dans le
matériau afin de ne pas endommager les
dents de cette dernière.
• Utiliser ses deux mains pour faire avancer
la scie à travers la pièce travaillée.
• Exercer une pression légère et constante
pour faire avancer la lame dans le matériau.
Lorsque la coupe est terminée, relâcher
le bouton poussoir ON/OFF et attendre que
la lame soit en arrêt complet. Ne pas exercer
de pression latérale sur la lame dans l’optique
de ralentir celle-ci plus rapidement.
AVERTISSEMENT: Si le moteur s’arrêtait
ou se bloquait durant une coupe, relâcher
immédiatement le bouton poussoir et
débrancher l’appareil du courant. Retirer
l’outil de la pièce travaillée avant de
rechercher la cause du problème et
de tenter de redémarrer le moteur.
(6)
ENTRETIEN
(6.1) Remarque : Tout entretien doit
être effectué avec la machine éteinte et
débranchée de la prise secteur/de la batterie.
Vérifiez régulièrement que tous les éléments
de sécurité et les protections fonctionnent
correctement. N’utilisez cette machine que si
toutes les protections/les éléments de sécurité
fonctionnent correctement. Tous les paliers du
moteur de cette machine sont lubrifiés à vie.
Aucune autre lubrification n’est requise.
Utilisez un tissu propre et légèrement
humide pour nettoyer les pièces en plastique
de la machine. N’utilisez pas de solvants
ou de produits similaires qui pourraient
endommager les parties en plastique.
AVERTISSEMENT : Ne tentez pas de nettoyer
la machine en insérant des objets pointus dans
les ouvertures de son carter, etc. Les évents
de la machine doivent être régulièrement
nettoyés à l’aide d’air sec comprimé.
Une quantité excessive d’étincelles peut
indiquer la présence de saletés dans le moteur
ou être un signe d’usure des balais en carbone.
(>6.2) Si vous suspectez un tel
dysfonctionnement, demandez à un
technicien d’effectuer la maintenance de la
machine et de remplacer les brosses. (<6.2)
(6.4)
PROTECTION DE
L’ENVIRONNEMENT
Les déchets électriques et les produits
mécaniques ne doivent pas être jetés avec les
ordures ménagères. Veuillez recycler lorsque
les infrastructures le permettent. Contactez
votre municipalité ou votre revendeur pour
des conseils concernant le recyclage.
Page 32

62 63
www.evolutionpowertools.com www.evolutionpowertools.com
EN
FR
DE
IT
SCHÉMA DES PIÈCES DÉCLARATION CE DE CONFORMITÉ
En accord avec EN ISO 17050-1:2004.
Le fabricant du produit couvert par cette déclaration est.:
Evolution Power Tools, Venture One, Longacre Close, Holbrook Industrial Estate, Sheffield, S20 3FR.
Le fabricant déclare par la présente que la machine comme détaillée dans cette déclaration
respecte toutes les dispositions de la Directive Machines et toutes les autres directives détaillées
ci-après. Le fabricant déclare également que la machine comme détaillée dans cette déclaration
respecte, lorsque cela s’applique, les dispositions pertinentes des exigences essentielles
de santé et de sécurité.
Les directives couvertes par cette déclaration sont comme listées ci-après:
2006/42/EC. Directive Machines.
2004/108/EC. (until Apr 19th 2016) Directive relative à la compatibilité électromagnétique.
2014/30/EU. (starting from Apr 20th 2016) Directive relative à la
compatibilité électromagnétique.
2011/65/EU. Directive relative à la limitation de l’utilisation de certaines
substances dangereuses dans les équipements électriques
et électroniques (RoHS) Directive .
2012/19/EU. Relative aux déchets d’équipements électriques et électroniques (DEEE).
Et est conforme aux dispositions prévues par les documents suivants:
EN55014-1:2006+A1+A2 • EN55014-2:1997+A1+A2 • EN61000-3-2:2014
EN61000-3-11:2000 • EN60745-1:2009+A11 • EN60745-2-5:2010
Détails du produit
Description: FURYB/STEALTH 185mm (7-1/4”) SCIE CIRCULAIRE MULTIUSAGES
Modèle Evolution n° : F URYB1851 / FURYB1852 / FURY B1852EU /
STEALTH1851 / STEALTH1852 / STEALTH1852EU
Brand Name: EVOLUTION
Tension: 220-240V ~ 50Hz
Entrée: 1200W
La documentation technique prouvant que le produit est conforme aux exigences de la directive
peut être consultée auprès des autorités de contrôle. Elle permet de vérifier que notre dossier
technique contient tous les documents répertoriés ci-dessus.
Nom et adresse du détenteur de la documentation technique.
Signed: Print: Matthew Gavins: Directeur Général du Groupe.
Date: 01/03/2016
STEALTH
185
Page 33

EN
FR
DE
IT
®
ITALIANO
Traduzione delle istruzioni originali
Page 34

66 67
www.evolutionpowertools.com www.evolutionpowertools.com
EN
FR
DE
IT
INDICE
(1.2) IL PRESENTE MANUALE DELLE
ISTRUZIONI È STATO ORIGINALMENTE
REDATTO IN INGLESE
(1.3) IMPORTANTE
Leggere con attenzione e per intero queste
istruzioni sul funzionamento e la sicurezza. Per
la vostra stessa sicurezza, se avete dei dubbi
su qualsiasi aspetto legato all’uso di questo
apparecchio, rivolgetevi all’Assistenza Tecnica
pertinente al numero reperibile sul sito web
di Evolution Power Tools. Attraverso la nostra
organizzazione globale gestiamo diverse
linee di Assistenza Tecnica, e altre linee sono
disponibili presso il vostro rivenditore.
WEB
www.evolutionpowertools.com
(1.4) Congratulazioni per il vostro acquisto
di un apparecchio Evolution Power ToolsVi
preghiamo di completare la registrazione del
vostro prodotto “online”, come indicato nelle
istruzioni per la registrazione della garanzia A4
in dotazione con l’apparecchio.
Potete inoltre eseguire la scansione del
codice QR presente sul foglio A4 con uno
smartphone. In questo modo potrete
convalidare il periodo di la garanzia del
vostro apparecchio sul sito web di Evolution,
inserire i vostri dati e assicurarvi così un rapido
servizio in caso di necessità. Vi ringraziamo
sinceramente per avere scelto un prodotto di
Evolution Power Tools.
GARANZIA LIMITATA EVOLUTION
Evolution Power Tools si riserva il diritto di
apportare migliorie e modiche al disegno del
prodotto senza preavviso.
Consultare le istruzioni per la registrazione
della garanzia e/o la confezione per i dettagli
dei termini e delle condizioni di garanzia.
(1.5) Evolution Power Tools, all’interno del
periodo coperto da garanzia, a partire dalla data
di acquisto originale, riparerà o sostituirà ogni
eventuale parte rivelatasi difettosa nei materiali
o nella fabbricazione. La presente garanzia
cesserà di essere valida in caso di utensile
restituito dopo essere stato usato al di fuori delle
raccomandazioni indicate nel Manuale delle
Istruzioni o di apparecchio danneggiato a causa
di incidente, negligenza o interventi impropri.
La presente garanzia non vale per apparecchi
e/o componenti che siano stati alterati,
sostituiti o modicati in alcun modo, né
sottoposti a un uso al di fuori delle capacità
e speciche raccomandate. Le componenti
elettriche sono soggette alle garanzie dei
rispettivi produttori. Ogni articolo restituito
perché difettoso dovrà essere spedito a carico
del mittente a Evolution Power Tools. Evolution
Power Tools si riserva il diritto di riparare o
sostituire a discrezione un tale articolo con lo
stesso articolo o uno equivalente.
Non si forniscono garanzie, né scritte né verbali,
su accessori di consumo, tra i quali (a titolo non
esaustivo) lame, taglienti, punte di perforazione,
scalpelli, spatole, e così via. In nessun caso
Evolution Power Tools sarà responsabile per
perdite o danni derivanti direttamente o
indirettamente dall’uso delle nostre merci o da
qualunque altra causa. Evolution Power Tools
non è responsabile per alcun costo sopportato
per tali merci né per danni conseguenti.
Nessun funzionario, dipendente o agente
di Evolution Power Tools è autorizzato a
prestare dichiarazioni verbali di idoneità né
ad annullare i termini di vendita di cui sopra,
e nessuna dichiarazione da tali soggetti sarà
vincolante per Evolution Power Tools.
Ogni richiesta riguardante la presente
garanzia limitata dovrà essere rivolta
all’ucio del direttore dell’azienda o al
numero di Assistenza appropriato.
INTRODUZIONE
Garanzia Pag. 67
Specifiche dell’apparecchio Pag. 68
Vibrazione Pag. 69
Etichette e simboli Pag. 69
Usi di destinazione di questo utensile Pag. 70
Usi proibiti di questo utensile Pag. 70
PRECAUZIONI DI SICUREZZA
Sicurezza Elettrica Pag. 70
Uso all’aperto Pag. 71
Istruzioni generali per la sicurezza dell’utensile Pag. 71
Istruzioni addizionali per la sicurezza Pag. 73
PER INIZIARE
Disimballaggio Pag. 75
Cenni generali Pag. 76
Assemblaggio e preparazione Pag. 77
Istruzioni per il funzionamento Pag. 77
MANUTENZIONE
Protezione ambientale Pag. 81
Schema dei pezzi di ricambio Pag. 82
DICHIARAZIONE DI CONFORMITÀ Pag. 83
English Page 2
Deutsch Seite 22
Français Page 42
Italiano Pagina 64
Page 35

68 69
www.evolutionpowertools.com www.evolutionpowertools.com
EN
FR
DE
IT
SPECIFICHE FURY
SPECIFICHE MACCHINA METRIC IMPERIAL
Motore UK/EU (220-240V ~ 50Hz) 1200W 5A
Motore USA (120V ~ 60Hz) 1200W 10A
No Load Velocità 3700min
-1
3700rpm
Peso 5.4kg 12lbs
CAPACITÀ DI TAGLIO METRIC IMPERIAL
Acciaio Dolce Piastra (Max Spessore) 3mm 1/8”
Box Acciaio Dolce Di Sezione (Max Spessore Parete) 3mm 1/8”
Spessore Massimo Di Taglio (Wood 90
0
) 60mm 2-3/8”
Spessore Massimo Di Taglio (Wood 45
0
) 40mm 1-1/2”
CARATTERISTICHE LAMA METRIC IMPERIAL
Diametro 185mm 7-1/4”
Foro Del Diametro 20mm 3/4”
Numero Di Denti 16 16
Velocità Massima Della Lama 3900min
-1
3900rpm
Spessore 1.7mm .067”
NOISE & VIBRATION DATI
Sonora L
PA
Pressione (Sotto Carico) 98,83dB(A) K=3dB(A)
Livello Di Potenza Sonora L
wa
(Sotto Carico) 109,83dB(A) K=3dB(A)
Livello Di Vibrazione (Sotto Carico)
a
h,W=3,78 m/s
2
ah,M=1,596 m/s
2
K=1,5 m/s
2
(1.6) Nota: La misurazione delle vibrazioni
è stata eseguita in condizioni standard in
accordo con EN60745-1.
Il valore totale dichiarato per le vibrazioni
è stato misurato in accordo con un metodo
di prova standard e può essere usato per
confrontare un utensile con un altro.
Il valore totale dichiarato per le vibrazioni può
inoltre essere usato in valutazioni preliminari
dell’esposizione.
(1.7)
VIBRAZIONI
AVVERTENZA: Nell’uso di questo apparecchio,
l’operatore può trovarsi esposto a livelli elevati
di vibrazioni trasmessi alla mano e al braccio.
È possibile che l’operatore possa sviluppare
la “malattia delle dita bianche da vibrazione”
(sindrome di Raynaud). Questa condizione
può ridurre la sensibilità della mano
alla temperatura, oltre a produrre un
indolenzimento generale.
In caso di uso prolungato o regolare di questo
apparecchio, controllare con attenzione
la condizione delle mani e delle dita. Se si
presenta un qualsiasi sintomo, consultare
immediatamente un medico.
• La misurazione e la valutazione
dell’esposizione degli esseri umani
alle vibrazioni trasmesse alle mani sul
posto di lavoro sono riportate su
BS EN ISO 5349-1:2001 e
BS EN ISO 5349-2:2002.
• Parecchi fattori possono inuire
sull’eettivo livello delle vibrazioni durante
il funzionamento, tra cui la condizione delle
superci di lavoro e l’orientamento, il tipo e
le condizioni dell’apparecchio usato. Prima
di ogni uso si dovranno valutare tali fattori, e
se possibile adottare le misure professionali
appropriate. La gestione di questi fattori può
aiutare a ridurre gli eetti delle vibrazioni.
Manipolazione
• Manipolare l’apparecchio con cura,
lasciando che esso esegua il lavoro.
• Evitare di applicare eccessivi sforzi sici
sui vari comandi dell’apparecchio.
• Tenere conto della propria sicurezza
e stabilità e dell’orientamento della
macchina durante l’uso.
Supercie di lavoro
• Tenere conto del materiale della supercie
di lavoro: le sue condizioni, densità,
resistenza, rigidità e orientamento.
AVVERTENZA: L’emissione di vibrazioni
durante l’eettivo uso dell’utensile può
dierire dal valore totale dichiarato, in
funzione delle modalità d’uso dell’utensile.
La necessità di identicare misure di sicurezza
e proteggere l’operatore si basa su una stima
dell’esposizione nelle eettive condizioni
d’uso (tenendo conto di tutte le parti del ciclo
operativo, tra cui i periodi in cui l’utensile è
spento, o in funzionamento a vuoto, oltre ai
tempi di attivazione).
(1.8)
ETICHETTE E SIMBOLI
AVVERTENZA: Non azionare l’apparecchio se
le etichette di avvertenza e/o istruzione sono
assenti o danneggiate. Contattare Evolution
Power Tools per le etichette di sostituzione.
Nota: Nel manuale o sul prodotto possono
comparire tutti i simboli seguenti o solo alcuni.
AVVERTENZA: A causa della potenza assorbita di questo prodotto su start up, si possono
verificare cadute di tensione e questo può influenzare le altre attrezzature (ad esempio luci
dimmerabili). Così, per ragioni tecniche vi consigliamo, se la rete impedenza è Zmax <0.431Ohm,
non sono previsti questi disturbi. Se avete bisogno di ulteriori chiarimenti, è possibile contattare
l’autorità elettrica locale.
Page 36

70 71
www.evolutionpowertools.com www.evolutionpowertools.com
EN
FR
DE
IT
(1.9)
Simbolo Descrizione
V
Volt
A
Ampère
Hz
Hertz
Min
-1
Velocità
~
Corrente alternata
n
o
Velocità senza carico
Indossare occhiali di sicurezza
Indossare protezioni per le orecchie
Indossare protezioni contro
la polvere
Leggere le istruzioni
Certificazione CE
Certificazione EAC
Certificazione CSA
Smaltimento di apparecchiature
elettriche ed elettroniche
Triman - la Raccolta Rifiuti
e Riciclaggio
Avvertenza
(1.10)
USI DI DESTINAZIONE
DI QUESTO UTENSILE
AVVERTENZA: Questo prodotto è una sega
circolare azionata a mano ed è stato progettato
per essere usato con speciali lame Evolution.
Usare esclusivamente accessori progettati per
l’uso in questo apparecchio e/o raccomandati
specicamente da Evolution Power Tools Ltd.
Se munito di lama appropriato, questo
apparecchio può essere usato per tagliare:
Acciaio dolce alluminio legno
(1.11)
USI PROIBITI DI QUESTO UTENSILE
AVVERTENZA: Questo prodotto è una sega
circolare azionata a mano e deve essere usato
esclusivamente come tale. Lo stesso non dovrà
essere in alcun modo modicato o usato per
azionare qualsiasi altro accessorio diverso da
quelli indicati in questo Manuale delle Istruzioni.
(1.13) AVVERTENZA: Questo apparecchio non
è destinato all’uso da parte di persone (compresi
bambini) con ridotte capacità siche, sensoriali
o mentali, o scarsa esperienza e competenza, se
non sotto supervisione e in possesso di istruzioni
riguardo all’uso in sicurezza dell’apparecchio
da parte di una persona responsabile della loro
sicurezza e competente per l’uso sicuro.
Si dovranno sorvegliare i bambini per
assicurarsi che non abbiano accesso e non
possano giocare con questo apparecchio.
(1.14)
SICUREZZA ELETTRICA
Questa macchina è dotata della spina sagomata e
del cavo corretti per il mercato designato. In caso
di cavo di alimentazione danneggiato, sostituirlo
con un complesso o cavo speciale disponibile
presso il produttore o i suoi rivenditori.
(1.15)
USO ALL’APERTO
AVVERTENZA: Per la vostra protezione, se
questo apparecchio si usa all’aperto, non
dovrà essere esposto alla pioggia né usato in
ambienti umidi. Non sistemare l’apparecchio
su superci umide. Usare un banco di lavoro
pulito e asciutto, se disponibile. Per ulteriore
protezione, usare un dispositivo di corrente
residua (RCD) che interrompa l’alimentazione
se la corrente di scarico a terra supera i 30 mA
per 30 ms. Controllare sempre l’operatività del
dispositivo di corrente residua (RCD) prima di
usare l’apparecchio.
Se è necessario un cavo di prolunga, esso dovrà
essere idoneo per l’uso all’aperto ed etichettato
in tal senso. Seguire sempre le istruzioni del
produttore se si usa un cavo di prolunga.
(2.1)
ISTRUZIONI GENERALI PER
LA SICUREZZA DELL’UTENSILE
(Queste Istruzioni Generali per la Sicurezza
dell’Utensile sono conformi a quanto specicato
in EN 60745-1:2009.
AVVERTENZA: Leggere tutte le avvertenze di
sicurezza e le istruzioni. La mancata osservazione
delle avvertenze e delle istruzioni può comportare
folgorazione, incendio e/o lesioni gravi.
Conservare tutte le avvertenze e le istruzioni
per riferimento futuro. Il termine “utensile
elettrico” nelle avvertenze si riferisce
all’utensile alimentato da rete (con lo) o
all’utensile alimentato a batteria (senza lo).
(2.2) 1) Avvertenze generali per la sicurezza
dell’utensile [Sicurezza nell’area di lavoro]
a) Mantenere l’area di lavoro sgombra e
ben illuminata. Le aree ingombrate o al buio
invitano agli incidenti.
b) Non azionare utensili elettrici in atmosfere
esplosive, ad esempio in presenza di liquidi
inammabili, gas o polvere. Gli utensili
elettrici creano scintille che potrebbero causare
l’accensione di polveri o fumi.
c) Mantenere i bambini e altre persone
presenti a distanza durante l’uso
dell’utensile. La distrazione può portare
l’operatore a perdere il controllo.
(2.3) 2) Avvertenze generali per la
sicurezza dell’utensile [Sicurezza elettrica]
a) La spina dell’utensile elettrico deve
combaciare con la presa. Non modicare
la spina in alcun modo. Non usare spine
adattatrici con utensili elettrici con connettore
di terra (massa). Spine non modicate e prese
corrispondenti ridurranno il rischio
di folgorazione.
b) Evitare il contatto corporeo con superci
messe a terra o a massa, tra cui tubi,
radiatori, linee e frigoriferi. Se il corpo
dell’operatore è messo a terra o a massa, si
presenta un maggiore rischio di folgorazione.
c) Non esporre utensili elettrici alla
pioggia o a condizioni di bagnato. Le
penetrazioni d’acqua in un utensile elettrico
aumentano il rischio di folgorazione.
d) Evitare usi impropri del cavo. Non
usare mai il cavo per trasportare, trainare
o scollegare l’utensile. Tenere il cavo al
riparo da calore, olio, spigoli alati o parti in
movimento. I cavi danneggiati o attorcigliati
aumentano il rischio di folgorazione.
e) In caso di uso di un utensile elettrico
all’aperto, utilizzare un cavo di prolunga
idoneo per l’uso all’aperto. L’utilizzo di un
cavo idoneo per l’uso all’aperto riduce il rischio
di folgorazione.
f) Se l’uso di un utensile elettrico in
una situazione umida è inevitabile,
utilizzare un’alimentazione protetta da un
dispositivo di corrente residua (RCD). L’uso
di un RCD riduce il rischio di folgorazione.
Page 37

72 73
www.evolutionpowertools.com www.evolutionpowertools.com
EN
FR
DE
IT
(2.4) 3) Avvertenze generali per la sicurezza
dell’utensile [Sicurezza personale]
a) Fare molta attenzione e agire sempre
con buon senso nell’utilizzare un utensile
elettrico. Non usare l’utensile elettrico se
stanchi o in seguito a consumo di droghe,
alcool o farmaci. Un attimo di disattenzione
durante l’utilizzo di un utensile elettrico può
causare gravi lesioni alla persona.
b) Usare equipaggiamento di protezione
personale. Indossare sempre protezione per
gli occhi. Altri dispositivi di protezione, come
maschere antipolvere, scarpe di sicurezza
antiscivolo, casco rigido o paraorecchie nelle
condizioni appropriate ridurranno le lesioni
alla persona.
c) Prevenire l’avvio involontario. Assicurarsi
che l’interruttore sia in posizione spenta prima
di collegare l’apparecchio all’alimentazione o a
una batteria, e prima di raccogliere o trasportare
l’apparecchio. Il trasporto di un apparecchio con
un dito sull’interruttore o l’alimentazione di un
apparecchio con interruttore acceso aumentano
la probabilità di incidenti.
d) Rimuovere ogni eventuale chiave
di regolazione prima di accendere
l’apparecchio. Una chiave o altro attrezzo
lasciato su una parte rotante di un utensile
elettrico può causare lesioni alla persona.
e) Non allungarsi eccessivamente.
Mantenere in ogni momento i piedi saldi a
terra e un buon equilibrio. Questo permette
di esercitare un buon controllo dell’utensile in
situazioni impreviste.
f) Indossare indumenti appropriati. Non
portare abiti ampi né catenine, braccialetti e
simili. Tenere i capelli, gli indumenti e i guanti a
distanza dalle parti in movimento. Abiti ampi,
monili o capelli lunghi possono rimanere
impigliati nelle parti in movimento.
g) Se sono previsti dispositivi per il
collegamento di unità per l’estrazione e la
raccolta della polvere, assicurarsi che questi
siano collegati e correttamente usati. L’uso di
dispositivi di raccolta della polvere può ridurre i
rischi collegati con la formazione di polvere.
(2.5) 4) Avvertenze generali per la sicurezza
dell’utensile [Uso e conservazione]
a) Non forzare l’utensile. Usare l’utensile
corretto per l’applicazione in questione.
L’utensile corretto eseguirà il proprio lavoro
meglio e con maggiore sicurezza alla velocità
per la quale è stato progettato.
b) Non usare l’utensile se l’interruttore non
si accende o non si spegne. Qualsiasi utensile
che non possa essere controllato con il suo
interruttore è pericoloso e deve essere riparato.
c) Scollegare l’utensile dall’alimentazione
elettrica e/o la batteria dall’utensile prima
di eseguire ogni eventuale regolazione,
sostituzione di accessori o conservazione
dell’utensile. Tali misure di sicurezza
preventive riducono il rischio di azionamento
involontario dell’utensile.
d) Conservare gli utensili inattivi fuori
dalla portata dei bambini e non lasciare
che persone poco familiari con l’utensile o
con queste Istruzioni utilizzino l’utensile.
Gli utensili elettrici sono pericolosi nelle mani
di utenti non addestrati.
e) Sottoporre a manutenzione gli utensili
elettrici. Controllare l’allineamento o l’eventuale
intralcio di parti in movimento, i danni a tali
parti e qualsiasi altra condizione che possa
pregiudicare il funzionamento dell’utensile. In
caso di danni far riparare l’utensile prima dell’uso.
Molti incidenti sono causati da utensili elettrici
con scarsa manutenzione.
f) Mantenere alati e puliti gli utensili
di taglio. Utensili di taglio correttamente
mantenuti con bordi alati sono meno
soggetti a incastrarsi e più facili da controllare.
g) Usare l’utensile, gli accessori e i ricambi in
accordo con queste istruzioni, tenendo conto
delle condizioni di lavoro e delle operazioni
da compiere. L’uso dell’utensile elettrico per
operazioni diverse da quelle per le quali è
progettato può provocare situazioni rischiose.
(2.6) 5) Avvertenze generali per la sicurezza
dell’utensile [Manutenzione e riparazione]
a) Rivolgersi esclusivamente a personale
qualicato per la riparazione dell’utensile
e usare solamente parti di ricambio
identiche. In questo modo ci si assicurerà di
mantenere la sicurezza dell’utensile.
(2.7)
CONSIGLI PER LA SALUTE
AVVERTENZA: Nell’uso di questo apparecchio
si possono produrre particelle di polvere. In certi
casi, a seconda dei materiali sui quali si lavora,
questa polvere può rivelarsi particolarmente
nociva. Se sospettate che la vernice sulla
supercie del materiale che desiderate
tagliare contenga piombo, rivolgetevi a un
professionista. Le vernici a base di piombo
devono essere rimosse esclusivamente da un
professionista; non cercare di rimuoverle da soli.
Una volta depositata la polvere sulle superci, il
contatto di una mano con la bocca può portare
a un’ingestione di piombo. L’esposizione a livelli
di piombo anche ridotti può causare danni
irreversibili al cervello e al sistema nervoso.
I bambini piccoli o non ancora nati sono
particolarmente vulnerabili. Vi raccomandiamo di
tenere conto dei rischi associati con i materiali sui
quali lavorate e di ridurre il rischio di esposizione.
Poiché alcuni materiali possono produrre
polvere che potrebbe essere pericolosa per
la vostra salute, raccomandiamo l’uso di una
mascherina appropriata con ltri sostituibili
nell’utilizzo di questo apparecchio.
Dovrete sempre:
• Lavorare in un’area ben ventilata.
• Portare equipaggiamento di sicurezza
omologato, ad esempio maschere
antipolvere specicamente progettate per
ltrare particelle microscopiche.
(2.8) AVVERTENZA: L’azionamento di
qualsiasi utensile elettrico può causare il
lancio di oggetti estranei verso gli occhi,
con possibile grave danno oculare. Prima di
iniziare a utilizzare l’utensile, indossare sempre
occhiali o mascherine di sicurezza per gli occhi
con protezione laterale, o una maschera intera
per il viso ove necessario.
(3.0)
ISTRUZIONI ADDIZIONALI
PER LA SICUREZZA
(3.1) a) PERICOLO: Tenere le mani lontano
dall’area di lavoro e dalla lama. Tenere la
seconda mano sull’impugnatura ausiliaria o
sulla cassa del motore. Se entrambe le mani
reggono la sega, non subiranno tagli dalla lama.
b) Non allungare le mani sotto il pezzo in
lavorazione. La copertura della lama non vi
garantisce protezione sotto il pezzo.
c) Regolare la profondità di taglio secondo lo
spessore del pezzo. Sotto il pezzo dovrà essere
visibile meno di un dente intero della lama.
d) Non reggere mai con le mani o tra le
gambe il pezzo che si desidera tagliare.
Fissare il pezzo su una piattaforma stabile.
È importante sorreggere correttamente il
pezzo per minimizzare l’esposizione del corpo,
essioni alla lama o perdite di controllo.
e) Reggere l’utensile usando le superci
di presa isolate durante l’esecuzione di
operazioni nelle quali l’utensile può entrare a
contatto con cablaggi nascosti o il suo stesso
cavo. Il contatto con un cavo “vivo” renderà “vive”
anche le parti metalliche esposte dell’utensile e
trasmetterà la corrente all’operatore.
f) Nelle operazioni di strappo, usare sempre
una barriera o guida a bordi diritti. In questo
modo si migliora la precisione del taglio e si
riducono le possibilità di deessione della lama.
g) Usare sempre lame di forma e
dimensione corretta (al diamante o tonde)
con fori per alberi corretti. Le lame non
corrispondenti all’attacco di montaggio della
sega ruotano in modo eccentrico, causando
perdita di controllo.
Page 38

74 75
www.evolutionpowertools.com www.evolutionpowertools.com
EN
FR
DE
IT
h) Non usare mai viti o rondelle danneggiate
o non corrette per la lama. Le viti e le rondelle
per la lama sono state appositamente progettate
per la vostra sega a scopo di funzionamento
ottimale e sicurezza operativa.
i) Non usare lame per sega in Acciaio Super
Rapido (HSS).
j) Ispezionare l’apparecchio e la lama
prima di ogni uso. Non usare lame deformate,
incrinate, usurate o altrimenti danneggiate.
k) Non usare mai la sega senza il sistema
di protezione originale. Non ssare la
protezione mobile in posizione aperta.
Accertarsi che la protezione si muova
liberamente senza incastrarsi.
l) Usare esclusivamente lame conformi
con le caratteristiche specicate in questo
manuale. Prima di usare gli accessori,
vericare sempre la velocità di rotazione
massima permessa per l’accessorio in
confronto a quella dell’apparecchio.
(3.2) Cause di rinculo e possibile
prevenzione da parte dell’operatore:
Il rinculo è un’improvvisa reazione a una lama
incastrata, trattenuta o male allineata, che
porta una sega non controllata a sollevarsi,
allontanandosi dal pezzo in lavorazione e
avvicinandosi all’operatore.
1. Quando la lama si incastra o rimane
trattenuta dalla richiusura della luce di taglio,
la lama si blocca e la reazione del motore
spinge rapidamente l’unità verso l’operatore.
2. Se la lama diventa distorta o male
allineata durante il taglio, i denti sul bordo
posteriore della lama possono fare presa
sulla supercie del pezzo, portando la
lama a risalire dalla luce di taglio e saltare
verso l’operatore.
(3.3) Il rinculo è una conseguenza dell’uso
scorretto della sega e/o di scorrette
condizioni o procedure operative, e può
essere evitato prendendo le precauzioni
indicate nel seguito.
a) Mantenere una presa salda con ambo
le mani sulla sega e posizionare le braccia
in modo da resistere alle forze di rinculo.
Posizionare il corpo su uno dei lati della lama,
ma non in linea con la lama. Il rinculo potrebbe
portare la sega a saltare all’indietro, ma le forze di
rinculo possono essere controllate dall’operatore
prendendo le precauzioni opportune.
b) Se la lama si piega, o in caso di
interruzione del taglio per qualsiasi
ragione, rilasciare il pulsante di marcia
e mantenere la sega ferma nel materiale
nché la lama si arresta completamente.
Non cercare mai di rimuovere la lama dal pezzo
né tirare all’indietro la sega mentre la lama è in
movimento: questo potrebbe causare rinculo.
Cercare la ragione e prendere contromisure per
eliminare la causa della essione della lama.
c) Al riavvio di una sega entro il pezzo in
lavorazione, centrare la lama nella luce del
taglio e vericare che i denti della lama
non siano piantati nel materiale. Se la lama
si piega, potrebbe risalire lungo il taglio o
rinculare dal pezzo al riavvio della sega.
d) Prevedere un supporto per pannelli
di grandi dimensioni per minimizzare il
rischio di incastro della lama e rinculo.
I pannelli di grandi dimensioni tendono a
piegarsi in basso a causa del proprio stesso
peso. Sarà necessario posizionare supporti
sotto il pannello, da ambo i lati, vicino alla
linea di taglio e presso il bordo del pannello.
e) Le levette di blocco della profondità del
taglio e della regolazione dello smusso
devono essere strette e in sicurezza prima
di eseguire un taglio. Se la regolazione
della lama si sposta durante il taglio, questo
potrebbe causare piegamento e rinculo.
f) Non usare lame danneggiate o senza lo.
Le lame non alate o impropriamente impostate
producono una luce di taglio più stretta, causando
eccessivo attrito, essione della lama e rinculo.
g) Usare particolari attenzioni
nell’esecuzione di tagli “a immersione”
in pareti esistenti o altre aree cieche. La
parte sporgente della lama potrebbe tagliare
oggetti che causano rinculo.
h) Controllare che la protezione inferiore si
chiuda correttamente prima di ogni uso. Non
azionare la sega se la protezione inferiore non
si muove liberamente chiudendosi all’istante.
Non ssare né bloccare mai la protezione
inferiore in posizione aperta. Se si lascia cadere
involontariamente la sega, la protezione inferiore
potrebbe piegarsi. Sollevare la protezione
inferiore con l’impugnatura a scomparsa e
assicurarsi che si muova liberamente e non
tocchi la lama né qualsiasi altra parte, a ogni
angolo e profondità di taglio.
i) Vericare il funzionamento della molla
della protezione inferiore. Se la protezione
e la molla non funzionano correttamente,
eseguire la manutenzione appropriata
prima dell’uso. La protezione inferiore
potrebbe funzionare imperfettamente a causa
di parti danneggiate, depositi di materiale
appiccicoso o accumulo di detriti.
j) La protezione inferiore potrà essere
rimossa a mano solamente per tagli
speciali - “a immersione” oppure
“composti”. Sollevare la protezione inferiore
usando l’impugnatura a scomparsa, quindi
rilasciare la protezione appena la lama entra
nel materiale. Per ogni altra operazione di
taglio, la protezione dovrà essere mantenuta
in funzionamento automatico.
k) Controllare sempre che la protezione
inferiore copra la lama prima di posare
la sega su un banco o sul pavimento. Una
lama non protetta ancora in movimento
porterà la sega a muoversi all’indietro,
tagliando tutto ciò che trova sul cammino.
Tenere conto del tempo necessario anché la
lama si fermi dopo il rilascio del pulsante.
(3.4) AVVERTENZA: Se una qualsiasi parte
è assente, non azionare l’apparecchio prima
di sostituire la parte in questione. La mancata
osservanza di questa regola può causare gravi
danni alla persona.
(4.1)
PER INIZIARE - DISIMBALLAGGIO
Attenzione: L’imballaggio contiene oggetti
alati. Disimballare con precauzione. Rimuovere
l’apparecchio insieme con gli accessori forniti in
dotazione. Controllare con cura che l’apparecchio
sia in buone condizioni e che siano presenti tutti
gli accessori indicati in questo manuale; inoltre,
assicurarsi che tutti gli accessori siano completi.
Se una qualche parte è assente, restituire al
rivenditore l’apparecchio e i suoi accessori
insieme, nella confezione originale. Non gettare
l’imballaggio, ma conservarlo per tutto il periodo
di garanzia. Smaltire l’imballaggio in maniera
rispettosa dell’ambiente; se possibile, riciclare. Non
lasciare che i bambini giochino con sacchetti di
plastica vuoti per prevenire rischi di soocamento.
(4.2)
ARTICOLI IN DOTAZIONE
Descrizione Quantità
Manuale delle istruzioni 1
Lama multiuso (già montata) 1
Chiave esagonale
(sostituzione delle lame)
1
Guida a bordi paralleli 1
(4.3)
ACCESSORI ADDIZIONALI
Oltre agli articoli di serie in dotazione di questo
apparecchio, sono disponibili i seguenti accessori
presso il punto vendita online di Evolution su
www.evolutionpowertools.com, oppure dal
vostro rivenditore locale.
(4.4)
Descrizione N° ar t.
Lama multiuso FURY 185
Lama al diamante DIAMOND 185
Page 39

76 77
www.evolutionpowertools.com www.evolutionpowertools.com
EN
FR
DE
IT
5
4
3
6
1
CENNI GENERALI
1. IMPUGNATURA POSTERIORE
2. IMPUGNATURA ANTERIORE
3. PROTEZIONE SUPERIORE PER LA LAMA
4. PROTEZIONE INFERIORE PER LA LAMA
5. PIASTRA DI BASE
6. PRESA DI ESPULSIONE DEI TRUCIOLI
(10)
PER INIZIARE - PREPARAZIONE
AVVERTENZA: Scollegare sempre la sega dall’alimentazione
prima di eseguire ogni eventuale regolazione.
La sega è provvista di cavo di alimentazione e spina approvati
per il Paese di destinazione. Non alterare né modicare il cavo
di alimentazione
(<10.1) INSTALLAZIONE/RIMOZIONE DI UNA LAMA
AVVERTENZA: Usare esclusivamente lame Evolution originali
progettate per questo apparecchio. Assicurarsi che la velocità
massima della lama sia compatibile con l’apparecchio. Eseguire
questa operazione sempre con l’apparecchio scollegato
dall’alimentazione di rete.
Nota: Si raccomanda l’uso di guanti di protezione per l’operatore
durante la manipolazione della lama in fase di installazione o
durante la sostituzione della lama dell’apparecchio. (>10.1)
• Sistemare la sega su una supercie piana e sicura.
• Bloccare l’albero dell’apparecchio con l’apposita spina (g. 1).
• Usando la chiave esagonale in dotazione, allentare e
rimuovere la vite a testa esagonale della sede dell’albero, la
rondella, e la angia esterna di guida della lama (g. 2).
Nota: La vite della sede dell’albero ha una lettatura destrorsa.
Girare in senso orario per stringere, girare in senso antiorario
per allentare.
• Rimuovere la lama della sega, lasciando in posizione di
servizio la angia interna della lama.
• Pulire con cura la supercie di montaggio delle ange guida
interne ed esterne della lama prima di installare una nuova lama.
• Assicurarsi che le frecce della direzione di rotazione
riportate sulla lama corrispondano alla direzione delle
frecce di rotazione presenti sulle protezioni superiori e
inferiori dell’apparecchio (g. 3).
• Reinstallare la angia guida esterna, la rondella e la vite della
sede dell’albero.
• Inserire il blocco dell’albero e stringere la vite della sede
dell’albero con la chiave esagonale.
• Controllare che il blocco dell’albero sia completamente
rilasciato ponendo manualmente in rotazione la lama.
• Vericare il funzionamento della protezione inferiore della lama.
Fig. 1
Fig. 3
2
Fig. 2
serrare
Page 40

78 79
www.evolutionpowertools.com www.evolutionpowertools.com
EN
FR
DE
IT
Guida a bordi paralleli
Sulla piastra di base dell’apparecchio è possibile ssare una
guida a bordi paralleli (utile nei tagli a strappo). Il braccio guida
dovrà essere inserito nelle feritoie rettangolari sul lato anteriore
della piastra di base e fatto scivolare sotto la vite zigrinata di
blocco (g. 4).
Nota: La guida a bordi paralleli può essere disposta su ambo i lati
della piastra di base e dovrà essere ssata e regolata unicamente
con l’apparecchio scollegato dall’alimentazione di rete.
• Regolare la guida a bordi paralleli in modo che si trovi alla
distanza richiesta dalla lama, quindi stringere la vite zigrinata.
Vericare che la guida a bordi paralleli sia parallela alla lama.
Regolazione della profondità di taglio
• Allentare la vite di blocco per la regolazione della profondità
(g. 5) per regolare alla profondità di taglio richiesta.
• Per assistere nell’impostazione, è riportata una scala
sulla staa di profondità ed è incorporato un indice nella
protezione superiore dell’apparecchio.
• Regolare la profondità di taglio allo spessore del pezzo.
Meno di un dente completo dei denti lama deve sporgere
sotto al pezzo.
Nota: Controllare sempre l’eventuale presenza di
ostruzioni sotto la supercie di lavoro che possano inuire
sull’impostazione della profondità di taglio.
• Stringere saldamente la vite di regolazione della profondità
per ssare l’apparecchio nella posizione richiesta.
Regolazione dell’angolo di taglio
• Allentare la vite di blocco dello smusso presente sul lato
anteriore della sega (g. 6).
• Inclinare la lama all’angolo desiderato (g. 7).
• Stringere in sicurezza la vite di blocco dello smusso.
Nota: Per assistere nell’impostazione, è incorporata una scala
angolare (0° - 45°) nel quadrante di blocco dello smusso.
(<10.2) CONSIGLI PER IL FUNZIONAMENTO
Eseguire i normali controlli di sicurezza ogni volta che si
usa l’apparecchio.
Vericare che tutte le protezioni di sicurezza funzionino
correttamente e che tutte le impugnature e le viti siano
saldamente ssate.
Controllare che la lama sia in sicurezza e correttamente
installata. Controllare inoltre che la lama sia appropriata
per il materiale da tagliare.
Vericare l’integrità del cavo di alimentazione.
Ancorare sempre il pezzo in lavorazione a un supporto rigido,
come un banco o un cavalletto, ogni volta che è possibile.
(10.2>)
(5.4)
INTERRUTTORE ACCESO/SPENTO
Questo apparecchio è munito di interruttore di avvio di
sicurezza (g. 8).
Per avviare l’utensile:
• Spingere all’interno il pulsante di blocco di sicurezza sul lato
dell’impugnatura con il pollice.
• Premere il pulsante principale di avvio per azionare il motore.
AVVERTENZA: Non azionare mai la lama con il bordo tagliente
della lama a contatto con la supercie del pezzo.
Fig. 5
Fig. 4
Fig. 6
0-45
o
Fig. 7
Fig. 8
Page 41

80 81
www.evolutionpowertools.com www.evolutionpowertools.com
EN
FR
DE
IT
(10.3)
CONSIGLI PER IL TAGLIO
AVVERTENZA: L’operatore dovrà indossare
tutti i Dispositivi di Protezione Individuale
(DPI) necessari per il lavoro in questione,
compresi eventuali occhiali di sicurezza,
mascherine antipolvere, calzature di
sicurezza, ecc. L’operatore dovrà sempre
essere consapevole della posizione e del
tragitto del cavo di alimentazione.
(10.4)
• Non forzare l’apparecchio.
• Lasciare che la velocità della lama esegua
il lavoro. Il rendimento del taglio non
aumenterà in seguito ad applicazione di
eccessiva pressione alla macchina, e anzi si
ridurrà la vita utile della lama.
• Quando si usa la guida a bordi paralleli,
assicurarsi che essa sia parallela alla lama. La
lama e/o il motore potranno subire dei danni
se l’apparecchio è usato con una guida a
bordi paralleli erroneamente regolata.
• Sistemare il bordo anteriore della piastra di
base frontalmente sul pezzo in lavorazione,
assicurandosi che la lama non sia a contatto
con il pezzo, prima di avviare il motore.
• Quando si inizia il taglio, collimare la
linea di taglio con la linea della guida,
facendo attenzione a introdurre la lama
del materiale lentamente, in modo da non
danneggiare i denti.
Nota: Sono previste due (2) linee di guida del
taglio (solo per gli angoli di smusso a 0° e 45°)
sul bordo anteriore della piastra di base.
• Usare ambo le mani per muovere la sega in
avanti attraverso il pezzo.
• Applicare una pressione costante e
uniforme per muovere la sega in avanti
attraverso il pezzo.
Una volta completato il taglio, rilasciare
il pulsante ON/OFF e lasciare che la lama
si arresti completamente. Non applicare
pressione laterale al disco della lama nel
tentativo di farlo rallentare più in fretta.
(10.5) AVVERTENZA: Se il motore dovesse
arrestarsi o imballarsi mentre si cerca di
eseguire un taglio, rilasciare immediatamente
il pulsante e scollegare l’apparecchio
dall’alimentazione. Rimuovere l’apparecchio
dal pezzo in lavorazione prima di indagare
sulle cause e di cercare di far ripartire il motore.
(6)
MANUTENZIONE
(6.1) Nota: Ogni operazione di manutenzione
dovrà essere eseguita con l’apparecchio
spento e scollegato dall’alimentazione di rete
o a batteria.
A intervalli regolari, controllare che tutte
le protezioni e le dotazioni di sicurezza
siano correttamente in funzione. Usare
questo apparecchio solamente se tutte le
protezioni e dotazioni di sicurezza sono
perfettamente operative.
Tutti i cuscinetti motore su questo apparecchio
sono lubricati a vita. Non è necessaria
ulteriore lubricazione.
Usare un panno pulito e lievemente inumidito
per pulire le parti in plastica dell’apparecchio.
Non usare solventi o prodotti simili, che
potrebbero danneggiare le parti in plastica.
AVVERTENZA: Non tentare di pulire
inserendo oggetti appuntiti attraverso
aperture nella carcassa dell’apparecchio o
altro. Pulire le prese di ventilazione con aria
compressa asciutta.
Un’eccessiva formazione di scintille potrebbe
essere indice della presenza di sporcizia nel
motore, o di spazzole al carbonio usurate.
(>6.2) Se si sospetta questa situazione,
rivolgersi a un tecnico qualicato per le
riparazioni e le sostituzioni delle spazzole.
(<6.2)
(6.4)
PROTEZIONE AMBIENTALE
I prodotti elettrici di scarto non dovranno
essere smaltiti con i normali riuti domestici.
Riciclare sempre ove esistano strutture idonee.
Rivolgersi alle Autorità Locali o al rivenditore
per consigli sul riciclaggio.
Page 42

82 83
www.evolutionpowertools.com www.evolutionpowertools.com
EN
FR
DE
IT
DICHIARAZIONE DI CONFORMITÀ CE
In accordo con EN ISO 17050-1:2004
Il fabbricante del prodotto coperto dalla presente Dichiarazione è: Evolution Power Tools,
Venture One, Longacre Close, Holbrook Industrial Estate, Sheeld S20 3FR (Regno Unito).
Il sottoscritto fabbricante dichiara che l’apparecchio, come identicato nella presente
dichiarazione, soddisfa ogni provvedimento rilevante entro la Direttiva sui Macchinari e ogni altra
direttiva appropriata, come riportato in dettaglio nel seguito.
Il fabbricante dichiara inoltre che l’apparecchio, come identicato nella presente dichiarazione, ove
applicabile, soddisfa i provvedimenti rilevanti di cui ai requisiti sulla Salute e Sicurezza Essenziali.
Le Direttive coperte dalla presente Dichiarazione sono come riportate di seguito:
2006/42/EC. Direttiva sui Macchinari
2004/108/EC. (until Apr 19th 2016) Direttiva sulla Compatibilità Elettromagnetica.
2014/30/EU. (starting from Apr 20th 2016) Direttiva sulla Compatibilità Elettromagnetica.
2011/65/EU. Restrizione sull’Uso di Determinate Sostanze Pericolose
nella Direttiva sulle Attrezzature Elettriche (RoHS).
2012/19/EU. Direttiva sulle Attrezzature Elettriche ed Elettroniche di Scarto (WEEE).
Dichiara inoltre di trovarsi in conformità con gli applicabili requisiti di cui ai documenti seguenti:
EN55014-1:2006+A1+A2 • EN55014-2:1997+A1+A2 • EN61000-3-2:2014
EN61000-3-11:2000 • EN60745-1:2009+A11 • EN60745-2-5:2010
Dati del prodotto
Descrizione: SEGA CIRCOLARE MULTIUSO FURYB/STEALTH 185 mm (7-1/4”)
N° articolo Evolution: FURYB1851 / FURYB1852 / FURYB1852EU /
STEALTH1851 / STEALTH1852 / STEALTH1852EU
Nome commerciale: E VOLUTION
Tensione: 220-240V ~ 50Hz
Ingresso: 1200W
La documentazione tecnica richiesta per dimostrare che il prodotto soddisfa i requisiti della
direttiva è stata compilata ed è disponibile a scopo di ispezione da parte delle autorità di legge
pertinenti, e conferma che i nostri archivi tecnici contengono i documenti sopra elencati e che gli
stessi costituiscono le norme corrette per il prodotto come sopra identicato.
Denominazione e indirizzo del soggetto detentore della documentazione tecnica.
Firma: In lettere: Matthew Gavins: Group Chief Executive.
Data: 01/03/2016
PARTI SCHEMA
STEALTH
185
Page 43

UK
Evolution Power Tools Ltd
Venture One
Longacre Close
Holbrook Industrial Estate
Sheffield
S20 3FR
+44 (0)114 251 1022
US
Evolution Power Tools LLC
8363 Research Drive
Davenport
Iowa
52806
+1 866-EVO-TOOL
EU
Evolution Power Tools SAS
61 Avenue Lafontaine
33560
Carbon-Blanc
Bordeaux
+ 33 (0)5 57 30 61 89
Discover Evolution Power Tools
Visit: www.evolutionpowertools.com or download
the QR Reader App on your smart phone and scan
the QR code (Right).
V2.2
 Loading...