

Page 1

Pebble and Dualys User’s Guide part number: KU09E Rev. B0
Ev
olis Car
d Print
er © June 2007
USERÕs Guide
Page 2
CCooppyyrriigghhtt IInnffoorrmmaattiioonn
Ev
olis Card Printer © June 2007. All rights reserved.
CCooppyyrriigghhtt NNoottiiccee
Users must respect the copyright laws applicable in their country. This manual must not be
photocopied, translated, reproduced or transmitted in whole or in part for any reason and by the
means that might be, albeit electronic or mechanical, without the express, written authorisation of the company Evolis Card Printer.
All information contained herein may be subject to modification without prior notice.
Evolis Card Printer accepts no liability for any possible errors herein, nor for any accidental
damage or damage caused through the dissemination or the use of this manual.
TTrraaddeemmaarrkkss
Pebble and Dualys are trademarks and Evolis is a registered trademark of Evolis Card Printer.
Windows and MS.DOS are registered trademarks of Microsoft Corp. All other trademarks or
r
egistered trademarks are marks of their respective holders. eMedia Card Designer is a trade-
mark of Mediasoft Technologies.
IIccoonnss
Throughout this manual, different icons highlight important information, as follows:
Indicates information that emphasizes or supplements important points of the main text.
Advises you of information that is essential to complete a task, or points out the importance
of specific information in the text.
Advises you that failure to take or avoid a specific action could result in physical harm to
you, or could result in physical damage to the hardware.
WWaarrrraannttyy IInnffoorrmmaattiioonn
Refer to the Warranty booklet enclosed with your Evolis printer for terms and conditions.
RReettuurrnn MMaatteerriiaallss AAuutthhoorriizzaattiioonn
In or
der t
o mak
e a warr
anty claim you must contact an Evolis Reseller. You will be responsible for
packaging the printer for shipment and the costs of shipping and insurance of the printer from the
point of use of the print
er t
o the Evolis Reseller. The Evolis Reseller will bear the costs of shipping
and insuring the printer from the repair location to the address from which the printer was shipped.
Before returning any equipment for in-warranty or out-of warranty repair, contact an Evolis
Reseller or an Evolis Repair Center (ERC) for a Return Materials Authorization (RMA) number.
Repack the equipment in the original packing material and mark the RMA number clearly on
the outside of the box. For more information about RMA or Evolis warranty statements, refer to
the W
arr
anty bookl
et enclosed with your Evolis printer.
PPrroodduucctt DDiissppoossaall
WEEE Directive
This symbol indicates that when the last user wishes to discard this product, it must
be sent t
o appr
opriat
e f
acilities for recovery and recycling.
By not discarding this product along with other household-type waste, the volume
of was
te sent to incinerators or landfills will be reduced and natural resources will
be conserved. Your Evolis printer should be recycled according to your local standards. For more information, please contact Evolis at: info@evolis.com.
Page 3

TThhaannkkss ffoorr cchhoooossiinngg aann
EEvvoolliiss CCaarrdd PPrriinntteerr ttoo
ppeerrssoonnaalliizzee yyoouurr bbaaddggeess
Using the latest printing and encoding technologies, Evolis
Pebble and Dualys offer their users both performance and
quality.
Evolis printers, fully adapted to both small and midvolume runs, combine simplicity of use and functional
richness: high quality printing, magnetic encoding, encoding of both contact and contactless smart cards.
The ‘Evolis Genuine Product’ line of consumables linked to
the printer was specifically developed and optimized to
guarantee the highest quality of printing.
Using these consumables increases the life span of your
badges and of your Evolis printer.
As for all Evolis products, particular care has been used in
writing this manual. But if an error has still managed to slip
into these pages without our wanting it, please let us know
by sending an e-mail to info@evolis.com. Evolis will then do
everything in its power to correct the problem and give you
complete satisfaction.
Page 4

11
Install the Evolis printer
Technology and benefits ...........................................06
Initial approach
......................................................07
Install your printer
..................................................09
Check the components shipped
Connect the cables
Printer Control panel...............................................11
Stand by ...............................................................11
Install the ribbons
...................................................12
Monochrome or color ribbon
Install the cards .....................................................13
Types of cards
Placement in the feeder
Adjustment of thickness
Remove the personalized cards ..................................15
22
Setting of parameters
Windows print driver ...............................................17
Installation of the print driver
Properties of the driver
Card printing configuration in
an office automation application
33
Error messages and diagnostics
Notification of messages...........................................25
LED indicator
Port Monitor
Interpretation of messages .......................................26
Status messages
Alert messages
Error messages
Diagnostics assistance. . . . . . . . . . . . . . . . . . . . . . . . . . . . . . . . . . . . . . . . . . 28
Print and interpret a test card
Identify the software versions installed
Contents
Page 5

44
Servicing and Maintenance
Ordinary maintenance..............................................29
Clean the card feed module
Service the cleaning roller
Clean the print head
Maintenance .........................................................34
Replace the cleaning roller
Replace the print head
Updat
e the Firmware
Update the print driver
Troubleshooting .....................................................38
Free a card in the printing unit
Improve printing quality
Assistance.............................................................41
Network of Evolis partners
Look for information on www
.evolis.com
Download updates
55
Characteristics
Declaration of conformity..........................................42
Printer specifications
...............................................44
Printer options
.......................................................45
List of “Evolis Genuine Product” consumables
...............46
List of Pebble and Dualys accessories
..........................46
Magnetic encoding
..................................................47
Smart card contact station
........................................49
Contents
Page 6

IIn
nssttaallll
tth
hee
E
Evvoolliiss
p
prrii
n
ntteerr
The aim of this first part is to assist you, step-by-step, in
discovering your new printer and putting it to work for you.
By taking the time to review these few pages, you will get more
detailed knowledge about your printer and its capabilities, while
optimizing the time needed to install and start using the product.
TTeecchhnnoollooggyy aanndd bbeenneeffiittss
The Evolis Pebble and Dualys printers are specially designed for users requiring superior quality of
printing, high availability as well as premium performances.
The personalization cycle includes various stages, depending on the nature of the card: magnetic
encoding, smart card encoding with or without contact, monochrome or color printing, and single or
dual-sided printing.
The Evolis printer can combine multiple encoding options, which make it possible to personalize all
types of cards available on the market.
T
ruly flexible, the printers can be used for batch printing with the 100-card feeder, or “over-the-
counter” printing, with cards inserted manually, one after the other.
Moreover, Evolis will study any of your special requirements for specific applications, and investigat
e appr
opriat
e modifications.
The Pebble and Dualys printers are product leaders for the entire range of personalized badges:
professional and business cards, identification badges, membership cards, and event cards.
The
y have also been immensely successful in niche applications such as discount cards, loyalty cards,
transportation passes, debit and credit cards, student IDs, and security badges for access control.
1
1
06
Page 7

07
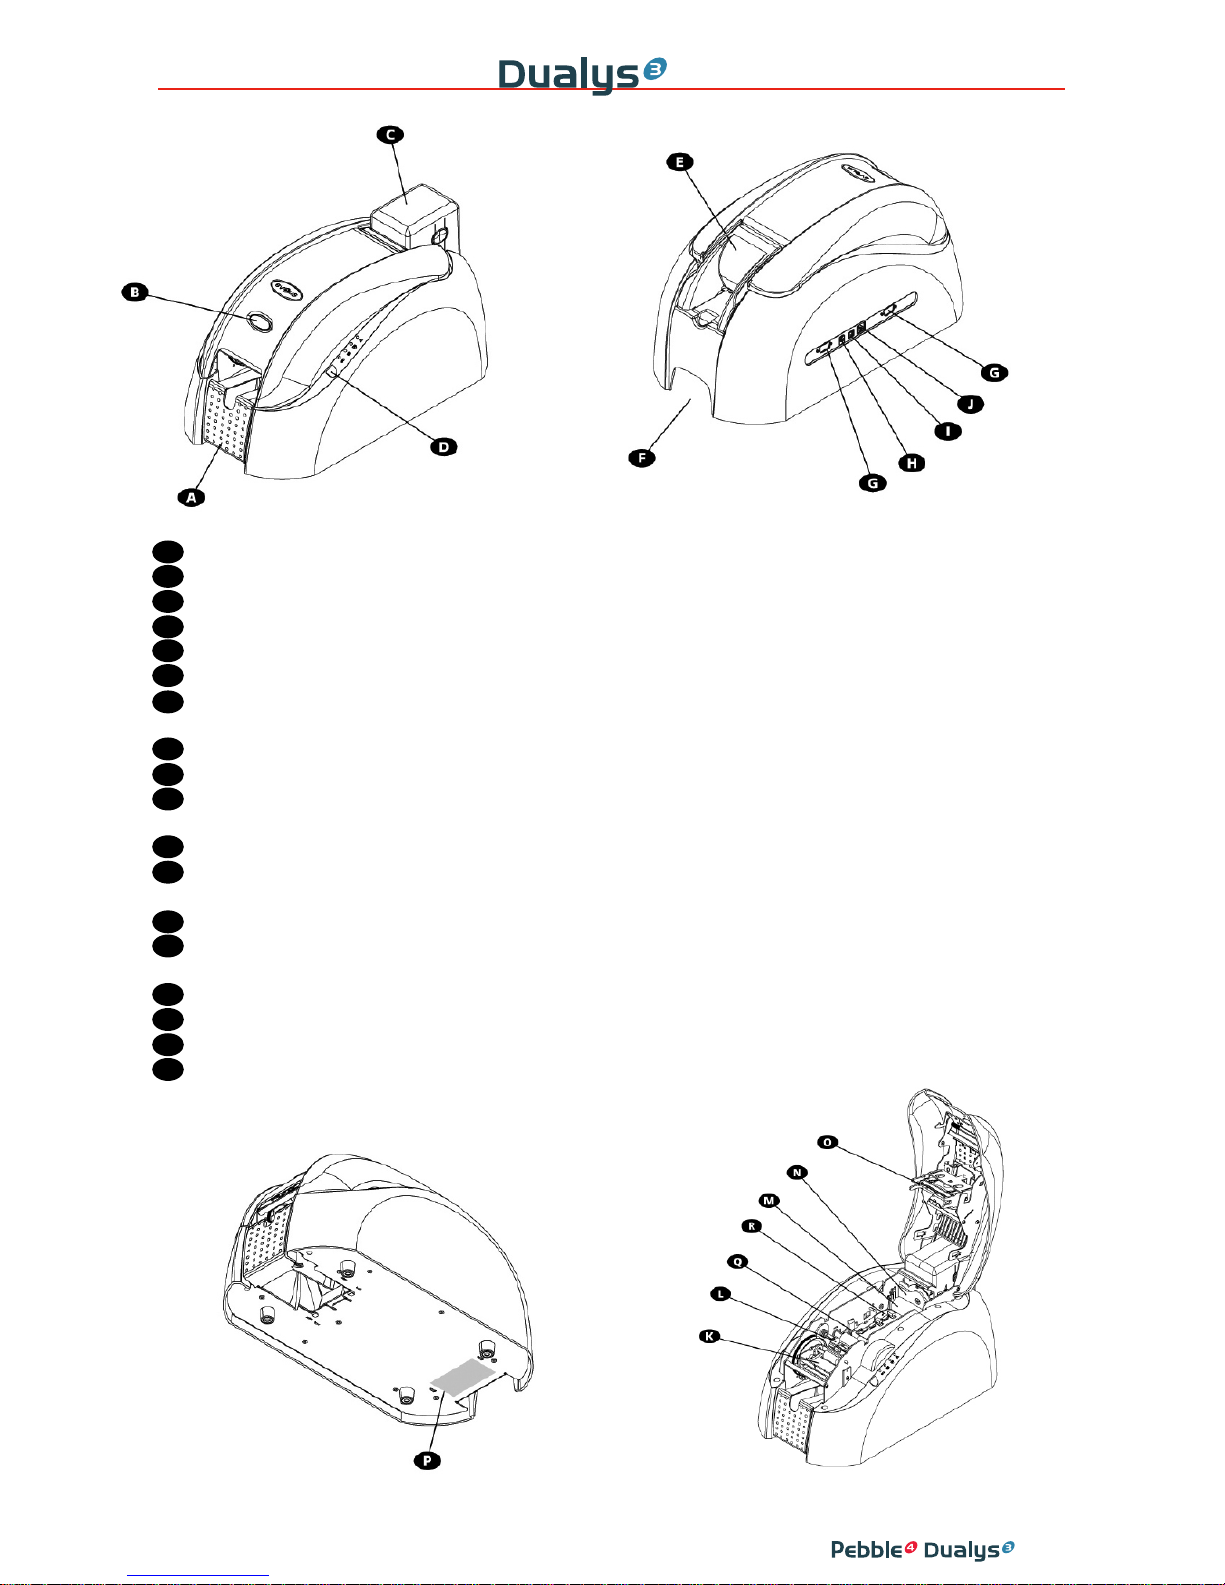
IInniittiiaall aapppprrooaacchh
A Output hopper Collects the printed and/or encoded cards.
B Cover lever Enables the printer cover to be opened and closed.
C 100-card Feeder Receives the cards for printing.
D Control Panel Shows the printer activity.
E Manual card feeder (option) Enables the cards to be inserted one by one. E
F Carrying handle
Enables the printer to be carried.
G DB-9 connector(s) (option) Enables data to be received and sent "from" and "to" the computer
or a coupler to be connected for chip cards personalization
H Power supply connector Enables the printer to be connected to its power supply.
I USB computer connector (std) Enables data to be received and sent "from" and "to" the computer.
J RJ45 Ethernet connector (option) Enables data to be received and sent from and to computer(s)
through an Ethernet network.
K Cleaning roller Removes all dust before the cards are printed.
L Card thickness gauge
Enables the adjustment of the cards from 0.25 mm (10 mil) to 1 mm (40 mil).
M Thermal print head Enables the cards to be printed in 300 dpi.
N Identification label Indicates the model and the serial number of the printer as well as
its Mac address (necessary for hooking up to the Ethernet network T
CP/IP).
O
Contactless (RFID) card encoding
Enables contactless chip cards to be personalized.
antenna (option)
P
Magnetic encoding head (option)
Enables cards with magnetic tracks 1, 2 and 3 to be encoded.
Q
Smart c
ard contact station (option)
Enabl
e cards with chip to be personalized.
Page 8
08
IInniittiiaall aapppprrooaacchh
A Output hopper Collects the printed and/or encoded cards.
B Cover lever Enables the printer cover to be opened and closed.
C 100-card Feeder Receives the cards for printing.
D Control Panel Shows the printer activity.
E Manual card feeder Enables the cards to be inserted one by one.
F Carrying handle Enables the printer to be carried.
G DB-9 connector(s) (option) Enables data to be received and sent "from" and "to" the computer
and coupler to be connected for chip cards personalization.
H Power supply connector Enables the printer to be connected to its power supply.
I USB computer connector (std) Enables data to be received and sent "from" and "to" the computer.
J
RJ45 Ethernet connector (option)
Enables data to be received and sent from and to computer(s)
through an Ethernet network.
K Flip-over station Rotates the card 180°.
L
Contactless (RFID) card encoding
Enables contactless chip cards to be personalized.
antenna (option)
M Cleaning roller Removes all dust before the cards are printed
N Card thickness gauge Enables the thickness of the card to be adjusted from
0.25 mm (10mil) to 1 mm (40mil)
O Thermal print head Enables the cards to be printed in 300 dpi.
P Identification label This label indicates the model and the serial number of the printer.
Q
Magnetic encoding head (option)
Enables cards with magnetic tracks 1, 2 and 3 to be encoded.
R
Smart c
ar
d c
ont
act s
tation (option)
Enabl
e c
ar
ds with chip t
o be per
sonalized.
Page 9
09
IInnssttaallll yyoouurr pprriinntteerr
The Evolis printer must be set up in a dry, well-ventilated location protected against dust and air
curr
ents.
In addition, make sure you install your printer on a sturdy flat surface that can support its weight of
around 5,9 kg (13 Lbs) for Pebble and 7.4 kg (16 Lbs) for Dualys.
Finally, it is essential to allow free access to the connectors and to the power plug.
CChheecckk tthhee iitteemmss sshhiippppeedd
The Evolis printer is shipped with a set of accessories that we invite you to examine.
Please take note that this list may vary in terms of the geographic area where you are located.
The printer is shipped in an original container specially designed to ensure that the product is protected against any risk of damage during shipment.
In the event of visible damage at the time of delivery, do not hesitate to carry out all required steps
as far as the shipper is concerned, and immediately contact your Evolis dealer who will provide you
with all necessary assistance.
Evolis has paid particular attention to the quality of this shipping material, and we urge you to keep
it in a clean, dry space.
This packaging material will be required to return equipment.
During the manufacturer’s guarantee period, returning material without the original Evolis
packaging could cause you to lose the benefit of this guarantee !
The following parts are furnished with your Evolis printer:
■ Power supply unit - VP ELECTRONIQUE or SWITCHBOX Type F10723-A or VP ELECTRONIQUE
Type EA10723
■ Main power cable
■ USB cable (length 1:80 m) - Item # A5017
■ CD-Rom Drivers & Documentations
■ CD-Rom eMedia Car
d Designer, badge design and per
sonalization softwar
e including
the utilization of an Excel source data base
■ Cleaning kit
■ Evolis Limited Guarantee document (must be consulted)
In the absence of one of these components, please contact your Evolis dealer.
Only use the power supply delivered with your Pebble or Dualys:
VP ELECTRONIQUE or SWITCHBOX Type F10723-A or VP ELECTRONIQUE Type EA10723
Page 10
10
PPrree--iinnssttaallllaattiioonn aaccttiivvaattiioonn
Before installing the printer, please perform the following operations:
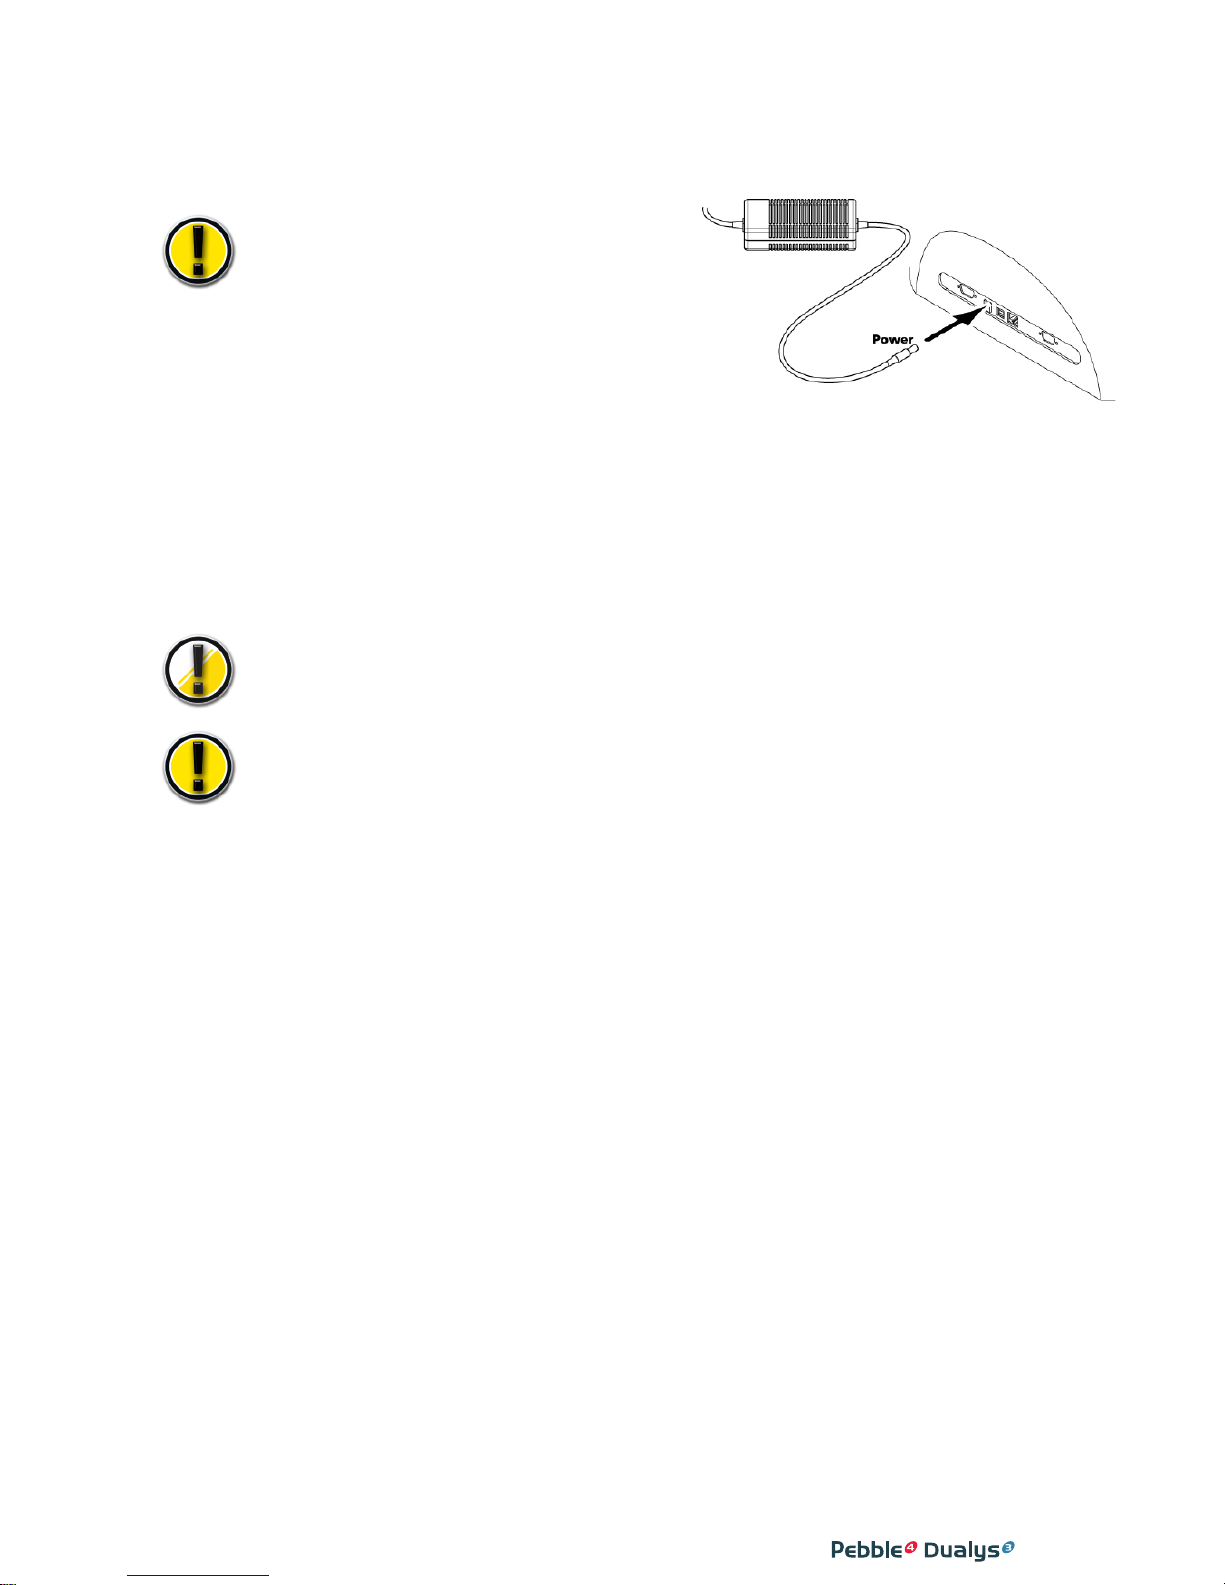
CCoonnnneecctt tthhee pprriinntteerr ttoo tthhee mmaaiinn ppoowweerr ssuuppppllyy
Connecting t
o the electrical system
Turn off the printer by pulling the plug out of the
socket, which must always be accessible.
This product must be connected to an electrical
installation that is correctly protected and grounded.
FI: Laite on liitettävä suojamaadoitus koskettimilla
varustettuun pistorasiaan
NO: Apparatet må tilkoples jordet stikkontakt
SE: Apparaten skall anslutas till jordat uttag
1. Connect the power supply cord to the power supply, then attach the power cord connector to the printer.
2. Then connect the end of the power supply cord to a grounded system outlet.
3. The printer is under power. The light on the control panel comes on and the print head rises and
falls to indicate the correct mechanical working of the printer. If the light fails to come on, this
means that the installation has not been carried out correctly or possibly that the printer is not
working properly. Check the installation.
Prior to any maintenance action, always disconnect the power supply cable.
For your own safety, these components must remain accessible at all times to permit
emergency action
This product must be connected to a correctly protected and grounded electrical installation
CCoonnnneeccttiinngg tthhee ddaattaa ccaabbllee
The data cable (USB, Ethernet or other) must never be connected before the installation of the
printer driver has been completed.
Refer to Chapter 2.1 and carefully follow these instructions.
Page 11

11
PPrriinntteerr ccoonnttrrooll ppaanneell
A control panel is available on the top of the printer.
Four lights are associated with symbols indicating the printer activity.
These lights indicate the following:
Refer to chapter 3 of this manual for further information
on interpreting the messages of the control panel.
SSttaanndd bbyy
The printer automaticlly goes into stand-by after 10 minutes of inactivity. The
light on the push button from the control panel goes out. To reactivate the
printer, press the push button for one second.
The light on the push button comes on.
The Pebble and Dualys printers may be left in stand-by at any time by pressing a
few seconds the push button as indicated. The light on the push button goes out.
Turned on
Data reception
(Pushbutton)
End of
ribbon
No card in
the feeder
or feeder
not present
Cleaning
signal
Cover
open
Page 12
12
IInnssttaallll tthhee rriibbbboonnss
The Evolis Pebble and Dualys printers use three types of ribbons:
■ Color ribbon also called multi-panel ribbons
■ Monochrome ribbons available in different colors: black, red, green, blue, white, gold, silver
■ Special ribbons such as scratch-off and hologram
The Evolis original ribbons are specially designed to guarantee optimum operation of your
equipment without any risk of damage. The use of ribbons from any other source than Evolis
could seriously damage the print head, consequently entailing the immediate interruption of
the factory warranty.
For optimum printing quality, Evolis recommends cleaning all the equipment each time a ribbon is
changed. It is up to the user to make this determination, provided, however, that he makes sure to
comply with the mandatory cleaning cycles in order to keep the equipment in perfect operating conditions (consult the chapter on Ordinary Maintenance).
The validity of the factory guarantee is conditional upon compliance with these cleaning
cycles (cf. Limited Evolis Warranty document).
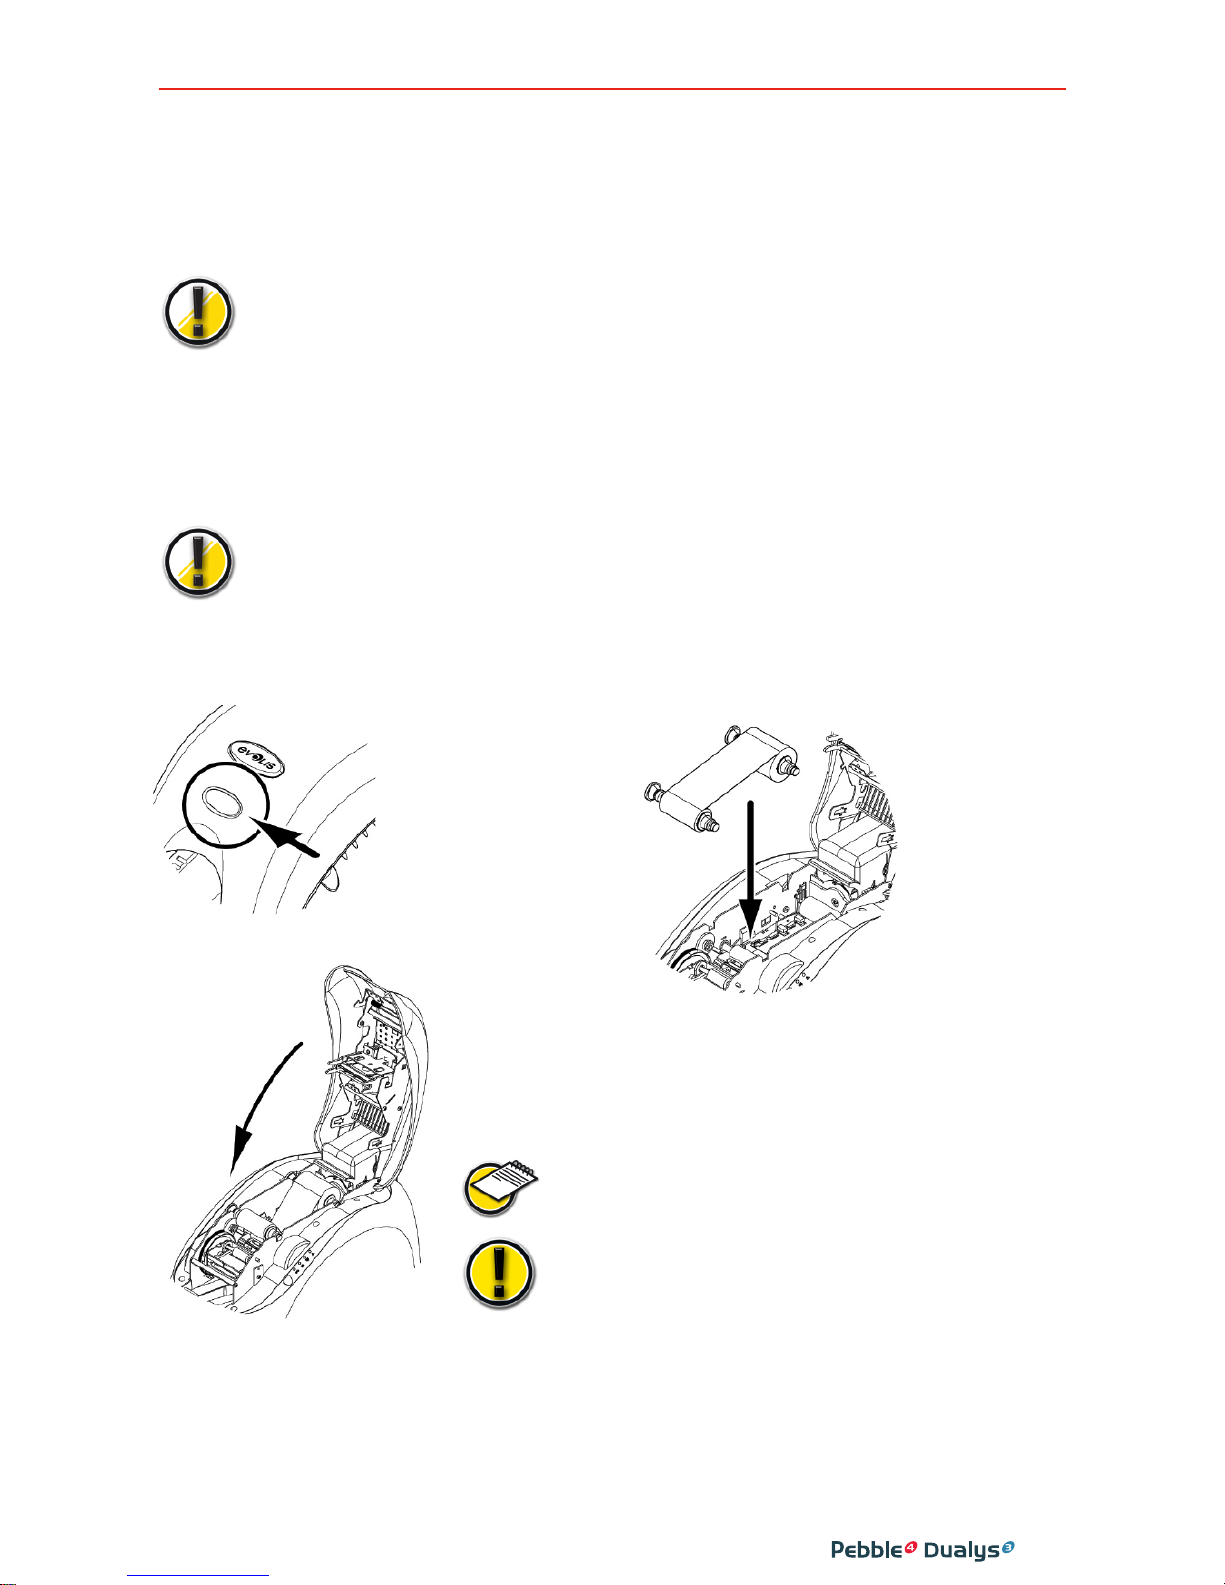
MMoonnoocchhrroommee oorr ccoolloorr rriibbbboonn
To install a monochrome or color ribbon in the print module, proceed as follows:
The ribbon is automatically positioned
after the cover is closed
.
Installation of the print ribbons must be accompanied by
adequate defining of the parameters of the print driver.
Please refer to the chapters on
Properties of the Driver for
additional details.
1. Open the cover of
the printer by
pressing the
opening lever then
turn it in vertical
position.
2. Install the new
ribbon in the
position indicated in
the diagram:
•Toothed wheel
toward the rear
of the printer.
• Part including the
new ribbon located
on the right side
(card feeder).
3. Lower the cover
and lock it.
Page 13
13
IInnssttaallll tthhee ccaarrddss
TTyyppeess ooff ccaarrddss
The P
ebble and Dualys printers support PVC cards varying in thickness between 0.25 mm (10 mil)
and 1 mm (40 mil). F
or optimum quality, these cards must comply with ISO Standard 7810.
They are of a number of types:
■ Blank cards
■ Magnetic stripe cards
■ Contact smart cards
■ Contactless smart cards
■ Smart cards and magnetic stripe
Correct positioning of the magnetic stripe cards and of the contact smart cards in the feeder must
be scrupulously observed. Failure to comply with the direction of insertion would prevent the encoding option from functioning.
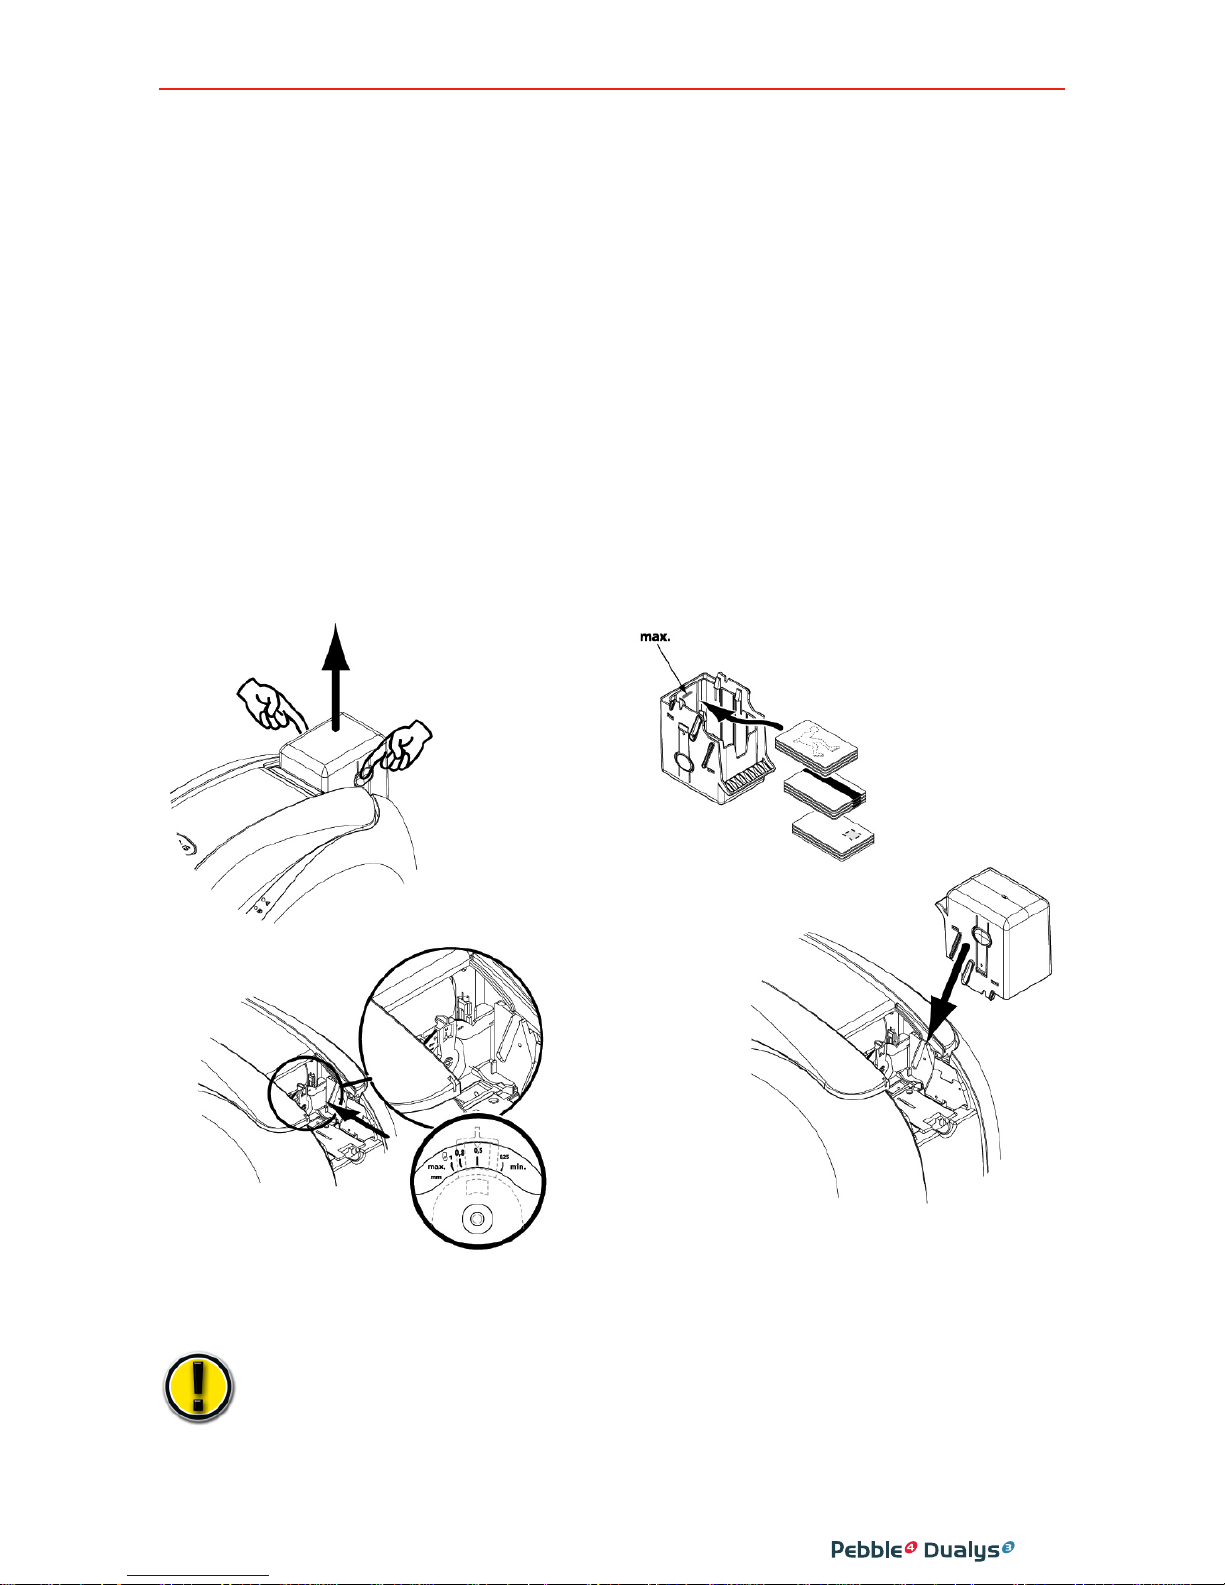
IInnssttaallllaattiioonn iinn tthhee ffeeeeddeerr
The cards are installed in the feeder as follows:
Only use the type of cards appearing in the Technical Specifications in this manual
Do not touch the printable surface of the cards: the printing quality depends on this.
Do not use cards that are damaged, bent or that have an embossed texture.
Always store the blank cards in a clean and dust-free location.
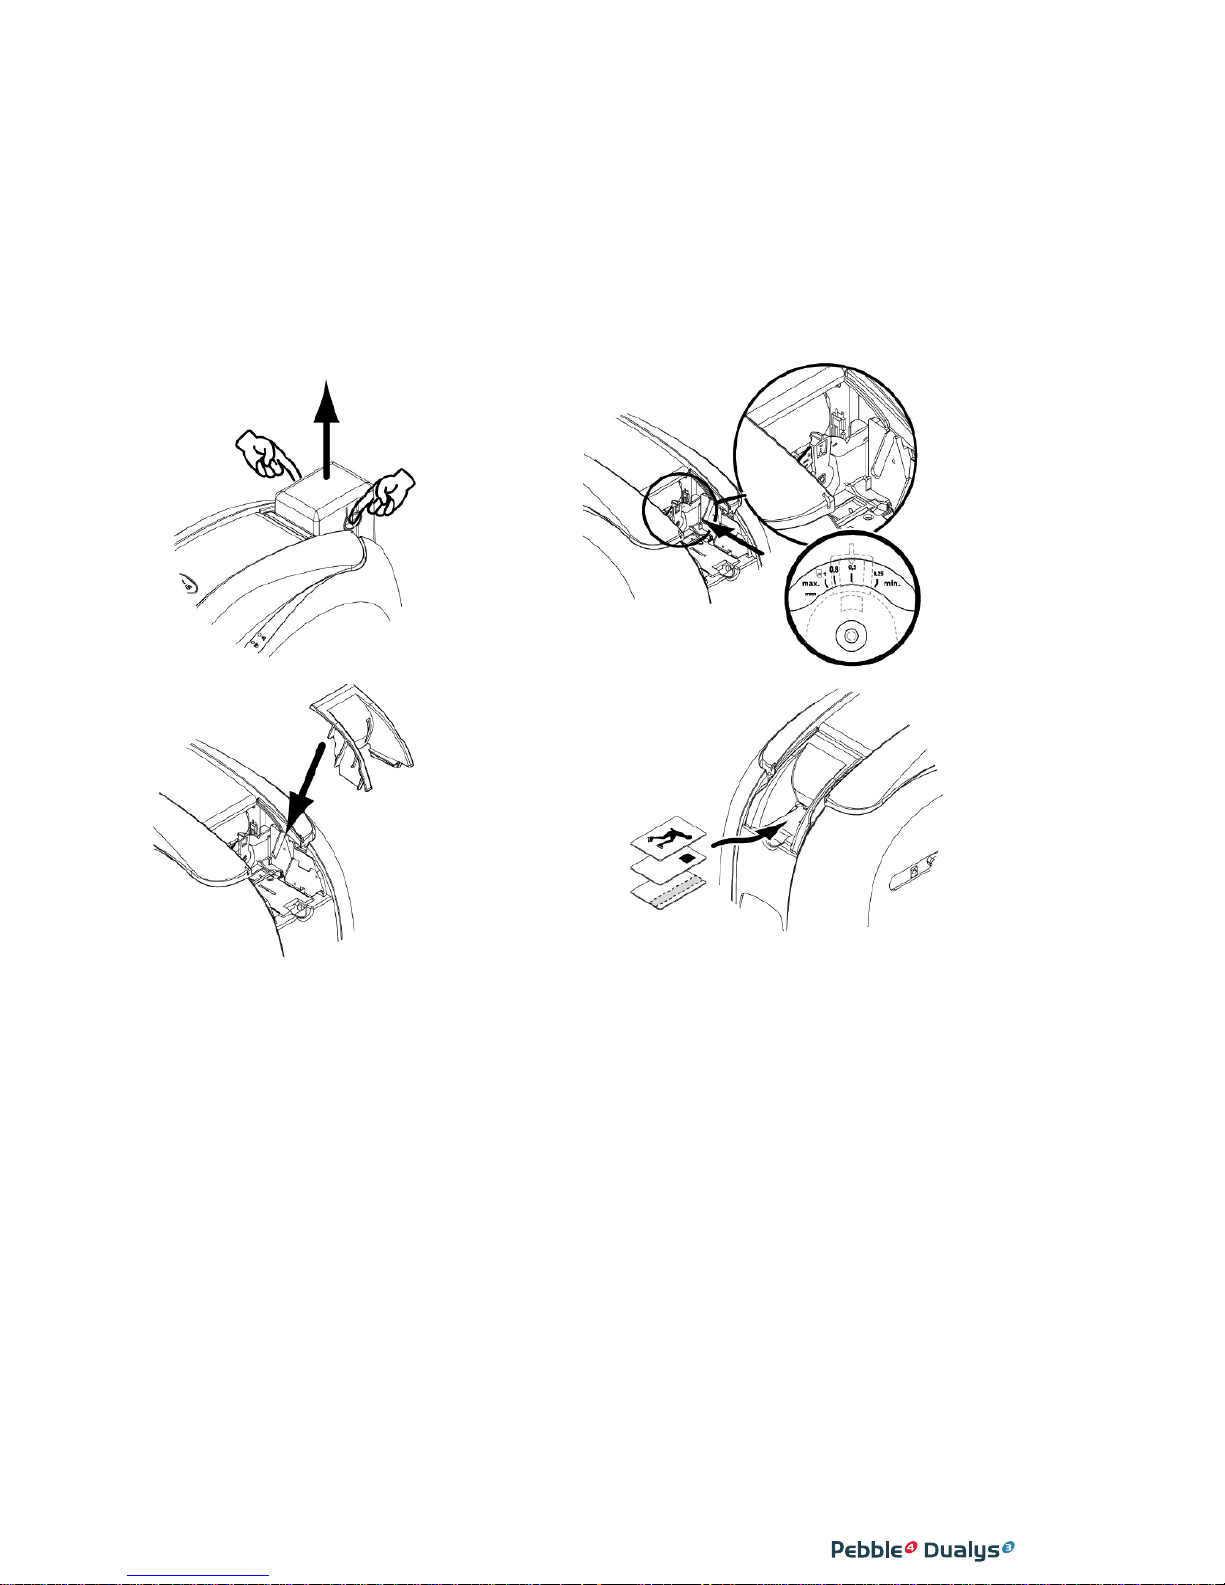
1. Remove the
feeder as
indicated.
2. Insert the
cards into the
feeder as
indicated,
printable face
down.
3. Adjust the
gauge setting
in terms of the
thickness of
y
our c
ar
ds.
4. Put the feeder back into
plac
e in the print
er until it
“Clicks” in place.
Page 14
14
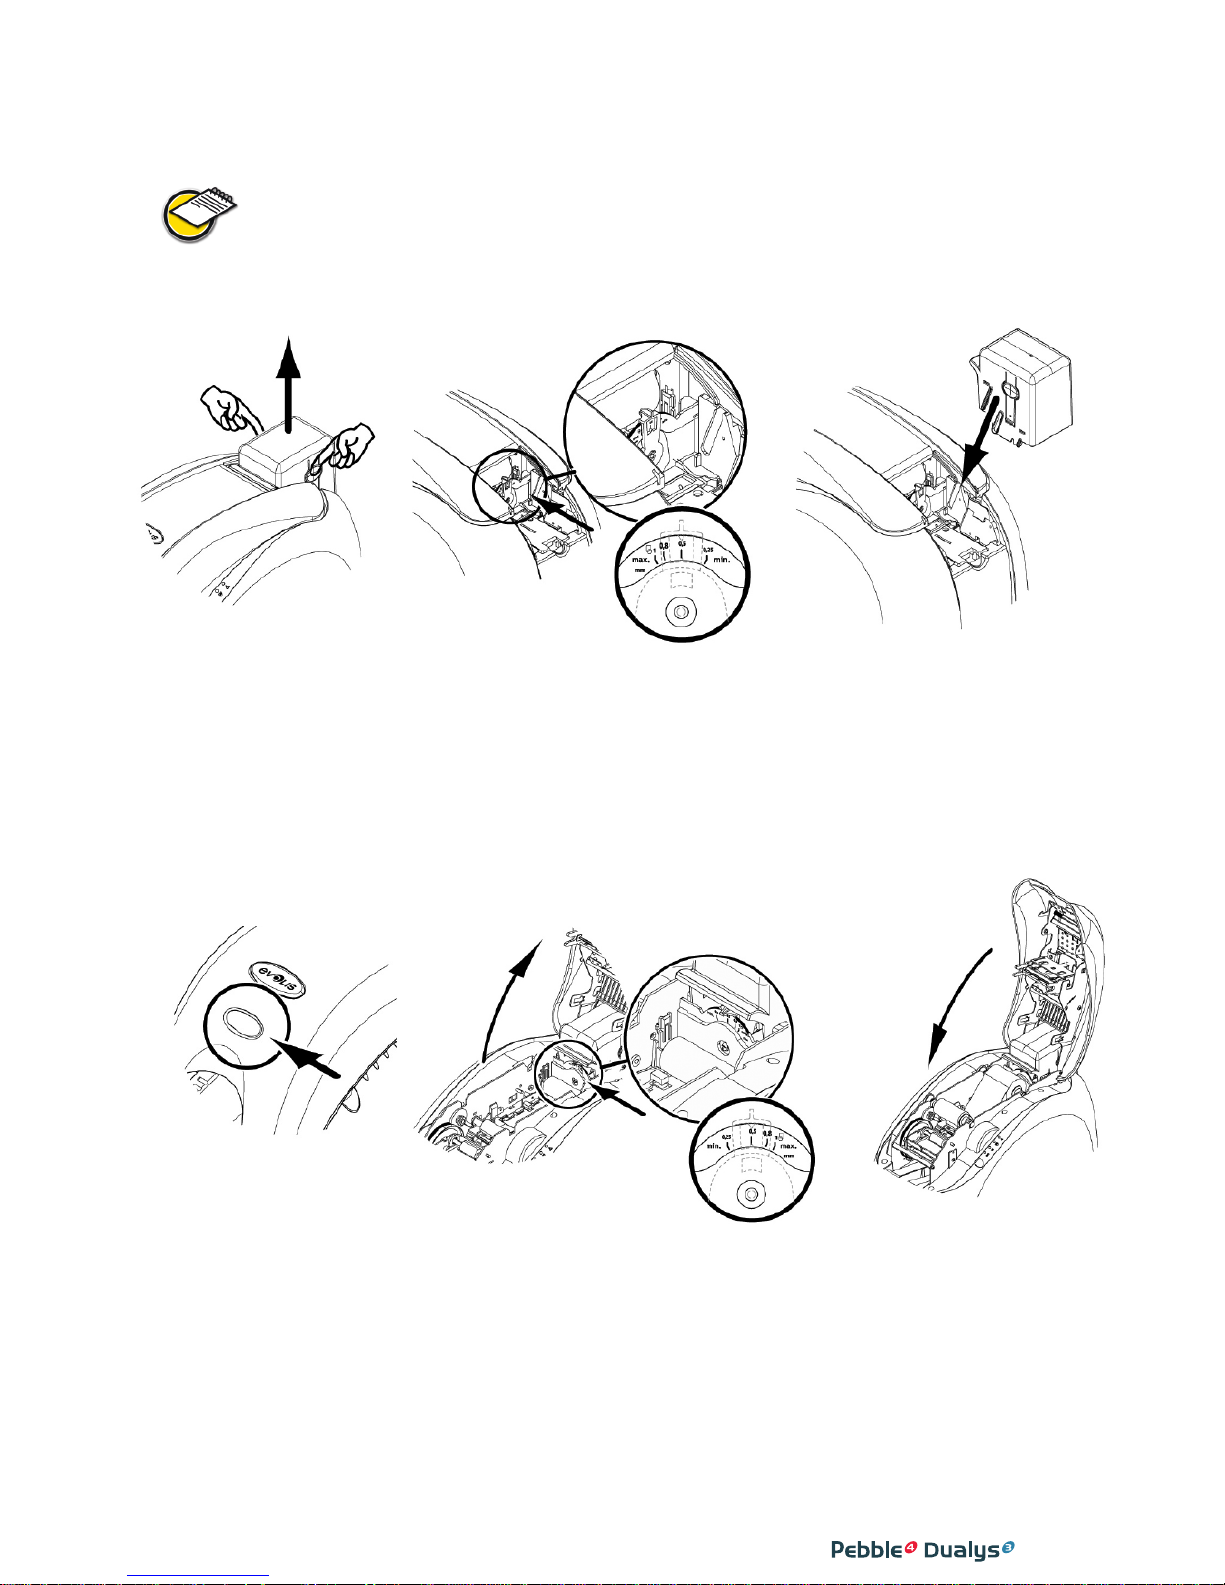
AAddjjuussttmmeenntt ooff tthhee tthhiicckknneessss
The Pebble and Dualys printers are equipped with a manual system for setting the thickness of the
cards, which is accessible either through the feeder frame, or through the inside of the printing
modul
e when the cover is open.
The Pebble and Dualys printers accept card thickness between 0.25 mm (10 mil) and 1 mm
(40 mil). The factory thickness setting of the cards is 0.76 mm (30 mil).
To adjust the thickness of the cards using the feeder cage:
To adjust the thickness of the cards from the inside the printer:
1. Remove the feeder
from the printer as
shown.
2. Adjust the thickness of the
cards used by moving the
handle from right to left on
the required card thickness.
2. If applic
abl
e, r
emove the ribbon
from the printer. Then adjust the
thickness of the cards used by
moving the handle from right to
l
eft on the r
equir
ed c
ar
d thicknes
s.
3. Reins
t
all the ribbon
in the printer and
close the cover.
1. Open the c
o
v
er of the
printer by pressing the
opening lever and then
turn it.
3. Put the feeder back in
the printer. Then press
on the top of the feeder
until it clicks.
Page 15
15
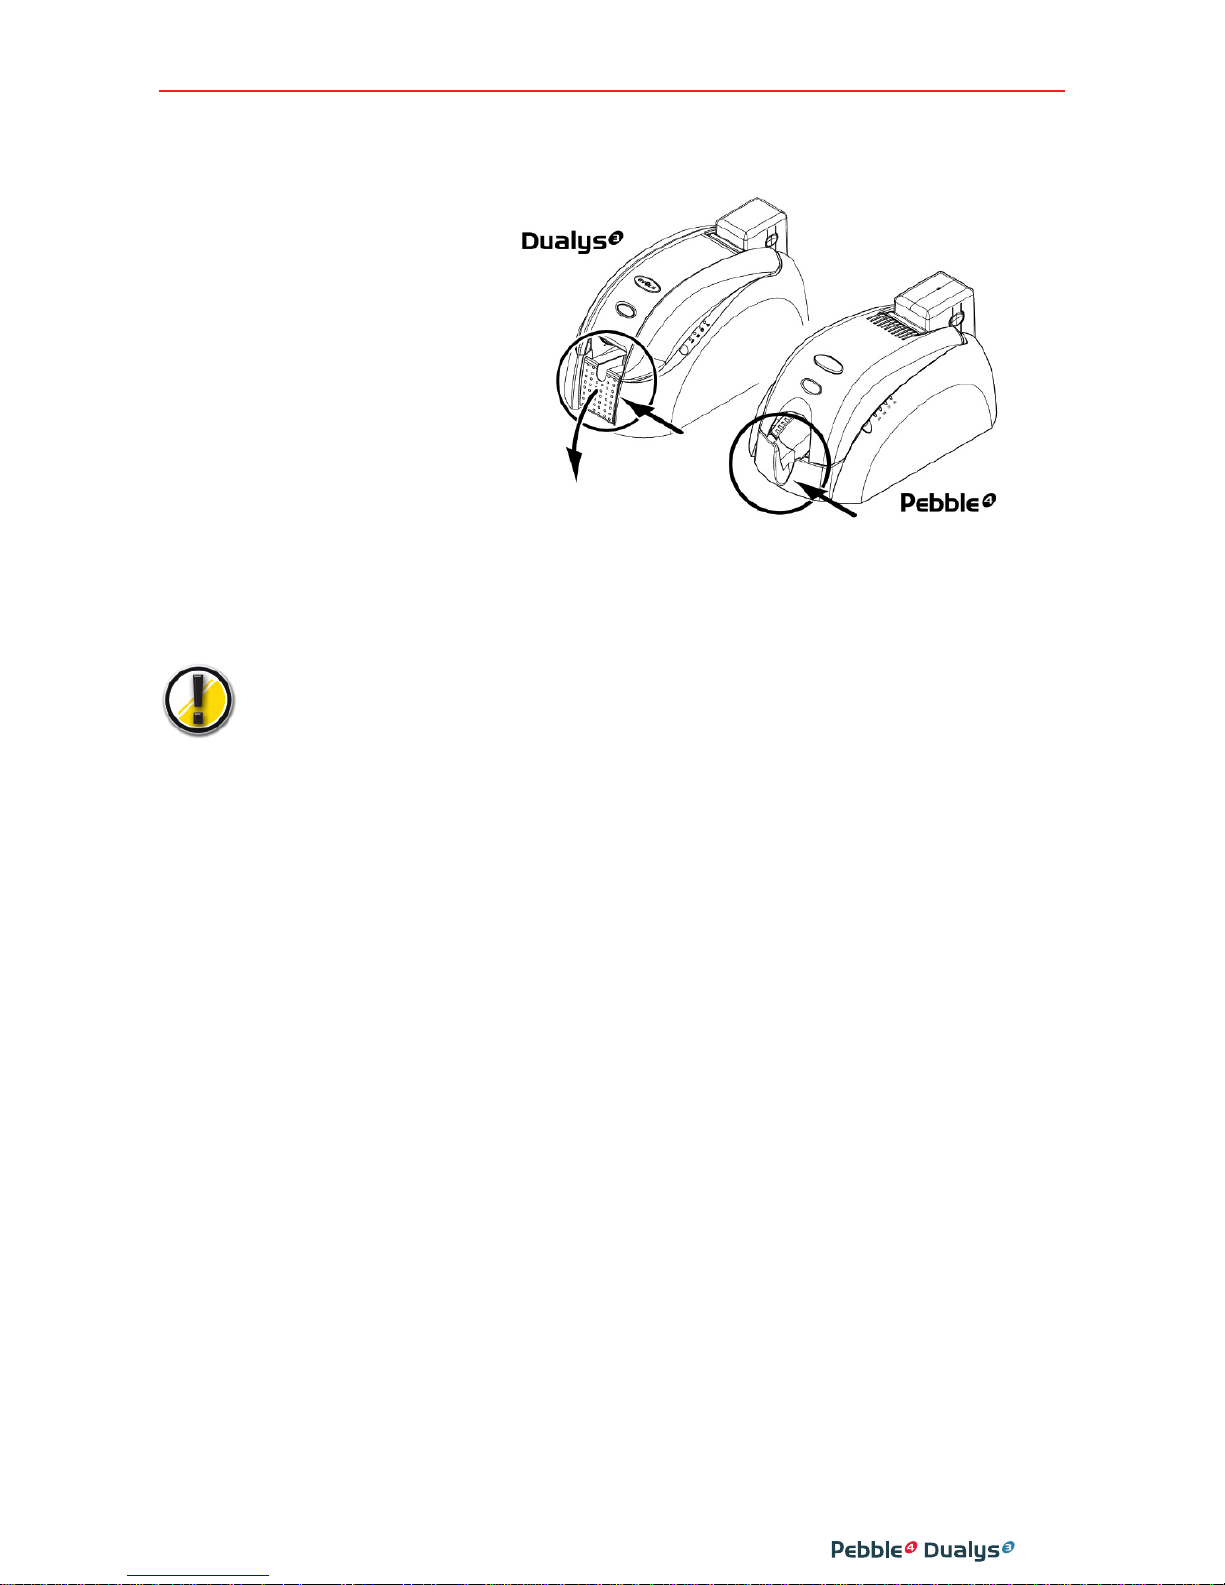
RReemmoovvee tthhee ppeerrssoonnaalliizzeedd ccaarrddss
Once the personalization cycle is completed, the card is delivered in the hopper located on the left
side of the unit.
The printer is fitted with an output hopper with a capacity for 100 cards (Dualys) or 50 cards (Pebble)
in 0.76 mm (30 mil) format. This is intended to receive the printed and/or encoded cards.
Locate the output
hopper and rotate it
(Dualys only)
Dualys: the hopper should be completly rotaded until it clicks. The “Cover open”
LED will blink when the hopper stands in middle position.
Page 16
16
IInnssttaalllliinngg tthhee mmaannuuaall ccaarrdd ffeeeeddeerr aanndd llooaaddiinngg tthhee ccaarrddss
The Pebble and Dualys printers may be optionally fitted with a manual card feeder for inserting cards
one by one. Manual card feeder option should be set through the driver Properties in the
Graphic tab.
Then select
Manual feed option in Source Tray menu and in Output Tray menu choose the option
according to the required operation mode for the card exit.
The manual card feeder is installed as follows:
OOtthheerr ssttaaggeess ttoo tthhee iinnssttaallllaattiioonn
You have now completed the installation (material) of your Evolis printer. For the moment, we would
urge you to carry on reading this manual and we would inform you that there are still two extra stages to be followed to make your Evolis printer fully operational:
• Installation of the driver
• Printer cleaning
4. Insert the
card as
shown.
3. Place the manual
supply tray in the
printer as
indicated. Then
press on the top
of the feeder
until it clicks.
1. Remove the
feeder from
the printer as
shown.
2. Using the
lever, adjust
the thickness
of the card to
MAX position.
Page 17

17
S
Seettttii
n
n
g
g
ooff p
paarraa
m
meetteerrss
Defining the parameters of the printer and of its driver is a
highly important step and requires very special attention.
As a matter of fact, a poorly-defined film, or improper
settings, are factors that have a negative impact on the quality
of personalization.
It is therefore essential to proceed in stages, changing the
parameters only when you are completely sure.
Evolis gives you at all times the ability to return to the ‘factory’
settings if the adjustments made do not give the expected results.
Be careful about defining the personalized parameters and do not hesitate to contact your
Evolis dealer to get the necessary advice and assistance prior to any modification.
WWiinnddoowwss pprriinntt ddrriivveerr
The Evolis Pebble and Dualys drivers operate under Windows XP, 2003 and Vista 32 and 64-bits
IInnssttaallllaattiioonn ooff tthhee pprriinntt ddrriivveerr
To install your print driver, you will need the CD-Rom ‘Drivers and Documentation’ shipped with your
Evolis printer.
Please make sure the data cable is disconnected before starting this procedure.
The installation program automatically selects the version to be installed in terms of your
operating system.
1. Load the ‘DRIVERS & DOCUMENT
A
TIONS’ CD-Rom in y
our CD drive.
2. W
ait a f
e
w sec
onds until the welcome screen asks you to choose your language. If the
CD-Rom does not launch aut
omatic
all
y, double click on the setup.exe file located in the DRIVERS
directory on the CD-Rom
3. Sel
ect y
our language by clicking on the appr
opriate flag.
4. Click the “Ins
t
all Driv
er” option t
o launch the setup pr
ogr
am
2
2
2
2
Page 18

18
5. Windo
ws XP or 2003 platforms may require the Microsoft.NET package to be installed. Click OK
t
o confirm and start this installation.
Confirm your willing to proceed with the installation of Microsoft.NET by clicking on Yes.
Then continue the installation process ‘til it is complete.
The installation process is now complete. Click on OK to continue with the driver’s setup.
Page 19

19
6. Setup is perf
ormed through a eight-step process. Make sure you stick precisely to the
installation guidelines. Some versions of Windows may require the user to have Administrator
rights to install the driver.
Step 1: disconnect the data cable
Step 2: accept the limited warranty conditions
Note: This window may appear during the installation. No action is required, and the window will
disappear during the pr
oc
es
s.
Page 20

20
Step 3: Installation Process
Step 4: select the communication port
If you install your PC in USB mode, you can choose to activate the Port Monitor,
an application that displays all operating error messages on the PC screen.
Step 5: detect communication port
Wait until the setup wizard detects the communication port with your printer to carry on to the next step.
Page 21

21
During this process, the following windows
may appear
. Click on 'continue' or 'install
this driver software anyway'
Step 6: personalize your printer
During this s
tep, you can set a personalized name to your printer.
The printer can also be defined as default
printer.
You may then select the Evolis Color Profile.
In selected cases, the color profile will enable
to get color textures on printings closer to
what is displayed on the screen.
Step 7: install driver and end of the process
When the installation process is over, print a test card to make sure your printer operates suitably.
You are now ready to use your printer.
If y
ou choose t
o install your printer via an Ethernet TCP/IP port, please download an additional
guide “Pebble-Dualys-User Guide-Ethernet Setup" from www.evolis.com/ en/supservices/download_UGQO.asp
Sel
ect “
P
ebbl
e
” or “Dualys”, then “Ethernet Setup”. Choose the appr
opriat
e language and click the
download button.
Page 22

22
PPrrooppeerrttiieess ooff tthhee ddrriivveerr
Before using your printer, you must determine your personalized parameters:
■ T
ype of ribbon for printing the cards
■ Default parameter settings
■ Adjus
tment of encoding parameters
You will find more detailed information on Evolis ribbons in the ‘Evolis Genuine Product’
Consumables List section.
In general, it is recommended to retain the default parameters determined by the print driver.
Modification of these parameters by an uninformed user could lead to a poor quality of personalization as well as to hardware damage.
So, stay alert and contact your Evolis dealer, who will guide you in adjusting these
parameters if applicable.
These printing par
ameters are accessible:
■ From the Start button located at the bottom left on the Windows task bar: select Printers and Faxes.
■ Choose your printer by left-clicking with the mouse, for example Evolis Dualys.
■ Click again but with right mouse key to bring up a menu, and select Properties.
An initial screen for setting the equipment properties parameters now appears.
The principal tabs for defining parameters are ‘Graphics’and ‘Tools’.
‘Graphic’ tab
• Choice of printing mode and of the associated ribbons
• Orientation of the printed card
• Number of copies
• Adjustment of the ribbon parameters: color, black panel, overlay panel options
(depend on the print ribbon selected)
Dualys Pebble
Page 23

23
‘Tools’ tab
• Setting parameters and testing
of the magnetic encoding options
•
Testing and diagnostic tools
On-line help
A help file guides you in using each of the parameters of the print manager in terms of the different print modes and criteria selected.
To familiarize yourself with these different parameters, we recommend that you consult this help
feature before making any changes.
Print a test card (Tools tab)
We recommend that you print a Test Card at the
time of the first use, and that you save it.
This card stores data that you may be asked to provide if y
ou call Sales Service.
Default printer
Depending on your application, it may be important to define your Evolis printer as a default printing peripheral device.
In that event, all your print work (not just cards but office documentation) will be sent to the Evolis
printer.
To define your default printer, proceed as follows:
■ Using the Start button at the bottom left of the Windows task bar, select Printers and Faxes.
■ Select your printer with a left mouse click, for example Evolis Dualys.
■ Click again using the right mouse key to bring up a menu, and choose Define as default printer.
Other tabs
> ‘General’ tab
::
Windows information window that allows you to print a test page to monitor the
computer-printer communication.
> ‘Ports’ tab
:
:
Windows control window that allows you to select the printing port and to validate use
of the appropriate print driver.
The parameters displayed should be changed only by a person with advanced computer skills.
> ‘Color management’ tab
:
:
This dialog box makes it possible to associate the printing with a specific
color profile.
>
‘Security’, ‘Sharing’, ‘Advanced’ tabs: Windows and Network parameters reserved for the system
administrator of your computer system.
Do not change without prior approval.
Page 24

24
CCaarrdd pprriinnttiinngg ccoonnffiigguurraattiioonn iinn aann ooffffiiccee aauuttoommaattiioonn aapppplliiccaattiioonn
A large number of Windows applications permit the printing of a document (for example, the tools
of the Micr
osoft office suite: MS-Word, MS-Access, MS-Excel, MS-Power Point).
T
o help you familiarize yourself with formatting a card and setting the parameters for its formatting
and printing, we offer the following example:
Using Microsoft®Word
After first setting up the Evolis default printer:
■ Start the MS-Word application.
■ Click File on the menu bar, then click on Formatting.
■ The Paper tab proposes Paper format; select type ‘Card CR80’.
■ Under the Margins tab, set all the margins to
‘0’, then under Orientation, select Landscape.
■ Close the window by clicking on OK.
Your Word window should now look like this:
Your are ready to personalize your card by entering
the different composition components:
■ Logo and illustration.
■ Identification photo.
■ Fixed and variable text.
■ Bar code, etc.
EExxaammppllee:
:
Please note that this example does not propose to initiate the operator on operating the
MS-Word application. Its purpose is simply to establish a relationship between the graphics of a card and the parameters of the Evolis printer driver that are necessary for the
printing operation.
Setting the parameters of the Evolis print driver from MS-Word:
■ Click on File on the menu bar, then
click on
Print.
■ The dialog box informs you that the
Evolis printer has been selected.
Now click on
Properties. The Evolis
printer drive dialog box appears.
The printing par
amet
er
s f
or this graphics example are:
1.
Main
dialog box, select:
■
Type of ribbon: Standard 5 panel ribbon (YMCKO).
■
Click on 'Set ribbon' to validate
■
Orientation: Landscape.
■
Copy (number to be determined).
2. Graphic dialog box, select:
■
Black panel: All black points.
■
Varnish panel: All the surface.
3. Click on Apply if you modify a parameter, then on OK to successively close each dialog box.
4. Having returned to the main window, click OK to start printing.
Consult the help of each dialog box, if necessary. See the « Use of on-line help » paragraph above for
further information.
Page 25

25
E
Errrroorr
m
meessssaa
g
geess
aan
n
d
d
d
diiaa
g
g
n
noossttiiccss
While the Evolis Pebble and Dualys printers were designed to
work independently, keeping your involvement to a minimum, it may
nevertheless be useful to become familiar with the main alert messages.
NNoottiiffiiccaattiioonn ooff mmeessssaaggeess
PPoorrtt MMoonniittoorr
The Port Monitor is a software component that helps you monitor your Evolis printer on a day-to-day
basis. When installed on your computer, it enables you to visualize the activity of your Evolis printer
unit from your work station.
No need to move: the Port Monitor will alert you as soon as an important message is sent by the printer.
For more information on this function, consult the
www.evolis.com site and download the documentation
relative to installation, parameter setting and operation.
DDeessccrriippttiioonn ooff tthhee pprriinntteerr ccoonnttrrooll ppaanneell
The control panel includes 1 button
and a 4-LED-type diode.
The lights on the control panel are
represented in one of the following
states:
Switched off Switched on Flashing
The push button returns the control panel to its original state after dealing with the following cases:
■
ABSENCE OF CARD or INTERNAL PRINTER PROBLEM.
■
ERROR IN MAGNETIC ENCODING.
■
CARD EJECTION.
The push button also enables:
■
The printer to be set to stand-by.
■
A test card to be printed.
■
A cleaning cycle to be started.
3
3
T
urned on
Data reception
(Pushbutton)
End of
ribbon
No c
ard in
the f
eeder
or feeder
not present
Cl
eaning
signal
Co
v
er
open
Page 26

26
IInntteerrpprreettaattiioonn ooff mmeessssaaggeess
Consult the following states of the control panel to determine the activity of your Evolis printer or the nature of
the problem:
State of the lights Interpretation Solution or explanation
The printer is ready to receive data.
The printer receives data from one
or several of its interfaces.
■
There is no ribbon in the printer.
■
The ribbon has finished.
■
The ribbon has been badly installed
in the printer.
■
The ribbon is cut.
Check the state of the ribbon in the
printer. If you are have a printing job in
course, this restarts with a new card.
PRINTER READY
PROCESSING
END OF RIBBON
NO CARD IN FEEDER
OR FEEDER NOT PRESENT
WAITING FOR A CARD TO
BE INSERTED
PRINTER CLEANING
ALERT (AFTER 1000
INSERTIONS)
PRINTER CLEANING
ALERT (AFTER 1200
INSERTIONS)
PRINTER COVER OPEN
■
There is no card in the feeder.
■
The thickness of the cards has not
been correctly adjusted.
■
The cards are curved.
■
The cards are stuck together.
■
The feeder is not present in the
printer or is badly inserted.
Check the state of the cards in the feeder or make sure that the feeder is present in the printer and correctly inser
ted Then, press the push button for one
second. The printing restarts
■
The printer is waiting for a card to be
inserted.
The printer is fitted with the manual
card feeder option: insert a card in the
printer. Go to chapter 1 “Install the
Evolis printer”.
■
The printer has to be cleaned.
Go to chapter 4 “Servicing and
Maintenance”.
■
The printer has to be cleaned.
Go to chapter 4 “Servicing and
Maintenance”.
■
The print
er cover is open.
Close the cover of the printer.
The activity in course restarts.
Page 27

27
State of the lights Interpretation Solution or explanation
■
The output hopper is midway between open and close positions.
Close or open the output hopper.
The activity in course restarts.
■
There is a card jammed in the printing station or in the flip-over station.
■
A mechanical part in the printer is
faulty.
Press the push button for one second. If
the problem persists, call your Evolis
reseller for assistance.
■
The orientation of the magnetic
track in the feeder is not correct.
■
The type of encoding has not been
correctly parameterised (HICO or
LOCO).
Go to Chapter 5 of this
manual for more information.
■
The encoded data do not conform
to ISO 7811 or to the parameters
pre-defined in the properties of the
driver.
Go to Chapter 5 of this
manual for more information.
Press the push button for one second.
The printer restarts the magnetic
encoding cycle with a new card. If the
problem persists, call your Evolis
reseller for assistance.
■
The print head c
ooling sys
t
em is
activated.
The printer stops working for a few
seconds. As soon as the print head
reaches the normal working temperature, the activity starts once more.
OUTPUT HOPPER POSITION
(Dualys only)
MECHANICAL PROBLEM
ENCODING ERROR
COOLING MODE
Page 28

28
DDiiaaggnnoossttiiccss aassssiissttaannccee
In this chapter, you will find all the information required to perform certain simple procedures that you may
be asked to do by your Evolis dealer to provide you with the most effective assistance.
PPrriinnttiinngg aa tteesstt ccaarrdd
Printing a test card gives certain technical information about your printer and confirms its correct working.
We advise you to print it when the printer is put into service and to keep it at hand.
1.
Make sure there are a ribbon and a card in the printer.
2.
Press the push button for three seconds. All the lights go out.
3.
Press the push button once more and hold it down.
4.
The light of the push button comes on.
5.
Release the push button as soon as the light flashes.
6.
The test card is printed in a few seconds (in color if the printer has a color ribbon or in monochrome
if it has a black ribbon).
7.
The printed card is ejected into the output hopper.
IInntteerrpprreettiinngg aa tteesstt ccaarrdd
The printing of a test card gives the following information:
■
Correct printing of the colors and black.
■
The correct position of the ribbon in the printer.
■
The printer model.
■
The serial number of the printer.
■
The version of the Firmware installed in the printer.
This example below shows the Dualys printer test card:
Front side printing Back side printing
IIddeennttiiffyy tthhee ssooffttwwaarree vveerrssiioonn iinnssttaalllleedd
As indicated above, you can simply identify the software version loaded into your printer thanks to
the test card (Firmware no.). You can also identify the version of the print driver installed as follows:
■
Go into the driver
properties (on the print
driver logo, right-click
and choose
Pr
operties
)
■ Graphic
tab
■ About
button
Page 29

S
Seerrvviiccii
n
n
g
g
aan
n
d
d
M
Maaii
n
nttee
n
naa
n
nccee
In this chapter, we suggest that you identify the ordinary service
operations for your Evolis printer that will enable you to ensure a
very high quality of personalization of your plastic cards.
Keep your Warranty in effect !
The factory warranty is subject to strict compliance with ordinary maintenance instructions, and specifically to compliance with the equipment cleaning cycle intervals.
Failure to comply with the procedures described in this chapter entails cancellation of
the warranty on your printer and its print head.
Evolis will not be liable if the printer is used under non-approved maintenance conditions.
OOrrddiinnaarryy mmaaiinntteennaannccee
Evolis provides you with the following maintenance items, available under the following reference item
A5011 - UltraClean cleaning kit:
■ Five cleaning cards pre-saturated with 99% isopropyl alcohol.
■ Five 99% isopropyl-based cotton swabs.
■ A dispenser box of 40 pre-saturated cleaning wipes.
CClleeaann tthhee ccaarrdd ffeeeedd mmoodduullee
Cleaning cycle: every 1000 cards printed
Maximum interval between two cleaning cycles: 1200 printed cards
Maintenance accessory: pre-saturated cleaning cards
When a cleaning of the card feed module is necessary (every 1000 cards
printed), the cleaning light from the control panel comes on as follows:
This message is an alert that indicates to the operator that it is necessary to perform the cleaning cycle.
If the print
er is not cleaned after the LED illuminates, the LED will remain illuminated and will start
flashing when 200 additional cards have been printed.
In that e
v
ent, immediat
el
y s
t
op the w
ork in pr
ogress and proceed with the cleaning.
If there is no maintenance action on your part, the message will remain posted and the
factory warranty will be implicitly invalidated for failure to comply with the contractual
maintenance requirements.
29
4
4
Page 30

2. Remove the cards
that are in the
feeder.
3. Insert the cleaning
card in the feeder
as indicated.
5. Put the feeder
back into the
printer than
press on the top
part of the
feeder until the
‘click’ is heard.
To service the printer card feed system, obtain a pre-saturated cleaning card specially designed for
the print
er.
A cl
eaning kit including samples of these cards is shipped with your Evolis printer.
Repeat
ed running of the card in the printer cleans the card feed rollers, the cleaning rollers, the
print head and the magnetic head (if y
our device has one).
Proceed as follows:
4.
Using the
lever, adjust
the thickness
of the card to
the MAX
position.
1. Remove the
card feeder
as indicated.
6. Open the
cover and
remove the
ribbon from
the printer
as shown.
7. Close the
cover of
the print
er
.
30
Page 31

Following a cleaning cycle, wait 2 minutes until all the cleaner is completely evaporated
before using the printer.
Take advantage of this interruption to clean the print head (see below).
RReeccoommmmeennddaattiioonns
s
Maintenance of the card feed module ensures a high quality of printing. Evolis recommends
that you perform servicing on each ribbon change. Without waiting for the signal of the light
of the printer, proceed as described above.
31
SSeerrvviiccee tthhee cclleeaanniinngg rroolllleerr
The function of the cleaning roller is to eliminate any residual dust on the front and rear faces of the
cards before they enter the feeder system.
This roller, blue in color, therefore systematically becomes dirty. This is a sign of its efficacy.
If this roller remains clean, we suggest that you check its quality by contacting your Evolis dealer in
order to replace it, if applicable.
T
o supplement the servicing of the card feeder system which is intended to clean it, you can obtain
a saturated cleaning cloth and clean this component thoroughly.
Cl
eaning cy
cle
: on each ribbon change
Maintenance accessory: cleaning cloths
Proceed as follows:
1. Open the cover.
If there is one,
remove the ribbon
and locate the
cl
eaning r
oll
er.
2. Release
the
cl
eaning
r
oll
er
from its
seat.
8. Press the push button on the
control panel for a second.
The cleaning starts.
9. The used
cl
eaning card is
ejected in the
output hopper.
Page 32

32
CClleeaann tthhee pprriinntt hheeaadd
Cleaning cycle: at each ribbon change
Maintenance accessory: cotton swab saturated with isopropyl alcohol
The print head is cleaned at the time the inside of the printer is cleaned (see above).
However, in order to preserve the original printing quality and to reduce the incidents created by the
presence of surplus ink on the surface of the print head, it is recommended that the print head be cleaned r
egularl
y (at each ribbon change) using the c
ott
on swabs supplied with the UltraClean cleaning kit.
It is very important to protect the print head and any other related component handled
against any electrostatic discharge.
The print head is a fragile component of your printer. To prevent any damage to it:
■
Before cleaning the print head, disconnect the printer from its power supply.
■
Comply with the cleaning cycles.
■
Never put the print head into contact with pointed and or metal objects.
■
Avoid direct contact between the surface of the print head and the fingers. This could result in
an altered print quality, or even permanent damage to the print head.
3. Clean the roller with a
cleaning cloth from your
cleaning kit. Eliminate all
dust by rubbing the cloth
lightly over the entire
surface of the roller.
4. When it is dry, replace the roller into the printer, making
sure it is properly positioned.
5. Put the ribbon back in its place, lower and close the cover.
6. The printer is again available for use.
After a cleaning cycle, wait 2 minutes for the cleaning fluid to evaporate completely
before using the printer
Page 33

33
After a cleaning cycle, wait 2 minutes until all the cleaning fluid evaporates before using
the printer.
Pr
oceed as follows:
2.
Take a cotton swab and
press the middle of the
tube until a click is
heard. The cotton
becomes saturated with
alcohol.
3. Carefully rub the cotton swab from right
to left along the print head for a few
seconds.
4. Close the cover. The printer is again ready
for operation.
1. Open the c
over
and locate the
printhead.
Page 34

MMaaiinntteennaannccee
The Evolis printers are designed to offer the user quality of personalization, ease of use and equipment
l
ongevity.
However, depending on the type and volume of personalized cards as well as the operating environment,
certain elements are able to be exchanged by the user.
Moreover, it is common in the computer world to do regular upgrades of the software components:
the firmware and the print drivers.
The following chapters provide information on the ordinary maintenance operations that make it
possible to keep your Evolis printer in perfect working order.
RReeppllaaccee tthhee cclleeaanniinngg rroolllleerr
In the event your cleaning roller becomes less efficient despite regular maintenance, it needs to
be replaced in order to keep the print head from becoming clogged and ultimately permanently
damaged. (See the chapter on Service the Cleaning Roller).
The cleaning roller is available as a consumable from your Evolis dealer.
To replace the roller, proceed as follows:
4.
Replace the ribbon, lower and and close the cover.
5. The printer is ready for operation.
RReeppllaaccee tthhee pprriinntt hheeaadd
The print head is a sensitive component of your equipment. It determines the print quality, and its regular maintenance as well as the absence of dust in the immediate environment guarantee its longevity.
However, it can happen that this head needs to be replaced. Evolis has designed a unique device that
all
o
ws the user to proceed to this exchange without using any tools by simply following the instruc-
tions very carefully.
Before doing anything else, please contact your Evolis dealer in order to check with him whether it
is advisable to replace the print head. If applicable, the dealer will furnish you with a replacement
print head.
During the printer warranty period, Evolis has put in place a program for the replacement
of defective print heads. Your equipment is eligible for this program if:
■
You use only Evolis consumables (ribbons and maintenance products).
■
You have scrupulously complied with the equipment maintenance cycles.
■
You work in a dust-free environment in accordance with technical specifications.
■
You use flat cards without any rough areas that could damage the surface of the
print head.
34
1. Open the cover.
2. Locate the cleaning roller
and release it from its seat.
3. Install the new roller into
the printer, making sure
that it is c
orrectly
positioned in its seat.
Page 35

1. Note the code indicated
on the white ticket affixed
t
o the print head. Y
ou
will be asked for this
code in Step 3.
2. Pick up the new
print head and
turn it t
o
war
d
you, with the
white connector
visible.
3. Connect the cable into its
seat, making sur
e it is in
the c
orrect direction. Do
not f
orce the mechanism,
as this part is relatively
sensitive.
4. T
urn the head so
that the notice is
visible: the
connector is no
longer visible.
35
T
o complete the exchange of the print head, proceed as follows:
Before changing a print head, make sure to disconnect the printer from its power supply.
Step 1 - Removing the defective print head
Step 2 - Installing the new print head
7. The head is put back in place.
1. Open the cover and locate the
print head.
2. Press down on the metal piece at
the bottom as indicated
in order to release the lugs of the
holding forks, then
pull the lugs out from their seat .
3. Turn the head
carefully and
disconnect the
connector linked
to the cable
without forcing
the mechanism.
Page 36

36
8. Close the cover. The new print head is now installed.
Step 3 - Setting the parameters of the new print head
1. Power up the printer and make sure it is properly connected to a computer
on which the Pebble (or Dualys) printer print driver is installed.
2. Under print driver “Properties”, click on the “Tools” dialogue box.
3. In the “Dialog with printer” portion, enter the following command: Pkn;x
X = the print head kit number that you read in Step 2
Example: if the print head kit number is: 179-004-00048, you must enter the command:
Pkn;179-004-00048
If the print head kit number is not entered correctly, printer malfunctions can occur and the
warranty may be canceled.
Step 4 - Cleaning the printer
On the LED control panel, the cleaning light comes on as follows:
Cl
eaning is absolutely required after a print head change.
No printing should be started before this operation has been completed.
Refer to the
Clean Card Feed Module chapter to perform this operation.
Also service the cleaning roller and replace cards and ribbons.
Onc
e the cl
eaning is done, y
our Ev
olis printer is again ready to personalize your cards.
UUppddaattee tthhee FFiirrmmwwaarree
5. Insert the
head vertically
into the two
guides so as
to lock the
f
ork lugs into
their seats.
6. T
urn the print
head by
pressing the
t
op of the metal
piece in order
t
o clip it into
the springmount
ed part.
Page 37

37
Updating the Firmware is a simple operation, but if is not carried out fully, the result can be a disabled.
Prior to any update, please contact your Evolis dealer who can advise you as to whether or not it is
appropriate to carry out this operation. In general, this type of update is required only in
case of a problem or malfunction clearly identified by your Evolis dealer.
In or
der to download an update from the
www
.evolis.com/en/supservices/access.asp
sit
e, you must
first have registered your product with Evolis (see chapter
Register your product in order to benefit
from updates).
1. Enter your login and password: a page is displayed.
2. Select the Pebble (or Dualys) printer model and the Firmware selection.
3. Accept the download and register the file in a directory on your hard disk.
The file is stored in compressed zip. file. You must extract it and save it in a temporary directory.
4. Then double-click on the file in the directory to start the download.
5. When asked by the program, click on the Download button to start the operation.
The downloading is in process, the push button from the control panel flashes.
6. After about thirty seconds, the Firmware has been transferred to the printer, and the operation
is complete. The light from the push button comes on and the print head rises and falls to
indicate the correct transfer of the firmware. If the light fails to come on or flashes, this means
that the transfer has not been carried out correctly or possibly that the printer is not working
properly. Perform a new transfer.
The update is complete, and your equipment is ready to personalize your cards.
Never interrupt the transfer between the PC and the printer
during the important downloading phase (by turning off the
printer or the PC, or disconnecting a cable). The result would be the total inability to restart
the printer.
If this ever occurs, please contact your Evolis dealer, who will replace your printer’s processor card.
UUppddaattee tthhee pprriinntt ddrriivveerr
The updating of the print driv
er is r
equir
ed in or
der t
o sol
ve malfunction problems.
Prior to any update, contact your Evolis dealer who can advise you as to whether or not it is
appropriate to carry out this operation.
In order to download an update from the www.evolis.com/en/supservices/access.asp site,
you must first have registered your product with Evolis (see chapter
Register your product
in or
der t
o benefit fr
om updat
es).
1. Ent
er y
our login and password: a page is displayed.
2. Sel
ect the P
ebbl
e (or Dual
ys) print
er model and the Drivers selection.
3. Accept the download and register the file in a directory on your hard disk.
The file is stored in compressed zip. file. You must extract it and save it to a temporary directory.
4. Then doubl
e-click on the fil
e (Setup.e
x
e) that y
ou hav
e jus
t extracted in order to start the
do
wnl
oading pr
oc
es
s.
F
or more details on procedures, please consult the chapter on
Ins
talling the Print Driver
.
Page 38

38
TTrroouubblleesshhoooottiinngg
In this chapt
er, you will find out how to resolve certain problems that can arise while you are working.
Never use a metal tool or object to work on your equipment: you run the risk of hurting
yourself or damaging all or part of the equipment.
FFrreeee aa ccaarrdd jjaammmmeedd iinn tthhee pprriinnttiinngg uunniitt
When a card is jammed in the printing unit, the LEDS from the
control panel are as shown:
Work is interrupted.
Do not turn off the unit: this would lead to a loss of the printing jobs in progress that are
stored in the printer’s memory.
Remove the card as follows:
1. Open the cover of the printer and remove the ribbon.
2. Remove the card by pressing the push button and/or pushing it manually towards the printer
oulet. If there are several cards, push the top one first.
3. Replace the ribbon then close the printer cover.
4. Press the push button on the control panel for one second.
To prevent card jamming:
1. Make sure the cards are correctly adjusted with the right thickness.
2. Mak
e sur
e that the c
ar
d thickness corresponds to the specifications in the ”Technical
Specific
ations”
section of this manual.
3 Check that the cards are not curved.
Page 39

39
UUppggrraaddee tthhee pprriinntt qquuaalliittyy
The following information will help you solve potential print quality problems that can arise when using
your printer. If, despite this information, you cannot solve the problem, contact your Evolis dealer.
NNootthhiinngg pprriinnttss
1. Check your equipment’s power supply
Make sure that:
■ The power cord is correctly connected to the printer and to a working outlet.
■ The printer is powered. The button must be illuminated.
■ The power supply used is the one shipped with the printer.
2. Check the card feeder and the card in the printer itself
■ Verify the presence of cards in the feeder.
■ Check that there is no jamming.
In that case, the LED would be as follows:
3. Check the ribbon
■ Make sure the ribbon is correctly installed and that the the cover is closed.
4. Print a test card
See the chapter “Print and interpret a test card”.
5. Check the printer’s interface cable
■ Check the connection to the computer and to the printer.
■ Try using another cable of the same type.
6. Check the print driver
■ Check for the presence of the print driver of the Pebble (or Dualys) printer in the Windows
parameters.
■ Check the computer’s printing parameters.
■ Make sure the Pebble (or Dualys) printer is selected as the default printer.
AA bbllaannkk ccaarrdd iiss eejjeecctteedd ffrroomm tthhee pprriinntteerr
1. Check the ribbon
■ Mak
e sur
e the ribbon is not finished or cut. Replac
e or r
eins
t
all the ribbon, if applic
abl
e.
2. Check the printer connection
■ Check the printer’s interface cable.
■ Check the c
onnection t
o the c
omput
er and t
o the printer.
■ Try using another cable of the same type.
3. Components of the print head are perhaps damaged
■ Print a test card.
If the test card does not print, contact your dealer for a replacement for the print head.
Page 40

40
TThhee pprriinntt qquuaalliittyy iiss nnoott ssuuffffiicciieenntt
1. The contrast and brightness parameters must be modified
■ Lack of contrast and color saturation: increase the contrast and brightness parameters
in the print driver configuration.
2. The type of card used may be inappropriate
■ Make sure the type of cards used corresponds to the required specifications.
See the “Characteristics” chapter in this manual for more information.
TThhee tteexxttuurree ooff tthhee ccaarrdd iiss rroouugghh oorr nnoott ppeerrffeeccttllyy ffllaatt
■ Try to print using another type of card.
PPaarrttiiaall oorr iinnccoorrrreecctt pprriinnttiinngg
1. Check the parameters defined for the printing
■ Make sure no element of your formatting is outside the print margins.
■ Check the orientation of the document selected in the configuration of the print driver
(Landscape or Portrait).
2. Check the printer interface cable
■ If some unusual characters print out, make sure you are using the interface cable
appropriate for your printer.
■ Check the connection to the computer and to the printer.
■ Try using another cable of the same type.
3. Make sure the printer is clean
■ Clean the inside of the printer, the cleaning rollers and the print head, if necessary.
See the “Maintenance” chapter of this manual.
4. Make sure the cards are clean
■ Make sure they are stored in a dust-free location.
5. Mak
e sur
e the print head is cl
ean
See the procedure for cleaning the print head in the “Maintenance” chapter of this manual.
6. Check the ribbon
■ Make sure its position in the printer is correct.
■ Make sure it is unrolling correctly.
■ Make sure the ribbon is selected in the printer's driver (Graphics Tab). Don't forget to apply
by clicking on the 'Set ribbon' button
7. Check the print head
■ If horizont
al (whit
e) lines appear on the c
ar
d, some c
omponents of the print head
may be dirty or damaged.
■ Clean the print head.
Consult the “Maintenance” chapter for more information.
■ If the pr
obl
em is not sol
v
ed after cleaning, contact your Evolis reseller for a new print head.
Page 41

41
AAssssiissttaannccee
In order to assist you on a day-to-day basis, Evolis has structured its customer service
ar
ound a network of specialized partners.
Moreover, to let you get answers to your questions 24/7, the Internet site www.evolis.com
includes a number of elements linked to the day-to-day operation of your Pebble and
Dualys.
NNeettwwoorrkk ooff EEvvoolliiss ppaarrttnneerrss
For any unresolved technical problem, contact an Evolis dealer. If you do not know of an Evolis dealer, go onto the
www.evolis.com site and send us your request. Evolis will give you the address of
the Evolis dealer closest to you. When you call an Evolis dealer, you must be next to your computer
and be prepared to provide the following information:
■ The type and serial number of your printer
■ The type of configuration and the operating system you are using
■ A description of the problem that has occurred
■ A description of the steps you have taken to solve the problem.
LLooookk ffoorr iinnffoorrmmaattiioonn oonn wwwwww..eevvoolliiss..ccoomm
If you need additional technical aid, you will find a large amount of information relative to the utilization and troubleshooting of the Evolis printers under the heading
Support & Services on the Evolis
Internet site.
This item offers the downloading of the most recent versions of Firmware, print drivers and user
manuals, Evolis printer use and maintenance and an FAQ* item to provide answers to the most frequently-asked questions.
*FAQ : Frequently-asked Questions
RReeggiisstteerr yyoouurr pprroodduucctt ttoo bbeenneeffiitt ffrroomm uuppddaatteess
To benefit from driver and Firmware updates, you must pre-register on the www.evolis.com site.
Ent
er the following address into your browser in
or
der to get access to the registration form.
http://www.evolis.com/en/supservices/profile.asp
Please fill out the entire form, making sure
to complete correctly the fields in red.
Y
ou will r
eceive a return confirmation e-mail
including your personal access codes.
Page 42

C
C
h
haarraacctteerriissttiiccss
This chapter covers technical specifications and certifications
for the Evolis printer
DDeeccllaarraattiioonn ooff CCoonnffoorrmmiittyy
Concerning Safety and Electromagnetic Compatibility
Manufacturer’s Name: Evolis Card Printer
Manufacturer’s Address: 29, avenue de la Fontaine
Z.I. Angers Beaucouzé
49070 Beaucouzé - France
Material Designation: Dualys 3
Year of Manufacture: 2007
I, the undersigned, Serge Olivier,
Declare that I have received the assumption of the above material, used and installed in accordance with the notice, with the essential requirements of
Directives 73/23/CEE and 89/336/CEE, modified by 92/31/CEE and 93/68/CEE by the application of the following regulations:
EN 60950-1 of 2001
EN 55022 Class B of 1998
EN 55024 of 1998
EN 61000-3-2 of 2000
EN 61000-3-3 of 2000 +A1 of 2001
Full name: Serge Olivier
Title: Technical Manager
Date: May 2007
Signature:
EEUURROOPPEE::
Norway Only: This product is designed for IT power system with phase-to-phase voltage 230V. Earth grounding is via the polarized, 3-wire power cord. FI: “Laite on
liitettävä suojamaadoitus koskettimilla varustettuun pistorasiaan”
SE: “Apparaten skall anslutas till jordat uttag”. NO: “Apparatet må tilkoples jordet stikkontakt”
FCC Statement (For U.S.A.)
Federal Communications Commission Radio Frequency Interferences Statement
Dualys 3 models conform to the following specifications: FCC Part 15, Subpart A, Section 15.107(a) and Section 15.109(a) Class B digital device.
Supplemental information:
This equipment has been tested and finds to comply with the limits for a Class B digital device, pursuant to part 15 of the FCC Rules. These limits are
designed to provide reasonable protection against harmful interference in a residential installation. This equipment generates uses and can radiate radio
fr
equency ener
gy and, if not ins
t
all
ed and used in accordance with the instructions, may cause harmful interference to radio communications. However,
ther
e is no guar
antee that interference will not occur in a particular installation. If this equipment does cause harmful interference to radio or television
r
eception, which can be determined by turning the equipment off and on, the user is encouraged to try to correct the interference’s by one or more of
the following measures:
- Reorient or relocate the receiving antenna.
- Increase the separation between the equipment and the receiver.
- Connect the equipment into an outlet on a circuit different from that to which the receiver is connected.
- Consult the dealer or an experienced radio/TV technician for help.
Use of a shielded cable is required to comply within Class B limits of Part 15 of FCC Rules.
Pursuant to Part 15.21 of the FCC Rules, any changes or modifications to this equipment not expressly approved by Evolis Card Printer may cause, harmful interference and void the FCC authorization to operate this equipment.
VCCI (For Japan)
This is a Class B product
based on the standard of the
Voluntary Control Council for
Interference from Information
Technology Equipment (VCCI).
If this is used near a radio or television receiver
in a domestic environment, it may cause radio
interference. Install and use the equipment
according to the instruction manual.
End of life product disposal
This symbol indic
at
es that W
as
t
e El
ectrical and Electronic Equipment (WEEE) must be disposed of separately from normal household
was
t
e in or
der t
o pr
omot
e reuse, recycling and other forms of recovery and to reduce the quantity of waste to be eliminated though land-
fill. WEEE includes ac
c
es
sories such as r
emot
e c
ontrol, batteries, AC adaptor, etc. When you dispose of such products, please contact
y
our dis
tribut
or or Ev
olis at inf
o@evolis.com.
5
5
42
Page 43

Concerning Safety and Electromagnetic Compatibility
Manufacturer’s Name: Evolis Card Printer
Manufacturer’s Address: 29, avenue de la Fontaine
Z.I. Angers Beaucouzé
49070 Beaucouzé - France
Material Designation: Pebble 4
Year of Manufacture: 2007
I, the undersigned, Serge Olivier,
Declare that I have received the assumption of the above material, used and installed in accordance with the notice, with the essential requirements of
Directives 73/23/CEE and 89/336/CEE, modified by 92/31/CEE and 93/68/CEE by the application of the following regulations:
EN 60950-1 of 2001
EN 55022 Class B of 1998
EN 55024 of 1998
EN 61000-3-2 of 2000
EN 61000-3-3 of 2000 +A1 of 2001
Full name: Serge Olivier
Title: Technical Manager
Date: May 2007
Signature:
EEUURROOPPEE::
Norway Only: This product is designed for IT power system with phase-to-phase voltage 230V. Earth grounding is via the polarized, 3-wire power cord. FI: “Laite on
liitettävä suojamaadoitus koskettimilla varustettuun pistorasiaan”
SE: “Apparaten skall anslutas till jordat uttag”. NO: “Apparatet må tilkoples jordet stikkontakt”
FCC Statement (For U.S.A.)
Federal Communications Commission Radio Frequency Interferences Statement
Pebble 4 models conform to the following specifications: FCC Part 15, Subpart A, Section 15.107(a) and Section 15.109(a) Class B digital device.
Supplemental information:
This equipment has been tested and finds to comply with the limits for a Class B digital device, pursuant to part 15 of the FCC Rules. These limits are
designed to provide reasonable protection against harmful interference in a residential installation. This equipment generates uses and can radiate radio
fr
equency ener
gy and, if not ins
t
all
ed and used in accordance with the instructions, may cause harmful interference to radio communications. However,
ther
e is no guar
antee that interference will not occur in a particular installation. If this equipment does cause harmful interference to radio or television
r
eception, which can be determined by turning the equipment off and on, the user is encouraged to try to correct the interference’s by one or more of
the following measures:
- Reorient or relocate the receiving antenna.
- Increase the separation between the equipment and the receiver.
- Connect the equipment into an outlet on a circuit different from that to which the receiver is connected.
- Consult the dealer or an experienced radio/TV technician for help.
Use of a shielded cable is required to comply within Class B limits of Part 15 of FCC Rules.
Pursuant to Part 15.21 of the FCC Rules, any changes or modifications to this equipment not expressly approved by Evolis Card Printer may cause, harmful interference and void the FCC authorization to operate this equipment.
VCCI (For Japan)
This is a Class B product
based on the standard of the
Voluntary Control Council for
Interference from Information
Technology Equipment (VCCI).
If this is used near a radio or television receiver
in a domestic environment, it may cause radio
interference. Install and use the equipment
according to the instruction manual.
End of life product disposal
This symbol indic
at
es that W
as
t
e El
ectrical and Electronic Equipment (WEEE) must be disposed of separately from normal household
was
t
e in or
der t
o pr
omot
e reuse, recycling and other forms of recovery and to reduce the quantity of waste to be eliminated though land-
fill. WEEE includes ac
c
es
sories such as r
emot
e c
ontrol, batteries, AC adaptor, etc. When you dispose of such products, please contact
y
our dis
tribut
or or Ev
olis at inf
o@evolis.com.
DDeeccllaarraattiioonn ooff CCoonnffoorrmmiittyy
43
Page 44

44
PPrriinntteerr ssppeecciiffiiccaattiioonnss
GGeenneerraall SSppeecciiffiiccaattiioonnss
■ Color printing module
■ 300 dpi print head (11.8 dots/mm)
■ USB c
onnection
■ Option for Ethernet TCP-IP connection
■ 16 MB RAM all
owing two card storages (front & back)
■ Flip-over station for dual-sided printing (Dualys only)
■ Detachable feeder with a capacity of 100 cards (0.76 mm or 30 mil)
■ Output hopper with a capacity of 50 cards (Pebble) or 100 cards (Dualys) (0.76 mm or 30mil)
■ 1-Button and 4-LED control panel
■ Pebble available in three colours: Ocean blue, Fire red and Jungle green
■ Dualys available in Ocean blue colour
PPrriinntt MMooddeess
■ Color dye sublimation and monochrome thermal transfer
■ Enhanced color management system for top quality pictures
■ Edge-to-edge printing
■ Dual-sided printing (Dualys only)
■ Integrated ribbon saver for monochrome printing.
PPrriinnttiinngg ssppeeeedd
Personalization throughput will depend on card design and printer settings
■ YMCKO, 150 cards/hour
■ YMCK0-K, 125 cards/hour (Dualys only)
■ Monochrome 1 side, up to 1000 cards/hour
1
■ Monochrome 2 sides, up to 350 cards/hour (Dualys only)
1
SSuuppppoorrtteedd ppllaattffoorrmmss
■ Windows
TM
XP, 2003 and Vista, 32 & 64 bits
■ Mac
TM
OS X v10.2, 10.3 et 10.4
■ Linux
SSuupppplliieedd ssooffttwwaarree
■
eMedia Car
d Designer Softwar
e f
or designing and editing badges
•
Compatible with Windoxs XP, 2003 and Vista
•
Connection to Microsoft Excel databases
RRiibbbboonn ttyyppeess
■ 2-panel KO black monochrome ribbon - 500 cards/roll
■ 5-panel YMCKO color ribbon - 200 cards/roll
■ 6-panel YMCKO-K color ribbon - 200 cards/roll (Dualys only)
■ Half-panel YMCKO color ribbon - 400 cards/roll
■ Monochrome ribbons - Up to 1000 cards/roll: available in black, red, green, blue, white, gold and silver
■ Special ribbons - Varnish hologram - 350 cards/roll, Scratch-Off - Up to 1000 cards/roll
OOppttiioonnss
■ Encoding options (can be combined)
• Magnetic stripe encoder ISO 7811 HiCo/LoCo or JIS2
• Smart c
ont
act s
tation - ISO 7816-2
• Smart c
ont
act s
t
ation and enc
oding unit - PC/SC, EMV 2000-1
• Contactless encoding unit - ISO 14443A, B, ISO 15693, Mifare, DesFire, HID iCLASS
• Other types upon request
■ 100-card additional feeder: Ocean, Fire and Jungle
■ Manual card feeder: Ocean, Fire and Jungle
WWaarrrraannttyy
Use Evolis Genuine products for best performance and extended lifespan of your printer
■ Printer, print head: 3-year warranty, unlimited number of passes
2
Page 45

45
Car
d types
All PVC, Composite PVC cards, PET1, ABS1and special varnished cards
1
Card format ISO CR-80 - ISO 7810 (53.98 mm x 85.60 mm – 3.375" x 2.125")
Car
d thickness
F
rom 0.25 mm (10 mil) to 1 mm (40 mil)
Dual-sided printing r
ecommend from 0,50 mm (20 mil)
Card feeder capacity 100 cards (0.76 mm-30 mil), 300 cards (0,25mm-10 mil)
Car
d output hopper capacity Pebble
:50 c
ards (0.76 mm-30 mil), 150 cards (0,25mm-10 mil)
Dualys:100 cards (0.76 mm-30 mil), 300 cards (0,25mm-10 mil)
Printer size Pebble: Height: 192 mm (7.55") - Length: 396 mm (15.59")
Width: 235 mm (9.25")
Dualys: Height: 235 mm (9.25”) - Length: 447 mm (17.59”)
Width: 237 mm (9.33”)
Printer weight Pebble: 5,9 Kg (13 lbs)
Dualys: 7,4 Kg (16.31 lbs)
Connections USB (Cable supplied), option for Ethernet (TCP-IP)
Electrical Power supply: 110-230 Volts AC, 1,8 A, 60-50 Hertz
Printer: 24 Volts DC, 3 A
Environmental Min/Max operating temperature: 15° / 30°C (59° / 86° F)
Humidity: 20% to 65% non-condensing
Min/Max storage temperature: -5° / +70°C (23° / 158° F)
Storage humidity: 20% to 70% non-condensing
Operating ventilation: free air
1
Under specific conditions
2
Subject to observance of specific conditions and use of Evolis genuine consumables
PPrriinntteerr ooppttiioonnss>>PPeebbbbllee
Part Number Product Description
PBL401ccU BASIC Pebble Basic
Basic printer without option, USB, 100-card feeder
PBL401ccU-M MAG Pebble Mag ISO
Printer equipped with an ISO Mag stripe encoder, Hico/Loco, 3-track,
USB, 100-card feeder
PBL401ccH-0S SMART Pebble Smart
Printer equipped with a Smart contact station (no encoding unit),
USB, 100-card feeder
PBL401ccH-00AC MIFARE Pebble Mifare
®
Printer equipped with a contactless Mifare® encoding unit, USB,
100-card feeder
Combination of encoding options and other encoding features available upon request.
Pebble is available with three different cover colours, cc stands for: OC : Ocean blue, FR: Fire red, JG: Jungle green
PPrriinntteerr ooppttiioonnss>>DDuuaallyyss
Part Number Product Description
DUA301OCU BASIC Dualys Basic
Basic printer without option, dual-sided, USB, 100-card feeder,
Ocean blue
DUA301OCU-M MA
G
Dual
ys Mag ISO
Print
er equipped with an ISO Mag s
tripe enc
oder, Hico/Loco, 3-track,
dual-sided, USB, 100-card feeder, Ocean blue
DUA301OCH-0S SMART Dual
ys Smart
Print
er equipped with a Smart c
ont
act s
tation (no encoding unit),
dual-sided, USB, 100-card feeder, Ocean blue
DUA301OCH-00AC MIF
ARE
Dual
ys Mif
ar
e
®
Print
er equipped with a c
ont
actl
es
s Mifare® encoding unit,
dual-sided, USB, 100-card feeder, Ocean blue
Combination of encoding options and other encoding features available upon request.
Dualys is only available with Ocean blue cover (OC)
Page 46

46
LLiisstt ooff ““EEvvoolliiss GGeennuuiinnee PPrroodduucctt”” ccoonnssuummaabblleess
Part Number Description Pebble Dualys
Multi P
anel Color Ribbons
R3011 5-Panel Color Ribbon - YMCKO - 200 cards/roll ■■
R3314
6-Panel Color Ribbon - YMCKO-K - 200 cards/roll
■
R3012 2-Panel Monochome - KO - 500 cards/roll ■■
R3013
5 Half-Panel Color Ribbon - Half YMCKO - 400 cards/roll
■
■
Aimed at printing Color photo-ID cards
Monochrome Ribbons
R2011 Black Monochrome Ribbon - Up to1000 cards/roll ■■
R2012 Blue Monochrome Ribbon - Up to1000 cards/roll ■■
R2013 Red Monochrome Ribbon - Up to1000 cards/roll ■■
R2014 Green Monochrome Ribbon - Up to1000 cards/roll ■■
R2015 White Monochrome Ribbon - Up to1000 cards/roll ■■
R2016 Gold Monochrome Ribbon - Up to1000 cards/roll ■■
R2017 Silver Monochrome Ribbon - Up to1000 cards/roll ■■
Special Ribbons
R2018 Scratch-Off Ribbon - Up to1000 cards/roll ■■
R4001 Varnish Hologram Optoseal®Ribbon - 350 cards/roll ■■
R2019 BlackWAX Monochrome Ribbon - Up to1000 cards/roll ■■
Aimed at printing on ABS and rough surface
LLiisstt ooff PPllaassttiicc CCaarrddss
Part Number Description Pebble Dualys
C4001 Classic Blank White plastic cards – 0.76 mm (30mil) ■■
5 packs of 100 cards
C4002 Classic Blank White Plastic Cards – 0.50 mm (20mil)
■ ■
5 packs of 100 cards
C4003 Classic Blank White Plastic Cards with a HICO Magnetic Stripe
■■
0.76 mm (30mil) -5 packs of 100 cards
C4004 Classic Blank White Plastic Cards with LOCO Magnetic Stripe
■■
0.76 mm (30mil) -
5 packs of 100 cards
C1001 Premium Blank White Plastic Cards
■■
0.76 mm (30mil) - 5 packs of 100 cards
C1003 Premium Blank White Plastic Cards with HICO Magnetic Stripe
■■
0.76 mm (30mil) - 5 packs of 100 cards
C1004
Pr
emium Blank White Plastic Cards with LOCO Magnetic Stripe
■
■
0.76 mm (30mil) - 5 packs of 100 cards
LLiisstt ooff EEvvoolliiss PPeebbbbllee aanndd DDuuaallyyss AAcccceessssoorriieess
Part Number Description Pebble Dualys
Print
er Accessories
S5305cc Manual card feeder ■■
S5304cc 100-card feeder ■■
A5017 USB interface cable ■■
A5008
P
o
w
er suppl
y
■
■
A5009 Power cord, 220V ■■
A5010 Power cord, 110V ■■
A5019
P
ower cord, UK
■
■
Page 47
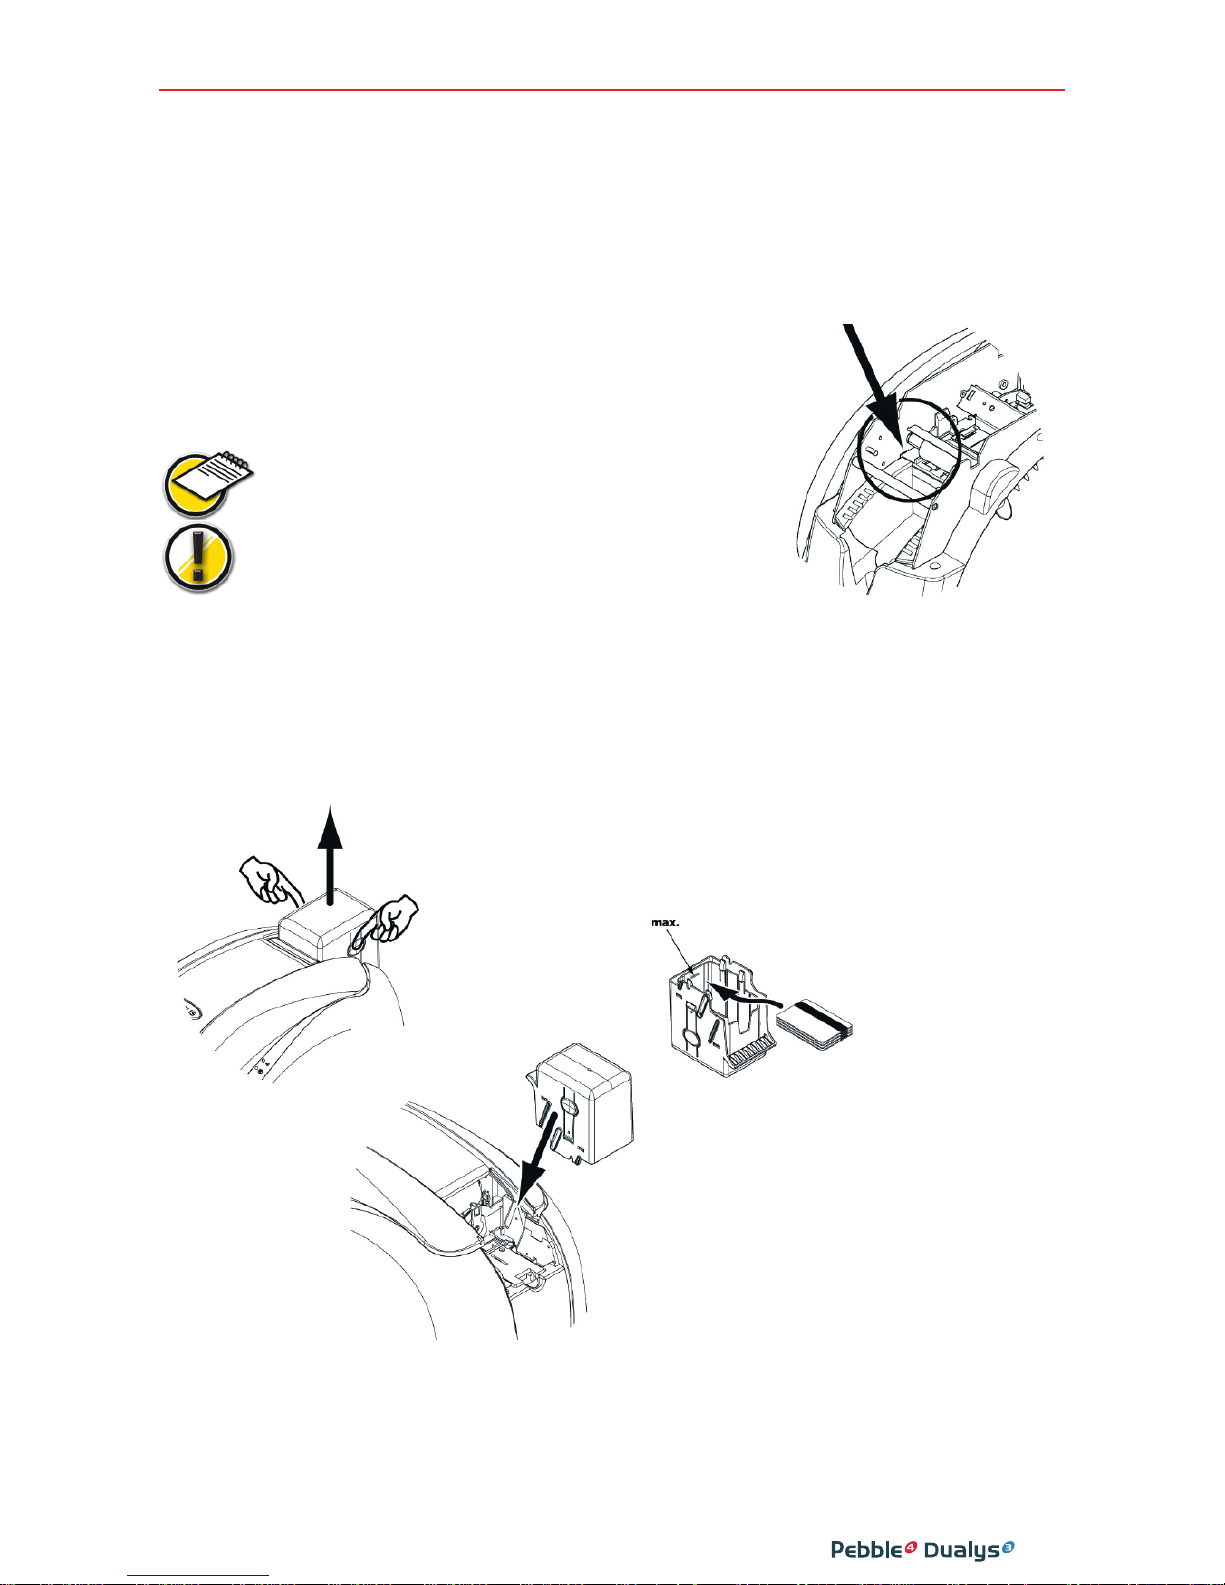
MMaaggnneettiicc eennccooddiinngg
Pebble and Dualys printers with a magnetic stripe card encoder are called Pebble Mag and Dualys Mag printers.
The oper
ating mode of a Pebble and Dualys Mag printer is identical to that of a Pebble or Dualys printer.
The magnetic encoder encodes tracks ISO 1, 2 and 3 in a single passage and then checks the data.
Set in high c
oercivity (HICO) or in low coercivity (LOCO) with a simple click from the Windows driver,
however, the encoders of the Pebble and Dualys Mag are sent adjusted to high coercivity (HICO) by
default, unless specifically requested on the order.
LLooccaattiioonn ooff tthhee mmaaggnneettiicc eennccooddeerr
The magnetic encoder is a module installed in the factory on
Pebble and Dualys Mag printers. The writing and reading head
is placed under the path of the cards and after the print head.
The encoding sequence of a card is still carried out
before printing.
Only use cards with magnetic tracks conform to ISO
7810 and ISO 7811. To work properly, the magnetic
track must be moulded in the card. Never use a card
with a glued magnetic track.
CCaarrdd oorriieennttaattiioonn
Cards with a magnetic track must be installed in the feeder so the magnetic strip faces upwards, as
follows:
SSeettttiinngg tthhee WWiinnddoowwss DDrriivveerr
When fir
s
t installing the Windows driver, it is necessary to parameterise the functions of the magne-
tic enc
oder. The functions of the magnetic encoder are accessible from the
T
ools
dial
og box of the
driver by clicking the
Encoding Definition button.
47
2. Lower the spring
system as shown
and insert 100
magnetic cards of
0.76 mm (30mil) at
most.
1. Remove the
feeder from the
printer as
shown.
3. Put the feeder back in
the printer. Then press
on the top of the feeder
until it clicks.
Page 48
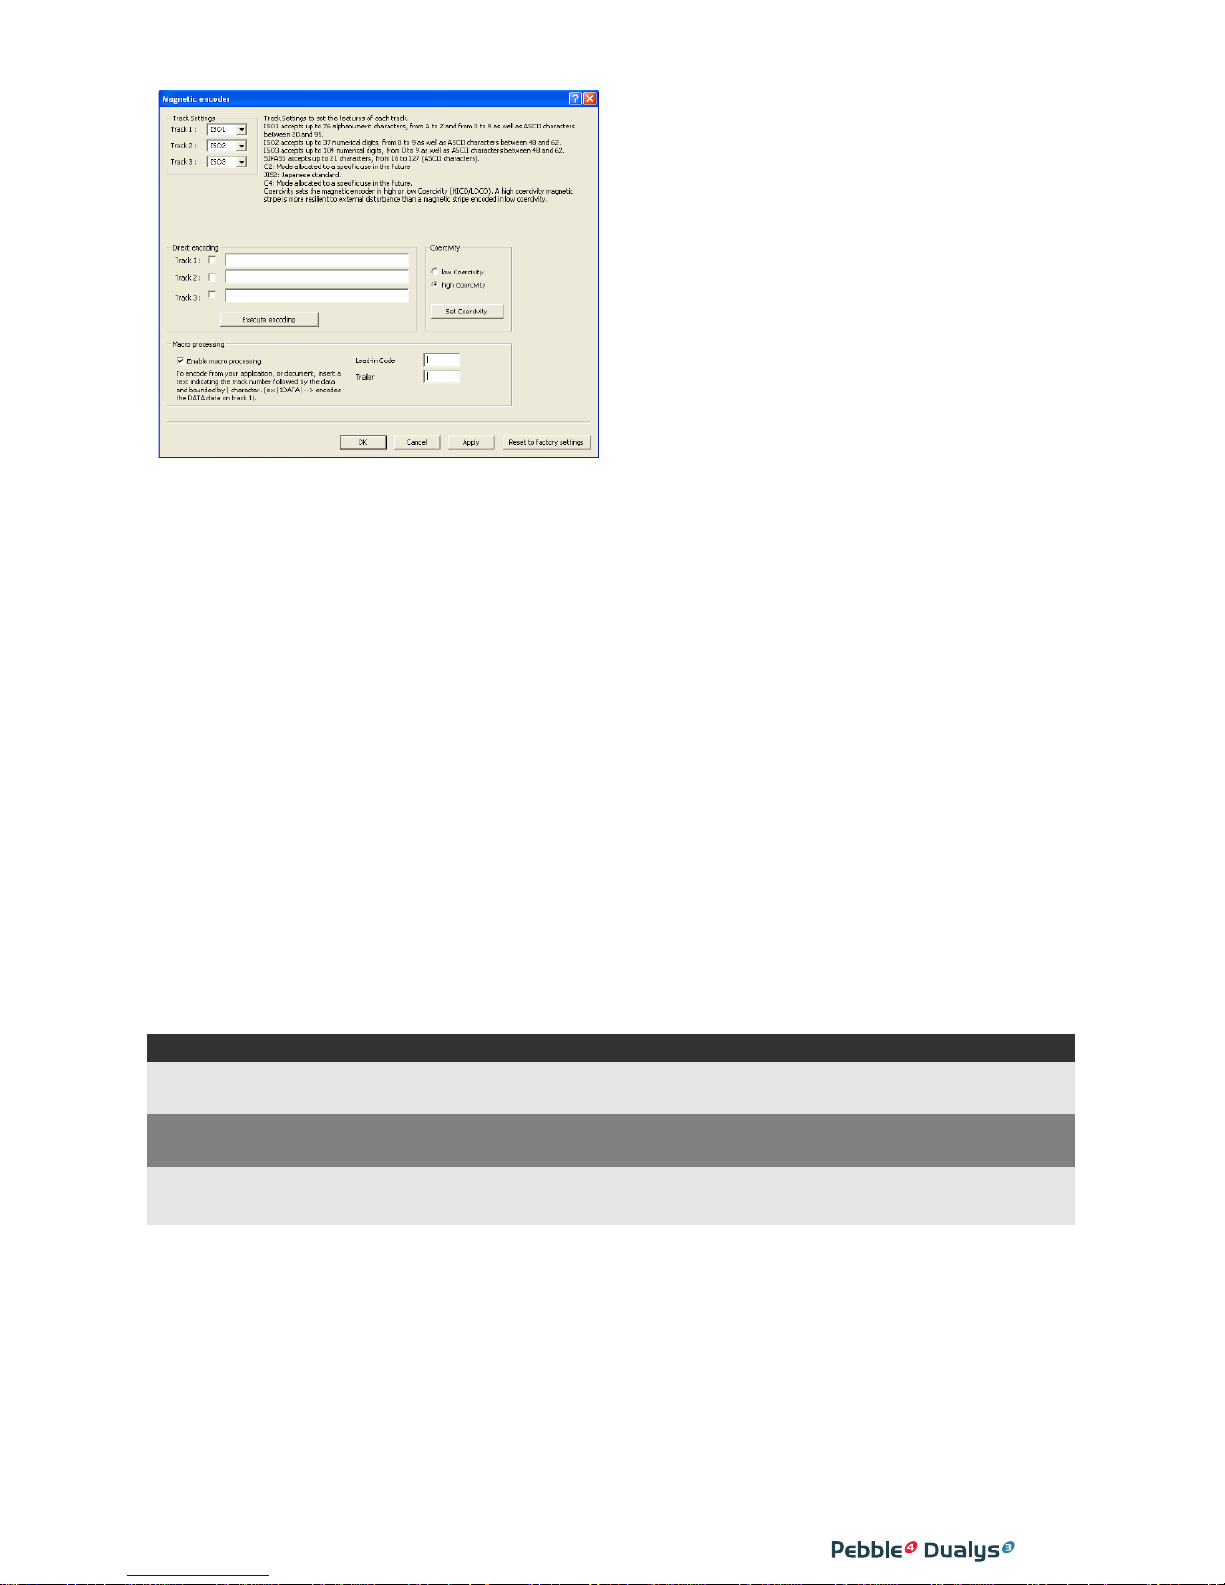
48
““MMaaggnneettiicc EEnnccooddeerr”” ddiiaalloogg bbooxx
The Magnetic Enc
oder
dial
og box opens on
selecting the
Encoding Definition button.
Track settings allows us to choose the ISO stan-
dar
d required for each track. See the table in
this Chapter for the information concerning the
ISO 7811 s
tandards.
Coercivity parameterises the magnetic encoder
in high (HICO) or low (LOCO) coercivity. A
magnetic track encoded in high coercivity is
more resistant to exterior disturbances than a
magnetic track encoded in low coercivity.
Direct encoding allows the direct encoding of
one or more magnetic tracks from this window
simply by selecting them and entering the data
to be encoded. Click on the “
Execute encoding” button to start the encoding cycle.
Automatic extraction allows cards with magnetic tracks to be encoded from Windows applications
(such as Word for example). A text field surrounded by the characters ”|” and ”|” (or another character to be defined by the user) may be interpreted as an encoding command by the driver.
CClleeaanniinngg ooff tthhee mmaaggnneettiicc eennccooddeerr
The head of a magnetic encoder needs regular cleaning to be able to assure the integrity of the data
encoded in the cards.
The magnetic encoder is cleaned when the printer is the object of a cleaning sequence with the pre-saturated cards (refer to the “Servicing and Maintenance” chapter in this manual for further information).
Repeated passages of the cleaning card inside the printer clean the card transport rollers, the cleaning roller and the reading / writing head of the magnetic encoder.
If between two printer cleaning sessions (every 1000 cards printed), the reading/writing process has
failed with more than one card, it is recommended to manually start a printer cleaning process (refer
t
o the
“Servicing and Maint
enance” chapter of this manual for the procedure to be followed).
IISSOO 77881111 eennccooddiinngg ssttaannddaarrddss
1
Bit(s) per inch
2
Except the “?” character
3
Including the Start, Stop and LRC characters. The magnetic encoder generates these characters automatically.
Track no. Field separatorTrack density Types of characters Number of characters
T
r
ack 1
^
210 bpi
1
Alphanumeric
al
79
3
(ASCII 20- 95)
2
Track 2 = 75 bpi
1
Numerical 40
3
(ASCII 48-62)
2
Track 3 = 210 bpi
1
Numerical 107
3
(ASCII 78-62)
2
Page 49

49
SSmmaarrtt CCaarrdd CCoonnttaacctt SSttaattiioonn
P
ebble and Dualys printers with a Smart Card Contact Station are called Pebble Smart and Dualys
Smart printers. The working mode of a Pebble and Dualys Smart printers is identical to that of a
P
ebble and Dualys printers. The Smart Card Contact Station of the Pebble Smart or Dualys Smart
enables the chips to be programmed to the ISO 7816-2 standards.
LLooccaattiioonn ooff tthhee ccoonnttaacctt ssttaattiioonn
The Contact Station is a module installed in the factory on
Pebble and Dualys Smart printers.
The Contact Station is positioned over the path of the cards and
before the print head. To contact the Station, the chip card is
placed under it and is pushed up.
The programming sequence of a chip is always carried out before the card is printed.
Only use chip cards conform to ISO 7816-2.
Never print on the chip.
CCaarrdd oorriieennttaattiioonn
Chip cards must be installed in the card feeder so that the chip is downwards, as shown below:
2. Lower the spring
system as shown
and insert 100
chip cards of 0.76
mm (30mil) at
most (chip
downwards).
1. Remove the
feeder from the
print
er as
shown.
3. Put the feeder back in
the printer. Then press
on the top of the feeder
until it clicks.
Page 50

50
IInntteerrffaaccee ooff tthhee CCoonnttaacctt SSttaattiioonn
The P
ebble Smart and Dualys Smart printers are fitted with a DB-9 female connector on the back of
the printer. This connector, directly connected to the Contact Station inside the printer, is also
connected to an external coupler to program the chip.
DB-9 Connector pins Chip card contact points
1 C1 (V c.c.)
2 C2 (reset to 0)
3 C3 (Clock)
4 C4 (reserved)
5 C5 (Ground)
6
C6 (Vpp)
7 C7 (E-S)
8 C8 (reserved)
9 C9 Ground when the chip is commuted
with the Cont
act St
ation
USB
External Coupler
Serial Port, USB, …
A sequenc
e of c
ommands mus
t be sent via the interface of the printer to insert a card in the prin-
ter and then place it under the Station to establish contact
The command sequence is the following:
Sending the “Sis” sequence
■
One c
ar
d is mo
v
ed fr
om the f
eeder to the Contact Station and stops under it.
■
The card is pushed up to come into contact with the Station.
■
The print
er c
onnects the Cont
act St
ation to the DB-9 connector.
■
The chip may be pr
ogr
ammed via the serial or USB interface of the computer and the external coupler.
Check the Programming Guide of the Pebble and Dualys printers to obtain more complete
information on how to program a chip card.
DB-9 Connector
Page 51

 Loading...