

Page 1

Gebruikershandleiding
Evolar EVO-18000CH mobiele airconditioner
(R290)
Lees deze gebruikershandleiding zorgvuldig door om een juist gebruik, onderhoud en installatie te garanderen
Page 2

Inhoud
1. Veiligheid 1
Algemene veiligheidsinstructies 2
Algemene instructies 5
Bekwaamheid van servicepersoneel 8
Transport, markering en opslag voor units die brandbare koudemiddelen gebruiken 11
2. Componenten 12
3. Functies op het configuratiescherm 13
4. Functies van de afstandsbediening 14
5. Gebruiksinstructies 15
Voor gebruik 16
AUTO-modus 16
Koelen 16
Ontvochtigen 16
Ventileren 16
Verwarmen 17
Timerwerking 17
Auto SWING 17
SLAAP-modus 17
Waterafvoer 17
Wifi-functie 17
6. Installatie instructies 18
7. Onderhoudsinstructies 21
8. Probleemoplossing 22
Page 3
1. Veiligheid
BELANGRIJK!
Installeer of gebruik uw mobiele airconditioner niet voordat u deze handleiding zorgvuldig heeft
gelezen. Bewaar deze instructiehandleiding voor een eventuele productgarantie en voor
toekomstig gebruik.
Waarschuwingen
- Gebruik geen andere middelen om het ontdooiproces te versnellen of schoon te maken dan
die welke door de fabrikant worden aanbevolen.
- Het apparaat moet worden opgeslagen in een ruimte zonder continu werkende
ontstekingsbronnen zoals bijvoorbeeld een open vuur, een werkend gastoestel of een
werkende elektrische kachel.
- Apparaat niet doorboren of verbranden.
- Houd er rekening mee dat de koudemiddelen mogelijk geen geur bevatten.
- Het apparaat moet worden geïnstalleerd, bediend en opgeslagen in een kamer met een
vloeroppervlak groter dan X m2:
MODEL
X (m 2 )
5000Btu / uur, 7000Btu / uur, 8000Btu / uur
4
9000Btu / uur, 10000Btu / uur, 10500Btu / uur
12
12000Btu / uur, 14000,16000Btu / uur, 18000Btu / uur
15
Specifieke informatie over apparaten met koelgas R290.
● Lees alle waarschuwingen zorgvuldig door.
● Gebruik bij het ontdooien en reinigen van het apparaat geen ander gereedschap dan dat is
aanbevolen door het fabricagebedrijf.
● Het apparaat moet in een ruimte worden geplaatst zonder continue ontstekingsbronnen
(bijvoorbeeld: open vuur, gas- of elektrische apparaten in werking).
● Niet doorboren en niet verbranden.
● Dit apparaat bevat Y g (zie typeplaatje op de achterkant van het apparaat) koelgas R290.
● R290 is een koelgas dat voldoet aan de Europese richtlijnen inzake het milieu. Doorboor geen
enkel onderdeel van het koelcircuit.
● Als het apparaat wordt geïnstalleerd, gebruikt of opgeslagen in een ongeventileerde ruimte, moet
de kamer zo zijn ontworpen dat de ophoping van koudemiddellekken wordt voorkomen, wat kan
leiden tot brand- of explosiegevaar, als gevolg van ontbranding van het koudemiddel veroorzaakt
door elektrische verwarmingstoestellen, kachels of andere ontstekingsbronnen.
● Het apparaat moet zo worden opgeslagen dat mechanische defecten worden voorkomen.
● Personen die het koudemiddelcircuit bedienen of eraan werken, moeten de juiste certificering
1
Page 4

hebben, afgegeven door een geaccrediteerde organisatie die bekwaamheid garandeert in het
omgaan met koudemiddelen volgens een specifieke evaluatie die wordt erkend door verenigingen
in de bedrijfstak.
● Reparaties moeten worden uitgevoerd op basis van de aanbeveling van het productiebedrijf.
Onderhoud en reparaties waarbij de hulp van ander gekwalificeerd personeel nodig is, moeten
worden uitgevoerd onder toezicht van een persoon die gespecialiseerd is in het gebruik van
brandbare koudemiddelen.
Algemene veiligheidsinstructies
1. Het apparaat is uitsluitend bedoeld voor gebruik binnenshuis.
2. Sluit het apparaat niet aan op een stopcontact dat wordt gerepareerd of niet correct is geïnstalleerd.
3. Gebruik het apparaat niet:
- in de buurt van een brandhaard.
- in een gebied waar olie kan spatten.
- als het in direct zonlicht staat.
- in een gebied waar water kan spatten.
- in de buurt van een bad, een wasruimte, een douche of een zwembad.
4. Steek nooit uw vingers of objecten in de luchtuitlaat. Waarschuw kinderen voor dit gevaar.
5. Zorg dat het apparaat constant rechtop staat tijdens transport en opslag.
6. Schakel de airconditioner altijd uit, haal de stekker uit het stopcontact of schakel uit, voordat u de
airconditioner reinigt.
7. Schakel de airconditioner altijd uit, haal de stekker uit het stopcontact of schakel uit en beweeg de
airconditioner langzaam, wanneer u de airconditioner verplaatst.
8. Om brand te voorkomen, dient u de airconditioner nooit af te dekken.
9. Het stopcontact waar de airconditioner op wordt aangesloten dient te voldoen aan de lokale
elektrische veiligheidseisen. Controleer het, indien nodig, aan de vereisten.
10. Houd toezicht op kinderen in de buurt van de airconditioner om te voorkomen dat ze met het
apparaat spelen.
11. Als het netsnoer is beschadigd, moet het worden vervangen door de fabrikant, zijn serviceagent
of vergelijkbaar gekwalificeerde personen om gevaarlijke situaties te voorkomen.
12. Dit apparaat kan worden gebruikt door personen van 8 jaar en ouder en personen met
verminderde fysieke, sensorische of mentale vermogens of gebrek aan ervaring en kennis, mits
2
Page 5
ze onder toezicht staan of instructies hebben gekregen over het veilige gebruik van het apparaat
en de bijbehorende gevaren begrijpen. Kinderen mogen niet met het apparaat spelen. Reiniging
en gebruikersonderhoud mogen niet zonder toezicht door kinderen worden uitgevoerd.
13. Het apparaat moet worden geïnstalleerd in overeenstemming met de nationale
bedradingsvoorschriften.
14. Details van type en classificatie van zekeringen: T, 250V AC, 2A of hoger.
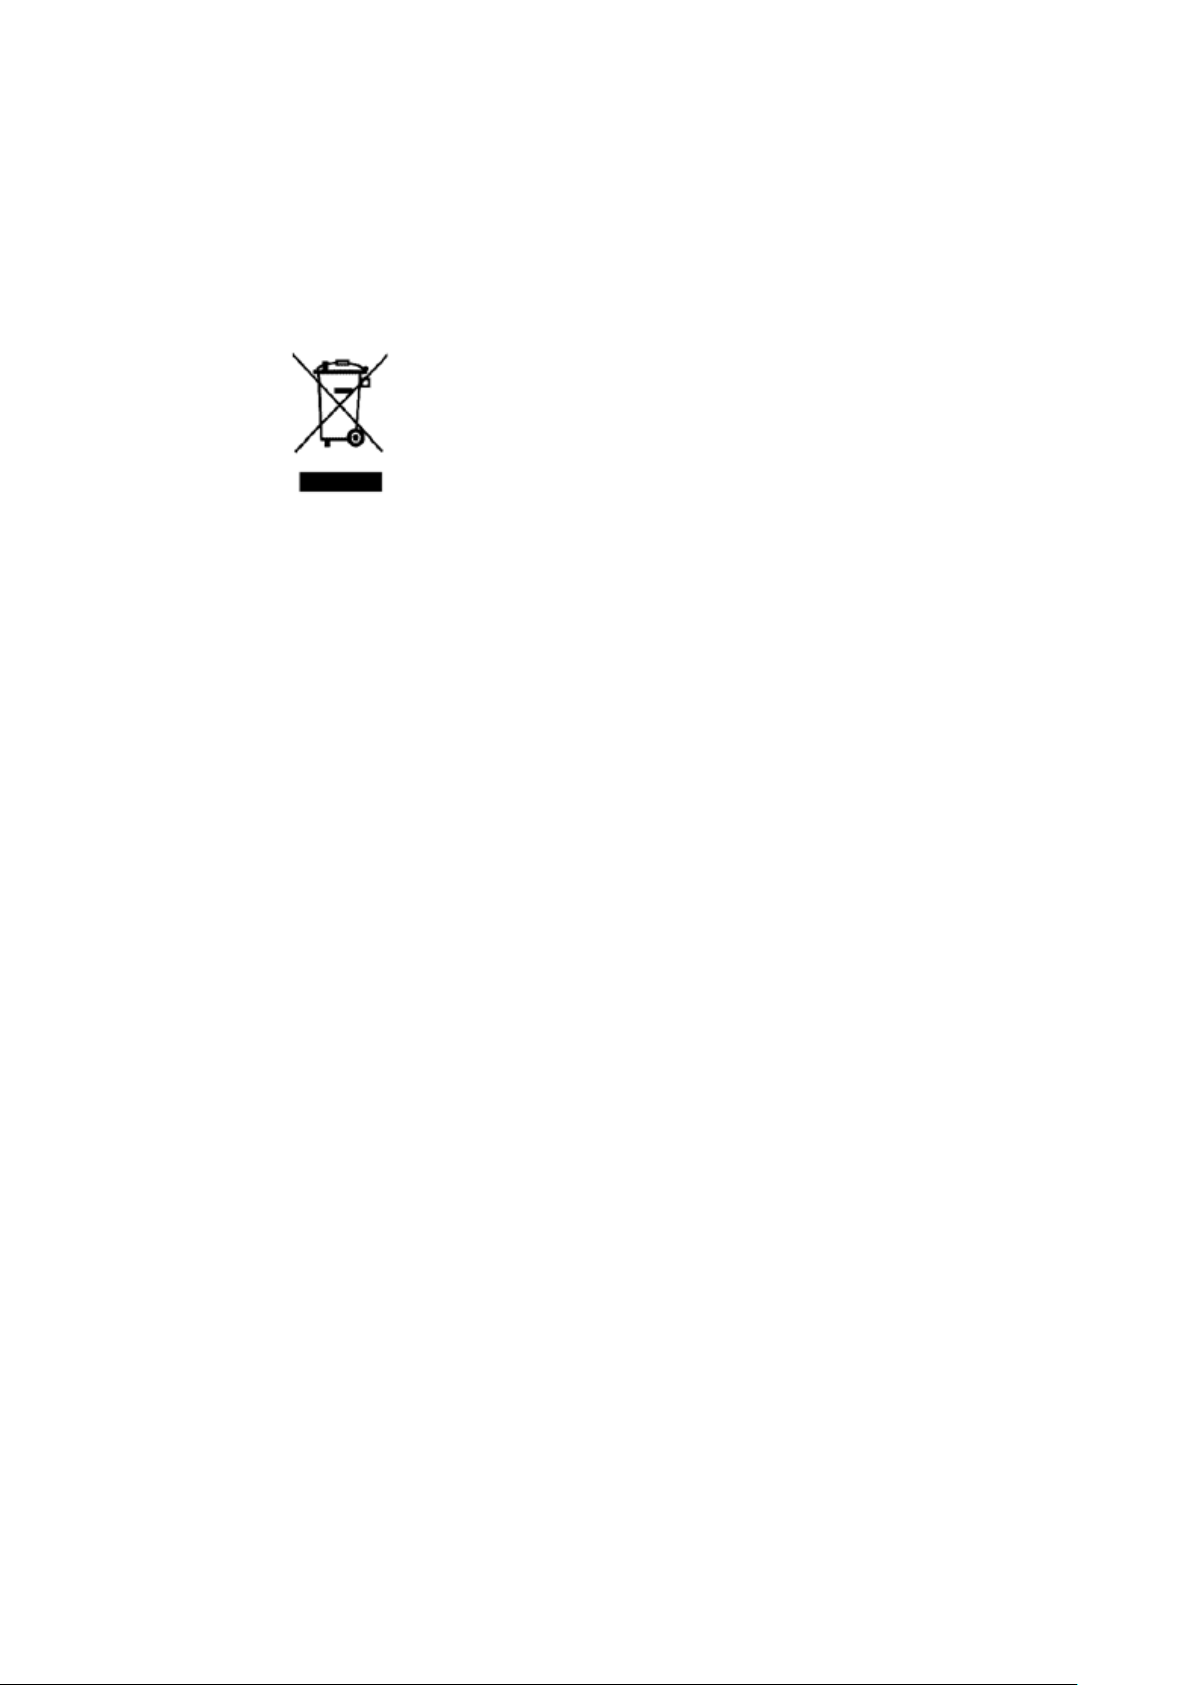
15. Recycling
Deze markering geeft aan dat dit product in de hele EU niet met ander huishoudelijk afval mag worden
verwijderd. Om mogelijke schade aan het milieu of de menselijke gezondheid door
ongecontroleerde afvalverwijdering te voorkomen, dient u het op een verantwoorde manier te
recyclen om het duurzame hergebruik van materiële hulpbronnen te bevorderen. Om uw
gebruikte apparaat te retourneren, gebruikt u de retour- en ophaalsystemen of neemt u contact
op met de winkel/verkoper waar het product is gekocht. Ze kunnen dit product meenemen voor
milieuvriendelijke recycling.
16. Neem contact op met een geautoriseerde servicetechnicus voor reparatie of onderhoud van dit
apparaat.
17. Niet aan het netsnoer trekken, deze vervormen, wijzigen of onderdompelen in water. Aan het
netsnoer trekken of verkeerd gebruik kan leiden tot schade aan het apparaat en elektrische
schokken veroorzaken.
18. Er moet worden voldaan aan de nationale gasvoorschriften.
19. Houd ventilatieopeningen vrij van obstructies.
20. Iedereen die betrokken is bij het werken aan of inbreken in een koudemiddelcircuit, moet in het
bezit zijn van een actueel geldig certificaat van een door de industrie geaccrediteerde
beoordelingsinstantie, die hun bekwaamheid autoriseert om veilig met koudemiddelen om te gaan
in overeenstemming met een door de industrie erkende beoordelingsspecificatie.
21. Onderhoud mag alleen worden uitgevoerd zoals aanbevolen door de fabrikant van de
apparatuur. Onderhoud en reparaties waarbij de hulp van ander bekwaam personeel nodig is,
moeten worden uitgevoerd onder toezicht van de persoon die bekwaam is in het gebruik van
brandbare koudemiddelen.
22. Stop het apparaat nooit door de stekker uit het stopcontact te trekken, gebruik altijd de knop om
het apparaat uit te schakelen. Hiermee voorkomt u elektrische schokken of brand als gevolg van
warmteontwikkeling.
23. Haal de stekker uit het stopcontact als er vreemde geluiden, geuren en/of rook uit het apparaat
komen.
3
Page 6
Opmerkingen:
- Neem bij beschadiging van onderdelen contact op met de dealer of een aangewezen
reparatiewerkplaats;
- Schakel in geval van schade de luchtschakelaar uit, koppel de voeding los en neem contact op met
de dealer of een aangewezen reparatiewerkplaats;
- Het netsnoer dient altijd te worden geaard.
- Schakel de luchtschakelaar uit en koppel de stroomtoevoer los als het netsnoer beschadigd is. Het
dient te worden vervangen door de dealer of een aangewezen reparatiewerkplaats.
4
Page 7

Algemene instructies
Controles naar het omgeving
Voordat wordt begonnen met werkzaamheden aan systemen die ontvlambare koudemiddelen
bevatten, zijn veiligheidscontroles nodig om ervoor te zorgen dat het risico op ontsteking tot een
minimum wordt beperkt. Bij reparatie van het koelsysteem moeten de volgende
voorzorgsmaatregelen in acht worden genomen voordat werkzaamheden aan het systeem
worden uitgevoerd.
Werkprocedure
Het werk moet worden uitgevoerd volgens een gecontroleerde procedure om het risico dat een
brandbaar gas of damp aanwezig is, terwijl het werk wordt uitgevoerd, te minimaliseren.
Algemeen werkgebied
Al het onderhoudspersoneel en anderen die in de omgeving werken, moeten worden geïnstrueerd
over de aard van het uitgevoerde werk. Werk in besloten ruimtes moet worden vermeden. Het
gebied rond de werkruimte moet worden afgeschermd. Zorg ervoor dat de omstandigheden in
het gebied veilig zijn gemaakt door controle op brandbaar materiaal.
Controleren op aanwezigheid van koudemiddel
De ruimte moet voorafgaand aan en tijdens het werk worden gecontroleerd met een geschikte
koudemiddeldetector om er zeker van te zijn dat de technicus zich bewust is van mogelijk
ontvlambare atmosferen. Zorg ervoor dat de gebruikte lekdetectieapparatuur geschikt is voor
gebruik met ontvlambare koudemiddelen. Dit wil zeggen dat de apparatuur niet-vonkend,
voldoende afgesloten of intrinsiek veilig dient te zijn.
Aanwezigheid van brandblusser
Als er warmtewerkzaamheden moeten worden uitgevoerd aan de koelapparatuur of bijbehorende
onderdelen, moet geschikte brandblusapparatuur beschikbaar zijn. Zorg voor een droog
poeder- of CO2 -brandblusser naast het oplaadgebied.
Geen ontstekingsbronnen
Niemand die werkzaamheden uitvoert met betrekking tot een koelsysteem, waarbij leidingen worden
blootgelegd die ontvlambaar koudemiddel bevatten of hebben bevat, dient ontstekingsbronnen
te gebruiken op een manier dat dit kan leiden tot brand- of explosiegevaar. Alle mogelijke
ontstekingsbronnen, inclusief het roken van sigaretten, dienen voldoende ver weg te worden
gehouden van de plaats van installatie, reparatie, verwijdering en afvoer, waarbij brandbaar
koudemiddel mogelijk naar de omliggende ruimte kan vrijkomen. Voordat er werkzaamheden
worden uitgevoerd, moet het gebied rond de apparatuur worden onderzocht om er zeker van te
zijn dat er geen ontvlambare gevaren of ontstekingsrisico's zijn. "Niet roken”-waarschuwingen
dienen te worden geplaatst.
Geventileerde ruimte
Zorg ervoor dat de ruimte in de open lucht is of dat deze voldoende wordt geventileerd voordat u in
het systeem inbreekt of warmtewerkzaamheden uitvoert. Gedurende de periode dat de
werkzaamheden worden uitgevoerd, wordt een zekere mate van ventilatie voortgezet. De
ventilatie moet eventueel vrijgekomen koudemiddel veilig verspreiden en bij voorkeur extern in
de atmosfeer afvoeren.
Controle van de koelapparatuur
Wanneer elektrische componenten worden vervangen, moeten deze geschikt zijn voor het doel en
voldoen aan de juiste specificaties. De onderhouds- en servicerichtlijnen van de fabrikant moeten
te allen tijde worden opgevolgd. Raadpleeg bij twijfel de technische dienst van de fabrikant voor
assistentie. De volgende controles moeten worden uitgevoerd op installaties die brandbare
koudemiddelen gebruiken: de grootte van de vulling is in overeenstemming met de grootte van
de ruimte waarin de koudemiddelhoudende onderdelen zijn geïnstalleerd; de ventilatieapparatuur
en -uitlaten moeten naar behoren werken en niet worden belemmerd; indien een indirect
koelcircuit wordt gebruikt, moet het secundaire circuit worden gecontroleerd op de aanwezigheid
5
Page 8

van koudemiddel; markering op de apparatuur blijft zichtbaar en leesbaar. Markeringen en tekens
die
onleesbaar zijn, worden gecorrigeerd; koelleiding of -componenten zijn geïnstalleerd op een plaats
waar het onwaarschijnlijk is dat ze worden blootgesteld aan enige stof die koudemiddelhoudende
componenten kan aantasten, tenzij de componenten zijn gemaakt van materialen die inherent
bestand zijn tegen corrosie of die op passende wijze zijn beschermd tegen corrosie.
Controles aan elektrische apparaten
Reparatie en onderhoud aan elektrische componenten moeten initiële veiligheidscontroles en
inspectieprocedures voor componenten omvatten. Als er een storing is die de veiligheid in gevaar
kan brengen, mag er geen elektrische voeding op het circuit worden aangesloten, totdat deze
naar tevredenheid is verholpen. Als de storing niet onmiddellijk kan worden verholpen, maar het
bedrijf moet worden voortgezet, moet een geschikte tijdelijke oplossing worden gebruikt. Dit wordt
gerapporteerd aan de eigenaar van de apparatuur, zodat alle partijen worden geïnformeerd.
De eerste veiligheidscontroles omvatten: de condensatoren moeten ontladen zijn: dit moet op een
veilige manier gebeuren om vonkvorming te voorkomen; er mogen geen spanningvoerende
elektrische componenten en bedrading worden blootgesteld tijdens het opladen, herstellen of
doorspoelen van het systeem; dat er continuïteit is in de aardverbinding.
Reparaties aan verzegelde componenten
- Tijdens reparaties aan verzegelde componenten moeten alle elektrische voedingen worden
losgekoppeld van de apparatuur waaraan wordt gewerkt, voordat verzegelde afdekkingen
worden verwijderd. Als het absoluut noodzakelijk is om tijdens het onderhoud een elektrische
voeding naar de apparatuur te hebben, dan moet een lekdetectie op het meest kritieke punt
worden geplaatst om te waarschuwen voor een mogelijk gevaarlijke situatie.
- Bijzondere aandacht moet worden besteed aan het volgende om ervoor te zorgen dat door te
werken aan elektrische componenten, de behuizing niet zodanig wordt gewijzigd dat het
beschermingsniveau wordt beïnvloed. Dit omvat schade aan kabels, buitensporig aantal
aansluitingen, klemmen die niet gemaakt zijn volgens originele specificatie, beschadiging van
afdichtingen, onjuiste montage van pakkingbussen, enz. Zorg ervoor dat het apparaat stevig is
gemonteerd. Zorg ervoor dat afdichtingen of afdichtingsmaterialen niet zodanig zijn verslechterd
dat ze niet langer dienen om het binnendringen van brandbare atmosferen te voorkomen.
Vervangende onderdelen moeten in overeenstemming zijn met de specificaties van de fabrikant.
OPMERKING: Het gebruik van siliconenkit kan de effectiviteit van sommige soorten lekdetectie
apparatuur belemmeren. Intrinsiek veilige componenten hoeven niet te worden geïsoleerd voordat
eraan wordt gewerkt.
Reparatie aan intrinsiek veilige componenten
Pas geen permanente inductieve of capaciteitsbelastingen toe op het circuit zonder ervoor te zorgen
dat dit de toegestane spanning en stroom, die is toegestaan voor de gebruikte apparatuur, niet
overschrijdt.
Intrinsiek veilige componenten zijn de enige typen waaraan gewerkt kan worden terwijl ze gebruikt
worden in aanwezigheid van een brandbare atmosfeer. De testapparatuur moet de juiste
classificatie hebben. Vervang onderdelen alleen door onderdelen die zijn gespecificeerd door de
fabrikant. Andere onderdelen kunnen leiden tot ontbranding van koudemiddel in de atmosfeer
door een lek.
Bekabeling
Controleer of de bekabeling niet onderhevig is aan slijtage, corrosie, overmatige druk, trillingen,
scherpe randen of andere nadelige (milieu-)effecten. Bij de controle moet ook rekening worden
gehouden met de effecten van veroudering of voortdurende trillingen van bronnen, zoals
compressoren of ventilatoren.
Detectie van ontvlambare koudemiddelen
In geen geval mogen potentiële ontstekingsbronnen worden gebruikt bij het zoeken naar of
detectie van koudemiddellekken. Een halogenidetoorts (of een andere detector die een open vlam
gebruikt) mag niet worden gebruikt.
6
Page 9

Lekdetectie methoden
De volgende lekdetectiemethoden worden aanvaardbaar geacht voor systemen met
brandbare koudemiddelen:
- Elektronische lekdetectoren moeten worden gebruikt om brandbare koudemiddelen te
detecteren, maar de gevoeligheid is mogelijk niet voldoende of moet mogelijk opnieuw worden
gekalibreerd. (Detectieapparatuur dient te zijn gekalibreerd in een koudemiddelvrije ruimte.) Zorg
ervoor dat de detector geen potentiële bron van ontsteking is en geschikt is voor het gebruikte
koudemiddel. Lekdetectieapparatuur moet worden ingesteld op een percentage van de LFL van
het koudemiddel en moet worden gekalibreerd op het gebruikte koudemiddel en het juiste
percentage gas (maximaal 25%) wordt bevestigd.
- Lekdetectievloeistoffen zijn geschikt voor gebruik met de meeste koudemiddelen, maar het
gebruik van chloorhoudende reinigingsmiddelen moet worden vermeden, aangezien het chloor
kan reageren met het koudemiddel en de koperen leidingen kan aantasten. Als een lek wordt
vermoed, dient ieder open vuur te worden verwijderd/gedoofd. Als er een koudemiddellekkage
wordt gevonden, waarvoor solderen nodig is, moet al het koudemiddel uit het systeem worden
teruggewonnen of worden geïsoleerd (door middel van afsluiters) in een deel van het systeem op
afstand van het lek. Zuurstofvrije stikstof (OFN) zal dan zowel voor als tijdens het soldeerproces
door het systeem worden gespoeld.
Verwijdering en evacuatie
Bij het inbreken in het koudemiddelcircuit om reparaties uit te voeren - of voor enig ander doel conventionele procedures zullen worden gebruikt; het is echter belangrijk dat de beste praktijken
worden gevolgd, aangezien ontvlambaarheid een overweging is. De volgende procedure moet
worden gevolgd: koudemiddel verwijderen; het circuit reinigen met inert gas; evacueren; opnieuw
met inert gas spoelen; open het circuit door te snijden of te solderen. De koudemiddelvulling moet
worden teruggewonnen in de juiste terugwinningscilinders. Het systeem moet worden "gespoeld"
met OFN om de eenheid veilig te maken. Dit proces moet mogelijk meerdere keren worden
herhaald. Er mag geen perslucht of zuurstof worden gebruikt voor deze taak. Het spoelen wordt
bereikt door het vacuüm in het systeem met OFN te onderbreken en door te gaan met vullen tot
de werkdruk is bereikt, vervolgens te ontluchten naar de atmosfeer en tenslotte naar een vacuüm
te trekken. Dit proces wordt herhaald totdat er geen koudemiddel in het systeem meer aanwezig
is. Wanneer de laatste OFN-vulling wordt gebruikt, moet het systeem worden ontlucht tot
atmosferische druk om het werk mogelijk te maken. Deze handeling is absoluut noodzakelijk als
soldeerwerkzaamheden aan het leidingwerk moeten plaatsvinden.
Zorg ervoor dat de uitlaat voor de vacuümpomp zich niet in de buurt van ontstekingsbronnen bevindt
en er ventilatie aanwezig is.
Oplaadprocedures
Naast conventionele oplaadprocedures moeten de volgende vereisten worden gevolgd:
- Zorg ervoor dat tijdens het gebruik van vulapparatuur geen vervuiling van verschillende
koudemiddelen optreedt. Slangen of leidingen moeten zo kort mogelijk zijn om de hoeveelheid
koudemiddel erin te minimaliseren.
- Cilinders moeten rechtop worden gehouden.
- Zorg ervoor dat het koelsysteem geaard is voordat u het systeem met koudemiddel vult.
- Label het systeem wanneer het opladen is voltooid.
- Wees er uiterst voorzichtig mee dat het koelsysteem niet te vol wordt.
Voordat het systeem opnieuw wordt opgeladen, moet het onder druk worden getest met OFN. Het
systeem dient op lekken getest te zijn na voltooiing van het opladen maar vóór inbedrijfstelling.
Een vervolglektest dient uitgevoerd te worden voordat u de locatie verlaat.
Buitenbedrijfstelling
Voordat u deze procedure uitvoert, is het essentieel dat de technicus volledig bekend is
met de apparatuur en al zijn details. Het wordt aanbevolen om alle koudemiddelen veilig terug te
winnen. Voordat de taak wordt uitgevoerd, moet een olie- en koudemiddelmonster worden
genomen voor het geval dat analyse vereist is voordat het teruggewonnen koudemiddel opnieuw
wordt gebruikt. Het is essentieel dat er elektrische stroom beschikbaar is voordat met de taak
wordt begonnen.
1. Raak vertrouwd met de apparatuur en de bediening ervan.
7
Page 10

2. Isoleer het systeem elektrisch.
- Voordat u de procedure uitvoert, moet u ervoor zorgen dat: mechanische behandelingsapparatuur
beschikbaar is, indien nodig, voor het hanteren van koudemiddelcilinders; alle persoonlijke
beschermingsmiddelen aanwezig zijn en correct worden gebruikt; het herstelproces te allen tijde
onder toezicht staat van een bevoegd persoon; terugwinningsapparatuur en cilinders voldoen
aan de toepasselijke normen.
3. Pomp, indien mogelijk, het koelsysteem leeg.
- Als een vacuüm niet mogelijk is, maak dan een verdeelstuk, zodat het koudemiddel uit
verschillende delen van het systeem kan worden verwijderd.
4. Zorg ervoor dat de cilinder zich op de weegschaal bevindt voordat herstel plaatsvindt.
5. Start de herstelmachine en bedien hem in overeenstemming met de instructies van de fabrikant.
6. Overvul cilinders niet. (Niet meer dan 80% vloeistofvulling).
7. Overschrijd de maximale werkdruk van de cilinder niet, ook niet tijdelijk.
8. Zorg ervoor dat, wanneer de cilinders correct zijn gevuld en het proces voltooid is, dat de cilinders
en de apparatuur onmiddellijk van de locatie worden verwijderd en alle isolatiekleppen op de
apparatuur zijn gesloten.
- Teruggewonnen koudemiddel mag niet in een ander koelsysteem worden gevuld tenzij het is
schoongemaakt en gecontroleerd.
Etikettering
Apparatuur moet worden geëtiketteerd met de mededeling dat deze buiten gebruik is gesteld en
leeggemaakt is van koudemiddel. Het etiket wordt gedateerd en ondertekend. Zorg ervoor dat er
labels op de apparatuur zitten waarop staat dat de apparatuur ontvlambaar koudemiddel bevat.
Herstel
Bij het verwijderen van koudemiddel uit een systeem, zowel voor onderhoud als buitenbedrijfstelling,
wordt aanbevolen om alle koudemiddelen veilig te verwijderen. Zorg er bij het overbrengen van
koudemiddel in cilinders voor dat alleen geschikte koudemiddelterugwinningscilinders worden
gebruikt. Zorg ervoor dat het juiste aantal cilinders voor de totale systeemvulling beschikbaar is.
Alle te gebruiken cilinders zijn bedoeld voor het teruggewonnen koudemiddel en gelabeld voor
dat koudemiddel. Cilinders moeten compleet zijn met een overdrukklep en bijbehorende afsluiters
die in goede staat verkeren. Lege opvangcilinders worden extra leeggepompt en, indien mogelijk,
gekoeld voordat herstel plaatsvindt. De terugwinningsapparatuur moet in goede staat verkeren
met een set instructies met betrekking tot de apparatuur die voorhanden is en moet geschikt zijn
voor het terugwinnen van brandbare koudemiddelen. Daarnaast moet een set gekalibreerde
weegschalen beschikbaar zijn en deze dienen in goede staat te verkeren. Slangen moeten
compleet zijn met lekvrije ontkoppelingskoppelingen en in goede staat verkeren. Controleer,
voordat u de herstelmachine gebruikt, of deze in goede staat verkeert en goed is onderhouden
en dat alle bijbehorende elektrische componenten zijn afgedicht om ontsteking te voorkomen, in
het geval dat koudemiddel vrijkomt. Raadpleeg bij twijfel de fabrikant. Het teruggewonnen
koudemiddel dient in de juiste terugwinning naar de koudemiddelleverancier te worden
teruggestuurd in de juiste terugwinningscilinder, en de relevante afvaltransportnota gerangschikt.
Meng nooit koudemiddelen bij terugwinning, ook niet in cilinders.
Als compressoren of compressor-oliën moeten worden verwijderd, zorg er dan voor dat ze tot een
aanvaardbaar niveau zijn afgevoerd om er zeker van te zijn dat er geen brandbaar koudemiddel
in het smeermiddel achterblijft. Het evacuatieproces moet worden uitgevoerd voordat de
compressor aan de leveranciers wordt geretourneerd. Alleen elektrische verwarming van het
compressorlichaam mag worden gebruikt om dit proces te versnellen. Wanneer olie uit een
systeem wordt afgetapt, moet dit op een veilige manier gebeuren.
Bekwaamheid van servicepersoneel
Algemeen
Speciale training naast de gebruikelijke reparatieprocedures voor koelapparatuur is vereist wanneer
apparatuur met brandbare koudemiddelen wordt aangetast. In veel landen wordt deze training
gegeven door nationale trainingsorganisaties die geaccrediteerd zijn om les te geven in de
relevante nationale competentienormen die in wetgeving kunnen zijn vastgelegd. De behaalde
competentie moet worden gedocumenteerd door een certificaat.
8
Page 11

Training
De training moet de inhoud van het volgende bevatten:
- Informatie over het explosiegevaar van ontvlambare koudemiddelen om aan te tonen dat
ontvlambare stoffen gevaarlijk kunnen zijn als ze onzorgvuldig worden gehanteerd.
- Informatie over mogelijke ontstekingsbronnen, vooral die niet voor de hand liggen zoals
aanstekers, lichtschakelaars, stofzuigers en elektrische kachels.
- Informatie over de verschillende veiligheidsconcepten:
Ongeventileerd - (zie clausule GG.2) Veiligheid van het apparaat is niet afhankelijk van ventilatie
van de behuizing. Het uitschakelen van het apparaat of het openen van de behuizing heeft geen
noemenswaardige invloed op de veiligheid. Desalniettemin is het mogelijk dat lekkend
koudemiddel zich ophoopt in de behuizing en brandbare gassen zullen vrijkomen wanneer de
behuizing wordt geopend.
Geventileerde behuizing - (zie artikel GG.4) De veiligheid van het apparaat hangt af van de
ventilatie van de behuizing. Het uitschakelen van het apparaat of het openen van de behuizing
heeft een aanzienlijk effect op de veiligheid. Er moet voor worden gezorgd dat er voldoende
ventilatie is.
Geventileerde ruimte - (zie artikel GG.5) De veiligheid van het apparaat is afhankelijk van de
ventilatie van de kamer. Het uitschakelen van het apparaat of het openen van de behuizing
heeft geen noemenswaardige invloed op de veiligheid. De ventilatie van de ruimte mag niet
worden uitgeschakeld tijdens reparatieprocedures.
Informatie over het concept van afgedichte componenten en afgedichte behuizingen
volgens IEC 60079-15: 2010.
Informatie over de juiste werkprocedures:
Inbedrijfstelling
● Zorg ervoor dat het vloeroppervlak voldoende is voor de koudemiddelvulling of dat het
ventilatiekanaal op de juiste manier is gemonteerd.
● Sluit de leidingen aan en voer een lektest uit voordat u koudemiddel bijvult.
● Controleer de veiligheidsuitrusting voordat u deze in gebruik neemt.
Onderhoud
● Mobiele apparatuur moet buiten of in een speciaal daarvoor ingerichte werkplaats worden
gerepareerd voor onderhoud van units met brandbare koudemiddelen.
● Zorg voor voldoende ventilatie op de reparatieplaats.
● Houd er rekening mee dat een defect aan de apparatuur kan worden veroorzaakt door verlies
van koudemiddel en een koudemiddellekkage is mogelijk.
● Ontlaad de condensatoren op een manier die geen vonk veroorzaakt. (De
standaardprocedure voor kortsluiting van de condensatoraansluitingen veroorzaakt meestal
vonken.)
● Zet verzegelde behuizingen nauwkeurig in elkaar. Vervang de afdichtingen als deze versleten
zijn.
● Controleer de veiligheidsuitrusting voordat u deze in gebruik neemt.
Reparatie
● Mobiele apparatuur moet buiten of in een speciaal daarvoor ingerichte werkplaats worden
gerepareerd voor onderhoud van units met brandbare koudemiddelen.
● Zorg voor voldoende ventilatie op de reparatieplaats.
● Houd er rekening mee dat een defect aan de apparatuur kan worden veroorzaakt door verlies
van koudemiddel en een koudemiddellekkage mogelijk is.
● Ontlaad de condensatoren op een manier die geen vonk veroorzaakt.
● Als solderen vereist is, moeten de volgende procedures op de juiste manier worden
uitgevoerd:
- Verwijder het koudemiddel. Als de terugwinning niet vereist is door de nationale regelgeving,
laat u het koudemiddel naar buiten leeglopen. Zorg ervoor dat het afgetapte koudemiddel
geen enkel gevaar veroorzaakt. Bij twijfel moet één persoon het stopcontact bewaken. Wees
extra voorzichtig dat afgetapt koudemiddel niet zal terugvloeien in het gebouw.
9
Page 12

- Evacueer het koelcircuit.
- Spoel het koudemiddelcircuit gedurende 5 minuten met stikstof.
- Evacueer het koudemiddel opnieuw.
- Verwijder de te vervangen onderdelen door te snijden, niet door vlammen.
- Spoel het soldeerpunt met stikstof tijdens de soldeerprocedure.
- Voer een lektest uit voordat u het met koudemiddel vult.
● Zet de verzegelde behuizingen nauwkeurig weer in elkaar. Vervang de afdichtingen als deze
versleten zijn.
● Controleer de veiligheidsuitrusting voordat u deze in gebruik neemt.
Buitenbedrijfstelling
● Als de veiligheid in het gedrang komt wanneer de apparatuur buiten gebruik wordt gesteld,
dient het koudemiddel worden verwijderd alvorens buiten bedrijf te worden gesteld.
● Zorg voor voldoende ventilatie op de plaats van de apparatuur.
● Houd er rekening mee dat een defect aan de apparatuur kan worden veroorzaakt door verlies
van koudemiddel en een koudemiddellekkage mogelijk is.
● Ontlaad de condensatoren op een manier die geen vonk veroorzaakt.
● Verwijder het koudemiddel. Als de terugwinning niet vereist is door de nationale regelgeving,
laat u het koudemiddel naar buiten leeglopen. Zorg ervoor dat het afgetapte koudemiddel
geen gevaar veroorzaakt. Bij twijfel moet één persoon het stopcontact bewaken. Wees extra
voorzichtig dat het afgetapte koudemiddel niet zal terugvloeien in het gebouw.
● Evacueer het koelcircuit.
● Spoel het koudemiddelcircuit gedurende 5 minuten met stikstof.
● Evacueer het koudemiddel opnieuw.
● Vul stikstof bij tot atmosferische druk.
● Plak een label op de apparatuur dat het koudemiddel is verwijderd.
Verwijdering
● Zorg voor voldoende ventilatie op de werkplek.
● Verwijder het koudemiddel. Als de terugwinning niet vereist is door de nationale regelgeving,
laat u het koudemiddel naar buiten leeglopen. Zorg ervoor dat het afgetapte koudemiddel
geen gevaar veroorzaakt. Bij twijfel moet één persoon het stopcontact bewaken. Wees extra
voorzichtig dat het afgetapte koudemiddel niet zal terugvloeien in het gebouw.
● Evacueer het koelcircuit.
● Spoel het koudemiddelcircuit gedurende 5 minuten met stikstof.
● Evacueer het koudemiddel opnieuw.
● Schakel de compressor uit en tap de olie af.
10
Page 13

Transport, markering en opslag voor units die brandbare
koudemiddelen gebruiken
Transport van apparatuur die brandbare koudemiddelen bevat
Let op: er gelden mogelijk aanvullende transportvoorschriften op apparatuur die brandbaar gas bevat.
Het maximale aantal apparaten of de configuratie van de apparatuur die samen vervoerd mag
worden, wordt bepaald door de geldende transportvoorschriften.
Markering van apparatuur met behulp van borden
Borden voor soortgelijke apparaten die in een werkgebied worden gebruikt, vallen over het algemeen
onder plaatselijke voorschriften en geven de minimumvereisten voor het voorzien van veiligheidsen / of gezondheidssignalering voor een werklocatie.
Alle vereiste borden moeten worden onderhouden en werkgevers moeten ervoor zorgen dat
werknemers passende en voldoende instructie en training ontvangen over de betekenis van
geschikte veiligheidssignalering en de acties die moeten worden ondernomen in verband met
deze borden.
De effectiviteit van borden mag niet worden verminderd door te veel borden bij elkaar te plaatsen.
Alle gebruikte pictogrammen moeten zo eenvoudig mogelijk zijn en alleen essentiële details bevatten.
Verwijdering van apparatuur met ontvlambare koudemiddelen
Zie nationale regelgeving.
Opslag van apparatuur / apparaten
De opslag van apparatuur moet in overeenstemming zijn met de instructies van de fabrikant.
Voor opslag van verpakte (onverkochte) apparatuur; de bescherming van de opslagverpakking moet
zo worden geconstrueerd dat mechanische schade aan de apparatuur in de verpakking geen
lekkage van koudemiddel zal veroorzaken.
Het maximale aantal apparaten dat samen mag worden opgeslagen, is bepaald door lokale
voorschriften.
11
Page 14
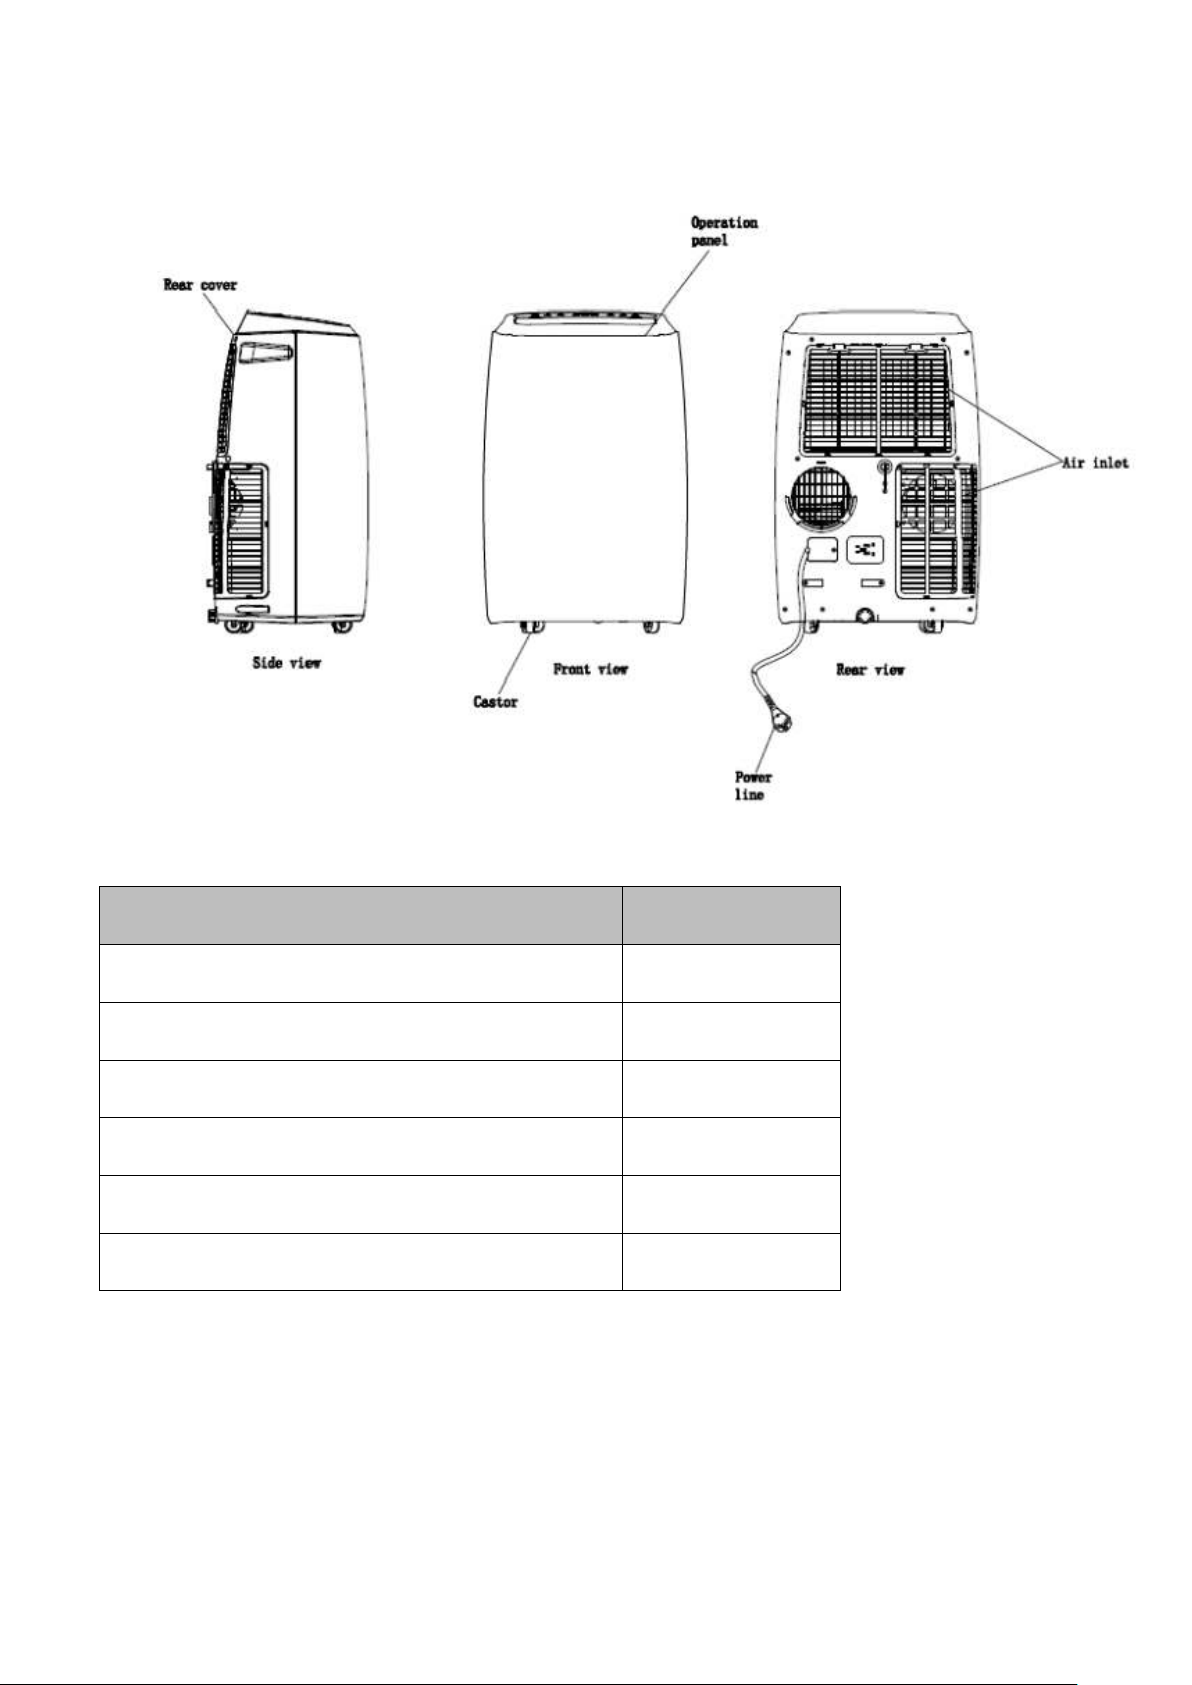
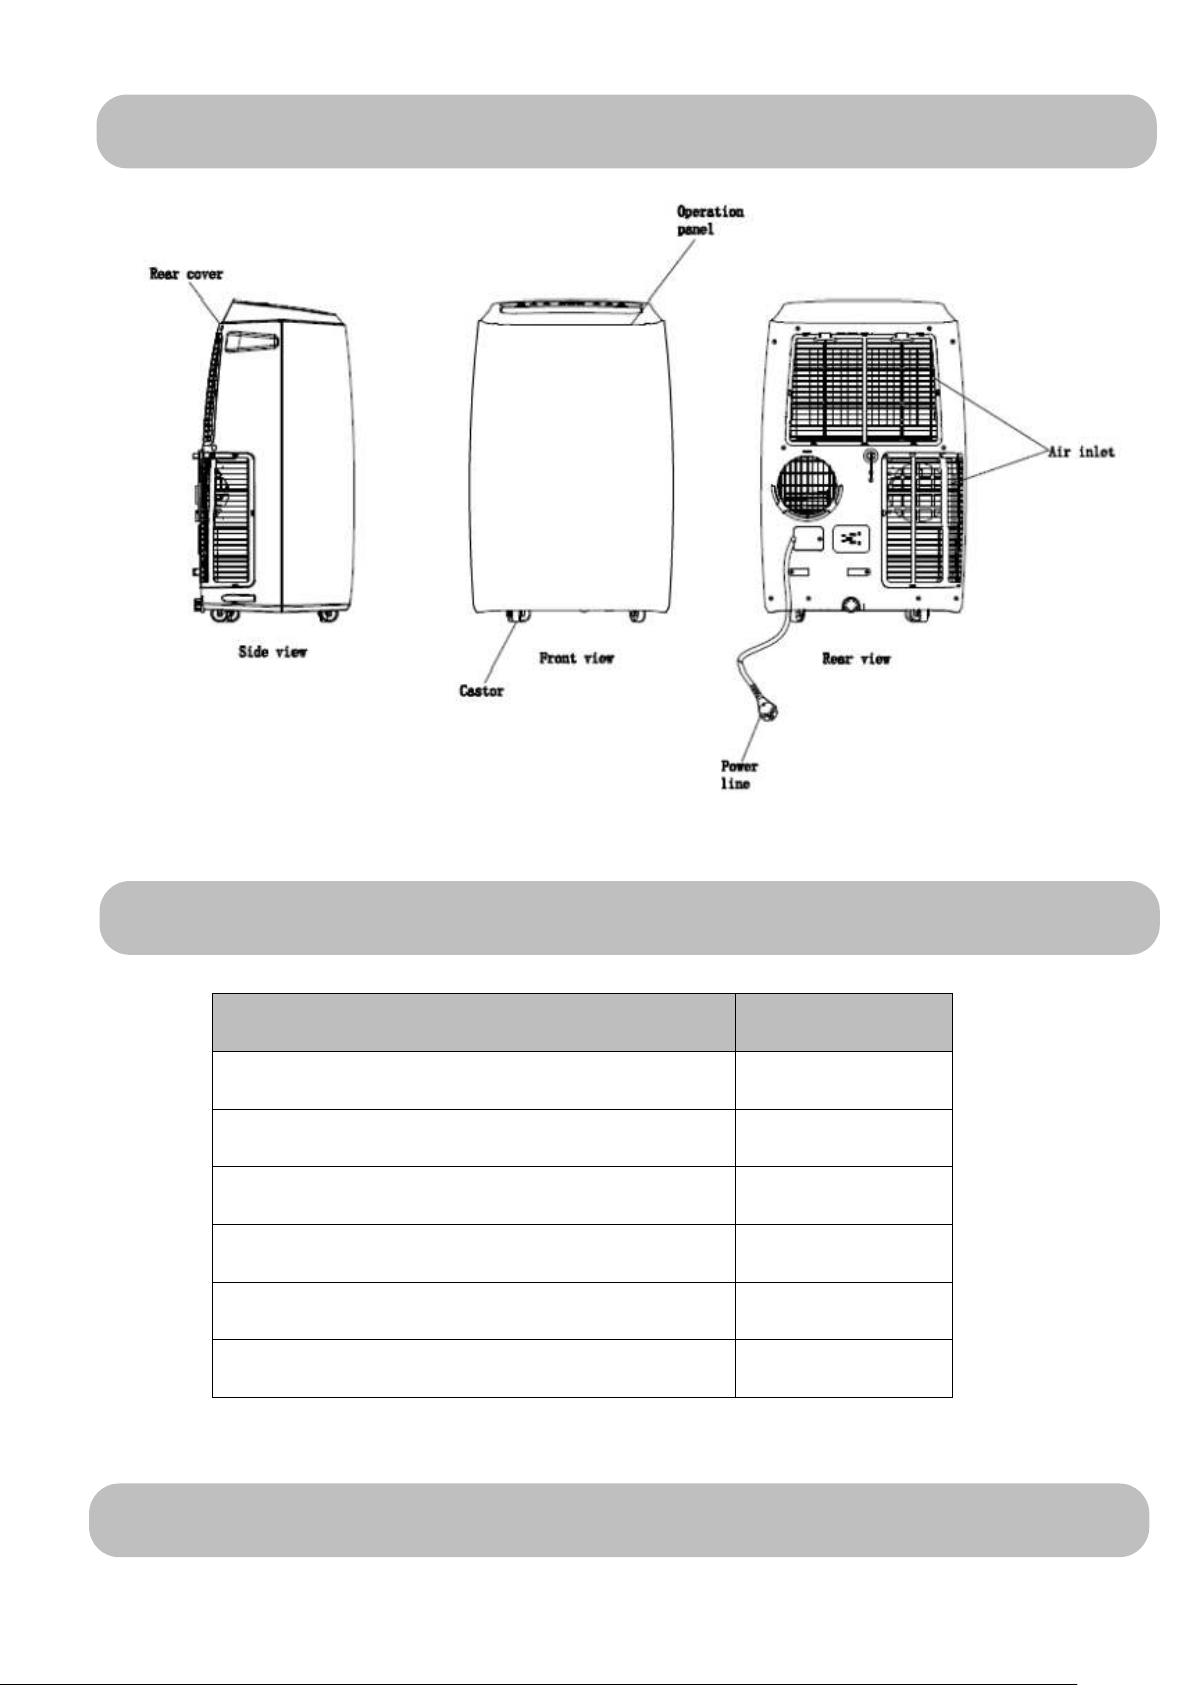
2. Componenten
Onderdeel Beschrijving
Hoeveelheid
Hoofd airconditioner eenheid
1
Uitlaatslang voor hete lucht
1
Slangconnector (raamuiteinde)
1
Slangconnector (uiteinde airconditioner)
1
Venster kit
1
Afstandsbediening
1
Afbeelding 1
Accessoires
Controleer na het uitpakken of de bovengenoemde accessoires zijn meegeleverd en controleer hun
doel in de installatie-inleiding in deze handleiding.
12
Page 15
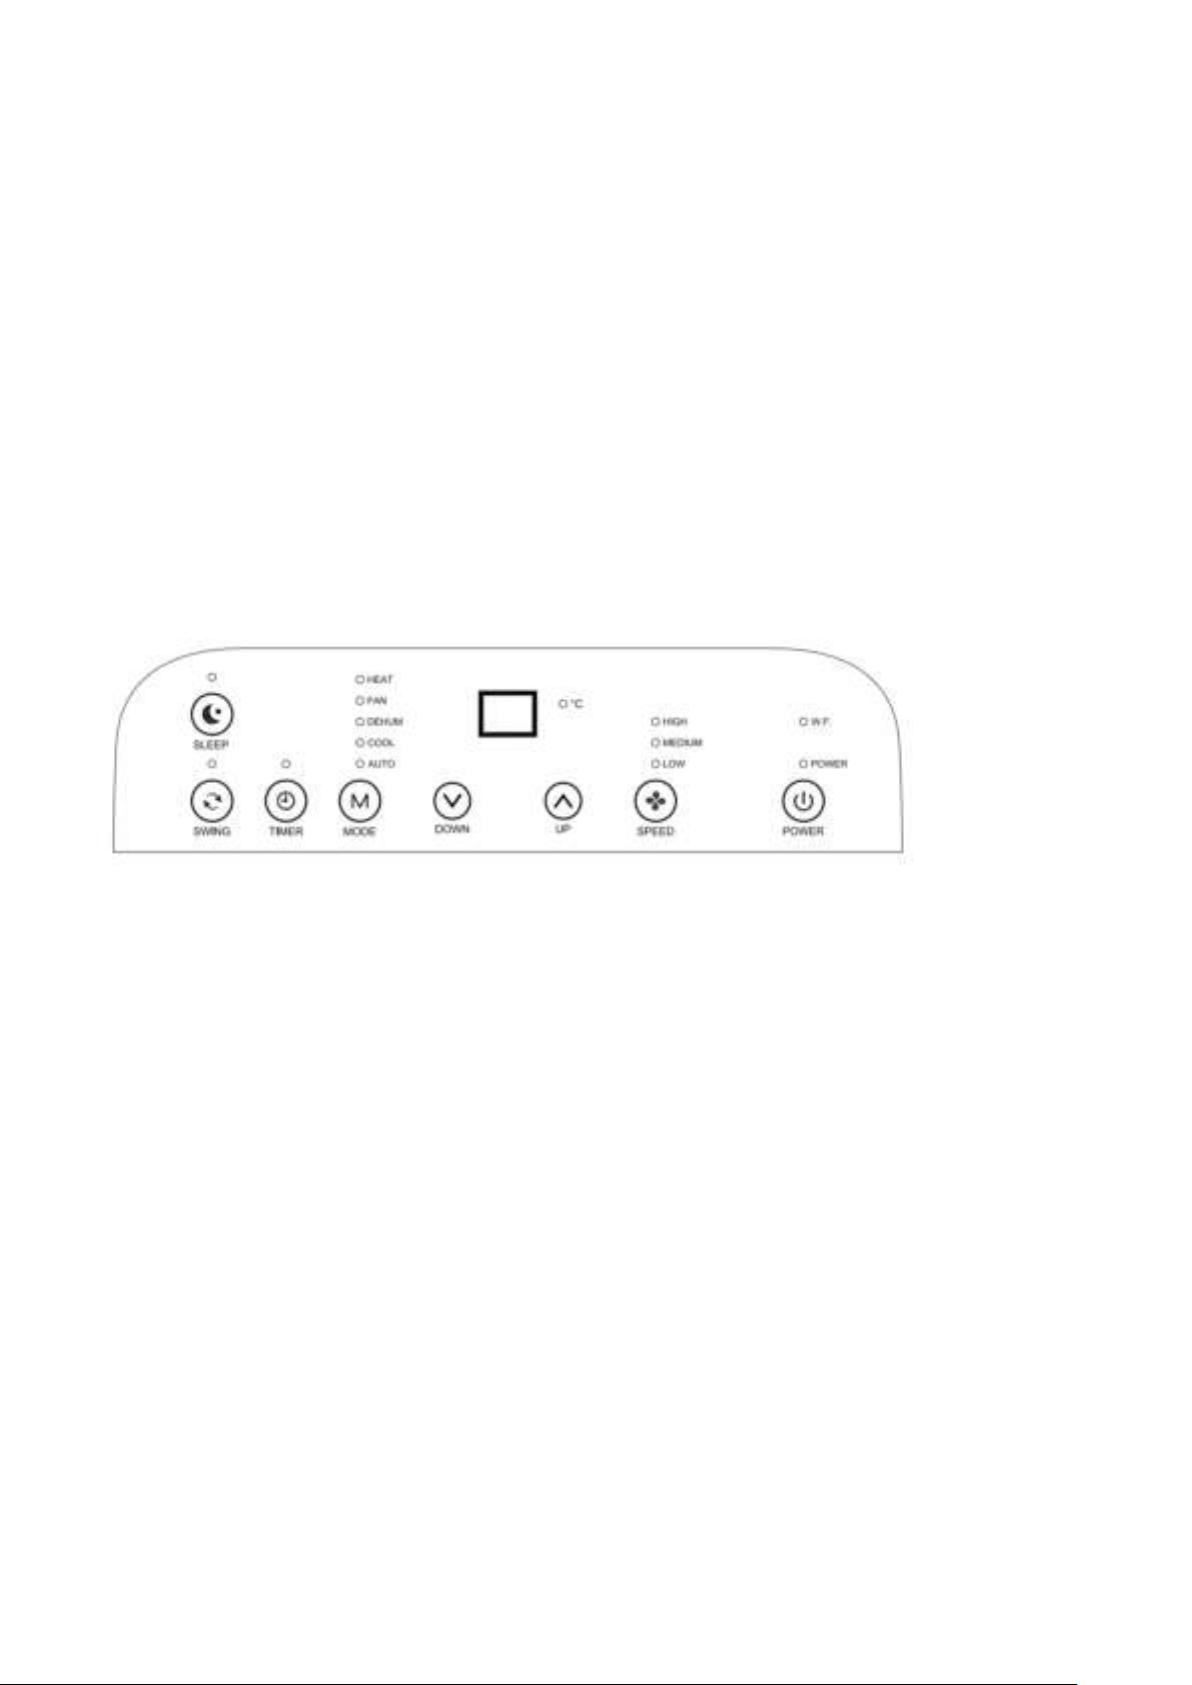
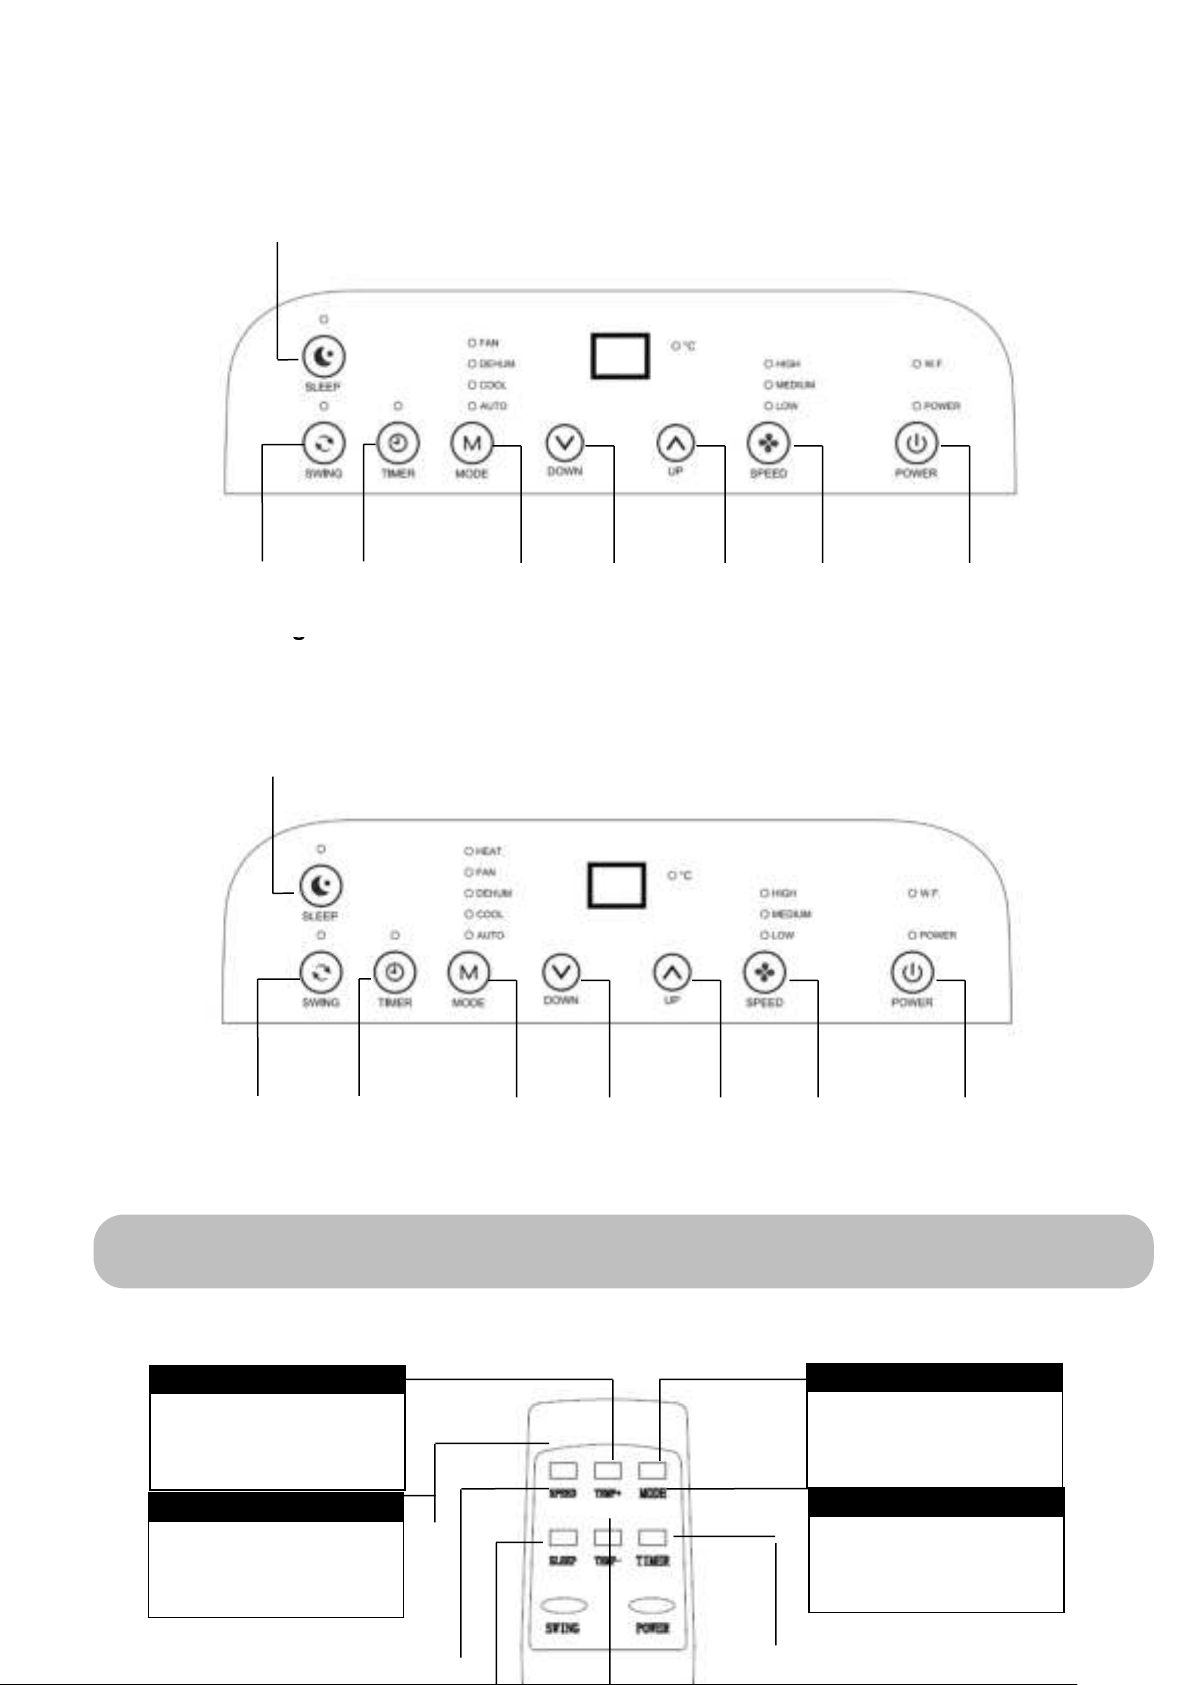
3. Functies op het configuratiescherm
Alleen koelen model
Model voor koelen en verwarmen
13
Page 16
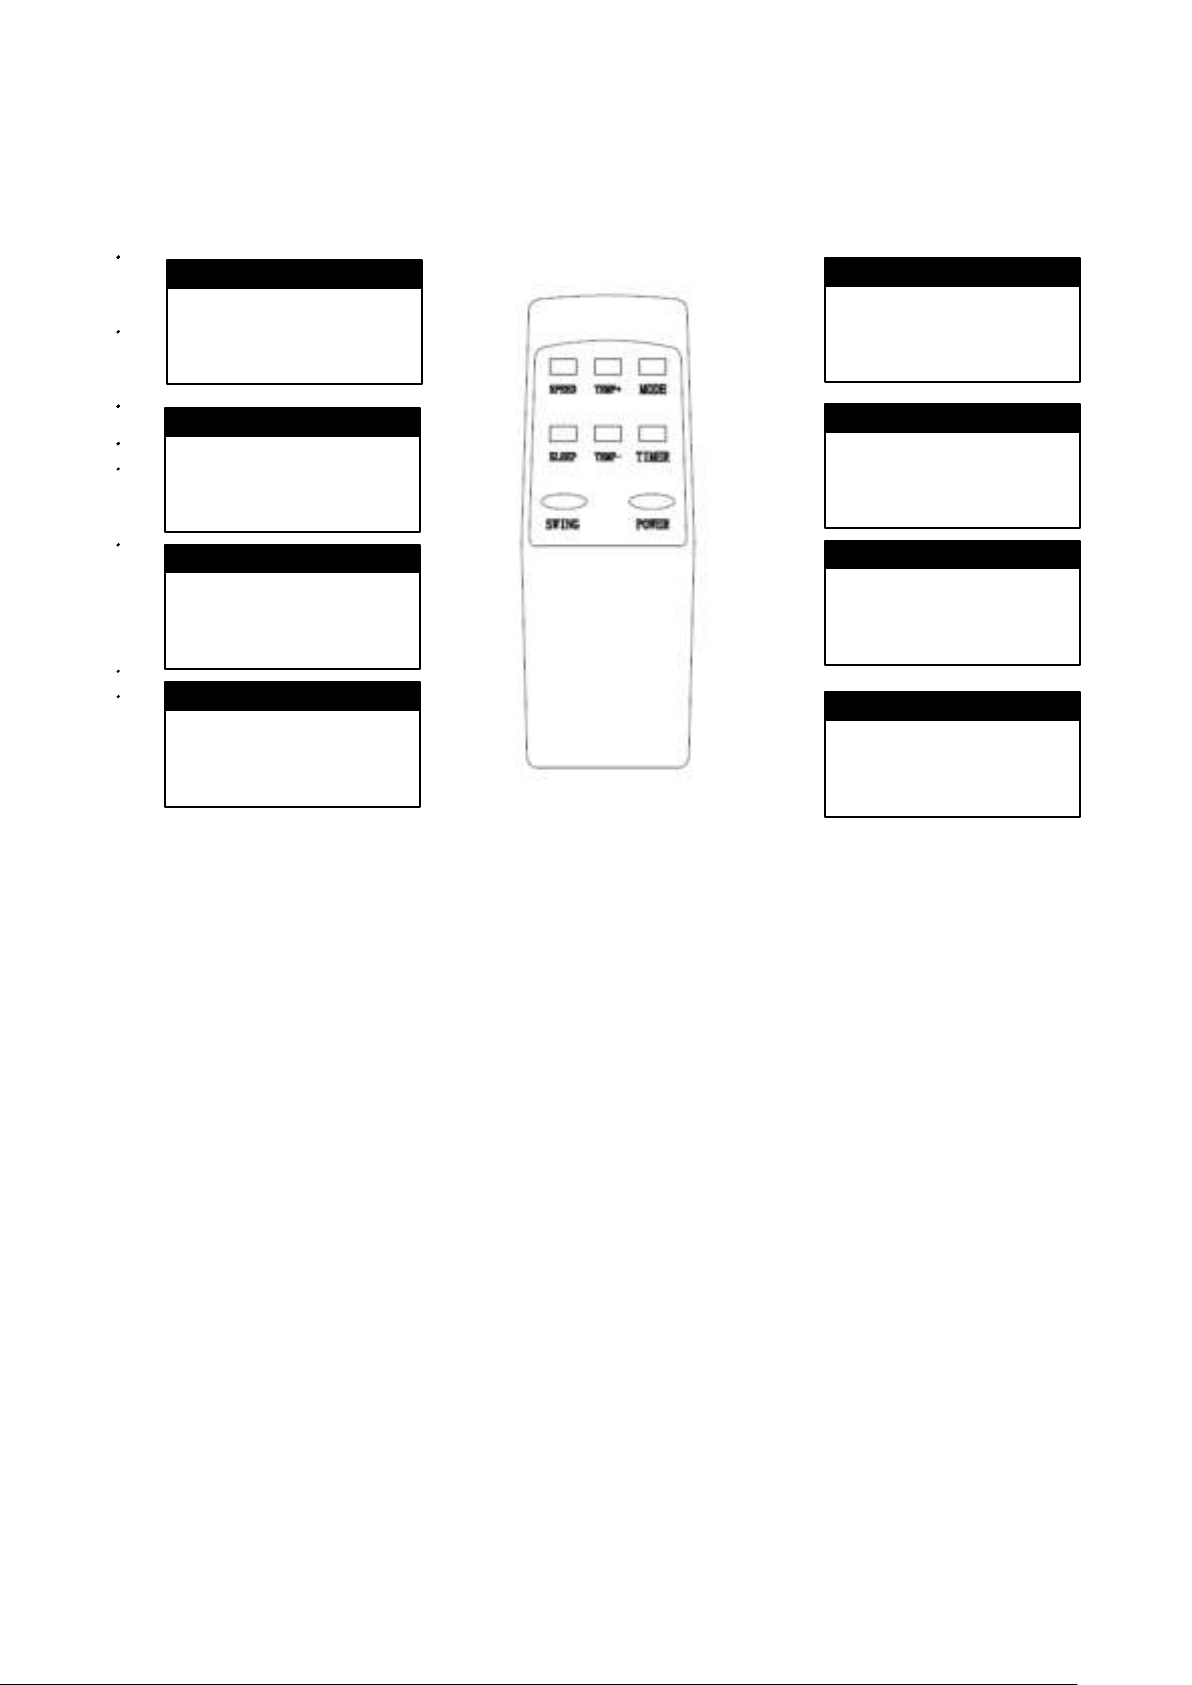
Mode selector
Temperature selector
Fan speed selector
Hourly programming
Sleep mode selector
On/Off switch
Auto Swing selector
Temperature selector
4. Functies van de afstandsbediening
up
down
Opmerkingen:
- Laat de afstandsbediening niet vallen.
- Leg de afstandsbediening niet op een plek deze aan direct zonlicht wordt blootgesteld.
14
Page 17
5. Gebruiksinstructies
Voordat u met de bewerkingen in dit gedeelte begint:
1. Zoek een plaats met stroomvoorziening in de buurt.
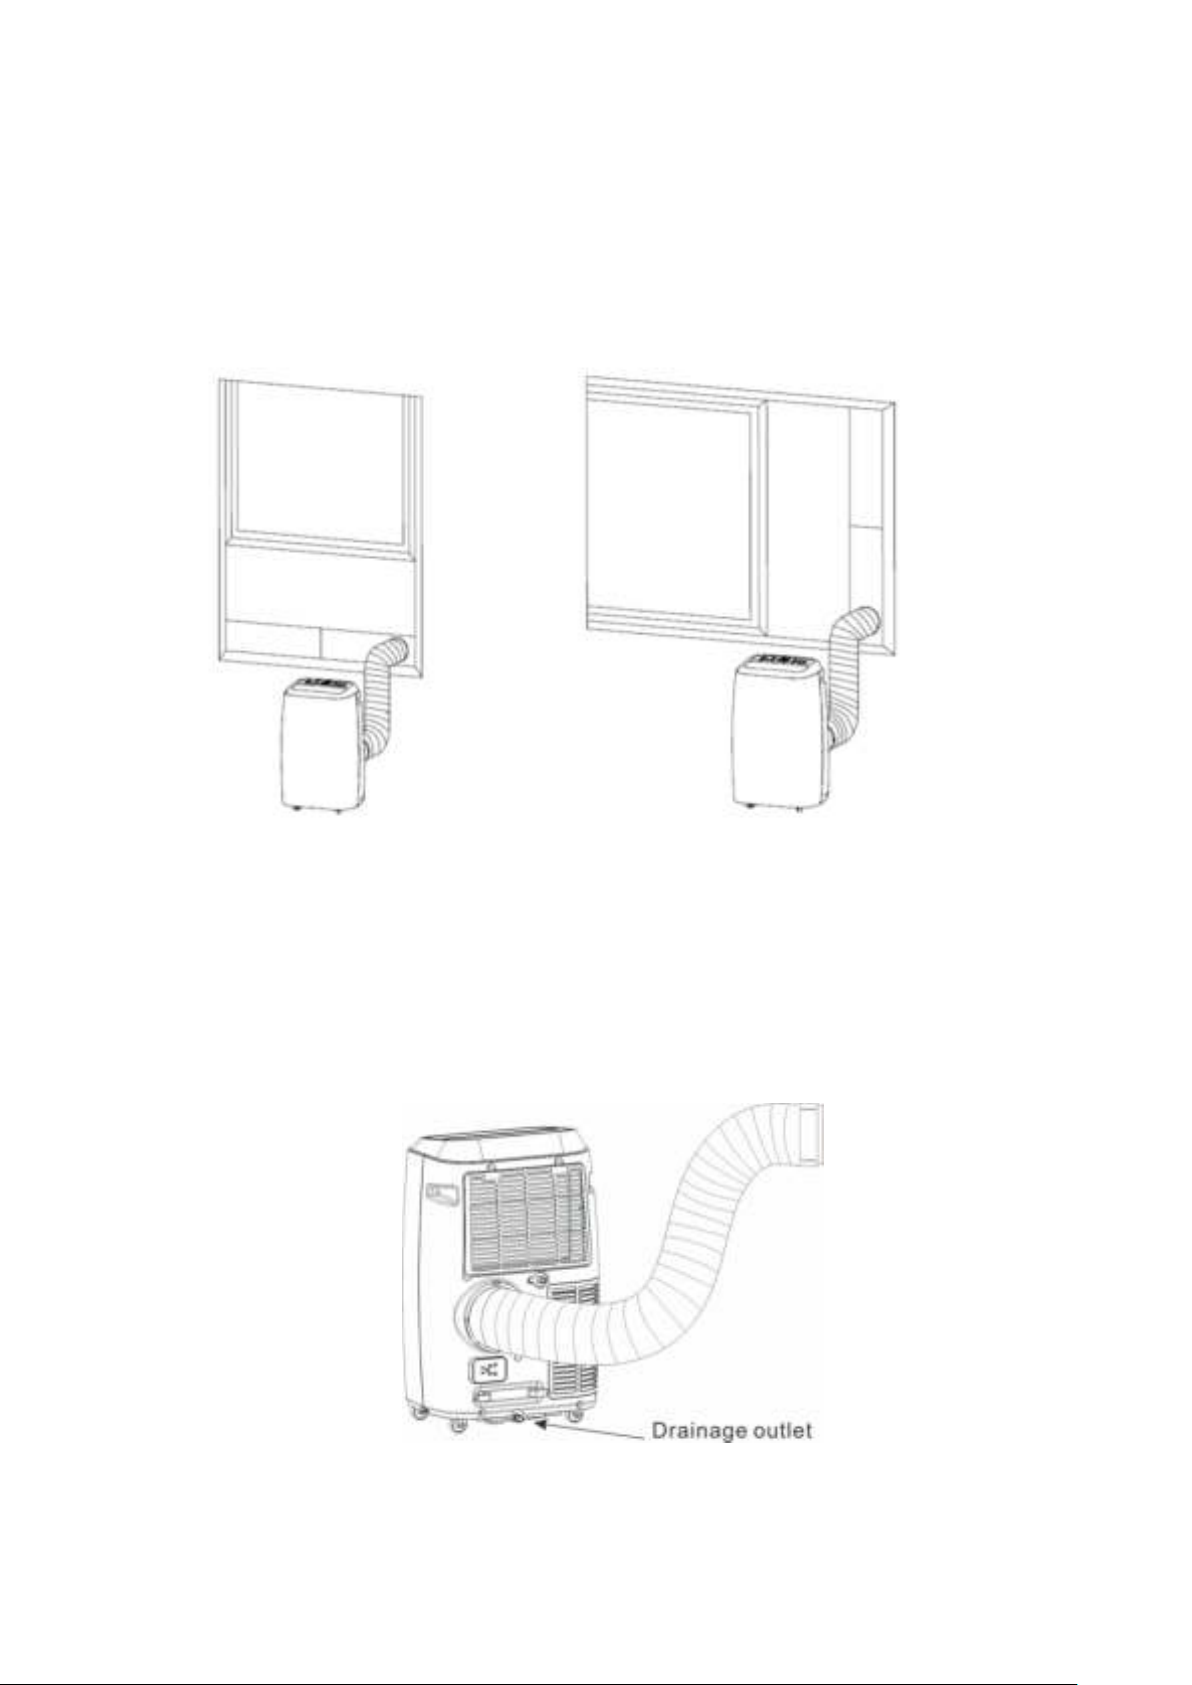
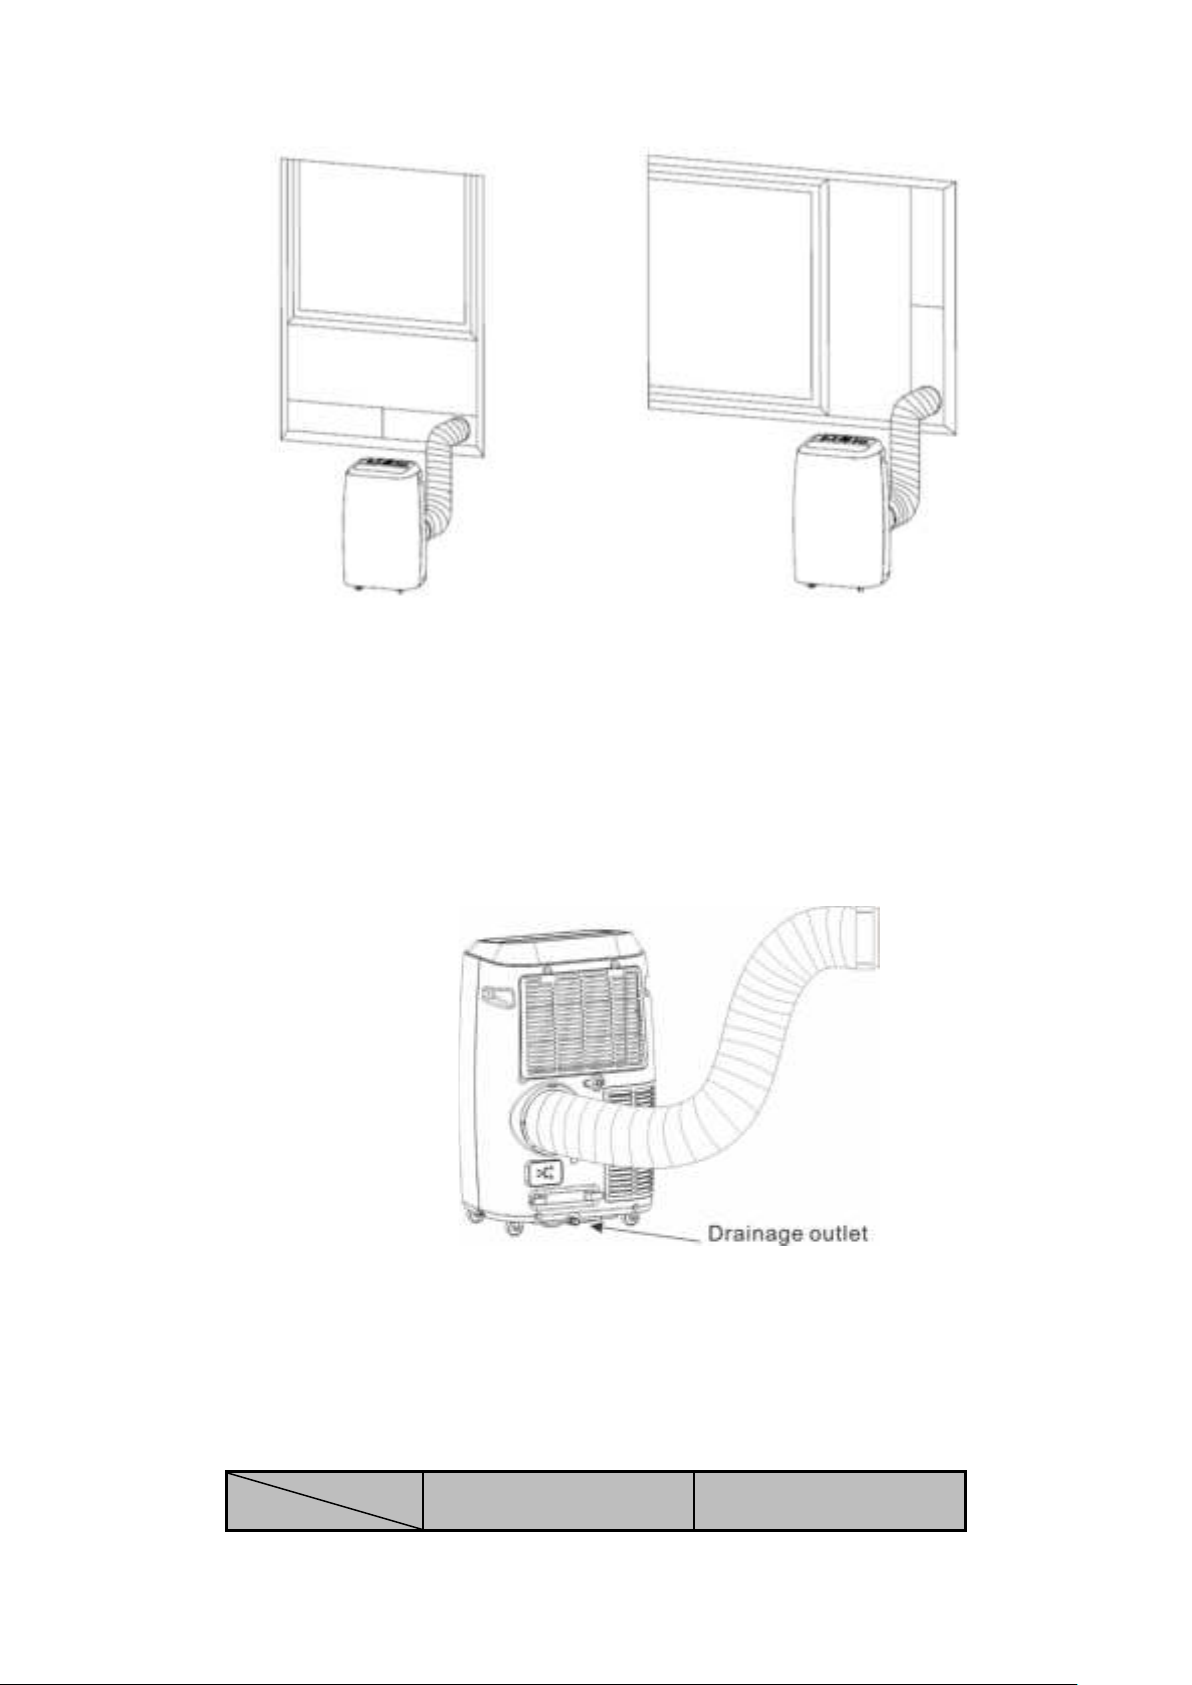
2. Installeer de uitlaatslang zoals getoond in afbeelding 5 en afbeelding 5a en stel de raamstand
goed af.
Afbeelding 5 Afbeelding 5a
3. Sluit de afvoerslang goed aan zoals getoond in afbeelding 6 (alleen bij gebruik van
verwarmingsmodel)
4. Steek de stekker van het netsnoer in een geaard AC220 ~ 240V / 50Hz stopcontact.
5. Druk op de AAN-UIT-knop om de airconditioner in te schakelen.
15
Afbeelding 6
Page 18

Maximale koeling
Minimale koeling
DB / WB (℃)
35/24
18/12
Maximale verwarming
Minimale verwarming
DB / WB (℃)
27/ -
7/ -
Kamertemperatuur (Tr)
23 ℃ ≤Tr <
26 ℃
Tr ≥26 ℃
Modus
Verwarming
Ontvochtigen
Koelen
Temperatuur instellen
21 ℃
23 ℃
25 ℃
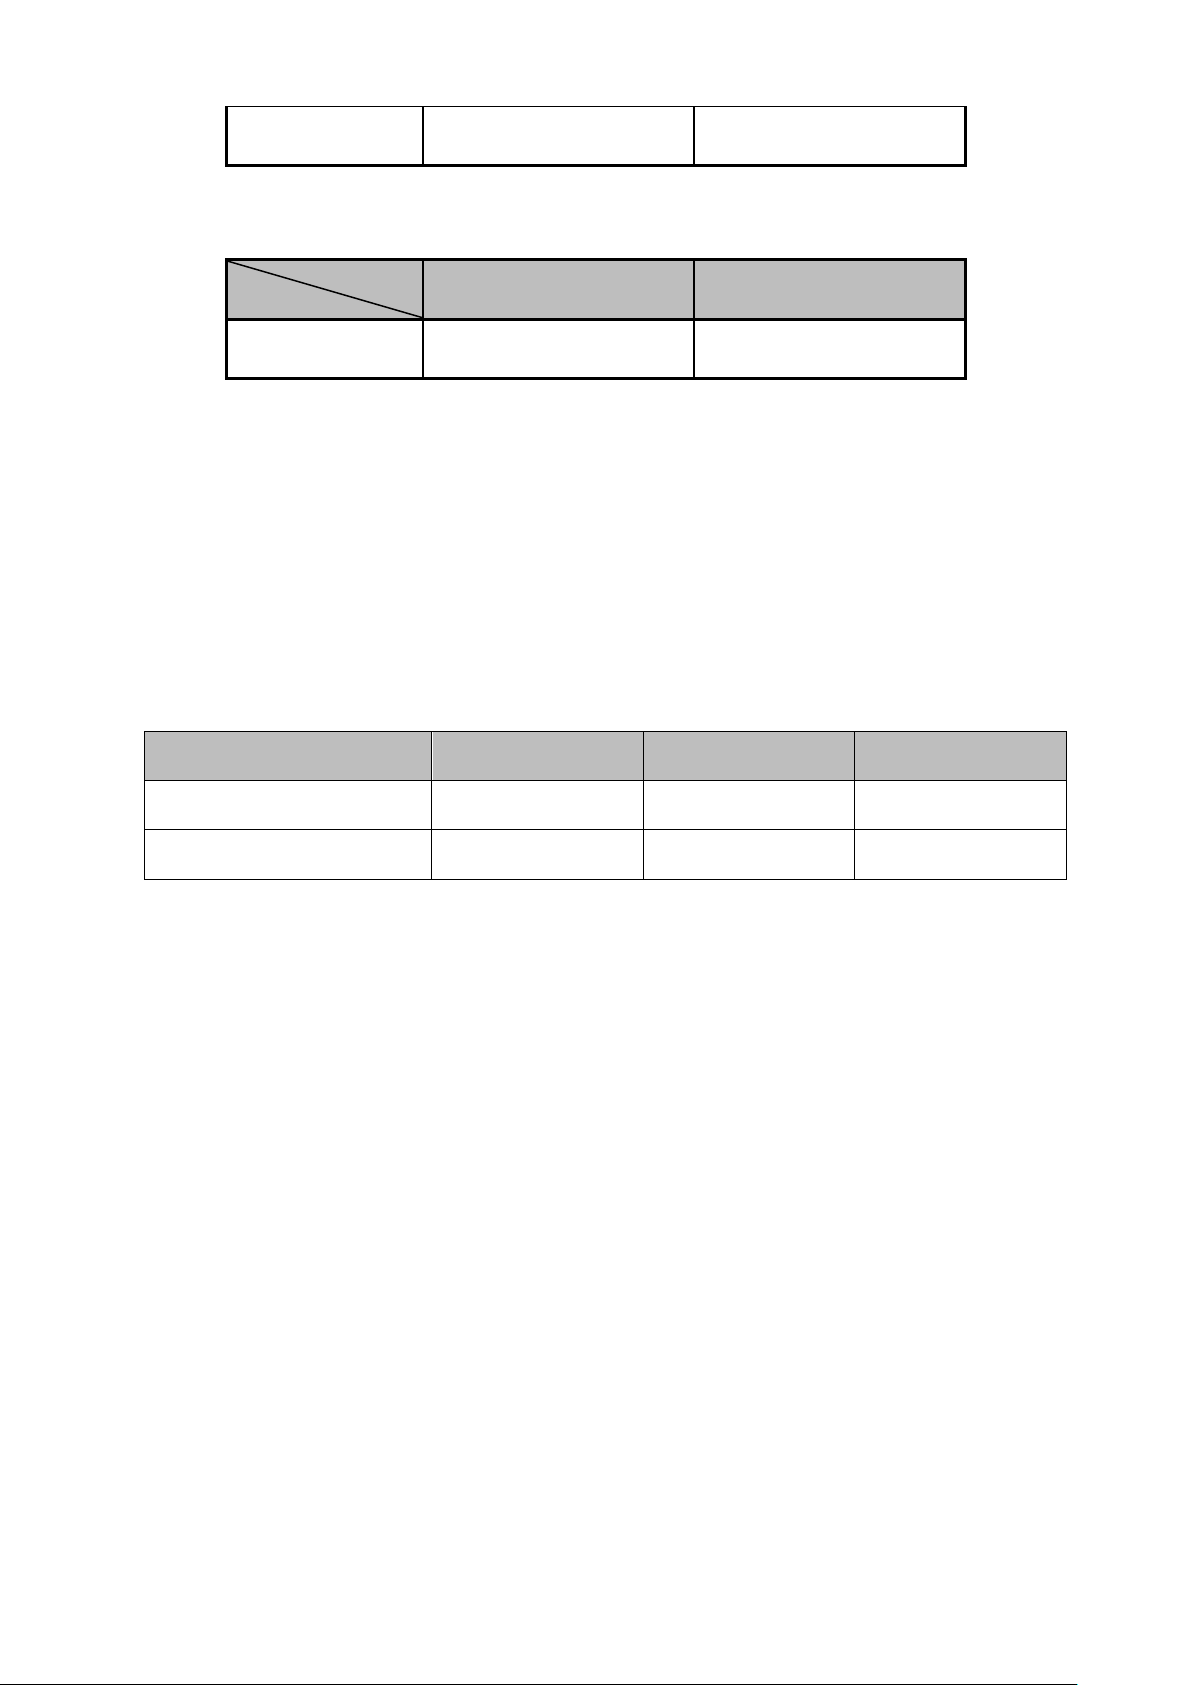
Voor gebruik
Bedrijfstemperatuurbereik:
Controleer of de uitlaatslang correct is gemonteerd.
Waarschuwingen voor koeling en ontvochtiging werkzaamheden:
- Houd bij het gebruik van functies voor koelen en ontvochtigen een interval van minimaal 3
minuten aan tussen elke AAN / UIT.
- Zorg dat de voeding van het apparaat voldoet aan de eisen.
- Het stopcontact dient geschikt te zijn voor airconditioning gebruik.
- Deel een stopcontact niet met andere apparaten.
- De voeding dient te voldoen aan: AC220V ~ 240V / 50Hz
AUTO-modus
Afhankelijk van de huidige kamertemperatuur, selecteert het apparaat automatisch de modus: koelen,
ontvochtigen of verwarmen (zie tabel 1).
Tabel 1
Koelen
- Druk op de knop "Modus" totdat het pictogram "Koel" verschijnt.
- Druk op de knop "OMLAAG" of "OMHOOG" om de gewenste kamertemperatuur te selecteren.
(16 ℃ -31 ℃)
- Druk op de "WIND" -knop om de windsnelheid te selecteren.
Ontvochtigen
- Druk op de knop "Modus" totdat het pictogram "Ontvochtigen" verschijnt.
- Stel de geselecteerde temperatuur automatisch in op de huidige kamertemperatuur minus 2 ℃.
(16 ℃ -31 ℃)
- Stel de ventilatormotor automatisch in op LAGE windsnelheid.
Ventileren
- Druk op de "Modus" knop totdat het "Ventilator" icoon verschijnt.
- Druk op de "WIND" -knop om de windsnelheid te selecteren.
16
Page 19

Verwarmen
(Deze functie is niet beschikbaar voor een koelingsunit)
- Druk op de "Modus" knop tot het "Verwarmen" icoon verschijnt.
- Druk op de knop "OMLAAG" of "OMHOOG" om de gewenste kamertemperatuur te selecteren.
(16 ℃ -31 ℃)
- Druk op de "WIND" -knop om de windsnelheid te selecteren.
Timerwerking
Timer AAN instelling:
- Als de airconditioner UIT staat, drukt u op de “Timer” -knop en selecteert u een gewenste AANtijd met de temperatuur- en tijdinstelknoppen.
- "Vooraf ingesteld OP TIJD" wordt weergegeven op het bedieningspaneel.
- De AAN-tijd kan op elk moment worden ingesteld in 0-24 uur.
Timer UIT-instelling
- Wanneer de airconditioner AAN staat, drukt u op de “Timer” -knop en selecteert u een gewenste
UIT-tijd met de temperatuur- en tijdinstelknoppen.
- "Vooraf ingestelde UIT Tijd" wordt weergegeven op het bedieningspaneel.
- De UIT-tijd kan op elk moment worden ingesteld in 0-24 uur.
Auto SWING
Nadat het apparaat is ingeschakeld, drukt u op deze toets, de lamel zal continu naar links en rechts
zwaaien; door nogmaals op deze knop te drukken, stopt de beweging en blijft de lamel in die
positie.
SLAAP-modus
- Druk in de koel-modus op de SLAAP-toets om de temperatuur in te stellen. Het stijgt 1 ℃ na
een uur en stijgt hoogstens 2 ℃ na 2 uur.
- Druk in de verwarming-modus op de SLAAP-toets om de temperatuur in te stellen. Het daalt na
een uur 1 ℃ en daalt na 2 uur hooguit 2 ℃ af.
- Druk nogmaals op de SLAAP-toets om de instelling te annuleren.
Waterafvoer
Vol water alarm
De binnenste waterbak in de airconditioner heeft één waterniveau-veiligheidsschakelaar, deze regelt
het waterniveau. Wanneer het waterpeil een verwachte hoogte bereikt, gaat de indicator voor vol
water branden. Als de waterbak vol is, verwijder dan de rubberen stop van de afvoer aan de
onderkant van de unit en voer al het water naar buiten af.
Continue afvoer
- Als u van plan bent om dit apparaat lange tijd niet te gebruiken, verwijder dan de rubberen stop
uit de afvoeropening aan de onderkant van het apparaat en laat al het water naar buiten lopen.
- U kunt de continue afvoer gebruiken met een afvoerslang die is aangesloten op het onderste
afvoergat, wanneer de unit in de VERWARMEN-modus werkt.
- De continue afvoer hoeft niet te worden toegepast wanneer de unit in de modus KOELEN of
ONTVOCHTIGEN werkt. De unit kan het condenswater automatisch verdampen door de
spatmotor. Zorg ervoor dat de afvoergaten goed zijn afgedicht.
- Als de water spatmotor beschadigd is, kan continue afvoer worden gebruikt. Om de afvoerslang
aan te sluiten op de onderste afvoer (Fig.6), kan de unit ook goed werken.
- Als de spatmotor is beschadigd, kan ook intermitterende afvoer worden gebruikt. Onder deze
omstandigheden, wanneer het indicatielampje 'Water vol' gaat branden, sluit u een afvoerslang
aan op de onderste afvoeropening, waarna al het water in de watertank naar buiten wordt
afgevoerd.
Wifi-functie
- Houd de SNELHEID-knop gedurende 5 seconden ingedrukt om naar de wifi-
fabrieksinstellingsmodus te gaan.
- De unit is verbonden met wifi. Als de wifi-indicator brandt, is er geen verbinding. Wanneer de
17
Page 20
wifi-indicator langzaam knippert, staat het apparaat in de wifi-instelmodus. Als het snel knippert,
is het apparaat verbonden met wifi.
- U kunt alle functies van de airconditioner realiseren via de APP van de mobiele telefoon met
wifi verbonden.
6. Installatie instructies
- Een mobiele airconditioner dient op een vlakke en lege plaats worden geïnstalleerd.
- Blokkeer de luchtuitlaat niet.
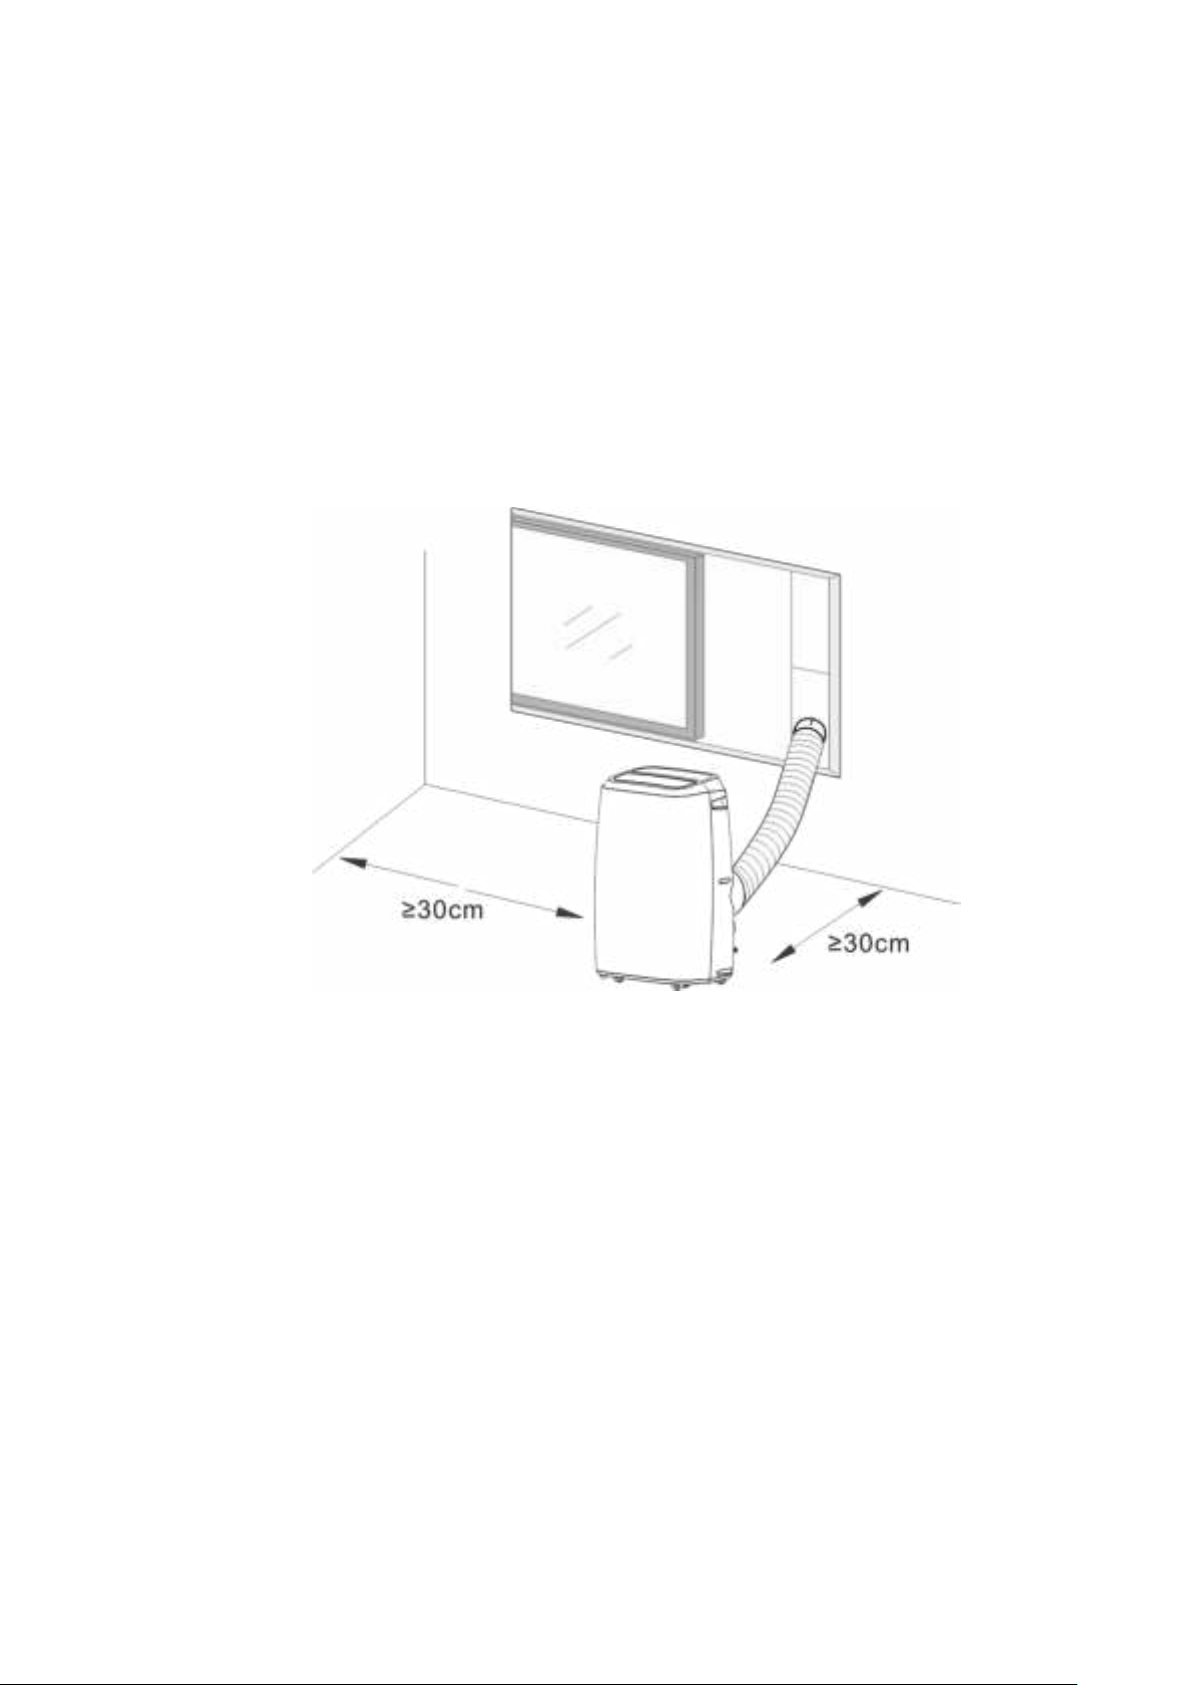
- De vereiste afstand rondom het apparaat moet minimaal 30 cm zijn. (Zie afbeelding 8)
- Het apparaat mag niet worden geïnstalleerd op een natte locatie, zoals de wasruimte.
- De bedrading van de stopcontacten moet in overeenstemming zijn met de lokale elektrische
veiligheidseisen.
Afbeelding 8
18
Page 21
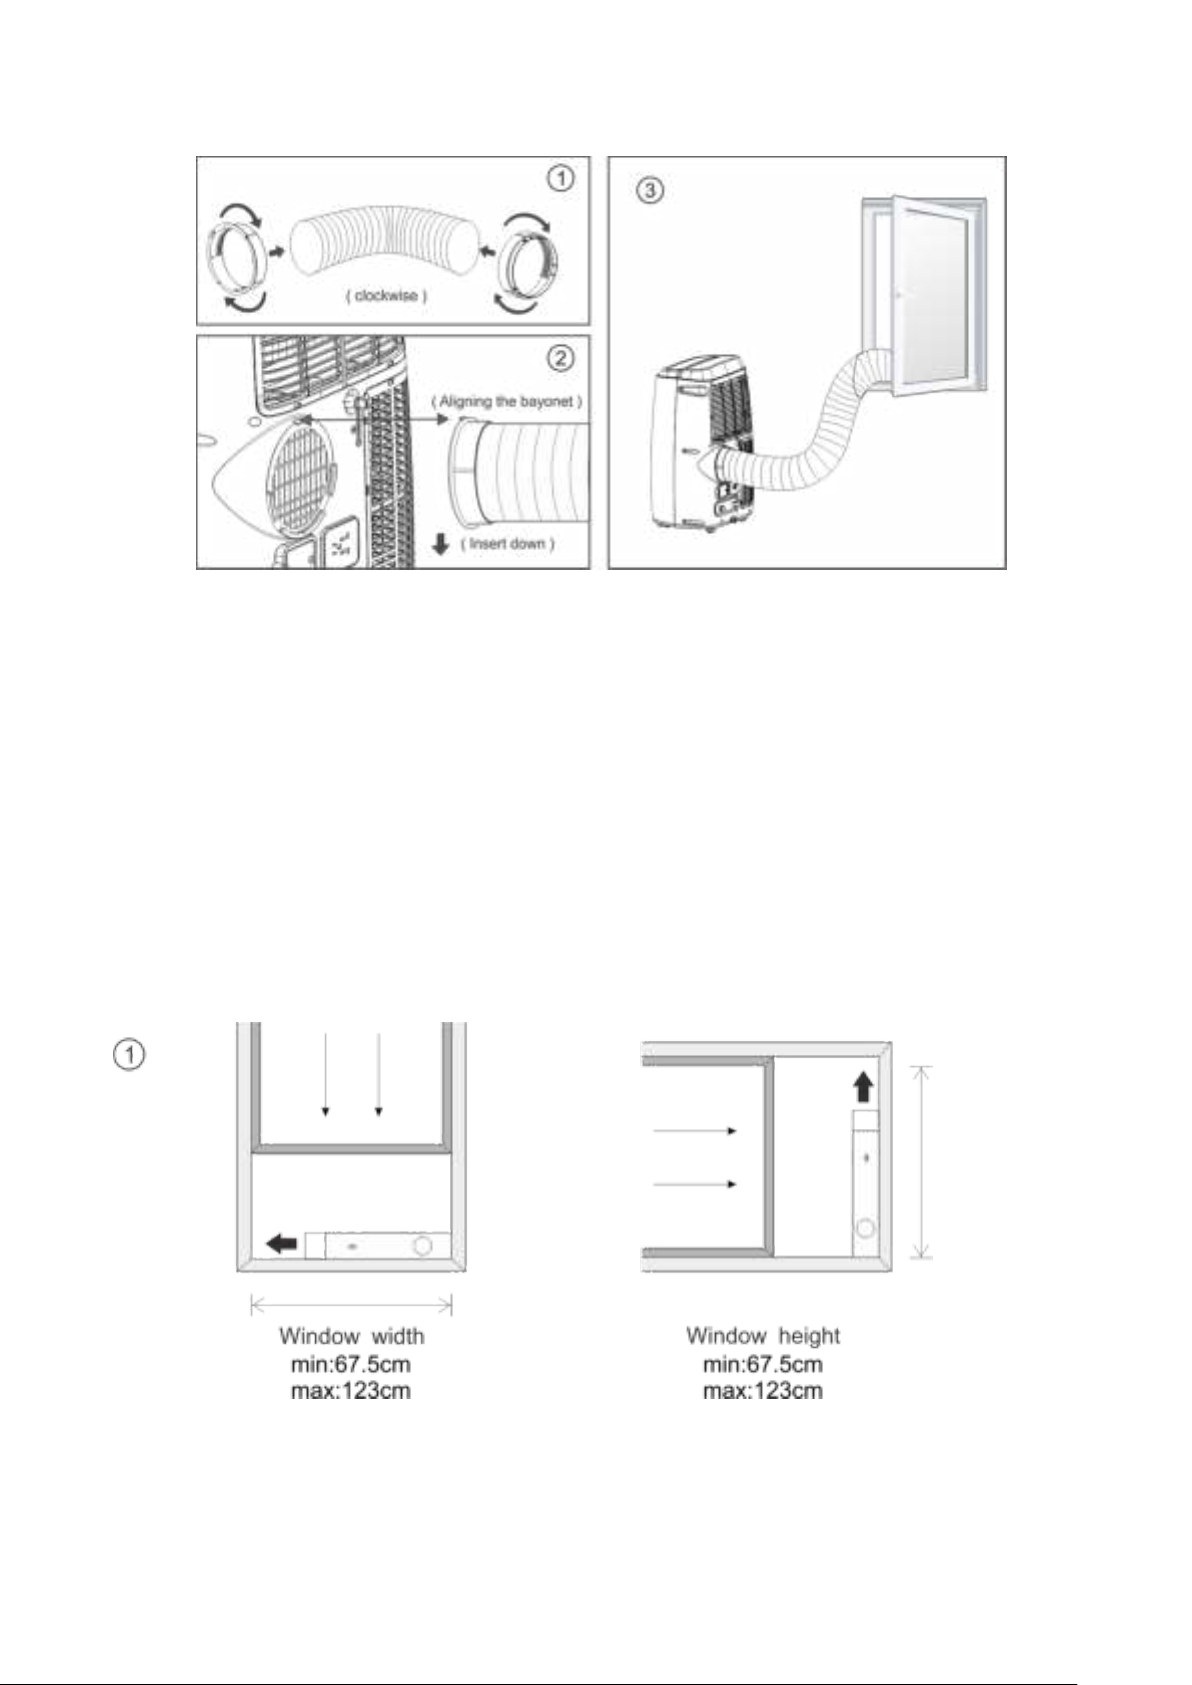
Inleiding tot de installatie van een afvoerslang
Afbeelding 9
Tijdelijke installatie
1. Draai de behuizings-adapter en de raamconnector naar de uiteinden van de uitlaatslang.
2. Steek de bevestigingsclip van de behuizings-adapter in de openingen aan de achterkant van
de airconditioner.
3. Plaats het andere uiteinde van de uitlaatslang in de vensterbank (zie afbeelding 9).
Raam kit installatie
De installatiewijze van de raamschuif kit is meestal in "horizontaal" of "verticaal".
- Zoals getoond in Afb. 10 en Afb. 10a, controleer de min. en max. grootte van het raam vóór de
installatie.
1. Installeer de raamkit op het raam (zie afbeelding 10 en afbeelding 10a)
2. Pas de lengte van de raamschuiverset aan de raambreedte of -hoogte aan en zet deze vast
met de plug.
3. Steek de raamkoppeling van de slang in het gat van de raamkit (zie afbeelding 11).
Afbeelding 10 Afbeelding 10a
19
Page 22
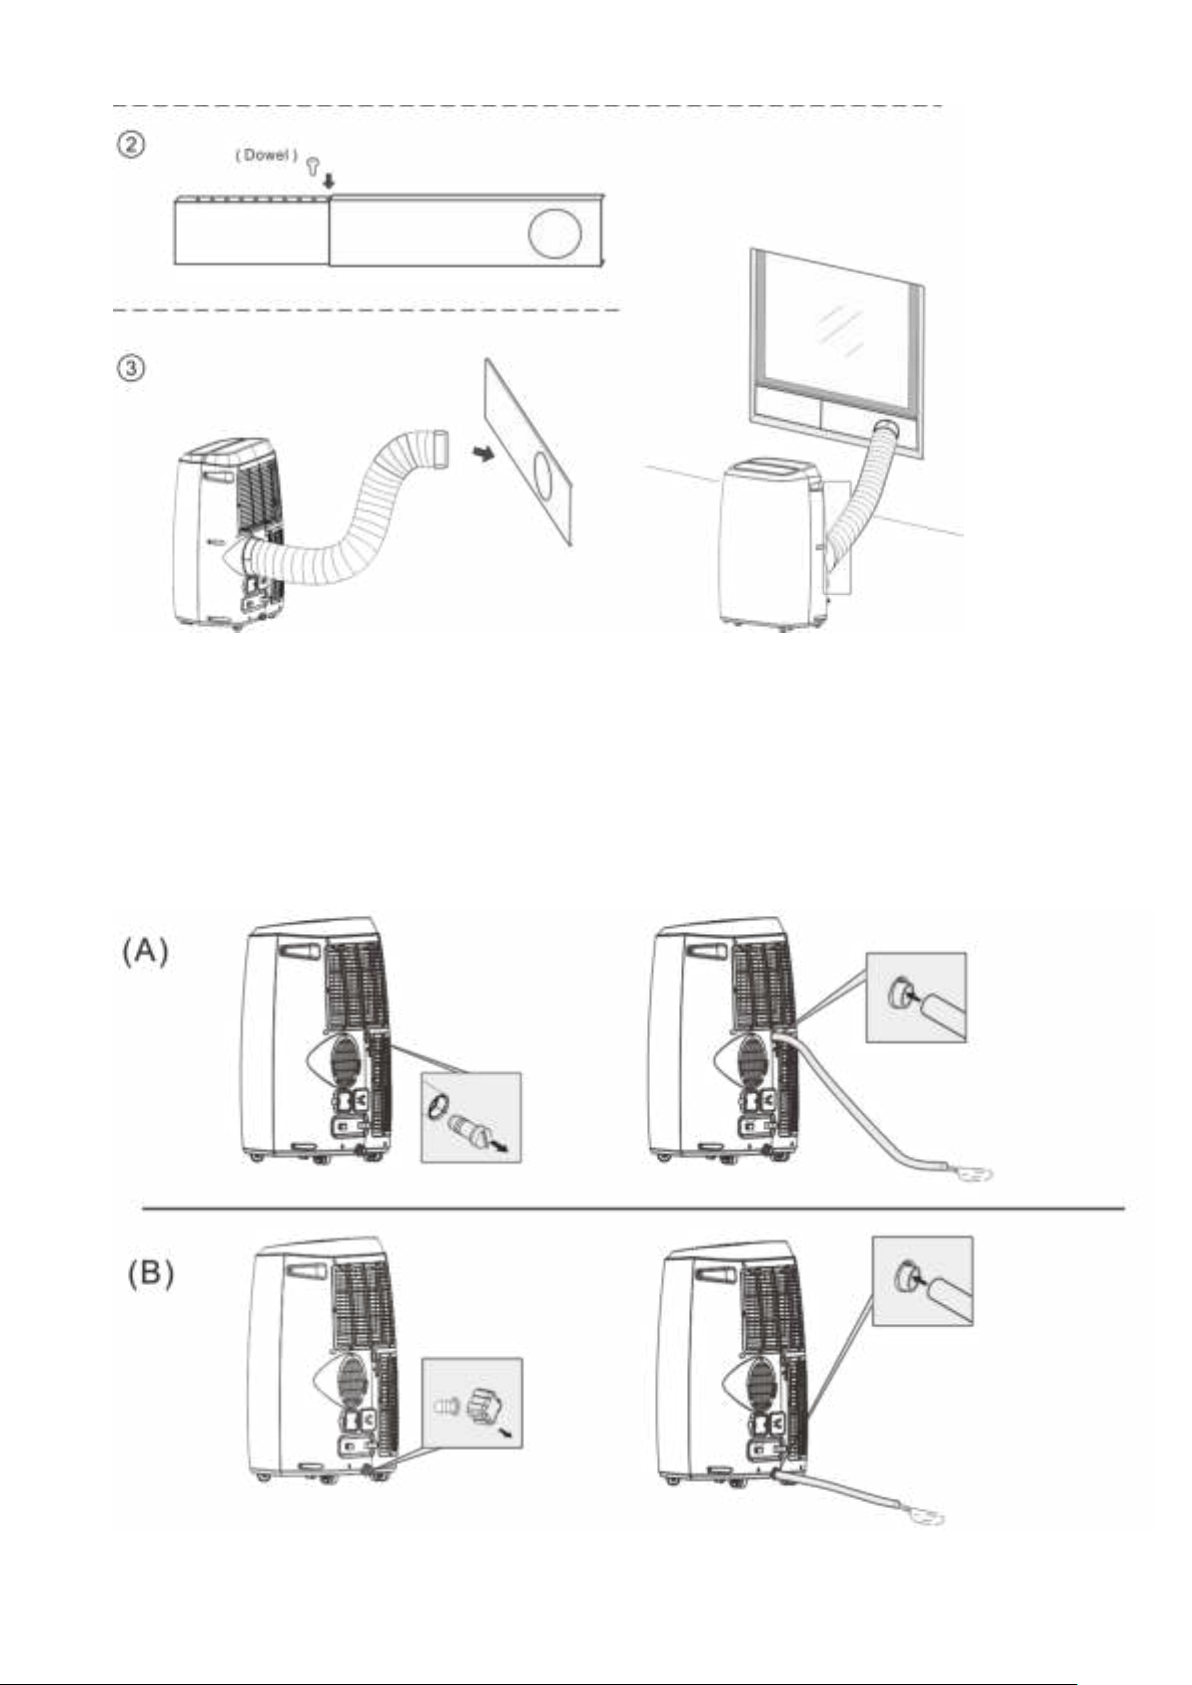
Afbeelding 11
Alarmfunctie waterbak vol
De binnenste waterbak in de airconditioner heeft één veiligheidsschakelaar voor het waterniveau,
deze regelt het waterniveau. Wanneer het waterpeil een verwachte hoogte bereikt, gaat de
indicator voor water vol branden. (Als de water spatmotor beschadigd is en het water vol is,
verwijder dan de rubberen verstopping aan de onderkant van het apparaat en al het water wordt
naar buiten afgevoerd.)
20
Page 23
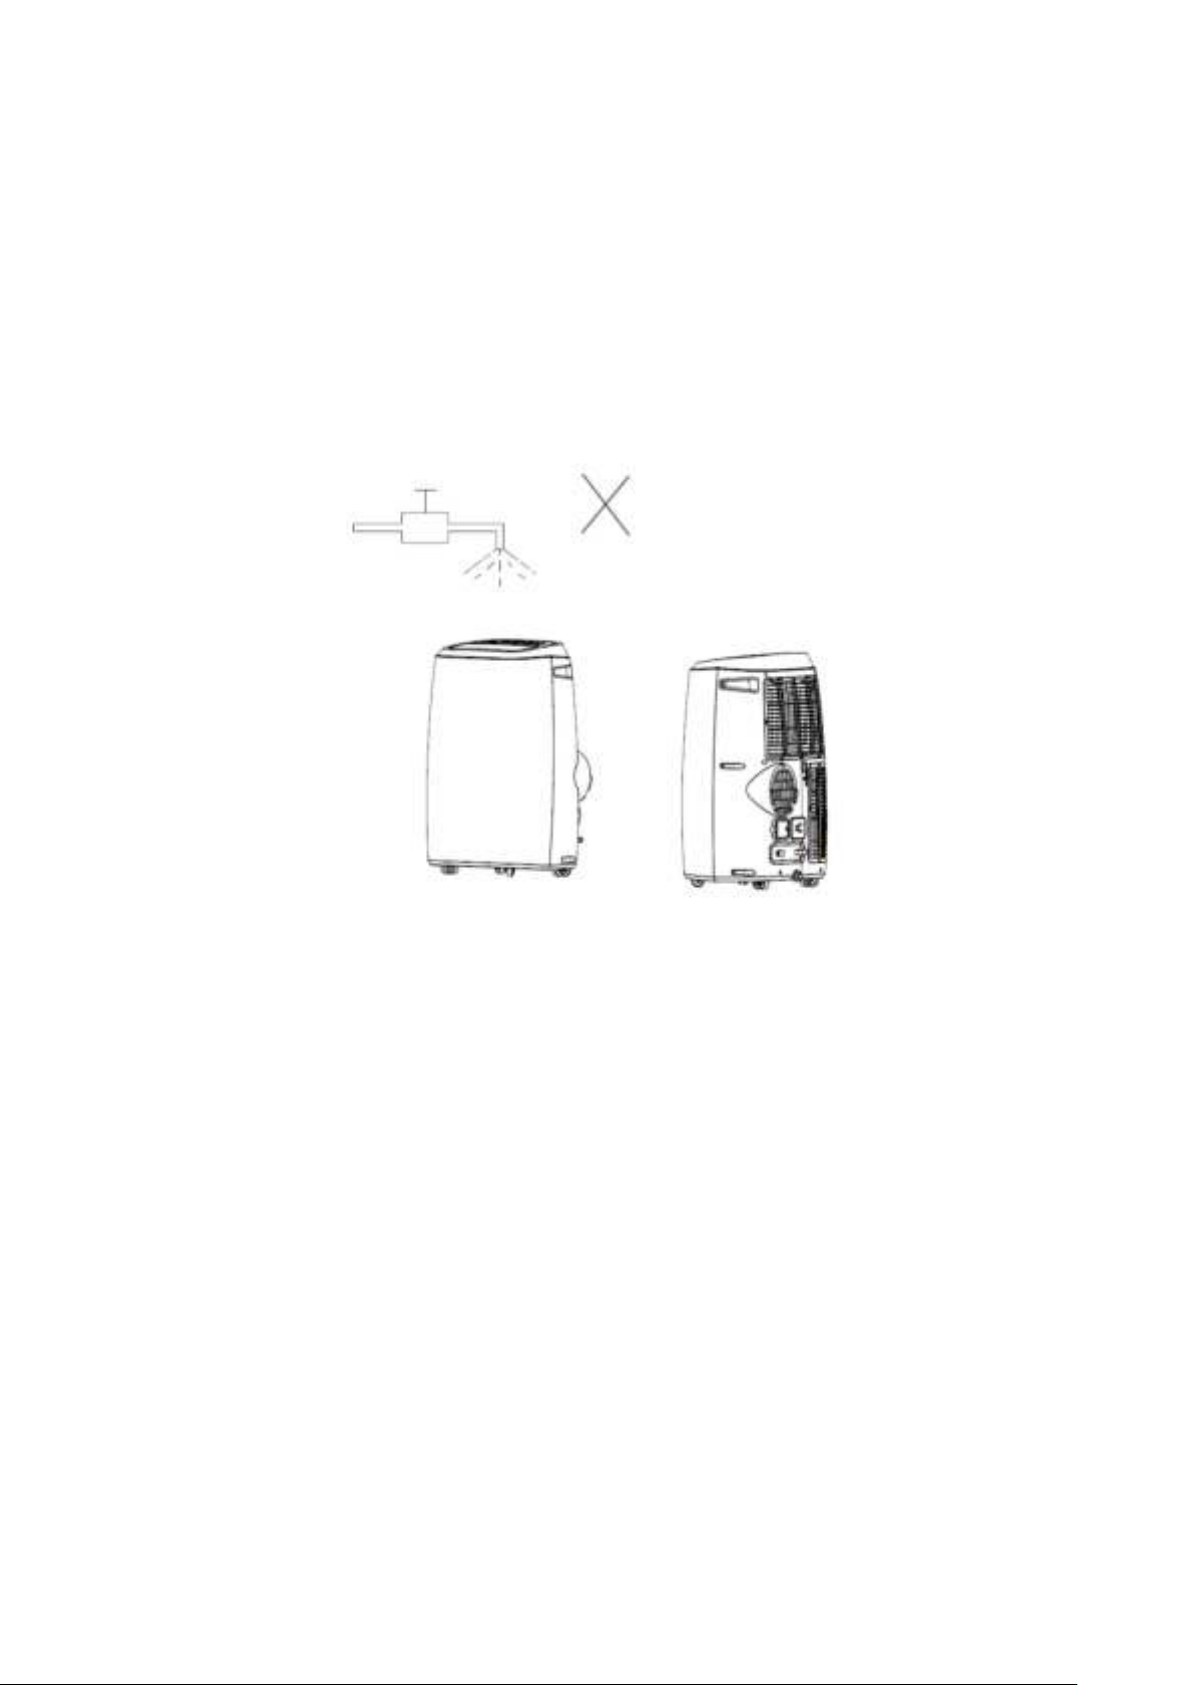
7. Onderhoudsinstructies
Verklaring:
- Zorg ervoor dat u het apparaat loskoppelt van een stopcontact voordat u het schoonmaakt.
- Gebruik geen benzine of andere chemicaliën om het apparaat te reinigen.
- Was het apparaat niet rechtstreeks.
- Als de conditioner beschadigd is, neem dan contact op met de dealer of reparatiewerkplaats.
Luchtfilter
Als het luchtfilter verstopt raakt met stof en/of vuil, moet het luchtfilter eens in de twee weken worden
gereinigd.
Demontage: Open het luchtinlaatrooster en verwijder het luchtfilter.
Reinigen: Reinig het luchtfilter met een neuraal reinigingsmiddel in lauwwarm water (40 ℃) en laat het
in de schaduw drogen.
Montage: Plaats het luchtfilter in het inlaatrooster en vervang de componenten zoals ze waren.
Reinig het oppervlak van de airconditioner
Maak het oppervlak eerst schoon met een neutraal schoonmaakmiddel en een natte doek, en veeg het
daarna af met een droge doek.
21
Page 24
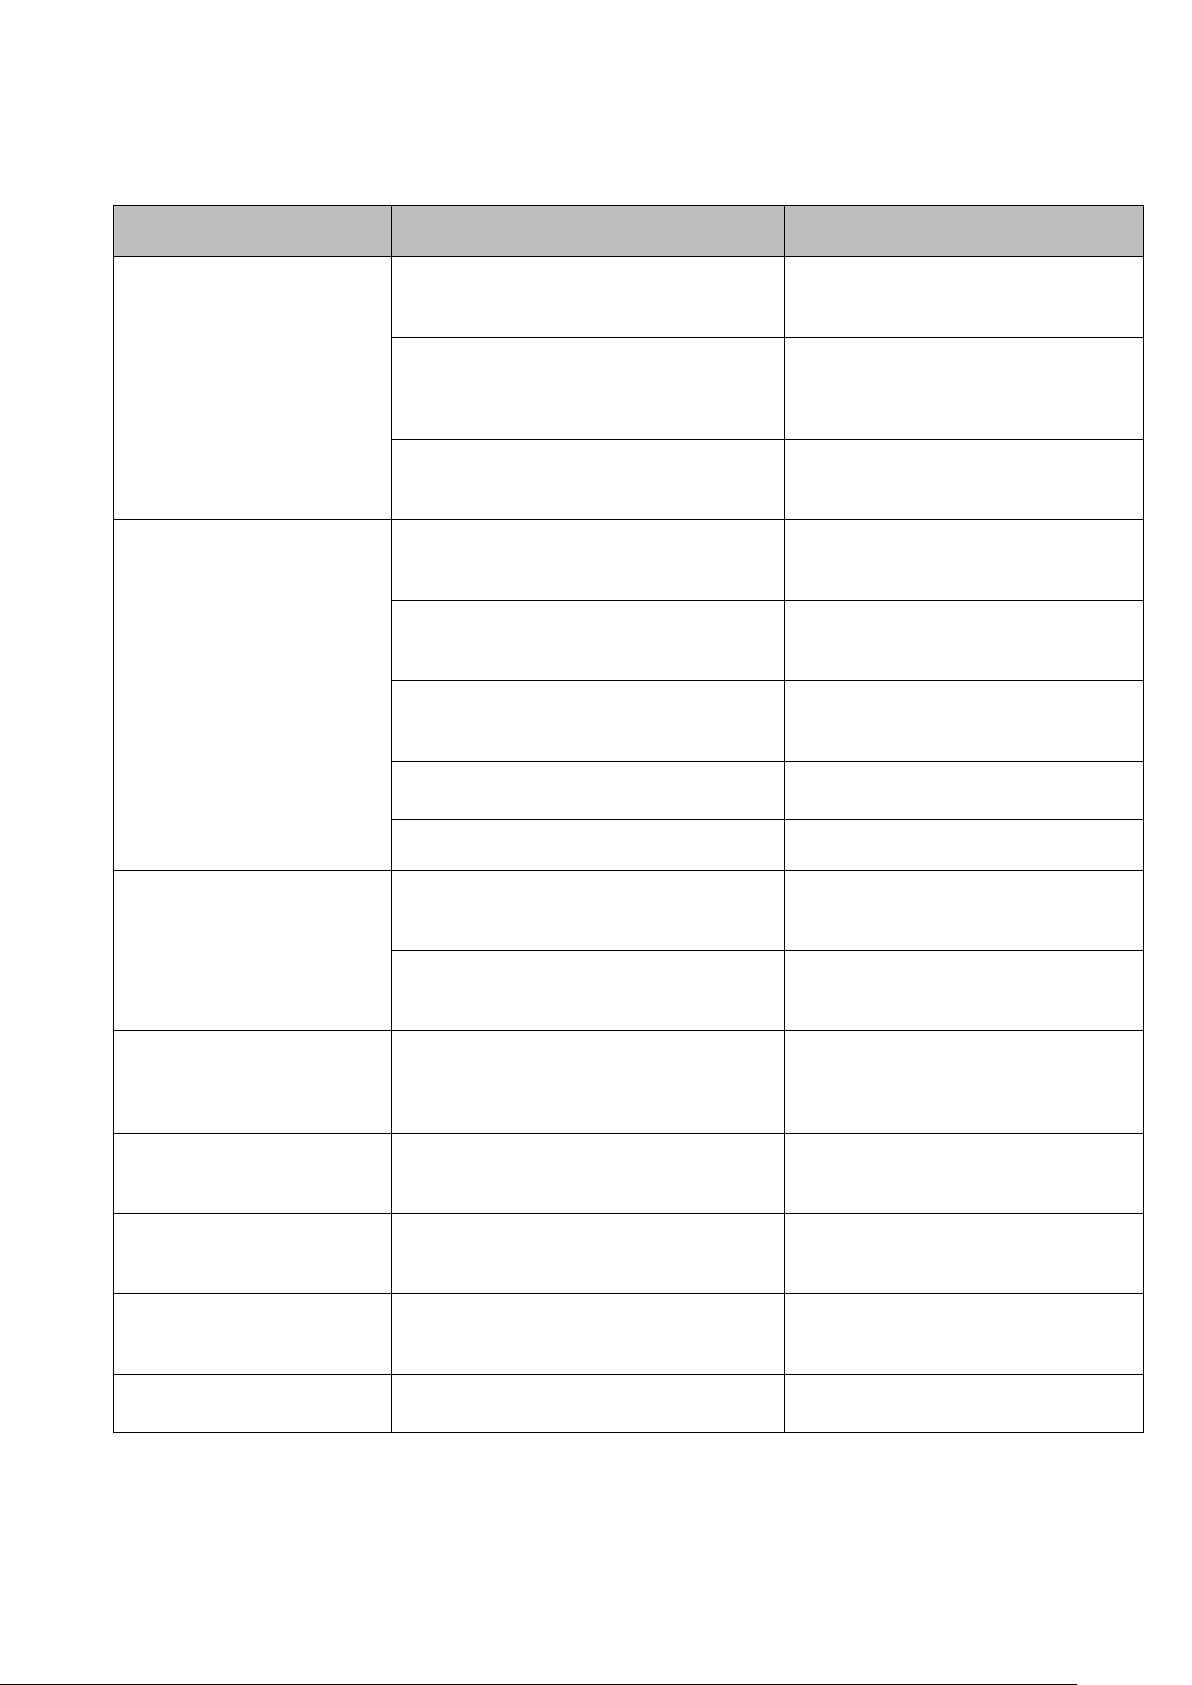
8. Probleemoplossing
Problemen
Mogelijke oorzaken
Voorgestelde oplossingen
1. Het apparaat start
niet als ik op de aan
/ uit-knop druk
Indicatielampje water vol knippert
en de waterbak is vol.
Giet het water uit de waterbak.
De kamertemperatuur is hoger dan
de ingestelde temperatuur.
(Elektrische verwarmingmodus)
Reset de temperatuur
De kamertemperatuur is lager dan
de ingestelde temperatuur.
(Koel-modus)
Reset de temperatuur
2. De airconditioner
maakt de ruimte niet
koud genoeg
De deuren of ramen zijn niet
gesloten.
Zorg ervoor dat alle ramen en
deuren gesloten zijn.
Er zijn warmtebronnen in de kamer.
Verwijder de warmtebronnen
indien mogelijk
Afvoerluchtslang is niet aangesloten
of verstopt.
Sluit de afvoerluchtslang aan of
reinig deze.
Temperatuurinstelling is te hoog.
Reset de temperatuur
Luchtinlaat is geblokkeerd.
Reinig de luchtinlaat.
3. Het apparaat maakt
lawaai
De grond is niet vlak of niet vlak
genoeg
Plaats het apparaat, indien
mogelijk, op een vlakke
ondergrond
Het geluid is afkomstig van het
stromende koudemiddel in de
airconditioner
Dit geluid hoort bij de functie van
het apparaat
4. E0-code
Kamertemperatuursensor defect
Vervang de
kamertemperatuursensor
(de unit kan ook zonder
vervanging werken.)
5. E1-code
Condensor temperatuursensor
defect
Vervang de condensor
temperatuursensor
6. E2-code
Waterbak vol tijdens koelen
Verwijder de rubberen stop en
laat het water weglopen.
6. E3-code
Verdamper temperatuursensor
defect
Vervang de verdamper
temperatuursensor
7. E4-code
Waterbak vol tijdens opwarmen
Maak de waterbak leeg.
Opmerking: het werkelijke product kan er anders uitzien dan afgebeeld in dit document.
22
Page 25
1. Safety Awareness
VERY IMPORTANT!
Please do not install or use your portable air conditioner before you have carefully read this
manual. Please keep this instruction manual for an eventual product warranty and for future
reference.
Warning
Do not use means to accelerate the defrosting process or to clean, other than those
recommended by the manufacturer.
The appliance shall be stored in a room without continuously operating ignition sources
(for example: open flames, an operating gas appliance or an operating electric heater.
Do not pierce or burn.
Be aware the refrigerants may not contain an odour.
m2.
MODEL
X (m2)
5000Btu/h,7000Btu/h,8000Btu/h
4
9000Btu/h,10000Btu/h,10500Btu/h
12
12000Btu/h,14000,16000Btu/h,18000Btu/h
15
Warning (for R290)
1. Safety Awareness
Specific information regarding appliances with R290 refrigerant gas.
• Thoroughly read all of the warnings.
• When defrosting and cleaning the appliance , do not use any tools other than those
recommended by the manufacturing company.
• The appliance must be placed in an area without any continuously sources of ignition (for
example: open flames , gas or electrical appliances in operation).
• Do not puncture and do not burn.
• This appliance contains Y g (see rating label back of unit ) of R290 refrigerant gas.
• R290 is a refrigerant gas that complies with the European directives on the environment. Do
not puncture any part of the refrigerant circuit.
23
Page 26

General Safety Instruction
• If the appliance is installed, operated or stored in an unventilated area, the room must be
designed to prevent to the accumulation of refrigerant leaks resulting in a risk of fire or
explosion due to ignition of the refrigerant caused by electric heaters, stoves, or other sources
of ignition.
• The appliance must be stored in such a way as to prevent mechanical failure.
• Individuals who operate or work on the refrigerant circuit must have the appropriate
certification issued by an accredited organization that ensures competence in handling
refrigerants according to a specific evaluation recognized by associations in the industry.
• Repairs must be performed based on the recommendation from the manufacturing company.
Maintenance and repairs that require the assistance of other qualified personnel must be
performed under the supervision of an individual specified in the use of flammable
refrigerants.
1. The appliance is for indoor use only.
2. Do not use the unit on a socket under repairs or not installed properly
3. Do not use the unit, follow these precautions:
A: Near to source of fire.
B: An area where oil is likely to splash.
C: An area exposed to direct sunlight.
D: An area where water is likely to splash.
E: Near a bath, a laundry, a shower or a swimming pool.
4. Never insert your fingers, rods into the air outlet. Take special care to warn children of these
dangers.
5. Keep the unit upward while transport and storage, for the compressor locates properly.
6. Before cleaning the air-conditioner, always turn off or disconnect the power supply.
7. When moving the air-conditioner, always turn off and disconnect the power supply, and
move it slowly.
8. To avoid the possibility of fire disaster, the air-conditioner shall not be covered.
9. All the air-conditioner sockets must comply with the local electric safety requirements. If
necessary, please check it for the requirements.
10. Children should be supervised to ensure that they do not play with the appliance.
24
Page 27
11. If the supply cord is damaged, it must be replaced by the manufacturer, its service agent or
similarly qualified persons in order to avoid a hazard.
12. This appliance can be used by children aged from 8 years and above and persons with
reduced physical, sensory or mental capabilities or lack of experience and knowledge if
they have been given supervision or instruction concerning use of the appliance in a safe
way and understand the hazards involved. Children shall not play with the appliance.
Cleaning and user maintenance shall not be made by children without supervision.
13. The appliance shall be installed in accordance with national wiring regulations.
14. Details of type and rating of fuses:
T, 250V AC,2A or higher.
15. Recycling
This marking indicates that this product should not be disposed with other household wastes
throughout the EU. To prevent possible harm to the environment or human health from
uncontrolled waste disposal, recycle it responsibly to promote the sustainable reuse of
material resources. To return your used device, please use the return and collection systems
or contact the retailer where the product was purchased. They can take this product for
environmental safe recycling.
16. Contact authorized service technician for repair or maintenance of this unit.
17. Do not pull , deform . or modify the power supply cord , or immerse it in water . Pulling or
misuse of the power supply cord can result in damage to the unit and cause electrical shock.
18. Compliance with national gas regulations shall be observed.
19. Keep ventilation openings clear of obstruction.
20. Any person who is involved with working on or breaking into a refrigerant circuit should hold
a current valid certificate from an industry-accredited assessment authority, which
authorizes their competence to handle refrigerants safely in accordance with an industry
recognized assessment specification.
21. Servicing shall only be performed as recommended by the equipment manufacturer .
Maintenance and repair requiring the assistance of other skilled personnel shall be carried
out under the supervision of the person competent in the use of flammable refrigerants.
22. Do not operate or stop the unit by inserting or pulling out Die power plug, it may cause
electric shock or fire due to heat generation .
25
Page 28
INSTRUCTIONS FOR REPAIRING APPLIANCES CONTAINING R290
23. Unplug the unit if strange sounds, smell, or smoke comes from it.
Notes:
— If any parts damage, please contact the dealer or a designated repair shop;
— In case of any damage, please turn off the air switch, disconnect the power supply, and
contact the dealer or a designated repair shop;
— In any case, the power cord shall be firmly grounded.
— To avoid the possibility of danger, if power cord is damaged, please turn off the air switch
and disconnect the power supply. It must be replaced from the dealer or a designated repair
shop.
1 GENERAL INSTRUCTIONS
1.1 Checks to the area
Prior to beginning work on systems containing flammable refrigerants, safety checks are
necessary to ensure that the risk of ignition is minimised. For repair to the refrigerating
system, the following precautions shall be complied with prior to con-ducting work on the
system.
1.2 Work procedure
Work shall be undertaken under a controlled procedure so as to minimise the risk of a
flammable gas or vapour being present while the work is being performed.
1.3 General work area
All maintenance staff and others working in the local area shall be instructed on the nature of
work being carried out. Work in confined spaces shall be avoided.The area around the
workspace shall be sectioned off. Ensure that the conditions within the area have been made
safe by control of flammable material.
1.4 Checking for presence of refrigerant
The area shall be checked with an appropriate refrigerant detector prior to and during work,
to ensure the technician is aware of potentially flammable atmospheres. Ensure that the leak
tection equipment being used is suitable for use with flammable refrigerants, i.e. nonsparking,
26
Page 29

adequately sealed or intrinsically safe.
1.5 Presence of fire extinguisher
If any hot work is to be conducted on the refrigeration equipment or any associated parts,
propriate fire extinguishing equipment shall be available to hand. Have a dry powder or CO 2
fire extinguisher adjacent to the charging area.
1.6 No ignition sources
No person carrying out work in relation to a refrigeration system which involves exposing any
pipe work that contains or has contained flammable refrigerant shall use any sources of
ignition in such a manner that it may lead to the risk of fire or explosion. All possible ignition
sources, including igarette smoking, should be kept sufficiently far away from the site of
installation, repairing, removing and disposal, during which flammable refrigerant can
possibly be released to the surrounding space. Prior to work taking place, the area around
the equipment is to be surveyed to make sure that there are no flammable hazards or ignition
risks. “No Smoking” signs shall be
displayed.
1.7 Ventilated area
Ensure that the area is in the open or that it is adequately ventilated before breaking into the
system or conducting any hot work. A degree of ventilation shall continue during the period
that the work is carried out. The ventilation should safely disperse any released refrigerant
and preferably expel it externally into the atmosphere.
1.8 Checks to the refrigeration equipment
Where electrical components are being changed, they shall be fit for the purpose and to the
correct specification. At all times the manufacturer’s maintenance and service guidelines
shall be followed. If in doubt consult the manufacturer’s technical department for
assistance.The following checks shall be applied to installations using flammable
refrigerants: the charge size is in accordance with the room size within which the refrigerant
containing parts are installed; the ventilation machinery and outlets are operating adequately
and are not obstructed; if an indirect refrigerating circuit is being used, the secondary circuit
shall be checked for the presence of refrigerant; marking to the equipment continues to be
visible and legible. Markings and signs that
are illegible shall be corrected; refrigeration pipe or components are installed in a position
where they are unlikely to be exposed to any substance which may corrode refrigerant
containing components, unless the components are constructed of materials which are
inherently resistant to being corroded or are suitably protected against being so corroded.
1.9 Checks to electrical devices
Repair and maintenance to electrical components shall include initial safety checks and
component inspection procedures. If a fault exists that could compromise safety, then no
electrical supply shall be connected to the circuit until it is satisfactorily dealt with. If the fault
cannot be corrected immediately but it is necessary to continue operation, an adequate
temporary solution shall be used. This shall be reported to the owner of the equipment so
all parties are advised.
Initial safety checks shall include: that capacitors are discharged: this shall be done in a safe
manner to avoid possibility of sparking; that there no live electrical components and wiring
are exposed while charging, recovering or purging the system; that there is continuity of
earth bonding.
2 REPAIRS TO SEALED COMPONENTS
2.1 During repairs to sealed components, all electrical supplies shall be disconnected from
the equipment being worked upon prior to any removal of sealed covers, etc. If it is
absolutely necessary to have an electrical supply to equipment during servicing, then a
permanently operating form of leak detection shall be located at the most critical point to
warn of a potentially hazardous situation.
2.2 Particular attention shall be paid to the following to ensure that by working on electrical
27
Page 30

components, the casing is not altered in such a way that the level of protection is affected.
This shall include damage to cables, excessive number of connections, terminals not
made to original specification, damage to seals, incorrect fitting of glands, etc. Ensure that
apparatus is mounted securely. Ensure that seals or sealing materials have not degraded
such that they no longer serve the purpose of preventing the ingress of flammable
atmospheres. Replacement parts shall be in accordance with the manufacturer’s
specifications.
NOTE The use of silicon sealant may inhibit the effectiveness of some types of leak
detection
equipment. Intrinsically safe components do not have to be isolated prior to working on
them.
3 REPAIR TO INTRINSICALLY SAFE COMPONENTS
Do not apply any permanent inductive or capacitance loads to the circuit without ensuring
that this will not exceed the permissible voltage and current permitted for the equipment in
use.
Intrinsically safe components are the only types that can be worked on while live in the
presence of a flammable atmosphere. The test apparatus shall be at the correct rating.
Replace components only with parts specified by the manufacturer. Other parts may result
in the ignition of refrigerant in the atmosphere from a leak.
4 CABLING
Check that cabling will not be subject to wear, corrosion, excessive pressure, vibration,
sharp edges or any other adverse environmental effects. The check shall also take into
account the effects of aging or continual vibration from sources such as compressors or
fans.
5 DETECTION OF FLAMMABLE REFRIGERANTS
Under no circumstances shall potential sources of ignition be used in the searching for or
detection of refrigerant leaks. A halide torch (or any other detector using a naked flame)
shall not be used.
6 LEAK DETECTION METHODS
The following leak detection methods are deemed acceptable for systems containing
flammable refrigerants. Electronic leak detectors shall be used to detect flammable
refrigerants, but the sensitivity may not be adequate, or may need recalibration. (Detection
equipment shall be
calibrated in a refrigerant-free area.) Ensure that the detector is not a potential source of
ignition and is suitable for the refrigerant used. Leak detection equipment shall be set at a
percentage of the LFL of the refrigerant and shall be calibrated to the refrigerant employed
and the appropriate percentage of gas (25 % maximum) is confirmed. Leak detection fluids
are suitable for use with most refrigerants but the use of detergents containing chlorine shall
be avoided as the chlorine may react with the refrigerant and corrode the copper pipe-work.
If a leak is suspected, all naked flames shall be removed/extinguished. If a leakage of
refrigerant is found which requires brazing, all of the refrigerant shall be recovered from the
system, or isolated (by
means of shut off valves) in a part of the system remote from the leak. Oxygen free nitrogen
(OFN) shall then be purged through the system both before and during the brazing process.
7 REMOVAL AND EVACUATION
When breaking into the refrigerant circuit to make repairs – or for any other purpose – conventional procedures shall be used.However, it is important that best practice is followed
since flammability is a consideration. The following procedure shall be adhered to: remove
refrigerant; purge the circuit with inert gas; evacuate; purge again with inert gas; open the
circuit by cutting or brazing.The refrigerant charge shall be recovered into the correct
recovery cylinders. The system shall be “flushed” with OFN to render the unit safe. This
process may need to be repeated several times.Compressed air or oxygen shall not be
used for this task. Flushing shall be achieved by breaking the vacuum in the system with
28
Page 31

OFN and continuing to fill until the working pressure is achieved, then venting to
atmosphere, and finally pulling down to a vacuum. This process shall be repeated until no
refrigerant is within the system. When the final OFN charge is used, the system shall be
vented down to atmospheric pressure to enable work to take place.This operation is
absolutely vital if brazing operations on the pipework are to take place.
Ensure that the outlet for the vacuum pump is not close to any ignition sources and there is
ventilation available.
8 CHARGING PROCEDURES
In addition to conventional charging procedures,the following requirements shall be
followed.
- Ensure that contamination of different refrigerants does not occur when using charging
equipment. Hoses or lines shall be as short as possible to minimise the amount of
refrigerant contained in them.
- Cylinders shall be kept upright.
- Ensure that the refrigeration system is earthed prior to charging the system with
refrigerant.
- Label the system when charging is complete (if not already).
- Extreme care shall be taken not to overfill the refrigeration system.
Prior to recharging the system it shall be pressure tested with OFN. The system shall be
leak
tested on completion of charging but prior to commissioning. A follow up leak test shall be
carried out prior to leaving the site.
9 DECOMMISSIONING
Before carrying out this procedure, it is essential that the technician is completely familiar
with the equipment and all its detail. It is recommended good practice that all refrigerants
are recovered safely. Prior to the task being carried out, an oil and refrigerant sample shall
be taken in case analysis is required prior to re-use of reclaimed refrigerant. It is essential
that electrical power is available before the task is commenced.
a) Become familiar with the equipment and its operation.
b) Isolate system electrically.
c) Before attempting the procedure ensure that :mechanical handling equipment is
available, if required, for handling refrigerant cylinders; all personal protective equipment is
available and being used correctly; the recovery process is supervised at all times by a
competent person; recovery equipment and cylinders conform to the appropriate
standards.
d) Pump down refrigerant system,if possible.
e) If a vacuum is not possible, make a manifold so that refrigerant can be removed from
various parts of the system.
f) Make sure that cylinder is situated on the scales before recovery takes place.
g) Start the recovery machine and operate in accordance with manufacturer's instructions.
h) Do not overfill cylinders. (No more than 80 % volume liquid charge).
i) Do not exceed the maximum working pressure of the cylinder,even temporarily.
j) When the cylinders have been filled correctly and the process completed, make sure
that the cylinders and the equipment are removed from site promptly and all isolation
valves on the equipment are closed off.
k) Recovered refrigerant shall not be charged into another refrigeration system
unless it has been cleaned and checked.
10 LABELLING
Equipment shall be labelled stating that it has been de-commissioned and emptied of refrigerant.The label shall be dated and signed.
Ensure that there are labels on the equipment stating the equipment contains flammable
refrigerant.
11 RECOVERY
29
Page 32

When removing refrigerant from a system, either for servicing or decommissioning, it is
recommended good practice that all refrigerants are removed safely. When transferring
refrigerant into cylinders, ensure that only appropriate refrigerant recovery cylinders are
employed. Ensure that the correct number of cylinders for holding the total system charge
are available.All cylinders to be used are designated for the recovered refrigerant and
labelled for that refrigerant (i.e. special cylinders for the recovery of refrigerant). Cylinders
shall be complete with pressure relief valve and associated shut-off valves in good working
order. Empty recovery cylinders are evacuated and, if possible, cooled before recovery
occurs.
The recovery equipment shall be in good working order with a set of instructions concerning
the equipment that is at hand and shall be suitable for the recovery of flammable
refrigerants.In addition,a set of calibrated weighing scales shall be available and in good
working order. Hoses shall be complete with leak-free disconnect couplings and in good
condition. Before using the recovery machine, check that it is in satisfactory working order,
has been properly maintained
and that any associated electrical components are sealed to prevent ignition in the event of
a refrigerant release. Consult manufacturer if in doubt.
The recovered refrigerant shall be returned to the refrigerant supplier in the correct recovery
cylinder,and the relevant Waste Transfer Note arranged. Do not mix refrigerants in recovery
units and especially not in cylinders.
If compressors or compressor oils are to be removed, ensure that they have been
evacuated to an acceptable level to make certain that flammable refrigerant does not
remain within the lubricant. The evacuation process shall be carried out prior to returning
the compressor to the suppliers. Only electric heating to the compressor body shall be
employed to accelerate this process.When oil is drained from a system,it shall be carried
out safely.
Competence of service personnel
General
Special training additional to usual refrigerating equipment repair procedures is required
when equipment with flammable refrigerants is affected.
In many countries, this training is carried out by national training organisations that are
accredited to teach the relevant national competency standards that may be set in legislation.
The achieved competence should be documented by a certificate.
Training
The training should include the substance of the following:
Information about the explosion potential of flammable refrigerants to show that flammables
may be dangerous when handled without care.
Information about potential ignition sources, especially those that are not obvious, such as
lighters, light switches, vacuum cleaners, electric heaters.
Information about the different safety concepts:
Unventilated – (see Clause GG.2) Safety of the appliance does not depend on ventilation of
the housing. Switching off the appliance or opening of the housing has no significant effect on
the safety. Nevertheless, it is possible that leaking refrigerant may accumulate inside the
enclosure and flammable atmosphere will be released when the enclosure is opened.
Ventilated enclosure – (see Clause GG.4) Safety of the appliance depends on ventilation of
the housing. Switching off the appliance or opening of the enclosure has a significant effect
on the safety. Care should be taken to ensure a sufficient ventilation before.
Ventilated room – (see Clause GG.5) Safety of the appliance depends on the ventilation of
the room. Switching off the appliance or opening of the housing has no significant effect on
the safety. The ventilation of the room shall not be switched off during repair procedures.
Information about the concept of sealed components and sealed enclosures
according to IEC 60079-15:2010.
30
Page 33

Information about the correct working procedures:
a) Commissioning
• Ensure that the floor area is sufficient for the refrigerant charge or that the ventilation
duct is assembled in a correct manner.
• Connect the pipes and carry out a leak test before charging with refrigerant.
• Check safety equipment before putting into service.
b) Maintenance
• Portable equipment shall be repaired outside or in a workshop specially equipped for
servicing units with flammable refrigerants.
• Ensure sufficient ventilation at the repair place.
• Be aware that malfunction of the equipment may be caused by refrigerant loss and a
refrigerant leak is possible.
• Discharge capacitors in a way that won’t cause any spark. The standard procedure to
short circuit the capacitor terminals usually creates sparks.
• Reassemble sealed enclosures accurately. If seals are worn, replace them.
• Check safety equipment before putting into service.
c) Repair
• Portable equipment shall be repaired outside or in a workshop specially equipped for
servicing units with flammable refrigerants.
• Ensure sufficient ventilation at the repair place.
• Be aware that malfunction of the equipment may be caused by refrigerant loss and a
refrigerant leak is possible.
• Discharge capacitors in a way that won’t cause any spark.
• When brazing is required, the following procedures shall be carried out in the right
order:
– Remove the refrigerant. If the recovery is not required by national regulations, drain
the refrigerant to the outside. Take care that the drained refrigerant will not cause
any danger. In doubt, one person should guard the outlet. Take special care that
drained refrigerant will not float back into the building.
– Evacuate the refrigerant circuit.
– Purge the refrigerant circuit with nitrogen for 5 min.
– Evacuate again.
– Remove parts to be replaced by cutting, not by flame.
– Purge the braze point with nitrogen during the brazing procedure.
– Carry out a leak test before charging with refrigerant.
• Reassemble sealed enclosures accurately. If seals are worn, replace them.
• Check safety equipment before putting into service.
d) Decommissioning
• If the safety is affected when the equipment is putted out of service, the refrigerant
charge shall be removed before decommissioning.
• Ensure sufficient ventilation at the equipment location.
• Be aware that malfunction of the equipment may be caused by refrigerant loss and a
refrigerant leak is possible.
• Discharge capacitors in a way that won’t cause any spark.
• Remove the refrigerant. If the recovery is not required by national regulations, drain
the refrigerant to the outside. Take care that the drained refrigerant will not cause any
danger. In doubt, one person should guard the outlet. Take special care that drained
refrigerant will not float back into the building.
• Evacuate the refrigerant circuit.
• Purge the refrigerant circuit with nitrogen for 5 min.
• Evacuate again.
• Fill with nitrogen up to atmospheric pressure.
• Put a label on the equipment that the refrigerant is removed.
31
Page 34

e) Disposal
• Ensure sufficient ventilation at the working place.
• Remove the refrigerant. If the recovery is not required by national regulations, drain
the refrigerant to the outside. Take care that the drained refrigerant will not cause any
danger. In doubt, one person should guard the outlet. Take special care that drained
refrigerant will not float back into the building.
• Evacuate the refrigerant circuit.
• Purge the refrigerant circuit with nitrogen for 5 min.
• Evacuate again.
• Cut out the compressor and drain the oil.
Transportation, marking and storage for units that employ flammable refrigerants
Transport of equipment containing flammable refrigerants
Attention is drawn to the fact that additional transportation regulations may exist with respect
to equipment containing flammable gas. The maximum number of pieces of equipment or the
configuration of the equipment, permitted to be transported together will be determined by the
applicable transport regulations.
Marking of equipment using signs
Signs for similar appliances used in a work area generally are addressed by local regulations
and give the minimum requirements for the provision of safety and/or health signs for a work
location.
All required signs are to be maintained and employers should ensure that employees receive
suitable and sufficient instruction and training on the meaning of appropriate safety signs and
the actions that need to be taken in connection with these signs.
The effectiveness of signs should not be diminished by too many signs being placed together.
Any pictograms used should be as simple as possible and contain only essential details.
Disposal of equipment using flammable refrigerants
See national regulations.
Storage of equipment/appliances
The storage of equipment should be in accordance with the manufacturer’s instructions.
Storage of packed (unsold) equipment
Storage package protection should be constructed such that mechanical damage to the
equipment inside the package will not cause a leak of the refrigerant charge.
The maximum number of pieces of equipment permitted to be stored together will be
determined by local regulations.
32
Page 35
2. Name of Parts
Part Description
Quantity
Main Air conditioner Unit
1
Hot air exhaust hose
1
Hose Connector (Window end)
1
Hose Connector (Air conditioner end)
1
Window Kit
1
Remote Controller
1
2. Name of Parts
3. Accessories
4. Appearance and Function of Control Panel
Fig.1
3. Accessories
After
unpacking,
please check
whether the above-
mentioned
accessories are included, and check their purposes in the installation introduction in this
manual.
4. Appearance and Function of Control Panel
33
Page 36
5. Appearance and Function of Remote Control
POWER
FAN SPPED
UP
BUTTON
DOWN
MODE
TIMER ON/OFF
SWING
SLEEP
Fan speed selector
Mode selector
Hourly programming
Temperature selector
POWER
FAN SPPED
UP
BUTTON
DOWN
MODE
TIMER ON/OFF
SWING
SLEEP
Cooling only model
BUTTON
BUTTON
BUTTON
Cooling & Heating model
BUTTON
BUTTON
BUTTON
BUTTON
BUTTON
BUTTON
BUTTON
BUTTON
BUTTON
BUTTON
BUTTON
5. Appearance and Function of Remote Control
34
up
Page 37
6. Operation Introduction
Sleep mode selector
On/Off switch
Auto Swing selector
Temperature selector
down
Notes:
- Do not drop the remote control.
- Do not place the remote control in a location exposed to direct sunlight.
6. Operation Introduction
Before starting operations in this section:
1) Find a place where there is power supply nearby.
2) As shown in Fig.5 and Fig.5a, install the exhaust hose, and adjust the window position
well.
35
Page 38
Maximum cooling
Minimum cooling
Fig.5 Fig.5a
3) As shown in Fig. 6, connect drain hose well (only for using heating model);
4) Insert the power cord into an grounded
AC220~240V/50Hz socket;
5) Press the POWER button to turn on the air-conditioner.
Fig.6
6.1. Before using
Notice:
- Operation temperature range:
36
Page 39
Room Temperature (Tr)
Tr<23 ℃
23℃≤Tr <26℃
Tr ≥26℃
Mode
Heating
Dehumidify
Cooling
Set Temperature
21℃
23℃
25℃
DB/WB(℃)
35/24
18/12
Maximum heating
Minimum heating
DB/WB(℃)
27/---
7/---
Check up whether the exhaust hose has been mounted properly.
Cautions for cooling and dehumidifying operations:
- When using functions on cooling and dehumidifying, keep an interval of at least 3
minutes between each ON/OFF.
- Power supply meets the requirements.
- The socket is for AC use.
- Do not share one socket with other appliances.
- Power supply is
AC220V~240V/50Hz
6.2 AUTO Mode
- According to the current room temperature ,automatically select the mode:cooling,
dehumidifying or fan (see table 1).
Table 1
6.3 Cooling operation
- Press the “Mode” button till the “Cool” icon appears.
- Press the “ DOWN ”or“ UP ”button to select a desired room temperature. (16℃-31℃)
- Press the “ WIND ” button to select wind speed.
6.4 Dehumidifying operation
Press the “Mode” button till the “Dehumidify” icon appears .
- Automatically set the selected temperature to current room temperature minus 2℃. (16℃-31℃)
- Automatically set the fan motor to LOW wind speed.
6.5 Fan operation
- Press the “Mode” button till the “Fan” icon appears.
- Press the “ WIND ” button to select wind speed.
6.6 Heating operation (this function is not available for a cold-single unit)
- Press the “Mode” button till the “Heat” icon appears.
- Press the “ DOWN ”or“ UP ” button to select a desired room temperature. (16℃-31℃)
- Press the “ WIND ” button to select wind speed.
6.7 Timer operation
Timer ON setting:
- When the air-conditioner is OFF, press the “Timer” button and select a desired ON time through
the temperature and time setting buttons.
- “Preset ON Time” is displayed on the operation panel.
- ON time can be regulated at any time in 0-24 hours.
Timer OFF setting
- When the air-conditioner ON, press “Timer” button and select a desired OFF time through the
37
Page 40

7. Installation Explanations
temperature and time setting buttons.
- “Preset OFF Time” is displayed on the operation panel.
- OFF time can be regulated at any time in 0-24 hours.
6.8 Auto SWING
After machine turns on, press this key, the louver will swing continuously left and right; by pressing
this button again the movement will stop and the louver remain in that position.
6.9 SLEEP mode
- While in cooling mode, press the SLEEP key to set the temperature. It increases1 ℃ after an hour
and at most increases 2 ℃ after 2 hours.
- While in heating mode, press the SLEEP key to set the temperature. It decreases 1 ℃ after an
hour and at most decreases 2 ℃ after 2 hours.
- Press the SLEEP key again can cancel the setting.
6.10 Water drainage
Water Full Alarm
The inner water tray in the air-conditioner has one water
level safety switches, it controls the water level. When water level reaches an anticipated
height, the water full indicator lights up. When the water is full, please remove the rubber
blockage from the drainage outlet at the bottom of unit, and drain all water outside.
Continuous Drainage
- When you plan to leave this unit unused for a long time, please remove the rubber
blockage from the drainage hole at the bottom of unit, and drain all water outside.
- You can use the continuous drainage with a drainage hose connected to the bottom drain
hole, when the unit working at the HEAT mode.
- The continuous drainage is not need to be applied when the unit working at the COOL
or DEHUMIDIFY mode. The unit can evaporate the condensate water automatically by
the splash motor. Make sure the drainage holes are stemmed well.
- If water splash motor is damaged, continuous drainage can be used. To connect the
drain hose to the bottom drainage outlet (
Fig.6), the unit can also work well.
- If splash motor is damaged, intermittent drainage can also be used. Under this condition,
when the water full indicator lights up, please connect a drain hose to the bottom
drainage hole, then all the water in the water tank will be drained outside. The unit can
also work well.
6.11 WIFI function
- Long press the SPEED button for 5s, enter the WIFI factory set up mode;
- The unit is connected with WIFI If the WIFI indicator is on, other wise is not connected.
When the WIFI indicator flashing slowly, the unit is at the WIFI set up mode, if flashing
quickly, the unit is connected with WIFI;
- You can realize all the air conditioner functions by the mobile phone APP with the WIFI
connected.
7. Installation Explanations
7.1 Installation Explanations:
- A removal air-conditioner shall be installed in the flat and empty place all around. Don’t
block the air outlet, and the required distance around should be at least 30cm. (See
Fig.8)
- Should not be installed in wet location, such as the laundry room.
- Socket wiring should be in accordance with the local electric safety requirements.
38
Page 41
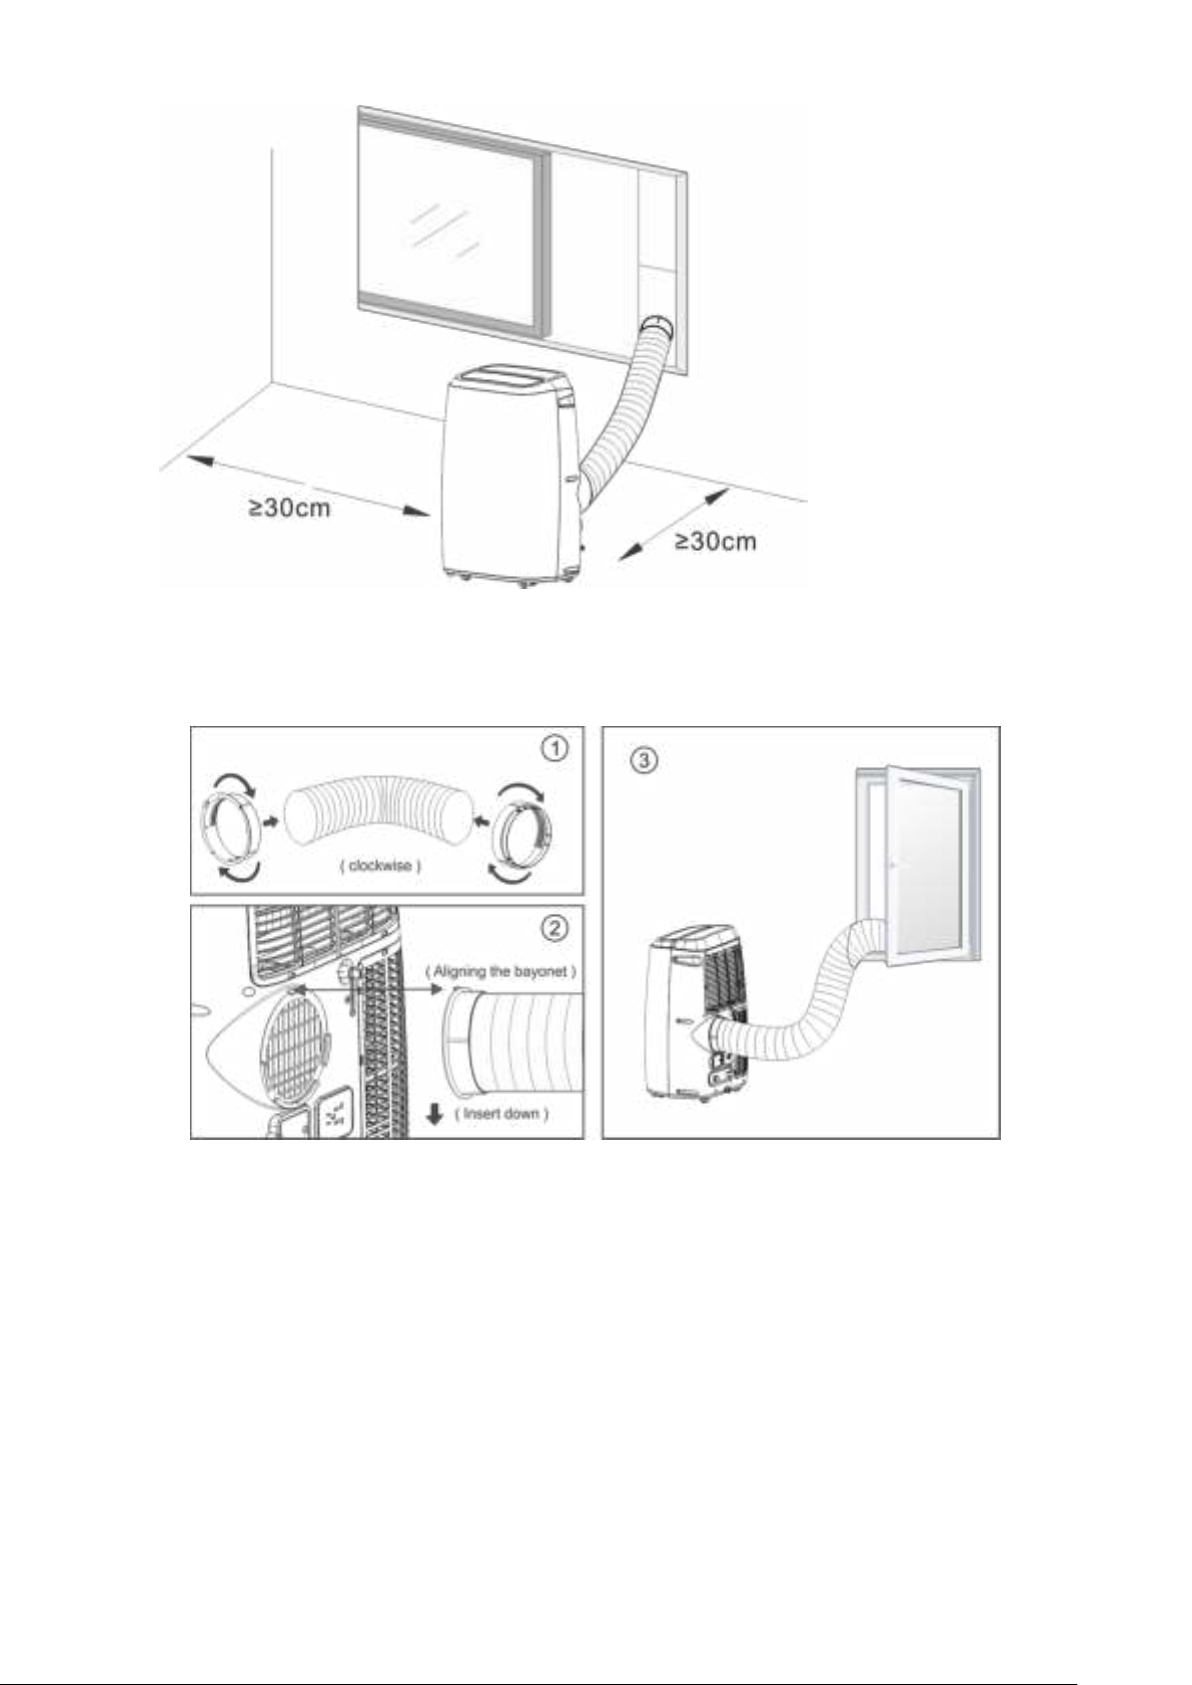
Fig.8
7.2 Introduction to Exhaust Hose Installation
Fig.9
Temporary installation
1. Twist the housing adaptor and the window Connector to the ends of the exhaust
hose.
2. Insert the fixing clip of the housing adaptor into the openings at back of the air
conditioner.
3. Put the other end of the exhaust hose to the near windowsill(
see Fig.9).
Window Kit Installation
The installation manner of window slider kit is mostly in “horizontal” or “vertical”. As
shown
Fig.10 and Fig.10a, check the min. and max. size of the window before the
installation.
1. Install the window kit on the window (
Fig.10, Fig.10a);
2. Adjust the length of the window slider kit according to the window width or height, and
39
Page 42
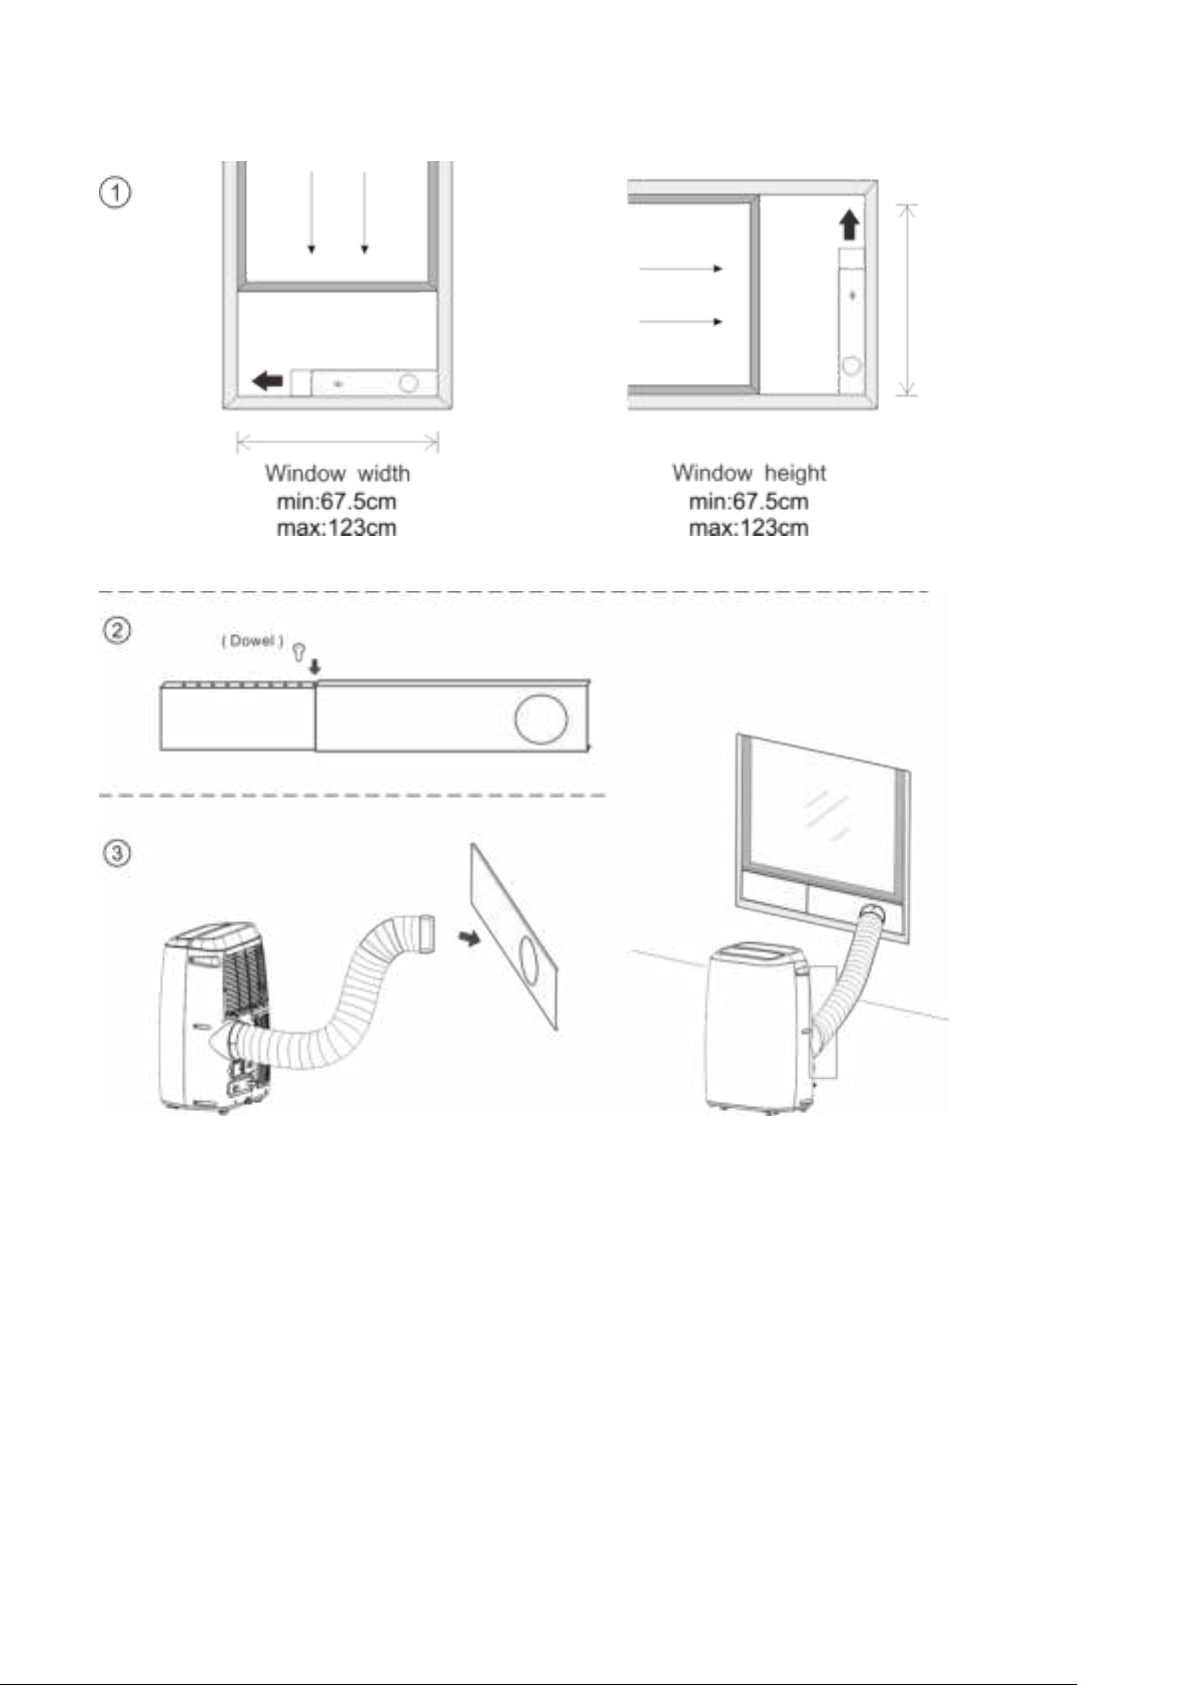
fix it with the dowel;
3. Insert the window connector of the hose to the hole of the window kit(Fig.11).
Fig.10 Fig.10a
Fig.11
7.3 Water Full Alarm Function
The inner water tray inside the air-conditioner has one water level safety switches, it
controls water level. When water level reaches an anticipated height, the water full indicator
lights up. (If water splash motor is damaged, when the water is full, please remove the rubber
blockage at the bottom of unit, and all water will be drained outside.)
40
Page 43
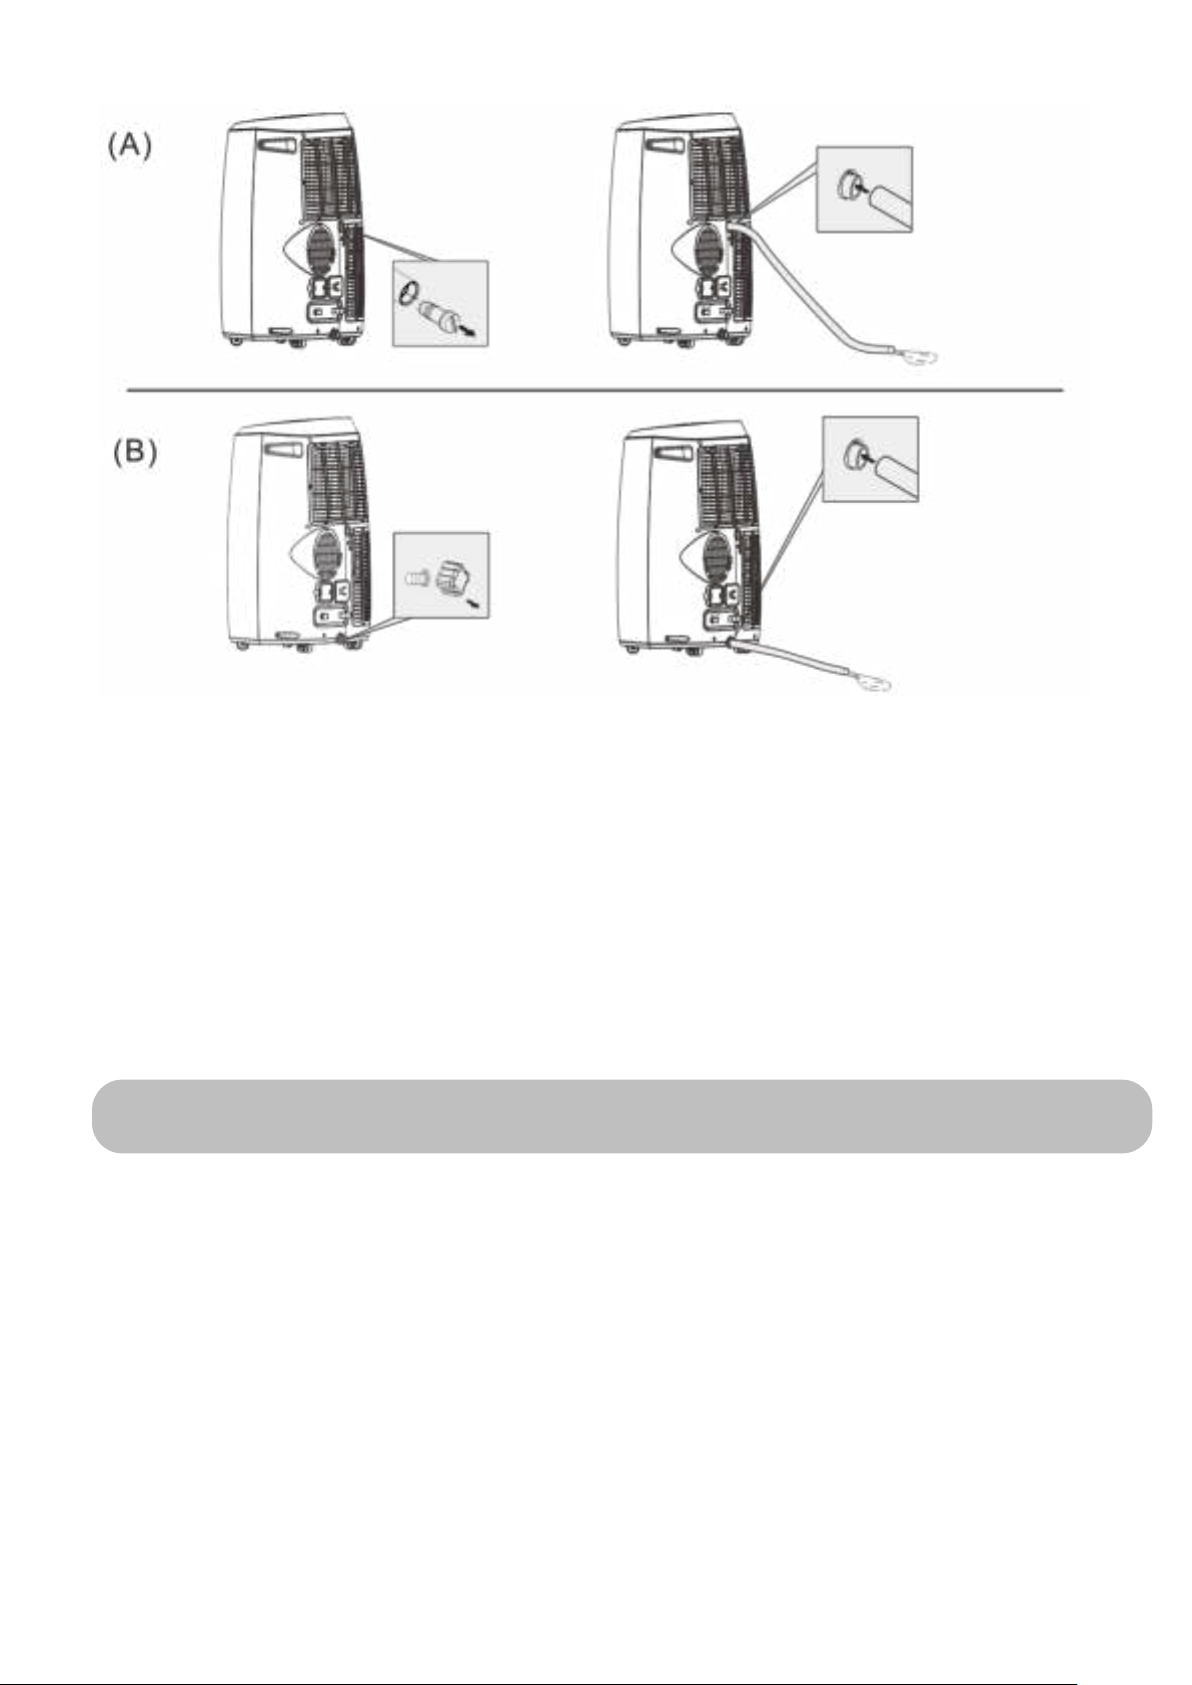
8. Maintenance Explanations
8. Maintenance Explanations
Declaration:
1) Before cleaning, be sure to disconnect the unit from any electric supply outlet;
2) Do not use gasoline or other chemicals to clean the unit;
3) Do not wash the unit directly;
4) If the conditioner is damaged, please contact the dealer or repair shop.
41
Page 44
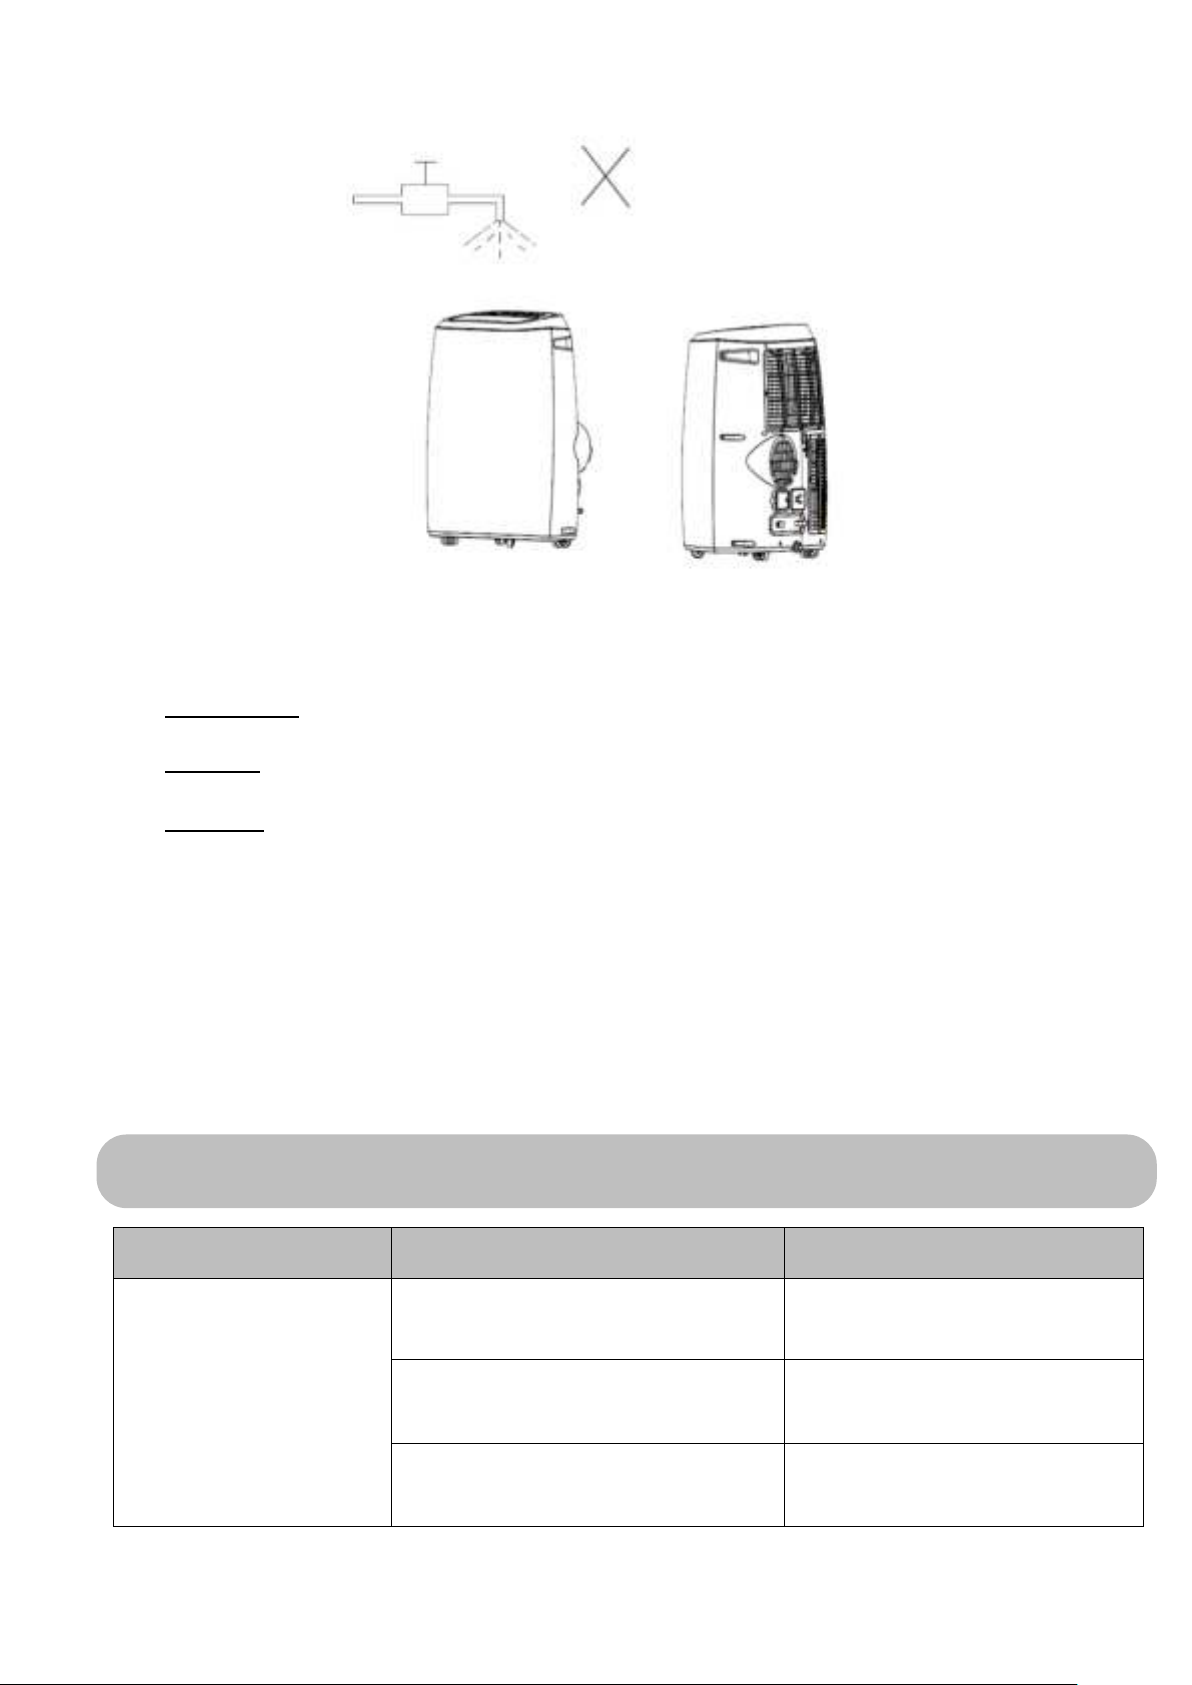
Troubles
Possible Causes
Suggested Remedies
1.Unit does not start
when pressing on/off
button
- Water full indicator lamp blinks,
and water tray is full.
Dump the water out of the
water tray.
- Room temperature is higher than
the setting temperature. (Electric
heating mode)
Reset the temperature
- Room temperature is lower than
the setting temperature. (Cooling
mode)
Reset the temperature
9. Troubleshooting
8.1 Air Filter
- If the air filter becomes clogged with dust/dirt, the air filter should be cleaned once every
two weeks.
- Dismounting
Open the air inlet grille and take off air filter.
- Cleaning
Clean the air filter with neural detergent in lukewarm(40℃)and dry it up in the shade.
Mounting
Putting the air filter into the inlet grille, replace the components as they were.
8.2 Clean the Air-conditioner Surface
First clean the surface with a neutral detergent and wet cloth, and then wipe it with a dry
cloth.
9. Troubleshooting
42
Page 45

2. Not cool enough
- The doors or windows are not
closed.
Make sure all the windows and
doors are closed.
- There are heat sources inside
the room.
Remove the heat sources if
possible
- Exhaust air hose is not
connected or blocked.
Connect or clean the exhaust
air hose.
- Temperature setting is too high.
Reset the temperature
- Air inlet is blocked.
Clean the air inlet.
3. Noisy
- The ground is not level or not flat
enough
Place the unit on a flat, level
ground if possible
- The sound comes from the
flowing of the refrigerant inside the
air conditioner
It is normal.
4. E0 Code
Room temperature sensor failed
Replace room temperature
sensor (the unit can also work
without replacement.)
5. E1 Code
Condenser temperature sensor
failed
Replace condenser
temperature sensor
6. E2 Code
Water tray full when cooling
Take off rubber stopper and
empty the water.
6. E3 Code
Evaporator temperature sensor
failed
Replace evaporator
temperature sensor
7. E4 Code
Water tray full when heating
Please empty the water tray.
Note: The real products may look different.
43
 Loading...