

Page 1
EVOKO MINTO CONFERENCE PHONE
USER MANUAL
2
www.evoko.se
EVOKO MINTO
CONFERENCE PHONE
USER MANUAL
Version 1.2
Page 2

EVOKO MINTO CONFERENCE PHONE
USER MANUAL
3
www.evoko.se
TABLE OF CONTENTS
Initial configuration ................................................................................................................. 03
Wall Mount instructions
........................................................................................................ 04
Using the Evoko Minto
.......................................................................................................... 05
Halo light statuses
.................................................................................................................... 07
Cable storage
.............................................................................................................................. 07
Charging & battery status
..................................................................................................... 07
Auto power off
.......................................................................................................................... 08
More about connections
........................................................................................................ 08
Configuration from the Evoko Control Panel
............................................................... 09
Model No: EM1001
Evoko Minto
Evoko Unlimited AB
Page 3
EVOKO MINTO CONFERENCE PHONE
USER MANUAL
4
www.evoko.se
1. Initial configuration
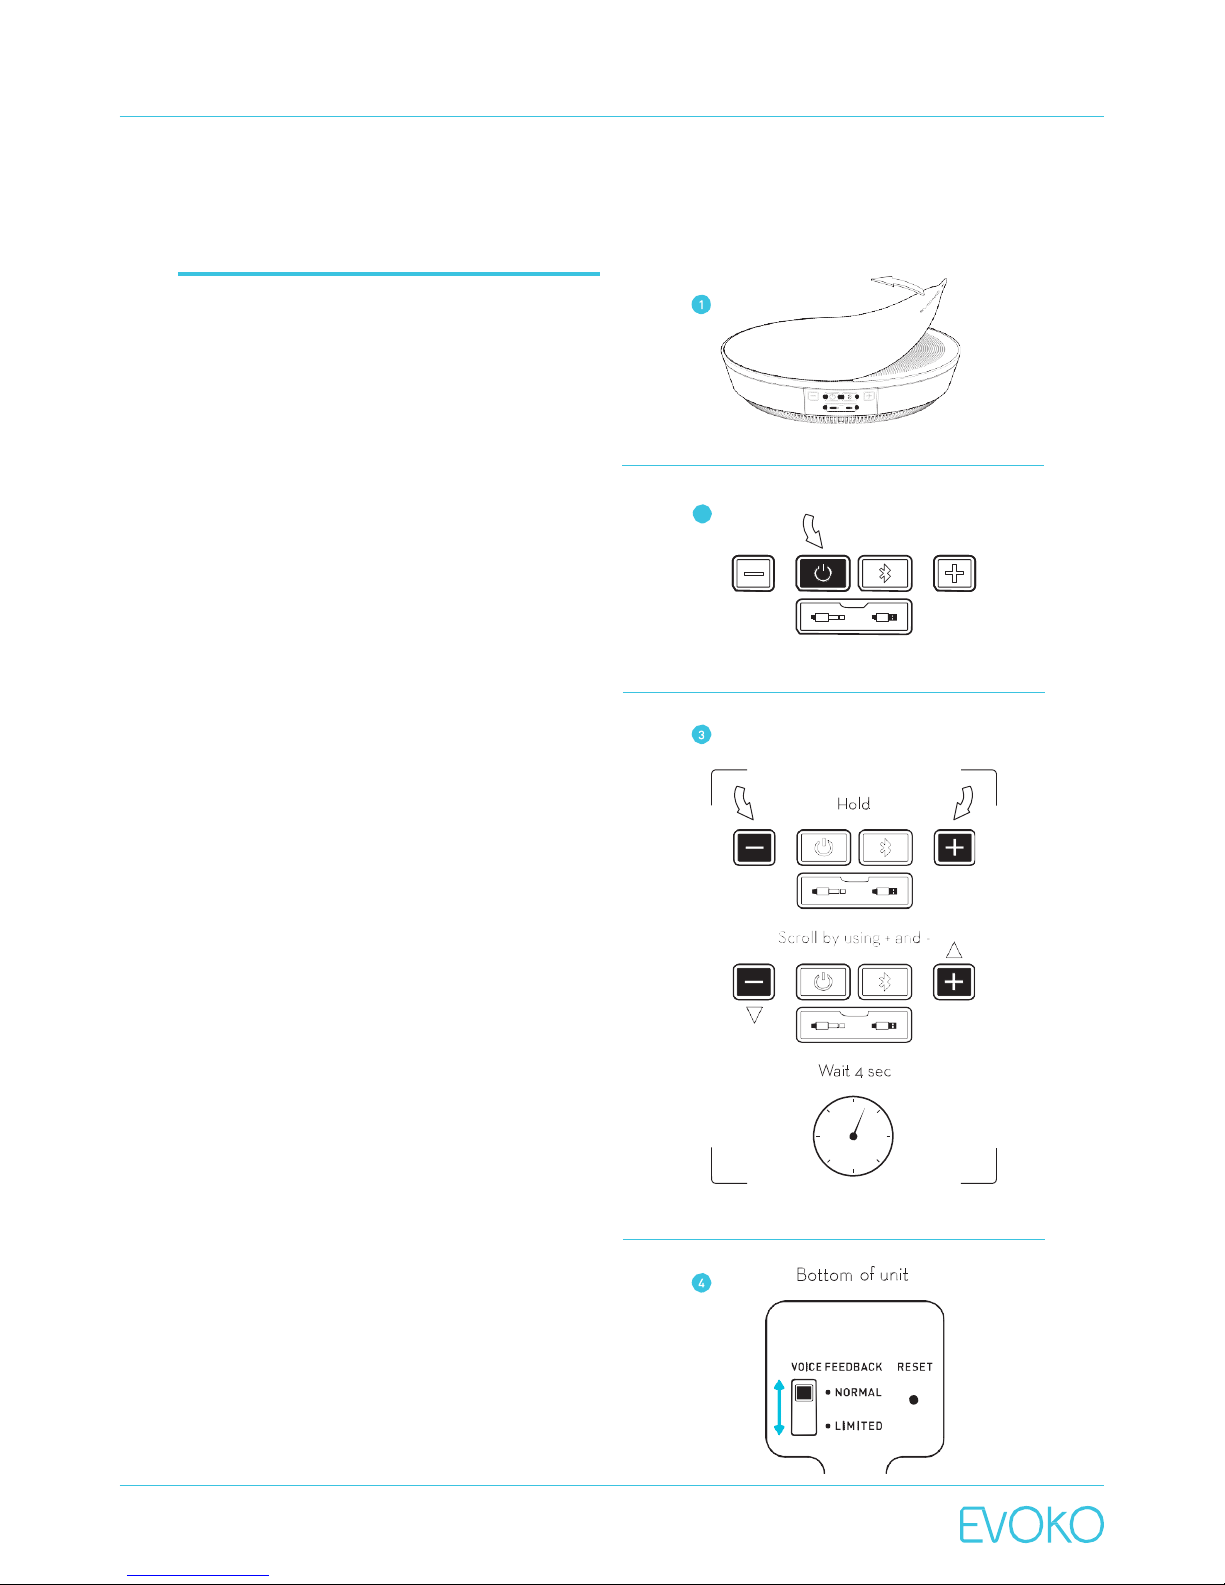
1. Remove plastic cover
2. Turn on by pressing the power button
3. Language selection
a. Available languages are: English, German,
French, Swedish, Spanish, Italian, Russian, and
Chinese (Mandarin).
b. To change the language for Voice Feedback:
simultaneously hold down the + and – buttons for
2 seconds and you will hear a beeping sound. You
will then hear instructions in the first available
language.
c. Scroll between languages that are being vocally
presented by pressing either + or -.
d. To select your desired language simply wait 4
seconds after hearing the language of your
choice and it will be activated. You will hear the
beeping sound again.
NOTE:The language setting will be saved for the next time
the unit is restarted. Language settings can only be made
when no active audio session is ongoing. No audio session
can be started until the language setting is completed.
4. Set Voice Feedback mode
a. Activate or deactivate voice feedback using the
voice feedback switch at the bottom of the unit.
b. Voice mode
i. The feedback switch is moved to ”NORMAL”
position.
c. Sound mode
i. The feedback switch is moved to ”LIMITED”
position.
NOTE: Certain system-critical voice feedback tags will also
be played in limited mode.
5. Set backlight mode
a. To activate a backlight while charging in the
Minto Wall Mount, simultaneously hold down
the Bluetooth button and power button on the
Evoko Minto. Do the same to deactivate.
NOTE:The default backlight mode is off.
NOTE: The unit can be rebooted by carefully inserting a
paper clip in the hole marked with “Reset” on the bottom of
the unit.
2
Page 4
EVOKO MINTO CONFERENCE PHONE
USER MANUAL
5
www.evoko.se
2. Wall Mount
instructions
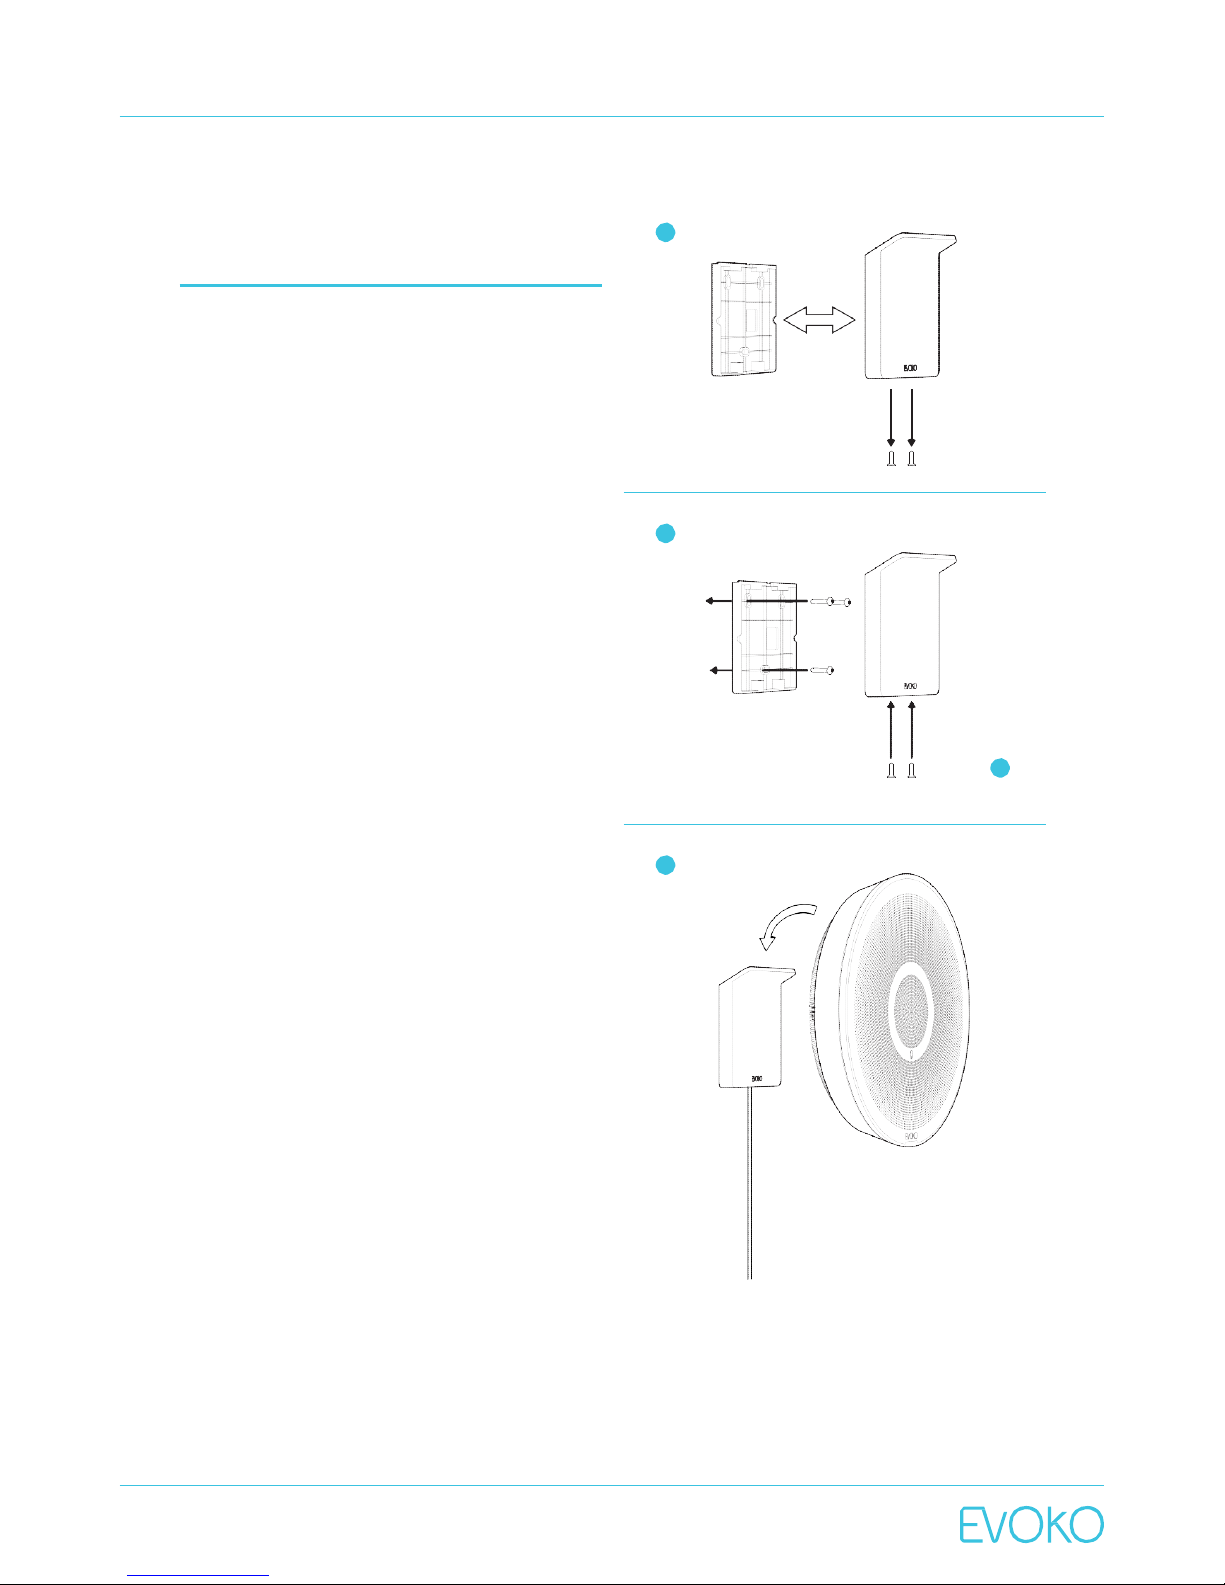
1. Start by unscrewing the two lower screws
holding the Wall Mount and wall bracket
together.
2. Fasten the Wall Mount bracket on to wall using
suitable wall plugs and fastening screws. The
cord is pre-assembled vertically, but it is
possible to mount it in any direction.
3. Place Wall Mount on top of bracket and fasten
from underneath with the screws which come
2
with the package
4. Plug in the power adapter to a proper wall
outlet.
5. Slide Minto into place by guiding it onto the back
slot on the Wall Mount’s protruding top edge.
6. When the Evoko Minto is placed on the wall
mount it will automatically charge. When
removed from the Wall Mount, voice feedback is
3
provided on the battery status.
5
1
Page 5
EVOKO MINTO CONFERENCE PHONE
USER MANUAL
6
www.evoko.se
3. Using the Evoko Minto
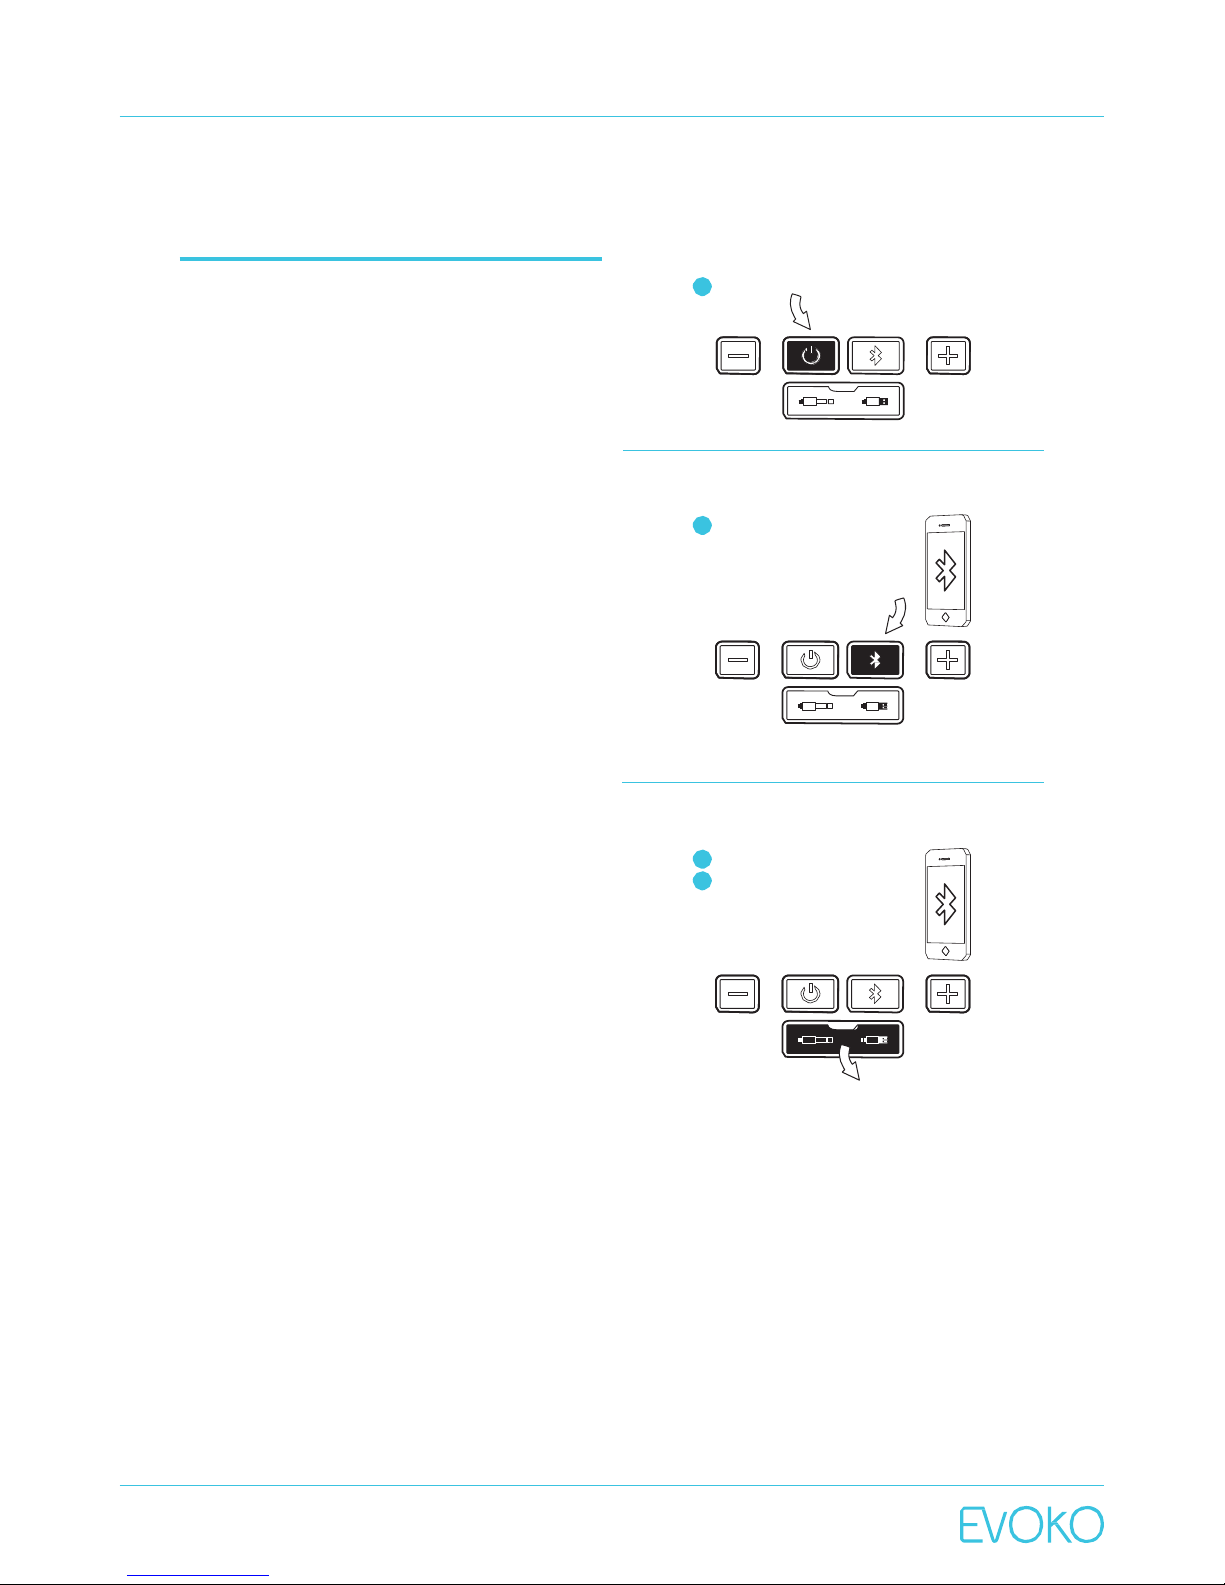
1. Turn on by pressing the power button
2. Connect the Evoko Minto to the device you would
like to use for your call, e.g. mobile phone,
tablet or laptop. Evoko Minto can be connected
using either Bluetooth, USB cable or audio
cable and it can also be used with normal phone
calls or VoIP services such as Skype or Micro
soft Lync.
a. Bluetooth
i. Press the Bluetooth button to initiate pairing
mode.
ii. The device ID is now visible and ready for
connection.
iii. Make sure that Bluetooth is activated on the
device you would like to connect to the Evoko
Minto and choose the Evoko Minto from the
list of available Bluetooth devices.
iv. When pairing is completed this is confirmed
by sound and light feedback.
v. To remove the Bluetooth connection, press
and hold the Bluetooth button.
NOTE: The default device ID is “Evoko Minto” followed by the
last four digits of the serial number of the unit (which can be
found on the bottom of the unit).
NOTE: To change device the Bluetooth connection needs to
be removed.
b. USB cable
i. Open the cover on the front of the Evoko Minto.
ii. Plug in the micro USB connector to the Evoko
Minto and the standard USB connector to the
device you would like to connect.
c. Audio cable
i. Open the cover on the front of the Evoko Minto.
ii. Plug in one end of the audio cable to the
Evoko Minto and the other end to the device
you would like to connect.
NOTE: When using the audio cable, the halo light turns
green immediately once the cable is plugged in.
1
2a
2b
2c
Page 6
EVOKO MINTO CONFERENCE PHONE
USER MANUAL
7
www.evoko.se
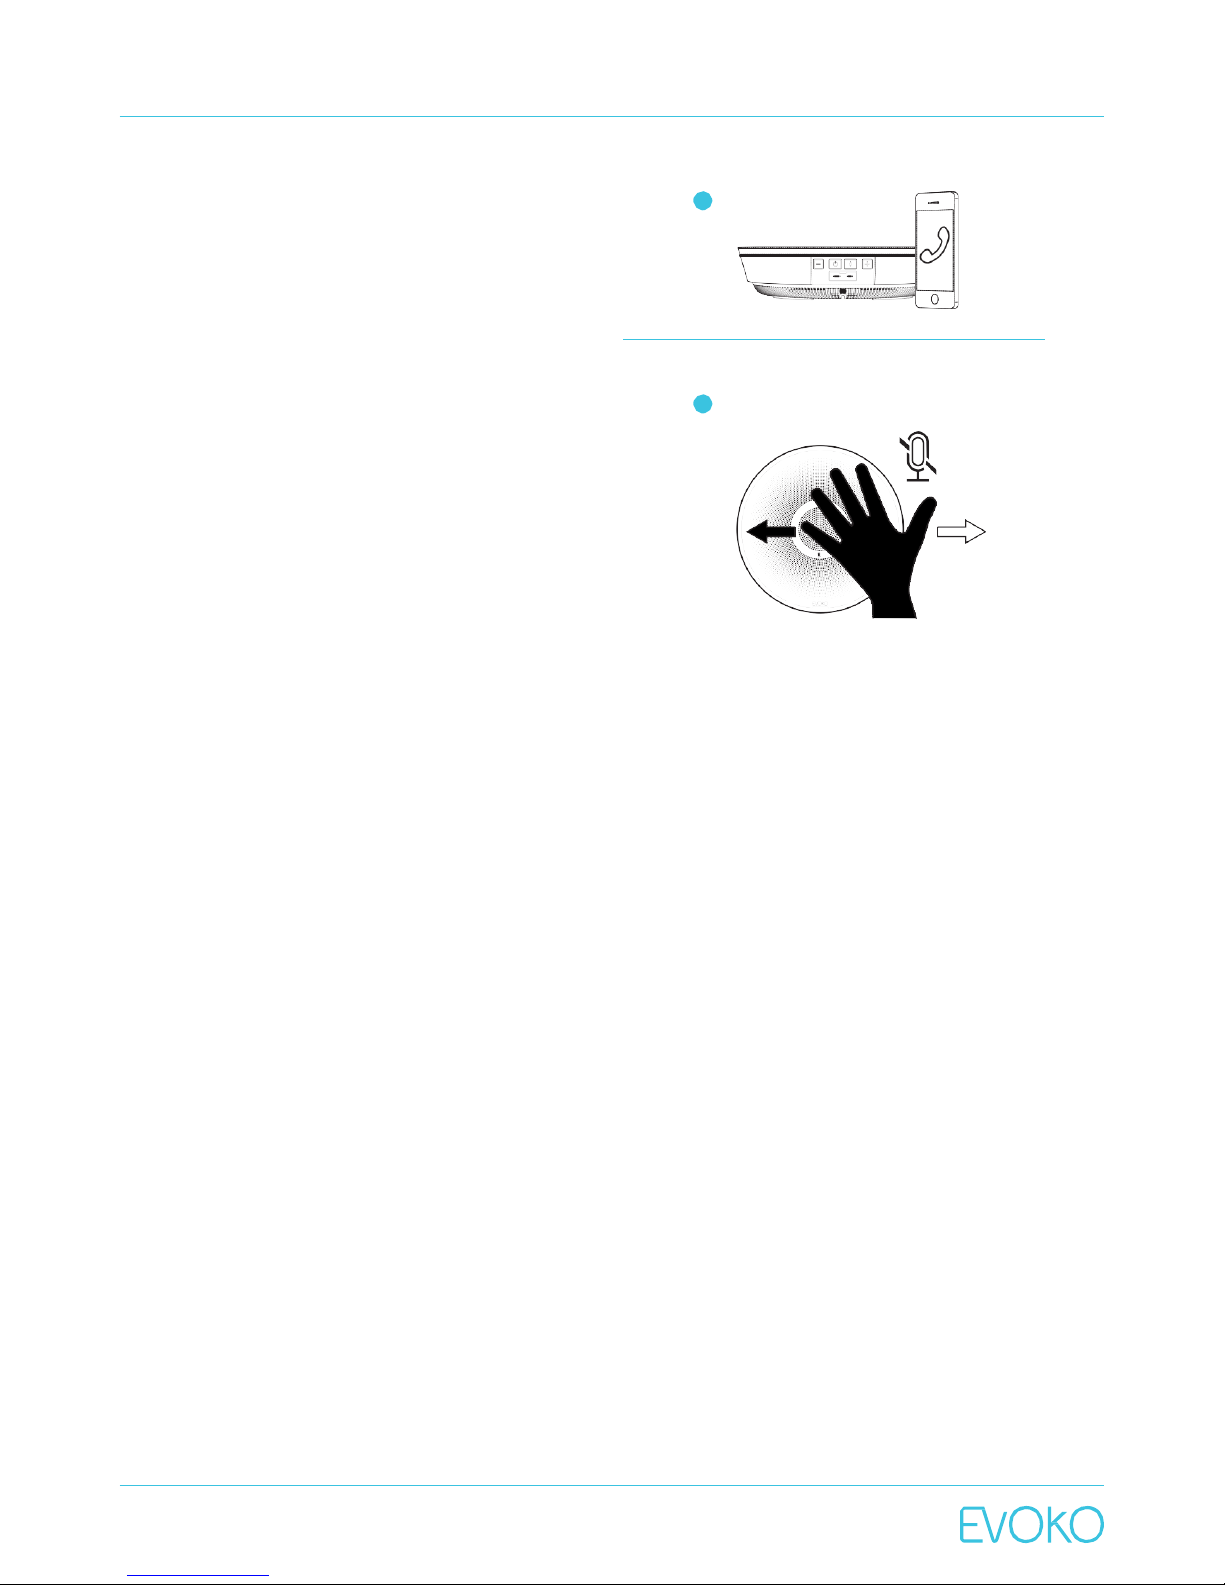
3. Use the connected device to make a call.
4. Air Swipe to mute.
a. Move your hand over the unit’s “mute icon” at
the center of the device at a distance of
approximately 5 cm (2 in) to activate the mute
function. The halo light turns red to clearly show
to everyone that the microphones are turned off.
b. To unmute, just do another Air Swipe.
NOTE: The Mute function can only be activated in case a
voice connection is valid.
5. Change the volume on the Evoko Minto or on the
connected device. On the Evoko Minto,
a. Press + to increase, - to decrease volume. Each
button press increases or decreases the volume
by one step.
b. Hold down on button to increase or decrease
volume continuously until maximum or mini
mum volume level is reached.
NOTE: The volume is a combination between the volume set
on Evoko Minto and the volume set on the device
connected to it. On the minimum volume level on Evoko
Minto, the speaker sound is completely muted. When a
connection is broken or changed, and when the Evoko Minto
is powered off, the volume level is reset to its default value.
6. Press the power button once to receive voice
feedback on battery status.
NOTE: This voice feedback will not be heard at the other end
even if there is an ongoing call. For info about the different
battery levels, please see the charging and battery section
below.
7. Press and hold the power button to power off.
3
4
Page 7
EVOKO MINTO CONFERENCE PHONE
USER MANUAL
8
www.evoko.se
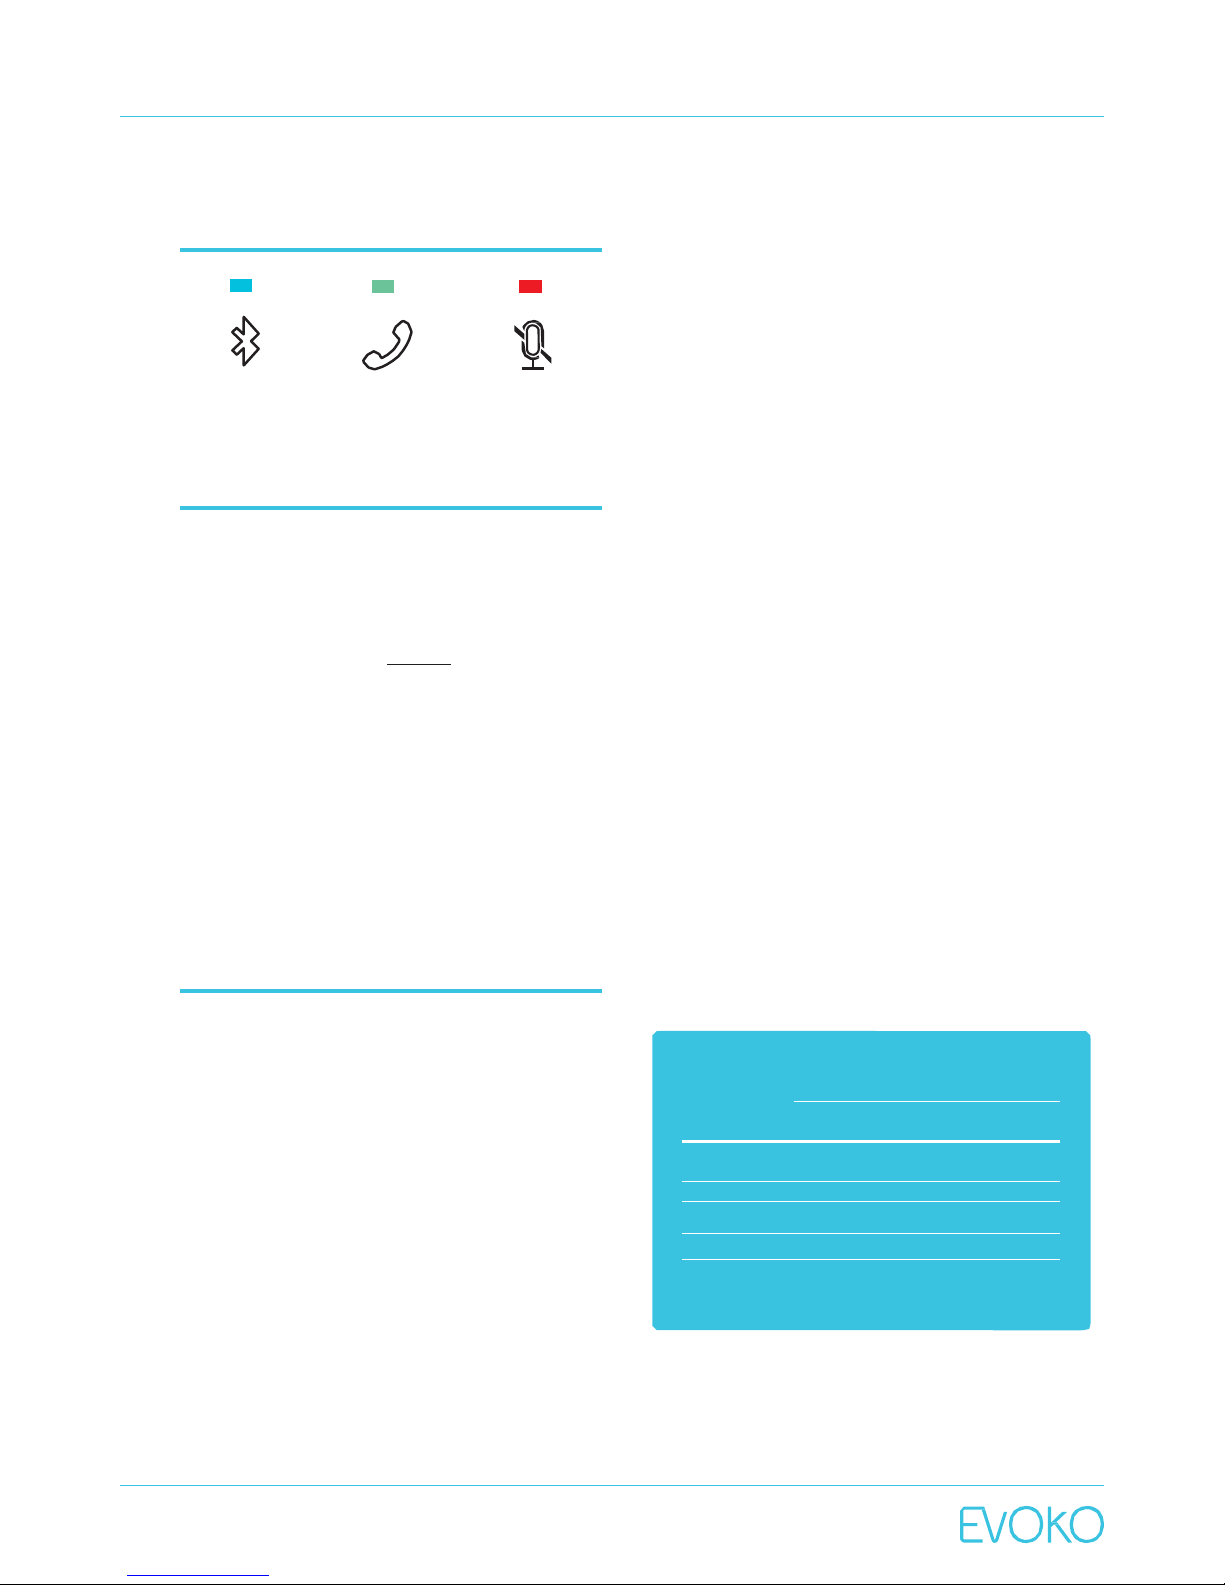
4. Halo light statuses
Flashing: pairing mode
Solid: connected
Active call Microphone muted
5. Cable storage
At the bottom of the Evoko Minto, there are two
cable storage slots; one for the USB cable and
one for the Audio cable. To use the cable, simply
pull the cable tag and unwind the cable. To put
the cable back in the cable storage slot, start by
putting the connector without the cable tag in its
slot and wind the cable in the direction shown by
the symbols at the bottom of the Evoko Minto
and finish by inserting the connector with the
cable tag into its slot.
NOTE: Only one cable can be kept in the slot at one time.
The Evoko Minto comes with the USB cable in the cable
storage slot. The Audio cable can be found in the gift box.
6. Charging &
battery status
Evoko Minto is stored and charged on its Wall
Mount when not in use. When it is placed on the
Wall Mount, it will automatically charge and
when removed from the Wall Mount voice
feedback will be given on the battery status.
Fully charging a completely empty battery takes
6 hours. You will then have a talk time of up to 8
hours.
If connected with a USB cable that is attached to
a power source, e.g. the USB port of a laptop,
this also provides power to the Evoko Minto and
charges the battery.
NOTE: It is possible to buy Portable Chargers as
accessories.
Battery level/ P O W E R B U T T O N L I G H T
voice feedback Charging Running on battery
Full
Fixed white
Fixed white
High Breathing white Fixed white
Medium
Breathing white Fixed white
Low
Breathing red Flashing red
Critical Breathing red Flashing red
Page 8

EVOKO MINTO CONFERENCE PHONE
USER MANUAL
9
www.evoko.se
7. Auto power off
After 10 minutes of inactivity you will hear the
voice feedback ”Auto power off in 10 seconds”.
You will then hear: ”Press any button to abort” .
Press any button on the Evoko Minto to abort
the automatic power off. If no button is pressed
within the 10 seconds, the unit will power off to
save battery power.
NOTE: When an audio cable is connected, the auto power off
function is disabled. If there is an active Bluetooth connection, the unit will stay on for 30 minutes before going into
Automatic disconnect (see more in the Bluetooth section
below) before the Auto power off timer starts.
8. More about
connections
1. Audio cable
a. The audio cable connection has the highest
priority.
b. Pressing the Bluetooth button will activate voice
feedback: “Please remove audio cable before
Bluetooth pairing” and maintain existing audio
cable connection.
c. Inserting a micro USB cable will initiate
charging, if the cable is connected to the device
that will supply power, and keep existing 3.5mm
cable connection.
NOTE: The audio cable used is an analog audio cable with a
4-pole 3.5 mm connector that works with most mobile
phones. Some phone models however use the 3-pole
connector.
2. USB cable
a. If an audio cable is connected, it has a higher
priority and makes the USB connection MUTE.
b. If the Bluetooth button is pressed, it has higher
priority and the device will switch to Bluetooth
and initiate Bluetooth pairing.
c. The USB cable also provides power for the
Evoko Minto. Charging with USB can also be
done if the audio cable is connected or a
Bluetooth connection is active.
3. Bluetooth connection
a. If the USB cable is connected, it will initiate and
maintain the existing Bluetooth connection
b. If the audio cable is connected, it has higher
priority and makes the Bluetooth connection
mute. However if the audio cable is removed
and the Bluetooth call is still active the call will
be resumed.
c. Cancel ongoing pairing or remove active
connection: Hold down the Bluetooth button to
cancel Bluetooth pairing.
d. Failed paring: Device will attempt pairing for 40
sec. If the pairing fails, please check the
following and try again:
i. Make sure the device you are trying to connect
has Bluetooth activated, is in visible mode,
and is within 10m from the Evoko Minto.
ii. That the correct Evoko Minto unit is selected
from the list of Bluetooth devices.
e. Automatic disconnect: After 30 minutes of
inactivity, the voice feedback ”Bluetooth will
disconnect in 10 seconds. Press any button to
abort.” will be played. Press any button on the
Evoko Minto to abort the automatic disconnection. If no button is pressed within the 10
seconds, the Bluetooth connection will be
removed to save battery power.
f. Bluetooth during Wall Mount (loudspeaker
mode): The device can be used as a wireless
audio speaker when in the Wall Mount. Pairing
is initiated by pressing the Bluetooth button, but
works in the same way as regular pairing
described above.
Page 9
EVOKO MINTO CONFERENCE PHONE
USER MANUAL
10
www.evoko.se
9. Configuration from the
Evoko Control Panel
The settings in the Evoko Minto can also be
changed in the Evoko Control Panel software.
This is also where you do firmware upgrades.
Please visit www.evoko.se/support
to download the Evoko Control Panel.
Please visit
www.evoko.se/support
if you have any questions
or need any help.
Page 10
EVOKO MINTO CONFERENCE PHONE
USER MANUAL
11
www.evoko.se
FCC Compliance
This device complies with Part 15 of the FCC Rules. Operation is
subject to the following two conditions: (1) this device may not
cause harmful interference, and (2) this device must accept any
interference received, including interference that may cause
undesired operation.
Warning: Changes or modifications to this unit not expressly
approved by the party responsible for compliance could void the
user’s authority to operate the equipment.
NOTE: This equipment has been tested and found to comply with
the limits for a Class B digital device, pursuant to Part 15 of the
FCC Rules. These limits are designed to provide reasonable
protection against harmful interference in a residential installation. This equipment generates, uses and can radiate radio
frequency energy and, if not installed and used in accordance
with the instructions, may cause harmful interference to radio
communications.
However, there is no guarantee that interference will not occur in
a particular installation. If this equipment does cause harmful
interference to radio or television reception, which can be
determined by turning the equipment off and on, the user is
encouraged to try to correct the interference by one or more of
the following measures:
• Reorient or relocate the receiving antenna.
• Increase the separation between the equipment and
receiver.
• Connect the equipment into an outlet on a circuit different
from that to which the receiver is needed.
• Consult the dealer or an experienced radio/TV technician
for help.
Responsible party:
Evoko Unlimited AB, c/o DMJ Technologies, Northeast Territory 2.
NJ, NY Metro, 140 Henley Avenue, New Milford, NJ07646, USA.
Tel.+1 201 261-5560.
Evoko Minto - Model number EM1001.
Warnings:
• “3.5 mm audio cables must be shorter than 3 meters.”
• “The socket-outlet shall be installed near the equipment and
easily be accessible.”
• “Excessive sound pressure from earphones and headphones
can cause hearing loss.”
CAUTION:
Danger of explosion if battery is incorrectly replaced.
Replace only with the same or equivalent type.
SAA 121069EA
Hereby, Evoko Unlimited AB declares that
this conference phone is in compliance with
the essential requirements and other
relevant provisions of directive 1999/5/EC.
The declaration of conformity may be
consulted at: www.evoko.se/downloads
0359
Page 11

www.evoko.se
 Loading...