

Page 1

EVOKO MINTO
USER MANUAL
1
EVOKO MINTO
A new era in phone-conferencing
USER MANUAL
Edition 1.7 EN
Page 2

EVOKO MINTO
USER MANUAL
2
CONTENTS
1. Initial configuration............................................................................................................... 03
2. Wall Mount instructions....................................................................................................04
3. Using the Evoko Minto.......................................................................................................05
4. Halo light statuses ...............................................................................................................07
5. Cable storage........................................................................................................................07
6. Charging & battery status.................................................................................................07
7. Auto power off..................................................................................................................... 08
8. More about connections................................................................................................ .08
9. Configuration from the Evoko Control Panel..........................................................09
10. Demo mode……..………………………………………………………………………………….......09
Model No: EM1001
Evoko Minto
Evoko Unlimited AB
Page 3
EVOKO MINTO
USER MANUAL
3
1. Initial configuration
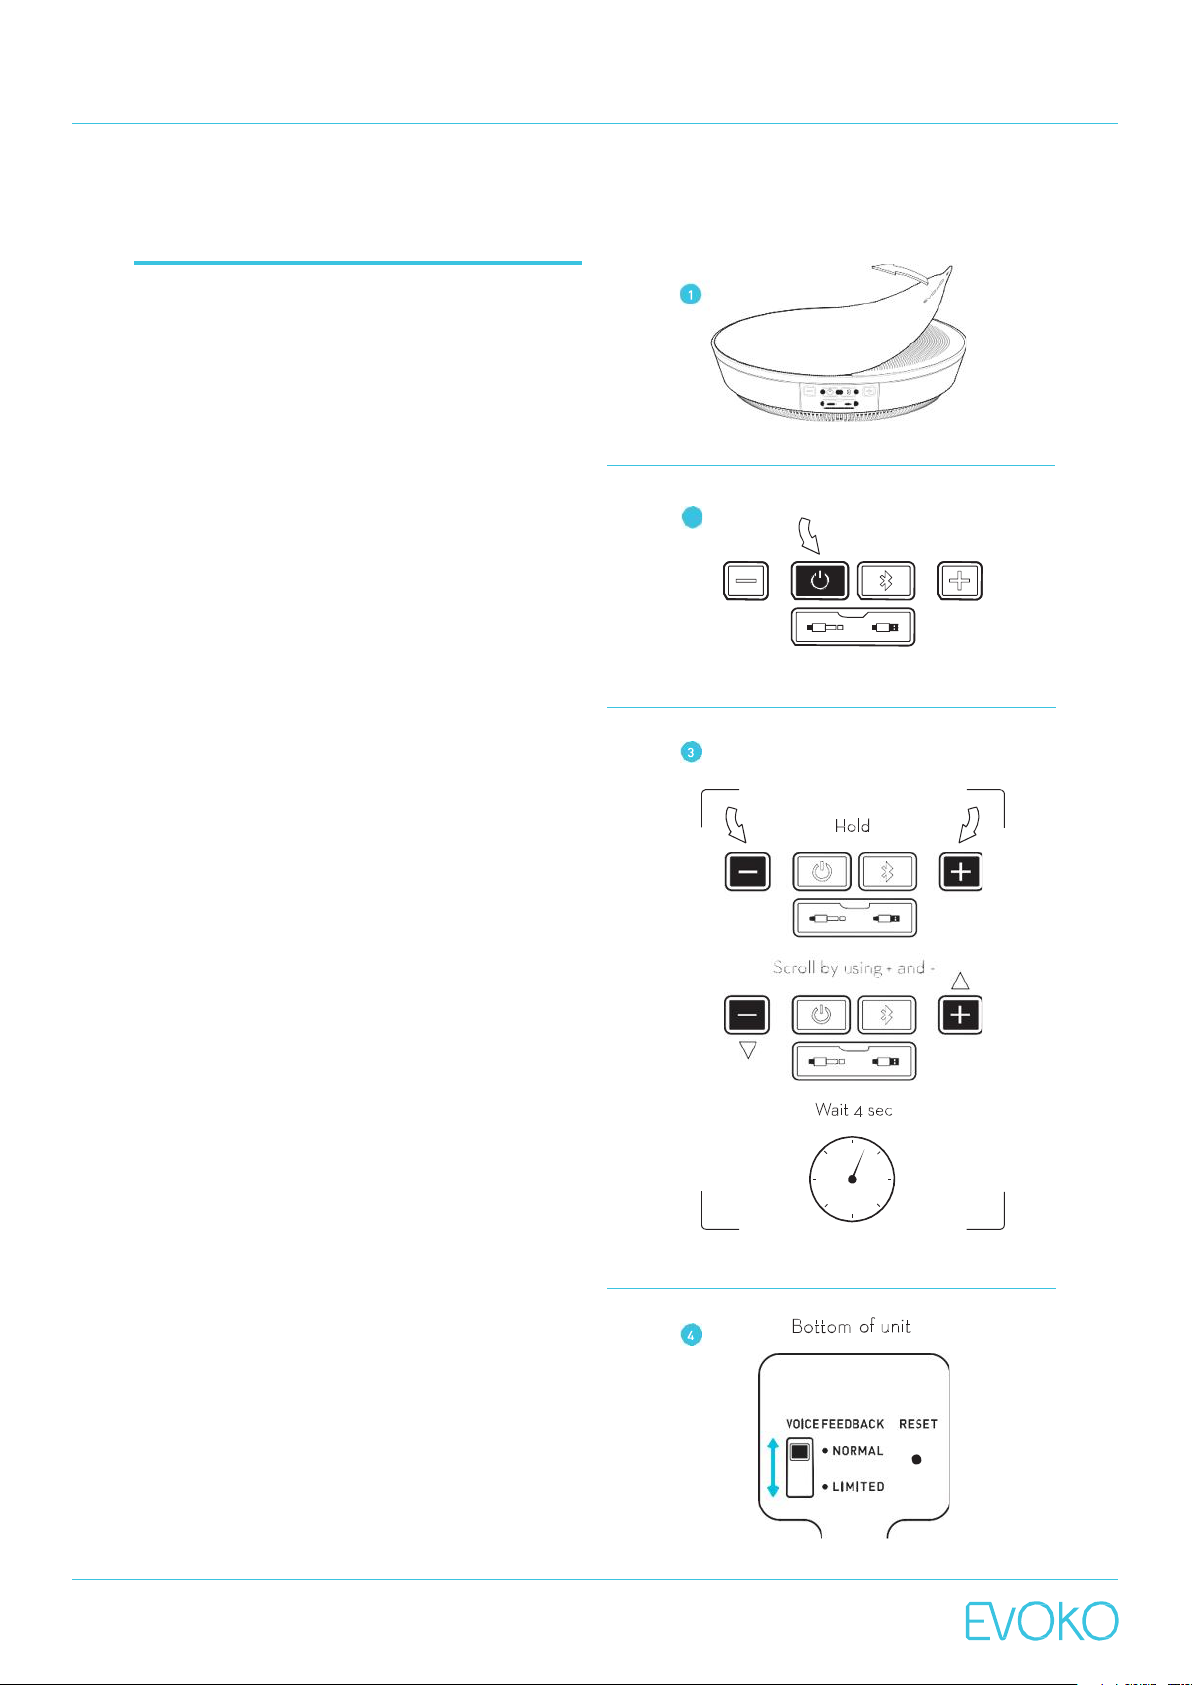
1. Remove plastic cover.
2. Turn on by pressing thepower button.
3. Languageselection.
a. Available languagesare: Chinese (Mandarin),
English,French, German, Italian, Japanese,
Russian, Spanishand Swedish.
b. Tochangethe language for Voice Feedback:
simultaneously hold down the+ and – buttons for
2 seconds and youwill hear a beeping sound.You
willthen hear instructionsin the first available
language.
c. Scroll between languages that arebeing vocally
presented by pressing either +or -.
d. Toselectyour desired language simplywait 4
secondsafter hearing the language of your
choiceand it will beactivated. You will hear the
beepingsound again.
NOTE: The language settingwill besaved forthe nexttime
theunit isrestarted.Languagesettings canonly be made
whenno active audio sessionis ongoing.No audiosession
canbe started untilthelanguagesettingis completed.
4. Set VoiceFeedback mode.
a. Activateor deactivatevoice feedback using the
voicefeedback switch atthe bottomof the unit.
b. Voice mode.
i. The feedback switch is moved to ”NORMAL”
position.
c. Sound mode.
i. The feedback switch is moved to ”LIMITED”
position.
NOTE: Certainsystem-criticalvoicefeedbacktags willalso
be playedin limitedmode.
5. Set backlightmode.
a. Toactivatea backlight whilecharging in the
Minto Wall Mount, simultaneouslyhold down
the Bluetoothbutton and power button on the
Evoko Minto. Do the same to deactivate.
NOTE:The defaultbacklightmode isoff.
NOTE: Theunit canbe rebootedby carefullyinsertinga
paperclip inthe holemarkedwith “Reset”on thebottom of
theunit.
2
Page 4
EVOKO MINTO
USER MANUAL
4
2.Wall Mount
instructions
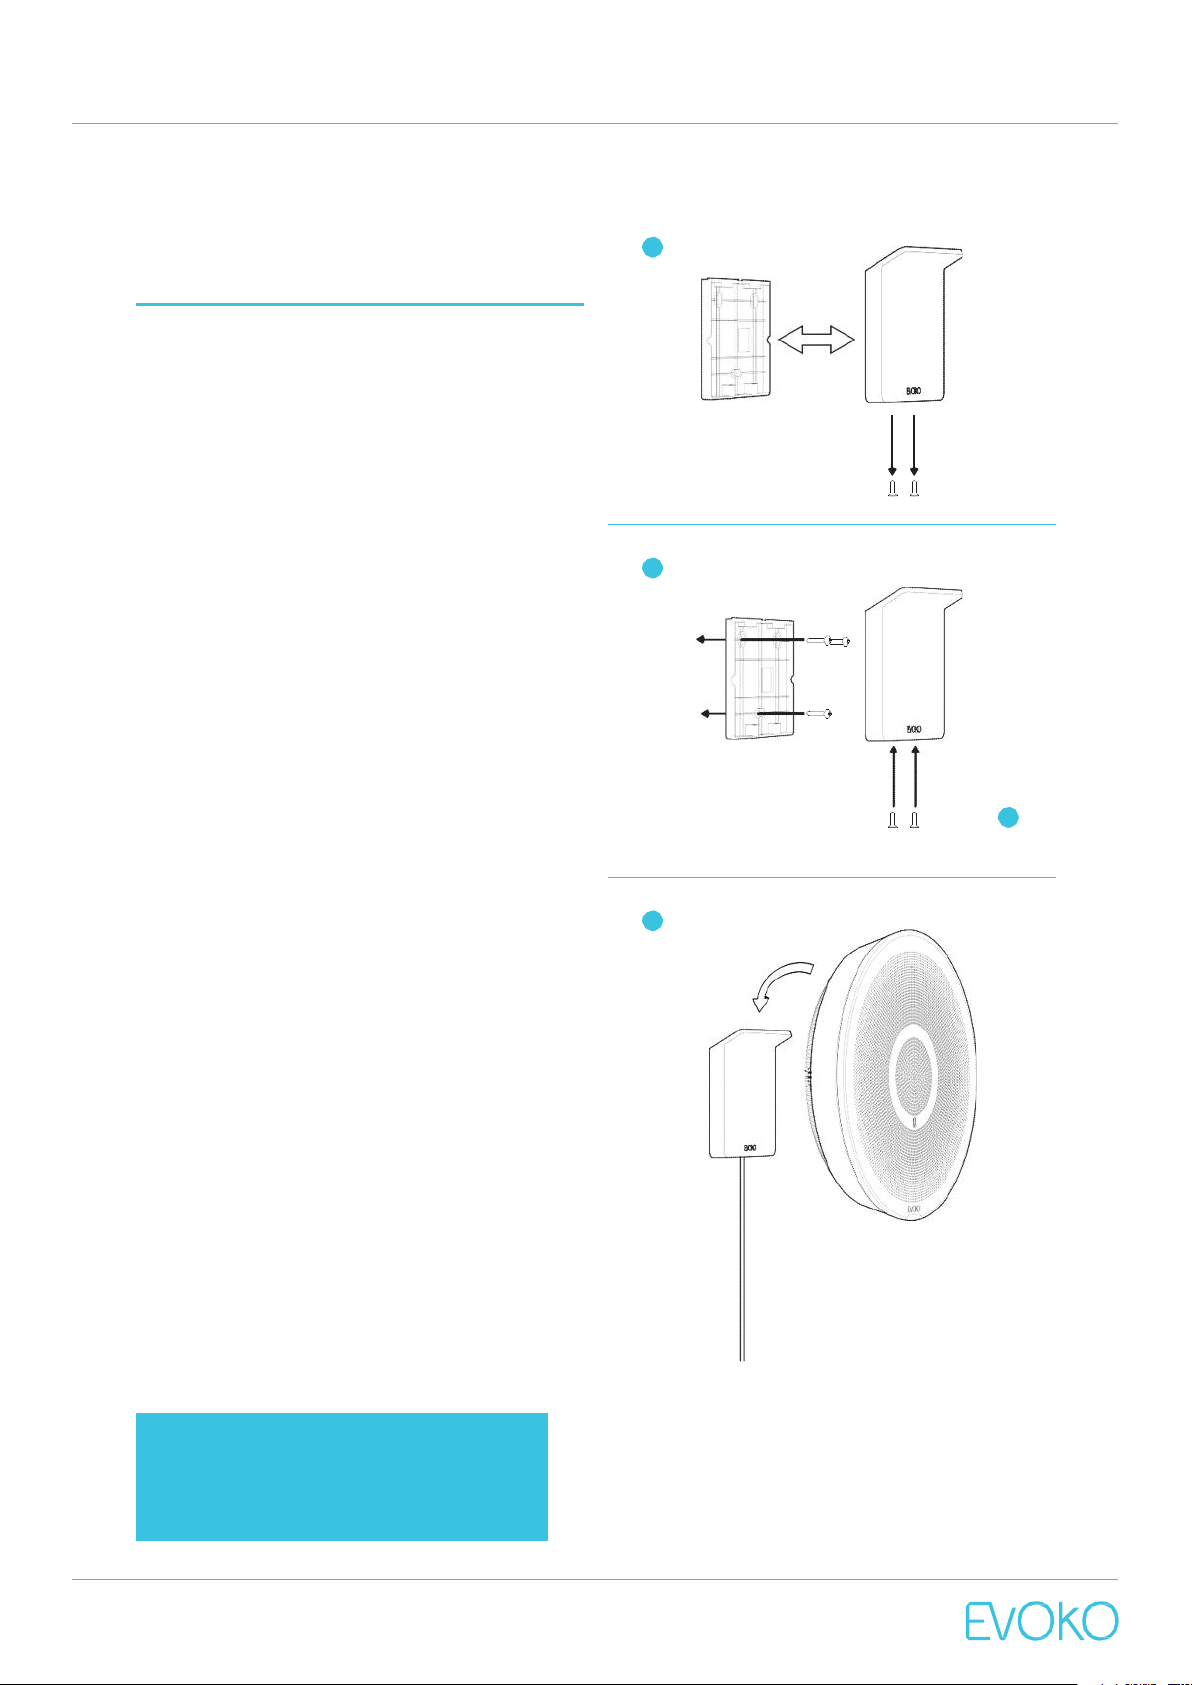
1. Start by unscrewing thetwo lowerscrews
holdingthe WallMount and wall bracket
together.
2. Fasten the Wall Mountbracket on to wall using
suitable wall plugsand fasteningscrews. The
cordis pre-assembled vertically, but it is
possible tomount it in any direction.
3. PlaceWall Mount on top of bracket and fasten
from underneath with the screws which come
2
with the package.
4. Plug in the power adapterto a proper wall
outlet.
5. SlideMintointo place by guidingit onto the back
slot on the Wall Mount’s protruding top edge.
6. When the Evoko Minto is placed on the wall
mount it will automatically charge. When
removed from theWall Mount,voice feedback is
3
provided on the batterystatus.
5
1
NOTE: Glass Wall Mounting Sticker for
mounting on glass walls is available as
an accessory purchased separately
(Art. No. EMX1016
Page 5
EVOKO MINTO
USER MANUAL
5
3. Using the Evoko Minto
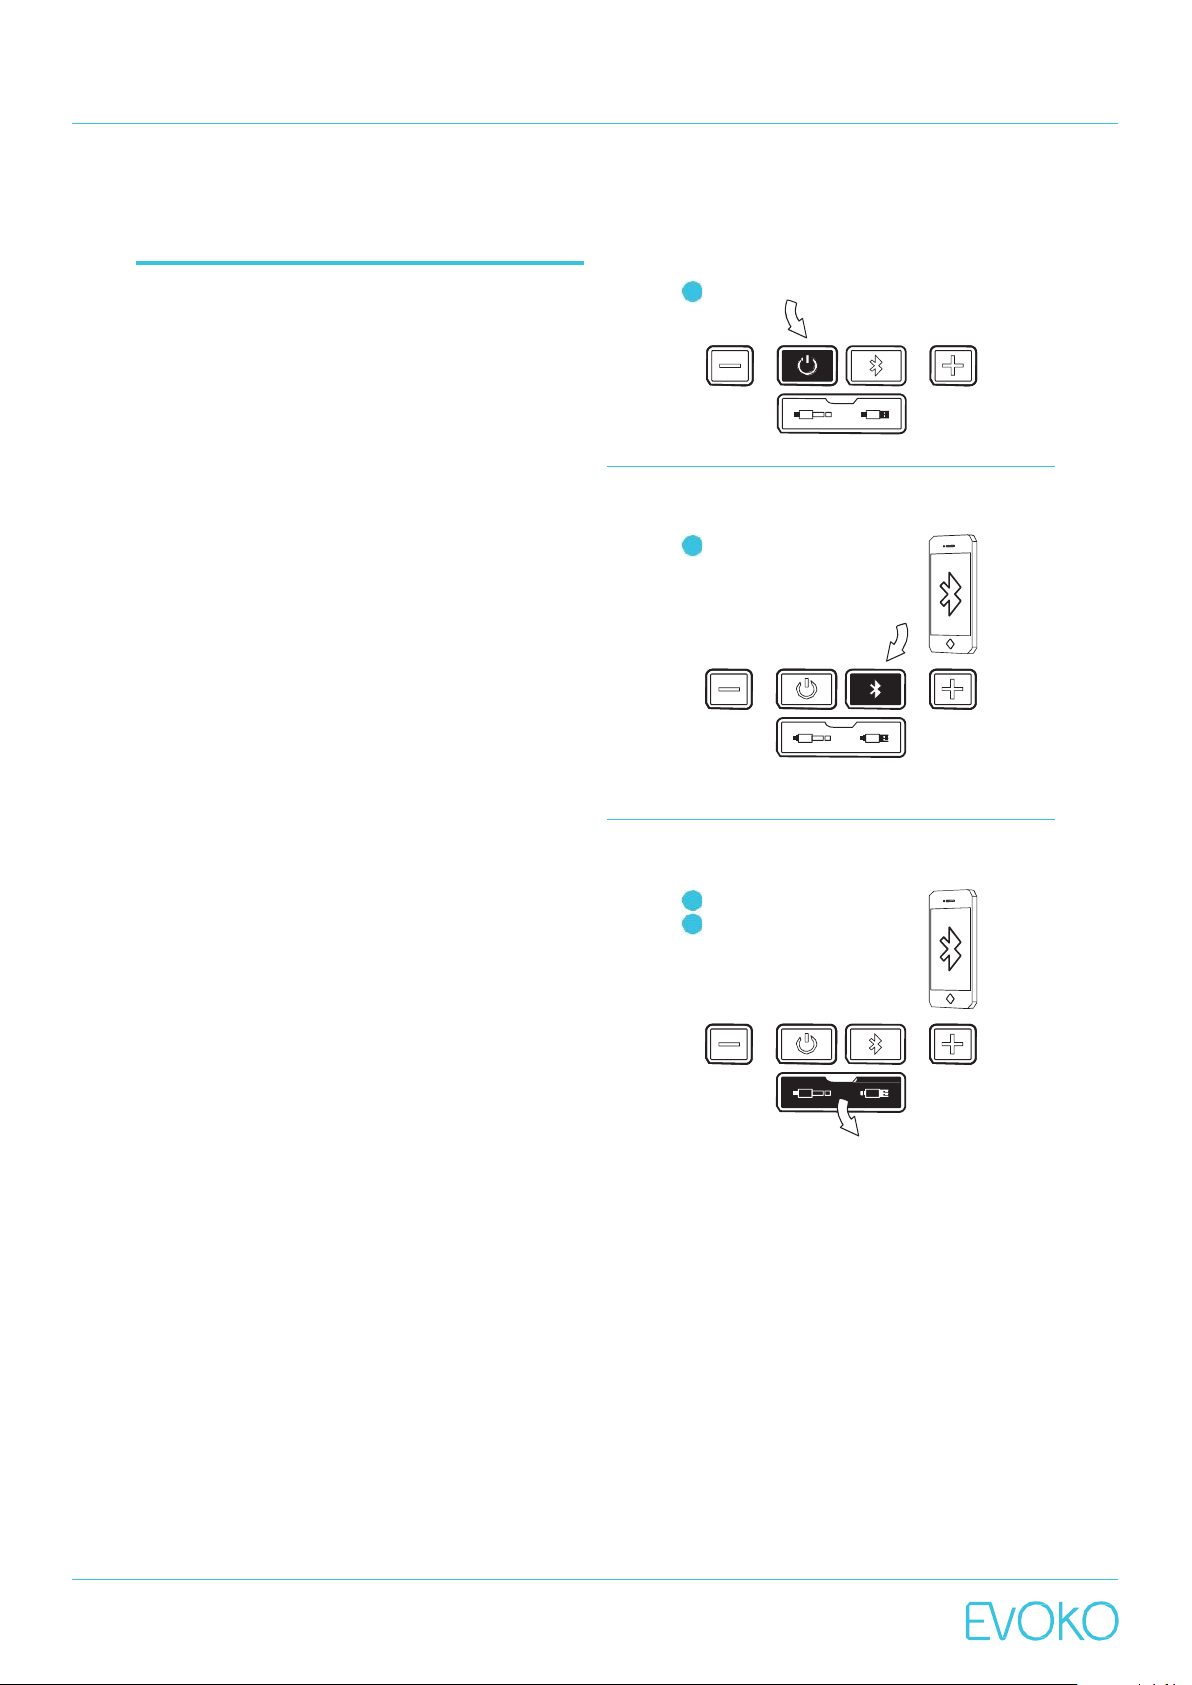
1. Turn on by pressingthe power button.
2. Connectthe Evoko Minto tothe device youwould
liketo use for your call, e.g. mobilephone,
tabletor laptop.EvokoMinto can be connected
using either Bluetooth, USB cable or audio
cableand it canalso be usedwith normal phone
calls or VoIP servicessuch as Skype or Micro
soft Lync.
a. Bluetooth.
i. Press the Bluetoothbutton to initiate pairing
mode.
ii. The device ID is now visible and ready for
connection.
iii.Make sure that Bluetooth is activated on the
deviceyou would like to connect to the Evoko
Minto and choose the Evoko Minto from the
list ofavailable Bluetooth devices.
iv.When pairing is completedthis is confirmed
by soundand the halolight turns blue.
v. To removethe Bluetooth connection, press
and hold the Bluetooth button.
NOTE: The defaultdevice ID is “Evoko Minto” followed by the
last four digits of theserial numberof the unit (which canbe
foundon the bottom of theunit).
NOTE: Tochange devicethe Bluetoothconnectionneeds to
be removed.
b. USB cable.
i. Open the coveron the frontof the EvokoMinto.
ii. Plug in the micro USB connectorto the Evoko
Minto and the standard USB connector to the
deviceyou would like to connect.
c. Audio cable.
i. Openthe coveron the front of theEvoko Minto.
ii. Plug in one end of the audio cable tothe
Evoko Minto and the otherend to the device
you would liketo connect.
NOTE: When usingthe audiocable, the halolight turns
greenimmediatelyonce thecable isplugged in.
1
2a
2b
2c
Page 6
EVOKO MINTO
USER MANUAL
6
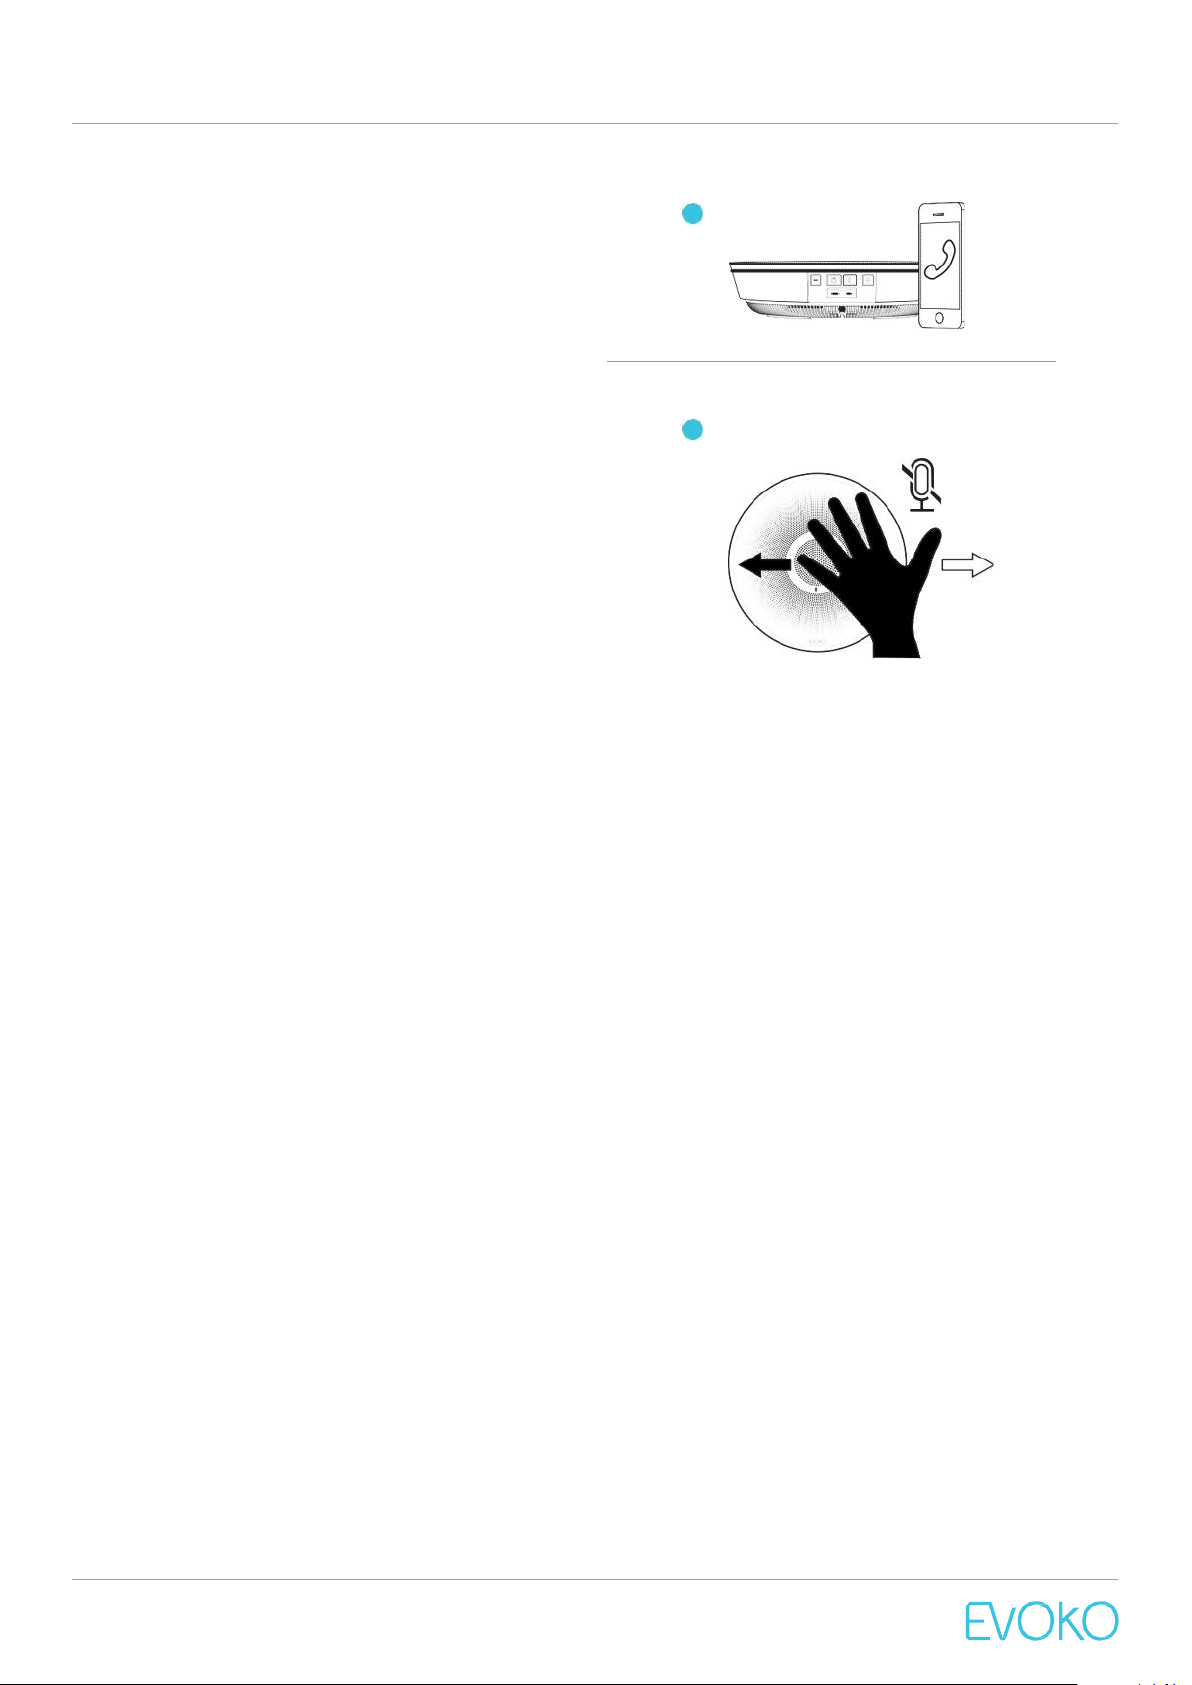
3. Use theconnected device to makea call.
4. Air Swipe to mute.
a. Move your hand over the unit’s“mute icon” at
the centerof the device at a distanceof
approximately 5 cm (2 in) to activate the mute
function. The halo light turnsred to clearly show
to everyonethat the microphones are turned off.
b. Tounmute, just do another Air Swipe.
NOTE: The Mute functioncan onlybe activated incase a
voiceconnection isvalid.
5. Change the volumeon the EvokoMinto or onthe
connected device.
a. On the Evoko Minto, press + to increase, - to
decrease volume. Each button press increases
or decreasesthe volume by one step.
b. Hold down + or - button to increase or
decrease volume continuously until
maximum or minimum volumelevel is
reached.
NOTE: The volumeis a combination betweenthe volume set
on EvokoMinto and thevolume set on the device
connectedto it. Onthe minimum volumelevel on Evoko
Minto, thespeakersound iscompletely muted. Whena
connectionis broken orchanged,and when the EvokoMinto
is poweredoff,the volumelevel isreset toits default value.
6. Pressthe power buttononce toreceive voice
feedback onbattery status.
NOTE: This voicefeedbackwill not beheard atthe otherend
evenif thereis an ongoingcall.For infoabout thedifferent
battery levels,please see thecharging and battery section
below.
7. Press and hold the power button to power off.
3
4
Page 7
EVOKO MINTO
USER MANUAL
7
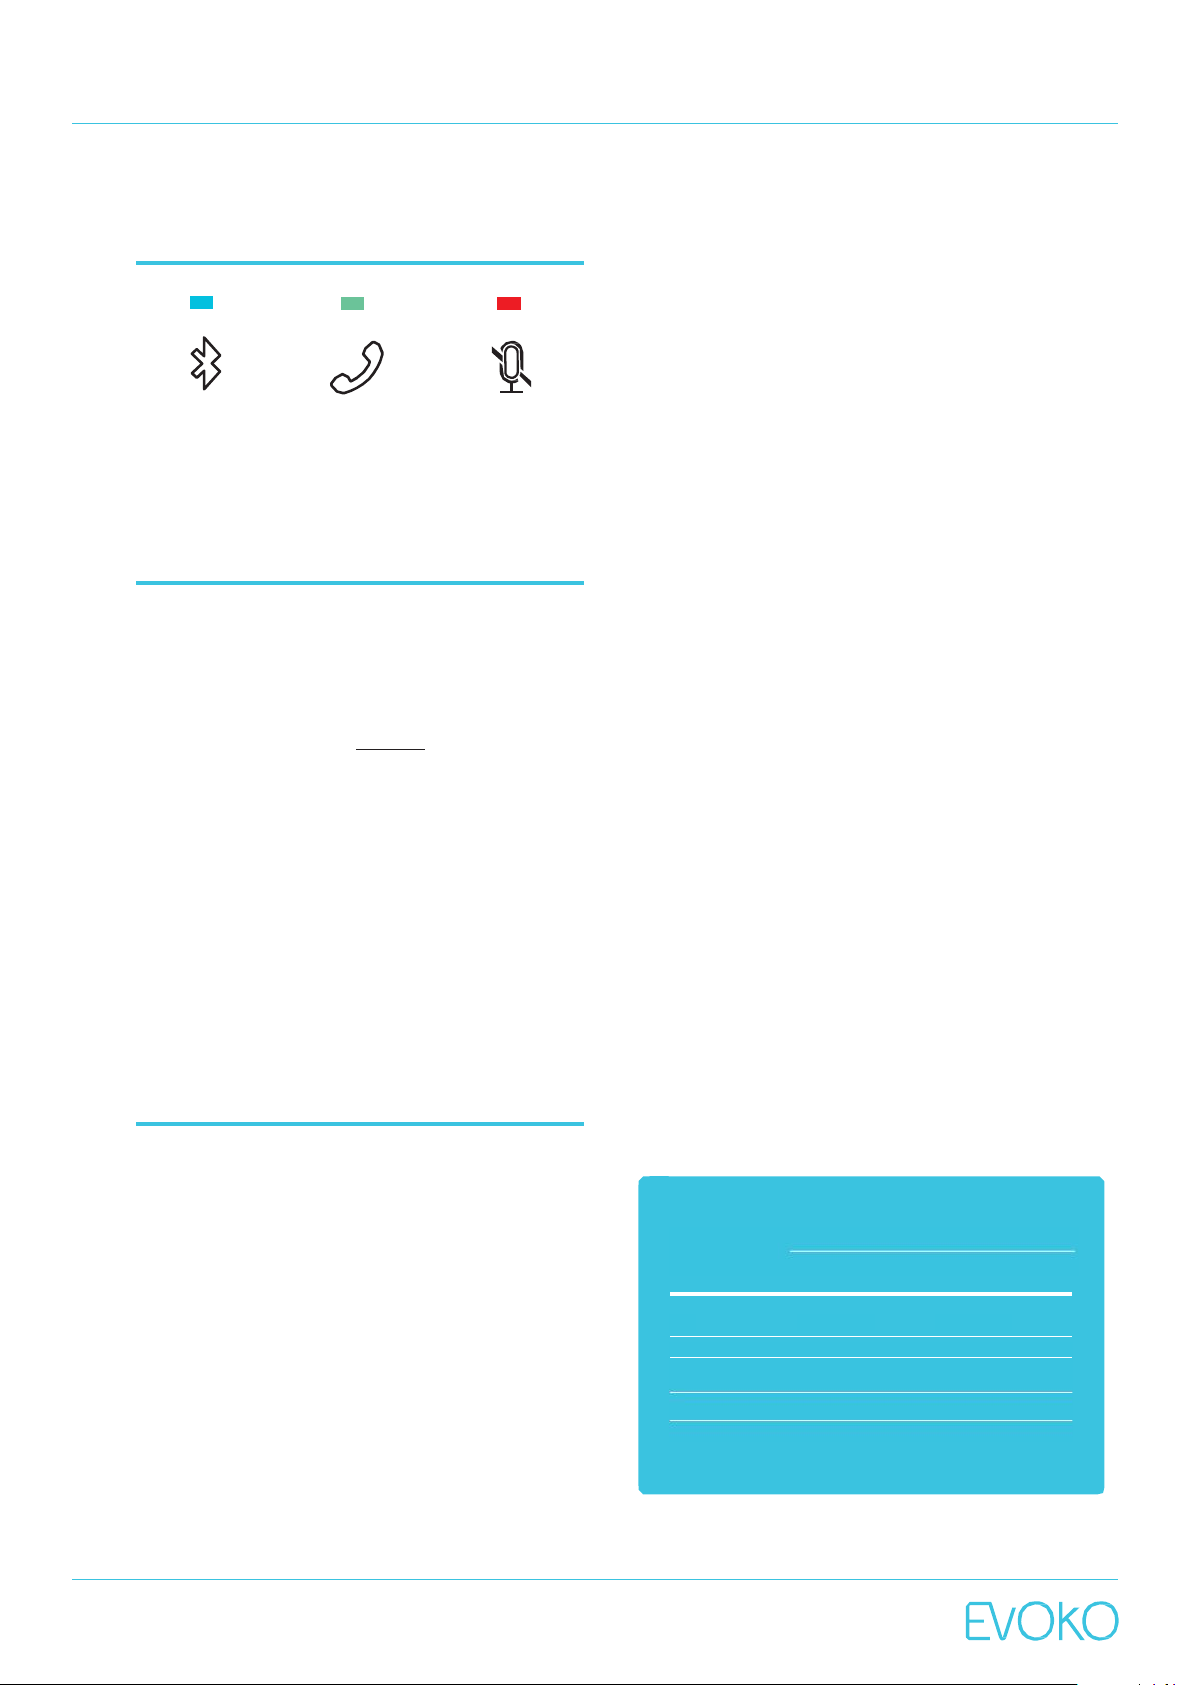
4. Halo light statuses
Flashing: pairingmode
Solid:connected
Activecall Microphone muted
5. Cable storage
At the bottom of theEvokoMinto, there are two
cablestorageslots; one for theUSB cable and
one for the Audio cable. To use the cable, simply
pull the cable tag and unwind the cable. To put
the cable back in the cable storage slot, start by
putting the connector without the cable tagin its
slot and windthe cable in the directionshown by
the symbols at the bottom of the Evoko Minto
and finish by inserting the connector with the
cabletag into its slot.
NOTE: Onlyone cablecan be kept in theslot at one time.
TheEvoko Minto comeswith the USB cable inthe cable
storage slot.TheAudio cable canbe foundin the gift box.
6. Charging &
battery status
Evoko Minto is stored and charged on its Wall
Mount when notin use. Whenit is placed on the
Wall Mount, it will automatically charge and
when removed from theWall Mount voice
feedback will be given on the battery status.
Fully charging a completely empty battery takes
6 hours. You will then have a talk time of up to 8
hours.
If connectedwith a USB cablethat is attached to
a power source, e.g. theUSB port of a laptop,
this also providespower to the Evoko Minto and
charges the battery.
NOTE: It is possibleto buy Portable Chargers as
accessories.
Battery level/ P O W E R B U T T O N L I G H
T
Full
Fixed white
Fixed white
High Breathing white Fixed white
Medium Breathing white Fixed white
Low Breathing red Flashing red
Critical Breathing red Flashing red
Page 8

EVOKO MINTO
USER MANUAL
8
7.Auto power off
connected or a Bluetoothconnection is
active.
3. Bluetooth connection.
After 10 minutes of inactivity you will hear
the voice feedback ”Autopower off in 10
seconds”. You will thenhear: ”Press any
button to abort” . Press any button on the
Evoko Minto to abort the automatic power
off.If no button is pressed within the 10
seconds, the unit will poweroff to save
batterypower.
NOTE: When anaudio cable is connected, the auto power
off functionis disabled. If thereis an active Bluetooth
connec- tion, theunit willstay on for 30minutes before
goinginto Automatic disconnect (seemore inthe
Bluetooth section below) beforethe Auto power off timer
starts.
8. More about
connections
1. Audio cable.
a. The audiocable connection has the
highest priority.
b. Pressing theBluetooth button will activate
voice feedback:“Please removeaudio cable
before Bluetoothpairing” and maintain
existing audio cableconnection.
c. Inserting a micro USB cable will initiate
charging, if the cable is connectedto the
device that will supply power, and keep
existing 3.5mm cable connection.
NOTE: The audio cableused is ananalog audio cable
witha 4-pole3.5 mm connector that workswith most
mobile phones.Some phone models howeveruse the3pole connector.
2. USB cable.
a. If an audio cable is connected, it has a
higher priority and makesthe USB
connectionMUTE.
b. If the Bluetooth button is pressed, it has
higher priority and the device will switch to
Bluetooth and initiate Bluetooth pairing.
c. The USB cable also provides power for
the Evoko Minto. Chargingwith USB can
also be done if the audio cable is
a. If the USB cable is connected,it will
initiateand maintainthe existing
Bluetoothconnection.
b. If the audio cable is connected,it has
higher priority andmakesthe Bluetooth
connection mute. However,if the audio
cableis removed and theBluetooth call
is still activethe call will be resumed.
c. Cancel ongoing pairing or removeactive
connection: Hold downthe Bluetooth
button to cancelBluetooth pairing.
d. Failedparing: Device will attempt pairing
for 40 sec. If the pairing fails, please
check the following and try again:
i. Make sure thedeviceyou are trying to
connect has Bluetoothactivated,is in
visiblemode and is within 10mfrom the
Evoko Minto.
ii.Make sure thatthe correct Evoko Minto
unit is selected from the list of
Bluetoothdevices.
e. Automaticdisconnect: After 30 minutes of
inactivity,the voicefeedback ”Bluetooth
will disconnectin 10 seconds. Press any
button to abort.” will be played. Press any
button on the EvokoMinto to abort the
automatic dis- connection.If no button is
pressed within the 10 seconds, the
Bluetoothconnection will be removed to
save battery power.
f. Bluetooth during Wall Mount
(loudspeaker model): The device can be
used as a wireless audio speaker when in
the Wall Mount. Pairing is initiatedby
pressing the Bluetooth button, but works
in the same way as regularpairing
described above.
g. Auto Pair Mode: Evoko Minto is often
connected to the same device. Auto
Pairing Mode creates an easy pairing
procedure and means that one specific
device (Auto Pair Device) can be specified
for automatic pairing at Power up of
Minto. Auto Pair Mode is activated by
specifying what device Minto should Auto
Pair with:
1. Pair Minto with the device (Auto
Page 9

EVOKO MINTO
USER MANUAL
9
Pair Device) as normal.
2. When the device is connected
with Minto, press VOL + and BT
key simultaneous for 3 sec.
3. There will be a confirm beep and
the device is now stored in Auto
Pair Memory.
10. Demo Mode
Available from the Minto SW version 4.7.0.
Demo Mode can be used to show and test the unit
without an active call.
The automatic pairing (160 sec) can
be interrupted by pressing the BT key
when Minto blinking blue =>“pairing
removed“ and Minto will go back to
Normal Mode. Next time Minto is
powered up it will try to Auto Pair
again.
The Auto Pair Mode can be deactivated by pressing VOL+ and BT
just after Power Up and when Evoko
Minto is trying to Auto Pair, i.e. the
blue light is blinking. The Auto Pair
Device should not be on (if it is, it will
pair with Evoko Minto and deactivation will not go through).
9. Configuration from
the Evoko Control
Demo Mode is activated by:
Powering up the Minto without connected cables or
BT connection.
Press VOL– and Power keys simultaneously for 3
sec.
A positive beep is heard when Demo Mode is
activated. Minto starts automatically to clear the
memory and the Halo Light is breathing red until the
memory is cleared.
When the unit beeps and the Halo Light turns steady
blue it is ready to be used:
1. Press BT key to start recording. The Halo Light
becomes steady green and will be recording for 12
sec.
2. When 4 sec. is left of the recording Minto starts
flashing green.
Panel
In the Evoko Control Panel
software you are able to do
firmware upgrade.
Please visit www.evoko.se/support
to download the Evoko Control
Panel
3. After 12 sec. the Minto beeps and automatically
plays back the recording while breathing blue.
4. After the playback, the memory is cleared again and
when the Halo Light turns steady blue it is ready to
start a new recording (see step 1)
Demo Mode is de-activated by:
Pressing VOL– and POWER key simultaneously for 3
sec. or
Turning off the device
Page 10
EVOKO MINTO
USER MANUAL
10
Please visit
www.evoko.se/support
if you have any questions
or need any help
Page 11
EVOKO MINTO
USER MANUAL
11
FCC Compliance
Thisdevice complies withPart 15of the FCCRules. Operationis
subject tothe followingtwo conditions:(1) thisdevice may not
causeharmful interference, and (2) this devicemustaccept any
interference received,includinginterferencethat maycause
undesiredoperation.
Warning:Changes ormodifications tothis unit notexpressly
approvedby the party responsiblefor compliance couldvoid the
user’sauthorityto operate theequipment.
NOTE: This equipment hasbeen tested and foundto complywith
the limitsfor a Class B digitaldevice,pursuantto Part 15of the
FCC Rules.These limits aredesigned toprovidereasonable
protectionagainstharmful interference ina residentialinstallation.This equipmentgenerates,uses and canradiateradio
frequencyenergyand, if not installed and used inaccordance
withthe instructions,may causeharmfulinterferenceto radio
communications.
However,there isno guaranteethat interferencewill notoccur in
a particularinstallation. If thisequipment does causeharmful
interference to radio ortelevision reception,which can be
determinedby turningthe equipment off andon, the user is
encouragedto tryto correct the interferenceby one or moreof
the followingmeasures:
• Reorient orrelocatethe receiving antenna.
• Increase the separationbetweenthe equipment and
receiver.
• Connectthe equipment into anoutlet on acircuitdifferent
fromthat towhich thereceiveris needed.
• Consultthe dealeror an experiencedradio/TV technician
for help.
Responsibleparty:
Evoko Unlimited AB
297 Kinderkamack Rd, Suite 200,Oradell, NJ 07649, USA
Tel.+1201 261-5560
Evoko Minto- Modelnumber EM1001.
Warnings:
• “3.5 mm audiocables must beshorter than3 meters.”
• “The socket-outlet shallbe installed near the equipmentand
easily beaccessible.”
• “Excessivesound pressurefrom earphonesand headphones
cancausehearing loss.”
CAUTION:
Dangerof explosionif batteryis incorrectly replaced.
Replace onlywith thesame or equivalent type.
注意!
電通信。
012-140014
Hereby, Evoko Unlimited AB declares that this conference phone is in compliance with the
essential requirements and other relevant provisions of directive 1999/5/EC. The declaration
of conformity may be consulted at: www.evoko.se/downloads
La operación de este equipo está sujeta a las siguientes dos condiciones: (1) es posible que
este equipo o dispositivo no cause interferencia perjudicial y (2) este equipo o dispositivo debe
aceptar cualquier interferencia, incluyendo la que pueda causar su operación no deseada
依據 低功率電波輻射性電機管理辦法
第十二條
經型式認證合格之低功率射頻電機,非經許
可,公司、商號或使用者均不得擅自變更頻率、加
大功率或變更原設計之特性及功能。
第十四條
低功率射頻電機之使用不得影響飛航安全及
干擾合法通信;經發現有干擾現象時,應立即停
用,並改善至無干擾時方得繼續使用。
前項合法通信,指依電信法規定作業之無線
Page 12

www.evoko.se
 Loading...